Genesis G90 (2017 year). Manual - part 11


  Index      Genesis     Genesis G90 (2017 year) - manual in english


Search            copyright infringement  


Content      ..     9      10      11      12     ..


Genesis G90 (2017 year). Manual - part 11


3-88

Convenient features of your vehicle

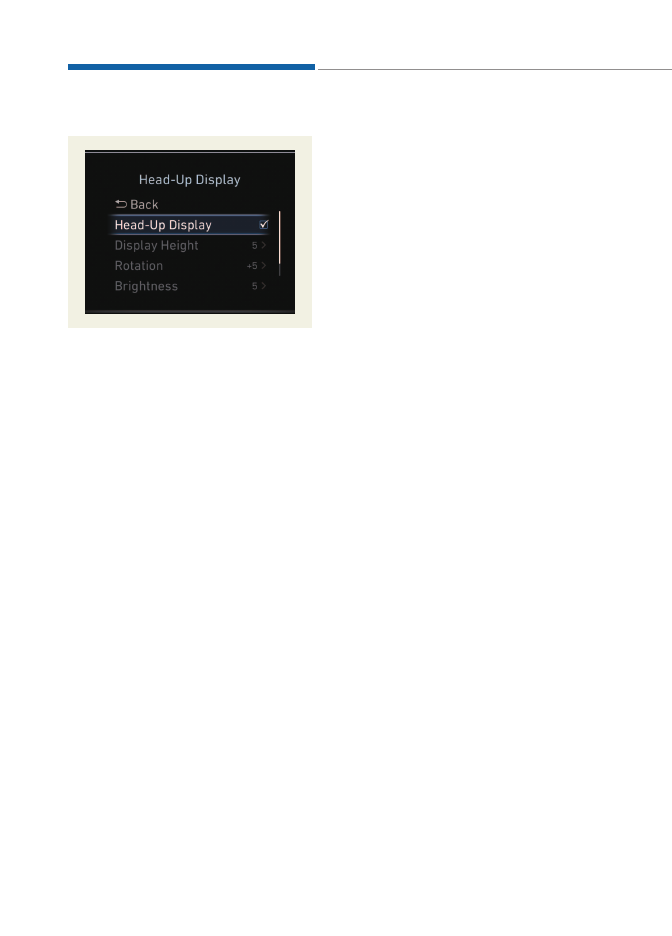
Head-Up Display setting

The driver can set the Head-Up
Display menus by using the Users
Settings mode on the LCD display.
For more information, refer to "LCD
Display" in this chapter.
• Head-Up Display
• Display Height
• Rotation
• Brightness
• Content Select
• Speedometer Size
• Speedometer Color 

OHI046162L

-------------------------------------------------------------------------------------------------------------------------------------------------------------

3-89

03

L

LIIG

GH

HT

T

Exterior lights

Lighting control

To operate the lights, turn the knob at
the end of the control lever to one of
the following positions:
(1) OFF (O) position
(2) AUTO light position
(3) Parking lamp position
(4) Headlamp position

AUTO light position

When the light switch is in the AUTO
position, the parking lamp and head-
lamp will be turned ON or OFF auto-
matically depending on the amount
of light outside the vehicle.

Even with the AUTO light feature in
operation, it is recommended to
manually turn ON the lamps when
driving at night or in a fog, or when
you enter dark areas, such as tun-
nels and parking facilities.

• Do not cover or spill anything on

the sensor (1) located on the
instrument panel.

• Do not clean the sensor using a

window cleaner, the cleanser
may leave a light film which
could interfere with sensor oper-
ation.

• If your vehicle has window tint

or other types of metallic coat-
ing on the front windshield, the
AUTO light system may not work
properly.

NOTICE

OHI046481L

OHI046482L

OHI046414L

Type A

■ 

Type B

-------------------------------------------------------------------------------------------------------------------------------------------------------------

3-90

Convenient features of your vehicle

Parking lamp position (

)

When the light switch is in the parking
lamp position (1st position), the park-
ing lamp, license plate lamp and
instrument panel lamp are turned ON.

Headlamp position (

)

When the light switch is in the head
lamp position (2nd position), the
headlamp, parking lamp, license plate
lamp and instrument panel lamp are
turned ON.

Information 

The Engine Start/Stop button must be
in the ON position to turn on the
headlamp.

High beam operation

To turn on the high beam headlamp,
push the lever away from you. The
lever will return to its original position.
The high beam indicator will light
when the headlamp high beams are
switched on.
To turn off the high beam headlamp,
pull the lever towards you. The low
beams will turn on.

i

OHI046415L

OHI046418L

OHI046416L

Do not use high beam when there
are other vehicles approaching
you. Using high beam could
obstruct the other driver's vision.

WARNING

-------------------------------------------------------------------------------------------------------------------------------------------------------------

3-91

03

To flash the high beam headlamp,
pull the lever towards you, then
release the lever. The high beams
will remain ON as long as you hold
the lever towards you.

Smart high beam
(if equipped)

The Smart High Beam is a system
that automatically adjusts the head-
lamp range (switches between high
beam and low beam) according to
the brightness of other vehicles and
road conditions.

Operating condition

1. Place the light switch in the AUTO

position.

2. Turn on the high beam by pushing

the lever away from you.
The smart high beam (

) indica-

tor will illuminate.

3. The Smart High Beam will turn on

when vehicle speed is above
45km/h (28 mph).

• If the lever is pushed away when

the Smart High Beam is operat-
ing, the Smart High Beam will
turn off and the high beam will be
on continuously. The smart high
beam (

) indicator will turn off.

• If the lever is pulled towards you

when the Smart High Beam is
operating and turns on high
beams, the Smart High Beam
will turn off.

OHI046417L

OHI046419L

-------------------------------------------------------------------------------------------------------------------------------------------------------------

3-92

Convenient features of your vehicle

4. If the light switch is placed to the

headlamp position, the Smart
High Beam will turn off and the low
beam will be on continuously.

The high beam switches to low beam
in the below conditions.
- When the Smart High Beam is off.
- When the light switch is not in the

AUTO position.

- When the headlamp is detected

from the on-coming vehicle.

- When the tail lamp is detected

from the front vehicle.

- When the surrounding is bright

enough high beams are not need-
ed.

- When streetlights or other lights

are detected.

- When vehicle speed is below

35km/h (22 mph).

The system may not operate nor-
mally in the below conditions.
• When the light from the on-com-

ing or front vehicle is not detect-
ed because of lamp damage,
hidden from sight, etc.

• When the lamp of the on-coming

or front vehicle is covered with
dust, snow or water.

• When the light from the on-com-

ing or front vehicle is not detect-
ed because of exhaust fume,
smoke, fog, snow, etc.

• When the front window is cov-

ered with foreign matters such
as ice, dust, fog, or is damaged.

• When there is a similar shape

lamp with the front vehicle’s
lamps.

(Continued)

(Continued)
• When it is hard to see because

of fog, heavy rain or snow.

• When the headlamp is not

repaired or replaced at an
authorized dealer.

• When headlamp aiming is not

properly adjusted.

• When driving on a narrow

curved road or rough road.

• When driving downhill or uphill.
• When only part of the vehicle in

front is visible on a crossroad or
curved road.

• When there is a traffic light,

reflecting sign, flashing sign or
mirror.

• When the road conditions are

bad such as being wet or cov-
ered with snow.

• When the front vehicle’s head-

lamps are off but the fog lamps
on.

• When a vehicle suddenly

appears from a curve.

• When the vehicle is tilted from a

flat tire or being towed.

• When the LDWS (Lane

Departure Warning  System)
warning light illuminates. (if
equipped)

NOTICE

-------------------------------------------------------------------------------------------------------------------------------------------------------------

3-93

03

Turn signals and lane change
signals

To signal a turn, move the lever up
for a right turn or down for a left turn
to position (A). The lever will return to
the OFF position when the turn is
completed.
To signal a lane change, move the
turn signal lever slightly and hold it in
position (B). The lever will return to
the OFF position when released.

One-touch turn signal function 
(if equipped)

To activate an one-touch turn signal
function, move the turn signal lever
slightly and then release it. The lane
change signals will blink 3, 5 or 7
times.
You can activate/deactivate the One
Touch Turn Signal function or choose
the number of blinking (3, 5, or 7)
from the User Settings mode on the
LCD display. For more information,
refer to "LCD Display" in this chapter.

Information 

If the turn signal indicator stays on and
does not blink, or if it blinks abnormal-
ly, a bulb may be burned out or have a
poor electrical connection in the circuit.
The bulb may require replacement.

i

OHI046420L

• Do not place any accessories,

stickers or tint the windshield.

• Have the windshield glass

replaced from an authorized
dealer.

• Do not remove or impact relat-

ed parts of the Smart High
Beam system.

• Be careful that water doesn’t

get into the Smart High Beam
unit.

• Do not place objects on the

dashboard that reflects light
such as mirrors, white paper,
etc. The system may malfunc-
tion if sunlight is reflected.

• At times, the Smart High

Beam system may not work
properly, always check the
road conditions for your safe-
ty. When the system does not
operate normally, manually
change between the high
beam and low beam.

WARNING

-------------------------------------------------------------------------------------------------------------------------------------------------------------

3-94

Convenient features of your vehicle

Rear fog lamp (if equipped)

To turn on the rear fog lamp:
Position the light switch in the head-
lamp position, and then turn the light
switch (1) to the rear fog lamp position.

To turn the rear fog lamps off, do one
of the following:
• Turn off the headlamp switch.
• Turn the light switch to the rear fog

lamp position again.

Battery saver function

The purpose of this feature is to pre-
vent the battery from being dis-
charged. The system automatically
turns off the parking lamp when the
driver turns the engine off and opens
the driver-side door.
With this feature, the parking lamps
will turn off automatically if the driver
parks on the side of road at night.
If necessary, to keep the lamps on
when the engine is turned off, perform
the following:
1) Open the driver-side door.
2) Turn the parking lamps OFF and

ON again using the light switch on
the steering column.

Headlamp delay function 
(if equipped)

If you place the Engine Start/Stop
button in to the ACC or OFF position
with the headlamps ON, the head-
lamps (and/or parking lamps) remain
on for about 5 minutes. However,
with the engine off if the driver’s door
is opened and closed, the head-
lamps (and/or parking lamps) are
turned off after 15 seconds.
The headlamps (and/or parking
lamps) can be turned off by pressing
the lock button on the smart key
twice or turning the light switch to the
OFF or AUTO position. However, if
you turn the light switch to the AUTO
position when it is dark outside, the
headlamps will not be turned off.
You can activate or deactivate the
Headlamp Delay function from the
User Settings mode on the LCD dis-
play. For more information, refer to
"LCD Display" in this chapter.

OHI046483L

-------------------------------------------------------------------------------------------------------------------------------------------------------------

3-95

03

If the driver gets out of the vehicle
through other doors (except dri-
ver's door), the battery saver func-
tion does not operate and the
headlamp delay function does not
turn off automatically. Therefore, It
causes the battery to be dis-
charged. In this case, make sure to
turn off the lamp before getting out
of the vehicle.

AFLS (Adaptive Front Lighting
System) (if equipped)

Adaptive front lighting system uses
the steering angle and vehicle
speed, to keep your field of vision
wide by swiveling and leveling the
headlamp.
Change the switch to the AUTO posi-
tion when the engine is running. The
adaptive front lighting system will
operate when the headlamp is ON.
To turn off the AFLS, change the
switch to other positions. After turn-
ing the AFLS off, headlamp swiveling
no longer occurs, but leveling oper-
ates continuously.

If the AFLS malfunction indicator
comes on, the AFLS is not working
properly.
Drive to the nearest safe location
and restart the engine. If the indica-
tor continuously remains on, we rec-
ommend that the system be checked
by an authorized retailer of Genesis
Branded products.

Daytime running light (DRL) 

The Daytime Running Lights (DRL)
can make it easier for others to see
the front of your vehicle during the
day, especially after dawn and before
sunset.

The DRL system will turn the dedi-
cated lamp OFF when:
1. The light switch is in the headlamp

position, including the operation that
the headlamp is turned on automat-
ically in the AUTO light position.

2. The engine is turned off.
3. The hazard warning flasher is on.
4. You turn the turn signal light on.

- If you turn on the turn signal light,

only the corresponding daytime
running lights will turn off.

- If you turn on turn signal light with

the parking lamp turned on, the
daytime running lights will turn off
but the parking lamp remains on.

NOTICE

OHI046473

OHI046105

-------------------------------------------------------------------------------------------------------------------------------------------------------------

3-96

Convenient features of your vehicle

Headlamp leveling device 

It automatically adjusts the headlamp
beam level according to the number
of passengers and loading weight in
the luggage area.
And it offers proper headlamp beam
under various conditions.

Headlamp washer (if equipped)

Washer fluid will be sprayed on the
headlamps at the same time you
operate the windshield washer when:
1. The Engine Start/Stop button is in

the ON position.

2. The light switch is in the headlamp

position (low beam).

Information 

• Check the headlamp washers peri-

odically to confirm that the washer
fluid is being sprayed properly onto
the headlamp lenses.

• The headlamp washer can be oper-

ated 15 minutes after the last opera-
tion.

Traffic change (for Europe) 

Use this function when you visit a
country with opposite traffic direction.

For more information, refer to
“Light Bulbs” in chapter 7.

i

If it does not work properly even
though your car is inclined
backward according to passen-
ger's posture, or the headlight
beam is irradiated to the high or
low position, we recommend
that the system be inspected by
an authorized retailer of Genesis
Branded products.
Do not attempt to inspect or
replace the wiring yourself.

WARNING

-------------------------------------------------------------------------------------------------------------------------------------------------------------

3-97

03

Welcome system (if equipped)

Welcome light (if equipped)

Puddle lamp

When all the doors (and trunk) are
closed and locked, the puddle lamp
will come on for about 15 seconds if
any of the below is performed.
• When the door unlock button is

pressed on the smart key.

• When the button of the outside

door handle is pressed.

• When the vehicle is approached

with the smart key in possession.

Also, if the outside rearview mirror
folding switch is in the AUTO posi-
tion, the outside rearview mirror will
unfold automatically.

Door handle lamp (if equipped)

When all the doors (and trunk) are
closed and locked, the door handle
lamp will come on for about 15 sec-
onds if any of the below is performed.
• When the door unlock button is

pressed on the smart key.

• When the button of the outside

door handle is pressed.

• When the vehicle is approached

with the smart key in possession.

Headlamp and Parking lamp

When the headlamp (lamp switch in
the headlamp or AUTO position) is on
and all doors (and trunk) are locked
and closed, the parking lamp and
headlamp will come on for 15 seconds
if/or any of the below is performed.
• When the door unlock button is

pressed on the smart key.

At this time, if you press the door lock
or unlock button, the parking lamp and
headlamp will turn off immediately.

You can activate or deactivate the
Welcome Light from the User Settings
mode on the LCD display. For more
information, refer to "LCD Display" in
this chapter.

Interior lamp

When the interior lamp switch is in
the DOOR position and all doors (and
trunk) are closed and locked, the
room lamp will come on for 30 sec-
onds if any of the below is performed.
• When the door unlock button is

pressed on the smart key.

• When you grab the outside door

handle.

At this time, if you press the door lock
or unlock button, the room lamp will
turn off immediately.

OHI046411

-------------------------------------------------------------------------------------------------------------------------------------------------------------

3-98

Convenient features of your vehicle

Interior lights

Do not use the interior lights for
extended periods when the engine
is turned off or the battery will dis-
charge.

Interior lamp AUTO cut

The interior lamps will automatically
go off approximately 20 minutes after
the engine is turned off and the
doors closed. If a door is opened, the
lamp will go off 40 minutes after the
engine is turned off. If the doors are
locked by the smart key and the vehi-
cle enters the armed stage of the
theft alarm system, the lamps will go
off five seconds later.

Front lamps

:

Press either of these buttons to
turn the map lamp on or off. This
light produces a spot beam for con-
venient use as a map lamp at night
or as a personal lamp for the driver
and the front passenger.

:

Press the button to turn ON all
front lamps. Re-repress the button
to turn OFF all front lamps.

NOTICE

Do not use the interior lights
when driving in the dark.The inte-
rior lights may obscure your view
and cause an accident.

WARNING

OHI046423

Type A

OHI046423L

■ 

Type B

-------------------------------------------------------------------------------------------------------------------------------------------------------------

3-99

03

:

The front or rear room lamps come
on when the front or rear doors are
opened if the engine is running or
not. When doors are unlocked by
the Smart Key, the front and rear
lamps come on for approximately
30 seconds as long as any door is
not opened. The front and rear room
lamps go out gradually after approx-
imately 30 seconds if the door is
closed. However, if the Engine
Start/Stop button is in the ON posi-
tion or all doors are locked, the front
and rear lamps will turn off. If a door
is opened with the Engine Start/
Stop button in the ACC position or
the OFF position, the front and rear
lamps stay on for about 20 minutes.

:

Press this button to turn the front
and rear room lamps on and off.

Rear lamps

:

Press the button to turn ON the
rear map lamp and the door handle
lamps. You cannot separately turn
OFF the door handle lamps. Re-
press the button to turn OFF the
rear map lamp and the door handle
lamps together.

:

Press this button to turn the rear
room lamps on and off.

:

Press the button to dim the rear
map lamp. Re-press the button to
turn OFF the rear map lamp.

OHI046424

Type A

OHI046425L

■ 

Type B

-------------------------------------------------------------------------------------------------------------------------------------------------------------

3-100

Convenient features of your vehicle

Do not leave the lamp switches on
for an extended period of time
when the engine is turned off.

Vanity mirror lamp (Front)

Opening the lid of the vanity mirror
will automatically turn on the mirror
light.

To prevent unnecessary charging
system drain, close the vanity mir-
ror cover after using the mirror.

Vanity mirror lamp (Rear)

Press the vanity mirror on the vehicle
ceiling. Then, it automatically turns
ON the rear vanity mirror lamp while
opening the cover.

Glove box lamp

The glove box lamp comes on when
the glove box is opened.
If the glove box is not closed, the
lamp will turn off after 20 minutes.

To prevent unnecessary charging
system drain, close the glove box
securely after using the glove box.

NOTICE

NOTICE

NOTICE

OHI046427

OHI046428

OHI046430

-------------------------------------------------------------------------------------------------------------------------------------------------------------

3-101

03

Trunk room lamp  

The trunk room lamp comes on when
the trunk is opened.

The trunk lamp comes on as long
as the trunk lid is open. To prevent
unnecessary charging system
drain, close the trunk lid securely
after using the trunk.

Puddle lamp

Welcome light

When all doors (and trunk) are
closed and locked, the puddle lamp
will come on for 15 seconds if the
door is unlocked by the smart key or
outside door handle button.
For more information, refer to "Welcome
System" in this chapter.

Escort light

When the Engine Start/Stop button
is in the OFF position and the driver's
door is opened, the puddle lamp will
come on for 30 seconds. If the dri-
ver's door is closed within the 30
seconds, the puddle lamp will turn off
after 15 seconds. If the driver's door
is closed and locked, the puddle
lamp will turn off immediately.
The Puddle Lamp Escort Light will
turn on only the first time the driver's
door is opened after the engine is
turned off.

NOTICE

OHI046429

OHI046426

-------------------------------------------------------------------------------------------------------------------------------------------------------------

3-102

Convenient features of your vehicle

W

WIIP

PE

ER

RS

S  A

AN

ND

D  W

WA

AS

SH

HE

ER

RS

S  

A : Wiper speed control

· MIST (

) – Single wipe

· OFF (O) – Off
· AUTO – Automatic control wipe
· LO (1) – Low wiper speed
· HI (2) – High wiper speed

B : Auto control wipe time adjust-

ment

C : Wash with brief wipes

Windshield wipers 

Operates as follows when the Engine
Start/Stop button is in the ON position.
• MIST / 

:

For a single wiping cycle, move the
lever to 

or MIST position and

release. The wipers will operate
continuously if the lever is held in
this position.

• OFF / O :

Wiper is not in operation.

• AUTO  :

The rain sensor located on the
upper end of the windshield glass
senses the amount of rainfall and
controls the wiping cycle for the
proper interval. The more it rains,
the faster the wiper operates.
When the rain stops, the wiper
stops.To vary the speed setting,
turn the speed control knob (B).

• LO / (1) :

The wiper runs at a lower speed.

• HI / (2) :

The wiper runs at a higher speed.

Information 

If there is heavy accumulation of snow
or ice on the windshield, defrost the
windshield for about 10 minutes, or
until the snow and/or ice is removed
before using the windshield wipers to
ensure proper operation.
If you do not remove the snow and/or
ice before using the wiper and washer,
it may damage the wiper and washer
system.

i

OHI046421L

Type A

OHI046484L

■ 

Type B

-------------------------------------------------------------------------------------------------------------------------------------------------------------

3-103

03

AUTO (Automatic) control 

The rain sensor located on the upper
end of the windshield glass senses
the amount of rainfall and controls
the wiping cycle for the proper inter-
val. The more it rains, the faster the
wiper operates.
When the rain stops, the wiper stops.
To vary the speed setting, turn the
speed control knob (B).
If the wiper switch is set in AUTO
mode when Engine Start/Stop button
is in the ON position, the wiper will
operate once to perform a self-check
of the system. Set the wiper to OFF
position when the wiper is not in use.

• When washing the vehicle, set

the wiper switch in the OFF (O)
position to stop the auto wiper
operation. The wiper may oper-
ate and be damaged if the switch
is set in the AUTO mode while
washing the vehicle.

• Do not remove the sensor cover

located on the upper end of the
passenger side windshield
glass. Damage to system parts
could occur and may not be cov-
ered by your vehicle warranty.

• There may be a malfunction with

the wiper sensor while operating
in the AUTO mode, when there
are interruptions by foreign sub-
stances, such as small pebbles,
dust, or insects, or when an out-
side brightness is abruptly
changed while driving.

• There may be a malfunction with

the wiper sensor in detecting a
rainfall amount, when the front
windshield is coated with wax,
or when the wiper blades are
worn out.

NOTICE

To avoid personal injury from
the windshield wipers, when the
engine is running and the wind-
shield wiper switch is placed in
the AUTO mode:
• Do not touch the upper end of

the windshield glass facing
the rain sensor.

• Do not wipe the upper end of

the windshield glass with a
damp or wet cloth.

• Do not put pressure on the

windshield glass.

WARNING

-------------------------------------------------------------------------------------------------------------------------------------------------------------


Content      ..     9      10      11      12     ..