Genesis G90 (2017 year). Manual - part 8
 

  Index      Genesis     Genesis G90 (2017 year) - manual in english


Search            copyright infringement  


Content      ..     6      7      8      9     ..


Genesis G90 (2017 year). Manual - part 8


Information 

• If you press the door unlock button

(2), the Smart Trunk function will
be deactivated temporarily. But, if
you do not open any door for 30 sec-
onds, the smart trunk function will
be activated again.

• If you press the trunk open button

(3) for more than 1 second, the
trunk opens.

• If you press the door lock button (1)

or trunk open button (3) when the
Smart Trunk function is not in the
Detect and Alert stage, the smart
trunk function will not be deactivat-
ed.

• In case you have deactivated the

Smart Trunk function by pressing
the smart key button and opened a
door, the smart trunk function can
be activated again by closing and
locking all doors.

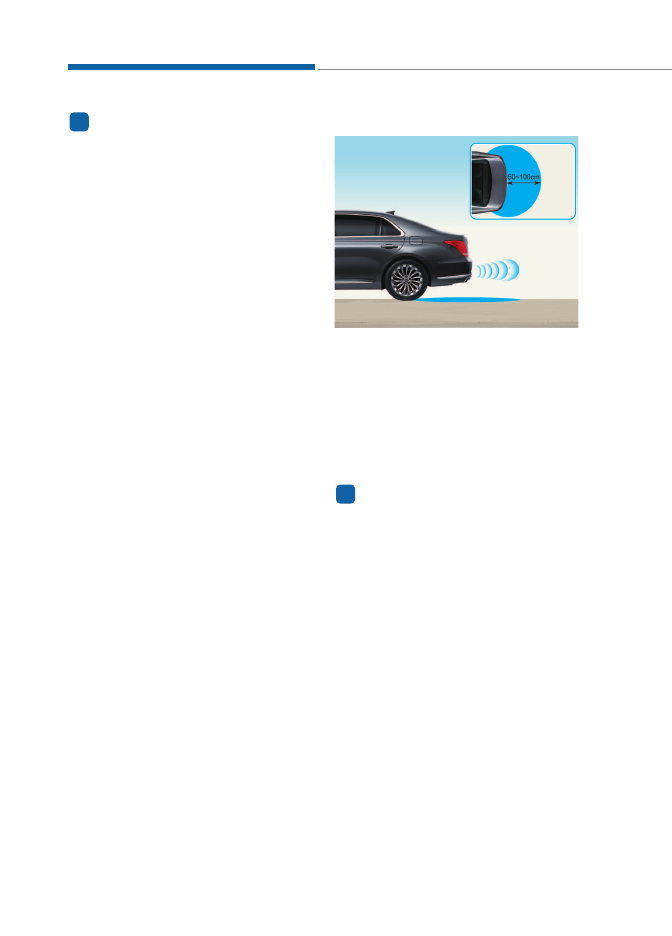
Detecting area

• The Smart Trunk operates with a

welcome alert if the smart key is
detected within 50~100 cm from
the trunk.

• The alert stops at once if the smart

key is positioned outside the
detecting area during the Detect
and Alert stage.

Information 

• The Smart Trunk function will not

work if any of the following occurs:
- The smart key is close to a radio

transmitter such as a radio station
or an airport which can interfere
with normal operation of the
transmitter.

- The smart key is near a mobile two

way radio system or a cellular
phone.

- Another vehicle's smart key is

being operated close to your vehi-
cle.

• The detecting range may decrease

or increase when :
- One side of the tire is raised to

replace a tire or to inspect the vehi-
cle.

- The vehicle is slantingly parked on

a slope or unpaved road, etc.

i

i

3-40

Convenient features of your vehicle

OHI046027

-------------------------------------------------------------------------------------------------------------------------------------------------------------

Opening the fuel filler door

1. Turn the engine off.
2. Push the fuel filler door opener

button.

3. Pull the fuel filler door (1) out to

fully open.

4. To remove the fuel tank cap (2),

turn it counterclockwise. You may
hear a hissing noise as the pres-
sure inside the tank equalizes.
Place the cap on the fuel filler door.

Information 

If the fuel filler door does not open
because ice has formed around it, tap
lightly or push on the door to break the
ice and release the door. Do not pry on
the door. If necessary, spray around the
door with an approved de-icer fluid (do
not use radiator anti-freeze) or move
the vehicle to a warm place and allow
the ice to melt.

Closing the fuel filler door

1. To install the fuel tank cap, turn it

clockwise until it “clicks” one time.

2. Close the fuel filler door until it is

latched securely.

i

F

FU

UE

EL

L  F

FIIL

LL

LE

ER

R  D

DO

OO

OR

R

3-41

03

OHI046034

OHI046035

Gasoline is highly flammable
and explosive. Failure to follow
these guidelines may result in
SERIOUS INJURY or DEATH:
• Read and follow all warnings

posted at the gas station.

• Before refueling, note the

location of the Emergency
Gasoline Shut-Off, if available,
at the gas station.

• Before touching the fuel noz-

zle, you should eliminate the
potential build-up of static
electricity by touching a metal
part of the vehicle, a safe dis-
tance away from the fuel filler
neck, nozzle, or other gas
source, with your bare hand.

(Continued)

WARNING

-------------------------------------------------------------------------------------------------------------------------------------------------------------

3-42

Convenient features of your vehicle

(Continued)
• Do not use cellular phones

while refueling. Electric cur-
rent and/or electronic interfer-
ence from cellular phones can
potentially ignite fuel vapors
and cause a fire.

• Do not get back into a vehicle

once you have begun refuel-
ing. You can generate a build-
up of static electricity by
touching, rubbing or sliding
against any item or fabric
capable of producing static
electricity. Static electricity
discharge can ignite fuel
vapors causing a fire. If you
must re-enter the vehicle, you
should once again eliminate
potentially dangerous static
electricity discharge by touch-
ing a metal part of the vehicle,
away from the fuel filler neck,
nozzle or other gasoline
source, with your bare hand.

• When using an approved

portable fuel container, be
sure to place the container on
the ground prior to refueling.
Static electricity discharge
from the container can ignite
fuel vapors causing a fire.
Once refueling has begun,
contact between your bare
hand and the vehicle should
be maintained until the filling
is complete.

• Use only approved portable

plastic fuel containers designed
to carry and store gasoline.

(Continued)

(Continued)
• When refueling, always move

the shift lever to the P (Park)
position,

set the parking

brake, and place the Engine
Start/Stop button to the OFF
position. Sparks produced by
electrical components related
to the engine can ignite fuel
vapors causing a fire.

• Do not use matches or a

lighter and do not smoke or
leave a lit cigarette in your
vehicle while at a gas station,
especially during refueling.

• Do not over-fill or top-off your

vehicle tank, which can cause
gasoline spillage.

• If a fire breaks out during refu-

eling, leave the vicinity of the
vehicle, and immediately con-
tact the manager of the gas
station and then contact the
local fire department. Follow
any safety instructions they
provide.

• If pressurized fuel sprays out,

it can cover your clothes or
skin and thus subject you to
the risk of fire and burns.
Always remove the fuel cap
carefully and slowly. If the cap
is venting fuel or if you hear a
hissing sound, wait until the
condition stops before com-
pletely removing the cap.

• Always check that the fuel cap

is installed securely to pre-
vent fuel spillage in the event
of an accident.

-------------------------------------------------------------------------------------------------------------------------------------------------------------

Information 

• Make sure to refuel your vehicle

according to the "Fuel Requirements"
suggested in the Introduction chapter.

• Do not spill fuel on the exterior sur-

faces of the vehicle. Any type of fuel
spilled on painted surfaces may dam-
age the paint.

If the fuel filler cap requires
replacement, use only a Genesis/
Hyundai Part cap or the equivalent
specified for your vehicle. An
incorrect fuel filler cap can result
in a serious malfunction of the fuel
system or emission control sys-
tem.

Emergency fuel filler door
release

If the fuel filler door does not open
using the remote fuel filler door
release button, you can open it man-
ually. Pull the handle of the release
located on the left side of the lug-
gage compartment outward slightly.

Do not pull the handle excessive-
ly, otherwise the luggage area trim
or release handle may be dam-
aged.

NOTICE

NOTICE

i

3-43

03

OHI046036L

-------------------------------------------------------------------------------------------------------------------------------------------------------------

1. Tachometer
2. Speedometer
3. Engine coolant temperature gauge

4. Fuel gauge
5. Warning and indicator lights
6. LCD display (including trip computer)

IIN

NS

ST

TR

RU

UM

ME

EN

NT

T  C

CL

LU

US

ST

TE

ER

R

3-44

Convenient features of your vehicle

OHI046100L

The actual cluster in the vehicle may differ from the illustration.

All warning sounds (e.g. welcome/good-bye sound, virtual engine
sound) are generated from the exterior amplifiers. If necessary, we rec-
ommend you to purchase Genesis/Hyundai Part to replace an exterior
amplifier. Any unauthorized product may cause a malfunction of the
exterior amplifiers.

NOTICE

-------------------------------------------------------------------------------------------------------------------------------------------------------------

Instrument cluster control

Instrument panel illumination 

When the vehicle's parking lights or
headlights are on, press the illumina-
tion control button to adjust the
brightness of the instrument panel
illumination.
When pressing the illumination con-
trol button, the interior switch illumi-
nation intensity is also adjusted.

• The brightness of the instrument

panel illumination is displayed.

• If the brightness reaches to the

maximum or minimum level, a
chime will sound.

3-45

03

Never adjust the instrument clus-
ter while driving.This could result
in loss of control and lead to an
accident that may cause death,
serious injury, or property dam-
age.

WARNING

OHI046412

OHI046110L

-------------------------------------------------------------------------------------------------------------------------------------------------------------

Gauges

Speedometer

The speedometer indicates the speed
of the vehicle and is calibrated in kilo-
meters per hour (km/h) and/or miles
per hour (MPH).

Tachometer

The tachometer indicates the
approximate number of engine revo-
lutions per minute (rpm).
Use the tachometer to select the cor-
rect shift points and to prevent lug-
ging and/or over-revving the engine.

Do not operate the engine within
the tachometer's RED ZONE. This
may cause severe engine damage.

Engine coolant temperature
gauge

This gauge indicates the tempera-
ture of the engine coolant when the
Engine Start/Stop button is in the ON
position.

If the gauge pointer moves beyond
the normal range area toward the
"H (Hot)" position, it indicates
overheating that may damage the
engine.
Do not continue driving with an
overheated engine. If your vehicle
overheats, refer to "If the Engine
Overheats" in chapter 6.

NOTICE

NOTICE

3-46

Convenient features of your vehicle

OHI046102

OHI046103

OHI046101/OHI046101L

■ MPH, km/h

■ km/h

Never remove the radiator cap  or
reservoir cap when the engine is
hot. The engine coolant is under
pressure and could severe
burns. Wait until the engine is
cool before adding coolant to the
reservoir.

WARNING

-------------------------------------------------------------------------------------------------------------------------------------------------------------

Fuel gauge

This gauge indicates the approxi-
mate amount of fuel remaining in the
fuel tank.

Information 

• The fuel tank capacity is given in

chapter 8.

• The fuel gauge is supplemented by a

low fuel warning light, which will
illuminate when the fuel tank is
nearly empty.

• On inclines or curves, the fuel gauge

pointer may fluctuate or the low fuel
warning light may come on earlier
than usual due to the movement of
fuel in the tank.

Avoid driving with a extremely low
fuel level. Running out of fuel
could cause the engine to misfire
damaging the catalytic converter.

Outside Temperature  Gauge

This gauge indicates the current out-
side air temperatures by 1°C (1°F).
- Temperature range :

-40°C ~ 60°C (-40°F ~ 140°F)

The outside temperature on the dis-
play may not immediately change
like a general thermometer (to avoid
distracting the driver).
The temperature unit (from °C to °F
or from °F to °C) can be changed by:

- User Settings mode in the Cluster :

You can change the temperature
unit in the “Other Features -
Temperature unit” .

- Automatic climate control system :

While pressing the OFF button,
press the AUTO button for 3 sec-
onds or more.

The temperature unit of the instrument
cluster and climate control system will
change at once.

NOTICE

i

3-47

03

OHI046104

OHI046111

Running out of fuel can expose
vehicle occupants to danger.
You must stop and obtain addi-
tional fuel as soon as possible
after the warning light comes
on or when the gauge indicator
comes close to the "E (Empty)"
level.

WARNING

-------------------------------------------------------------------------------------------------------------------------------------------------------------

Odometer

The odometer indicates the total dis-
tance that the vehicle has been driv-
en and should be used to determine
when periodic maintenance should
be performed.

Range

The range is the estimated distance
the vehicle can be driven with the
remaining fuel in the fuel tank.
If the estimated distance is below 1 km
(1 mile), the cluster will display "----" as
the range.

Information 

• If the vehicle is not on level ground

or the battery power has been inter-
rupted, the range function may not
operate correctly.

• The range may differ from the actu-

al driving distance as it is an esti-
mate of the available driving dis-
tance.

• The range may not register addition-

al fuel if less than 6 liters of fuel are
added to the vehicle.

• The range may vary significantly

based on driving conditions, driving
habits, and condition of the vehicle.

i

3-48

Convenient features of your vehicle

OHI046114

OHI046186L

-------------------------------------------------------------------------------------------------------------------------------------------------------------

Warning and indicator lights

Air bag Warning Light

This warning light illuminates:

• Once you place the Engine Start/

Stop button to the ON position.
- It illuminates for approximately 6

seconds and then goes off.

• When there is a malfunction with

the SRS.
In this case, we recommend that
you have the vehicle inspected by
an authorized retailer of Genesis
Branded products.

Seat Belt Warning Light

This warning light informs the driver
that the seat belt is not fastened.
For more information, refer to the
“Seat Belts” in chapter 2.

Parking Brake & Brake
Fluid Warning Light

This warning light illuminates:

• Once you place the Engine Start/

Stop button to the ON position.
- It illuminates for approximately 3

seconds

- It remains on if the parking brake

is applied.

• When the parking brake is applied.
• When the brake fluid level in the

reservoir is low.
- If the warning light illuminates

with the parking brake released, it
indicates the brake fluid level in
reservoir is low.

If the brake fluid level in the reser-
voir is low:

1. Drive carefully to the nearest safe

location and stop your vehicle.

2. With the engine stopped, check

the brake fluid level immediately
and add fluid as required (For
more information,

refer to

“Brake Fluid” in chapter 7). After
adding brake fluid, check all brake
components for fluid leaks. If a
brake fluid leak is found, or if the
warning light remains on, or if the
brakes do not operate properly, do
not drive the vehicle. We recom-
mend you to have the vehicle
inspected by an authorized retailer
of Genesis Branded products.

3-49

03

-------------------------------------------------------------------------------------------------------------------------------------------------------------

Dual-diagonal braking system

Your vehicle is equipped with dual-
diagonal braking systems. This
means you still have braking on two
wheels even if one of the dual sys-
tems should fail.
With only one of the dual systems
working, more than normal pedal
travel and greater pedal pressure is
required to stop the vehicle.
Also, the vehicle will not stop in as
short a distance with only a portion
of the brake system working.
If the brakes fail while you are driv-
ing, shift to a lower gear for addition-
al engine braking and stop the vehi-
cle as soon as it is safe to do so.

Anti-lock Brake System
(ABS) Warning Light

This warning light illuminates:

• Once you place the Engine Start/

Stop button to the ON position.
- It illuminates for approximately 3

seconds and then goes off.

• When there is a malfunction with

the ABS (The normal braking sys-
tem will still be operational without
the assistance of the anti-lock
brake system).
In this case, we recommend that
you have the vehicle inspected by
an authorized retailer of Genesis
Branded products.

Electronic Brake force
Distribution (EBD)
System Warning Light

These two warning lights illuminate
at the same time while driving:

When the ABS and regular brake
system may not work normally.
In this case, we recommend that you
have the vehicle inspected by an
authorized retailer of Genesis
Branded products.

3-50

Convenient features of your vehicle

Parking Brake & Brake Fluid
Warning Light
Driving the vehicle with a warn-
ing light ON is dangerous. If the
Parking Brake & Brake Fluid
Warning Light illuminates with
the parking brake released, it
indicates that the brake fluid
level is low.
In this case, we recommend
that you have the vehicle
inspected by an authorized
retailer of Genesis Branded
products.

WARNING

-------------------------------------------------------------------------------------------------------------------------------------------------------------

Information 

- Electronic

Brake force Distribution (EBD)
System Warning Light

When the ABS Warning Light is on or
both ABS and Parking Brake & Brake
Fluid Warning Lights are on, the
speedometer, odometer, or tripmeter
may not work. Also, the EPS Warning
Light may illuminate and the steering
effort may increase or decrease.
In this case, we recommend you have
the vehicle inspected by an authorized
retailer of Genesis Branded products
as soon as possible.

Electric Power Steering
(EPS) Warning Light 

This warning light illuminates:

• Once you place the Engine Start/

Stop button to the ON position.
- It illuminates for approximately 3

seconds and then goes off.

• When there is a malfunction with

the EPS.
In this case, we recommend that
you have the vehicle inspected by
an authorized retailer of Genesis
Branded products.

Malfunction Indicator
Lamp (MIL)

This warning light illuminates:

• Once you place the Engine Start/

Stop button to the ON position.
- It illuminates for approximately 3

seconds and then goes off.

• When there is a malfunction with

the emission control system.
In this case, we recommend that
you have the vehicle inspected by
an authorized retailer of Genesis
Branded products.

Driving with the Malfunction Indicator
Lamp (MIL) on may cause damage to
the emission control systems which
could affect drivability and/or fuel
economy.

NOTICE

i

3-51

03

Electronic Brake force
Distribution (EBD) System
Warning Light
When both ABS and Parking
Brake & Brake Fluid Warning
Lights are on, the brake system
will not work normally and you
may experience an unexpected
and dangerous situation during
sudden braking.
In this case, avoid high speed
driving and abrupt braking.
We recommend you have the
vehicle inspected by an author-
ized retailer of Genesis Branded
products as soon as possible.

WARNING

-------------------------------------------------------------------------------------------------------------------------------------------------------------

If the Malfunction Indicator Lamp
(MIL) illuminates, potential catalyt-
ic converter damage is possible
which could result in loss of
engine power.
In this case, we recommend that
you have the vehicle inspected by
an authorized retailer of Genesis
Branded products as soon as pos-
sible.

Charging System
Warning Light

This warning light illuminates:

• Once you place the Engine Start/

Stop button to the ON position.
- It remains on until the engine is

started.

• When there is a malfunction with

either the alternator or electrical
charging system.

If there is a malfunction with either
the alternator or electrical charging
system:

1. Drive carefully to the nearest safe

location and stop your vehicle.

2. Turn the engine off and check the

alternator drive belt for looseness
or breakage.
If the belt is adjusted properly,
there may be a problem in the
electrical charging system.
In this case, we recommend that
you have the vehicle inspected by
an authorized retailer of Genesis
Branded products as soon as pos-
sible.

Engine Oil Pressure
Warning Light

This warning light illuminates:

• Once you place the Engine Start/

Stop button to the ON position.
- It remains on until the engine is

started.

• When the engine oil pressure is low.

If the engine oil pressure is low:

1. Drive carefully to the nearest safe

location and stop your vehicle.

2. Turn the engine off and check the

engine oil level (For more informa-
tion, refer to “Engine Oil” in chap-
ter 7)
. If the level is low, add oil as
required.

If the warning light remains on
after adding oil or if oil is not avail-
able, we recommend that you have
the vehicle inspected by an
authorized retailer of Genesis
Branded products as soon as pos-
sible.

To prevent severe engine damage,
after the Engine Oil Pressure
Warning Light is illuminated and as
soon as it is safe to do so, turn the
engine off and check the oil level.
If the oil level is low, fill the engine
oil to the proper level and start the
engine again. If the light stays on
with the engine running, turn the
engine off immediately.
In this case, have your vehicle
inspected by an authorized retailer of
Genesis Branded products.

NOTICE

NOTICE

NOTICE

3-52

Convenient features of your vehicle

-------------------------------------------------------------------------------------------------------------------------------------------------------------

Low Fuel Level
Warning Light

This warning light illuminates:

When the fuel tank is nearly empty.
Add fuel as soon as possible.

Driving with the Low Fuel Level
warning light on or with the fuel
level below "E" can cause the
engine to misfire and damage the
catalytic converter (if equipped).

Overspeed Warning
Light (if equipped)

This warning light blinks:

When you drive the vehicle more
than 120 km/h.
- This is to prevent you from driving

your vehicle with overspeed.

- The overspeed warning chime also

sounds for approximately 5 sec-
onds.

Master Warning Light

This indicator light illuminates:

• Once you place the Engine Start/

Stop button to the ON position.
- It illuminates for approximately 3

seconds and then goes off.

• When there is a malfunction in

operation in any of the following
systems:
- Pre-Active Seat Belt (PSB) mal-

function

- Smart high beam malfunction
- Adaptive Front Lighting System

(AFLS) malfunction

- Blind Spot Detection (BSD) mal-

function (if equipped)

- Autonomous Emergency Braking

(AEB) malfunction

- Smart cruise control malfunction
- Electronic Controlled Suspension

(ECS) malfunction

- Haptic steering malfunction
To identify the details of the warn-
ing, look at the LCD display.

NOTICE

3-53

03

-------------------------------------------------------------------------------------------------------------------------------------------------------------

Low Tire  Pressure
Warning Light 
(if equipped)

This warning light illuminates:

• Once you place the Engine Start/

Stop button to the ON position.
- It illuminates for approximately 3

seconds and then goes off.

• When one or more of your tires are

significantly underinflated (The
location of the underinflated tire is
displayed on the supervision clus-
ter LCD display).

For more information, refer to
“Tire Pressure Monitoring System
(TPMS)” in chapter 6.

This warning light remains ON
after blinking for approximately 60
seconds, or repeatedly blinks ON
and OFF in 3 second intervals:

When there is a malfunction with the
TPMS.
In this case, we recommend that you
have the vehicle inspected by an
authorized retailer of Genesis Branded
products as soon as possible.
For more information, refer to
“Tire Pressure Monitoring System
(TPMS)” in chapter 6.

Electronic Parking
Brake (EPB) Warning
Light

This warning light illuminates:

• Once you place the Engine Start/

Stop button to the ON position.
- It illuminates for approximately 3

seconds and then goes off.

• When there is a malfunction with

the EPB.
In this case, we recommend that
you have the vehicle inspected by
an authorized retailer of Genesis
Branded products.

Information

The Electronic Parking Brake (EPB)
Warning Light may illuminate when
the Electronic Stability control (ESC)
Indicator Light comes on to indicate
that the ESC is not working properly
(This does not indicate malfunction of
the EPB).

i

3-54

Convenient features of your vehicle

Safe Stopping
• The TPMS cannot alert you to

severe and sudden tire damage
caused by external factors.

• If you notice any vehicle insta-

bility, immediately take your
foot off the accelerator pedal,
apply the brakes gradually with
light force, and slowly move to
a safe position off the road.

WARNING

-------------------------------------------------------------------------------------------------------------------------------------------------------------

AUTO HOLD Indicator Light 

This indicator light illuminates:

• [White] When you activate the auto

hold system by pressing the AUTO
HOLD switch.

• [Green] When you stop the vehicle

completely by depressing the
brake pedal with the auto hold sys-
tem activated.

• [Yellow] When there is a malfunc-

tion with the auto hold system.
In this case, we recommend that
you have the vehicle inspected by
an authorized retailer of Genesis
Branded products.

For more information, refer to
“Auto Hold” in chapter 5.

Electronic Stability
Control (ESC) Indicator
Light 

This indicator light illuminates:

• Once you place the Engine Start/

Stop button to the ON position.
- It illuminates for approximately 3

seconds and then goes off.

• When there is a malfunction with

the ESC system.
In this case, we recommend that
you have the vehicle inspected by
an authorized retailer of Genesis
Branded products.

This indicator light blinks:

While the ESC is operating.
For more information, refer to
“Electronic Stability Control (ESC)”
in chapter 5.

Electronic Stability
Control (ESC) OFF
Indicator Light 

This indicator light illuminates:

• Once you place the Engine Start/

Stop button to the ON position.
- It illuminates for approximately 

3 seconds and then goes off.

• When you deactivate the ESC sys-

tem by pressing the ESC OFF but-
ton.

For more information, refer to
“Electronic Stability Control (ESC)”
in chapter 5.

3-55

03

-------------------------------------------------------------------------------------------------------------------------------------------------------------


Content      ..     6      7      8      9     ..