Genesis G90 (2017 year). Manual - part 6
 

  Index      Genesis     Genesis G90 (2017 year) - manual in english


Search            copyright infringement  


Content      ..     4      5      6      7     ..


Genesis G90 (2017 year). Manual - part 6


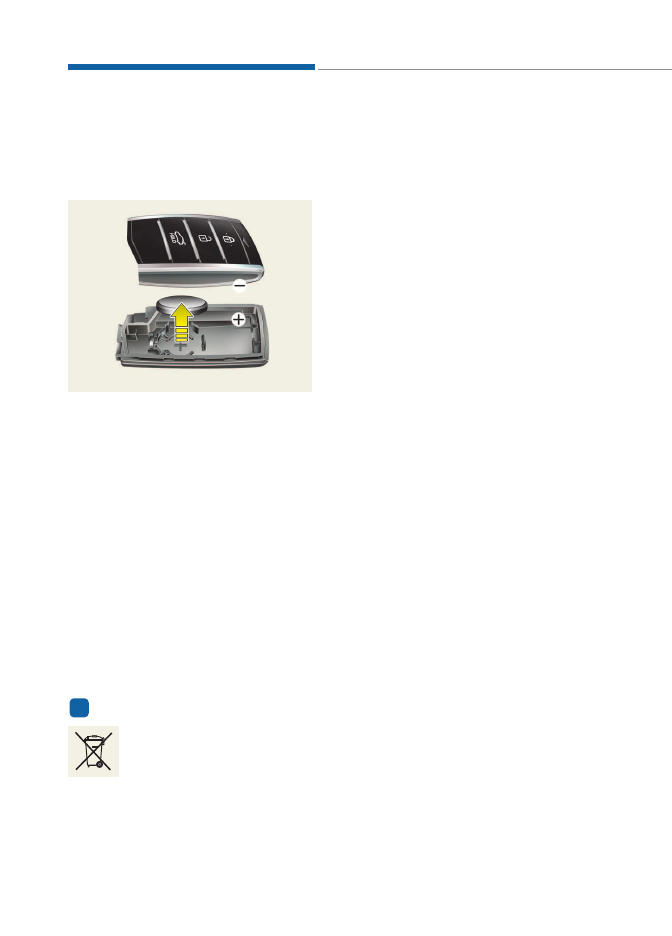
Battery replacement 

If the Smart Key is not working prop-
erly, try replacing the battery with a
new one.

Battery Type: CR2032
To replace the battery:
1. Pry open the rear cover of the

smart key with a flat-head driver.

2. Remove the old battery and insert

the new battery. Make sure the
battery position is correct.

3. Reinstall the rear cover of the

smart key.

If you suspect your smart key might
have sustained some damage, or
you feel your smart key is not work-
ing correctly, it is recommended that
you contact an authorized retailer of
Genesis Branded products.

Information 

An inappropriately disposed
battery can be harmful to the
environment and human
health. Dispose the battery
according to your

local

law(s) and regulation.

i

3-8

Convenient features of your vehicle

OHI046006L

-------------------------------------------------------------------------------------------------------------------------------------------------------------

D

DO

OO

OR

R  L

LO

OC

CK

KS

S

3-9

03

Operating door locks from
outside the vehicle 

Mechanical key

First, remove the cover (1~2), and
then turn the key toward the rear of
the vehicle to unlock and toward the
front of the vehicle to lock (3).
If you lock/unlock the driver's door
with a key, all vehicle doors will
lock/unlock automatically.
Once the doors are unlocked, they
may be opened by pulling the door
handle.
When closing the door, push the
door by hand. Make sure that doors
are closed securely.

When removing the cover, be
careful not to scratch the vehicle
or lose the cover.

Smart key 

To lock the doors, press the button
on the outside door handle while car-
rying the smart key with you or press
the door lock button on the smart
key.
To unlock the doors, grab the outside
door handle while carrying the smart
key with you or press the door unlock
button on the smart key.
Once the doors are unlocked, they
may be opened by pulling the door
handle.
When closing the door, push the
door by hand. Make sure that doors
are closed securely.

NOTICE

OHI046010

OHI046003

OHI046001L

Door Unlock

Door Lock

-------------------------------------------------------------------------------------------------------------------------------------------------------------

Information 

• In cold and wet climates, door lock

and door mechanisms may not work
properly due to freezing conditions.

• If the door is locked/unlocked multi-

ple times in rapid succession with
either the vehicle key or door lock
switch, the system may stop operat-
ing temporarily in order to protect
the circuit and prevent damage to
system components.

Power door latch (if equipped)

If a door isn’t closed completely but
is closed to the first detent position,
the door will close automatically.

To reduce the risk of injury:
• Before closing the door, check

there are no obstructions in the
path of the door.

• Keep your fingers away from the

edge of the door or they may
become trapped when the power
door latch operates.

Operating door locks from
inside the vehicle 

With the door lock button

• To unlock a door, push the door

lock button (1) to the “Unlock” posi-
tion. The red mark (2) on the door
lock button will be visible.

• To lock a door, push the door lock

button (1) to the “Lock” position. If
the door is locked properly, the red
mark (2) on the door lock button
will not be visible.

• To open a door, pull the door han-

dle (3) outward.

• If the inner door handle of the dri-

ver’s (or front passenger’s) door is
pulled when the door lock button is
in the lock position, the button is
unlocked and door opens.

• Doors cannot be locked if the

smart key is in the vehicle and any
door is open.

NOTICE

i

3-10

Convenient features of your vehicle

OHI046011

Lock

Unlock

OHI046012

-------------------------------------------------------------------------------------------------------------------------------------------------------------

Information 

If a power door lock ever fails to func-
tion while you are in the vehicle try
one or more of the following tech-
niques to exit: 
Operate the door unlock feature
repeatedly (both electronic and manu-
al) while simultaneously pulling on the
door handle. 
Operate the other door locks and han-
dles, front and rear. 
Lower a front window and use the
mechanical key to unlock the door
from outside.

With the central door lock
switch (if equipped)

When pressing the (

) portion (1) of

the switch, all vehicle doors will lock.
When pressing the (

) portion (2) of

the switch, all vehicle doors will unlock.
If the smart key is in the vehicle and
any door is opened, the doors will not
lock even though the lock button (1)
of the central door lock switch is
pressed.

i

3-11

03

OHI046013/OHI046014

■ Driver’s door

■ Passenger’s door

The doors should always be
fully closed and locked while
the vehicle is in motion. If the
doors are unlocked, the risk of
being thrown from the vehicle in
a crash is increased.

WARNING

Do not leave children or animals
unattended in your vehicle. An
enclosed vehicle can become
extremely hot, causing death or
serious injury to unattended
children or animals who cannot
escape the vehicle. Children
might operate features of the
vehicle that could injure them,
or they could encounter other
harm, possibly from someone
gaining entry to the vehicle.

WARNING

Leaving your vehicle unlocked
increases the potential risk to
you or others from someone
hiding in your vehicle.
To secure your vehicle, while
depressing the brake, move the
shift lever to the P (Park) posi-
tion, engage the parking brake,
and press the Engine Start/Stop
button to the OFF position, close
all windows, lock all doors, and
always take the key with you.

WARNING

-------------------------------------------------------------------------------------------------------------------------------------------------------------

Auto door lock/unlock features 

Impact sensing door unlock
system

All doors will be automatically
unlocked when an impact causes the
air bags to deploy.

Speed sensing door lock system

All doors will be automatically locked
when vehicle speed exceeds 15 km/h
(9 mph).
All of the doors will be automatically
unlocked after the engine is turned off.

You can activate or deactivate the
Auto Door Lock/Unlock features from
the User Settings mode on the LCD
display. For more information , refer
to "LCD Display" in this chapter.

Child-protector rear door locks

The child safety lock is provided to
help prevent children seated in the
rear from accidentally opening the
rear doors. The rear door safety locks
should be used whenever children
are in the vehicle.
The child safety lock is located on
the edge of each rear door. When the
child safety lock (1) is in the lock
position, the rear door will not open if
the inner door handle (2) is pulled.
To lock the child safety lock, insert a
screwdriver into the hole and turn it
to the lock position.
To allow a rear door to be opened
from inside the vehicle, unlock the
child safety lock.

3-12

Convenient features of your vehicle

Opening a door when something
is approaching may cause dam-
age or injury. Be careful when
opening doors and watch for
vehicles, motorcycles, bicycles
or pedestrians approaching the
vehicle in the path of the door.

WARNING

OHI046015

If children accidently open the
rear doors while the vehicle is
in motion, they could fall out of
the vehicle. The rear door safety
locks should always be used
whenever children are in the
vehicle.

WARNING

-------------------------------------------------------------------------------------------------------------------------------------------------------------

This system helps to protect your
vehicle and valuables. The horn will
sound and the hazard warning lights
will blink continuously if any of the
following occurs:
- A door is opened without using the

smart key.

- The trunk is opened without using

the smart key.

- The engine hood is opened.
The alarm continues for 30 seconds,
then the system resets. To turn off
the alarm, unlock the doors with the
smart key.
The Theft Alarm System automati-
cally sets 30 seconds after you lock
the doors and the trunk. For the sys-
tem to activate, you must lock the
doors and the trunk from outside the
vehicle with the smart key or by
pressing the button on the outside of
the door handles with the smart key
in your possession.
The hazard warning lights will blink
once to indicate the system is armed.
Once the security system is set,
opening any door, the trunk, or the
hood without using the smart key will
cause the alarm to activate.
The Theft Alarm System will not set if
the hood, the trunk, or any door is
not fully closed. If the system will not
set, check the hood, the trunk, or the
doors are fully closed.
Do not attempt to alter this system or
add other devices to it.

Information 

• Do not lock the doors until all pas-

sengers have left the vehicle. If the
remaining passenger leaves the
vehicle when the system is armed,
the alarm will be activated.

• If the vehicle is not disarmed with

the smart key, open the doors by
using the mechanical key and  start
the engine.

• When the system is disarmed but a

door or trunk is not opened within
30 seconds, the system will be
rearmed.

Information 

Vehicles equipped with a theft alarm
system will have a label attached to
the vehicle with the following words:
1. WARNING
2. SECURITY SYSTEM

i

i

T

TH

HE

EF

FT

T-

-A

AL

LA

AR

RM

M  S

SY

YS

ST

TE

EM

M

3-13

03

OJC040170

-------------------------------------------------------------------------------------------------------------------------------------------------------------

The Seat Position Memory System is
provided to store and recall the fol-
lowing memory settings with a sim-
ple button operation.
1) Driver's seat position
- Seat/Steering wheel/Outside rearview

mirror position

- Instrument panel illumination intensity
- Head-Up Display (HUD) position,

brightness, and angle

2) Passenger/Rear seat position
- Seat position

Information 

• If the battery is disconnected, the

memory settings will be erased. 

• If the Seat Position Memory System

does not operate normally, we recom-
mend that you have the system
checked by an authorized retailer of
Genesis Branded products. 

i

S

SE

EA

AT

T  P

PO

OS

SIIT

TIIO

ON

N  M

ME

EM

MO

OR

RY

Y  S

SY

YS

ST

TE

EM

M  ((IIF

F  E

EQ

QU

UIIP

PP

PE

ED

D))

3-14

Convenient features of your vehicle

OHI046057L

■ Driver’s seat

OHI046043

■ Passenger/Rear seat

Never attempt to operate the seat
position memory system while
the vehicle is moving.
This could result in loss of con-
trol, and an accident causing
death, serious injury, or property
damage.

WARNING

-------------------------------------------------------------------------------------------------------------------------------------------------------------

Storing memory positions

1. Move the shift lever into P (Park)

while the Engine Start/Stop button
is in the ON position.

2. Adjust the driver's seat position,

outside rearview mirror position,
steering wheel position, instru-
ment panel illumination intensity
and head-up display height/bright-
ness to the desired position.

3. Press the SET button. The system

will beep once and notify you
"Press button to save settings"on
the LCD display.

4. Press one of the memory buttons

(1 or 2) within 4 seconds. The sys-
tem will beep twice when the mem-
ory has been successfully stored.

5.

"Driver 1 (or 2) settings saved" will
appear on the LCD display.

Information 

Only the driver’s seat position memo-
ry appears on the LCD display.

Recalling memory positions

1. Move the shift lever into P (Park)

while the Engine Start/Stop button
is in the ON position.

2. Press the desired memory button

(1 or 2). The system will beep
once, and then the driver's seat
position, outside rearview mirror
position, steering wheel position,
instrument panel illumination
intensity and head-up display
height/brightness will automatical-
ly adjust to the stored positions.

3.

"Driver 1(or 2) settings is applied" will
appear on the LCD display.

Information 

• While recalling the "1" memory

position, pressing the SET or 1 but-
ton temporarily stops the adjust-
ment of the recalled memory posi-
tion. Pressing the 2 button recalls
the "2" memory position. 

• While recalling the "2" memory

position, pressing the SET or 2 but-
ton temporarily stops the adjust-
ment of the recalled memory posi-
tion. Pressing the 1 button recalls
the "1" memory position.

• While recalling the stored positions,

pressing one of the control buttons
for

the driver's seat, outside

rearview mirror, steering wheel,
instrument panel illumination or
head-up display will cause the
movement of that component to stop
and move in the direction that the
control button is pressed. 

i

i

3-15

03

OHI046176L/OHI046177L

OHI046178L/OHI046179L

-------------------------------------------------------------------------------------------------------------------------------------------------------------

3-16

Convenient features of your vehicle

Easy access function

When exiting the vehicle, the steering
wheel will move away from the driver
and the driver seat will move rear-
ward when the engine is turned off
and door is opened. When entering
the vehicle, the steering wheel will
move toward the driver and the driver
seat will move forward when the
Engine Start/Stop button is pressed
to the ACC position.
You can activate or deactivate the
Driver easy access function from the
User Settings mode on the LCD dis-
play. For more information, refer to
"LCD Display" in this chapter.
The front passenger’s seat or a rear
passenger’s seat moves backward
for his/her convenience, when a cor-
responding door is opened with the
DOOR button in the ON position.

-------------------------------------------------------------------------------------------------------------------------------------------------------------

Electric power steering (EPS)

The system assists you with steering
the vehicle. If the engine is turned off
or if the power steering system
becomes inoperative, you may still
steer the vehicle, but it will require
increased steering effort.
Should you notice any change in the
effort required to steer during normal
vehicle operation, we recommend
that the system be checked by an
authorized retailer of Genesis
Branded products.

If the Electric Power Steering System
does not operate normally, the warn-
ing light (

) will illuminate on the

instrument cluster. The steering
wheel will require increase effort. We
recommend that the system be
checked by an authorized retailer of
Genesis Branded products as soon
as possible.

Information 

The following symptoms may occur dur-
ing normal vehicle operation:
• The steering effort may be high

immediately after placing the Engine
Start/Stop button in the ON position.
This happens as the system performs
the EPS system diagnostics. When
the diagnostics is completed, the
steering wheel will return to its nor-
mal condition.

• A click noise may be heard from the

EPS relay after the Engine Start/Stop
button is in the ON or OFF position.

• Motor noise may be heard when the

vehicle is at stop or at a low driving
speed.

• When you operate the steering wheel

in low temperature, abnormal noise
may occur. If temperature rises, the
noise will disappear. This is a normal
condition.

Tilt steering / Telescope steering

Adjust the steering wheel so it points
toward your chest, not toward your
face. Make sure you can see the
instrument cluster warning lights and
gauges. Always adjust the position of
the steering wheel before driving.

To change the steering wheel angle
and height:
• Move the switch (1) up and down to

adjust the angle (2).

• Move the switch forward or rear-

ward to adjust the height (3).

Do not adjust the steering wheel
longer than necessary when the
engine is turned off.This may result
in unnecessary battery drain.

NOTICE

i

NOTICE

S

ST

TE

EE

ER

RIIN

NG

G  W

WH

HE

EE

EL

L

3-17

03

OHI046046

• NEVER adjust the steering

wheel while driving. This may
cause loss of vehicle control
resulting in an accident.

• Always adjust the position of

the steering wheel before driv-
ing.

WARNING

-------------------------------------------------------------------------------------------------------------------------------------------------------------

3-18

Convenient features of your vehicle

Heated steering wheel 

When the ignition switch is in the ON
position or when the engine is running,
press the heated steering wheel but-
ton to warm the steering wheel. The
indicator on the button will illuminate.
To turn the heated steering wheel off,
press the button again. The indicator
on the button will turn off.
• Each time you push the switch, the

temperature setting changes as
follows:

• When the heated steering wheel

switch is pressed to high ( 

) :

The heated steering wheel switch
automatically changes to the low
position after 30 minutes. You can
turn off the heated steering wheel
by pressing the switch to the OFF
position.

• When the Engine Start/Stop button

is pressed to ON position with the
heated steering wheel switch in the
high/low position, the heated steer-
ing wheel automatically starts in
the high position.

Do not install any cover or accesso-
ry on the steering wheel. This cover
or accessory could cause damage
to the heated steering wheel sys-
tem.

Horn

To sound the horn, press the area
indicated by the horn symbol on your
steering wheel (see illustration). The
horn will operate only when this area
is pressed.

Do not strike the horn severely to
operate it, or hit it with your fist. Do
not press on the horn with a sharp-
pointed object.

NOTICE

NOTICE

OHI046047

OFF 

HIGH ( 

LOW (

)

OHI046049

-------------------------------------------------------------------------------------------------------------------------------------------------------------

Inside rearview mirror

Before you start driving, adjust the
rearview mirror to the center on the
view through the rear window.

Electric chromic Mirror (ECM) 

The electric rearview mirror automati-
cally controls the glare from the head-
lamp of the car behind you in night-
time or low light driving conditions.
When the engine is running, the
glare is automatically controlled by
the sensor mounted in the rearview
mirror. The sensor detects the light
level around the vehicle, and auto-
matically adjusts to control the head-
lamp glare from vehicles behind you.
Whenever the shift lever is placed in
R (Reverse), the mirror will automat-
ically go to the brightest setting in
order to improve the drivers view
behind the vehicle.

When cleaning the mirror, use a
paper towel or similar material
dampened with glass cleaner. Do
not spray glass cleaner directly on
the mirror as that may cause the
liquid cleaner to enter the mirror
housing.

NOTICE

M

MIIR

RR

RO

OR

RS

S

3-19

03

Make sure your line of sight is
not obstructed. Do not place
objects in the rear seat, cargo
area, or behind the rear head-
rests which could interfere with
your vision through the rear
window.

WARNING

To prevent serious injury during
an accident or deployment of
the air bag, do not modify the
rearview mirror and do not
install a wide mirror.

WARNING

NEVER adjust the mirror while
driving. This may cause loss of
vehicle control resulting in an
accident.

WARNING

OHI046051L

-------------------------------------------------------------------------------------------------------------------------------------------------------------

3-20

Convenient features of your vehicle

Outside rearview mirror  

Your vehicle is equipped with both
left-hand and right-hand outside
rearview mirrors.

• Do not scrape ice off the mirror

face; this may damage the sur-
face of the glass.

• If the mirror is jammed with ice,

do not adjust the mirror by
force. Use an approved spray
de-icer (not radiator antifreeze)
spray, or a sponge or soft cloth
with very warm water, or move
the vehicle to a warm place and
allow the ice to melt.

Adjusting the rearview mirrors:

1. Press either the L (driver's side) or

R (passenger's side) button (1) to
select the rearview mirror you
would like to adjust.

2. Use the mirror adjustment control

(2) to position the selected mirror
up, down, left or right.

3. After adjustment, press the L or R

button (1) again to prevent inad-
vertent adjustment.

NOTICE

OHI046052

• The right outside rearview mir-

ror is convex. In some coun-
tries, the left outside rearview
mirror is also convex. Objects
seen in the mirror are closer
than they appear.

• Use your interior rearview mir-

ror or turn your head and look
to determine the actual dis-
tance of following vehicles
when changing lanes.

WARNING

OHI046053

Do not adjust or fold the outside
rearview mirrors while driving.
This may cause loss of vehicle
control resulting in an accident.

WARNING

-------------------------------------------------------------------------------------------------------------------------------------------------------------

3-21

03

• The mirrors stop moving when

they reach the maximum adjust-
ing angles, but the motor contin-
ues to operate while the switch
is pressed. Do not press the
switch longer than necessary,
the motor may be damaged.

• Do not attempt to adjust the out-

side rearview mirror by hand or
the motor may be damaged.

Folding/Unfolding the outside
rearview mirror

The outside rearview mirror can be
folded or unfolded by pressing the
switch as below.
Left (1) : The mirror will unfold.
Right (2) : The mirror will fold.
Center (AUTO) :
The mirror will fold or unfold automat-
ically as follows:
- The mirror will fold or unfold when

the door is locked or unlocked by
the smart key.

- The mirror will fold or unfold when

the door is locked or unlocked by the
button on the outside door handle.

- The mirror will unfold when you

approach the vehicle (all doors
closed and locked) with a smart
key in possession. (if equipped)

The electric type outside rearview
mirror operates even though the
Engine Start/Stop button is in the
OFF position. However, to prevent
unnecessary battery discharge,
do not adjust the mirrors longer
than necessary while the engine is
not running.

Do not fold the electric type out-
side rearview mirror by hand. It
could cause motor failure.

NOTICE

NOTICE

NOTICE

OHI046054

-------------------------------------------------------------------------------------------------------------------------------------------------------------

Reverse parking aid function
(if equipped)

When you move the shift lever to the
R (Reverse) position, the outside
rearview mirror(s) will rotate down-
wards to aid with driving in reverse.
The position of the outside rearview
mirror switch (1) determines whether
or not the mirrors will move:
Left/Right :
When either the L (Left) or R (Right)
switch is selected, both outside
rearview mirrors will move.
Neutral :
When neither switch is selected, the
outside rearview mirrors will not move.
The outside rearview mirrors will
automatically revert to their original
positions if any of the following occur:
• The Engine Start/Stop button is

pressed to either the OFF position
or the ACC position.

• The shift lever is moved to any

position except R (Reverse).

• The remote control outside rearview

mirror switch is not selected.

3-22

Convenient features of your vehicle

OHI046044L

-------------------------------------------------------------------------------------------------------------------------------------------------------------

1. Driver’s door power window switch
2. Front passenger’s door power

window switch

3. Rear door (left) power window

switch

4. Rear door (right) power window

switch

5. Window opening and closing
6. Automatic power window
7. Power window lock switch 

W

WIIN

ND

DO

OW

WS

S

3-23

03

OHI046028

Power windows

-------------------------------------------------------------------------------------------------------------------------------------------------------------


Content      ..     4      5      6      7     ..