Iran Khodro Runna. Service Manual - part 5


  Index      Manuals     Iran Khodro Runna. Service Manual


Search            copyright infringement  


Content      ..     3      4      5      6     ..


Iran Khodro Runna. Service Manual - part 5


-------------------------------------------------------------------------------------------------------------------------------------------------------------

70

4

BONNET

Filling gasoline tank

Gasoline tank should be filled when 

the 

vehicle is ignited OFF.

Put the key in the tank cap and turn it to 

the left and then remove the cap.

The  specification  of  the  gasoline  has 

been mentioned on the tank cap.

When you fill the tank and the fuel pump’s 

nozzle is stopped, cease the filling.

This may cause fault in your vehicle 

function.

Your vehicle’s gasoline tank capacity 

is about 50 liters.

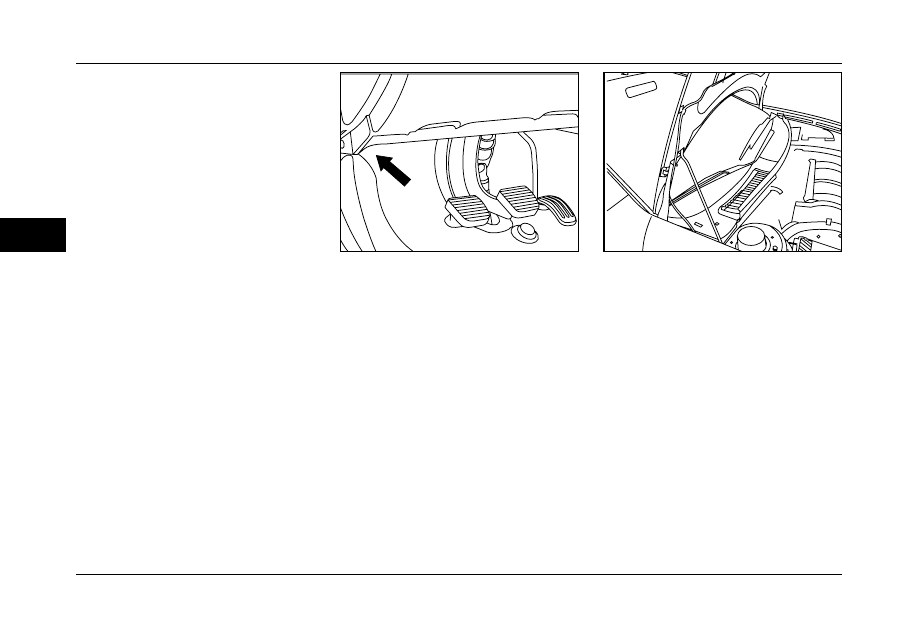
Opening the engine compartment door 

From interior of the vehicle:

Pull the handle which is below left side of 

the fascia.

From outside of the vehicle:

Lift the control and raise the engine 

compartment door.

Engine compartment strut

Keep the engine compartment door by 

using the strut. Place the strut back in 

its housing before closing the engine 

compartment door.

Closing engine compartment door 

Lower the engine compartment and 

release it at the end of its travel.

Check that the engine compartment is 

locked.

-------------------------------------------------------------------------------------------------------------------------------------------------------------

-------------------------------------------------------------------------------------------------------------------------------------------------------------

71

4

ENGINE COMPARTMENT

Gasoline engine 1.6 lit. 16V (105hp)

1- Windscreen wash reservoir 

2- Hydraulic  steering oil reservoir 

3- Coolant reservoir.

4- Brake fluid reservoir 

5- Battery

6- Air filter

7- Dipstick

8- Engine Oil Reservoir

9- ECU

10- Fuel reconnect button

Warning

When working on the engine 

compartment, observe the safety 

warnings.

-------------------------------------------------------------------------------------------------------------------------------------------------------------

-------------------------------------------------------------------------------------------------------------------------------------------------------------

72

4

Warning

-Brake  fluid  is  very  dangerous  and 

corrosive. Avoid its contact with skin.

-When adding oil, be careful the oil 

does not splash on other parts of the 

engine; otherwise there is the risk of 

the firing.

-Do not forget closing the cap, 

otherwise  there  is  the  risk  of  firing 

due to splashing of oil on the hot 

surfaces of the engine.

-Oil level indicator shows only the 

reduction of the oil level less than 

necessary level, but not more than 

max. Amount which is only possible 

by reading the dipstick.

ENGINE COMPARTMENT

Checking levels

Oil level

Do the maintenance as per the instruction.  

Check the level regularly and top up 

between changes. (Oil consumption is 

0.5 liter per 1000 kilometers). Check the 

level with the vehicle level, engine cold, 

using the dipstick.

Dipstick

There are two marks on the dipstick:

A = maximum

Never fill the oil ,so that it passes 

the mark of A.

B = minimum

To maintain the reliability of 

engines and emission control systems, 

the use of additives in engine oil is 

prohibited.

Oil change

According to the information given in the 

servicing booklet.*

Note: Avoid long contact of the used oil 

with skin.

Viscosity selection

In all cases, the oil selected must meet 

the manufacturer’s requirements.

Always use the oil which the manufacturer 

has recommended according to the 

DOT4 standards.*

* It’s recommended to use the approved brands 
and packages, offered by the Isaco.

-------------------------------------------------------------------------------------------------------------------------------------------------------------

-------------------------------------------------------------------------------------------------------------------------------------------------------------

73

4

Cuation

Hydraulic oil destroys the painted 

surfaces. First clean the oil by a cloth 

and then wash if with the water and 

special shampoo.

Cuation

Do not use the mixture of the water and 

antifreeze in the washing reservoir. 

This damages the vehicle paint.

ENGINE COMPARTMENT

Warning

Slacken the cap by two turns to 

release the pressure to prevent any 

risk of scalding. When the pressure 

has dropped, remove the cap and 

top it up.

Warning

Avoid opening the coolant cap 

after one hour the engine has been 

stopped.

Warning

Hydraulic steering oil is very 

poisonous and should be kept in 

the closed container out of reach of 

children. If swallowed refer to the 

physician immediately.

* It’s recommended to use the approved brands 
and packages, offered by the Isaco.

Coolant level of cooling system*

Use the  fluid  recommended  by  the 

manufacturer. When the engine is warm, 

the temperature of the coolant is controlled 

by the engine fan. As this fan can operate 

with the ignition key removed and because 

the cooling system is pressurized, wait at 

least one hour after the engine has stopped 

before carrying out any work.

Note: Applicable antifreeze used in the 

vehicle must be Ethylene Glycol.

Used products

Do  not  dispose  used  oil,  brake  fluid  or 

coolant into drains or onto the ground.

Hydraulic steering fluid reservoir

Open the reservoir, with the engine at 

ambient temperature. The level should 

always be above the minimum mark and 

close to the maximum mark.

Windscreen wash level*

For best quality cleaning and safety of 

yourself, use the products recommended 

by the manufacturer.

Note: Applicable washing solution of 

glasses must be Iseo Propanol.

Note:  the coolant does not need to be 

changed.

-------------------------------------------------------------------------------------------------------------------------------------------------------------

-------------------------------------------------------------------------------------------------------------------------------------------------------------

74

4

Warning

Consult with one of the Iran Khodro 

authorized deal before installing any 

audio system and its speakers on 

your vehicle.

ENGINE COMPARTMENT

Installation of the radio

Followings are installed on your vehicle 

in the factory:

Roof antenna

Coaxial cable of antenna

Noise eliminator

Front speaker feed

Rear speaker feed

Two 8 pins contactors 

Installation of the speakers

You can install following speakers:

- 165 mm dia. Speakers on the front doors.

- 130 mm dia. Speakers on the rear doors.

- 22/5 mm dia. Speakers in the mirror frames.

Connections (contactors- connectors)

A1:

A2:

A3:

A4: (+) after connection

A5:

A6: (+) after connection – side lamps

A7: (+) permanent

A8: Mass Earth 

B1: (+) rear right speaker

B2: (-) rear right speaker

B3: (+) front right speaker

B4: (-) front right speaker

B5: (+) front left speaker

B6: (-) front left speaker

B7: (+) rear left speaker

B8: (-) rear left speaker

1- connection means, position 1 in the switch.
2- In order to adding of rear speakers by vehicle owner in authorized dealer of IKCO.

-------------------------------------------------------------------------------------------------------------------------------------------------------------

-------------------------------------------------------------------------------------------------------------------------------------------------------------

75

4

VEHICLE MAINTENANCE

Protection of the vehicle body

To care and protect the paint and 

plastic decoration of the vehicle, it is 

recommended to wash them regularly.

-There  is  no  specific  issue  for  manual 

washing

- Macroscopic particles during automatic 

car washers may cause damage to 

paints, especially dark paints.

- When washing with high pressure 

take care more (such as pressure and 

distance of the spraying)

- If the vehicle body is damaged (on the 

painted dampers or head lamp) do not 

use above method. Clean those areas 

manually. Prevent water from entering 

the locks.

- Avoid putting and drying the mat on the 

vehicle body. If doing this continual and 

in a long-term, it causes the vehicle body 

paint is changed

- Consult with authorized dealers about 

servicing and maintenance of the vehicle.

Polishing

Regular waxing and washing vehicle 

with water will protect the paint against. 

Consult with authorized dealer about 

maintenance and quality of the parts.

Plastic parts

First clean these parts by a diluted 

detergent. Then rub with a wet cloth. Do not 

varnish the fascia. It should be unvarnished 

to prevent its reflection in the wind screen.

Instrument panel, clock, audio system, 

display

Use dry cloth. Do not use detergents, 

spray and/or solvents.

Warning

Be careful the water does not 

penetrate the seat belt spool. Do not 

use oil, washing detergent, furniture 

varnishes and polish.

Cuation

-Clean bird’s droppings, resin rains spot, fat, grease and tar spots (all of them 

include substances which cause unrecoverable damage to the vehicle paint).

-Do not use dry and abrasive and/or detergent for cleaning lenses and headlamp 

glasses and all glasses which have poly chromate cover.

-Do not use gasoline, oil or cloth soaked in them for cleaning the body and plastic 

parts of the vehicle.

-Repair any damages to the paint (due to impact of stone, scratch, etc.) as soon 

as possible.

-Detach blue strips on the frame of the side mirror, windows, vehicle bumper, etc. 

they cause problem in long time.

mat

Use diluted detergent and let them dry in 

shadow to prevent their discoloration.

-------------------------------------------------------------------------------------------------------------------------------------------------------------

-------------------------------------------------------------------------------------------------------------------------------------------------------------

76

4

Cuation

For optimum performance of the 


main systems of the vehicle such 

as steering wheel and braking 

system, Iran Khodro has approved 

some  specific  products  (oils)  and 

recommend them to you.*

To avoid any damage to your vehicle 

electrical equipment, avoid washing 

the engine.

Cuation

Use only  products recommended by 

Iran Khodro and/or products with the 

same quality and specifications.*

Batery

At the start of winter, have your battery 

checked by an Iran Khodro authorized 

dealer.

Air filter and passenger compartment 

filter

Have  the  filter  elements    replaced 

regularly.  If you drive in dusty conditions, 

change them also between two scheduled 

maintenances.

Brake pads

Brake pad wear depends on the style of 

driving, in particular for vehicles which 

are used in town, over short distances. It 

may be necessary to check the thickness 

of the pads, even between scheduled 

maintenance.

Parking brake

Where the handbrake travel is too great 

or there is a reduction in the performance 

of the system, the handbrake should 

be adjusted, even between scheduled 

maintenances. Have  the  system checked 

by and Iran Khodro Authorized dealer. 

Oil filter

Change  the filter regularly, in accordance 

with the servicing schedule.

Manual  gearbox

Gear box oil level should be checked 

every 60000 km and top it up, if 

necessary. Oil level should be checked 

in accordance with the manufacturer’s 

servicing schedule.

To do scheduled maintenance in regard to 

the fluids necessary for vehicle and other 

factors, refer to the vehicle maintenance 

manual.

Stoppage of fuel to the engine

In case of the hard impact, a certain 

system stops supply of fuel to the engine. 

In order to re-start supply of fuel to engine, 

press the button on the Inertia switch, at 

the left front side under the engine cover.

* It’s recommended to use the approved brands 
and packages, offered by the Isaco.

VEHICLE MAINTENANCE

-------------------------------------------------------------------------------------------------------------------------------------------------------------

-------------------------------------------------------------------------------------------------------------------------------------------------------------

77

4

Battery

Use a Battery Charger  to charge the 

battery.

- Disconnect the battery,

- Follow the instructions for use given by 

the battery charger manufacturer,

- Reconnect starting with the negative  (-) 

terminal,

- Check that the terminals and connectors 

are clean. If they are covered with 

sulphated (white or greenish deposit), 

disconnect them and clean them.

To start the vehicle from another 

battery:

- Connect the red cable to the positive (+) 

terminals of the two batteries,

- Connect one end of the green or black 

cable to the negative (-) terminal of the 

slave battery,

- Connect the other end of the green 

or black cable to an earth point on the 

broken down vehicle as far as      possible 

from the battery,

- Operate the starter, let the engine run.

- Wait for the engine to return to idle, then 

disconnect the cables.

When the vehicle is switched off and 

ignition switch is in position zero, front 

windows controls are usable only for 30 

seconds and then they become inactive.

Warning

Battery acid is corrosive and poisonous. If it leaks, be careful:

-If acid comes in contact with skin or clothe, take out the dress and wash the skin 

with plenty of the water and refer to the physician. 

-If acid comes in contact with the eye, wash the eyes at least for 15 minutes with 

clean water and refer to the physician immediately.

-If battery acid is swallowed, it could be fatal if the medical procedures is not done.

-Battery which is being charged emits Hydrogen gas which is explosive, take 

the  fire  and  spark  away  from  engine  compartment.  When  working  on  engine 

compartment, put your cuff and such on away. Never let the battery poles come in 

contact with the tool or metal parts of the vehicle. 

-Do not charge a battery which may be frosted.

-Take fire or spark out when charging the battery (charged battery or battery which 

is being charged emit flammable Hydrogen gas).

-Wait one hour after charging the battery and before connecting it to the vehicle.

VEHICLE MAINTENANCE

-------------------------------------------------------------------------------------------------------------------------------------------------------------

-------------------------------------------------------------------------------------------------------------------------------------------------------------

78

4

ENGINE COMPARTMENT

Cuation

-If the vehicle is not to be used for more than 6 days, it must be switched on at least once and stay on for one hour.

-It is advisable to disconnect the battery if the vehicle is not to be used for a period of more than one month.

- Never charge a battery without first disconnecting the terminals, otherwise the vehicle electric system may be damaged.

-It is recommended  to check the battery’s acid level, if possible to open the battery’s cap. In case its level is less than max. mark, 

top it up.

-All consuming electrical devices must be off before disconnecting the battery.

-Wait for 2 minutes after switching off the ignition before disconnecting the battery.

-Never disconnect a terminal when the engine is running.

-Never charge the battery before disconnecting.

-Close the windows and the sunroof before disconnecting the battery. 

- After every reconnection of the battery, switch on the ignition and wait 1 minute before starting to allow the electronic systems 

to be initialized. If slight difficulties are experienced after this, please consult an Iran Khodro dealer. 

-------------------------------------------------------------------------------------------------------------------------------------------------------------

-------------------------------------------------------------------------------------------------------------------------------------------------------------

79

TECHNICAL EMERGENCIES

5

CHANGING WHEELS ................................................ 80

FUSES .......................................................................... 84

REPLACING LAMPS .................................................. 89

TOWING VEHICLE ...................................................... 93

-------------------------------------------------------------------------------------------------------------------------------------------------------------

-------------------------------------------------------------------------------------------------------------------------------------------------------------

80

5

CHANGING OF WHEELS 

Warning

-Jack shall be used only for changing 

the wheels. It should not be used for 

any other works such as repairing and 

access to underneath the vehicle. 

-If long time has passed from life of 

the spare wheel, take it to the one of 

the authorized dealer to inspect is 

whether it is safe for use.

- If one of the tires is punctured, 

replace it as soon as possible.

An expert shall check (and repair, if 

necessary) punctured tire.

- For your safety, always change a wheel:

- on level, stable and non-slippery ground, 

-  with the handbrake applied, ignition off,

- with first or reverse gear engaged 

- never go underneath a vehicle raised 

using a jack (use an axle stand).

Cuation

Tire under inflation cause premature 

wear and abnormal warming of 

the tires. It has also many safety 

consequences:

-poor performance on road

-risk of tire blow out and/or tread wear

-tires pressure depends to the weight 

and speed of the vehicle. Adjust the 

pressure in accordance with the 

using conditions.

-If the governor valve is not closed 

properly, the tire pressure will be 

reduced. Use always a governor 

valve similar to the original one

-------------------------------------------------------------------------------------------------------------------------------------------------------------

-------------------------------------------------------------------------------------------------------------------------------------------------------------

81

5

CHANGING OF WHEELS

Parking vehicle

Park the vehicle on a level, stable and 

non-slippery ground.

Apply  handbrake  and  engage  first  or 

reverse gear.

(use a chock, if necessary) and turn flasher on.

Access to the spare wheel and the jack

- Lift the mat floor using the grab handle. 

Secure the handle behind the luggage 

compartment rim to have the mat fixed.

Tools available for you

Following tools have been placed in a 

plastic box, located in the spare wheel:

1- jack and jack handle

2- Wheel brace and wheel nut spanner 

3- chock.

Note

Standard tire for your vehicle is only 

185/65/R14

-------------------------------------------------------------------------------------------------------------------------------------------------------------

-------------------------------------------------------------------------------------------------------------------------------------------------------------

82

5

Warning

For your safety, always change a 

wheel:

- on level, stable and non-slippery 

ground,

- Apply handbrake 

- with first or reverse gear engaged

- You should use a  chock diagonally 

at the back of one of the rear tires.

- never go underneath a vehicle raised 

using a jack (use an axle stand).

After changing the wheel

-refer to one of Iran Khodro authorized 

dealer to adjust bolts tightness  and 

pressure of the spare tire as soon as 

possible.

-Repair the punctured tire and put it 

in its place.

CHANGING OF WHEELS

Removal of  wheel

- Put the chock 3 under the wheel is 

biased  to the wheel to be replaced. 

- Remove Hub Cap by pulling the handle 

jack 1 in the empty space around the valve.

-  Slacken the wheel bolts.

-  Place the jack 1 under one of the four 

locating points on the sub-frame (A),  that 

is closest to the wheel to be changed. 

Ensure that the entire surface of the jack  

1 base plate is in contact with the ground.

- ensure the jack floor axel to be vertical 

in regard to the point A

- raise the vehicle

- completely unscrew the bolts and remove 

the wheel.

Fitting a wheel

Position the wheel.

Partly tighten the bolts using wheel brace 2.

Fold the jack 1 and remove it.

Fully tighten the bolts using the wheel 

brace 2. 

re’det the wheel trim starting by placing 

its notch facing the valve and press with 

the palm of the hand.

Note: Each tool has a specific place in 

the jack box.  Tighten the spare wheel 

securing strap to prevent noise and for 

your safety in the event of impact.

Fitting snow tires

If you ‘det snow tires mounted on steel 

wheels onto your vehicle, it is essential to 

use special bolts available from your Iran 

Khodro dealer.

-------------------------------------------------------------------------------------------------------------------------------------------------------------

-------------------------------------------------------------------------------------------------------------------------------------------------------------

83

5

CHANGING OF WHEELS

Warning

-Damaged tires are very dangerous. 

Avoid driving with damaged, worn, 

flat or over-inflated tires.

-Use always similar radial tires for 

front and rear wheels. Do not use the 

tires with crisscross pattern.

-Your vehicle  wheels are not made 

for tubes. Use only tubeless tires.

-Do not drive with worn and flat tires 

or tires without adjusted pressure.

-Underinflated tires are worn rapidly 

and cause increase of the fuel 

consumption and decrease of the 

directional control.

Tread wear indicator

the tires have molded-in tread wear 

indicators in the grooves. When the 

indicators appear on the tread surface, 

the remaining depth of the tread is 

1.6 mm or less and the tire should be 

replaced.

Tires pressure

Check tire pressure at least once a week. 

Under inflation of the tires cause heat and 

life of the tire is decreased. Over inflation 

has negative effect of the convenience 

driving.

Vehicle’s tire rotation

In front-wheel drive vehicles, front tires 

are worn more than rear tires due to the 

brake, drift and steering forces. To avoid 

uneven wear of your tires and to prolong 

their life, rotate the tires as illustrated. 

Tires should be rotated every 10000 km.

Tire Size

Size of your vehicle’s tires are marked on 

its pillar  as follows:

185.65 R14, in which 185 is the tire width 

in mm, 65 is the ratio of the height to 

the width of the tire, R is indicator of the 

Radial structure and 14 is the diameter of 

the wheel in inch.

Front of Vehicle

-------------------------------------------------------------------------------------------------------------------------------------------------------------

-------------------------------------------------------------------------------------------------------------------------------------------------------------

84

5

FUSES

Changing fuses

A fuse box is under driver side of the  

dashboard, other one is placed in the 

engine compartment.

Fuse box under dashboard

Remove the cover of fuse box to gain 

access to the fuses.

The spare fuses and the pliers A are 

located on a removable holder, secured 

horizontally inside the dashboard fuse box.

Removing and fitting a fuse

Before changing a fuse, the cause of the 

fault must be found and remedied. The 

fuse numbers are indicated on the fuse 

box. Use the pliers A. 

Always replace a faulty fuse with a fuse 

of the same rating (for example replace a 

5 ampere damaged fuse with a sound 5 

ampere  fuse).

-------------------------------------------------------------------------------------------------------------------------------------------------------------

-------------------------------------------------------------------------------------------------------------------------------------------------------------

85

5

FUSES

R1 R2

R3 R4

R5 R6

R7 R8

Fuses guide table (cabin) 

Fuse Function

Rating

Fuse No.

Spare

-

F21

Main switch supply (position 2) air bag unit and central node. 

10A

F22

Main switch supply (position 1) lighter

20A

F23

Main switch supply - position 1(motivation of heater relay ، Radio, brake 

light, front node, central node and instrument panel).

10A

F24

Radio permanent supply

10A

F25

Central node supply

20A

F26

Central node supply

20A

F27

Central node supply and main supply and motivation of rear door motive relay.

30A

F28

Rear window control supply

30A

F29

Central node supply (Front lifting window)

30A

F30

Rear window heater.

30A

F31

Heater fan supply.

30A

F32

Engine ignition.  

30A

F33

Main switch supply (position 2) immobilizer, diagnostic connector, 

instrument panel, cooler gas pressure sensor, engine unit.

10A

F34

Main switch supply (position 2), Anti-brake system (ABS).

5A

F35

Immobilizer permanent supply, diagnostic connector, instrument panel, 

motivation of window heater ، windscreen washer pump, Multipurpose 

Instrument Panel

10A

F36

Setting of relays (Inside cabin)

Relay No.

Relay Function

Rating - type

R1

Front windscreen washer Pump

30A- 1Contact

R2

Trunk lid unlocking 

30A- 2Contact

R3

Mirrors and rear window heater

30A- 1Contact

R4

Heater Fan

40A- 1Contact

R5

Rear Window Control 

30A- 1Contact

R6
R7
R8

-------------------------------------------------------------------------------------------------------------------------------------------------------------


Content      ..     3      4      5      6     ..