Tractors X60 Series. Manual - part 34
 

  Index      Tractors     Tractors X60 Series - service repair manual 2012 year


Search            


Content   ..  32  33  34  35   ..


Tractors X60 Series. Manual - part 34


137

Operation

5

Hitch System

The front power lift is operated via the tractor’s remote
hydraulic valve circuit and is double acting, (the linkage
is power lifted and power lowered).

The hitch is designed for Category IIIN implements.
The top link has a ball end.

Maximum Lift Capacity............................................2800 kg

IMPORTANT: Do not exceed the maximum permitted 

front axle operating weight when using the front hitch.  
Observe tyre load capacities and any possible legal 
limitations. 

FRONT POWER LIFT (if equipped)

 [4.2.g]

DECAL

(If equipped with a front hitch -
Located near the multi-purpose
control valve)

Read the Operator’s Manual 
carefully before using.

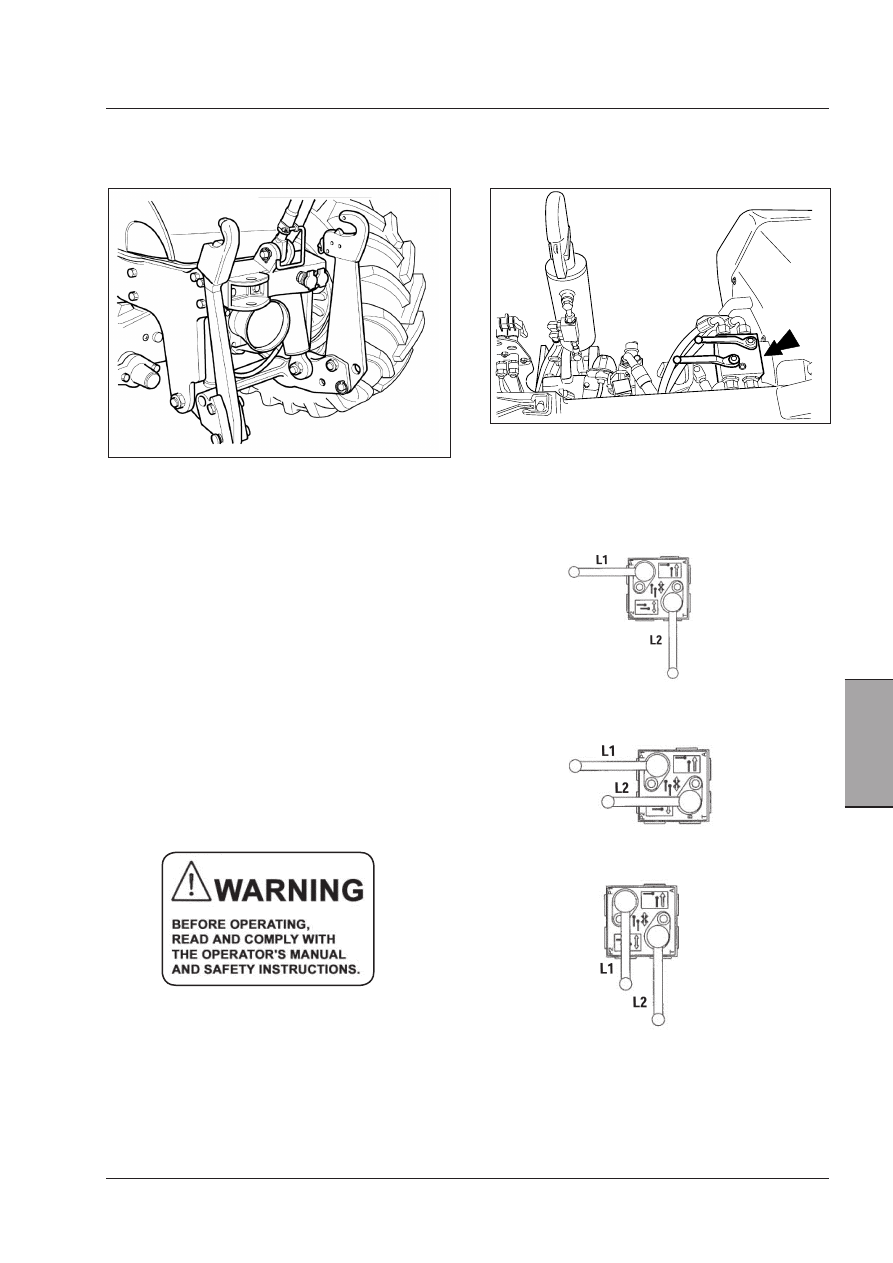
Multi Valve

The valve is mounted at the rear of the tractor.
The multi valve has two operation modes.

Valve Positions

1st mode - Double acting

2nd mode - Single acting

3rd mode - Disengaged (Transport) - For system safety
during transport or travel on road.

IMPORTANT: The front power lift is operated using 
one of the tractors remote valves. In order to use the 
rear couplers of this valve the front power lift MUST be 
disengaged as shown.

138

Operation

Lower Links

The lower links have three positions. When changing
the position of the lower links, support the links when
removing the retaining pins.

Both lift links must be set in the same position.

Rigid Position

For operation with no vertical movement, install the
retaining pins in the rear hole.

Float position

For operation with vertical float, independently of each
other, install the retaining pins in the front hole.

Transport position

Top Link

When not being used store the top link as shown
above.

When operating on the public highway without equip-
ment attached always store the top link correctly.

139

Operation

5

Hitch Operation

OPERATION 1

Lower the lower links and set for Rigid or Float applica-
tion, as required.

OPERATION 2

Attach the implement to the hitch. Make sure the
correct category implement is attached. A category
indication is stamped on each lower link.
Make sure the claws on the front hitch engage with the
implement and the latches lock.

OPERATION 3

Move the relevant remote control to raise or lower the
hitch as required.
(Except further applications when the tractor is equipped
with a front loader).

Front Ballast

On request, a front ballast kit on the front power lift is
available.

WARNING: Use suitable lifting means when 
handling the ballast.

WARNING: When servicing work is requi-
red, lower the front lift to the ground and 
unhitch the implement. NEVER carry out 
servicing work by standing under the front 
lift.

Optional Equipment

Front Hydraulic Quick Couplers for Remote 
Valves (available as a kit)

IMPORTANT: The front remote couplers are supplied 

from one of the rear remote valves.  DO NOT use both 
the front and the corresponding rear remote couplers at 
the same time. 

WARNING: Stand well clear of the linkage 
or implement when operating the external 
controls or injury can result from contact 
with moving parts.  Watch for possible pinch 
points between the implement and tractor 
when the hitch is moved.

140

Operation 

Towing attachments

Front tow hook

The tractor is equipped with a front tow hook for emer-
gency operations for towing the tractor.

Front tow hook.

Rear tow hook.

Rear pull hooks 

The following rear pull hooks are available depending
on approvals and regulations valid in each country.
The availability should be checked on each 
market.

Weight to be towed by the tractor

The max. weight a tractor may tow varies according to
the laws in force in each country.
Check the installed tyres for their load capacity.
Ask your Dealer for information about the max. towable
weight.

Rear tow hooks, hand adjustable in height, with 
welded frame - Italian market.

- CUNA ‘C’ tow hook (for the Italian market).
- CUNA ‘D2’ tow hook (trailer hydraulic brakes) (for the

Italian market).

- CUNA drawbar, Class A (for the Italian market)
- CUNA C hook and CUNA drawbar, Class A (for the

Italian market)

- EEC hook, not automatic - EEC market.

These tow devices can be used for agricultural imple-
ments and one or two-axle trailers on road.

To make hitching the implement easier, this device can
be adjusted to different heights.

This operation requires great attention. A well adjusted
hook means easier handling of the tractor and, above
all, safety and stability of the tractor.

If the towing attachment is placed in the highest posi-
tion, towing is easier, but the tractor might pitch up at
the front.

When using four-wheel drive, keep the tow hook in one
of the lower positions so that the drawbar remains as
horizontal as possible. This keeps the weight over the
front axle and improves tractive force.

CAUTION:  Refer to licensing documents issued by 
the Ministry of Transport to know data relating to 
max. vertical and horizontal loads on tow hooks and 
max. trailer weights.

CAUTION: Use exclusively the provided hooks to 
tow the machine.

CAUTION: DO NOT raise the machine with the tow 
hook.


Content   ..  32  33  34  35   ..