Tractors X60 Series. Manual - part 29
 

  Index      Tractors     Tractors X60 Series - service repair manual 2012 year


Search            


Content   ..  27  28  29  30   ..


Tractors X60 Series. Manual - part 29


117

Operation

5

Parking brake

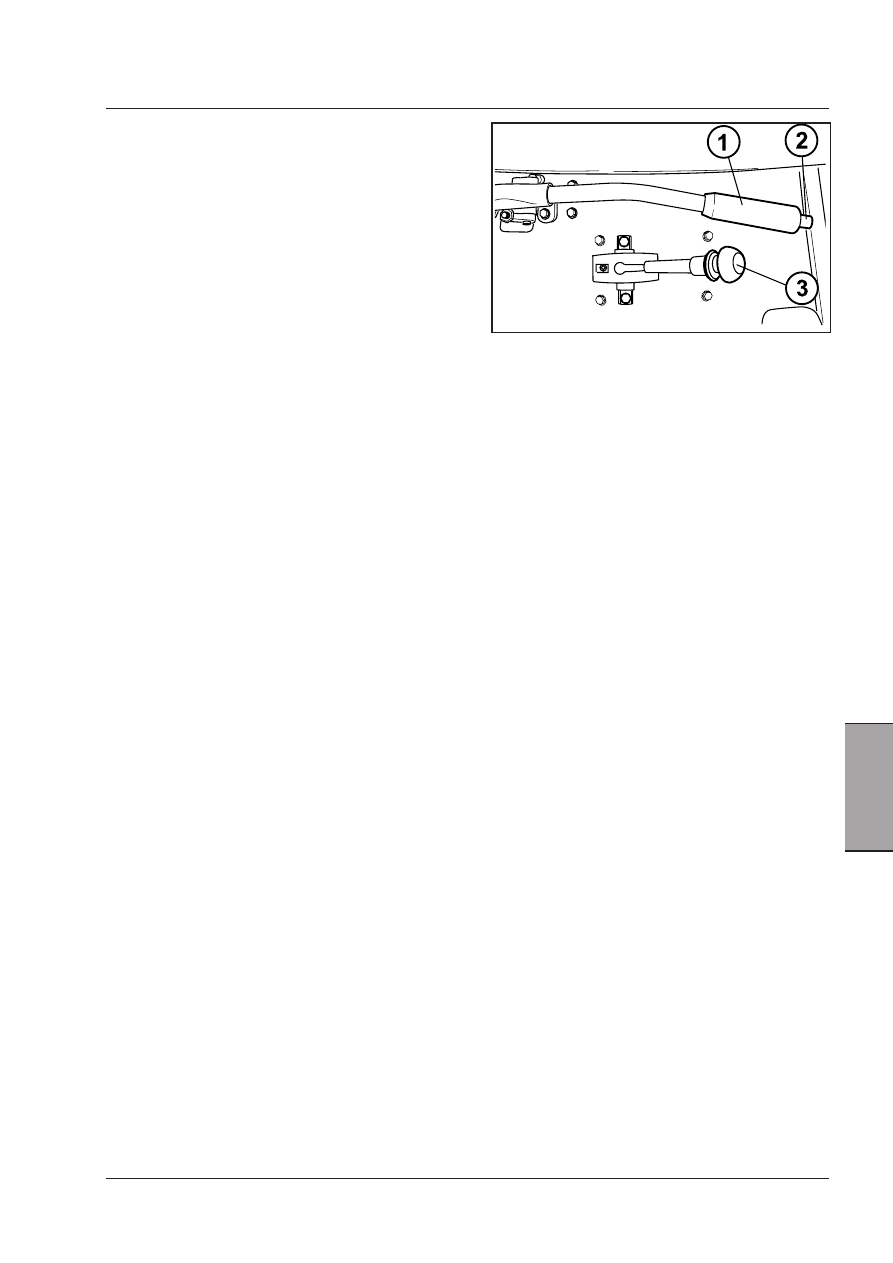
A hand lever (1) controls the parking brake. This acts,
via a series of linkages, directly on the brake discs and
is fully independent of the foot brakes.

Parking brake engagement
- Fully depress the brake pedals.
- Pull the lever completely to operate the parking brake (1).
- Release the brake pedals and make sure that the tractor
is stopped.
- If this is not the case, pull the parking brake lever with
higher force.

When the parking brake is engaged, the warning lamp on
the instrument cluster will illuminate when the key switch
is turned to ON.

NOTE: The indicator light in the instrument panel lights 
up when the parking brake is engaged, independently 
of the force used for the engagement.

To start the tractor, shift into gear and release the parking
brake.

Parking brake release
- Fully depress the brake pedals.
- Pull the lever lightly (1), push down the button (2), let the
lever down and release the button.

IMPORTANT: Driving the tractor with the parking 

brake partially engaged will cause damage to internal 
transmission components. Make sure the brake is fully 
off.

NOTE: For the Xtrashift transmission with Park-Lock (op-
tional) see description in “Stopping the Xtrashift tractor
by means of the Park Lock control lever” (3).

118

Operation

Hydraulic trailer brake (Approved for
ITALY)

[4.2.i]

The tractor braking system can be equipped with a
hydraulic valve (1) which, if connected to the hydraulic
circuit of the trailer brakes, allows the trailer itself to be
braked along with the tractor. .
Comply with the following instructions to correctly
connect and disconnect the flexible trailer brake tube to
and from the union (2) at the rear of the tractor and to
always operate in conditions of the utmost safety.

The trailer-tractor connecting tube can be connected
and disconnected with the engine either running or at a
standstill:

-  With the engine at a standstill: there are no diffi-

culties when either connecting or disconnecting as
there is no oil pressure in the brake circuit.

-  With the engine running: it is essential to engage

the hand brake since this ensures that no pressure
remains in the brake circuit.

WARNING: It is extremely important to al-
ways carry out this operation before deta-
ching the trailer from the tractor since it en-
sures the immediate action of the automatic 
safety braking system with which this trailer 
braking system is obligatorily equipped.

There is a specific indicator light (3) on the control panel
of the tractor which keeps the operator constantly
informed about the operating conditions of the trailer
brake oil tap.

Indicator light off:

-  When the oil tap is not connected to the trailer.
-  When the pressure of the oil in the circuit is regular

with the trailer connected.

Indicator light on:

-  When the engine is at a standstill and the ignition key

is turned to first position.

-  When the hand brake is engaged with the engine

running.

WARNING: If the indicator light should 
come on in conditions differing from those 
mentioned above, this means that there is a 
fault in the braking system and that use of it 
must immediately stop for safety reasons.

Hydraulic trailer braking tap (Approved for ITALY).
1 - Valve unit.
2 - Oil tap union.
3 - Indicator light on dashboard.

Hydraulic trailer braking tap
(Approved for FRANCE and EXPORT market).
1- Valve unit.
2- Oil tap union.

Hydraulic trailer brake (Approved for
FRANCE and EXPORT market)

The tractor braking system can be equipped with a
dedicated hydraulic valve (1) that, if connected to the
hydraulic circuit of the trailer brakes, allows the trailer
to be braked along with the tractor.
The flexible tube of the trailer brakes should be connec-
ted to the union (2) installed at the rear of the tractor.

119

Operation

5

WARNING: Make sure the system is at wor-
king pressure before operating the brakes 
with a trailer(s) fitted.  Failure to do this can 
result in injury or death. 

WARNING: DO NOT park an unattended 
tractor/trailer(s) combination using air pres-
sure to apply the brakes (Dual Line Pneu-
matic Braking System).  The mechanical 
park brake on both the tractor and trailer(s) 
MUST be applied. 

The air reservoirs store air under pressure to operate the
trailer brakes.

Maximum Permitted Pressure .................... 12.5 bar

Working Pressure
Dual Line System ..................................... 7.5 bar

Single Line System ..................................... 5.0 bar

NOTE: If the pressure in the system, as indicated by 

the pressure gauge, is lower than 4 bar, the red light (5) 
on the pressure gauge lights up. In this case, ask your 
Dealer’s specialized workshop for help.

Capacity......................................................10 litres

Drain the reservoirs............................Daily (or 

every 10 work hours).

TRAILER AIR BRAKE COUPLINGS

 [4.2.i]

(if equipped, according to market)

1. YELLOW COUPLING - BRAKE SERVICE LINE (DUAL LINE SYSTEM)

2. RED COUPLING - BRAKE EMERGENCY LINE (DUAL LINE SYSTEM)

3. BLACK COUPLING - FEED AND RETURN (SINGLE LINE SYSTEM) - (OPTIONAL)

4. Air pressure indicator; 5. Red warning light - low system
pressure.

Drain pneumatic trailer brake 
reservoirs (if equipped)

Daily or every 10 work hours - Operate the drain valve
plunger under each reservoir to  drain any  water which
has collected.

120

Operation

Locking the differential

The tractors are fitted with a system for locking the
differential on the rear and front axles on 4WD models.
The system is used when a wheel slips because of lack
of grip. To lock the differentials, just press the button (1)
under the control panel of the electronic power lift for a
second.

A yellow function indicator on the instrument panel
lights up to indicate that the diff lock is engaged.

NOTE: For the best results, engage the diff lock before 

the wheels are likely to slip. Do not engage the lock 
while one of the wheels is actually slipping.

Depress one or both of the brake pedals to disengage
the diff lock. The indicator light on the instrument panel
goes out.

WARNING: Disengage the diff lock when 
traveling on roads and when you need to 
turn the tractor. Disengage the differential 
lock before steering the wheels.

Four-wheel drive

4WD increases traction on broken ground, muddy and
slippery surfaces, etc.
Press the button (1) to engage 4WD. When 4WD is en-
gaged, an indicator light on the instrument panel comes
on. When it is disengaged, the light goes out.

NOTE: Only use four-wheel drive when strictly neces-
sary. Avoid use of 4WD when maximum traction is not 
required, e.g. on hard ground, roads, etc., since this 
would only increase tyre wear unnecessarily.

Fully depress the top of the switch (1) to engage four-
wheel drive.

Fully depress the top of the switch (1) to engage the
differential lock.


Content   ..  27  28  29  30   ..