Tractors X60 Series. Manual - part 17


  Index      Tractors     Tractors X60 Series - service repair manual 2012 year


Search            


Content   ..  15  16  17  18   ..


Tractors X60 Series. Manual - part 17


69

Instruments and Programming

4

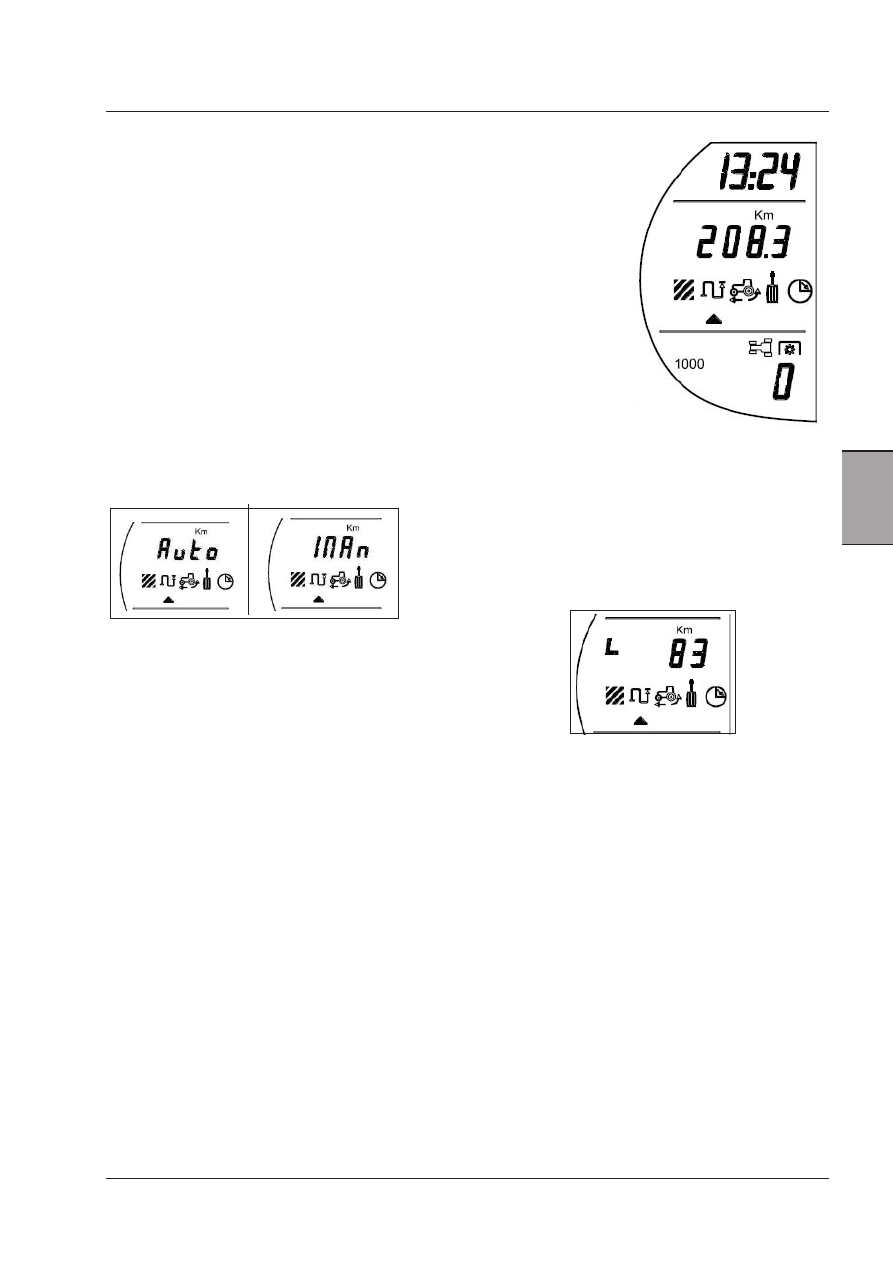
1.1.3  Distance travelled

If the down button is pushed again the Distance Travelled menu is selected:

The screen shows:

Time - 13:24
Distance units selected - Km
Distance travelled/worked - 208.3 Km
PTO mode currently selected - 1000 Rear
PTO RPM - 0

The arrow indicates the Distance menu is selected.
If the counter is operating, this arrow will flash when the menu is selected.
Each  time  the  menu  is  selected,  the  counter  will  display  "AUTO"  or  "Man"
(MANUAL) 2 seconds long before displaying the relative
value. The operator is thus informed about the settings actually active.

Use:
-  The  first  screen  shows  the  distance  travelled/worked
in the units preset in the Accessory menu. To indicate a
distance shorter than 1 mile/1 km, the display shows the
following symbol corresponding to the 5th digit:
- One decimal place will be shown until the amount of
units reaches 9999.9, at this point the counter will show
a value of 10000.
If 99999 is exceeded the counter will reset.
- Counter can work in two different modes. Mode selec-
tion is available into Accessory menu (see Auto Function
Settings):

Manual Mode (Distance Travelled): when activated 
by the operator, the counter counts every time the 
tractors is moving until the operator stops it.

 
Auto Mode (Distance Worked): the counter starts to count
when the tractor is moving and either the hitch is down
or the Remote implement switch is on.

Auto and Manual mode will increment the same counter
value.

Counter Activation:
- Pushing the MENU button for less than 2seconds starts/
stops the distance counter (only for Manual mode).
- Pushing the menu button for longer than 2 seconds when
selected but not active resets the counter,
-  if  pushed  for  longer  than  2  seconds  when  active  the
counter will stop (only for Manual mode).
- If the UP or DOWN arrows are pressed to change the
menu function selected when the counter is active it will
continue to count.
- To turn the distance counter off after exiting the menu the
operator will have to go back into this screen and press
the menu button(only for Manual mode).
- If active at key-off the unit will start again counting at
key-on (only for Manual mode).

70

Instruments and Programming

1.1.4  Calibration Menu 

If the down button is pushed again the top level of the Calibration menu is selected:

The screen shows:

Time - 13:24
Calibration menu selected
PTO mode currently selected - 1000 Rear
PTO RPM - 0

The arrow indicates the Calibration menu is active.

Use:
- After the Calibration menu has been selected, by pressing the MENU button the operator can choose which controller
to calibrate.
The following screen is shown:

The instrument cluster is the first default controller to be calibrated.

After entering this menu, you may display the calibration state by means of the bottom
part on the display that normally shows PTO speed rate.

WARNING: The operator may only perform the calibrations quoted in the Opera-
tor column in the following table. The operator MAY NOT perform the operations 
quoted in the column NOT FOR THE OPERATOR. They may only be performed by 
specialized technicians at the Dealer's. 

71

Instruments and Programming

4

- After scrolling to the correct controller the operator will press the MENU button again to start the calibration sequence.
- After the calibration has been completed, the operator can choose to calibrate another controller by scrolling through

using the UP and DOWN buttons, or can hold the MENU button longer than 2 seconds to exit to the top level of the
calibration menu. From this point the other parts of the working menu can be accessed by using the UP and DOWN
buttons.

NOTE:  If the indication " - - - " appears, during calibration selection, in the area of the display where the calibration status 
is shown, tje selected calibration is not available owing to some problem in the system. Ask your Dealer for help.

-  If the cluster is already calibrated, the operator can choose another controller by pressing the UP or DOWN buttons.
 The order of the controllers to be calibrated is the following:

Controller 

Display 

Operator 

NOT for the operator


 Instrument cluster (hitch position)

ICh

OK

 Transmission

tc

-

NO

 Cab suspension (if equipped)

CS

-

NO

72

Instruments and Programming

1.1.5.1 ICh Calibration sub-menu, hitch position display

This calibration defines the hitch position display.
When the LCD shows "ICh" and the PTO display shows "0", the operator has to press the "MENU" button to access the
hitch calibration menu.
Now the LCD will show "1", i.e. "ready to start". The instrument is waiting for the operator to lower the hitch down to mini-
mum height. When the hitch reaches the minimum height, press "MENU" to save the lowest limit of hitch travel, which
is stored as "0%". The code "10" is displayed for 2 seconds, followed by the code "11". Now the instrument is waiting for
the operator to raise the hitch to its upper limit. Make sure the Upper Limit Control is set to maximum position. When
the hitch reaches the maximum height, press "MENU" to save the upper limit of hitch travel, which is stored as "100%".
The code "20" is displayed for 2 seconds, followed by the code "50" to show that the calibration was properly performed.

Press MENU for longer than 2 seconds to exit Calibration and go to another menu.

ICh calibration sequence

ICh calibration errors 


Calibration index

Display
PTO

Description

100

Calibration not OK. Repeat the calibration procedure


Calibration index

Display
PTO

Description

0

Calibration mode not accessed

1

Ready to start - waiting for hitch down

10

Hitch lowest limit stored - 0%

11

Waiting for hitch up

20

Hitch upper limit stored - 100%

50

Calibration OK


Content   ..  15  16  17  18   ..