Tractors X60 Series. Manual - part 13
 

  Index      Tractors     Tractors X60 Series - service repair manual 2012 year


Search            


Content   ..  11  12  13  14   ..


Tractors X60 Series. Manual - part 13


53

Controls - Cab

3

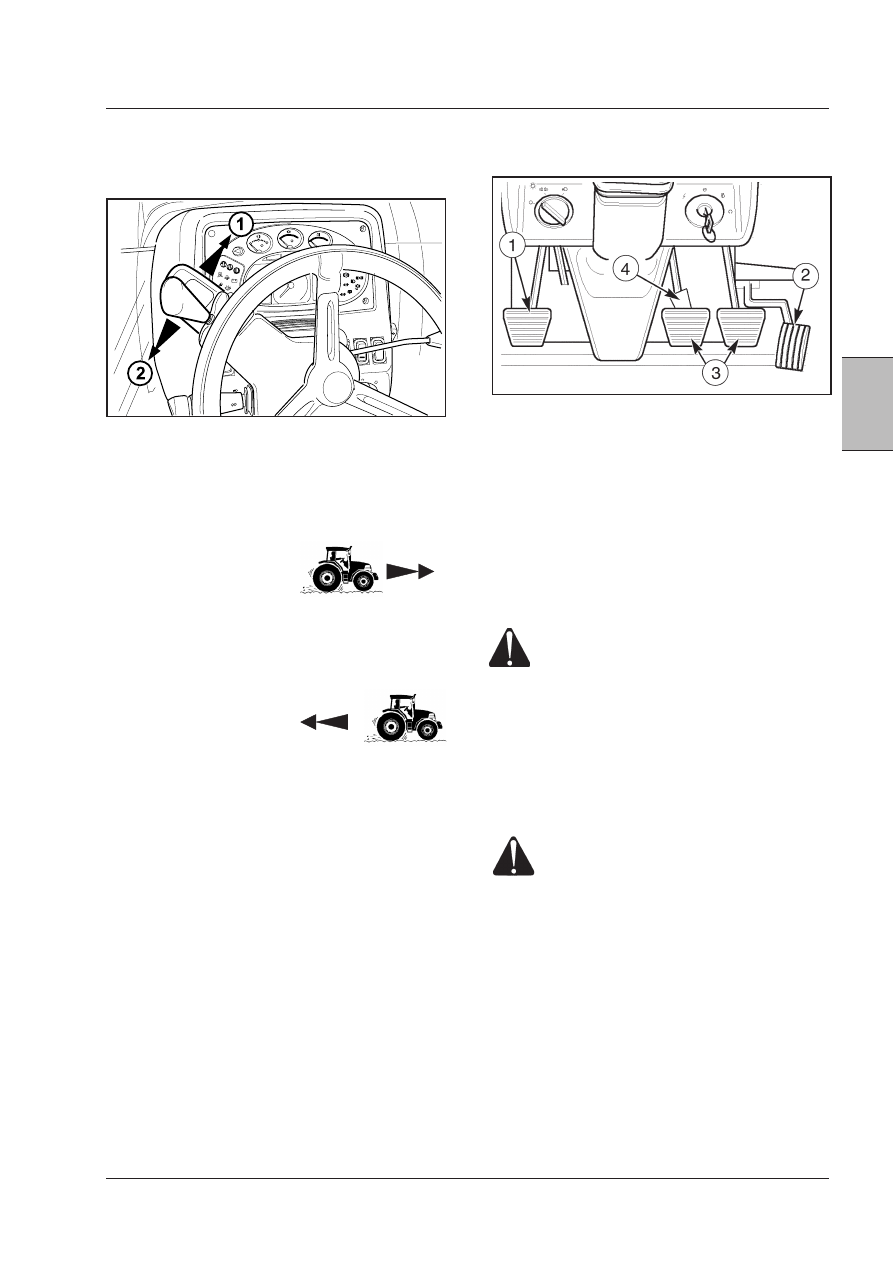
Forward/Neutral/Reverse switch

POWERSHUTTLE GEARBOX (XTRASHIFT TRACTORS)

Use the Forward/Neutral/Reverse (F/N/R) shuttle lever to
change direction of travel.

Position 1=Forward

NEUTRAL - Neutral

Position 2=Reverse

Pedal Controls

1. CLUTCH  PEDAL  -  Used  to  temporarily  disengage

drive.

 Gradually and completely releasing the clutch pedal

for a controlled smooth start and gear changes.

2. THROTTLE PEDAL

3. BRAKE PEDALS - The left brake pedal stops the left
rear wheel and the right brake pedal stops the right rear
wheel. When using the tractor in the field, the pedals may
be used independently to make turns easier. When driving
on roads, the pedals MUST be locked together.

WARNING:  Extra  weight  and  bad  traction 
conditions, such as mud or ice, increase your 
stopping distance. Remember that liquid in 
the tires, weights on the machine or wheels, 
tanks filled with fertilizer, herbicides or in-
secticides; all these add weight and increase 
the distance you need to stop. Do not exceed 
maximun  permitted  operating  weights  on 
axle or tractor.

4. BRAKE PEDALS INTERLOCK - Used to lock the brake
pedals together.

WARNING:  Brake  pedals  must  be  locked 
together  for  road  travel.  This  will  ensure 
uniform  brake  operation  and  maximum 
stopping ability.

54

Controls - Cab

CONTROLS ON LOWER RIGHT-
HAND PANEL

1. ACCELERATOR LEVER - To increase or reduce engine
speed rate.
2.XTRASHIFT CONTROL - It controls the engagement of
POWERSHIFT ranges (only available in forward speeds).
3. GEARSHIFT LEVER
4.  RANGE  SHIFT  LEVER  (and  CREEPER  LEVER,  if
equipped)
5. AUXILIARY CONTROL VALVE LEVERS
6. LEVER LOCKING DEVICE
7. ASHTRAY
8. Not used.
9.  FRONT  FIELD  LIGHTS  ON  ROOF  AND  HANDGRIPS
(if provided).
10. REAR FIELD LIGHTS ON ROOF AND MUDGUARDS
(if equipped)

1. UP/DOWN SWITCH, HITCH
2. FOUR-WHEEL DRIVE (if equipped)
3. DIFFERENTIAL LOCK SWITCH

NOTE:NEVER use four-wheel drive for light work or 

when driving the tractor on public roads. 

WARNING: Tractors equipped with four-wheel 
drive (4WD) have a better drive and can cope 
with steeper slopes. Stay off slopes too steep 
for safe operation. To avoid tractor overturn-
ing, drive up steep slopes in reverse gear. 

4. SWITCH FOR SHOCK ABSORBER CONTROL (if pro-
vided).
5. FRONT PTO CONTROL SWITCH (optional)
6.

ELECTROHYDRAULIC  REAR  PTO  CLUTCH

SWITCH
- ENGAGEMENT - Lift the locking collar on the PTO ON/
OFF switch and pull the switch up to the ON position to
engage the PTO. Now the switch will remain on the ON
position, while the PTO indicator light on the instrument
panel lights up.
- DISENGAGEMENT - Push the ON/OFF switch fully down.
The PTO indicator light on the instrument panel goes off.

NOTE: The engine can be started only if the PTO en-
gagement switch is in the OFF position.

7. IMPLEMENT WORK DEPTH/HEIGHT CONTROL.
8.  FUNCTION  SELECTOR  KNOB  (POSITION-DRAFT-
INTERMIX)
9. FRONT WINDSCREEN WASHER
10. FRONT WINDSCREEN WIPER
11. DIAGNOSTIC RECEPTACLE
12. QUICK DIG-IN SWITCH

13. FRONT LOADER CONTROL LEVER (if provided)

Refer to the loader manual or to your dealer for informa-
tion about correct use of the loader.

CONTROLS ON RIGHT-HAND PANEL

55

Controls - Cab

3

Park brake

1. PARK BRAKE LEVER
2. PARK BRAKE BUTTON
3. PARK-LOCK ENGAGEMENT LEVER (optional)

The park brake (1) is located at the LH side of the opera-
tors seat. Pull the lever fully up to engage the park brake.
If you set the tractor in motion, release the parking brake
after putting the tractor in neutral (see note). Press the
button (2) on the end of the lever, then lower the lever to
release the brake.

When the parking brake is engaged, the warning lamp on
the instrument cluster will illuminate when the key switch
is turned to ON. The master warning lamp will flash when
the engine is started.

The lamps will go off when the brake is disengaged.

NOTE: When a gear is engaged (1, 2, 3, 4) with the en-
gine running and the parking brake angaged, an audible 
alarm will sound.

IMPORTANT: Driving the tractor with the park brake 
partially engaged will cause damage to internal trans-
mission components. Make sure brake is fully off.

Pick Up Hitch
Auto Hitch Locking Latches Release 
Control (if equipped) 

This control is located behind the seat on the RH side.

Pull the auto hitch release control to unlock the locking
latches.

1. HITCH CONTROLLER

A. HITCH DROP RATE CONTROL KNOB.
B. HITCH MAX. LIFT CONTROL KNOB.
See hitch description in this manual.

2. 2-3 SPEED REAR PTO LEVER
3. THREE-WAY SOCKET
4. CIGARETTE LIGHTER
5. SELECTOR LEVER OF PTO OPERATION, INDEPENDENT
OR SYNCHRONIZED WITH GROUND SPEED (if equipped)

56

Controls - Cab

Main components of the cab

1 - Front field lights; 2 - Rotary beacon, 3 - Rear field lights;
4 - Rear window; 5 - Full opening doors, with safety lock;
6 - Rear view mirros; 7 - Sunroof (Top version).

Cab

The  cab  is  made  of  steel  sections  and  is  fastened  to
the  tractor  by  means  of  a  double  system  of  rubber
dampers (silent block) protecting the driver's seat both
from vibrations and from engine noise. The noise peak
is therefore limited to low values, for more comfort for
the operator.

Doors (5)

Both doors can be opened both from the inner and outer
side, and kept open by dampening cylinders. Both doors
are provided with a lock with key.

Rear window (4)

Release the rear window lock and turn the handle coun-
terclockwise  to  open  it.  The  window  is  kept  open  by
dampeners.

Field lights

The cab can be provided with front (1) and rear (3) field
lights to improve visibility when working at night. The on/
off switches are on the cab roof.

Rotary beacon

The  rotary  beacon  is  installed  on  the  rear  side  of  the
cab.

CAB

All non-metallic components within the cab comply with the ISO 3795 standard.
The  cab  is  approved  according  to  OECD  codes  concerning  ROPS  test  (protection  against  overturning)  and  safety
belts.

NOTE: See the cab maintenance section for filter use 
and maintenance.


Content   ..  11  12  13  14   ..