Snowmobile Polaris Power P1000i, P2000i (2018 year). Manual - part 8


  Index      Snowmobiles / ATV     Snowmobile Polaris Power P1000i, P2000i - service manual 2018 year


Search            


Content   ..  6  7  8  9   ..


Snowmobile Polaris Power P1000i, P2000i (2018 year). Manual - part 8


30

MAINTENANCE

storage or transport, or ON to run the generator. 

Engine Oil

Oil Recommendation

Oil directly affects performance and service life. Use a 4-
stroke automotive detergent oil. Polaris 5W-30 Engine Oil
is recommended for this generator. 

The SAE oil viscosity and service category are in the API
label on the oil container. Polaris recommends the use of
API service category “SJ” or later, equivalent oil. 

Oil Level Inspection

Failure to use the proper 4-stroke engine oil may result in
engine damage.

Using  non-recommended  oil  may  cause  serious  engine
damage. Never substitute or mix oil brands.
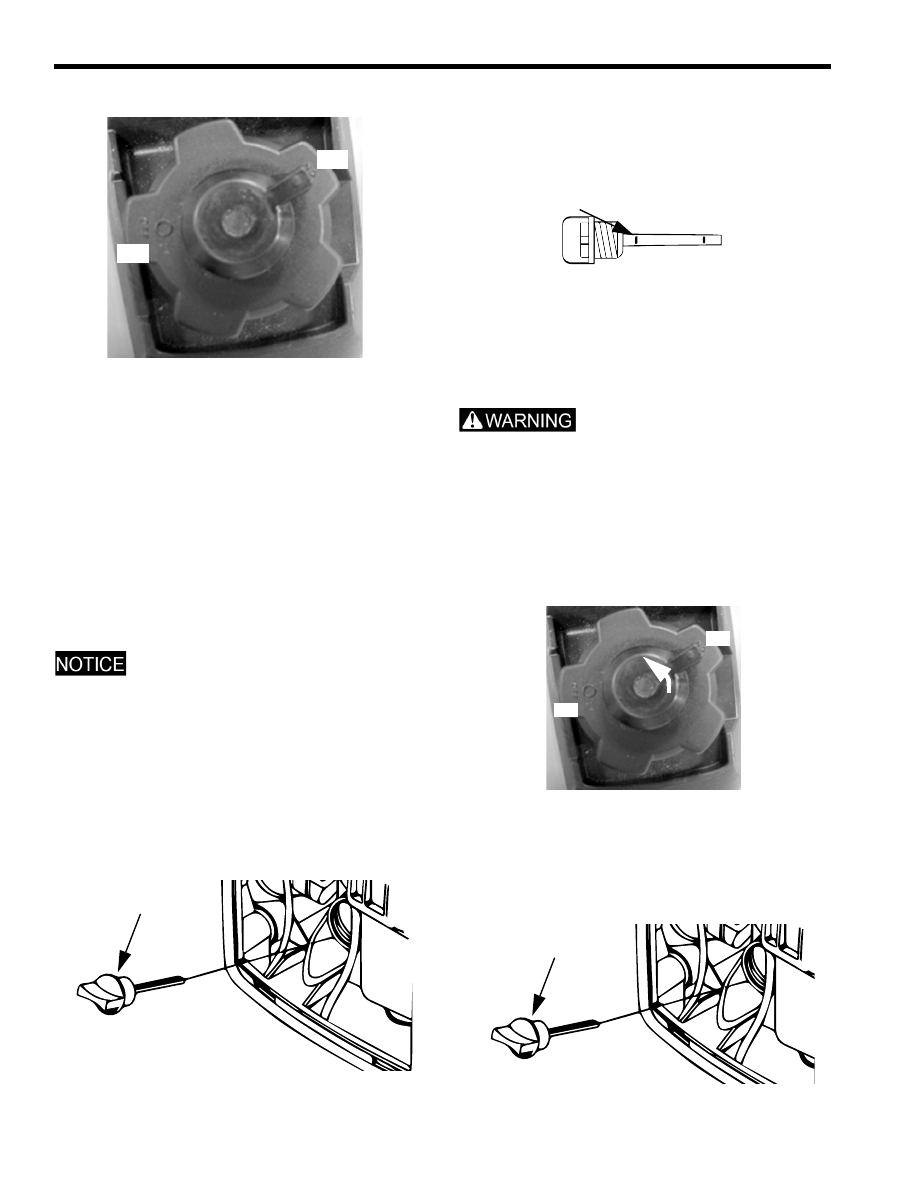
NOTE:  Inspect the oil level before each use with the
engine stopped and the generator on a level surface.

1.

Remove the maintenance cover.

2.

Remove  the  oil  filler  cap  /  dipstick  (A)  and  wipe  it
clean.

3.

Insert the dipstick (A) into filler neck, without screwing
it in, to inspect the oil level.

4.

Remove  the  dipstick  and  verify  that  the  oil  is  at  the
upper limit (B). Add additional oil and inspect the level
as needed until the upper limit has been reached.

5.

Re-install the dipstick (A).

6.

Re-install the maintenance cover.

Oil Change Procedure

Oil  may  be  hot.  Do  not  allow  hot  oil  to  come  into
contact with skin, as serious burns may result.

NOTE:  Drain  the  oil  while  the  engine  is  warm  to
assure rapid and complete draining.

1.

Start the engine and allow it to run for a few minutes.
Stop the engine.

2.

Position engine switch and fuel cap vent lever to OFF. 

3.

Remove the maintenance cover (Page 29).

4.

Place a drain pan beneath the generator for used oil.

5.

Remove the oil filler cap / dipstick (A), tip the generator
toward the oil filler neck, and drain the oil into a drain
pan.

OFF

ON

A

B

OFF

ON

A

31

MAINTENANCE

NOTE:  Improper  disposal  of  engine  oil  can  be
harmful to the environment and is unlawful. Properly
dispose of used oil. 

6.

Drain the used oil into a sealed container and take it
to a recycling center. Do not discard the oil in a trash
can, dump it on the ground, or pour it down the
drain.

7.

Fill the oil to the high limit mark (B) on the dipstick (A).

8.

Start the engine and let it run for 1 or 2 minutes. Stop
the engine and look for leaks.

9.

Re-check the oil level on the dipstick (A) and add oil
as needed to bring the level to the upper mark (B) on
the dipstick.

10. Re-install the dipstick (A).

11. Re-install the maintenance cover.

12. Wash hands with soap and water after handling used

oil.

Air Filters

Operating the engine without air filters or with a damaged
air  filters  will  allow  debris  to  enter  the  engine,  causing
rapid wear.

Air Filter Inspection

NOTE:  An  obstructed  air  filter  restricts  air  flow  to
the  carburetor.  To  prevent  carburetor  malfunction,
regularly  service  the  air  filter.  Service  more
frequently  when  operating  the  generator  in
extremely dusty areas.

1.

Remove the maintenance cover.

2.

Loosen the cover screw (A) and remove the air filter
cover (B).

3.

Remove the two air filters (C).

4.

Inspect the air filters (C) to ensure both are clean and
in  good  condition.  If  obstructed,  perform  “Air  Filter
Cleaning”. 

If 

damaged, 

perform 

“Air 

Filter

Replacement”.

5.

Ensure the rubber seal is set in to the groove of air
filter cover (B).

6.

When  the  maintenance  complete,  re-install  the  air
filter cover and maintenance cover.

Air Filter Cleaning

NOTE:  If operating the generator in a very dust area,
clean the air filters more frequently than specified in
the Periodic Maintenance Chart.

1.

Wash the air filters (C) in warm water and detergent,
rinse,  and  allow  to  completely  dry;  or  clean  with  a
high flash point solvent and allow to completely dry.

2.

Soak the elements in clean engine oil and squeeze
out the excess oil.

3.

Wipe  debris  from  the  air  filter  housing  and  air  filter
cover (B) using a moist towel. 

4.

Re-install the cleaned filter(s) (C).

Air Filter Replacement

1.

Remove the air filters (C).

2.

Install new air filters.

B

A

B

C

32

MAINTENANCE

Spark Plug

Spark Plug Inspection and Replacement

Using  a  non-recommended  spark  plug  can  result  in
serious engine damage. Always use recommended spark
plugs.

NOTE:  In  order  to  service  the  spark  plug,  a
commercially  available  spark  plug  wrench  is
required.

Refer  to  the  “Specification”  chapter  (page 38)  for  the
recommended spark plug type. Always torque the spark
plug to specification.

NOTE:  To ensure proper engine operation, the spark
plug must be free of deposits and properly gapped.
If  the  engine  has  been  running,  allow  it  to  cool
before servicing.

Normal Spark Plug
The normal insulator tip is gray, tan, or light brown. There
will be few combustion deposits. The electrodes are not
burned or eroded. This indicates the proper type and heat
range for the engine and the service.

NOTE:  The tip should not be white. A white insulator
tip  indicates  overheating,  caused  by  use  of  an
improper  spark  plug,  fuel,  or  incorrect  carburetor
adjustments.

Wet Fouled Spark Plug
The  wet  fouled  insulator  tip  is  black.  A  damp  oil  film
covers the firing end. There may be a carbon layer over
the entire nose. Generally, the electrodes are not worn.
Fouling  may  be  caused  by  excessive  oil  or  by  frequent
short trips, especially in cold weather.

1.

Remove the top of the generator by removing the 4
bolts (A) in the top through the handles.     

2.

Remove the spark plug cap (B).

3.

Clean any dirt from around the base of the spark plug.

4.

Using a spark plug wrench, remove the spark plug.

5.

Inspect  the  electrode  for  wear  and  carbon  buildup.
Look  for  a  sharp  outer  edge  with  no  rounding  or
erosion of the electrode.

6.

Inspect spark plug. Replace if electrode is worn or if
the insulator is cracked, chipped, or fouled. 

7.

Using  a  wire-type  feeler  gauge,  measure  the  spark
plug electrode gap. If necessary, correct the gap by
carefully bending the side electrode. The gap should
be 0.024 - 0.028 in (0.6 - 0.7 mm).

8.

Ensure  the  spark  plug  sealing  washer  is  in  good
condition  and  thread  the  spark  plug  in  by  hand  to
prevent cross-threading.

A loose spark plug can overheat and damage the engine.
Over  tightening  the  spark  plug  can  damage  the  plug
threads.

9.

After a new spark plug has been seated by hand, it
should  be  tightened  1/2  turn  with  a  wrench  to
compress  its  washer.  If  a  used  plug  is  being
reinstalled, it should only require 1/8 to 1/4 turn after
being seated.

10. Re-install the spark plug cap (B) and the maintenance

cover (A).

A

B

Inspect electrode for
wear and buildup

Spark plug gap

33

TRANSPORTATION AND STORAGE

TRANSPORTATION AND STORAGE

Transportation

Transporting the Generator

A  hot  engine  or  exhaust  system  can  cause  severe
burns  and  ignite  flammable  material.  Ensure
adequate  time  for  cooling  before  storage  or
transportation.

When  operating  or  transporting  the  generator,  be
sure it is kept upright. If the generator tilts, fuel may
leak. Be sure the fuel tank cap is tight during trans-
portation.

Do  not  operate  the  generator  while  transporting  or
while it is in a vehicle.

Do  not  transport  the  generator  with  fuel  in  the  fuel
tank.

IMPORTANT: Take  care  not  to  drop  or  strike  the
generator  when  transporting.  Do  not  place  heavy
objects on the generator.

1.

If the generator has been used, allow it to cool for at
least  15  minutes  before  loading  it  on  the  transport
vehicle.

2.

Drain the fuel prior to transportation, see page 34.

3.

Position the engine switch (A) and the fuel tank vent
lever (B) to OFF (see “Control and Features, Engine
Switch  and  Fuel  Tank  Vent  Lever”),  and  keep
generator level to reduce possibility of fuel leakage.

Storage

Storage Preparation

Gasoline is highly flammable and explosive and can
cause serious injury. Stop the engine and keep heat,
sparks,  and  flame  away.  Handle  fuel  only  outdoors.
Wipe up spills immediately.

NOTE:  Long-term  storage  of  the  generator  will
require  some  additional  preventative  measures  to
guard  against  deterioration.  If  fuel  is  kept  in  the
generator,  ensure  that  the  engine  is  run  for  at  least
30  minutes  per  month  in  order  to  ensure  an  easy
start in emergencies.

1.

If  the  generator  will  be  stored  with  fuel,  perform
“Adding Fuel Stabilizer”.

2.

If the generator will be stored dry of fuel, perform the
“Draining Fuel” and “Fogging the Engine procedures.

3.

Perform  “Oil  Change”  (see  “Maintenance,  Oil
Change”).

4.

Clean the exterior of the generator with a clean cloth
and apply a rust inhibitor.

Do  not  pour  water  directly  on  to  the  generator  or
wash it with water.

ON

OFF

B

A


Content   ..  6  7  8  9   ..