Snowmobile Polaris DEEP SNOW (2005 year). Manual - part 60


  Index      Snowmobiles / ATV     Snowmobile Polaris DEEP SNOW (TRAIL RMK, 600 RMK, 700 RMK, 800 RMK, 900 RMK, 600 SWITCHBACK, 800 SWITCHBACK) - service manual 2005 year


Search            


Content   ..  58  59  60  61   ..


Snowmobile Polaris DEEP SNOW (2005 year). Manual - part 60


CHASSIS

12.11

DECAL REMOVAL / APPLICATION

Before you begin, read these instructions and check to be sure all parts and tools are accounted for.
Please retain these installation instructions for future reference and parts ordering information.

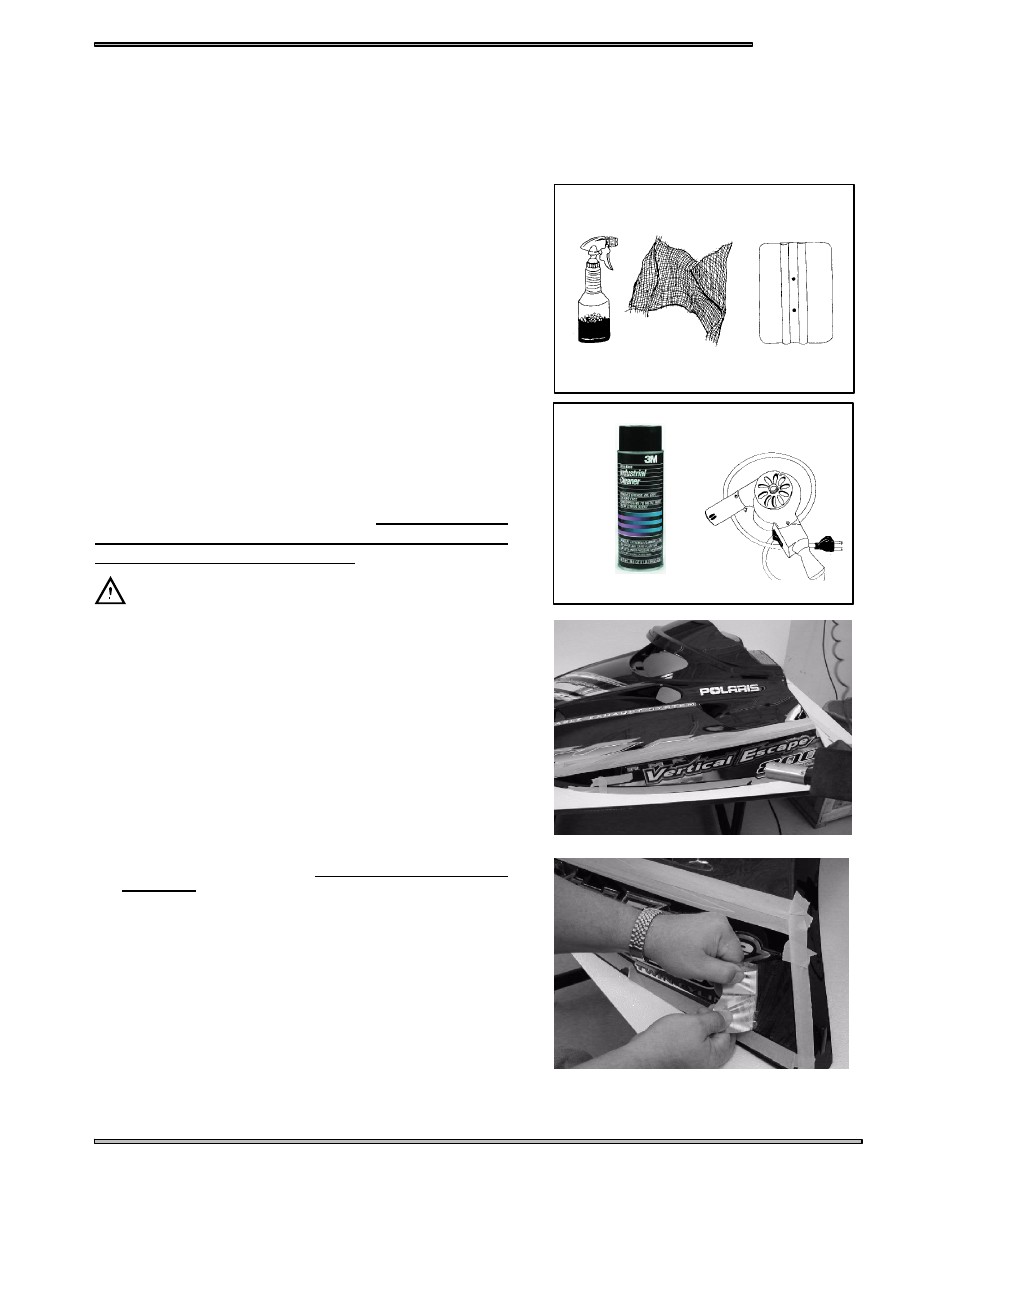
YOU WILL NEED TO SUPPLY:

Squeegee

Cheese Cloth or nonabrasive cloth

Paper Shop Towels

Hair Dryer or Heat Gun

Wall Paper Seam Roller or Similar Style Roller

3M citrus based cleaner (PN 62-4615-4930-5,

available at most auto parts stores)

Cleaning Solution (99% water 1% mild dish

washing detergent)

ScotchR 233 Performance Masking Tape

DECAL REMOVAL INSTRUCTIONS
Perform the decal removal procedures carefully! If

care is not taken, the possibility exists that paint could

peel from the hood. Follow each step thoroughly and

completely to avoid hood damage! Polaris is not re-

sponsible for any hood or paint damage resulting from

this decal replacement procedure.

CAUTION

Use safety glasses and rubber gloves when performing this proce-

dure.

1. Using masking tape, tape off all decals that are not going to be

replaced. If you do not tape off the other decals, the cleaning

solution used later in the process may cause the adhesive to break

down in the non-affected decals.

2. Using a hair dryer (preferable) or low setting on a heat gun,

carefully heat the decal to loosen the adhesive. Heat until the

decal is warm to touch. DO NOT OVER HEAT! Overheating

may cause damage to the paint and to the integrity of the

hood.

Polaris is not responsible for any hood damage resulting from

this decal replacement procedure.

3. Once the decal is warm to touch and the adhesive is loose, peel

the decal off slowly and evenly. Use of a hair dryer or heat gun

is required! If heat is not applied, the decal will be very hard to

remove and paint from the hood may peel off with the decal.

Cleaning Solution:
99% water 1% mild dishwashing detergent

Cheese Cloth or similar
non-abrasive cloth

Squeegee

Hair Dryer (Preferred)

or Heat Gun

3M Citrus Based Cleaner

CHASSIS

12.12

4. After the decal is removed, apply 3M citrus based cleaner to the

decal area to remove the adhesive. Be sure to follow the

instructions and the precautions on the container, and use rubber

gloves and safety glasses. Spray the cleaner on the adhesive and

let set for 15--20 seconds. Using a squeegee, wipe the adhesive

from the hood and deposit it in a paper shop towel. You may have

to repeat this process several times to remove all of the adhesive

from the hood. Use care not to get the cleaner on any other

decals.

5. When the bulk of the adhesive is removed from the hood by using

the squeegee, remove any left over residue with a clean,

non-abrasive shop towel or cheese cloth that is wet with the 3M

cleaner.

6. Carefully remove any masking tape that you may have used to

protect other decals.

7. Once all of the adhesive is removed from the decal area,

follow with a cleaning solution of 99% water to 1% mild

dishwashing detergent. Use a non-abrasive cloth with the solution to remove dirt, grease, cleaning solvent, and

finger prints. Always clean the surface where the decal will be applied.

It is extremely important to remove all traces of dirt and debris from the hood where the decal is to be

applied. Left over debris will be magnified through the chrome decals.

DECAL INSTALLATION INSTRUCTIONS

All decals should be applied indoors, free from dust, dirt, cold air, and

humidity. Room temperature must be between 40_ and 100_ F. These

decals are to be applied dry.

1. Make sure the surface area of the hood where the decal is to be

placed is free of any dirt, debris, or adhesive.

2. Place the decal in the area to be installed and make sure that

everything lines up properly.

3. When you’re ready to install the decal, carefully peel away the

adhesive side of the decal.

4. Apply the decal and slowly work the decal down the side of the hood

using a clean squeegee to lay the decal straight and to avoid

creating air bubbles. Do NOT remove the decal mask until the decal

is fully applied. If you attempt to use a squeegee on the decal with

the chrome exposed, the chrome will be damaged.

CAUTION

Once the adhesive sticks, it can be very difficult to pull the decal

back off of the hood. Use extreme care!

CHASSIS

12.13

5. When finished installing the decal, carefully remove the decal

mask at a 180_ angle.

CAUTION

If you encounter air bubbles DO NOT attempt to use a straight

pin to poke the bubble and let the air out. A hole poked in a

chrome decal will be very noticeable.

6. Peel the backing off and install the urocals in the appropriate places. These also have strong adhesives and once applied they

cannot be removed easily. Use a wall paper roller to adhere all surfaces of the urocal. Urocal decals are rigid and need to be

rolled to ensure good adhesion, particularly on the edges.

Decals

Typical Multimeter Usage

13.1 -- 13.2

. . . . . . . . . . . . . . . . . . . . . . . . . . . . . . . . . . . . . . . . . .

Ignition Timing Explanation

13.3

. . . . . . . . . . . . . . . . . . . . . . . . . . . . . . . . . . . . . . . .

Ignition Timing Specification Chart

13.4

. . . . . . . . . . . . . . . . . . . . . . . . . . . . . . . . . .

Timing Procedure

13.5

. . . . . . . . . . . . . . . . . . . . . . . . . . . . . . . . . . . . . . . . . . . . . . . . .

Preparing a New Battery

13.6

. . . . . . . . . . . . . . . . . . . . . . . . . . . . . . . . . . . . . . . . . . .

Load Test

13.7

. . . . . . . . . . . . . . . . . . . . . . . . . . . . . . . . . . . . . . . . . . . . . . . . . . . . . . .

Charging Procedure

13.7

. . . . . . . . . . . . . . . . . . . . . . . . . . . . . . . . . . . . . . . . . . . . . . .

Testing Electric Start

13.8

. . . . . . . . . . . . . . . . . . . . . . . . . . . . . . . . . . . . . . . . . . . . . .

Starter Motor Testing

13.9

. . . . . . . . . . . . . . . . . . . . . . . . . . . . . . . . . . . . . . . . . . . . . .

Starter Housing and Coil Inspection

13.9

. . . . . . . . . . . . . . . . . . . . . . . . . . . . . . . . . .

Starter Assembly

13.10

. . . . . . . . . . . . . . . . . . . . . . . . . . . . . . . . . . . . . . . . . . . . . . . . . .

Starter Solenoid Test

13.11

. . . . . . . . . . . . . . . . . . . . . . . . . . . . . . . . . . . . . . . . . . . . . . .

Starter Installation

13.11

. . . . . . . . . . . . . . . . . . . . . . . . . . . . . . . . . . . . . . . . . . . . . . . .

Unregulated Voltage

13.11

. . . . . . . . . . . . . . . . . . . . . . . . . . . . . . . . . . . . . . . . . . . . . . .

Sort Circuit Current

13.12

. . . . . . . . . . . . . . . . . . . . . . . . . . . . . . . . . . . . . . . . . . . . . . .

Regulated Voltage

13.12

. . . . . . . . . . . . . . . . . . . . . . . . . . . . . . . . . . . . . . . . . . . . . . . . .

Headlight Bulb Test

13.13

. . . . . . . . . . . . . . . . . . . . . . . . . . . . . . . . . . . . . . . . . . . . . . .

HI/LO Beam Switch Testing

13.13

. . . . . . . . . . . . . . . . . . . . . . . . . . . . . . . . . . . . . . . .

Seat Harness Troubleshooting

13.13

. . . . . . . . . . . . . . . . . . . . . . . . . . . . . . . . . . . . . . .

Switch Testing

13.14

. . . . . . . . . . . . . . . . . . . . . . . . . . . . . . . . . . . . . . . . . . . . . . . . . . .

Troubleshooting

13.17

. . . . . . . . . . . . . . . . . . . . . . . . . . . . . . . . . . . . . . . . . . . . . . . . . .

500/600/700/800 Liberty TPS setting

13.18 -- 13.22

. . . . . . . . . . . . . . . . . . . . . . . . . . . . . . . . .

900 Liberty TPS setting

13.22 -- 13.23

. . . . . . . . . . . . . . . . . . . . . . . . . . . . . . . . . . . . . . . . . . . .

900 Liberty Temperature Light

13.24

. . . . . . . . . . . . . . . . . . . . . . . . . . . . . . . . . . . . . .

900 Liberty DET

13.25

. . . . . . . . . . . . . . . . . . . . . . . . . . . . . . . . . . . . . . . . . . . . . . . . . .

IQ Coolant Temperature

13.26

. . . . . . . . . . . . . . . . . . . . . . . . . . . . . . . . . . . . . . . . . . . .

IQ Exhaust Temperature Sensor

13.27

. . . . . . . . . . . . . . . . . . . . . . . . . . . . . . . . . . . . . .

IQ Crank Position Sensor

13.28

. . . . . . . . . . . . . . . . . . . . . . . . . . . . . . . . . . . . . . . . . . .

IQ Speed Sensor

13.29

. . . . . . . . . . . . . . . . . . . . . . . . . . . . . . . . . . . . . . . . . . . . . . . . . .

Oil Level Sender

13.30

. . . . . . . . . . . . . . . . . . . . . . . . . . . . . . . . . . . . . . . . . . . . . . . . . .

IQ Engine Chassis Connection Location

13.31

. . . . . . . . . . . . . . . . . . . . . . . . . . . . . . .

ECU Plug #1

13.32 -- 13.33

. . . . . . . . . . . . . . . . . . . . . . . . . . . . . . . . . . . . . . . . . . . . . . . . . . . . .

ECU Plug #2

13.34 -- 13.35

. . . . . . . . . . . . . . . . . . . . . . . . . . . . . . . . . . . . . . . . . . . . . . . . . . . . .

IQ Stator

13.36

. . . . . . . . . . . . . . . . . . . . . . . . . . . . . . . . . . . . . . . . . . . . . . . . . . . . . . . .

IQ Coil / EV Solenoid

13.37 -- 13.38

. . . . . . . . . . . . . . . . . . . . . . . . . . . . . . . . . . . . . . . . . . . . .

IQ Regulator Rectifier

13.39

. . . . . . . . . . . . . . . . . . . . . . . . . . . . . . . . . . . . . . . . . . . . .

IQ Capacitor

13.40

. . . . . . . . . . . . . . . . . . . . . . . . . . . . . . . . . . . . . . . . . . . . . . . . . . . . .

IQ Chassis Relay

13.41

. . . . . . . . . . . . . . . . . . . . . . . . . . . . . . . . . . . . . . . . . . . . . . . . .

Chassis Hood Connections

13.42 -- 13.43

. . . . . . . . . . . . . . . . . . . . . . . . . . . . . . . . . . . . . . . . . .

Diagnostic Ports

13.44

. . . . . . . . . . . . . . . . . . . . . . . . . . . . . . . . . . . . . . . . . . . . . . . . . .


Content   ..  58  59  60  61   ..