Snowmobile Polaris DEEP SNOW (2005 year). Manual - part 42


  Index      Snowmobiles / ATV     Snowmobile Polaris DEEP SNOW (TRAIL RMK, 600 RMK, 700 RMK, 800 RMK, 900 RMK, 600 SWITCHBACK, 800 SWITCHBACK) - service manual 2005 year


Search            


Content   ..  40  41  42  43   ..


Snowmobile Polaris DEEP SNOW (2005 year). Manual - part 42


BRAKES

8.4

6. Remove master cylinder cover screws and cover. Pour out the

fluid in the reservoir into a container. Unscrew the brake fluid line

from the master cylinder outlet using a shop cloth to catch the

remaining fluid. Drain the fluid from the brake line into the

aforementioned container and discard the fluid.

INSPECTION

Due to the critical nature of these parts and procedures, be sure you
have thoroughly read and understand Hydraulic Brake Operation.

1. Thoroughly clean all brake parts with isopropyl alcohol and either

wipe dry with a clean lint free cloth or lightly blow dry with an air

hose. Examine all parts carefully for signs of excessive wear,

damage, or corrosion. Replace any parts found to be damaged.

Check park lever spring for breakage.

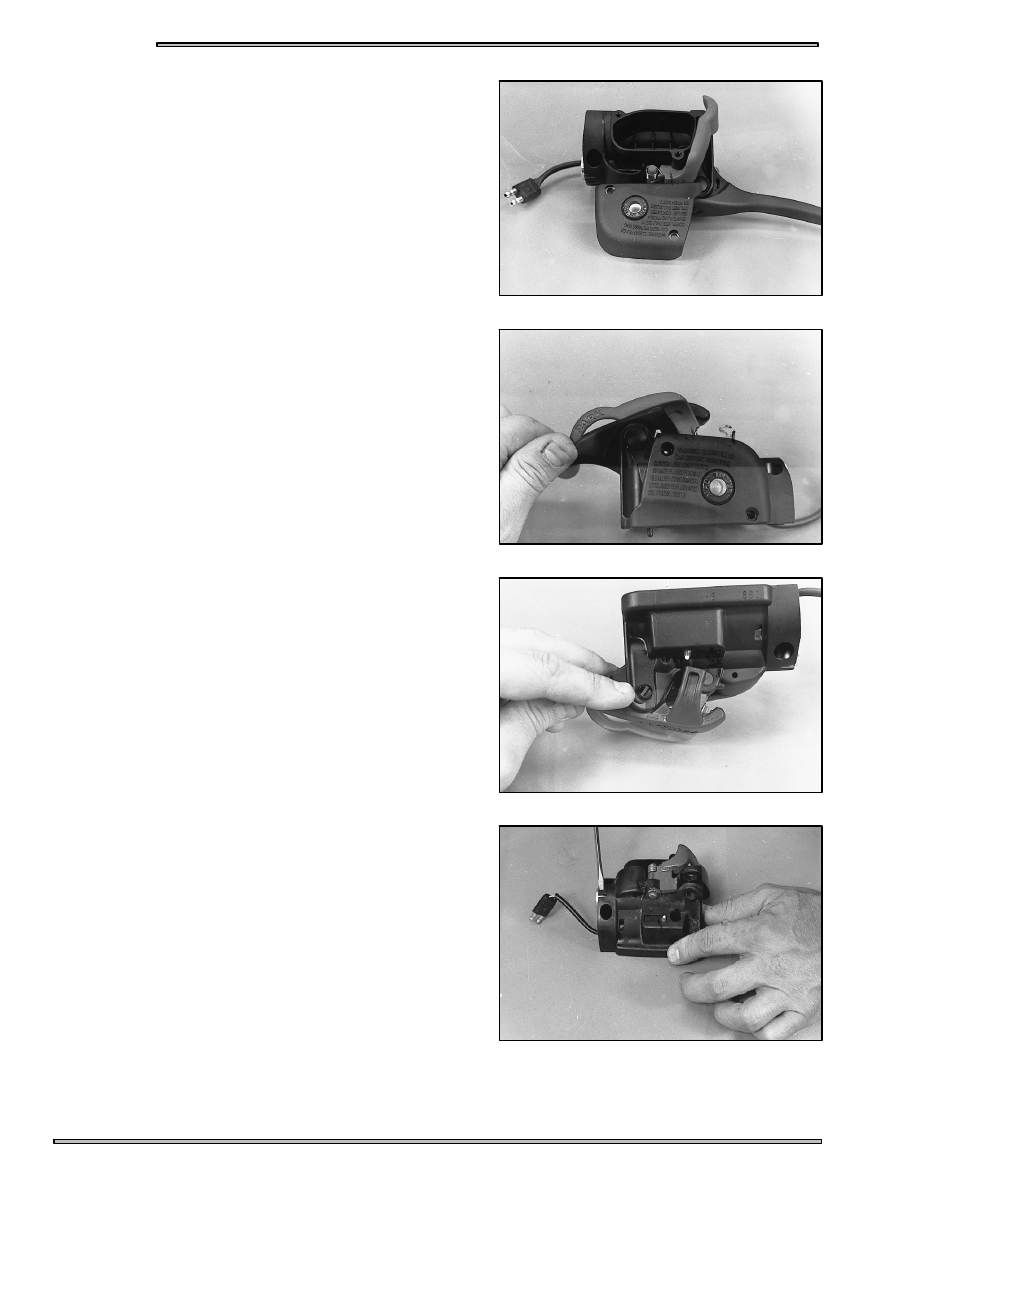
REPLACING CARTRIDGE SUBASSEMBLY

1. Remove master cylinder assembly as described previously.

2. To remove the lever from the housing, squeeze the lever handle

and actuate the parking brake lever enough distance for the head of

the pivot pin to clear the park brake lever.

3. Remove the snap ring and push the pivot pin up through the hole.

Remove the pivot pin and the lever.

4. Lift the housing tab on the outlet end of the housing to release the

cartridge assembly, allowing the cartridge to be pushed out the

back of the housing.

BRAKES

8.5

5. Clean housing bore with alcohol. Inspect bore for scratches,

dents, cuts, or digs that might cause a leak. Replace housing if

severe damage is found.

6. Paint housing bore and cartridge o-rings with D.O.T. 3 brake

fluid. For the Fusion use DOT 4 brake fluid.

7. Align slots in cartridge with tabs in housing bore and insert

cartridge. Push cartridge through until outlet end of cartridge

snaps into place.

8. Install the lever and pivot pin by actuating the parking brake

lever enough distance for the head of the pivot pin to clear the

park brake lever.

Polaris DOT 3 Brake Fluid

PN 2870990

FUSION use DOT 4 Brake Fluid

BRAKES

8.6

9. Align the lever pivot hole with the housing pivot hole. Push pivot

pin down though the pivot hole and then install snap ring.

10. Install brake line by starting 2--3 threads, apply sealant, and

tighten snug.

11. Mount the master cylinder and switch pack to the handlebars

making sure the wires are not pinched or twisted.

Start all four screws prior to tightening. Tighten top two screws first,
followed by bottom two. Do not over tighten. This will create a gap
approximately .050-.100, between LH control and master cylinder at
the bottom of the assembly. There should not be a gap at the top when
correct tightening/torque sequence has been followed. Torque to
24-28 in.lbs.(2.7-3.2 Nm).

12. Tighten brake line connector at outlet to 12--16 ft.lbs. plus two

turns.

Master Cylinder Control Torque -

24-28 in. lb. (2.7-3.2 Nm)

Brake Line Torque -

12--16 ft. lbs. (16--22Nm)

BRAKES

8.7

13. Fill reservoir with clean DOT 3 brake fluid.

14. Bleed brakes as outlined in this chapter. Check entire system for

leaks and fill reservoir to fluid level line.

15. Install master cylinder reservoir cover and gasket. Torque screws

to 15-18 in.lbs. (1.7-2.0 Nm.)

LEVER AND/OR PIVOT PIN REMOVAL

1. For ease of service, remove master cylinder assembly as outlined

earlier in this chapter.

2. Squeeze the lever handle and actuate the parking brake lever

enough distance for the head of the pivot pin to clear the park

brake lever.

Cover Screw Torque -

15-18 in. lb. (1.7-2.0 Nm)


Content   ..  40  41  42  43   ..