SINUMERIK 840D sl. Service - Configuring Commissioning. Manual (2011-2020) - page 110
Ctrl-E Analysis
3.1 SENTRON PAC3200/4200
Parameterizing SENTRON PAC
You have the option of parameterizing the measuring device in the following ways:
● Using the input keys and display of the SENTRON PAC
● Using a PC connected to the SENTRON PAC, which has the software this has been
supplied (powerconfig).
After booting select the language and the measuring device is then ready for operation.
3.1.3
Commissioning the PAC PROFIBUS expansion module (840D sl)
To communicate via Profibus, the SENTRON PROFIBUS module in combination with Sentron
PAC3200/4200 must be parameterized differently.
1. Select SENTRON PAC "Settings" > "PROFIBUS modules".
- OR -
For SENTRON PAC4200, select "Settings" > "Expansion modules" > "MOD1" >
"PROFIBUS MODULE".
2. Press "Enter".
You obtain the following information in the subsequent window:
- Order number
- Serial number of the SENTRON PROFIBUS module
- Firmware version of the SENTRON PROFIBUS module
- PROFIBUS ADDR.:
The DP address of module is displayed here.
3. Press "Enter".
This means that you have the option of entering the same PROFIBUS address as in the
automation system.
Ctrl-Energy
14
System Manual, 10/2015, 6FC5397-0EP40-5BA3
Ctrl-E Analysis
3.2 Commissioning the PLC for SENTRON PAC
3.1.4
Commissioning the expansion module PAC PROFINET (828D)
To communicate via PROFINET, the SENTRON SWITCHED ETHERNET PROFINET module
in combination with Sentron PAC3200/4200 must be parameterized differently.
1. Select SENTRON PAC "Settings" > "SWITCHED ETHERNET".
- OR -
Select SENTRON PAC "Settings" > "Expansion modules" > "MOD1" > "SWITCHED
ETHERNET".
2. Press "ENTER".
You obtain the following information in the subsequent window:
- Order number
- Serial number of the SENTRON SWITCHED ETHERNET PROFINET module
- Firmware version of the SENTRON SWITCHED ETHERNET PROFINET module
- The first character of the NameOfStation of the SENTRON SWITCHED ETHERNET
PROFINET module that can be a maximum of 26 characters
- IP-ADDR.:
The IP address of the module is displayed here.
3. Using the menu item "- ->", open the next window and obtain among other things the
information about the SUBNET address of the module.
Specifying/changing the device name
The device name can only be entered (it must be specified) using the powerconfig software
in the submenu "Expansion slot1".
● Sentron PAC3200: pac3200-pn22
● Sentron PAC4200: pac4200-pn21
The next time that the 828D boots, the 828D IO controller assigns the correct IP address to
the expansion module according to the device name:
● pac4200-pn21 --> 192.168.214.21
● pac3200-pn22 --> 192.168.214.22
3.2
Commissioning the PLC for SENTRON PAC
3.2.1
SINUMERIK 840D sl
3.2.1.1
Commissioning the PLC with PROFIBUS
PROFIBUS is commissioned with the PLC Toolbox 4.6 or higher.
Ctrl-Energy
System Manual, 10/2015, 6FC5397-0EP40-5BA3
15
Ctrl-E Analysis
3.2 Commissioning the PLC for SENTRON PAC
Preconditions
● Configure the hardware, save and compile the project
● Generating the system data for the PLC
● Install the Toolbox software, which also contains the libraries for the PLC basic program of
an NCU 7x0.3.
Note
PLC Toolbox 4.6SP1 requires STEP 7 V5.5 SP3 or higher.
Procedure
You are on the main screen of the SIMATIC Manager.
1. Select the "File" > "Open" menu and then click on the "Libraries" tab.
2. Select the library for the PLC basic program "bp7x0_46" and confirm the dialog with "OK".
3. You have inserted the library and selected the PLC program under "PLC-First-Startup 840D
sl" > "SINUMERIK" > "PLC317F-3 PN/DP " > "S7 Program".
Ctrl-Energy
16
System Manual, 10/2015, 6FC5397-0EP40-5BA3
Ctrl-E Analysis
3.2 Commissioning the PLC for SENTRON PAC
4. Copy the sources, modules and symbols to the PLC program
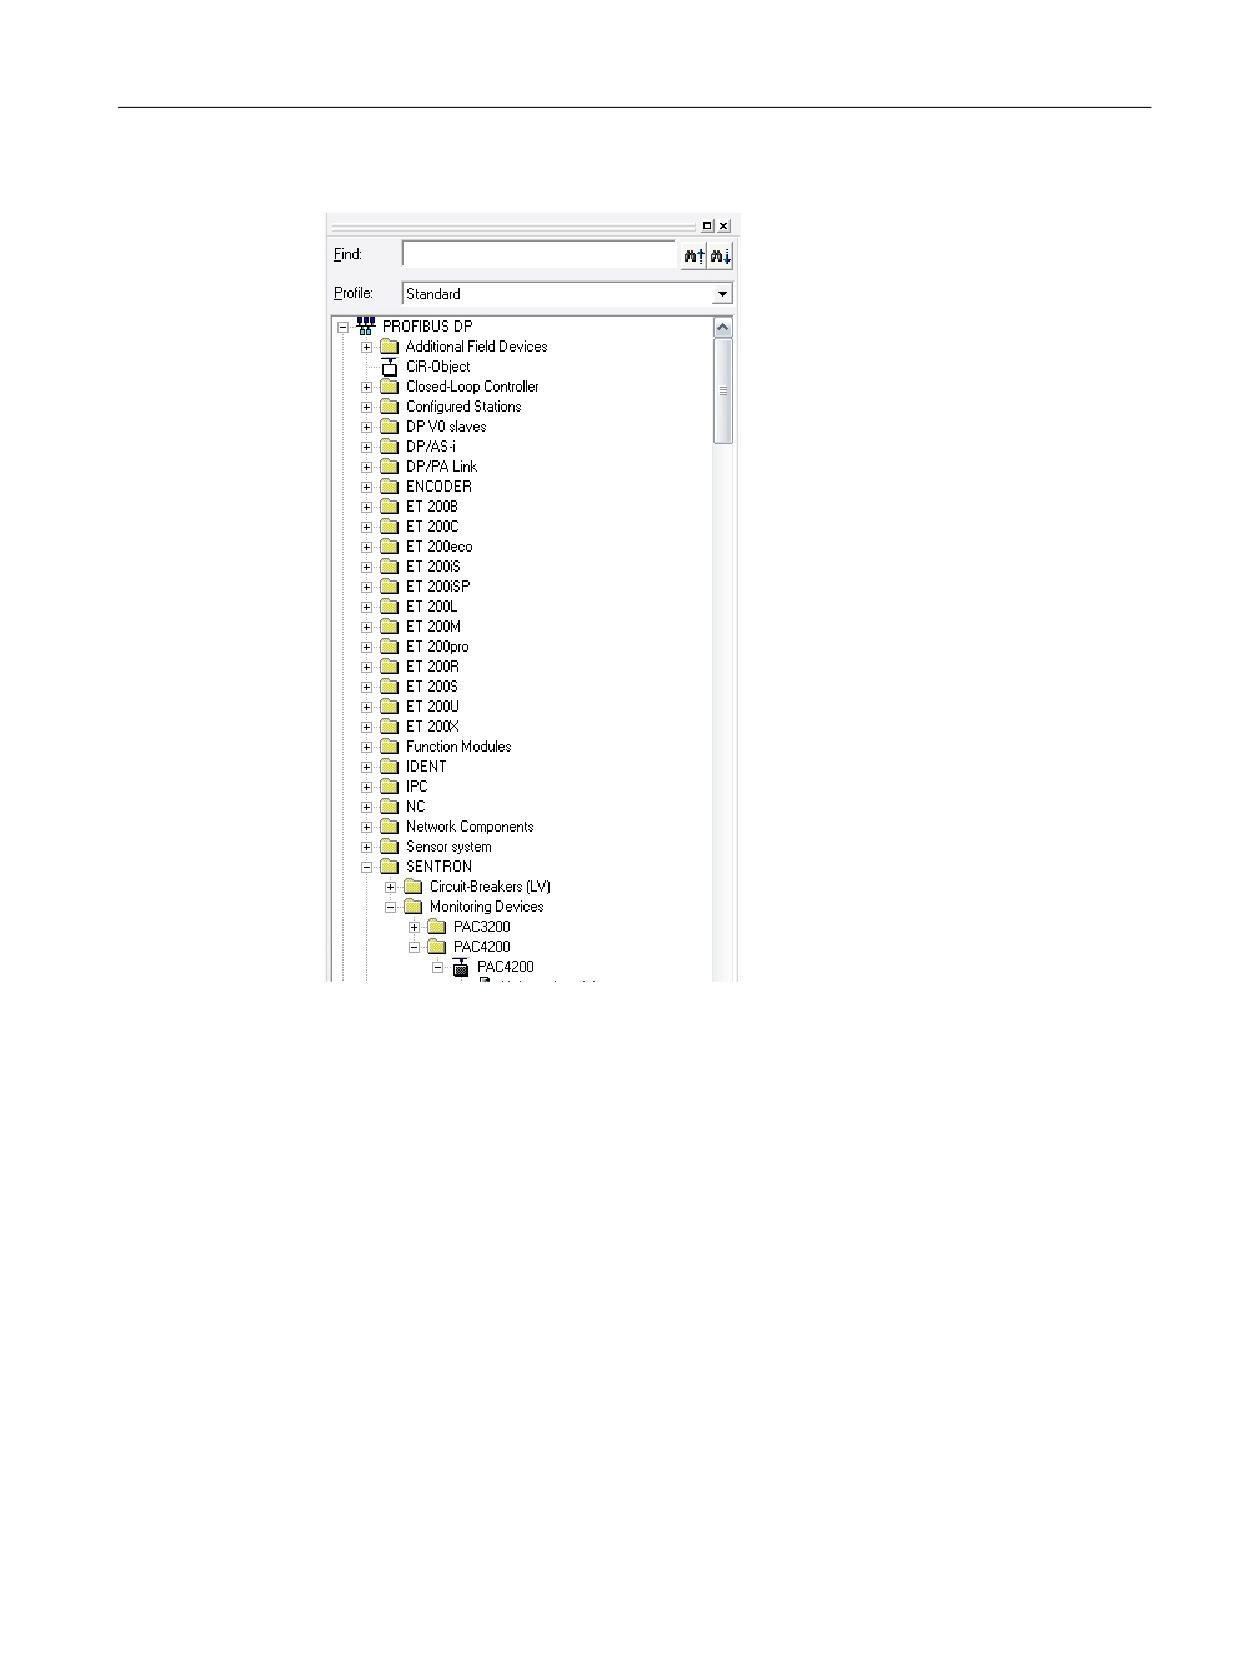
Figure 3-1
Hardware catalog after incorporating the GSD file
Ctrl-Energy
System Manual, 10/2015, 6FC5397-0EP40-5BA3
17
Ctrl-E Analysis
3.2 Commissioning the PLC for SENTRON PAC
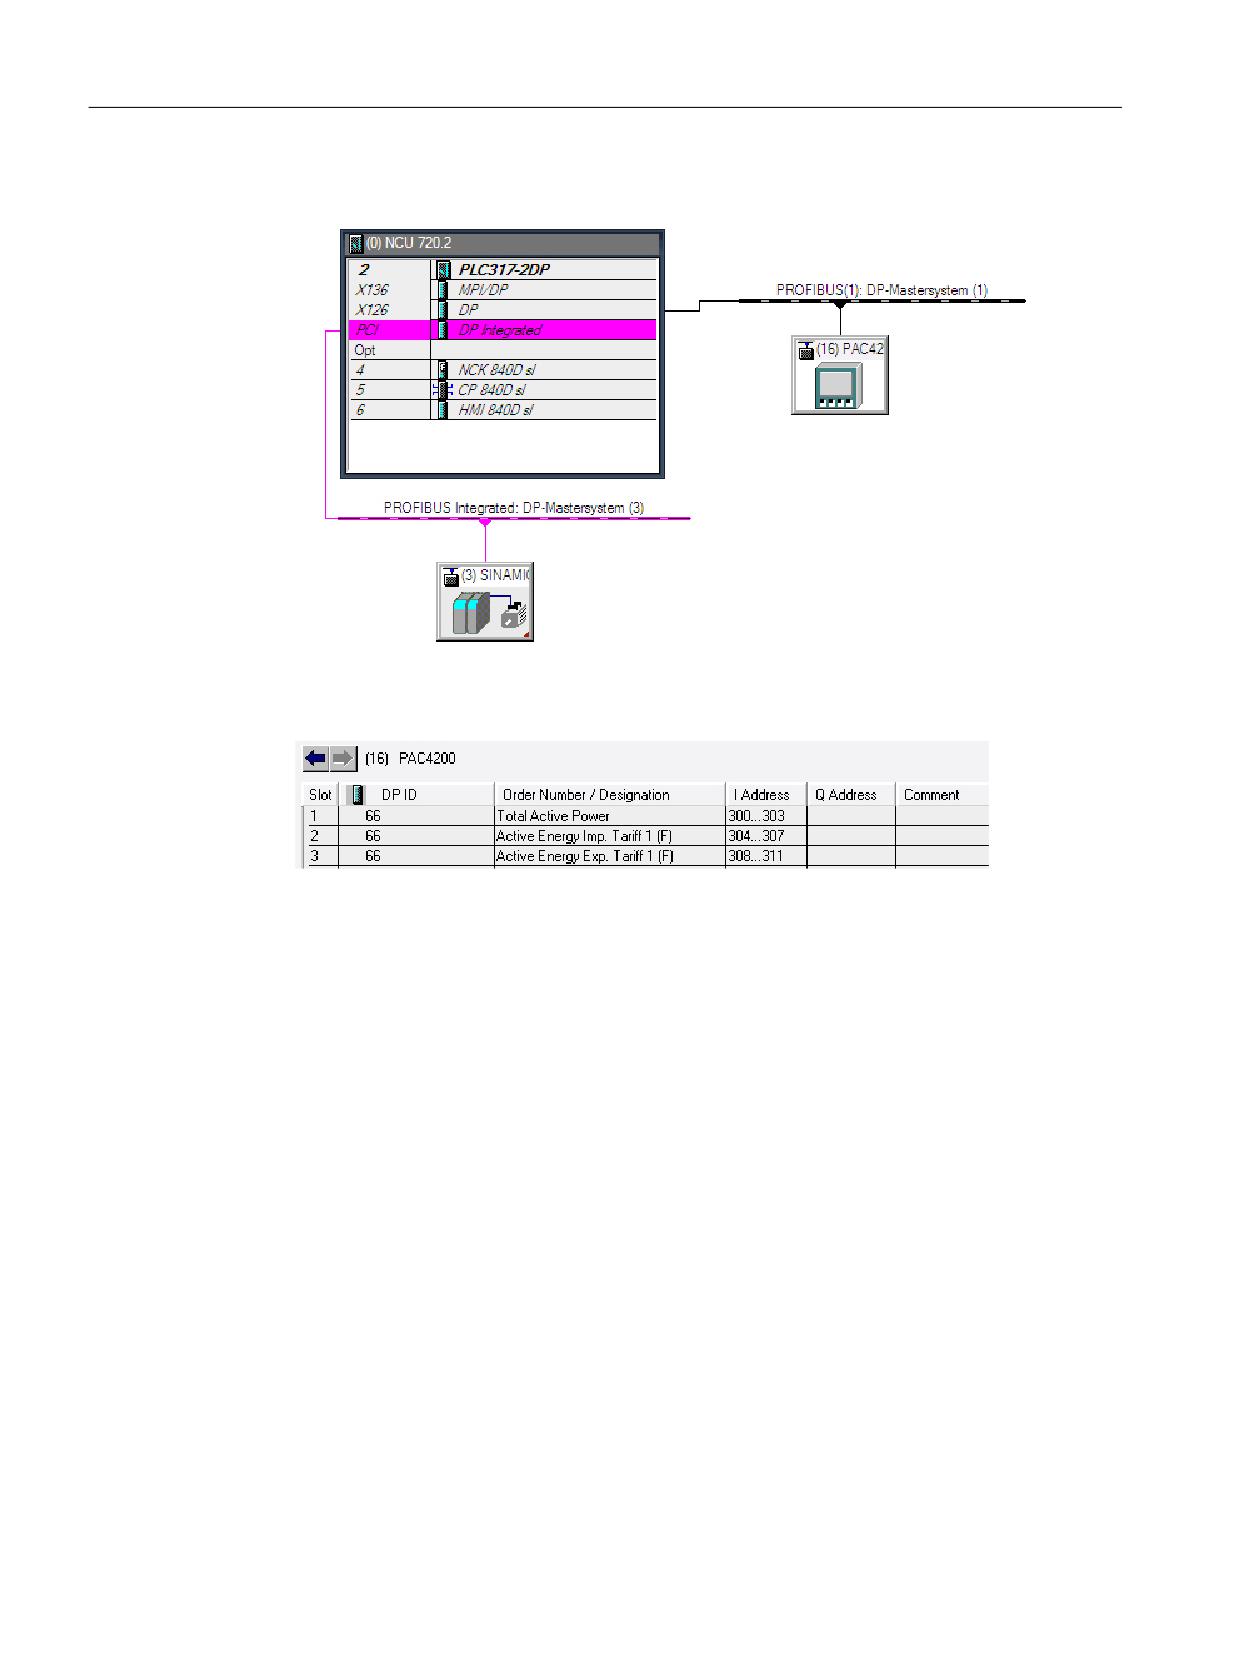
5. In HW Config, drag the selected module to the Profibus DP master system.
6. In the hardware catalog, open the required module and assign the subslots as shown in
the diagram.
Ctrl-Energy
18
System Manual, 10/2015, 6FC5397-0EP40-5BA3
Ctrl-E Analysis
3.2 Commissioning the PLC for SENTRON PAC
PROFIBUS interface
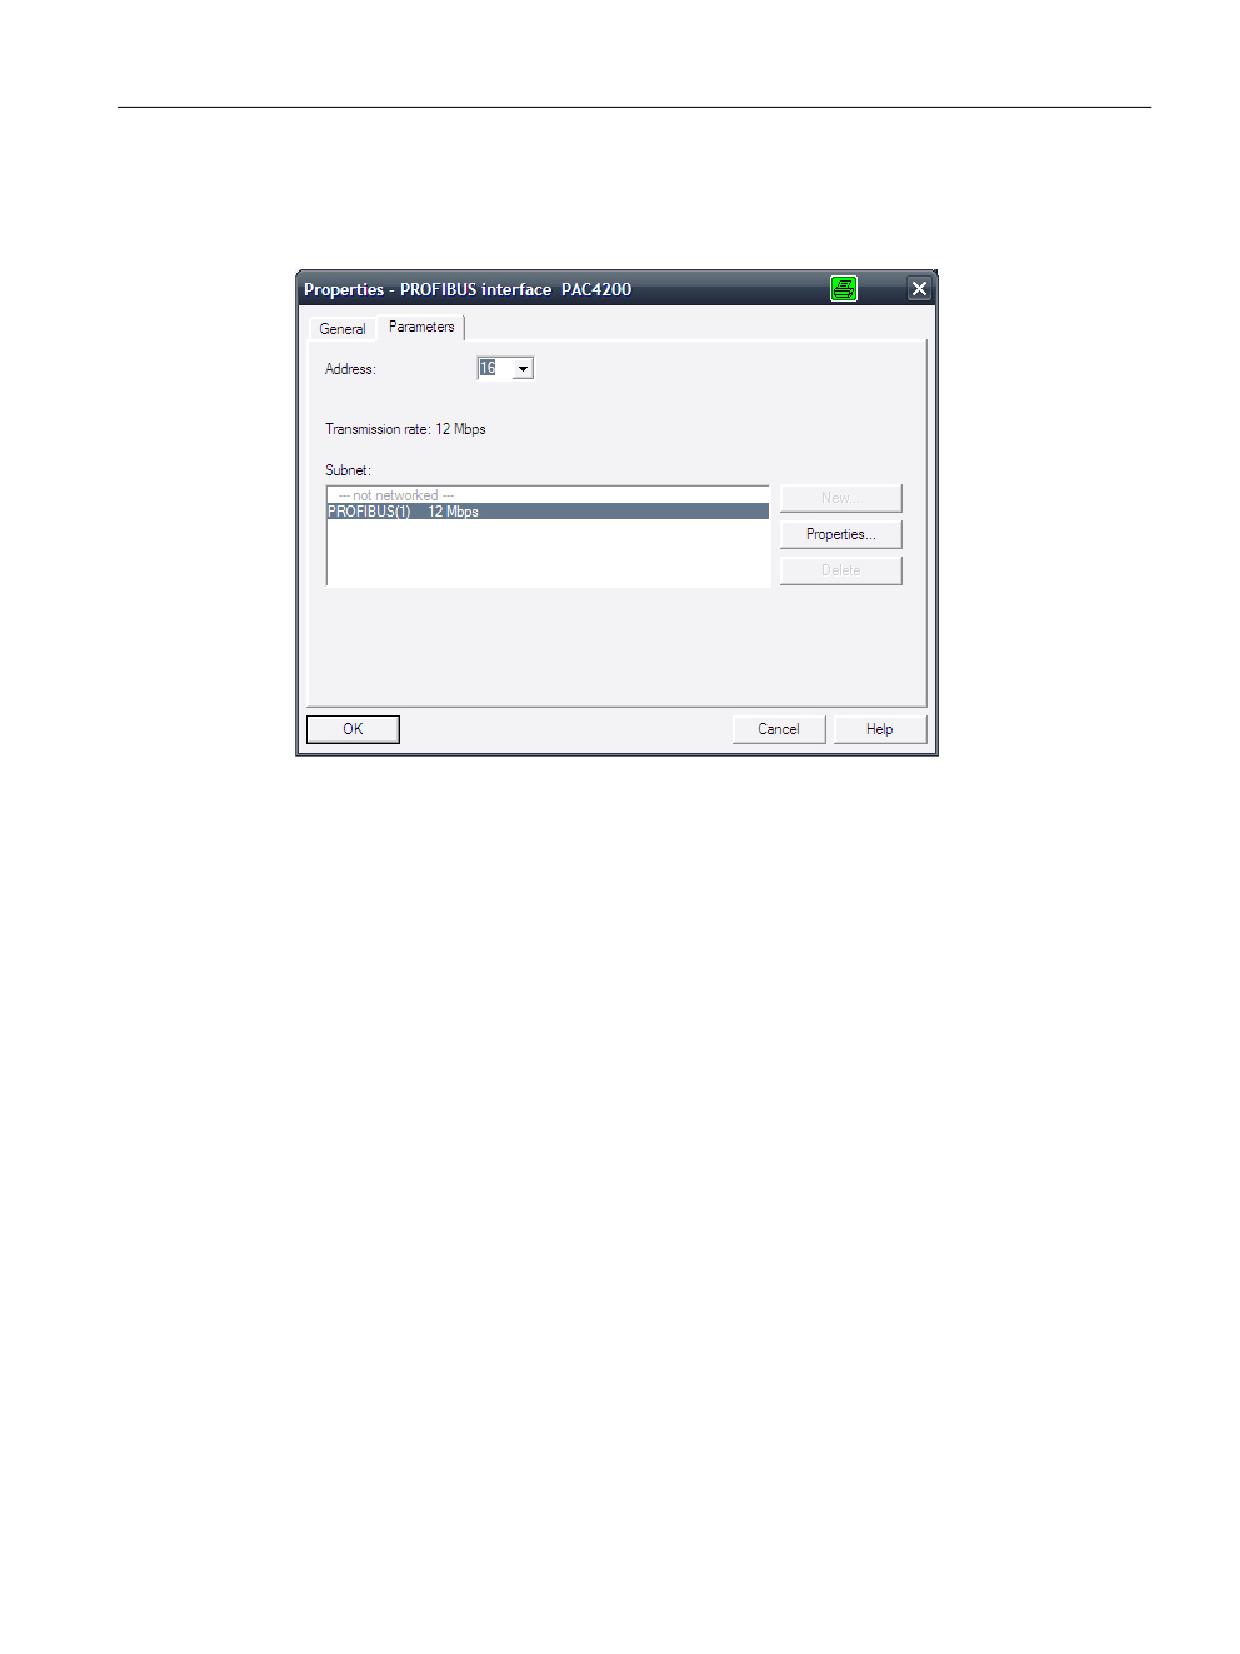
PROFIBUS must be configured with a data transfer rate of 12 Mbit/s.
Setting the PROFIBUS address
Set the PROFIBUS address of the expansion module either directly at the SENTRON PAC or
enter using the powerconfig software.
References
Additional information about commissioning the PLC can be found in the following references:
CNC Commissioning Manual: NCK, PLC, drive / SINUMERIK 840D sl
3.2.1.2
Commissioning the PLC with PROFINET
PROFINET is commissioned with the PLC Toolbox 4.6 or higher. This requires SIMATIC STEP
7 V5.5SP3 or higher.
Preconditions
● Configure the hardware, save and compile the project
● Generating the system data for the PLC
● Install the Toolbox software, which also contains the libraries for the PLC basic program of
an NCU 7x0.3PN.
● GSDML for PAC PROFINET
Ctrl-Energy
System Manual, 10/2015, 6FC5397-0EP40-5BA3
19
Ctrl-E Analysis
3.2 Commissioning the PLC for SENTRON PAC
Procedure
You are on the main screen of the SIMATIC Manager.
1. Select the "File" > "Open" menu and then click on the "Libraries" tab.
2. Select the library for the PLC basic program "bp7x0_46" and confirm the dialog with "OK".
3. You have inserted the library and selected the PLC program under "PLC-First-Startup 840D
sl" > "SINUMERIK" > "CPU 317F-3 PN/DP" > "S7 Program".
4. Copy the sources, modules and symbols to the PLC program
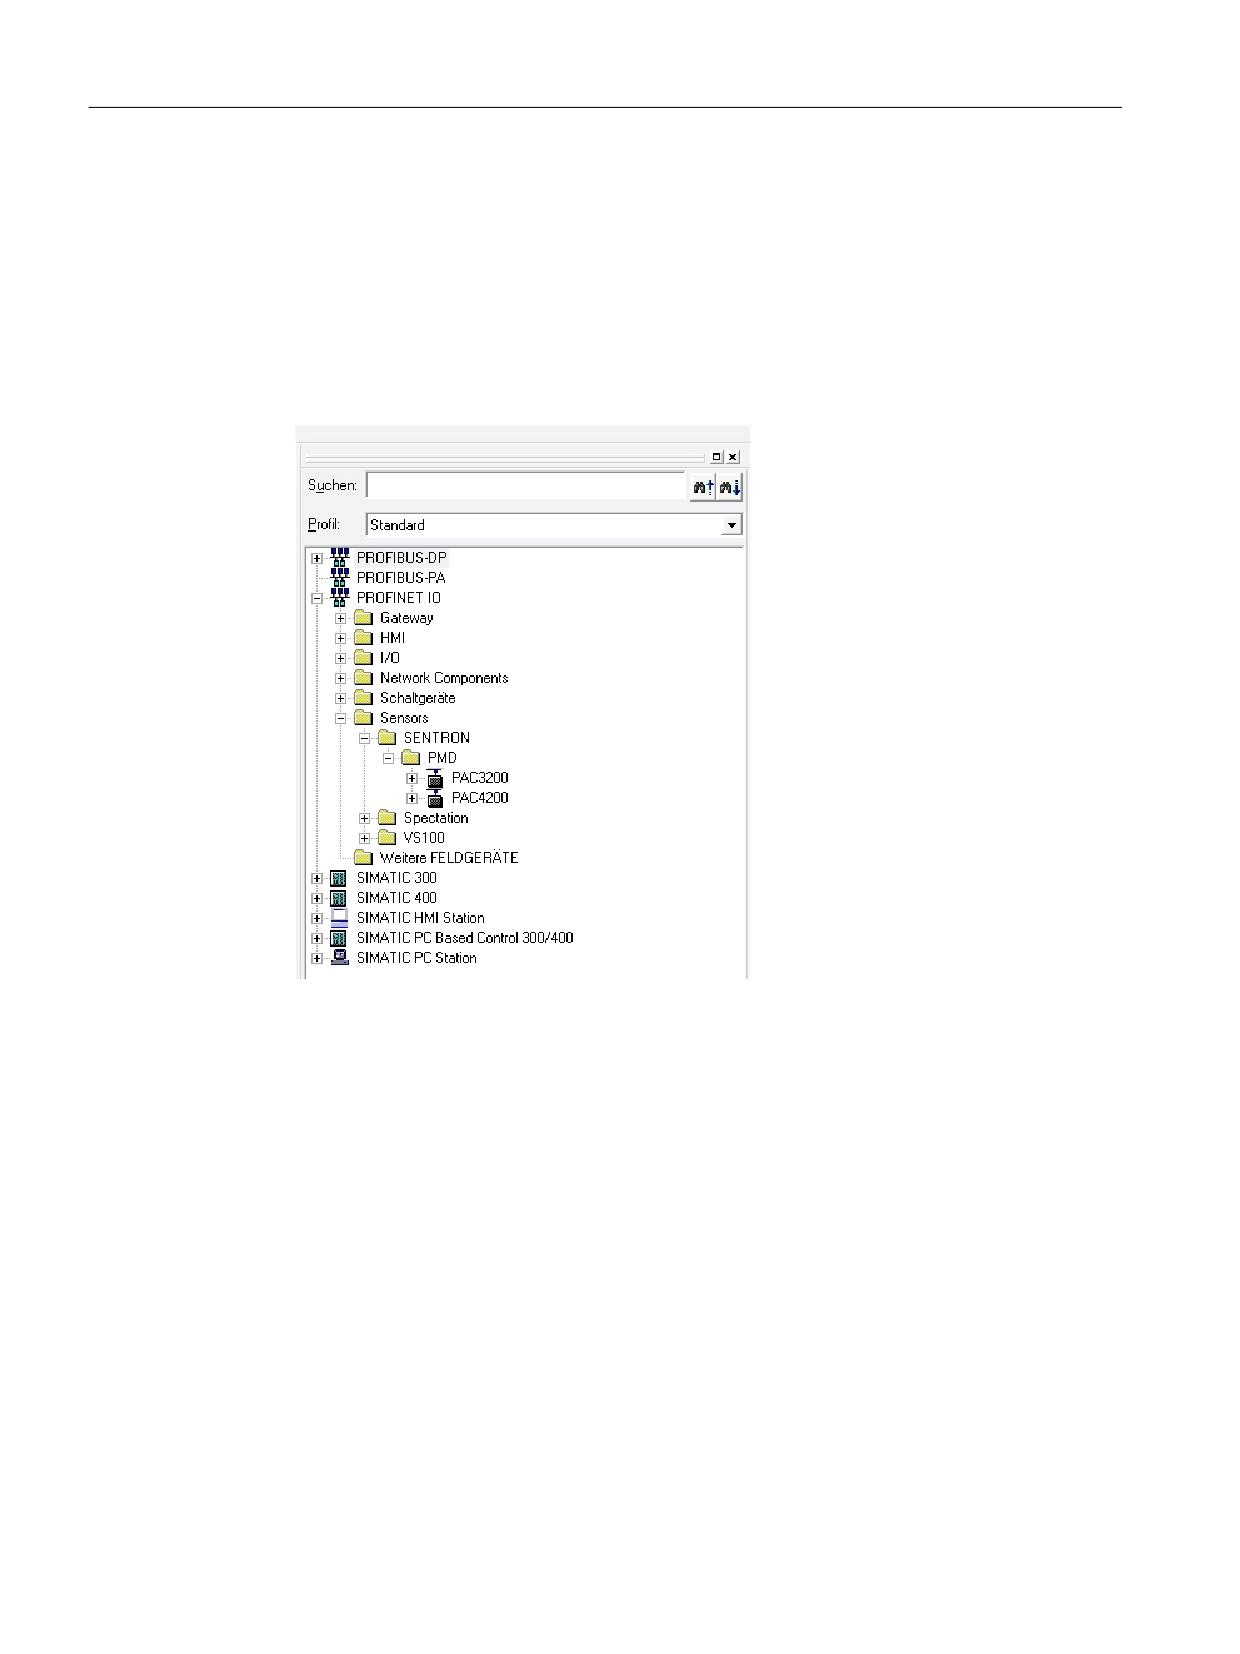
Figure 3-2
Hardware catalog after linking-in the GSDML file
Ctrl-Energy
20
System Manual, 10/2015, 6FC5397-0EP40-5BA3
Ctrl-E Analysis
3.2 Commissioning the PLC for SENTRON PAC
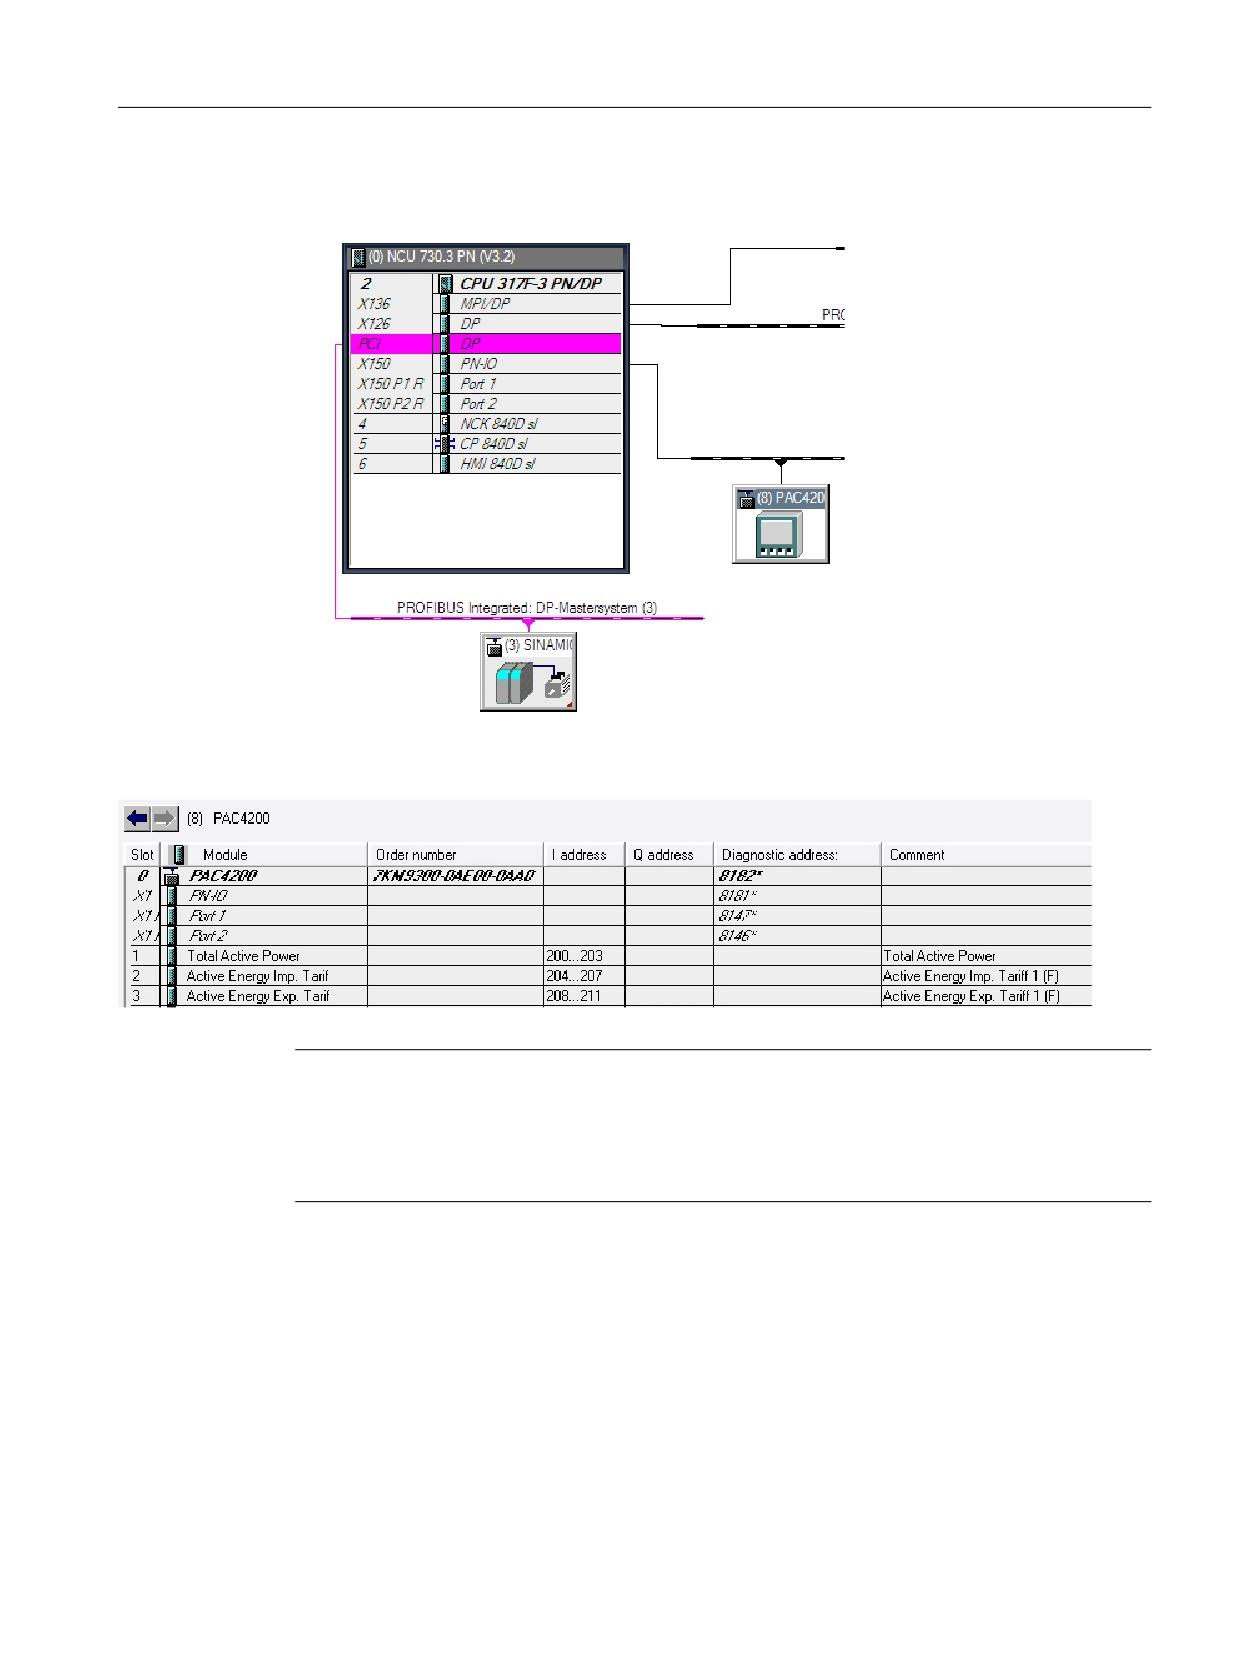
5. In HW Config, drag the selected module to the Profinet IO system.
6. In the hardware catalog, open the required module and assign the subslots as shown in
the diagram.
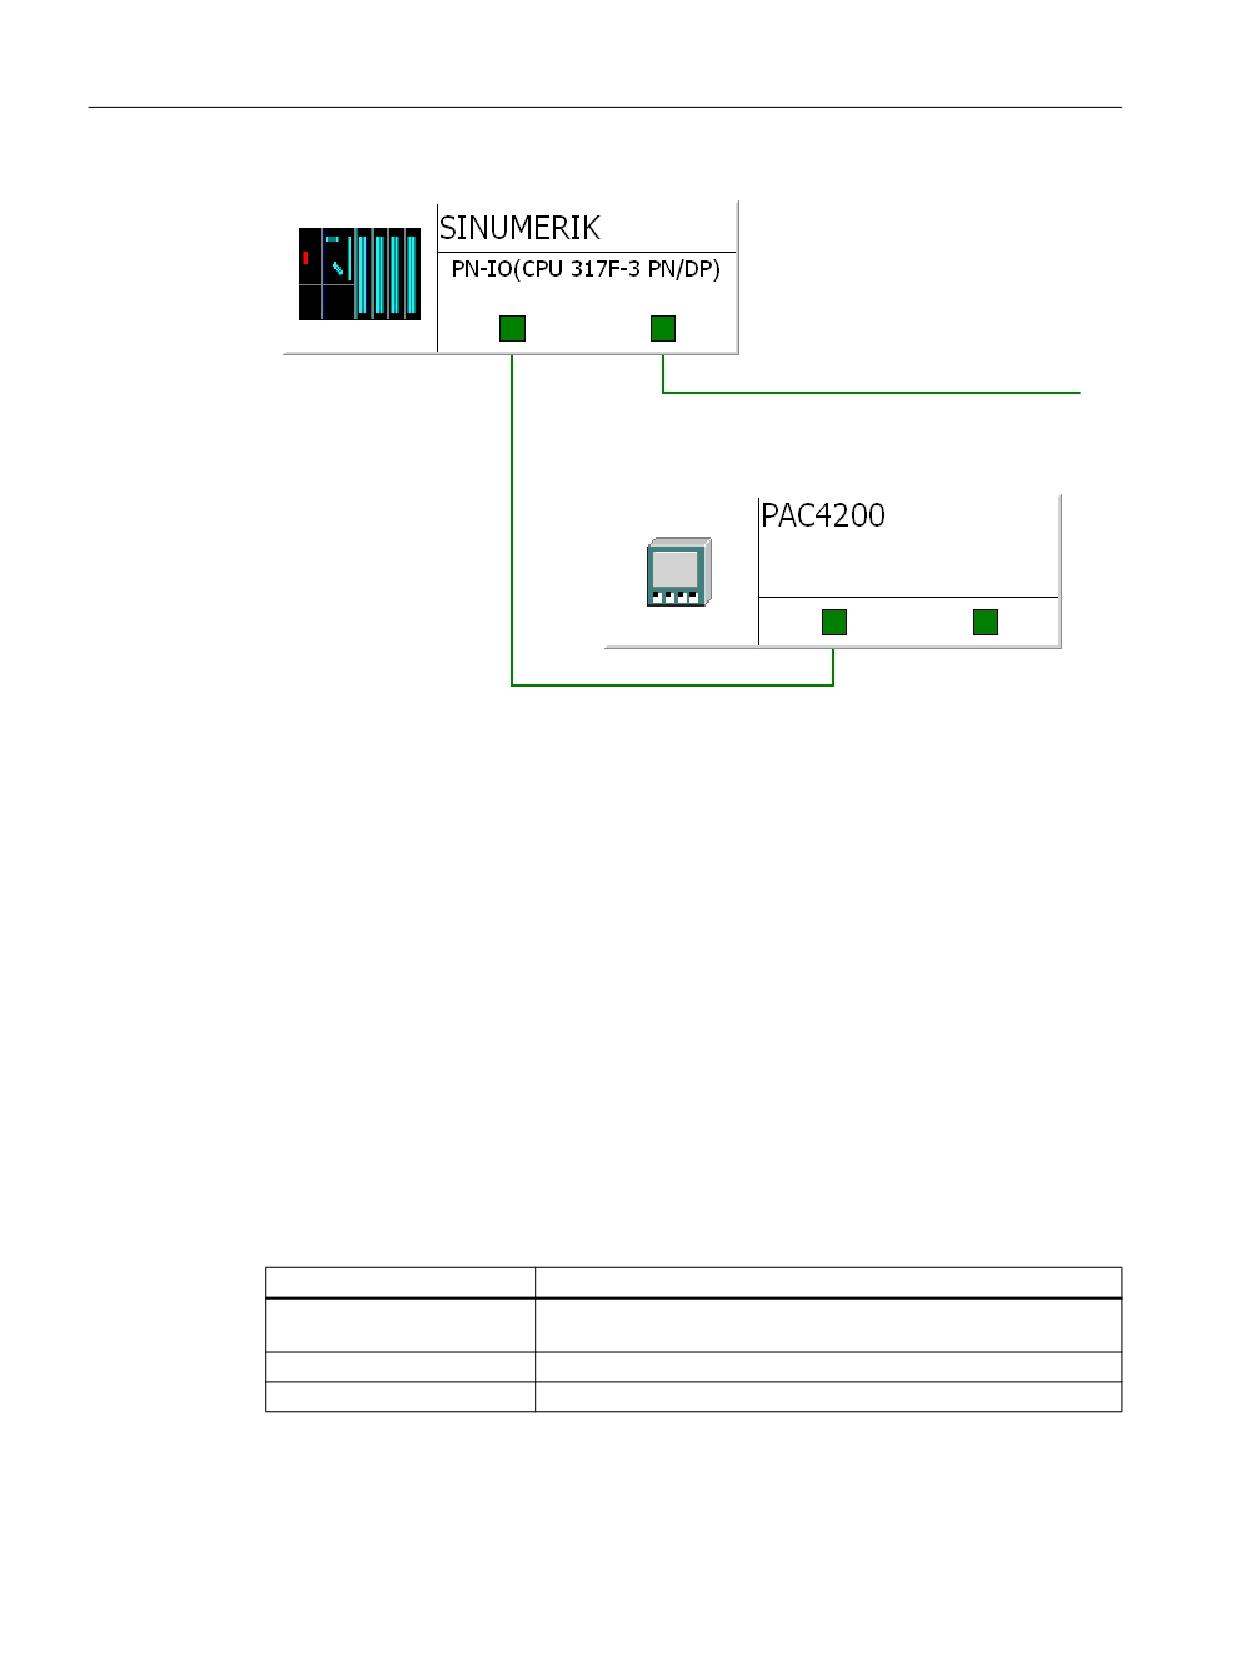
Note
Port interconnection
To simplify commissioning, in HW Config configure the PAC PROFINET using port
interconnection at the PROFINET ports of the NCU. This saves you from having to initialize
PAC.
Ctrl-Energy
System Manual, 10/2015, 6FC5397-0EP40-5BA3
21
Ctrl-E Analysis
3.2 Commissioning the PLC for SENTRON PAC
References
Additional information about commissioning the PLC can be found in the following references:
CNC Commissioning Manual: NCK, PLC, drive / SINUMERIK 840D sl
3.2.2
SINUMERIK 828D
The PLC of the 828D has a fixed PLC I/O image.
Using the general machine data MD12986[...], the possible peripheral connections (addresses)
are activated or deactivated. When delivered, these addresses are deactivated for the Sentron
devices by entering the address.
Activating the peripheral connection
● SENTRON PAC4200
I address
132 ... 135
Total active power
(value saved from SENTRON PAC)
136 ... 139
Active energy, imported, tariff 1 (instantaneous value)
140 ... 143
Active energy, exported, tariff 1 (instantaneous value)
Ctrl-Energy
22
System Manual, 10/2015, 6FC5397-0EP40-5BA3
Ctrl-E Analysis
3.3 Commissioning the PLC for Ctrl-E Analysis
For example, you activate the logical input address 132 by changing the machine data MD[...]
with entry 132 to -1.
● SENTRON PAC3200
I address
144 ... 147
Total active power
(value saved from SENTRON PAC)
148 ... 151
Active energy, imported, tariff 1 (instantaneous value)
152 ... 155
Active energy, exported, tariff 1 (instantaneous value)
For example, you activate the logical input address 144 by changing the machine data MD[...]
with entry 144 to -1.
The measured values are transferred in the float format.
References
Additional information about commissioning the PLC can be found in the following references:
SINUMERIK 828D Turning and Milling Commissioning Manual
3.3
Commissioning the PLC for Ctrl-E Analysis
3.3.1
Configuring the energy consumption display for SINUMERIK 840D sl
The energy consumption is displayed in the "SINUMERIK Ctrl-E Analysis" window.
See also
Signals for controlling energy-saving profiles (Page 44)
Signals for parameterization (Page 45)
The data block can be imported via the Toolbox and is loaded to the NCU via the user program.
Data block
DB1001
Signal
Meaning
Identifier
Format
direction
Name: SentronPac
DB1001.DBX0.0
PLC -> HMI
Display manual value
ManualVal
BOOL
DB1001.DBX0.1
PLC -> HMI
SENTRON PAC rep-
SentronPacMach
BOOL
resents the complete
machine
Ctrl-Energy
System Manual, 10/2015, 6FC5397-0EP40-5BA3
23

Ctrl-E Analysis
3.3 Commissioning the PLC for Ctrl-E Analysis
DB1001
Signal
Meaning
Identifier
Format
direction
Name: SentronPac
DB1001.DBX0.2
PLC -> HMI
Imported active ener-
FeedInEnergyReadSP
BOOL
gy is read from SEN-
TRON PAC
DB1001.DBX0.3
PLC -> HMI
Exported active ener-
FeedBackEnergyReadSP
BOOL
gy is read from SEN-
TRON PAC
DB1001.DBX1.0
PLC -> GP
Measuring request to
MeasAuto
BOOL
PLC basic program
DB1001.DBX2.0
HMI -> GP
Measurement is run-
MeasAct
BOOL
ning
DB1001.DBX3.0
PLC -> HMI
Power display shown
EStateOn
BOOL
in status display
DB1001.DBD4
PLC -> HMI
Manual value
ManualValue
REAL
DB1001.DBD8
GP -> HMI
Total active power
ActivePowerItem
REAL
DB1001.DBD12
MeasAuto
Measured imported
ActiveEnergyItem
REAL
== 0:
active energy in kWh
PLC -> HMI
to HMI
MeasAuto
== 1:
GP -> HMI
DB1001.DBD16
MeasAuto
Measured exported
ReactiveEnergyItem
REAL
== 0:
active energy in kWh
PLC -> HMI
to HMI
MeasAuto
== 1:
GP -> HMI
DB1001.DBD20
PLC -> GP
Total active power
ActivePowerSentron
REAL
in watts from SEN-
TRON
DB1001.DBD24
PLC -> GP
Imported active ener-
ActiveEnergySentron
REAL
gy at tariff 1 (F) in Wh
from SENTRON
DB1001.DBD28
PLC -> GP
Exported active ener-
ReactiveEnergySentron
REAL
gy at tariff 1 (F) in Wh
from SENTRON
DB1001.DBD32
GP -> HMI
Imported active ener-
ActiveEnergyDay
REAL
gy in kWh current day
to HMI
DB1001.DBD36
GP -> HMI
Exported active ener-
ReactiveEnergyDay
REAL
gy in kWh current day
to HMI
DB1001.DBD40
GP -> HMI
Imported active ener-
ActiveEnergyPrevDay
REAL
gy in kWh previous
day to HMI
DB1001.DBD44
GP -> HMI
Exported active ener-
ReactiveEnergyPrevDay
REAL
gy in kWh previous
day to HMI
Ctrl-Energy
24
System Manual, 10/2015, 6FC5397-0EP40-5BA3

Ctrl-E Analysis
3.3 Commissioning the PLC for Ctrl-E Analysis
DB1001
Signal
Meaning
Identifier
Format
direction
Name: SentronPac
DB1001.DBD48
GP -> HMI
Imported active ener-
ActiveEnergyMonth
REAL
gy in kWh month to
HMI
DB1001.DBD52
GP -> HMI
Exported active ener-
ReactiveEnergyMonth
REAL
gy in kWh month to
HMI
DB1001.DBD56
GP -> HMI
Imported active ener-
ActiveEnergyPrevMonth
REAL
gy in kWh previous
month to HMI
DB1001.DBD60
GP -> HMI
Exported active ener-
ReactiveEnergyPrevMonth
REAL
gy in kWh previous
month to HMI
DB1001.DBD64
GP -> HMI
Imported active ener-
ActiveEnergyYear
REAL
gy in kWh year to HMI
DB1001.DBD68
GP -> HMI
Exported active ener-
ReactiveEnergyYear
REAL
gy in kWh year to HMI
DB1001.DBD72
GP -> HMI
Imported active ener-
ActiveEnergyPrevYear
REAL
gy in kWh previous
year to HMI
DB1001.DBD76
GP -> HMI
Exported active ener-
ReactiveEnergyPrevYear
REAL
gy in kWh previous
year to HMI
DB1001.DBB96
PLC -> HMI
Presentation of the en-
ProductionAct
Byte
ergy consumption in
the status display
Note
Evaluation of the energy consumption of the complete machine
If you have installed SENTRON PAC in the main circuit of the machine or SENTRON PAC
evaluates the energy consumption of the complete machine, set bit DB1001.DBX0.1 to 1.
As a consequence, in the display for Ctrl-E Analysis, the line "SentronPAC" is removed and
the measured value of the SENTRON PAC is entered into the line "Total machine".
Data block for auxiliary systems
Up to 10 auxiliary systems are supported by the data block. A data structure is defined for each
auxiliary system. In order to display the energy/power of an auxiliary system in the HMI, bit 0
of the first byte of the data structure must be set.
Auxiliary system
Start of the data structure
End of the data structure
Auxiliary system 1 (n=0)
DB1001.DBB100
DB1001.DBB139
Auxiliary system 2 (n=40)
DB1001.DBB140
DB1001.DBB179
Auxiliary system 3 (n=80)
DB1001.DBB180
DB1001.DBB219
Auxiliary system 4 (n=120)
DB1001.DBB220
DB1001.DBB259
Auxiliary system 5 (n=160)
DB1001.DBB260
DB1001.DBB299
Auxiliary system 6 (n=200)
DB1001.DBB300
DB1001.DBB339
Ctrl-Energy
System Manual, 10/2015, 6FC5397-0EP40-5BA3
25

Ctrl-E Analysis
3.3 Commissioning the PLC for Ctrl-E Analysis
Auxiliary system
Start of the data structure
End of the data structure
Auxiliary system 7 (n=240)
DB1001.DBB340
DB1001.DBB379
Auxiliary system 8 (n=280)
DB1001.DBB380
DB1001.DBB419
Auxiliary system 9 (n=320)
DB1001.DBB420
DB1001.DBB459
Auxiliary system 10 (n=360)
DB1001.DBB460
DB1001.DBB499
DB1001
Signal
Meaning
Identifier
Format
direction
Name: SentronPac
DB1001.DBX(100+n).0
PLC ->
GP calculates the energy/
ProcessAux
BOOL
GP/HMI
power of the auxiliary sys-
tem
DB1001.DBX(100+n).1
PLC ->
Actual value update
ReadEnergy
BOOL
GP/HMI
DB1001.DBX(100+n).2
PLC ->
Measurement in progress
MeasACT
BOOL
GP/HMI
DB1001.DBX(100+n).3
PLC ->
1: Differential values are
MeasMode
BOOL
GP/HMI
written to the variables for
the measurement end
0: Absolute values are
written to the variables for
the measurement start
and measurement end
DB1001.DBX(100+n).4
PLC ->
1: Energy
InputMode
BOOL
GP/HMI
0: Power
DB1001.DBX(100+n).7
PLC ->
Delete data structure
ResetAux
BOOL
GP/HMI
DB1001.DBD(104+n)
PLC ->
Active power or active en-
ActivePowerAux
REAL
GP/HMI
ergy of the auxiliary sys-
tem
DB1001.DBD(108+n)
GP ->
Active energy drawn by
ActiveEnAux
REAL
HMI
the auxiliary system in
kWh
DB1001.DBD(112+n)
GP ->
Active energy supplied by
ReActiveEnAux
REAL
HMI
the auxiliary system in
kWh
DB1001.DBD(116+n)
GP ->
Active energy drawn by
ActiveEnAuxMeasON
REAL
HMI
the auxiliary system at
the measurement start in
kWh
DB1001.DBD(120+n)
GP ->
Active energy supplied by
ReActiveEnAuxMeasON
REAL
HMI
the auxiliary system at
the measurement start in
kWh
Ctrl-Energy
26
System Manual, 10/2015, 6FC5397-0EP40-5BA3
Ctrl-E Analysis
3.3 Commissioning the PLC for Ctrl-E Analysis
DB1001
Signal
Meaning
Identifier
Format
direction
Name: SentronPac
DB1001.DBD(124+n)
GP ->
Active energy drawn by
ActiveEnAuxMeasOFF
REAL
HMI
the auxiliary system at
the measurement end in
kWh
DB1001.DBD(128+n)
GP ->
Active energy supplied by
ReActiveEnAuxMeasOFF
REAL
HMI
the auxiliary system at
the measurement end in
kWh
3.3.1.1
PLC user program for SINUMERIK 840D sl programming
Via the expansion modules, SENTRON PAC devices provide the total active power in the unit
W and the active energy data in Wh. In HMI the units kW and kWh are used.
PLC basic program
The PLC basic program offers the following functions:
● Provision of the total active power [kW]
● Provision of the values for imported and exported active energy [kWh]
for the current day, month and the current year as well as for the previous day, previous
month and the previous year.
The values of the current time periods are updated in every cycle. If one of the time periods
changes (new day, new month or new year) then the "current" variables of the time period
that changes is copied into its previous day, previous month or previous year variables and
the "current" variables are accumulated again starting from 0.
● Two measuring procedures for imported and exported active energy [kWh]
- Measuring carried out by the basic program
- The user calculates and writes the measured values
This allows user-specific measuring routines to be implemented.
The two values of measured imported energy [kWh] (DBD12) and the measured exported
energy [kWh] (DBD16) are made available for the HMI. The source of the values as well as
measuring procedure and measuring duration (start, stop) are defined using measurement
control bits.
Programming the PLC user program
● You take the total active power from the input address and transfer the value to
DB1001.DBD20.
● You take the imported active power from the input address and transfer the value to
DB1001.DBD24.
● You take the exported active power from the input address and transfer the value to
DB1001.DBD28.
Ctrl-Energy
System Manual, 10/2015, 6FC5397-0EP40-5BA3
27
Ctrl-E Analysis
3.3 Commissioning the PLC for Ctrl-E Analysis
● If the control bits DB1001.DBX0.2 and DBX0.3 are equal to 0, then the HMI counts the
energy on the basis of the total active power transferred from the SENTRON between the
start and stop.
● If the imported and exported energy is to be directly evaluated by SENTRON PAC
(DB1001.DBX0.2 and DBX0.3 equal to 1), then program this measurement in the user
program as follows:
- SENTRON PAC devices permanently cumulate the "imported active energy (tariff 1)"
or "the exported active energy (tariff 1)" separately when their supply voltages are
connected.
- With the positive edge of the signal "Measurement running" (DB1001.DBX2.0) you
buffer these instantaneous values from SENTRON (imported and exported active
energy T1)
- Cyclically generate the differences between the energy data now being counted minus
the initial values, divide the differences by 1000.0 and transfer the results to
DB1001.DBD12 (for measured imported active energy T1) and DB1001.DBD16
(measured exported active energy T1) up to the STOP signal (falling edge).
- During the measurement, the increasing difference (energy in kWh) is displayed on the
HMI, which can then be read as measured value with Stop measurement.
Measurement control HMI → GP and PLC → GP
● With a 1 signal of the control bit "MeasAuto" (DBX1.0), the user requests that the basic
program makes the measurement.
If this bit is not set, then the user is responsible for calculating and writing the measured
values.
● Using a 1 signal of the control bit "MeasAct" (DBX2.0), via the HMI it is signaled as to when
the measurement should be made: 0→1 start measurement, 1→0 stop measurement.
The basic program only evaluates this signal if control bit "MeasAuto" (DBX1.0) is set.
Measurement carried out by the basic program:
For these measurements, the cyclic increases in the energy values are accumulated in the
measured variables.
Ctrl-Energy
28
System Manual, 10/2015, 6FC5397-0EP40-5BA3
Ctrl-E Analysis
3.3 Commissioning the PLC for Ctrl-E Analysis
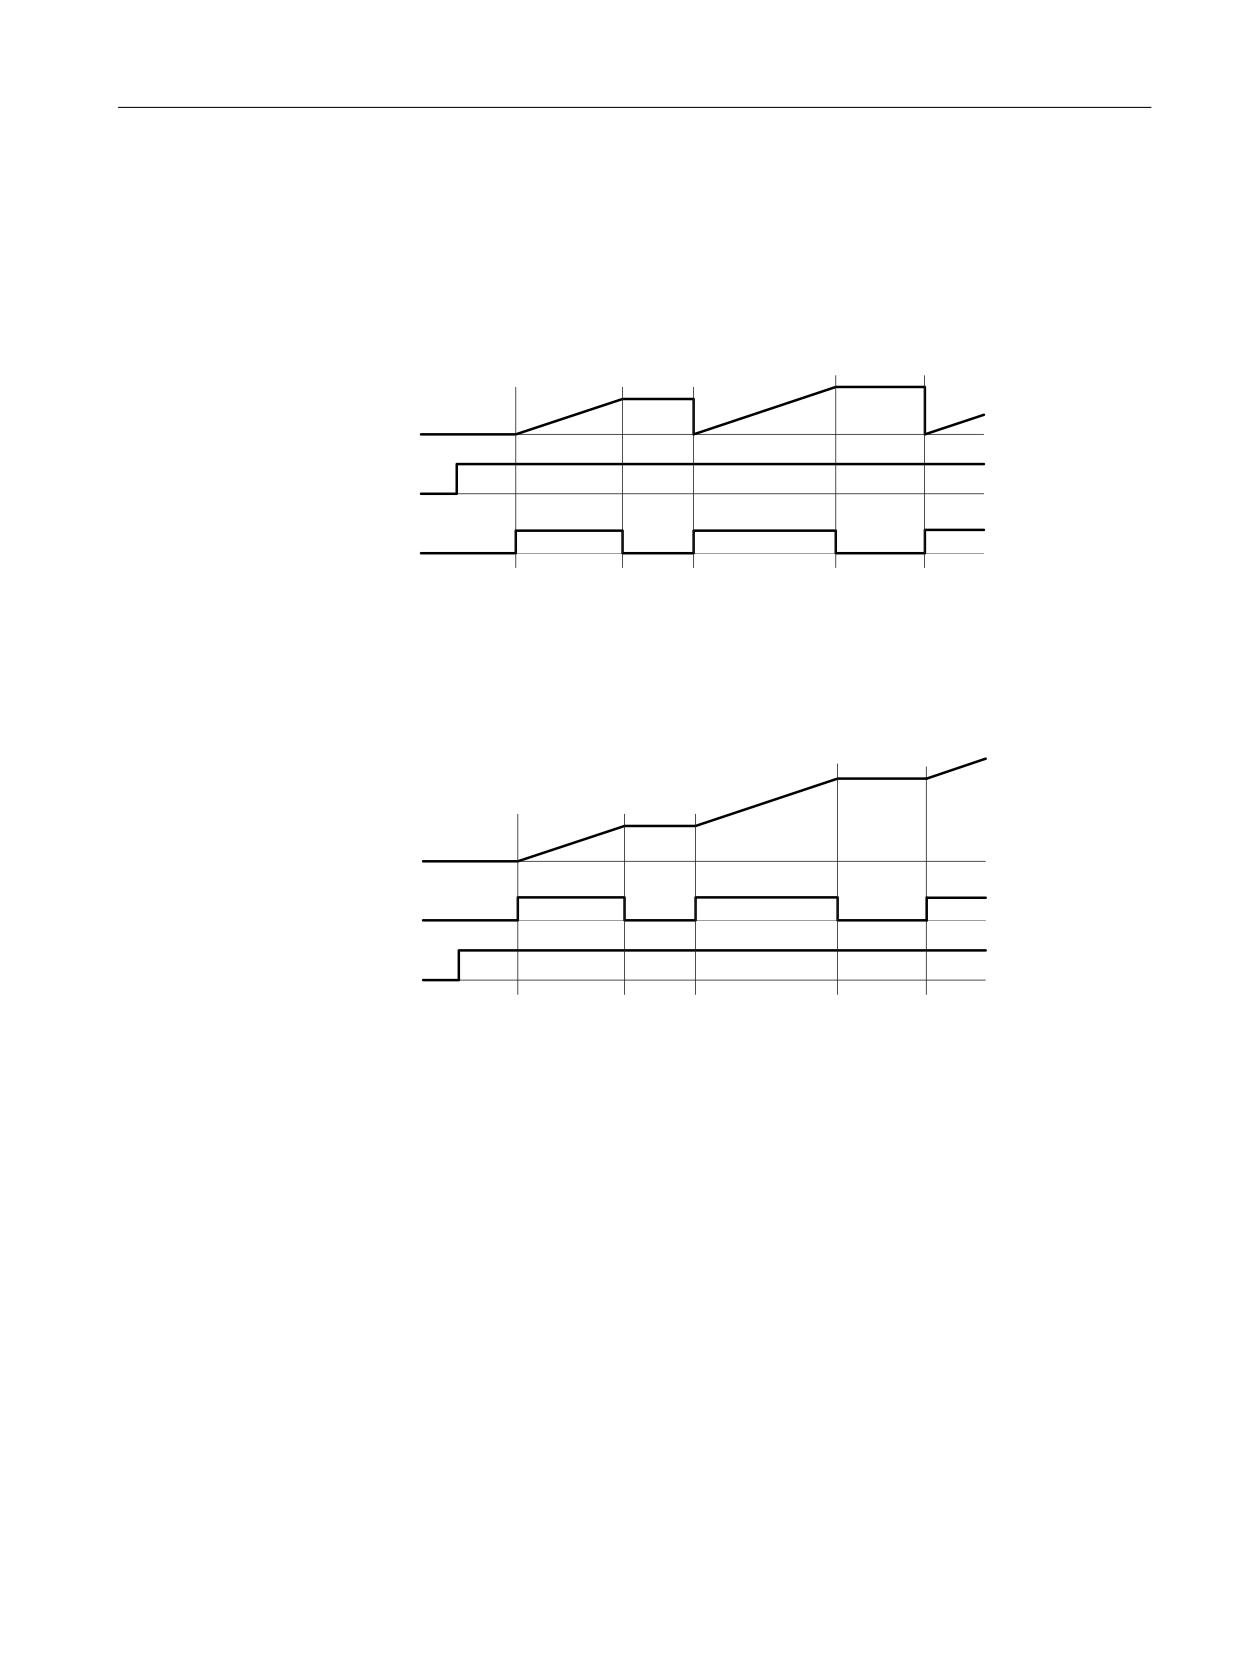
The behavior for different signal sequences of both measurement control signals are described
in the following:
● DBX1.0 is set first
If DBX1.0 ("MeasAuto") is first set, and then remains statically present, every 0-1 edge of
DBX2.0 ("MeasAct") deletes the measured value and then starts the measurement.
If DBX2.0 is reset, the measurement is canceled and the measured value remains constant.
The sequence is repeated at the next 0-1 edge of DBX2.0.
0HDVXUHG
YDOXH
'%;
'%;
Figure 3-3
Measurement control signal DBX1.0 is set first
● DBX2.0 is set first
If DBX2.0 ("MeasAct") is set first, and then remains statically present, every 0-1 edge of
DBX1.0 ("MeasAuto") accumulates the measured value without deleting the previous value.
If DBX1.0 is reset, the measurement is only interrupted and the measured value remains
constant.
0HDVXUHG
YDOXH
'%;
'%;
Figure 3-4
Measurement control signal DBX2.0 is set first
3.3.2
Configuring the display of energy consumption for SINUMERIK 828D
The energy consumption is displayed in the "SINUMERIK Ctrl-E Analysis" window.
See also
Signals for controlling energy-saving profiles (Page 46)
Signals for parameterization (Page 47)
Ctrl-Energy
System Manual, 10/2015, 6FC5397-0EP40-5BA3
29

Ctrl-E Analysis
3.3 Commissioning the PLC for Ctrl-E Analysis
Data block
DB9907
Signal
Meaning
Symbol
Format
direction
Name: Sentron-
Pac
DB9907.DBX0.0
PLC -> HMI
Display manual value
ManualVal
BOOL
DB9907.DBX0.1
PLC -> HMI
SENTRON PAC rep-
SentronPacMach
BOOL
resents the complete
machine
DB9907.DBX0.2
PLC -> HMI
Imported active ener-
FeedInEnergyReadSP
BOOL
gy is read from SEN-
TRON PAC
DB9907.DBX0.3
PLC -> HMI
Exported active ener-
FeedBackEnergyReadSP
BOOL
gy is read from SEN-
TRON PAC
DB9907.DBX1.0
PLC -> FW
Measuring request to
MeasAuto
BOOL
PLC FW
DB9907.DBX2.0
HMI -> FW
Measurement is run-
MeasAct
BOOL
ning
DB9907.DBD4
PLC -> HMI
Manual value
ManualValue
REAL
DB9907.DBD8
FW -> HMI
Total active
ActivePowerItem
REAL
power
DB9907.DBD12
MeasAuto
Measured imported
ActiveEnergyItem
REAL
== 0:
active energy tariff1
PLC -> HMI
MeasAuto
== 1:
FW -> HMI
DB9907.DBD16
MeasAuto
Measured exported
ReactiveEnergyItem
REAL
== 0:
active energy tariff1
PLC -> HMI
MeasAuto
== 1:
FW -> HMI
DB9907.DBD20
PLC -> FW
Total active
ActivePowerSentron
REAL
power
in watts from SEN-
TRON
DB9907.DBD24
PLC -> FW
Imported active ener-
ActiveEnergySentron
REAL
gy at tariff 1 (F) in Wh
from SENTRON
DB9907.DBD28
PLC -> FW
Exported active ener-
ReactiveEnergySentron
REAL
gy at tariff 1 (F) in Wh
from SENTRON
DB9907.DBD32
FW -> HMI
Imported active ener-
ActiveEnergyDay
REAL
gy in kWh current day
to HMI
Ctrl-Energy
30
System Manual, 10/2015, 6FC5397-0EP40-5BA3
Ctrl-E Analysis
3.3 Commissioning the PLC for Ctrl-E Analysis
DB9907
Signal
Meaning
Symbol
Format
direction
Name: Sentron-
Pac
DB9907.DBD36
FW -> HMI
Exported active ener-
ReactiveEnergyDay
REAL
gy in kWh current day
to HMI
DB9907.DBD40
FW -> HMI
Imported active ener-
ActiveEnergyPrevDay
REAL
gy in kWh previous
day to HMI
DB9907.DBD44
FW -> HMI
Exported active ener-
ReactiveEnergyPrevDay
REAL
gy in kWh previous
day to HMI
DB9907.DBD48
FW -> HMI
Imported active ener-
ActiveEnergyMonth
REAL
gy in kWh month to
HMI
DB9907.DBD52
FW -> HMI
Exported active ener-
ReactiveEnergyMonth
REAL
gy in kWh month to
HMI
DB9907.DBD56
FW -> HMI
Imported active ener-
ActiveEnergyPrevMonth
REAL
gy in kWh previous
month to HMI
DB9907.DBD60
FW -> HMI
Exported active ener-
ReactiveEnergyPrevMonth
REAL
gy in kWh previous
month to HMI
DB9907.DBD64
FW -> HMI
Imported active ener-
ActiveEnergyYear
REAL
gy in kWh year to HMI
DB9907.DBD68
FW -> HMI
Exported active ener-
ReactiveEnergyYear
REAL
gy in kWh year to HMI
DB9907.DBD72
FW -> HMI
Imported active ener-
ActiveEnergyPrevYear
REAL
gy in kWh previous
year to HMI
DB9907.DBD76
FW -> HMI
Exported active ener-
ReactiveEnergyPrevYear
REAL
gy in kWh previous
year to HMI
DB9907.DBB96
PLC -> HMI
Presentation of the
ProductionAct
Byte
energy consumption
in the status display
Note
Evaluation of the energy consumption of the complete machine
If you have installed SENTRON PAC in the main circuit of the machine or SENTRON PAC
evaluates the energy consumption of the complete machine, set bit DB9907.DBX0.1 to 1.
As a consequence, in the display for Ctrl-E Analysis, the line "SentronPAC" is removed and
the measured value of the SENTRON PAC is entered into the line "Total machine".
Ctrl-Energy
System Manual, 10/2015, 6FC5397-0EP40-5BA3
31
Ctrl-E Analysis
3.3 Commissioning the PLC for Ctrl-E Analysis
Data block for auxiliary systems
Up to 10 auxiliary systems are supported by the data block. A data structure is defined for each
auxiliary system. In order to display the energy/power of an auxiliary system in the HMI, bit 0
of the first byte of the data structure must be set.
Auxiliary system
Start of the data structure
End of the data structure
Auxiliary system 1 (n=0)
DB9907.DBB100
DB9907.DBB139
Auxiliary system 2 (n=40)
DB9907.DBB140
DB9907.DBB179
Auxiliary system 3 (n=80)
DB9907.DBB180
DB9907.DBB219
Auxiliary system 4 (n=120)
DB9907.DBB220
DB9907.DBB259
Auxiliary system 5 (n=160)
DB9907.DBB260
DB9907.DBB299
Auxiliary system 6 (n=200)
DB9907.DBB300
DB9907.DBB339
Auxiliary system 7 (n=240)
DB9907.DBB340
DB9907.DBB379
Auxiliary system 8 (n=280)
DB9907.DBB380
DB9907.DBB419
Auxiliary system 9 (n=320)
DB9907.DBB420
DB9907.DBB459
Auxiliary system 10 (n=360)
DB9907.DBB460
DB9907.DBB499
DB9907
Signal
Meaning
Identifier
Format
direction
Name: SentronPac
DB9907.DBX(100+n).0
PLC ->
FW calculates the energy/
ProcessAux
BOOL
FW/HMI
power of the auxiliary sys-
tem
DB9907.DBX(100+n).1
PLC ->
Actual value update
ReadEnergy
BOOL
FW/HMI
DB9907.DBX(100+n).2
PLC ->
Measurement in progress
MeasACT
BOOL
FW/HMI
DB9907.DBX(100+n).3
PLC ->
1: Differential values are
MeasMode
BOOL
FW/HMI
written to the variables for
the measurement end
0: Absolute values are
written to the variables for
the measurement start
and measurement end
DB9907.DBX(100+n).4
PLC ->
1: Energy
InputMode
BOOL
FW/HMI
0: Power
DB9907.DBX(100+n).7
PLC ->
Delete data structure
ResetAux
BOOL
FW/HMI
DB9907.DBD(104+n)
PLC ->
Active power or active en-
ActivePowerAux
REAL
FW/HMI
ergy of the auxiliary sys-
tem
DB9907.DBD(108+n)
FW ->
Active energy drawn by
ActiveEnAux
REAL
HMI
the auxiliary system in
kWh
DB9907.DBD(112+n)
FW ->
Active energy supplied by
ReActiveEnAux
REAL
HMI
the auxiliary system in
kWh
Ctrl-Energy
32
System Manual, 10/2015, 6FC5397-0EP40-5BA3
Ctrl-E Analysis
3.3 Commissioning the PLC for Ctrl-E Analysis
DB9907
Signal
Meaning
Identifier
Format
direction
Name: SentronPac
DB9907.DBD(116+n)
FW ->
Active energy drawn by
ActiveEnAuxMeasON
REAL
HMI
the auxiliary system at
the measurement start in
kWh
DB9907.DBD(120+n)
FW ->
Active energy supplied by
ReActiveEnAuxMeasON
REAL
HMI
the auxiliary system at
the measurement start in
kWh
DB9907.DBD(124+n)
FW ->
Active energy drawn by
ActiveEnAuxMeasOFF
REAL
HMI
the auxiliary system at
the measurement end in
kWh
DB9907.DBD(128+n)
FW ->
Active energy supplied by
ReActiveEnAuxMeasOFF
REAL
HMI
the auxiliary system at
the measurement end in
kWh
3.3.2.1
Programming the PLC user program for SINUMERIK 828D
Via the expansion modules, SENTRON PAC devices provide the total active power in the unit
W and the active energy data in Wh. In HMI the units kW and kWh are used.
PLC firmware
The PLC firmware offers the following functions:
● Provision of the total active power [kW]
● Provision of the values for imported and exported active energy [kWh]
for the current day, month and the current year as well as for the previous day, previous
month and the previous year.
The values of the current time periods are updated in every cycle. If one of the time periods
changes (new day, new month or new year) then the "current" variables of the time period
that changes is copied into its previous day, previous month or previous year variables and
the "current" variables are accumulated again starting from 0.
● Two measuring procedures for imported and exported active energy [kWh]
- Measurement carried out by the PLC firmware (see "Measurement control HMI → FW
and PLC → FW")
- The user calculates and writes the measured values
This allows user-specific measuring routines to be implemented.
The two values of measured imported energy [kWh] (DBD12) and the measured exported
energy [kWh] (DBD16) are made available for the HMI. The source of the values as well as
measuring procedure and measuring duration (start, stop) are defined using measurement
control bits.
Ctrl-Energy
System Manual, 10/2015, 6FC5397-0EP40-5BA3
33
Ctrl-E Analysis
3.3 Commissioning the PLC for Ctrl-E Analysis
Programming the PLC user program
● You take the total active power from the input address and transfer the value to
DB9907.DBD20. This must be realized according to the following point "Adapt byte
sequence".
● You take the imported active power from the input address and transfer the value to
DB9907.DBD24. This must be realized according to the following point "Adapt byte
sequence".
● You take the exported active power from the input address and transfer the value to
DB9907.DBD28. This must be realized according to the following point "Adapt byte
sequence".
● If the control bits DB9907.DBX0.2 and DBX0.3 are equal to 0, then the HMI counts the
energy on the basis of the total active power transferred from the SENTRON between the
start and stop.
● If the imported and exported energy is to be directly evaluated by SENTRON PAC
(DB9907.DBX0.2 and DBX0.3 equal to 1), then program this measurement in the user
program as follows:
- SENTRON PAC devices permanently cumulate the "imported active energy (tariff 1)"
or "the exported active energy (tariff 1)" separately when their supply voltages are
connected.
- With the positive edge of the signal "Measurement running" (DB9907.DBX2.0) you
buffer these instantaneous values from SENTRON (imported and exported active
energy T1)
- Cyclically generate the differences between the energy data now being counted minus
the initial values, divide the differences by 1000.0 and transfer the results to
DB9907.DBD12 (for measured imported active energy T1) and DB9907.DBD16
(measured exported active energy T1) up to the STOP signal (falling edge).
- During the measurement, the increasing difference (energy in kWh) is displayed on the
HMI, which can then be read as measured value with Stop measurement.
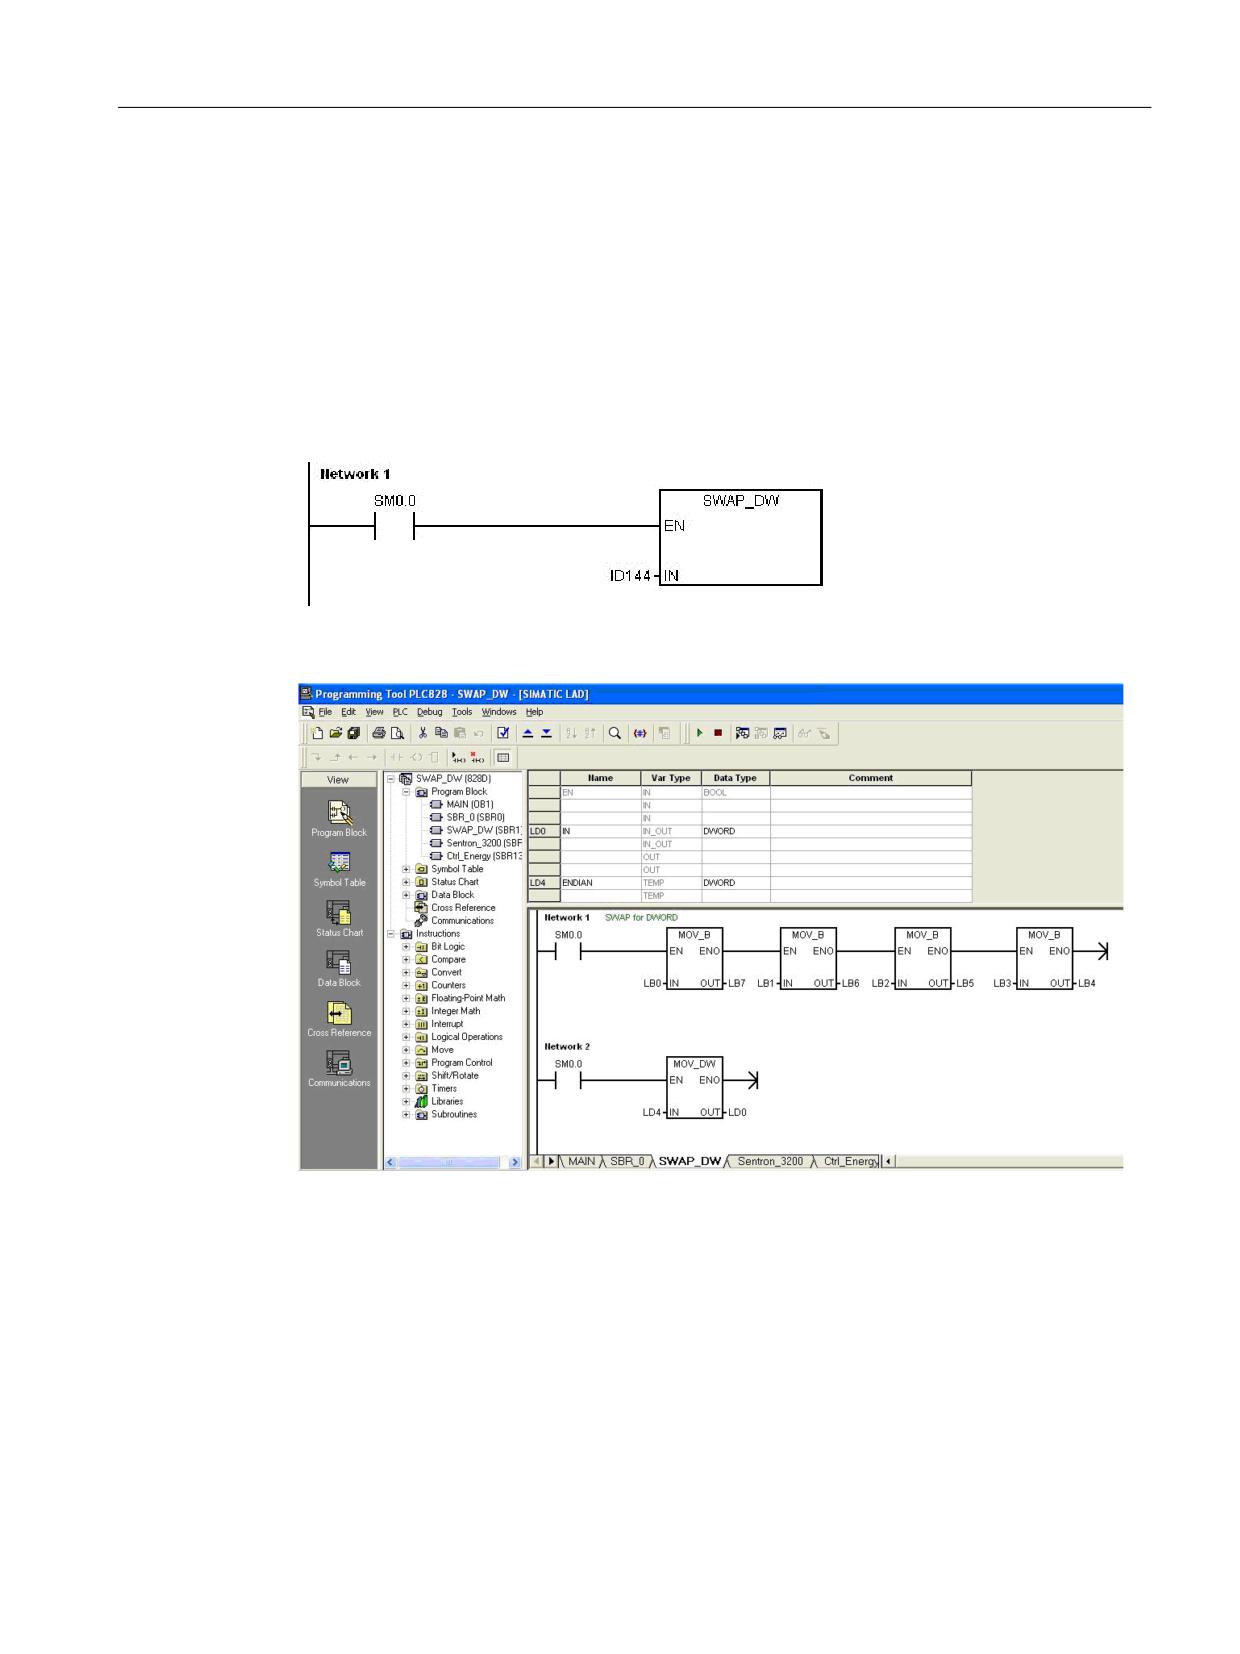
Adapting the byte sequence
Save the values of the SENTRON PAC so that the byte sequence of the double words is
swapped over (Endian conversion).
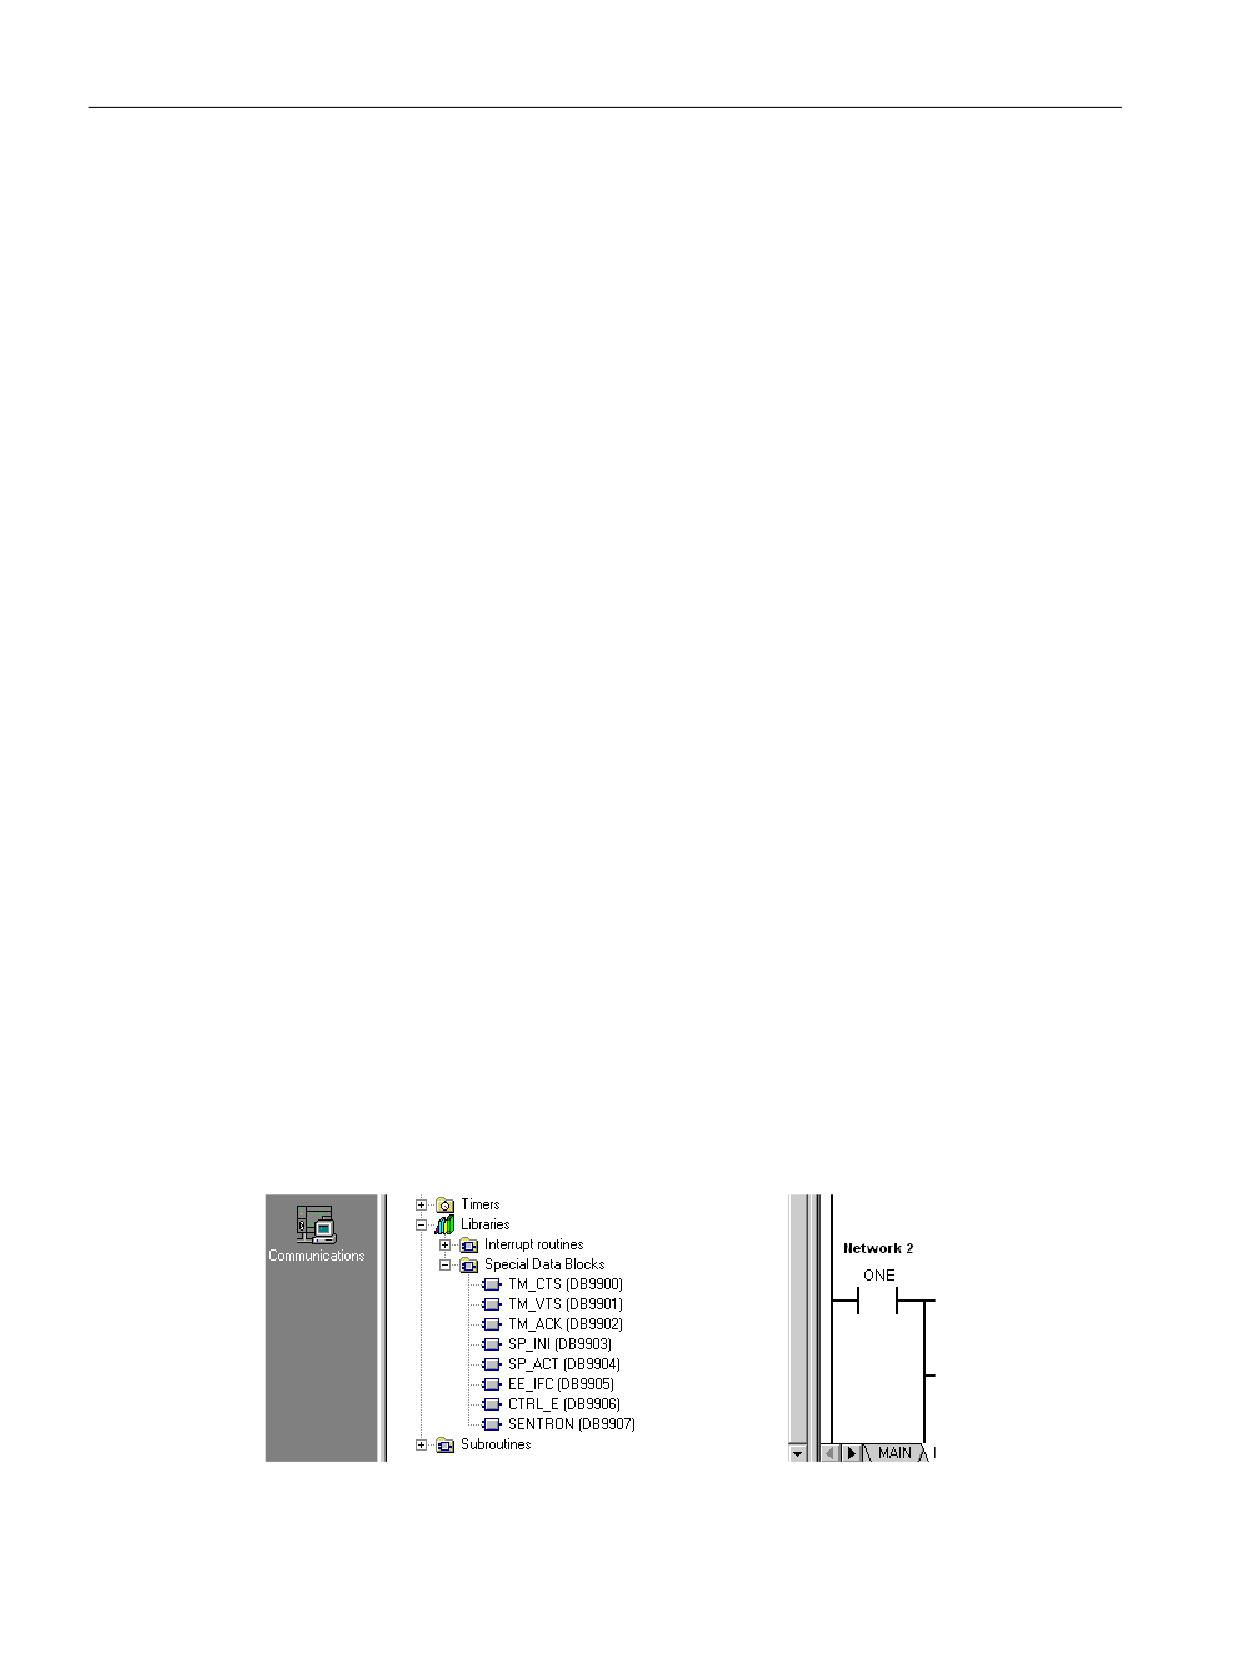
The CTRL_E and SENTRON blocks are located in the following directory:
Ctrl-Energy
34
System Manual, 10/2015, 6FC5397-0EP40-5BA3
Ctrl-E Analysis
3.3 Commissioning the PLC for Ctrl-E Analysis
Example for SINUMERIK 828D with SENTRON PAC3200
Swap over the byte sequence of the total active power in ID144:
For the total active power, the numerical value of 18.4 is supplied from SENTRON. This
corresponds to a hexadecimal value of 0x41933334, which is located just like this in the double
word ID144. To be further processed by the PLC, the sequence of these four bytes must be
swapped over: 0x34339341.
Also the values for the active energy import tariff 1 and active energy export tariff 1 must be
handled in this way.
Figure 3-5
SWAP_DW subroutine
Figure 3-6
Byte sequence
You can find the SWAP_DW subroutine on the Toolbox-CD under Examples\PLC
Ctrl-Energy
System Manual, 10/2015, 6FC5397-0EP40-5BA3
35
Ctrl-E Analysis
3.3 Commissioning the PLC for Ctrl-E Analysis
Measurement control HMI → FW and PLC → FW
● With a 1 signal of the control bit "MeasAuto" (DBX1.0), the user requests that the firmware
makes the measurement.
If this bit is not set, then the user is responsible for calculating and writing the measured
values.
● Using a 1 signal of the control bit "MeasAct" (DBX2.0), via the HMI it is signaled as to when
the measurement should be made: 0→1 start measurement, 1→0 stop measurement.
The firmware only evaluates this signal if control bit "MeasAuto" (DBX1.0) is set.
Measurement carried out by the firmware
For these measurements, the cyclic increases in the energy values are accumulated in the
measured variables.
The behavior for different signal sequences of both measurement control signals are described
in the following:
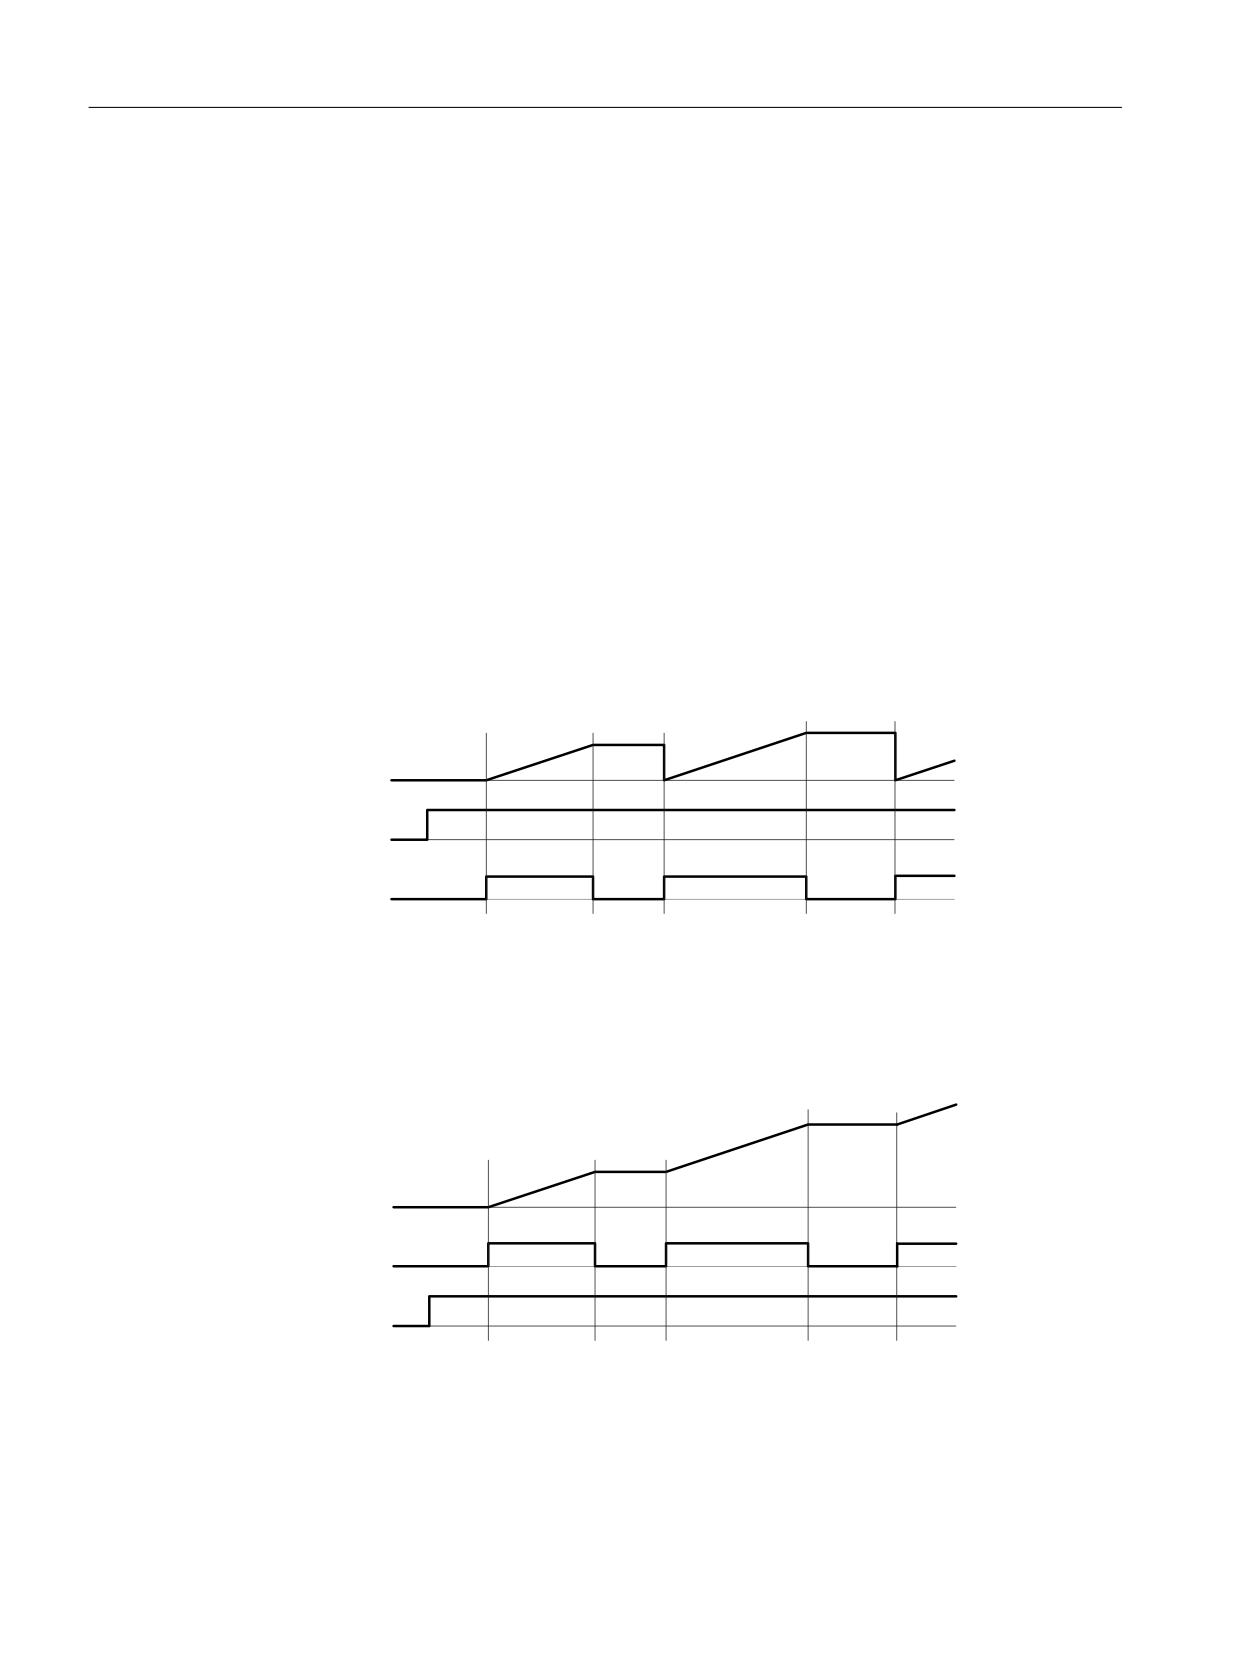
● DBX1.0 is set first
If DBX1.0 ("MeasAuto") is first set, and then remains statically present, every 0-1 edge of
DBX2.0 ("MeasAct") deletes the measured value and then starts the measurement.
If DBX2.0 is reset, the measurement is canceled and the measured value remains constant.
The sequence is repeated at the next 0-1 edge of DBX2.0.
0HDVXUHG
YDOXH
'%;
'%;
Figure 3-7
Measurement control signal DBX1.0 is set first
● DBX2.0 is set first
If DBX2.0 ("MeasAct") is set first, and then remains statically present, every 0-1 edge of
DBX1.0 ("MeasAuto") accumulates the measured value without deleting the previous value.
If DBX1.0 is reset, the measurement is only interrupted and the measured value remains
constant.
0HDVXUHG
YDOXH
'%;
'%;
Figure 3-8
Measurement control signal DBX2.0 is set first
Ctrl-Energy
36
System Manual, 10/2015, 6FC5397-0EP40-5BA3
Ctrl-E Analysis
3.4 Commissioning the HMI for Ctrl-E Analysis
3.4
Commissioning the HMI for Ctrl-E Analysis
No additional adaptation is required.
As soon as the DB1001 (840D sl) or the DB9907 (828D) is available and actively assigned
with data words, then the HMI automatically accepts this data.
If you have configured auxiliary systems, these devices are displayed as "AUX1" to "AUX10"
in the Ctrl-E analysis. You can assign these devices language-dependent display texts.
3.4.1
Changing display texts of the auxiliary systems
The display texts for the auxiliary systems are stored in the "slnrgauxunits_xxx.ts" file. A
dedicated file must be created for each supported language. The file names differ by the
language code. Set the appropriate language code for "xxx" (e.g. "slnrgauxunits_eng.ts" for
English).
Structure of the "slnrgauxunits_xxx.ts" file
In the "slnrgauxunits_xxx.ts" file, the text identifiers from the software are assigned language-
dependent texts.
Tag
Meaning
source
Text identifier
The auxiliary systems are identified with "AUX_UNIT_1" to
"AUX_UNIT_10".
translation
Text which is displayed on the user interface.
You can enter single and multi-line texts. "%n" is used to generate a line
break.
chars
Text length (number of characters)
lines
Number of lines
Procedure
1. Copy the "slnrgauxunits_deu.ts" template file from the directory: siemens/sinumerik/
hmi/template/lng.
2. Save the file to the /oem/sinumerik/hmi/lng or /user/sinumerik/hmi/lng
directory.
3. If required, change the file name.
If you wish to create texts for additional languages, then a separate file must be created
for each language. Save the file with the appropriate language code in the file name.
4. Open the file and enter the text to be displayed between the <translation> and </translation>
tags.
5. Restart SINUMERIK Operate.
The file must still be converted into a binary format so that the texts can be displayed during
the program runtime. This conversion is only executed when the HMI powers up.
Ctrl-Energy
System Manual, 10/2015, 6FC5397-0EP40-5BA3
37
Ctrl-E Analysis
3.6 Power display in the status line of the "Machine" operating area
3.5
Long time measurement
In order that you can read the usage values in the Ctrl-Energy initial window and in the "Long
time measurement" window, program the PLC user program as specified in Chapter 2.3.1.1
(840D sl) or 2.3.2.1 (828D).
3.6
Power display in the status line of the "Machine" operating area
The current energy consumption is displayed in the first line of the status display in the
"Machine" operating area in the form of colored bars.
To show the power display set DB1001.DBX3.0 = 1 in the STEP 7 program of the PLC.
The following machine statuses are displayed:
Displaying the machine status
DB1001.DBB96 = 0
Red bar upwards - the machine is unproductive
DB1001.DBB96 = 1
Dark green bar upwards - the machine is productive and consumes
energy
DB1001.DBB96 = 2
Light green bar downwards - the machine feeds energy back into
the line supply (generator operation)
Ctrl-Energy
38
System Manual, 10/2015, 6FC5397-0EP40-5BA3
Ctrl-E Profiles
4
To optimize the energy consumption, you have the option of defining energy saving profiles
and saving them.
Controlling the energy-saving states of the machine
The following pre-defined energy-saving profiles are available when the system is delivered:
● Simple energy-saving mode (machine standby)
A specific interface signal is initiated if the control has not exited the reset state after a
defined time. Using this signal, with the PLC a pre-defined energy state is established,
where, for example it is still possible to operate the machine for setting-up purposes.
● Full energy-saving mode (NC standby)
A specific interface signal is initiated if none of the keys on the machine control panel at
the control has been pressed for a specific time. A pre-defined energy state can be
established with the PLC using this signal, where it is still possible, for example, to transfer
programs to the control or edit them.
● Maximum energy-saving mode (auto shut-off)
An additional interface signal is initiated if, at the control, no key on the operator panel and
machine control panel has been pressed for a defined time and there is no active
communication with the external device. Via the PLC, the main switch is automatically
opened, e.g. using the undervoltage release function.
These predefined energy-saving profiles only become effective if the control system is in the
reset state. They can be blocked using a PLC user signal. The energy-saving profiles can be
changed at any time and supplemented to include up to a total of 8 profiles.
For instance, you have the option of assigning a customer key to an energy-saving profile,
with which the control can be immediately shut down.
4.1
Commissioning the PLC for Ctrl-E Profiles
4.1.1
Overview
In every machine tool, the PLC is the central part of the control for the peripherals and mounted
equipment/devices. Each machine can have several operating stations.
The energy-saving profiles are managed and stored in the PLC. The signals to monitor energy
within the machine are available in the PLC; these signals can then be appropriately logically
combined in the PLC user program.
Ctrl-Energy
System Manual, 10/2015, 6FC5397-0EP40-5BA3
39
Ctrl-E Profiles
4.1 Commissioning the PLC for Ctrl-E Profiles
SINUMERIK 840D sl
In SINUMERIK 840D sl, "Ctrl+Energy" is integrated in the basic program (FB15). Data for each
energy-saving profile is saved in DB1000, which is supplied with the Toolbox.
SINUMERIK 828D
In SINUMERIK 828D, "Ctrl+Energy" is integrated in the PLC firmware. The data for each
energy-saving profile is saved in the DB9906, which is included in the Programming Tool 828D.
In the other versions, for the "basic program (FB15)" for 828D, "PLC firmware" applies.
Energy-saving profiles
The PLC supports 8 energy-saving profiles. After the relevant configured delay times have
expired, the energy-saving profiles are individually active. The total time up until the energy-
saving profile is activated is obtained from its activation time plus the prewarning time. During
the two time intervals, the selected signals, enabled using masking, are monitored for any
activity and the profile only becomes finally active when the signals are completely inactive.
Of course, when required OEMs can configure either one or both times with zero.
The energy-saving profile in the PLC is characterized by the following data:
● the maximum time for T1 - the activation time
● the maximum time for T2 - the prewarning limit time of the user
● the actual value for T1
● the actual value for T2
● masking of the signals to assume/exit the energy-saving state
The times have the units of seconds, are 16 bits wide and unsigned. A maximum time is
therefore approximately 18 hours.
Note
The time until the energy-saving profile has been finally activated is obtained by adding the
actual values of T1 and T2
The data for each energy-saving profile is saved in DB1000 for the 840Dsl and in DM9906 for
the 828D.
4.1.2
Automatic state machine PLC functions
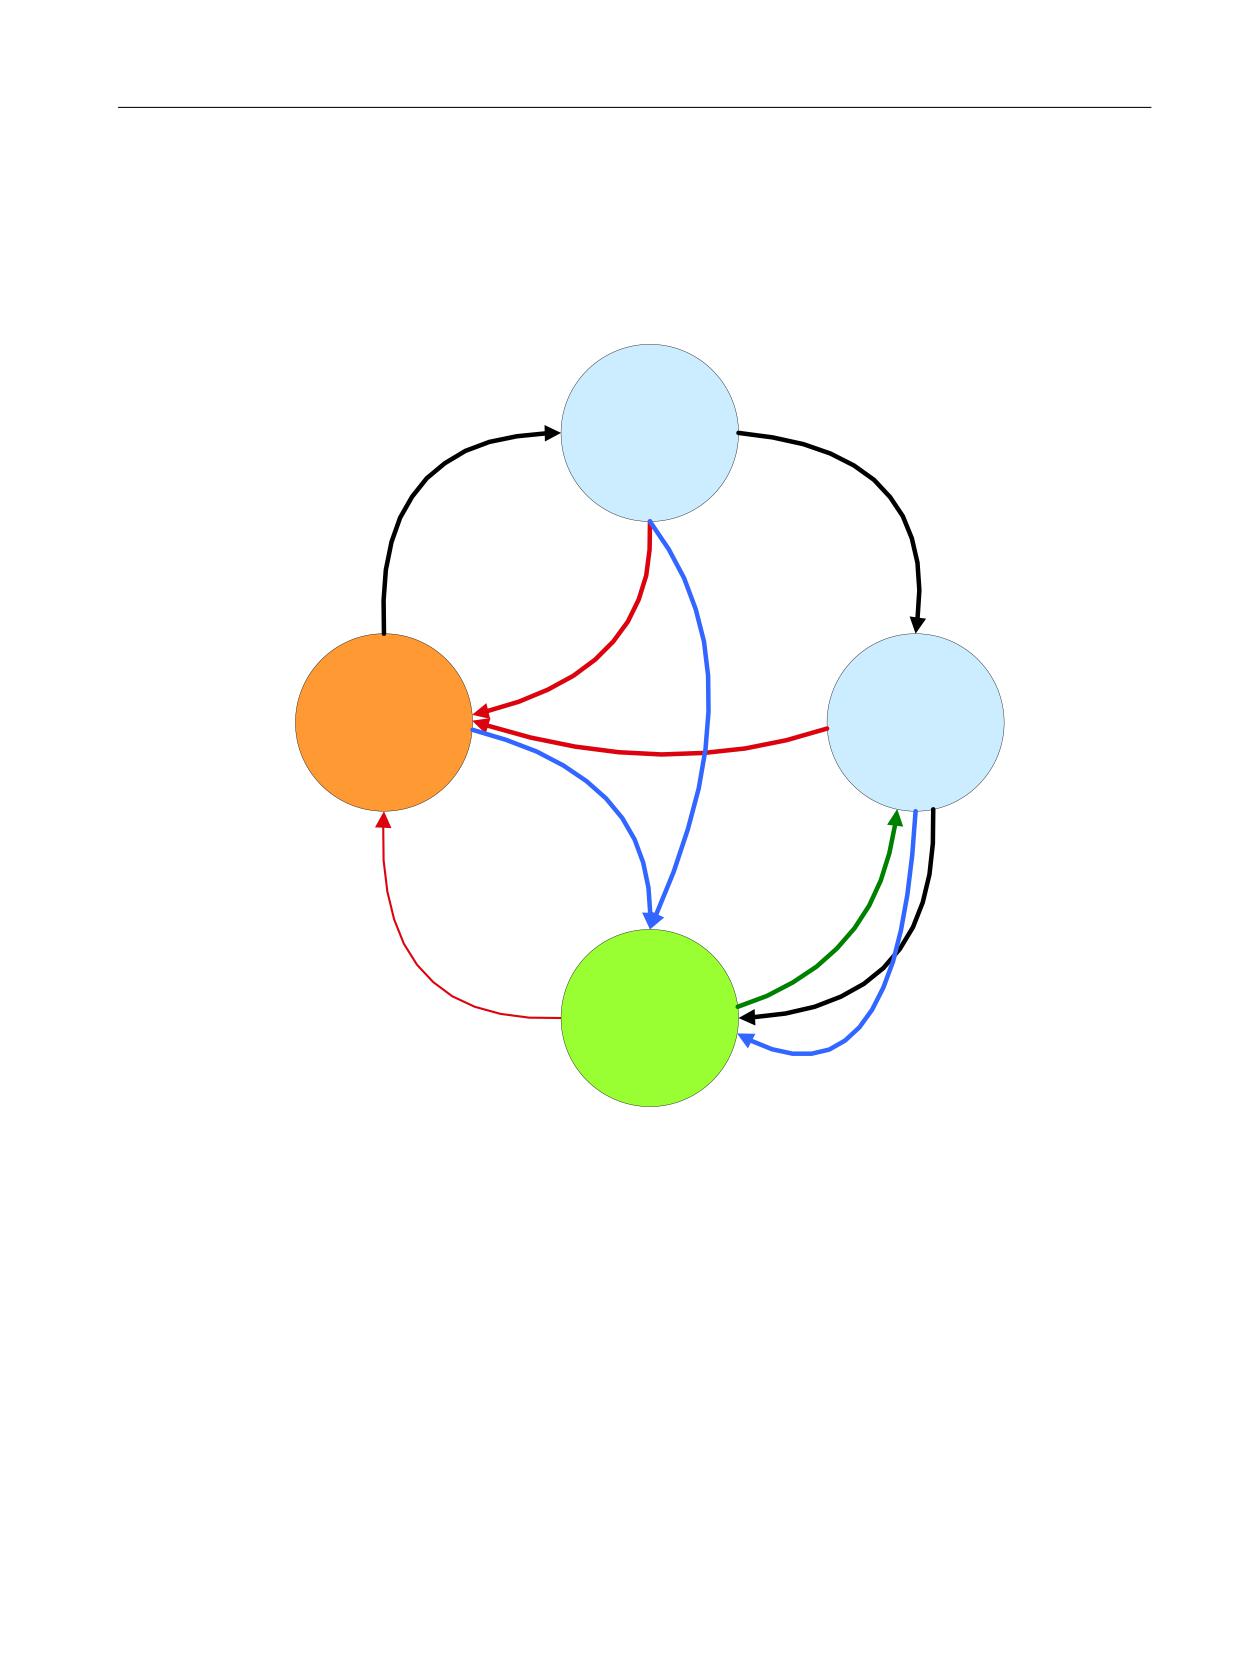
The automatic state machine shows the functionality in the PLC.
The state transition "OFF" results in a change into the "Energy-saving state inactive" from
every other state. This corresponds to "waking up" the machine.
After the NCU powered up, every energy-saving profile in the state "Energy-saving state
inactive" and the actual values of the times T1 and T2 are set to the maximum values.
Ctrl-Energy
40
System Manual, 10/2015, 6FC5397-0EP40-5BA3
Ctrl-E Profiles
4.1 Commissioning the PLC for Ctrl-E Profiles
An energy-saving profile runs through the displayed automatic state machine if the associated
"energy-saving profile initialized" bit is set. The HMI resets this bit before changing the times
or the signal mask, and sets it after the values have been consistently written into the PLC.
When the "Energy-saving profile active" bit is set, then an energy-saving profile is considered
to have been assigned.
7LPHU 7
7UDQVLWLRQ
7UDQVLWLRQ
LV
581
581
GHFUHPHQWHG
7 KDV H[SLUHG
'LUHFWO\ DFWLYDWH
HQHUJ\ VDYLQJ SURILOH
VHW
7UDQVLWLRQ
2))
(QHUJ\
7LPHU 7
VDYLQJ VWDWH
7UDQVLWLRQ
LV
LQDFWLYH
2))
GHFUHPHQWHG
'LUHFWO\ DFWLYDWH
7 KDV H[SLUHG
HQHUJ\ VDYLQJ SURILOH
6HW WLPH WR
VHW
SUHZDUQLQJ OLPLW
ORDG 7 ZLWK
VHWSRLQW
7UDQVLWLRQ
581
7UDQVLWLRQ
2))
(QHUJ\
VDYLQJ VWDWH
DFWLYH
'LUHFWO\ DFWLYDWH
HQHUJ\ VDYLQJ SURILOH
VHW
Figure 4-1
State monitoring
Transition to "RUN"
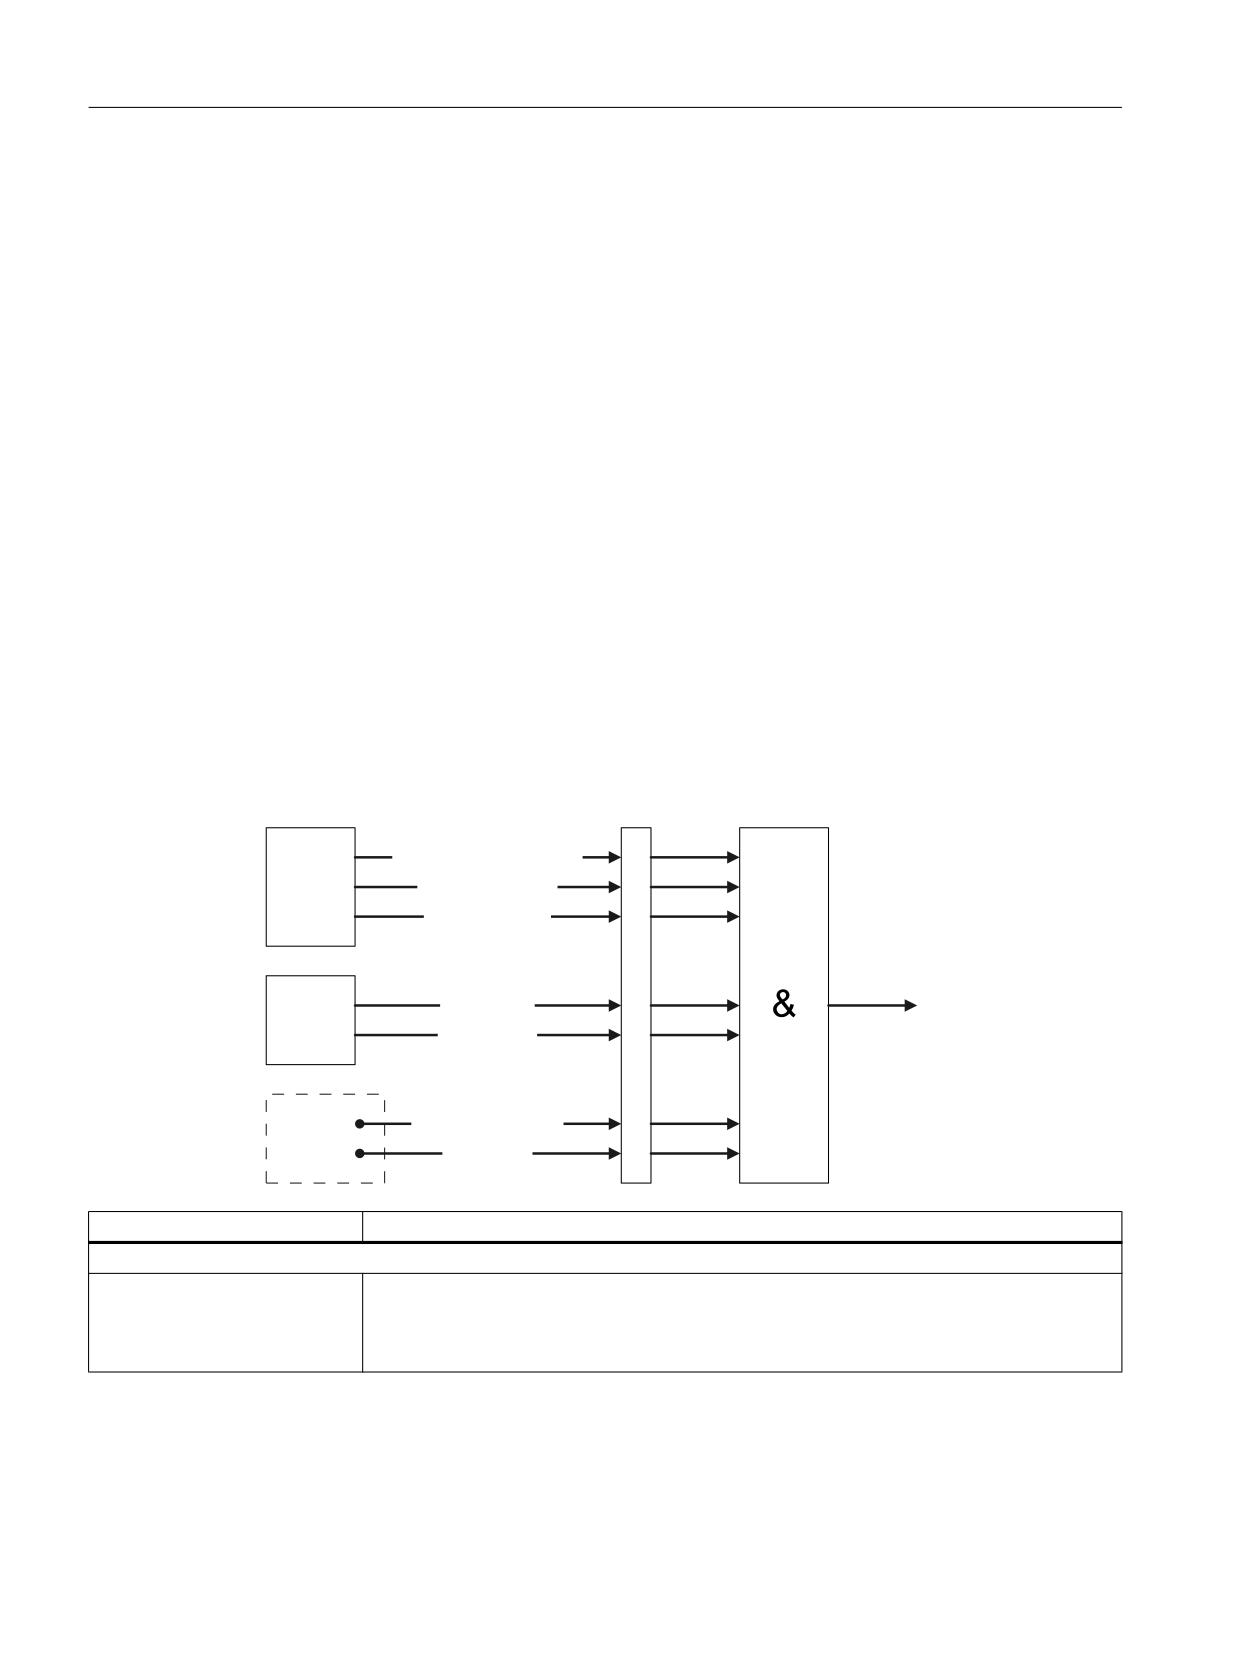
All of the signals that have been enabled for evaluation using the following masking bits, are
inactive
(also see Chapter 3.1.5.2.):
DBX 11.0, DBX 11.1, DBX 11.2
HMI activities
DBX 12.0
MCP activities
DBX 13.0 - DBX 13.7
NCK channel activities
DBX 14.0, DBX 14.1
NCK channel activities
DBX 15.0, DBX 15.1
Master computer and PLC prohibit signals
The specified signals refer to energy-saving profile 1.
Ctrl-Energy
System Manual, 10/2015, 6FC5397-0EP40-5BA3
41
Ctrl-E Profiles
4.1 Commissioning the PLC for Ctrl-E Profiles
Transition to "OFF"
DBX 10.1 == 1 ("deactivate profile") or delete the profile: highest priority and independent
of the profile initialization
- OR -
0-1 edge at the DBX 10.0 ("profile is initialized")
- OR -
At least one of the signals that have been enabled for evaluation using the following masking
bits, is inactive (also see Chapter 3.1.5.2.):
DBX 11.0, DBX 11.1, DBX 11.2
HMI activities
DBX 12.0
MCP activities
DBX 13.0 - DBX 13.7
NCK channel activities
DBX 14.0, DBX 14.1
NCK channel activities
DBX 15.0, DBX 15.1
Master computer and PLC prohibit signals
The specified signals refer to energy-saving profile 1.
4.1.3
Checking the energy-saving states
The following signals are checked when entering or retaining the energy-saving profile. The
signals can be masked for each energy-saving profile.
.H\ERDUG KDV EHHQ XVHG
+0,
'DWD WUDQVIHU DFWLYH
2SHUDWH
6FUHHQ FKDQJH
0
DFWLYH
D
V
N
L
0&3 RSHUDWHG
H
3/& *3
1&. DFWLYLW\
U
X
Q
J
0DVWHU FRPSXWHU
3/& XVHU
SURKLELWV
83 VLJQDO
SURJUDP
Signal
Function
Generated by the HMI
Keyboard has been used
This signal is set if in the last second the keyboard of the SINUMERIK control was used.
This signal is only available once for each control system and is automatically linked through
(state condition "No key press-
the masking. In the case of several operator panels, the group signal of all keyboards is
ed on the operator panel")
used. For a keystroke, the HMI sets this bit and the PLC handles the reset process.
Ctrl-Energy
42
System Manual, 10/2015, 6FC5397-0EP40-5BA3
Ctrl-E Profiles
4.1 Commissioning the PLC for Ctrl-E Profiles
Signal
Function
Data transfer active
This signal is set if data is being transferred. After completion of the data transfer, the HMI
resets this bit. This includes the use of a USB memory medium, a V24 connection or a
(state condition "No communi-
network drive.
cation with an external device
active (USB, Ethernet, V24)")
This signal is also set when generating or importing a commissioning archive. This signal
is only available once for each control system and is automatically linked through the mask-
ing. In the case of several operating stations, the group signal is formed. Acyclic S7 com-
munication in the sense of a connected engineering system or an external HMI does not
apply as data transfer in the sense of this signal.
Screen change active
This signal is set if a screen is being changed. After processing, the PLC resets the bit.
This signal is only available once for each control system and is automatically linked through
(state condition "No screen
the masking. For several operator stations, the group signal is formed here.
change realized")
Generated by the PLC basic program (828D: PLC firmware)
Machine control panel used
This signal is set if the machine control panel in the PLC is used. To do this, a specified
address range of the inputs is monitored in the PLC.
(state condition "No key press-
ed on the machine control pan-
● For 840D sl, the ranges addressed via parameters DB7 MCP1In and MCP2IN
el")
● For 828D, the input range of the PN-MCP
This signal is only available once for each control system and is automatically linked through
the masking. The group signal is formed when several machine control panels are being
used.
NCK activity
This signal is set if the NCK channel is not in the Reset channel state.
(state condition "NC channel/
Note: Static synchronized actions, which are also active in the Reset channel state = TRUE,
channels in reset")
are not detected and must be taken into account by the user.
From the PLC user program interface
Master computer prohibits
Using this signal, an external master computer or a coupled control system can prevent
that the energy-saving profile is activated. This signal is available in the user interface for
(state condition "master com-
each energy-saving profile.
puter signal prohibits")
PLC user program signal
Using this signal, from the user program in the PLC, an energy-saving profile can be pre-
vented from being activated. This signal is available in the user interface for each energy-
(state condition "PLC user sig-
saving profile.
nal prohibits")
4.1.4
PLC user program
The following signals are available in the user program for controlling the energy-saving
profiles. These signals are not masked within the energy profile, and are available for each
profile.
Signal
Function
Control signal to "directly acti-
The energy-saving profile is immediately activated when this signal is set. The two timers
vate the energy-saving profile"
are set to zero. For the case that the energy profile has already been activated, no change
is made.
Set time to prewarning limit
When setting this signal, the timer for the prewarning limit T2 is set to its setpoint and is
then restarted. This is also the case, even if the energy-saving profile is already active. The
activation is then reset, and after the prewarning time is set again.
Ctrl-Energy
System Manual, 10/2015, 6FC5397-0EP40-5BA3
43
Ctrl-E Profiles
4.1 Commissioning the PLC for Ctrl-E Profiles
Signal
Function
Feedback signal, "prewarning
This signal is set by the basic PLC program (FB15) if the timer has expired and the pre-
time T1 expired"
warning is output on the HMI.
Feedback signal, "prewarning
This signal is set by the basic PLC program (FB15) if, after the prewarning limit has been
time T2 expired"
reached, also the prewarning time of the corresponding energy profile has expired. This
means that this signal is equivalent to the information "Energy-saving state active".
Note
Shutdown auxiliary equipment
If auxiliary equipment is also to be shut down using the "Prewarning time expired" signal, which
acknowledges the shutdown process, then using a normal PLC timer and the signal "PLC user
program signal", a monitoring function can be installed in the basic PLC program. If the auxiliary
equipment has still not been run down after the PLC timer has expired, then the energy-saving
state can be exited again using the "PLC user program signal".
4.1.5
Interface signals 840D sl
4.1.5.1
Signals for controlling energy-saving profiles
Dynamic data are cleared when the control powers up.
The signals described in the following section refer to energy-saving profile 1.
Control signals (user program)
DB1000
DBX0.0
Directly activate energy-saving profile
DBX0.1
Set time to prewarning limit
Control signals (HMI)
DB1000
DBX1.0
Directly activate energy-saving profile
Signals to check the energy-saving state (user program)
DB1000
DBX2.0
Master computer prohibits energy-saving state
DBX2.1
PLC user program signal prohibits energy-saving state
Ctrl-Energy
44
System Manual, 10/2015, 6FC5397-0EP40-5BA3
Ctrl-E Profiles
4.1 Commissioning the PLC for Ctrl-E Profiles
Status signals
DB1000
DBX4.0
Energy-saving profile is active
DBX4.1
Prewarning limit T1 reached
Actual values
DB1000
DBW6
Actual value T1
DBW8
Actual value T2
4.1.5.2
Signals for parameterization
Retentive parameterization data.
Effectiveness (HMI → PLC)
DB1000
DBX 10.0
Energy-saving profile configured
DBX 10.1
Disable energy-saving profile
Masking (HMI → PLC)
DB1000
DBX 11.0
Keyboard has been used
DBX 11.1
Data transfer active
DBX 11.2
Screen change active
DBX 12.0
Machine control panel used
DBX 13.0
NCK channel 1
DBX 13.1
NCK channel 2
DBX 13.2
NCK channel 3
DBX 13.3
NCK channel 4
DBX 13.4
NCK channel 5
DBX 13.5
NCK channel 6
DBX 13.6
NCK channel 7
DBX 13.7
NCK channel 8
DBX 14.0
NCK channel 9
DBX 14.1
NCK channel 10
DBX 15.0
Master computer prohibits*
DBX 15.1
PLC user program signal prohibits*
*prohibits changing into the energy-saving mode
Ctrl-Energy
System Manual, 10/2015, 6FC5397-0EP40-5BA3
45
Ctrl-E Profiles
4.1 Commissioning the PLC for Ctrl-E Profiles
Maximum times (HMI → PLC)
DB1000
DBW 16
Activation time T1
DBW 18
Time for the prewarning limit T2
Additional profile instances
DB1000
DBW 20
Energy-saving profile 2
DBW 40
Energy-saving profile 3
DBW 60
Energy-saving profile 4
DBW 80
Energy-saving profile 5
DBW 100
Energy-saving profile 6
DBW 120
Energy-saving profile 7
DBW 140
Energy-saving profile 8
4.1.6
Interface signals 828D
4.1.6.1
Signals for controlling energy-saving profiles
Dynamic data are cleared when the control powers up.
Control signals (user program)
DB9906
DBX0.0
Directly activate energy-saving profile
DBX0.1
Set time to prewarning limit
Control signals (HMI)
DB9906
DBX1.0
Directly activate energy-saving profile
Signals to check the energy-saving profile (user program)
DB9906
DBX2.0
Master computer prohibits energy-saving state
DBX2.1
PLC user program signal prohibits energy-saving state
Ctrl-Energy
46
System Manual, 10/2015, 6FC5397-0EP40-5BA3
Ctrl-E Profiles
4.1 Commissioning the PLC for Ctrl-E Profiles
Status signals
DB9906
DBX4.0
Energy-saving profile is active
DBX4.1
Prewarning limit T1 reached
Actual values
DB9906
DBW6
Actual value T1
DBW8
Actual value T2
4.1.6.2
Signals for parameterization
Retentive parameterization data.
Effectiveness (HMI → PLC)
DB9906
DBX10.0
Energy-saving profile configured
DBX 10.1
Disable energy-saving profile
Masking (HMI → PLC)
DB9906
DBX11.0
Keyboard has been used
DBX11.1
Data transfer active
DBX11.2
Screen change active
DBX12.0
Machine control panel used
DBX13.0
NCK channel 1
DBX13.1
NCK channel 2
DBX15.0
Master computer prohibits*
DBX15.1
PLC user program signal prohibits*
*prohibits changing into the energy-saving mode.
Maximum times (HMI → PLC)
DB9906
DBW16
Activation time T1
DBW18
Time for the prewarning limit T2
Ctrl-Energy
System Manual, 10/2015, 6FC5397-0EP40-5BA3
47

Ctrl-E Profiles
4.2 Creating and editing energy-saving profiles
Additional instances
DB9906
DBW20
Energy profile 2
DBW40
Energy profile 3
DBW60
Energy profile 4
DBW80
Energy profile 5
DBW100
Energy profile 6
DBW120
Energy profile 7
DBW140
Energy profile 8
4.2
Creating and editing energy-saving profiles
You can make the following changes in the list of energy-saving profiles in the commissioning
mode:
● Creating new energy-saving profiles with prewarning time and activation time period.
● Changing state conditions, prewarning time and activation time period
● Deleting energy-saving profiles
● Importing externally generated energy-saving profiles into the system
● Backing up energy-saving profiles on an external medium
Note
Maximum number of energy-saving profiles
A maximum of 8 energy-saving profiles can be created.
If the maximum number of profiles already exists, then the "New" softkey is no longer
available. To create a new energy-saving profile, remove a profile using the "Delete" softkey
or change an existing profile using the "Change" softkey.
Note
Access level of the energy-saving profiles for users
You specify the access level for the "Energy-saving profiles" softkey in the "Parameter"
operating area using the machine data 51071 $MNS_ ACTIVATE_CTRL_E (protection level
1 as standard; this must be explicitly enabled by the manufacturer).
Note
Designations of energy-saving profiles that have been created
The names of the new energy-saving profiles that have been created are only visible at the
control where you generated them.
Ctrl-Energy
48
System Manual, 10/2015, 6FC5397-0EP40-5BA3

Ctrl-E Profiles
4.2 Creating and editing energy-saving profiles
Energy conditions
The following criteria are available for configuring an energy-saving profile:
State conditions
Meaning
No key on the operator panel pressed
To activate the energy-saving profile, it is not permis-
sible that an operator panel key is pressed.
No key on the machine control panel pressed
To activate the energy-saving profile, it is not permis-
sible that a machine control panel key is pressed.
No screen change realized
To activate the energy-saving profile it is not permis-
sible that a screen is being changed.
No communication with an external device ac-
To activate the energy-saving profile, it is not permis-
tive (USB, Ethernet, V24)
sible that data is being exchanged with an external
device, for example.
NC channel/channels in Reset
To activate the energy-saving profile, NC channel/
channels must be in the Reset state.
Master computer signal prohibits
To activate the energy-saving profile, it is not permis-
sible that a signal is received from the master com-
puter.
PLC user signal prohibits
To activate the energy-saving profile, it is not permis-
sible that a signal is received from the PLC user pro-
gram.
The OEM can logically combine other state condi-
tions with this signal and influence the profiles.
Activation of the energy-saving profile after
Here, you enter the time period after which the ener-
gy-saving profile is activated.
Prewarning after
Here, you enter when the system starts to display the
prewarning.
Note:
If you enter the same value into the "Activation of the
energy-saving profile after" and "Prewarning after"
fields, then no message is displayed specifying the
remaining time up until the energy-saving profile is
activated.
Note
Protection levels for editing energy-saving profiles
You define the protection level that is required in order to create or edit an energy-saving profile
in machine data 51072 $MNS_ACCESS_EDIT CTRL_E (default, protection level 2 (service)).
Ctrl-Energy
System Manual, 10/2015, 6FC5397-0EP40-5BA3
49
Ctrl-E Profiles
4.2 Creating and editing energy-saving profiles
Procedure
1.
Select the "Startup" operating area.
2.
Press the "HMI" and "Ctrl-Energy" softkeys.
The window "SINUMERIK Ctrl-Energy: Definition of the energy-saving
profile" is opened.
Newly creating/changing energy profiles
3.
Position the cursor on the line where you wish to create a new energy-
saving profile and press the "New" softkey.
The window "SINUMERIK Ctrl-Energy: Definition of the energy-saving
profile" is opened.
In the "Designation" field, enter the desired name for the new energy-
saving profile. Activate the required state conditions. Specify the times to
display the prewarning limit and to activate the energy-saving profile.
- OR -
Position the cursor on the energy-saving profile that you want to edit and
press the "Change" softkey.
The window "SINUMERIK Ctrl-Energy: Definition of the energy-saving
profile" is opened.
In the "Designation" entry field, enter the modified name of the energy-
saving profile. Select or deselect the state conditions that should be ef-
fective for the modified energy-saving profile - and when required, change
the time data.
4.
Press the "OK" softkey.
The new or modified energy-saving profiles are activated.
The modified texts (def_conditions<long>.ts) are saved in the \oem\sinu-
merik\hmi\lng directory.
Importing energy-saving profiles
5.
Press the "Import profile" softkey.
The "Import energy-saving profiles" window is displayed.
Select the required XML file and press the "OK" softkey. After a prompt,
the energy-saving profiles are downloaded into the PLC.
The associated text files (def_conditions<long>.ts) are saved in the \oem
\sinumerik\hmi\lng directory.
Note:
After importing the energy-saving profiles, a restart is required in order
to make the profiles effective.
Exporting energy-saving profiles
6.
Press the "Export profiles" softkey.
The window "Export energy-saving profiles: Select storage location"
opens.
Ctrl-Energy
50
System Manual, 10/2015, 6FC5397-0EP40-5BA3
Ctrl-E Profiles
4.2 Creating and editing energy-saving profiles
7.
Select the required storage location and press the "OK" softkey.
The language-neutral state data are stored in the XML format, the asso-
ciated texts in a .ts file. You have the option of selecting a name for the
XML file (default: def_conditions.xml).
The text files are saved under a fixed name. All of the defined energy-
saving profiles are always exported.
Note:
Please note that the energy-saving profiles supplied from Siemens are
also deleted. It is recommended that the energy-saving profiles are al-
ways exported and backed up.
Deleting energy-saving profiles
8.
Select the energy-saving profile that you want to delete from the list and
press the "Delete" softkey.
9.
Confirm the prompt with "OK" to remove the profile.
Ctrl-Energy
System Manual, 10/2015, 6FC5397-0EP40-5BA3
51
Ctrl-E Profiles
4.2 Creating and editing energy-saving profiles
Ctrl-Energy
52
System Manual, 10/2015, 6FC5397-0EP40-5BA3
Reactive power compensation
5
The Active Line Modules of the SINAMICS S120 series offer the option of compensating
capacitive or inductive reactive current. As standard, this function is used to compensate for
the system's own modules.
In addition, within a sensible scope, this feature can be used to compensate other (generally
inductive) loads connected to machine.
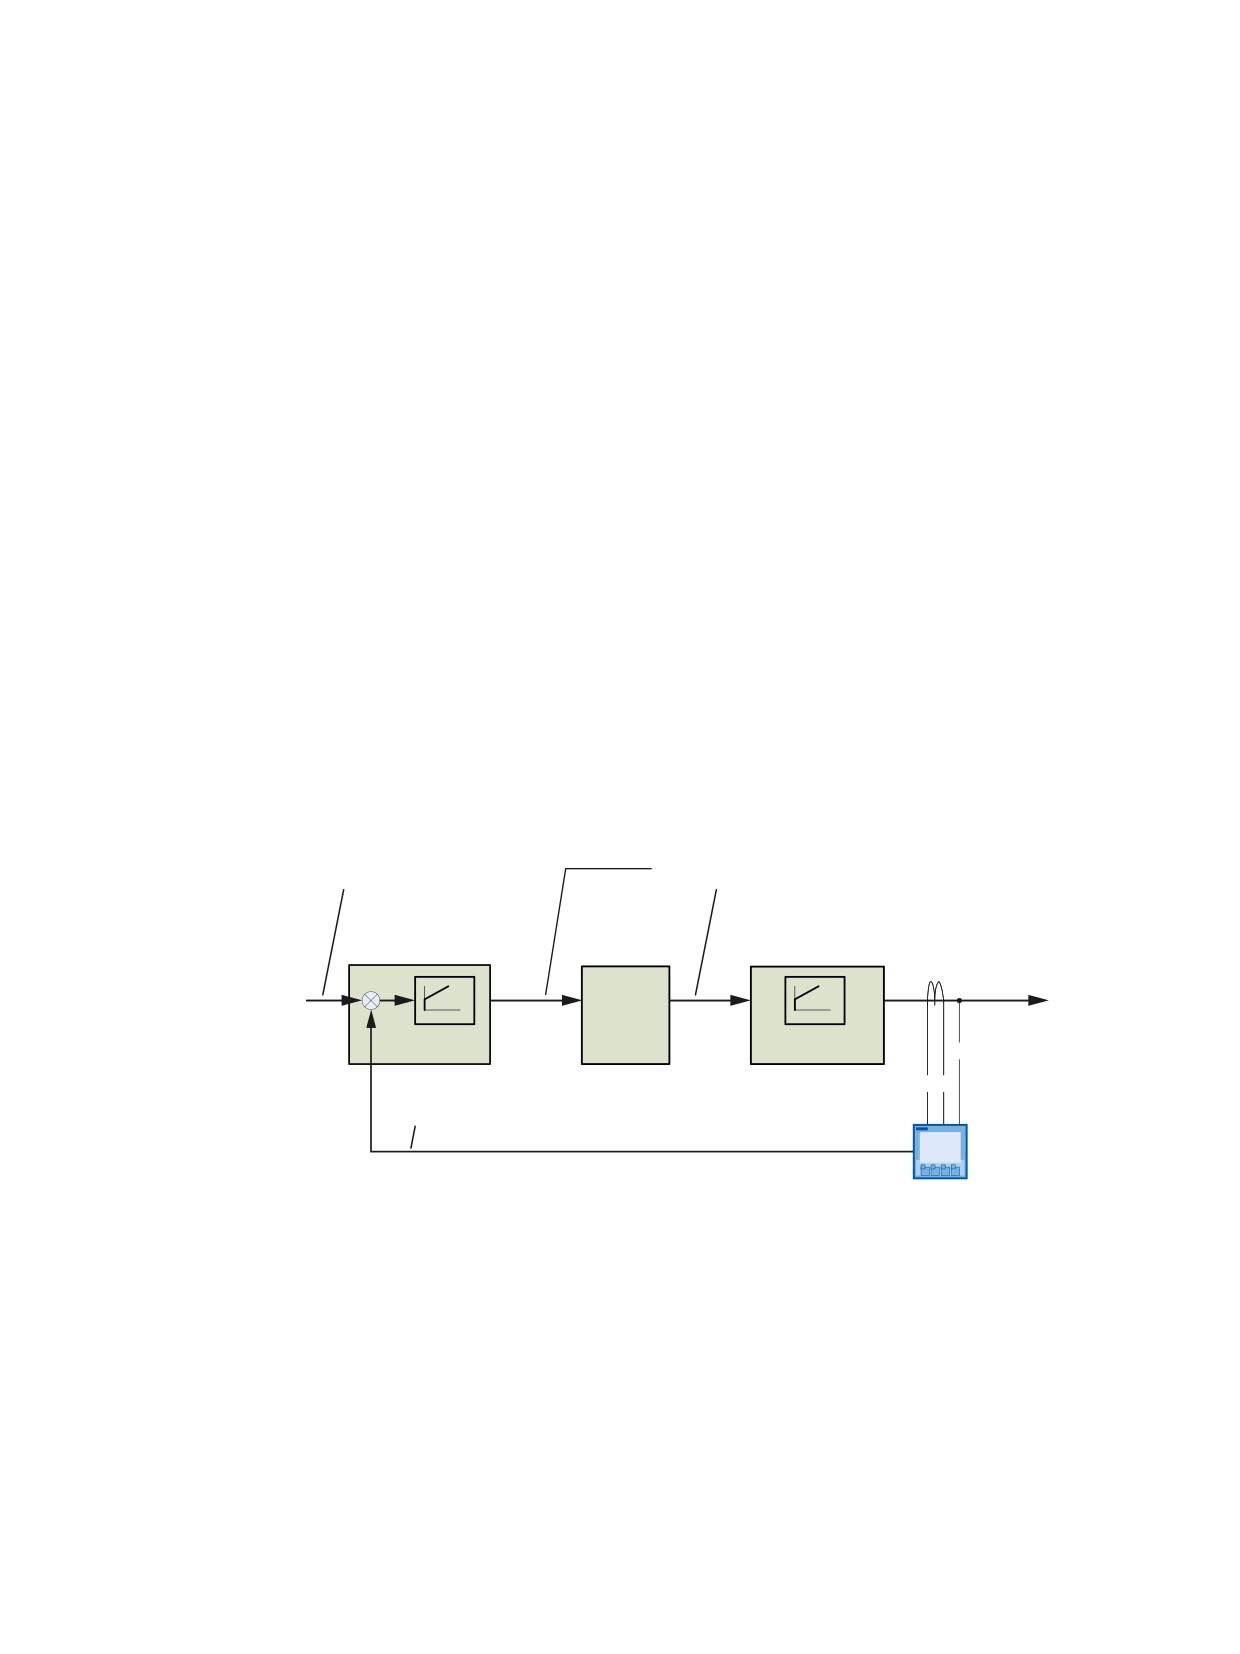
As a result of the properties of the SINAMICS S120 Active Line Module as actuator on one
hand, the properties of SENTRON PAC4200 as measuring element as well as additional PLC
blocks (also as controller), this function can be implemented with the SINUMERIK 840D sl also
independent of NC software releases.
Further information
Please contact your local sales organization if you require additional information regarding
reactive power compensation.
Function schematic
5HDFWLYH SRZHU 4 EDVLF IXQGDPHQWDO
6XSSOHPHQWDU\ UHDFWLYH SRZHU VHWSRLQW
6HWSRLQW
DV D SHUFHQWDJH
7UDQVSRUW
3/&
D[LV
$/0
)%
%,&2
6)%
3/& *3
3KDVH
*HW 3XW
VKLIWHU
9ROWDJH
&XUUHQW
5HDFWLYH SRZHU 4 EDVLF IXQGDPHQWDO
$FWXDO YDOXH
6(17521
352),%86
352),1(7
3$&
Figure 5-1
Principle of operation of reactive power compensation
Ctrl-Energy
System Manual, 10/2015, 6FC5397-0EP40-5BA3
53
Reactive power compensation
Ctrl-Energy
54
System Manual, 10/2015, 6FC5397-0EP40-5BA3
Flux reduction
6
In the drive parameters (p1581 [0..n]), the rated magnetization for induction motors - which is
normally 100% - can be permanently reduced. This includes the switching times for reducing
and building up the flux (r1578, r1579[0…n]).
In this case, not only can the magnetizing losses in the motors be reduced at standstill, but
also during operations that only require a lower power.
Optimization criterion
Under no-load conditions, the percentage value of the rated magnetization is reduced in steps
of between 5-10% to just above a value where the no-load behavior starts to become uneven.
From this limit value onwards, rough operating behavior can be heard as a result of the
significantly fluctuating active current.
It makes sense to monitor the current characteristic and this transition point using a trace
function.
Options for use
You have various options to specifically use this.
● Permanently set the actual parameter set p1581 [0] to the determined value <100%.
Taking into consideration the time constants, the flux is automatically reduced if the
instantaneous active power permits this. If more active power is demanded, then the flex
automatically increases back up to 100% with the corresponding time constant. This does
not have a negative impact on the process.
● Preselecting various parameter sets
If load changes are to be expected in a time shorter than the time constant (e.g. for an
interrupted roughing cut with facing head milling tools), it may be more favorable for the
process if the flux is permanently controlled by pre-selecting various parameter sets by
knowing the machining to be expected or the tool involved.
Example ((see the interface signals at the spindle DB31-61.DBB21))
Bit0: = 0:
p1581 [0] = 100%;
p1578 [0] and p1579 [0] = factory setting, e.g. for an interrupted cut
Bit0: = 1:
p1581 [1] < 100%;
p1578 [1], p1579 [1], adapted for partial load or no load
Ctrl-Energy
System Manual, 10/2015, 6FC5397-0EP40-5BA3
55
Flux reduction
Ctrl-Energy
56
System Manual, 10/2015, 6FC5397-0EP40-5BA3
User know-how
7
Machine manufacturers are being increasingly confronted with special demands from users
regarding proving energy consumption data or displaying limit values, for example.
Using SINUMERIK Integrate Run MyScreens (Easy Screen), it is possible to visualize the
functions obtained from these requirements, and also position them in the context of Ctrl-
Energy.
Displaying additional measuring data
The SENTRON PAC 3200/4200 Power Monitoring Devices provide, in different expansion
stages, a wealth of electrical measured data.
In addition to the active power/active energy displayed today in SINUMERIK Operate, using
Easy Screen, you have the option of displaying, for example, the reactive power/reactive
energy and the apparent power/apparent energy of the measuring location in customized
screen forms.
References
More information on the various measuring options is available in the following references:
● SENTRON PAC3200 Power Monitoring Device Manual
● SENTRON PAC4200 Power Monitoring Device System Manual
7.1
Commissioning user screen forms
General procedure
● You create your own screen forms in SINUMERIK Integrate Run MyScreens (Easy Screen),
for example in a xxx.com file.
● You insert the new "xxx.com" project file name in "easyscreen.ini" in the "Parameter" area.
● Save the modified "easyscreen.ini" in the following directory: oem\sinumerik\hmi\cfg\.
● If the released horizontal softkey 7 in the extended softkey bar of the "Parameter" operating
area is already used with a "yyy.com", then you have the option of programming the vertical
softkey 4 behind the "Ctrl-Energy" softkey for an additional "xxx.com".
An additional neutral "aufruf.com" file is created with the following start softkeys:
//S(START)
VS4=("Start XXX")
Ctrl-Energy
System Manual, 10/2015, 6FC5397-0EP40-5BA3
57
User know-how
7.1 Commissioning user screen forms
PRESS(VS4)
LM("maske_xxx","xxx.com")
END_PRESS
HS7=("Start YYY")
PRESS(HS7)
LM("maske_yyy","yyy.com")
END_PRESS
//END
These start calls directly access the specified screen forms of the relevant *.com files. A start
softkey in these particular *.com files can be omitted.
● Save the project files "xxx.com", "yyy.com" and "aufruf.com" in the following directory: oem
\sinumerik\hmi\proj\.
References
Additional information on the design and configuration of user interfaces is provided in the
following references on SINUMERIK Integrate Run MyScreens (Easy Screen):
Programming Manual Easy Screen (BE2); SINUMERIK 840D sl
Ctrl-Energy
58
System Manual, 10/2015, 6FC5397-0EP40-5BA3
Product SinuCom
1
Installation
2
General Operating
SINUMERIK 840D sl/840Di sl/
3
Sequences
840D/840Di/810D
SinuCom NC:
4
Functions
SinuCom Installation/Service Tools
SinuCom FFS:
5
Functions
Operating Manual
SinuCom CFS:
6
Functions
SinuCom ARC :
7
Functions
SinuCom PCIN:
8
Functions
Appendix
A
Valid for
Control
Index
I
SINUMERIK 840D sl/ 840DE sl
SINUMERIK 840Di sl/ 840DiE sl
SINUMERIK 840D/840Di/810D
Software
Version
SinuCom
7.50
07/2008
SINUMERIK®-Documentation
Printing history
Brief details of this edition and previous editions are listed below.
The status of each edition is shown by the code in the "Remarks" columns.
Status code in the "Remarks" column:
A
New documentation.
B
Unrevised reprint with new Order No.
C
Revised edition with new status.
Edition
Order No.
Remarks
06.03
Included in online help only -
A
03/2007
Included in online help only -
C
07/2008
included in online help only -
C
Registered trademarks
All names with the protective right label ® are registered trademarks of the Siemens AG. The
other product and system names in this document may be registered trademarks of their
respective companies and must be treated accordingly.
Disclaimer of liability
We have checked that the contents of this document correspond to the hardware and
software described. Nonetheless, differences might exist and therefore we cannot guarantee
that they are completely identical. The information contained in this document is, however,
reviewed regularly and any necessary changes will be included in the next edition.
© Siemens AG 2008. All Rights Reserved.
Bestell-Nr. included in online help only -
Siemens-Aktiengesellschaft.
07/2008
Preface
Preface
Structure of the documentation
SINUMERIK documentation is organized in 3 parts:
• General documentation
• User documentation
• Manufacturer/Service Documentation
An overview of publications (updated monthly) indicating the language versions
available can be found on the Internet at:
Follow menu items "Support" → "Technical Documentation" → "Ordering
Documentation" →"Printed Documentation".
The Internet version of the DOConCD (DOConWEB) is available at:
Information about training courses and FAQs (Frequently Asked Questions) can be
found at the following web site:
http://www.siemens.com/motioncontrol under menu option "Support"
Reader group
This manual is intended for users of machine tools with
SINUMERIK 840D sl/ 840Di sl and SINAMICS drive,
SINUMERIK 840D/ 840Di/ 810D and SIMODRIVE.
Standard version
This Parameter Manual only describes the functionality of the standard version.
Extensions or changes made by the machine tool manufacturer are documented by
the machine tool manufacturer.
Other functions not described in this documentation might be executable in the
control. This does not, however, represent an obligation to supply such functions
with a new control or when servicing.
Further, for the sake of simplicity, this documentation does not contain all detailed
information about all types of the product and cannot cover every conceivable case
of installation, operation or maintenance.
© Siemens AG 2008 All Rights Reserved
SINUMERIK 840D sl/840Di sl/ 840D/840Di/810D SinuCom (INC) - 07/2008
iii
Preface
07/2008
Technical Support
If you have any questions, please get in touch with our Hotline:
Europe / Africa
Phone
+49 180 5050 - 222
Fax
+49 180 5050 - 223
Internet
America
Phone
+1 423 262 2522
Fax
+1 423 262 2200
E-mail
mailto:techsupport.sea@siemens.com
Asia / Australia
Phone
+86 1064 719 990
Fax
+86 1064 747 474
E-mail
mailto:adsupport.asia@siemens.com
Note
Country telephone numbers for technical support are provided under the following
Internet address:
Calls are subject to charge, e.g. € 0.14/min on the German landline network.
Tariffs of other hone providers may differ.
Questions about the documentation
If you have any queries (suggestions, corrections) in relation to this documentation,
please fax or e-mail us:
Fax
+49 9131 98 - 2176
E-mail
mailto:docu.motioncontrol@siemens.com
Fax form: See the reply form at the end of the document.
SINUMERIK Internet address
© Siemens AG 2008 All Rights Reserved
iv
SINUMERIK 840D sl/840Di sl/ 840D/840Di/810D SinuCom (INC) - 07/2008
07/2008
Preface
Aim
This document explains how to install the SINUMERIK SinuCom
Installation/Service Tools and describes its functionality. The purpose of the
SinuCom Installation/Service Tools is to facilitate start-up and installation of the
SINUMERIK 840D sl/ 804Di sl/ 840D/ 840Di/ 810D.
On the SINUMERIK 840D/810D the tool is started from the PG/PC in online mode
(PG/PC control via OPI). It is included in the Software on the SINUMERIK 840Di.
Standard scope
This publication describes the standard scope of functions. Any extensions or
modifications to the standard scope made by the machine manufacturer will be
documented by the machine manufacturer. Please contact your local Siemens
sales office for further information about other publications relating to SINUMERIK
840D/840Di/810D and publications that are applicable to all SINUMERIK controls
(e.g. universal interface, measuring cycles ...).
Other functions not described in this documentation might be executable in the
control. This does not, however, represent an obligation to supply such functions
with a new control or when servicing.
Important
!
This System Description is applicable to the following control types:
SINUMERIK 840D sl / SINUMERIK 840DE sl (export version)
SINUMERIK 840D powerline / 840DE powerline (export version)
SINUMERIK 840Di powerline / 840DiE powerline (export version)
SINUMERIK 810D powerline / 810DE powerline (export version)
with operator panel types OP 010, OP 010C, OP 010S, OP 12 or OP 15
(PCU 50, PCU 70/ NCU 710, NCU 720, NCU 730).
Notes
The following notes with special significance are used in the documentation:
Note
This symbol always appears in this documentation to draw your attention to
further information relevant to the subject in hand.
Important
!
This symbol always appears in the documentation when important information is
being conveyed.
© Siemens AG 2008 All Rights Reserved
SINUMERIK 840D sl/840Di sl/ 840D/840Di/810D SinuCom (INC) - 07/2008
v
Preface
07/2008
Additional ordering options
Appears in the documentation whenever a described function is not contained in
the standard version but may be ordered as an option.
Safety information
This manual contains notices that you should observe to ensure your own personal
safety, as well as to protect the product and connected equipment. Notices
referring to your personal safety are highlighted in the manual by a safety alert
symbol; notices referring to property damage only have no safety alert symbol. The
warnings are shown below in decreasing order of danger.
Danger
!
Indicates an imminently hazardous situation which, if not avoided, will result in
death or serious injury or in substantial property damage.
Warning
!
Indicates a potentially hazardous situation which, if not avoided, could result in
death or serious injury or in substantial property damage.
Caution
!
Used with the safety alert symbol indicates a potentially hazardous situation
which, if not avoided, may result in minor or moderate injury or in property
damage.
Caution
Used without safety alert symbol indicates a potentially hazardous situation
which, if not avoided, may result in property damage.
Notice
Used without the safety alert symbol indicates a potential situation which, if not
avoided, may result in an undesirable result or state.
If several hazards of different degrees occur, the hazard with the highest degree
must always be given priority. If a warning note with a warning triangle warns of
personal injury, the same warning note can also contain a warning of material
damage.
© Siemens AG 2008 All Rights Reserved
vi
SINUMERIK 840D sl/840Di sl/ 840D/840Di/810D SinuCom (INC) - 07/2008
07/2008
Preface
Qualified personnel
Start-up and operation of the device/equipment/system in question must only be
performed using this documentation. The device/system must only be started and
operated by qualified personnel. Qualified personnel as referred to in the safety
guidelines in this documentation are those who are authorized to start up, earth
and label units, systems and circuits in accordance with the relevant safety
standards.
Correct usage
Note the following:
Warning
!
The unit may be used only for the applications described in the catalog or the
technical description, and only in combination with the equipment, components
and devices of other manufacturers where recommended or permitted by
Siemens. This product can only function correctly and safely if it is transported,
stored, set up, and installed correctly, and operated and maintained as
recommended.
© Siemens AG 2008 All Rights Reserved
SINUMERIK 840D sl/840Di sl/ 840D/840Di/810D SinuCom (INC) - 07/2008
vii
07/2008
Contents
Contents
1 Product SinuCom
1-13
1.1 Product features
1-14
1.2 Scope of supply
1-16
1.3 Permissible PC platforms
1-17
2 Installation
2-19
2.1 Installation variants
2-20
2.2 Installation of SinuCom NC
2-20
2.3 Installation of SinuCom FFS
2-22
2.4 Installation of SinuCom CFS
2-23
2.5 Installation of SinuCom ARC
2-24
2.6 Installation of SinuCom PCIN
2-25
2.7 Uninstalling
2-26
3 General Operating Sequences
3-27
3.1 Installation and start-up with SinuCom NC
3-28
3.2 Help functions
3-29
3.3 Using the keyboard
3-32
4 SinuCom NC: Functions
4-33
4.1 Document Scope and Supported Systems
4-34
4.1.1 Scope of this Manual
4-34
4.1.2 Supported Systems and NCK Versions
4-34
4.1.3 Supported Languages
4-34
4.2 What's New in SinuCom NC 7.50
4-35
4.3 Main Menu
4-35
4.4 Toolbar Buttons
4-36
4.5 Alarm Messages
4-36
4.6 Machine Data ("MD")
4-37
© Siemens AG 2008 All Rights Reserved
SINUMERIK 840D sl/840Di sl/ 840D/840Di/810D SinuCom (INC) - 07/2008
ix
Contents
07/2008
4.6.1 Viewing and Configuring MD
4-37
4.6.2 Machine Data Project Tree
4-39
4.6.3 Service Data
4-41
4.7 Archiving
4-42
4.8 SinuCom NC Trace
4-43
4.8.1 Overview: How Trace is Used
4-44
4.8.2 Sessions and Their Content
4-49
4.8.3 Reference Waveforms
4-52
4.8.4 Toolbars and Menus
4-54
4.8.5 Context Menus
4-68
4.8.6 Dialogs
4-73
4.8.7 Trace Symbol Import Wizard (TSIW)
4-88
4.8.8 Trace Setup Wizard (TSW)
4-94
4.9 Safety Integrated Acceptance Test Wizard
4-99
4.9.1 Example:
4-99
4.9.2 Common Screen Contents
4-101
4.9.3 Custom Templates
4-104
5 SinuCom FFS: Functions
5-109
5.1 Operation
5-110
5.2 Display of the NC image
5-110
5.3 Displaying/editing the FFS image
5-110
5.4 Writing/Reading an NC image to NC card
5-111
6 SinuCom CFS: Functions
6-113
6.1 Operation
6-114
6.1.1 Create projekt
6-114
6.1.2 Set up project views
6-116
6.1.3 Generate image
6-117
6.1.4 Read in / out image on the CompactFlash Card
6-117
6.1.5 Select language
6-118
7 SinuCom ARC: Functions
7-119
7.1 Operation
7-120
7.2 Displaying the contents of the archive
7-120
7.3 Editing the archive contents
7-120
7.4 Creating an archive
7-122
8 SinuCom PCIN: Functions
8-123
8.1 Operation
8-124
© Siemens AG 2008 All Rights Reserved
x
SINUMERIK 840D sl/840Di sl/ 840D/840Di/810D SinuCom (INC) - 07/2008
07/2008
Contents
8.2 Functions
8-124
8.3 File WINPCIN.ini
8-125
A Appendix
A-127
A.1 Abbreviations
A-127
A.2 Definitions
A-129
I Index
I-135
© Siemens AG 2008 All Rights Reserved
SINUMERIK 840D sl/840Di sl/ 840D/840Di/810D SinuCom (INC) - 07/2008
xi
07/2008
1 Product SinuCom
1.1 Product features
1
1 Product SinuCom
1.1 Product features
1-14
1.2 Scope of supply
1-16
1.3 Permissible PC platforms
1-17
© Siemens AG 2008 All Rights Reserved
SINUMERIK 840D sl/840Di sl/ 840D/840Di/810D SinuCom (INC) - 07/2008
1-13
1 Product SinuCom
07/2008
1.1 Product features
1.1 Product features
This program package supports simple and effective startup of
SINUMERIK 840D sl/ 840Di sl and SINUMERIK 810D/ 840D/ 840Di controls on
CNC machines.
On the SINUMERIK 810D/ 840D/ 840D sl the tool is started from the PG/PC in
online mode (PG/PC control via the OPI interface), in the case of the SINUMERIK
840Di/ 840Di sl it is included in the software.
Product components
The installation/service tools SinuCom comprises five tools:
1. SinuCom NC
- SinuCom NC Trace
- SinuCom NC SI
2. SinuCom FFS
3. SinuCom CFS
4. SinuCom ARC
5. SinuCom PCIN
Functions
The installation/service tools tool SinuCom offers the following functions:
• Use of the Trace functionality
• Safety Integrated Acceptance Test Wizard
• Creation of CompactFlash Card images
• Series commissioning file management
• Transfer of CNC user data
Note
The NC card is programmed with standard tools (e. g. Cardware) that are not
contained in the included in the scope of supply of SinuCom FFS.
A Flash File System (FFS) is comparable with a DOS data medium, e.g. a diskette.
Before data can be archived, the system must be formatted. Then the directory
structures can be created and files stored in a suitable format.
The data medium is an electrically erasable PROM (EEPROM). This means that
before writing the relevant sector must be erased. Algorithms written for the module
identification are required for erasing and writing. They largely determine the speed
with which data are written.
An FFS system can be read directly from DOS/WINDOWS.
Because the NC system software also stored on the NC card does not exist in FFS
format, this can only be performed with “SINUCOPY-FFS”.
Note
Please read the A&D software marketing guidelines before duplicating software.
© Siemens AG 2008 All Rights Reserved
1-14
SINUMERIK 840D sl/840Di sl/ 840D/840Di/810D SinuCom (INC) - 07/2008
07/2008
1 Product SinuCom
1.1 Product features
SinuCom NC Trace
SinuCom NC Trace function is used for the dynamic recording of CNC, PLC and
HMI variables, and of drive signals that are available via the CNC. These variables
can be displayed, printed out or stored in a file, similar to using an oscillograph or
logic analyzer. The SinuCom NC Trace function provides support in:
• Fault detection and fault correction
• Machine performance analysis, benchmarking and tuning
• Process performance analysis, benchmarking and tuning
SinuCom NC SI
SinuCom NC SI integrated acceptance test, it supports the original equipment
manufacturer (OEM), and optimizes the process:
• Verification of machines in accordance with EU Machinery Directive EN
954-1 (control category 3)
• Testing of safety functions (partly automated) during the machine
acceptance
• Logging of measured data and test results incl. Trace function records
• Testing of single/special-purpose machines, machine components (as a
partial test) and series machines as series startup
• Shorter startup times since, in the new acceptance mode, power-on alarms
during the acceptance test are acknowledged by RESET
• User-friendly operation due to controlled execution and the automatic
configuration of the Trace functions.
• Unambiguous quality verification for original equipment manufacturers as
well as customers and for dealings with government agencies.
SinuCom FFS
SinuCom FFS is used to generate an image for the PC card of the CCU/NCU of
SINUMERIK 810D/840D (powerline). It contains:
• Processing of the flash file system
• Preparing the image for programming the PC card
• Integrated help
© Siemens AG 2008 All Rights Reserved
SINUMERIK 840D sl/840Di sl/ 840D/840Di/810D SinuCom (INC) - 07/2008
1-15
1 Product SinuCom
07/2008
1.2 Scope of supply
SinuCom CFS
SinuCom CFS is used to generate an image for the SINUMERIK 840D sl NCU’s
CF card, in Ext3 format. It contains:
• Preparing the image for programming the CF card
• Integrated help
SinuCom ARC
SinuCom ARC simplifies the processing of series startup files:
• Reading, deleting, inserting and changing series startup files
• Integrated help
SinuCom PCIN
The SinuCom PCIN program is used to send and receive CNC user data, such as
machine data and part programs, via the serial interface between a Siemens
PC/PG and a Siemens control.
It contains:
• Setting up and interrogating V.24 interface
• Editing archive files
• Storing files from directories individually
• Secure data transmission
• Integrated help
The service tool SinuCom PCIN can be operated with the mouse or keyboard.
1.2 Scope of supply
Supply medium
The installation/service tools SinuCom is supplied on DVD.
Licenses
The following licenses are available:
• Single license
• Single license without data medium
• Software Update Service
• Update for certain SW version
Foreign languages
The installation/service tools SinuCom is supplied in six languages
(English/German/French/Spanish/Italian/Chinese, ATW Certificate Exportlist,
Service Data only). Language switchover only takes effect after rebooting.
© Siemens AG 2008 All Rights Reserved
1-16
SINUMERIK 840D sl/840Di sl/ 840D/840Di/810D SinuCom (INC) - 07/2008
07/2008
1 Product SinuCom
1.3 Permissible PC platforms
Ordering data
Table 1-1
Ordering data
Order No.
SinuCom
6FC5 250-
AY00-
AG
Installation/Service tools
on DVD including
SinuCom NC (Trace/SI)
SinuCom FFS, SinuCom CFS,
SinuCom ARC, SinuCom PCIN,
documentation
Languages English/German
License
• Single license, current SW version
...............-
0
........-
0
0
• Single license, particular software
...............-
........-
0
version
• Copy license
...............-
0
........-
0
1
Software maintenance
• Software maintenance service
...............-
0
........-
0
2
• Order updates separately, particular
...............-
........-
3
SW version
Example for a particular software version, e.g. SW 7.3: 6FC5 250-7
-3...
1.3 Permissible PC platforms
The product components of SinuCom can be used on the following PC platforms:
Table 1-2
SW
Windows
Windows
Windows
Windows
Windows
Windows
95
98
ME
2000
NT
XP
SinuCom
-
-
-
-
Yes
Yes
NC
SinuCom
-
-
Yes
-
Yes
Yes
FFS
SinuCom
-
-
-
-
-
Yes
CFS
SinuCom
-
-
Yes
Yes
Yes
Yes
ARC
SinuCom
Yes
Yes
Yes
Yes
Yes
Yes
PCIN
Note
SinuCom 07.01 and later can only be installed with Windows XP.
© Siemens AG 2008 All Rights Reserved
SINUMERIK 840D sl/840Di sl/ 840D/840Di/810D SinuCom (INC) - 07/2008
1-17
1 Product SinuCom
07/2008
1.3 Permissible PC platforms
© Siemens AG 2008 All Rights Reserved
1-18
SINUMERIK 840D sl/840Di sl/ 840D/840Di/810D SinuCom (INC) - 07/2008
07/2008
2 Installation
2.1 Installation variants
2
2 Installation
2.1 Installation variants
2-20
2.2 Installation of SinuCom NC
2-20
2.3 Installation of SinuCom FFS
2-22
2.4 Installation of SinuCom CFS
2-23
2.5 Installation of SinuCom ARC
2-24
2.6 Installation of SinuCom PCIN
2-25
2.7 Uninstalling
2-26
© Siemens AG 2008 All Rights Reserved
SINUMERIK 840D sl/840Di sl/ 840D/840Di/810D SinuCom (INC) - 07/2008
2-19
2 Installation
07/2008
2.1 Installation variants
2.1 Installation variants
The installation/service tools SinuCom includes four different installation variants:
1. SinuCom NC only
2. SinuCom FFS only
3. SinuCom CFS only
4. SinuCom ARC only
5. SinuCom PCIN only
2.2 Installation of SinuCom NC
Requirements
SinuCom NCrequires Windows® XP professional (SP1 or SP2).
SinuCom NC occupies approximately 7 MB in the Windows® system directory and
approximately 52 MB in the SinuCom NC directory. If HMI Advanced is not already
installed, an additional 156 MB are required.
The program is included in the scope of delivery of the SINUMERIK 840Di sl.
Procedure
1. Insert the DVD into the drive of your PG/PC
2. Start Windows Explorer (or MS-DOS).
3. Change to the CD/DVD-drive.
4. Open the folder "SinuCom NC”.
5. Start the program "Setup.exe”. This program starts up an operator-guided
installation of SinuCom NC.
6. A warm start must be performed on the PG/PC after the installation.
The info files "siemensd.txt" (German) and "siemense.txt" (English) are copied into
the SinuCom NC directory on your hard disk by the SETUP program, so this
information is still available to you after installation.
Starting SinuCom NC
"SinuCom NC" is started as follows:
1. Double-click the "SinuComNC" icon.
2. Via the Windows task bar of the PG/PC: "Start" → "Programs" →
"SinuCom" → "SinuComNC".
© Siemens AG 2008 All Rights Reserved
2-20
SINUMERIK 840D sl/840Di sl/ 840D/840Di/810D SinuCom (INC) - 07/2008
07/2008
2 Installation
2.2 Installation of SinuCom NC
Note
On 840Di, the 840Di software is usually installed before the optional HMI
Advanced software. In this case, SinuCom NC will not automatically be installed
on softkey 9. To make this softkey operational, SinuCom NC must be reinstalled
after the complete installation of the 840Di software.
Note
SinuCom NC can be run without a mouse by using a keyboard.
Establishing a connection to the NC
Starting with SinuCom NC, the "NCU Connection Wizard" (NCW) is the preferred
tool for connecting the NCK, PLC, and drives.
Starting NCU Connection Wizard
•
Via the Windows taskbar of the PG/PC: "Start" → "Programs" → "SinuCom"
→ "NC Connect Wizard".
•
If SinuCom NC is unable to connect at startup, a message automatically
appears that provides the NCW as a selection.
The wizard makes a selection of MPI or Ethernet connections available, based on
the answers to a few questions. Changes made using the NC Connection Wizard
(NCW) become effective only after SinuCom NC has been restarted.
For SINUMERIK powerline systems, a number of drivers are provided; however, if
the driver appropriate to your MPI hardware does not appear, you may have to
obtain and install the driver separately (e. g., from SIMATIC Software).
SINUMERIK solution line uses an Ethernet connection that requires no drivers.
© Siemens AG 2008 All Rights Reserved
SINUMERIK 840D sl/840Di sl/ 840D/840Di/810D SinuCom (INC) - 07/2008
2-21
2 Installation
07/2008
2.3 Installation of SinuCom FFS
2.3 Installation of SinuCom FFS
Requirements
• SinuCom FFS runs under Windows Me/NT 4.0/XP.
• SINUMERIK 810D/840D powerline.
• SinuCom FFS requires approx. 1.2 MB.
• Before you can install SinuCom FFS you must first close down all other
applications (not the Explorer).
When copying the software, be sure to follow the A&D software marketing
guidelines!
Procedure
1. Insert the DVD into the drive of your PG/PC
2. Start Windows Explorer (or MS-DOS).
3. Change to the CD/DVD-drive.
4. Open the folder "SinuCom FFS”.
5. Start the program "Setup.exe”. This program starts up an operator-guided
installation of SinuCom FFS.
6. A warm start must be performed on the PG/PC after the installation.
The info files "siemensd.txt" (German) and "siemense.txt" (English) are copied into
the SinuCom NC directory on your hard disk by the SETUP program, so this
information is still available to you after installation.
Note
• You can choose any drive name for the OMNI97 device: Enter the drive letter
in menu "Control Panel/Device Manager/Drives/OMNI97".
• Windows NT: Enter the drive letter in menu "OmniControl/DriveLetter".
Starting SinuCom FFS
"SinuCom FFS” is started as follows:
• Double-click the "SinuCom FFS" icon
• Via the Windows task bar of the PG/PC: "Start” → "Programs" → "SinuCom" →
"SinuComFFS"
© Siemens AG 2008 All Rights Reserved
2-22
SINUMERIK 840D sl/840Di sl/ 840D/840Di/810D SinuCom (INC) - 07/2008
07/2008
2 Installation
2.4 Installation of SinuCom CFS
2.4 Installation of SinuCom CFS
Requirements
• SinuCom CFS requires the Windows XP software platform.
•
156 MB memory space is required to install the SINUMERIK 840D sl system
software.
• SinuCom CFS occupies approx. 1 MB memory space.
• Terminate all applications (except the Explorer) before installing SinuCom CFS.
Procedure
1.
Insert the DVD into the drive of your PG/PC.
2.
Start Windows Explorer (or MS-DOS).
3.
Change to the CD/DVD-drive.
4.
Open the folder "SinuCom CFS”.
5.
Start the program "Setup.exe”. This program starts up an operator-guided
installation of SinuCom CFS.
6.
A warm start must be performed on the PG/PC after the installation.
The info files "siemensd.txt" (German) and "siemense.txt" (English) are copied into
the SinuCom NC directory on your hard disk by the SETUP program, so this
information is still available to you after installation.
Starting SinuCom CFS
"SinuCom CFS” is started as follows:
• Double-click the "SinuCom CFS" icon
• Via the Windows task bar of the PG/PC: "Start” → "Programs" → "SinuCom" →
"SinuComCFS"
© Siemens AG 2008 All Rights Reserved
SINUMERIK 840D sl/840Di sl/ 840D/840Di/810D SinuCom (INC) - 07/2008
2-23
2 Installation
07/2008
2.5 Installation of SinuCom ARC
2.5 Installation of SinuCom ARC
Requirements
• SinuCom ARC runs under Windows ME, Windows NT 4.0, Service Pack 6, and
higher), WindowsXP or Windows 2000.
• SinuCom ARC requires approx. 0.7 MB.
• Before you can install SinuCom ARC you must first close down all other
applications (not the Explorer).
Procedure
1. Insert the DVD into the drive of your PG/PC
2. Start Windows Explorer (or MS-DOS).
3. Change to the CD/DVD-drive.
4. Open the folder "SinuCom ARC”.
5. Start the program "Setup.exe”. This program starts up an operator-guided
installation of SinuCom ARC.
6. A warm start must be performed on the PG/PC after the installation.
The info files "siemensd.txt" (German) and "siemense.txt" (English) are copied into
the SinuCom ARC directory on your hard disk by the SETUP program. So this
information is still available to you after installation.
Starting SinuCom ARC
SinuCom ARC is started as follows:
1. Double-click the "SinuCom ARC" icon.
2. Via the Windows task bar of the PG/PC: "Start" → "Programs" → "SinuCom"
→ "SinuComARC".
3. In the "SinuCom NC" program via the menu "Options" → "SinuComARC".
© Siemens AG 2008 All Rights Reserved
2-24
SINUMERIK 840D sl/840Di sl/ 840D/840Di/810D SinuCom (INC) - 07/2008
07/2008
2 Installation
2.6 Installation of SinuCom PCIN
2.6 Installation of SinuCom PCIN
Requirements
• SinuCom PCIN runs under Windows 95/ 98/ ME/ NT 4.0/ 2000/ XP.
• SinuCom PCIN requires approx. 1.2 MB.
• HMI-Advanced SW 6.1.05.
• Before you can install SinuCom PCIN you must first close down all other
applications (not the Explorer).
Procedure
1. Insert the DVD into the drive of your PG/PC
2. Start Windows Explorer (or MS-DOS).
3. Change to the CD/DVD-drive.
4. Open the folder "SinuCom PCIN”.
5. Start the program "Setup.exe”. This program starts up an operator-guided
installation of SinuCom PCIN.
6. A warm start must be performed on the PG/PC after the installation.
The info files "siemensd.txt" (German) and "siemense.txt" (English) are copied into
the SinuCom PCIN directory on your hard disk by the SETUP program. So this
information is still available to you after installation.
Starting SinuCom PCIN
"SinuCom PCIN” is started as follows:
• Double-click the "SinuCom PCIN" icon.
• Via the Windows task bar of the PG/PC: "Start" → "Programs" → "SinuCom" →
"SinuCom PCIN".
© Siemens AG 2008 All Rights Reserved
SINUMERIK 840D sl/840Di sl/ 840D/840Di/810D SinuCom (INC) - 07/2008
2-25
2 Installation
07/2008
2.7 Uninstalling
2.7 Uninstalling
Requirements
Before you can uninstall SinuCom, you must first close down all other applications
(not the Explorer).
Procedure
1. Via the Windows task bar of the PG/PC: "Start" → "Settings" → "System
Control" → "Software".
All programs installed are displayed in the "Software" window.
2. Select the program to be deleted and click the "Remove" button.
3. The SinuCom commissioning / service tools are removed after the warm start.
© Siemens AG 2008 All Rights Reserved
2-26
SINUMERIK 840D sl/840Di sl/ 840D/840Di/810D SinuCom (INC) - 07/2008
07/2008
3 General Operating Sequences
3.1 Installation and start-up with SinuCom NC
3
3 General Operating Sequences
3.1 Installation and start-up with SinuCom NC
3-28
3.2 Help functions
3-29
3.3 Using the keyboard
3-32
© Siemens AG 2008 All Rights Reserved
SINUMERIK 840D sl/840Di sl/ 840D/840Di/810D SinuCom (INC) - 07/2008
3-27