SINUMERIK 840D sl. Service - Configuring Commissioning. Manual (2011-2020) - page 56
Table of contents
6.5.3.1
File transfer with standard methods
120
6.5.3.2
File transfer exceeding 16 MB between client and server
122
6.5.3.3
Comfort methods for file transfer < 16 MB
123
6.6
Select
126
6.6.1
Overview
126
6.6.2
Description
127
6.6.3
Input and output arguments
127
6.6.4
Example call
129
6.7
Tool management
130
6.7.1
Description
130
6.7.2
CreateTool
131
6.7.3
DeleteTool
132
6.7.4
CreateCuttingEdge
134
6.7.5
DeleteCuttingEdge
135
7
Diagnosis
139
7.1
Overview
139
7.2
Status screen
140
7.3
Diagnosis screen
142
7.4
OPC UA Archiving
148
7.5
OPC UA server version
156
8
Update of OPC UA server
159
8.1
Overview
159
8.2
Compatibility
160
8.3
Installation of OPC UA server
161
8.3.1
Installation/Upgrade on a PCU/IPC
161
8.3.2
Installation/Upgrade a PPU/NCU
161
9
Technical data
163
10
Exceptions: 828D / V4.5
165
10.1
Starting of configuration dialog
166
10.2
Update of OPC UA server
167
11
Trouble shooting
169
11.1
Frequently asked questions (FAQs)
169
11.2
Reference to OPC UA error code
172
A
Annex
173
A.1
840D sl documentation overview
173
A.2
828D documentation overview
174
Index
175
SINUMERIK Access MyMachine / OPC UA
Configuration Manual, 10/2020, 6FC5397-1DP41-0BA5
7
Introduction
1
1.1
General description
Uniform standard for data exchange
"Industrie 4.0" stands for the intensive utilization, evaluation and analysis of data from the
production in IT systems of the enterprise level. PLC programs today already record a wide range
of data at the production and process level (pressure values, temperatures and counter
readings) and make them available to systems at the enterprise level, for example, to increase
the product quality. With Industry 4.0, the data exchange between the production and
enterprise levels will increase much faster in the future. However, prerequisite for the success of
"Industrie 4.0" is a uniform standard for data exchange.
The OPC UA (Unified Architecture) standard is particularly suitable for data exchange across
different levels as it is independent from specific operating systems, has secure transfer
procedures and better semantic description of the data. OPC UA not only makes data available,
but also provides information about the data (e.g. data types). This enables machine-
interpretable access to the data.
1.1.1
SINUMERIK OPC UA server
The SINUMERIK OPC UA server offers a communication interface with manufacturer
independent standard. The information on SINUMERIK controls can be exchanged with an OPC
UA client using this communication interface.
The client is not part of SINUMERIK and is either part of standard software or can be developed
as part of individual software. For this purpose a stack for downloading is provided by the OPC
foundation.
Some manufacturers provide a software development kit, which can be used to develop an OPC
UA client.
SINUMERIK Access MyMachine / OPC UA
Configuration Manual, 10/2020, 6FC5397-1DP41-0BA5
9
Introduction
1.2 Features
1.2
Features
The SINUMERIK OPC UA server provides the possibility to communicate with SINUMERIK via
OPC UA. The following functionalities of the OPC UA specification are supported by the server:
• Read, write and subscribe to SINUMERIK variables (NC, PLC) (see chapter Variable access
(Page 94))
• Transfer of part programs (see chapter File system (Page 117))
• Support for File and Folder Objects
• Event based provision of SINUMERIK alarms and messages from HMI, NC and PLC (see
chapter Alarms (Page 104))
• Methods for selection of part programs from the NC file system and external memory (see
chapter Select (Page 126)) and methods for tool management (see chapter Tool
management (Page 130))
• Multi language support for the alarm and warning messages.
• The OPC UA server supports customer specific object models (see chapter Customer Specific
Object Model (CSOM) (Page 41))
Security settings
The server provides the possibility to communicate in an unencrypted or encrypted way. The
following options are possible:
• None
•
128 Bit - Sign (Basic128Rsa15)
•
128 Bit - Sign & Encrypt (Basic128Rsa15)
•
256 Bit - Sign (Basic256Sha256)
•
256 Bit - Sign (Basic256)
•
256 Bit - Sign & Encrypt (Basic256Sha256)
•
256 Bit - Sign & Encrypt (Basic256)
NOTICE
Security risk of no or low encryption
During operational process, an encrypted communication must always be used for security
reasons.
Furthermore, the SINUMERIK OPC UA server provides the possibility of user administration,
which allows to assign access rights for each user individually (see chapter User administration
(Page 83)).
See also
Certificate handling (Page 28)
SINUMERIK Access MyMachine / OPC UA
10
Configuration Manual, 10/2020, 6FC5397-1DP41-0BA5
Introduction
1.3 System setup
1.3
System setup
Accessibility of the server
The accessibility of the server varies in the particular SINUMERIK systems. The following table
shows the dependencies of the SINUMERIK systems:
SINUMERIK
Accessibility
systems
SINUMERIK
After successful licensing and activation the OPC UA server is accessible via the X130 interface.
828D
SINUMERIK
The OPC UA server needs SINUMERIK Operate and runs on the same place as SINUMERIK Operate. For this
840D sl
reason, system setup depends on whether a Thin Client is used (SINUMERIK Operate runs on NCU) or a PCU /
IPC with Windows operating system.
Thin Client
If a Thin Client is used, the OPC UA server is accessible after successful licensing and
activation via X120 and X130 interface of the NCU.
PCU / IPC
If a PCU / IPC is used, the OPC UA server is accessible after successful licensing and
activation via "eth1" and "eth2" interface of the PCU / IPC. In this case the OPC UA server
is neither accessible via "eth3" interface of the PCU/IPC nor the X120 or X130 interface
of the NCU.
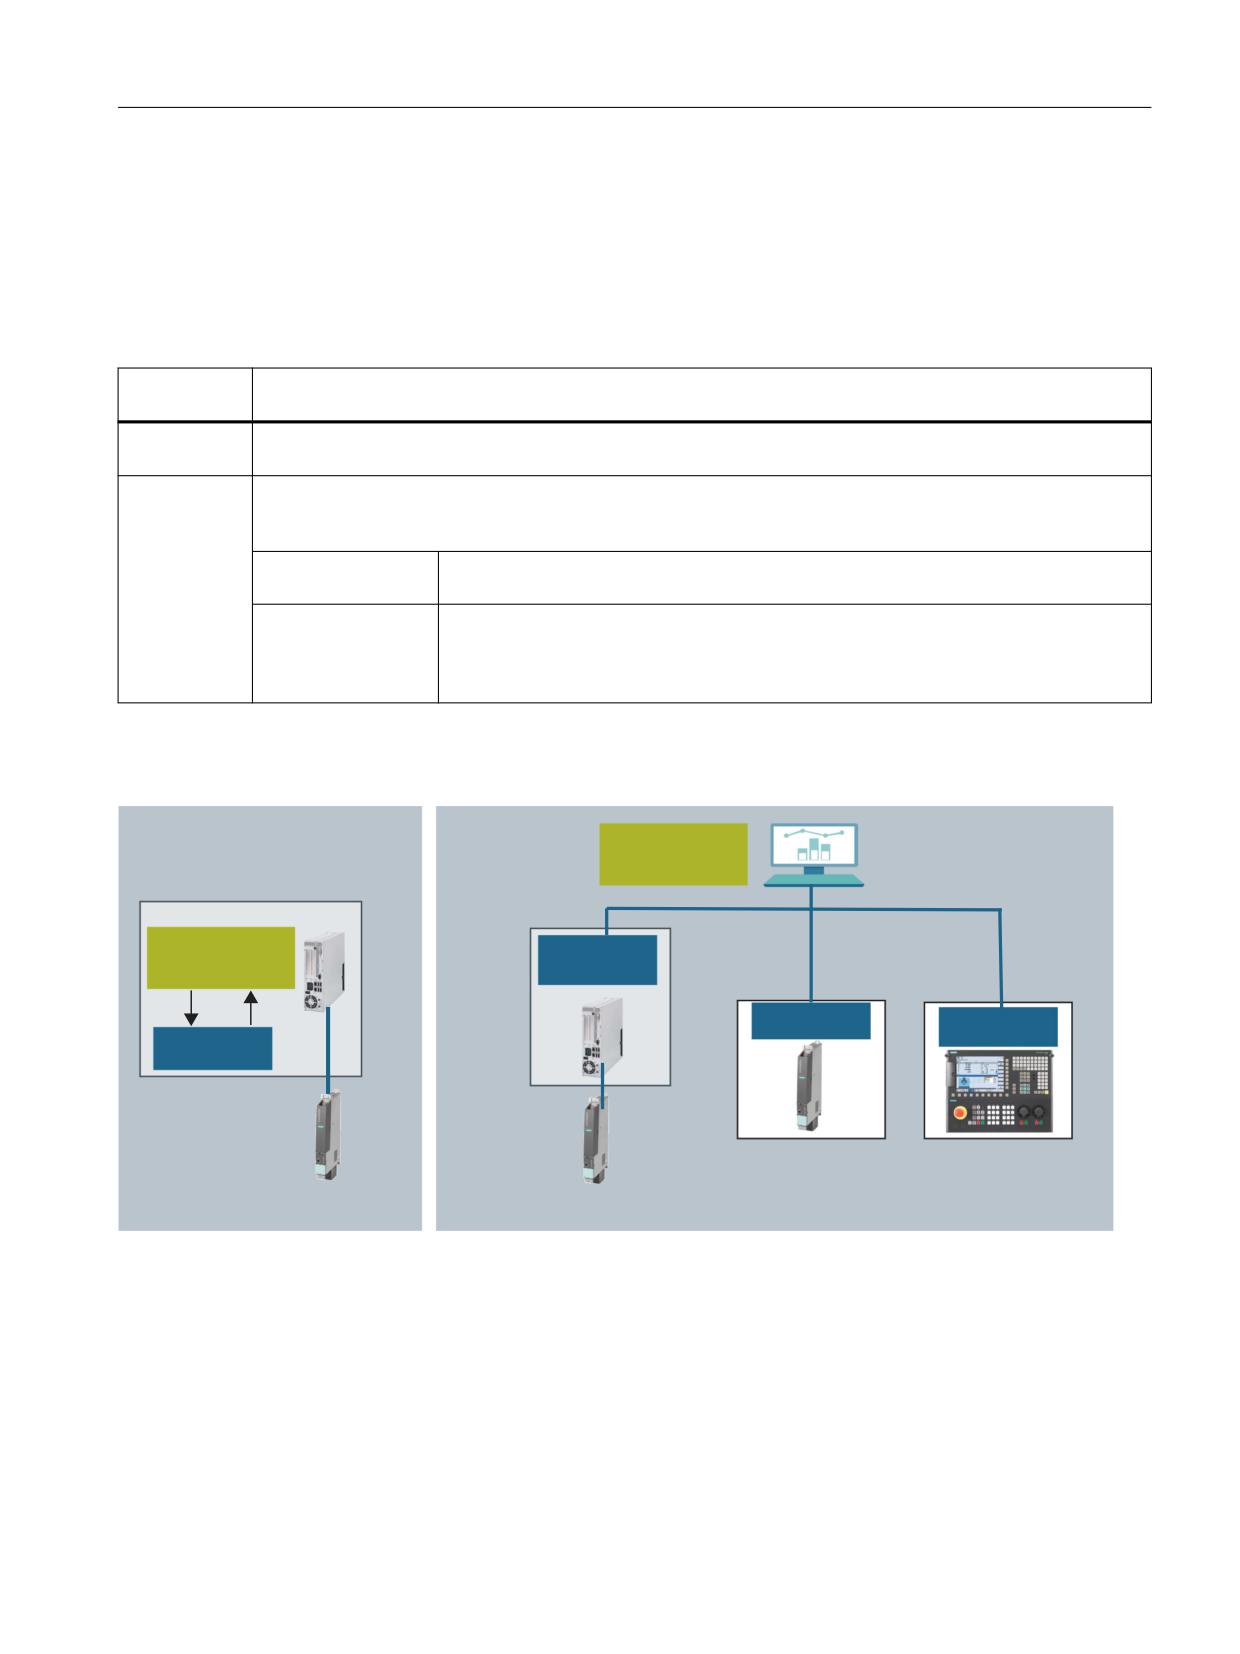
Application scenario
/RFDO
1HWZRUN
&XVWRPHU
DSSOLFDWLRQ 23&
8$ FOLHQW
3&8
,3&
&XVWRPHU
23& 8$
DSSOLFDWLRQ 23&
VHUYHU
8$ FOLHQW
23& 8$
23&
8$
VHUYHU
23& 8$ VHUYHU
VHUYHU
6,180(5,.
' VO
6,180(5,.
' VO
6,180(5,.
' VO
6,180(5,.
'
Figure 1-1
Application scenario
SINUMERIK Access MyMachine / OPC UA
Configuration Manual, 10/2020, 6FC5397-1DP41-0BA5
11
Introduction
1.4 Compatibility of OPC UA server version and CNC software versions
1.4
Compatibility of OPC UA server version and CNC software versions
The latest OPC UA server version is compatible to several CNC software versions.
CNC software versions:
•
4.5
•
4.07 - SP2...SP5
•
4.08 - SP2...SP3
•
4.92 and 4.92 - HF2
•
4.93
•
4.94
SINUMERIK Access MyMachine / OPC UA
12
Configuration Manual, 10/2020, 6FC5397-1DP41-0BA5
Introduction
1.5 Reference to OPC UA specification
1.5
Reference to OPC UA specification
The SINUMERIK OPC UA server matches the specification of the OPC foundation (https://
opcfoundation.org/) V1.0.3.
SINUMERIK Access MyMachine / OPC UA
Configuration Manual, 10/2020, 6FC5397-1DP41-0BA5
13
Safety notes
2
2.1
Fundamental safety instructions
2.1.1
General safety instructions
WARNING
Danger to life if the safety instructions and residual risks are not observed
If the safety instructions and residual risks in the associated hardware documentation are not
observed, accidents involving severe injuries or death can occur.
• Observe the safety instructions given in the hardware documentation.
• Consider the residual risks for the risk evaluation.
WARNING
Malfunctions of the machine as a result of incorrect or changed parameter settings
As a result of incorrect or changed parameterization, machines can malfunction, which in turn
can lead to injuries or death.
• Protect the parameterization against unauthorized access.
• Handle possible malfunctions by taking suitable measures, e.g. emergency stop or
emergency off.
2.1.2
Warranty and liability for application examples
Application examples are not binding and do not claim to be complete regarding configuration,
equipment or any eventuality which may arise. Application examples do not represent specific
customer solutions, but are only intended to provide support for typical tasks.
As the user you yourself are responsible for ensuring that the products described are operated
correctly. Application examples do not relieve you of your responsibility for safe handling when
using, installing, operating and maintaining the equipment.
2.1.3
Security information
Siemens provides products and solutions with industrial security functions that support the
secure operation of plants, systems, machines and networks.
SINUMERIK Access MyMachine / OPC UA
Configuration Manual, 10/2020, 6FC5397-1DP41-0BA5
15
Safety notes
2.1 Fundamental safety instructions
In order to protect plants, systems, machines and networks against cyber threats, it is necessary
to implement - and continuously maintain - a holistic, state-of-the-art industrial security
concept. Siemens’ products and solutions constitute one element of such a concept.
Customers are responsible for preventing unauthorized access to their plants, systems,
machines and networks. Such systems, machines and components should only be connected to
an enterprise network or the internet if and to the extent such a connection is necessary and only
when appropriate security measures (e.g. firewalls and/or network segmentation) are in place.
For additional information on industrial security measures that may be implemented, please
visit
Siemens’ products and solutions undergo continuous development to make them more secure.
Siemens strongly recommends that product updates are applied as soon as they are available
and that the latest product versions are used. Use of product versions that are no longer
supported, and failure to apply the latest updates may increase customer’s exposure to cyber
threats.
To stay informed about product updates, subscribe to the Siemens Industrial Security RSS Feed
under
services/cert.html#Subscriptions).
Further information is provided on the Internet:
Industrial Security Configuration Manual (https://support.industry.siemens.com/cs/ww/en/
view/108862708)
WARNING
Unsafe operating states resulting from software manipulation
Software manipulations, e.g. viruses, Trojans, or worms, can cause unsafe operating states in
your system that may lead to death, serious injury, and property damage.
• Keep the software up to date.
• Incorporate the automation and drive components into a holistic, state-of-the-art industrial
security concept for the installation or machine.
• Make sure that you include all installed products into the holistic industrial security concept.
• Protect files stored on exchangeable storage media from malicious software by with suitable
protection measures, e.g. virus scanners.
• On completion of commissioning, check all security-related settings.
SINUMERIK Access MyMachine / OPC UA
16
Configuration Manual, 10/2020, 6FC5397-1DP41-0BA5
Safety notes
2.2 OPC UA security notes
2.2
OPC UA security notes
NOTICE
OPC UA provides read/write access on data in SINUMERIK. This access might also affect security
relevant data.
• You can limit this access on SINUMERIK data by individual read and write permission or by
using an own object model and deactivating the SINUMERIK namespace. Please refer to
chapter User administration (Page 83), especially chapter "List of access rights".
Note
Communication and system performance
Please note that the OPC UA server is not a real-time enabled process that, depending on client
requirements, generates a corresponding communication load in the SINUMERIK system.
Increased communication load can have repercussions on system performance.
The SINUMERIK system load may vary with different part programs.
A high system load can have repercussions on communication performance.
See also
List of access rights (Page 86)
SINUMERIK Access MyMachine / OPC UA
Configuration Manual, 10/2020, 6FC5397-1DP41-0BA5
17
Setting up of OPC UA server
3
3.1
Prerequisites
NOTICE
Protection against security risks
To protect industrial plants and systems comprehensively against cyber attacks, measures must
be applied simultaneously at all levels (from the operational level up to the field level, from
access control to copy protection). Therefore, before setting up of the OPC UA server, apply the
"Defense in Depth" protection concept in order to avoid security risks in your environment.
Ensure that you do not connect the company network to the internet without suitable
protective measures.
You will find further information on the Defense-in-Depth concept, suitable protective
measures and Industrial Security in general in the Configuration Manual Industrial Security
Prerequisites
• OPC UA server requires SINUMERIK Operate.
• OPC UA server requires an OPC UA license (6FC5800-0AP67-0YB0 (paper license),
6FC5800-0AP67-0YH0 (electronic license)).
• Make sure that the HMI time is set correctly, since this is a prerequisite for encrypted
communication.
SINUMERIK Access MyMachine / OPC UA
Configuration Manual, 10/2020, 6FC5397-1DP41-0BA5
19
Setting up of OPC UA server
3.2 Option OPC UA
3.2
Option OPC UA
Setting the option
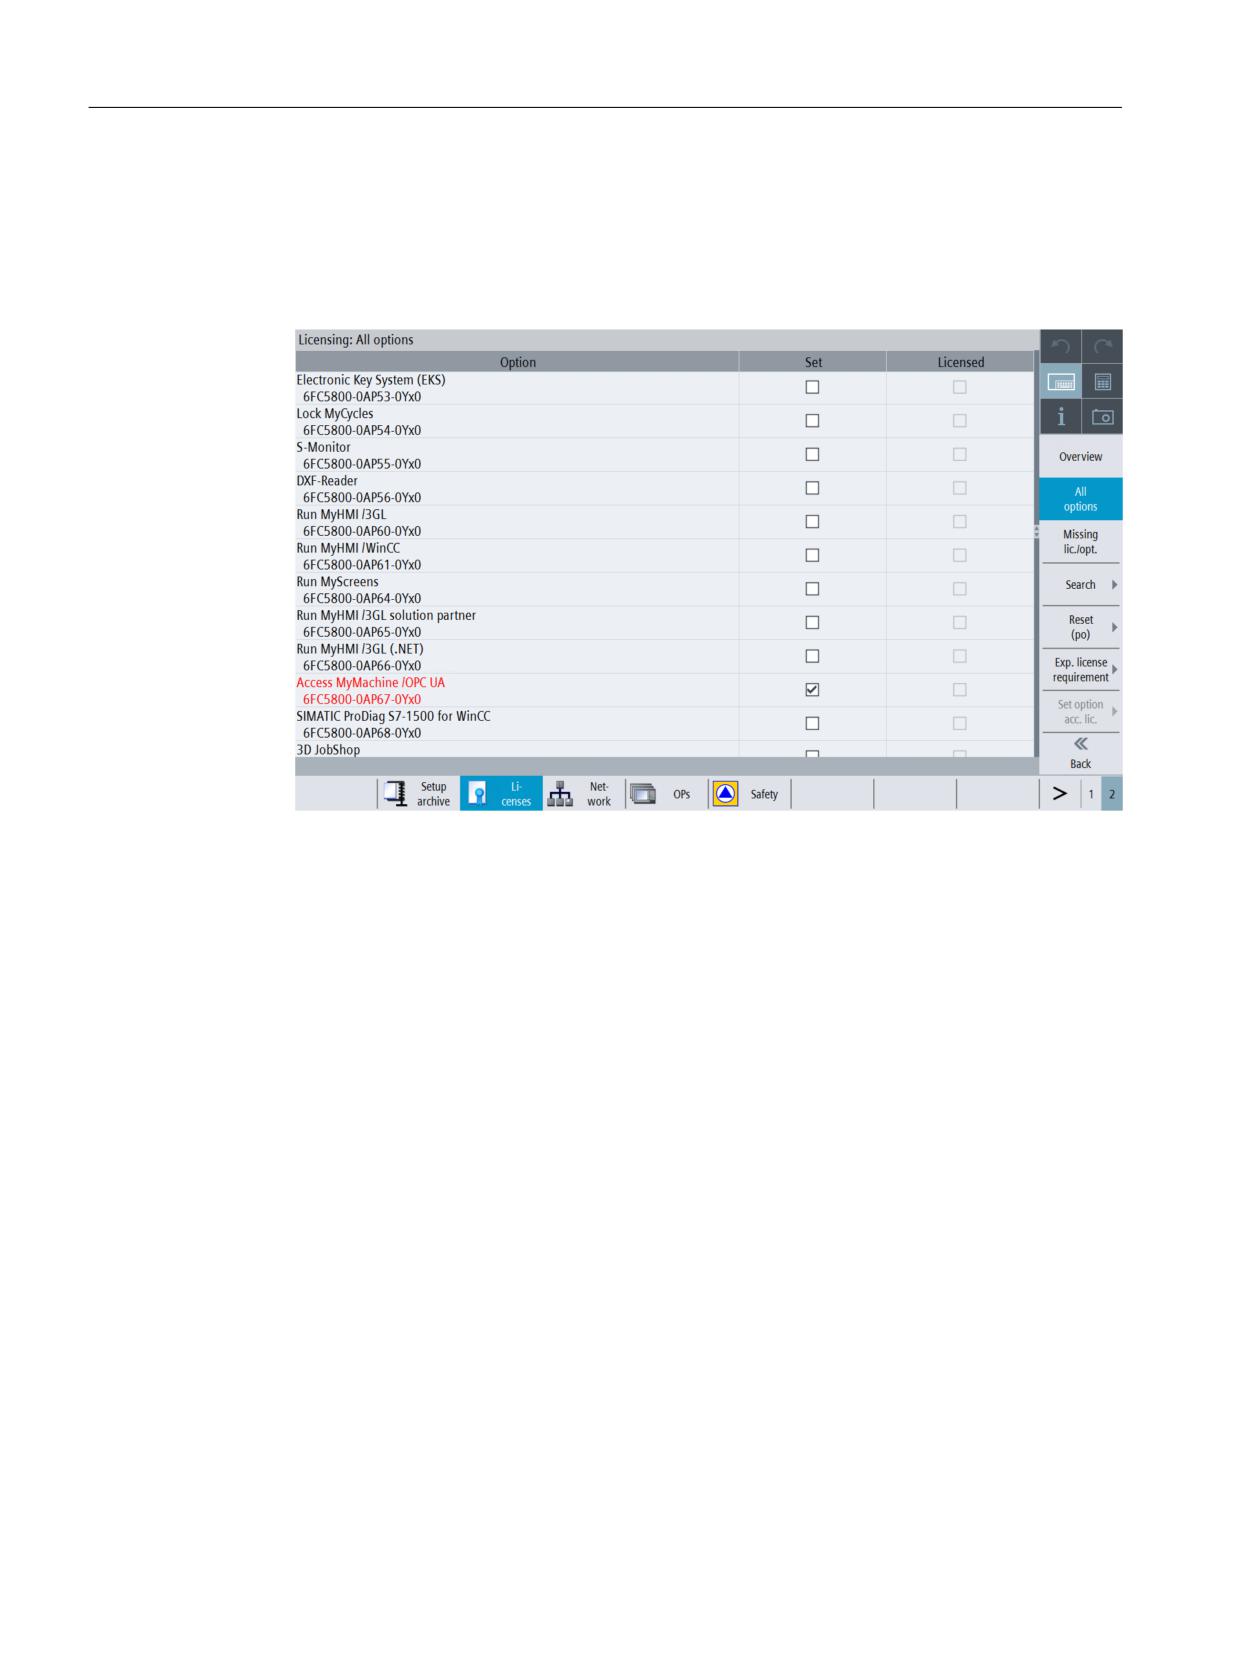
1. Set the "Access MyMachine / OPC UA" option via the "Startup > Licenses" operating area.
Figure 3-1
Setting the option
SINUMERIK Access MyMachine / OPC UA
20
Configuration Manual, 10/2020, 6FC5397-1DP41-0BA5
Setting up of OPC UA server
3.3 Commissioning
3.3
Commissioning
Checking the HMI time
Make sure that the HMI time is set correctly, since this is a prerequisite for encrypted
communication.
Note
The certificate needed for secure OPC UA communication is automatically created during the
first run-up. The start date of the validity period of the certificate is set to the current date. The
validity period is 20 years.
If the SINUMERIK system time is subsequently changed, so that it lies outside the validity period,
the secure OPC UA communication does not function (BadCertificateTimeInvalid).
The certificate can also be changed manually, as described in chapter Certificate handling
(Page 28).
Executing the OPC UA configuration dialog
1. Start the OPC UA configuration dialog via the operating area "Startup > Network".
Note
Different startup behavior with 828D / V4.5
The control 828D with CNC software version V4.5 has a different startup behavior of the
configuration dialog (see chapter Starting of configuration dialog (Page 166)).
2. Press the "OPC UA" softkey.
SINUMERIK Access MyMachine / OPC UA
Configuration Manual, 10/2020, 6FC5397-1DP41-0BA5
21
Setting up of OPC UA server
3.3 Commissioning
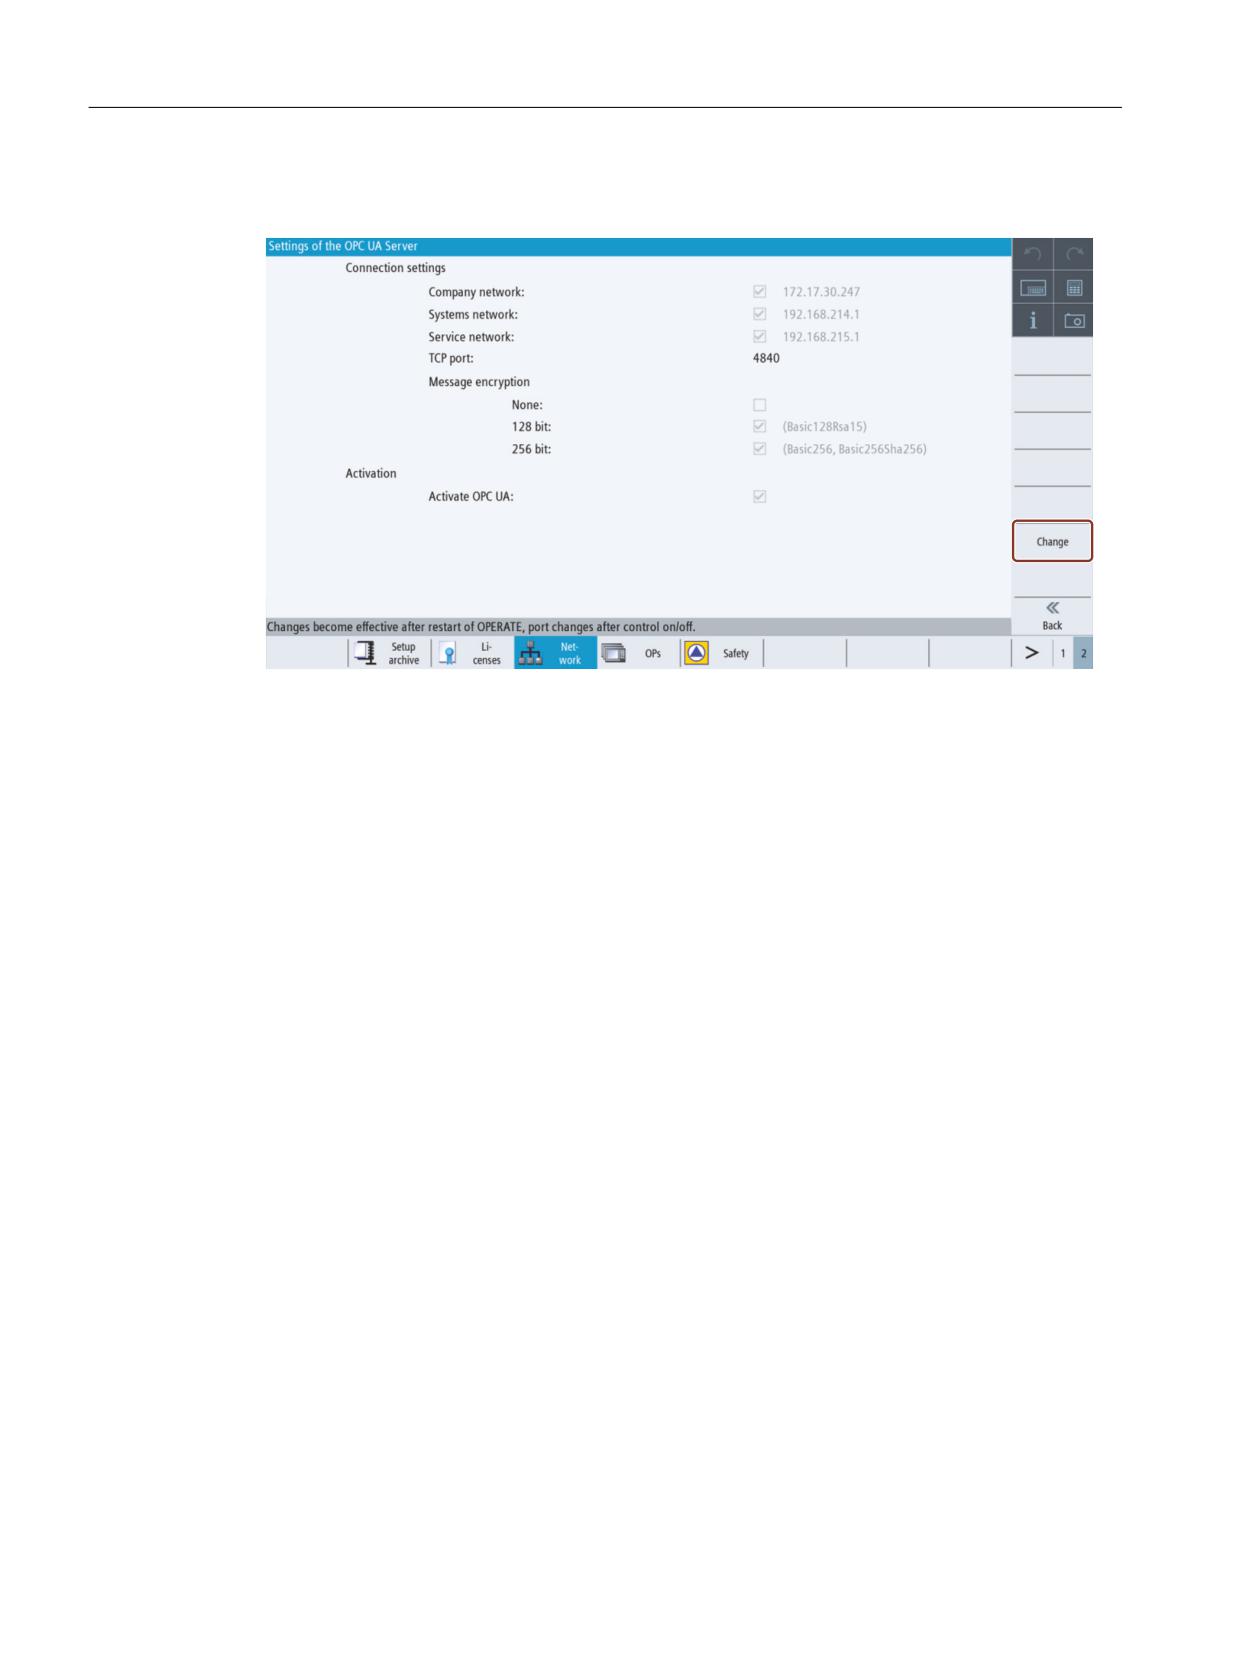
3. Press the "Setting" softkey. The Settings dialog will appear. Then press the "Change" softkey.
Make the necessary settings for connection and activation.
Figure 3-2
Settings of OPC UA Server (with changes)
SINUMERIK Access MyMachine / OPC UA
22
Configuration Manual, 10/2020, 6FC5397-1DP41-0BA5

Setting up of OPC UA server
3.3 Commissioning
Group
Setting
Description
Connection set-
• Company network
The available network connections (IP address) on a spe-
tings
cific target system (828D, 840D sl, PCU, IPC) are shown.
• Systems network
The available networks options vary depending on your
(machine network)
target system.
• Service network
• Company network
• Systems network (machine network)
• Service network.
For example, since IPC is considered as PCU there will be
only two networks (company and systems (machine) net-
work) displayed.
OPC UA clients running on the same IPC as the OPC UA
server can reach the server through the company or sys-
tem network IP addresses. The OPC UA server cannot be
reached through local host address (127.0.0.1).
It is possible to activate or deactivate an interface from
OPC UA server point of view.
TCP Port
TCP port at which the OPC UA server should be available.
Standard configuration: 4840
Note!
The port must also be open in the firewall. For PPU/NCU
this happens automatically. With PCU/IPC the port must be
opened manually in the firewall.
Message encryption
It can be chosen which security endpoints should be of-
fered from the server
Note!
By default strongest message encryption cannot be disa-
bled.
Setting
Standard configuration
None
Deactivated
128 bit
Activated
256 bit
Activated
Activation
Activate OPC UA
Place the checkmark to activate OPC UA and remove the
checkmark to deactivate it.
NOTICE
Security risk due to data manipulation and data sniffing
Anonymous access can be a security risk. Anonymous access should therefore be strictly
limited to commissioning.
• For normal operation authentication via username and password or based on
certificates should be used (see chapter Certificate handling).
SINUMERIK Access MyMachine / OPC UA
Configuration Manual, 10/2020, 6FC5397-1DP41-0BA5
23
Setting up of OPC UA server
3.3 Commissioning
NOTICE
Security risk due to data manipulation and data sniffing
If no message encryption to the client is established, there will be a security risk of data
manipulation and data sniffing. It is therefore highly recommended to establish a message
encryption to the client.
• Use the highest possible encryption standard (256 bit) to ensure a secure message
transfer.
Note
DNS based addressing
If you want to contact the OPC UA server via host name you have to do the following steps:
• Set the host name in SINUMERIK Operate. You can find further information on setting the
host name in SINUMERIK Operate in the Commissioning manual "Basesoftware and
operating software" (https://support.industry.siemens.com/cs/ww/en/view/
109777907).
• Afterwards go to the certificate dialogue of the OPC UA server and renew the server
certificate with "DNS only" (see chapter Server certificates (Page 29)).
Now the OPC UA server can be addressed via host name.
Please consider that for
• NCU
- System network is DHCP/DNS server
- Company network is DHCP/DNS client
• IPC
- System and company network is DHCP/DNS client
- Company network is DHCP/DNS client
For addressing the OPC UA server via company network you must ensure that the central DNS
server uses the same host name as given in Operate.
SINUMERIK Access MyMachine / OPC UA
24
Configuration Manual, 10/2020, 6FC5397-1DP41-0BA5
Setting up of OPC UA server
3.3 Commissioning
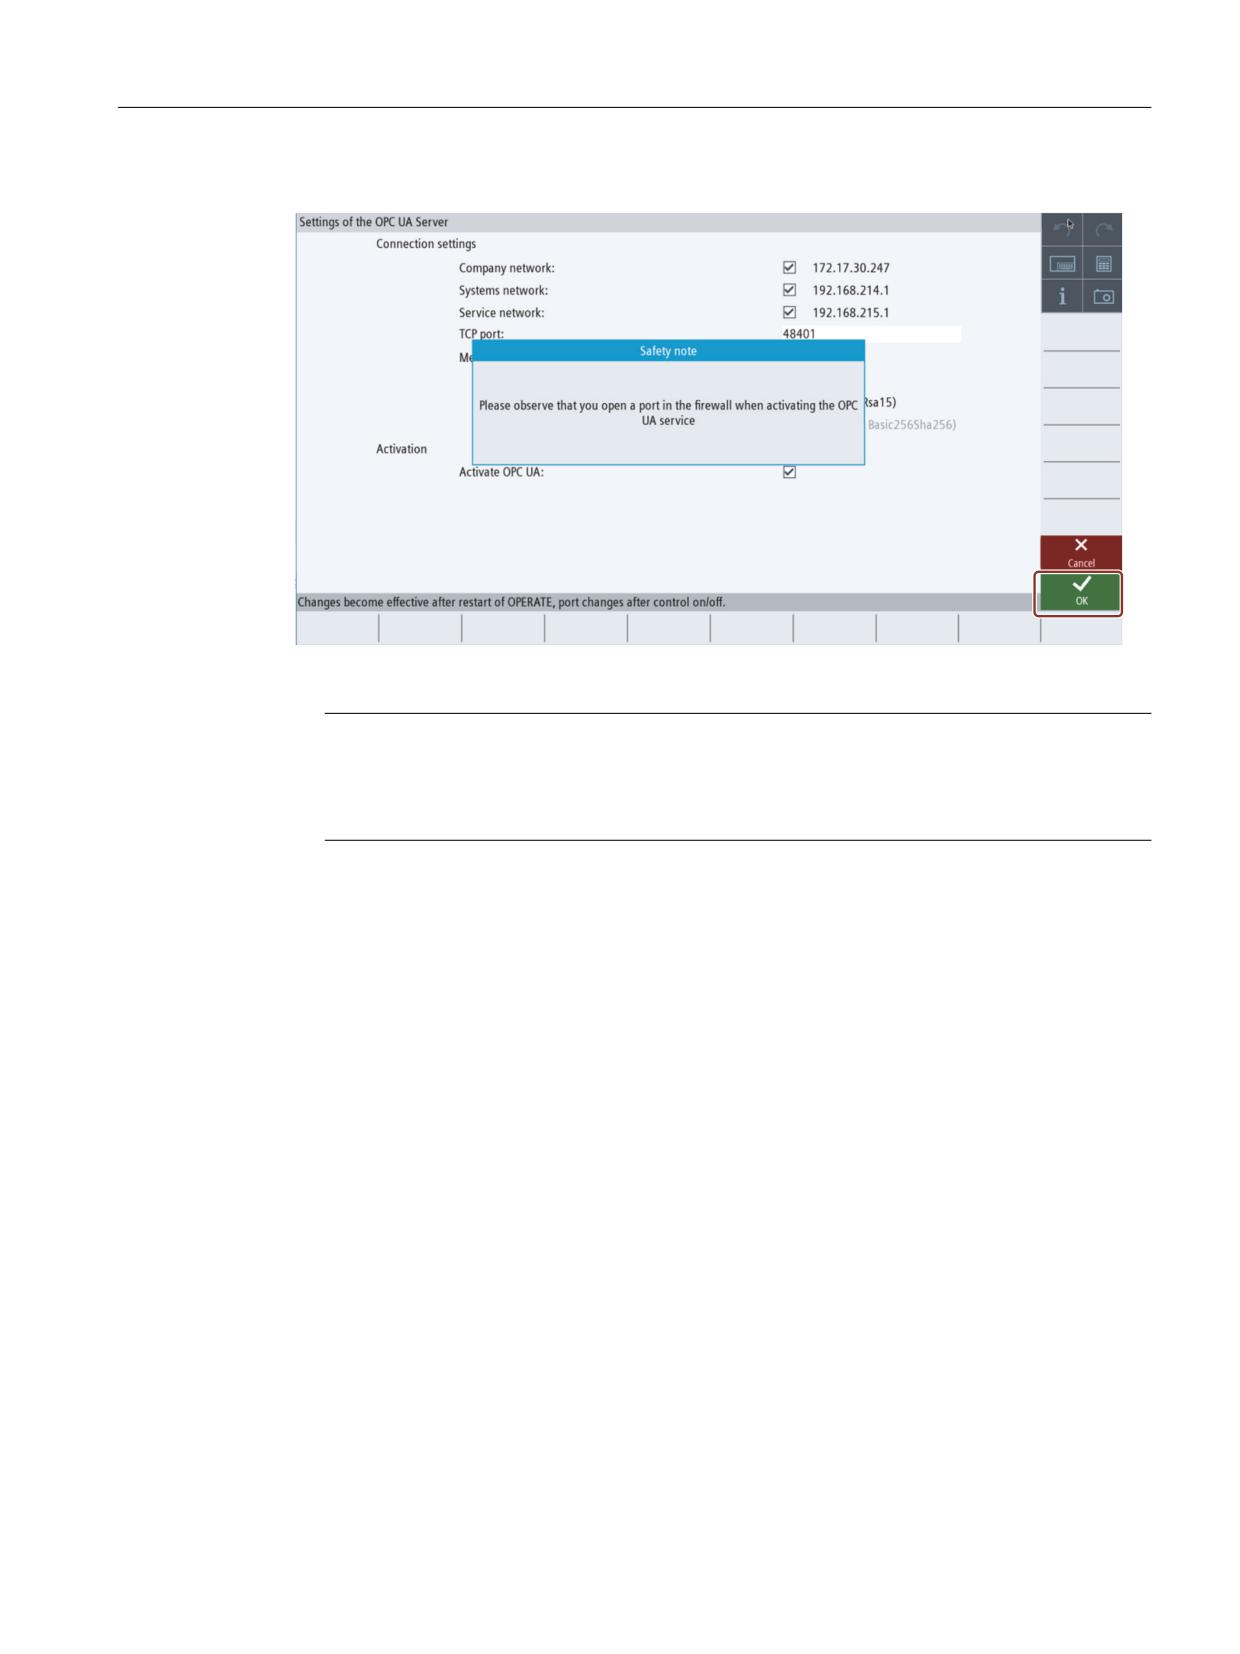
4. Then press "OK". If you enter a port for the first time, you will receive a safety note.
Figure 3-3
Safety note opening TCP port
Note
Port opening on IPC
On first startup of OPC UA server a windows message will appear, asking the user to confirm
the opening of the port.
5. To confirm the opening of the port, press "OK".
6. To perform the authentication settings, press "Back", and then press the "Authentication"
softkey. The Authentication dialog will appear.
SINUMERIK Access MyMachine / OPC UA
Configuration Manual, 10/2020, 6FC5397-1DP41-0BA5
25
Setting up of OPC UA server
3.3 Commissioning
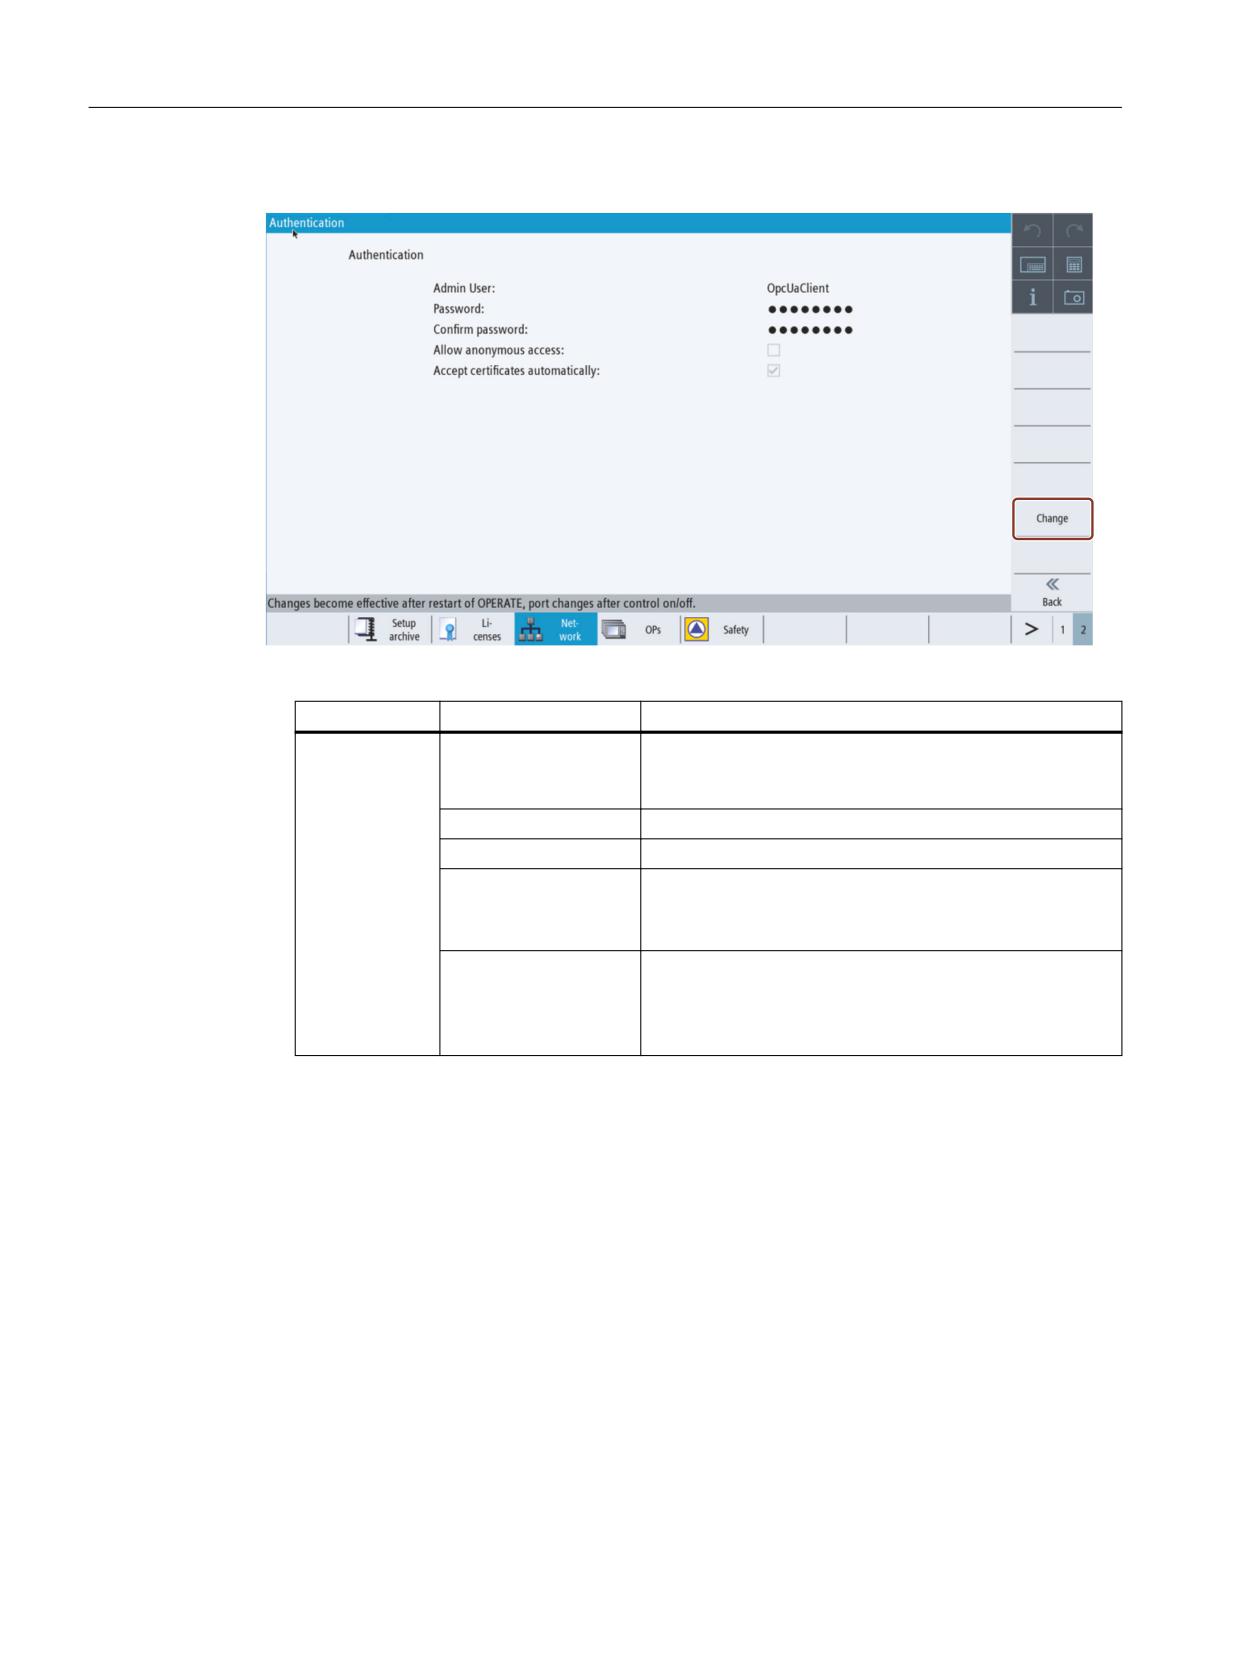
7. Press the "Change" softkey. Make the necessary settings for authentication.
Figure 3-4
Authentication settings of OPC UA server
Group
Setting
Description
Authentication
Admin User
User name of the administrator. The administrator can
add or delete users and assign or delete user authoriza-
tions.
Password
Password of the administrator.
Confirm Password
Enter the password again for confirmation.
Allow anonymous ac-
Standard configuration: Deactivated
cess
Anonymous access is only recommended for commission-
ing.
Accept certificates au-
Standard configuration: Activated
tomatically
If this option is set, all client certificates are automatically
accepted. For manual acceptance, please refer to chap-
ter Certificate handling (Page 28).
SINUMERIK Access MyMachine / OPC UA
26
Configuration Manual, 10/2020, 6FC5397-1DP41-0BA5
Setting up of OPC UA server
3.3 Commissioning
Note
Assigning secure passwords
Observe the following rules when creating new passwords:
• When assigning new passwords, ensure that you do not assign passwords that can be
guessed, e.g. simple words, key combinations that can be easily guessed, etc.
• Passwords must always contain a combination of upper-case and lower-case letters as
well as numbers and special characters. Passwords must comprise at least eight
characters. The server does not support passwords comprising less than eight characters.
PINS must comprise an arbitrary sequence of digits.
• Wherever possible and where it is supported by the IT systems, a password must always
have a character sequence as complex as possible.
The German Federal Office for IT Security (BSI) (https://www.bsi.bund.de/SharedDocs/
Downloads/DE/BSI/Grundschutz/International/GSK_15_EL_EN_Draft.pdf?
__blob=publicationFile&v=2) provides additional rules for creating secure passwords.
Programs are available that can help you to manage your passwords. Using these programs,
you can encrypt, save and manage your passwords and secret numbers - and also create
secure passwords.
Note
If you want to change the password later, you can do this via the OPC UA method
"ChangeMyPassword" or in the SINUMERIK Operate screen.
8. If settings are all done, restart is necessary to activate the new settings. Perform a hardware
restart on the target systems NCU and PPU. A restart of SINUMERIK Operate is necessary on
the PCU 50/IPC.
SINUMERIK Access MyMachine / OPC UA
Configuration Manual, 10/2020, 6FC5397-1DP41-0BA5
27
Setting up of OPC UA server
3.4 Certificate handling
3.4
Certificate handling
3.4.1
Overview
To establish a secure connection between an OPC UA server and a client it is necessary to
exchange and trust the certificate of the other communication partner. The exchange is
normally done automatically at the first connection attempt between client and server.
Nevertheless, there is also the possibility to exchange the certificates manually before the other
communication partner is available, e. g for preparing an easy commissioning.
For trusting the certificates there are two possibilities within the server:
• Automatic trusting of new certificates
If "Accept certificates automatically" is activated in the commissioning dialog, new client
certificates are trusted automatically and there is no manual interaction necessary to
establish a secure connection.
This is the most comfortable option, but less secure than the manual trusting, since all
certificates will be trusted.
• Manual trusting of certificates (recommended)
If "Accept certificates automatically" is deactivated in the commissioning dialog the
certificates must be trusted manually to establish a secure connection.
This allows the administrator of the OPC UA server to manually decide, which client can
establish a secure connection to the OPC UA server
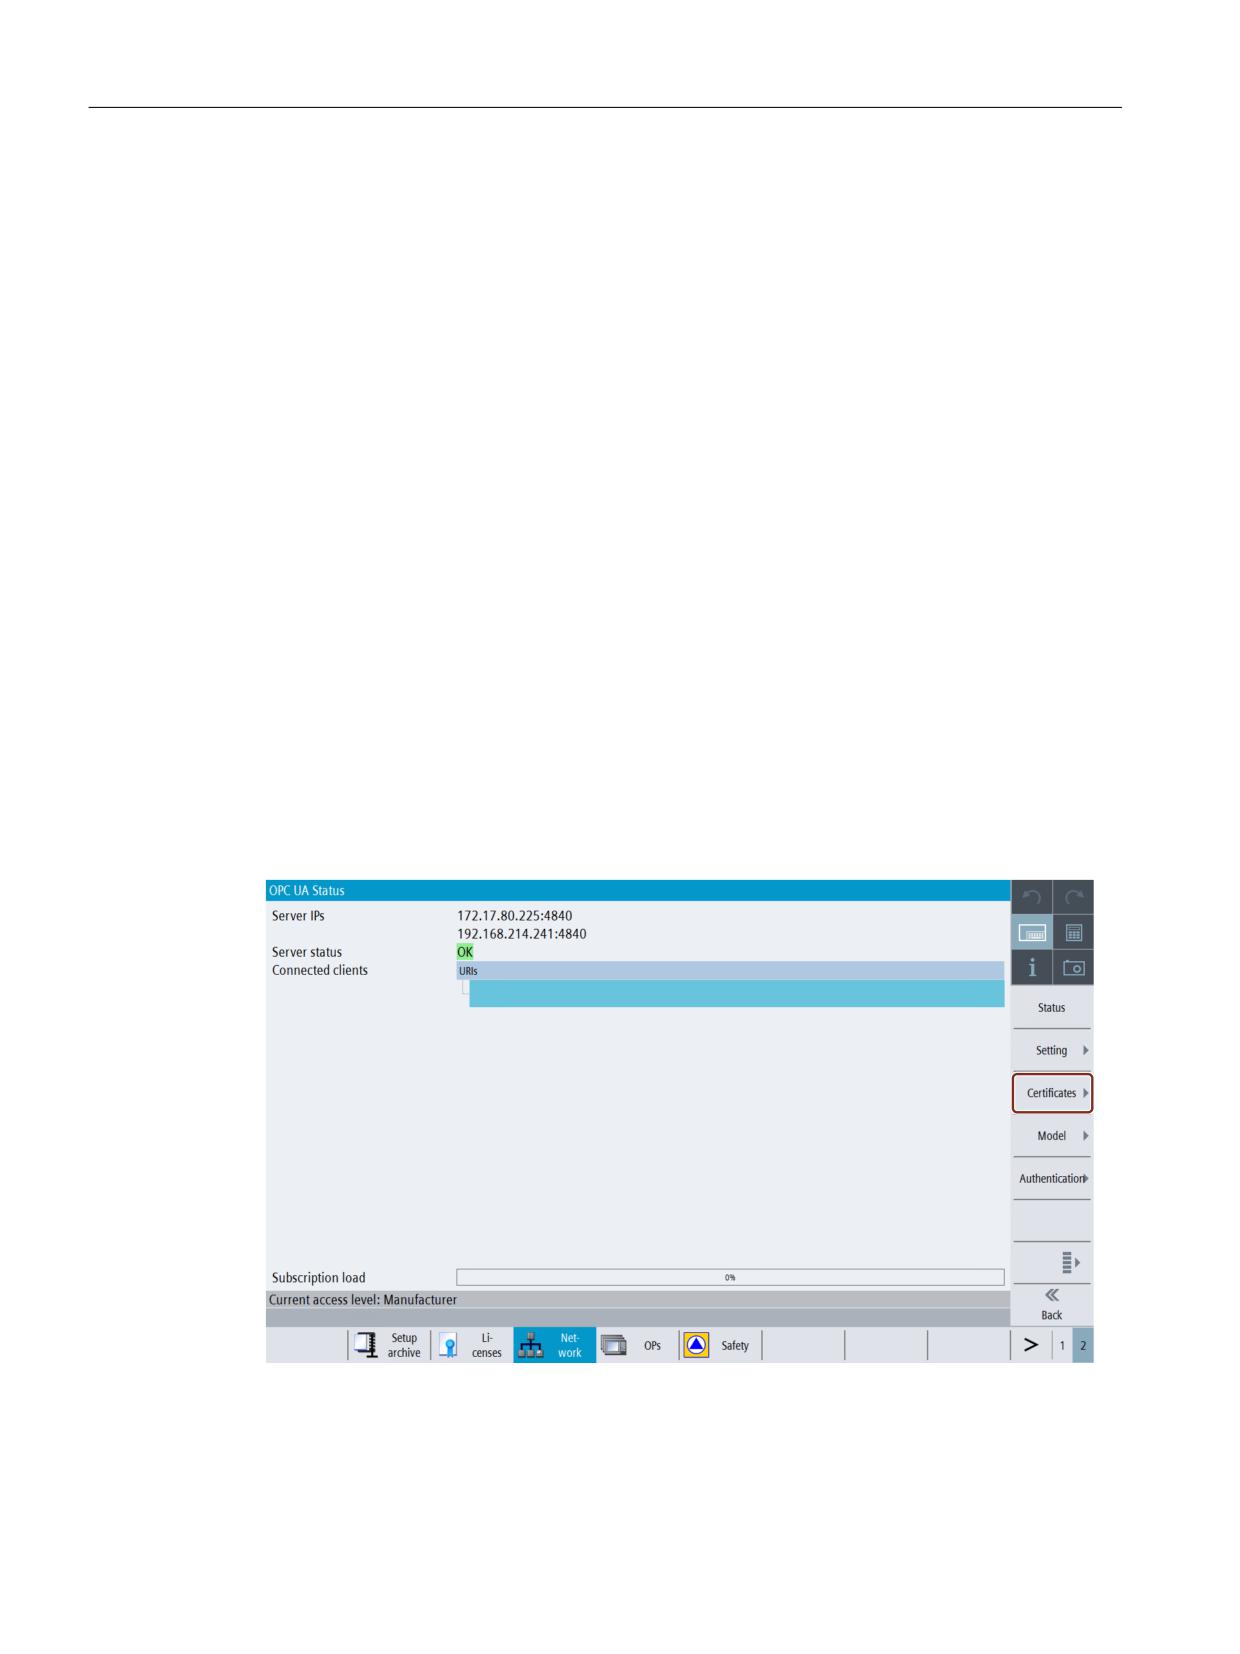
To have a comfortable way to handle certificates, the OPC UA dialog offers a certificate section,
which can be found under the softkey "Certificates".
Figure 3-5
Softkey Certificates
SINUMERIK Access MyMachine / OPC UA
28
Configuration Manual, 10/2020, 6FC5397-1DP41-0BA5
Setting up of OPC UA server
3.4 Certificate handling
Operations
The Certificate dialog allows the following operations:
• Server certificate
- Renewal of the server certificate
- Export of the current server certificate
• Client certificates
- List of the current trusted certificates
- List of the rejected client certificates
- Manual import of a client certificate
- Deletion of a client certificate
- Trust a rejected client certificate
3.4.2
Server certificates
Overview
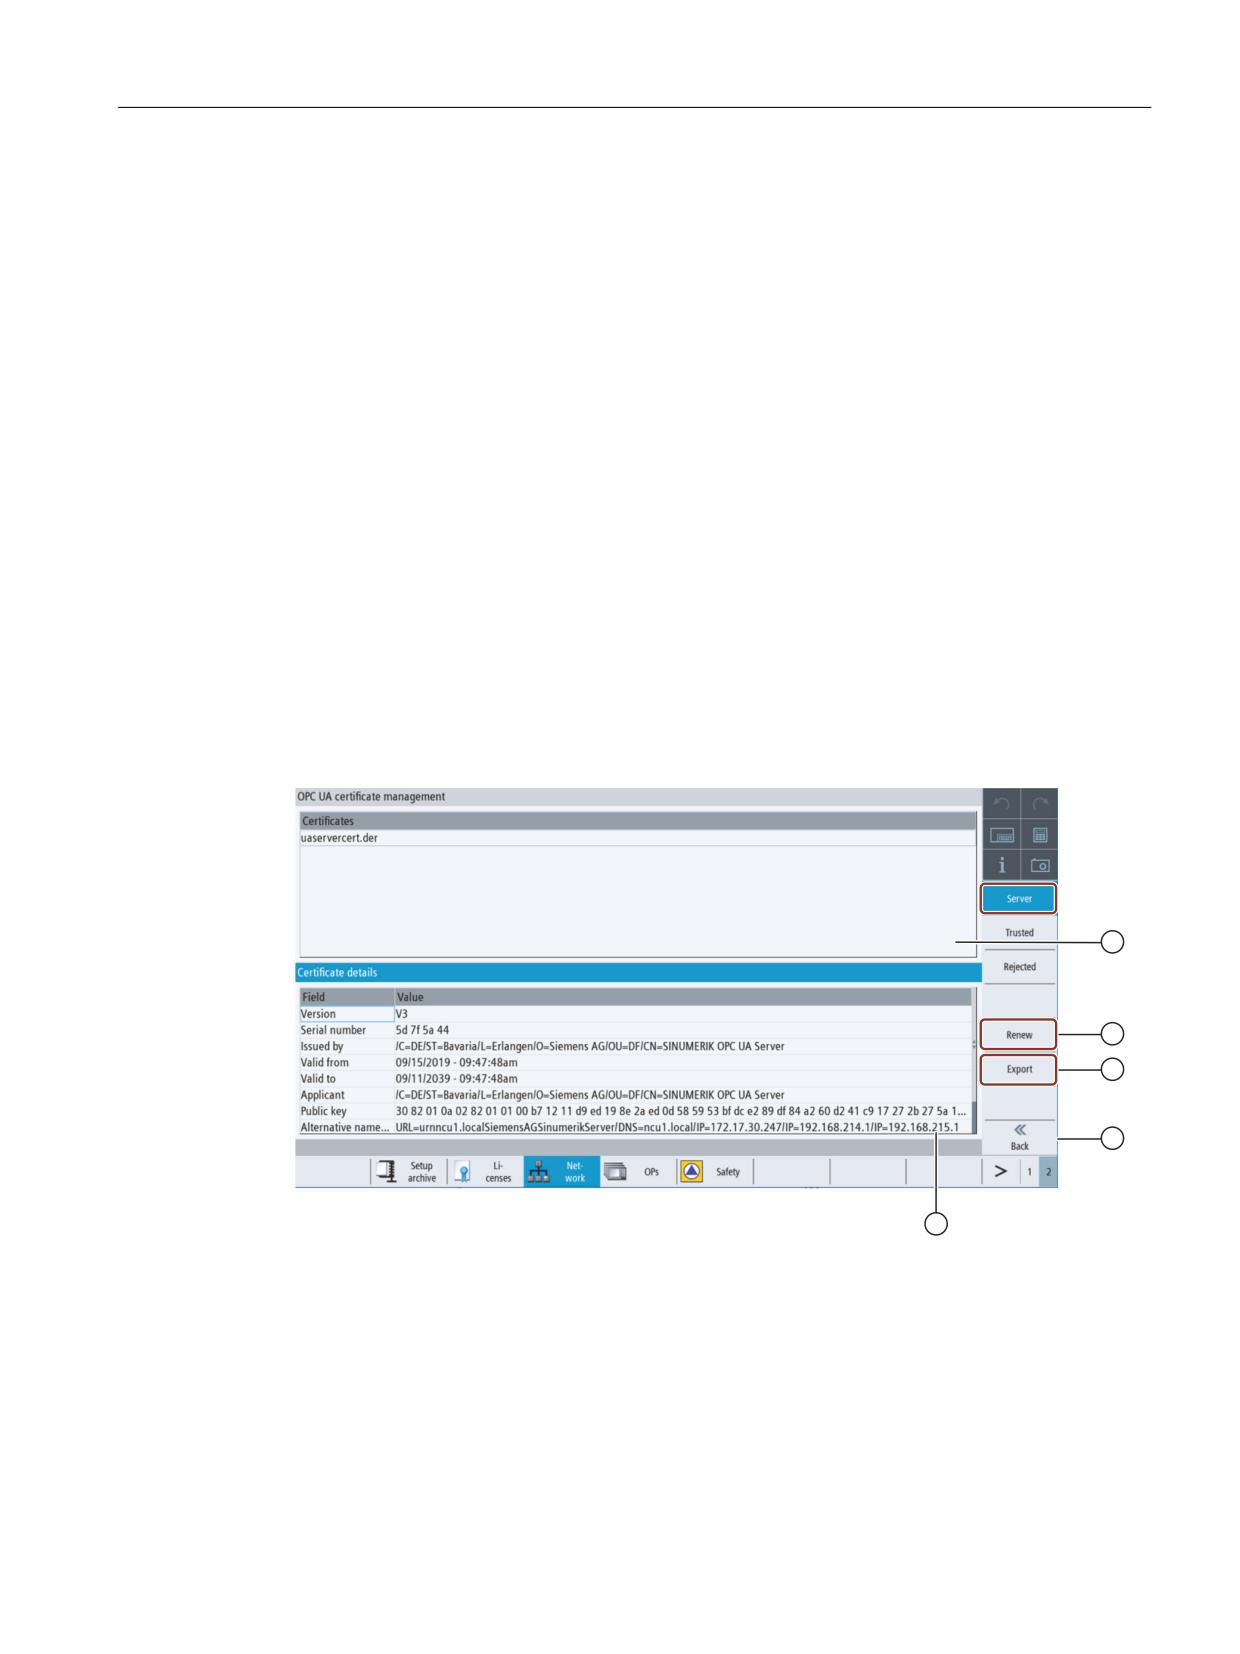
① The name of the OPC UA server certificate is shown in the upper part of the screen.
② You can renew the server certificates.
③ You can export the server certificate to a configured device.
④ You can leave the OPC UA dialogs.
⑤ The details of the server certificate are shown in the lower part of the screen. You can scroll down
to see further certificate attributes.
Figure 3-6
Server Certificate
SINUMERIK Access MyMachine / OPC UA
Configuration Manual, 10/2020, 6FC5397-1DP41-0BA5
29
Setting up of OPC UA server
3.4 Certificate handling
Renewing server certificates
The server certification can be renewed at any time. With the renewal the following things can
be specified by the administrator:
• Expiration date of the certificate / validity in years
Note
Before using this dialog make sure that the date and the time of SINUMERIK Operate is set
correctly, as the certificate will be valid from the current date in SINUMERIK Operate at the
time of renewal.
• Decision if IP address and/or DNS name should be mentioned in the server certificate
Note
Many clients will need the IP address in the certificate for validation. If the server will be
addressed by DNS name (e. g. because the IP address of the OPC UA server changes
frequently due to a dynamic assignment by a DHCP server), it is recommended only to
include the DNS name in the certificate. Because otherwise the certificate must be renewed
and exchanged with every change of the IP address.
To renew a server certificate, proceed as follows:
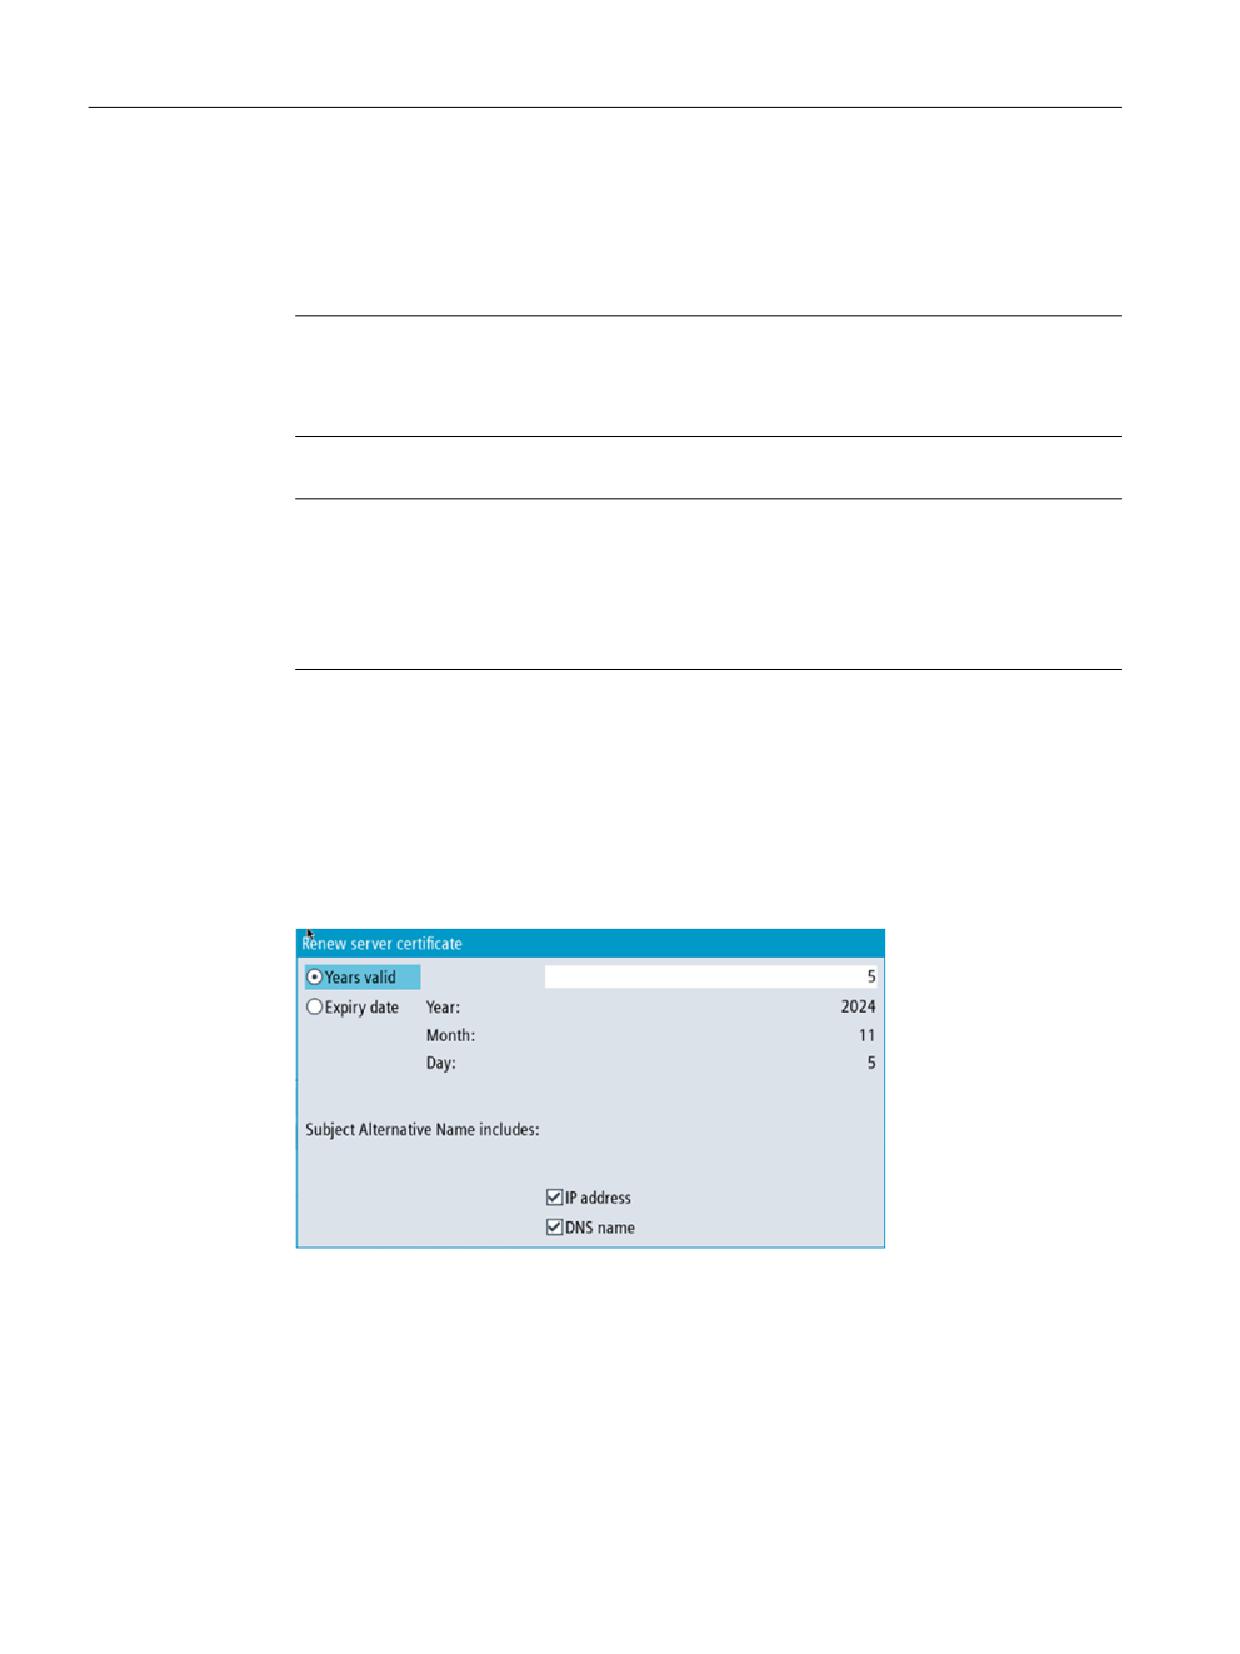
1. Press the softkey "Renew".
A pop-up screen will appear that offers two ways of selecting a time period:
- Select the number of years, the server certificate will be valid
- Specify a precise date, the server certificate will expire
Specify also whether the IP address and/or the DNS name should be written in the server
certificate.
Figure 3-7
Renew server certificate
Pressing the softkey "Cancel" will ignore all input and return to the "Server" dialog.
Pressing the softkey "Ok" will save the input to the system, the currently valid certificate will
be deleted and with the next start of SINUMERIK Operate the new certificate gets created.
SINUMERIK Access MyMachine / OPC UA
30
Configuration Manual, 10/2020, 6FC5397-1DP41-0BA5
Setting up of OPC UA server
3.4 Certificate handling
Exporting server certificates
For an offline preparation of the connection to the server, you can export the server certificate.
After that the certificate can be imported and trusted on the client side.
1. Press the softkey "Export".
A pop-up screen will appear showing the USB device to export to. You can navigate to a
location on the USB device to export the OPC UA server certificate.
Pressing the softkey "Cancel" will ignore all input and return to the "Server" dialog.
Pressing the softkey "Ok" will export the certificate.
3.4.3
Client certificates
3.4.3.1
Trusted certificates
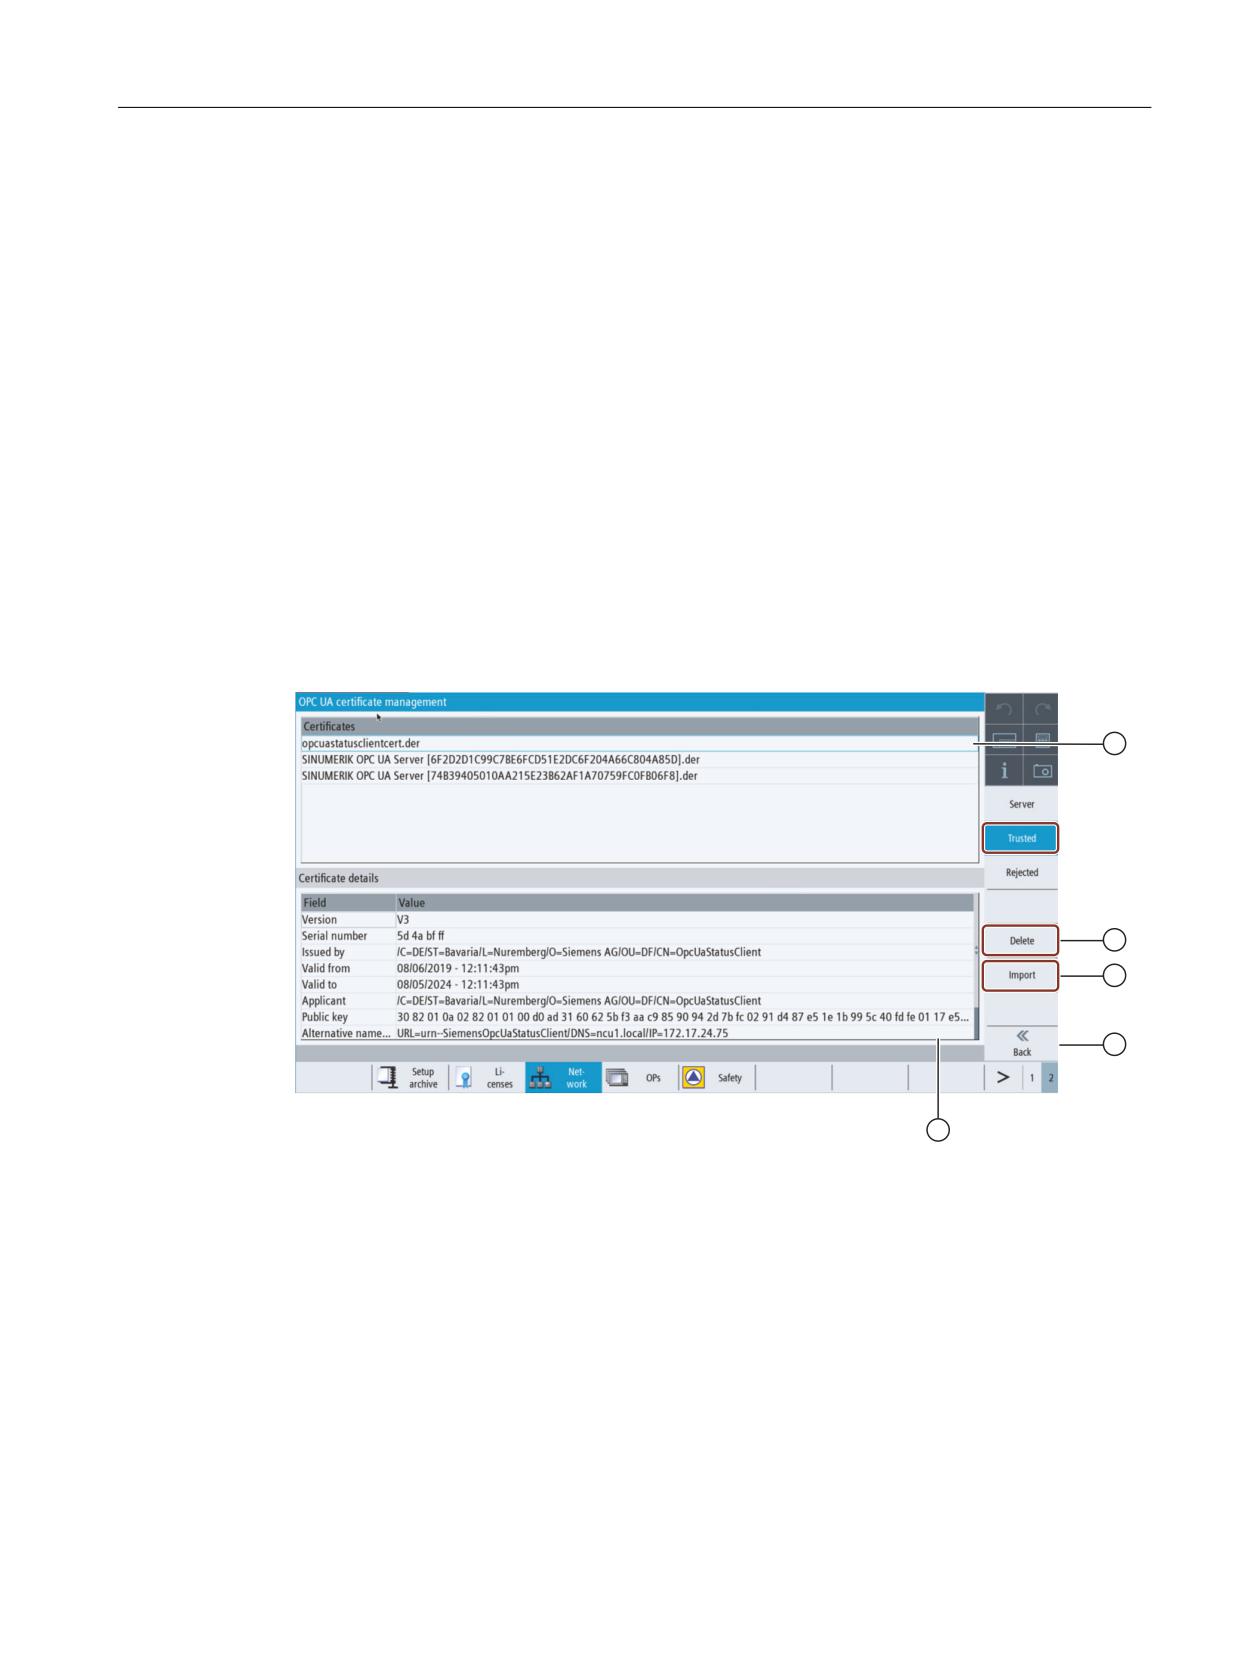
Overview
① The trusted certificates are listed in the upper part of the screen. You can select a certificate using
the arrow keys (cursor up/ cursor down).
② You can delete the trusted certificates.
③ You can import a certificate from an USB device.
④ You can leave the OPC UA dialogs.
⑤ The certificate details are shown in the lower part of the screen. To set the focus on the lower part
of the screen the softkey "next window" on the keyboard is used.
Figure 3-8
Trusted Certificate
SINUMERIK Access MyMachine / OPC UA
Configuration Manual, 10/2020, 6FC5397-1DP41-0BA5
31
Setting up of OPC UA server
3.4 Certificate handling
Deleting trusted certificates
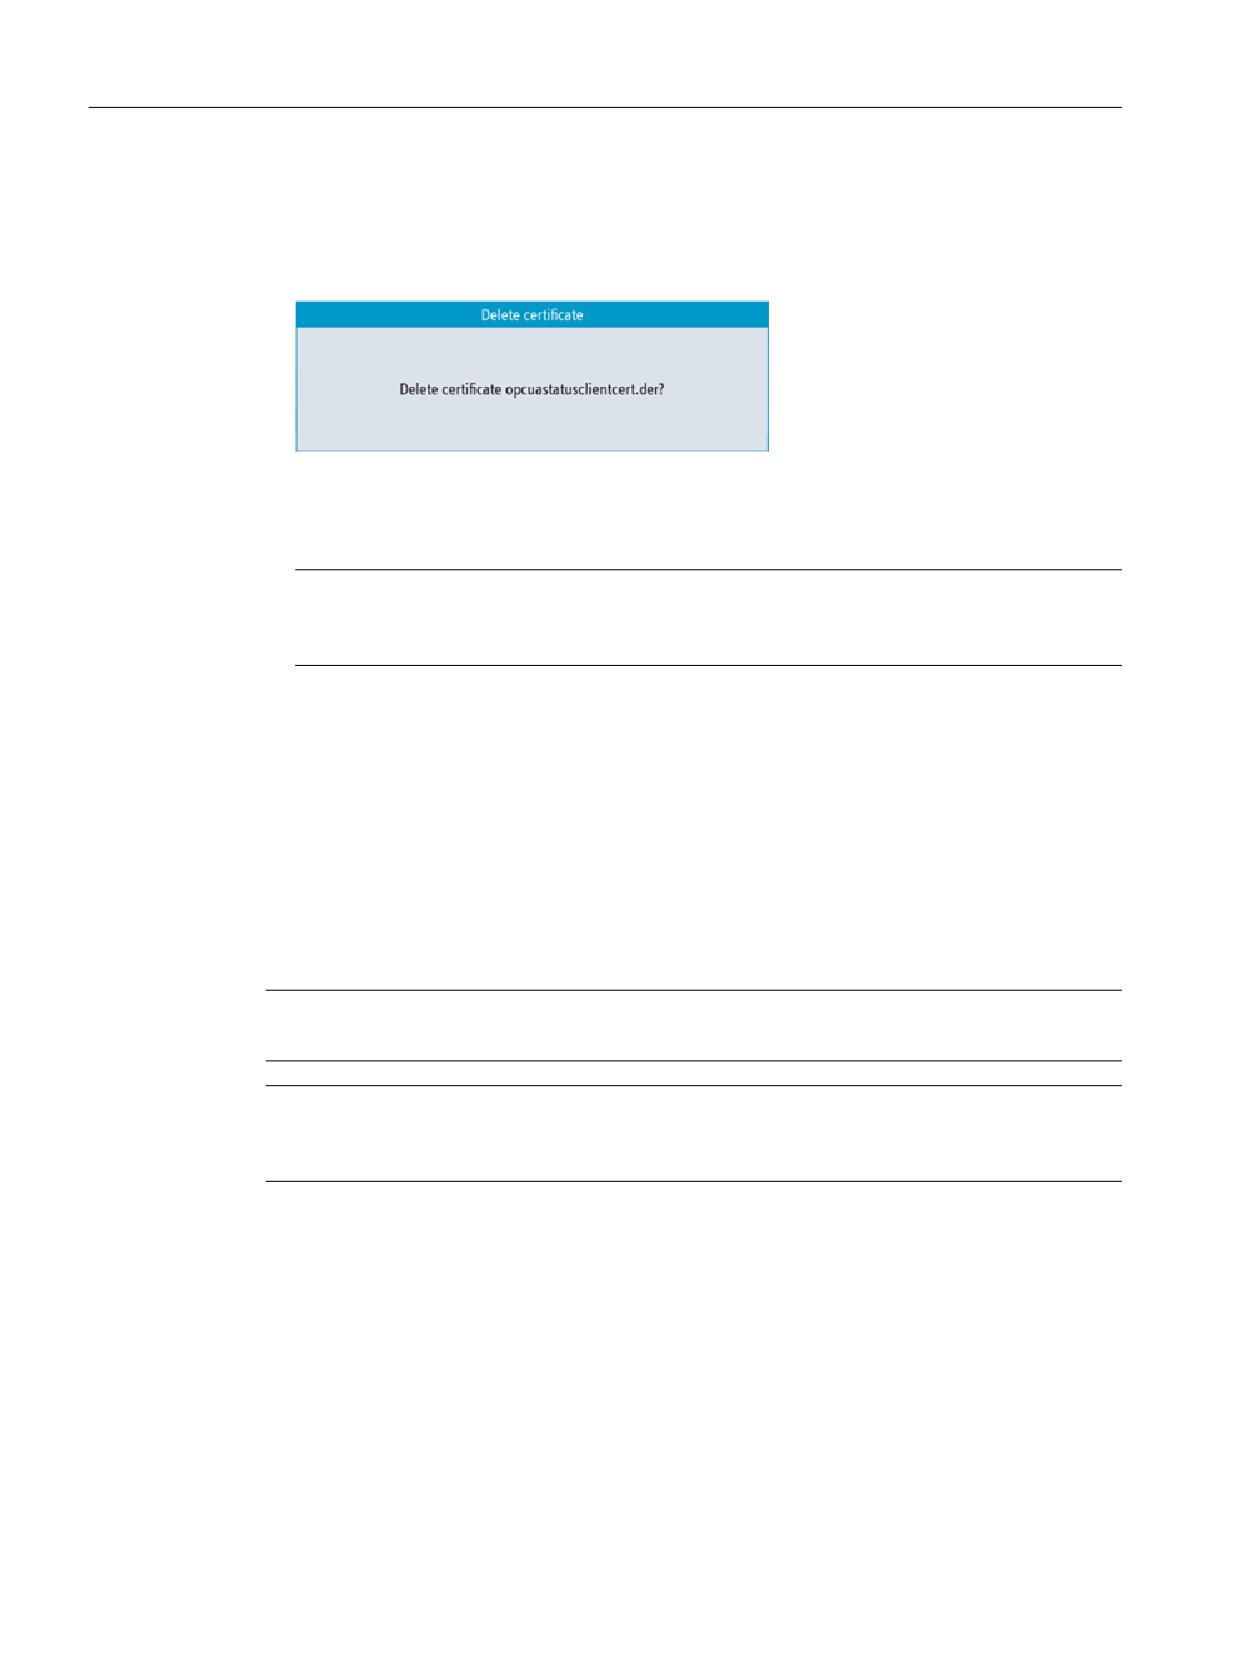
1. To manually delete a client certificate select a certificate in the trusted list and press the
softkey "Delete".
A pop-up screen will appear asking you for confirmation of deletion:
Figure 3-9
Delete certificate
Pressing the softkey "Cancel" will do no action and return to "Trusted" dialog.
Pressing the softkey "Ok" will delete the selected certificate.
Note
After the deletion of the client certificate a connection with OPC UA server can no longer be
established by the client of the corresponding certificate.
Importing certificates
To prepare a connection a client certificate can be imported before actually establishing a
connection. With the import the certificate is automatically trusted.
1. Press the softkey "Import".
A pop-up screen will appear showing the USB device to import from. You can navigate to a
location on the USB device to import a certificate to a trusted folder.
Pressing the softkey "Cancel" will ignore all input and return to the "Trusted" dialog.
Pressing the softkey "Ok" will import the certificate.
Note
Keep in mind, that only certificates with the file extension "*.der" are accepted.
Note
To use a certificate for authentication it is necessary to create a user with the method
"AddCertificateUser" first.
SINUMERIK Access MyMachine / OPC UA
32
Configuration Manual, 10/2020, 6FC5397-1DP41-0BA5
Setting up of OPC UA server
3.4 Certificate handling
3.4.3.2
Rejected certificates
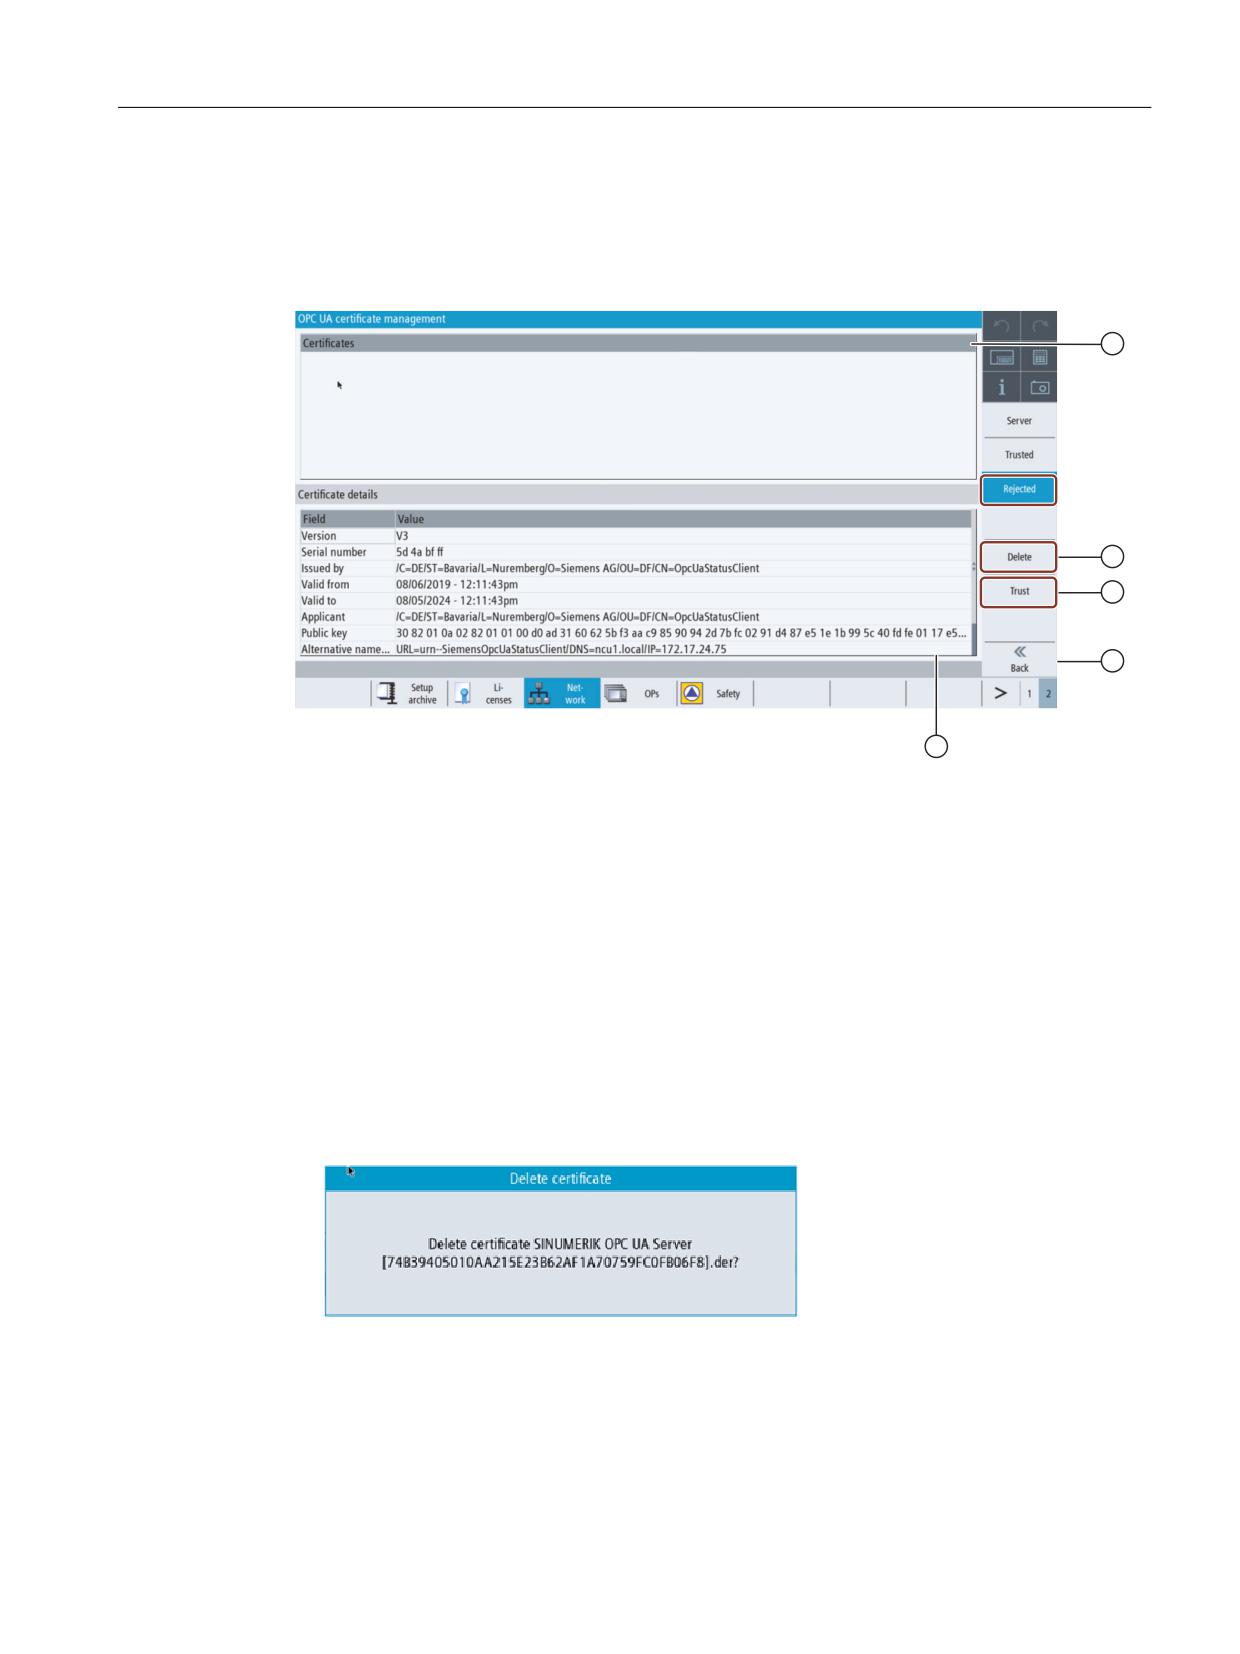
Overview
① The rejected certificates are listed in the upper part of the screen. You can select a certificate using
the arrow keys (cursor up/ cursor down).
② You can delete the selected certificate.
③ You can trust the selected certificate.
④ You can leave the OPC UA dialogs.
⑤ The certificate details are shown in the lower part of the screen. To set the focus on the lower part
of the screen the softkey "next window" on the keyboard is used.
Figure 3-10
Rejected Certificate
Deleting rejected certificates
1. To manually delete a client certificate, select the certificate in the rejected list and press the
softkey "Delete".
A pop-up screen will appear asking you for confirmation of deletion:
Figure 3-11
Delete rejected certficate
Pressing the softkey "Cancel" will do no action and return to the previous dialog.
Pressing the softkey "Ok" will delete the selected certificate.
SINUMERIK Access MyMachine / OPC UA
Configuration Manual, 10/2020, 6FC5397-1DP41-0BA5
33
Setting up of OPC UA server
3.4 Certificate handling
Trusting rejected certificates
If the setting "Accept certificates automatically" is deactivated, certificates automatically
transferred by a client with the first connection attempt will be treated as untrusted and need to
be trusted manually before the connection can be established. In this case, the server will report
an error (BadSecurityChecksFailed) on initial connection attempt.
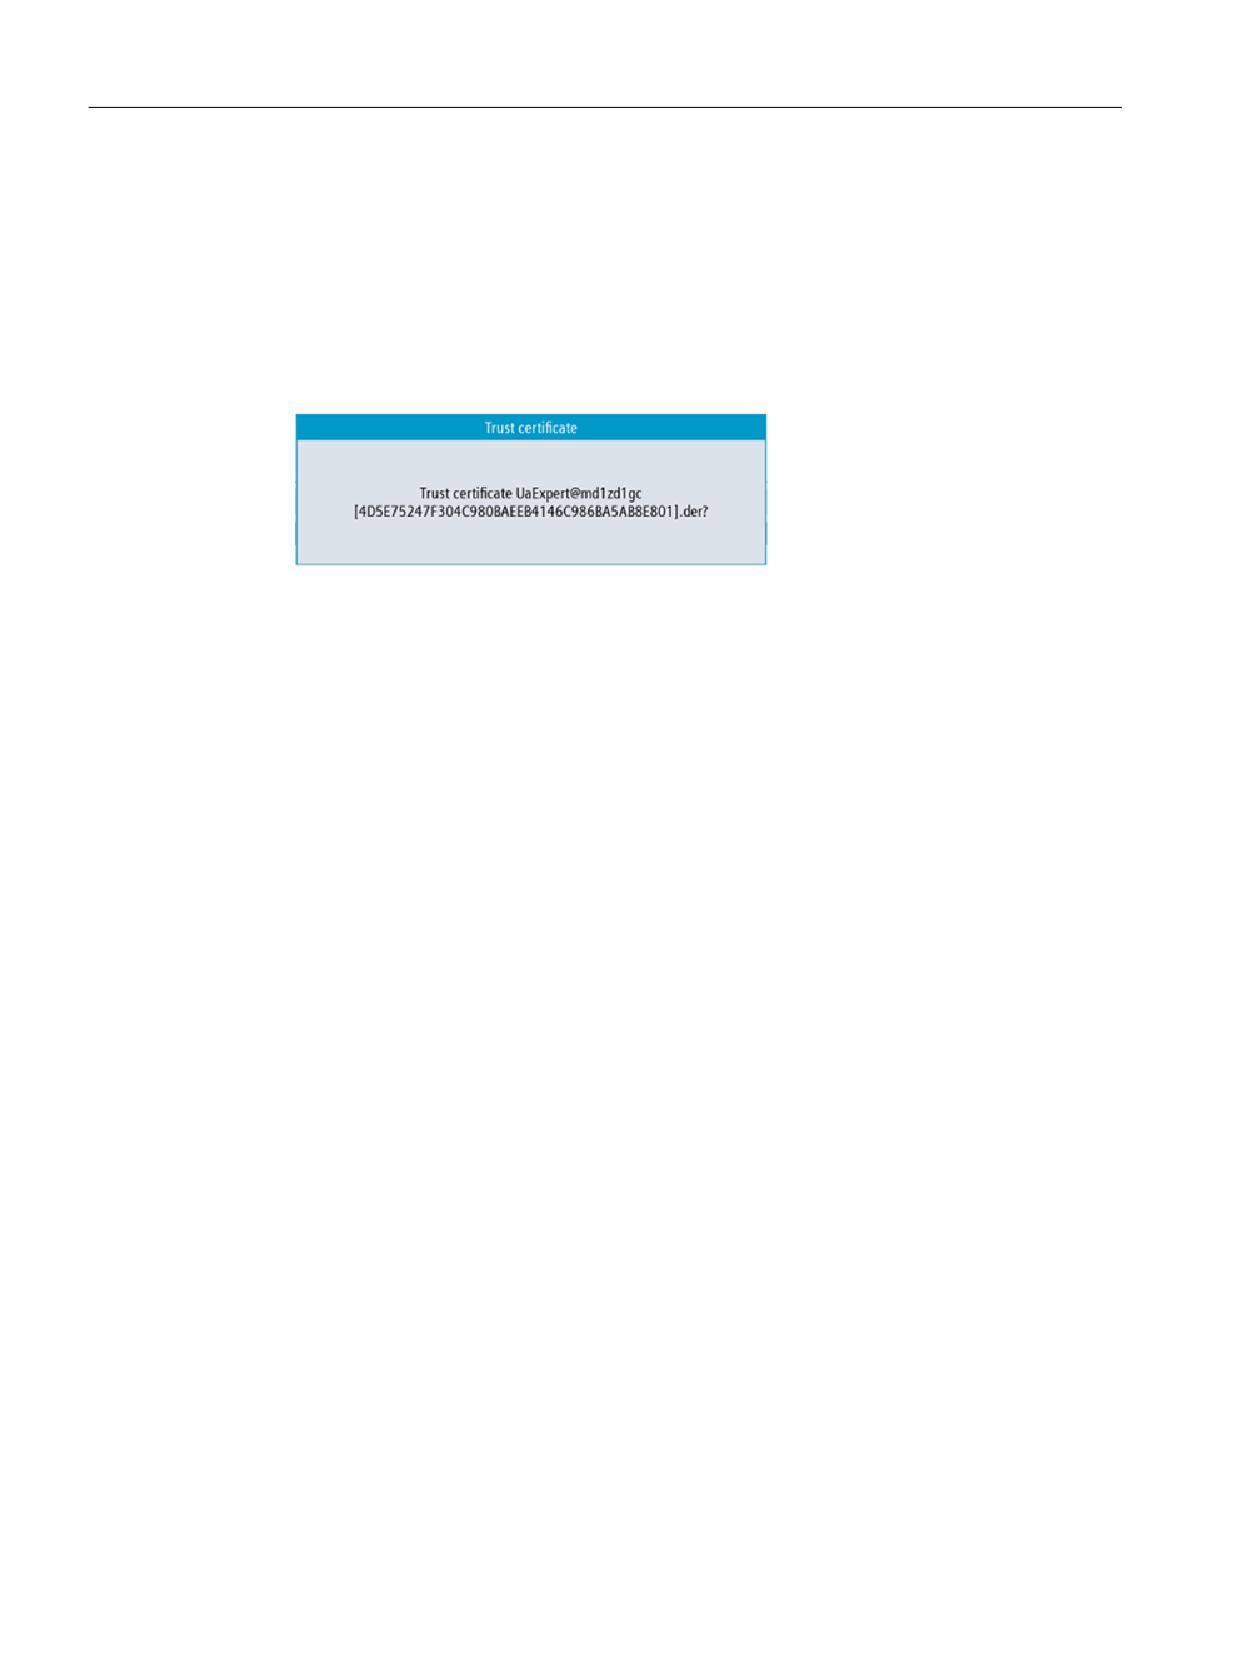
1. To manually trust a client certificate, select the certificate in the rejected list and press the
softkey "Trust".
A pop-up screen will appear asking for confirmation of trusting the certificate.
Figure 3-12
Trust certificate
Pressing the softkey "Cancel" will return to the "Rejected" dialog.
Pressing the softkey "Ok" will trust the certificate and move it to the trusted folder.
SINUMERIK Access MyMachine / OPC UA
34
Configuration Manual, 10/2020, 6FC5397-1DP41-0BA5
Setting up of OPC UA server
3.5 Testing the connection
3.5
Testing the connection
Requirement
To test the connection, you can use the "Sample Applications" of the OPC Foundation (https://
opcfoundation.org/developer-tools/specifications-unified-architecture/opc-unified-
architecture-for-cnc-systems/) under "Developer Tools/Developer Kits/Unified Architecture". It is
necessary to register with the OPC Foundation for this.
Note
There are two ways to establish the connection:
• Connection without security
• Connection with the security policy "Basic128Rsa15" respectively "Basic256" and the security
mode "SignAndEncrypt"
SIEMENS always recommends setting up a connection with security, as only in this way the
confidentiality of the data transmitted can be ensured.
Installation
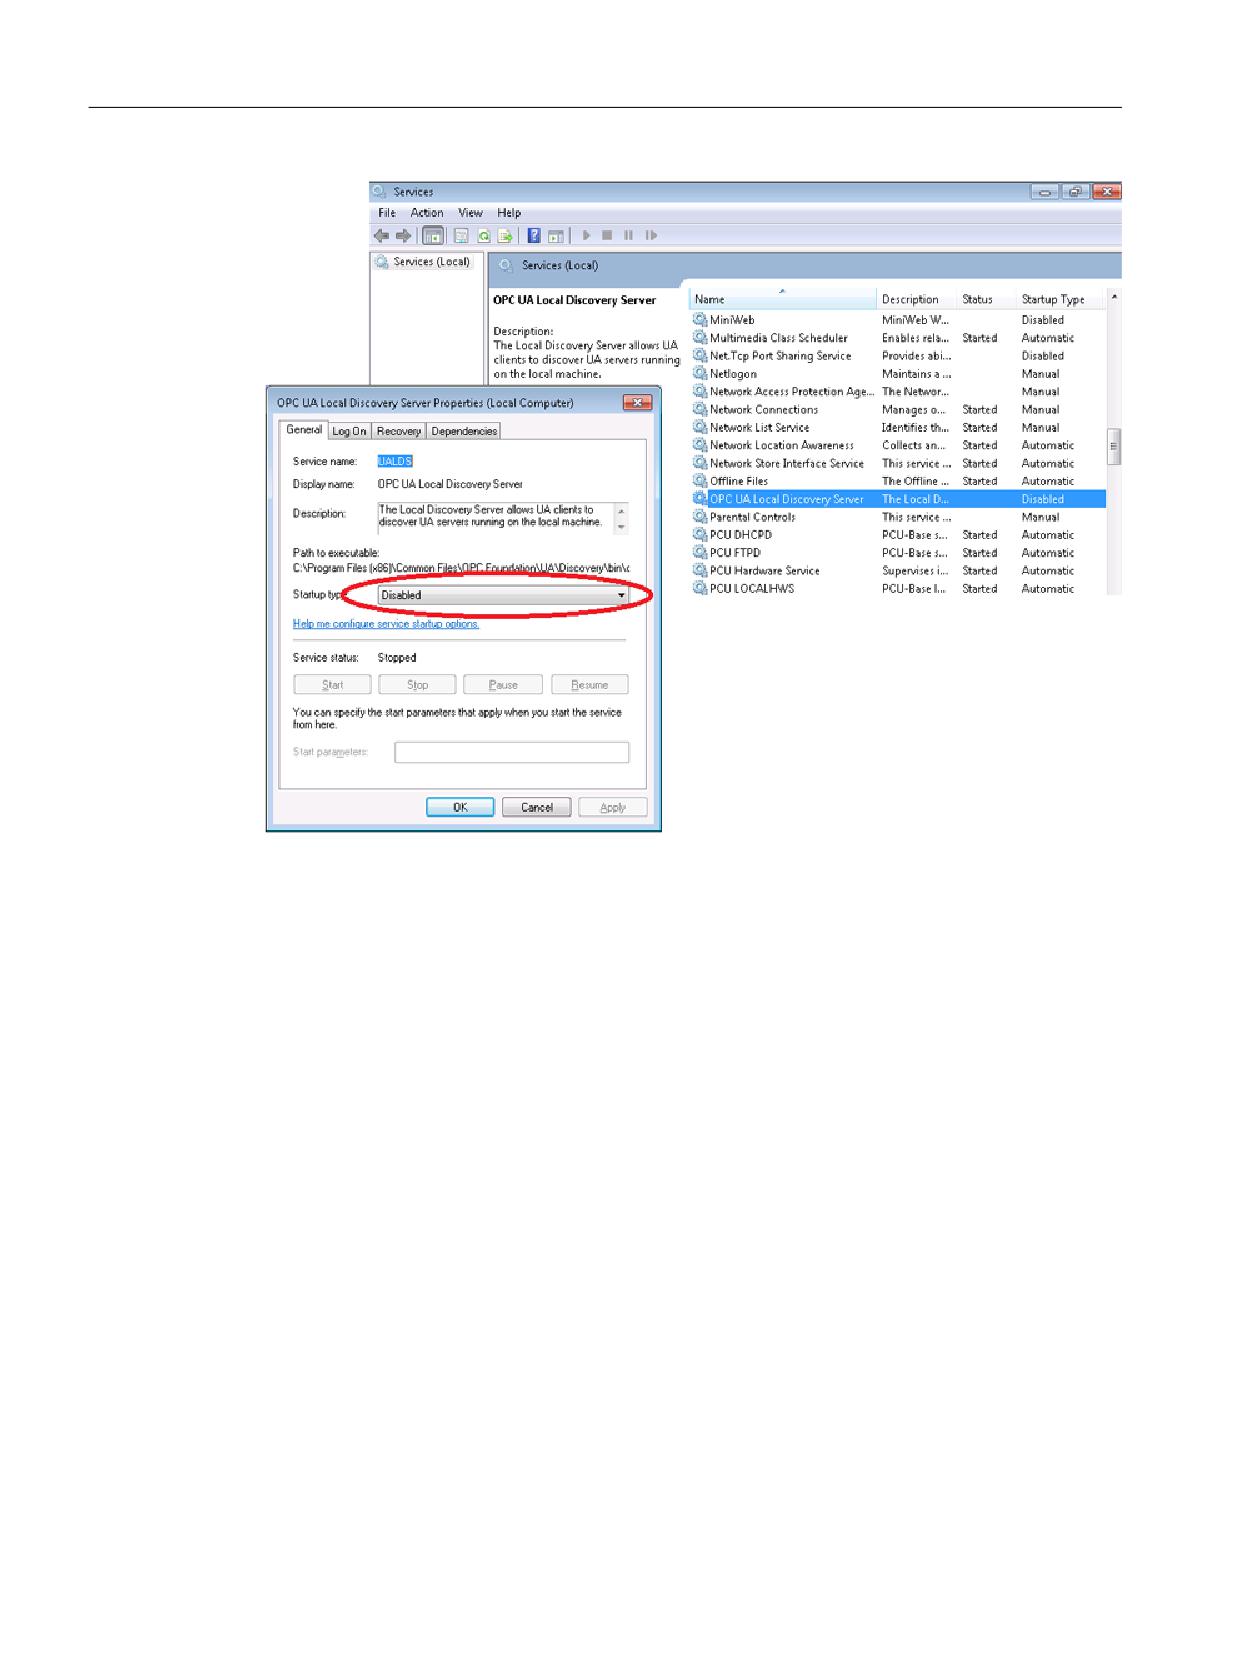
The "Sample Applications" additionally install a service with the name "OPC UA Local Discovery
Server". If you want to locally test the OPC UA connection, i.e. an installation directly on the PCU
50/IPC, you must deactivate this service.
Note
If the service "OPC UA Local Discovery Server" is active, the OPC UA server cannot be started
correctly, because it blocks the needed TCP port 4840.
This service has no influence if the "Sample Applications" are installed on a PC in the network.
Deactivation is then not necessary.
SINUMERIK Access MyMachine / OPC UA
Configuration Manual, 10/2020, 6FC5397-1DP41-0BA5
35
Setting up of OPC UA server
3.5 Testing the connection
Figure 3-13
Deactivating the "OPC UA Local Discovery Server" service on PCU 50/IPC
SINUMERIK Access MyMachine / OPC UA
36
Configuration Manual, 10/2020, 6FC5397-1DP41-0BA5
Setting up of OPC UA server
3.5 Testing the connection
Procedure
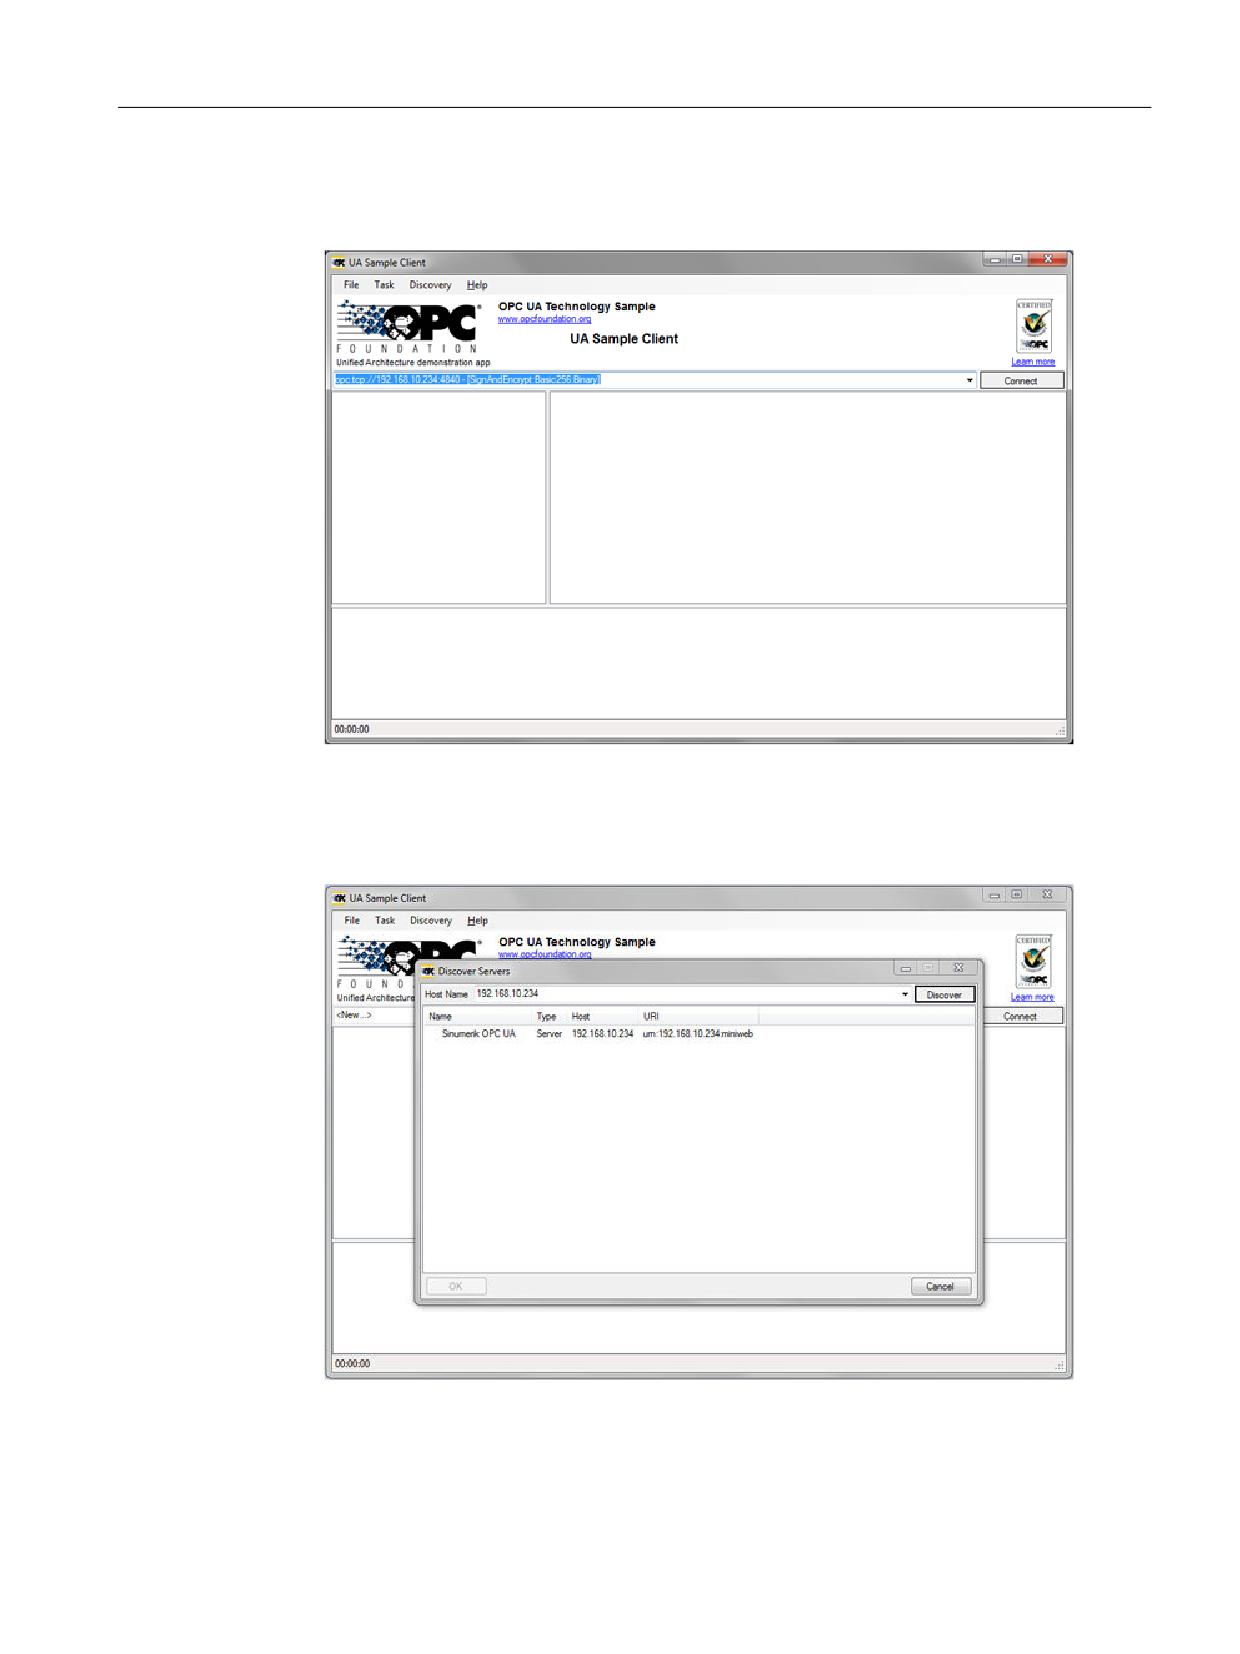
1. Start the OPC UA "Sample client".
Figure 3-14
Sample Client main window
2. Select the "New" entry from the drop-down list.
The "Discover Servers" window opens.
3. Now enter the IPv4 address of the target system and click the "Discover" button.
Figure 3-15
Discover servers
4. The SINUMERIK OPC UA server appears in the list. Select the server and confirm with "OK".
5. Return to the main window and click the "Connect" button.
SINUMERIK Access MyMachine / OPC UA
Configuration Manual, 10/2020, 6FC5397-1DP41-0BA5
37
Setting up of OPC UA server
3.5 Testing the connection
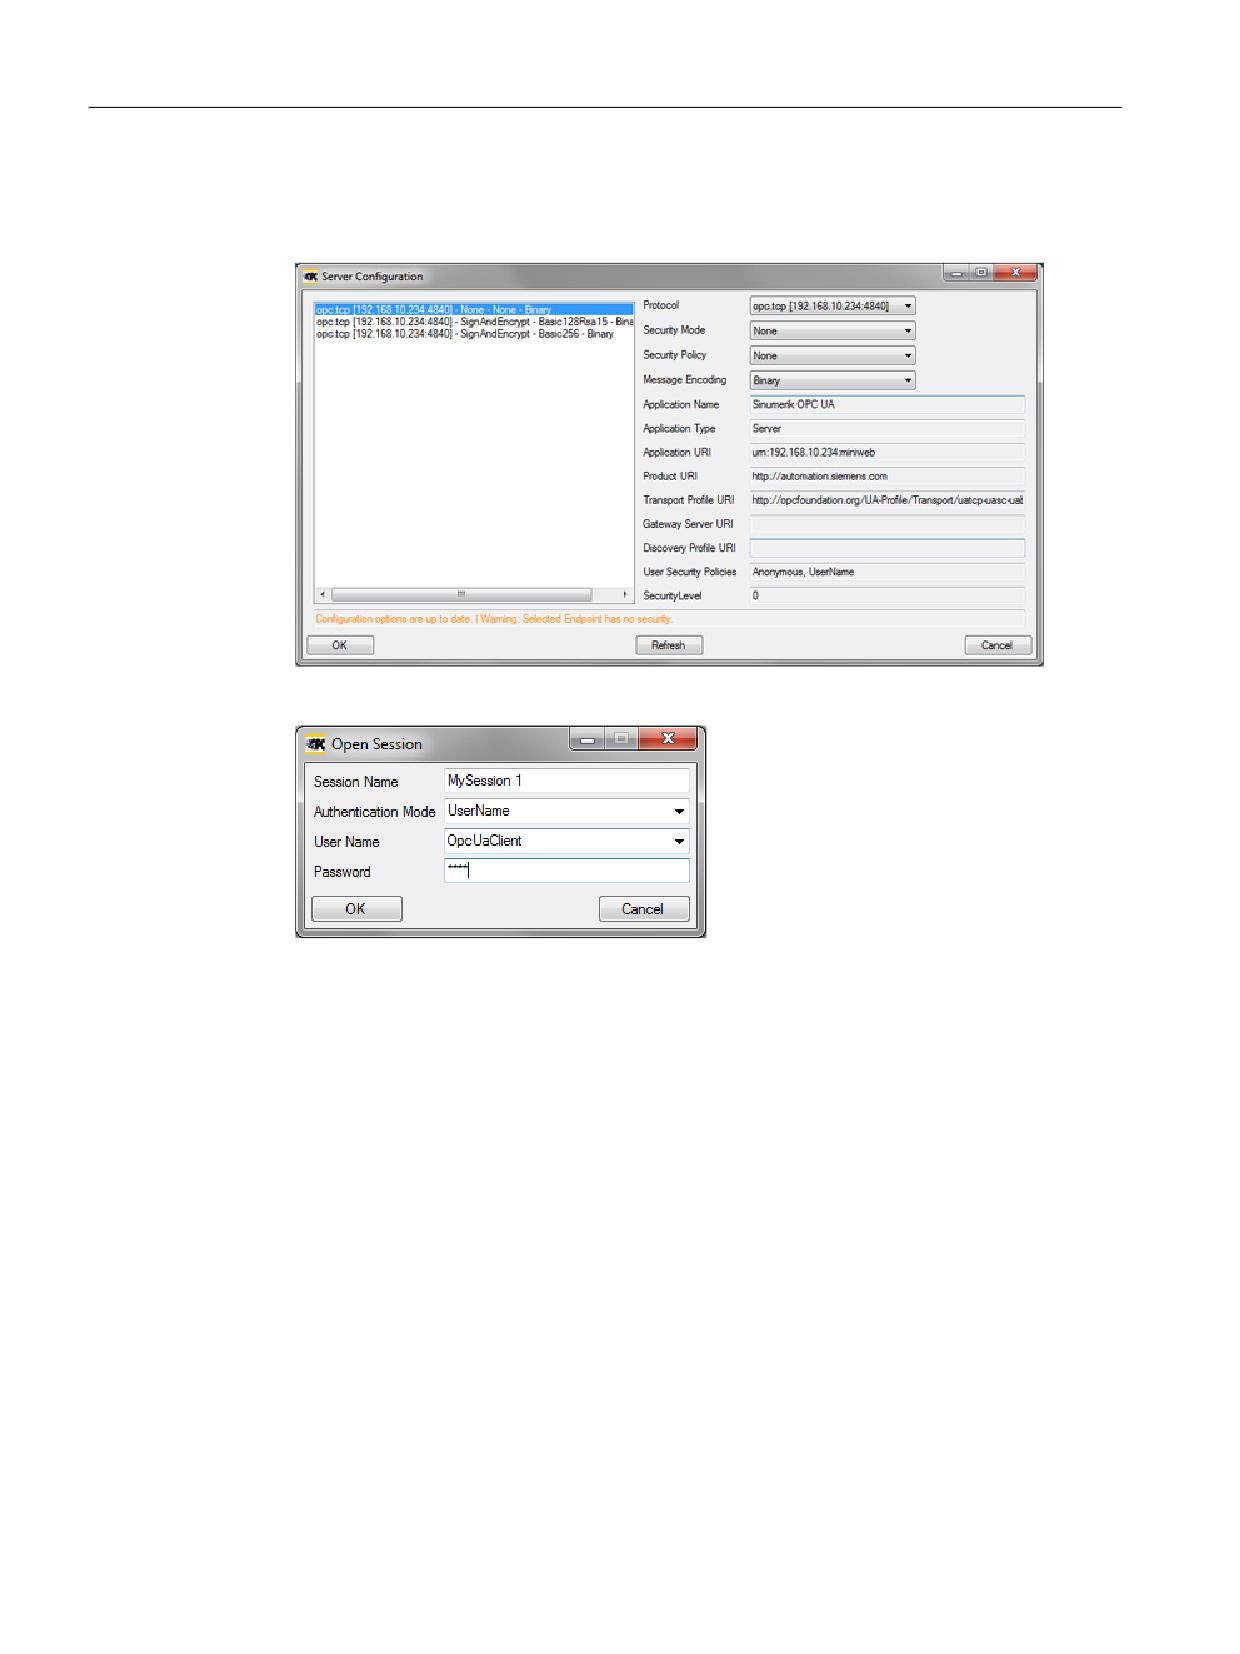
6. To establish a simple connection without security, configure the following settings. After
clicking "OK", enter the administrator user assigned when OPC UA was set up and the
administrator password. Confirm your settings by clicking "OK".
Figure 3-16
Server configuration
Figure 3-17
User Identity
SINUMERIK Access MyMachine / OPC UA
38
Configuration Manual, 10/2020, 6FC5397-1DP41-0BA5
Setting up of OPC UA server
3.5 Testing the connection
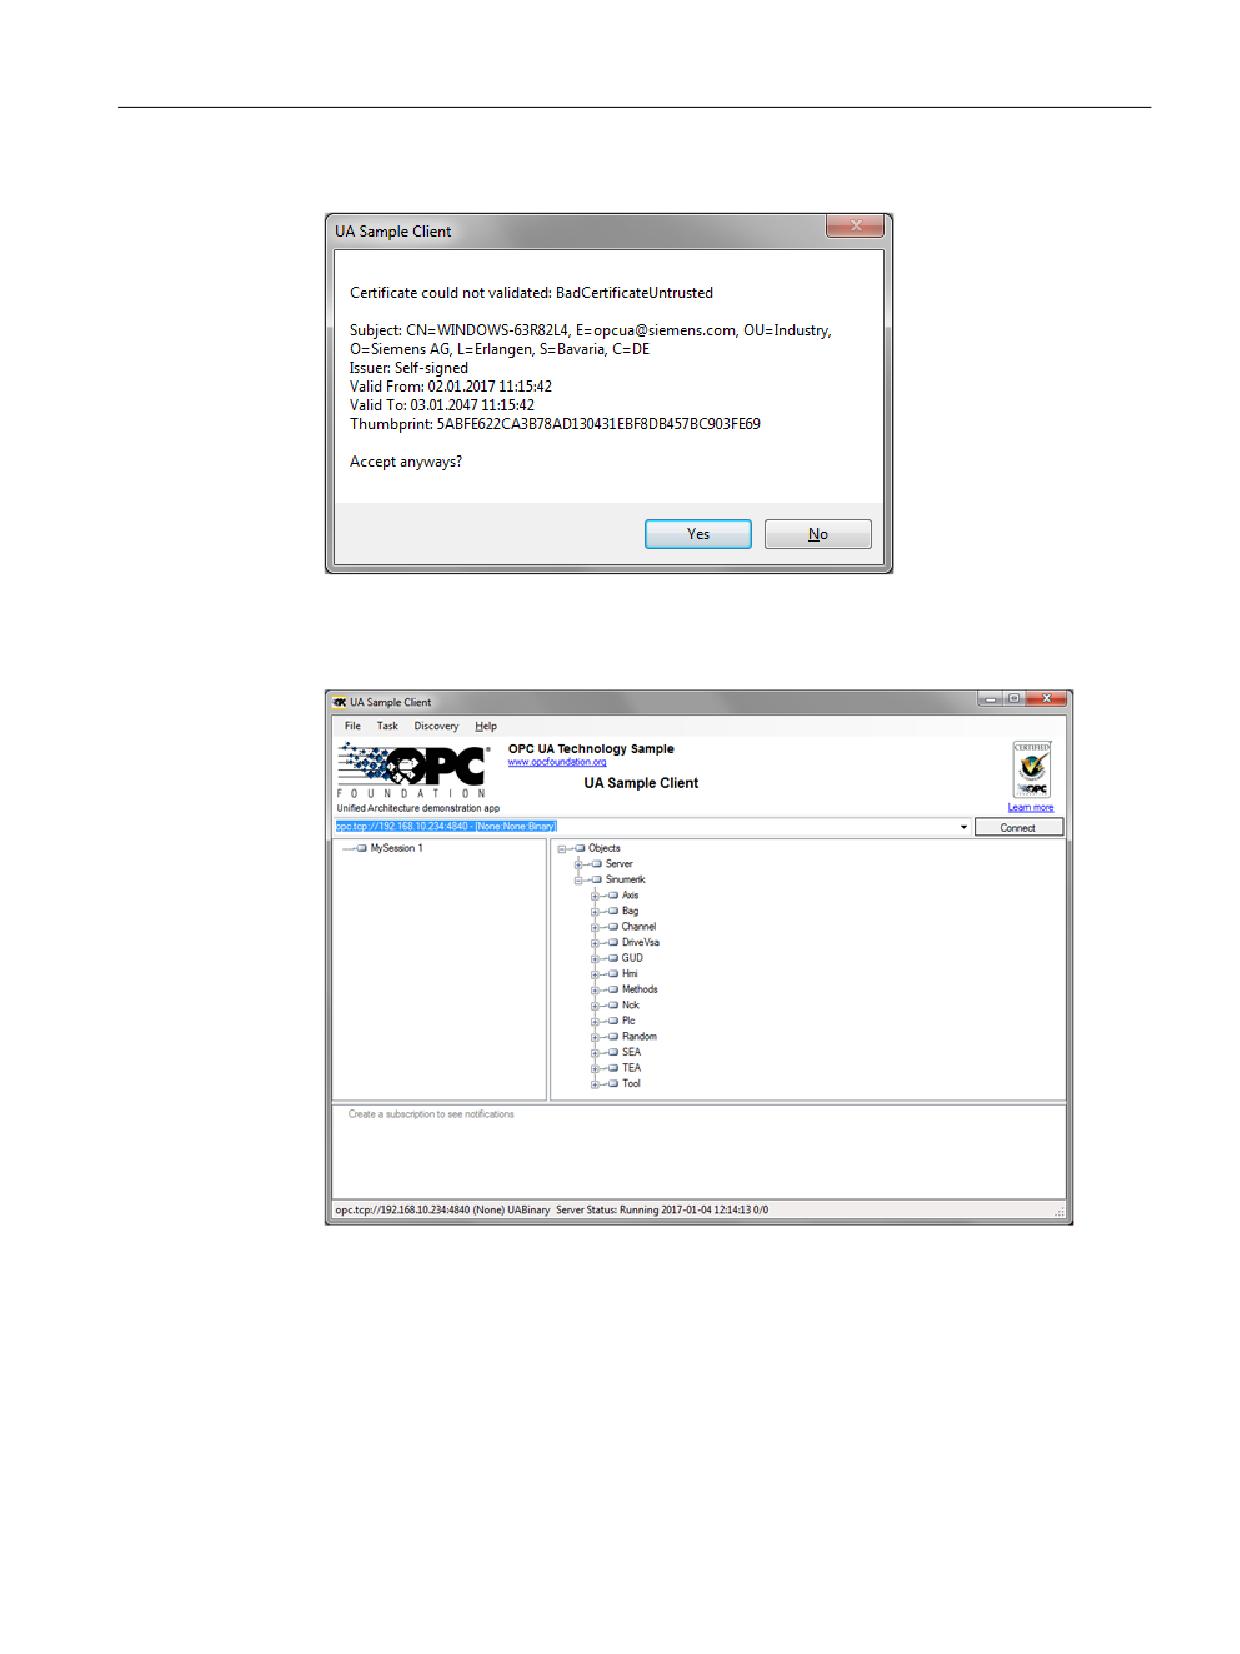
7. Confirm the prompt asking if you want to trust the transferred certificate with "Yes".
Figure 3-18
Certificate
The connection to the SINUMERIK OPC UA server is now established and the available address
space is displayed.
Figure 3-19
Address space of the SINUMERIK OPC UA server
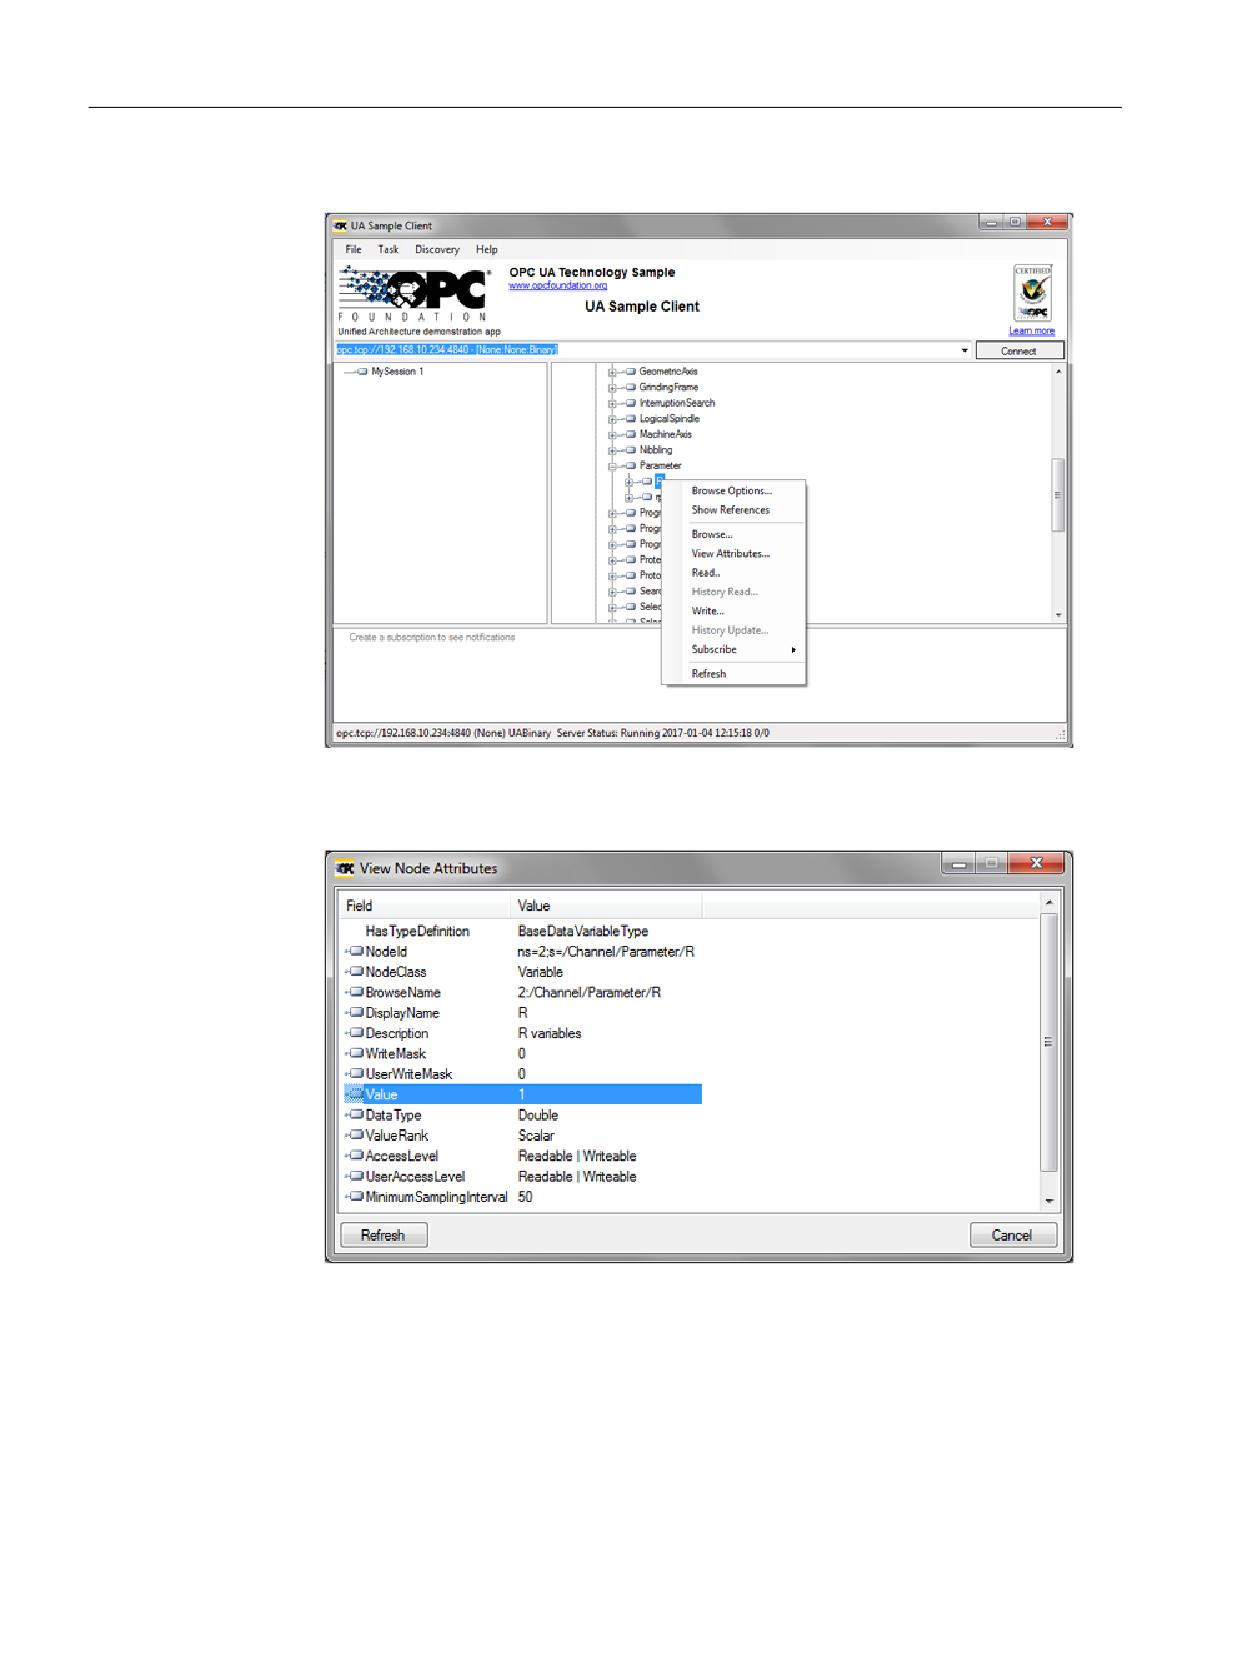
8. Now navigate to a nodeID (e.g. R-parameter at Sinumerik > Channel > Parameter > R) and
right click the corresponding entry. You can now test various functions:
SINUMERIK Access MyMachine / OPC UA
Configuration Manual, 10/2020, 6FC5397-1DP41-0BA5
39
Setting up of OPC UA server
3.5 Testing the connection
– E.g. read, write, setup monitoring
Figure 3-20
NodeID "Sinumerik > Channel > Parameter > R"
– The attributes of a NodeID can be queried via the entry "View Attributes". One of these
attributes is the "Value", which provides the corresponding value of R1.
Figure 3-21
Viewing node attributes
SINUMERIK Access MyMachine / OPC UA
40
Configuration Manual, 10/2020, 6FC5397-1DP41-0BA5
Customer Specific Object Model (CSOM)
4
4.1
Overview
What is a Customer Specific Object Model (CSOM)?
The primary objective of the OPC UA address space is to provide a standard way for servers to
represent objects to clients. The OPC UA object model has been designed to meet this objective.
It defines objects in terms of variables and methods. It also allows relationships to other objects
to be expressed.
A Customer Specific Object Model allows a specific view of the OPC UA server to meet the
requirements in a customer-specific project. For this purpose, you can specify all required OPC
UA nodes in an XML file.
You can use several tools to create your own Object Model. In this manual, all processes and
examples are explained on the base of the tool SiOME (Siemens OPC UA Modeling Editor).
SiOME
With the help of SiOME, a tool for implementing Customer Specific Object Models or OPC UA
companion specifications, you can:
• design information models / address spaces for your OPC UA server
• create new types and instances of OPC UA nodes
• map OPC UA variables to SINUMERIK variables
• enable multiple license in a single custom model (Page 63)
Download link and explanations about SIOME are available here (https://
support.industry.siemens.com/cs/de/en/view/109755133).
SINUMERIK Access MyMachine / OPC UA
Configuration Manual, 10/2020, 6FC5397-1DP41-0BA5
41
Customer Specific Object Model (CSOM)
4.2 Functionalities
4.2
Functionalities
What is possible with a CSOM?
Possible application scenarios for a CSOM could be the following:
• Implementation of an own Information model
• Modifying of an own information model:
- structure
- display name
- browse name
- description
What is not possible?
• Change of data types
Quantity structure of CSOM
Feature
Value
Maximum number of binary files
1
Maximum number of CSOM namespaces
71
Maximum number of nodes in CSOM
10.000
(1) Maximum number of CSOM namespaces can be created is 6, if lisence namesapce is created.
For more information, refer topic Modeling rules (Page 71).
SINUMERIK Access MyMachine / OPC UA
42
Configuration Manual, 10/2020, 6FC5397-1DP41-0BA5
Customer Specific Object Model (CSOM)
4.3 Workflow for using CSOM in the SINUMERIK OPC UA server
4.3
Workflow for using CSOM in the SINUMERIK OPC UA server
4.3.1
Overview
In order to use a Customer Specific Object Model (CSOM), it is necessary to follow a certain
workflow procedure.
The following chapter provides an overview about the necessary process steps. Every process
step will also be covered in greater detail.
CSOM process workflow
The CSOM workflow consists of the following steps:
1. Exporting SINUMERIK model from OPC UA server as OPC UA XML with SINUMERIK Access
MyMachine /P2P.
2. Creating a CSOM with SiOME (Page 45).
3. Converting the CSOM from XML to binary (Page 73) with SINUMERIK Access MyMachine /
P2P.
4. Importing the CSOM into the SINUMERIK OPC UA server (Page 74) with SINUMERIK Operate.
See also
Exporting SINUMERIK model from OPC UA server as OPC UA XML (Page 43)
4.3.2
Exporting SINUMERIK model from OPC UA server as OPC UA XML
SiOME offers the possibility to map variables using drag and drop. In order to provide this
usability, SiOME needs to know the SINUMERIK address space of the machine, where the CSOM
should be implemented.
Since the address space depends on machine configuration, this address space has to be
exported after commissioning of the machine using "SINUMERIK Access MyMachine /P2P".
SINUMERIK Access MyMachine /P2P is reading SINUMERIK address space via OPC UA browse
functionality and providing an XML file to be imported into SiOME.
Prerequisites
For exporting SINUMERIK OPC UA model, it is necessary to have SinuReadAll access right.
SINUMERIK Access MyMachine /P2P
SINUMERIK Integrate Access MyMachine /P2P (MLFB 6FC5860-7YC00-0YA0) supports the
commissioning of machines with SINUMERIK Operate (software version 2.6 and higher) using
a standard Windows PC. Its scope of functions includes the exchange of files between the service
PC and the control as well as operation of the HMI user interface. EasyScreen texts, alarm texts,
tool management texts and other texts can be edited easily.
SINUMERIK Access MyMachine / OPC UA
Configuration Manual, 10/2020, 6FC5397-1DP41-0BA5
43
Customer Specific Object Model (CSOM)
4.3 Workflow for using CSOM in the SINUMERIK OPC UA server
Exporting SINUMERIK OPC UA model as OPC UA XML
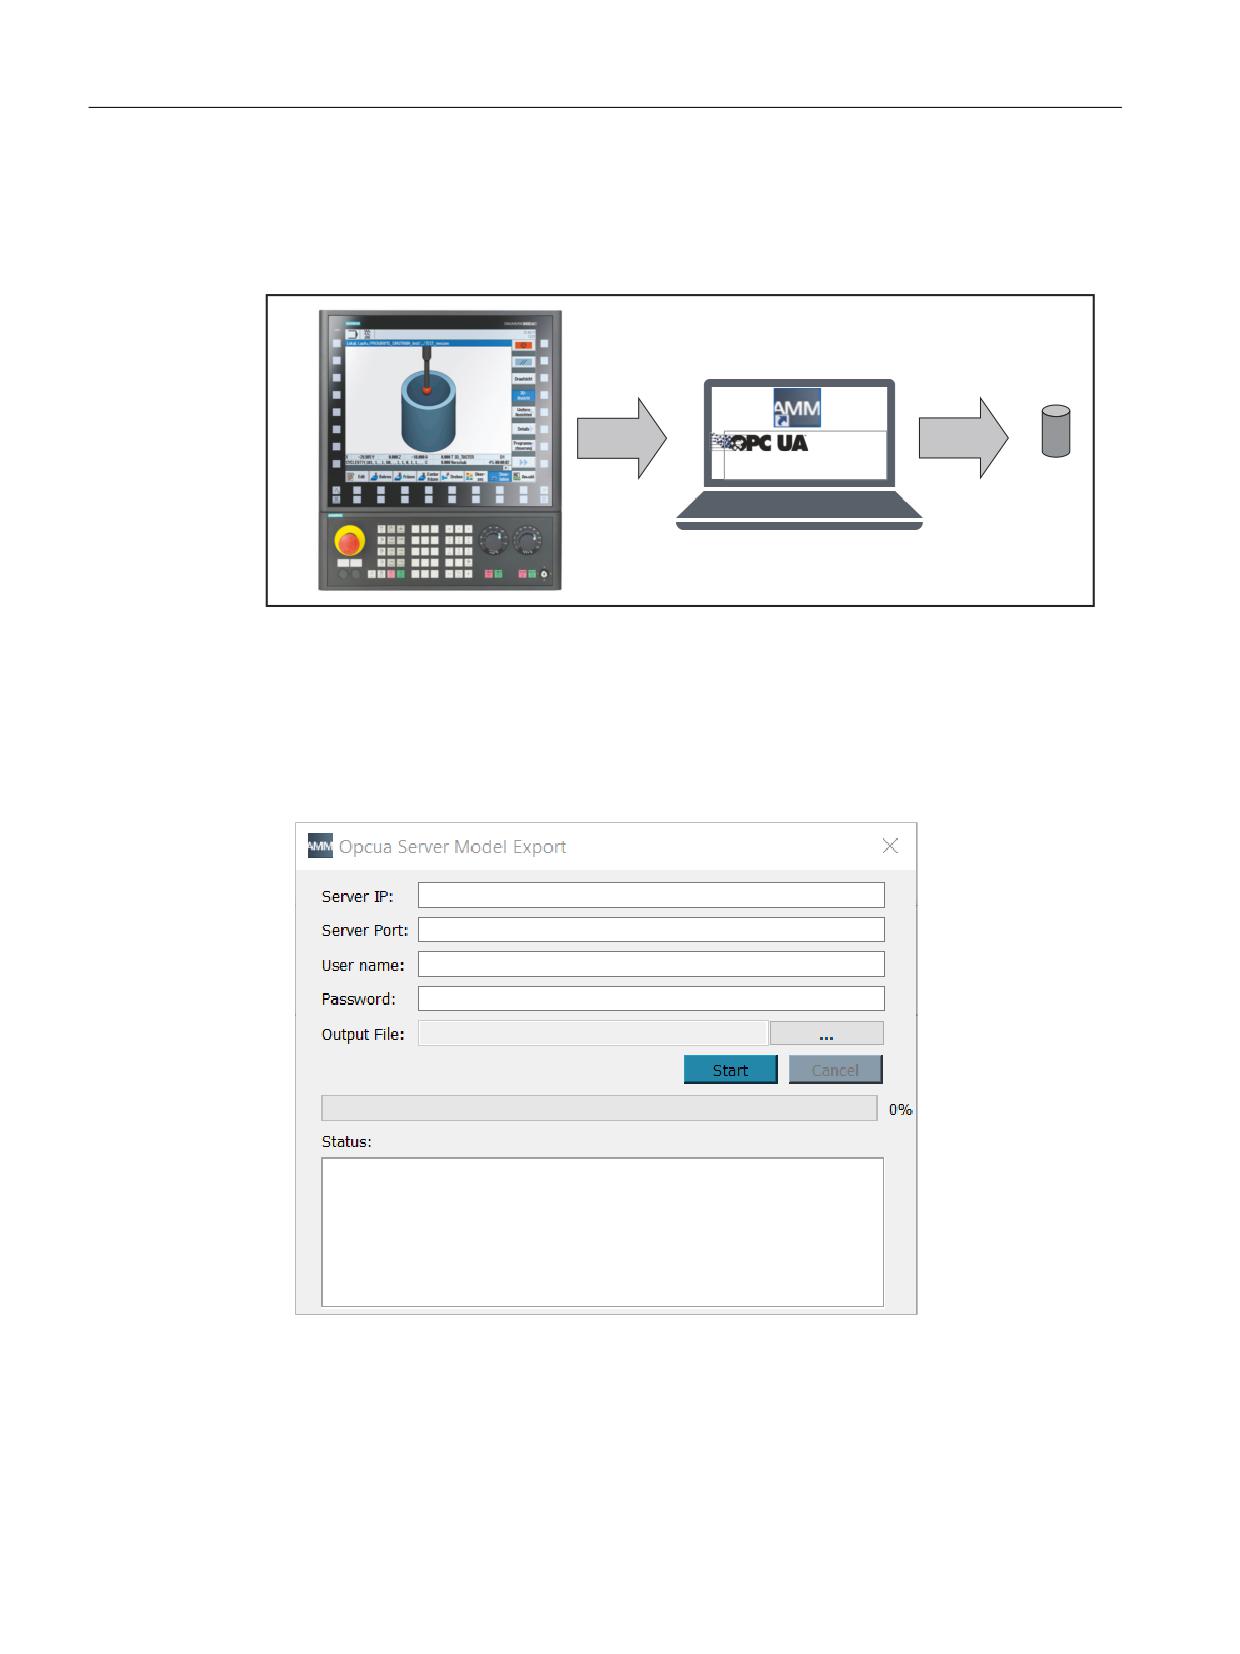
The following graphic shows the process of exporting the target system address space as OPC UA
XML.
;0/
%URZVH
([SRUW
6,180(5,.
6,180(5,.
0RGHO
&OLHQW
0RGHO
ವ&UHDWH ;0/
HJ 86%
Figure 4-1
Exporting SINUMERIK OPC UA model as OPC UA XML
Procedure
1. Open the application "SINUMERIK Access MyMachine /P2P".
2. Click on "Tools > Sinumerik Opcua Server Tools > Opcua Server Model Export". A popup
window appears.
Figure 4-2
Opcua Server Model Export
3. Enter the IP address and the port of the OPC UA server as well as the username and password
to access the server. Then specify where the output file should be saved to.
4. Click "Start" button to generate the xml file. The generated XML file is saved to the specified
location.
SINUMERIK Access MyMachine / OPC UA
44
Configuration Manual, 10/2020, 6FC5397-1DP41-0BA5
Customer Specific Object Model (CSOM)
4.3 Workflow for using CSOM in the SINUMERIK OPC UA server
The generated XML file can then be imported into SiOME tool.
4.3.3
Creating a CSOM with SiOME
4.3.3.1
Overview
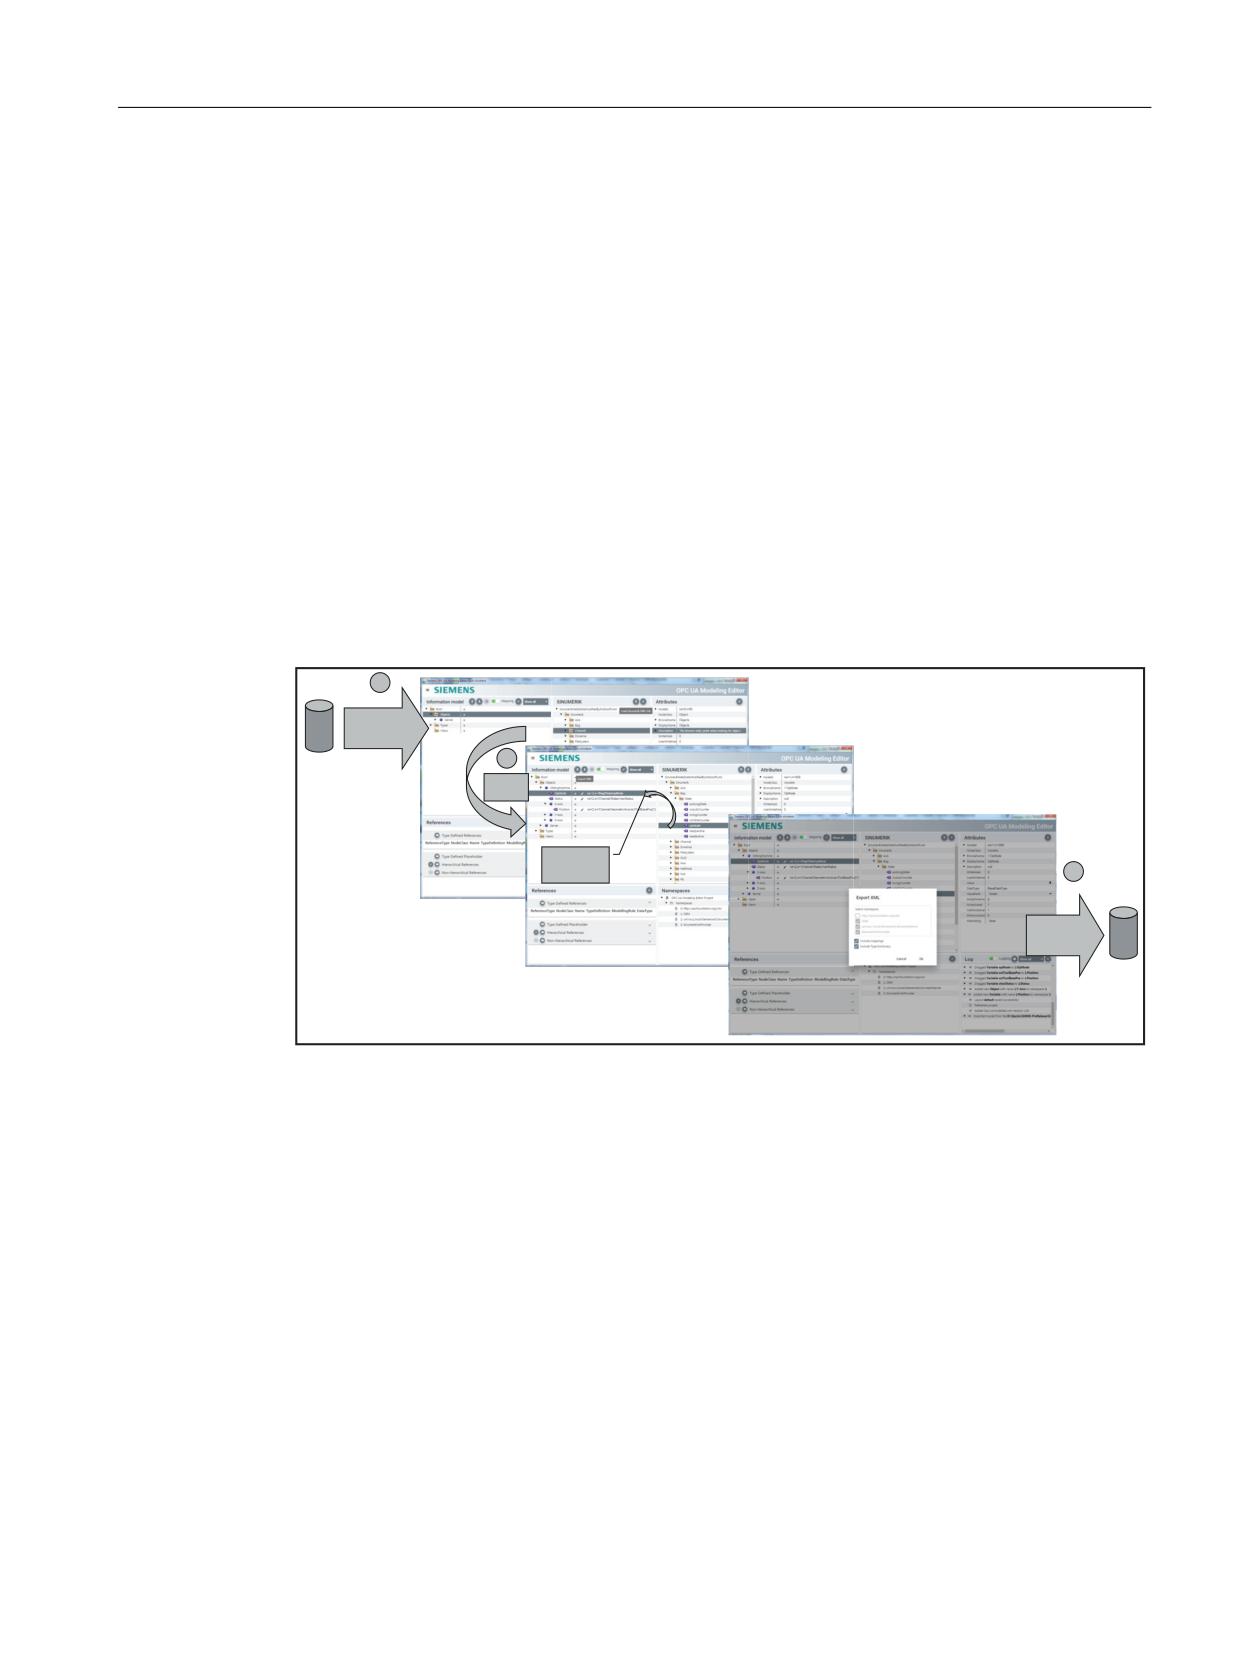
SiOME is a free of charge tool from SIEMENS that allows to easily create an OPC UA object model
and map the object either to SINUMERIK or SIMATIC S7-1500 variables.
The following chapter shows the engineering workflow for a CSOM with SINUMERIK and SiOME.
This process itself has 3 sub steps:
1. Importing SINUMERIK model (XML) (Page 45)
2. Modeling own object model (Page 48)
3. Exporting CSOM (XML) (Page 68)
;0/
,PSRUW
6,180(5,.
0RGHO
0RGHO
'HVLJQ
9DULDEOH
0DSSLQJ
;0/
([SRUW
&XVWRPHU
0RGHO
Figure 4-3
Creating a CSOM with SiOME
These 3 sub steps are explained further in the below sections with one application example.
4.3.3.2
Importing SINUMERIK model (XML)
Prerequisite
Exported SINUMERIK model (XML) file from SINUMERIK Access MyMachine /P2P.
SINUMERIK Access MyMachine / OPC UA
Configuration Manual, 10/2020, 6FC5397-1DP41-0BA5
45
Customer Specific Object Model (CSOM)
4.3 Workflow for using CSOM in the SINUMERIK OPC UA server
Procedure
1. Open the SiOME application.
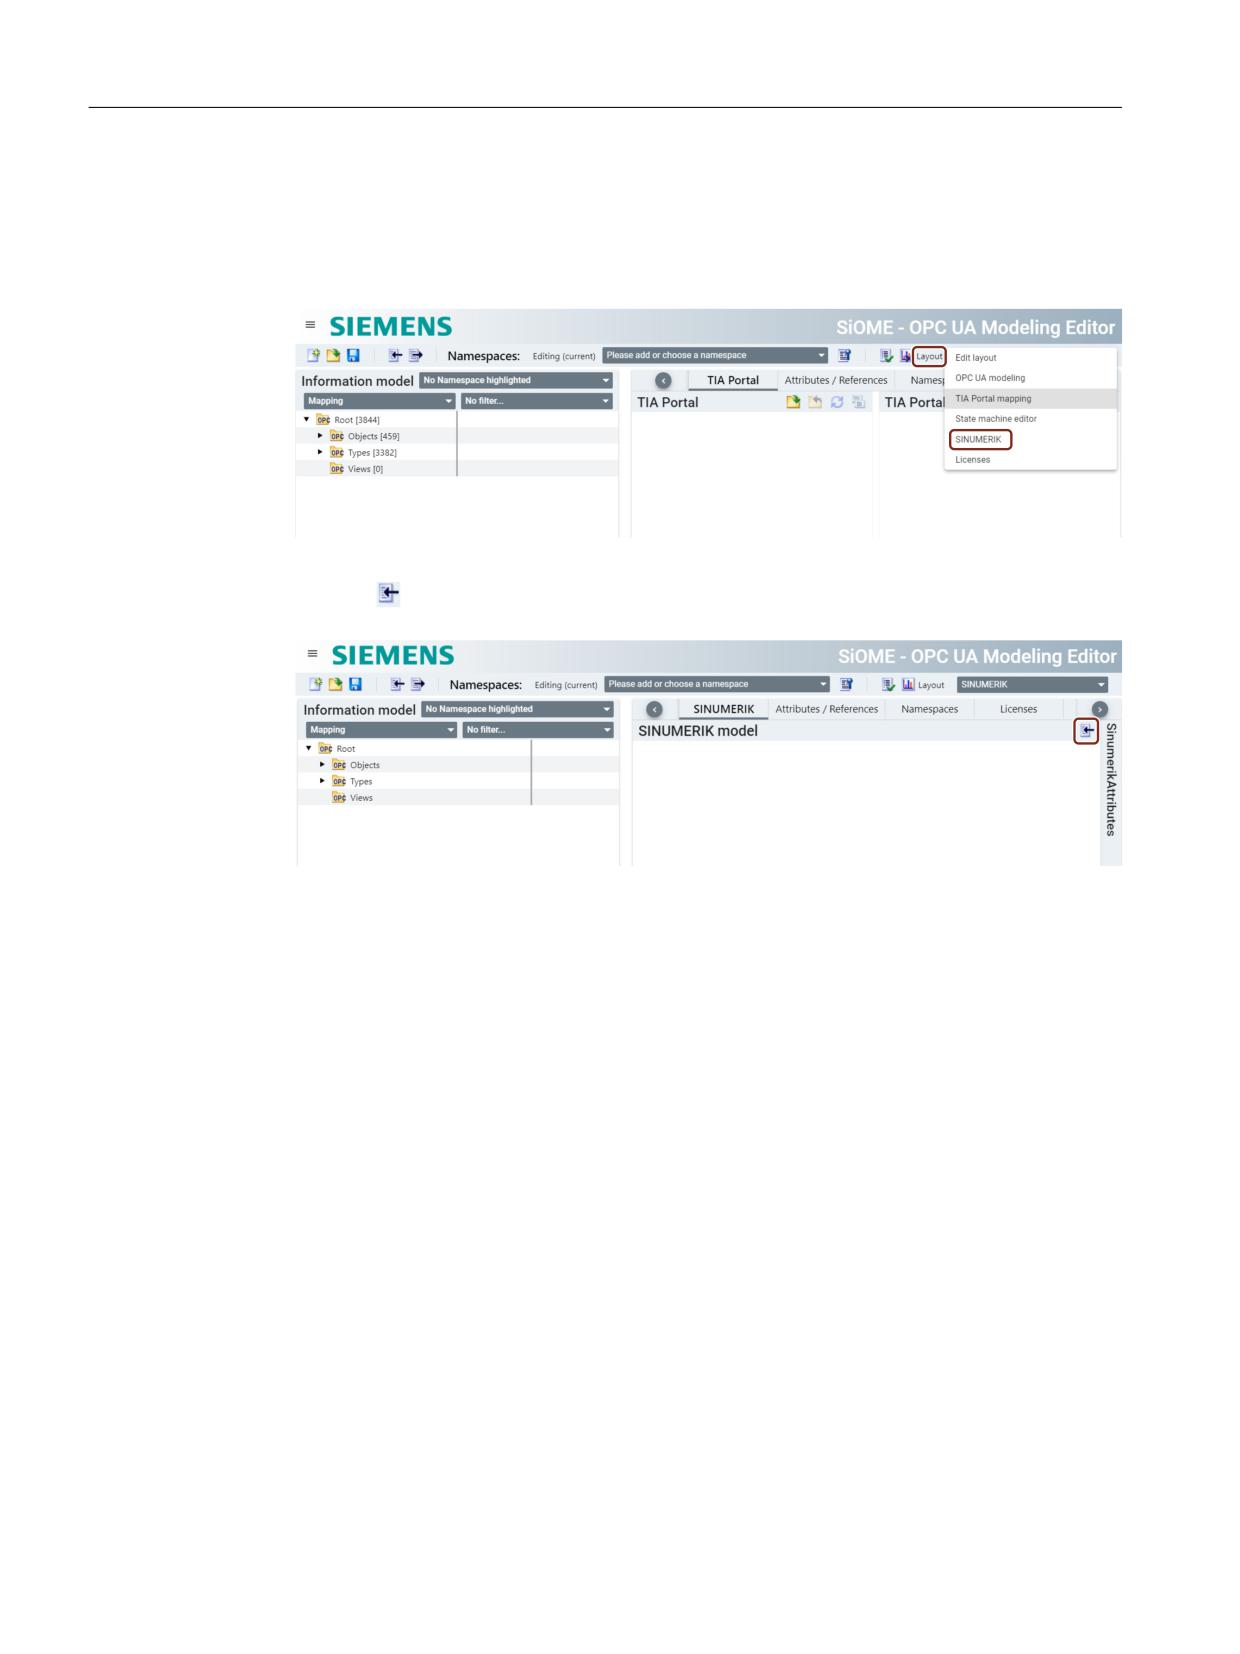
2. Click "Layout" drop down and select "SINUMERIK" as shown in the below image. The
SINUMERIK layout is displayed.
Figure 4-4
SiOME layout option
3. Click the
icon in "SINUMERIK" tab to import the SINUMERIK model (XML) as shown in the
below image.
Figure 4-5
SiOME dashboard page
4. A "Open" dialog box appears. Select the exported SINUMERIK model (XML) file and then click
"Open".
Result
SINUMERIK tab shows the SINUMERIK browse tree as shown in the below image:
SINUMERIK Access MyMachine / OPC UA
46
Configuration Manual, 10/2020, 6FC5397-1DP41-0BA5

Customer Specific Object Model (CSOM)
4.3 Workflow for using CSOM in the SINUMERIK OPC UA server
Figure 4-6
SINUMERIK tab with SINUMERIK browse tree
SINUMERIK Access MyMachine / OPC UA
Configuration Manual, 10/2020, 6FC5397-1DP41-0BA5
47
Customer Specific Object Model (CSOM)
4.3 Workflow for using CSOM in the SINUMERIK OPC UA server
4.3.3.3
Modeling own object model
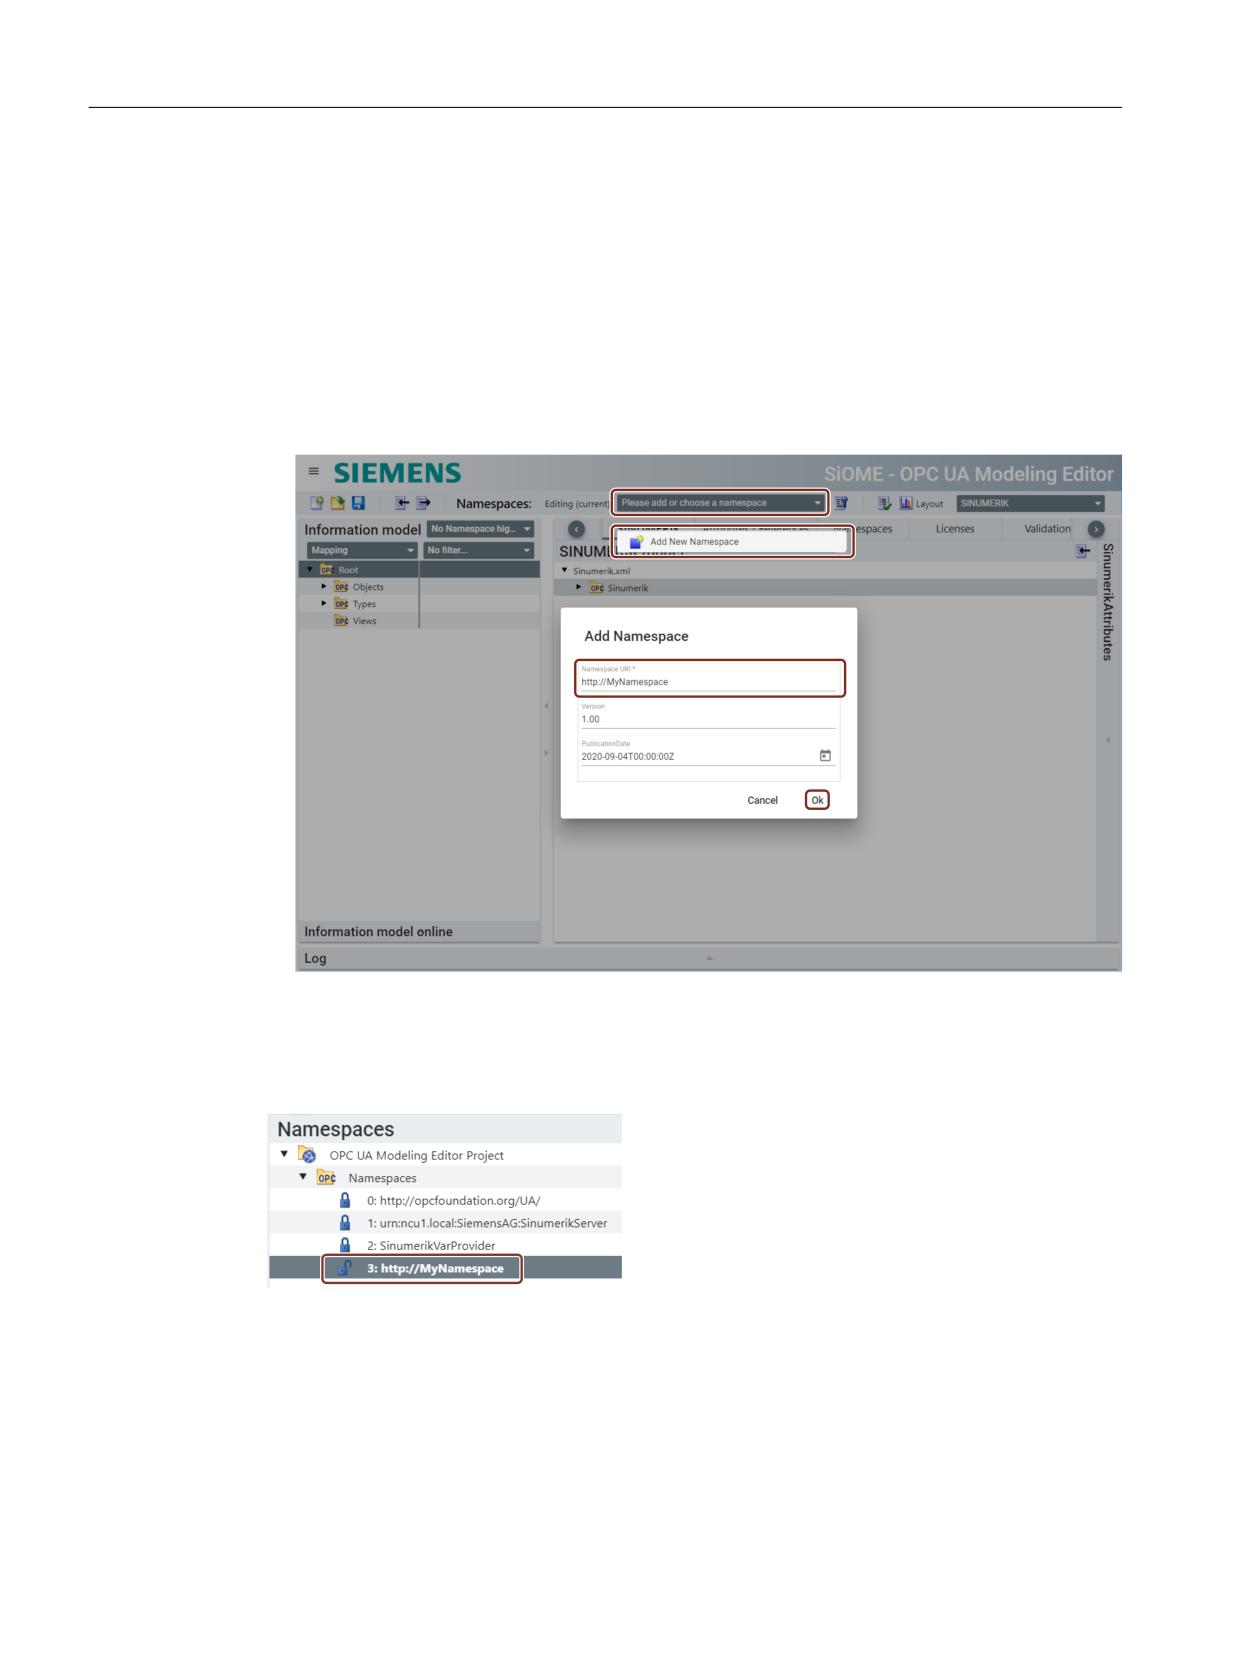
Creating new namespace
To create a new namespace, follow the below steps:
1. Click on "Please add or choose a namespace" and then click "Add New Namespace" as shown
in the below image.
2. The "Add Namespace" popup window appears. Enter a name in the "Namespace URI" field
and then click "Ok".
Figure 4-7
Adding new Namespace
Result
The new namespace is added in "Namespaces" tab.
Figure 4-8
Namespace added
SINUMERIK Access MyMachine / OPC UA
48
Configuration Manual, 10/2020, 6FC5397-1DP41-0BA5
Customer Specific Object Model (CSOM)
4.3 Workflow for using CSOM in the SINUMERIK OPC UA server
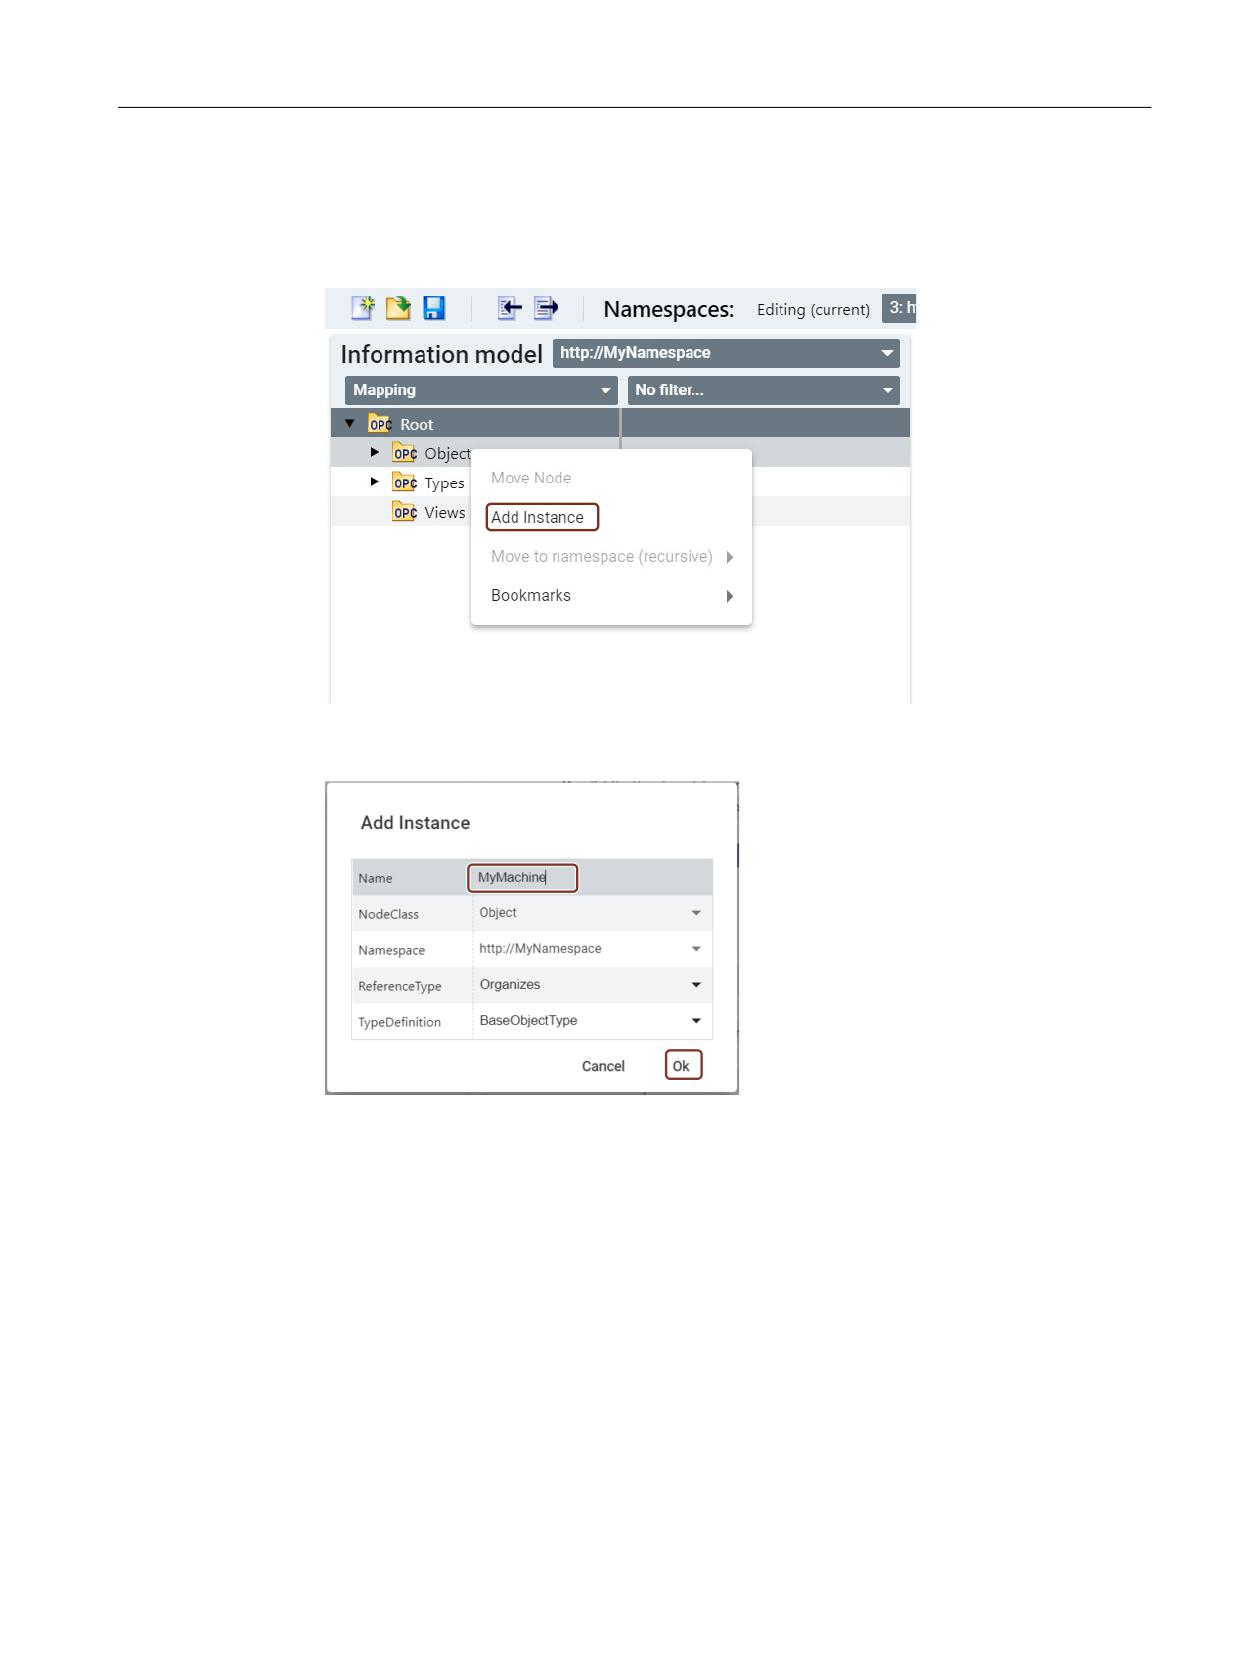
Creating a new object
To create a new object, follow the below steps:
1. Right-click on "Objects" node in "Information model" tab and then click on "Add Instance".
Figure 4-9
Information model tab
2. The "Add Instance" popup window appears. Enter a name in the "Name" field.
Figure 4-10
Add Instance popup window
3. Verify that newly added namespace is selected in the "Namespace" row and then click "Ok".
Result
The new instance is added under "Objects" node.
SINUMERIK Access MyMachine / OPC UA
Configuration Manual, 10/2020, 6FC5397-1DP41-0BA5
49
Customer Specific Object Model (CSOM)
4.3 Workflow for using CSOM in the SINUMERIK OPC UA server
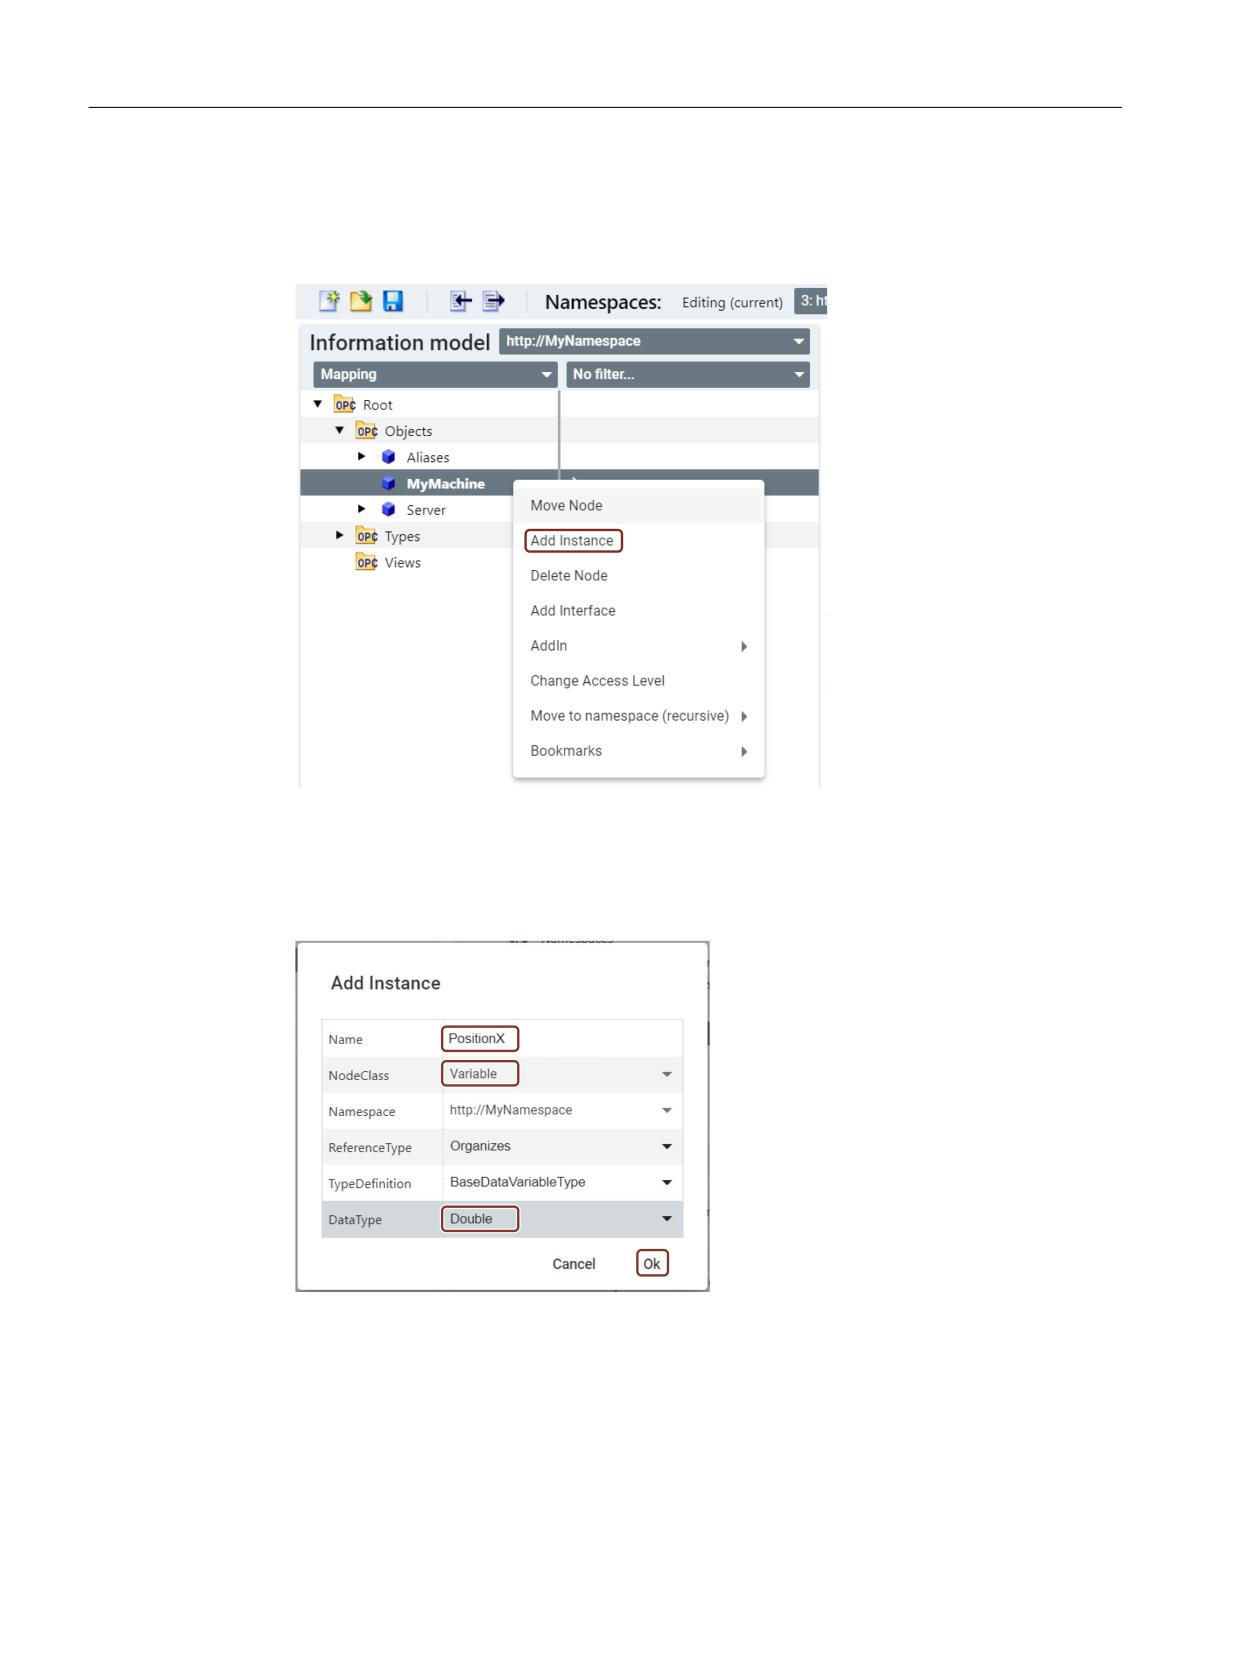
Adding a new instance for a variable
To add a new instance for a variable, follow the below steps:
1. Under "Objects" node, right-click on "MyMachine" node and then click on "Add Instance".
Figure 4-11
Adding a new instance for a variable
2. The "Add Instance" popup window appears. Enter a name in the "Name" field.
3. Select "Variable" from the "NodeClass" drop-down list.
4. Select "Double" from the "DataType" drop-down list and then click "Ok".
Figure 4-12
Add Instance popup for a variable
Result
The new instance is added for a variable under "MyMachine" node.
SINUMERIK Access MyMachine / OPC UA
50
Configuration Manual, 10/2020, 6FC5397-1DP41-0BA5
Customer Specific Object Model (CSOM)
4.3 Workflow for using CSOM in the SINUMERIK OPC UA server
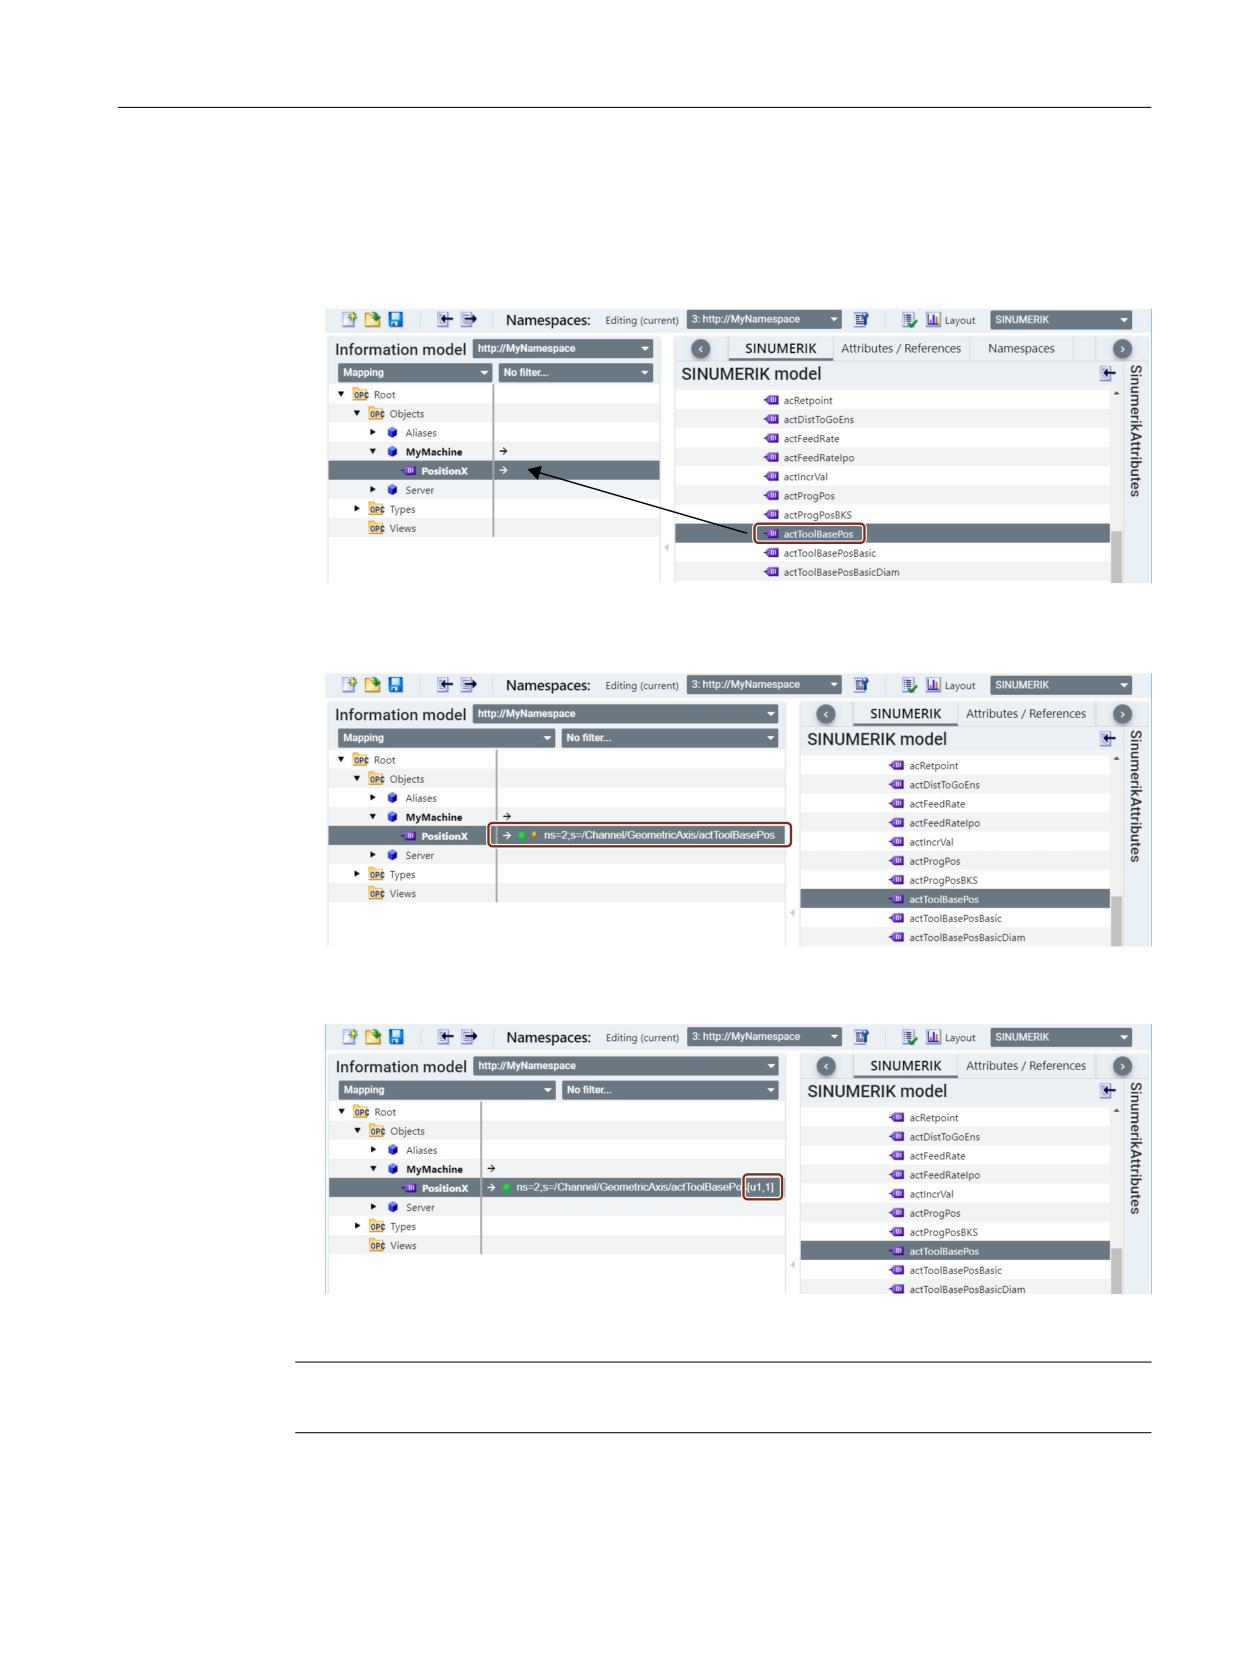
Mapping to SINUMERIK data
To map the SINUMERIK data, follow the below steps:
1. Drag and drop the variable from the "SINUMERIK" tab to the variable "PositionX" in the
"Information model" tab as shown in the below image.
Figure 4-13
Mapping SINUMERIK variable
The variable is mapped in the mapping table in the "Information model" tab.
Figure 4-14
SINUMERIK variable mapped in mapping table
2. Add the correct axis index.
Figure 4-15
Adding axis index
Note
Do not edit the namespace value (for instance, ns=2). If edited, it will not be considered.
SINUMERIK Access MyMachine / OPC UA
Configuration Manual, 10/2020, 6FC5397-1DP41-0BA5
51
Customer Specific Object Model (CSOM)
4.3 Workflow for using CSOM in the SINUMERIK OPC UA server
Adding a method node in CSOM
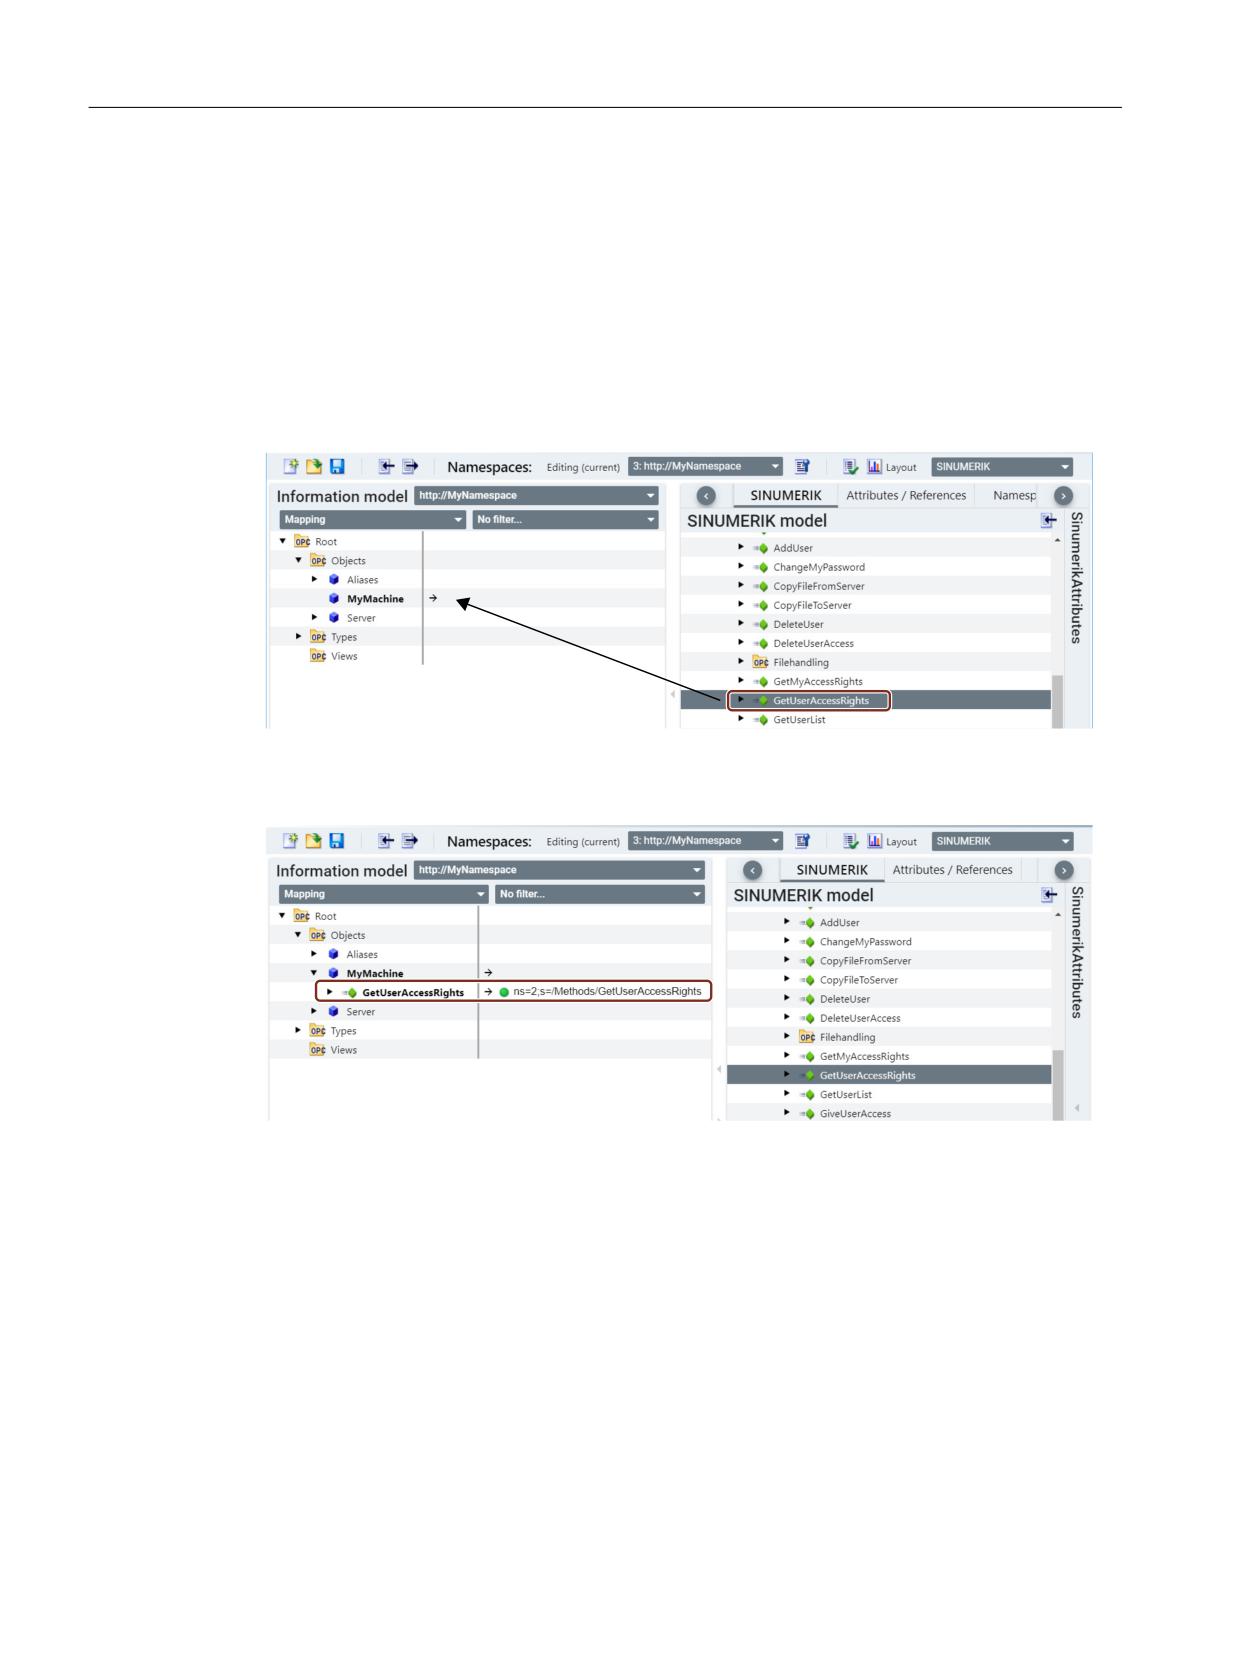
Method nodes can be added in two ways:
• Direct drag and drop under custom object.
• Adding a new instance variable and mapping the method from SINUMERIK tab.
Direct drag and drop under custom object
To add a method, press and hold the ctrl button and drag and drop the method from the
"SINUMERIK" tab to the "MyMachine" node as shown in the below image.
Figure 4-16
Mapping SINUMERIK method
The method is added under "MyMachine" node in the "Information model" tab.
Figure 4-17
SINUMERIK method added
SINUMERIK Access MyMachine / OPC UA
52
Configuration Manual, 10/2020, 6FC5397-1DP41-0BA5
Customer Specific Object Model (CSOM)
4.3 Workflow for using CSOM in the SINUMERIK OPC UA server
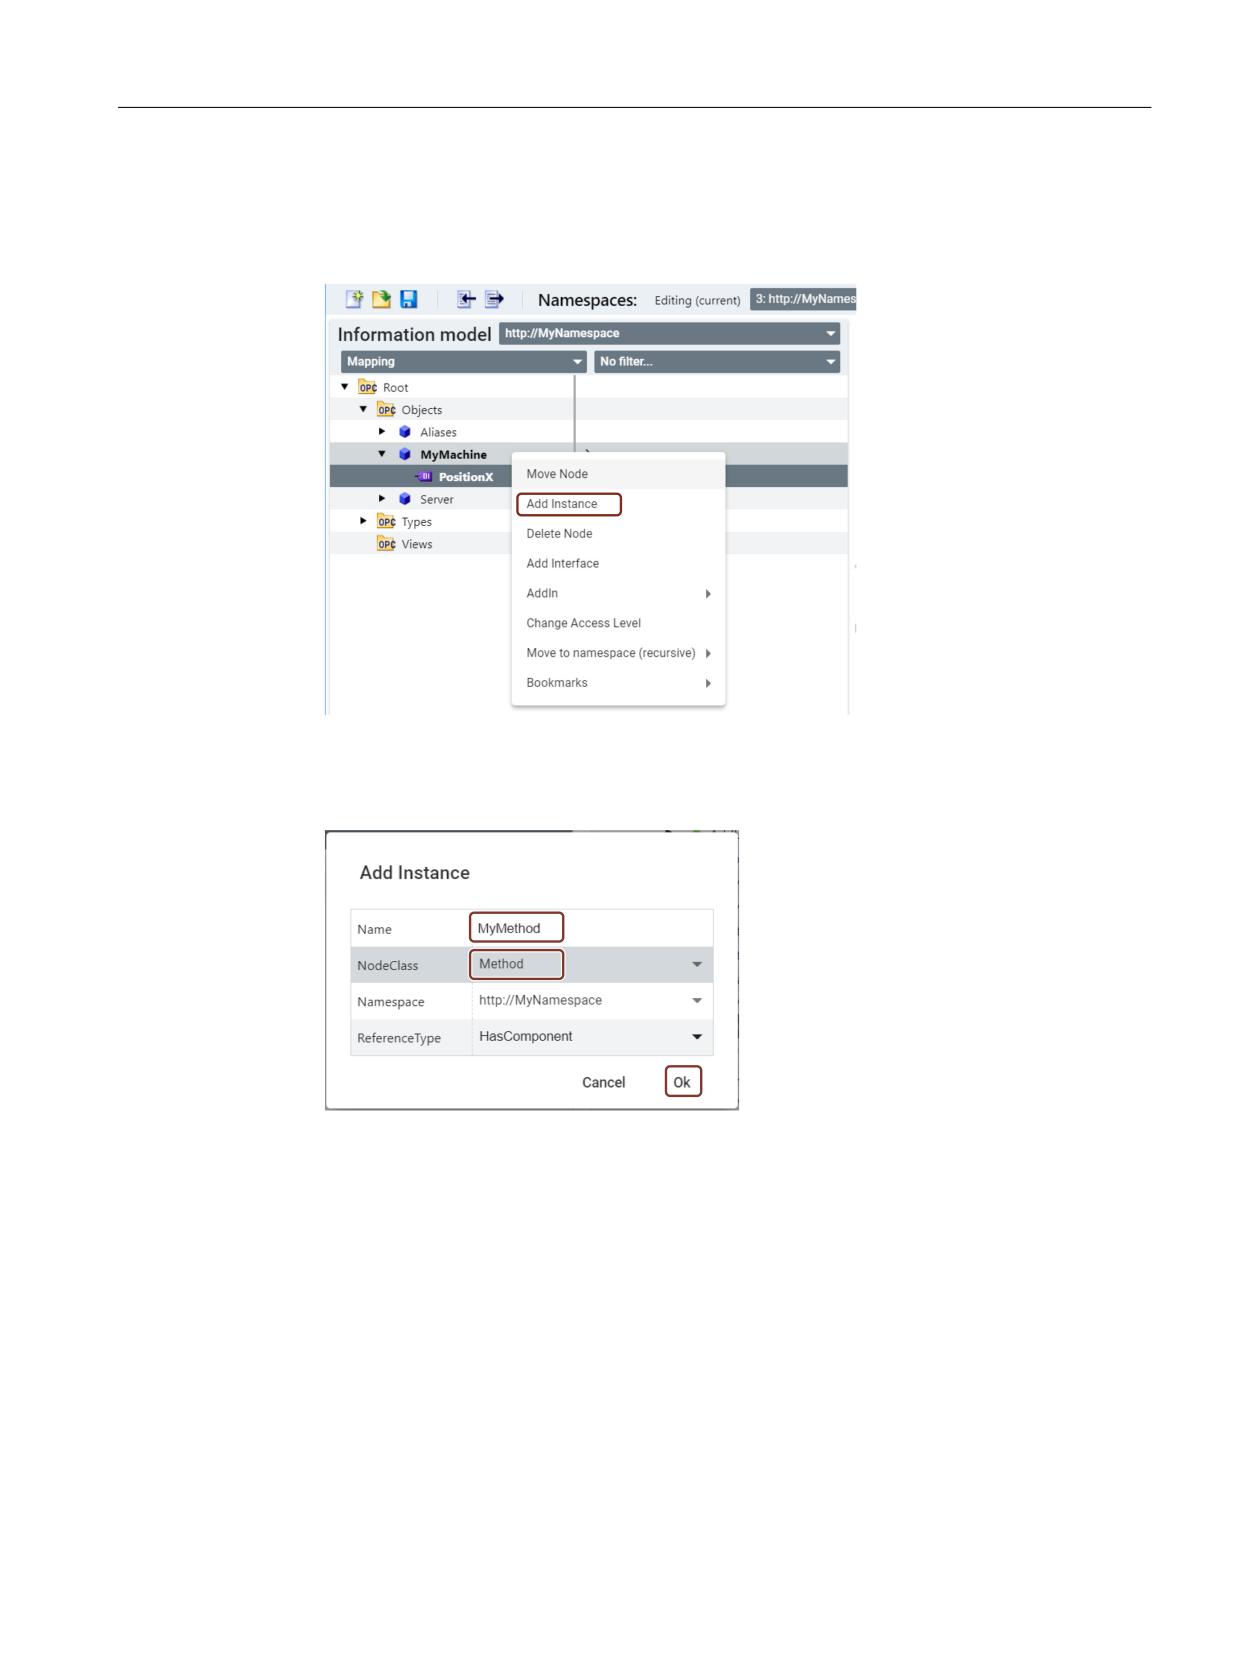
Adding a new instance variable and mapping the method from SINUMERIK tab
To add a new instance for a method, follow the below steps:
1. Under "Objects" node, right-click on "MyMachine" node and then click on "Add Instance".
Figure 4-18
Adding a new instance for a method
2. The "Add Instance" popup window appears. Enter a name in the "Name" field.
3. Select "Method" from the "NodeClass" drop-down list and click "Ok".
Figure 4-19
Add Instance popup for a method
4. The new instance is added for a method under "MyMachine" node. Expand the "MyMethod"
node.
SINUMERIK Access MyMachine / OPC UA
Configuration Manual, 10/2020, 6FC5397-1DP41-0BA5
53
Customer Specific Object Model (CSOM)
4.3 Workflow for using CSOM in the SINUMERIK OPC UA server
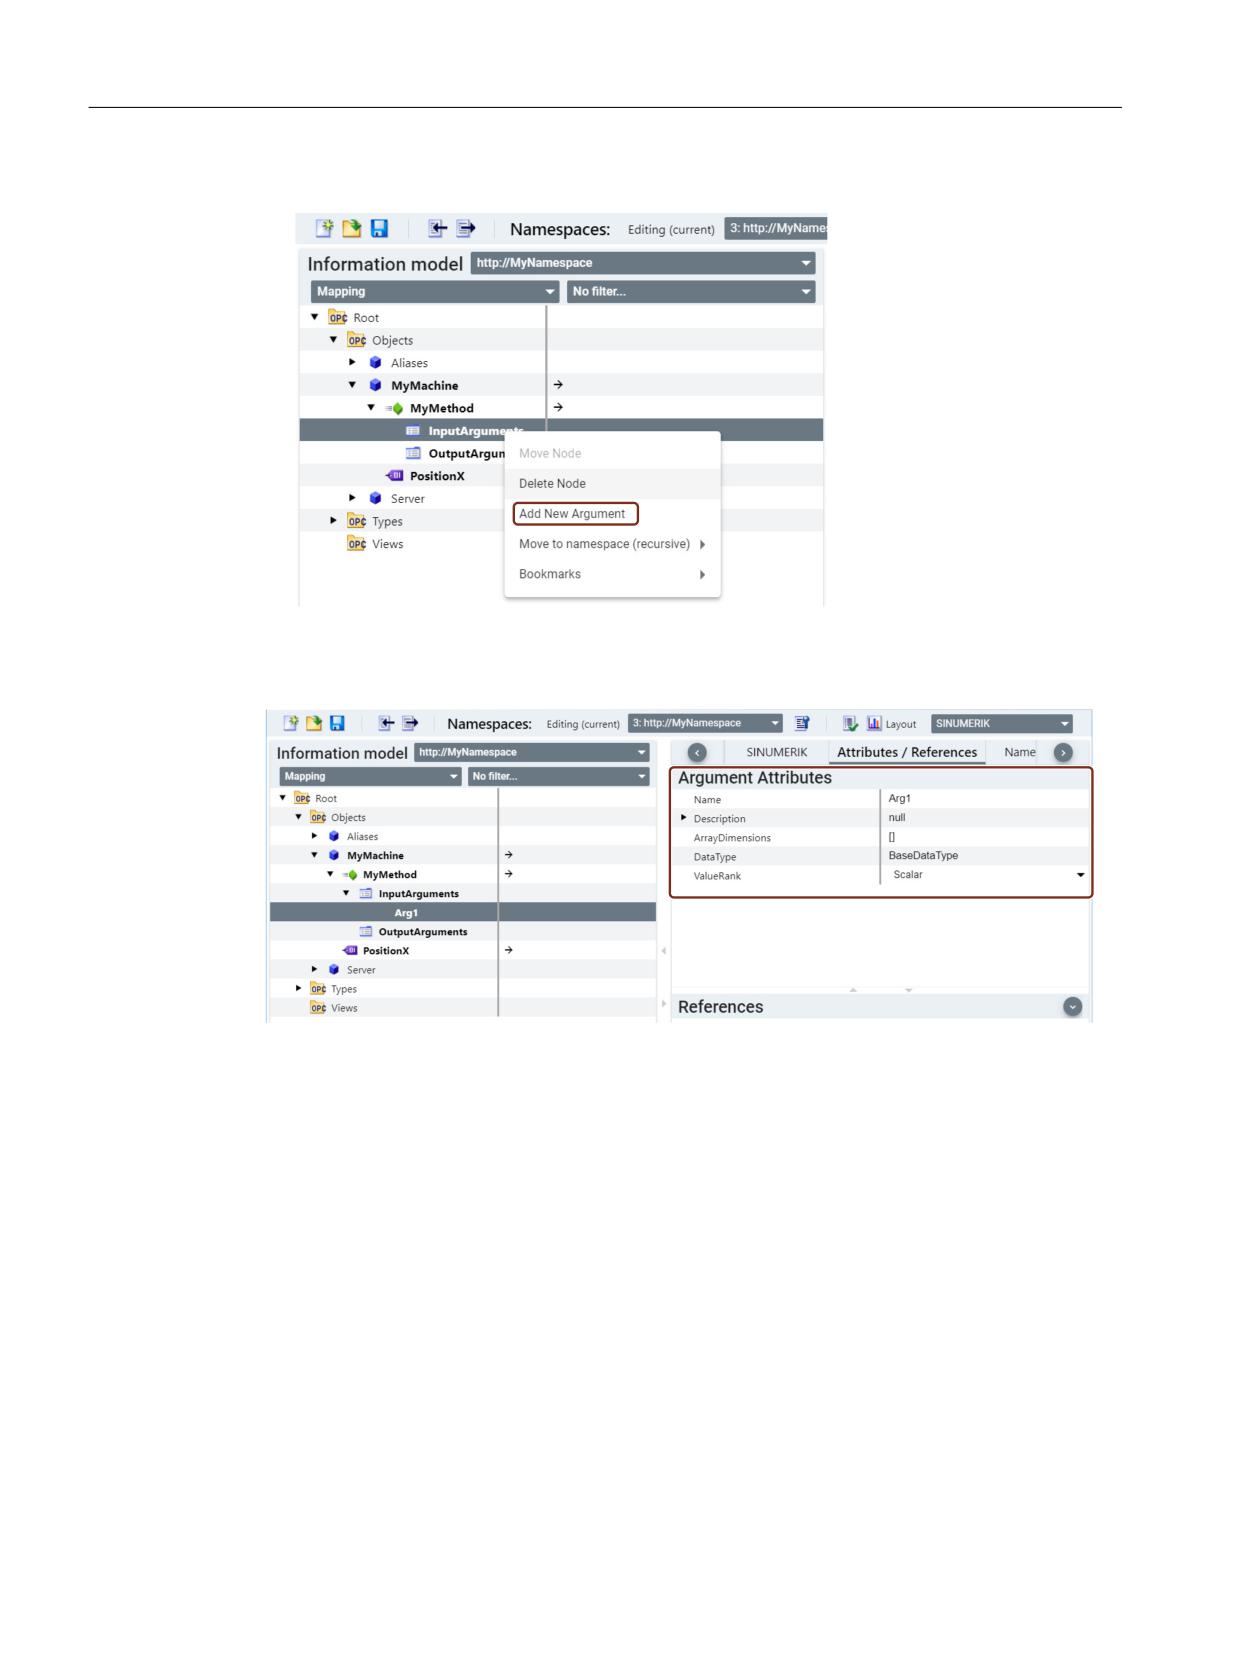
5. Right-click on "InputArguments" node and then click on "Add New Argument".
Figure 4-20
Adding a new argument under method
6. Select the newly created argument and then configure the values in the "Attributes /
References" tab according to the method argument.
Figure 4-21
Arguments tab
7. Then right-click on "OutputArguments" node and then click on "Add New Argument".
SINUMERIK Access MyMachine / OPC UA
54
Configuration Manual, 10/2020, 6FC5397-1DP41-0BA5
Customer Specific Object Model (CSOM)
4.3 Workflow for using CSOM in the SINUMERIK OPC UA server
8. Select the newly created argument and then configure the values in the "Attributes /
References" tab according to the method argument.
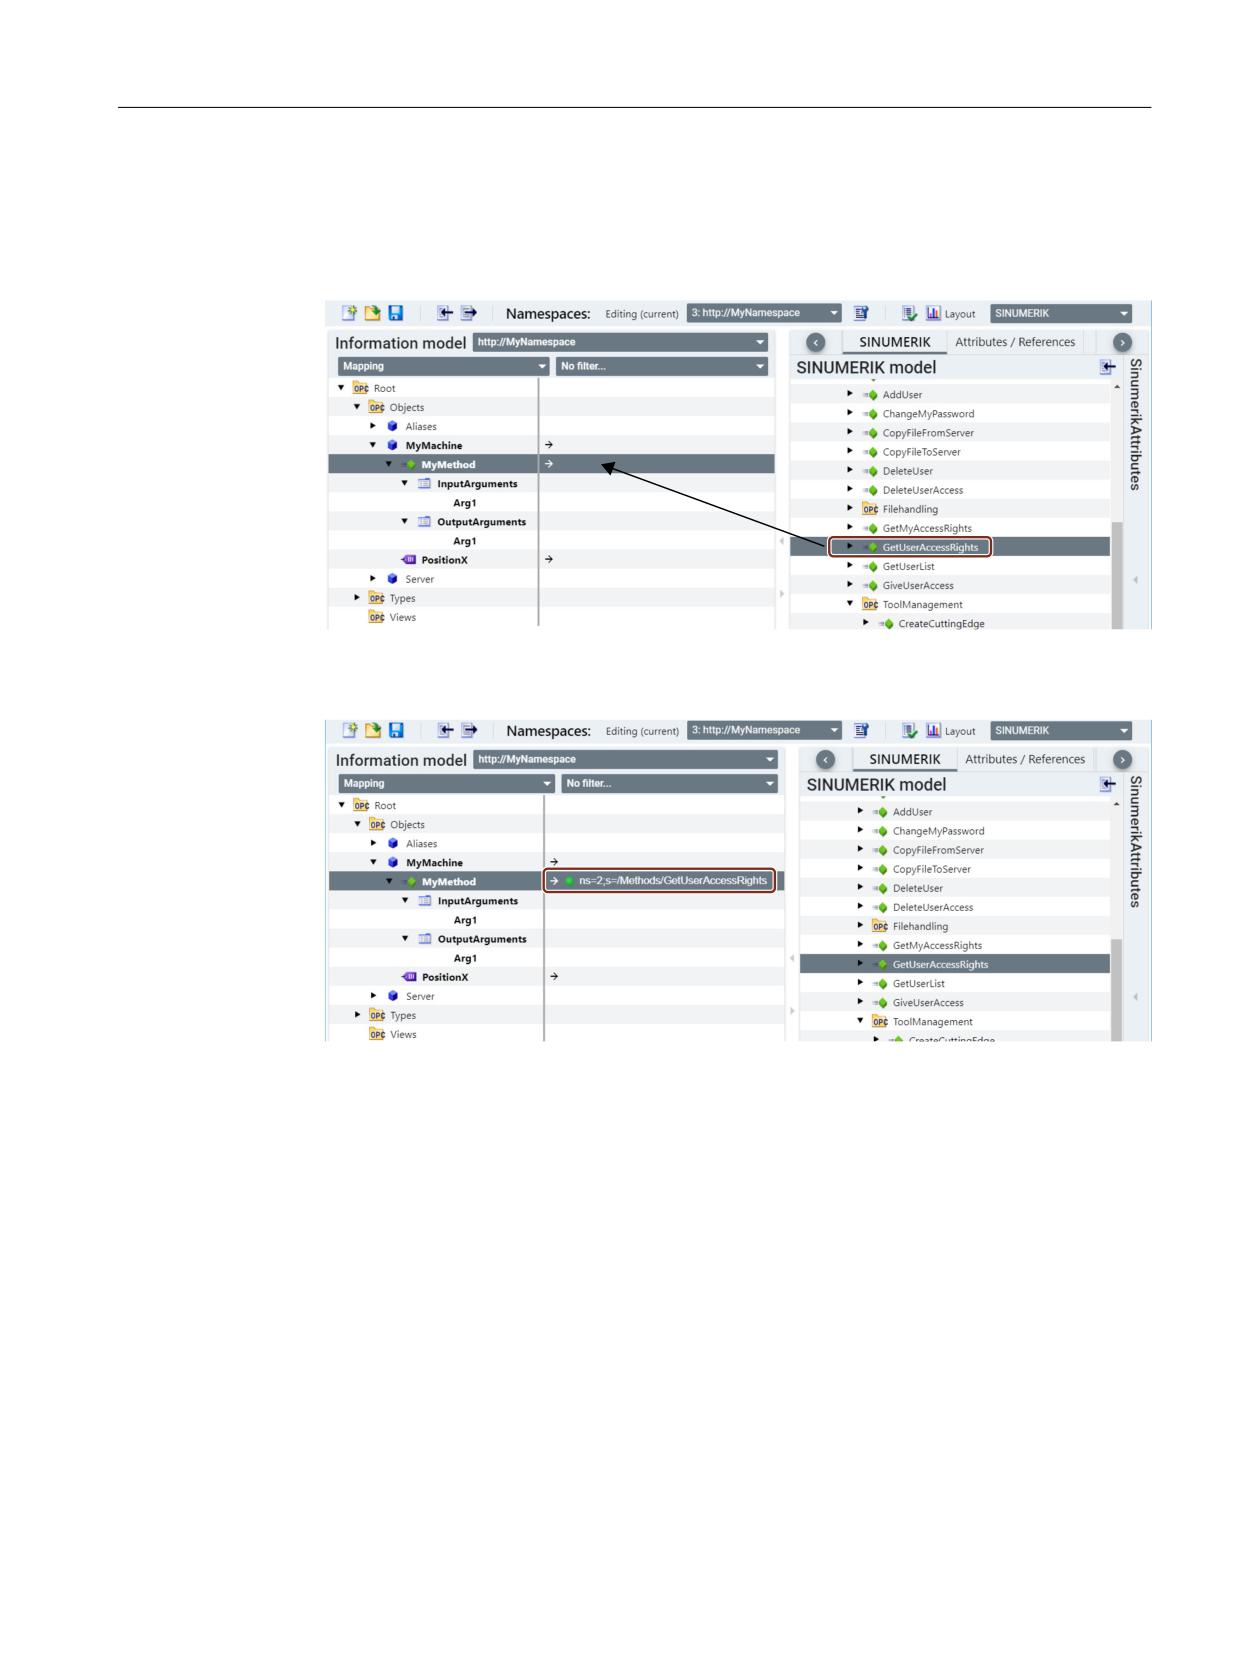
9. Drag and drop the method from the "SINUMERIK" tab to the "MyMethod" node in the
"Information model" tab as shown in the below image.
Figure 4-22
Mapping SINUMERIK method
The method is mapped in the mapping table in the "Information model" tab.
Figure 4-23
SINUMERIK method mapped in mapping table
SINUMERIK Access MyMachine / OPC UA
Configuration Manual, 10/2020, 6FC5397-1DP41-0BA5
55
Customer Specific Object Model (CSOM)
4.3 Workflow for using CSOM in the SINUMERIK OPC UA server
Adding a new instance for an alarm
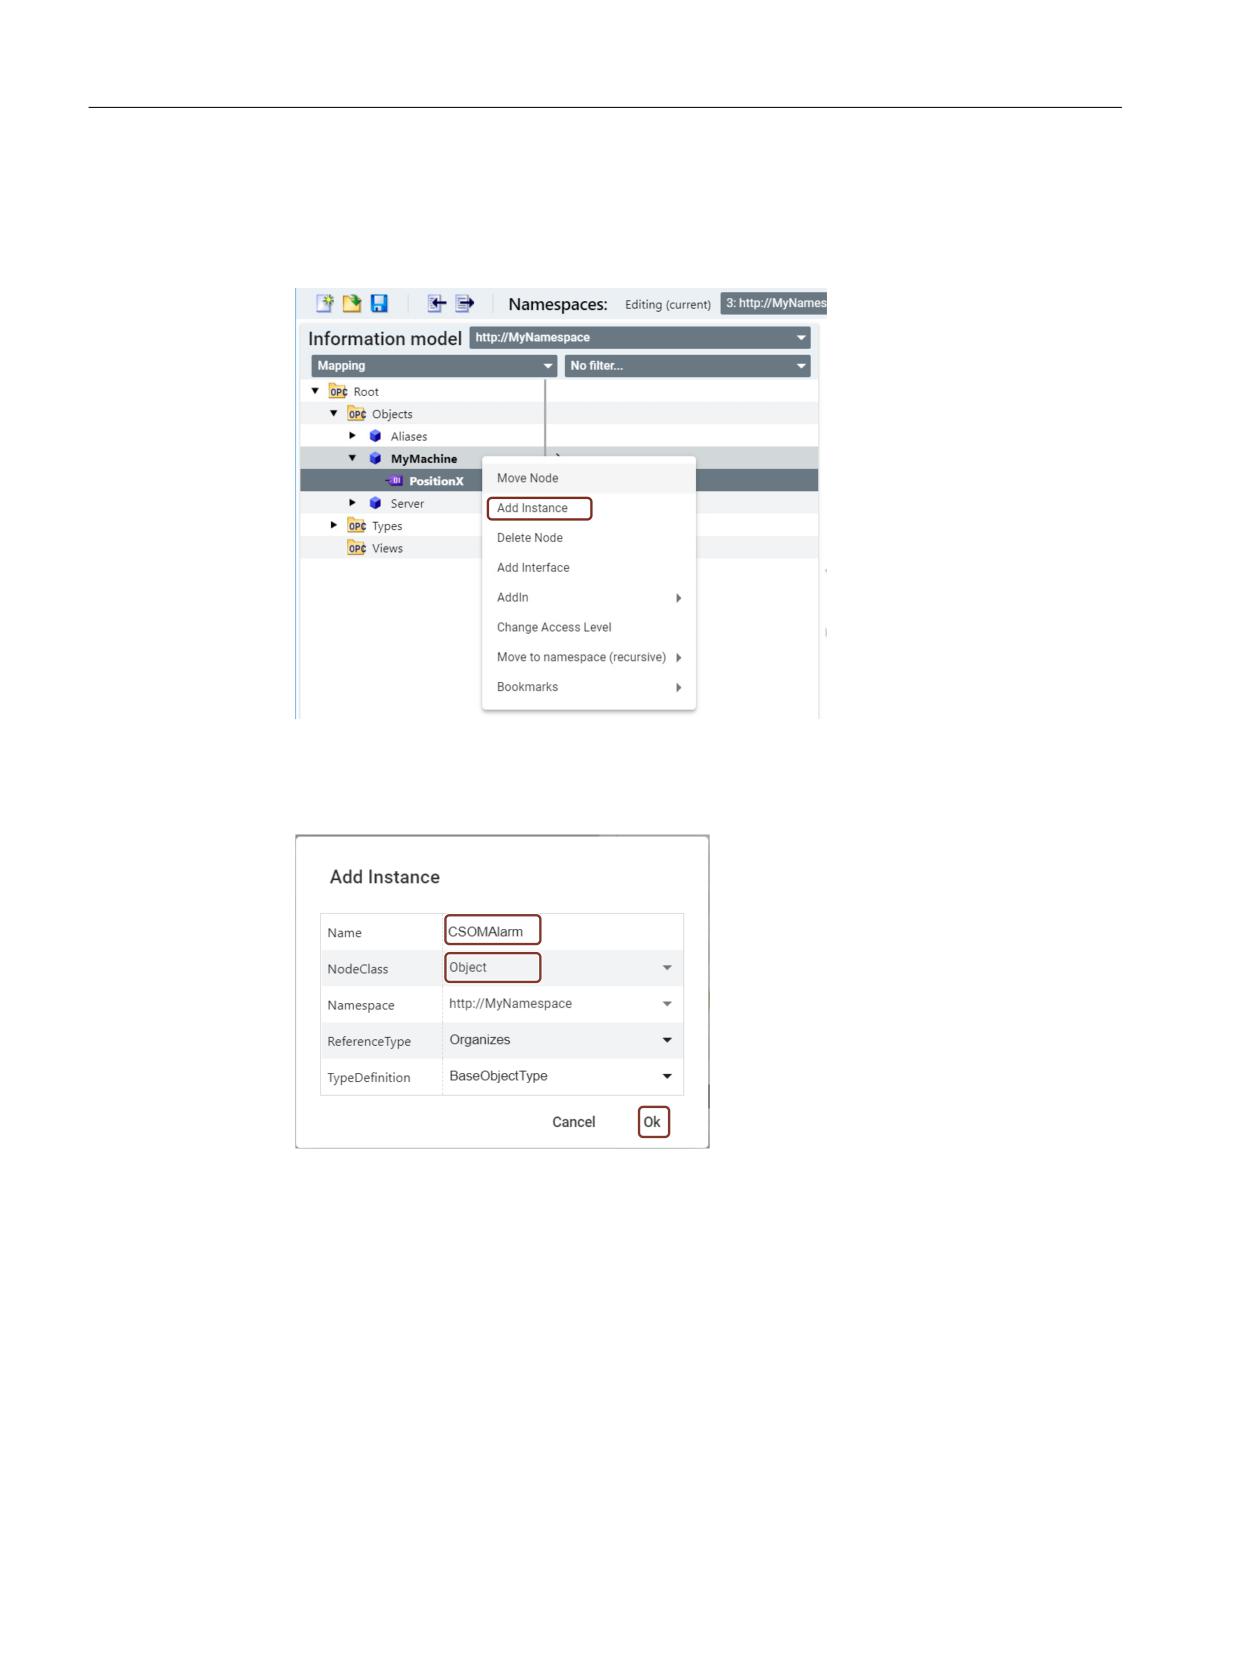
To add a new instance for an alarm, follow the below steps:
1. Under "Objects" node, right-click on "MyMachine" node and then click on "Add Instance".
Figure 4-24
Adding a new instance for an alarm
2. The "Add Instance" popup window appears. Enter a name in the "Name" field.
3. Select "Object" from the "NodeClass" drop-down list and then click "Ok".
Figure 4-25
Add Instance popup for an alarm
SINUMERIK Access MyMachine / OPC UA
56
Configuration Manual, 10/2020, 6FC5397-1DP41-0BA5
Customer Specific Object Model (CSOM)
4.3 Workflow for using CSOM in the SINUMERIK OPC UA server
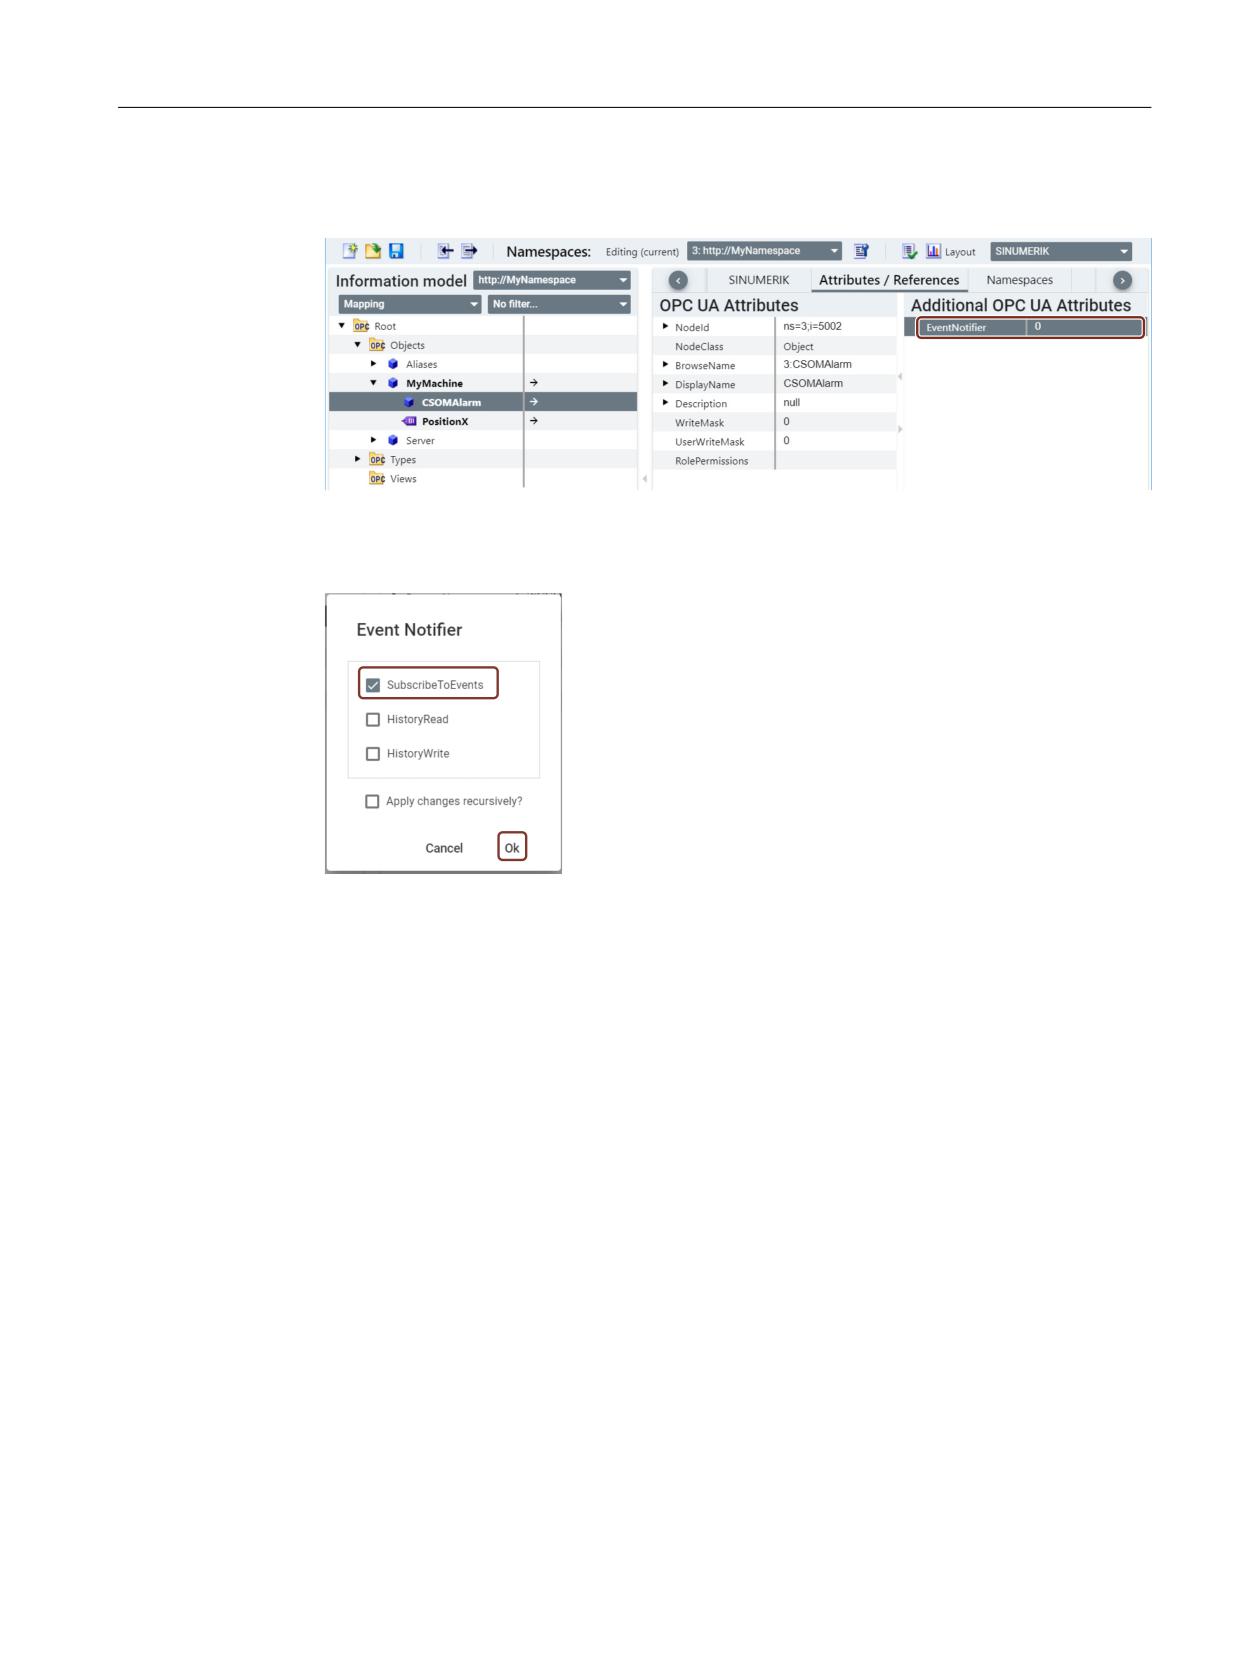
4. The new instance is added for an alarm under "MyMachine" node. Click on "EventNotifier" in
the "Additional OPC UA Attributes" tab as shown below.
Figure 4-26
New Instance added under a variable for alarm
5. The "Event Notifier" popup window appears. Select "SubscribeToEvents" check-box and click
"Ok".
Figure 4-27
Event Notifier popup for an alarm
Result
An object with event notifier is created and can be used for subscribing alarms. There is no need
for any mapping from SINUMERIK node.
SINUMERIK Access MyMachine / OPC UA
Configuration Manual, 10/2020, 6FC5397-1DP41-0BA5
57
Customer Specific Object Model (CSOM)
4.3 Workflow for using CSOM in the SINUMERIK OPC UA server
Adding file system node in CSOM
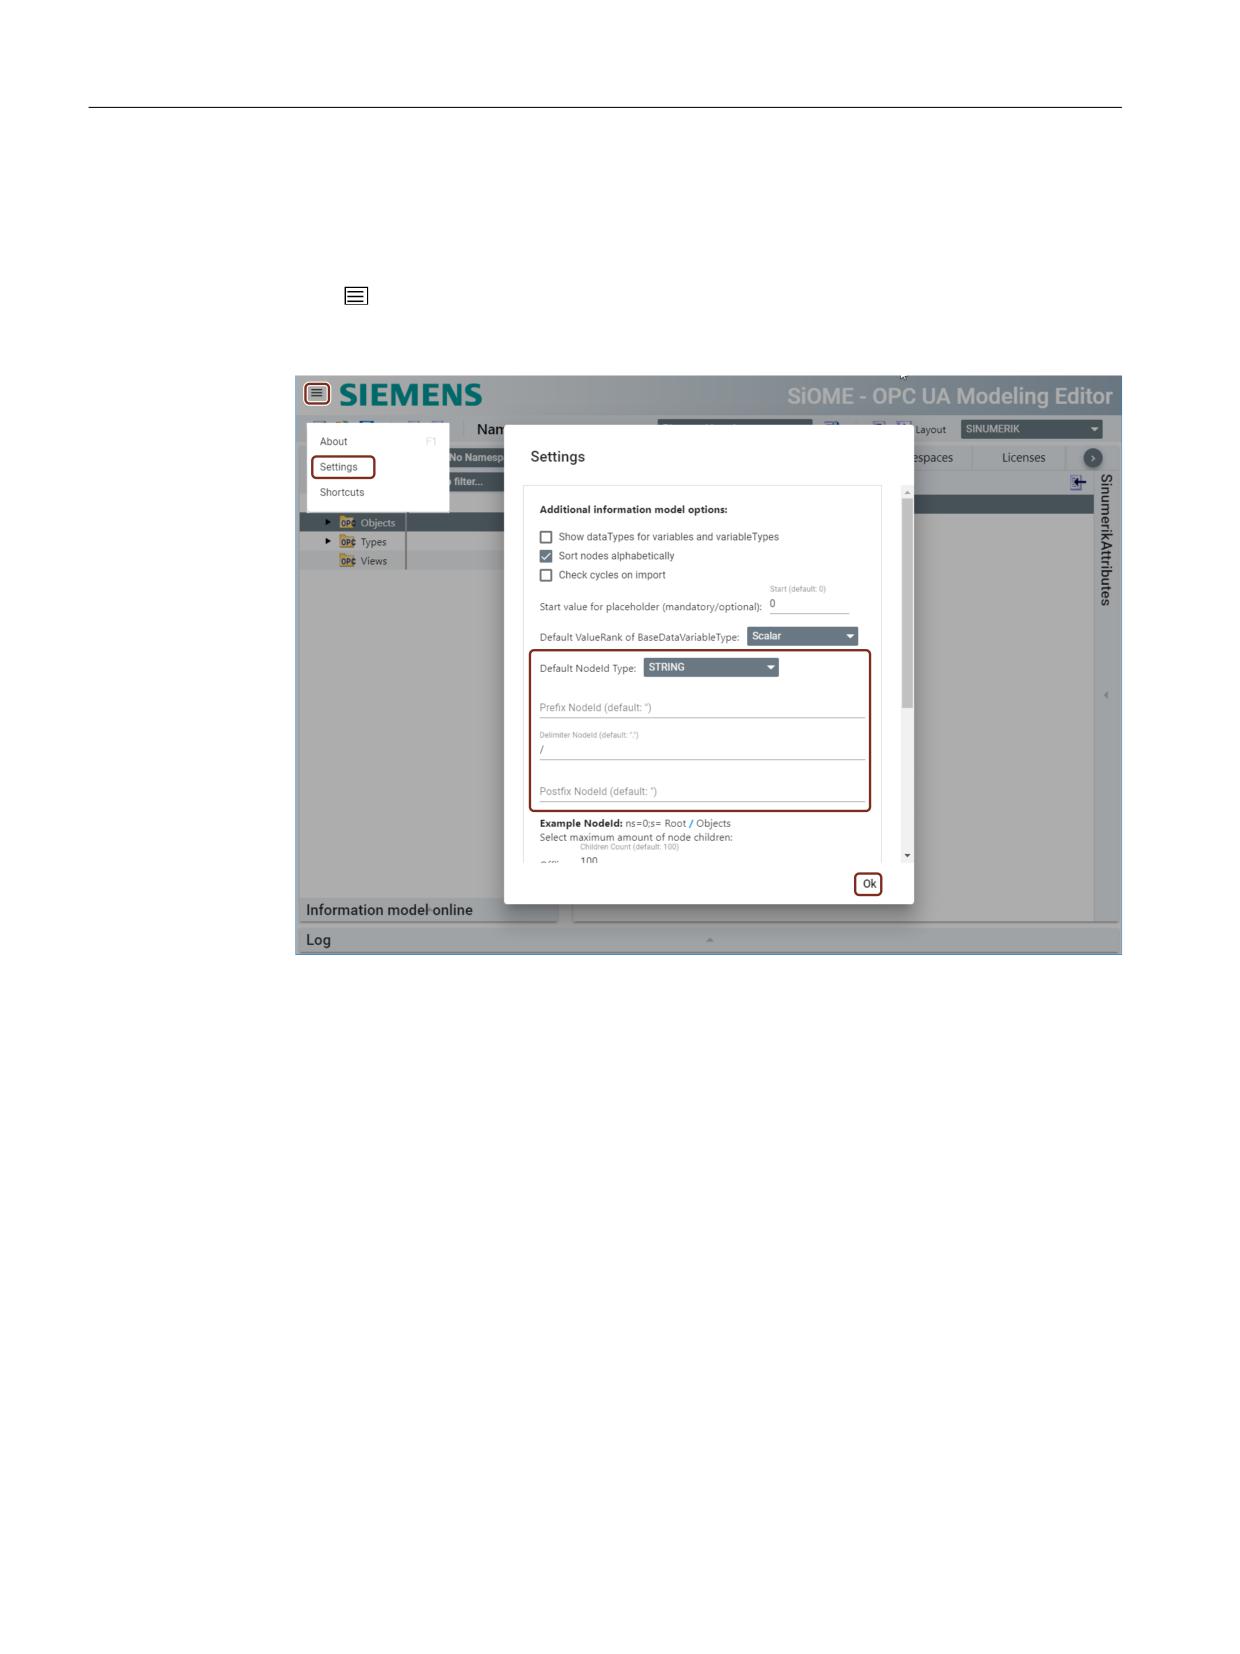
Before adding a file system node, you need to do the following changes in the settings page in
SiOME:
1. Click
icon in the SiOME home page and then click "Settings" as shown in the below image.
2. The "Settings" popup window appears. Change the highlighted fields as shown in the below
image and then click "Ok". The settings are applied.
Figure 4-28
SiOME Settings page
SINUMERIK Access MyMachine / OPC UA
58
Configuration Manual, 10/2020, 6FC5397-1DP41-0BA5
Customer Specific Object Model (CSOM)
4.3 Workflow for using CSOM in the SINUMERIK OPC UA server
To add a file system node, follow the below steps:
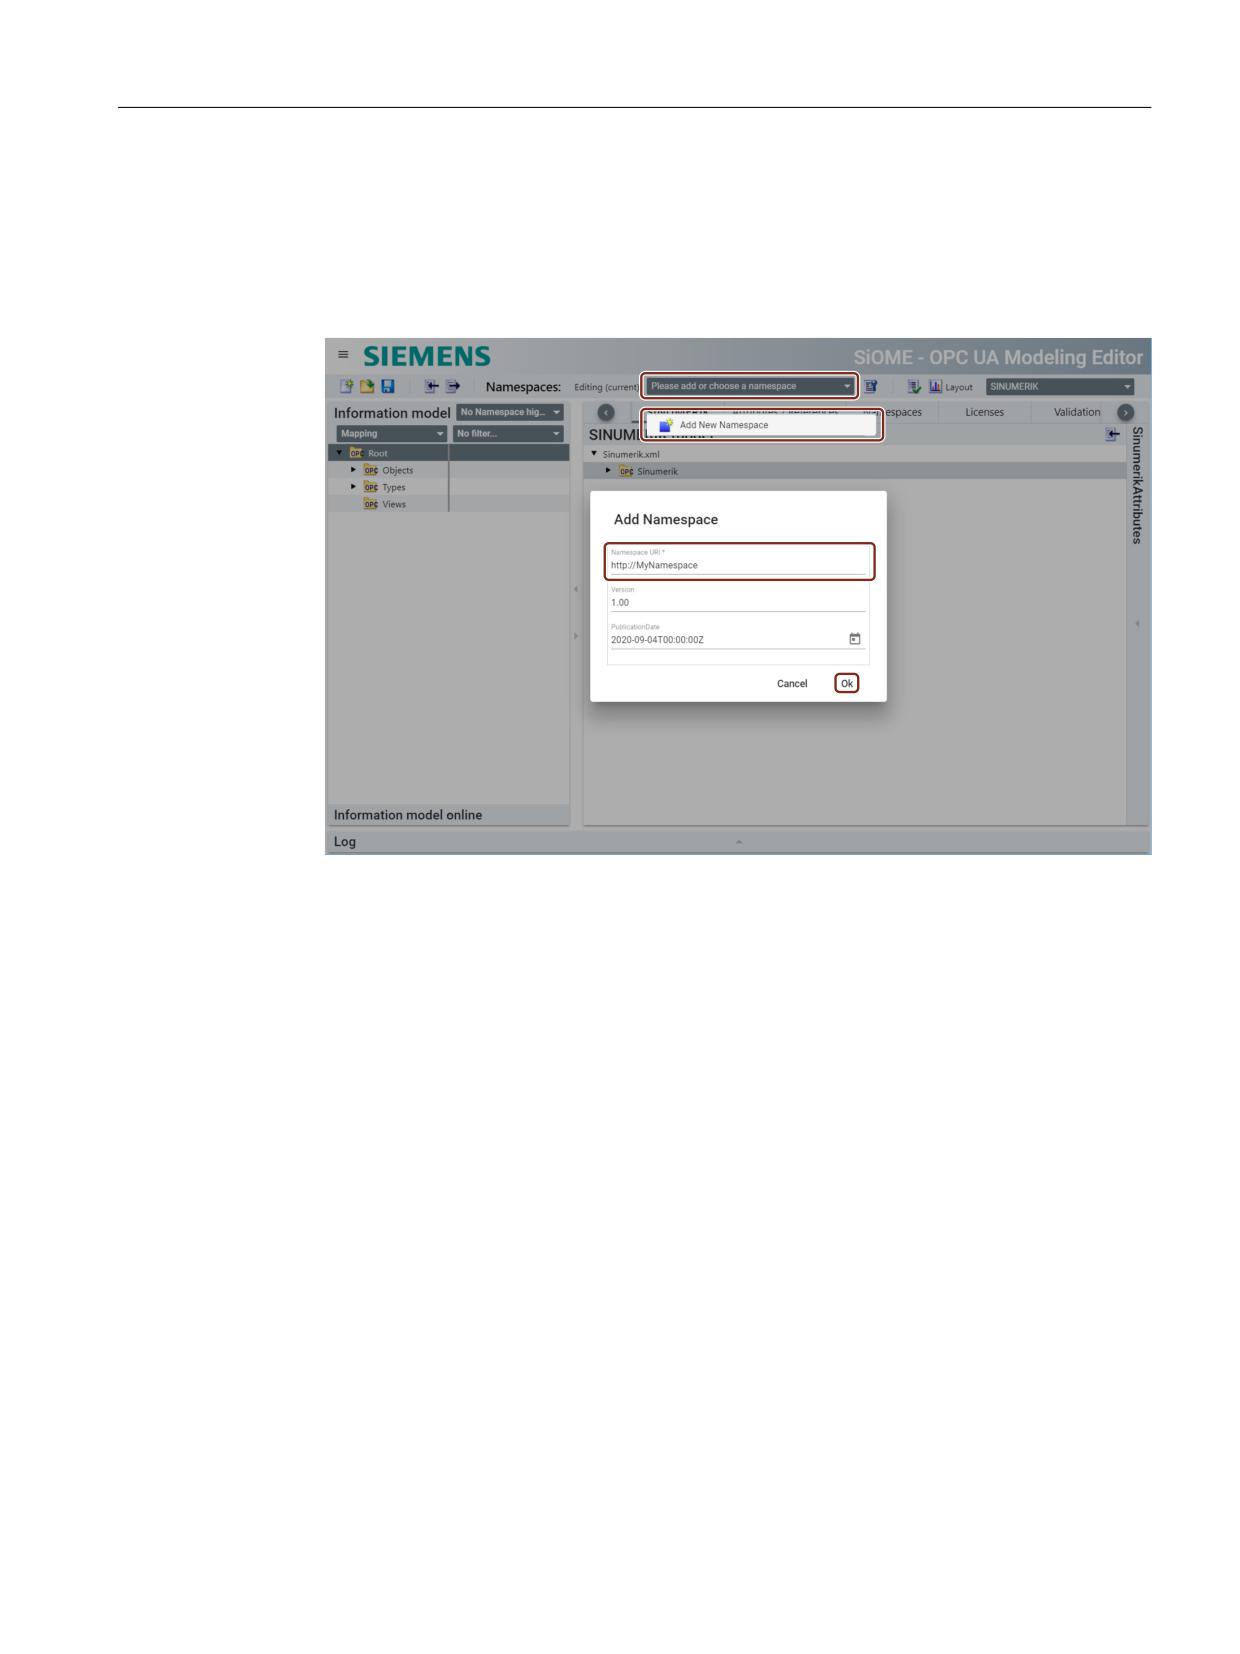
1. Click on "Please add or choose a namespace" and then click "Add New Namespace" as shown
in the below image.
2. The "Add Namespace" popup window appears. Enter a name in the "Namespace URI" field
and then click "Ok".
Figure 4-29
Namespaces tab
3. The new namespace is added in "Namespaces" tab. Right-click on "Objects" node in
"Information model" tab and then click on "Add Instance".
SINUMERIK Access MyMachine / OPC UA
Configuration Manual, 10/2020, 6FC5397-1DP41-0BA5
59
Customer Specific Object Model (CSOM)
4.3 Workflow for using CSOM in the SINUMERIK OPC UA server
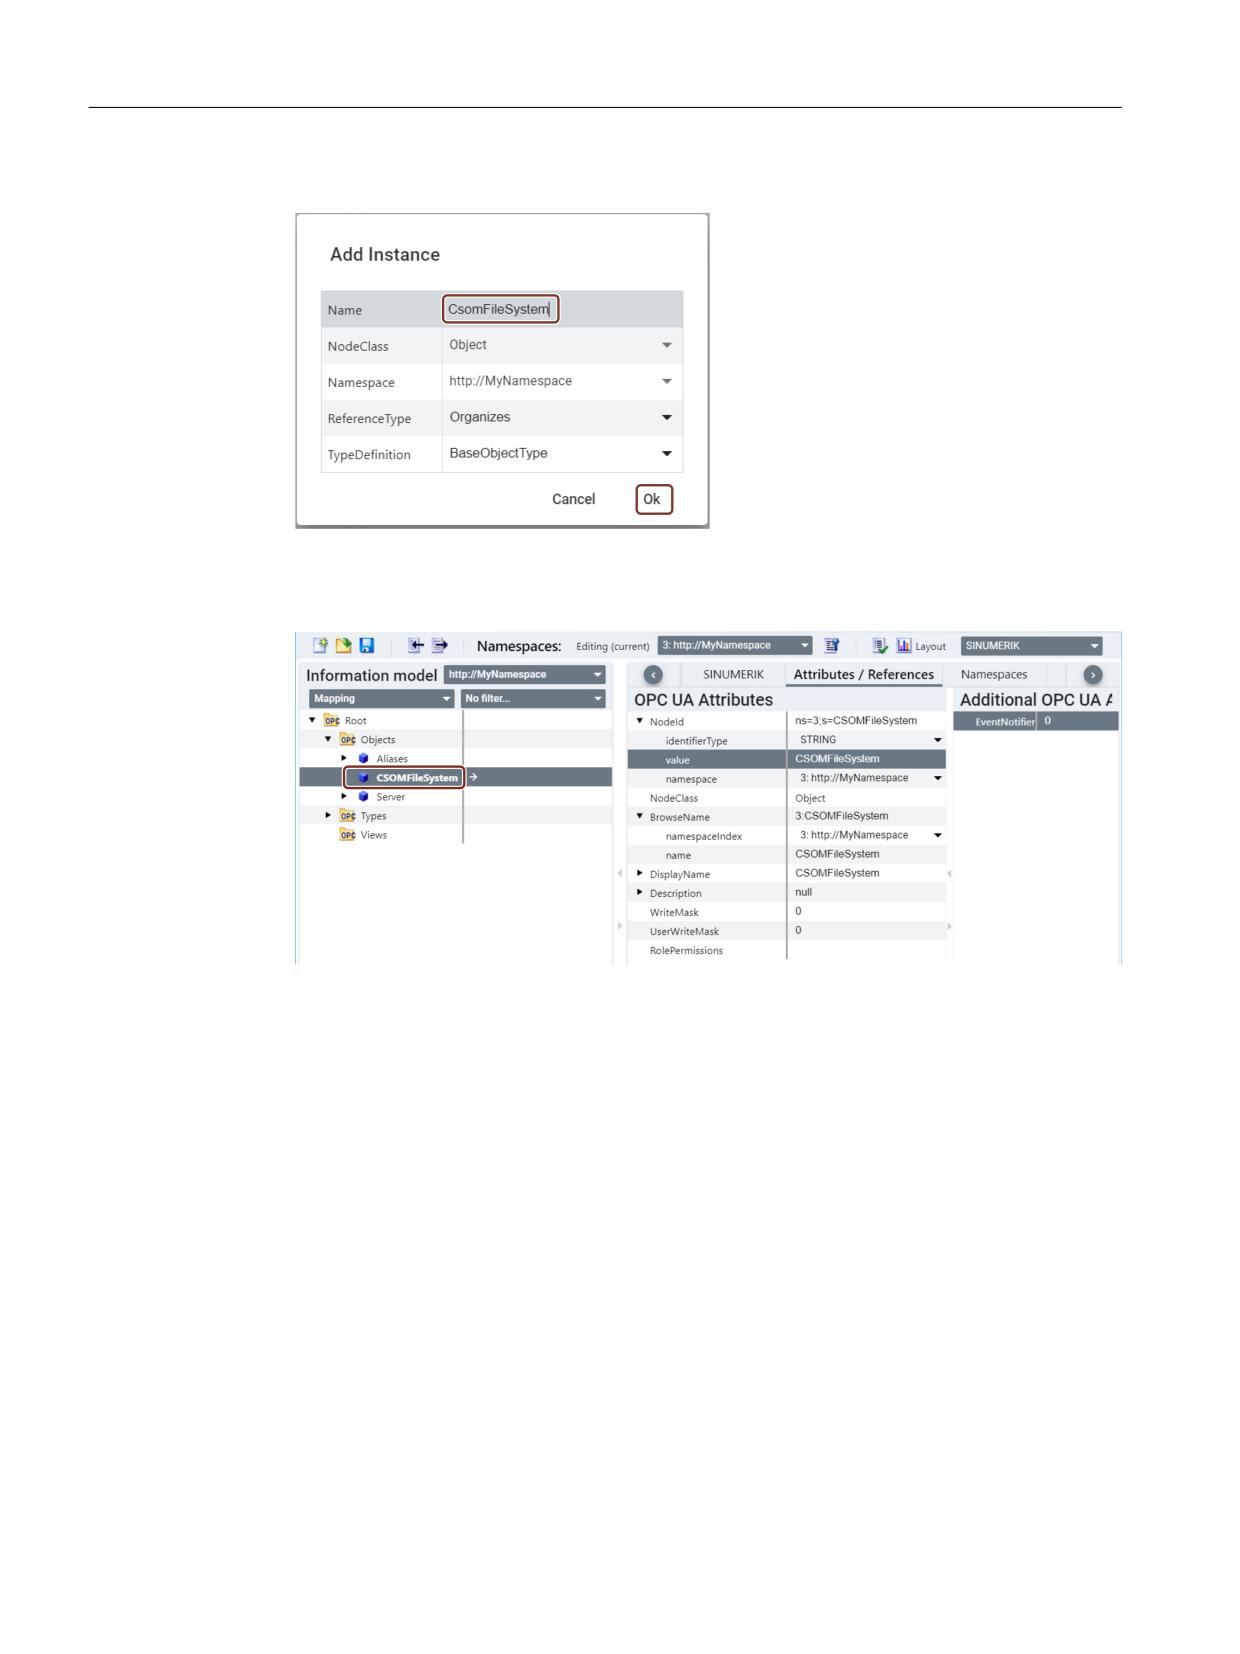
4. The "Add Instance" popup window appears. Enter a name in the "Name" field.
Figure 4-30
Add Instance popup window
5. Verify that newly added namespace is selected in the "Namespace" row and then click "Ok".
The new instance is added under "Objects" node.
Figure 4-31
New instance is added under object node
Adding a SINUMERIK file directory under file system node
SINUMERIK file directory node can be added in two ways:
• Direct drag and drop under parent node.
• Manually adding a new node of folder type/file directory type under parent node.
SINUMERIK Access MyMachine / OPC UA
60
Configuration Manual, 10/2020, 6FC5397-1DP41-0BA5
Customer Specific Object Model (CSOM)
4.3 Workflow for using CSOM in the SINUMERIK OPC UA server
Direct drag and drop under parent node
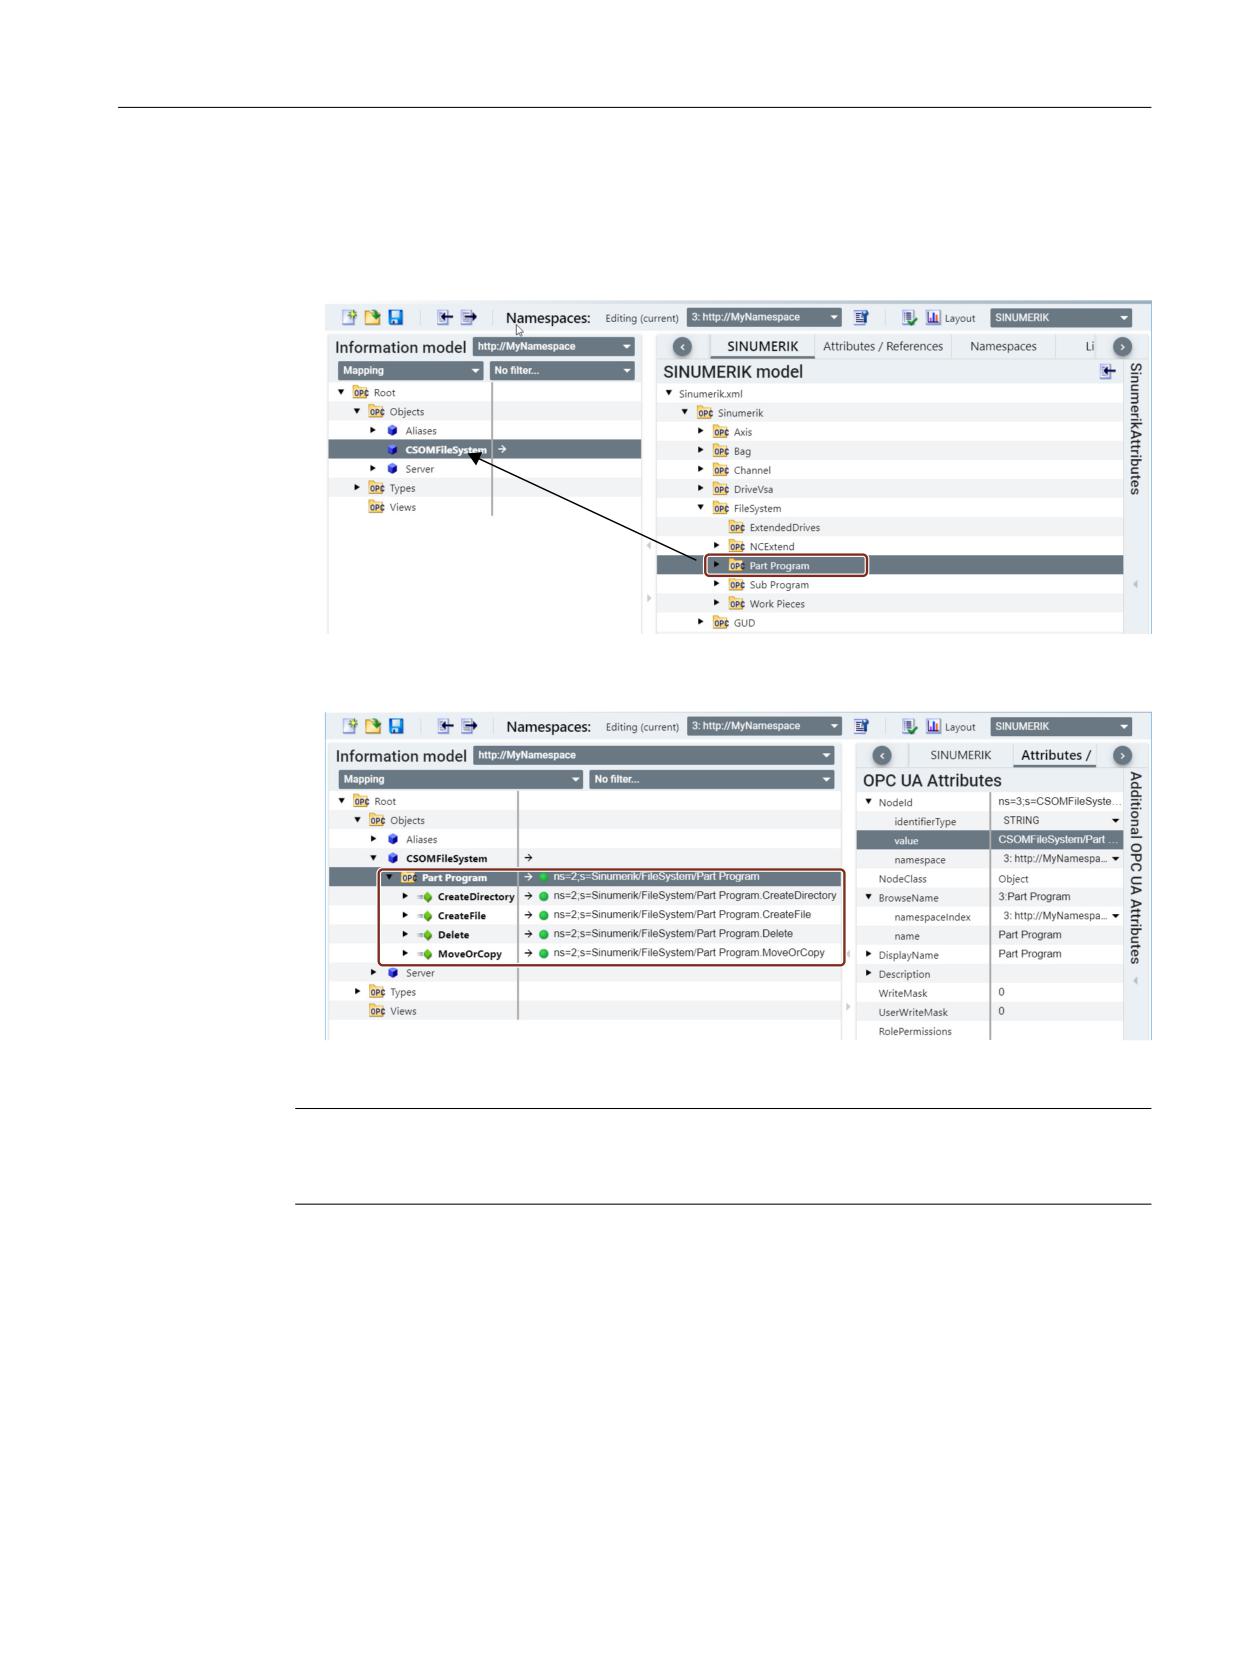
1. To add a SINUMERIK file directory under custom object, press and hold the ctrl button and
drag and drop the required SINUMERIK file directory from the "SINUMERIK" tab to the
"CsomFileSystem" node as shown in the below image.
Figure 4-32
Direct drag and drop under custom object
2. The SINUMERIK file directory is added under parent node.
Figure 4-33
SINUMERIK file directory added under parent node
Note
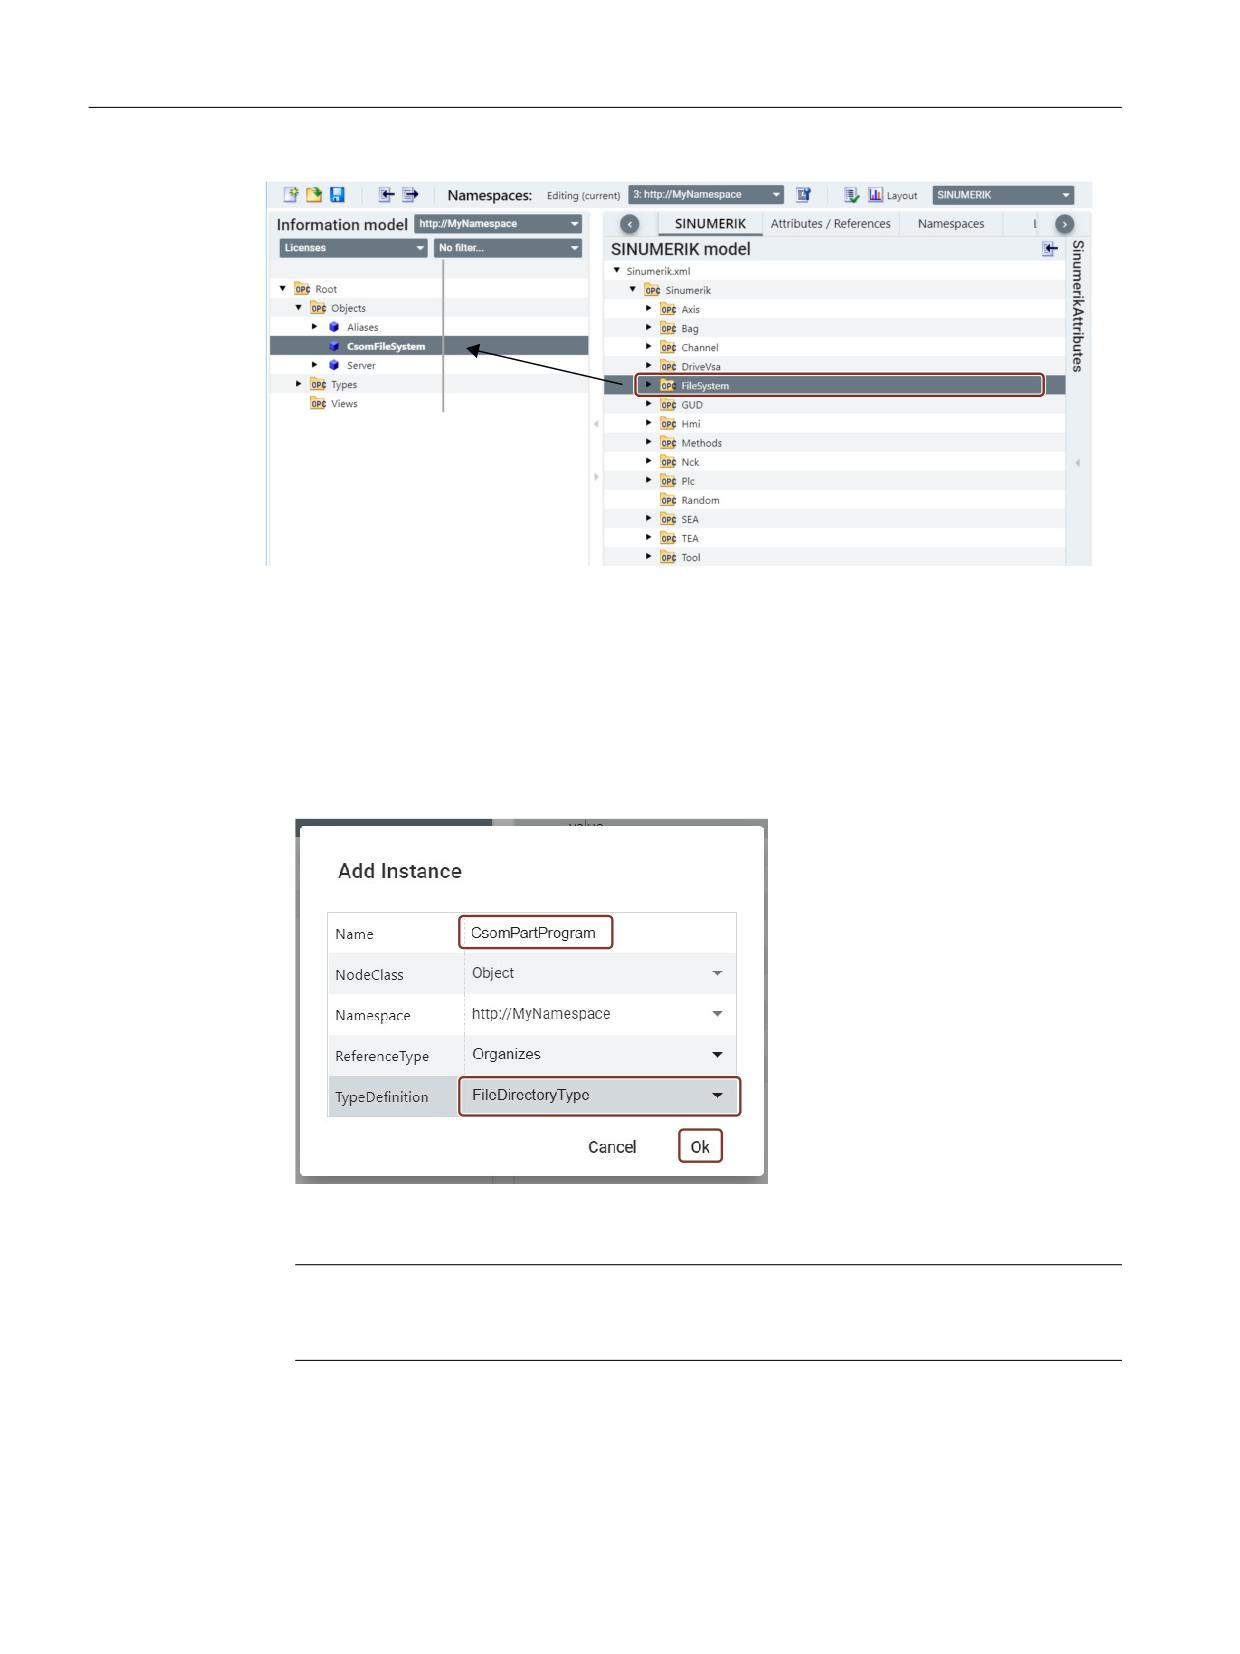
This method is also applicable if you want to add the complete SINUMERIK file system node. See
the below image for more information.
SINUMERIK Access MyMachine / OPC UA
Configuration Manual, 10/2020, 6FC5397-1DP41-0BA5
61
Customer Specific Object Model (CSOM)
4.3 Workflow for using CSOM in the SINUMERIK OPC UA server
Figure 4-34
Adding complete SINUMERIK file system node
Manually adding a new node of folder type/file directory type under parent node
1. Under "Objects" node, right-click on "CsomfileSystem" node and then click on "Add Instance".
2. The "Add Instance" popup window appears. Enter a name in the "Name" field.
3. Select "FolderType" or "FileDirectoryType" from the "TypeDefinition" drop-down list and then
click "Ok".
Figure 4-35
Add instance popup_File System
4. The new instance (here "CsomPartProgram") is added under "CsomfileSystem" node.
Note
Under file system node, except extended drives, all other nodes of file system should be of
file directory type.
SINUMERIK Access MyMachine / OPC UA
62
Configuration Manual, 10/2020, 6FC5397-1DP41-0BA5
Customer Specific Object Model (CSOM)
4.3 Workflow for using CSOM in the SINUMERIK OPC UA server
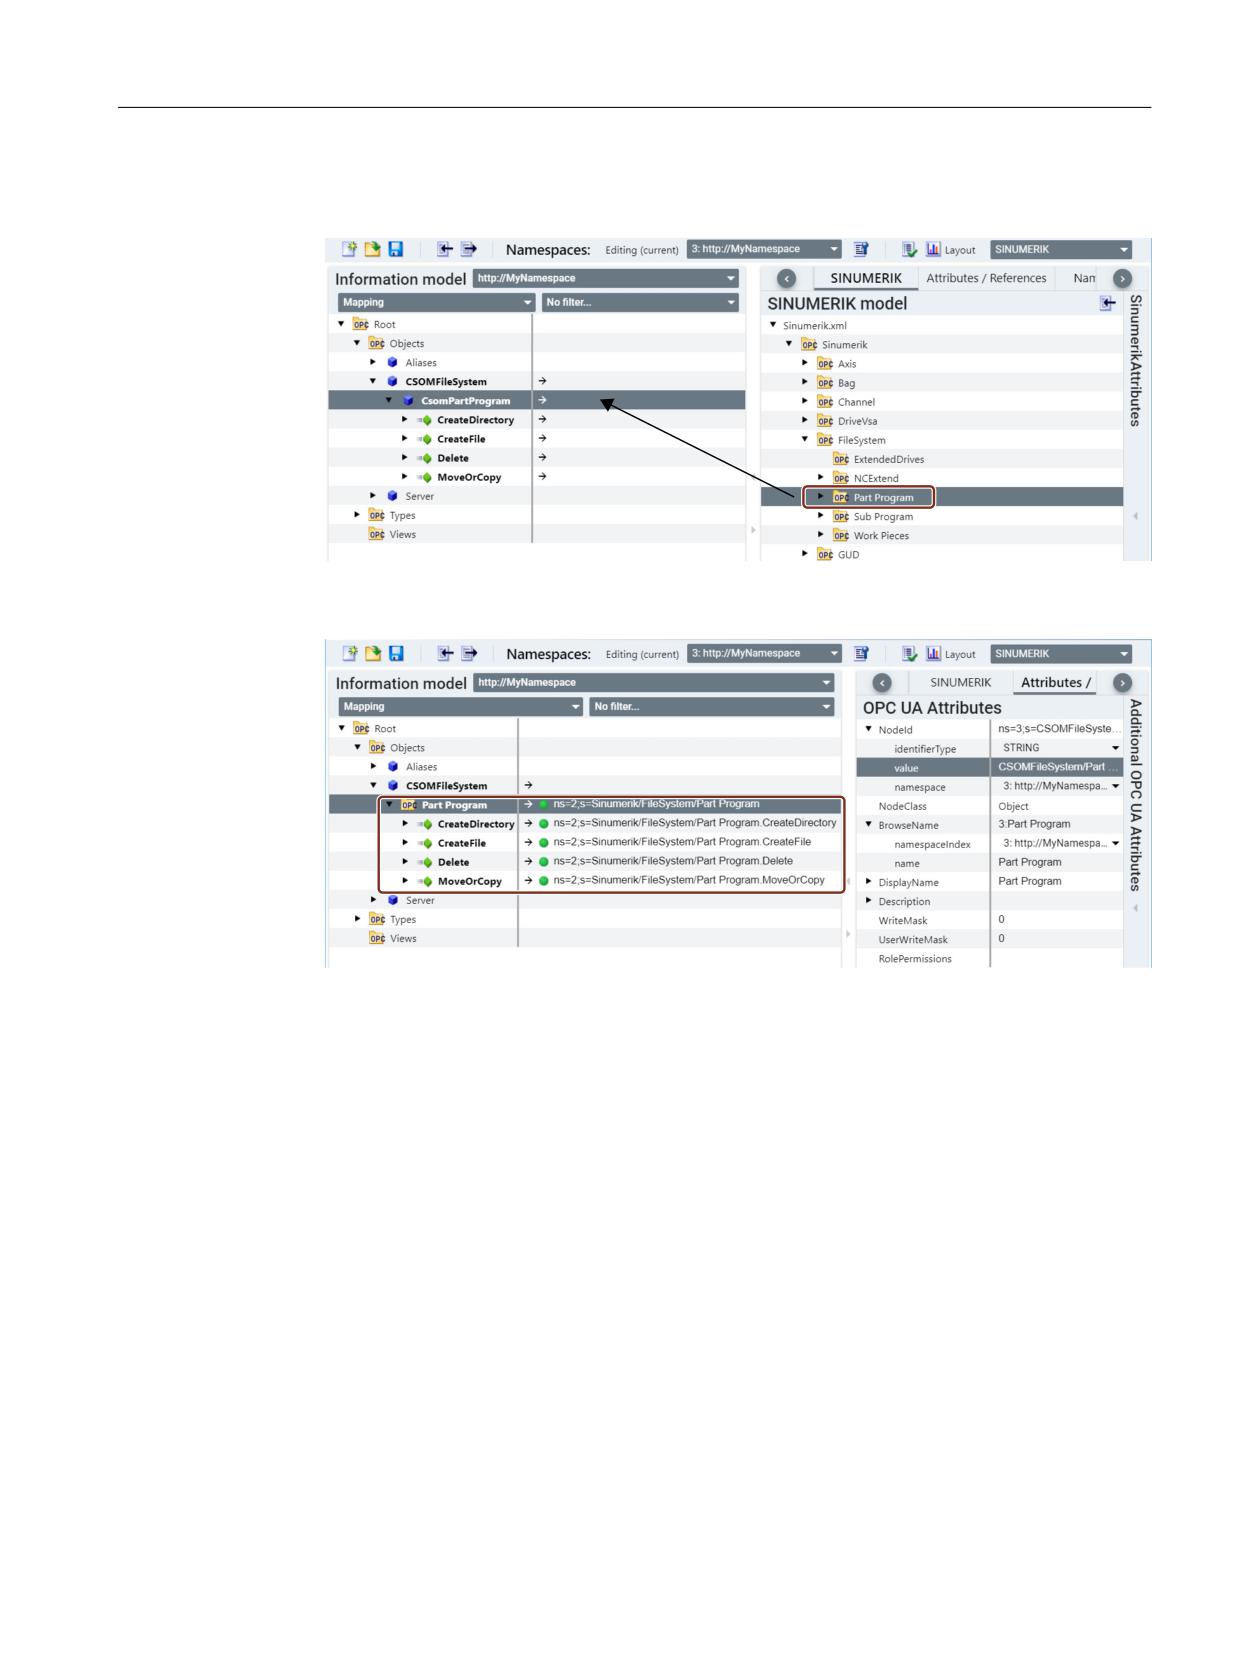
5. Drag and drop the required SINUMERIK file system directory from the "SINUMERIK" tab to the
"CsomPartProgram" node as shown in the below image.
Figure 4-36
Adding a new node of file directory type under custom object
6. The "CsomPartProgram" node is mapped in the mapping table.
Figure 4-37
SINUMERIK file directory added under custom object
4.3.3.4
Option management in SiOME
Overview
License management is used to enable the availability of nodes within an existing information
model based on licenses. These licenses can be used for machine models based on the machine
manufacturers need or end user requirements. Any SINUMERIK variable (PLC/NCK) variable can
be used by the machine manufacturer to enable the license functionality based on machine
model. With the license’s functionality user will have a flexibility of displaying different variables
and methods according to the license set. Therefore, the SINUMERIK OPC UA Server supports
two new use cases in conjunction with a CSOM:
• Individualization of the information model for modular machines on runtime level.
• Allowing a machine manufacturer to make information available within the OPC UA Server
at runtime depending on whether a customer has bought a license or not.
SINUMERIK Access MyMachine / OPC UA
Configuration Manual, 10/2020, 6FC5397-1DP41-0BA5
63
Customer Specific Object Model (CSOM)
4.3 Workflow for using CSOM in the SINUMERIK OPC UA server
This is basically done by engineering licenses within SiOME. To follow an easy to implement
solution a "license" is basically any NC / PLC variable (can be chosen freely) in the SINUMERIK
system which needs to have a certain value (can be defined in SiOME).
Following are the benefits with license functionality:
• Flexibility to use a single custom model for different machine models
• Flexibility to use a single custom model by OEM for different users
• Flexibility to add the required data set as part of custom model
• Reducing time for both commissioning and creating different models by OEM
• Lot of time can be saved while modeling and maintenance
Adding a license
To enable license options in custom models, follow the below steps:
1. Click "Layout" drop down and select "SINUMERIK". The SINUMERIK layout is displayed.
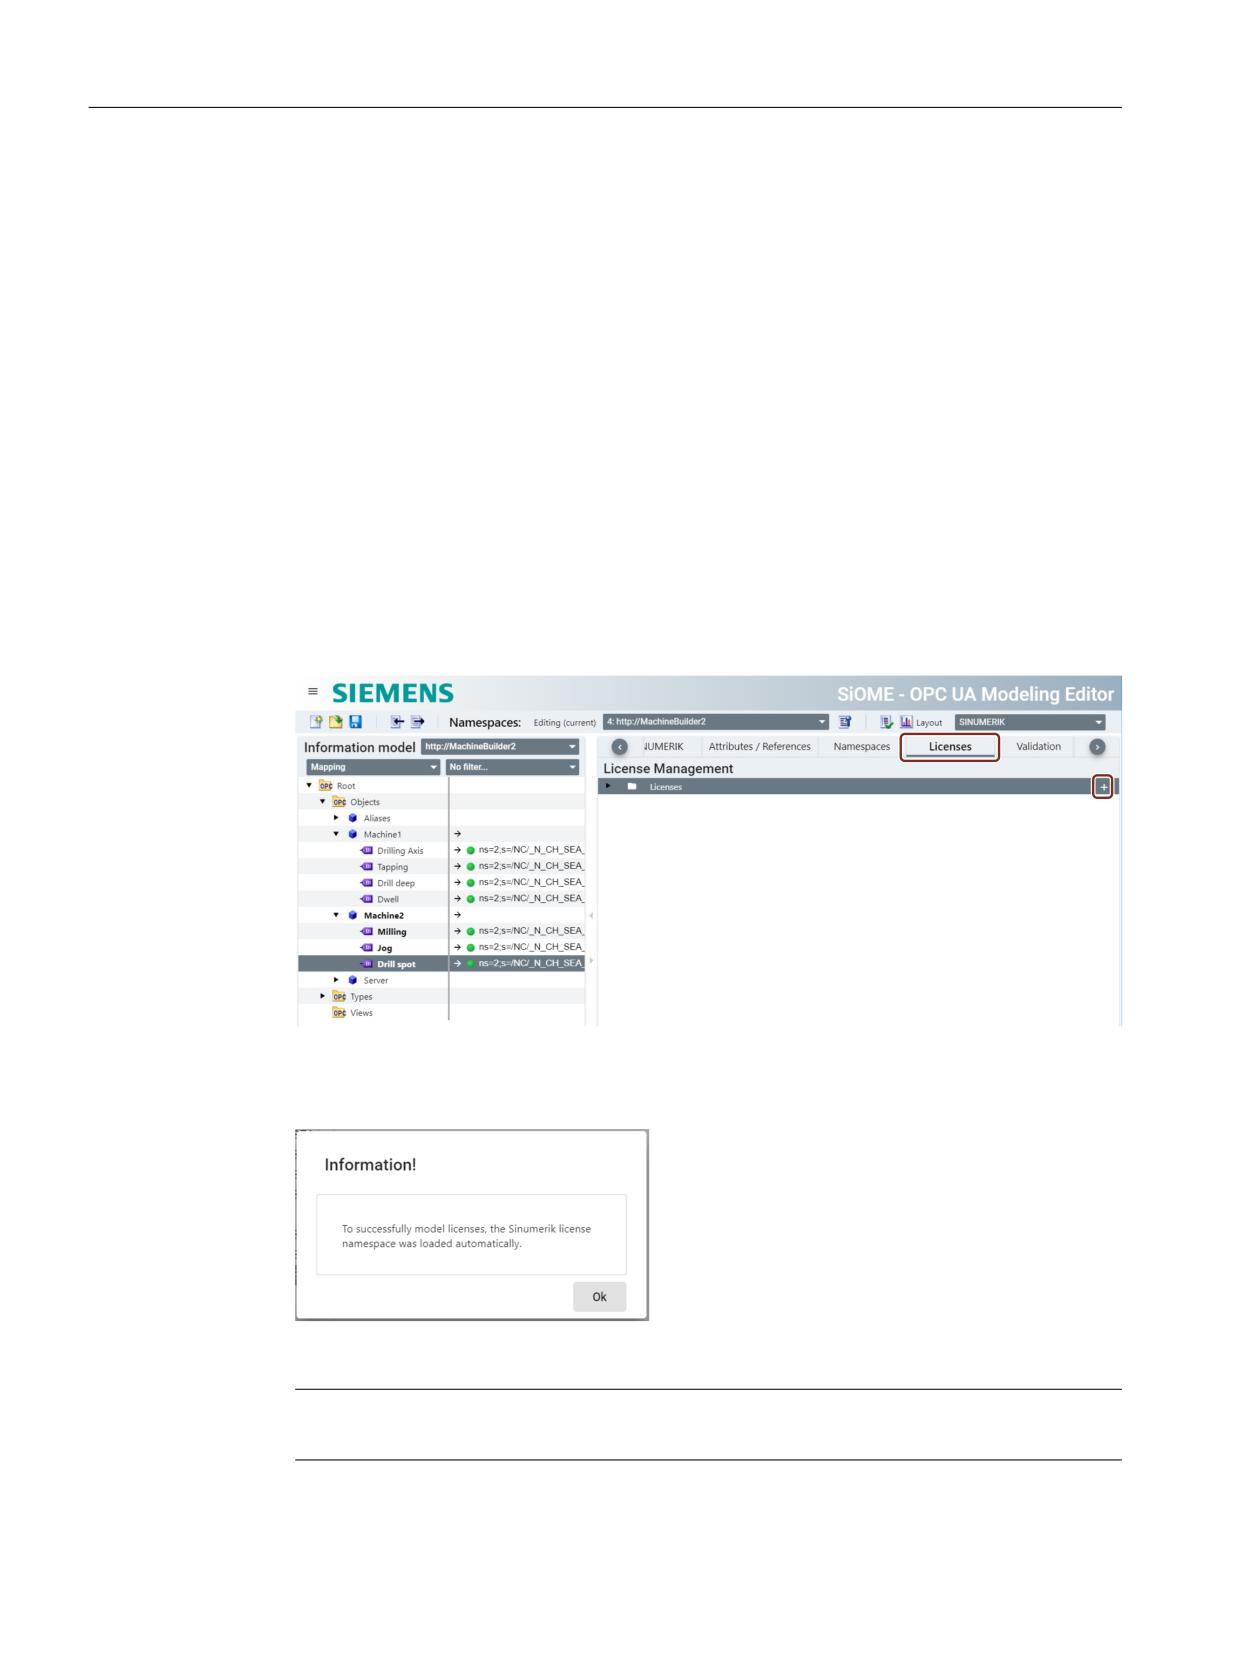
2. Under "Licenses" tab, click on + icon to add licenses, as shown in the below image.
Figure 4-38
Adding licenses in custom models
3. An information popup window appears. By clicking "Ok", a new namespace will be created
automatically for SINUMERIK license.
Figure 4-39
Licenses namespace popup window
Note
The SINUMERIK license namespace will get the next available namespace number.
SINUMERIK Access MyMachine / OPC UA
64
Configuration Manual, 10/2020, 6FC5397-1DP41-0BA5
Customer Specific Object Model (CSOM)
4.3 Workflow for using CSOM in the SINUMERIK OPC UA server
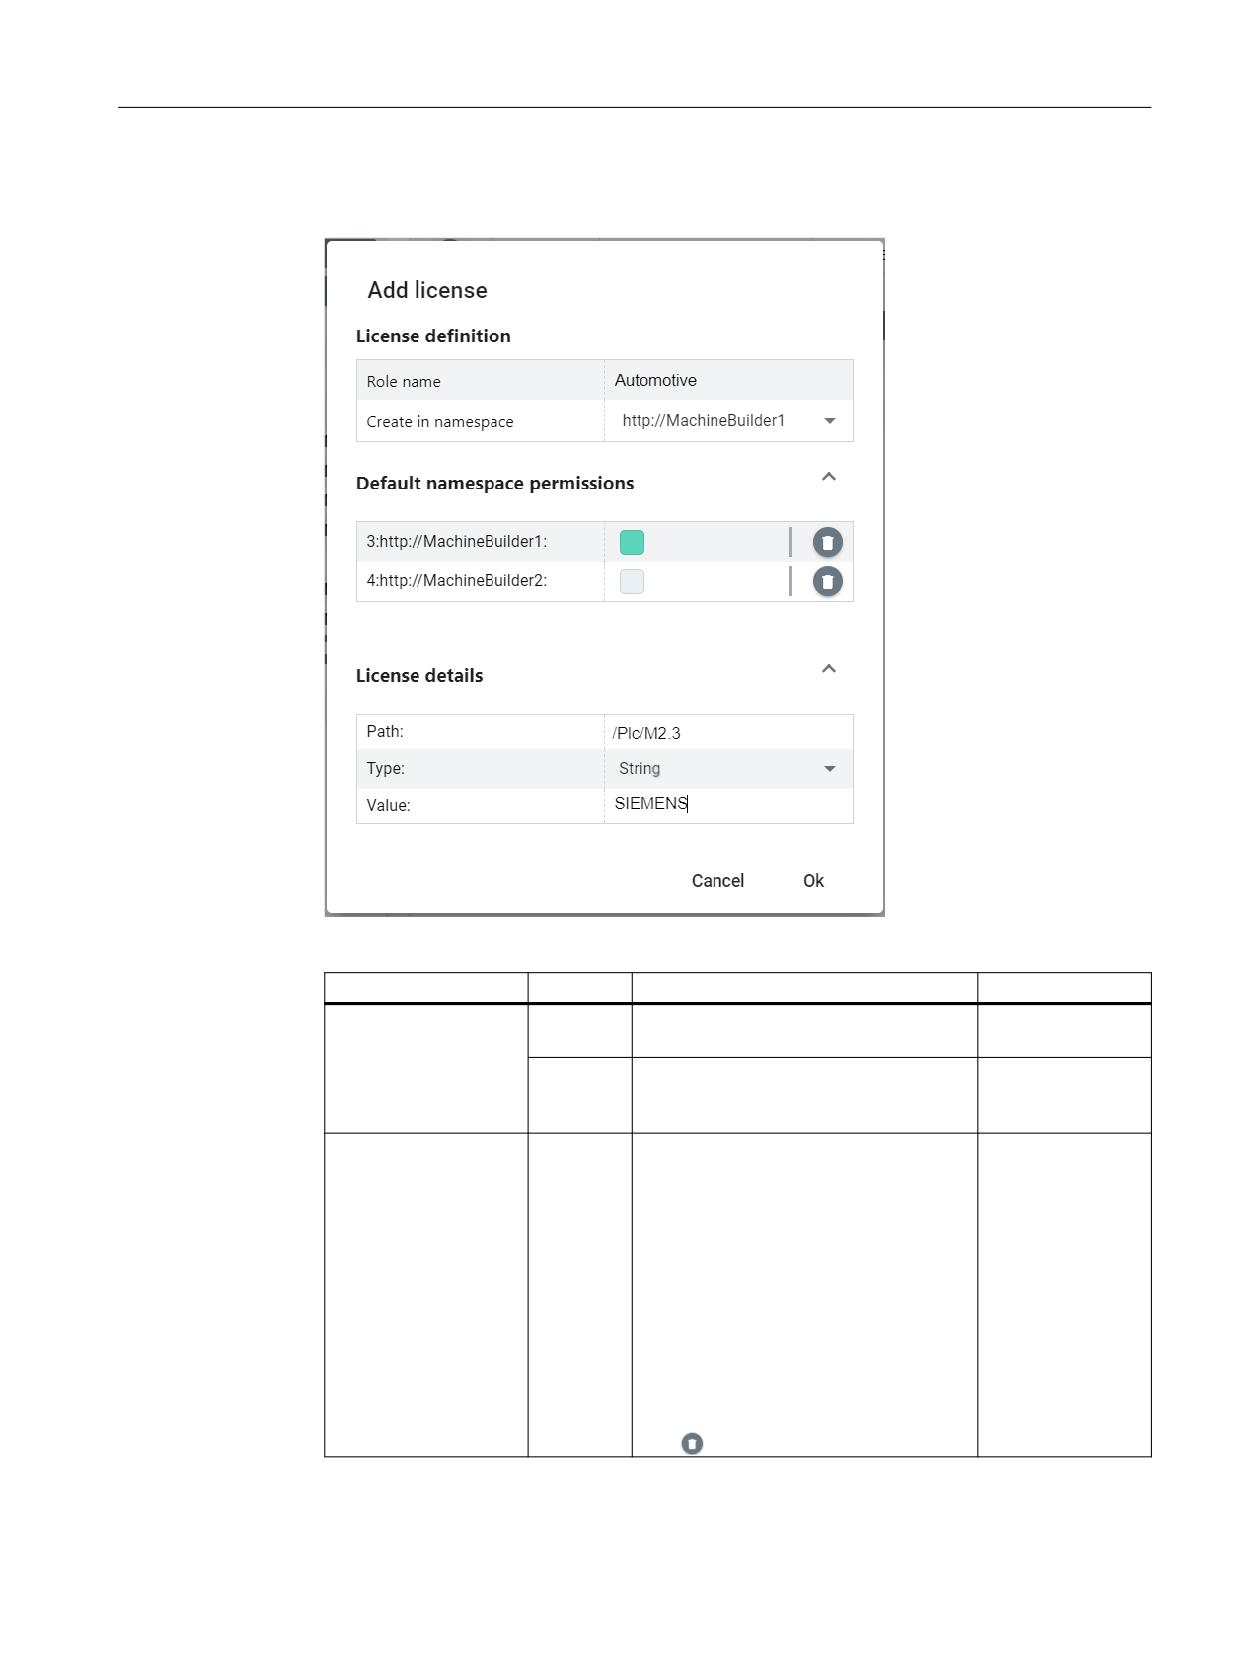
4. The "Add license" popup window appears. Make the necessary settings as described in the
below table.
Figure 4-40
Add license popup
Group
Settings
Description
Example
License definition
Role
You can edit the name of the license.
name
Create in
Select the namespace for which you
name-
want to add the license from the drop
space
down.
Default namespace
Select the default namespace.
permissions
Sets the default license to the selected
namespace. If a namespace is selected
here, all variables of this namespace will
be part of this licence by default. If this is
not required, then do not select any-
thing.
It is also possible to deselect the name-
space by clicking again on the selection
field. Green color indicates, selected and
White color indicates, not selected.
To remove the selected namespace,
click
icon.
SINUMERIK Access MyMachine / OPC UA
Configuration Manual, 10/2020, 6FC5397-1DP41-0BA5
65
Customer Specific Object Model (CSOM)
4.3 Workflow for using CSOM in the SINUMERIK OPC UA server
Group
Settings
Description
Example
License details
Path
Enter the path of the license variable. It is
Absolute address-
basically the path of the variable within
ing
the standard information model of the
"/Plc/M2.3"
SINUMERIK node within the OPC UA Serv-
er.
Symbolic address-
ing "/Plc/Memory/
activatelicense"
Type
Select the data type from the drop down
String
list.
Value
Select or enter the value depending on
"SIEMENS"
the data type selection.
If the variable has the same values as en-
tered here, then the part of the OPC UA
browse tree will be available in the OPC
UA server, after restart.
Note
The "Value" set for each license should match with the value in specified "Path" during the
Operate/HMI startup. In case of mismatch in value, the variables/methods associated with
the license will not be displayed in OPC UA address space.
SINUMERIK Access MyMachine / OPC UA
66
Configuration Manual, 10/2020, 6FC5397-1DP41-0BA5
Customer Specific Object Model (CSOM)
4.3 Workflow for using CSOM in the SINUMERIK OPC UA server
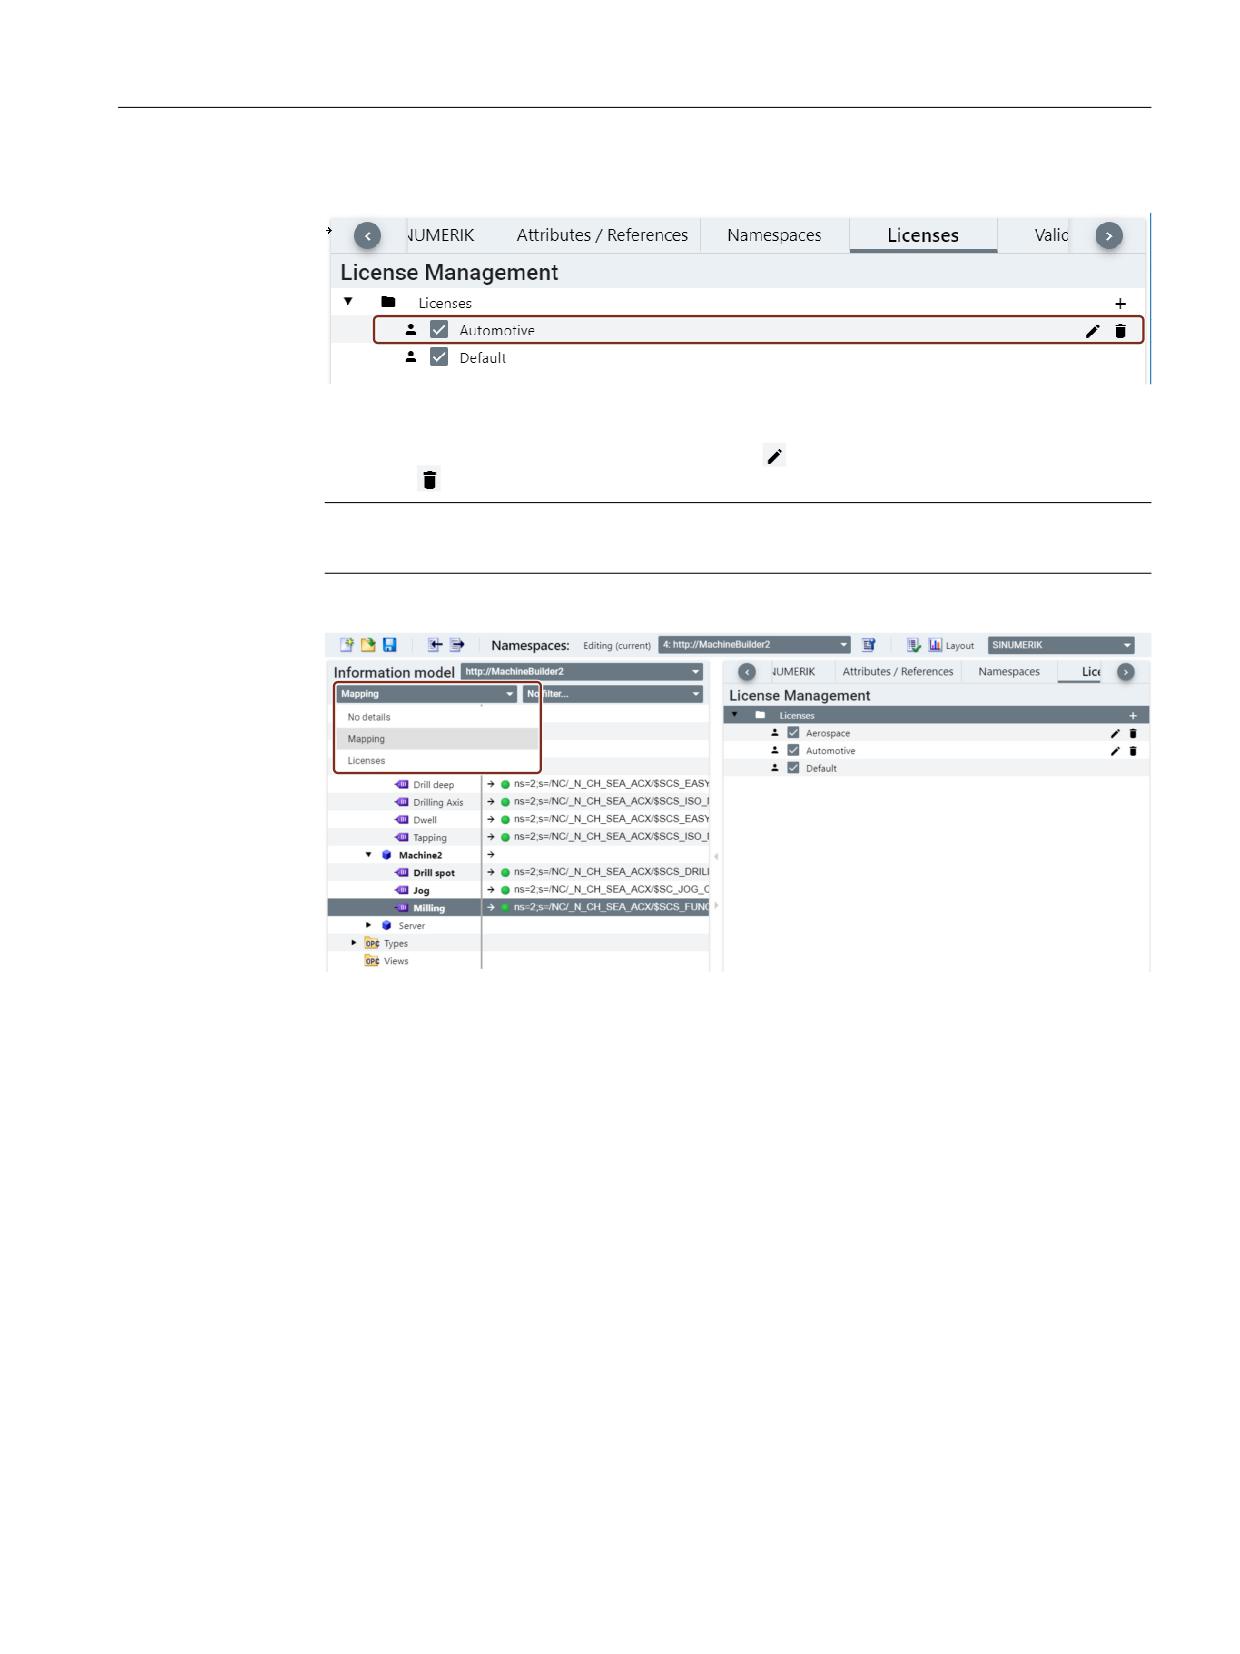
5. Click "OK". The license is added, as shown in the below image.
Figure 4-41
License added
If you want to edit the license details, then click
icon. If you want to remove the license,
then click
icon. Add more licenses in the same way, if you need.
Note
SINUMERIK OPC UA server supports up to 20 licenses.
6. Select "Licenses" from the drop down, as shown in the below image.
Figure 4-42
Switching from mapping to licenses
SINUMERIK Access MyMachine / OPC UA
Configuration Manual, 10/2020, 6FC5397-1DP41-0BA5
67
Customer Specific Object Model (CSOM)
4.3 Workflow for using CSOM in the SINUMERIK OPC UA server
Setting licences for CSOM namespaces
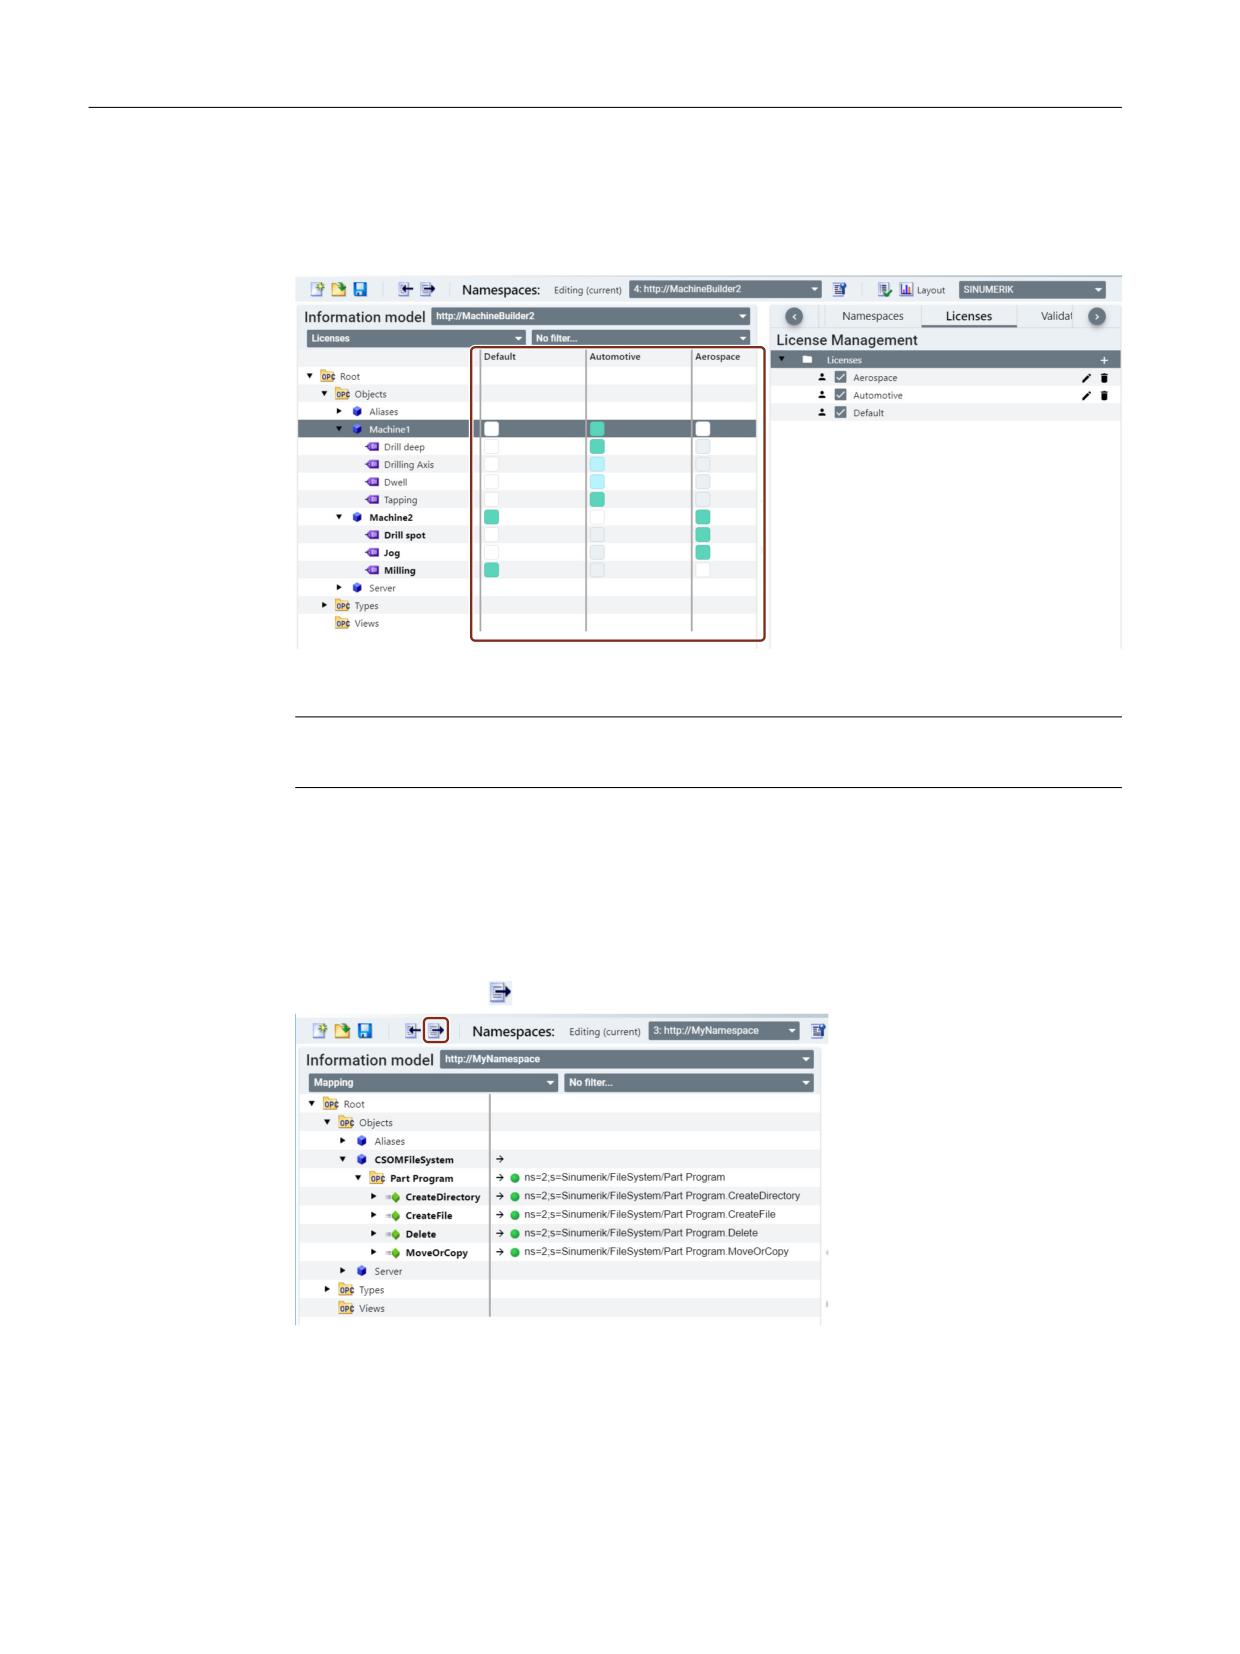
1. Assign the newly created licenses to the variables as per the requirement. The variables in the
"Default" license will always be shown in the address space.
Figure 4-43
Assigning the licenses to variables
Note
After a license is set, restart of the OPC UA Server is required to update the browse tree.
After assigning the licenses to the variables, export the CSOM (XML) as mentioned in the
next topic.
4.3.3.5
Exporting CSOM (XML)
To export the CSOM (XML) to your local machine, follow the below steps:
1. Click the Export XML icon as shown in the below image.
Figure 4-44
Exporting the CSOM
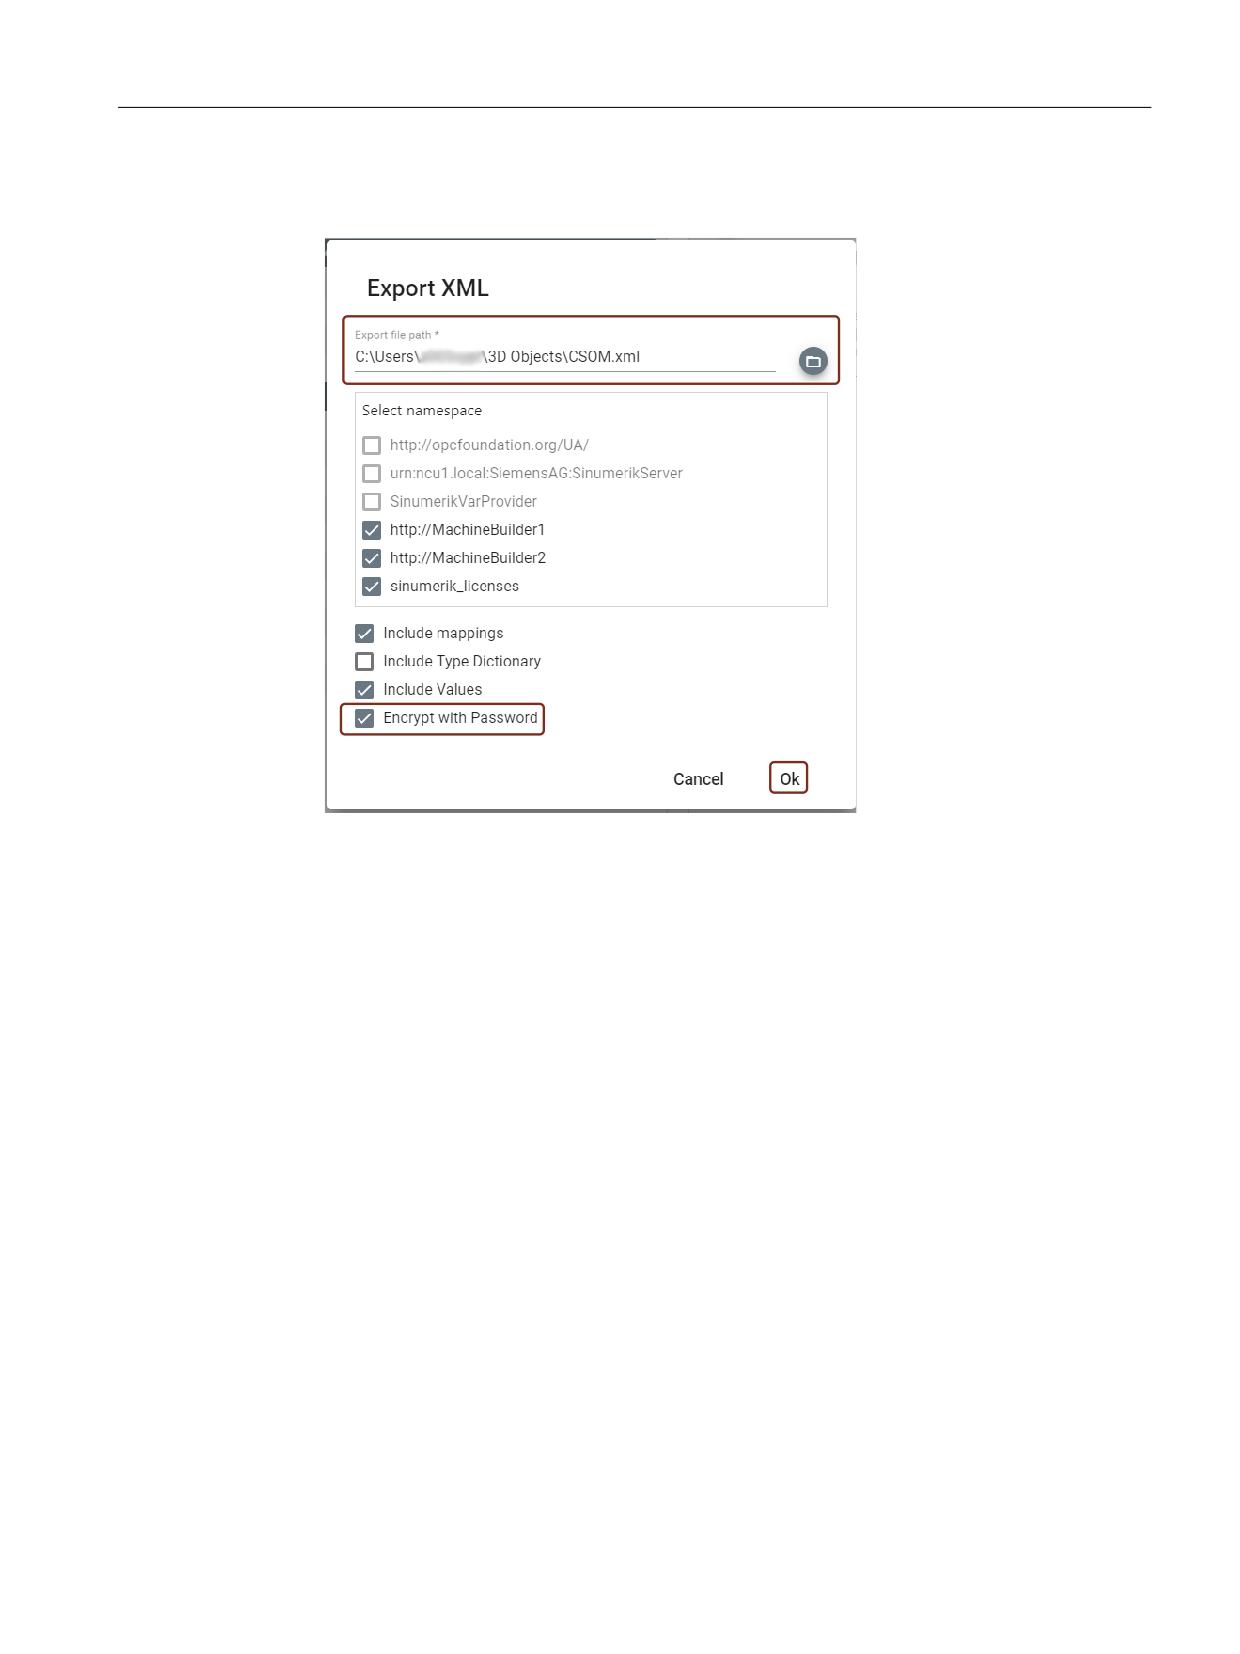
2. The "Export XML" popup appears. Click on browse icon.
SINUMERIK Access MyMachine / OPC UA
68
Configuration Manual, 10/2020, 6FC5397-1DP41-0BA5
Customer Specific Object Model (CSOM)
4.3 Workflow for using CSOM in the SINUMERIK OPC UA server
3. A "Save as" dialog box appears.
Select the location to save the exported CSOM (XML) file and then click "Save".
Figure 4-45
Export XML popup
4. If you want to encrypt the CSOM file, then select "Encrypt with Password" check box.
5. Click "OK". A password popup appears.
SINUMERIK Access MyMachine / OPC UA
Configuration Manual, 10/2020, 6FC5397-1DP41-0BA5
69
Customer Specific Object Model (CSOM)
4.3 Workflow for using CSOM in the SINUMERIK OPC UA server
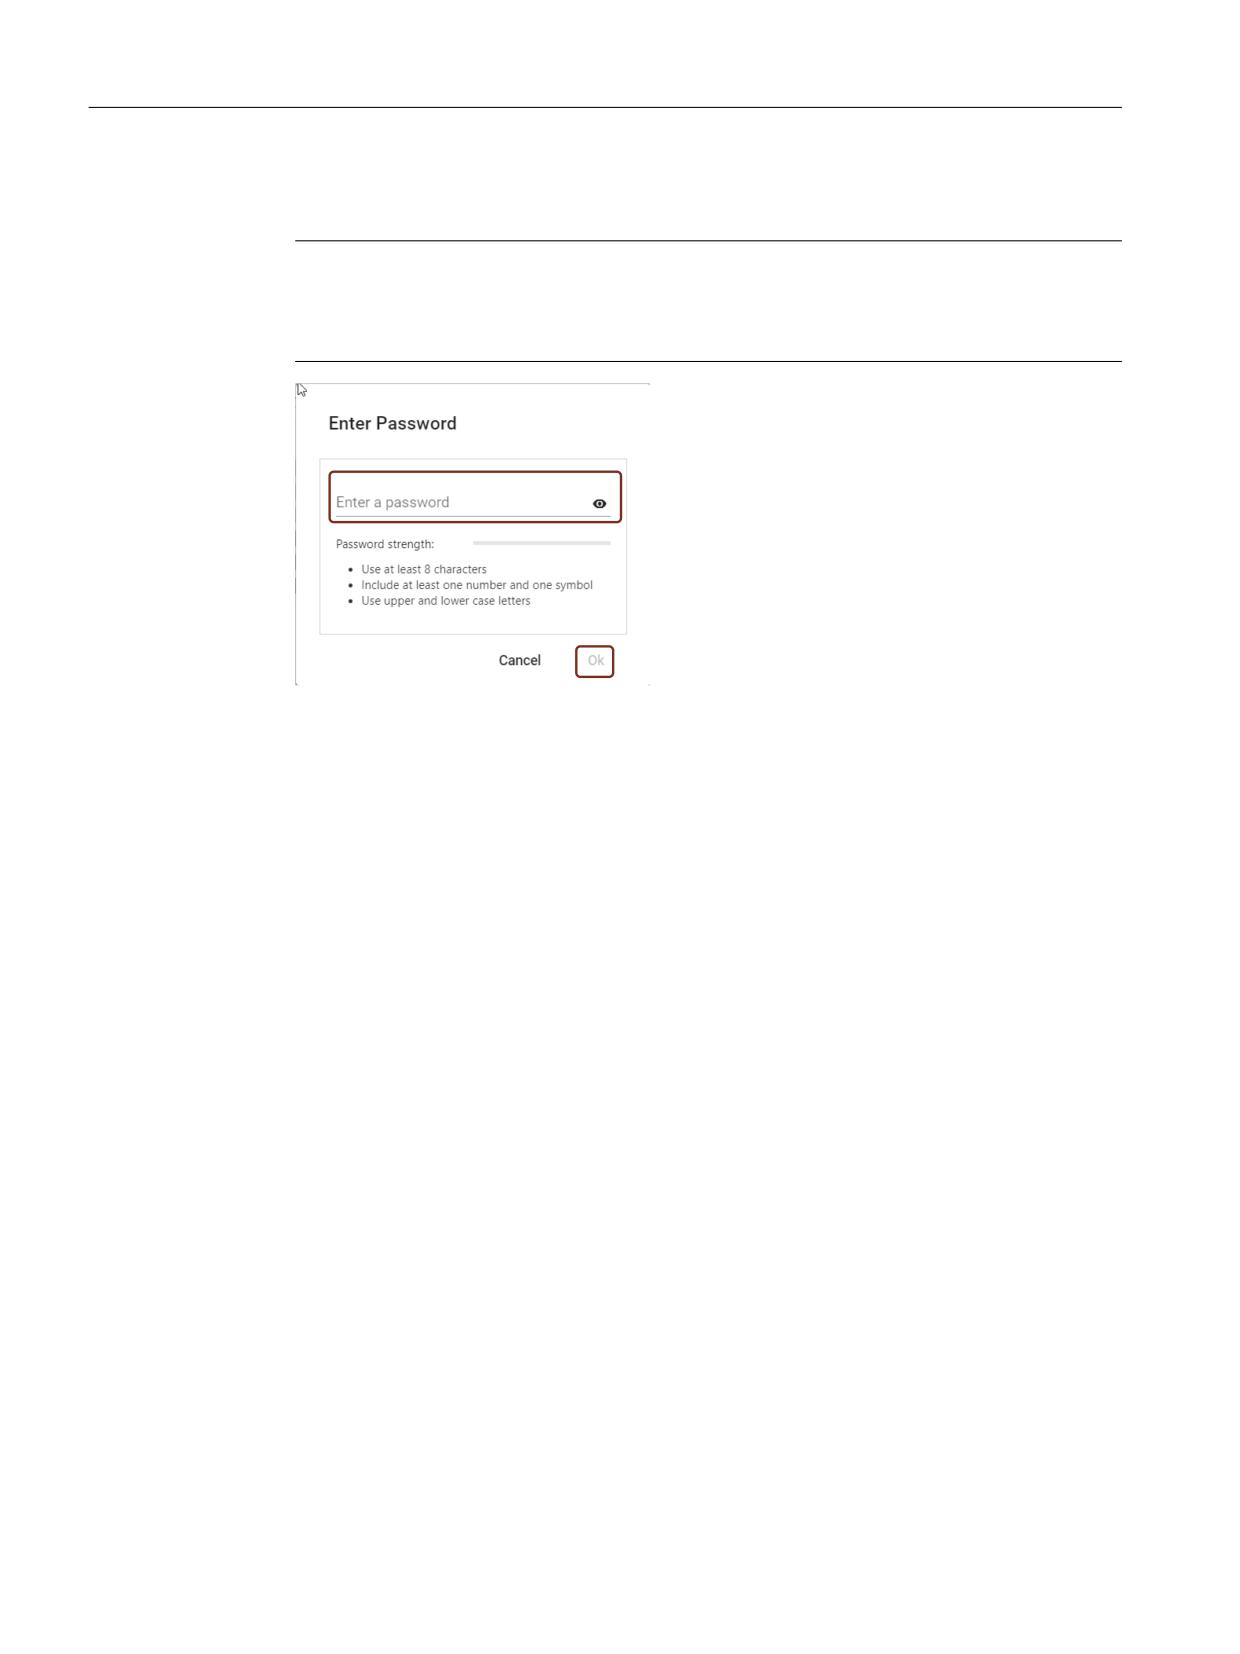
6. Enter a password. Also remember the password because it is required while converting the
CSOM from XML to binary in SINUMERIK Access MyMachine/ P2P.
Note
Passwords must always contain a combination of upper-case and lower-case letters as well
as at least one number and one special character. Password must comprise at least eight
characters.
Figure 4-46
CSOM XML encrypt with password popup
7. Click "OK". The CSOM (XML) file is saved in the specified location.
For further steps, continue with the chapter Converting the CSOM from XML to binary
(Page 73).
For a more detailed description of SiOME, refer to Industry Online Support (https://
support.industry.siemens.com/cs/de/en/view/109755133). You can find a function manual,
download link, further explanations and applications examples on modeling and mapping.
Additional information on data types, modeling rules and necessary user access rights for the
modeling process are explained in the following chapters:
• Mapping data types (Page 70)
• Modeling rules (Page 71)
• Access control with CSOM (Page 72)
4.3.3.6
Mapping data types
Mapping data types
The table below shows the compatible SINUMERIK data type for each OPC UA data type.
Assign the data types as shown below (SINUMERIK data type - OPC UA data type). Other
assignments are not permitted. You are responsible for the rule-compliant selection and
assignment of the data types.
SINUMERIK Access MyMachine / OPC UA
70
Configuration Manual, 10/2020, 6FC5397-1DP41-0BA5

Customer Specific Object Model (CSOM)
4.3 Workflow for using CSOM in the SINUMERIK OPC UA server
You may find further information on mapping of OPC UA data types in the document "OPC UA
Information Model for IEC 61131-3".
Table 4-1
Mapping of data types
SINUMERIK data type
OPC UA data type
Bool
Boolean
Character
Byte
Byte
Byte
Word
UInt16
Short Integer
SByte
Doubleword
UInt32
Long Integer
Int64
Float
Float
Real
Float
Double
Double
String
String
Note
The PLC datatype doubleword (e.g. DBD, MD) can be used for datatype “DInt” or “Real”.
For getting “Real” values via OPC UA it is necessary to append the “REAL” specifier to the PLC
variable used in the mapping, e. g.: DB100.DBD5:REAL.
4.3.3.7
Modeling rules
Following are the rules while modeling the exported SINUMERIK model (XML) with SiOME:
• The exported SINUMERIK Model (XML) should not be used in the "Information Model"
window as a base for model creation.
• No new nodes should be added under the below namespaces:
-
–
1: urn:ncu1.local:SiemensAG:SinumerikServer
–
2: SinumerikVarProvider
• Up to 10.000 nodes (over all CSOM namespaces) can be modeled within the OPC UA server.
• Total namespaces should not be more than 10 (Including the above namespaces).
• First three namespaces 0, 1 and 2 should not be edited, deleted or change in order.
• Standard folder or file functions names should not be renamed.
• Standard folder or file functions argument should not be modified.
• No new Objects, Variables or Methods should be added under standard folder or file
structures.
• Standard folder or files should not be deleted under standard folder or file structures.
SINUMERIK Access MyMachine / OPC UA
Configuration Manual, 10/2020, 6FC5397-1DP41-0BA5
71

Customer Specific Object Model (CSOM)
4.3 Workflow for using CSOM in the SINUMERIK OPC UA server
• Additional namespaces should have an index of 3 or higher.
• In SiOME, when a new node is created with a "ValueRank" set to "Dimension" then the value
attribute of the node should be initialized by clicking on the "Value" in the "Attribute" window.
Note
If customer model is not shown in the browse tree, then refer to the error logs under the folder
(..\user\sinumerik\hmi\log\opcua).
4.3.3.8
Access control with CSOM
For the CSOM, the customer has the following possibilities to provide access rights for variables:
1. In SiOME, the CSOM Access level can be defined.
2. In addition, the OPC UA administrator has two new access rights:
- CsomReadx
- CsomWritex
To read a variable within a CSOM namespace the OPC UA administrator has to provide the user
with the access right "CsomReadx" while "x" stands for the namespace index.
For example, to read a variable out of namespace 3, the user only needs to get the access right
"CsomRead3". No other access rights are needed. The same is valid for "CsomWritex".
The following table gives an overview about the interaction between CSOM access level and
access rights of target device. A variable that is read only by access rights of target device can not
be written by OPC UA, even if the OPC UA access write is read/write (3).
Table 4-2
Access table
CSOM
CSOM namespace
Rights of target device
Result
rights
AccessLevel
1 = Read
No access
Read / Write
No access
Read
Read / Write
Read
Write
Read / Write
No access
Read / Write
Read / Write
Read
2 = Write
No access
Read / Write
No access
Read
Read / Write
No access
Write
Read
No access
Write
Read / Write
Write
Read / Write
Read
No access
Read / Write
Read / Write
Write
SINUMERIK Access MyMachine / OPC UA
72
Configuration Manual, 10/2020, 6FC5397-1DP41-0BA5
Customer Specific Object Model (CSOM)
4.3 Workflow for using CSOM in the SINUMERIK OPC UA server
CSOM
CSOM namespace
Rights of target device
Result
rights
AccessLevel
3 = Read/Write
No access
Read / Write
No access
Read
Read / Write
Read
Write
Read
No access
Write
Read / Write
Write
Read / Write
Read
Read
Read / Write
Read / Write
Read / Write
4.3.4
Converting the CSOM from XML to binary
The exported CSOM (XML) from SiOME needs to be converted to a binary format that can be read
by SINUMERIK OPC UA server. The converted binary file has a more compact format and is
therefore controller optimized. For this conversion process SINUMERIK Access MyMachine/ P2P
is used.
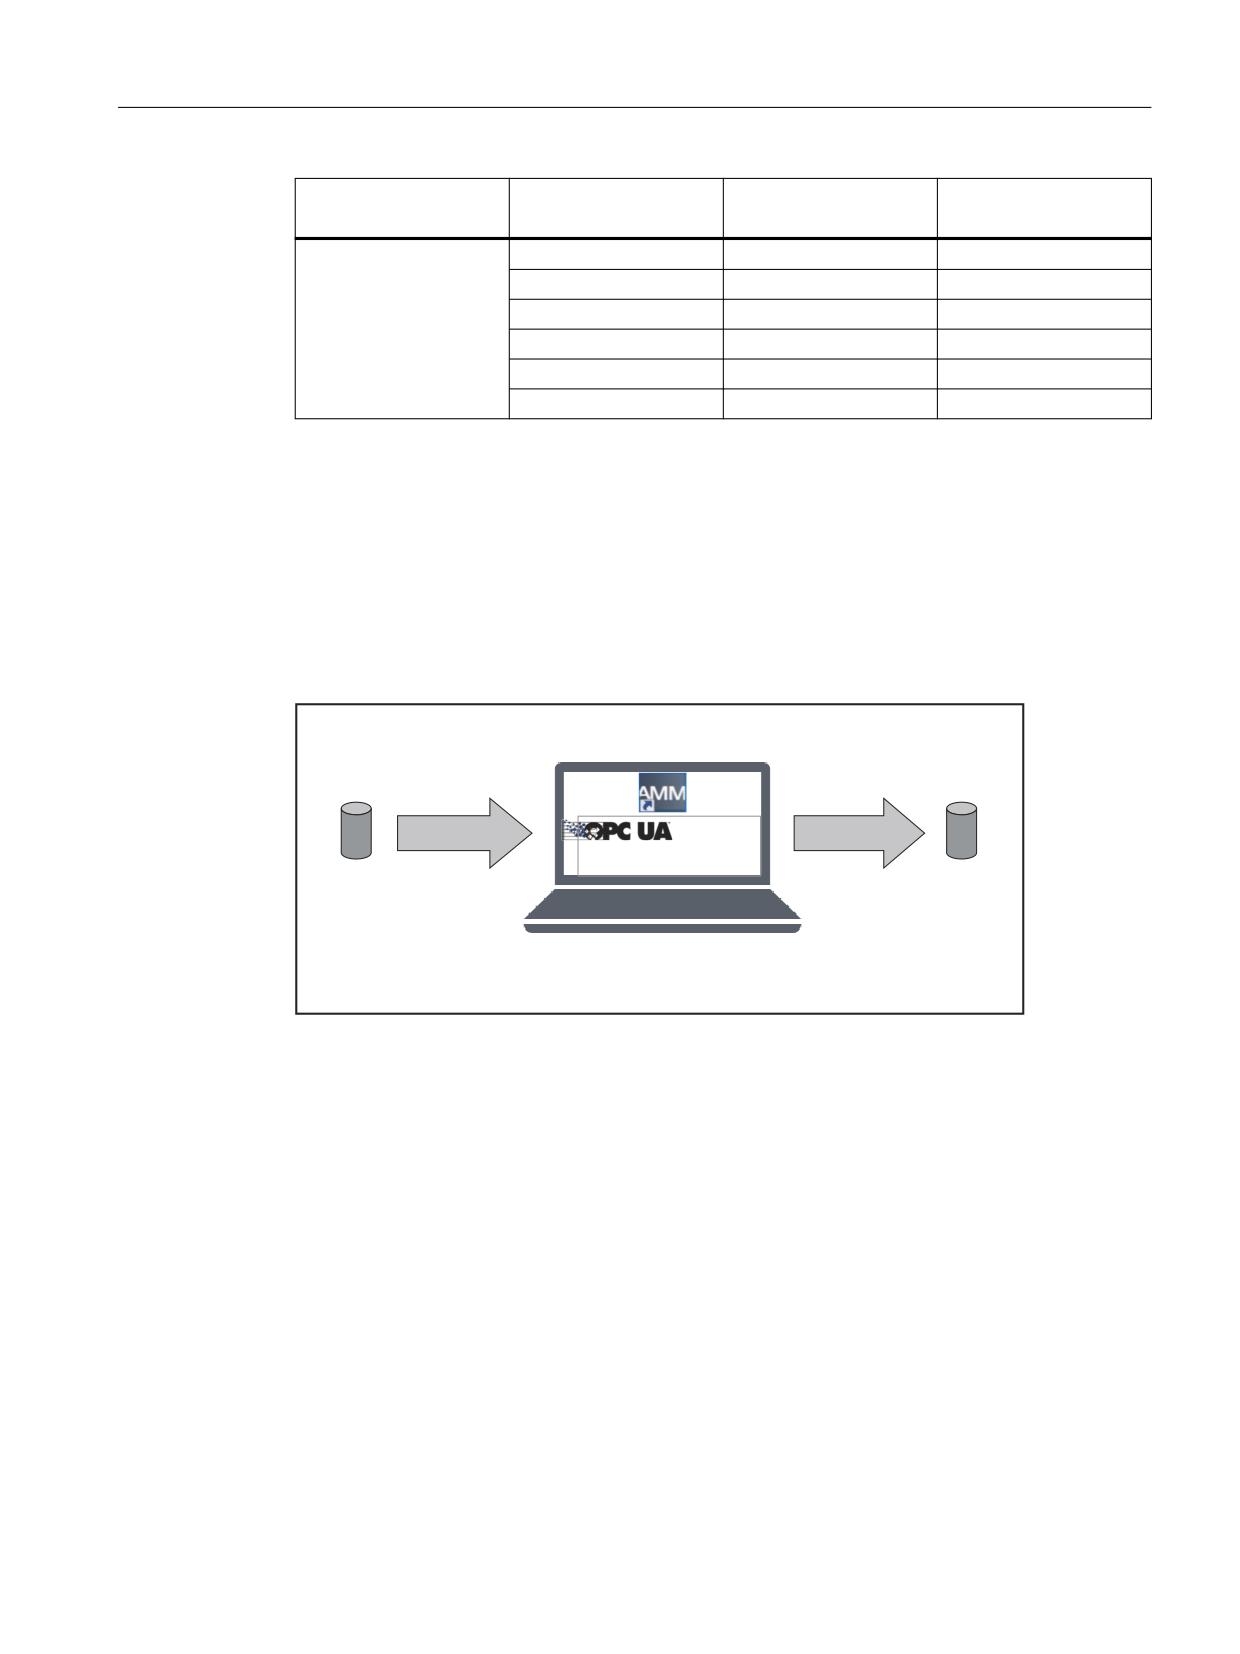
The following graphic shows the process of converting the CSOM (XML) to binary format.
;0/
5HDG &RQYHUW
6DYH %LQDU\
&OLHQW
&XVWRPHU 0RGHO
&XVWRPHU 0RGHO
ವ&RQYHUW;0/WRELQDU\
86%
Figure 4-47
Converting the CSOM from XML to binary
Procedure
1. Open the application "SINUMERIK Access MyMachine /P2P".
2. Click "Tools > Sinumerik Opcua Server Tools > Model Binary Converter". A popup window
appears.
SINUMERIK Access MyMachine / OPC UA
Configuration Manual, 10/2020, 6FC5397-1DP41-0BA5
73
Customer Specific Object Model (CSOM)
4.3 Workflow for using CSOM in the SINUMERIK OPC UA server
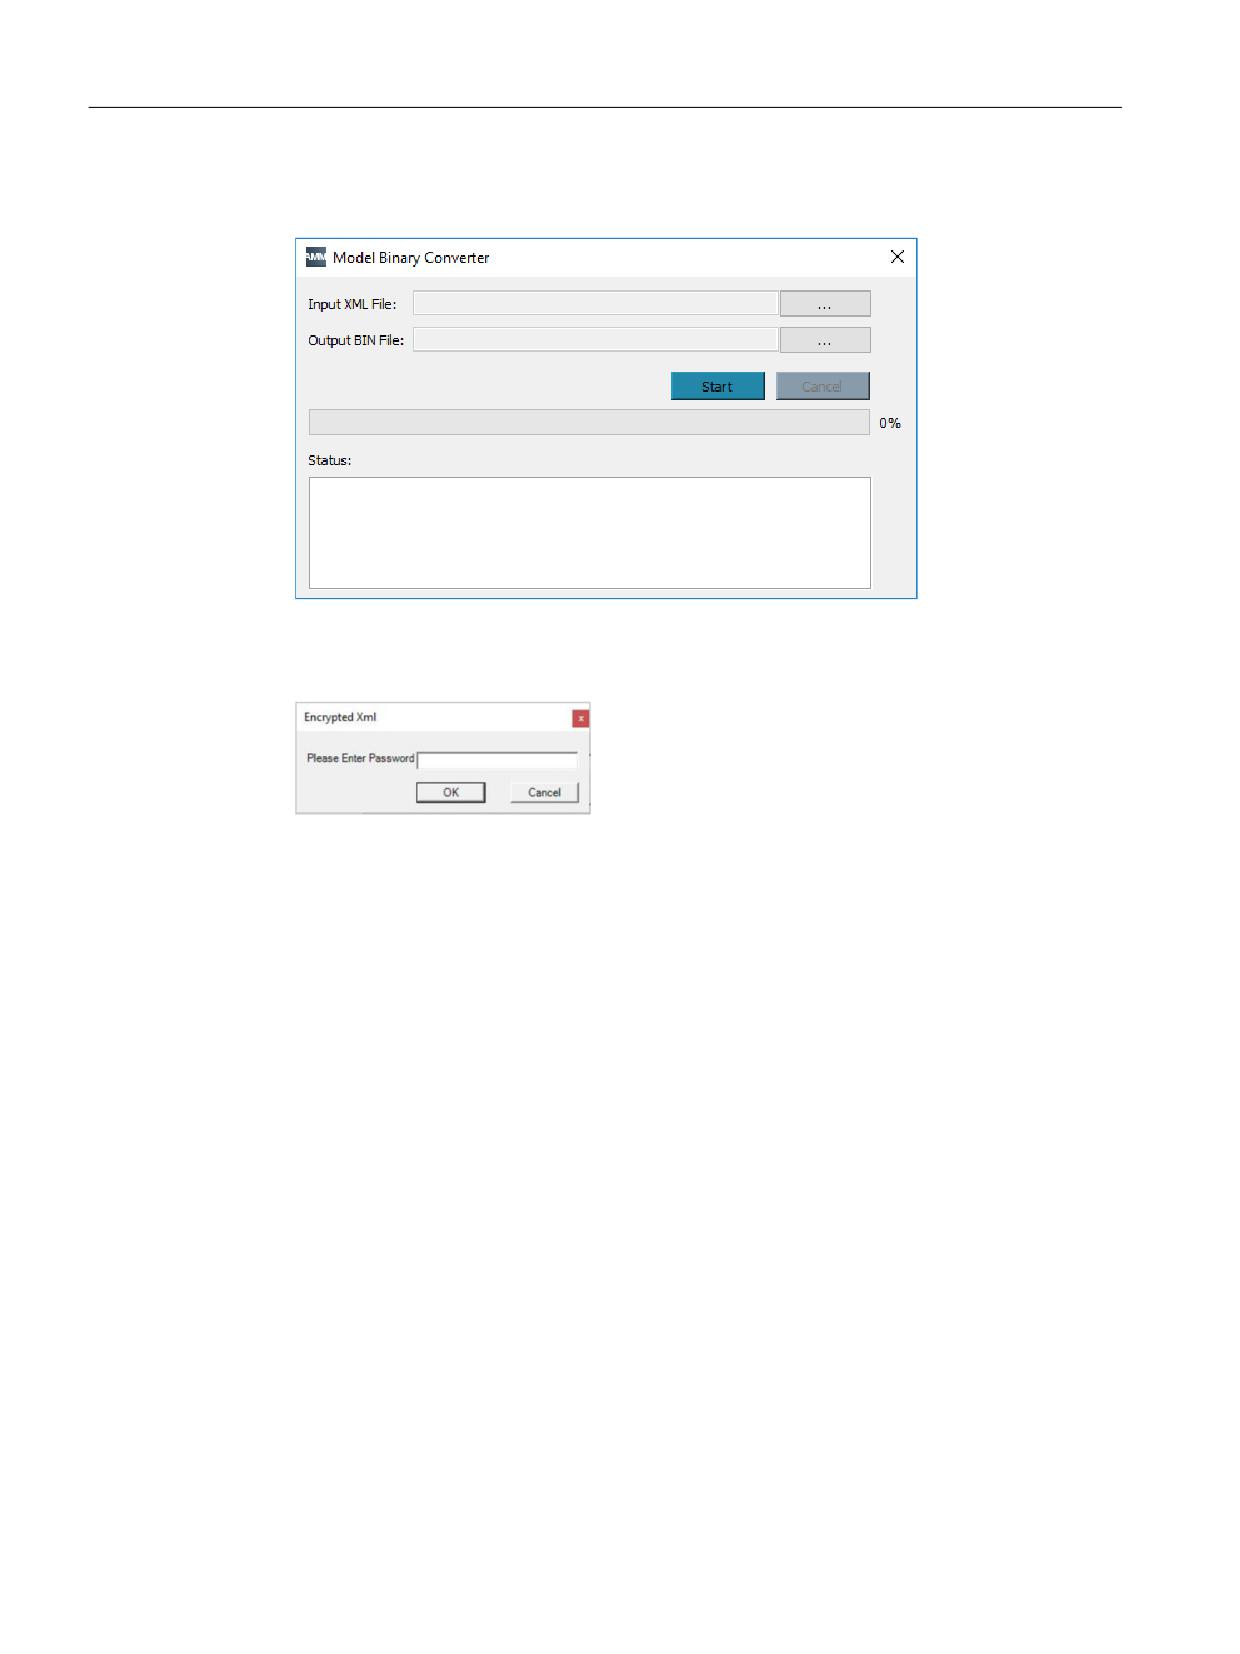
3. Select the location of the XML file under "Input XML File" and specify the location to save the
binary file under "Output BIN File".
Figure 4-48
Model Binary Converter
4. Click "Start" button to generate the binary file. If the XML file is encrypted, then a password
popup appears.
Figure 4-49
Password popup
5. Enter the same password that was set while encrypting the exported CSOM (XML) file from
SiOME.
6. Click "OK". If the password is correct, then the binary file will be generated and saved in the
specified location.
Result
Imported CSOM XML file is converted to binary format.
4.3.5
Importing the CSOM into the SINUMERIK OPC UA server
After converting the CSOM (XML) to a binary format, it can be imported to the SINUMERIK OPC
UA server.
The following image shows the process of importing the CSOM (binary format) to SINUMERIK
OPC UA server.
SINUMERIK Access MyMachine / OPC UA
74
Configuration Manual, 10/2020, 6FC5397-1DP41-0BA5
Customer Specific Object Model (CSOM)
4.3 Workflow for using CSOM in the SINUMERIK OPC UA server
,PSRUW %LQDU\
&XVWRPHU 0RGHO
HJ86%
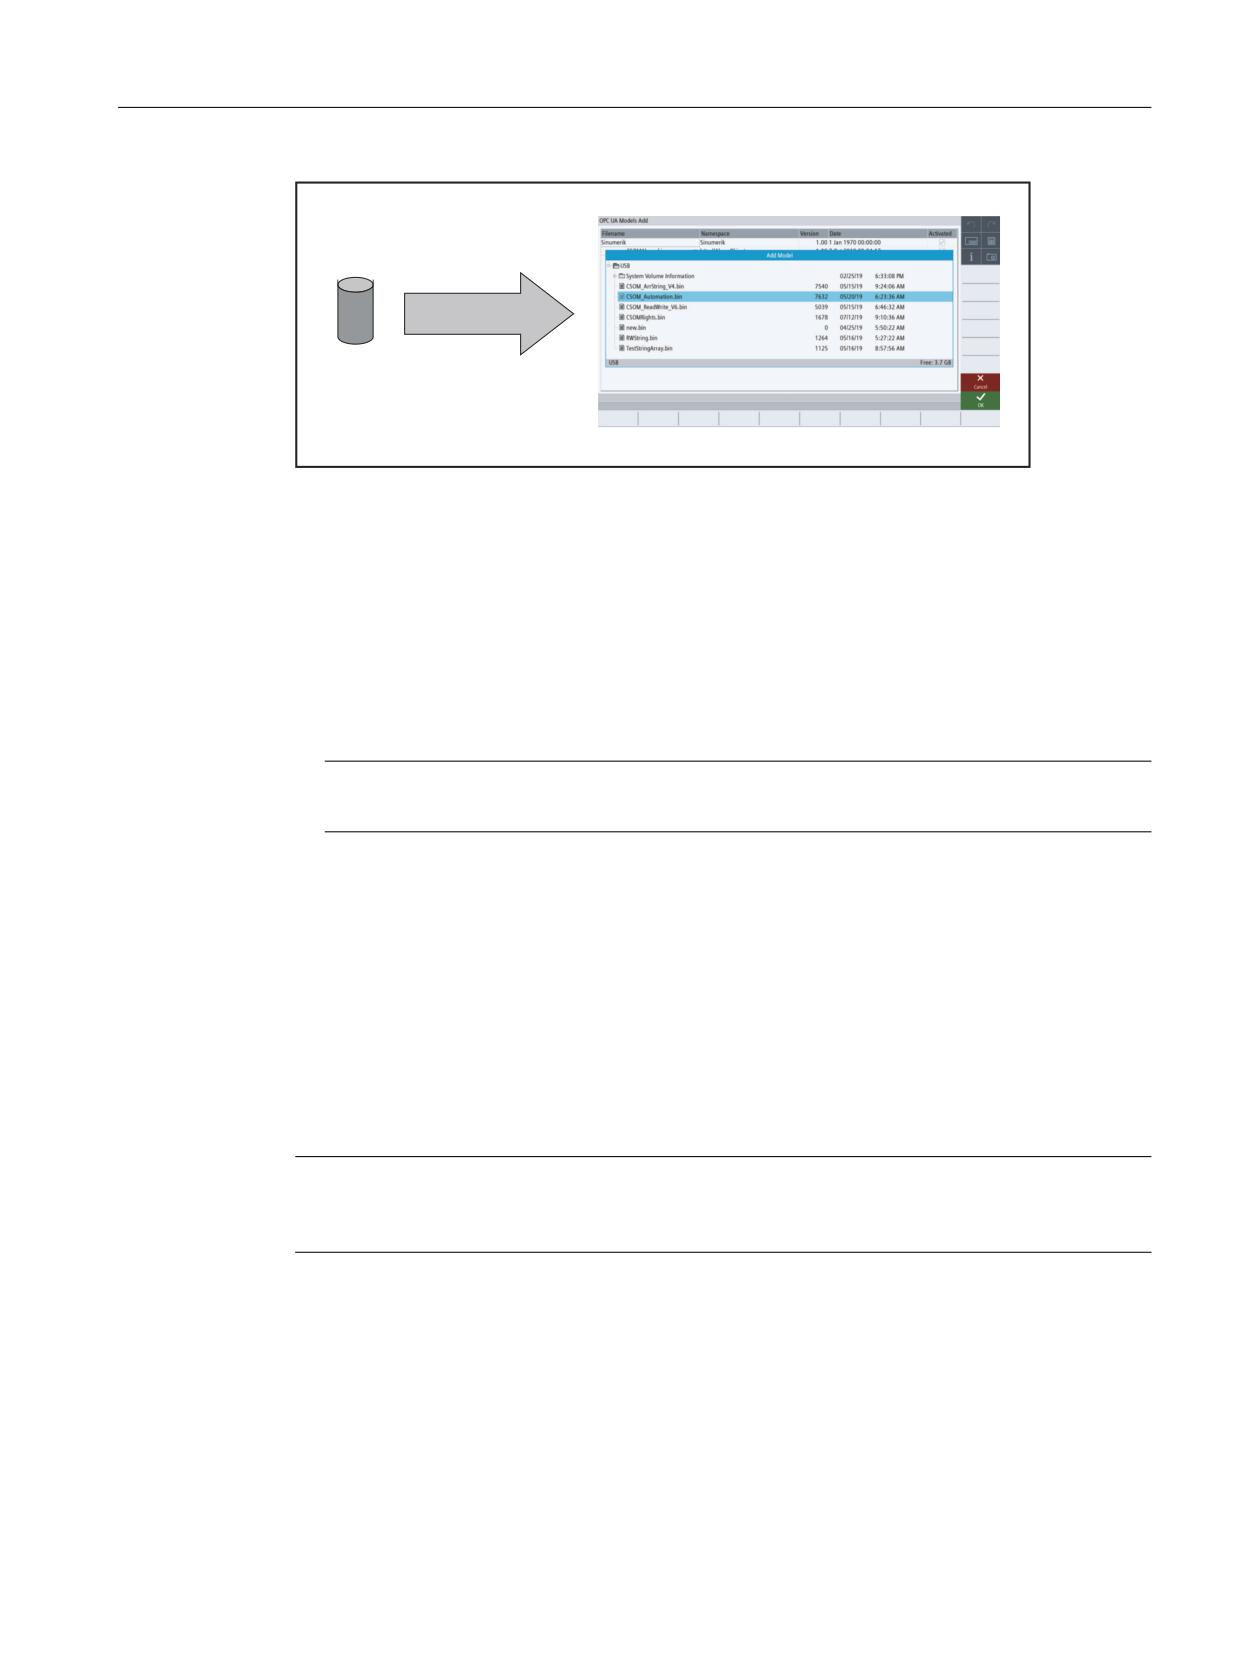
Figure 4-50
Importing the CSOM into the SINUMERIK OPC UA server
Procedure
1. Copy the binary file either to an USB/Networkshare or - alternatively - transfer the file via AMM
directly to the control.
- "\user\sinumerik\hmi\opcua\models\" for NCU
- "C:\Program Files (x86)\Siemens\Motion Control\user\sinumerik\hmi\opcua
\modeles" for PCU/IPC
Note
If models folder is not present, then create a folder name models.
2. Press the softkey "Add Model" in the OPC UA model dialog and select the saved binary file.
3. Press the softkey "OK".
The model is visible in the OPC UA model dialog.
4. Then press the softkey "Change" and activate the customer specific model.
5. Restart the OPC UA server by restarting SINUMERIK OPC UA server.
Result
The CSOM is now accessible in SINUMERIK Operate.
Note
For accessing data via an OPC UA client, it is necessary to have appropriate access rights (see
chapter "List of access rights").
See also
List of access rights (Page 86)
SINUMERIK Access MyMachine / OPC UA
Configuration Manual, 10/2020, 6FC5397-1DP41-0BA5
75
Customer Specific Object Model (CSOM)
4.4 CSOM dialog in SINUMERIK Operate
4.4
CSOM dialog in SINUMERIK Operate
4.4.1
Overview
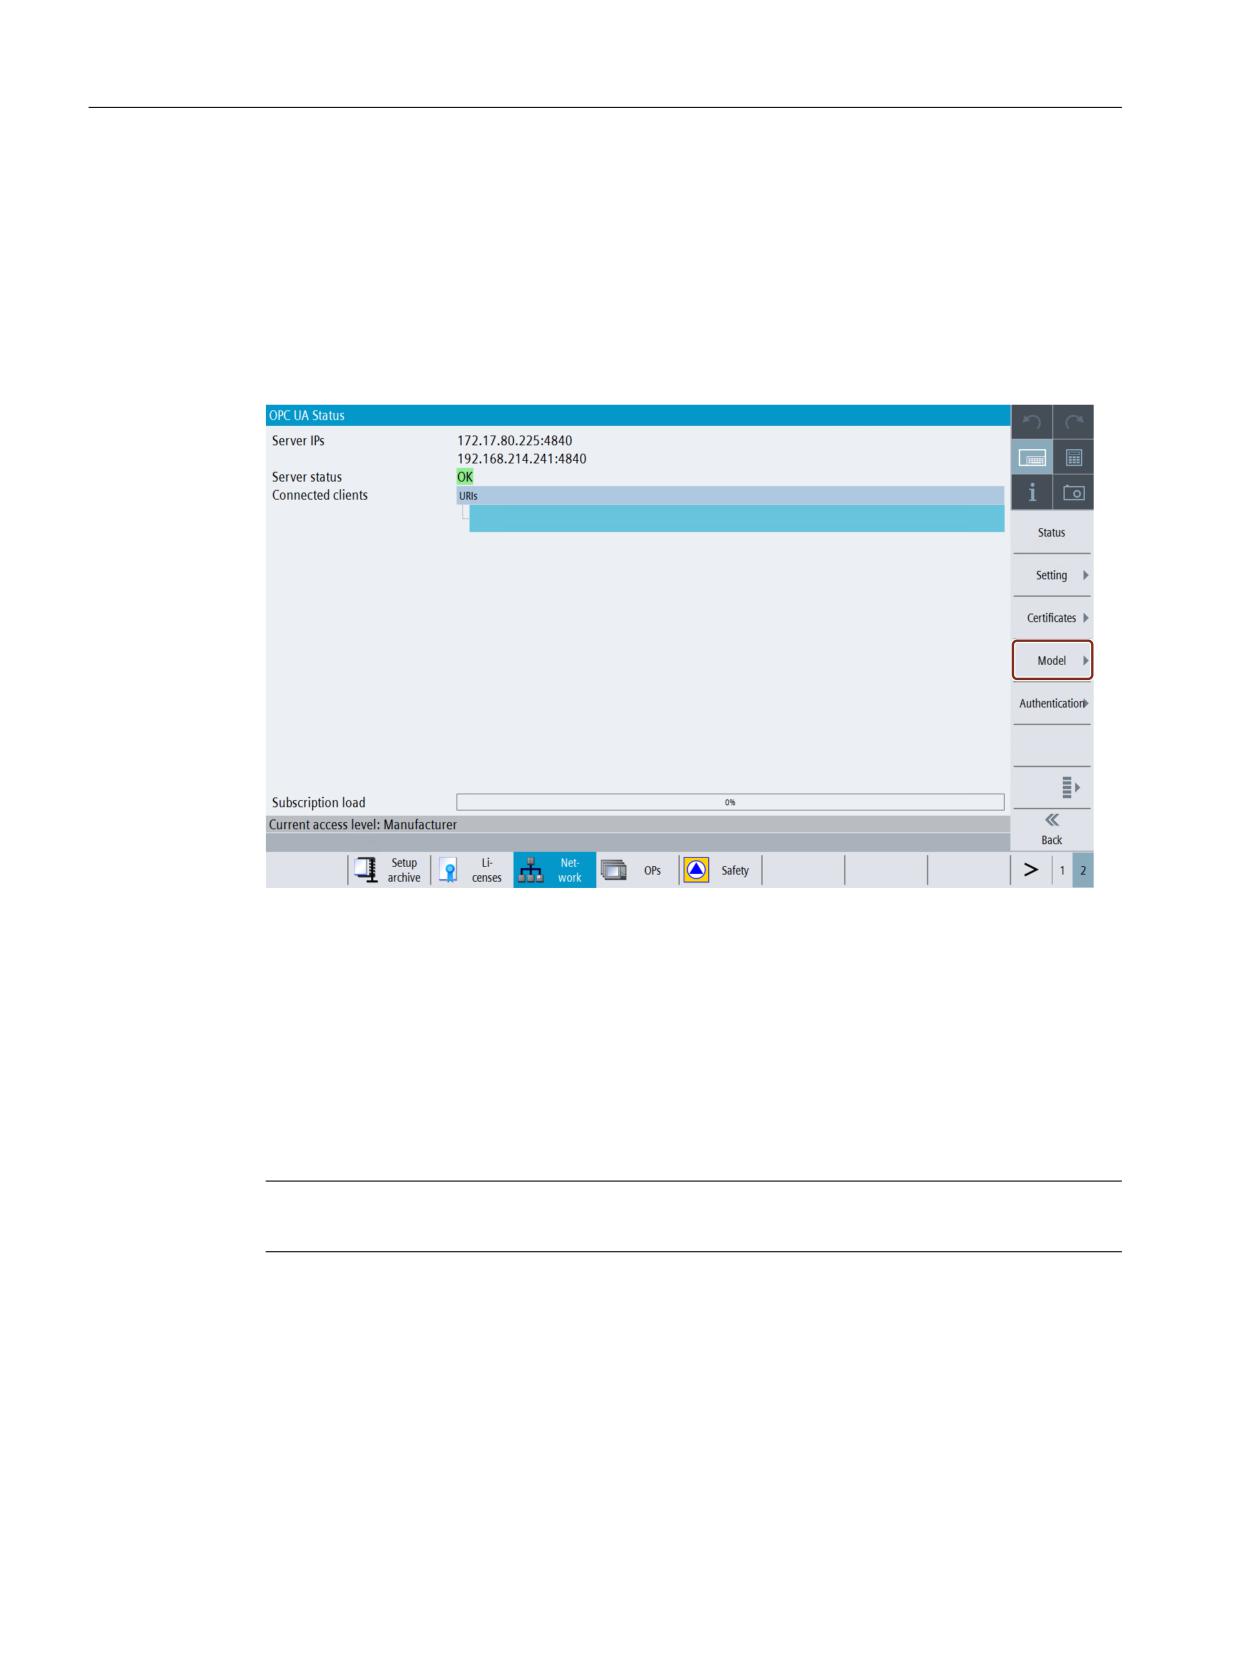
To have a comfortable way to work with a customer specific object model, the OPC UA dialog
offers a special section, which can be found under the softkey "Model".
Figure 4-51
Softkey Model
The SINUMERIK Operate dialog has the following functionality:
• Import of CSOM binary file from USB/Networkshare or via AMM
• Display the filename of the selected binary file
• Deleting the selected binary file
• Activate the selected binary file
• Deactivate the actual binary file
Note
The changes are visible only after restarting the OPC UA server.
SINUMERIK Access MyMachine / OPC UA
76
Configuration Manual, 10/2020, 6FC5397-1DP41-0BA5
Customer Specific Object Model (CSOM)
4.4 CSOM dialog in SINUMERIK Operate
4.4.2
OPC UA model dialog
Overview
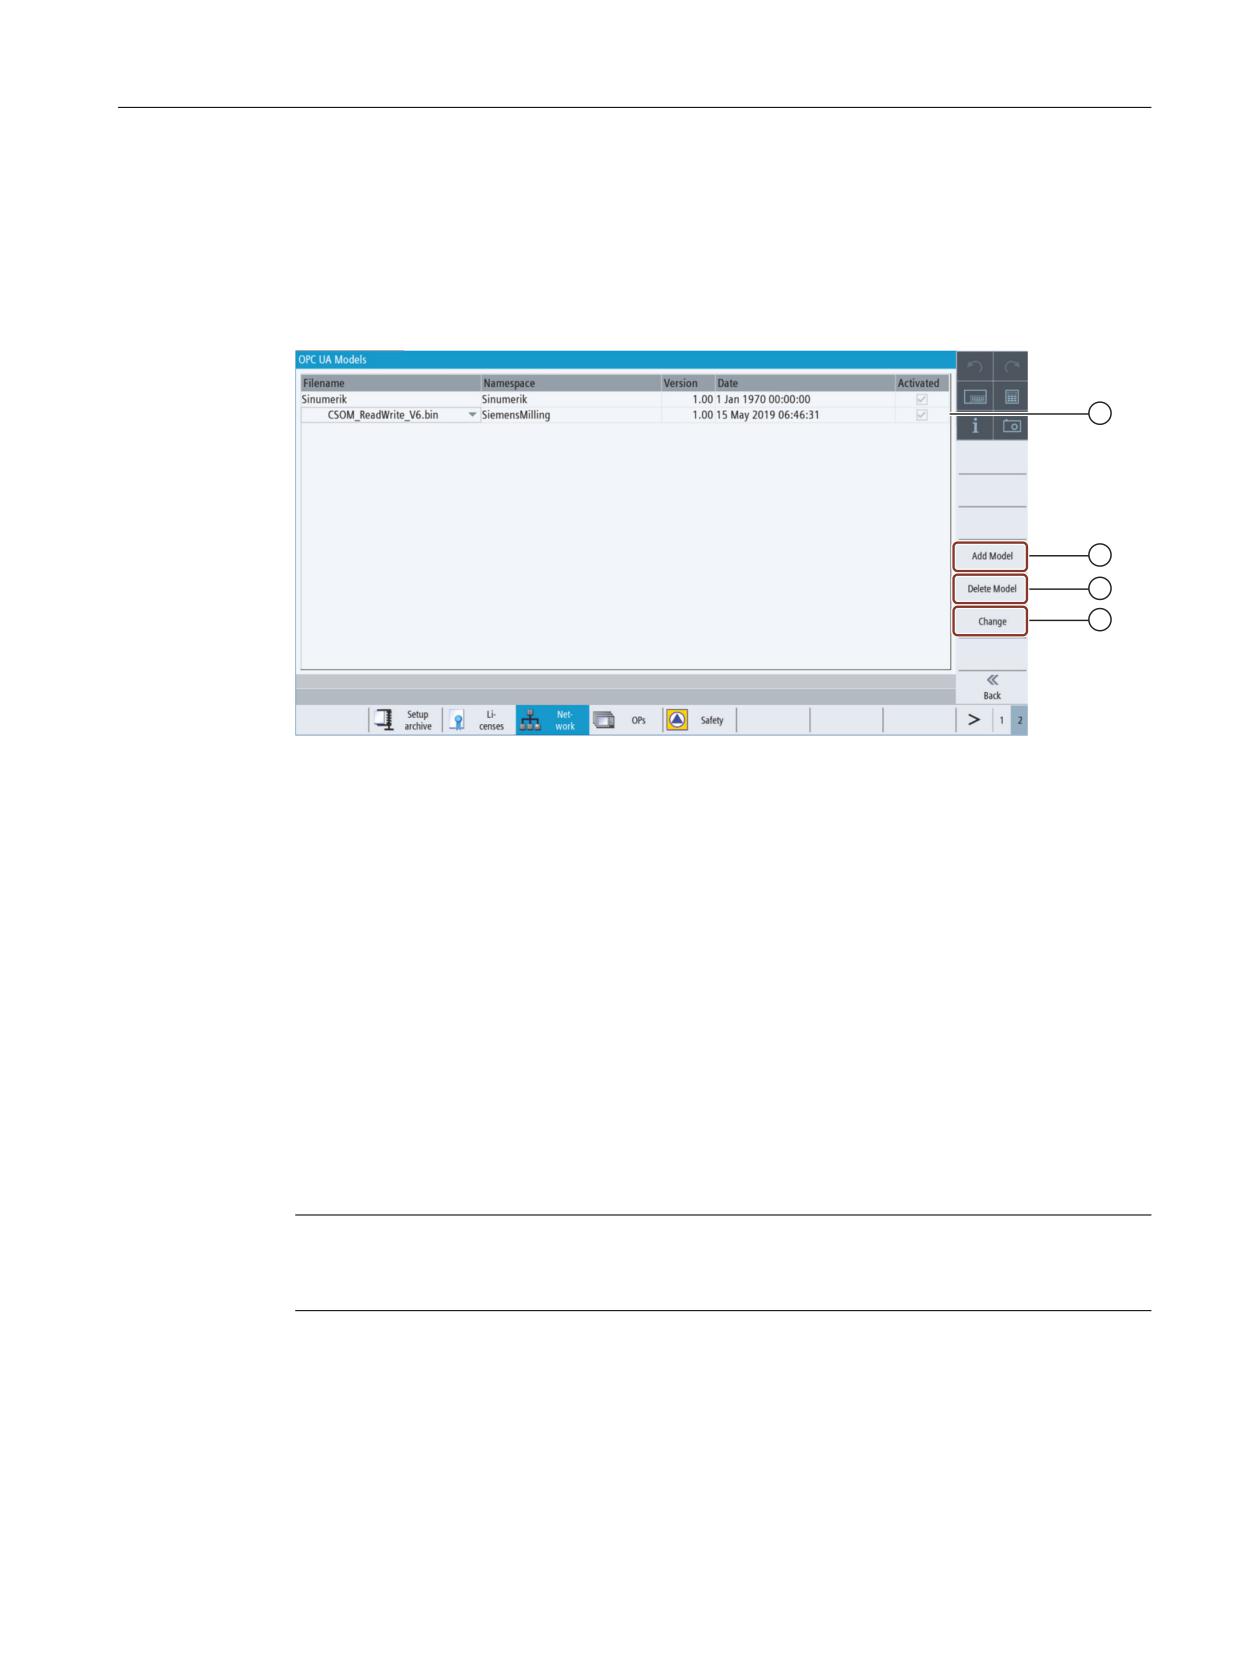
Press the "Model" softkey to get the below screen.
① The OPC UA model dialog shows the activated CSOM and also displays the following information:
• Filename of the CSOM
• The namespace of the CSOM
• The version of the CSOM
• The date of the import
• Status of activation
② You can add new CSOM
③ You can delete the CSOM
④ You can change the CSOM by selecting from the drop down list and also it can be activated/
deactivated
Figure 4-52
OPC UA Models
4.4.3
Adding model
Note
This option can be seen with user access rights, but the user can add models with only
manufacturer's access rights.
SINUMERIK Access MyMachine / OPC UA
Configuration Manual, 10/2020, 6FC5397-1DP41-0BA5
77
Customer Specific Object Model (CSOM)
4.4 CSOM dialog in SINUMERIK Operate
Procedure
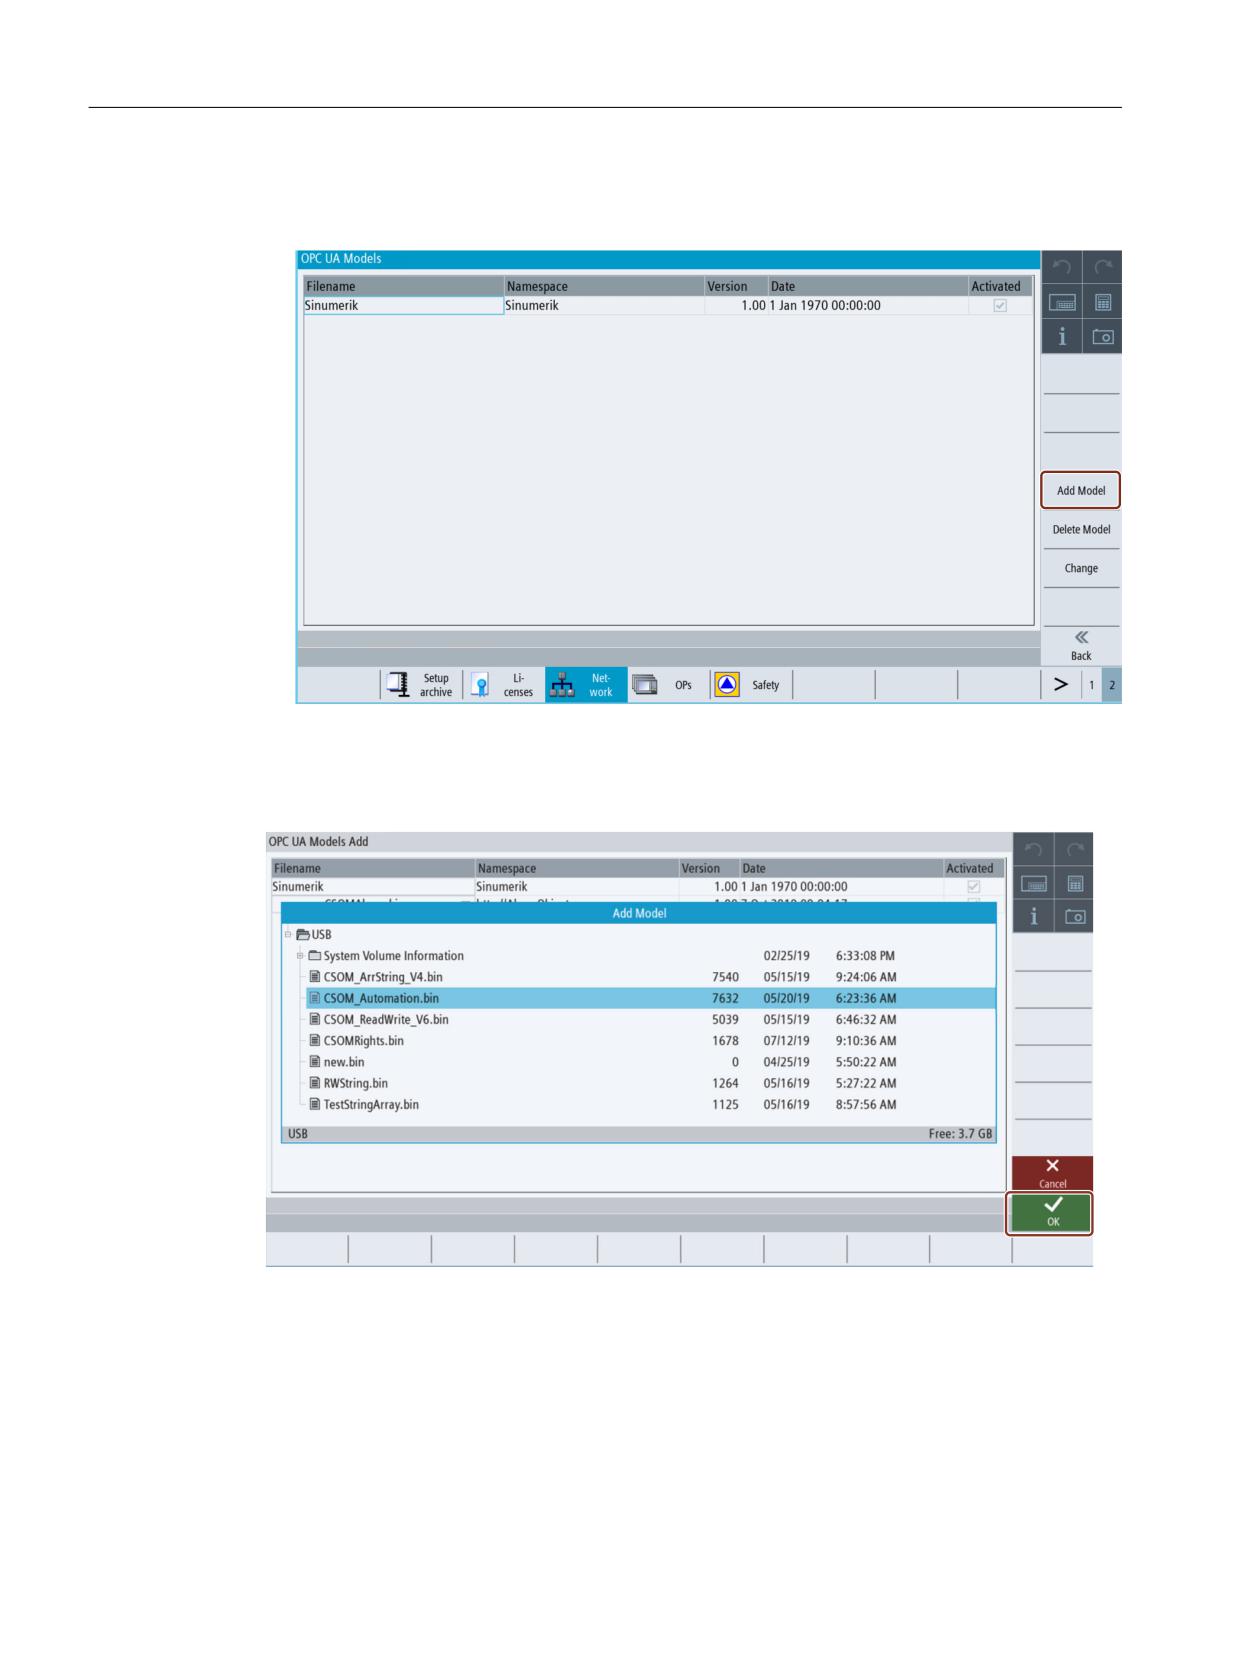
1. To add a customer specific object model, press the softkey "Add Model".
Figure 4-53
Softkey Add Model
The "Add Model" popup screen appears.
2. Select the binary file from either USB/Networkshare.
Figure 4-54
OPC UA Models Add
Pressing the softkey "Cancel" will do no action and return to "OPC UA Models" screen.
Pressing the softkey "OK" will add the binary file.
SINUMERIK Access MyMachine / OPC UA
78
Configuration Manual, 10/2020, 6FC5397-1DP41-0BA5