SINUMERIK 840D sl. Service - Configuring Commissioning. Manual (2011-2020) - page 55
Configuring the system
2.3 Configuration file "basesys.ini"
; PLC will happen
;DisablePLCTimeSync=1
;
PLCTimeType informs time synchronization what kind of time
;
is kept in PLC:
;
local: PLC uses "wall clock time", with switches between DST and
;
standard time, if DST exists in the selected Timezone
;
If Linux synchronizes to an external server and passes time on
;
to PLC, this means the PLC clock is changed twice a year.
;
For PLC time-of-day interrupts this means they can be skipped
;
(begin of DST) or executed twice (end of DST). If this might be
;
an issue,try to avoid such interrupts between 2am and 3am.
;
If Linux receives time from PLC, it assumes that this clock will
;
switch between DST and standard time somehow (manually or
;
automatically). If this doesn't happen (or is delayed) Linux time
;
will be 1h behind the correct value. NCK and drives will still
;
follow PLC clock.
;
;
local-nodst: PLC uses local time as above, but without DST
;
(summertime). All components (PLC, NCK, HMI, drives) always
;
use standard time, even if the selected timezone has a DST.
;
If Linux receives time from the PLC, it assumes standard
;
(non-DST) time, too. If this is not the case, the Linux clock
;
will be 1h ahead of the correct value.
;
This time type has been used implicitly up to SW 4.7.3 and is
;
still the default to maintain compatibility.
;
;
utc: PLC clock contains universal time (= GMT+0)
;
All components (PLC, NCK, HMI, drives) will use UTC.
;
However, S7-300 engineering and HMI Operate 4.7 are not prepared
;
for displaying UTC times as local times yet.
;
This type makes synchronization simple, as no changes for
;
timezone or DST are needed. It also avoids changes to PLC clock
;
and supports applications across different timezones.
;
If Linux receives time from the PLC, it assumes UTC there.
NCU operating system
36
Commissioning Manual, 10/2020, A5E48312736B AB
Configuring the system
2.3 Configuration file "basesys.ini"
;
If this is not the case, the Linux clock will have a permanent
;
offset according to local timezone.
;PLCTimeType=local
; Set to 1 to enable coredumps in /var/tmp
EnableCoreDumps=0
NCU operating system
Commissioning Manual, 10/2020, A5E48312736B AB
37
Configuring the system
2.4 Service Commands
2.4
Service Commands
2.4.1
Using service commands
Overview
The service command 'sc' is a tool used for performing a range of service tasks on a SINUMERIK
NCU. The required action is written in the command line after the 'sc', e.g.: sc help
This action produces a list of all actions with a short description. After the action, further
parameters or options can follow.
'sc' is available in both the NCU basic system and the service system (mostly in the form of a USB
memory.) However, some actions are only useful in one of the two systems (NCU/Service). This
is noted for each action.
Call up service command
A service command 'sc' can be called up both from the service system and from the service
console of the TCU:
• Service system: In the main menu, select the menu item "Service Shell".
• Press the following keys to call up the service console on the TCU:
Privilege levels
The 'sc' command can execute its actions using more privileges than are normally granted to the
calling user. For example, starting or stopping subsystems requires root privileges, but 'sc' allows
every user who belongs to the ‘service’ group to do this.
Each action of 'sc' is assigned a “privilege level”. This is a user group to which the user must
belong in order to execute the action. As the groups are hierarchically nested, members of
“higher” groups can also use the action in question. For example, the group 'manufact' is above
'service', which means that members of the group 'manufact' can call all actions that require the
privilege level 'service'.
The privilege level that the caller requires is noted for each individual action. The possible levels
are (in ascending order):
• none
• operator
• user
• service
• manufact
Example:
NCU operating system
38
Commissioning Manual, 10/2020, A5E48312736B AB
Configuring the system
2.4 Service Commands
An action with the privilege level 'user' can also always be executed by members of the groups
'service' and 'manufact'. Actions with privilege level ‘none’ can be called by all users.
If a user does not have the required privileges, the following error message is output:
Action 'ACTION' needs at least GROUP privilege level.
2.4.2
Syntax for the Actions
Description
'sc' in the command line is essentially not case-sensitive.
The following entries are therefore interpreted as identical:
sc help show
SC help SHOW
sc HeLp sHoW
In some cases, however, upper/lower case can make a difference, for example in file or user
names. This is avoided wherever possible.
The conventions used are as follows:
• Names completely in upper case represent objects to be used depending on the situation.
Example: sc help ACTION
In this case, ACTION is to be replaced by the action for which you want a description. If written
in lower case, however, the entry should be entered as specified.
• Square brackets indicate optional entries.
Example: sc help [ACTION]
In this case the specification of an action is optional, which means that you can enter an
action, but do not have to. Square brackets may also be nested:
... [USERNAME[/DOMAIN]] ...
In this case, USERNAME and DOMAIN are both optional, but you can only enter a DOMAIN if
you have also entered the USERNAME.
• Alternatives are separated with '|'.
Example: sc start all|system|SUBSYSTEM
This means that any of the following commands applies:
sc start all
sc start system
sc start SUBSYSTEM
In the latter case, SUBSYSTEM in upper case can be replaced by a concrete subsystem name.
• As a shortened form, alternatives can also be written in square brackets:
sc save [-full|-user] ...
Here you can use the option "-full" or "-user", or none at all.
• Options that begin with '-' can always be entered in any order.
For example, the notation could be interpreted to mean that "-force" must come after "-full"
or "-user", but this is not necessarily the case:
sc save [-full|-user] [-force] FILENAME
NCU operating system
Commissioning Manual, 10/2020, A5E48312736B AB
39
Configuring the system
2.4 Service Commands
2.4.3
Generic elements
Overview
This sections describes the syntax elements that are used by several actions.
Permitted interface designations
The names of network interfaces are used by "sc show ip" and "sc enable DHCPSvr", for example.
As the input of an interface is optional, it is always introduced by a '-' character. The '-' is followed
by the actual name. In most cases, multiple names are possible for the same interface.
Accepted names are:
System network port: "X120", "eth2", "tcu", "internal"
Company network
"X130", "eth1", "factory", "extern
port:
IBN port:
"X127", "ibn0", "pg"
Permitted subsystem designations
Subsystem names are entered when using "sc enable" and "sc start", for example. In most cases,
the name of the subsystem is simply the name of the corresponding CFS, without the path and
without the extension ".cfs". For example, for the CFS /siemens/sinumerik/nck.cfs, the relevant
subsystem name is simply "nck".
It is also possible to use absolute paths (beginning with /) in a subsystem name. In the example
above, you could also use "/siemens/sinumerik/nck" as a subsystem name. The difference
between names with and without a specified path is that without the path, all CFS with this name
are included, but if the path is specified, only this exact CFS is meant.
Subsystem
A subsystem is a CFS that not only contains a collection of files, but also executes a program, for
example, at runtime. To do this, the CFS contains a script that is used to control the starting and
stopping of this program.
For this reason, only administrators are permitted to set up NFS file systems, and NFS is usually
only implemented in uniformly administrated environments. Exported file systems on the server
are addressed directly on the server via their path.
CFS (Compressed File System)
A CFS (file extension ".cfs") is a compressed file system, similar to a zip file. It contains files and
subdirectories that look like normal files on the controller at runtime. Files and directories
contained in a CFS cannot be changed. They are decompressed at runtime as required.
NCU operating system
40
Commissioning Manual, 10/2020, A5E48312736B AB
Configuring the system
2.4 Service Commands
NFS (Network File System)
NFS is the most common protocol for remote file systems in the world of Unix, and is also
available for Windows. NFS is closely based on the Unix privilege model - each time a file is
accessed, a UID and GID are supplied which the server then uses to decide whether the operation
is permitted. The server relies on the client to provide the correct IDs.
Remote File System
A file system that is contacted over the network. The files are physically located on another
computer in the network (the "server"), but appear locally the same as all other files. Operations
performed on these files are sent via the network to the server, instead of being executed directly
on a local storage medium (such as a hard drive or CompactFlash Card).
As a server usually exports more than one file system, a name for the required file system must
also be entered in addition to the name of the server.
SMB (Server Message Block)
SMB is the underlying protocol of MS Windows file systems (also known as drives, releases,
shares, etc.). SMB connections are always active in the context of a specific user, who must be
known to the server. Exported file systems have a name (release name), by which they can be
addressed. The client does not need to know the concrete path on the server.
NCU operating system
Commissioning Manual, 10/2020, A5E48312736B AB
41
Configuring the system
2.5 Description of the actions
2.5
Description of the actions
2.5.1
Help
Description
Syntax:
sc help [Action]
Alternative names:
-h, - -help
Authorization level:
None
Calling "sc help" without any additional action outputs a list of all possible actions with a brief
description. If you enter an additional action, you receive a more detailed description for this
action.
Examples:
sc help
All actions:
help [ACTION]
Print help about a specific or list all actions
restart
Reboot the machine
enable hmi|nck|SUBSYSTEM...
enable DHCPSvr -INTERFACE
Enable HMI, NCK, or any other subsystem
[...]
sc help enable
enable hmi|nck|SUBSYSTEM...
DHCPSvr -INTERFACE
Enable subsystem(s), like 'hmi', 'nck', and so on. A subsystem name
is the name of the CFS containing it, without the '.cfs' extension.
This enables all CFSes with that name, but you can also use a full
path (e.g., /siemens/sinumerik/nck) to enable just a specific CFS.
Another form is to enable the DHCP server on a network interface,
for example 'enable DHCPSvr -X120'.
NCU operating system
42
Commissioning Manual, 10/2020, A5E48312736B AB
Configuring the system
2.5 Description of the actions
2.5.2
Check-cf
Description
Syntax:
sc check-cf
Alternative names:
checkcf
Authorization level:
user
With this action, the CompactFlash Card is read to check whether it has defective sectors. If errors
occur, this is noted in the /var/log/messages file.
2.5.3
Clear
Description
Various actions can be executed using command "sc clear".
sc clear dhcp
Syntax:
sc clear dhcp [-INTERFACE]
Alternative names:
---
Authorization level:
service
This command clears any state of the DHCP server at the specified interface (default setting is the
system network) and resets it to its initial state. This means that the Lease data is deleted: All IP
addresses are re-assigned in the network and the server "forgets" having ever detected a master
server.
This action is only appropriate on a machine on which the active DHCP server runs.
Note
The clearing of the Lease data does not delete the entire file, but only the data contained therein.
This action also increments the version number, so that available standby DHCP servers can also
perform the deletion.
sc clear preinstalled-keys
Syntax:
sc clear preinstalled-keys
Alternative names:
---
Authorization level:
service
NCU operating system
Commissioning Manual, 10/2020, A5E48312736B AB
43
Configuring the system
2.5 Description of the actions
This command deletes all of the SSH keys preinstalled by Siemens on the control system. When
called from the service system, the key on the CompactFlash Card is involved, and not the SSH
keys on the service system itself.
NOTICE
Accessing the control
When removing the SSH key preinstalled by Siemens, then the risk of unauthorized access
using it is eliminated, assuming this is known.
However, in order to ensure sufficient access to the system, before deleting we recommend
that a new SSH key is defined and installed.
2.5.4
Closeport
Description
Syntax:
sc closeport ID
Alternative names:
---
Authorization level:
service
Principle of operation
This command closes a port in the firewall opened previously with the "sc openport" command.
This is only necessary when the port is to be closed manually before the time set with "sc
openport" expires. Otherwise the port is closed automatically when the port service life expires.
One parameter is the ID number of the firewall rule output by "sc openport".
2.5.5
Connect
Description
Syntax:
sc connect [-ro] [-sec] SERVER:/PATH [MOUNTPOINT]
sc connect [-ro] [-public] [-sec] //[USERNAME[/DOMAIN]
[%PASSWORD]@]SERVER/SHARE [MOUNTPOINT]
Alternative names:
mount
Authorization level:
none
NCU operating system
44
Commissioning Manual, 10/2020, A5E48312736B AB
Configuring the system
2.5 Description of the actions
This action makes a remote file system on a server available on the control. This is enabled by
linking the remote file system to a local directory, known as the "MOUNTPOINT". The files
offered by the server are then visible under this directory.
NOTICE
Password protection
Note that when entering this command, the password appears on the screen in plain text
according to the specified syntax.
For path names, use the slash “/” and not the backslash “\”.
Supported file systems
Two types of remote file system are supported: Windows SMB and Unix NFS. These two systems
have completely different characteristics, particularly in terms of user administration:
• In Windows SMB, you connect to the server as a particular user that the server must
recognize. Via this connection, you then access the files as this user, independently of which
local user triggers the action.
This feature means that in SMB systems, you already have to enter a user name, if necessary
its domain, and a password when the connection is established.
• For NFS, the connection itself does not require a particular user to be entered. Instead, for
each file operation, the user who wants to carry out the operation must log on to the server.
The server then decides whether or not to permit this. Users are entered using a user ID and
group ID, not using names. The server must therefore recognize the corresponding IDs (or
permit access for all users).
Another type of remote file system that is supported are USB storage media exported from
the TCU (USB Flash Drive). Since these are integrated using NFS, the entries for server and
path are similar to those for NFS. However, the TCU names are administrated differently, and
the USB storage media have specific paths that do not physically exist.
Authentication using "security type"
Various Windows servers have requirements regarding the authentication technique used. If the
server only accepts certain types, and the default setting is not appropriate, then for CIFS and
SMB, a security type can be specified using option -sec.
Permissible values include:
• ntlm (= NTLMv1; still available only for compatibility reasons)
• ntlmv2
• ntlmv2i
• ntlmssp
• ntlmsspi
The "i" attached to the end, forces that the communication is signed.
NCU operating system
Commissioning Manual, 10/2020, A5E48312736B AB
45
Configuring the system
2.5 Description of the actions
Without the -sec option, the value of variable "DefaultCIFSSecurity" is used in basesys.ini
(Page 25). If this is also not defined, then the default setting is NTLMv1 or NTLMv2.
NOTICE
Authentication
It is recommended that NTLMv1 is no longer used, as the security associated with this
technique is no longer guaranteed.
Notation of the remote file system
For SMB and NFS/TCU, the file system is entered using different notations:
SMB: //[USERNAME[/DOMAIN][%PASSWORD]@]SERVER/SHARE
The fixed share is: //SERVER/SHARE
The server name can of course also be a numeric IP address. SHARE is the name of the release
on the server. Note that the character '$', which often occurs in this type of name, must be
preceded by a backslash ('\') in the command line. Otherwise, the system tries to expand a
variable.
A user name can also be entered in front of the server name, separated with a '@' character. If
necessary, the user name can also be extended by adding '/' followed by the Windows domain
to which it belongs. The password belonging to this user is normally queried interactively, so that
it is not visible on the screen.
For some applications, however, it may be necessary to write the password in the command line.
(For example, programs started from WinSCP cannot read from the keyboard.) In this case, you
can append an additional '%' character, followed by the password. If this contains any special
characters that are interpreted by the shell (<, >, &, ;, ", ', $, (, ), |), you should shield these by
preceding them with a backslash. Commas in SMB passwords cannot be interpreted.
NFS: SERVER:/PATH
In NFS, entering the user is not required, which just leaves the two components SERVER and
PATH. As before, SERVER is the name of the file server. In contrast to SMB, PATH is a path name
that exists on the server, and not an arbitrarily assigned name.
The command "sc show drives SERVER" shows the file systems offered by a particular server in
the correct notation. For SMB, if required, the user name, etc. still need to be added.
After the entry of the remote file system, you can also specify the required directory
('MOUNTPOINT') in which the remote files will become visible locally. This should be an empty
directory to which you have write access. If MOUNTPOINT is omitted, 'sc' itself generates a
suitable directory. The name is /tmp/drvNN (numbered consecutively), and is displayed when
the connection is successful.
The "-ro" option connects the remote file system in read-only mode, this means that you can only
read and do not have write access. This can be useful if you want to exclude changes that
originate from the control, or if the server only allows read-only connections.
As explained above, an SMB file system is connected as the specified user. To prevent a third user
from executing file operations on the control in the name of the connected user, the local
directory can normally only be accessed by the latter (and all members of the same group).
NCU operating system
46
Commissioning Manual, 10/2020, A5E48312736B AB
Configuring the system
2.5 Description of the actions
However, if you do want to make the remote directory available to further local users, you can
use the "-public" option to make the MOUNTPOINT belong to the "operator" group, and this
access is therefore guaranteed.
2.5.6
Disable
Description
Syntax:
sc disable hmi|nck|SUBSYSTEM ...
sc disable DHCPSvr -INTERFACE
sc disable DHCPSync [-X120]
sc disable IPAlias [-X120]
sc disable usb [-MINUTES] all | HOSTS
Alternative names:
---
Authorization level:
service
The "sc disable" command switches the specified subsystems off. These subsystems are then not
loaded again at the next cold restart. You can also switch several subsystems off with a single
"disable" command. "hmi", "nck" or any other subsystem names can be used for the subsystems.
Note
The "sc disable" command acts on the parameters in the basesys.ini file located in the user/
system/etc/basesys.ini directory.
"sc disable IPAlias" deactivates the second alias IP address for the X120 network interface.
See also
"InternalIP_Alias" and "InternalNetMask_Alias" parameters in the "basesys.ini" file.
Special subsystems
The "DHCPSvr" name is a special case. This does not switch a normal subsystem on or off, but
specifies whether or not a DHCP server should be started on a network interface. The interface
is entered in the standard form.
The synchronization of the DHCP server is switched on and off with "DHCPSync". The
synchronization is only possible in the system network.
The "sc enable" and "sc disable" commands function by changing certain variables in the /user/
system/etc/basesys.ini file. The associated variable is "DisableSubsystems" or
"DisableDHCPD<INTERFACE>" for subsystems and DHCPSvr, respectively.
NCU operating system
Commissioning Manual, 10/2020, A5E48312736B AB
47
Configuring the system
2.5 Description of the actions
"sc disable usb" locks USB storage devices: Specifically, the devices of USB class "storage" are
involved, i.e. input devices can still be operated at the USB interface.
• Without a time specification [-MINUTES] , a permanent disable is set. When a time is
specified, the inhibit is specified in minutes.
• The inhibit can refer to all network participants of the system network or a list with host
names or IP addresses can be specified, for which the inhibit is valid.
2.5.7
Disconnect
Description
Syntax:
sc disconnect MOUNTPOINT
sc disconnect all
Alternative names:
umount, unmount
Authorization level:
user
The "sc disconnect" command terminates the connection to a remote file system previously
connected using "sc connect". If the MOUNTPOINT was created automatically by 'sc', the
associated directory is also deleted again.
The "sc disconnect -all" variant can be used to remove all existing SMB and NFS file systems.
2.5.8
Distribute
Description
Syntax:
sc distribute [parameter]
Alternative names:
dist
Authorization level:
service
This command distributes TCU data to other machines in the system network. Only the "tcudata"
parameter is relevant here.
distribute tcudata
Syntax:
sc distribute tcudata
Alternative names:
---
Authorization level:
service
This command informs the active DHCP server that TCU data in /user/common/tcu has been
manually changed. The server can then distribute this data to the standby servers.
NCU operating system
48
Commissioning Manual, 10/2020, A5E48312736B AB
Configuring the system
2.5 Description of the actions
It is recommended that the version file in /user/common/tcu be changed manually as this is only
read-in once by the DHCP server at the start. An incrementing of the version would then only
take effect at a cold restart.
Note
This command can be performed on any machine in the system network, not only on the active
server. A message is always sent to the active server.
2.5.9
Enable
Description
Syntax:
sc enable hmi|nck|SUBSYSTEM ...
sc enable DHCPSvr -INTERFACE
sc enable DHCPSync [-X120] [-PRIORITY]
sc enable IPAlias [-X120] IPADDR[/NETMASK]
sc enable usb [-MINUTES] all | HOSTS
Alternative names:
---
Authorization level:
service
The "sc enable" command switches on the specified subsystems such that these are also
activated when a subsystem is started. You can also switch several subsystems on with a single
"enable" command. "hmi", "nck" or any other subsystem names can be used for the subsystems.
Note
The "sc enable" command acts on the parameters in the basesys.ini file located in the user/
system/etc/basesys.ini directory.
"sc enable IPAlias" defines a second alias IP address for a network interface. This is only supported
for X120. The IP address itself has the usual notation with four numbers separated by decimal
points. If not specified, the subnet mask can be determined from the class (A/B/C) of the IP or
determined explicitly. The CIDR notation (number of bits of the network section) is also possible.
See also
"InternalIP_Alias" and "InternalNetMask_Alias" parameters in the "basesys.ini" file.
Special subsystems
The "DHCPSvr" name is a special case. This does not switch a normal subsystem on or off, but
specifies whether or not a DHCP server should be started on a network interface. The interface
is entered in the standard form.
NCU operating system
Commissioning Manual, 10/2020, A5E48312736B AB
49
Configuring the system
2.5 Description of the actions
The "sc enable" and "sc disable" commands function by changing certain variables in the /user/
system/etc/basesys.ini file. The associated variable is "DisableSubsystems" or
"DisableDHCPD<INTERFACE>" for subsystems and DHCPSvr, respectively.
With "sc enable usb" USB storage devices on permanently disabled USB interfaces or on certain
host names or IP addresses are enabled again.
DHCP synchronization
The synchronization of the DHCP server is switched on and off with "DHCPSync". The
synchronization is only possible in the system network (X120). A priority can also be specified:
-LOW, -HIGH or -MASTER.
The priorities have the following effect for the synchronization of the DHCP server:
• MASTER: The computer node becomes an active DHCP server. If several servers have been
configured in the system network, this computer has the highest priority.
• HIGH: The computer node belongs to the server candidates with high priority, i.e. if no server
with "MASTER" priority becomes active, then a computer with "HIGH" priority can be the
active server.
• LOW: The computer node belongs to the server candidates with low priority, i.e. if no server
with "MASTER" priority or "HIGH" priority becomes active, then a computer with "LOW"
priority can be the active server.
Note
Recommended settings are:
• DHCP operation and DHCP synchronization are switched on in the system network.
• Exactly one NCU is set as DHCP server.
• A maximum of two computers are candidates with "HIGH" priority.
• All other components are set as DHCP clients or candidates with "LOW" priority.
See also
"SyncModeDHCPD_SysNet" parameter in the "basesys.ini" file.
2.5.10
ntpdiag (diagnostics)
Description
Syntax:
sc ntpdiag
Alternative names:
---
Authorization level:
None
Using command "sc ntpdiag" , a list of the configured time servers and their status is output.
In addition, for the time server, which the NCU uses, information such as IP address, stratum
(distance to a time character receiver, e.g. an atomic clock) and the offset between the NTP
NCU operating system
50
Commissioning Manual, 10/2020, A5E48312736B AB
Configuring the system
2.5 Description of the actions
server and its client are output. If the connection to the server is poor, a ping command is issued
in order to check the general accessibility situation.
2.5.11
Openport
Description
Syntax:
sc openport [-MINUTES] PROTO/PORT SOURCE ...
Alternative names:
---
Authorization level:
service
Principle of operation
This command opens a port in the firewall to the company network (X130) for a certain time. The
default time is 15 minutes, but this can be changed with the -MINUTES option. The maximum
possible time is 60 minutes.
The port to be opened is specified in the form "PROTO/PORTNR". The protocol can be either "tcp"
or "udp". This is followed by the specification of the hosts from which the port should be
accessible. Several forms are possible here:
• A single IP address: "128.128.12.12"
• A host name (if this can be resolved via DNS), e.g. "server"
• An IP area with net mask specification, e.g. "128.128.12.0/255.255.255.0"
• An IP area with specification of the valid bits, e.g. "128.128.12.0/24"
If the specification of the source host is completely missing, this is normally acknowledged with
an error message. However, an exception is when the "sc openport" command is entered in a
shell opened via SSH. The permitted host is taken from the $SSH_CLIENT environment variable
that contains the IP of the SSH client.
If the opening was successful, an ID number is output in a status message:
sc: Port tcp/25 is open, rule ID is 6620
This ID can be used with "sc closeport" to manually close the port earlier.
NOTICE
Security risk
Note that opening the ports in the firewall can represent a security risk. Only enable the ports
that you actually require.
Note that every accessible service can have security gaps.
See also
"FirewallOpenPorts" parameter in the "basesys.ini" file.
NCU operating system
Commissioning Manual, 10/2020, A5E48312736B AB
51
Configuring the system
2.5 Description of the actions
2.5.12
Portstatus
Description
Syntax:
sc portstatus [-x127] PORTSPEC SOURCE
Alternative names:
---
Authorization level:
service
Principle of operation
The "sc portstatus" command queries whether a specific port in the firewall is open. The "-x127"
option must be specified if X127 rather than the X130 firewall is concerned. The port
specification is identical to "sc openport", e.g. "tcp/102". However, no names are permitted here
and the specified source IP must be unique.
The following status is output:
• "Port not open" with exit status 1.
• "Port is open (rule ID is <N>)." and exit status 0.
Whereby, the ID required for "sc closeport" must also be specified.
2.5.13
Restart
Description
Syntax:
sc restart all|system|network| [!]SUBSYSTEM
Alternative names:
reboot
Authorization level:
service
The "sc restart" action initially stops the specified subsystems and then restarts them with the
following restriction: Dependent subsystems are also started for a restart.
Syntax
'hmi', 'nck' or any other subsystem names can be used as subsystems. Multiple subsystems can
also be specified successively; they (including all required dependencies) are then started and
stopped in this order. It is also possible to start and stop all subsystems, other than the named
ones. To do this, prefix an exclamation mark "!" to the list.
"all", "system" and "network" are special values for the subsystem:
• "all" stops and starts all available subsystems.
• In contrast, "sc restart system" initiates a cold restart of the system (reboot).
• "network" may be specified only together with "restart". "sc restart network" reinitializes the
network, e.g. after settings have been changed in basesys.ini.
NCU operating system
52
Commissioning Manual, 10/2020, A5E48312736B AB
Configuring the system
2.5 Description of the actions
Examples
# Stop all subsystems:
$ sc stop all
# Stop only HMI:
$ sc stop hmi
# Start HMI and NCK:
$ sc start hmi nck
# Start all subsystems other than NCK:
$ sc start ! nck
2.5.14
Restore
Description
Syntax:
sc restore [-full|-addon|-addon+|-oem|-oem+|-user]
[-force] [-nodelete] [-update] [-restart] FILENAME
Alternative names:
---
Authorization level:
user
A backup created with "sc save" can be restored to the control with "sc restore".
Principle of operation
As for "sc save", a restore is possible only from the service system or when the subsystems are
stopped. If "sc restore" reports an error, for example that the restore will cause running
subsystems to crash, you can use the "sc save" option to force the operation, as for "-force".
Normally, "sc restore" deletes the complete target area before the backup is restored (complete
CompactFlash Card for full backup, /user in user data backups). This means that no files are
subsequently available that were not included in the backup.
Archive and backup files larger than 4 GB
If a backup consisting of several archive files is to be restored with "sc restore", only the first file
of the backup must be specified in the FILENAME parameter. Once the end of the file has been
reached, other parts will be searched automatically.
Decisive when determining the continuation files is the format of the file name that was
transferred during calling, i.e. when calling "sc restore /tmp/backup.01of02.tgz", and after
reaching the end of "/tmp/backup.01of02.tgz", a search is next made for the "/tmp/
backup.02of02.tgz" file. When calling "sc restore /tmp/backup.1of2.tgz", the "/tmp/
backup.2of2.tgz file is expected correspondingly as a second part of the backup.
NCU operating system
Commissioning Manual, 10/2020, A5E48312736B AB
53
Configuring the system
2.5 Description of the actions
Options
If no further options are specified, the archive should represent a full backup and this should be
restored in full. The status of all files is therefore the same after the "restore" as it was at the time
of the backup.
• The -full option additionally forces the partition and the file system to be recreated on the
CompactFlash Card. This is, however, possible only from a service system. -full is necessary
if the partition table and/or file system is missing or damaged.
• However, if you want to restore the backup files without losing any files that have been
created in the meantime, you can use the "-nodelete" option to prevent them from being
deleted. "-nodelete" is not executed together with "-full", because all data is always deleted
when the file system is recreated.
• The -addon, -oem, -user, -addon+ and -oem+ options also allow only parts of an archive to
be unpacked.
• The -update option is used to load software updates supplied by Siemens. The -update
option can also be useful with -restart. If user-defined system files are changed when loading
the archive to the control, a cold restart or reinitialization is necessary. In such cases, "sc
restore" outputs an appropriate message at the end of the operation. The -restart option
causes the required action to be performed automatically.
2.5.15
Save
Description
Syntax:
sc save [-full|-addon|-addon+|-oem|-oem+|-user] [-force] [-
update] FILENAME
Alternative names:
backup
Authorization level:
user
The "save" or "backup" action creates a backup of the CompactFlash Card in FILENAME, which
specifies the archive path and also the file name. If the action is used from a service system, the
backup receives the files of the associated control - and not the service system.
Example:
sc save -user /tmp/drv01/backup.tgz
Options
The following options are used for selecting which directories of the file system are to be written
to the archive:
-full:
complete backup (default): all files of the control, incl. Boot Loader
-addon:
only /addon directory
-oem:
only /oem directory
-user:
only /user directory (user data)
NCU operating system
54
Commissioning Manual, 10/2020, A5E48312736B AB
Configuring the system
2.5 Description of the actions
-addon+:
/addon, /oem and /user
-oem+:
/oem and /user
If "sc save" is used directly on the control, and the subsystems are running, this can lead to
inconsistencies between saved files because they could still change during the backup process.
Therefore, in this case "sc save" exits with the message that subsystems are still running. If you
want to create a backup anyway, you can use the -force option. The message to the subsystems
is still output; however, the backup operation still continues.
If "sc save" is started from the service system, assuredly no subsystems of the control are running
and "-force" is not necessary.
Archiving and backup files larger than 4 GB
If the backup is written to an FAT32 target file system, which does not permit any file size greater
than 4 GB, the backup is divided into several files, each of which is smaller than this threshold
value.
In the target file name that is specified when "sc save" is called, in this case, details of which part
of a backup is involved and the total number of associated files are provided: Calling "sc save /tmp/
backup.tgz" thus generates, for example, the "/tmp/backup.01of02.tgz" and "/tmp/
backup.02of02.tgz" files.
2.5.16
save-nvram (data backup)
Description
Syntax:
sc save-nvram [-drive|-plc|-tco] [DIRECTORY]
Alternative names:
---
Authorization level:
None
Using command "sc set-nvram", the content is saved to a non-volatile memory (non-volatile
memory). Depending on the machine type and equipping, such an NVRAM is provided in the
integrated drive, in the PLC and as TCO-EEPROM.
Using options -drive, -plc and -tco, individual NVRAM types can also be explicitly selected for
backup. Backing up all existing types is the default setting.
The content is written to files called "nvram-TYP.bin"; whereby, TYP is replaced by "drive",
"plc",
The files are created in the current directory if no directory is specified.
NCU operating system
Commissioning Manual, 10/2020, A5E48312736B AB
55
Configuring the system
2.5 Description of the actions
2.5.17
set-svc-route (gateway)
Description
Syntax:
sc set-svc-route GATEWAY DESTNET
Alternative names:
---
Authorization level:
None
A special network route can be entered using command "sc set-svc-route". A typical application
is to make a service network, connected via modem, accessible, e.g. for remote diagnostics.
The parameters are the GATEWAY, via which the packets for DESTNET should be routed. The
gateway must be specified with its IP address, and this must be located in a network that is
directly connected. The gateway must be able to be accessed without additional intermediate
routers.
NOTICE
Routing in the network
The target network, which should be applicable for the detour via GATEWAY, can be specified
in the usual syntax with network mask ("128.128.12.0/255.255.255.0") or CIDR
("128.128.12.0/24"). It is not permissible that it overlaps with one of the directly accessible
networks of the NCU - neither completely nor partially.
2.5.18
Show
Description
Various displays regarding the system state are summarized in command "sc show".
show ip
Syntax:
sc show ip [-INTERFACE]
Alternative names:
----
Authorization level:
None
This command displays the IP address data of network interfaces. You have the option to enter a
specific interface. If no particular interface is specified, the data for all existing interfaces is
displayed, as well as the Default Gateway.
Example:
sc show ip
X120 (system network, eth0):
configured: (default)
current : IP=192.168.214.1 Netmask=255.255.255.0
MAC=08:00:06:73:55:fd
DNS Name
: ncu1.local
NCU operating system
56
Commissioning Manual, 10/2020, A5E48312736B AB
Configuring the system
2.5 Description of the actions
Nameserver: 127.0.0.1
DNS Suffix: local
DHCP
: synced server, prio=high, active
Statistics: RX=0.0MB (0.00% errors), TX=0.2MB (0.00% errors)
X130 (company network, eth1):
configured: DHCP
current
: IP=111.222.333.64 Netmask=255.255.248.0
MAC=08:00:06:73:55:fe
DNS Name
: name.test.siemens.de
Nameserver: 111.222.333.12 111.222.333.13 111.222.333.14
DNS Suffix: test.siemens.de
DHCP
: client (server: 111.222.333.221)
Statistics: RX=1.2MB (0.00% errors), TX=0.0MB (0.00% errors)
X127 (engineering network, ibn0):
current
: IP=192.168.215.1 Netmask=255.255.255.224
MAC=08:00:06:73:55:ff
DNS Name : ncu-ibn
DHCP
: server
Statistics: RX=0.0MB (0.00% errors), TX=0.0MB (0.00% errors)
Default gateway: 111.222.333.1 (via eth1)
Used nameserver: 127.0.0.1
Used DNS suffix: test.siemens.de local
The following data is displayed for each interface:
• Name: The name of the connection socket (X1_ _) together with the name used by the
operating system in brackets (ethN or ibnN).
• "configured": The IP address configured in the basesys.ini (variables ExternalIP/
ExternalNetMask for the X130, InternalIP/Internal-NetMask for the X120), or "(default)" if
nothing is configured in the basesys.ini, or "DHCP" if the address was sourced via DHCP.
• "current": The currently set IP address together with the network screen form and MAC
address of the interface.
• "DNS name": The result of a DNS reverse lookup for the current IP address.
• "Name server": The DNS servers associated with this interface (e.g. receive DHCP via this
interface) is output in this list.
• "DNS suffix": The DNS search suffix associated with this interface.
• "DHCP": A flag that indicates whether a DHCP client or server is running for this interface. In
the case of a client, the server where the IP address comes from is also displayed. A DHCP
server on X120 can additionally be synchronized in the system network. Then the
information is displayed whether the server is the active server or is in standby mode.
• "Statistics": The total data volume received or sent via this interface, and the percentage of
faulty packets.
When all interfaces are displayed, the default gateway is also output, i.e. the address of a router
to which all packets are sent that cannot reach their destination directly via a local interface.
The default gateway is therefore a piece of data that applies to all interfaces and of which there
is only one instance. However, there is one interface via which it must be possible to address the
default gateway. This is displayed in brackets after the address.
NCU operating system
Commissioning Manual, 10/2020, A5E48312736B AB
57
Configuring the system
2.5 Description of the actions
show drives
Syntax:
sc show drives SERVER
Authorization level:
None
"sc show drives" shows the remote file systems available for a particular server. The server name
SERVER can be an NFS server or a "TCU" that represents any USB media connected to a TCU. For
details of possible server names and how to enter a user name (often required for SMB), see the
description of the "sc connect" command.
Examples
Notation:
sc show drives someuser/somedomain@somepc # Windows-Server
Password: *******
//somepc/C$
//somepc/D$
//somepc/images
sc show drives someserver # NFS-Server
someserver:/export/home1
someserver:/export/home2
sc show drives TCU # TCU USB-Medien
TCU1:/dev0-0
TCU2:/dev0-0
All the available remote file systems of the relevant server are listed in the notation that is also
expected by "sc connect".
• In NFS file systems, the server name is always first, followed by a colon and then the export
path.
• A USB storage medium on a TCU is a special form of NFS, and therefore also has the same
notation as an NFS file system. The specified path exists - but not physically - on the TCU, but
is converted there to USB by the NFS server.
show net
Syntax:
sc show net [-xml] [-hw|-tco|-sw|-swfull|-loc|-panel|
-dhcp|-switch|-all] [HOSTS...]
Authorization level:
None
The "sc show net" command displays the devices in the system network and shows additional
information about these devices.
Because both these functions rely on SNMP (Simple Network Management Protocol), only
SNMP-capable devices will be found. SNMP as of version 2.6 is available for Linux-based devices,
NCU operating system
58
Commissioning Manual, 10/2020, A5E48312736B AB
Configuring the system
2.5 Description of the actions
for all other devices (e.g. MCP) this depends on the associated software version. If a simple call
is made without any additional options, a list of the devices found will appear showing the
relevant IP address, DNS name (if known), and a short description (module name).
Options
The various switches, which can also be combined, allow additional information to be output on
the devices found:
• Unless additional options are involved, the output format for "sc show net" is designed to be
displayed on the screen. The alternative XML format is preferable, however, if further
machine-based processing is required. This can be selected via the -xml option (this option
must be the first one!).
• If the command line contains nothing after the switches, "sc show net" will search the
complete system network via broadcast for devices able to use SNMP. This search takes time,
however, and in the case of larger systems, the volume of information output can be
considerable. In view of this, a list of IP addresses or (DNS) names can be specified to ensure
a better overview. This will limit the search process and only the named devices will be
included.
-hw
Information on hardware, such as the MLFB, serial number, hardware ID,
hardware version, SRM version, manufacturer, and the serial number of the
CompactFlash Card. Some devices have two of these hardware blocks (the
second one being intended for an integrated device).
The PLC in the NCU and the TACO in the OP on an TCU are two such examples.
-tco
Operating state data: Switch-on counter, operating hours counter, quantity of
data written to the CompactFlash Card, number of times maximum tempera-
ture exceeded.
-loc
Location data: Location, function, and contact details for the device (if con-
figured there).
-sw
Displays brief details of the software installed, only the version of the overall
status (or of the basic system if only this is installed).
-swfull
Displays all the installed software components. They are represented hier-
archically in the form of a tree. The following is provided for each component:
Information about the version, internal version (if different), target version (if
different), version details, and the installation path.
-panel:
Displays panel-specific data: Size and color depth of the display, MCP/TCU/DCK/
EKS index, and the VNC server currently represented
-dhcp
Data about a synchronizing DHCP server: Operating state (off/standby/active),
priority, versions of the lease file and TCU data, and the range for dynamically
assigned IP addresses
-switch
Displays the settings of rotary switches on the device, e.g. the NC and PLC
switches of an NCU or the DIPFIX of an HT 8.
-all
Equivalent to all the above switches.
NCU operating system
Commissioning Manual, 10/2020, A5E48312736B AB
59
Configuring the system
2.5 Description of the actions
Note
The data and information read out here are automatically written to the EUNA file (End User
Notification Administration), and saved on the associated device.
2.5.19
Start, Stop
Description
Syntax:
sc start all|system|SUBSYSTEM...
sc stop all|system|SUBSYSTEM...
Alternative names:
---
Authorization level:
service
These two actions start or stop individual or all subsystems. Since these actions have a direct
influence on the runtime behavior, they are available only directly on the control, but not in the
service system (exception: "sc stop system"). The subsystems of the associated control do not
run here, and can therefore not be controlled.
Note
Only "all" and "system" function, but not arbitrary subsystems. Both of these actions have been
implemented only to a limited extent.
Subsystem names
"hmi", "nck" or any other names can be used for the subsystems. Multiple subsystems can also be
specified successively; they are then started and stopped in this order.
"all" and "system" are special values for the subsystem:
• "all" starts or stops all available subsystems.
• "sc stop system" also stops all subsystems and the basic system with the control.
• "sc start system" is identical to "sc start all" and exists mainly for reasons of symmetry.
NCU operating system
60
Commissioning Manual, 10/2020, A5E48312736B AB
Configuring the system
2.5 Description of the actions
2.5.20
usb (connect device)
Description
Preconditions:
• Hardware: TCU 30.3
• Software: If a USB device is to be used, which requires additional drivers or software, then
these must be available on the NCU.
Syntax:
sc usb attach|export|unexport SERVER BUSID
sc usb detach PORT
sc usb showdevs SERVER
sc usb status
Alternative names:
---
Authorization level:
None
Using command "sc usb", any USB devices, with the exception of hubs and data storage media,
which are connected to a TCU can be made available on an NCU.
For parameter SERVER (TCU, whose devices are to be used), symbolic host names (e.g. TCU1) -
as well as also IP addresses (e.g. 192.168.214.10) - can be specified.
Examples
Listing devices connected to TCU1:
# sc usb showdevs TCU1
0bf8:100c
Exporting devices from TCU1:
# sc usb export TCU1 1-2.1
In the list, this device is marked as being exported:
# sc usb showdevs TCU1
0bf8:100c
[exported]
Attaching the device to the NCU:
# sc usb attach TCU1 1-2.1
The device is listed in the local status of the NCU:
# sc usb status
Port 00: Port in Use
TCU1:1-2.1
NCU operating system
Commissioning Manual, 10/2020, A5E48312736B AB
61
Configuring the system
2.5 Description of the actions
Detach the device from "sc usb status" using the port number:
# sc usb detach 00
Unexport device on the TCU:
# sc usb unexport TCU1 1-2.1
The device is no longer marked as exported:
# sc usb showdevs TCU1
0bf8:100c
2.5.21
vncpwd (password)
Description
The following actions are executed using command "sc vncpwd":
• sc vncpwd set to assign a password.
• sc vncpwd reset to delete a password.
Syntax:
sc vncpwd set companynetwork|systemnetwork
sc vncpwd reset companynetwork|systemnetwork
Alternative names:
---
Authorization level:
None
Using command "sc vncpwd set", on the server (NCU) a password is set up for the VNC
connection via the company network or the factory network. As soon as a password has been
assigned, a connection can only be established from an VNC client (TCU, Ultr@VNC, etc.) by
specifying the correct password.
Command sc vncpwd set always asks for a password to be entered.
Or, for example: sc vncpwd set systemnetwork secreT7+
Command sc vncpwd reset deletes the password for the specified network. A connection in
the network is therefore possible without authentication.
Note
Password in the network
In the network (factory network or company network), in order to access any server (NCU) in the
network from a TCU (client) via a VNC connection, all servers should use the same password.
NCU operating system
62
Commissioning Manual, 10/2020, A5E48312736B AB
Service and diagnostics
3
3.1
Creating a service system
Overview
To backup user data or the complete CompactFlash Card, proceed as follows:
• Creating a service system.
• Backing up the license
• Backup: Data backup on USB storage medium or on a network drive.
• System diagnostics
- Output network settings
- Changing the network settings
- Starting the VNC Viewer
To restore the user data or the complete CompactFlash Card, proceed as follows:
• Restore/Recover: Restore the data from USB storage medium or from network drive.
• Carry out software update.
• Carry out firmware update.
3.1.1
How do you create a service system for the NCU?
Purpose
In case service is needed, create a portable "Emergency Boot System" (EBS) on a USB memory.
Thus you can start the booting of the NCU from the service system in order to carry out various
service tasks, such as data backup or updates, in a service shell.
Two partitions are created on the service system:
• A Linux partition that is not displayed under Windows.
• An FAT partition, to backup files or save software updates.
The FAT partition can be read and written to under Linux as well as from a Windows system.
The FAT partition can be addressed under the path/data in a command shell under Linux.
NCU operating system
Commissioning Manual, 10/2020, A5E48312736B AB
63
Service and diagnostics
3.1 Creating a service system
Scope of delivery
To create a service system on a USB storage medium, the following files are included on CD:
• an executable file installdisk.exe
• an image file for USB-FlashDrive
• a file with the latest information siemensd.txt / siemense.txt
Recommendation:
It is better to use SIMATIC PC USB-FlashDrive.
Note
To create the service system, you need administrator rights.
All data already on the USB storage medium will be deleted.
The transfer is optimized for USB 2.0; therefore, the transmission to the USB storage medium
takes longer when using USB 1.1 than USB 2.0
Proceed as follows
To create a service system on a USB storage medium:
1. Copy the service system onto a local hard disk of your PG/PC.
2. Connect the USB storage medium to the USB interface of the PG/PC.
3. Determine in Windows Explorer which drive letter the USB storage medium was assigned,
e.g. H:
4. Open a DOS shell and change to the directory in which the files for the service system are
stored.
5. In the DOS shell, enter the following command:
installdisk --verbose --blocksize 1m linuxbase.img h:
Result: The image is transferred to the USB storage medium.
NCU operating system
64
Commissioning Manual, 10/2020, A5E48312736B AB
Service and diagnostics
3.1 Creating a service system
3.1.2
This is how you operate the service system
Connecting the service system
Procedure:
1. Connect the USB storage medium to the USB interface X125 or X135 of the NCU.
2. Switch-off the system and then switch on again.
OR
3. Press the "Reset" button.
The service system is unzipped from the USB storage medium when the NCU boots for the
first time: Only then can the USB storage medium be used as service system and the complete
storage capacity is available.
Operating the service system
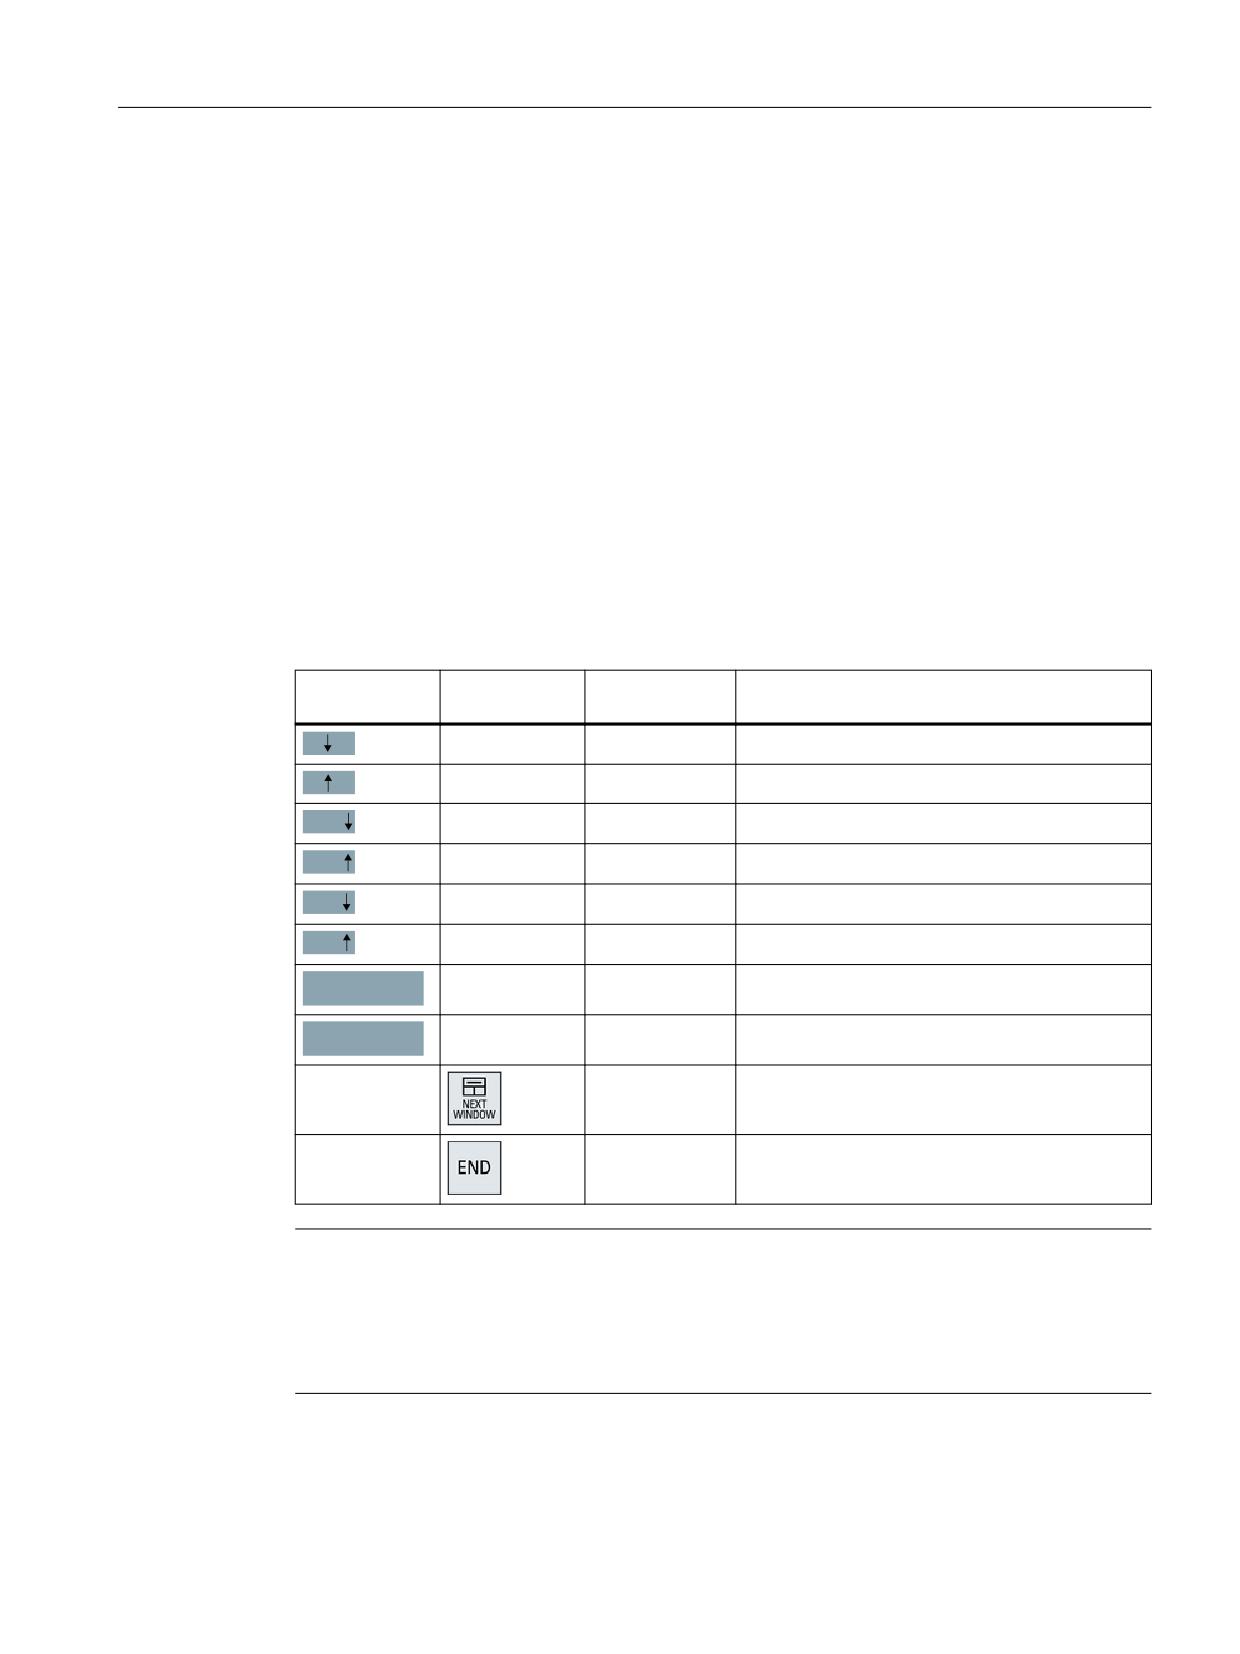
Keys and softkeys to navigate in the service system:
Softkey
Key on the OP
External key-
Description
board
HSK1
<F1>
Moves the cursor down a row
HSK2
<F2>
Moves the cursor up a row
Page
HSK3
<F3>
Moves the cursor down a page
Page
HSK4
<F4>
Moves the cursor up a page
Char
HSK5
<F5>
Inserts text or digits
Char
HSK6
<F6>
Inserts text or digits
VSK7
<Shift> + <F7>
Cancel / Return
Cancel
VSK8
<Shift> + <F8>
OK / Confirm
Ok
---
Pos1
Moves the cursor to the top row
---
End
Moves the cursor to the bottom row
Note
Operation with touch panels
The service system supports touch operation. The input fields are touch operated and the
integrated keyboard automatically appears.
For example: SINUMERIK OP 019 black, SIMATIC HMI Industrial Thin Client
NCU operating system
Commissioning Manual, 10/2020, A5E48312736B AB
65
Service and diagnostics
3.1 Creating a service system
3.1.3
Diagnostics functions
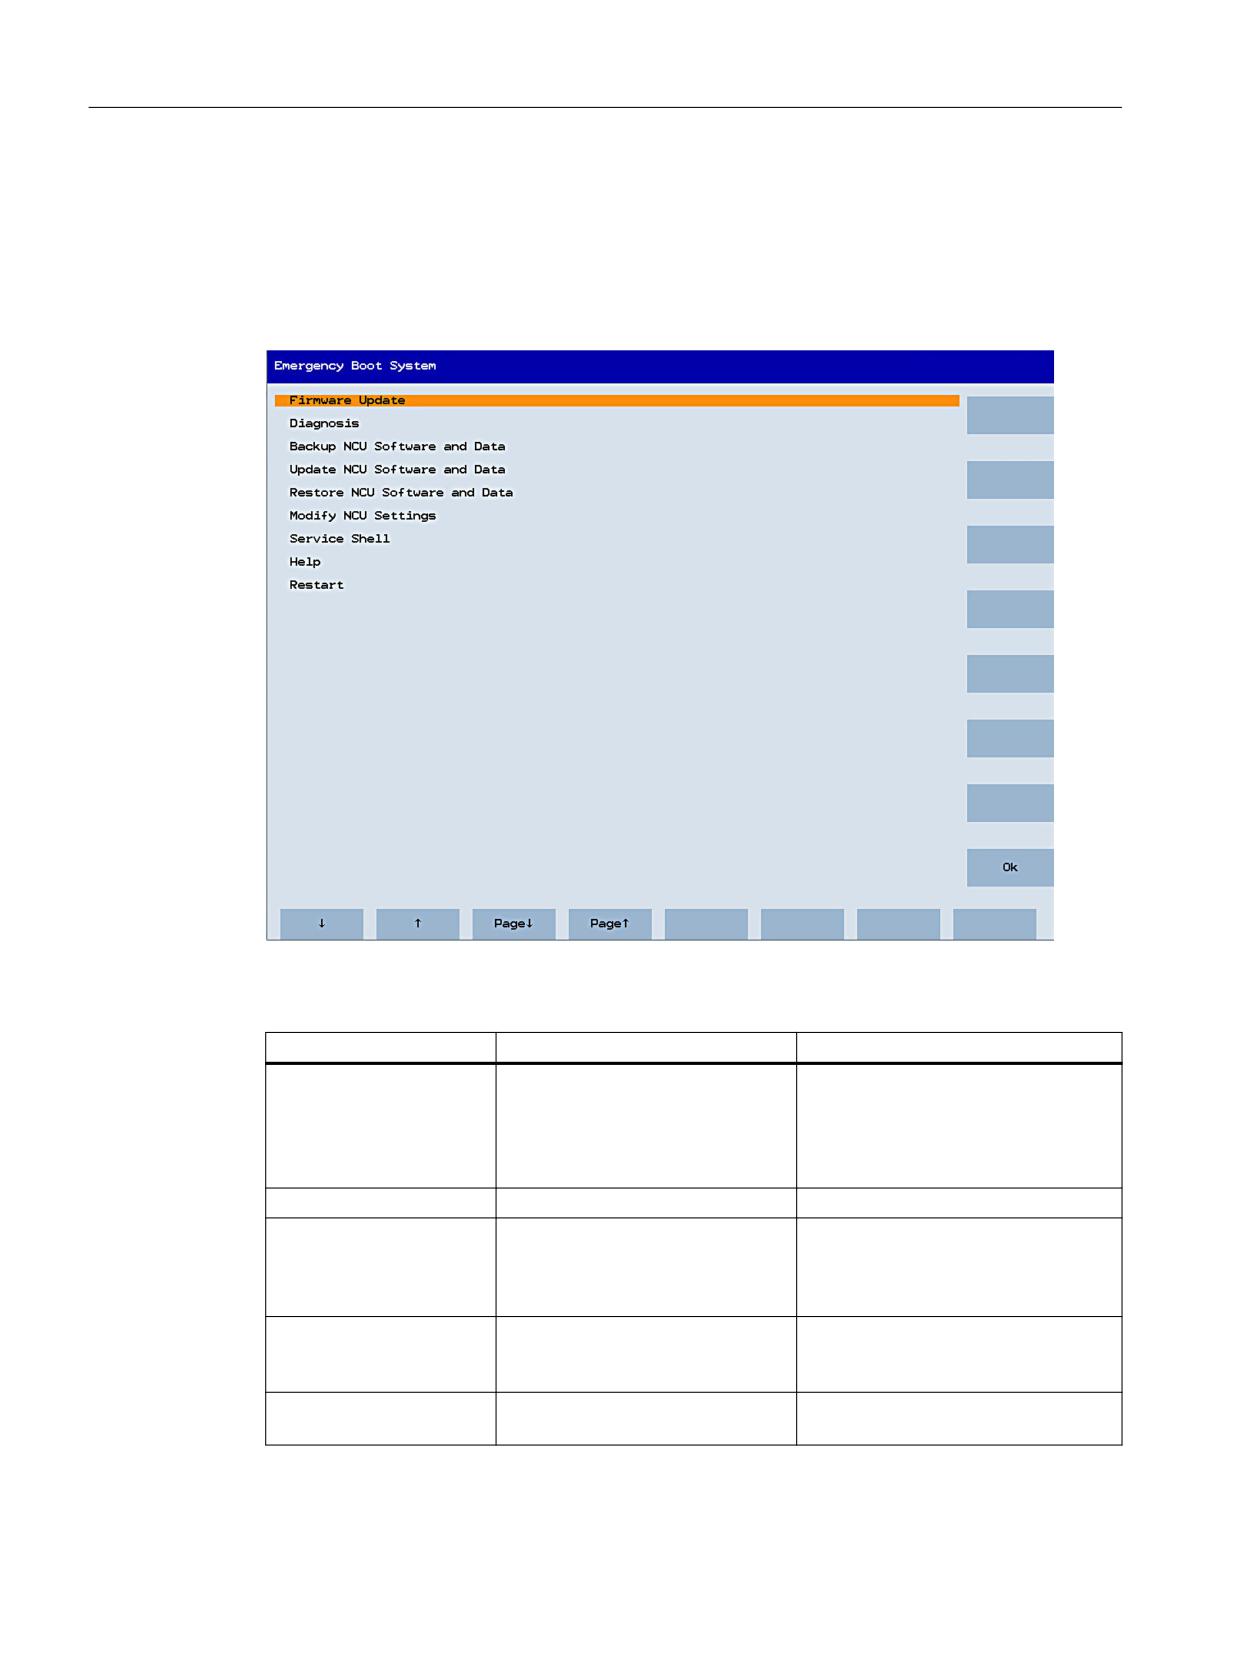
Functions of the service menu
The following functions for service and diagnostics are available on the service system:
Figure 3-1
Service menu
Overview of the main menu:
Main menu
Description
Reference
Firmware Update
Update BIOS:
This is how you update the firmware
(Page 84)
• PLC BIOS
• FPGA
• CBE30 Bootloader
VNC Viewer
Starting the VNC viewer
Calling the VNC Viewer (Page 94)
Diagnosis
Starting a diagnostic function to
Performing system diagnostics
display network-connection data
(Page 89)
and data on the system Compact-
Flash Card.
Backup NCU Software and
Backup system and user data on
Backup data via the service menu
Data
the USB FlashDrive or network
(Page 72)
drive.
Update NCU Software and
Upgrade the system from the USB
This is how you update the software
Data
FlashDrive or network drive.
(Page 86)
NCU operating system
66
Commissioning Manual, 10/2020, A5E48312736B AB
Service and diagnostics
3.1 Creating a service system
Main menu
Description
Reference
Restore NCU Software and
Restore system and user data from
Backup data via the service menu
Data
the USB storage medium or net-
(Page 72)
work drive.
Modify NCU Settings
• Change network settings
This is how you change the system
settings (Page 91)
• Activate/deactivate HMI
• Restore delivery condition of
the following components:
- HMI (SINUMERIK Operate)
- NC
- PLC
- Drive
Service Shell
A Service Shell is opened in order
Backing up data via the service shell
to input service commands.
(Page 80)
Service Commands (Page 38)
Help
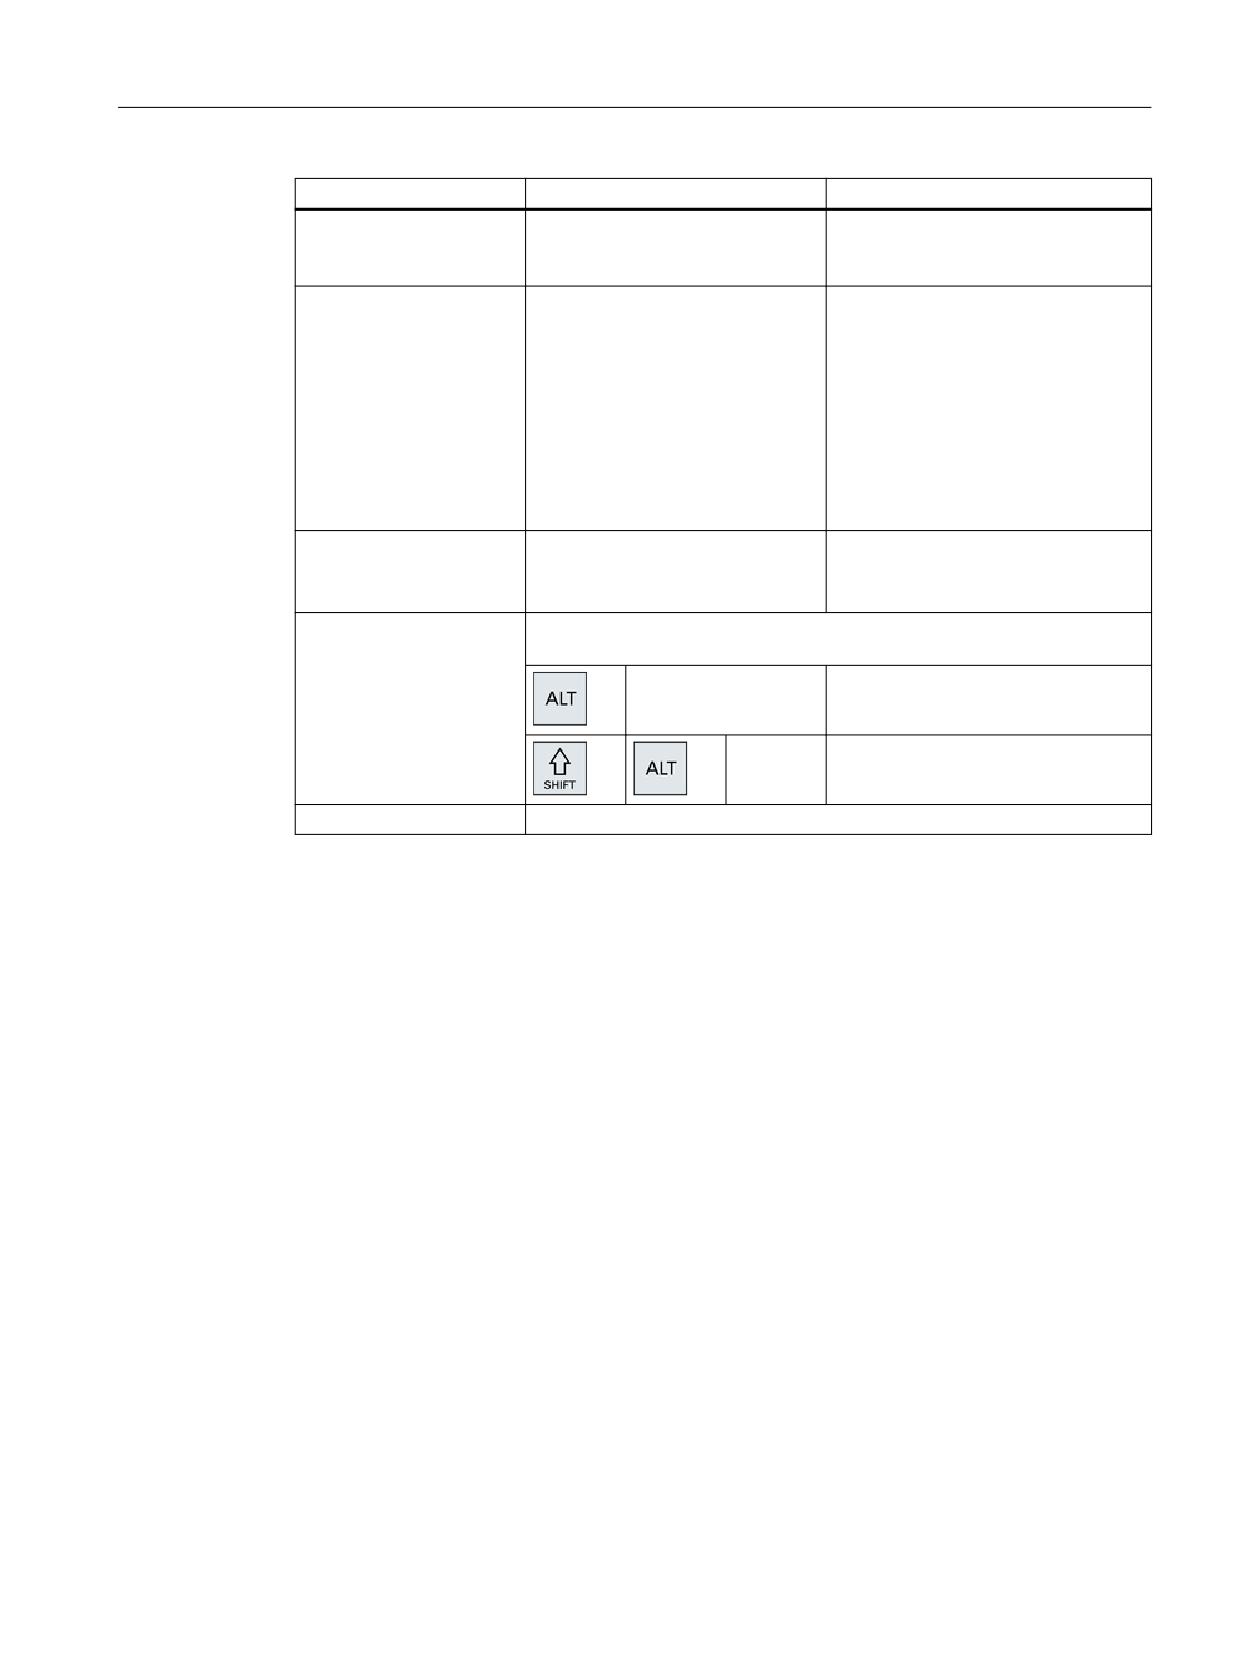
Help text to operate the service menu in case the external keyboard has no
function keys:
1 ... 8
Function keys <F1> ... <F8> for oper-
ating the horizontal softkeys
1 ... 8
Key combination for operating the ver-
tical softkeys: VSK1 ... VSK8
Restart
Restarts the system
3.1.4
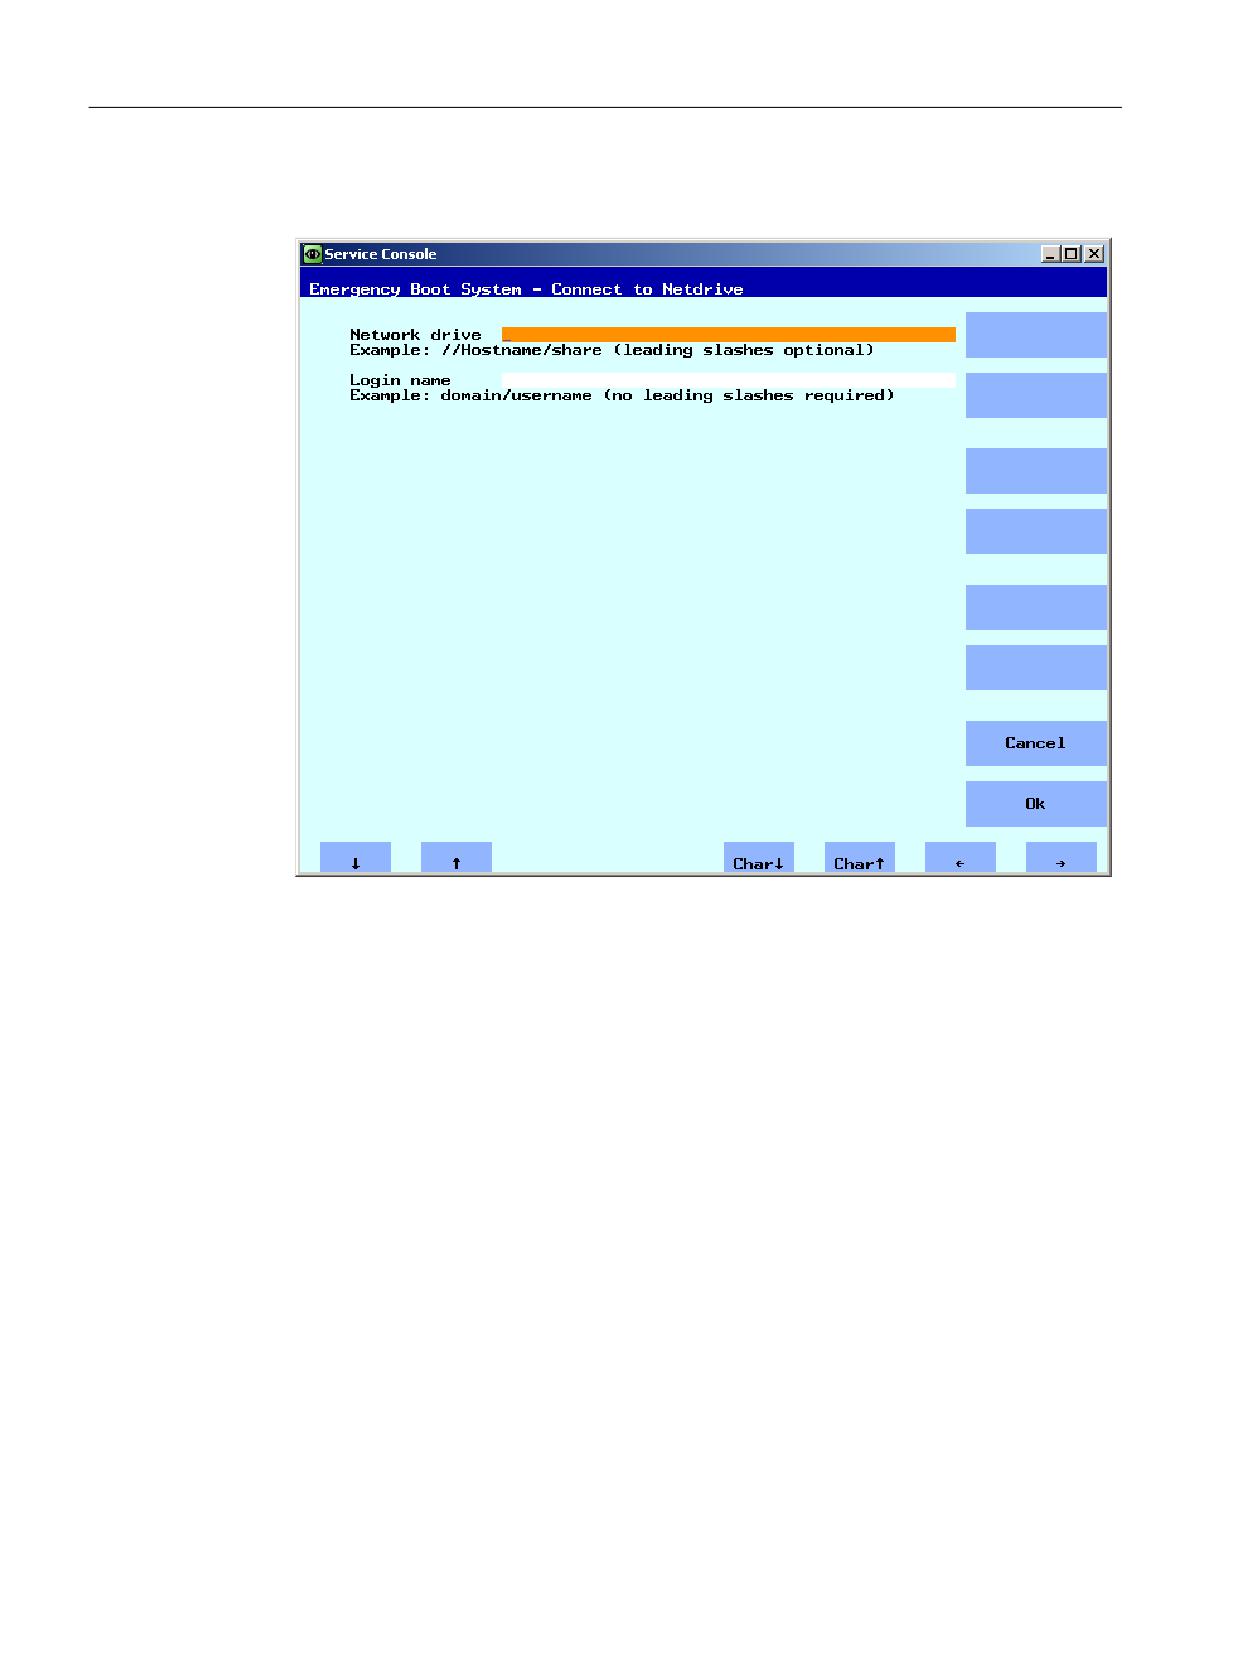
This is how you connect to a network drive
Connecting network drives
1. Select "Connect to network drive".
2. Enter the complete path name of the network drive.
NCU operating system
Commissioning Manual, 10/2020, A5E48312736B AB
67
Service and diagnostics
3.1 Creating a service system
3. Register yourself with a user name with access authorization to this drive.
Note the syntax of the examples specified:
Figure 3-2
Connecting network drives
4. Confirm with "Ok". You are then prompted to enter a password.
NCU operating system
68
Commissioning Manual, 10/2020, A5E48312736B AB
Service and diagnostics
3.2 Backup license
3.2
Backup license
Validity of the license key
The license key corresponds to the serial number of the CompactFlash Card. If the
CompactFlash Card is replaced for a SINUMERIK 840D sl, the license key loses its validity and the
system is no longer ready for operation.
This situation can occur for a defective hardware of the system CompactFlash Card.
Application
For the following cases, backup the license key of the CompactFlash Card on a USB storage
medium or on a network drive:
• Software update without license key
• System software error without defective hardware
Note
Replacement CompactFlash Card
The following data are required in order to obtain a valid license key after replacing the system
CompactFlash Card: The serial number of the defective and the new CompactFlash Card.
NCU operating system
Commissioning Manual, 10/2020, A5E48312736B AB
69
Service and diagnostics
3.2 Backup license
3.2.1
This is how you backup the license key
Backing up the license key on a USB storage medium
Procedure:
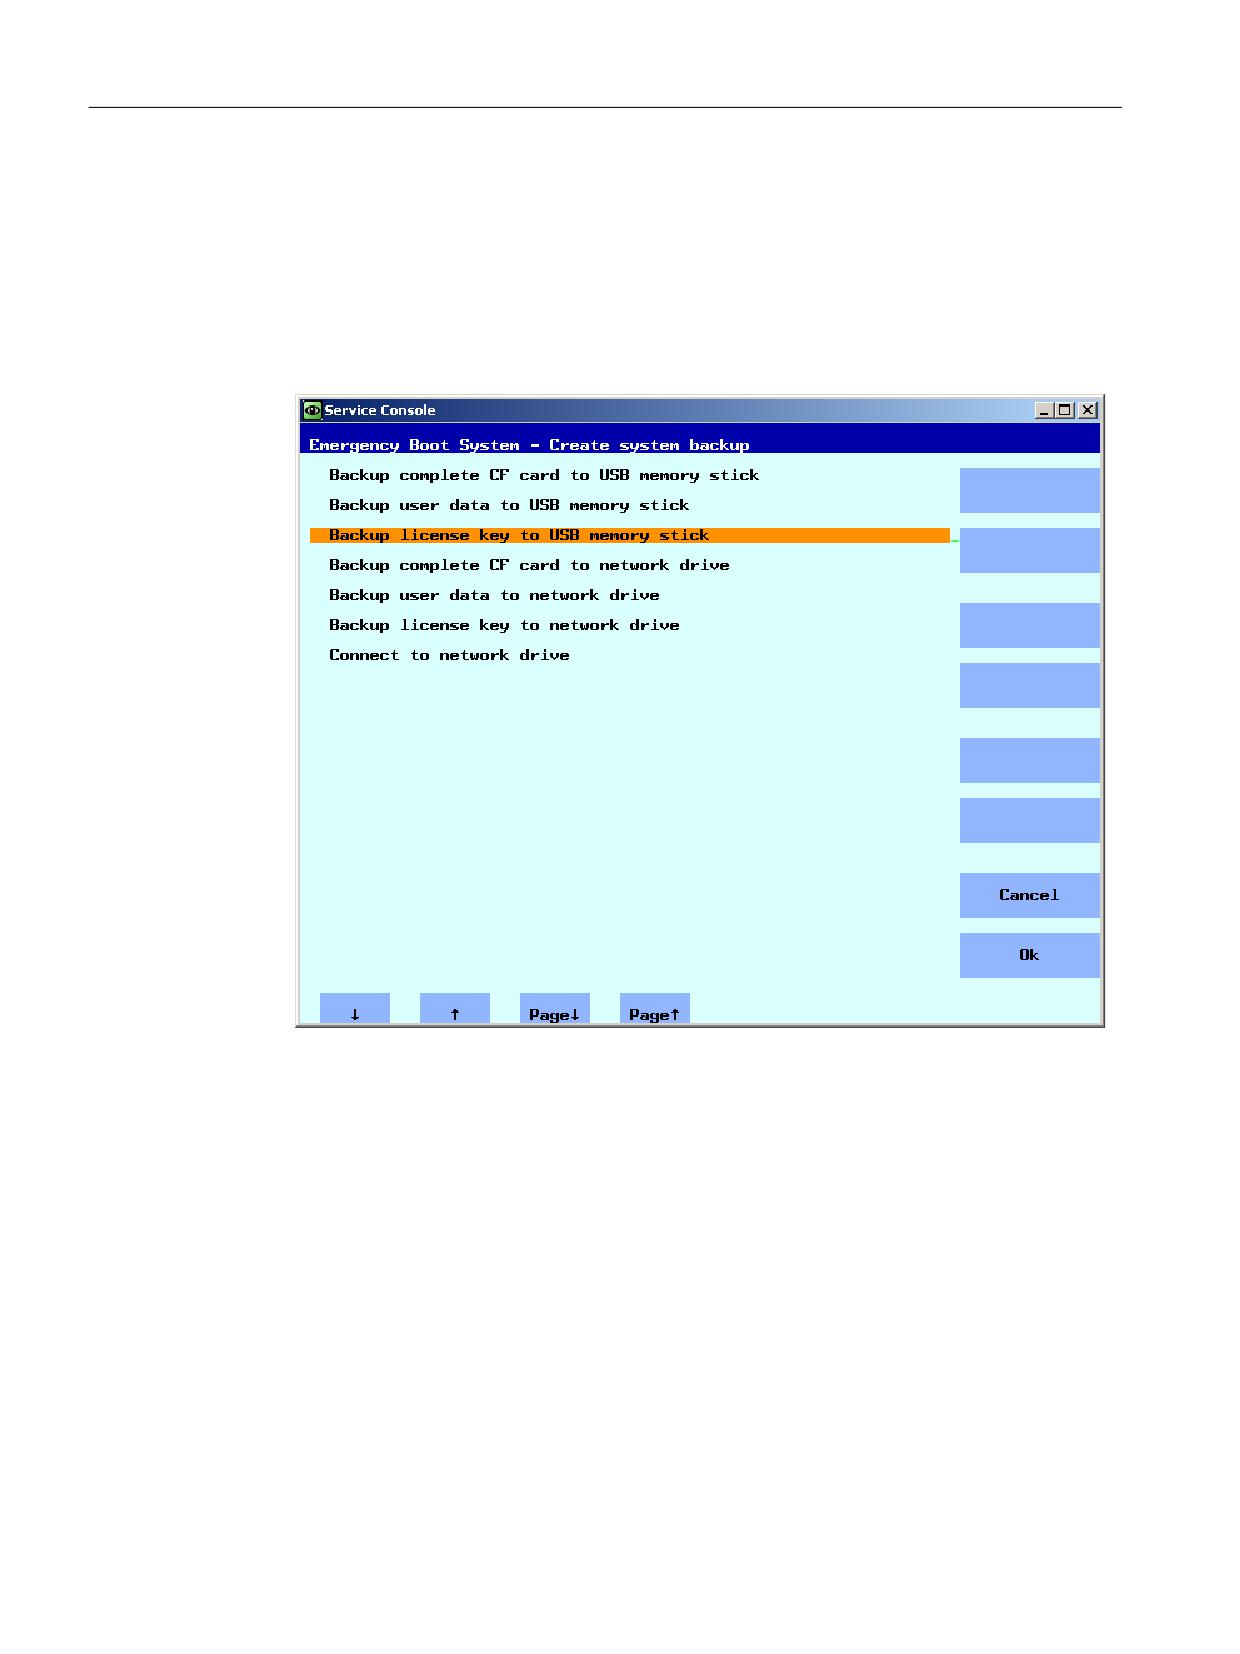
1. In the main menu, select the menu item "Backup NCU Software and Data".
The following menu is displayed:
Figure 3-3
Backing up licenses
2. Select the menu item "Backup license key to USB memory stick".
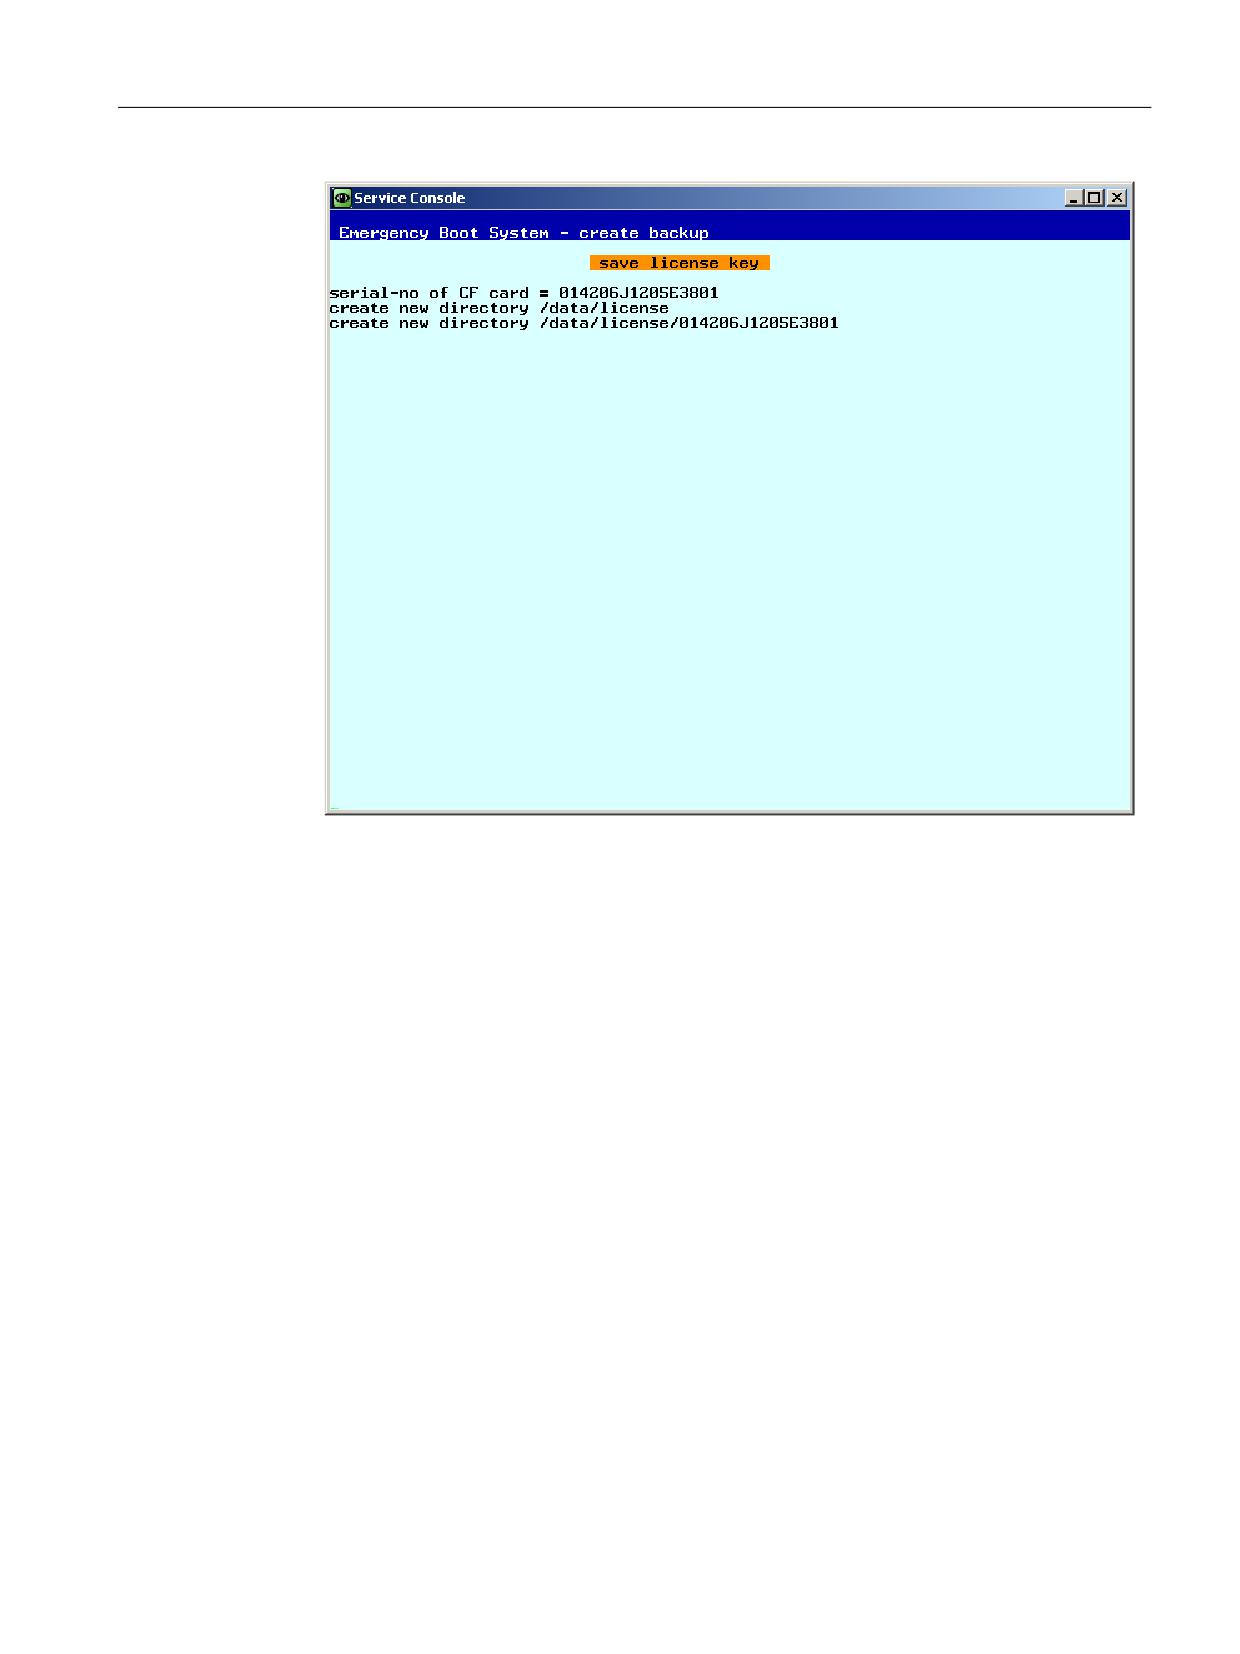
The following menu is displayed:
NCU operating system
70
Commissioning Manual, 10/2020, A5E48312736B AB
Service and diagnostics
3.2 Backup license
Figure 3-4
Save license key
The license key is backed up in the specified directory together with the serial number of the
CompactFlash Card.
See also
The procedure is essentially the same as for "Backup license key to network drive". In addition,
you connect to a network drive:
This is how you connect to a network drive (Page 67)
NCU operating system
Commissioning Manual, 10/2020, A5E48312736B AB
71
Service and diagnostics
3.3 Backup data via the service menu
3.3
Backup data via the service menu
3.3.1
This is how you backup user data
Backing up and restoring user data
Procedure:
1. In the main menu, select the menu item "Backup NCU Software and Data".
2. Select "Backup user data to USB memory stick" and confirm with "Ok".
NCU operating system
72
Commissioning Manual, 10/2020, A5E48312736B AB
Service and diagnostics
3.3 Backup data via the service menu
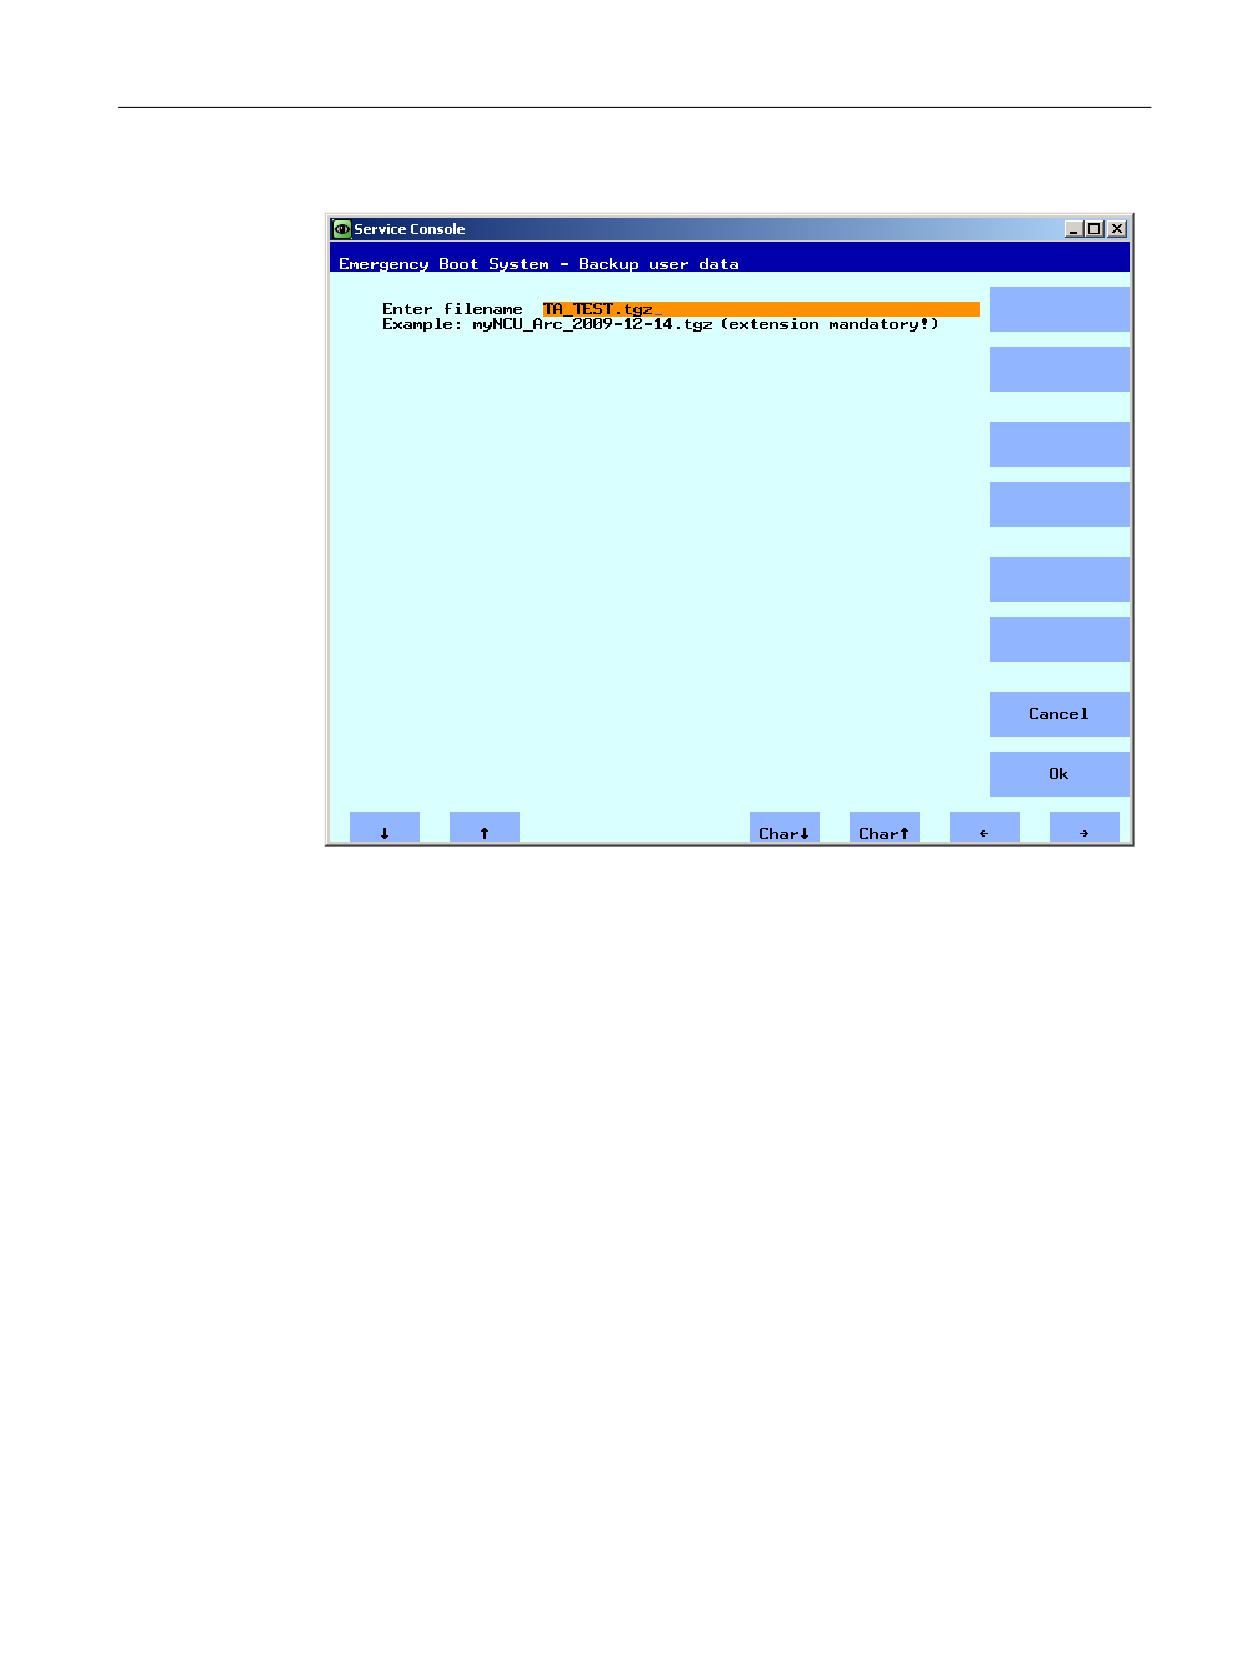
3. Enter a complete file name - as shown in the example:
Figure 3-5
Entering a file name
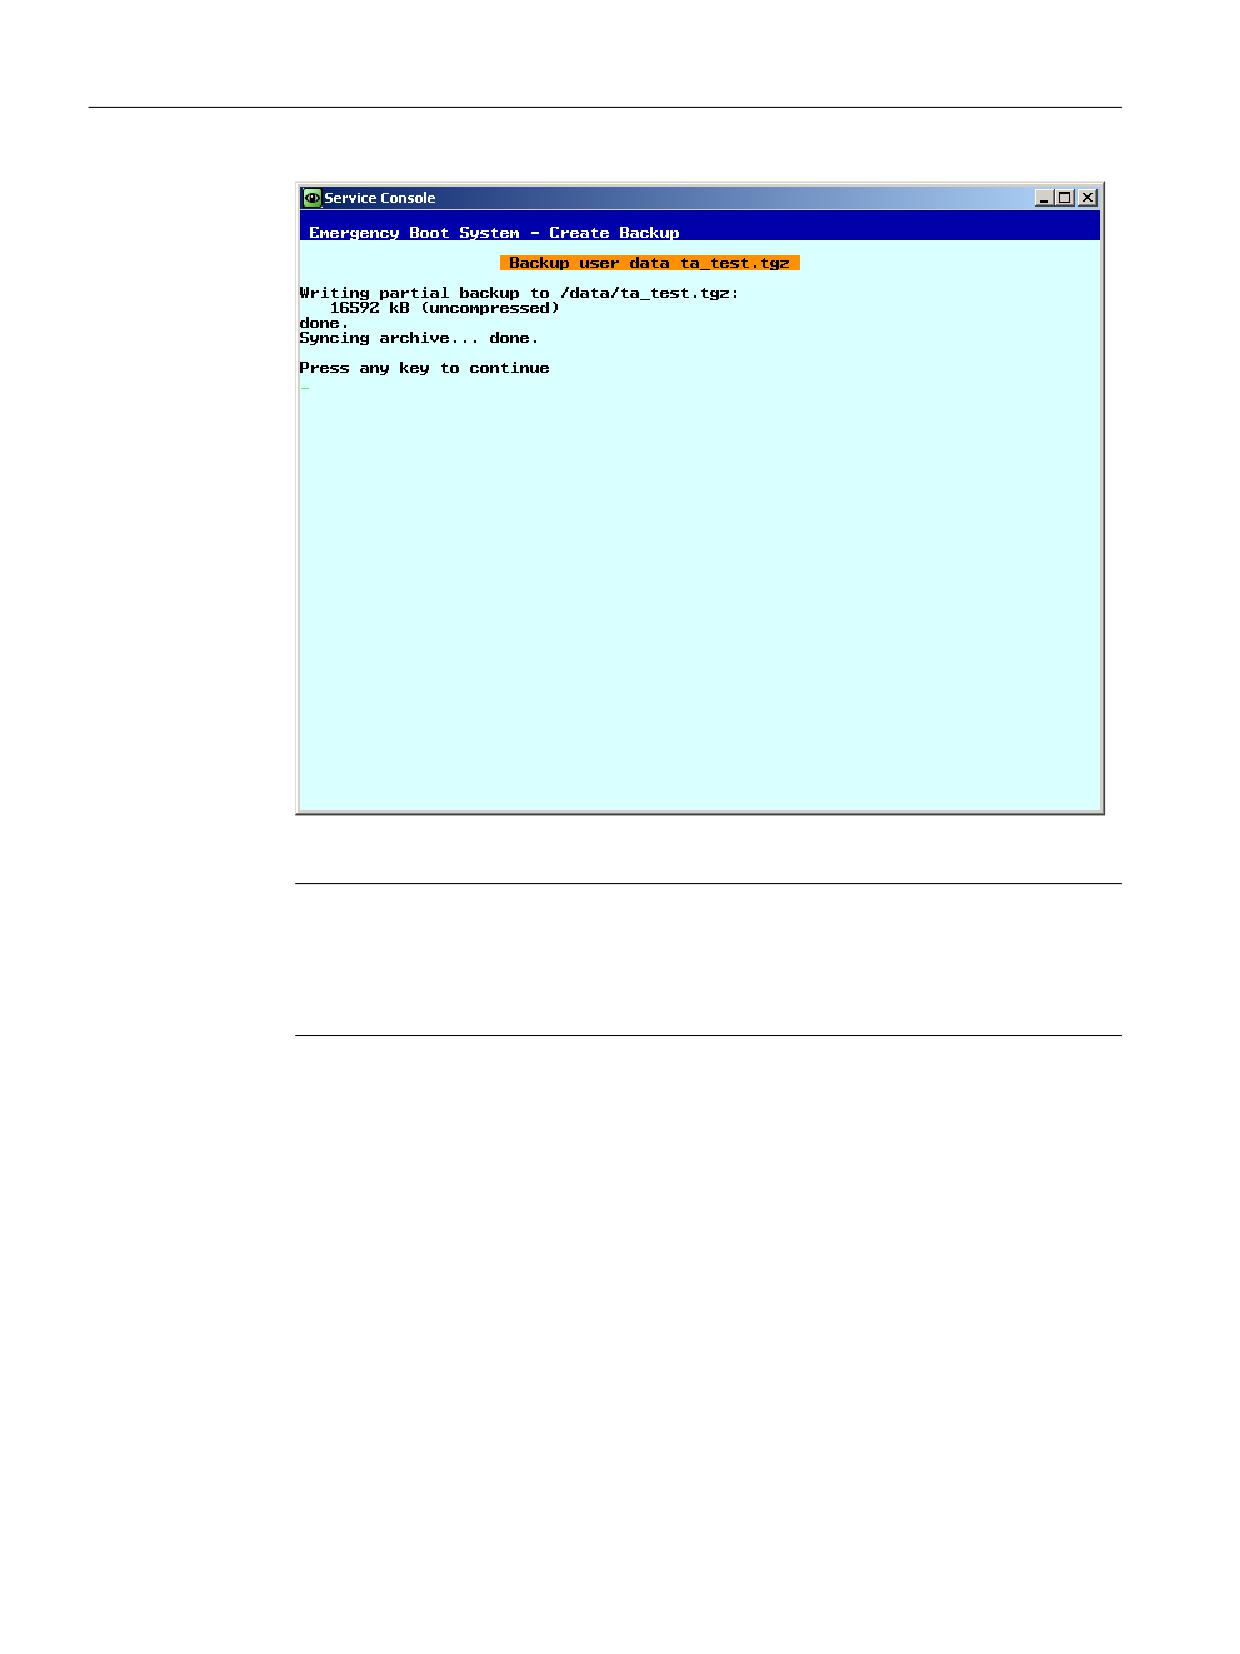
4. Confirm with "Ok". The following message is output after the operation has been successfully
completed:
NCU operating system
Commissioning Manual, 10/2020, A5E48312736B AB
73
Service and diagnostics
3.3 Backup data via the service menu
Figure 3-6
Operation completed
Note
Backup file ≥ 4GB
For a backup file ≥ 4GB, the space on the FAT partition of the service system (with 8GB) is no
longer sufficient. For this reason, backup files of this size are partitioned (see also: sc save/sc
restore) or they can be saved on a network drive.
See also
The procedure for "Backup user data to network drive" is analog. In addition, you connect to a
network drive:
This is how you connect to a network drive (Page 67)
NCU operating system
74
Commissioning Manual, 10/2020, A5E48312736B AB
Service and diagnostics
3.3 Backup data via the service menu
3.3.2
This is how you restore user data
Restoring user data
Procedure:
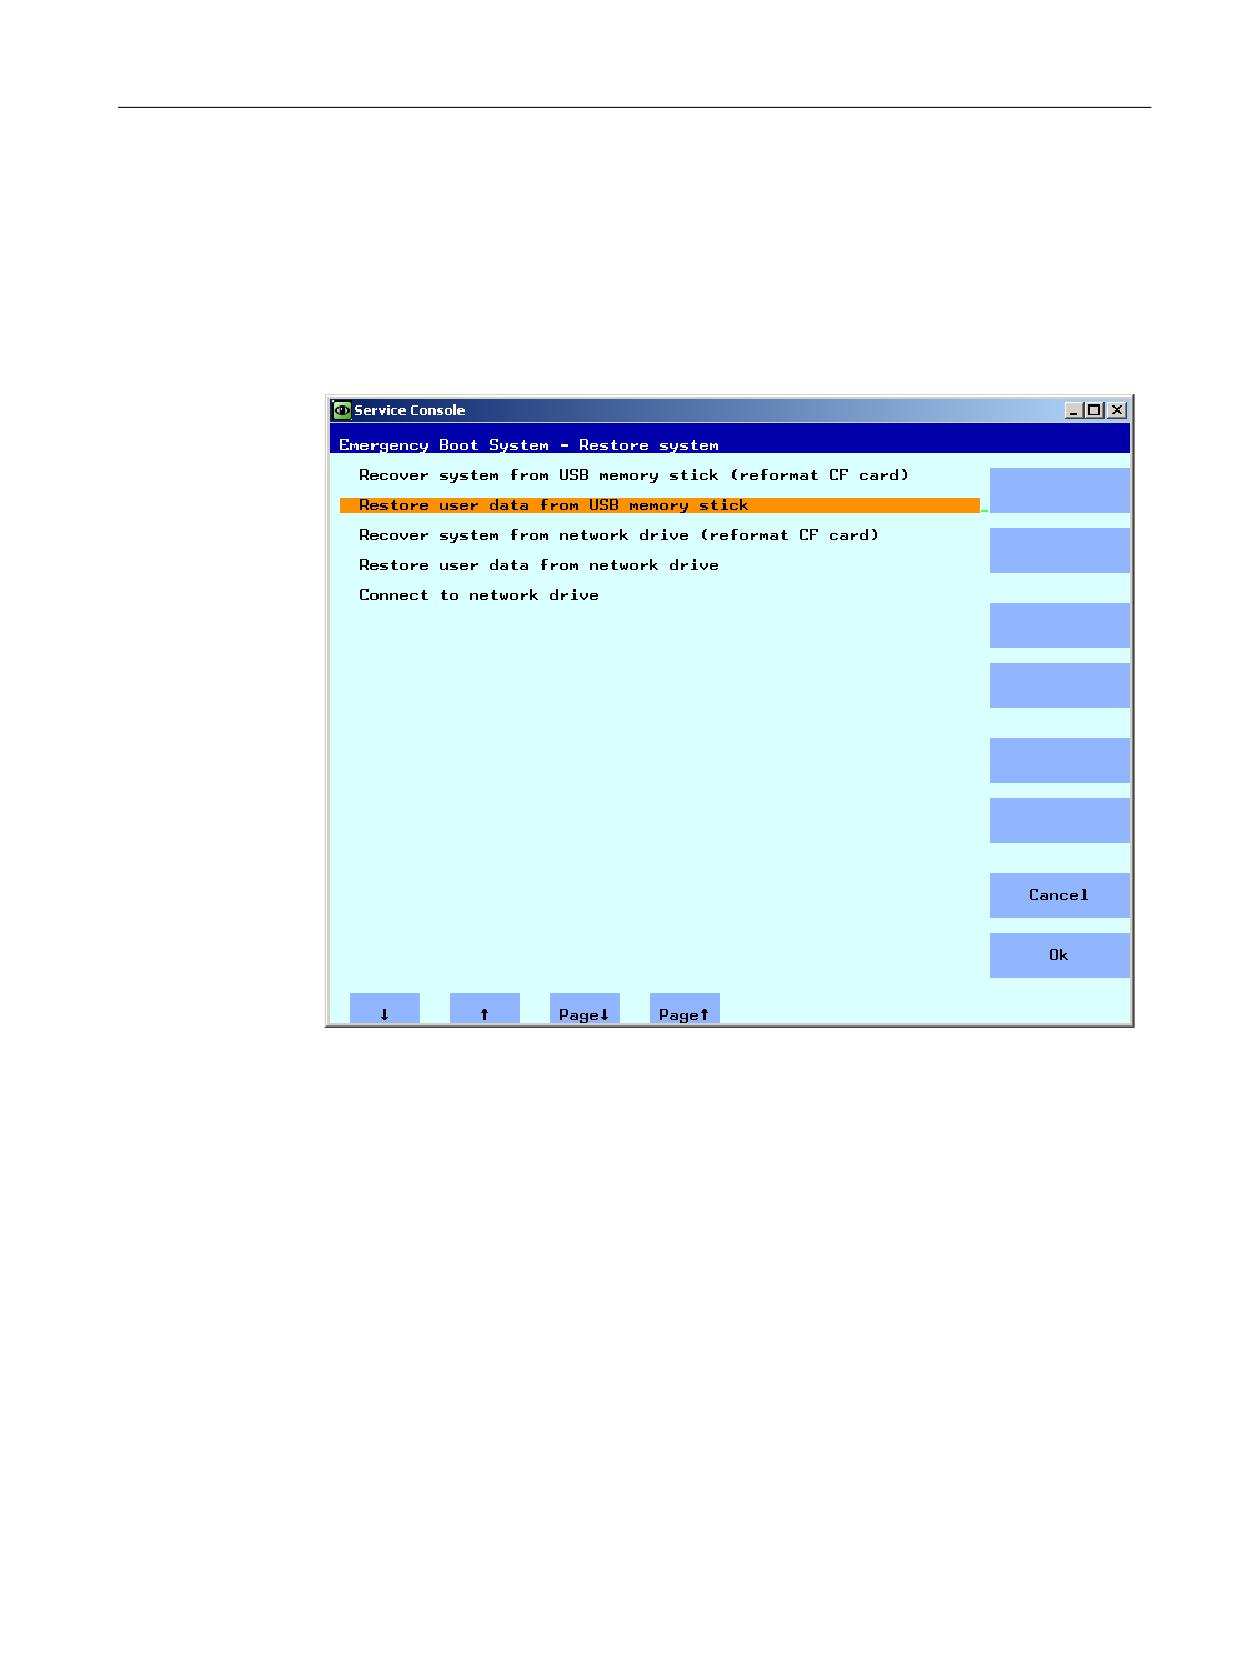
1. In the main menu, select the menu item "Restore NCU Software and Data".
The following menu is displayed:
Figure 3-7
Restoring user data
2. Select "Restore user data from USB memory stick" and confirm with "Ok".
The list of the tgz files available on the USB storage medium are displayed.
3. Select the appropriate tgz file and confirm with "Ok".
A message is output after the operation has been successfully completed.
See also
The procedure for "Restore user data from network drive" is essentially the same. In addition, you
connect to a network drive:
This is how you connect to a network drive (Page 67)
NCU operating system
Commissioning Manual, 10/2020, A5E48312736B AB
75
Service and diagnostics
3.3 Backup data via the service menu
3.3.3
This is how you create a complete backup of the CompactFlash Card
Creating a complete backup
Procedure:
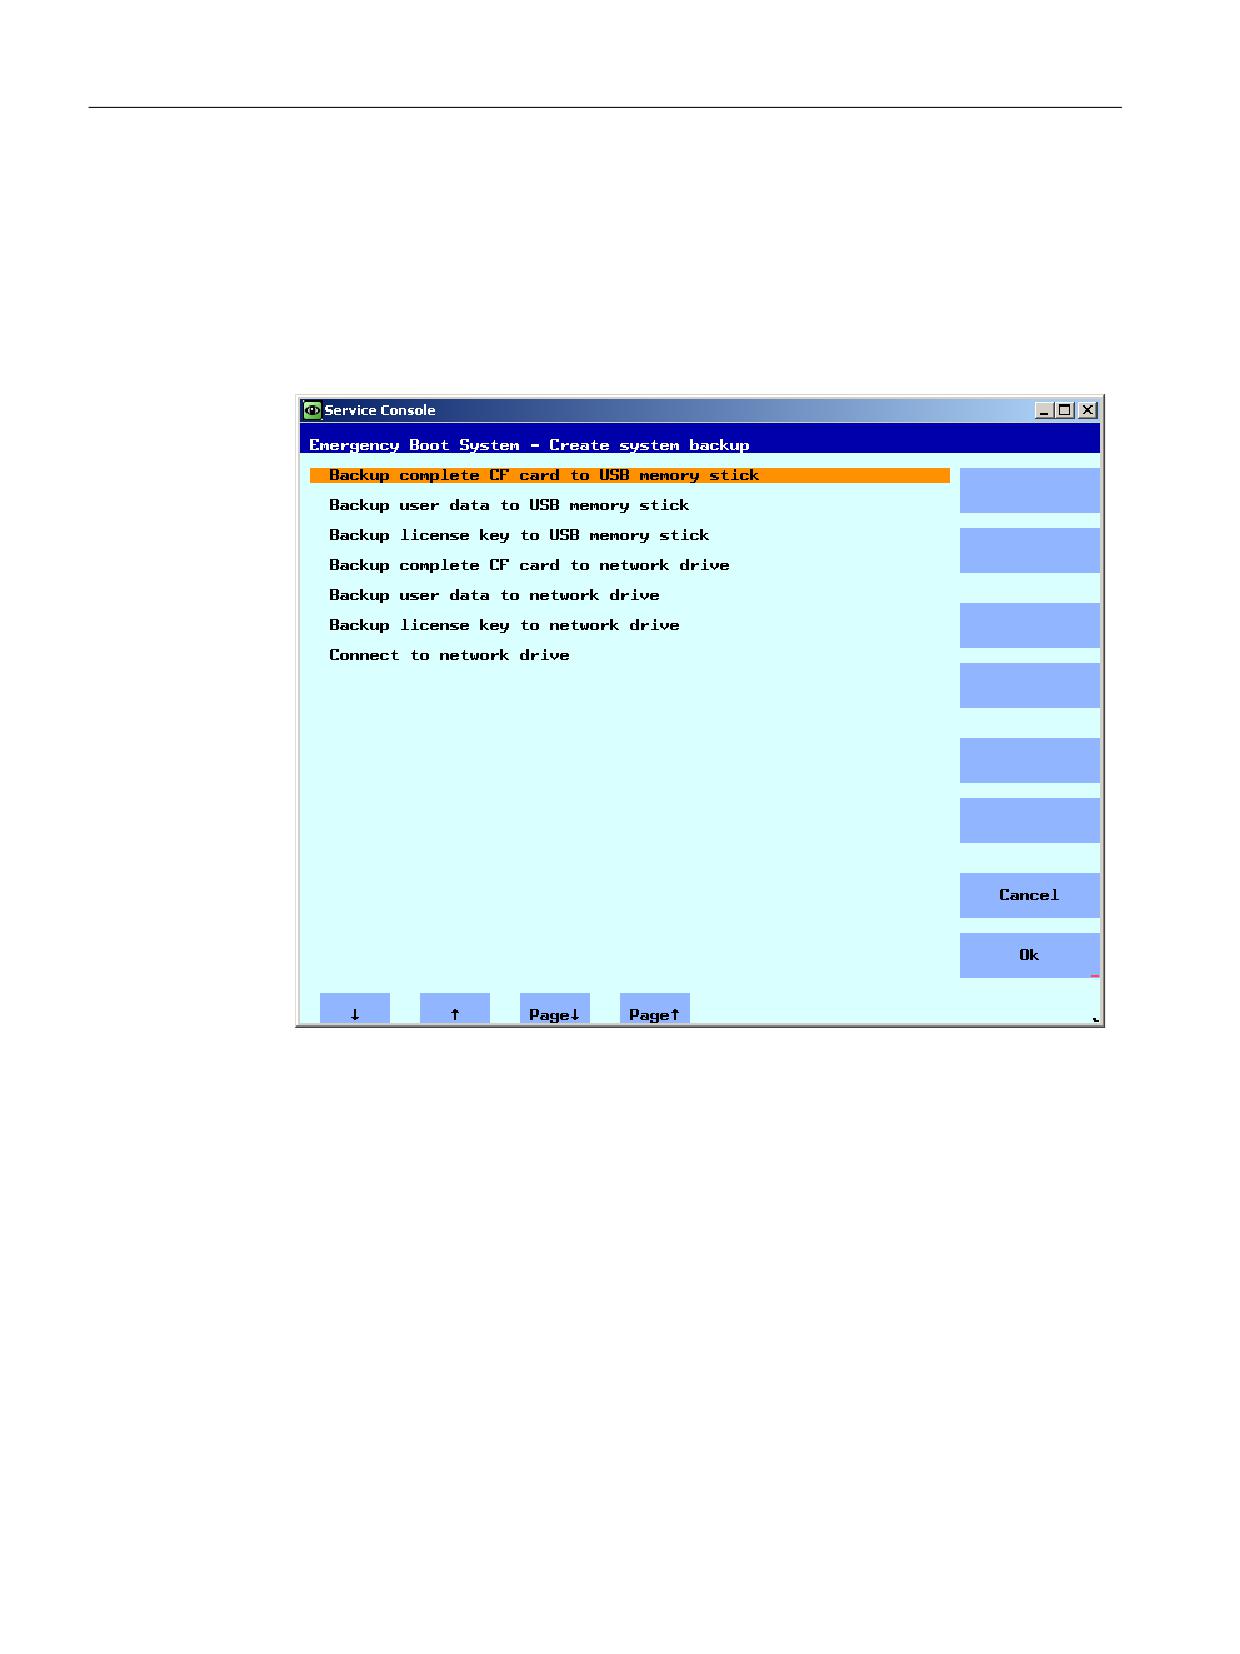
1. In the main menu, select the menu item "Backup NCU Software and Data".
The following menu is displayed:
Figure 3-8
Backup up
2. Select "Backup complete CF card to USB memory stick" and confirm with "OK".
NCU operating system
76
Commissioning Manual, 10/2020, A5E48312736B AB
Service and diagnostics
3.3 Backup data via the service menu
3. Enter a complete file name - as specified in the example.
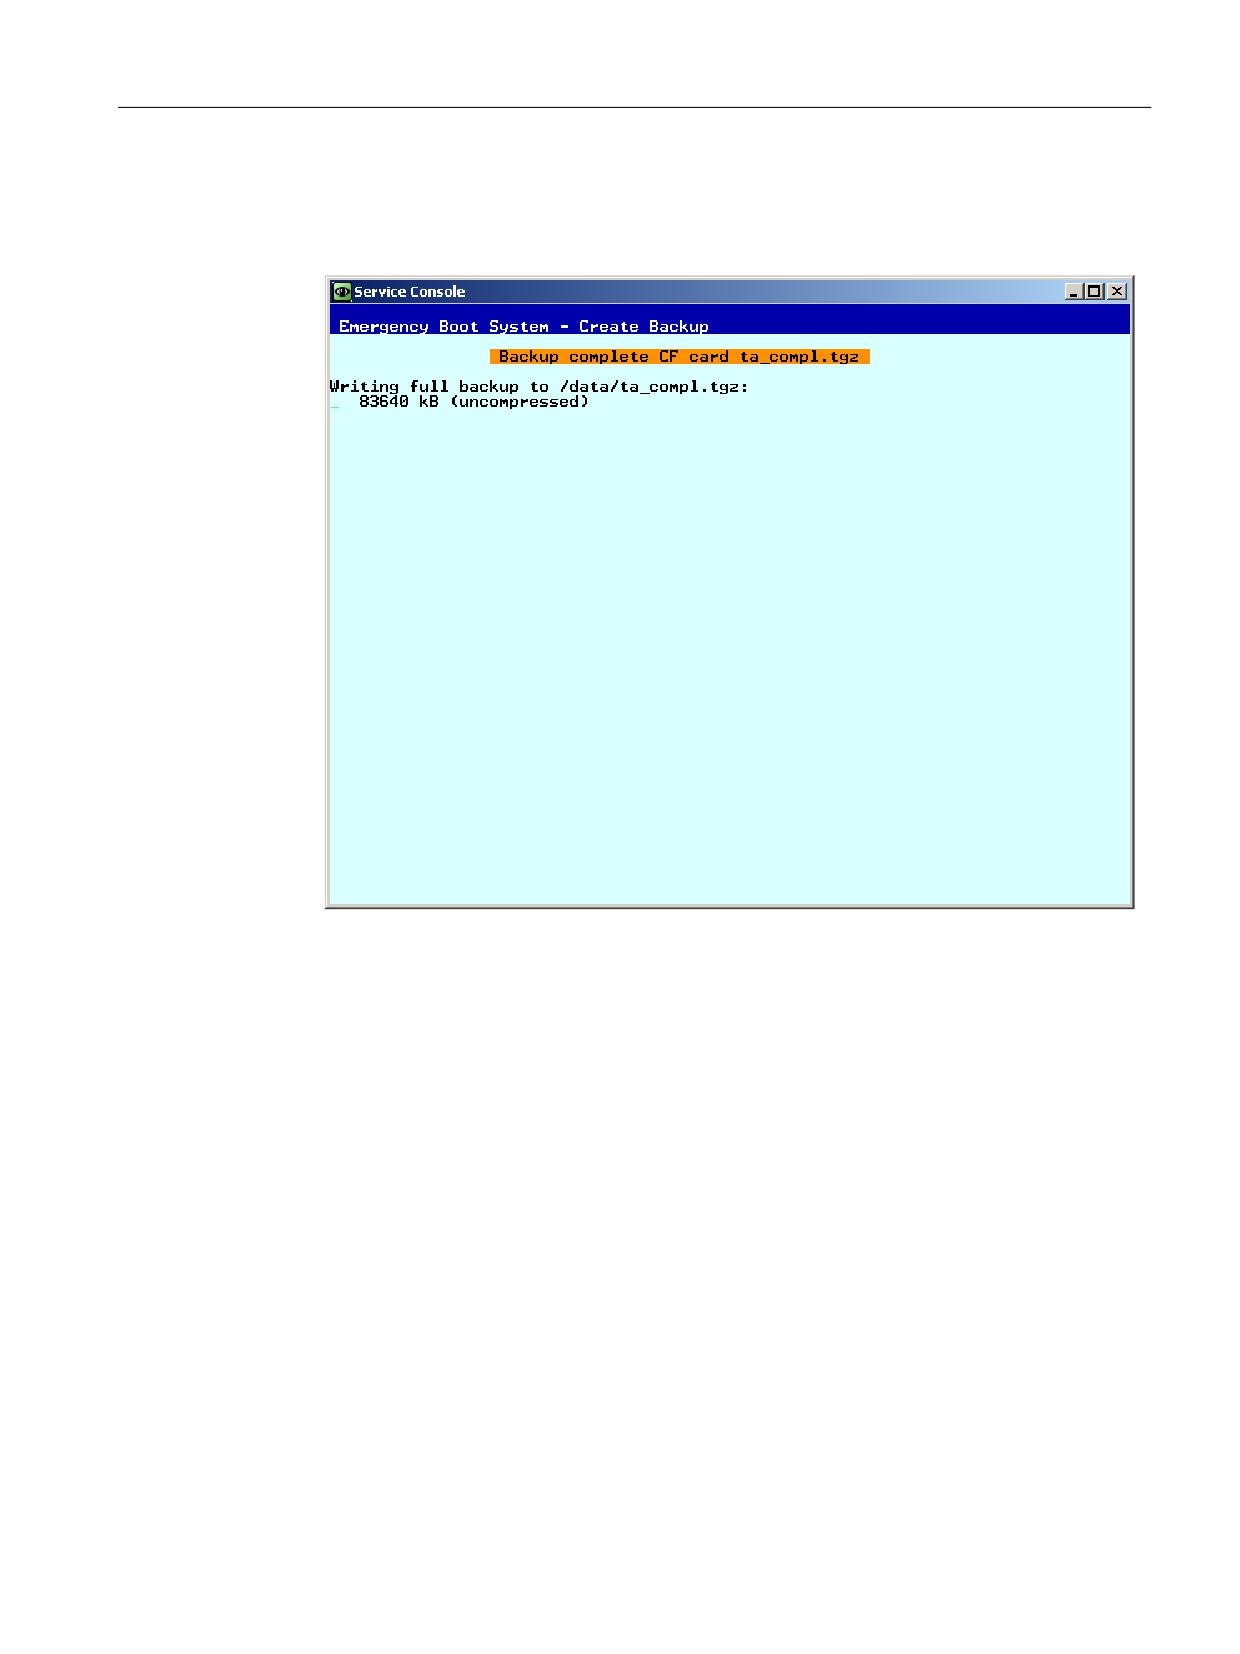
4. Confirm with "OK". This can take several minutes.
The operation is displayed:
Figure 3-9
Backing up ...
A message is output after the operation has been successfully completed.
See also
The procedure for "Backup complete CF card to network drive" is essentially the same. In
addition, you connect to a network drive:
This is how you connect to a network drive (Page 67)
NCU operating system
Commissioning Manual, 10/2020, A5E48312736B AB
77
Service and diagnostics
3.3 Backup data via the service menu
3.3.4
This is how you install a complete system backup
Installing the complete backup
With this menu item, a complete backup of the data from the service system or from a network
drive is installed on the CompactFlash Card, i.e. this backup includes both the system software
as well as also the user data.
NOTICE
Formatting
This procedure corresponds to formatting the CompactFlash Card and all of the existing data
are overwritten.
NCU operating system
78
Commissioning Manual, 10/2020, A5E48312736B AB
Service and diagnostics
3.3 Backup data via the service menu
Installing the complete backup
Procedure:
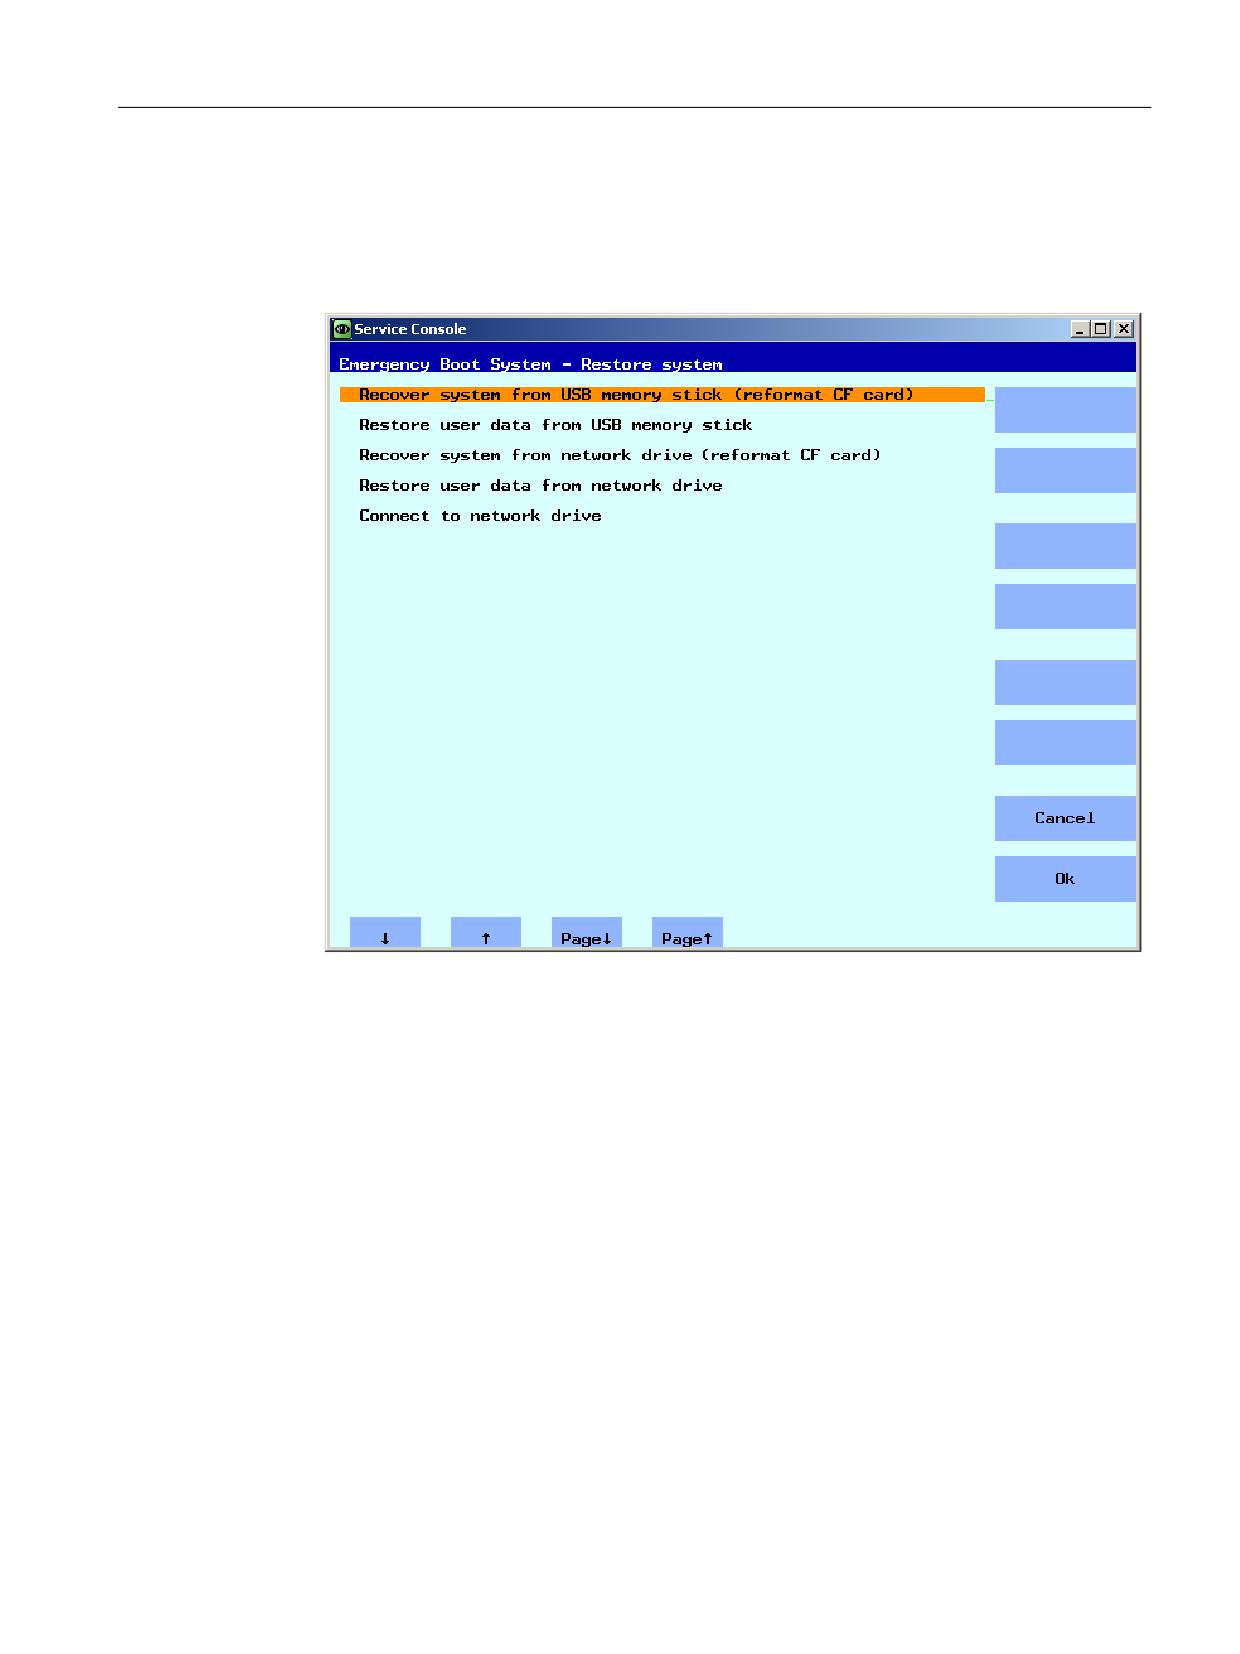
1. In the main menu, select the menu item "Restore NCU Software and Data".
The following menu is displayed:
Figure 3-10
Restore system
2. Select the menu item "Recover system from USB memory stick (reformat CF card)" and
confirm with "Ok".
The list of the tgz files available on the USB storage medium are displayed.
3. Select the appropriate tgz file and confirm with "Ok".
A message is output after the operation has been successfully completed.
Completion
The system must be restarted in order that the new data become effective.
See also
The procedure for "Recover system from network drive (reformat CF card)" is essentially the
same. In addition, you connect to a network drive:
This is how you connect to a network drive (Page 67)
NCU operating system
Commissioning Manual, 10/2020, A5E48312736B AB
79
Service and diagnostics
3.4 Backing up data via the service shell
3.4
Backing up data via the service shell
Backing up and restoring using a service shell
To call a service shell, depending on the configuration, the following possibilities are available:
(I)
Configuration of NCU with TCU: the service shell is called under Linux.
(II)
Configuring the NCU with PCU 50 or programming device (PG).
A service shell can be called under:
• on the NCU under Linux
• on the PCU/PG using the VNC Viewer (system network or company network)
• on the PCU/PG using WinSCP (system network or company network)
3.4.1
This is how you save data on a service system
Proceed as follows
To back up the complete system:
1. Connect the service system to a USB interface (X125 or X135) of the NCU and press the reset
button.
Alternatively, you can switch the NCU off, connect the service system, and switch the NCU on
again.
Result: The NCU boots from the service system.
2. In the main menu, select the menu item "Service Shell".
3. Log on as a service technician using the user name "manufact" and password "SUNRISE".
4. Using the command "sc backup" you can create the backup file "backup01.tgz".
The directory /data on the service system is provided for backup files. The complete path
should be specified.
5. Choose -full, to backup all data on the CompactFlash Card, or -user, if you only want to
backup user data.
Example: sc backup -full /data/backup01.tgz
Result:
A backup file of the complete CompactFlash Card is created under /data on the service system
on the USB storage medium.
NCU operating system
80
Commissioning Manual, 10/2020, A5E48312736B AB
Service and diagnostics
3.4 Backing up data via the service shell
3.4.2
This is how you restore data from the service system
Proceed as follows
To restore the complete system:
1. Connect the service system to a USB interface (X125 or X135) of the NCU and press the reset
button.
Alternatively, you can switch the NCU off, connect the service system, and switch the NCU on
again.
Result: The NCU boots from the service system and the main menu is displayed.
2. In the main menu, select the menu item "Service Shell".
3. Log on as a service technician using the user name "manufact" and password "SUNRISE".
4. With the command "sc restore" you can write the backup file "backup01" from the service
system back to the CompactFlash Card in the NCU. The complete path should be specified.
Example: sc restore /data/backup01.tgz
Result:
The system state stored in the file "backup01" is restored on the NCU.
Note
If access to the system data on the CompactFlash Card is not possible because the
CompactFlash Card is defective or empty, you can only log in as user "admin" with the
password "SUNRISE" and no longer as the user "manufact".
3.4.3
This is how you save data on a network drive
Sequence
Proceed as follows:
• Connect the service system.
• "Service Shell" open.
• Establish a connection to a network drive.
• Create a backup file.
Scenario I: Start Command Shell under Linux
Procedure:
1. Connect the service system to the USB interface X125 or X135 of the NCU.
2. In the main menu, select the menu item "Service Shell".
3. Log on as a service technician using the user name "manufact" and password "SUNRISE".
NCU operating system
Commissioning Manual, 10/2020, A5E48312736B AB
81
Service and diagnostics
3.4 Backing up data via the service shell
4. Use the command "sc connect" to connect the network drive:
sc connect //username%password@server/share /tmp/backup
Please enter here the user name and the password for the network drive that is to be
connected to.
5. Using the command "sc save", create the backup file "backup01".
Choose -full, to backup all data on the CompactFlash Card, or -user, if you only want to
backup user data in the directory /user.
Example: sc save -full /tmp/backup/backup01
Result:
A backup file of the complete CompactFlash Card is created under the specified path on the
network drive.
Scenario II: Start the command shell with WinSCP on the programming device:
Procedure:
1. Start WinSCP and enter the following data in the log-on window:
- IP address of the NCU (or, if required, host name)
- User name "manufact" with password "SUNRISE".
2. Select in the menu "Commands" → "Open Terminal".
3. Execute the data backup using the commands described in steps 4 to 6 from scenario I.
Scenario II: Start the command shell using the VNC Viewer on the programming device
Procedure:
1. Start the VNC Viewer and connect to the NCU using the IP address (or where relevant, using
the host name)
2. Log on under the "manufact" user name with the password "SUNRISE".
3. To restore the data, enter the corresponding commands as described under steps 3 to 5 in
scenario I.
3.4.4
This is how you restore data from the network drive
Sequence
Proceed as follows:
• Connect the service system.
• "Service Shell" open.
• Establish a connection to a network drive.
• Restore the data.
NCU operating system
82
Commissioning Manual, 10/2020, A5E48312736B AB
Service and diagnostics
3.4 Backing up data via the service shell
Scenario I: Start command shell under Linux
1. Connect the service system to the USB interface X125 or X135 of the NCU.
2. In the main menu, select the menu item "Service Shell".
3. Log on as a service technician using the user name "manufact" and password "SUNRISE".
4. Use the command "sc connect" to connect the network drive:
sc connect //username%password@server/share /tmp/backup
5. Please enter here the user name and the password for the network drive that is to be
connected to.
To completely restore the system (system data and user data), enter the following: sc
restore -full backup01
Result: The whole system is overwritten by the backup data.
6. To restore user data only, enter the following command:
sc restore -user backup01
Result: The user data are written back again.
All subsystems are then restarted: sc start all
Result:
The system state stored in the file "backup01.tgz" is restored on the NCU.
Scenario II: Start the command shell with WinSCP on the programming device:
Procedure:
1. Start WinSCP and enter the following data in the log-on window:
- IP address of the NCU (or, if required, host name)
- User name "manufact" with password "SUNRISE".
2. Select in the menu "Commands" → "Open Terminal".
3. To restore the data, enter the corresponding commands as described under steps 3 to 5 in
scenario I.
Scenario II: Start the command shell using the VNC Viewer on the programming device
Procedure:
1. Start the VNC Viewer and connect to the NCU using the IP address (or where relevant, using
the host name)
2. Log on under the "manufact" user name with the password "SUNRISE".
3. To restore the data, enter the corresponding commands as described under steps 3 to 5 in
scenario I.
NCU operating system
Commissioning Manual, 10/2020, A5E48312736B AB
83
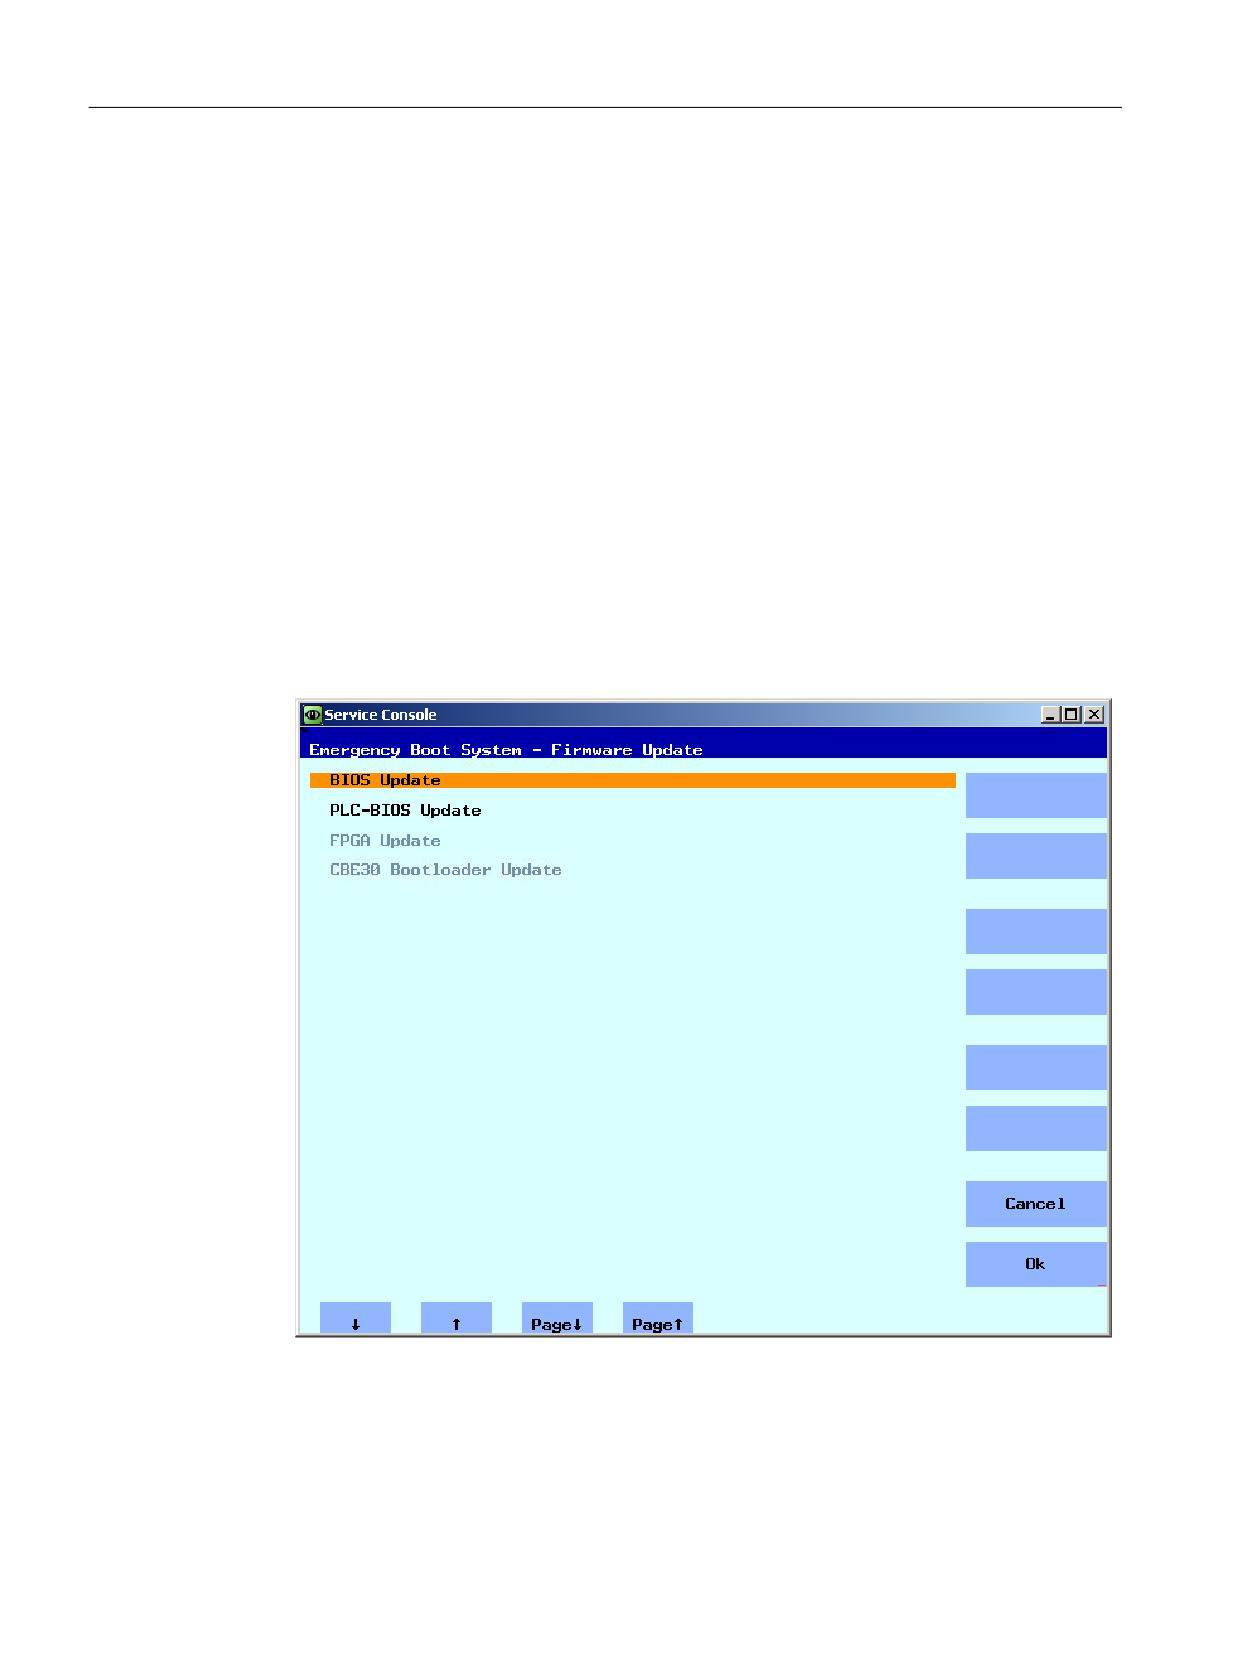
Service and diagnostics
3.5 Updating the software
3.5
Updating the software
3.5.1
This is how you update the firmware
Firmware Update
When service is required, it may be necessary for a service technician to install a BIOS update.
Siemens provides the corresponding update file. Possible formats include: *.img or *.rom or
*.bin. Or, the update file is already supplied on the service system, then step 1 is eliminated.
Procedure:
1. Copy the update file to the FAT partition of the service system.
2. Connect the service system to interface X125 or X135 of the NCU.
3. Switch on the system.
4. In the main menu, select the menu item "Firmware Update".
The following menu is displayed:
Figure 3-11
Firmware update
NCU operating system
84
Commissioning Manual, 10/2020, A5E48312736B AB
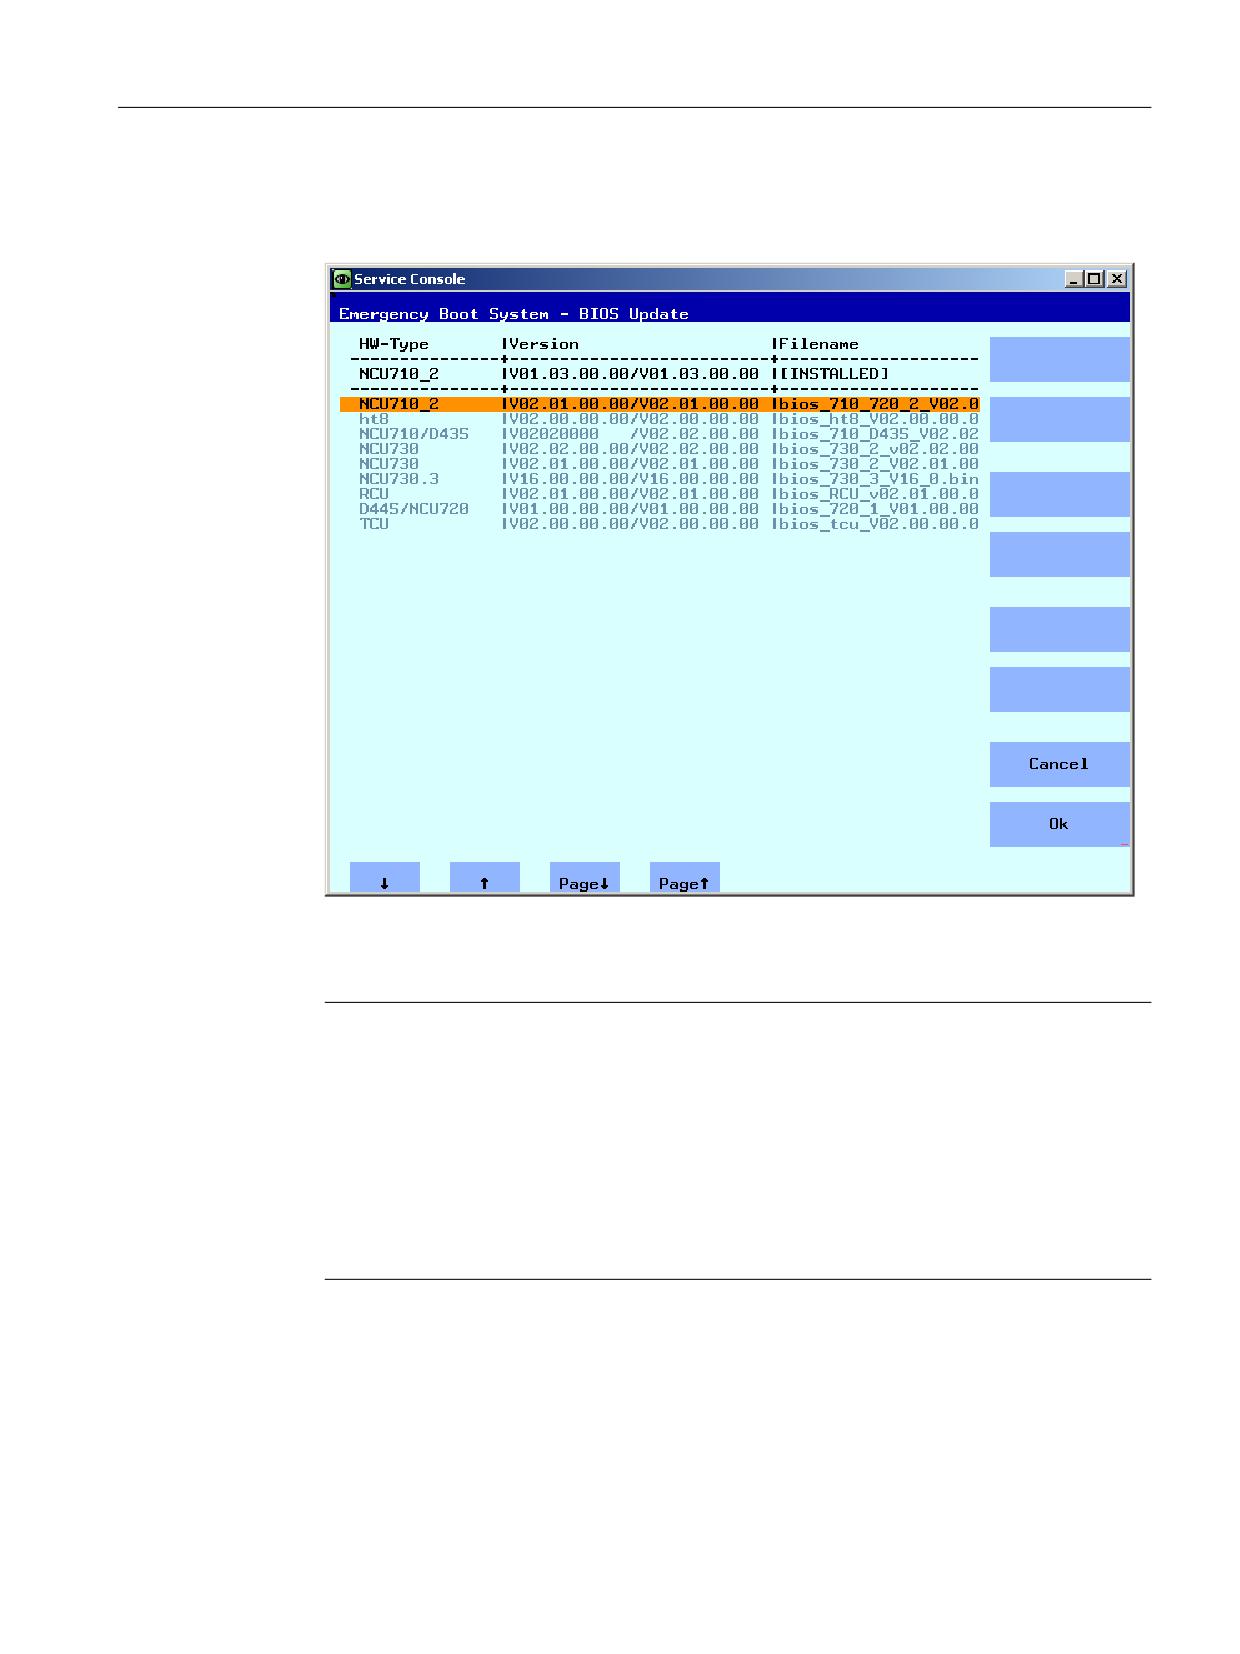
Service and diagnostics
3.5 Updating the software
5. Select "BIOS Update" and follow the next instructions.
The firmware version installed on the NCU and the update files on the service system are
output:
Figure 3-12
Select the updates
6. Select the update file and confirm with "OK".
A "Restart" is then required.
Note
Fall back strategy
Before the operating system update is installed, a backup of the installed firmware version is
stored on the service system.
For safety reasons, only files can be selected that are suitable and are appropriate for this
NCU.
If a directory called "BIOS" is created on the service system on the FAT partition, the operating
system updates are found in this directory and the backup of the installed firmware version
is stored in this directory.
NCU operating system
Commissioning Manual, 10/2020, A5E48312736B AB
85
Service and diagnostics
3.5 Updating the software
Update other components
The following rules must be observed for the additional updates:
• The procedure for updating the PLC-BIOS Update is the same as for the operating system
update.
• FPGA Update: for NCU7x0.3
• CBE30 Bootloader Update: for CBE30 and CBE30-2 (option module)
3.5.2
This is how you update the software
Update / Recover
The following options are available:
• Update the software from the service system or from the network drive.
• Completely restore the CompactFlash Card with the system software from the service system
or from the network drive (Recover system ...).
NCU operating system
86
Commissioning Manual, 10/2020, A5E48312736B AB
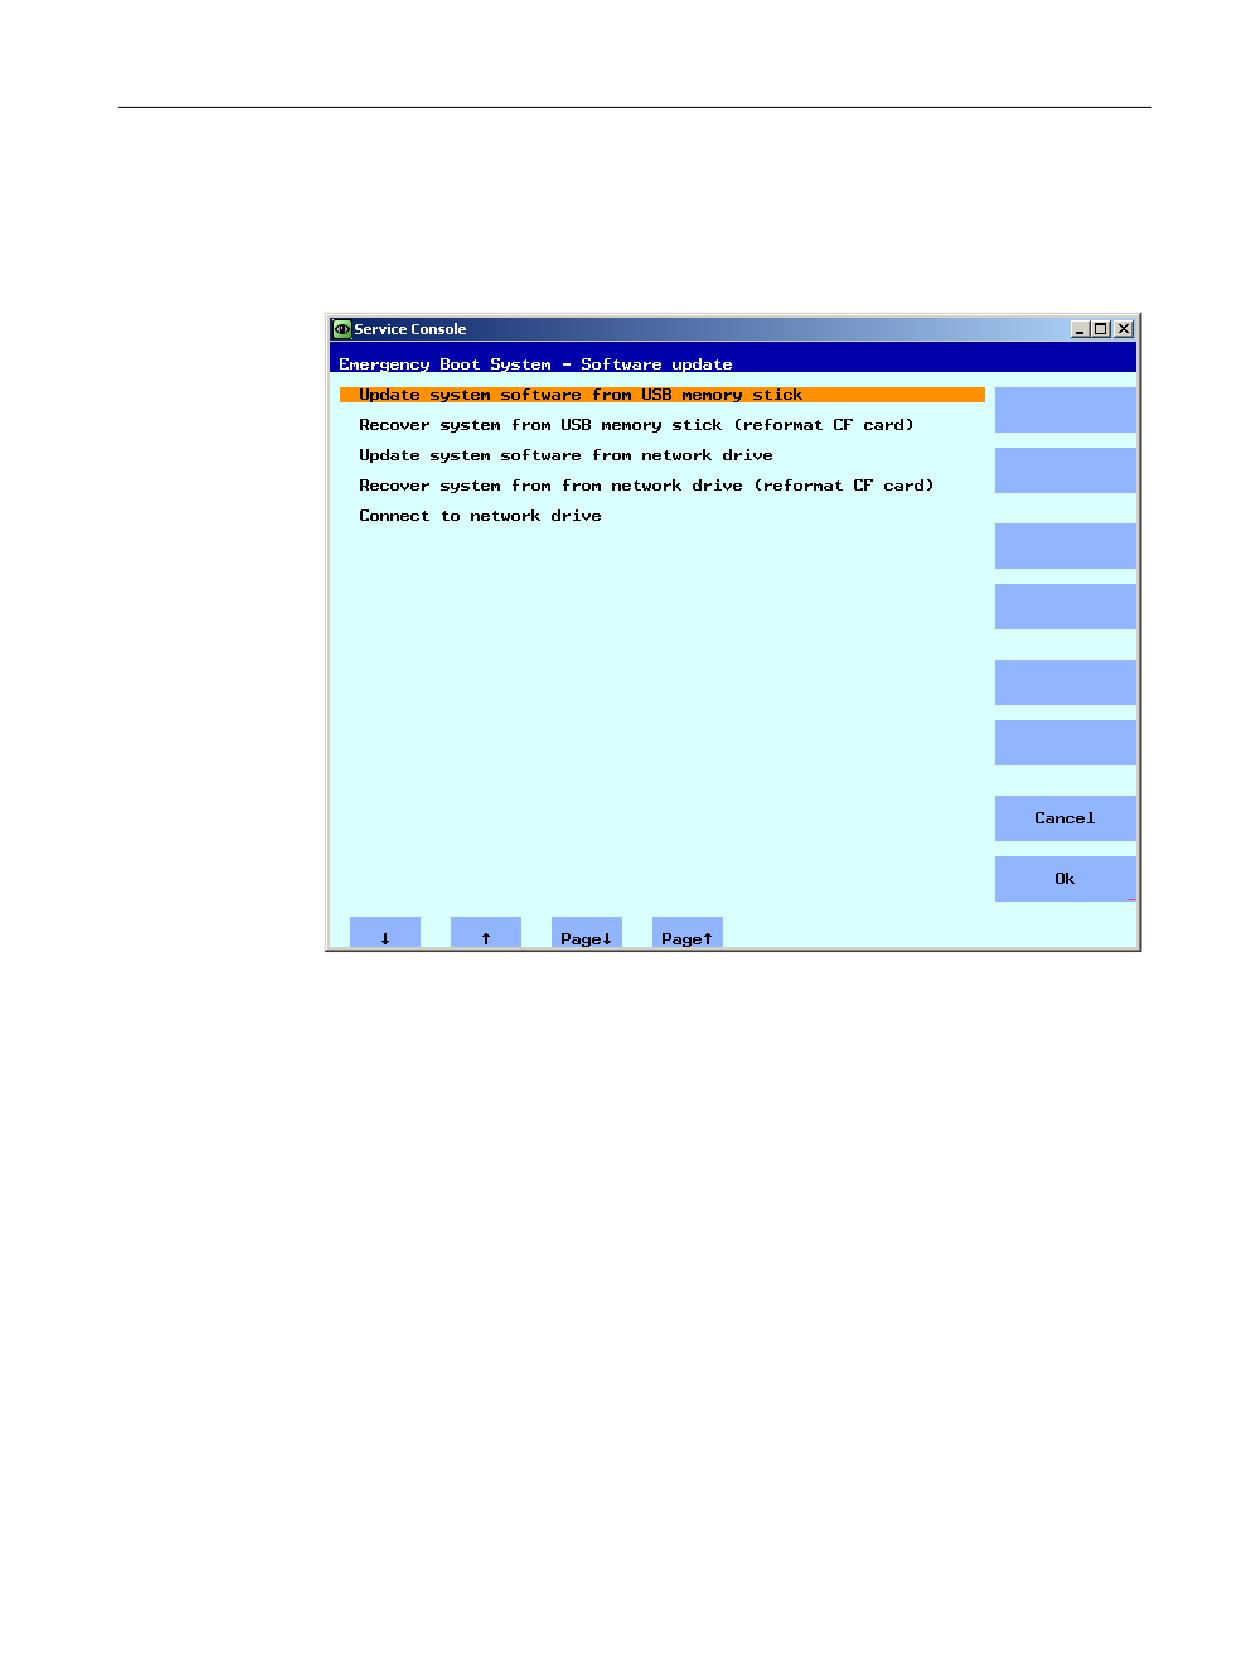
Service and diagnostics
3.5 Updating the software
Updating the software
Procedure:
1. In the main menu, select the menu item "Update NCU Software and Data".
The following menu is displayed:
Figure 3-13
Software update
2. Select the menu item "Update system software from USB memory stick".
The list of the tgz files available on the USB storage medium are displayed.
NCU operating system
Commissioning Manual, 10/2020, A5E48312736B AB
87
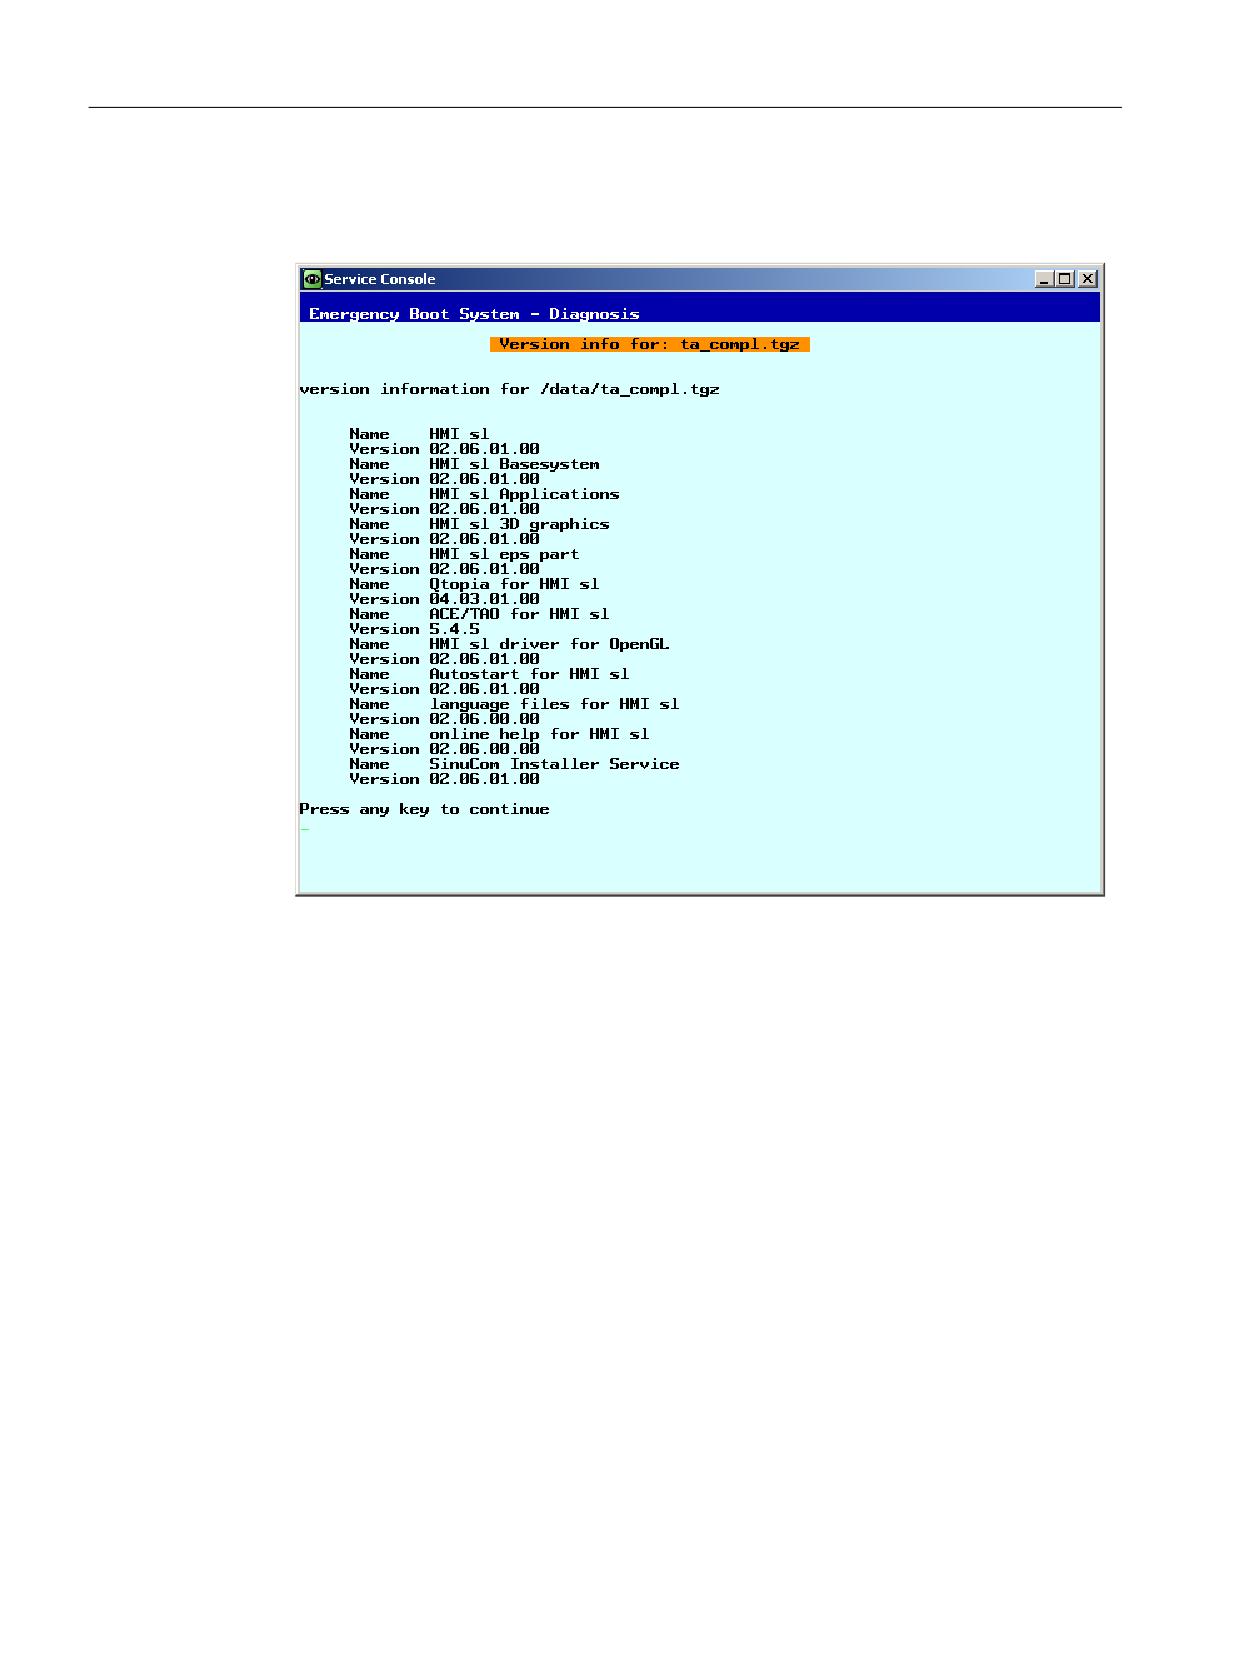
Service and diagnostics
3.5 Updating the software
3. In order to check which software version contains the tgz file, first select the tgz file, then
press "Show version".
The following information is output:
Figure 3-14
Version information
4. Select the appropriate tgz file and confirm with "Ok".
A message is output after the update has been successfully completed.
Completion
The system must be restarted in order that the new data become effective.
See also
The procedure for "Update system software from network drive" is essentially the same. In
addition, you connect to a network drive: This is how you connect to a network drive (Page 67)
For a complete backup of the system: This is how you install a complete system backup
(Page 78)
NCU operating system
88
Commissioning Manual, 10/2020, A5E48312736B AB
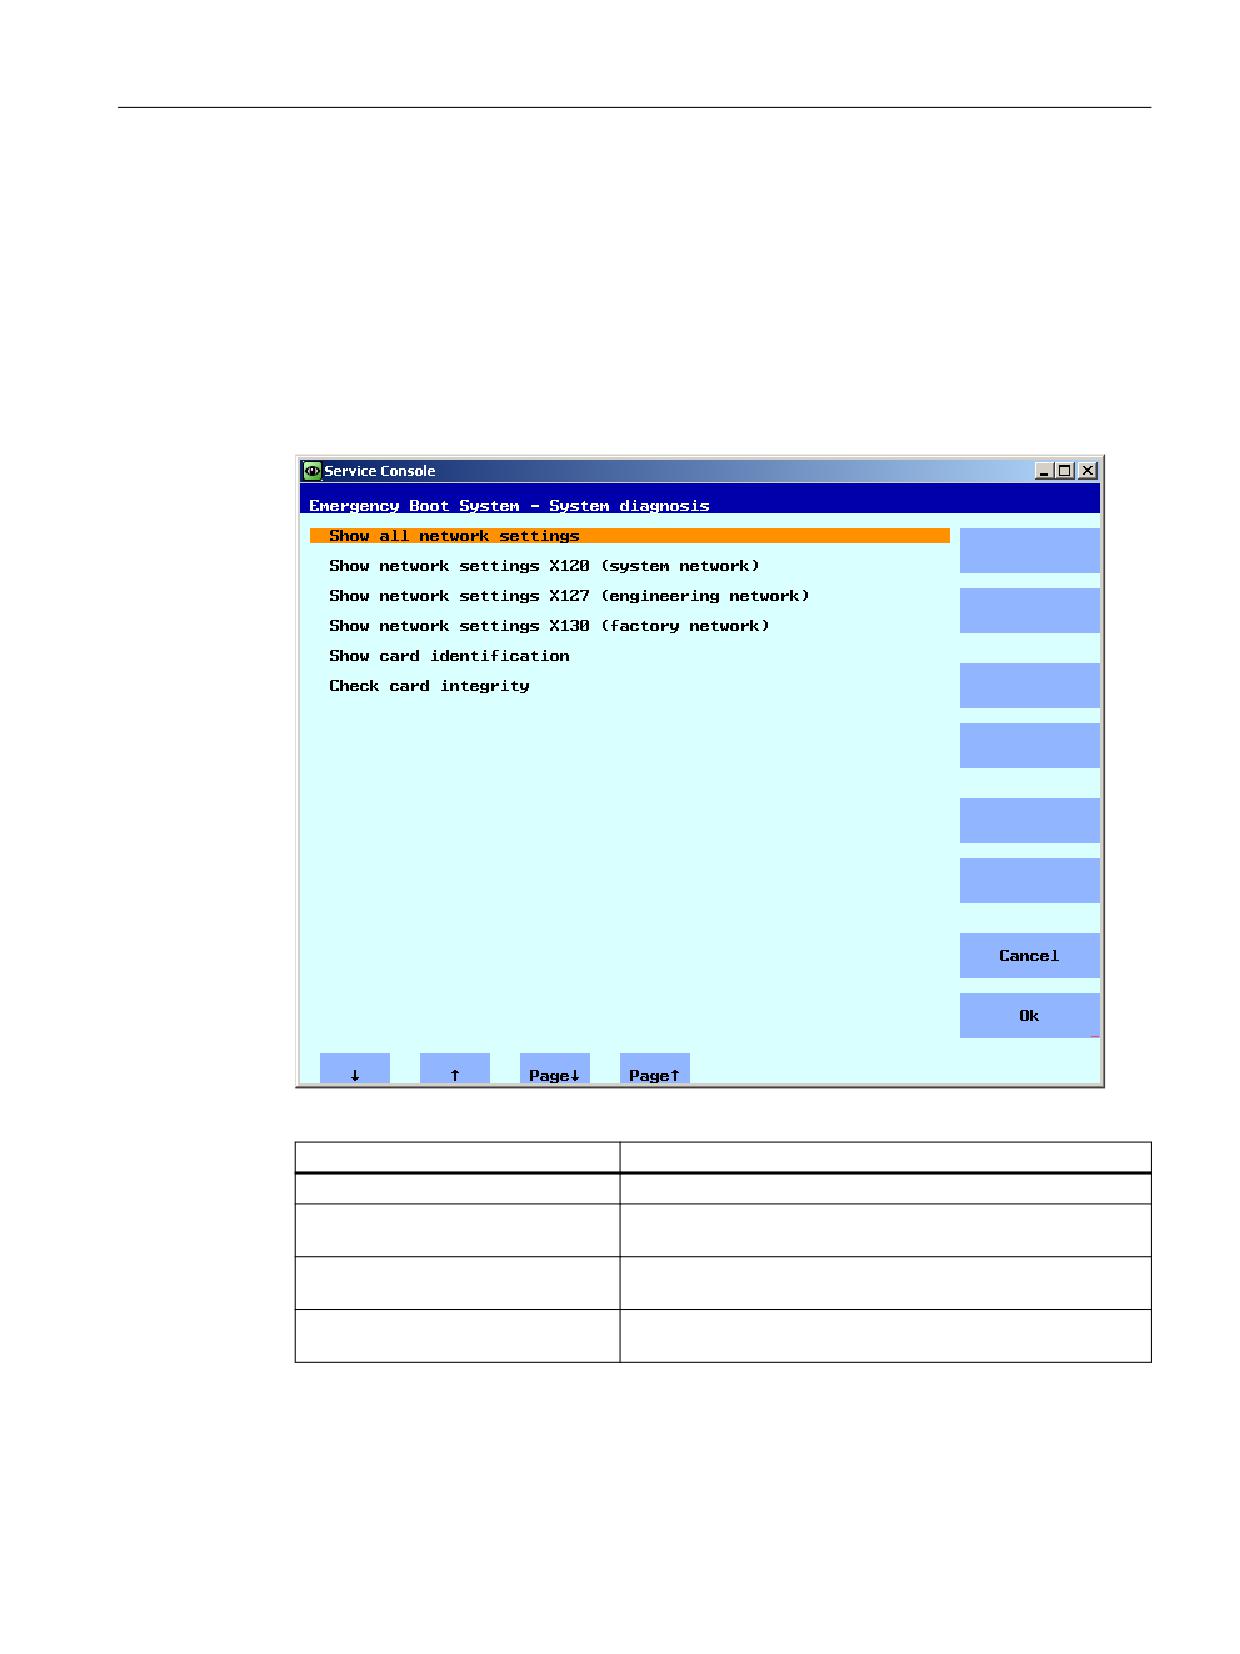
Service and diagnostics
3.6 System diagnostics
3.6
System diagnostics
3.6.1
Performing system diagnostics
Overview of diagnostic functions
The following diagnostic functions to display network settings are included in this menu:
Figure 3-15
Diagnostics functions
System diagnosis
Description
Show all network settings
Connection data of all Ethernet interfaces is displayed.
Show network settings X120
The connection data of interface X120 is displayed.
(system network)
Show network settings X127
The connection data of interface X127 is displayed.
(engineering network)
Show network settings X130
The connection data of interface X130 is displayed.
(factory network)
NCU operating system
Commissioning Manual, 10/2020, A5E48312736B AB
89
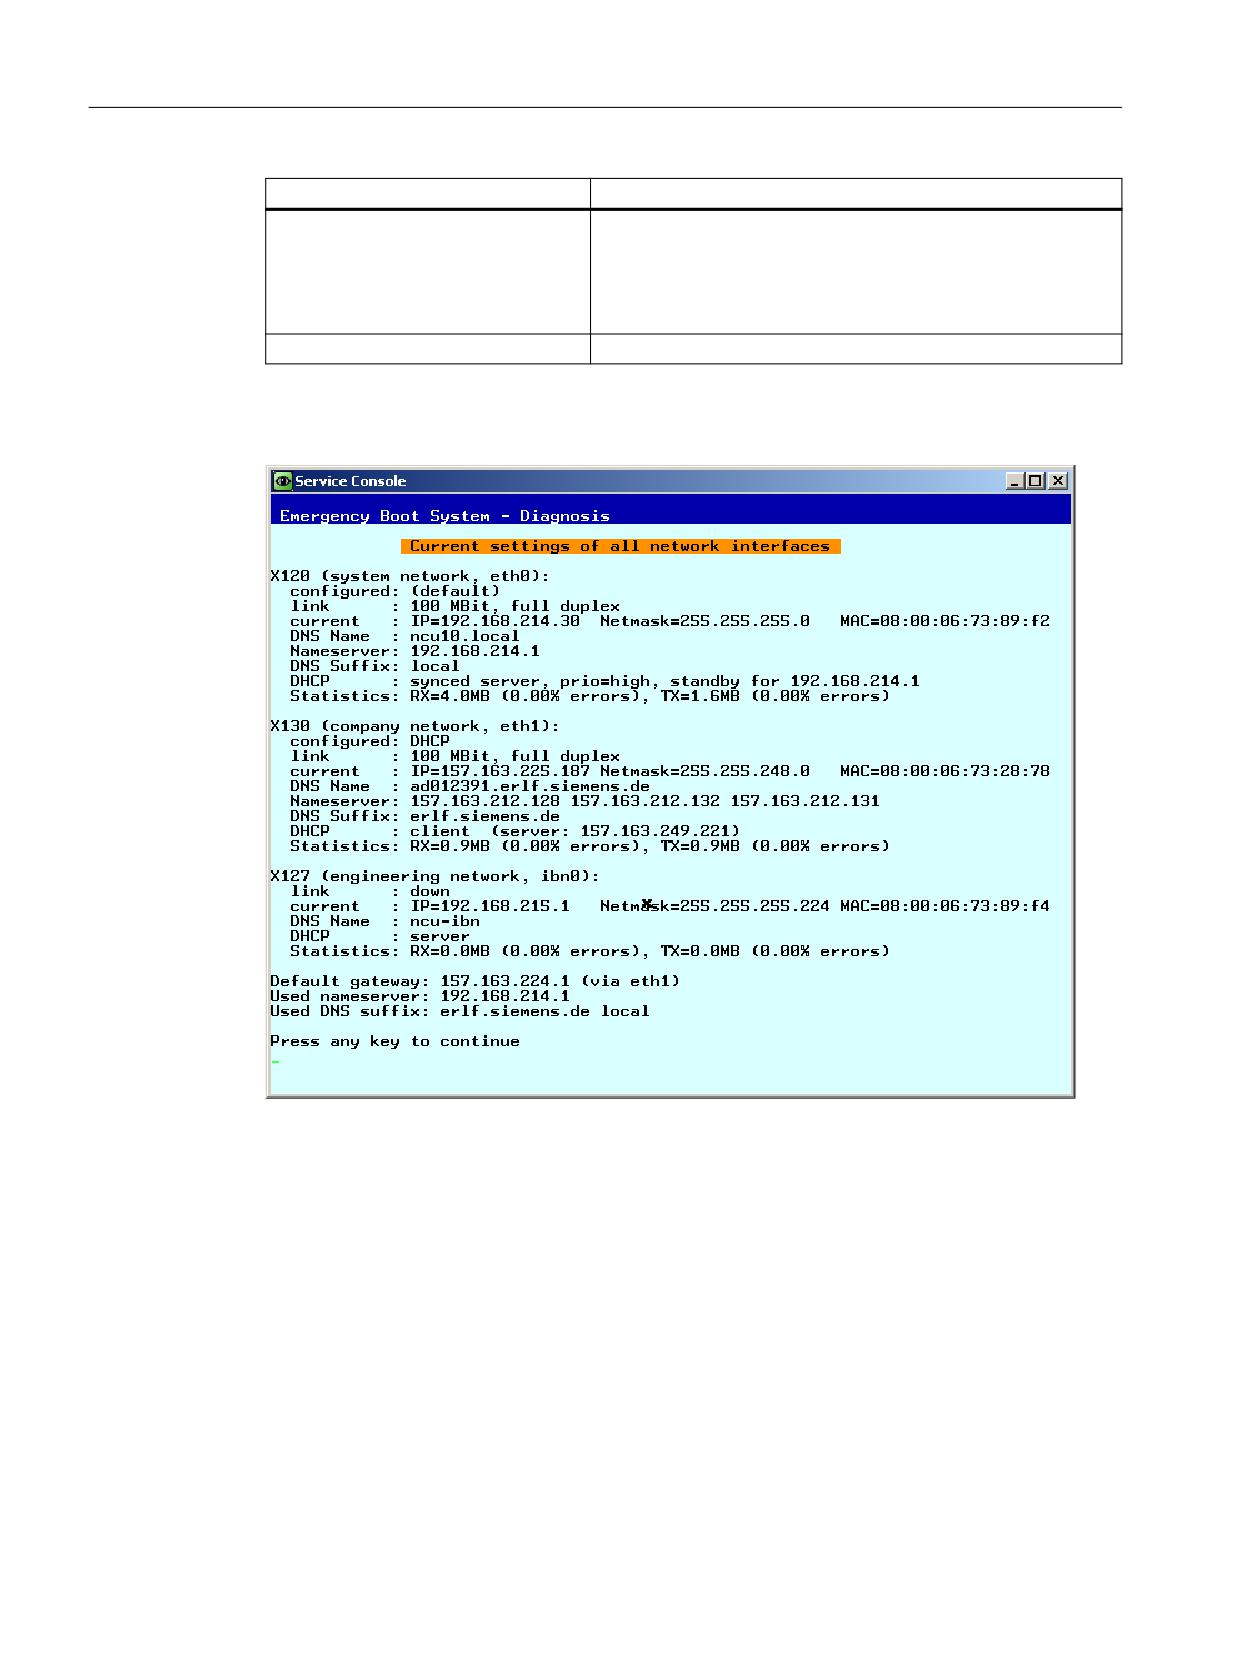
Service and diagnostics
3.6 System diagnostics
System diagnosis
Description
Show card identification
The following data of the system CompactFlash Card is output:
• Serial number
• System software version
• Hardware version (NCU)
Check card integrity
Checking the CompactFlash Card system
Example: Connection data of all Ethernet interfaces of the NCU:
Figure 3-16
NCU: Interfaces
See also
This is how you check the CompactFlash Card (Page 92)
NCU operating system
90
Commissioning Manual, 10/2020, A5E48312736B AB
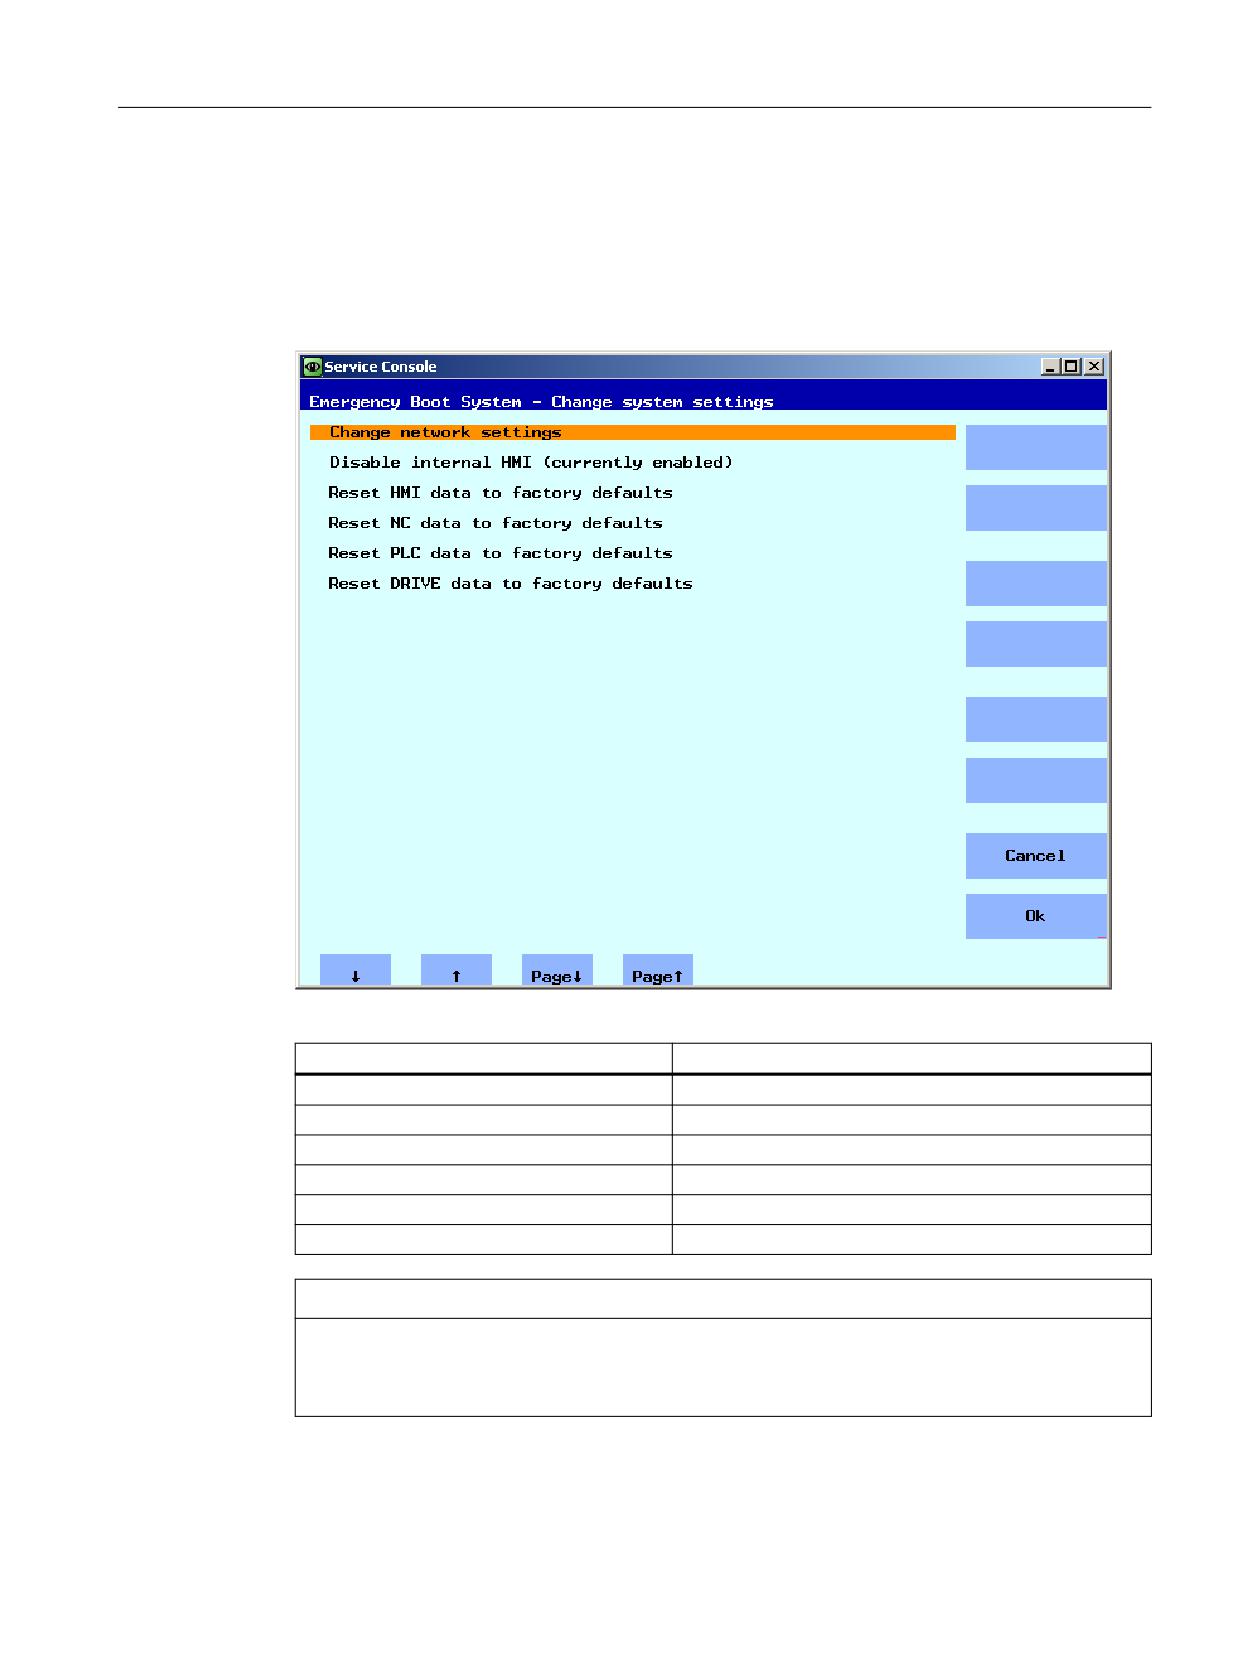
Service and diagnostics
3.6 System diagnostics
3.6.2
This is how you change the system settings
Modify NCU Settings
You can change the following system settings in this menu:
Figure 3-17
Changing system settings
Menu item
Description
Change network settings
Changing network settings of the NCU.
Disable internal HMI (currently enabled)
Activating/deactivating an HMI task
Reset HMI data to factory defaults
Restoring the delivery condition of HMI data.
Reset NC data to factory defaults
Restoring the delivery condition of NC data.
Reset PLC data to factory defaults
Restoring the delivery condition of PLC data.
Reset DRIVE data to factory defaults
Restoring the delivery condition of drive data.
NOTICE
Reset ... data to factory defaults
The selected data are reset to the state when delivered, therefore overwriting all of the previous
specific commissioning settings that have been made.
NCU operating system
Commissioning Manual, 10/2020, A5E48312736B AB
91
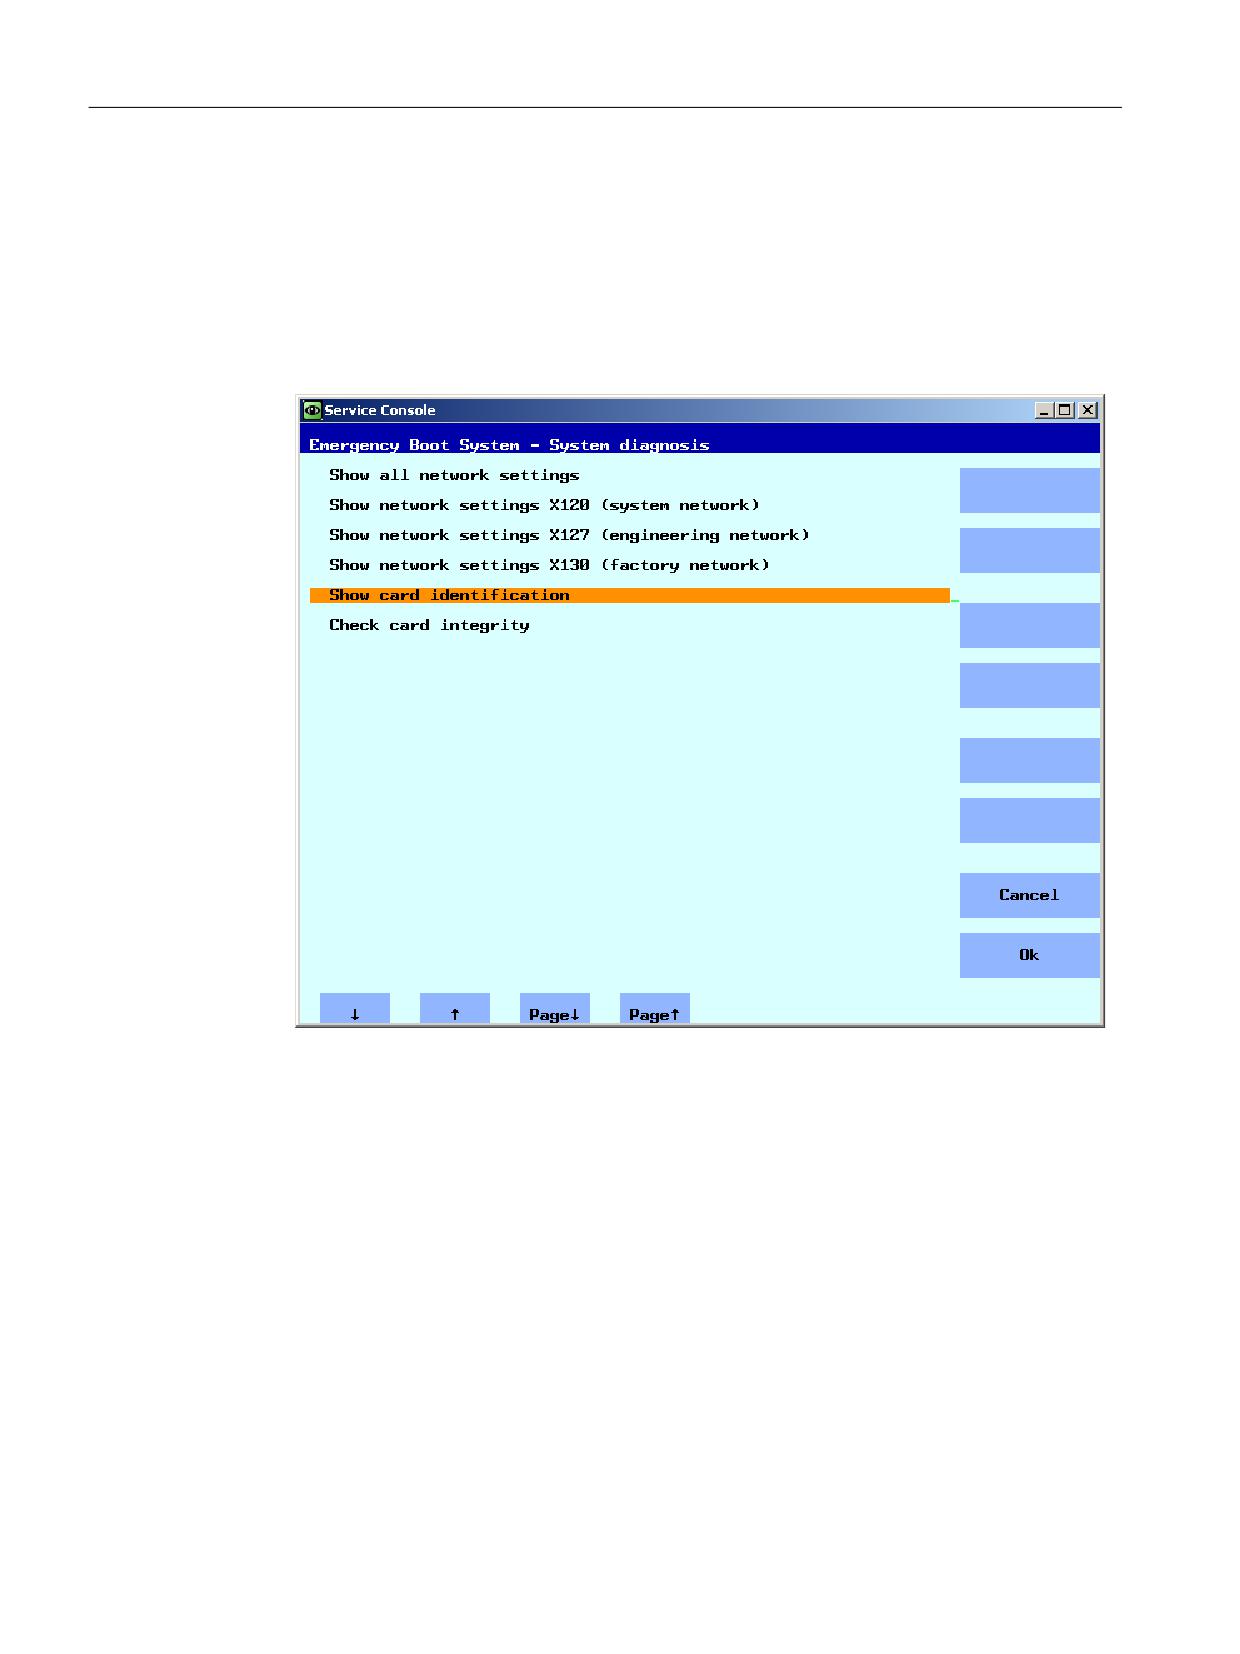
Service and diagnostics
3.6 System diagnostics
3.6.3
This is how you check the CompactFlash Card
Displaying identification data
Procedure:
1. In the main menu, select the menu item "Diagnosis".
The following menu is displayed:
Figure 3-18
System diagnostics
2. Select the menu item "Show card identification".
The following data for identification are output:
NCU operating system
92
Commissioning Manual, 10/2020, A5E48312736B AB
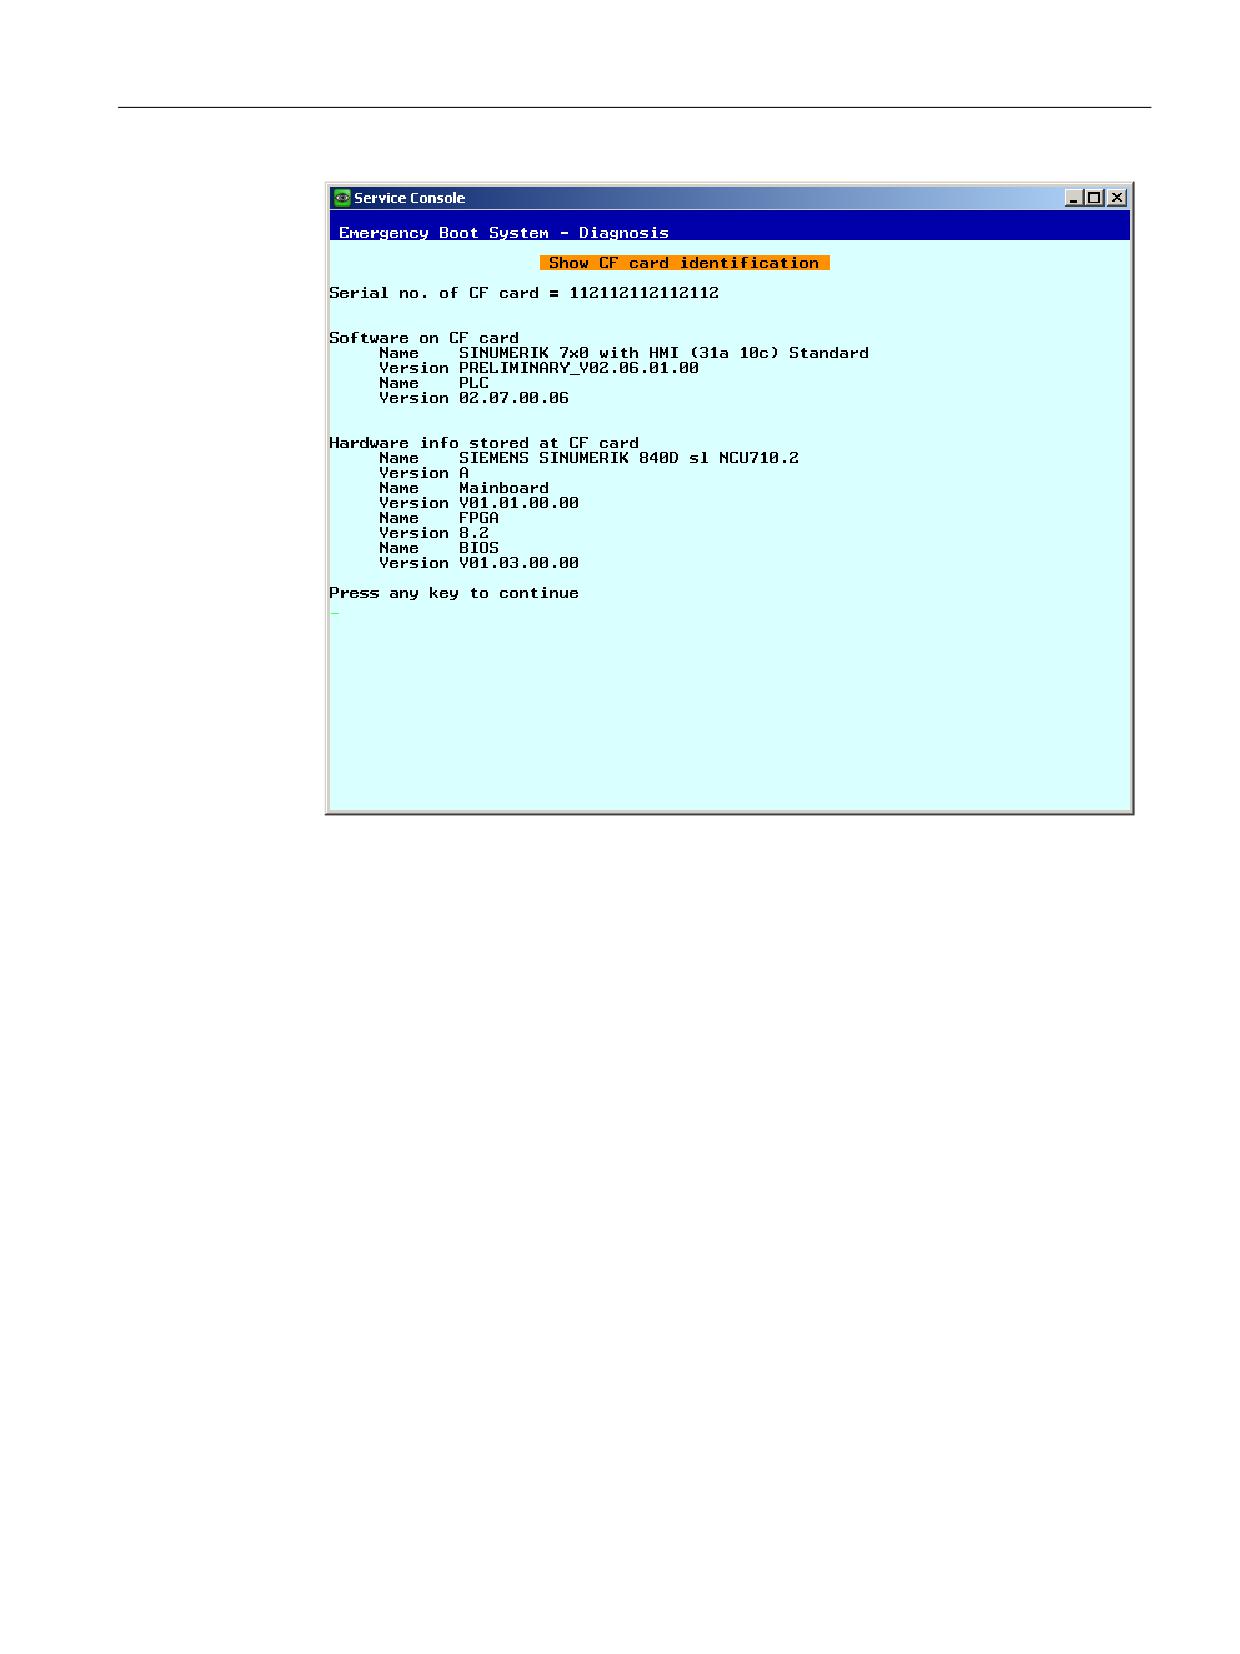
Service and diagnostics
3.6 System diagnostics
Figure 3-19
Identification
3. Select the menu item "Check card integritiy".
The CompactFlash Card is checked for errors:
NCU operating system
Commissioning Manual, 10/2020, A5E48312736B AB
93
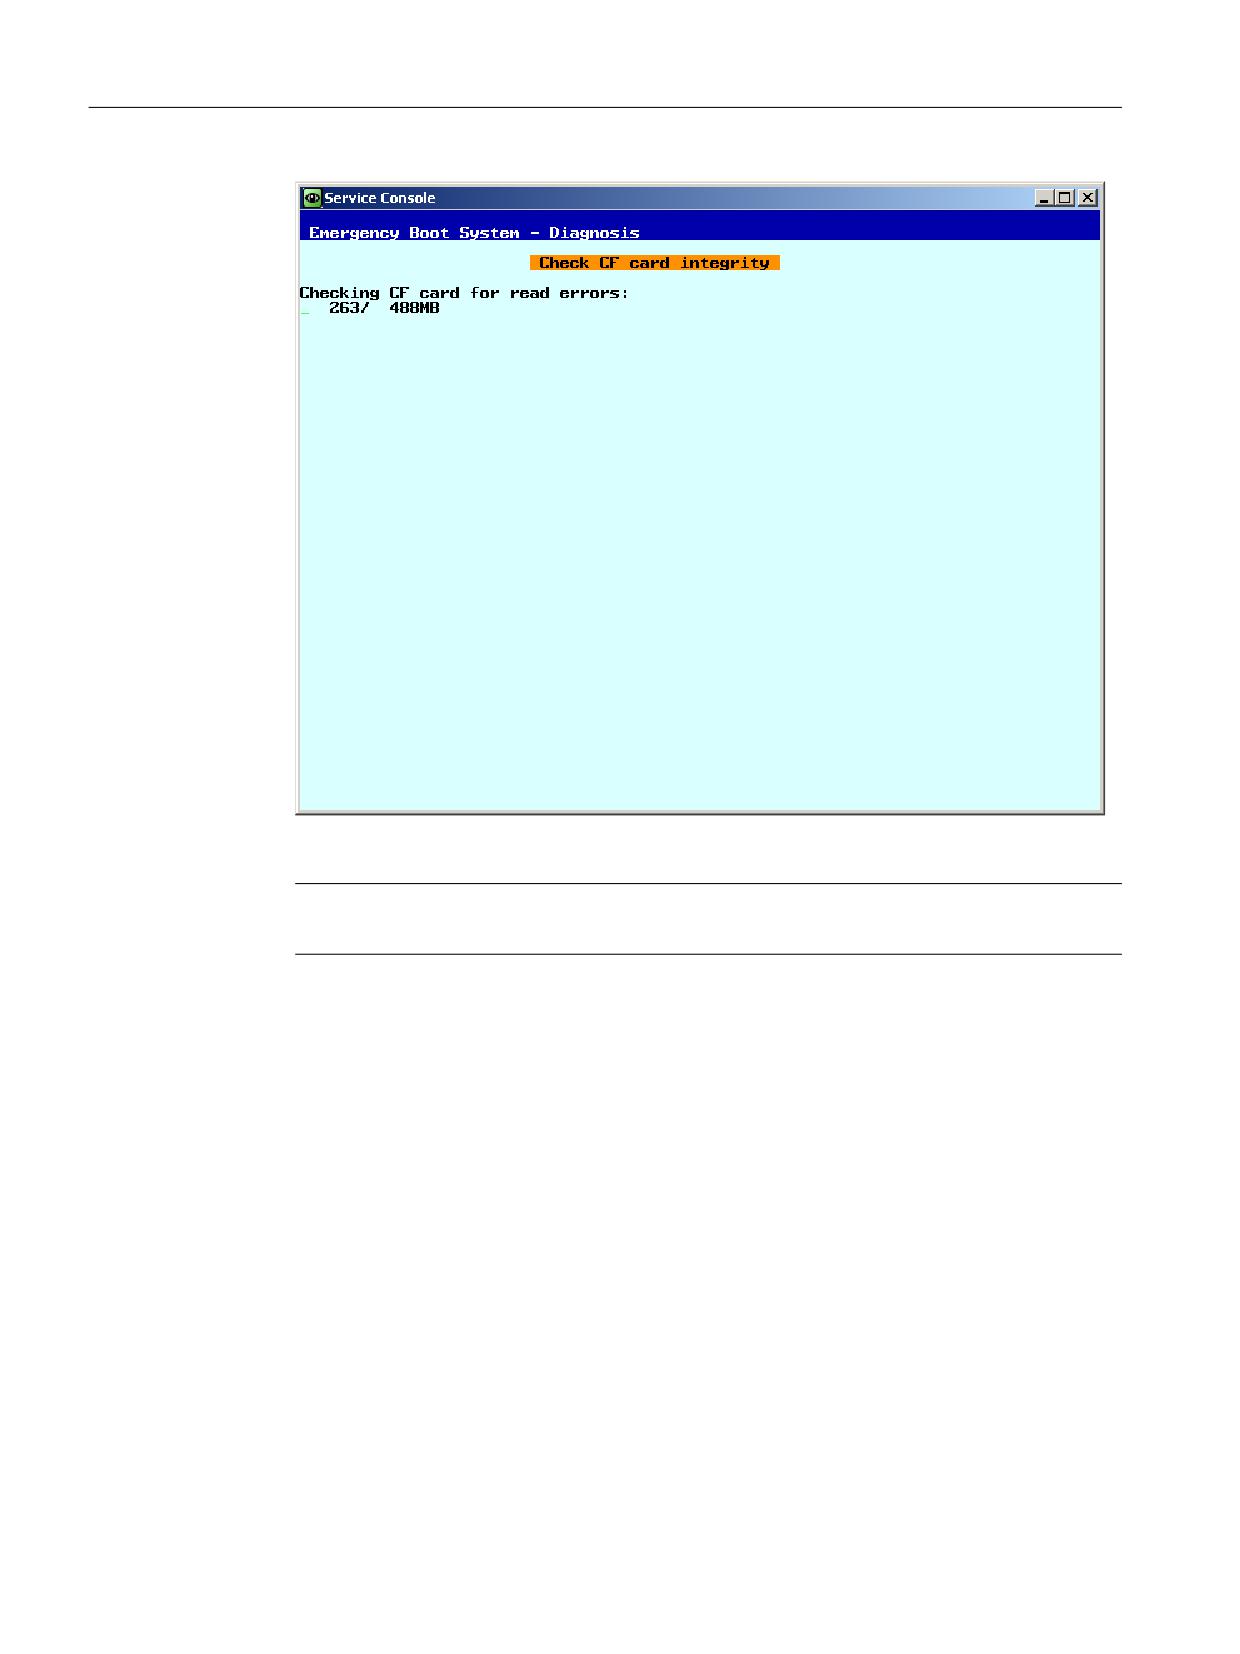
Service and diagnostics
3.6 System diagnostics
Figure 3-20
Check
Note
This procedure can take several minutes.
3.6.4
Calling the VNC Viewer
Application
The VNC Viewer is used to connect directly with a VNC Server and, for example, to operate an
HMI application.
Furthermore, it enables you to call up a list of all the network devices, thereby obtaining an
overview of the system network.
NCU operating system
94
Commissioning Manual, 10/2020, A5E48312736B AB
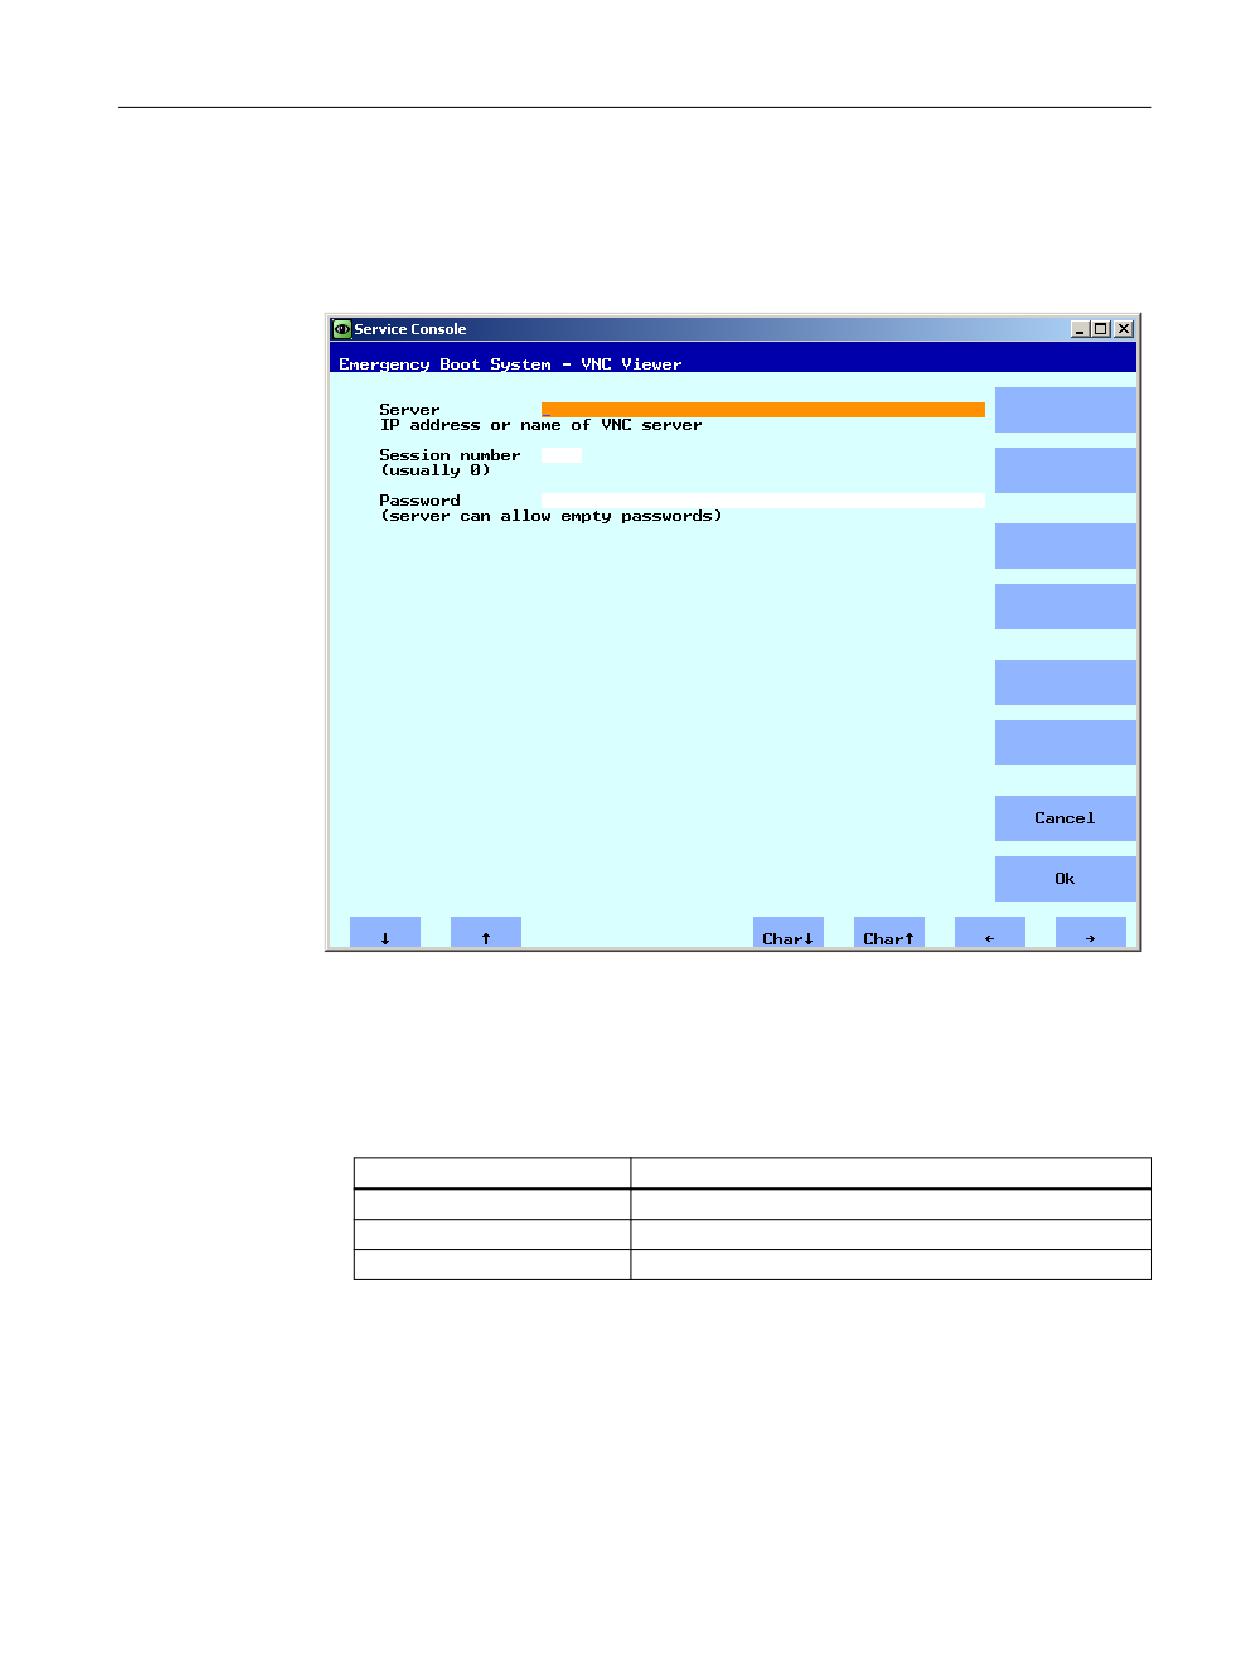
Service and diagnostics
3.6 System diagnostics
Starting the VNC Viewer
Procedure:
1. Select the "VNC Viewer" menu item in the main menu.
The following menu is displayed:
Figure 3-21
VNC Viewer
2. To start the VNC Viewer, enter the following connection data:
- Server name, e.g. IP address or DNS.
- The password is optional and can also be left empty.
- The following assignment applies to the "Session number":
Number
Meaning
Session 0
HMI-Applikation
Session 4
Command Shell
Session 5
System logfile
NCU operating system
Commissioning Manual, 10/2020, A5E48312736B AB
95
Service and diagnostics
3.6 System diagnostics
3.6.5
WinSCP and PuTTY
Use
The programs WinSCP and PuTTY are freely-available open source programs for Windows.
WinSCP is intended especially for transferring files from and to Linux systems, PuTTY for the
remote operation of a command shell.
• WinSCP can be downloaded via the following link: http://winscp.net/eng/download.php
WinSCP also offers a "command shell" that is limited so that commands can be issued, but no
callbacks can be answered.
• PuTTY, by contrast, offers a complete command shell.
With both programs, a service technician can log onto the NCU and carry out service tasks. The
username ‘manufact’ with the password ‘SUNRISE’ is available for the Siemens service
technician.
Starting WinSCP
WinSCP is started from Windows after the service technician has logged onto the NCU with
which he is connected using the corresponding authorization (e.g. as user "manufact" with
password "SUNRISE").
From the "Commands“ menu, select ”Open terminal” to open a command shell. There you can
carry out the service commands in the usual way.
NCU operating system
96
Commissioning Manual, 10/2020, A5E48312736B AB

Appendix
A
A.1
Abbreviations
CF
CompactFlash card: Memory card
CFS
Cluster File System
CIFS
Common Internet File System
DCK
Direct Control Keys: Direct control keys
DCP
Discovery and Basic Configuration Protocol
DHCP
Dynamic Host Configuration Protocol: Dynamic assignment of an IP address and other configuration param-
eters on a computer in a network
DNS
Domain Name System: Conversion of domain names into IP addresses
EBS
Emergency Boot System
EKS
Electronic Key System: System to check the identity of a user (authentication system)
EUNA
End User Notification Administration
HMI
Human Machine Interface: Operator interface
IRT
Isochronous Realtime (Ethernet)
LLDP
Link Layer Discovery Protocol: multi-vendor Layer 2 Protocol defined in accordance with the IEEE-802.1AB
standard, allows information to be exchanged between devices.
MAC
Media Access Control: The MAC address is a 48-bit Ethernet ID.
MCP
Machine Control Panel: Machine control panel
MPI
Multi-Point Interface: Multiple interface
MUI
Multilanguage User Interface
NAT
Network Address Translation
NCK
Numerical Control Kernel: NC kernel with block preparation, travel range, etc.
NCU
Numerical Control Unit: NCK hardware unit
NFS
Network File Service is a network protocol.
NRT
Non-Realtime (Ethernet)
NTFS
New Technology File System
NTLMSSP
NT LAN Manager (NTLM) Security Support Provider
NTP
Network Time Protocol: Standard for synchronizing clocks in the entire network
NTPD
NTP Daemon:
Utility that runs in the backg39round and does not have to be started by the user.
PCU
PC Unit: Computer unit
PDEV
Physical device
PG
Programming device
PLC
Programmable Logic Control: Programmable logic controller
RAM
Random Access Memory: Program memory which can be read and written into
RDY
Ready: The system is ready to operate.
RFC
Remote Function Call
SMB
Server Message Block
NCU operating system
Commissioning Manual, 10/2020, A5E48312736B AB
97

Appendix
A.1 Abbreviations
SNMP
Simple Network Management Protocol (network protocol for monitoring and controlling network elements
such as routers, servers, switches, and printers from a central station).
SSD
Solid State Drive
SSH
Secure Shell: Protocol for an encrypted network connection with a remote device
TCU
Thin Client Unit
TFTP
Trivial File Transfer Protocol: Very simple data transmission protocol
UDP
User Datagram Protocol: NTP is mostly processed via UDP.
USB
Universal Serial Bus
UPS
Uninterruptible power supply
UTC
Universal Time, Coordinated: Coordinated Universal Time (previously: Greenwich Mean Time)
VNC
Virtual Network Computing
NCU operating system
98
Commissioning Manual, 10/2020, A5E48312736B AB
Glossary
CFS (Compressed File System)
A CFS (file extension ".cfs") is a compressed file system, similar to a zip file. It contains files and
subdirectories that look like normal files on the controller at runtime. Files and directories
contained in a CFS cannot be changed. They are decompressed at runtime as required.
Network interface
The network interface is an interface that enables network communication. These are the
Ethernet interfaces on the NCU.
NFS (Network File System)
NFS is the most common protocol for remote file systems in the world of Unix, and is also
available for Windows. NFS is closely based on the Unix privilege model - each time a file is
accessed, a UID and GID are supplied which the server then uses to decide whether the operation
is permitted. The server relies on the client to provide the correct IDs.
Remote File System
A file system that is contacted over the network. The files are physically located on another
computer in the network (the "server"), but appear locally the same as all other files. Operations
performed on these files are sent via the network to the server, instead of being executed directly
on a local storage medium (such as a hard drive or CompactFlash Card).
As a server usually exports more than one file system, a name for the required file system must
also be entered in addition to the name of the server.
SMB (Server Message Block)
SMB is the underlying protocol of MS Windows file systems (also known as drives, releases,
shares, etc.). SMB connections are always active in the context of a specific user, who must be
known to the server. Exported file systems have a name (release name), by which they can be
addressed. The client does not need to know the concrete path on the server.
Subsystem
A subsystem is a CFS that not only contains a collection of files, but also executes a program, for
example, at runtime. To do this, the CFS contains a script that is used to control the starting and
stopping of this program.
For this reason, only administrators are permitted to set up NFS file systems, and NFS is usually
only implemented in uniformly administrated environments. Exported file systems on the server
are addressed directly on the server via their path.
NCU operating system
Commissioning Manual, 10/2020, A5E48312736B AB
99
Glossary
VNC (Virtual Network Computing)
Virtual Network Computing is a software that displays the screen contents of a remote
computer, with a running VNC server, on a local computer, with a running VNC viewer, and in
return sends keyboard and mouse movements of the local computer to the remote computer.
NCU operating system
100
Commissioning Manual, 10/2020, A5E48312736B AB
Preface
1
Introduction
2
Safety notes
SINUMERIK
3
Setting up of OPC UA server
SINUMERIK 840Dsl/828D
SINUMERIK Access MyMachine /
Customer Specific Object
4
Model (CSOM)
OPC UA
5
User administration
Configuration Manual
6
Functionality
7
Diagnosis
8
Update of OPC UA server
9
Technical data
10
Exceptions: 828D / V4.5
11
Trouble shooting
A
Annex
Valid for:
OPC UA server
Version 3.1
10/2020
6FC5397-1DP41-0BA5
Table of contents
Preface
3
1
Introduction
9
1.1
General description
9
1.1.1
SINUMERIK OPC UA server
9
1.2
Features
10
1.3
System setup
11
1.4
Compatibility of OPC UA server version and CNC software versions
12
1.5
Reference to OPC UA specification
13
2
Safety notes
15
2.1
Fundamental safety instructions
15
2.1.1
General safety instructions
15
2.1.2
Warranty and liability for application examples
15
2.1.3
Security information
15
2.2
OPC UA security notes
17
3
Setting up of OPC UA server
19
3.1
Prerequisites
19
3.2
Option OPC UA
20
3.3
Commissioning
21
3.4
Certificate handling
28
3.4.1
Overview
28
3.4.2
Server certificates
29
3.4.3
Client certificates
31
3.4.3.1
Trusted certificates
31
3.4.3.2
Rejected certificates
33
3.5
Testing the connection
35
4
Customer Specific Object Model (CSOM)
41
4.1
Overview
41
4.2
Functionalities
42
4.3
Workflow for using CSOM in the SINUMERIK OPC UA server
43
4.3.1
Overview
43
4.3.2
Exporting SINUMERIK model from OPC UA server as OPC UA XML
43
4.3.3
Creating a CSOM with SiOME
45
4.3.3.1
Overview
45
4.3.3.2
Importing SINUMERIK model (XML)
45
4.3.3.3
Modeling own object model
48
4.3.3.4
Option management in SiOME
63
4.3.3.5
Exporting CSOM (XML)
68
SINUMERIK Access MyMachine / OPC UA
Configuration Manual, 10/2020, 6FC5397-1DP41-0BA5
5
Table of contents
4.3.3.6
Mapping data types
70
4.3.3.7
Modeling rules
71
4.3.3.8
Access control with CSOM
72
4.3.4
Converting the CSOM from XML to binary
73
4.3.5
Importing the CSOM into the SINUMERIK OPC UA server
74
4.4
CSOM dialog in SINUMERIK Operate
76
4.4.1
Overview
76
4.4.2
OPC UA model dialog
77
4.4.3
Adding model
77
4.4.4
Deleting OPC UA model
79
4.4.5
Activating / Deactivating OPC UA model and SINUMERIK namespace
81
5
User administration
83
5.1
Overview
83
5.2
User management
84
5.3
Access rights management
85
5.4
List of access rights
86
5.5
Changing access rights for OPC UA configuration screens in SINUMERIK Operate
89
6
Functionality
91
6.1
Overview
91
6.2
Address space model
92
6.3
Variable access
94
6.3.1
Variable paths for NC access operations
94
6.3.2
Variable paths for GUD access operations
95
6.3.3
Variable paths for PLC access operations
96
6.3.4
Variable paths for machine and setting data
98
6.3.5
Variable paths for 1:N configuration (only target system PCU)
98
6.3.6
Finding of OPC UA variables
100
6.3.7
Monitored items
103
6.4
Alarms
104
6.4.1
Overview
104
6.4.2
Subscribe / unsubscribe to alarms
105
6.4.3
Sequence description of alarms
106
6.4.4
SINUMERIK Alarm object
106
6.4.4.1
Description
106
6.4.4.2
OPC UA event messages and alarms
107
6.4.5
Language of alarms
112
6.4.5.1
OPC UA language specification
112
6.4.5.2
SINUMERIK language specification
112
6.4.5.3
Mapping of SINUMERIK LanguageID with OPC UA LocaleID
112
6.4.6
OPC UA alarms and conditions constraints
113
6.4.7
OPC UA alarms and conditions client
114
6.4.8
OPC UA multi-language alarms and conditions client
115
6.5
File system
117
6.5.1
Overview
117
6.5.2
Prerequisites
118
6.5.3
Standard file system support
120
SINUMERIK Access MyMachine / OPC UA
6
Configuration Manual, 10/2020, 6FC5397-1DP41-0BA5