SINUMERIK 840D sl. Service - Configuring Commissioning. Manual (2011-2020) - page 54

Reference lists
A.7 Behavior when opening the dialog (attribute CB)
A.7
Behavior when opening the dialog (attribute CB)
The following table provides an overview of the conditions when the CHANGE method is called.
The following applies to attribute CB:
CB0
The CHANGE method is triggered when the screen is displayed if the variable has a valid value
at this time (e.g. through default setting or NC/PLC variable).
CB1 (default)
The CHANGE method is not explicitly triggered when the screen is displayed. If the variable has a
configured NC/PLC variable, then the CHANGE method is of course still called.
Condition
Response
Type
System or user variable
Default setting
Execute the CHANGE
method
I/O field
Yes
Yes
Yes
Due to the configured NC/PLC vari-
able, there is always at least one
No
automatic call of the CHANGE
No
Yes
method with the current value of
No
the NC/PLC variable. The pre-as-
signment of CB does not have an
effect.
No
Yes
Yes
The CHANGE method is called with
the pre-assigned value.
No
The CHANGE method is not called.
No
Yes
No call because there is no valid
value present to call the CHANGE
No
method.
Toggle
Yes
Yes
Yes
Due to the configured NC/PLC vari-
able, there is always at least one
No
automatic call of the CHANGE
No
Yes
method with the current value of
No
the NC/PLC variable. The pre-as-
signment of CB does not have an
effect.
No
Yes
Yes
The CHANGE method is called with
the pre-assigned value.
No
The CHANGE method is not called.
No
Yes
The CHANGE method is called with
the first pre-assigned value of the
(per default the
toggle list.
first value from the
toggle is assigned)
No
The CHANGE method is not called.
SINUMERIK Integrate Run MyScreens
Programming Manual, 10/2020, A5E40869575B AD
321
Tips and tricks
B
B.1
General tips
•
If possible, use the OPI version for system variables ($ variables).
Reason:
Avoids complex name resolution.
Example:
Instead of "$R[10]", it is better to use "/Channel/Parameter/R[u1,10]".
•
Avoids cyclic (similar) setting, e.g. of the screen and variable HLP property. Compare the
value to be set with the current value first, and only set it when it is different.
Reason:
Avoid a time-consuming search of the resolution-dependent help screens.
Example:
DEF MyVar=(R3///,"X1",,"mm"/WR1//"$AA_IM[0]")
CHANGE(MyVar)
IF MyVar.VAL < 100
HLP="mypic1.png"
ELSE
HLP="mypic2.png"
ENDIF
END_CHANGE
Recommendation:
CHANGE(MyVar)
IF MyVar.VAL < 100
IF HLP <> "mypic1.png"
HLP="mypic1.png"
ENDIF
ELSE
IF HLP <> "smypic2.png"
HLP="mypic2.png"
ENDIF
ENDIF
END_CHANGE
SINUMERIK Integrate Run MyScreens
Programming Manual, 10/2020, A5E40869575B AD
323
Tips and tricks
B.1 General tips
• Replace several RNP() functions in succession with one MRNP() function.
Replace several RDOP() functions in succession with one MRDOP() function.
Reason:
Reduces the communication load and increases the performance.
• Do not read drive parameters faster than in a 1 second cycle, slower is better.
Reason: The communication with the drives can otherwise be extremely disturbed or even
cause failures.
• Avoid successive arithmetic operations with system or user variable-connected dialog
variables. Use, for example, register (REG[x]) or (invisible) help variables for this.
Reason: Each assignment of a value results in a write operation in the connected system or
user variable.
• Similar code used in different blocks should be combined in a SUB block for reasons of
transparency, serviceability and performance (when displaying the screen). It can then be
called at the appropriate positions with the CALL() function.
• By monitoring the CPU load in the dialog line (setting in slguiconfig.xml), it is possible to
investigate the effects of changes in the screen on the performance.
SINUMERIK Integrate Run MyScreens
324
Programming Manual, 10/2020, A5E40869575B AD
Tips and tricks
B.2 Tips for debugging
B.2
Tips for debugging
• Use the DEBUG() function for diagnostic purposes. When the DEBUG() function is called, the
transferred string is written to the "easyscreen_log.txt" file. The output of information in the
dialog line by the DLGL() function can also be helpful.
However, after completion of the screen development, this function should be removed
again for performance reasons or commented out.
• The "easyscreen_log.txt" file should have no entries after the development of a screen is
completed.
SINUMERIK Integrate Run MyScreens
Programming Manual, 10/2020, A5E40869575B AD
325
Tips and tricks
B.3 Tips for the CHANGE method
B.3
Tips for the CHANGE method
•
Always keep CHANGE methods very short and small, particularly for those whose variables
are connected to a system or user variable and change very frequently.
Reason:
Increases the screen performance.
•
If possible, do not configure any RNP() functions in CHANGE methods. Instead, it is better to
configure an invisible variable parallel to the system or user variable to be read and then use
this.
Reason:
An RNP() function would be issued with each call. Otherwise, the current value which is
already available would be simply accessed.
Example:
A name resolution is performed via RNP() for each change of the axis motion in order to read
channel-specific machine data:
DEF AXIS_POSITION_X = (R///,""///"$AA_IM[X]")
CHANGE(AXIS_POSITION_X)
DLGL("Axis """ << RNP("$MC_AXCONF_GEOAX_NAME_TAB[0]") << """
has moved: "
<< AXIS_POSITION_X)
END_CHANGE
Keep the channel-specific machine data up-to-date with the aid of an invisible variable, copy
each value change to a temporary variable, e.g. register.
This temporary variable can then be used in the CHANGE method of the value change for the
axis position without making a name resolution of the machine data each time and the
subsequent read access:
DEF AXIS_POSITION_X = (R///,""///"$AA_IM[X]")
DEF AXIS_NAME_X = (S///,""/WR0//"$MC_AXCONF_GEOAX_NAME_TAB[0]")
CHANGE(AXIS_NAME_X)
REG[0] = AXIS_NAME_X
END_CHANGE
CHANGE(AXIS_POSITION_X1)
DLGL("Axis """ << REG[0] << """ has moved " << AXIS_POSITION_X)
END_CHANGE
SINUMERIK Integrate Run MyScreens
326
Programming Manual, 10/2020, A5E40869575B AD
Tips and tricks
B.3 Tips for the CHANGE method
• The update rate and therefore the execution of the associated CHANGE method of variables
that are connected to system or user variables with very frequent value changes, can be
reduced by using the UR variable property, e.g. variable that is coupled to the actual axis
values.
Reason:
In this way, the associated CHANGE method is executed in a fixed specified grid for a value
change.
SINUMERIK Integrate Run MyScreens
Programming Manual, 10/2020, A5E40869575B AD
327
Tips and tricks
B.4 Tips for DO LOOP loops
B.4
Tips for DO LOOP loops
As loops can impair the performance of SINUMERIK Operate, depending on the configuration,
they should be used carefully and if possible without time-intensive actions.
A register (REG[]) should also be used as run variable, because normal display variables
(particularly those with OPI connection) also impair the system performance due to the frequent
updates or write operations.
Note that the number of script lines executed "in one operation", is currently limited to 10,000.
When this number is reached, the script execution is aborted with an appropriate entry in the
"easyscreen_log.txt" file.
Reason:
• Prevention of endless loops
• "Run MyScreens" must remain operable
SINUMERIK Integrate Run MyScreens
328
Programming Manual, 10/2020, A5E40869575B AD
Animated elements
C
C.1
Introduction
Introduction
The manual describes working with the X3D Viewer with which you can integrate animated and
non-animated graphical scenes (animated elements) - called help screens in the following -
into the graphical user interface of SINUMERIK Operate as of Version V4.7 SP1 .
You can show motion sequences and parameters in context-sensitive help screens. This helps
you to improve the operation of applications and make the user interface more appealing.
Implementation of your initial idea to the final help screen is described in the steps below:
• Creation of graphical elements and 3D models for the help screens that will eventually
appear in the X3D Viewer (see Chapter Modeling (Page 331)).
• Creation of the scene description file in which the model data of the graphics file will be
assigned to the scenes and animations to be displayed at particular points (see
Chapter Structure of the scene description file (Page 337)).
• Conversion of the X3D files and XML files into HMI files (see Chapter Conversion to hmi file
(Page 342)).
• C++ integration of the X3D Viewer into your own application (see Chapter Implementation
example (Page 345)).
• Application in Run MyScreens (see Chapter Display in Run MyScreens (Page 346)).
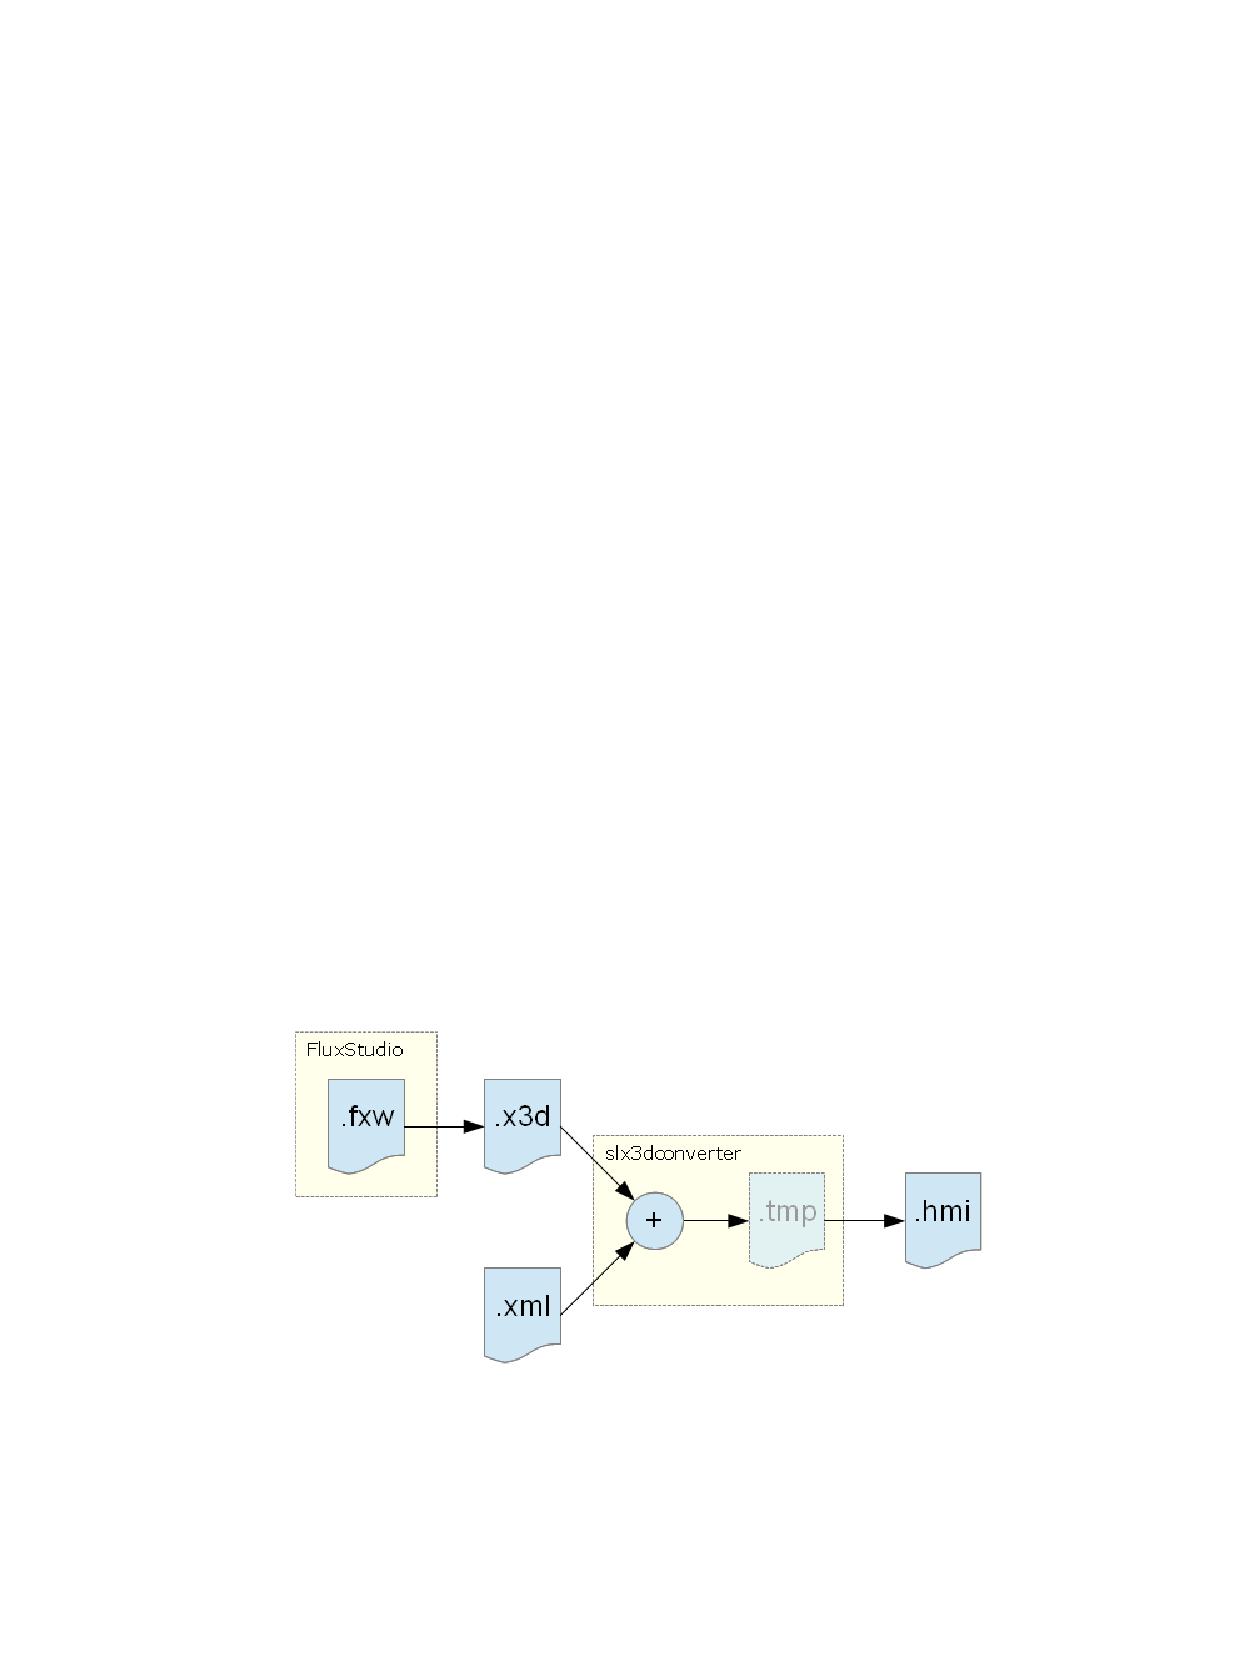
Overview of the file formats
Figure C-1
File formats
SINUMERIK Integrate Run MyScreens
Programming Manual, 10/2020, A5E40869575B AD
329
Animated elements
C.1 Introduction
File format
Description
.fxw
Graphic file from Vivaty Studio
.x3d
Model file in exchange format
.xml
Definition file for animations and scenes
.hmi
Output file for the X3D Viewer
SINUMERIK Integrate Run MyScreens
330
Programming Manual, 10/2020, A5E40869575B AD
Animated elements
C.2 Modeling
C.2
Modeling
C.2.1
Requirements
The aim of the modeling is to create a file with the generated 3D models in .x3d file format, an
official standard for 3D contents.
The modeling is done in Vivaty Studio. Vivaty Studio is a freely available 3D modelling tool with
versatile export and import options.
Requirements
• You installed Vivaty Studio, Version 1.0
• You are familiar with modeling and working with Vivaty Studio.
• File format .x3d is not described in any detail in this document, adequate knowledge of the
subject is assumed.
Note
You can download Vivaty Studio on the Internet via the link (https://www.web3d.org/projects/
vivaty-studio).
C.2.2
Rules for modeling
Observe the following rules when modeling. You will only be able to process your help screen
file if you have followed these rules correctly.
Rules for modeling
1. The time sensor must have the name "Animation".
2. All related elements must be assigned to a group.
3. All groups must be set to the following position:
x = 0, y = 0, z = 0
4. To make the groups invisible, the translation values are set as follows:
x = 1000000, y = 1000000 and z = 1000000
5. The following elements must have the same names in the Vivaty Studio graphic models and
in the XML scene definitions (cf. Chapter Overview (Page 337)):
- Tool
- Cameras
SINUMERIK Integrate Run MyScreens
Programming Manual, 10/2020, A5E40869575B AD
331
Animated elements
C.2 Modeling
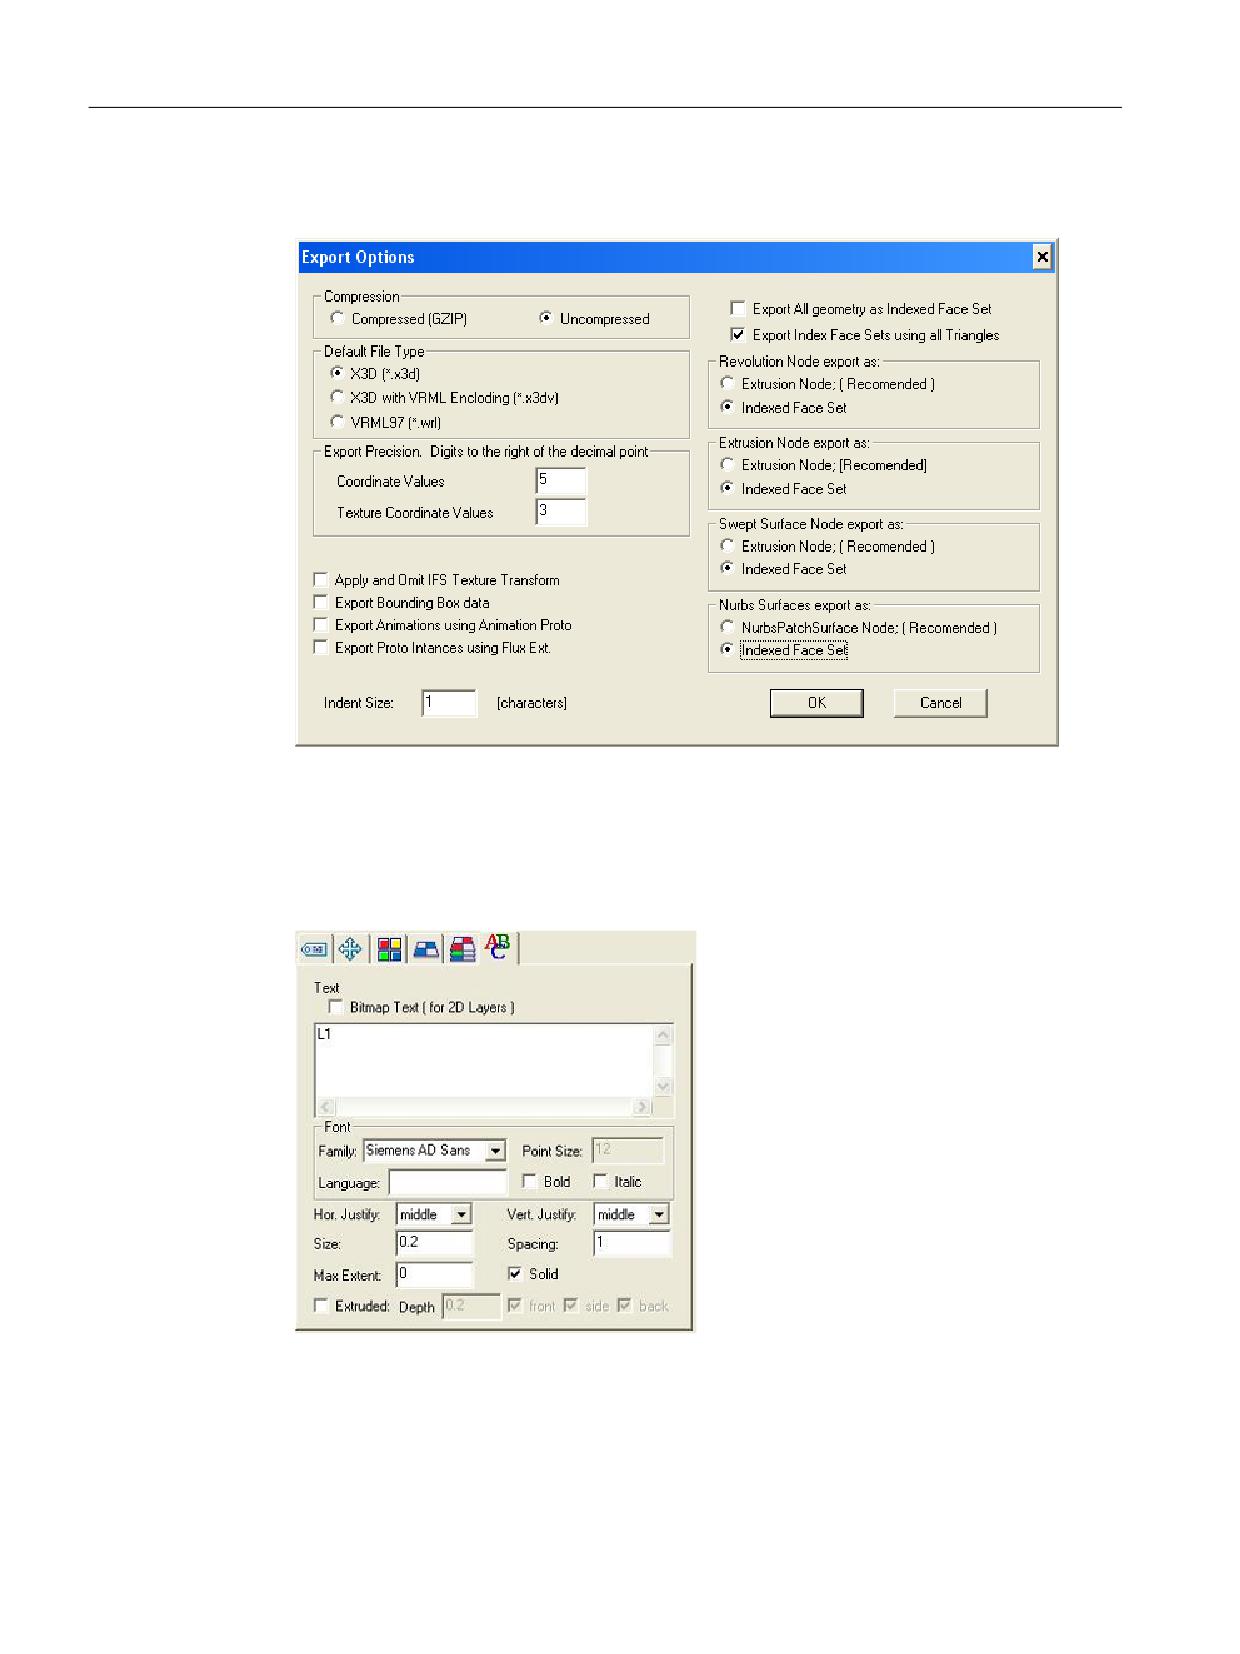
6. Before you can create a .x3d file you must make the following settings in dialog box "Export
Options":
Figure C-2
Settings in the Export Options dialog box
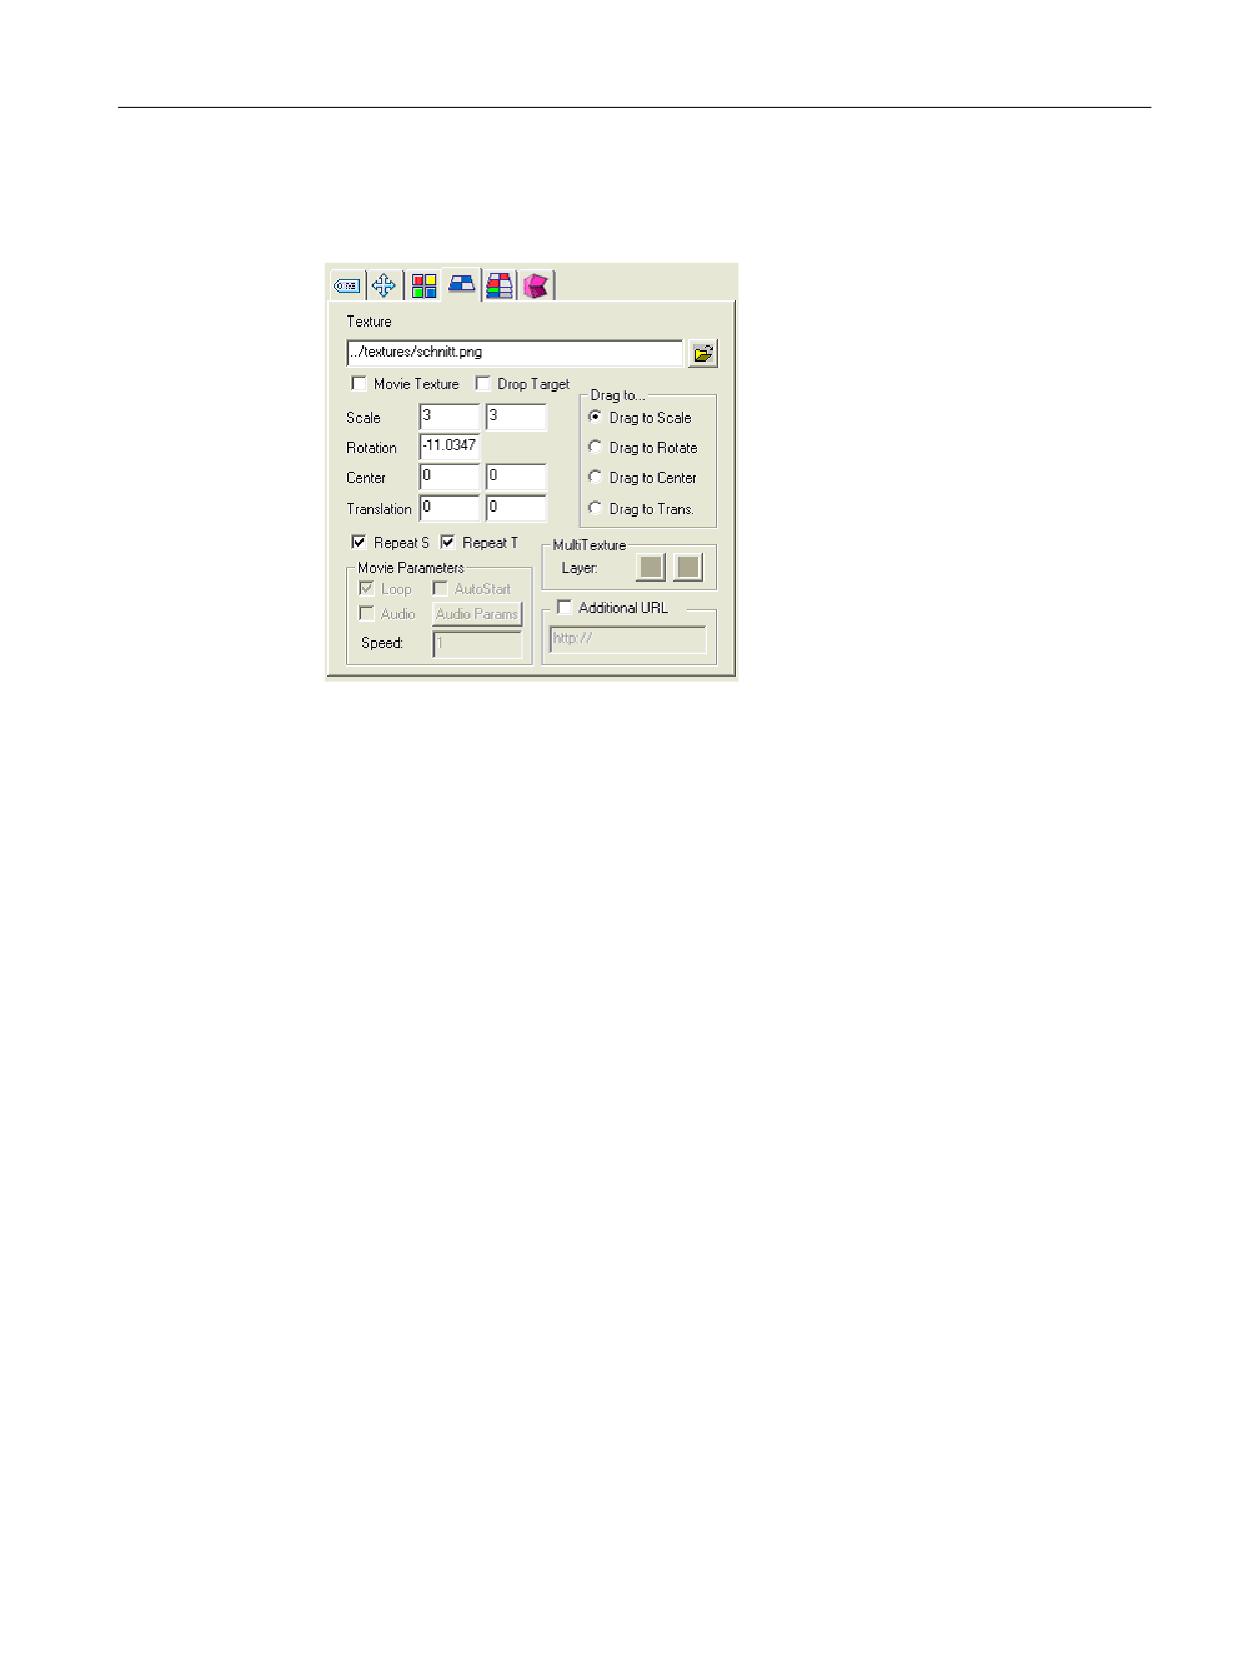
7. We recommend the following settings for texts (see also the following dialog box):
- Texts must always be centered.
- The size of the text should be 0.2. This size allows you to position the text easily. The text
output by the X3D Viewer is in the font size of the user interface, irrespective of this value.
Figure C-3
Settings for text
SINUMERIK Integrate Run MyScreens
332
Programming Manual, 10/2020, A5E40869575B AD
Animated elements
C.2 Modeling
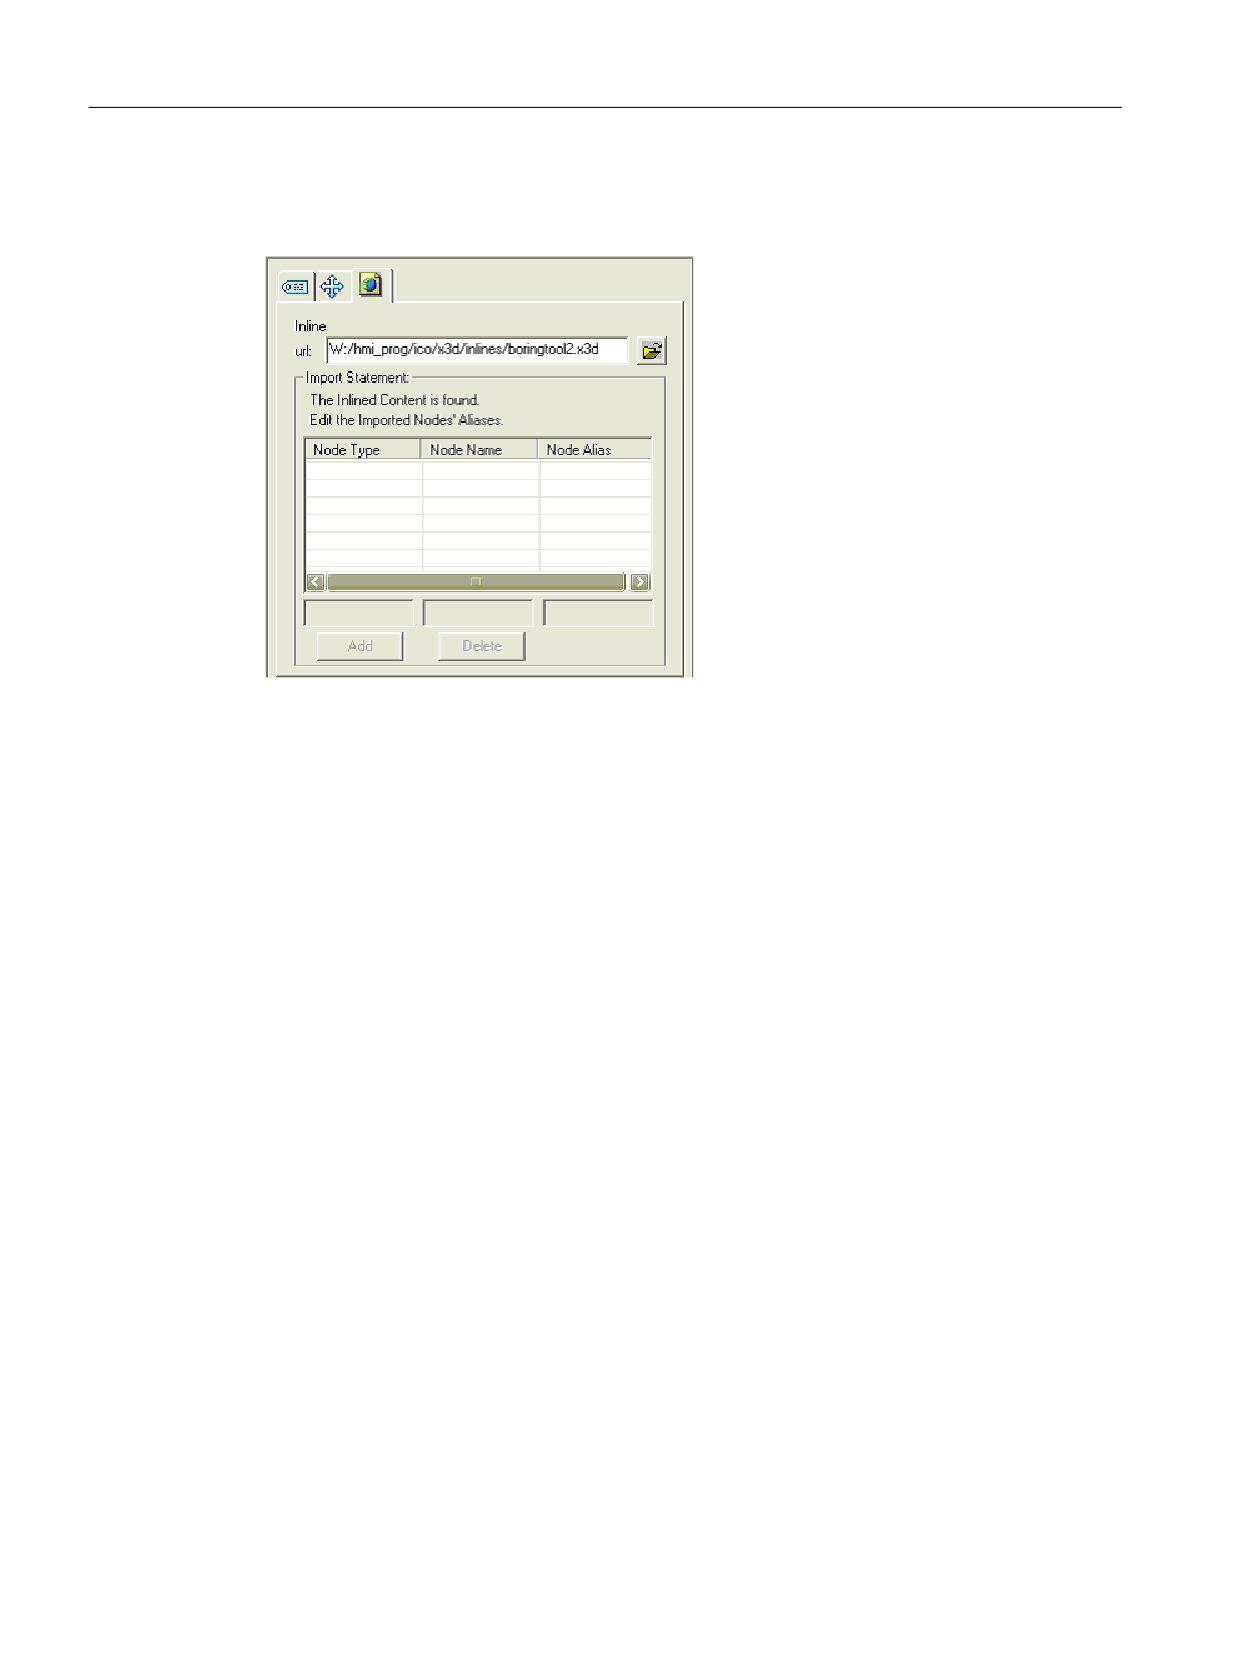
8. To create hatching, use file schnitt.png as the texture. The lines always go from the bottom
left to the top right at an angle of 45°. You should set the scaling to 3 in both dimensions. The
rotation depends on the construction type and must be adapted manually.
Figure C-4
Settings for hatching
9. We recommend the following sizes/dimensions for the blanks:
- Cylinder for turning operation:
Length = 5.5 ; Radius = 1.4 (cf. template turning_blank.fxw)
- Cube for milling operation
x = 4.75 ; y = 3 ; z = 3 (cf. template milling_blank.fxw)
See also
XML commands (Page 337)
C.2.3
Importing graphics (models)
In Flux Studio, you can import external graphics (models). You can store frequently used models,
such as tools, as .x3d or .hmi files centrally for further use as finished elements in other help
screens. You will find a list of supplied modeling templates in Chapter Modeling templates
(Page 335).
Complex objects can also be created with other modeling tools, such as Cinema4D, and then
imported.
A description of how you can reuse these models is given below.
Import as inline
Flux Studio uses the object "Inline" for importing .x3d files. It allows you to link in external
elements without multiplying the 3D data of these models.
SINUMERIK Integrate Run MyScreens
Programming Manual, 10/2020, A5E40869575B AD
333
Animated elements
C.2 Modeling
Insert the object with menu item Create -> Create Inline. Then enter a file name in the object
properties.
Figure C-5
Importing with object "Inline"
SINUMERIK Integrate Run MyScreens
334
Programming Manual, 10/2020, A5E40869575B AD
Animated elements
C.2 Modeling
Importing 3D model data
Proceed as follows to import model data from a file.
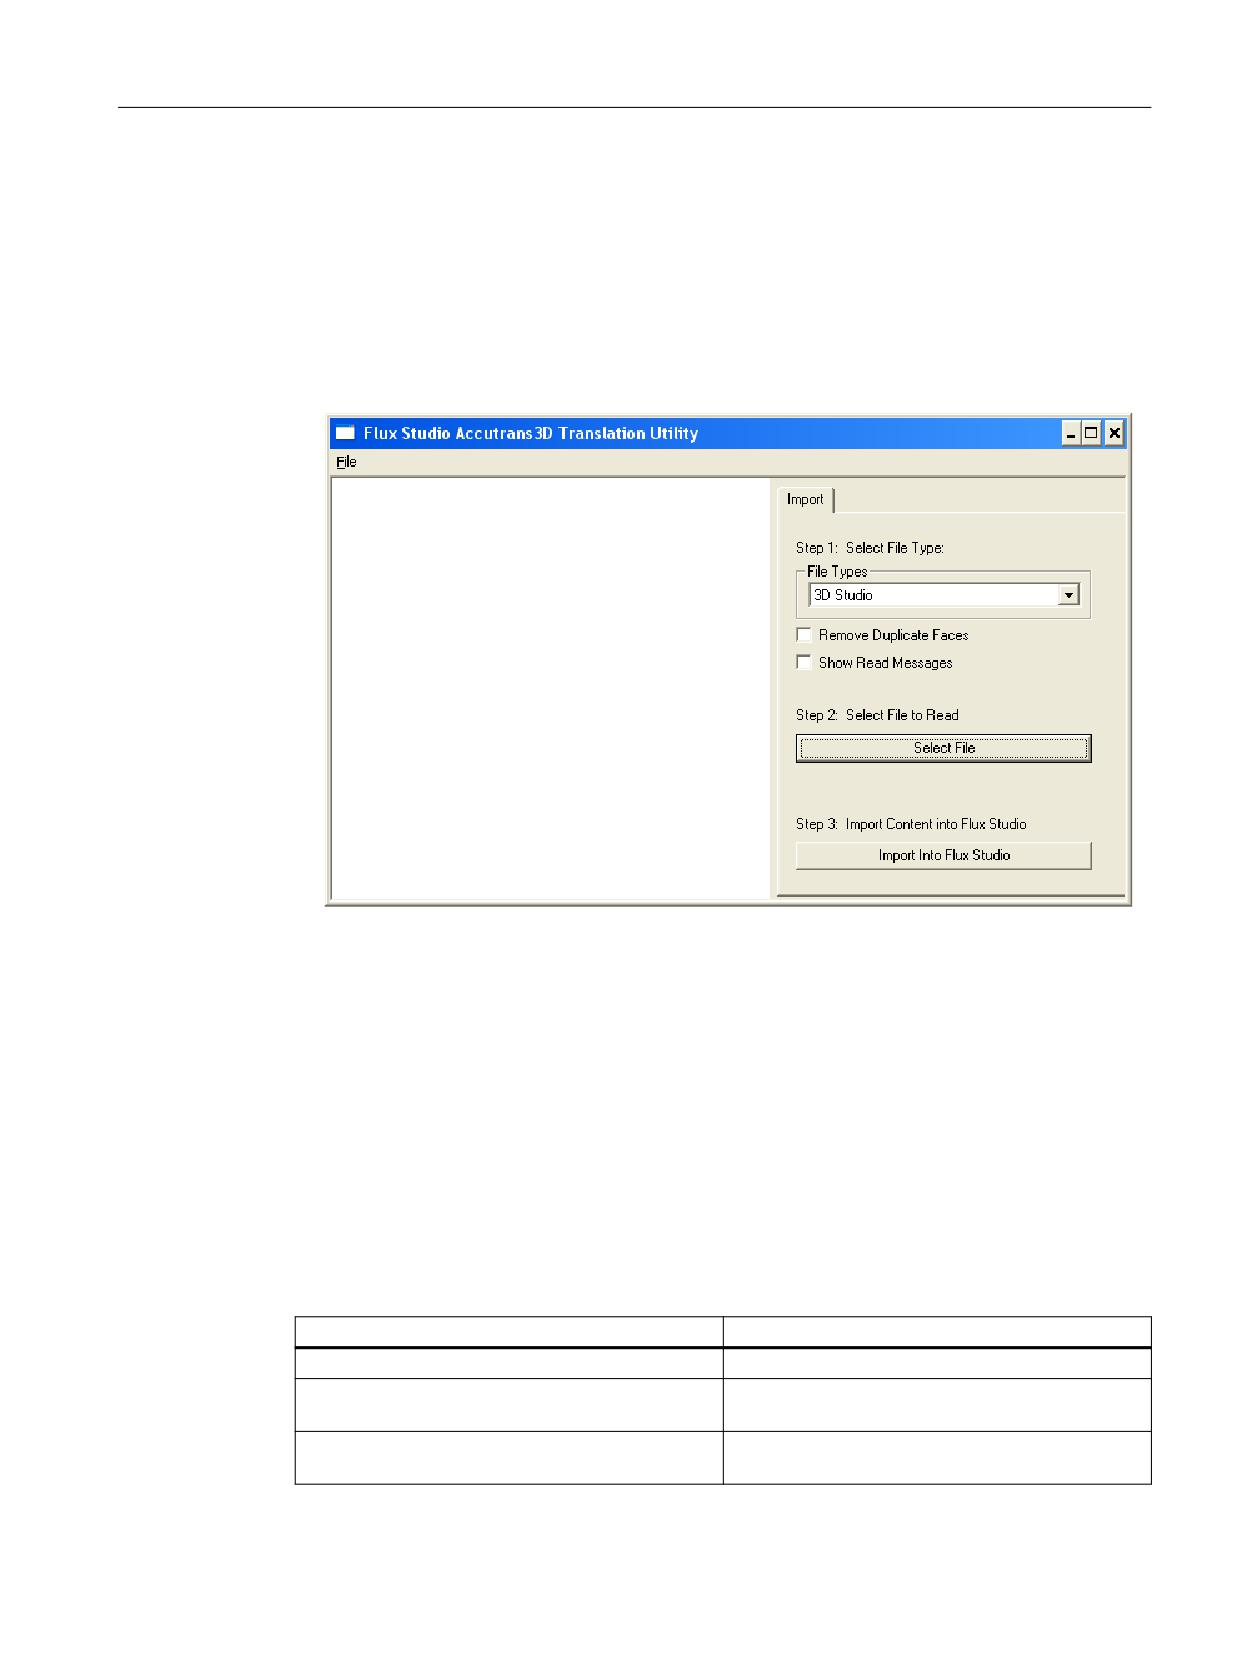
1. Open dialog box "Flux Studio Accutrans3D Translation Utility" via menu item File -> Import
Other Format .
2. Select a format from the "File Types" list box. For example, to import a Cinema4D file, select
file type "3D Studio."
3. Then select a file with Select Files and start import.
Figure C-6
Importing 3D model data
The model data from the Cinema4D file is inserted as a complete group. All cameras and any
other information that is additionally imported should be deleted. Only the graphics elements
of the Cinema4D file are required.
C.2.4
Modeling templates
In this chapter, you will find a list of graphics elements on which you can base your design, colors,
and sizes. To maintain a uniform "look and feel" in the user interface, we recommend using the
style of the templates or the templates themselves for creating your own graphics.
General
Template
Description
intersection_texture.png
Texture for an sectioned area
rapid_traverse_line_hori.fxw
Horizontal line to illustrate the tool traversing path
during rapid traverse
rapid_traverse_line_vert.fxw
Vertical line to illustrate the tool traversing path
during rapid traverse
SINUMERIK Integrate Run MyScreens
Programming Manual, 10/2020, A5E40869575B AD
335

Animated elements
C.2 Modeling
Template
Description
feed_traverse_line_hori.fxw
Horizontal line to illustrate the tool path during feed
feed_traverse_line_vert.fxw
Vertical line to illustrate the tool path during feed
dimensioning_lines_hori.fxw
Horizontal projection lines
dimensioning_lines_vert.fxw
Vertical projection lines
z1_inc.fxw
Horizontal dimension line with the identifier Z1
x1_inc.fxw
Vertical dimension line with the identifier X1
3d_coordinate_origin.fxw
3D coordinate origin
3d_zero_point.fxw
3D zero point
Turning
Template
Description
turning_blank.fxw
The blank for turning technology: A simple cylinder
turning_centerline.fxw
Center line
turning_centerpoint.fxw
Coordinate origin to display the zero point in the
WCS
turning_refpoint.fxw
Reference point, for example, for a machining op-
eration
turning_machining_area.fxw
Boundary lines for the machining area
Milling
Template
Description
milling_blank.fxw
The blank for milling technology: A simple cube
milling_centerline.fxw
Center line
milling_refpoint.fxw
Reference point, for example, for a machining op-
eration
SINUMERIK Integrate Run MyScreens
336
Programming Manual, 10/2020, A5E40869575B AD
Animated elements
C.3 XML commands
C.3
XML commands
C.3.1
Overview
The scene description file (*.xml) is required so that the X3D Viewer can access the graphics. In
the scene description file, you assign the scene names that are called from the configuration to
the times in the *.x3d file (time sensor) at which the graphics are positioned.
C.3.2
Structure of the scene description file
The structure of the scene description file is shown below together with an explanation of the
relevant XML commands:
Design and description
<!-- Treatment of the plane-dependent texts for turning -->
<TextPlane plane="G18_ZXY" />
Description
<TextPlane plane="G18_ZXY" />
Treatment of the plane-dependent texts (axis
names) specifically for turning. If, for example,
a text with the identifier "Z" is used (for G18
first geometry axis), the corresponding geom-
etry axis identifier of the control will be shown
in the help screen (for example, "Z").
<!--Text alignment -->
<TextPosition center='true' />
Description
<TextPosition center='true' />
Marking that the texts are centered. This is rel-
evant to the display of the texts in rotated
screens. We recommend using this setting.
<!--Adapting the tool speed -->
<ToolSpeedFactors planeSpeedFactor="0.4" rapidSpeedFactor="0.7"
reducedSpeedFac¬tor="1.0"/>
SINUMERIK Integrate Run MyScreens
Programming Manual, 10/2020, A5E40869575B AD
337
Animated elements
C.3 XML commands
Description
<ToolSpeedFactors
This entry can be added if the tool speeds are to
be modified.
planeSpeedFactor="0.4"
Factor for the feedrate ( 0.4 = 40% )
rapidSpeedFactor="0.7"
Factor for rapid traverse ( 0.7 = 70% )
reducedSpeedFactor="0.1" />
Factor for a third speed ( 0.1 = 10% )
<!--Definition of an animation-->
<SceneKey name='BoringAnimation' masterRotationSpeed="-64.0"
maxRotAngle="45.0" begin-Time='0.110 endTime='0.118 view='camiso'
speedMaster='boringtool' Type="VIEW_3D_TURN_CYL">
Description
<SceneKey name='BoringAnimation'
Name of the animation
masterRotationSpeed="-64.0"
Direction of rotation and rotation speed of the
tool.
The setting is optional.
maxRotAngle="45.0"
To avoid aliasing effects (tool seems to be turn-
ing in the wrong direction). The value is usually
a fourth of the symmetry of the tool.
The setting is optional.
beginTime='0.110
Start time of the animation on the time sensor
endTime='0.118'
End time of the animation on the time sensor
view='camiso'
Camera to be used for the animation
speedMaster='boringtool'
Name of the tool for the animation
type="VIEW_3D_TURN_CYL">
View type defines the view (see Section View
type (Page 341))
<!-- Elements -->
<Element name='1' time='0.110' feed='rapid' dwell=’2’/>
<Element name='2' time='0.112' feed='rapid'/>
<Element name='3' time='0.114' feed='rapid'/>
<Element name='4' time='0.116' feed='plane'/>
<Element name='5' time='0.118' feed='plane'/>
Description
<Element name='1'
Specifies that it is the first element of the ani-
mation.
time='0.110'
Time of the first element on the time sensor
SINUMERIK Integrate Run MyScreens
338
Programming Manual, 10/2020, A5E40869575B AD
Animated elements
C.3 XML commands
feed='rapid'
Traversing speed of the element
plane = machining feedrate
rapid = rapid traverse
reduced = reduced speed, slower than "plane"
dwell=’2’/>
Pause in the traversing motion of the anima-
tion. A rotating tool continues to rotate.
<!-- End of animation definition -->
</SceneKey>
Description
</SceneKey>
End of the animation definition
<!-- Existing animation as source for a new animation -->
<SceneKey source=''BoringAnimation' name=''BoringAnimationRear' mirror='
MirrorScreenX ' />
Description
<SceneKey source=''BoringAnimation'
Name of an animation that is to use another
animation as its source.
name=''BoringAnimationRear'
Name of the new animation based on the
source
mirror=' MirrorScreenX ' />
Mirroring in the direction of the X axis, output
is in the new animation.
<!-- Definition of a static scene (screen), (four examples) -->
<SceneKey name='Default' time='0.026' view='camiso'
type="VIEW_3D_DRILL_CUT"/>
<SceneKey name='Cut' time='0.046' view='camside' type="VIEW_SIDE"/>
<SceneKey name='Z1ink' time='0.056' view='camside' type="VIEW_SIDE"
highLightedGroup='dad_Z1ink'/>
<SceneKey name='Z1abs' time='0.066' view='camside' type="VIEW_SIDE"
highLightedGroup='dad_Z1abs'/>
Description
<SceneKeyname=’Z1abs'
Screen name
time='0.066'
Time of the screen on the time sensor
view='camside'
Camera to be used for the screen
SINUMERIK Integrate Run MyScreens
Programming Manual, 10/2020, A5E40869575B AD
339
Animated elements
C.3 XML commands
type="VIEW_SIDE"
View type defines the view (see Section View
type (Page 341))
highLightedGroup='dad_Z1abs'/>
Name of the group to be highlighted. The
group has been called "Z1abs" in Flux Studio.
The prefix "dad_" is automatically added by
Flux.
<!-- End of xml file -!>
C.3.3
Mirroring and rotations
Mirroring or rotation of the image or model is defined with the mirror command.
Description
mirror="RotateScreenX"
The screen is rotated around the X axis
mirror="RotateScreenY"
The screen is rotated around the Y axis
mirror="RotateScreenZ"
The screen is rotated around the Z axis
mirror="MirrorScreenX”
The screen is mirrored along the X axis
mirror="MirrorScreenY"
The screen is mirrored along the Y axis
mirror="MirrorScreenZ"
The screen is mirrored along the Z axis
mirror="RotatePieceX”
The model is rotated around the X axis
mirror="RotatePieceY"
The model is rotated around the Y axis
mirror="RotatePieceZ"
The model is rotated around the Z axis
mirror="MirrorPieceX"
The model is mirrored along the X axis
mirror="MirrorPieceY"
The model is mirrored along the Y axis
mirror="MirrorPieceZ"
The model is mirrored along the Z axis
All rotate and mirror options can be combined. A rotation angle must be defined for rotation.
Examples
mirror="RotatePieceZ=180"
mirror="RotatePieceZ=-90 MirrorScreenX"
mirror="RotateScreenY=90"
mirror="MirrorPieceX MirrorPieceY"
mirror="MirrorPieceZ RotatePieceX=-90"
SINUMERIK Integrate Run MyScreens
340
Programming Manual, 10/2020, A5E40869575B AD
Animated elements
C.3 XML commands
C.3.4
View type
You define the views with the view type. The views are based on empirical values and rules that
produce a sensible representation of the objects.
This ensures that the representation of the objects matches the coordinate system settings
made in the user interface (MD 52000 $MCS_DISP_COORDINATE_SYSTEM or MD 52001
$MCS_DISP_COORDINATE_SYSTEM_2).
Description
"VIEW_STATIC"
Direct view without conversion
"VIEW_3D_TURN_CYL"
3D view for turning operations (cylinder)
"VIEW_3D_MILL_CUBE"
3D view for milling operations (cube)
"VIEW_3D_DRILL_CUT"
3D view for drilling operations (sectional view)
"VIEW_SIDE"
2D view for drilling operations (sectional view)
"VIEW_TOP_GEO_AX_1"
2D view from the direction of the 1st geometry
axis
"VIEW_TOP_GEO_AX_2"
2D view from the direction of the 2nd geome-
try axis
"VIEW_TOP_GEO_AX_3"
2D view from the direction of the 3rd geometry
axis
SINUMERIK Integrate Run MyScreens
Programming Manual, 10/2020, A5E40869575B AD
341
Animated elements
C.4 Conversion to hmi file
C.4
Conversion to hmi file
Note
The X3D files and their associated XML files are converted to HMI files when the HMI is powered
up.
For each X3D file, a corresponding XML file of the same name must be created. To do this, you
store the X3D files and XML files in directory search path of HMI\ico\x3d\turning
or milling. You proceed in the same way with the .ts files.
SINUMERIK Integrate Run MyScreens
342
Programming Manual, 10/2020, A5E40869575B AD
Animated elements
C.5 Display in Create MyHMI /3GL
C.5
Display in Create MyHMI /3GL
C.5.1
X3D Viewer
If you want to display particular help screens in a separate OA application you must integrate the
X3D Viewer widget into its own OA application.
The X3D Viewer widget provides interfaces, which enable X3D contents to be presented in the
HMI.
Class SlX3dViewerWidget is provided for displaying graphical scenes. The definition of the class
can be found in the corresponding slx3dviewerwidget.h header file in the global GUI include
directory \hmi_prog\gui\include.
C.5.2
Class SlX3dViewerWidget
The class provides a flexible widget that autonomously displays the contents of a model file
specified during runtime and, if required, runs the animation.
The interface of the class comprises the Constructor, Destructor, and two methods for
controlling the graphical output.
As a direct derivative of the Qt class QWidget, a much more expansive interface is available,
which will not be described in any further detail here, (for example, show(), hide() and
resize(...). For more information, please refer to the Qt documentation).
C.5.3
Public methods
SlX3dViewerWidget ( QWidget* pParent = 0 )
Constructor of the X3D Viewer widget.
Parameters
Meaning
pParent
The parameter is passed on to the constructor of
the Qwidget.
~SlX3dViewerWidget ( )
Destructor of the X3D Viewer widget.
Parameters
Meaning
-
-
SINUMERIK Integrate Run MyScreens
Programming Manual, 10/2020, A5E40869575B AD
343

Animated elements
C.5 Display in Create MyHMI /3GL
C.5.4
Public slots
void viewSceneSlot ( const QString& rsFileName, const QString& rsScene, const QString&
rsAnimationScene, int nChannel, int nPlane, SlStepTechnology nTechnology )
With the viewSceneSlot method, the X3D Viewer is instructed to load the rsScene static scene
and the rsAnimationSzene animated scene from the rsFileName file and display them
alternately.
The static scene and then the animated scene are repeatedly alternately displayed for a fixed
time.
If no static scene is specified, the animation will be shown immediately; an animated scene may
also not have been specified.
Channel number, plane and technology are used to rotate the scenes to the correct position
(depending on the set machine coordinate system).
Parameters
Meaning
rsFileName
Name of the file that contains the scenes to be dis-
played
rsScene
Name of the static scene.
rsAnimationScene
Name of the animated scene.
nChannel
Channel number
nPlane
Plane
nTechnology
Technology
The following constants are defined for the SlStep-
Technology enumeration type:
• SL_STEP_NO_TECHNOLOGY
• SL_STEP_MILLING
• SL_STEP_TURNING
• SL_STEP_SURFACE_GRINDING
• SL_STEP_CIRCULAR_GRINDING
void viewSceneSlot ( const QString& rsFileName, const QString& rsScene, const QString&
rsAnimationScene )
A simplified form of the viewSceneSlot method with which the X3D Viewer can be instructed to
load and display the rsScene static scene and/or the rsAnimationSzene animated scene from the
rsFileName file.
Parameters
Meaning
rsFileName
Name of the file that contains the scenes to be dis-
played.
rsScene
Name of the static scene.
rsAnimationScene
Name of the animated scene.
SINUMERIK Integrate Run MyScreens
344
Programming Manual, 10/2020, A5E40869575B AD
Animated elements
C.5 Display in Create MyHMI /3GL
C.5.5
Libraries
In order to be able to apply the X3D Viewer in your own projects, the list of library dependencies
must be extended by the 'slx3dviewer.lib' entry.
C.5.6
Implementation example
You will find an implementation example in the package Create MyHMI/3GL under \examples
\GUIFrameWork\SlExGuiX3D.
C.5.7
Machine data
Display MD 9104 $MM_ANIMATION_TIME_DELAY
Time delay in seconds until the animation is started for help screens. The setting does not apply
to help screens that are only animated.
The setting applies globally to all animations of SINUMERIK Operate.
C.5.8
Notes about use
• The animation is interrupted if the X3D Viewer widget is hidden. If this happens, there is no
need to choose a scene selection without animation.
• You should avoid frequent or multiple instantiation of the X3D Viewer widget as this reduces
performance and memory capacity. The use (implementation) of an X3D Viewer Singleton
is recommended in such application scenarios.
• The X3D Viewer can also be used in signal slot concepts.
• If an error occurs (for example, a file not found or unknown scene name), the X3D Viewer
widget opens a message area. This area is automatically hidden again when another help
screen is activated.
SINUMERIK Integrate Run MyScreens
Programming Manual, 10/2020, A5E40869575B AD
345
Animated elements
C.6 Display in Run MyScreens
C.6
Display in Run MyScreens
This section is intended for experienced "Run MyScreens" developers. Necessary backg38round
knowledge is provided in the associated documentation.
In addition to using screens in .bmp or .png format, animated help screens can also be displayed
with the X3D Viewer.
To integrate help screens, use the Run MyScreens interface in the usual way.
To output images in .bmp or .png format, XG0 is entered in the definition of a dialog box in the
Attributes section or the parameter is left empty. To integrate X3D help screens in a dialog, you
must enter XG1 in the attributes.
//M(MASK_F_DR_O1_MAIN/$85407////52,80/XG1)
The following parameters are required to activate the individual help screens; their meaning is
described in Section 5.3 Public slots:
1. File name
2. StaticScene (optional)
3. AnimationScene (optional)
4. Technology (optional)
5. Plane (optional)
The parameters are combined into a character string in this order, separated by a comma.
Hlp = "File name,StaticScene,AnimationScene,Technology,Plane"
Examples
• The default help screen can be set with the specified variable Hlp.
In the following example, the "MyAnimation" animation is output from the "MyDlgHelp.hmi"
file. No StaticScene is specified, i.e. no static scene is output. No specifications are made for
the Technology and Plane, i. e. default values are used.
Hlp = "MyDlgHelp.hmi,,MyAnimation"
• The hlp property can be set on a specific help screen for the individual parameters of the input
screen.
In the following example, the static "MyParam" scene and the "MyAnimation" animation are
output from the "MyDlgHelp.hmi" file in the G17 plane. No specification is made for the
Technology, i.e. a default value is used.
VarMyParam.hlp = "MyDlgHelp.hmi,MyParam,MyAnimation,,G17"
SINUMERIK Integrate Run MyScreens
346
Programming Manual, 10/2020, A5E40869575B AD

Documentation overview
D
You will find extensive documentation on the functions of SINUMERIK 840D sl from version 4.8
SP4 at 840D sl documentation overview (https://support.industry.siemens.com/cs/ww/en/view/
109766213).
You can display the documents or download them in PDF or HTML5 format.
The documentation is divided into the following categories:
• User: Operating
• User: Programming
• Manufacturer/Service: Functions
• Manufacturer/Service: Hardware
• Manufacturer/Service: Configuration/Setup
• Manufacturer/Service: Safety Integrated
• Manufacturer/Service: SINUMERIK Integrate/MindApp
• Information and training
• Manufacturer/Service: SINAMICS
SINUMERIK Integrate Run MyScreens
Programming Manual, 10/2020, A5E40869575B AD
347
Documentation overview
SINUMERIK Integrate Run MyScreens
348
Programming Manual, 10/2020, A5E40869575B AD
Index
Definition block, 54
Multiple columns, 64
A
Properties, 55
Dialog change mode, 173
Access level, 69
Dialog element, 62
Alarms
Display mode, 99
Language code, 319
Display option, 99
Array
DLL file, 165
Access mode, 205
Column index, 205
Compare mode, 205
E
Definition, 204
Element, 205
ELLIPSE (define circle), 202
Line index, 205
ELLIPSE (define ellipse), 202
Status, 208
Attributes, 99
F
File
B
Copy, 151
Background color, 101
Delete, 151
Moving, 153
File formats
C
fxw, 329
hmi, 329
Colors, 101
x3d, 329
Conditions, 130
xml, 329
Configuration file, 35
Focus control, 213
Configuration syntax"; "Extended syntax, 49
Foreground color, 101
Configuration syntax"; "Screens, 49
Function
Configuration syntax"; "Softkey, 50
CALL (Subprogram call), 147
Configuration syntax"; "Table columns, 50
CLEAR_BACKGROUND), 150
Configuration syntax"; "Variables, 49
CP (Copy Program), 151
Configuring PLC softkeys, 289
CVAR (Check Variable), 149
Constants, 129
Cyclic execution of scripts, 198
Custom widget
DEBUG, 158
Automatic data exchange, 217
DLGL (Dialog line), 157
Definition, 214
DO LOOP), 196
Executing a method, 220
DP (Delete Program), 151
Interface, 215
EP (Exist Program), 152
Library, 214
EVAL (Evaluate), 163
Manual data exchange, 218
EXIT, 159
Reading and writing properties, 218
EXITLS (EXIT Loading Softkey), 164
Responding to a custom widget signal, 222
FCT, 165
File access, 155
FORMAT (string), 194
D
GC (Generate Code), 167
Defines the softkey menu, 68
HMI_LOGIN, 169
Dialog
HMI_LOGOFF, 169
Definition, 53
HMI_SETPASSWD, 170
SINUMERIK Integrate Run MyScreens
Programming Manual, 10/2020, A5E40869575B AD
349
Index
INSTR (String), 190
Grid → Table, 210
LA (Load Array), 170
LB (Load Block), 171
LEFT (string), 191
H
LEN (string), 190
H_SEPARATOR (define horizontal dividing line), 203
LISTADDITEM), 161
Help display, 101
LISTCLEAR), 161
Help file, 102
LISTCOUNT), 161
Help variable, 88
LISTDELETEITEM, 161
LISTINSERTITEM, 161
LM (Load Mask), 172
I
LS (Load Softkey), 174
MIDS (string), 192
I/O field with integrated unit selection, 102
MP (Move Program), 153
Image as short text, 94
MRDOP), 146
Import
MRNP (Multiple Read NC PLC), 177
Graphics (models), 333
Overview, 145
Input mode, 100
PI_START, 179
RDFILE), 155
RDLINEFILE), 155
L
RDOP), 146
Language code, 319
Reading and writing drive parameters, 146
Language-dependent texts, (SIEsTouchButton)
Recompile NC code, 184
Limits, 98
Recompile without comment, 185
LINE (define line), 201
REPLACE (string), 192
List field, 93
RESIZE_VAR_IO, 180
Long text, 98
RESIZE_VAR_TXT, 180
RETURN (Back), 183
RIGHT (string), 191
M
RNP (Read NC PLC Variable), 179
SB (Search Backward), 188
Machine data, 345
SF (Search Forward), 188
Machining step support, 185
SP (Select Program), 154
Master dialog, 172
START_TIMER), 198
Mathematical functions, 128
STOP_TIMER, 198
Menu tree, 37
STRCMP (string), 192
Method
STRINSERT (string), 193
ACCESSLEVEL, 132
STRREMOVE (string), 193
CHANGE, 133
SWITCH), 176
CHANNEL, 134
TRIMLEFT (string), 194
CONTROL, 134
TRIMRIGHT (string), 194
LANGUAGE, 136
UNTIL, 196
LOAD, 136
WDOP, 146
LOAD GRID, 175
WHILE, 196
OUTPUT, 138
WNP (Write NC PLC Variable), 180
Overview, 132
WRFILE, 155
PRESS, 139
WRLINEFILE), 155
PRESS(ENTER), 140
PRESS(TOGGLE), 140
RESOLUTION, 141
G
RESUME, 141
SUSPEND, 142
Generates NC code, 167
UNLOAD, 137
Graphic text, 98
SINUMERIK Integrate Run MyScreens
350
Programming Manual, 10/2020, A5E40869575B AD
Index
Multitouch operation, 255
addCircle, 247
addContour, 241
addEllipse, 247
N
addLine, 246
addPoint, 246
NC variable
addRect, 246
Read, 179
addRoundedRect, 247
Write, 180
addText, 248
Number format, 106
AxisNameX, 228
AxisNameY, 229
AxisY2Factor, 229
O
AxisY2Offset, 229
Operator
AxisY2Visible, 229
Bit, 130
BackColor, 235
Mathematical, 127
ChartBackColor, 235
clearContour, 243
CursorColor, 236
P
CursorStyle, 238
CursorX, 237
Password dialogs, 65
CursorY, 237
Password input mode (asterisk), 97
CursorY2, 237
PI services, 145
findX, 244
PLC variable
fitViewToContour, 243
Read, 179
fitViewToContours, 243
Write, 180
ForeColor, 235
Position
ForeColorY2, 235
Input/output field, 101, 110
GridColor, 236
Short text, 101, 110
GridColorY2, 236
Pre-assignment, 98
hideAllContours, 242
Progress bar with two color changes, 95
hideContour, 242
Progress bar without color change, 96
KeepAspectRatio, 233
Protection levels, 317
moveCursorOnContourBack, 252
Public slots, 344
moveCursorOnContourBegin, 251
moveCursorOnContourEnd, 251
moveCursorOnContourNext, 252
R
Overview of functions, 239
RECT (defining a rectangle), 201
Overview of properties, 228
Registers
Overview of signals, 253
Exchanging data, 181
removeContour, 242
Status, 183
repaint, update, 245
Value, 182
ScaleTextEmbedded, 231
Relational operators, 129
ScaleTextOrientationYAxis, 232
SelectedContour, 234
serialize, 253, 274
S
setCursorOnContour, 250
setCursorPosition, 249
Short text, 98
setCursorPositionY2Cursor, 250
SIEsButton
setFillColor, 249
Overview of properties, 257
setIntegralFillMode, 245
SIEsGraphCustomWidget
setMargins, 273
Reading and writing properties, 227
setMaxContourObjects, 241
SIEsGraphCustomWidgets
setPenColor, 249
addArc, 248
SINUMERIK Integrate Run MyScreens
Programming Manual, 10/2020, A5E40869575B AD
351
Index
setPenStyle, 249
Softkey
setPenWidth, 248
Assign properties, 68
setPolylineMode, 244
Properties, 70
setView, 240
Start softkey, 37, 39
showAllContours, 242
Strings, 112
showContour, 241
Sub-dialog, 172
ShowCursor, 236
Subprogram, 145
ViewChanged, 253
Block identifier, 148
ViewMoveZoomMode, 238
Call, 147
SIEsTouchButton, (Language-dependent texts)
cancel, 183
BackColor, 267
Variable, 148
BackColorChecked, 267
System colors, 318
BackColorDisabled, 268
System variable, 89, 101
BackColorPressed, 268
BackgroundPicture, 270
BackgroundPictureAlignment, 271
T
BackgroundPictureAlignmentString, 271
Table
BackgroundPictureKeepAspectRatio, 272
Defining columns, 212
ButtonStyle, 258
Definition, 210
Checkable, 260
Programming, 211
checked, 276
Text, 98
Checked, 260
Toggle field, 93, 98, 107
clicked, 275
Toggle symbol, 99
clickedDisabled, 276
Tooltip, 98, 100
Enabled, 259
Touch operation, 255
Flat, 258
Trigonometric functions, 128
Overview of functions, 273
Overview of signals, 274
Picture, 261
U
PictureAlignment, 262
PictureAlignmentString, 263
Unit text, 98
PictureKeepAspectRatio, 264
Update rate, 99
PicturePressed, 262
User variable, 101
ScaleBackgroundPicture, 272
ScalePicture, 263
ShowFocusRect, 261
V
Text, 264
V_SEPARATOR (define vertical dividing line), 202
TextAlignedToPicture, 267
Variable
TextAlignment, 265
Calculating, 88
TextAlignmentString, 266
Change property, 102
TextColor, 269
Check, 149
TextColorChecked, 269
CURPOS, 114
TextColorDisabled, 270
CURVER, 115
TextColorPressed, 269
End, 159
TextPressed, 264
ENTRY, 116
Signal color"; "progress bar, 101
ERR, 117
Signal values"; "progress bar, 98
FILE_ERR, 118
SlEsTouchButton
FOC, 120
Reading and writing properties, 256
Parameter, 98
slhlp.xml, 83
S_ALEVEL, 121
SlX3dViewerWidget, 343
S_CHAN, 122
S_CONTROL, 123
SINUMERIK Integrate Run MyScreens
352
Programming Manual, 10/2020, A5E40869575B AD
Index
S_LANG, 124
S_NCCODEREADONLY, 125
S_RESX, 126
S_RESY, 126
Variable status, 87
Variable type, 98
INTEGER, 104
VARIANT, 105
Variable value, 87
Vivaty Studio, 331
W
Write mode, 101
SINUMERIK Integrate Run MyScreens
Programming Manual, 10/2020, A5E40869575B AD
353
Index
SINUMERIK Integrate Run MyScreens
354
Programming Manual, 10/2020, A5E40869575B AD
1
System settings
2
Configuring the system
3
Service and diagnostics
SINUMERIK
A
Appendix
SINUMERIK 840D sl
NCU operating system
Commissioning Manual
Valid for:
CNC software for 840D sl/ 840DE sl V4.94
Linux basic software V5.10
10/2020
A5E48312736B AB
Legal information
Warning notice system
This manual contains notices you have to observe in order to ensure your personal safety, as well as to prevent damage
to property. The notices referring to your personal safety are highlighted in the manual by a safety alert symbol, notices
referring only to property damage have no safety alert symbol. These notices shown below are graded according to
the degree of danger.
DANGER
indicates that death or severe personal injury will result if proper precautions are not taken.
WARNING
indicates that death or severe personal injury may result if proper precautions are not taken.
CAUTION
indicates that minor personal injury can result if proper precautions are not taken.
NOTICE
indicates that property damage can result if proper precautions are not taken.
If more than one degree of danger is present, the warning notice representing the highest degree of danger will be
used. A notice warning of injury to persons with a safety alert symbol may also include a warning relating to property
damage.
Qualified Personnel
The product/system described in this documentation may be operated only by personnel qualified for the specific
task in accordance with the relevant documentation, in particular its warning notices and safety instructions.
Qualified personnel are those who, based on their training and experience, are capable of identifying risks and
avoiding potential hazards when working with these products/systems.
Proper use of Siemens products
Note the following:
WARNING
Siemens products may only be used for the applications described in the catalog and in the relevant technical
documentation. If products and components from other manufacturers are used, these must be recommended or
approved by Siemens. Proper transport, storage, installation, assembly, commissioning, operation and maintenance
are required to ensure that the products operate safely and without any problems. The permissible ambient
conditions must be complied with. The information in the relevant documentation must be observed.
Trademarks
All names identified by ® are registered trademarks of Siemens AG. The remaining trademarks in this publication may
be trademarks whose use by third parties for their own purposes could violate the rights of the owner.
Disclaimer of Liability
We have reviewed the contents of this publication to ensure consistency with the hardware and software described.
Since variance cannot be precluded entirely, we cannot guarantee full consistency. However, the information in this
publication is reviewed regularly and any necessary corrections are included in subsequent editions.
Siemens AG
A5E48312736B AB
Digital Industries
Ⓟ 08/2020 Subject to change
All rights reserved
Postfach 48 48
90026 NÜRNBERG
GERMANY
Table of contents
1
System settings
5
1.1
Delivery condition of the system
5
1.2
Meaning of switch positions
8
1.3
System booting
9
1.4
Displays during system booting
10
2
Configuring the system
13
2.1
Ethernet interfaces of the NCU
13
2.2
How to determine the IP address of the NCU
14
2.3
Configuration file "basesys.ini"
15
2.3.1
Section [ExternalInterface]
16
2.3.2
Section [InternalInterface]
18
2.3.3
Section [IBNInterface]
21
2.3.4
Section [SNMP]
22
2.3.5
Section [DCP]
24
2.3.6
Section [LLDP]
24
2.3.7
Section [LinuxBase]
25
2.3.8
Example: Configuration file 'basesys.ini'
30
2.4
Service Commands
38
2.4.1
Using service commands
38
2.4.2
Syntax for the Actions
39
2.4.3
Generic elements
40
2.5
Description of the actions
42
2.5.1
Help
42
2.5.2
Check-cf
43
2.5.3
Clear
43
2.5.4
Closeport
44
2.5.5
Connect
44
2.5.6
Disable
47
2.5.7
Disconnect
48
2.5.8
Distribute
48
2.5.9
Enable
49
2.5.10
ntpdiag (diagnostics)
50
2.5.11
Openport
51
2.5.12
Portstatus
52
2.5.13
Restart
52
2.5.14
Restore
53
2.5.15
Save
54
2.5.16
save-nvram (data backup)
55
2.5.17
set-svc-route (gateway)
56
2.5.18
Show
56
2.5.19
Start, Stop
60
NCU operating system
Commissioning Manual, 10/2020, A5E48312736B AB
3
Table of contents
2.5.20
usb (connect device)
61
2.5.21
vncpwd (password)
62
3
Service and diagnostics
63
3.1
Creating a service system
63
3.1.1
How do you create a service system for the NCU?
63
3.1.2
This is how you operate the service system
65
3.1.3
Diagnostics functions
66
3.1.4
This is how you connect to a network drive
67
3.2
Backup license
69
3.2.1
This is how you backup the license key
70
3.3
Backup data via the service menu
72
3.3.1
This is how you backup user data
72
3.3.2
This is how you restore user data
75
3.3.3
This is how you create a complete backup of the CompactFlash Card
76
3.3.4
This is how you install a complete system backup
78
3.4
Backing up data via the service shell
80
3.4.1
This is how you save data on a service system
80
3.4.2
This is how you restore data from the service system
81
3.4.3
This is how you save data on a network drive
81
3.4.4
This is how you restore data from the network drive
82
3.5
Updating the software
84
3.5.1
This is how you update the firmware
84
3.5.2
This is how you update the software
86
3.6
System diagnostics
89
3.6.1
Performing system diagnostics
89
3.6.2
This is how you change the system settings
91
3.6.3
This is how you check the CompactFlash Card
92
3.6.4
Calling the VNC Viewer
94
3.6.5
WinSCP and PuTTY
96
A
Appendix
97
A.1
Abbreviations
97
Glossary
99
Index
101
NCU operating system
4
Commissioning Manual, 10/2020, A5E48312736B AB
System settings
1
1.1
Delivery condition of the system
Scope of validity
This document is valid for all systems that are supplied with Linux as operating system on the
CompactFlash Card, such as all NCUs of the type NCU 7x0.3B PN.
Directories on the CompactFlash Card
A Linux partition as well as a FAT partition are available on the CompactFlash Card. The memory
space of the CompactFlash Card is occupied mainly by the Linux-EXT3 partition containing the
system software and the user data. A 2 MB large FAT partition still exists but only for internal
administration purposes.
When the system is in operation, the following directories (this is a selection and not a complete
list) are available in the EXT3 partition on the CompactFlash Card:
Directory
Use
/siemens
Reserved for Siemens system software
/addon
Reserved for Siemens add-on software
/oem
Additional software and configurations of the machine manufacturer
/user
• Storage of user data
• Configuring the HMI application
• Data that is created when commissioning the system using the HMI
application.
/system
Linux operating system
/user/system/etc
File basesys.ini (modifications possible)
/user/common/tcu
TCU configuration files
/var/log/messages
System log file (same as event.log under Windows)
Note
Files in the directory under /user always have priority over files with the same name in the
directory /oem → /addon → /siemens.
NCU operating system
Commissioning Manual, 10/2020, A5E48312736B AB
5
System settings
1.1 Delivery condition of the system
Partitioning of the memory
The memory of the CompactFlash Card is purely logically partitioned, i.e. the user can in
principle assign the memory up to the end of the physical limit. An alarm under LINUX is
triggered if less than 4 MB free memory is available.
Directory
1 GB card
8 GB card
/oem
100 MB
1 GB
/addon
/user
256 MB
2 GB
Preset users
The following users have already been set up:
Users
Access level
Target group
Operator
Key switch position 0
Operators, users
Operator1
Key switch position 1
Operators, users
Operator2
Key switch position 2
Operators, users
Operator3
Key switch position 3
Operators, users
user
Password:CUSTOMER
Operators, users
service
Password: EVENING
Service personnel
manufact
Password:SUNRISE
Machine manufacturer
NOTICE
Changing the password
You can only change the passwords of Linux users in the basic NCU system - not for the booted
service system.
To increase system security, you should change the passwords in the Linux system for users
"manufact", "service" and "user" analogous to the passwords for the NC access levels.
You can access the basic NCU system e.g. via the WinSCP/Putty (Page 96) program, via a service
console or on a TCU.
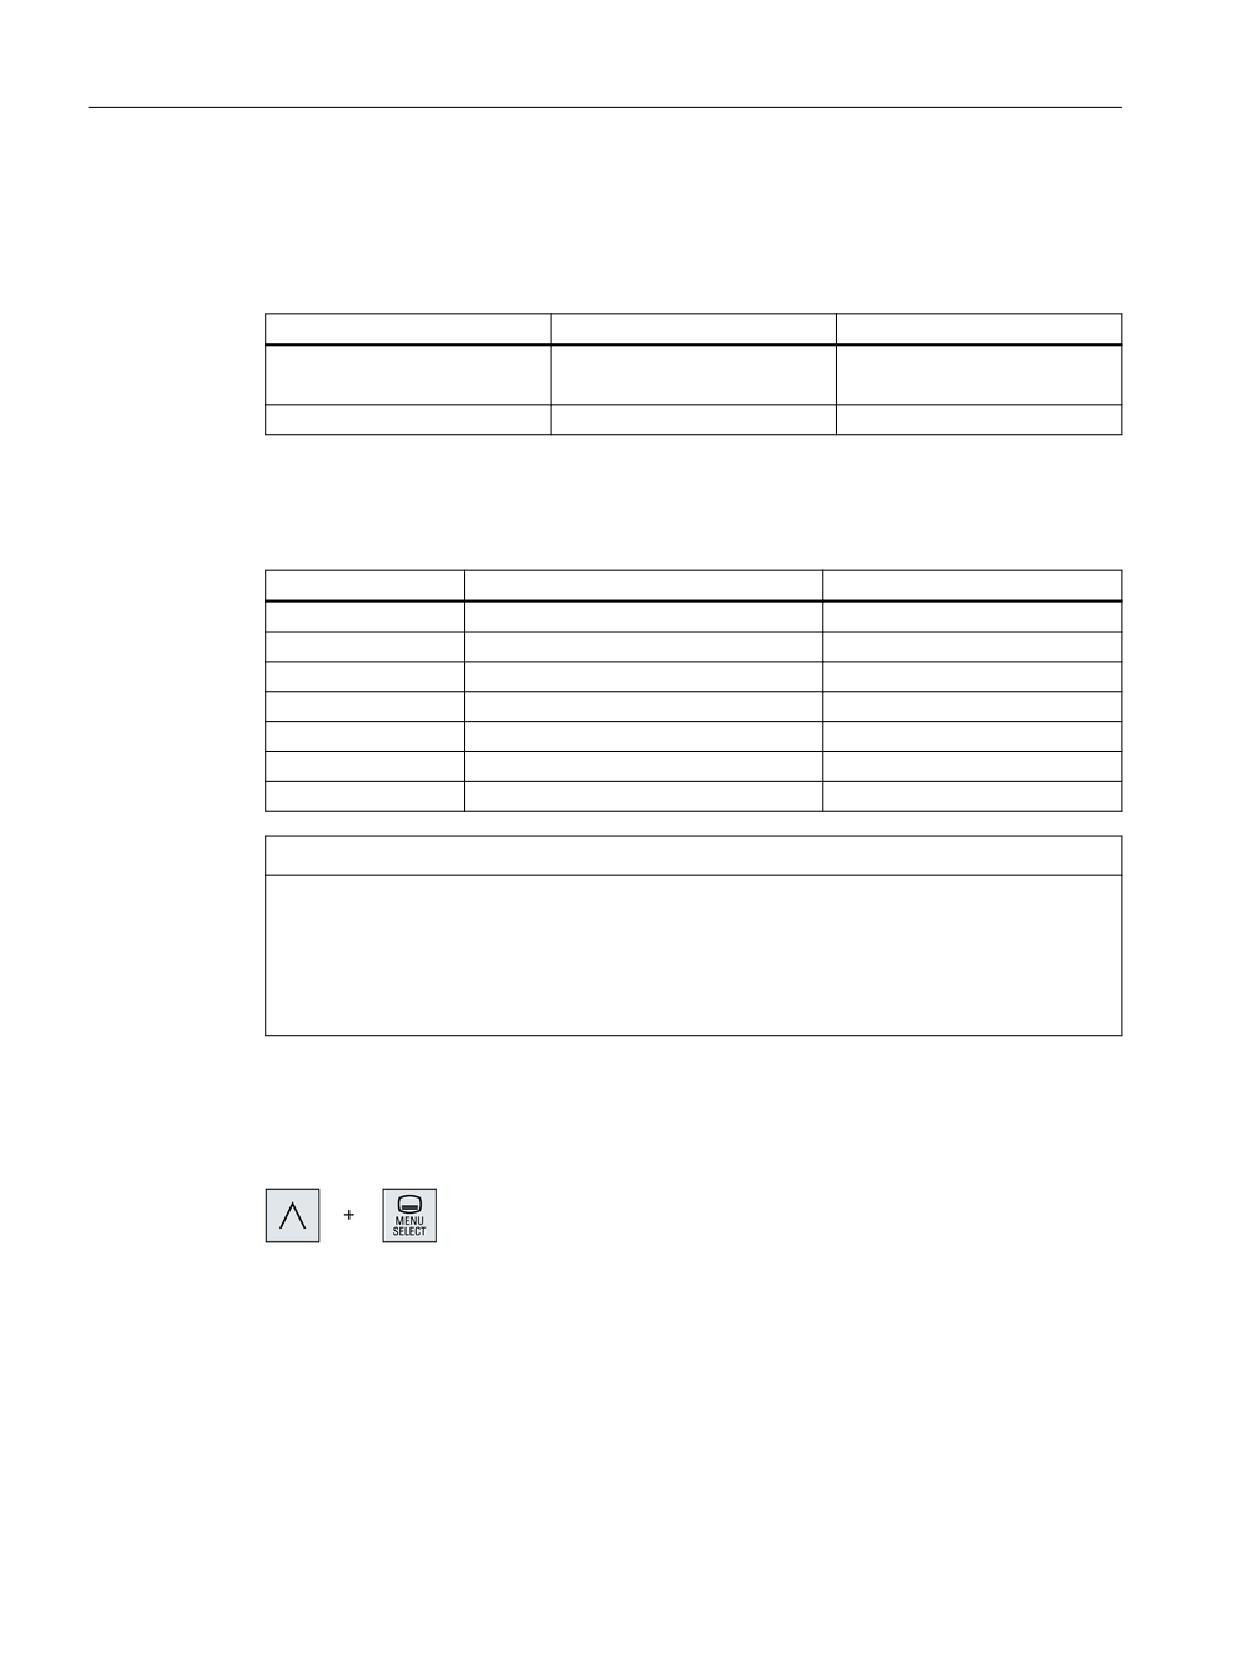
Call the service console on the TCU with the menu back key and key <MENU SELECT>:
NCU operating system
6
Commissioning Manual, 10/2020, A5E48312736B AB
System settings
1.1 Delivery condition of the system
Rules relating to the password structure
The following rules must be observed when assigning a new password:
• Permissible (and specified) characters include lowercase letters, uppercase letters, numbers
and special characters.
• The password must have a minimum length of 6 characters. For each missing character
category (lowercase letters, uppercase letters, numbers and special characters), the
minimum length is extended by two characters.
Example: As a consequence, a password comprising only uppercase letters must be 12
characters long.
• It is not permissible that the password contains too many identical characters
• It is not permissible that the password has any similarity to the user name, the computer
name and the old password (e.g. write the password backwards, interchange uppercase/
lowercase letters).
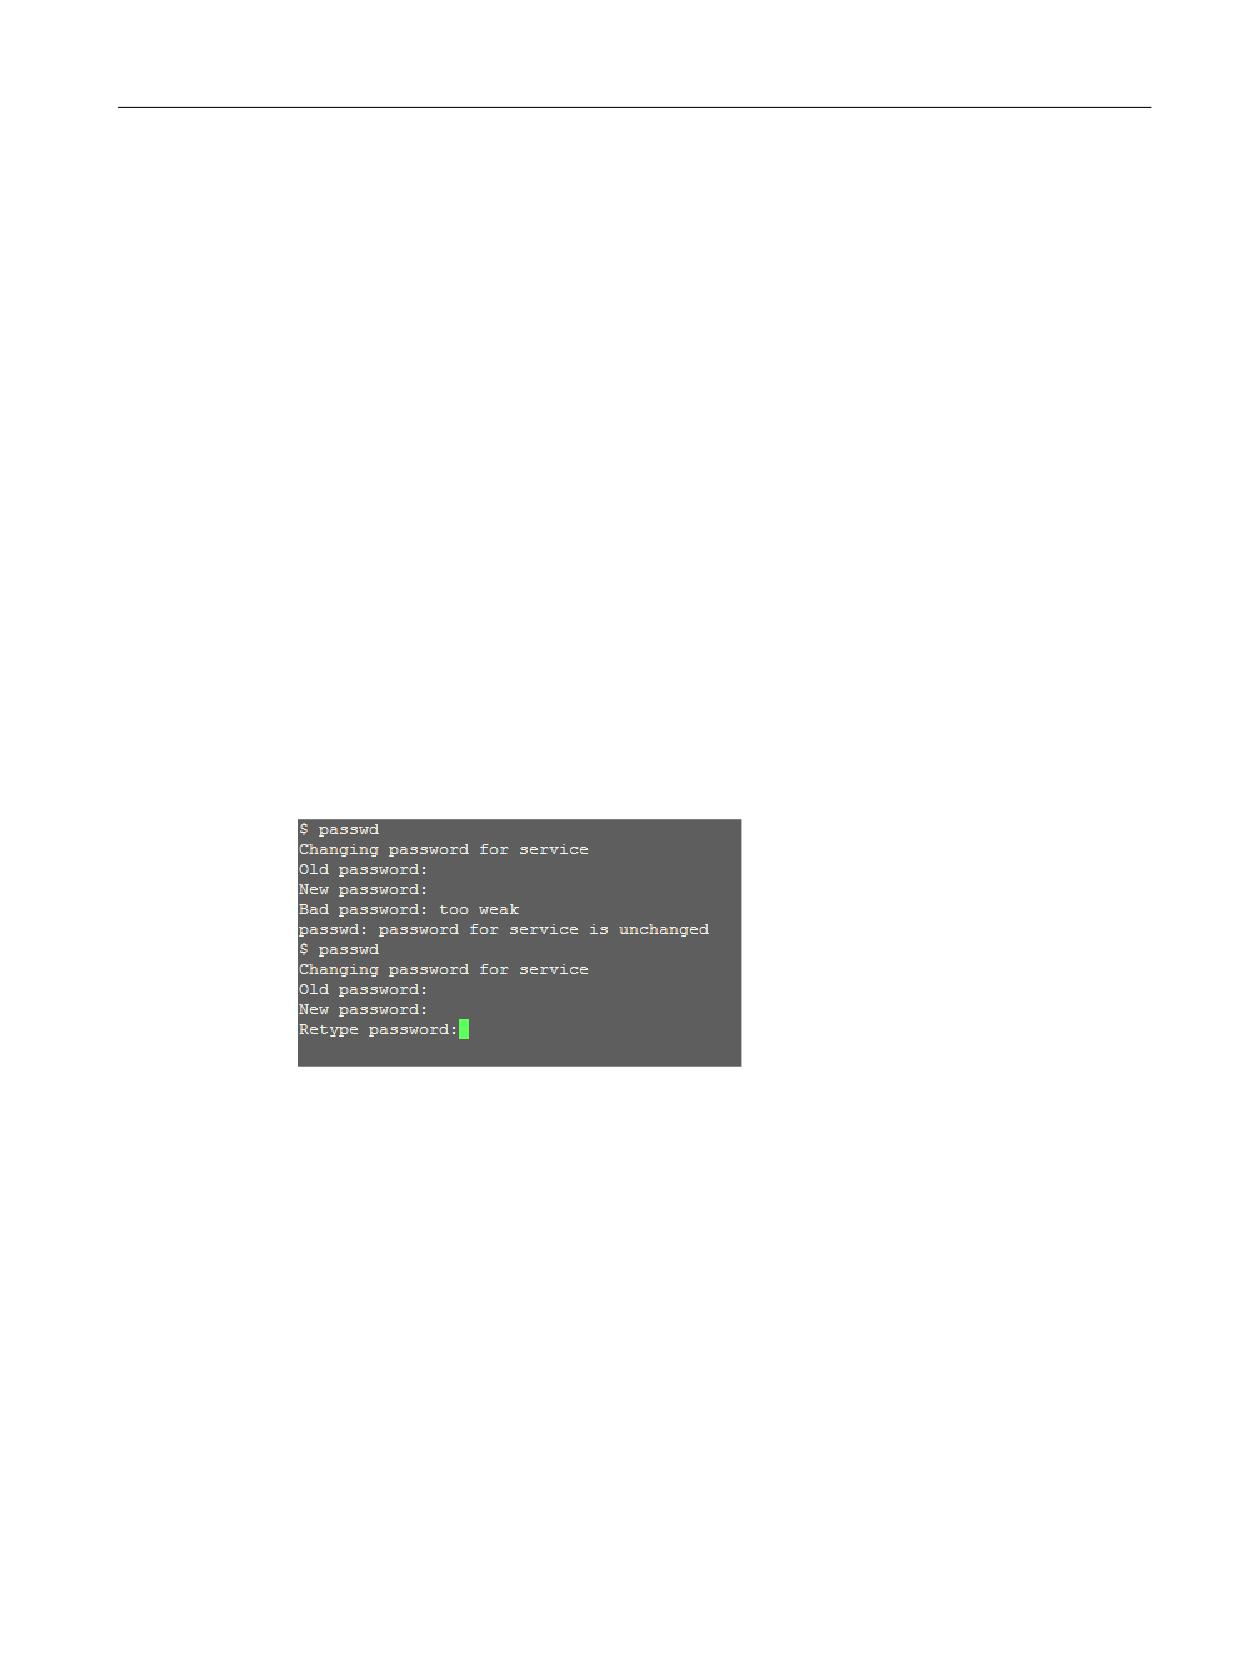
If this rule is not complied with, then "too weak" message is output - and the old password
remains unchanged.
Changing the password
You can only change the user password with which you used to login; this means that if you wish
to change the passwords of all default users, then you must login with the particular login one
after the other.
Procedure:
1. Log into the basic NCU system (Linux) with user name and password.
2. Enter the "passwd" command.
3. Follow the instructions to enter the old, previous password.
4. Enter a new password and repeat this to confirm the password.
5. The new password is valid once all of the entries are correct. Any deviation means that the
dialog is exited, and the old password remains unchanged and valid.
NCU operating system
Commissioning Manual, 10/2020, A5E48312736B AB
7
System settings
1.2 Meaning of switch positions
1.2
Meaning of switch positions
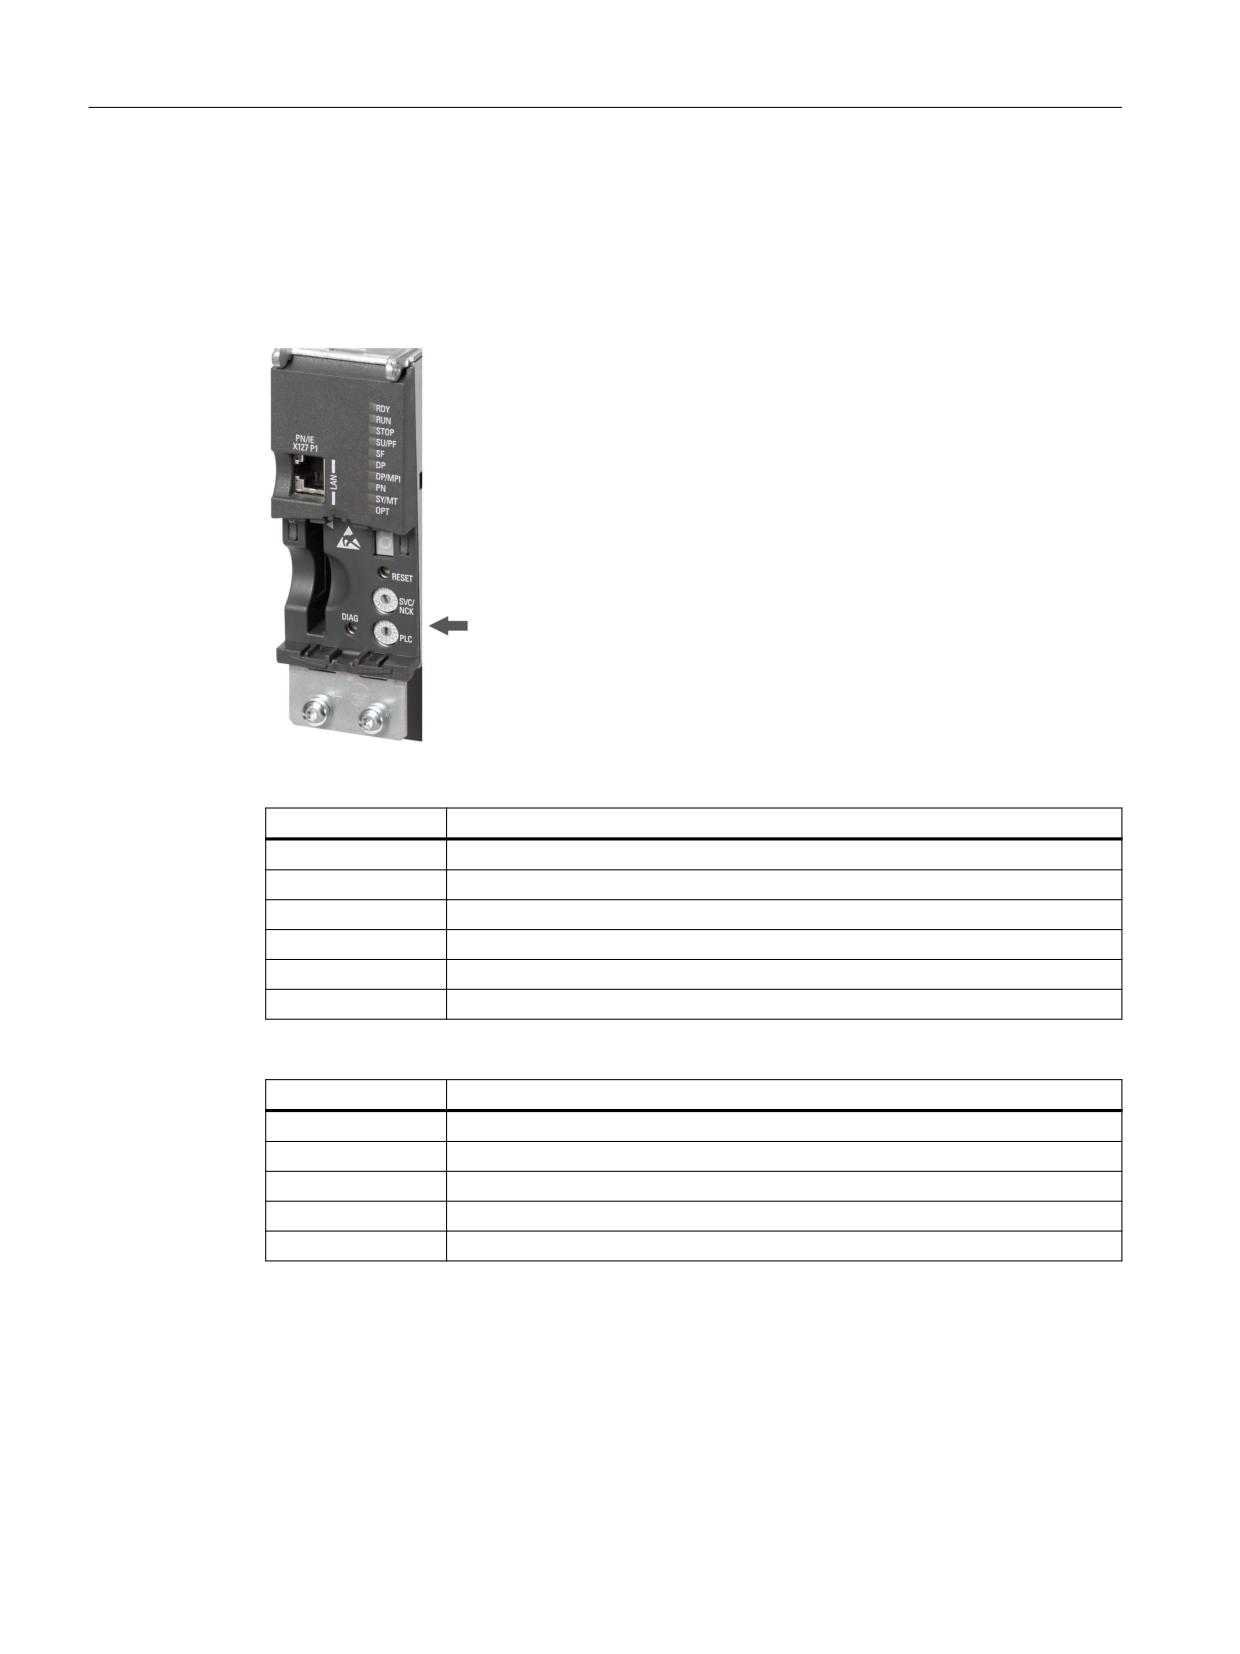
Diagnostic displays of the NCU
The NCU has two twist buttons in the lower section of the front panel.
Meaning of the settings on the SVC/NCK rotary switch:
Switch position
NC operating mode
0
NC normal run-up
1
Run-up of the NC with preset values (= memory reset)
2
Run-up of the NC with preset values; after powering up, the PLC is in RUN.
7
Debug mode (NC is not started)
8
IP address of the NCU is displayed on the seven-segment display.
All others
Not relevant
The settings on the PLC rotary switch have the same meaning as for a SIMATIC S7-CPU:
Switch position
Operating mode of the PLC
0
RUN
1
RUN (protected mode)
2
STOP
3
Memory reset (MRES)
All others
Not relevant
NCU operating system
8
Commissioning Manual, 10/2020, A5E48312736B AB
System settings
1.3 System booting
1.3
System booting
Sequence
To ensure unproblematic booting of the NCU, the CompactFlash Card must be inserted.
When the NCU is booting up, visual information on the current operating system is provided
using the following displays:
• The RDY-LED flashes slowly orange when the CF card is accessed.
• During booting, the 7-segment display outputs different codes that indicate, for example,
when the BIOS is started, when the CompactFlash Card is accessed, etc.
When the booting has been completed successfully, the following is displayed:
• The PLC LED lights up green.
• The 7-segment display shows "6." with a flashing dot.
• The RDY-LED lights up green, all other LEDs remain dark.
Performing a reset operation
The reset button is located behind the blanking plate of the NCU.
A reset operation resets the entire system and requires a system restart. This is comparable to a
"Power On reset" - except that the 24 V power supply does not have to be switched off.
Booting for servicing purposes
For service or diagnosis purposes, the NCU can be booted from a service system, the Emergency
Boot System.
See also
How do you create a service system for the NCU? (Page 63)
NCU operating system
Commissioning Manual, 10/2020, A5E48312736B AB
9

System settings
1.4 Displays during system booting
1.4
Displays during system booting
Behavior of the LEDs when booting
Of the LEDs on the front panel of the NCU, only the RDY LED and its status is important when
booting the NCU.
RDY LED
Additional LEDs
State/phase
7-segment display
Orange
Orange
BIOS boot
Post codes
See table: Load BIOS
Slowly flashing or-
Set from the PLC or
Booting up the kernel
1
ange (0.5 Hz)
option module
Phase 2: Initialization of the driver
Slowly flashing or-
Set from the PLC or
Booting the basic system
See table: Load the basic
ange/green
option module
system
Phase 3: Initialization of the basic
(0.5 Hz)
system
OFF
Set from the PLC or
NRK/NCK outputs
See table: NRK/NCK out-
option module
puts
green/red flashing
Set from the PLC or
Basic system shutdown
OFF
0.5 Hz)
option module
red
Set from the PLC or
Kernel shutdown
OFF
option module
red (5 Hz)
Set from the PLC or
SINAMICS fault
---
option module
SINAMICS faults and alarms, also see: SINAMICS S120/S150 List Manual (LH1)
Load BIOS
7-segment display
Meaning
00
Before loading the Master Boot Record (MBR) from the CompactFlash Card
01
Before starting the Master Boot Record (MBR) codes
02
Master Boot Record (MBR) code started
03
Second stage of the boot loader started, before reading the configuration file
04
Before loading the kernel
05
Before starting the kernel
Booting the basic system
See diagram: Meaning of switch positions (Page 8)
7-segment display
Meaning
1 (begin)
Basis initializations
2 (prepfs)
Cleaning up and preparing the file system
3 (hostname, loopback)
The name is set and the loopback interface configured.
4 (syslog)
Starting the system logging
Starting the CFS class 1, provide the network interfaces.
NCU operating system
10
Commissioning Manual, 10/2020, A5E48312736B AB

System settings
1.4 Displays during system booting
7-segment display
Meaning
5 (network)
Initializing the network interfaces and the firewall
6 (NCU:rtai, TCU:tcucon-
Starting the time server (ntpd)
fig)
7 (lsh)
Starting the SSH server (generate a host key if one is still not available).
8 (NCU:ftpd,
Starting the FTP server
TCU:mtouch)
9 (NCU:tcuservices,
Starting the TCU services (TFTP, VNC)
TCU:usbexport)
U r
Update required:
The CompactFlash card of the NCU contains a software version that is not
executable on type 3B modules and cannot be updated by an update.
Remedy:
• Check whether this CompactFlash card runs up in another NCU.
• Check whether the CompactFlash card is defective with the aid of a service
system: sc check-cf (Page 43)
The code "U r" can also be output in the following cases:
• No CompactFlash card is inserted.
• The CompactFlash card cannot be read.
• The partition table of the CompactFlash card is defective.
NRK/NCK outputs
See diagram: Meaning of switch positions (Page 8)
7-segment display
Meaning
1
Not applicable.
2
Not applicable.
3
Debugger was initialized.
4
NRK operating system was successfully activated.
5
NRK operating system has booted, init task is being processed (→ the appli-
cation boots).
6
Initialization was successfully performed; the control is in cyclic operation.
6.
with flashing point: The control is in cyclic operation and the cycles are active.
F
Internal error: Can only be read via additional diagnostics.
1 or 2
CompactFlash Card and SRAM data do not match. To resolve this problem, a
general reset is required by booting with switch position 1 or 2.
Lxx=yyy
Internal error when starting NCK, "xx" is the line number in the mcsystem.ini,
"yyy" is a unique error code for the code position.
NCU operating system
Commissioning Manual, 10/2020, A5E48312736B AB
11

System settings
1.4 Displays during system booting
System error
See diagram: Meaning of switch positions (Page 8)
RDY LED
Additional
Meaning
7-segment
Meaning
LEDs
display
Rapidly
Set from the
Permanent error:
C
"crash": The operating system crashes (this approxi-
flashing
PLC or option
mately corresponds to a Blue Screen for Windows); de-
The system is stopped.
red (2Hz)
module
tails can be found in the system log file.
P
"partition": Error when repartitioning
Rapidly
Set from the
Temporary error:
E
"error": A read or write error has occurred on the Com-
flashing
PLC or option
pactFlash Card (an additional point is displayed for a
The system may con-
red/orange
module
write error). It is possible that the CompactFlash Card is
tinue to run with re-
(2 Hz)
defective and should be replaced.
stricted functions.
F
"full": The CompactFlash Card is too full, so it is probable
that not all of the services will be able to be successfully
started.
When booting, this error is displayed for 1 minute; the
system then continues to boot, however, it can be as-
sumed that problems will occur.
NCU operating system
12
Commissioning Manual, 10/2020, A5E48312736B AB
Configuring the system
2
2.1
Ethernet interfaces of the NCU
Supplementary conditions
For the operation of an NCU:
• No more than one NCU may be operated as a DHCP server on the system network.
• An external mouse is recommended when using the System Network Center.
Configuration of the interfaces
The following connections can be established via the Ethernet interfaces:
Interface
Labeling
Inter-
Terminal settings
nal
name
Ethernet IE1/OP
X120
(Eth 2)
Connection to the system network with preset IP address
192.168.214.1 with subnet screen form 255.255.255.0
and active DHCP server for SINUMERIK
Ethernet IE2/NET
X130
(Eth 1)
Connection to company network as standard DHCP client
Ethernet
X127
(Ibn 0)
Service terminal with fixed IP address 192.168.215.1 and
fixed subnet screen form 255.255.255.224 with active
DHCP server
Network interface
The network interface is an interface that enables network communication. These are the
Ethernet interfaces on the NCU.
VNC (Virtual Network Computing)
Virtual Network Computing is a software that displays the screen contents of a remote
computer, with a running VNC server, on a local computer, with a running VNC viewer, and in
return sends keyboard and mouse movements of the local computer to the remote computer.
NCU operating system
Commissioning Manual, 10/2020, A5E48312736B AB
13
Configuring the system
2.2 How to determine the IP address of the NCU
2.2
How to determine the IP address of the NCU
NCU in the system network (X120)
On the X120, the NCU is pre-selected as required: No settings are necessary.
NCU in the company network (X130)
On the X130, the NCU is set to the address reference via DHCP. If the company network has a
DHCP server no further settings are required.
Example: Determining the IP address
There are several possibilities for determining the address that the NCU obtained in the company
network:
• If the NCU boots in switch position 8, it shows the IP address on the X130 on the 7-segment
display.
• Once the NCU has booted successfully, open a service shell on the TCU and execute the
following command (Page 56) to obtain the desired information:
SC SHOW IP
If the company network has no available DHCP server or if this cannot be used, you are given the
option to set a fixed address for the NCU on the X130 (in accordance with the addresses already
used in the company network).
The following command displays the IP address on the X130:
SC SHOW IP -X130
Note
The IP addresses can also be set directly from the SINUMERIK Operate user interface in the
"Commissioning" → "Network" operating area.
NCU operating system
14
Commissioning Manual, 10/2020, A5E48312736B AB
Configuring the system
2.3 Configuration file "basesys.ini"
2.3
Configuration file "basesys.ini"
Storage path
For a Linux basic system, a template of the file is provided on the system CompactFlash card
under the following path:
siemens/system/etc/template-basesys.ini
Copy this template with the name basesys.ini into one of the following directories:
oem/system/etc/basesys.ini
user/system/etc/basesys.ini
Use
Settings are made in the basesys.ini file that specify the behavior of the system in the network.
To edit the basesys.ini file:
• Comments are introduced by ';' or '#' at the beginning of the line, and span the width of the
line. Empty lines are also handled as comments.
• The sections that start with a "[NAME]" line are ignored by the basic system itself, but are
sometimes used by the HMI.
• Variable definitions are written in the form "NAME=VALUE". Blanks are permitted around the
'=' character. The value may also be enclosed in double quotation marks, but this is optional.
Note
Suitable editors for Linux
In most Linux system files, lines may only be ended with LF, and not with CRLF as in Windows.
Please take note of this when selecting an editor. The HMI application editor under
"Commissioning” is suitable.
In the Linux operating system, the UNIX editor vi is available.
Please take note that the Linux operating system is case-sensitive.
Reference
To make settings in the basesys.ini file, dialogs are provided in the "Commissioning" operating
area in SINUMERIK Operate in order to display or modify the values of the individual variables:
Commissioning Manual "SINUMERIK Operate" (IM9)
NCU operating system
Commissioning Manual, 10/2020, A5E48312736B AB
15
Configuring the system
2.3 Configuration file "basesys.ini"
2.3.1
Section [ExternalInterface]
Description
In this section, the parameters and settings for the external Ethernet interface are defined. For
an NCU7x0, this is X130 (Eth1). If the external interface is in DHCP mode, i.e. the value of
ExternalIP is empty or not defined, then all parameters listed here, with the exception of
"DHCPClientID", are accepted by the DHCP server as long as the server provides a value for the
parameter.
DisableCompanyNet
If this variable is set to 1, the X130 interface to the company network is not initialized and is thus
not available.
Value:
Empty, 0 or 1
Default:
Empty
ExternalIP
If ExternalIP is not empty, the fixed IP address specified there is used in the company network
interface. The ExternalNetMask then also needs to be set, as well as the gateway, name servers,
host name, and domain if required.
If ExternalIP is not set or is empty, a DHCP client is started on the interface.
Value:
IP address
Default:
Empty
ExternalNetMask
ExternalNetMask must be set together with ExternalIP, in order to define the size of the network.
Value:
Subnet mask
Default:
Empty
Gateway
If the value of gateway is not empty, the host specified there is used as the default gateway,
which means that all IP packets that cannot be directly assigned are sent there for routing.
If no gateway is specified, only the networks that are directly connected are accessible.
Value:
IP address
Default:
Empty
NCU operating system
16
Commissioning Manual, 10/2020, A5E48312736B AB
Configuring the system
2.3 Configuration file "basesys.ini"
Nameservers
If DNS name servers are specified here, then these must be used to resolve symbolic host names,
i.e. at most of the points where an IP address is expected, a computer name can also be used
instead.
The name server setting is also sent to your DHCP client (TCU, PG) via the DHCP server of the NCU,
so that this can also work with symbolic names.
Value:
List of IP addresses (separated by blanks)
Default:
Empty
Timeservers
Here you can specify a list of NTP servers (Network Time Protocol) that can be used by the NTPD
on the NCU for time synchronization. The status of NTPD is output in the system log file /var/log/
messages
As an alternative to the system log file, you can use "ntpq -p localhost" to find a time server
marked '*'. The time is synchronized with this server.
Value:
List of IP addresses (separated by blanks)
Default:
Empty
Note
Setting the time zone and the time server
The IP addresses can also be set directly from the SINUMERIK Operate user interface in the
"Commissioning" → "Date time >" softkey operating area.
Hostname
Here you can define a name for the local host. This manually assigned name takes priority over
all other names.
The host name is determined in the following order:
• Host name from the basesys.ini file, if set.
• A name received from the DHCP server (if DHCP client mode and a name have been supplied),
the result of a reverse DNS lookup, i.e. which name belongs to the IP received (if name servers
are defined).
• Default name ("NONAME_...")
Because the host name is also used as DNS name it must satisfy the corresponding requirements
of the RFC:
• ASCII letters (a-z, A-Z), numbers (0-9) and '-'
• max. 63 characters
Value:
Name
Default:
Empty
NCU operating system
Commissioning Manual, 10/2020, A5E48312736B AB
17
Configuring the system
2.3 Configuration file "basesys.ini"
Domain
These variables can be used to configure the DNS domain. The effect is that names in this domain
can be resolved without qualification (e.g. if the domain is "test.local", you can also specify the
name "computer1.test.local" as "computer1").
Value:
Name
Default:
Empty
DHCPClientID
With these variables, you can influence which ClientID the DHCP client presents to its server. This
ID can be used by the server to assign certain parameters to the client, for example a static IP
address.
Usually, the MAC address of the Ethernet interface is used for this purpose. This is also the default
setting. Alternatively, you can also use the host name ("@NAME"), which must then be defined
in the basesys.ini, in order to be recognized before the DHCP request. It is also possible to use an
arbitrary string for ClientID.
Value:
@MAC, @CFID, @NAME or any string
Default:
@MAC
2.3.2
Section [InternalInterface]
Description
In the section [InternalInterface] the data is specified for synchronization of the DHCP server in
the system network.
DisableSysNet
If this variable is set to 1, the X120 interface to the system network is not initialized and is thus
not available.
Value:
Empty, 0 or 1
Default:
Empty
InternalIP
Use this variable to set the fixed IP address in the system network. InternalIP should always be
used together with InternalNetMask.
Value:
IP address
Default:
192.168.214.1
NCU operating system
18
Commissioning Manual, 10/2020, A5E48312736B AB
Configuring the system
2.3 Configuration file "basesys.ini"
InternalNetMask
Specifies the subnet mask for InternallP and should always be used together with it.
Value:
Subnet mask
Default:
255.255.255.0
InternalIP_Alias
Use this variable to define an additional alias IP address for the interface of the system network
(X120); this is practical in certain application cases.
Value:
IP address
Default:
Empty
InternalIP_Alias should always be used together with InternalNetMask_Alias.
InternalNetMask_Alias
This variable specifies the subnet mask for InternallP_Alias and should always be used together
with it.
Value:
Subnet mask
Default:
Empty
EnableDHCPD_SysNet
If this variable is set to zero, then the start of the DHCP server in the system network X120 is
prevented.
Value:
Empty, 0 or 1
Default:
Empty
SyncModeDHCPD_SysNet
If this variable is not set to "OFF", the DHCP servers synchronize themselves in the system
network (X120) so that only one of them actively assigns addresses. This makes it possible to
operate multiple NCUs or PCUs concurrently without having to adjust the network settings.
Value:
ON_MASTER, ON_HIGH (= ON), ON_LOW, or OFF
Default:
ON_HIGH
NCU operating system
Commissioning Manual, 10/2020, A5E48312736B AB
19
Configuring the system
2.3 Configuration file "basesys.ini"
The DHCP servers that are not active go into "standby" mode; in this mode they regularly get the
current address data and TCU data from the active server so that if the active server fails a
standby server can take over the active role without data loss.
• With the ON_MASTER setting instead of ON_HIGH you can influence the synchronization in
such a manner that the server with the "Master" setting is always the active server (for this
it must be active in the network). This means that in the normal situation deterministically
the same control is always the DHCP server and you can find the actual address data (/var/etc/
udhcp-eth0.leases) and the TCU data (/user/common/tcu/...) there. ON_MASTER should only
be set for a single DHCP server in the system network; there should not be multiple masters.
• The ON_LOW setting assigns the DHCP server a lower priority than normal. It then becomes
the active server if no server with ON_HIGH or ON_MASTER is found in the network.
Note
Compatibility with earlier versions
The priority level "ON_LOW" is used automatically if the DHCP server is switched off. Although
such an NCU does have a (standby) DHCP server and keeps a backup of the lease data,
normally, however, it does not become an active server.
InternalDynRangeStart
With the two variables InternalDynRangeStart and InternalDynRangeEnd, you can explicitly
specify the range of IP addresses assigned by the DHCP server. The number range of the
presetting should normally suffice.
Value:
IP address
Default:
First address in the system network + 10 or +2 (if ≤ 16 addresses)
InternalDynRangeEnd
Value:
IP address
Default:
Last address in the system network - 15 or -1 (if ≤ 16 addresses)
DHCPDNoMasterWait
If a synchronizing DHCP server has once "detected" a master server in the past, then it waits for
synchronization until the time specified here elapses before it becomes the active server.
This additional pause makes it possible for the intended DHCP master to become the active DHCP
server without displacement even if it is shortly switched on thereafter, or takes longer to boot
than other controls.
Value:
Time in seconds
Default:
120
NCU operating system
20
Commissioning Manual, 10/2020, A5E48312736B AB
Configuring the system
2.3 Configuration file "basesys.ini"
InternalDNSDomain
This is used to specify the Top Level Domain (TLD) name that is used in the system network. The
DNS server of the NCU assigns names to the devices in the system network in this zone. Name
requests for all other zones are forwarded to an external name server in the company network.
As presetting the "local" recommended by the RFC1035 is used for local networks, to avoid
conflicts with globally defined domain names.
Recommendation: The default setting should be maintained.
Value:
Domain name (letters, digits, '-', '_', max. 63 characters)
Default:
local
DisableNATRouting
The default setting permits that a machine can access a company network from the system
network via the control using the NAT routing (= "Network Address Translation"). In this case, the
NCU converts the source address of the packets to its own address, and handles the response
packets in the inverse way.
If this variable is set to zero, the NAT routing of the NCU from the internal interfaces eth0 =X120
and ibn0 =X127 to the external network on eth1 =X130 is prevented. In order that the NAT
routing is not simultaneously shut down for both internal networks, using the values "X120" or
"X127", the system network or the commissioning network is selectively shut down.
Value:
empty, 0, 1, X120 or X127
Default:
Empty
2.3.3
Section [IBNInterface]
Description
The settings in this section affect interface X127.
EnableDHCP_IBNNet
If this variable is set to 1 then this prevents the start of the DHCP server at the commissioning
interface X127.
Value:
Empty, 0 or 1
Default:
Empty
NCU operating system
Commissioning Manual, 10/2020, A5E48312736B AB
21
Configuring the system
2.3 Configuration file "basesys.ini"
DisableIBNNet
If this variable is set to 0, then the commissioning interface X127 is not initialized and is thus not
available.
Value:
Empty, 0 or 1
Default:
Empty
EnableSysNetToIBNForwarding
If this variable is set to 1, it is possible to transfer packets from the system network (X120) to
X127. A firewall usually prevents this.
It is important to remember that there is no NAT involved, and the sender is responsible for
ensuring (with a suitable routing entry, for example) that packets sent to the PG or service PC on
X127 with the address 192.168.215.x only reach the NCU to which the device is connected.
Value:
Empty, 0 or 1
Default:
Empty
NOTICE
Security risk
Note that opening the firewall can represent a security risk. Permit feed-through only for the
period for which it is actually required. Note that every accessible service can have security
gaps.
DisableIBNForwarding
If this variable is set to 1, the NAT transfer of packets from the service connection X127 to the
system network (X120) is deactivated.
Value:
Empty, 0 or 1
Default:
Empty
2.3.4
Section [SNMP]
Description
Character strings delivered via SNMP (Simple Network Management Protocol) are entered here.
This is a way of giving out information.
NCU operating system
22
Commissioning Manual, 10/2020, A5E48312736B AB
Configuring the system
2.3 Configuration file "basesys.ini"
SNMPLocation
This string is used for the standard OID SNMPv2-MIB::sysLocation. It is possible to specify a
location here, which can be subsequently called with an SNMP client.
Value:
Any character string
Default:
Empty
SNMPContact
This string is used for the standard OID SNMPv2-MIB::sysContact. It is possible to specify a
contact address here, which can be subsequently called with an SNMP client.
Value:
Any character string
Default:
Empty
SNMPAutLocation
This string is used for the Siemens-specific OID
automationSystemIdent.automationLocationTag. It is possible to specify an additional location
here, which can be subsequently called with an SNMP client. This is similar to SNMPLocation in
terms of the MIB description, although it is intended for entries relating to automation.
Value:
Any character string
Default:
Empty
SNMPFunction
This string is used for the Siemens-specific OID
automationSystemIdent.automationFunctionTag. It is possible to specify a function designation
here, which can be subsequently called with an SNMP client.
Value:
Any character string
Default:
Empty
SNMPStation
This string is used for the SINUMERIK-specific OID mcSinumerikMIB.mcSinumerikMiscStation.
The value is the name of a station to which the device belongs. Devices with the same station
name are therefore identified as being contiguous.
Value:
Any character string
Default:
Empty
NCU operating system
Commissioning Manual, 10/2020, A5E48312736B AB
23
Configuring the system
2.3 Configuration file "basesys.ini"
2.3.5
Section [DCP]
Description
The parameters in this section define the properties of the DCP protocol (Discovery and Basic
Configuration Protocol), e.g. that are used in the menu item "Accessible nodes" of STEP 7.
InternalDcpEnabled
This can be used to switch-on and switch-off the DCP in the system network (X120); for the NCU,
the value is also used for X127.
Value:
0 or 1
Default:
1
ExternalDcpEnabled
This can be used to switch-on and switch-off the DCP in the company network (X130).
Value:
0 or 1
Default:
0
2.3.6
Section [LLDP]
Description
The parameters in this section define the properties of the LLDP protocol (Link Layer Discovery
Protocol), which is used by several applications for network diagnostics.
InternalLldpEnabled
This can be used to switch-on and switch-off the LLDP in the system network (X120); for the NCU,
the value is also used for X127.
Value:
0 or 1
Default:
1
ExternalLldpEnabled
This can be used to switch-on and switch-off the LLDP in the company network (X130).
Value:
0 or 1
Default:
0
NCU operating system
24
Commissioning Manual, 10/2020, A5E48312736B AB
Configuring the system
2.3 Configuration file "basesys.ini"
InternalLldpTLVsTxEnabled
Using this parameter, additional information in the LLDP packets are enabled at X120/X127,
which are normally not included.
Value:
Numerical value from 0 ... 15
Default:
0
The value is a bit field, i.e. the total value is obtained as a sum (total) of the specified numbers,
if the corresponding information is to be sent:
1:
port description
2:
system name
4:
system description
8:
capabilities
ExternalLldpTLVsTxEnabled
Using this parameter, additional information in the LLDP packets is enabled on the X130, which
are normally not included.
Value:
Numerical value from 0 ... 15
Default:
0
The value corresponds to parameter InternalLldpTLVsTxEnabled.
2.3.7
Section [LinuxBase]
Description
Additional setting possibilities of the Linux system are combined in this section.
Note
Setting the time zone and the time server
The IP addresses can also be set directly from the SINUMERIK Operate user interface in the
"Commissioning" → "Date time >" softkey operating area.
NCU operating system
Commissioning Manual, 10/2020, A5E48312736B AB
25
Configuring the system
2.3 Configuration file "basesys.ini"
Synchronizing the time
You must distinguish between the following cases when synchronizing the time:
• If there is an external NTP server to act as a time server (entered in the basesys.ini file or via
DHCP), then the PLC clock is synchronized via the Linux clock.
• If there is no external time server, the PLC clock will be the master for the Linux clock:
With "memory reset" the time of the PLC clock remains intact and is not reset. If the PLC is
switched on in switch position 3 "MRES" then the time will be reset. In this case the valid time
is taken over from the Linux system and does not need to be reset.
You can obtain information about the NTP server using the following command: sc ntpdiag
(Page 50)
NOTICE
Restriction on time synchronization
Do not set the time synchronization on two different systems; this means:
Select the NTP server either in the PLC project via PROFINET IO (X150) or in the "basesys.ini" on
the NCU in section [LinuxBase], but not in both simultaneously, as an additional time zone can
be specified on the NCU - however, not in the PLC project.
Timezone
The time zone set here is used by the system to convert UTC time (Universal Time Coordinated)
to local time. The time zone is sent to all applications via the environment variable "TZ", and is
taken into account by the libc function localtime().
The time zone influences all time entries in the basic system, particularly for the command
"date", for "ls -l", and in the system log file /var/log/messages.
Value:
Time zone description (see syntax and examples)
Default:
UTC
Examples:
If the control is to synchronize with one of the listed time zones, the examples in the table can
simply be copied.
Zones with daylight saving time/standard time:
Europe:
WET0WEST,M3.5.0,M10.5.0/3
CET-1CEST,M3.5.0,M10.5.0/3
EET-2EEST,M3.5.0,M10.5.0/3
USA:
EST5EDT,M4.1.0,M10.5.0
CST6CDT,M4.1.0,M10.5.0
MST7MDT,M4.1.0,M10.5.0
PST8PDT,M4.1.0,M10.5.0
Zones without daylight saving time/standard time:
NCU operating system
26
Commissioning Manual, 10/2020, A5E48312736B AB
Configuring the system
2.3 Configuration file "basesys.ini"
China:
CST-8
Japan:
JST-9
Syntax for the time zone description
In order to synchronize with a different time zone, the following syntax applies:
tz offset dst,Mmwd,Mmwd
Syntax (obligatory):
tz offset
Time zone and difference from UTC:
West of the zero meridian, the difference must be added; east of the zero
meridian, the difference must be subtracted.
Syntax (optional, only if there is daylight saving time):
dst,Mmwd,Mmwd
Daylight saving time zone with beginning and end
m (1 ≤ m ≤ 12)
m: Month
w (1 ≤ w ≤ 5)
w: Week of the month, i.e. w = 5 is the last week of the month
d (0 ≤ d ≤ 6)
d: Day of the week (from 0 = Sunday to 6 = Saturday)
PLCTimeType
This variable specifies the type of time that the PLC clock has been set to:
• local-nodst stands for local time without daylight saving time, even if the time zone
defines daylight saving time. In summer, all clocks are 1 hour behind the normal time, but as
a consequence there are no time steps. If the PLC clock is inadvertently set to daylight saving
time, then the Linux clock advances by 1 hour.
This behavior was used until this variable was introduced, and for compatibility reasons, it
still remains the default setting.
• local b means local time with changeover to daylight saving/standard time if in the
corresponding time zone there is daylight saving. If Linux takes its time from an external
server, then with this setting, the PLC clock is changed over twice a year.
NOTICE
Time of day alarms of the PLC missing or are duplicated
If Linux takes its time from the PLC, then this must either be manually or automatically
changed over externally between daylight saving time and standard time. If this is not done,
then in summer, the Linux clock is back 1 hour.
• utc means that the PLC clock is set to universal time. This makes it easy to align the time as
also the Linux clock is internally set to UTC. For this setting, there are no time changes as UTC
never has daylight saving time. However, neither SINUMERIK Operate nor the engineering
tools of the PLC know this mode or support converting UTC into local time, so that in most
cases, a time differing from the normal time is displayed.
Value:
local-nodst, local or utc
Default:
local-nodst
NCU operating system
Commissioning Manual, 10/2020, A5E48312736B AB
27
Configuring the system
2.3 Configuration file "basesys.ini"
LogFileLimit
The size of the system log file /var/log/messages can be restricted with this variable. By
entering "Zero", the log file has no size limitations.
The specified limit is no hard limit for reasons of efficiency but rather a sort of target value. If the
log file reaches the target value times factor 1.5, then it is reduced to around 75% of the target
value. A check is carried out every two minutes maximum to see if the file has become too large.
Value:
Size in KB
Default:
100 KB
FirewallOpenPorts
Here you can specify a list of the ports which is to be enabled in the firewall of the external
network interface. The protocol is "TCP" or "UDP", the port is the (numerical) port number of the
service to be enabled. Several entries are separated by blanks.
Value:
List of protocol/port pairs
Default:
Empty
NOTICE
Security risk
Note that opening the ports in the firewall can represent a security risk. Only enable the ports
that you actually require.
Note that every accessible service can have security gaps.
DisableSubsystems
Using this variable, you can suppress mounting and starting of certain subsystems (CFS
systems). Several subsystem names can also be specified - separated by blanks.
Value:
List of CFS names (separated by blanks)
Default:
Empty
The names can either be simple CFS basic names (e.g. "nck"), whereby all CFS systems with this
name are ignored. Alternatively you can specify an absolute path (e.g. /siemens/
sinumerik/nck) referring specifically to this CFS system.
It is also possible to set "DisableSubsystems=all" whereby not a single CFS system can be
mounted or started any more.
NCU operating system
28
Commissioning Manual, 10/2020, A5E48312736B AB
Configuring the system
2.3 Configuration file "basesys.ini"
DefaultCIFSSecurity
The Linux command sc connect, has for CIFS network drives, an option "-sec=TYPE"; with this
option, the security type can be set when establishing a connection to the server. If, when
calling sc connect (Page 44) this option is not specified, then as a substitute, the value of
variable DefaultCIFSSecurity is used in basesys.ini:
none
No authentication, connection only as guest - if the server permits this.
ntlm
NTLMv1 password hashing (as a result of compatibility)
ntlmi
NTLMv1 with forced package signing (due to compatibility)
ntlmv2
NTLMv2 password hashing
ntlmv2i
NTLMv2 with forced package signing
ntlmssp
NTLMv2 via NTLMSSP packaging
ntlmsspi
NTLMSSP with forced package signing
(krb5 and krb5i - as a result of the missing Kerberos infrastructure, are not supported on the
NCU.)
Value:
none, ntlm, ntlmi, ntlmv2, ntlmv2i, ntlmssp, ntlmsspi
Default:
ntlmssp
DisableNTPTimeSync
If this variable is set to 1, then the NTPD server (Network Time Protocol Daemon) for the time
synchronization is not started and the time of day is not synchronized.
Value:
0 or 1
Default:
0
DisablePLCTimeSync
If this variable is set to 1, synchronization of the system time with the PLC time (in both
directions) will not be executed.
Value:
0 or 1
Default:
0
EnableCoreDumps
If this variable is set to 1, a log file for processes is created and stored under /var/tmp. The log
file contains a memory dump of the process that has crashed or that has terminated.
Value:
Empty, 0 or 1
Default:
0
NCU operating system
Commissioning Manual, 10/2020, A5E48312736B AB
29
Configuring the system
2.3 Configuration file "basesys.ini"
CheckTCUforUpdatePackage
If this variable is set to 1, when booting, the USB interface at the front of the TCU is checked to
identify any storage medium. If, when checking the update packages, type *.usz files created
with Create MyConfig are found, then the installation of these update packages is started.
With the default setting zero, this check is skipped in order to save time.
Value:
0 or 1
Default:
0
EnableUsbShares
If this variable is set to 1, then USB memories are integrated as jointly used network drive.
If this variable is set to 0, then USB memories are integrated as individual USB data storage
device.
Value:
0 or 1
Default:
1
2.3.8
Example: Configuration file 'basesys.ini'
Configuration file basesys.ini
The following defaults are applied to the template_basesys.ini file which is supplied in the /
siemens/system/etc directory:
; ------------------------------------------------------------------
; Default Linux basesystem configuration
; ------------------------------------------------------------------
;
; section ID is for Windows compatibility and is ignored ;)
[ExternalInterface]
; If DisableCompanyNet is set to 1, the whole interface will be
disabled.
;DisableCompanyNet=1
; If ExternalIP is set, you can force the external Ethernet
; interface to use a fixed IP address etc. instead of using DHCP
; If a Hostname is set, it even overrides one received by DHCP
; Please note that only letters, digits and '-' are allowed in
Hostname;
NCU operating system
30
Commissioning Manual, 10/2020, A5E48312736B AB
Configuring the system
2.3 Configuration file "basesys.ini"
; specifically '_' or '.' are forbidden!
;ExternalIP=210.210.210.210
;ExternalNetMask=255.255.255.0
;Gateway=210.210.210.1
;Nameservers=210.210.210.1 210.210.210.2
;Timeservers=210.210.210.3
;Hostname=somename
;Domain=example.com
; If ExternalIP is empty (default), DHCP is used with the following
; ClientID the default is "@MAC" to use the MAC address,
; alternatives are "@NAME" to use the hostname (Hostname above),
; "@CFID" to use the ID of the CF card if one is available
; (like on X120), or any other arbitrary string
;DHCPClientID=@MAC
[InternalInterface]
; If DisableSysNet is set to 1, the whole interface will
; be disabled
;DisableSysNet=1
; With InternalIP and InternalNetMask (both must be set together),
; you can change the address on the internal/TCU/automation/system
net.
;InternalIP=192.168.214.1
;InternalNetMask=255.255.255.0
; These two can define an alias IP for X120.
;InternalIP_Alias=192.168.216.1
;InternalNetMask_Alias=255.255.255.0
; This defines a "name of station" for ProfiNet (ERTEC interface)
; for use with DCP, default is the normal hostname.
; Please be careful if a PN-Name can also be set by other means,
; for example by NCU-Link. Usually it is not needed to define
NCU operating system
Commissioning Manual, 10/2020, A5E48312736B AB
31
Configuring the system
2.3 Configuration file "basesys.ini"
; a name here.
;PN_StationName="PN_IO"
; Setting EnableDHCPD_SysNet to 0 suppresses that a DHCP server is
; started on that interface
;EnableDHCPD_SysNet=0
; Set synchronization of all DHCP servers in the
; system/TCU network (X120). Possible values are:
; OFF,
; or ON_LOW (low priority),
; or ON or ON_HIGH (normal priority),
; or ON_MASTER (highest priority),
; or ON_CLIENT_SYNC (starts DHCP client only, synchronization
active),
; or ON_CLIENT_NO_SYNC (starts DHCP client only, synchronization
inactive).
; ON_MASTER is used to make this machine deterministically the
; DHCP master server, but should be used only for one server
; in the network.
;SyncModeDHCPD_SysNet=ON
; This is the range of dynamic IPs given out by the DHCP server
; Defaults should be sensible
InternalDynRangeStart=192.168.214.10
InternalDynRangeEnd=192.168.214.239
; If once a DHCP master was seen, the DHCP server waits this many
; seconds for the master to show up before trying to become the
; active server
;DHCPDNoMasterWait=120
; DNS domain name used for names in system/TCU network
; (default is "local" to conform with RFC)
InternalDNSDomain=local
NCU operating system
32
Commissioning Manual, 10/2020, A5E48312736B AB
Configuring the system
2.3 Configuration file "basesys.ini"
; FixedDomain and FixedNameservers can be used to define a DNS domain
; and nameservers, if the DHCP/DNS server on system network
; is disabled.
;FixedDomain=local
;FixedNameservers=192.168.214.1
; If DisableNATRouting is set to 1, the NCU won't forward
; from TCU or IBN net
; (X120 anad X127, resp.) to external net (X130).
; If set to "X120" or "X127", forwarding will only be
; disabled from that interface.
;DisableNATRouting=1
[IBNInterface]
; If DisableIBNNet is set to 1, the whole interface will be disabled
;DisableIBNNet=1
; Setting EnableDHCPD_IBNNet to 0 suppresses that a DHCP server
; is started on that interface
;EnableDHCPD_IBNNet=0
; If DisableIBNForwarding is set to 1, the NCU won't do NAT routing
; from IBN network (X127) to system network (X120).
;DisableIBNForwarding=1
; If EnableSysNetToIBNForwarding is set to 1, the NCU forwards
; packets from X120 to X127. (Please note that the sending host must
be
; able to route the packets to the NCU by its own means, the NCU just
; accepts and forwards packets to 192.168.215.x with this setting.)
;EnableSysNetToIBNForwarding=1
[SNMP]
; The following variables define strings which are delivered on
; certain SNMP requests.
NCU operating system
Commissioning Manual, 10/2020, A5E48312736B AB
33
Configuring the system
2.3 Configuration file "basesys.ini"
; SNMPLocation and SNMPContact are reported for the standard OIDs
; SNMPv2-MIB::sysLocation and SNMPv2-MIB::sysContact, resp.
; SNMPAutLocation and SNMPFunction are used in the Siemens A&D
specific
; AUTOMATION-SYSTEM-MIB as
automationSystemIdent.automationLocationTag
; and automationSystemIdent.automationFunctionTag, resp.
SNMPLocation="not specified"
SNMPContact="not specified"
SNMPAutLocation="not specified"
SNMPFunction="not specified"
SNMPStation=""
[DCP]
; These variables en/disable the DCP protocol on X120/X127
; and X130, resp.
;InternalDcpEnabled=0
;ExternalDcpEnabled=1
[LLDP]
; These variables en/disable the LLDP protocol on X120/X127
; and X130, resp.
;InternalLldpEnabled=0
;ExternalLldpEnabled=1
[LinuxBase]
; Keep size of /var/log/messages around this value
; (not followed exactly for performance reasons)
LogfileLimit=102400
; Protocol/Port pairs to open in the firewall
; (e.g. TCP/5900, UDP/514, ...)
;FirewallOpenPorts=TCP/5900 TCP/102 TCP/22
; If there is only one Ethernet interface, it's used by
; default as an external (company) network. Alternatively,
NCU operating system
34
Commissioning Manual, 10/2020, A5E48312736B AB
Configuring the system
2.3 Configuration file "basesys.ini"
; usage as automation net (TCU boot support etc.) is possible
; by setting NetworkModel to "automation". (NCU only, Service
; and PCU20A variants!)
;NetworkModel=automation
; DisableSubsystems can be used to skip certain CFSes (= subsystems)
; a list of multiple names (separated by spaces) is possible
; a simple name means all CFSes with this name, an absolute path
; (e.g.,/siemens/sinumerik/nck) exactly this one CFS with
; the special value "ALL", all subsystems can be disabled
;DisableSubsystems=nck
; Directory for OEM netboot files (served by tftp to diskless clients)
NetbootDirectory=/oem/common/netboot
; Default security type for all CIFS mounts, if not given explicitly
; by sc connect -sec=TYPE. If not defined, NTLMv1 is used or NTLMv2
; if the server allows.
;DefaultCIFSSecurity=ntlmssp
; Properties of local time zone: names, offset, start and end day
; Some examples:
; Europe: WET0WEST,M3.5.0,M10.5.0
;
CET-1CEST,M3.5.0,M10.5.0
;
EET-2EEST,M3.5.0,M10.5.0
;
USA:
EST5EDT,M4.1.0,M10.5.0
;
CST6CDT,M4.1.0,M10.5.0
;
MST7MDT,M4.1.0,M10.5.0
;
PST8PDT,M4.1.0,M10.5.0
;
China: CST-8
;
Japan: JST-9
Timezone=UTC
; TimezoneName(for-into-only-do-not-change)=Etc/Universal
; If DisablePLCTimeSync is set, no time synchronization with
NCU operating system
Commissioning Manual, 10/2020, A5E48312736B AB
35