SINUMERIK 840D sl. Service - Configuring Commissioning. Manual (2011-2020) - page 48
Generating user dialogs
2.11 Predefined functions
Function name
Meaning
Load Item
The function inserts a list of expressions into the control.
The function is only available for the control types "listbox" and "graph-
icbox".
Syntax:
<function name="control.loaditem"> control name,
list </function>
Attribute:
name - function name
Values:
control name - control name
list- string variable
The string contained in the variable must conform to the structure de-
scribed below.
Structure of the list:
The list contains a number of expressions, which must be separated from
one another using a \\n.
Example:
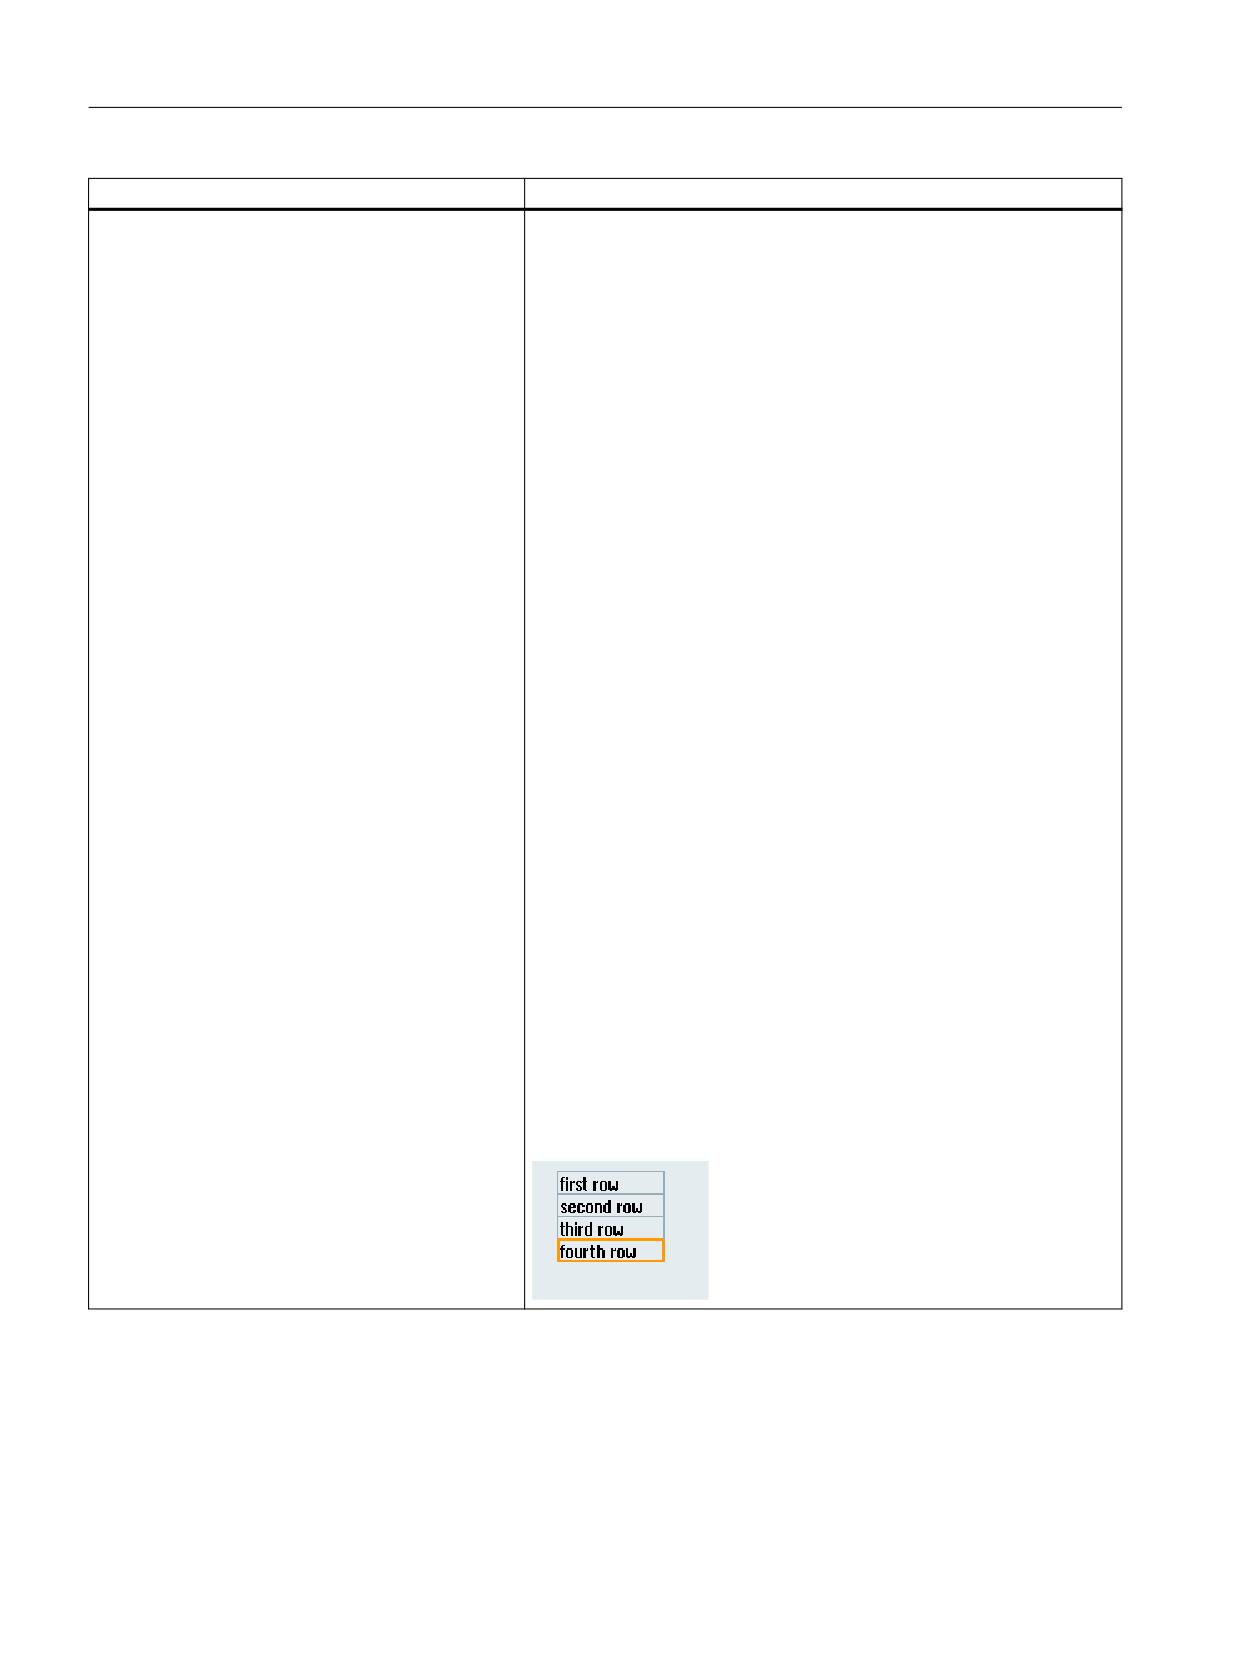
In the example, the content is assigned to the list box with the function
control.loaditem.
The control character \\n separates expressions belonging to the line.
<CONTROL name = "list" xpos = "160" ypos = "32"
width ="100" height="200" fieldtype="listbox"/>
<let name="lb_list" type="string" />
<op>
lb_list = _T"first row\\n";
lb_list = lb_list + _T"second row\\n";
lb_list = lb_list + _T"third row\\n";
lb_list = lb_list +_T"fourth row\\n";
</op>
<function name="control.loaditem">_T"list",
lb_list</function>
Easy XML
176
Programming Manual, 10/2020, 6FC5397-1DP40-6BA4
Generating user dialogs
2.11 Predefined functions
Function name
Meaning
Load Item continued
Example:
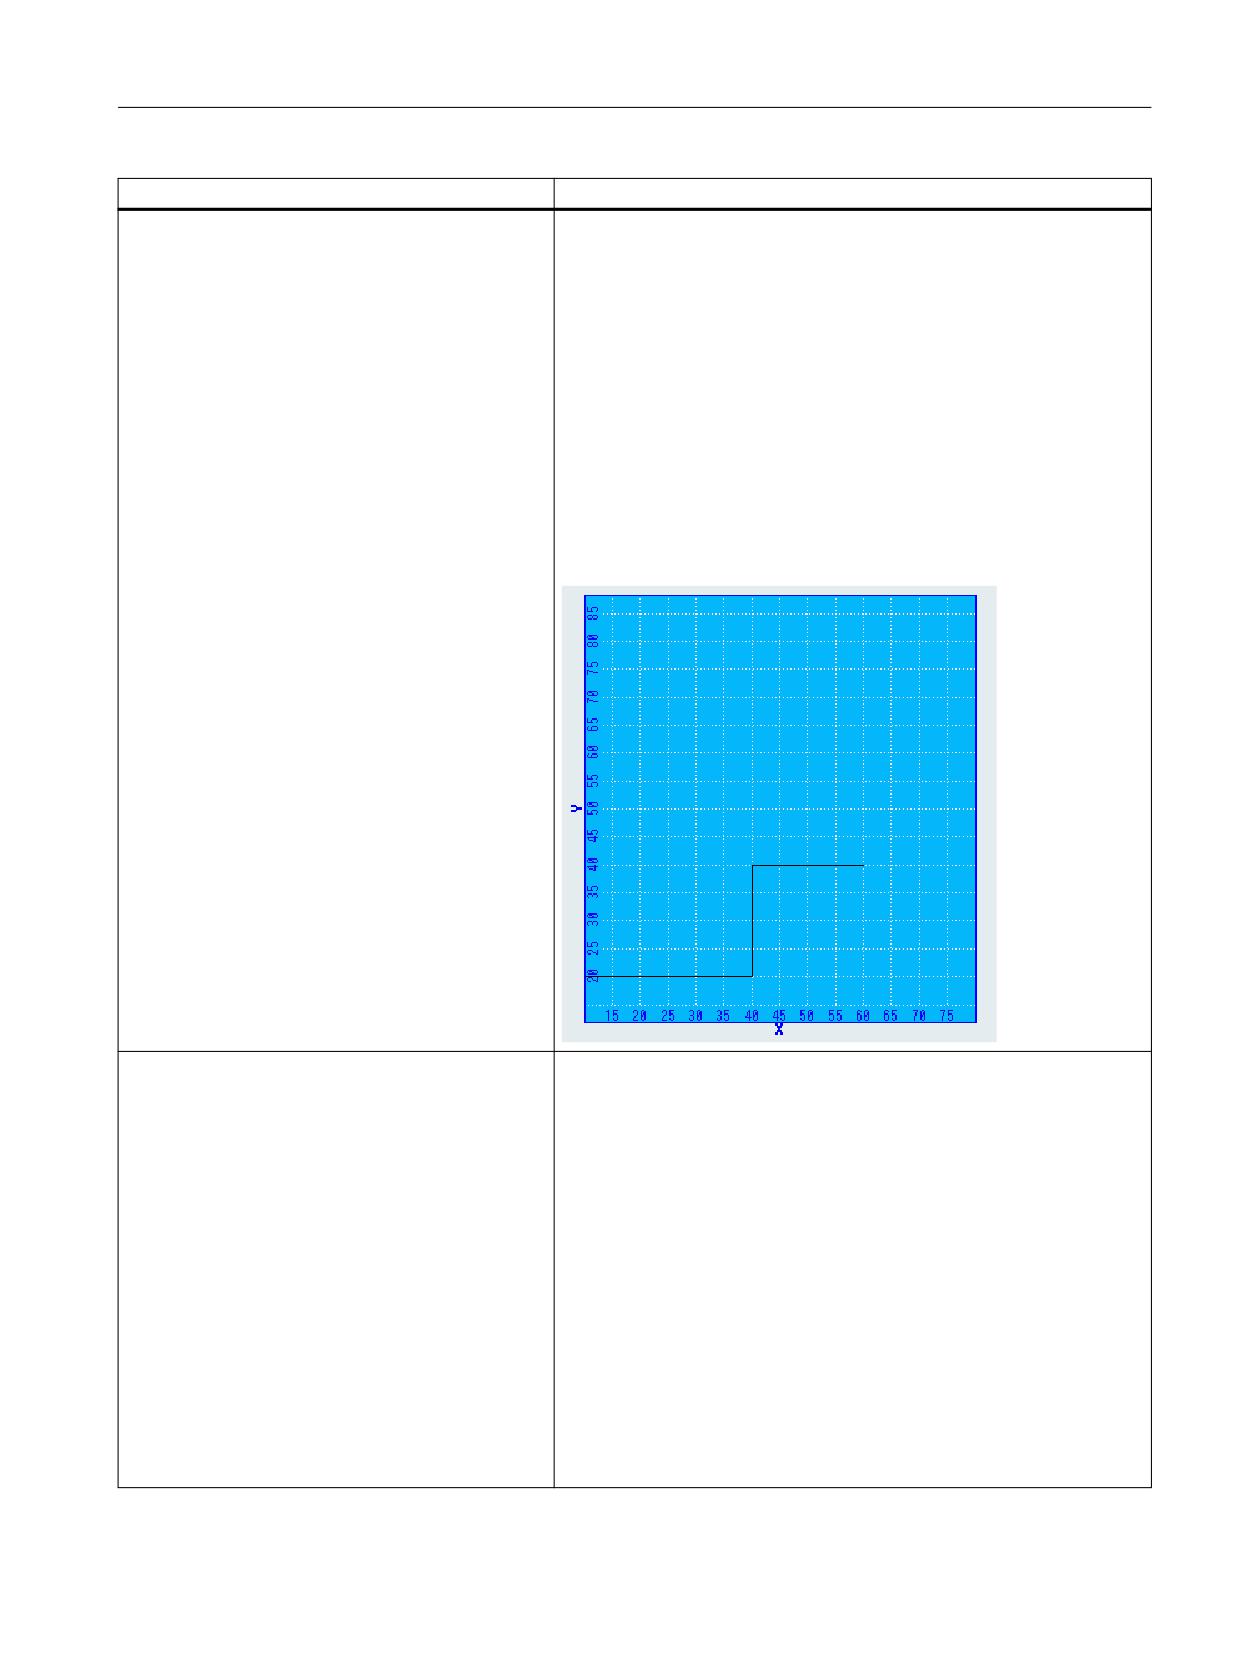
In the example, the content is assigned to the Graphicbox with the func-
tion control.loaditem.
The control character \\n separates the graphical elements.
<control name= "c_gbox" xpos = "6" ypos="32"
width="328" height="356" fieldtype="graphicbox" />
<let name="plot_list" type="string" />
<op>
plot_list = _T"l;10;20;40;20\\n";
plot_list = plot_list + _T"l;40;20;40;40\\n";
plot_list = plot_list + _T"l;40;40;60;40\\n";
plot_list = plot_list +_T"l;80;0;80;100\\n";
</op>
<function name="control.loaditem">_T"c_gbox",
plot_list</function>
Empty
The function deletes the contents of the specified list box or graphic box
controls.
Syntax:
<function name="control.empty"> control name,
</function>
Attribute:
name - function name
Values:
control name - control name
Example:
<function name="control.empty">_T"listbox1"
</function>
Easy XML
Programming Manual, 10/2020, 6FC5397-1DP40-6BA4
177
Generating user dialogs
2.11 Predefined functions
Function name
Meaning
Get focus
The function supplies the name of the control, which has the input focus.
Syntax:
<function name="control.getfocus"
return="focus_name" />
Attributes:
name - function name
return - a string variable should be specified, into which the control
name is copied.
Example:
<let name>="focus_field" type="string"></let>
<function name="control.getfocus"
return="focus_field"/>
Set focus
The function sets the input focus to the specified control.
The Controlname should be transferred as text expression of the func-
tion.
Syntax:
<function name="control.setfocus"> control name
</function>
Attribute:
name - function name
Value:
control name - name of the control
Example:
<function name="control.setfocus" ">_T"listbox1"
</function>
Get cursor selection
For a list box, the function supplies the cursor index.
The Controlname should be transferred as text expression of the func-
tion.
Syntax:
<function name="control.getcurssel"
return="var">control name </function>
Example:
<let name>="index"></let>
<function name="control.getcurssel"
return="index">_T"listbox1"</function>
Easy XML
178
Programming Manual, 10/2020, 6FC5397-1DP40-6BA4
Generating user dialogs
2.11 Predefined functions
Function name
Meaning
Set cursor selection
For a list box, the function sets the cursor to the appropriate line.
The Controlname should be transferred as text expression of the func-
tion.
Syntax:
<function name="control.setcurssel" > control name,
index</function>
Example:
<let name>="index">2</let>
<function name="control.setcurssel"
">_T"listbox1",index</function>
Get Item
For a list box, the function copies the contents of the selected line to the
specified variable.
A string variable should be specified as reference variable.
The Controlname should be transferred as text expression of the func-
tion.
Syntax:
<function name="control.getitem" return="var">
control name, index </function>
Example:
<let name>="index">2</let>
<let name>="item" type="string"></let>
<function name="control.getitem" return="item"
">_T"listbox1",index</function>
Get Item Data
For a list box, the function copies the user-specific allocated value of an
element to the specified variable.
For an edit control, the function copies the user-specific allocated value
(item_data) to the specified variable.
An integer variable should be specified as reference variable.
The Controlname should be transferred as text expression of the func-
tion.
Syntax:
<function name="control.getitemdata" return="var">
control name, index </function>
Example:
<let name>="index">2</let>
<let name>="itemdata"></let>
<function name="control.getitemdata"
return="itemdata" ">_T"listbox1",index</function>
Easy XML
Programming Manual, 10/2020, 6FC5397-1DP40-6BA4
179
Generating user dialogs
2.11 Predefined functions
Function name
Meaning
Image Box Set
This function is used to control the visible area of the controls Imagebox
and Graphicbox. The call parameters to be specified are the control
name, the control command, and the associated values.
Syntax:
<function name="control.imageboxset">control name,
command, command parameter</function>
Call parameters:
•
x_offs
The function shifts the image portion to the specified X-position. A
further parameter to be specified is the coordinate of the left corner.
•
y_offs
The function shifts the image portion to the specified Y position. A
further parameter to be specified is the coordinate of the upper cor-
ner.
•
xy_offs
The function shifts the image portion to the specified X/Y-positions.
Further parameters to be specified are the coordinates of the left and
upper corners.
•
followCursor
The image portion follows the set cursor position.
•
zoomplus
The image is enlarged by a factor of 0.12.
•
zoomminus
The image is reduced by a factor of 0.12.
•
autozoom
The image will automatically be scaled to fit the display area.
•
Update
The control is redrawn.
•
SetBkColor
The command sets the specified backg32round color. A further param-
eter to be specified is the color coding.
•
SetCursorRect
The portion specified as a rectangle is shifted into the visible area.
•
SetAnimationState (only applies to the Imagebox control)
- start - The command starts an animation.
- stop - The command stops an animation.
Easy XML
180
Programming Manual, 10/2020, 6FC5397-1DP40-6BA4
Generating user dialogs
2.11 Predefined functions
Function name
Meaning
Image Box Set continued
Example:
<softkey POSITION="1">
<caption>zoom%nin</caption>
<function name="control.imageboxset">_T"c_gbox",
_T"zoomplus"</function>
</softkey>
<form name = "main_form">
<init>
<caption> graphicbox</caption>
<control name= "c_gbox" xpos = "6" ypos="32"
width="328" height="356" fieldtype="graphicbox" />
<let name="plot_list" type="string" />
<op>
plot_list = _T"l;10;20;40;20\\n";
plot_list = plot_list + _T"l;40;20;40;40\\n";
plot_list = plot_list + _T"l;40;40;60;40\\n";
plot_list = plot_list +_T"l;80;0;80;100\\n";
</op>
<function name="control.loaditem">_T"c_gbox",
plot_list</function>
</init>
</form>
Image Box Get
This function is for querying the control properties image box. The call
parameters to be specified are the control command and the associated
values.
Syntax:
<function name="control.imageboxget">control name,
command, command parameter</function>
Call parameters:
GetViewSize
Returns the size of the display area
A further parameter to be specified is the variable with structure type
SIZE.
Example:
<let name="view_size" type="size" />
<function name="control.imageboxget">_T"topoview",
_T"GetViewSize", view_size</function>
Easy XML
Programming Manual, 10/2020, 6FC5397-1DP40-6BA4
181
Generating user dialogs
2.11 Predefined functions
Function name
Meaning
Bitmap Dim
The function copies the dimension of a bitmap back into a variable with
structure type SIZE. To define the type, file struct_def.xml must be in-
cluded in the project.
Further information is provided in Chapter "Creating the file
struct_def.xml (Page 125)"
Syntax:
<function name="bitmap.dim" >name, variable type
</function>
Parameter:
name - file path
variable type - variable name of a variable of type SIZE
Example:
<let name="bmp_size" type="size" />
<function name="bitmap.dim" >_T"test.bmp", bmp_size
</function>
Screen Resolution
The function copies the absolute screen resolution of the system back
into a variable with structure type SIZE. To define the type, file
struct_def.xml must be included in the project.
Further information is provided in Chapter "Creating the file
struct_def.xml (Page 125)"
Syntax:
<function name="hmi.screen_resolution"
>varialble type </function>
Get HMI Resolution
The function copies the screen resolution used by SINUMERIK Operate
back into a variable with structure type SIZE. To define the type, file
struct_def.xml must be included in the project.
Further information is provided in Chapter "Creating the file
struct_def.xml (Page 125)"
Syntax:
<function name="hmi.get_hmi_resolution"
>variable type </function>
Get Caption Height
The function returns the title bar height in pixels.
Syntax:
<function name="hmi.get_caption_height"
return="<return var>" />
Attributes:
return - integer variable
Easy XML
182
Programming Manual, 10/2020, 6FC5397-1DP40-6BA4
Generating user dialogs
2.11 Predefined functions
Function name
Meaning
Abs
This function returns the absolute value of the specified number.
Syntax:
<function name="abs" return="var"> value
</function>
SDEG
The function converts the specified value into degrees.
Syntax:
<function name="sdeg" return="var"> value
</function>
SRAD
The function converts the specified value into RADian.
Syntax:
<function name="srad" return="var"> value
</function>
SQRT
The function calculates the square root of the specified value.
Syntax:
<function name="sqrt" return="var"> value
</function>
ROUND
The function rounds of the transferred number to the specified number
of decimal places. If the number of decimal places is not specified, then
the function rounds off the number, taking into account the first decimal
place.
Syntax:
<function name="round" return="var"> value,
nDecimalPlaces </function>
FLOOR
The function supplies the largest possible integer value, which is less
than or equal to the transferred value.
Syntax:
<function name="floor" return="var"> value
</function>
CEIL
The function supplies the smallest possible integer value, which is great-
er than or equal to the transferred value.
Syntax:
<function name="ceil" return="var"> value
</function>
LOG
The function calculates the logarithm of the specified value.
Syntax:
<function name="log" return="var"> value </function>
Easy XML
Programming Manual, 10/2020, 6FC5397-1DP40-6BA4
183
Generating user dialogs
2.11 Predefined functions
Function name
Meaning
LOG10
The function calculates the common (decadic) logarithm of the speci-
fied value.
Syntax:
<function name="log10" return="var"> value
</function>
POW
The function calculates the value "ab".
Syntax:
<function name="pow" return="var"> a, b </function>
MIN
The function compares the transferred value and returns the lower of the
values.
Syntax:
<function name="min" return="var"> value1, value2
</function>
MAX
The function compares the transferred value and returns the higher of
the values.
Syntax:
<function name="max" return="var"> value1, value2
</function>
RANDOM
The function returns a pseudo random number.
Syntax:
<function name="random" return="var" </function>
Easy XML
184
Programming Manual, 10/2020, 6FC5397-1DP40-6BA4
Generating user dialogs
2.11 Predefined functions
Function name
Meaning
MMC
Function:
You can use the MMC command to display user-defined dialog forms
from the part program in SINUMERIK Operate. The appearance of the
dialog forms is defined in a pure text configuration (XML file in the man-
ufacturer directory). The system software remains unchanged.
Due to changes in the operate base system, the parameters are as fol-
lows:
XML → CYCLES or POPUPDLG
XML_ON → PICTURE_ON
XML_OFF → PICTURE_OFF
Syntax:
MMC ("operating area, command, XML script file, menu name, reserved,
reserved, display time or acknowledgment variable, reserved", "acknowl-
edgment mode")
Description:
• MMC
Calling the dialog form interactively from the part program in SINU-
MERIK Operate.
• EasyXml
Identification for user dialogs that are to be started from a part pro-
gram.
• XML_ON or XML_OFF
Command: Selection or deselection of a dialog
• XML file
Name of the XML script file
• Menu
Name of the menu tag that manages the dialog to be displayed
• reserved
reserved for SINUMERIK Operate
• reserved
reserved for SINUMERIK Operate
• Time
Display time of the dialog for acknowledgment mode "N"
• reserved
reserved for SINUMERIK Operate
• Acknowledgment mode
"S" synchronous, acknowledgment via the "OK" softkey
"N" asynchronous, dialog closes after the set time
Easy XML
Programming Manual, 10/2020, 6FC5397-1DP40-6BA4
185
Generating user dialogs
2.11 Predefined functions
Function name
Meaning
MMC continued
Example of synchronous call:
Due to changes in the operate base system, the parameters are as fol-
lows:
XML → CYCLES or POPUPDLG
XML_ON → PICTURE_ON
XML_OFF → PICTURE_OFF
NC instruction
MMC("EASYXML oder
CYCLES”,XML_ON,mmc_cmd.xml,cmd1,,,,,","S")
File: mmc_cmd.xml
<menu name = "cmd1">
<open_form name = "cmd1_form" />
<softkey_ok>
<close_form />
</softkey_ok>
</menu>
<form name = "cmd1_form" xpos ="12" ypos="100"
width="500" height="240">
<init>
</init>
<paint>
</paint>
</form>
Example of asynchronous call (acknowledgment not expected):
Due to changes in the operate base system, the parameters are as fol-
lows:
XML → CYCLES or POPUPDLG
XML_ON → PICTURE_ON
XML_OFF → PICTURE_OFF
NC instruction
MMC("EASYXML oder
CYCLES”,PICTURE_ON,mmc_cmd.xml,cmd1,,,10,,","N")
File: mmc_cmd.xml <menu name = "cmd1">
<open_form name = "cmd1_form" />
<softkey_ok>
<close_form />
</softkey_ok>
</menu>
<form name = "cmd1_form" xpos ="12" ypos="100"
width="500" height="240">
<init>
</init>
<paint>
</paint>
</form>
Easy XML
186
Programming Manual, 10/2020, 6FC5397-1DP40-6BA4
Generating user dialogs
2.11 Predefined functions
Function name
Meaning
MMC continued
Example of extraction of script parts from a part program:
Due to changes in the operate base system, the parameters are as fol-
lows:
XML → CYCLES or POPUPDLG
XML_ON → PICTURE_ON
XML_OFF → PICTURE_OFF
NC instruction
MMC(“XML,XML_ON,XMLDIAL_EMB.XML,main","S")
File: xmldial_emb.xml
<DialogGui>
<let name="menu_name" type="string">main</let>
<let name="script_loaded">0</let>
<menu name = "main">
<if>
<condition>script_loaded == 0</condition>
<then>
<function name ="load_current_program" />
<dynamic_include src="__tmp.xml" />
<op>
script_loaded = 1;
</op>
<navigation>$$$menu_name</navigation>
</then>
</if>
<softkey_back>
<close_form />
</softkey_back>
</menu>
<function_body name ="load_current_program" >
<let name="prog_name" type= "string"/>
<let name="contents" type= "string"/>
<let name="entry" type= "string"/>
<let name="len" />
<op> prog_name = "nck/Channel/ProgramInfo/
workPandProgName"</op>
<function name="DOC.LOADSCRIPT"
return="contents">prog_name, _T"main_dialog",
entry</function>
<function name="string.length"
return="len">contents</function>
<if>
<condition>len > 0</condition>
<then>
<op>
menu_name = entry;
</op>
<function name="doc.writetofile" >_T"__tmp.xml",
contents</function>
</then>
</if>
</function_body>
</DialogGui>
Easy XML
Programming Manual, 10/2020, 6FC5397-1DP40-6BA4
187
Generating user dialogs
2.11 Predefined functions
Function name
Meaning
MMC continued
Programming example
;<main_dialog entry="rpara_main">
; <let name="xpos" />
; <let name="ypos" />
; <let name="field_name" type="string" />
; <let name="num" />
; <menu name="rpara_main">
; <open_form name="rpara_form"/>
; <softkey_back>
; <close_form />
; </softkey_back>
;</menu>
;
;<form name="rpara_form">
; <init>
; <caption>test mask</caption>
; <let name="count" >0</let>
; <op>
; xpos = 120;
; ypos = 34;
;
; "nck/Channel/Parameter/R[10]" = 10;
; </op>
; <!-- load the number of controls -->
; <op>
; num = "nck/Channel/Parameter/R[10]";
; </op>
;
; <while>
; <condition>count < num</condition>
; <print name="field_name" text="edit%d">count</
print>
;
; <control name = "$field_name" xpos = "$xpos" ypos
= "$ypos" refvar="nck/Channel/Parameter/R[$count]"
hotlink="true" />
; <op>
; ypos = ypos +24;
; count = count +1;
; </op>
; </while>
;
; </init>
;
; <paint>
; <op>
; xpos = 8;
; ypos = 36;
; count = 0;
; </op>
; <while>
; <condition>count < num</condition>
; <print name="field_name" text="R-Parameter
%d">count </print>
Easy XML
188
Programming Manual, 10/2020, 6FC5397-1DP40-6BA4
Generating user dialogs
2.11 Predefined functions
Function name
Meaning
;
; <text xpos = "$xpos" ypos = "$ypos" >$$
$field_name</text>
; <op>
; ypos = ypos +24;
; count = count +1;
; </op>
; </while>
;
; </paint>
;
;</form>
;
;</main_dialog>
…
G94 F100
MMC(“XML,XML_ON,XMLDIAL_EMB.XML,main","A")
…
…
…
MMC(“XML,XML_OFF,XMLDIAL_EMB.XML,main","A")
G4 F2
M2
ISNUMERIC
The function checks the content of a string as to whether this can be
evaluated as number. Spaces and tabs are ignored. The sign and the
decimal point are still considered as valid characters. The function re-
turns a value of 1 if the conditions are satisfied.
Parameter:
string - Character string
Syntax:
<function name="isnumeric" return="result"><string>
</function>
ROOT
The function extracts the nth root from a number.
Parameter:
value - Number
n - Exponent of a root
Syntax:
<function name="ROOT" return="result"><value>, <n></
function>
Easy XML
Programming Manual, 10/2020, 6FC5397-1DP40-6BA4
189
Generating user dialogs
2.12 Multitouch operation
2.12
Multitouch operation
2.12.1
Multitouch function
Overview
When multitouch displays are introduced, it is necessary to adjust operation to the extended
functionality of the display. The rigid positioning of softkeys, for example, is eliminated and
replaced or supplemented by free positioning of buttons. Due to the diversity of design options
for buttons, it no longer makes sense to use just one control for programming whose
appearance is based exclusively on the design specifications of the operating software. Toggle
controls, which only know two states, can be replaced by switches, for example, that show the
respective state by means of an icon and react to tap or flick gestures.
Displays graphics can be given the capability of reacting to pan gestures. The imagebox control
has been extended for this purpose.
Note
Graphics that are output in the paint tag do not react to gestures.
Outside of the controls provided by the parser, finger gestures can be processed in the script,
thus providing the option, for example, of offering new navigation strategies in the dialogs.
Finger gestures could be used for zooming in to/out of dialog contents.
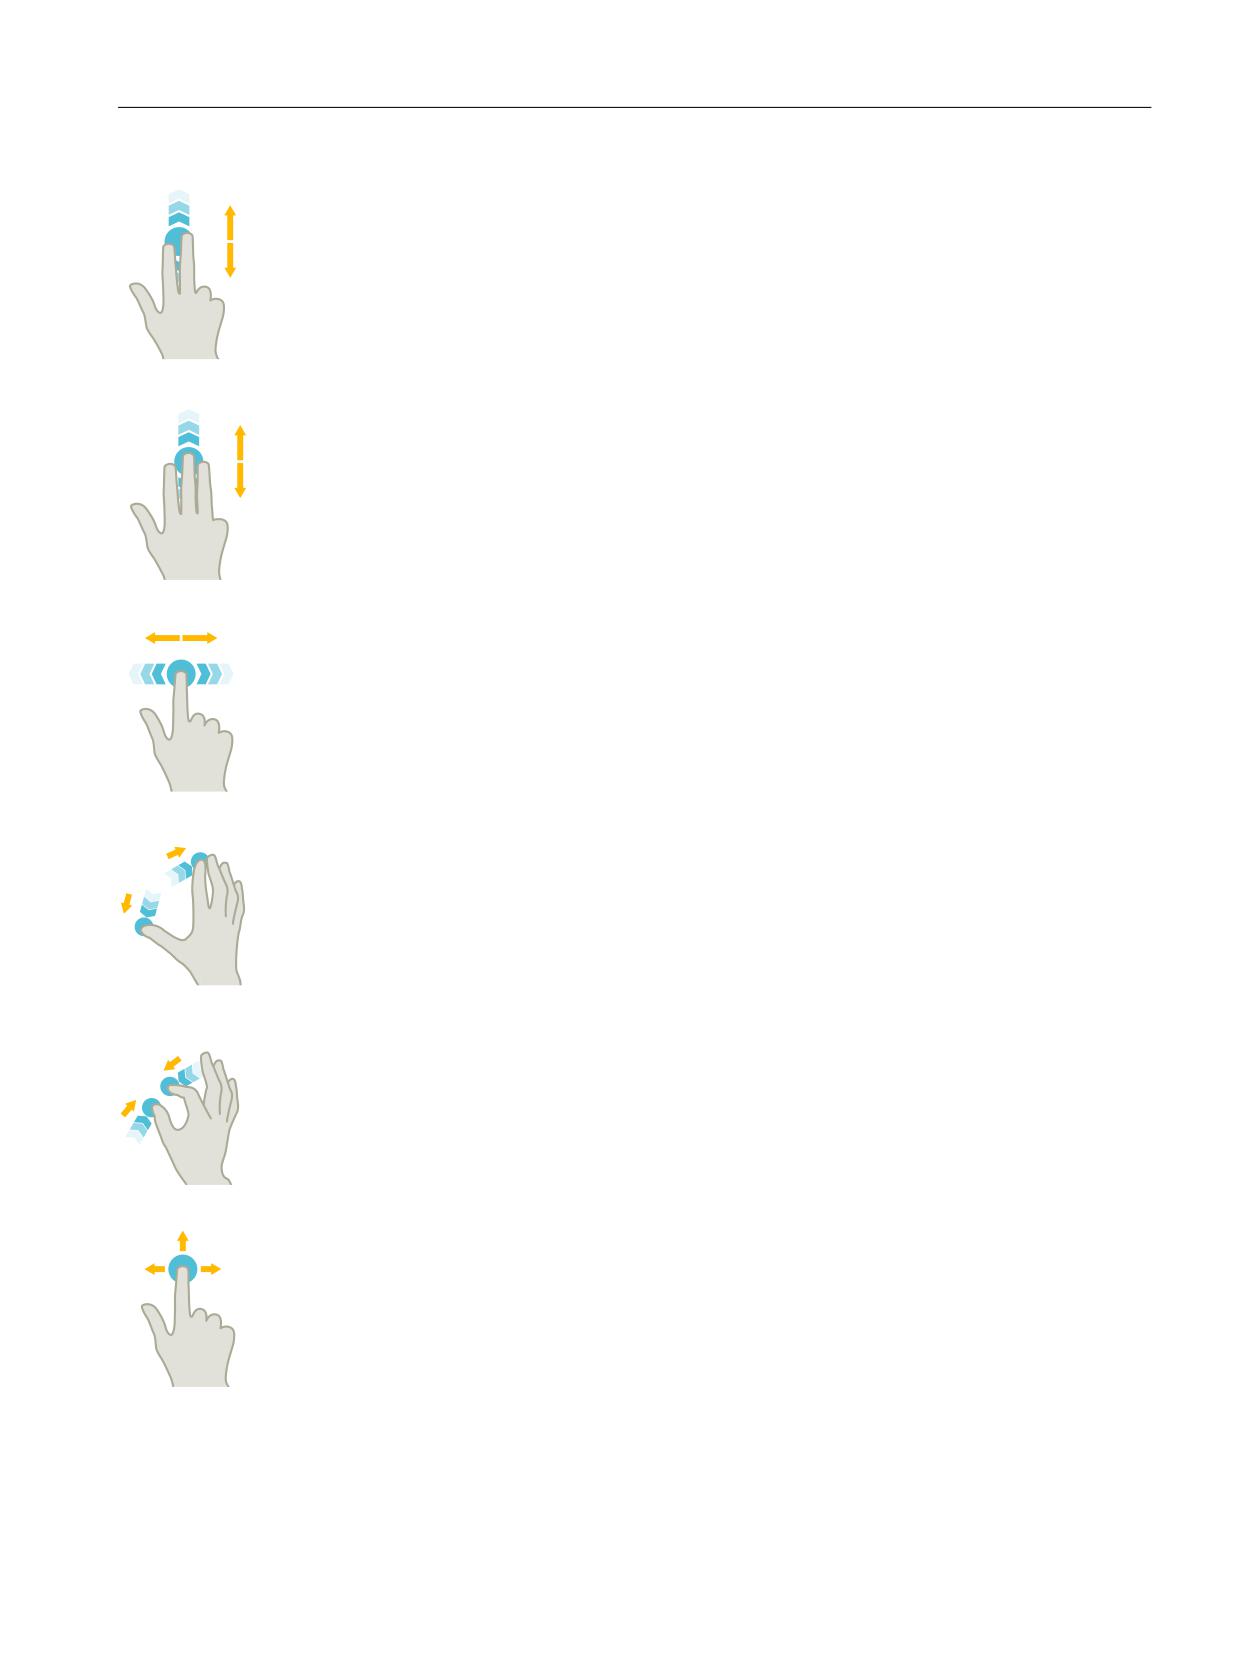
The Easy XML parser supports the following finger gestures:
Finger gestures
Tap
• Select window
• Select object (e.g. NC set)
• Activate entry field
- Enter or overwrite value
- Tap again to change the value
Flick vertically with one finger
• Scroll in lists (e.g. programs, tools, zero points)
• Scroll in files (e.g. NC program)
Easy XML
190
Programming Manual, 10/2020, 6FC5397-1DP40-6BA4
Generating user dialogs
2.12 Multitouch operation
Flick vertically with two fingers
• Page-scroll in lists (e.g. ZO)
• Page-scroll in files (e.g. NC programs)
Flick vertically with three fingers
• Scroll to the start or end of lists
• Scroll to the start or end of files
Flick horizontally with one finger
• Scroll in lists with many columns
Spread
• Zoom in to graphic contents (e.g. simulation, mold making view)
Pinch
• Zoom out from graphic contents (e.g. simulation, mold making view)
Pan with one finger
• Move graphic contents (e.g. simulation, mold making view)
• Move list contents
The gesture_event tag and the $gestureinfo variable are used for handling finger gestures. The
enable program actions for decoded finger gestures.
Easy XML
Programming Manual, 10/2020, 6FC5397-1DP40-6BA4
191
Generating user dialogs
2.12 Multitouch operation
2.12.2
Programming finger gestures
gesture_event tag
Note
This tag is executed only if the operator panel supports multitouch operation.
If the operating software recognizes a finger gesture, the parser provides the gesture
information in the $gestureinfo variable and executes the gesture_event tag. The variable
possesses the GestureInfoStruct data type and contains the following attributes:
Attribute
Value
Meaning
type
3
Pan gesture
4
Zoom out gesture
5
Tap gesture
flag
1
Scaling factor changed
2
Angle of rotation changed
state
1
Started
2
Updated
3
Completed
item_data
Identification of the active control
-1
The gesture is not assigned to a control
!= -1
The gesture was executed in a control to which this
value was assigned during creation
point
Position of the gesture
point.x
X position of the gesture
point.y
Y position of the gesture
delta
Difference between the start of the gesture and the
current event
<Scaling difference>
When scaling factor is changed
<Angular difference>
When angle of rotation is changed
These attributes are predefined in the struct_def.xml file.
Further information is provided in Chapter "Creating the file struct_def.xml (Page 125)"
Easy XML
192
Programming Manual, 10/2020, 6FC5397-1DP40-6BA4
Generating user dialogs
2.12 Multitouch operation
2.12.3
Gesture control for graphics
Imagebox control variable
The following three extensions are available for the gesture control of graphics when using
the Imagebox control variable:
Attribute
Meaning/behavior
rotationangle
This attribute value indicates the angle at which the graphic is to be displayed.
setrotationmode
The true attribute value allows processing of the pinch gesture
setzoommode
The true attribute value allows you to zoom in to/out from or move a graphic
in the display area. This default setting of this attribute is false.
Syntax
<property rotationangle="angle" />
<property setrotationmode="true/false" />
<property setzoommode="true/false" />
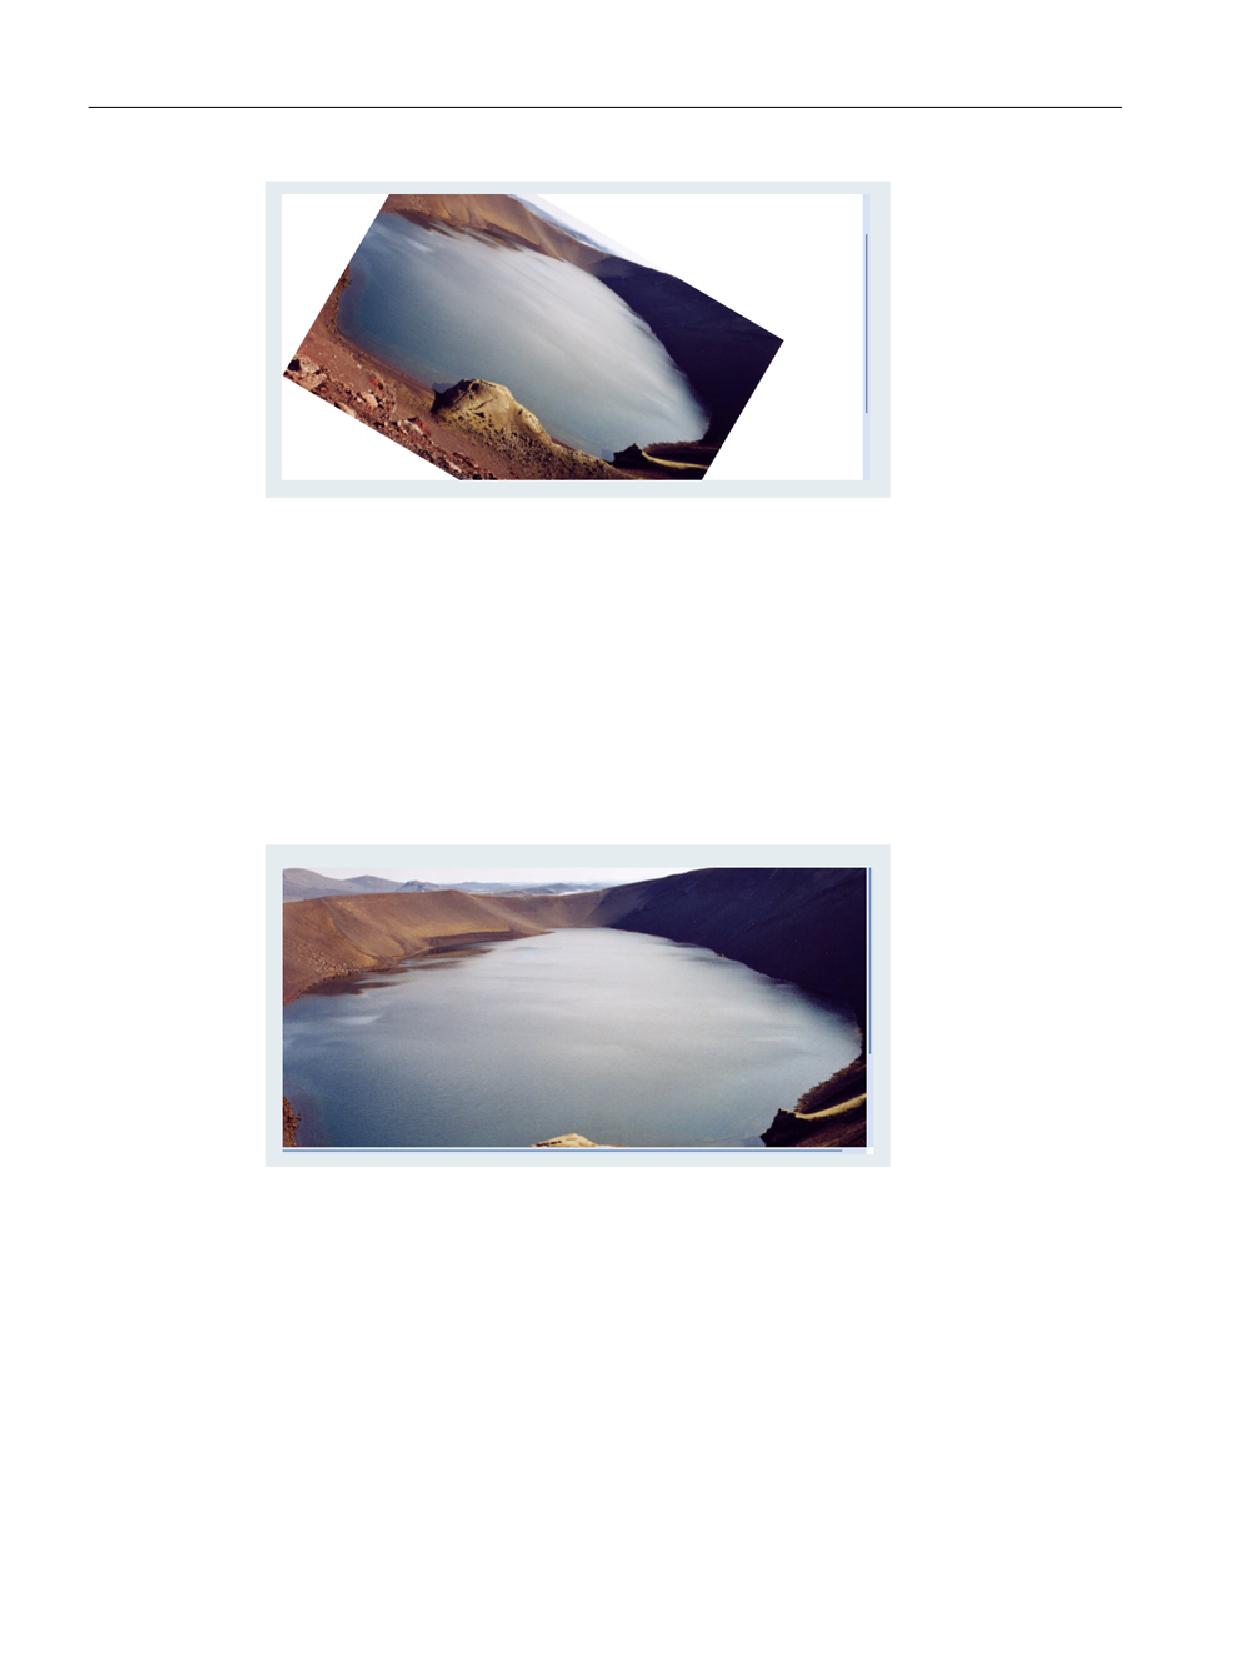
Example of bitmap rotation
Rotate bitmap by 30.5 degrees clockwise:
<let name="image_box_pict_name" type="string" >pic1.bmp</let>
…
…
…
<control name="image_view" xpos="100" ypos="123" width="300"
height="200" fieldtype="imagebox" refvar="image_box_pict_name"
hotlink="true" >
<property item_data="1000" />
<property rotationangle="30.5" />
<property setrotationmode ="true" />
</control>
Easy XML
Programming Manual, 10/2020, 6FC5397-1DP40-6BA4
193
Generating user dialogs
2.12 Multitouch operation
Example of bitmap zooming
Allowing zooming for a bitmap:
<control name="image_view" xpos="100" ypos="123" width="300"
height="200" fieldtype="imagebox" refvar="image_box_pict_name"
hotlink="true" >
<property item_data="1000" />
<property setzoommode="true" />
</control>
imageboxset control function
The properties can also be set using the control.imageboxset function.
Easy XML
194
Programming Manual, 10/2020, 6FC5397-1DP40-6BA4
Generating user dialogs
2.12 Multitouch operation
The following commands are available:
Command
Meaning/behavior
SetRotationAngle
The graphic is rotated around the angle indicated in lparam1.
SetRotationMode
The value of lparam1 defines the evaluation of the pinch gesture with respect
to the rotation.
Value equal to 1 - the gesture is processed by the control
SetZoomMode
If the value of lparam1 is equal to 1, the pinch gesture for zooming in to/out
from or moving the graphic is evaluated.
Easy XML
Programming Manual, 10/2020, 6FC5397-1DP40-6BA4
195
Generating user dialogs
2.12 Multitouch operation
2.12.4
Gesture processing
Tag message
If the scaling factor is greater than 1.0, the image in the display area will be moved. If the factor
is 1.0, this finger gesture can be used for browsing through a list of images, for example. In this
case, the parser sends a message to the form, which can be evaluated in the message tag.
The $message_par1 message parameter contains the Item_Data value of the control. The
$message_par2 message parameter signals the gesture's direction of movement.
The $message_par2 can accept the following values:
•
-1 roll left
•
1 roll right
•
-2 roll up
•
2 roll down
Example
…
…
<let name="image_box_pict_name" type="string" ></let>
<let name="pictindex" />
<let name="image_box_list" type="string" dim="4">
"pic1.bmp",
"pic2.bmp",
"pic3.bmp",
"pic4.bmp",
</let>
…
…
<control name="image_view" xpos="100" ypos="123" width="300"
height="200" fieldtype="imagebox" refvar="image_box_pict_name"
hotlink="true" >
<property item_data="1000" />
<property setzoommode="false" />
</control>
…
…
…
<!--
-1 roll left
1 roll right
-2 roll up
2 roll down
-->
<message>
<if condition="$message_par1 == 1000">
<then>
Easy XML
196
Programming Manual, 10/2020, 6FC5397-1DP40-6BA4
Generating user dialogs
2.12 Multitouch operation
<switch>
<condition>$message_par2</condition>
<case value="1">
<op>
pictindex = pictindex+1;
</op>
<if condition="pictindex > 3">
<then>
<op>
pictindex = 0;
</op>
</then>
</if>
</case>
<case value="-1">
<op>
pictindex = pictindex-1;
</op>
<if condition="pictindex < 0">
<then>
<op>
pictindex = 3;
</op>
</then>
</if>
</case>
</switch>
<op>
image_box_pict_name = image_box_list[$pictindex];
</op>
</then>
</if>
</message>
…
…
Easy XML
Programming Manual, 10/2020, 6FC5397-1DP40-6BA4
197
Generating user dialogs
2.13 Configuring your own buttons
2.13
Configuring your own buttons
Buttons can be integrated into a form as action buttons or selection buttons.
2.13.1
Pushbutton
Tag property
The pushbutton is a control element that can be used as a button or a switch (button with
latching function). The button can be designed by means of attribute definitions in the "softkey
look & feel" style as well as in a customized style. The relevant attributes must be defined with
the property tag.
The foreground or backg32round color can be changed using the color_fg, color_bk,
color_fg_pressed and color_bk_pressed attributes.
The pressed/locked or released states are represented by the values one or zero. A handler
function must be indicated to evaluate a button's change of state. The handler function is
indicated with the function attribute in the control tag.
The state of a switch can be determined by reading out the control variable or an assigned
reference variable.
With a touch operation, the finger gestures are "pressed" and "released" only when the finger
gesture is "let go".
Syntax
<control name="name" xpos="x position" ypos="y position"
fieldtype="pushbutton" >
<caption></caption>
</control>
Or with handler function
<control name="name" xpos="x position" ypos="y position"
fieldtype="pushbutton" function="button_handler" hotlink="true" >
<caption></caption>
</control>
…
…
…
<function_body name="button_handler">
…
…
…
</function_body>
or
Easy XML
198
Programming Manual, 10/2020, 6FC5397-1DP40-6BA4
Generating user dialogs
2.13 Configuring your own buttons
<control name="name" xpos="x position" ypos="y position"
fieldtype="pushbutton" refvar="button_state" hotlink="true" >
<caption></caption>
<property checkable="true" />
</control>
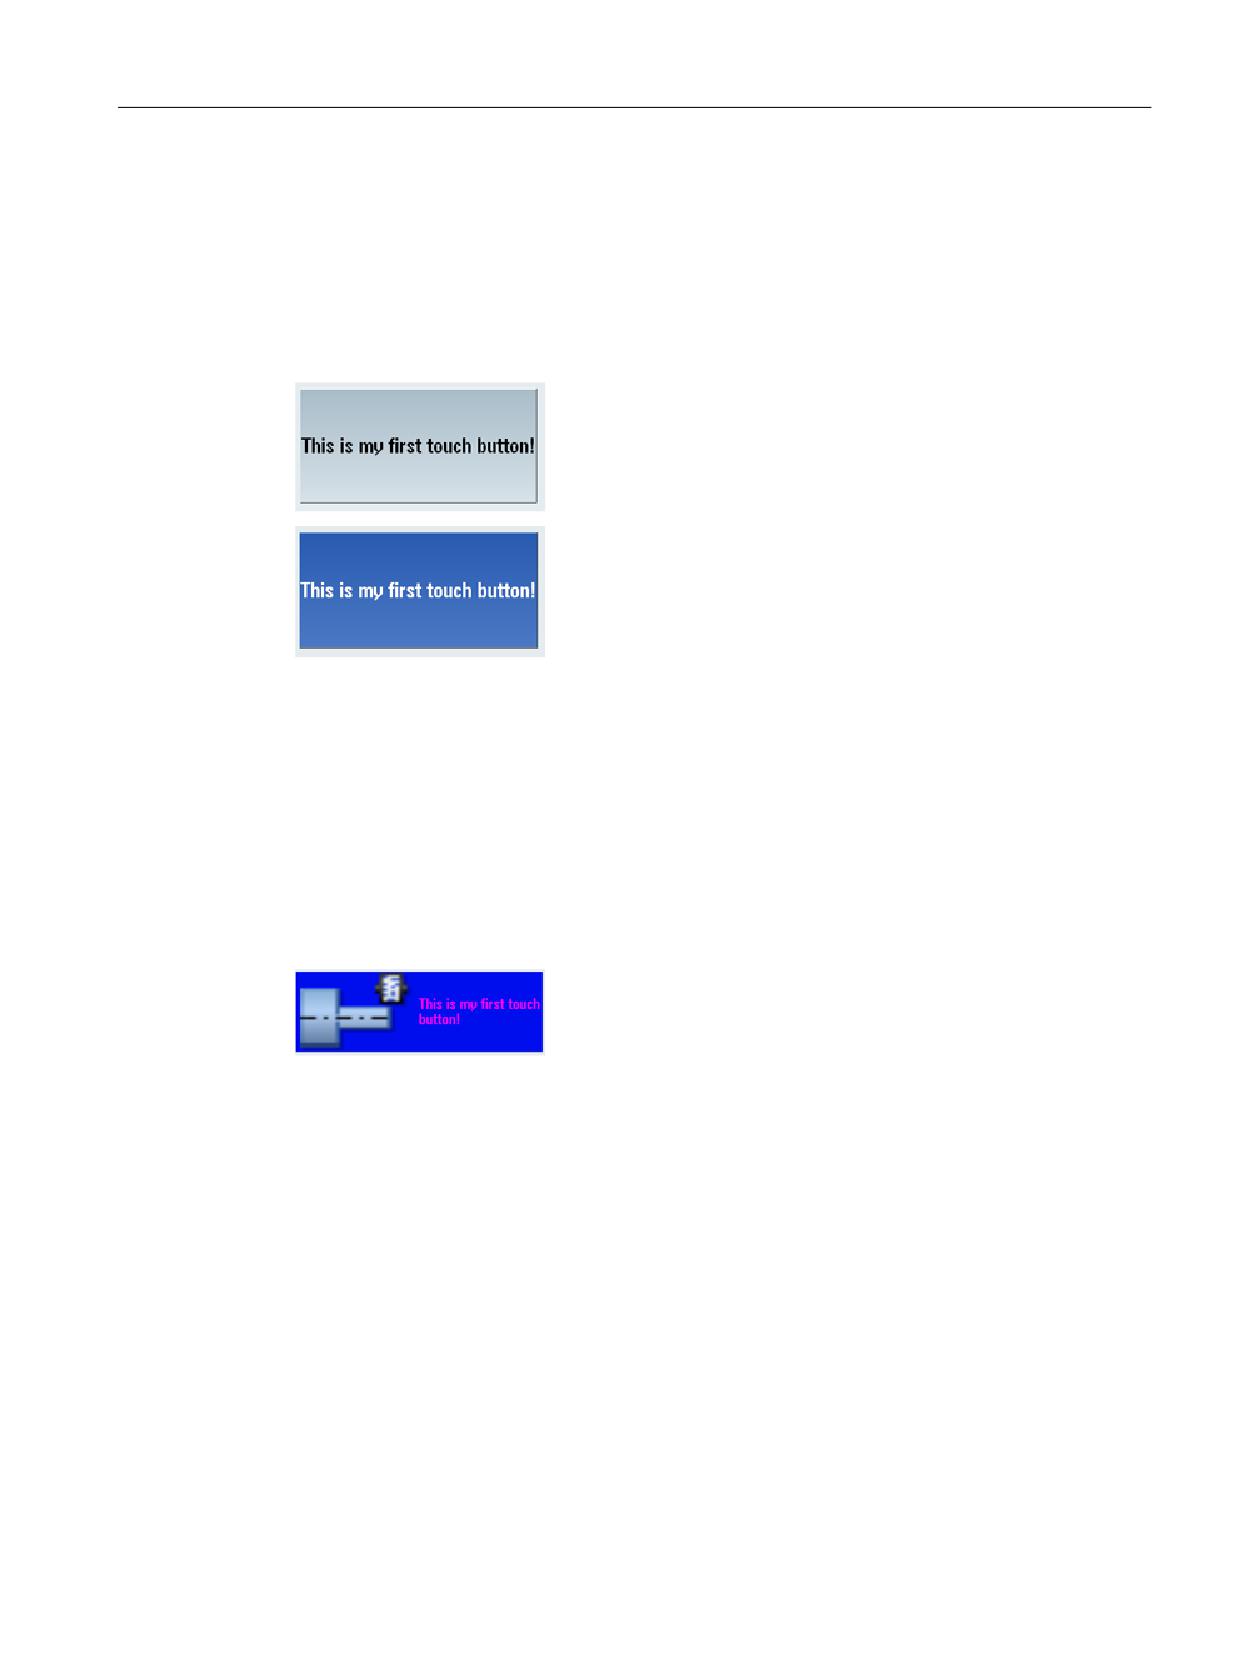
Deactivated
Activated, latched
Example
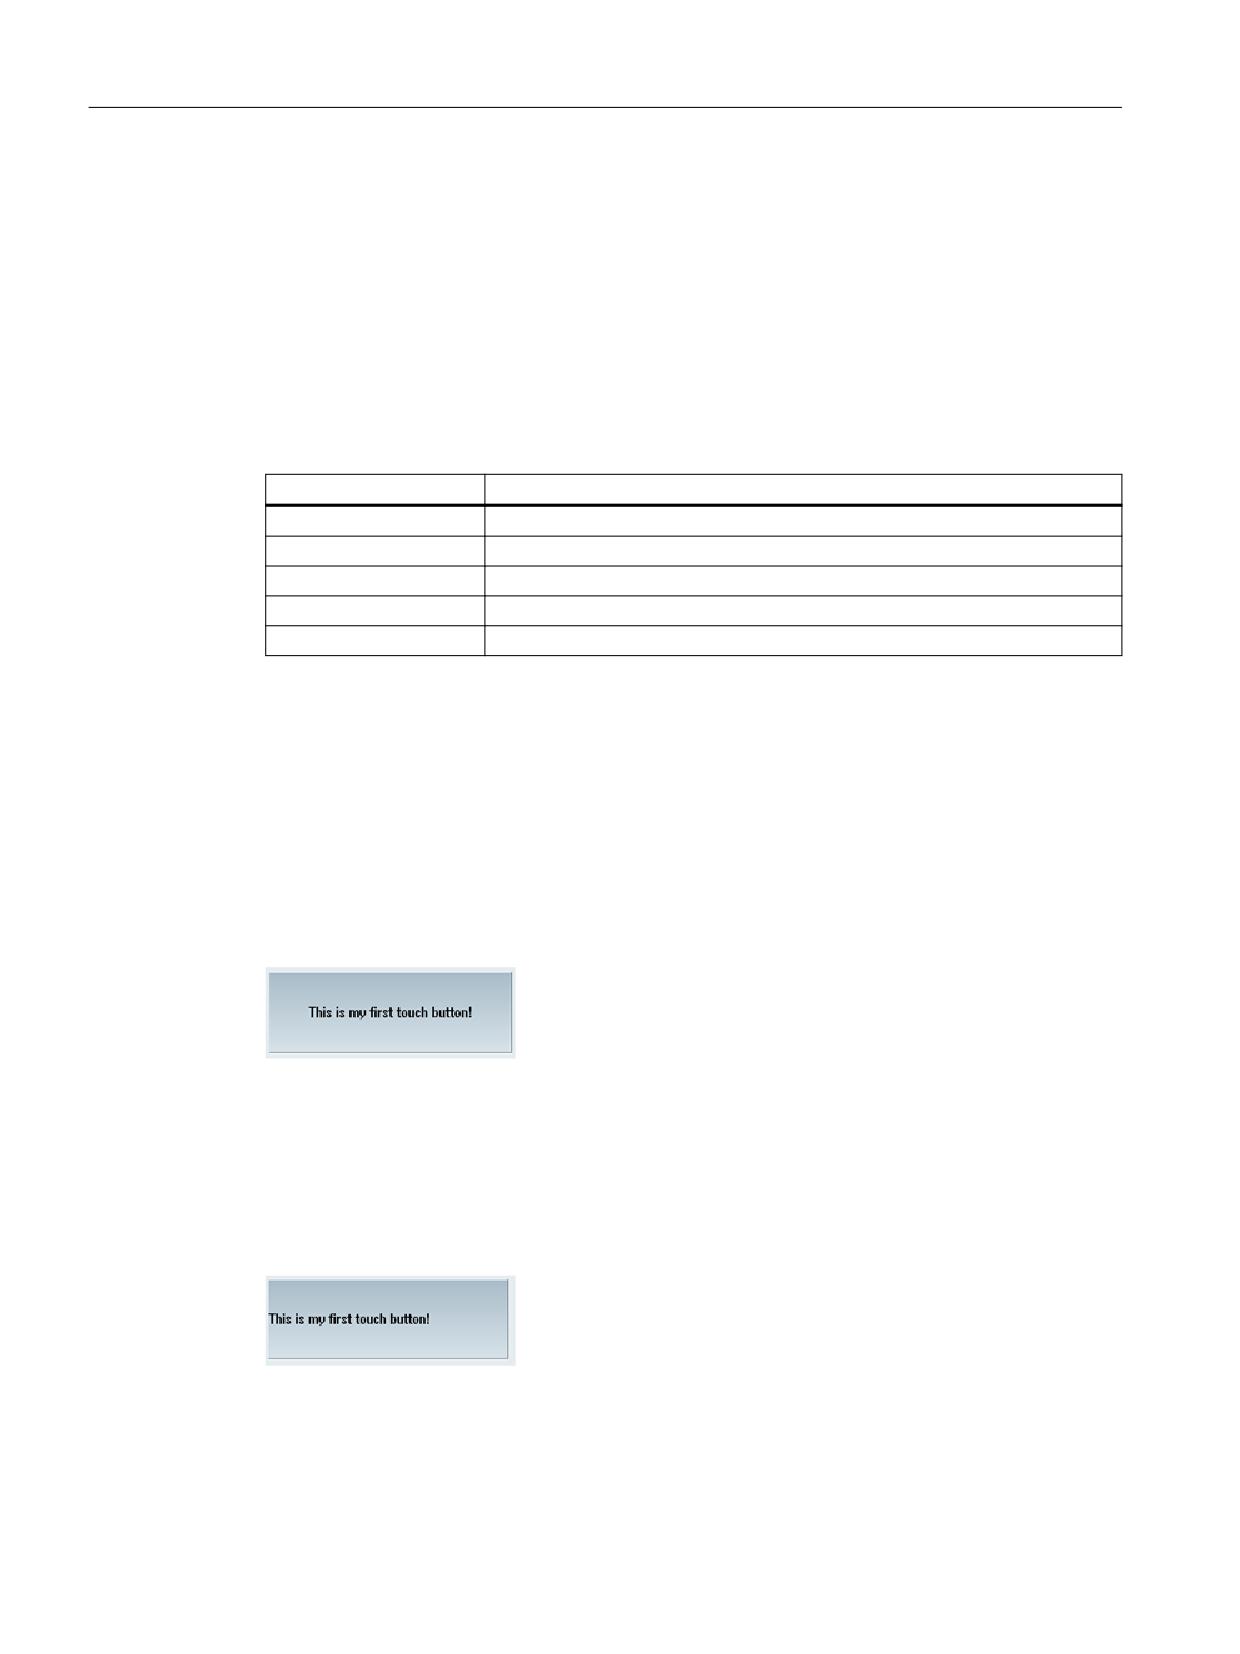
<control name="name" xpos="x position" ypos="y position"
fieldtype="pushbutton" refvar="button_state" hotlink="true"
color_fg="#ff00ff" color_bk="#000eee">
<property checkable="true" />
<caption></caption>
<property picture="sk_circ_grind_cg.png" alignment="left"
TextAlignedToPicture="true" scaled="true"/>
</control>
Easy XML
Programming Manual, 10/2020, 6FC5397-1DP40-6BA4
199
Generating user dialogs
2.13 Configuring your own buttons
2.13.2
Functions of the pushbutton
2.13.2.1
Sub-tags for the pushbutton
Tag caption
The programmer uses the caption tag to specify the button text to be displayed for the "not
pressed" state. In the default setting, the text is centered. The text alignment can be changed
with the alignment attribute. The following attribute values can be specified:
Attribute value
Alignment
left
Left-aligned
right
Right-aligned
top
Top
bottom
Bottom
center
Centered
If a different text is to be displayed for the "pressed" state, a second caption instruction must be
programmed with the pressed attribute and the true value.
Syntax
Centered display
<control name="name" xpos="x position" ypos="y position"
fieldtype="pushbutton" >
<caption>Button text</caption>
</control>
Left-aligned display
<control name="name" xpos="x position" ypos="y position"
fieldtype="pushbutton" >
<caption alignment= "left">Button text</caption>
</control>
Easy XML
200
Programming Manual, 10/2020, 6FC5397-1DP40-6BA4
Generating user dialogs
2.13 Configuring your own buttons
Pressed display
<control name="name" xpos="x position" ypos="y position"
fieldtype="pushbutton" >
<caption pressed=“true“>Button text pressed</caption>
</control>
Easy XML
Programming Manual, 10/2020, 6FC5397-1DP40-6BA4
201
Generating user dialogs
2.13 Configuring your own buttons
2.13.2.2
Properties for the pushbutton
Additional properties are assigned to the control with the property tag.
Determining button properties
The checkable attribute allows the button to be used as a switch. To do so, the value of the
attribute must be set to true.
Syntax
<control name="name" xpos="x position" ypos="y position"
fieldtype="pushbutton" >
<property checkable="true/false" />
</control>
Disabling a switch
The disabled attribute controls whether or not the button can be operated. If the value is true,
control actions are not processed.
Changes in state caused by an assigned reference variable result in updating of the button.
Syntax
<property disabled="true/false" />
Example
<control name="name" xpos="x position" ypos="y position"
fieldtype="pushbutton" >
<caption alignment=“left“>Button text</caption>
<property disabled="true " />
</control>
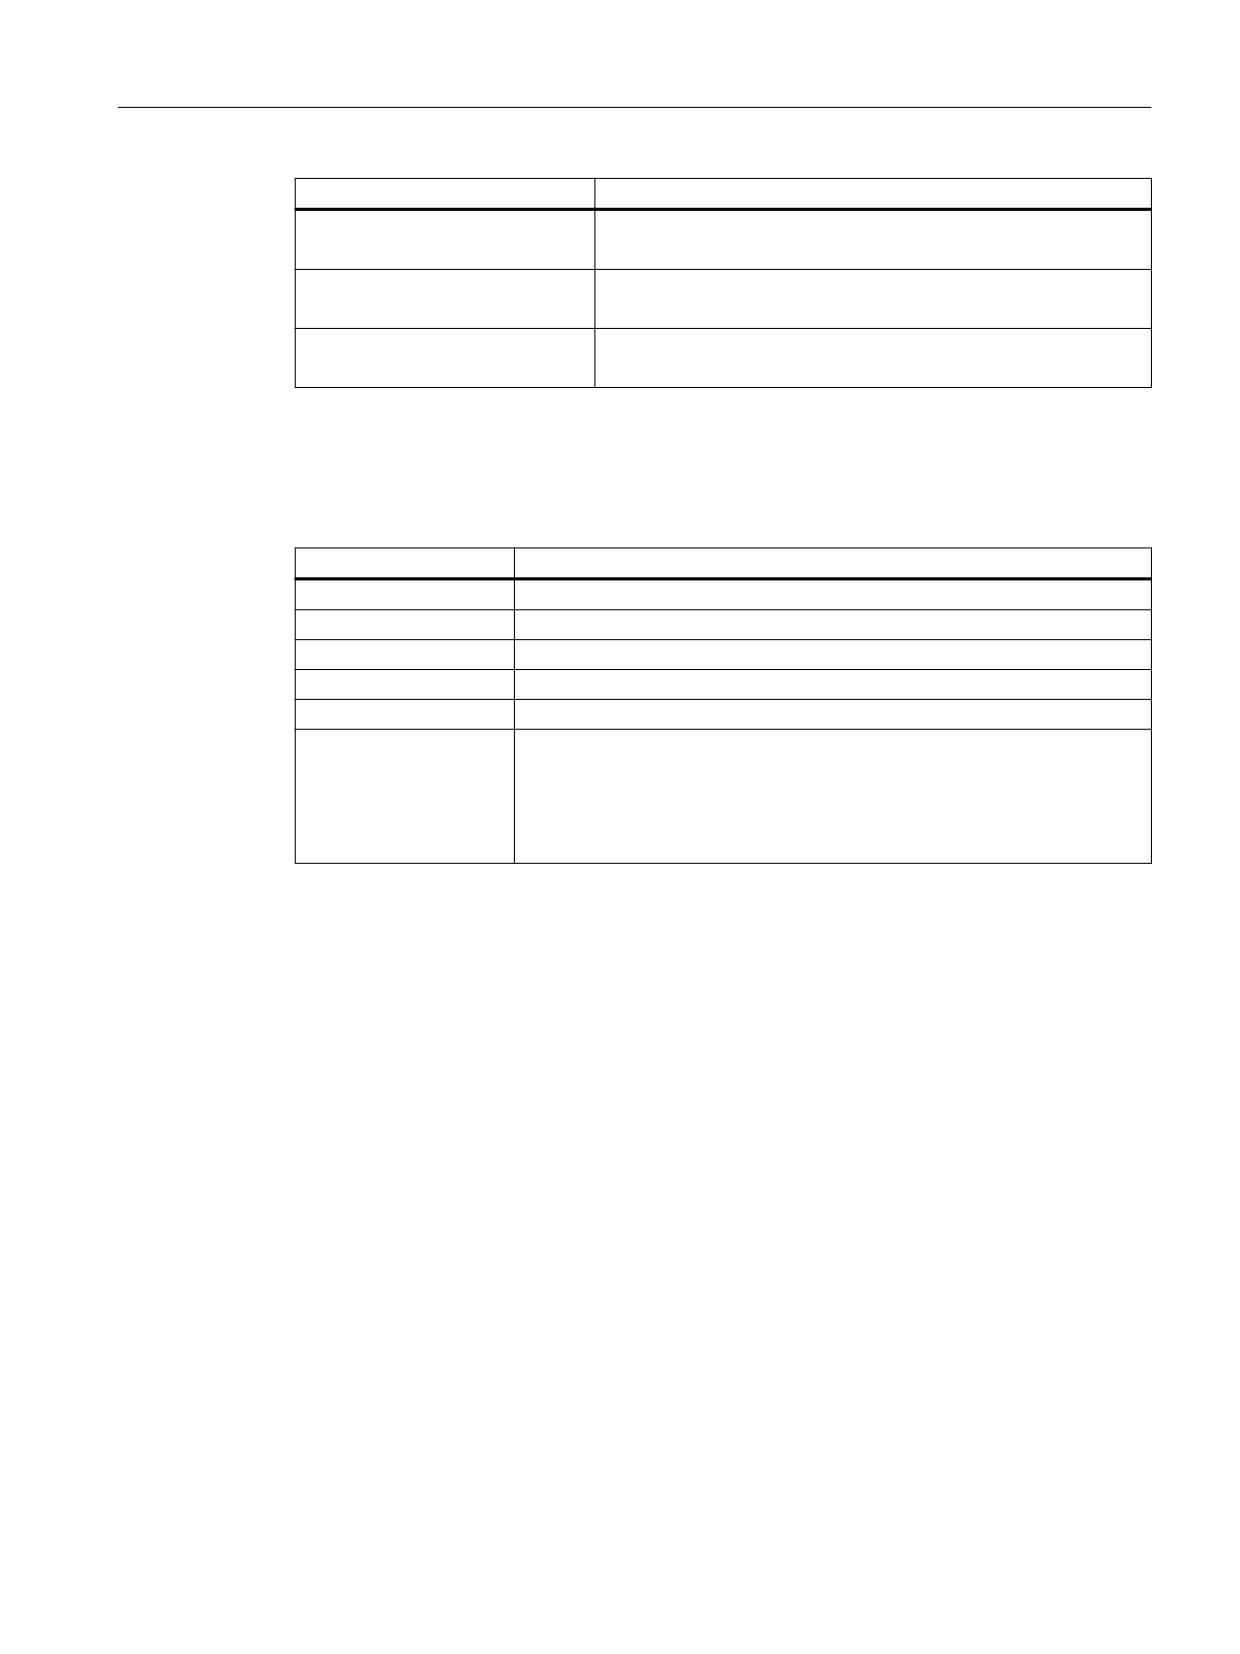
Assigning icons
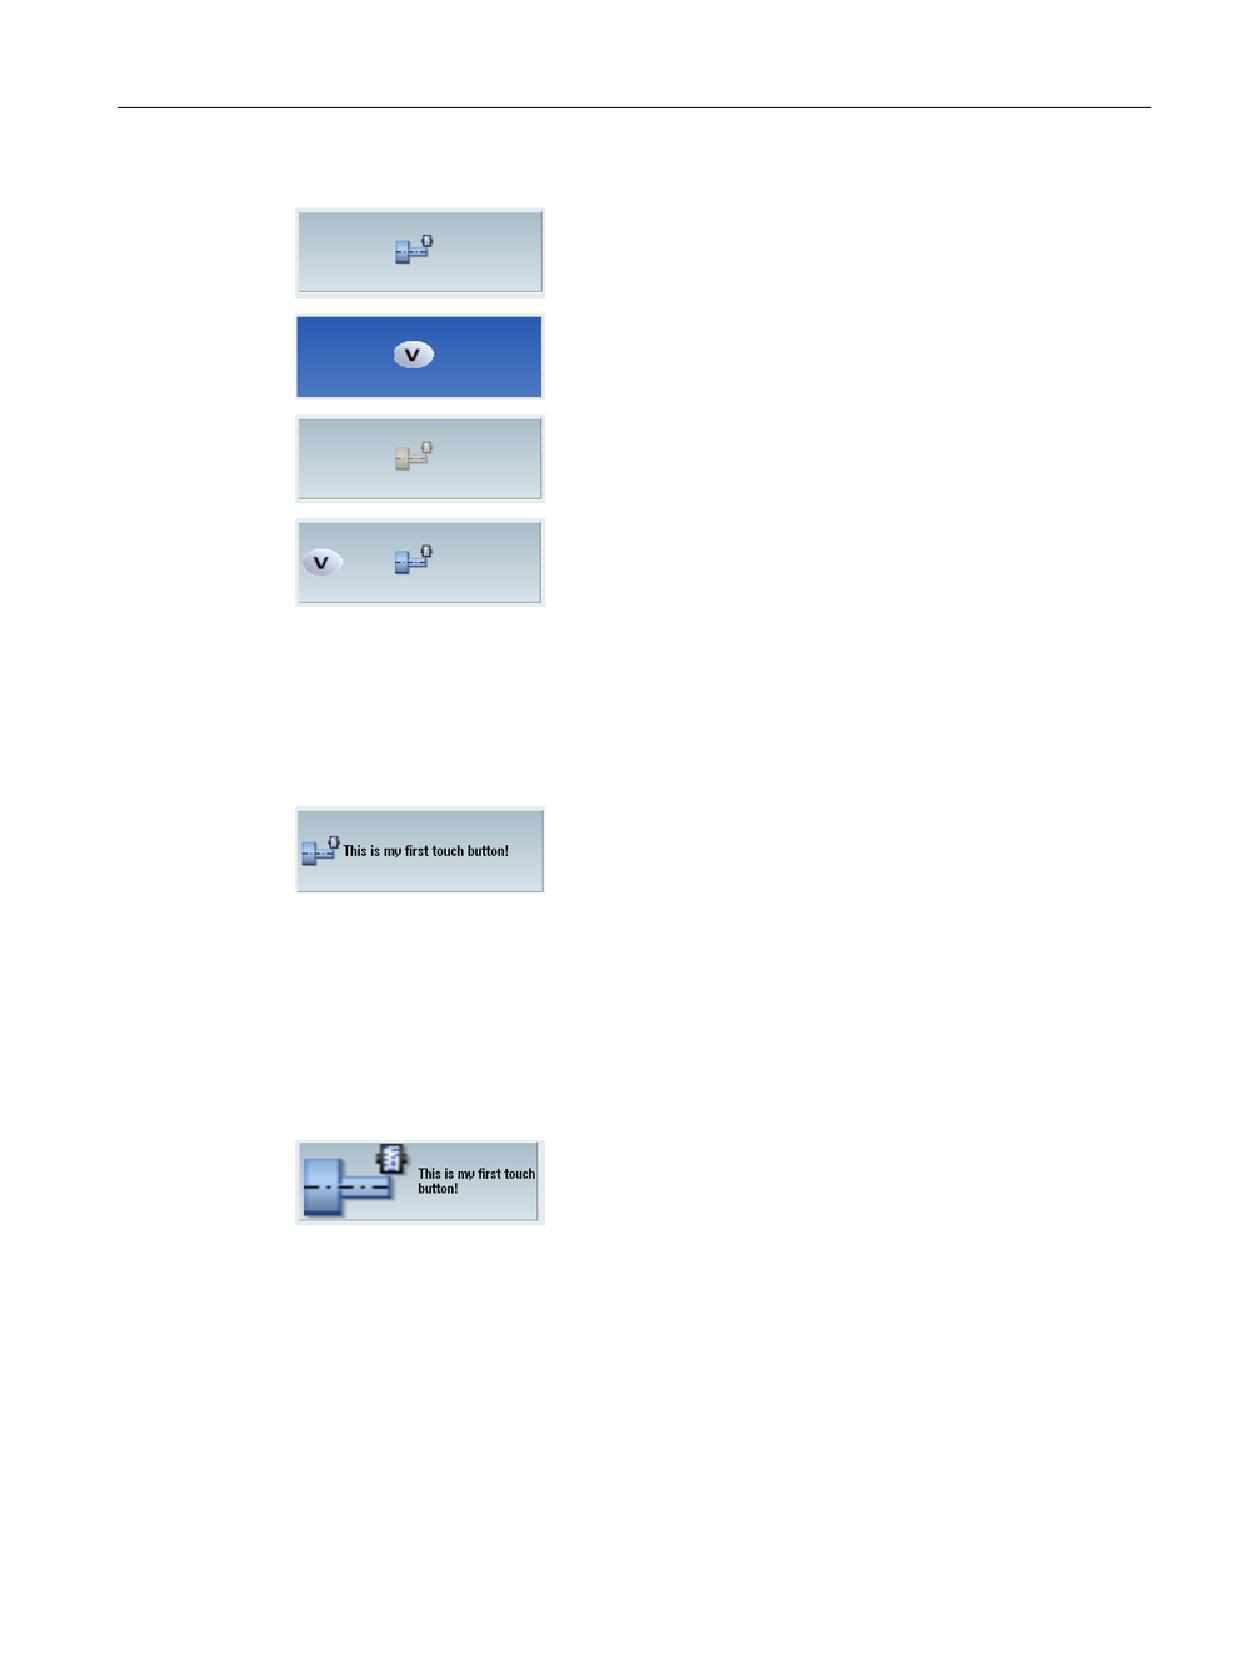
The predefined design can be covered over by specifying your own icons or button colors. An
icon can be assigned to the button for each of the states "not pressed", "pressed" and "disabled".
If there is no assignment for the states "pressed" or "disabled", the control displays the icon for
the "not pressed" state.
Other attributes control the alignment, scaling and transparency of each icon.
Attribute
Meaning/behavior
Picture
Icon in foreground
Name of the icon for the "not pressed" state
PicturePressed
Icon in foreground
Name of the icon for the "pressed" state
PictureDisabled
Icon in foreground
Name of the icon for the "disabled" state
Easy XML
202
Programming Manual, 10/2020, 6FC5397-1DP40-6BA4
Generating user dialogs
2.13 Configuring your own buttons
Attribute
Meaning/behavior
BackgroundPicture
Icon in backg32round
Name of the icon for the "not pressed" state
BackgroundPicturePressed
Icon in backg32round
Name of the icon for the "pressed" state
BackgroundPictureDisabled
Icon in backg32round
Name of the icon for the "disabled" state
Alignment attribute
Further attributes can be specified in the tag whose values refer to the alignment of the listed
icon assignments:
Attribute value
Alignment
left
Left-aligned
right
Right-aligned
top
Top
bottom
Bottom
center
Centered
stretch
Background icon:
If the stretch value is used, the parser scales the icon to the rectangular area
of the button.
Any desired outline can be generated for the button by declaring the trans-
parent color with the transparent attribute.
Easy XML
Programming Manual, 10/2020, 6FC5397-1DP40-6BA4
203
Generating user dialogs
2.13 Configuring your own buttons
2.13.2.3
Control variables for the pushbutton
Button properties can be subsequently changed by assigning new values to the attribute
variables listed below. The values are assigned in an operation instruction by specifying the
control name followed by the control variable name. The two names must separated by a period.
Syntax
<Control-Name>.<Control-Variable>
Control variable
Meaning/behavior
backg32roundpicture
Variable type: String
Name of backg32round icon
backg32roundpicturedisabled
Variable type: String
Name of backg32round icon for the disabled state
backg32roundpicturepressed
Variable type: String
Name of backg32round icon for the pressed state
picture
Variable type: String
Name of foreground icon
picturedisabled
Variable type: String
Name of foreground icon for the disabled state
picturepressed
Variable type: String
Name of foreground icon for the pressed state
picture_textalignedtopicture
Variable type: Bool
Value:
1 = true
0 = false
Button text is aligned on the icon
picturedisabled_textalignedtopicture
Variable type: Bool
Value:
1 = true
0 = false
Button text is aligned on the "disabled state" icon
picturepressed_textalignedtopicture
Variable type: Bool
Value:
1 = true
0 = false
Button text is aligned on the "pressed state" icon
backg32roundpicture_keepaspectratio
Variable type: Bool
Value:
1 = true
0 = false
The aspect ratio of the backg32round icon is retained
or ignored
Easy XML
204
Programming Manual, 10/2020, 6FC5397-1DP40-6BA4
Generating user dialogs
2.13 Configuring your own buttons
Control variable
Meaning/behavior
backg32roundpicturedisabled_keepaspectratio
Variable type: Bool
Value:
1 = true
0 = false
The aspect ratio of the "disabled state" backg32round
icon is retained or ignored
backg32roundpicturepressed_keepaspectratio
Variable type: Bool
Value:
1 = true
0 = false
The aspect ratio of the "pressed state" backg32round
icon is retained or ignored
picture_keepaspectratio
Variable type: Bool
Value:
1 = true
0 = false
The aspect ratio of the icon is retained or ignored
picturedisabled_keepaspectratio
Variable type: Bool
Value:
1 = true
0 = false
The aspect ratio of the "disabled state" icon is re-
tained or ignored
picturepressed_keepaspectratio
Variable type: Bool
Value:
1 = true
0 = false
The aspect ratio of the "pressed state" icon is re-
tained or ignored
backg32roundpicture_scaled
Variable type: Bool
Value:
1 = true
0 = false
The backg32round icon is adjusted to the dimensions
of the button
backg32roundpicturedisabled_scaled
Variable type: Bool
Value:
1 = true
0 = false
The "disabled state" backg32round icon is adjusted to
the dimensions of the button
Easy XML
Programming Manual, 10/2020, 6FC5397-1DP40-6BA4
205
Generating user dialogs
2.13 Configuring your own buttons
Control variable
Meaning/behavior
backg32roundpicturepressed_scaled
Variable type: Bool
Value:
1 = true
0 = false
The "pressed state" backg32round icon is adjusted to
the dimensions of the button
picture_scaled
Variable type: Bool
Value:
1 = true
0 = false
The icon is adjusted to the dimensions of the button
picturedisabled_scaled
Variable type: Bool
Value:
1 = true
0 = false
The "disabled state" icon is adjusted to the dimen-
sions of the button
picturepressed_scaled
Variable type: Bool
The "pressed state" icon is adjusted to the dimen-
sions of the button
backpicture_alignment
Variable type: String
backg32roundpicturedisabled_alignment
See attribute alignment
backg32roundpicturepressed_alignment
picture_alignment
picturedisabled_alignment
picturepressed_alignment
caption
Variable type: String
"Not pressed state" button text
captionpressed
Variable type: String
"Pressed state" button text
caption_alignment
Variable type: String
captionpressed_alignment
See attribute alignment
captiondisabled_alignment
disabled
Variable type: Bool
Value:
1 = true - pushbutton disabled
0 = false - pushbutton can be operated
Easy XML
206
Programming Manual, 10/2020, 6FC5397-1DP40-6BA4
Generating user dialogs
2.13 Configuring your own buttons
Picture
PicturePressed
PictureDisabled
BackgroundPicture + Picture
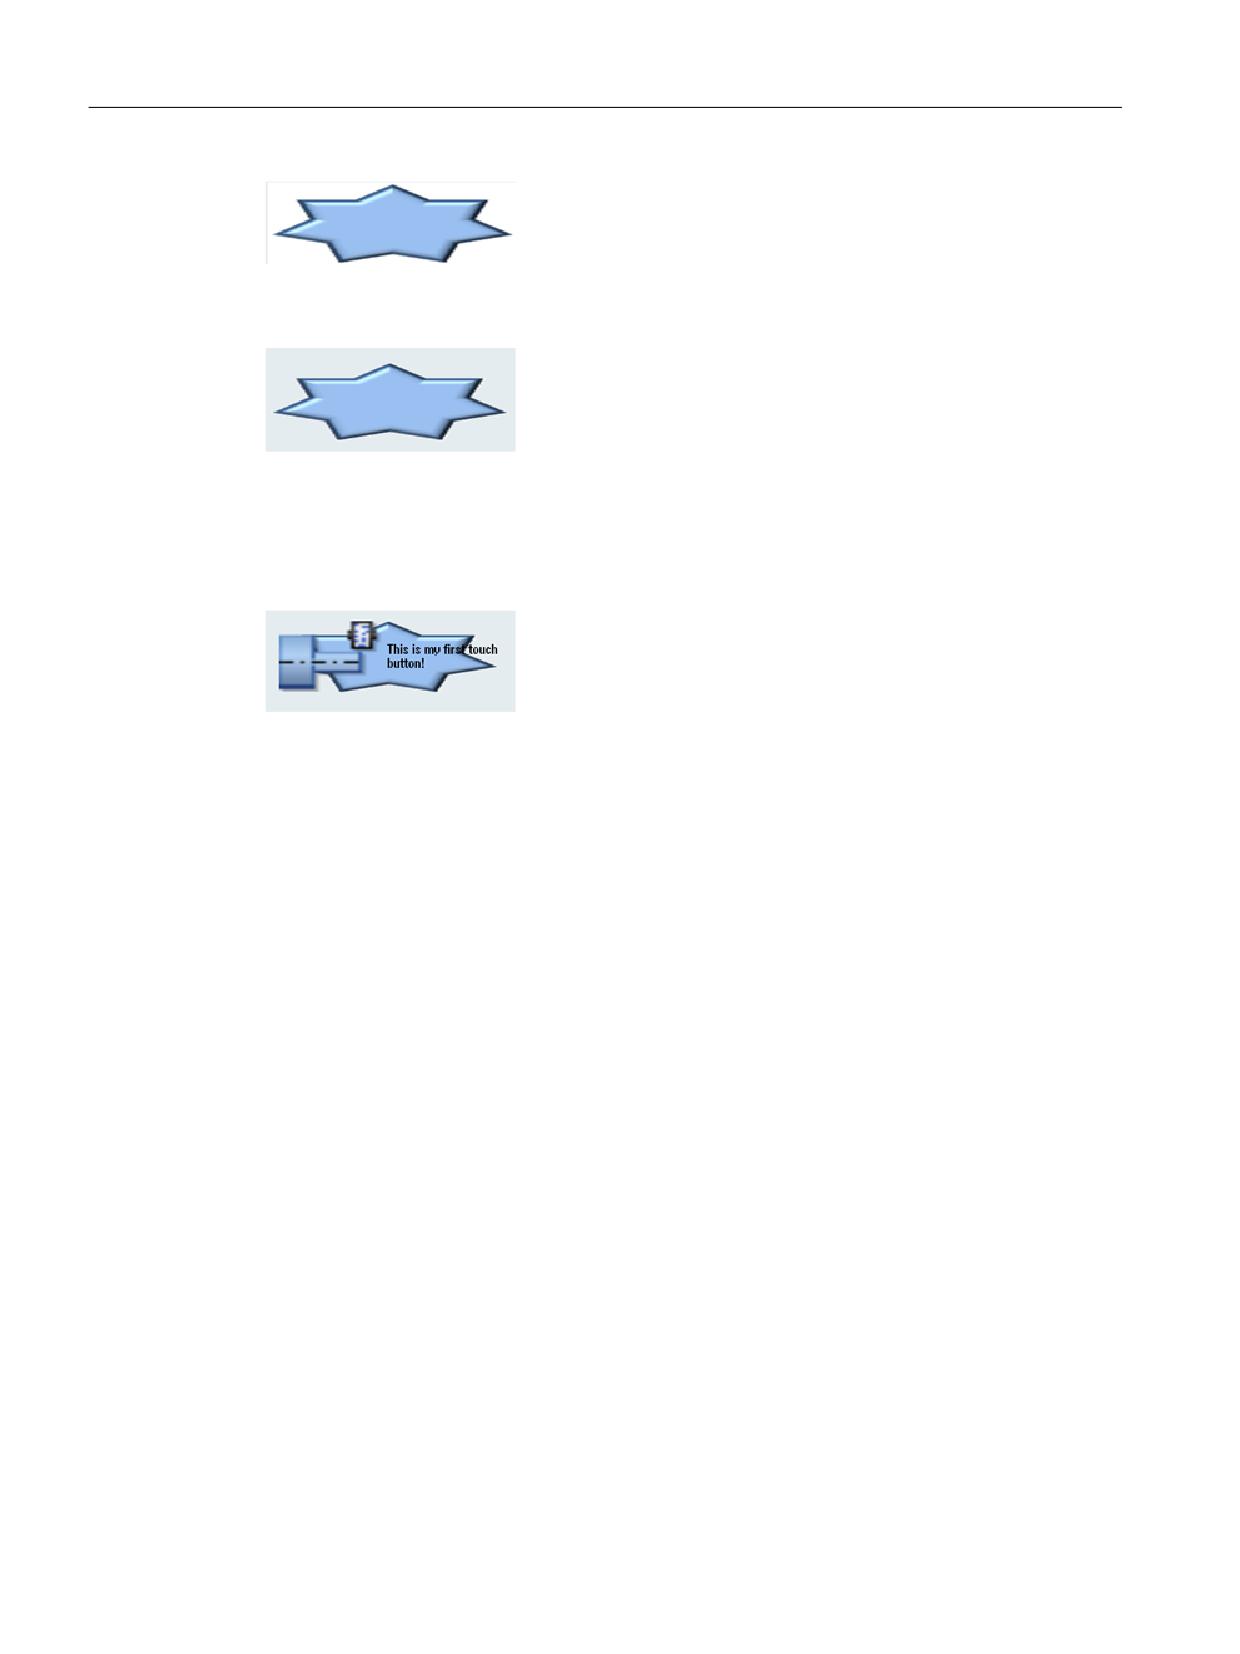
TextAlignedToPicture attribute
If the value of the attribute is true, the text is aligned relative to the icons.
<property picture="sk_circ_grind_cg.png" alignment="left"
TextAlignedToPicture="true" />
Scaled attribute
If the value of the attribute is true, the dimensions of the image are adjusted to the dimensions
of the button in such a way that 50% of the height or width of the button at most is made
available for the graphic.
<property picture="sk_circ_grind_cg.png" alignment="left"
TextAlignedToPicture="true" scaled="true"/>
Stretch attribute (only effective for backg32round icons)
If the value of the attribute is true, the dimensions of the image are adjusted to the dimensions
of the button.
<property backg32roundpicture="f:\appl\pbutton.png"
alignment="stretch" />
Easy XML
Programming Manual, 10/2020, 6FC5397-1DP40-6BA4
207
Generating user dialogs
2.13 Configuring your own buttons
<property backg32roundpicture="f:\appl\pbutton.png"
alignment="stretch" transparent="#ffffff"/>
<caption alignment="left" >This is my first touch button!</caption>
<property picture="sk_circ_grind_cg.png" alignment="left"
TextAlignedToPicture="true" scaled="true"/>
<property backg32roundpicture="pbutton.png" alignment="stretch"
transparent="#ffffff"/>
2.13.3
Switch on/off
A switch control is a graphic element that signals one of two states by means of an icon. This
control can be operated by touch or by using a mouse.
The state adopted can be stored in a reference variable or the change of state can be determined
in a function assigned to the control. The function is assigned with the function attribute in the
control tag.
The alignment attribute enables the vertical or horizontal alignment of the button.
This control has no standard design. If no icons are assigned to the control, only the bounding
box and switch position (shown by a dot) are displayed.
Syntax
<control name="name" xpos = "x position" ypos="y position"
width="width" height="height" fieldtype="switch" alignment="hr/vr">
<property left_position="value" />
<property right_position="value" />
</control>
Easy XML
208
Programming Manual, 10/2020, 6FC5397-1DP40-6BA4
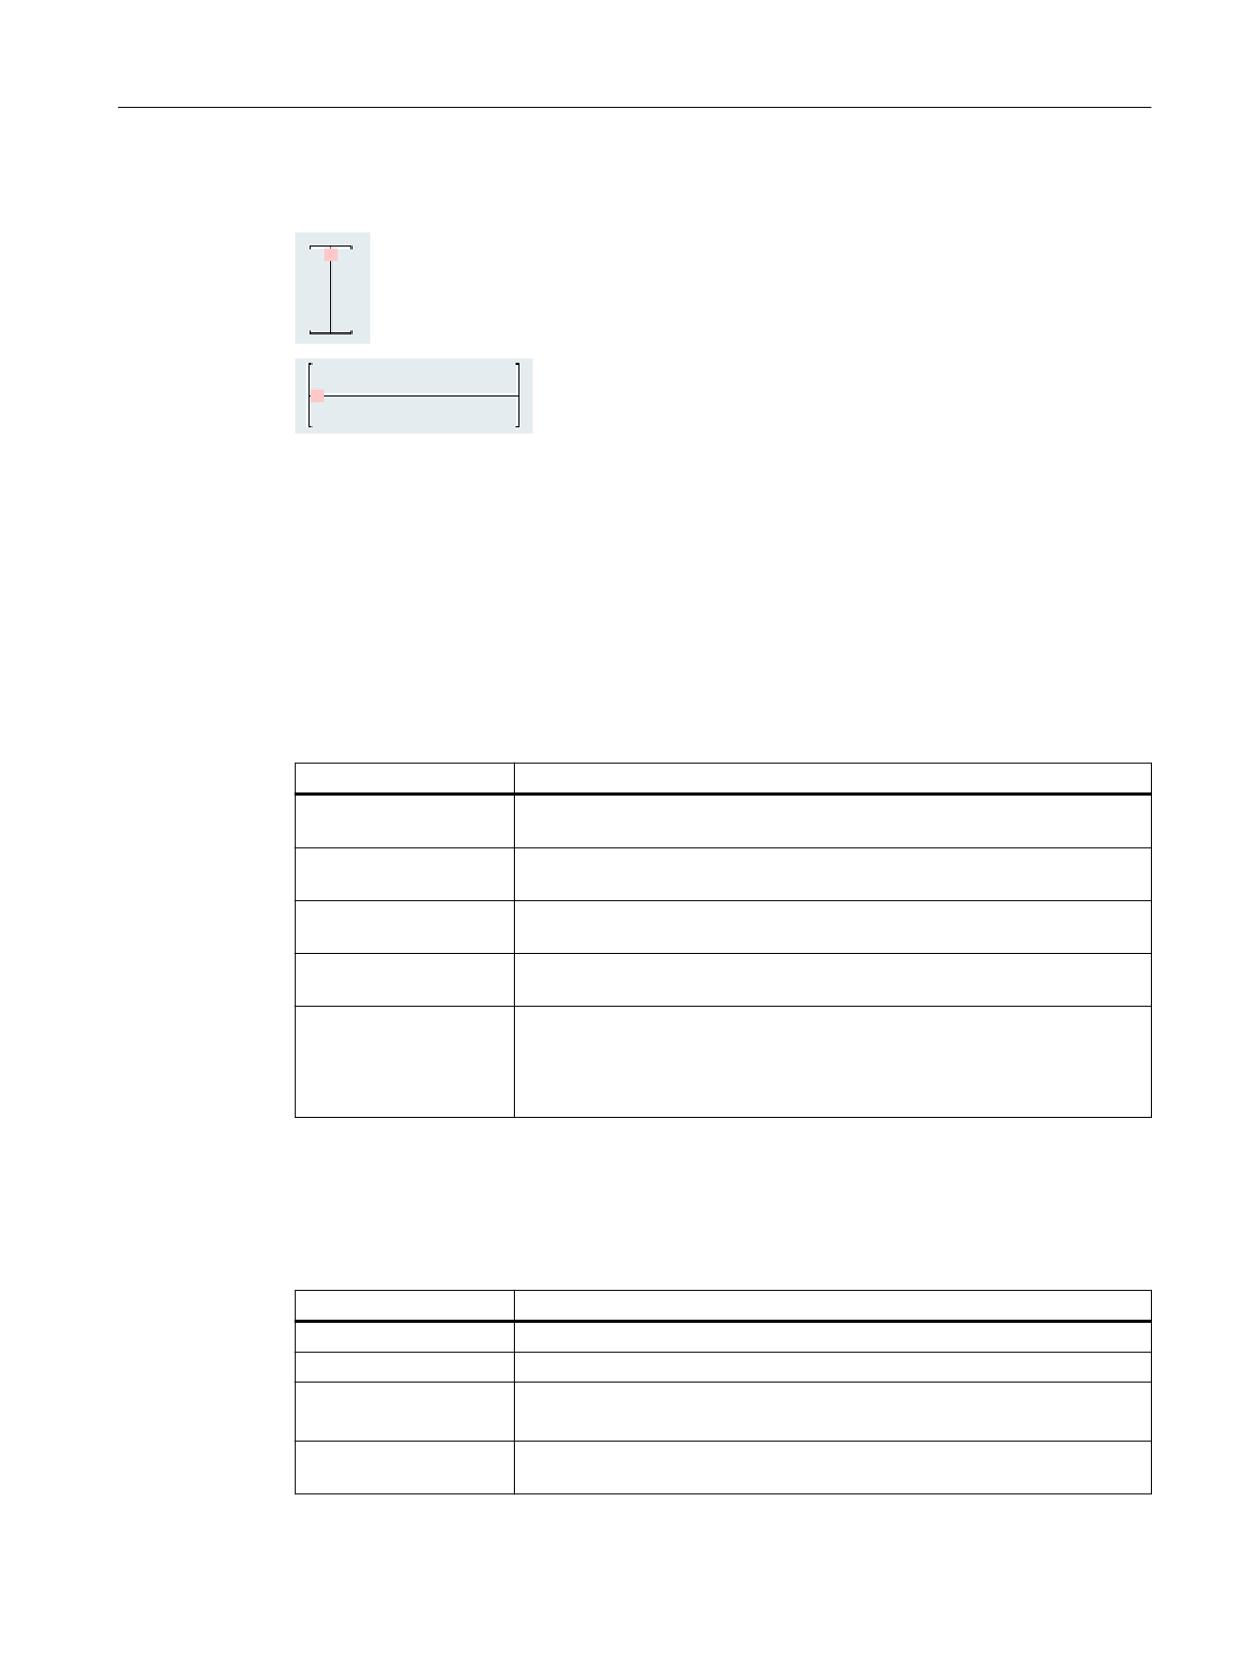
Generating user dialogs
2.13 Configuring your own buttons
Alignment attribute
Vertical switch: Value vr
Horizontal switch: Value hr
2.13.4
Functions of the switch
2.13.4.1
Properties for the switch
Tag property
The following switch positions can be assigned to the control with the property tag:
Attribute
Meaning/behavior
left_position
The value of the attribute is assigned to the control variable if the switch was
moved to the left.
right_position
The value of the attribute is assigned to the control variable if the switch was
moved to the right.
upper_position
The value of the attribute is assigned to the control variable if the switch was
moved up.
lower_position
The value of the attribute is assigned to the control variable if the switch was
moved down.
disabled
The attribute controls whether or not the switch can be operated.
If the value is true, a control action is not evaluated.
Changes in state caused by an assigned reference variable result in updating
of the switching state.
The final switch design must be determined by specifying further attributes. These attributes
must be defined together with the attribute left_position, right_position, upper_position or
lower_position.
Any desired outline can be generated for the switch by declaring one color as a transparent color
with the transparent attribute.
Attribute
Meaning/behavior
picture
Icon in foreground Name of the icon for the "not pressed" state
pictureDisabled
Icon in foreground Name of the icon for the "disabled" state
transparent
The attribute value includes the color value of the transparent color.
This color value is used for all icons assigned to the switch.
caption
The attribute value includes the text associated with the switch position. This
text is displayed on the element and limited by the dimensions of the switch.
Easy XML
Programming Manual, 10/2020, 6FC5397-1DP40-6BA4
209
Generating user dialogs
2.13 Configuring your own buttons
2.13.4.2
Control variables for the switch
Switch properties can be subsequently changed by assigning new values to the control variables
listed below. The values are assigned in an operation instruction by specifying the control name
followed by the control variable name. The two names must separated by a period.
Syntax
<Control-Name>.<Control-Variable>
Control variable
Meaning/behavior
Left_position
Variable type: Int
The value of the attribute is assigned to the control
variable if the switch was moved to the left.
Right_position
Variable type: Int
The value of the attribute is assigned to the control
variable if the switch was moved to the right.
Lower_position
Variable type: Int
The value of the attribute is assigned to the control
variable if the switch was moved down.
Upper_position
Variable type: Int
The value of the attribute is assigned to the control
variable if the switch was moved up.
Picture_left_position
Variable type: String
Name of icon for the left-hand position
Picture_right_position
Variable type: String
Name of icon for the right-hand position
Picture_upper_position
Variable type: String
Name of icon for the upper position
Picture_lower_position
Variable type: String
Name of icon for the lower position
Picturedisabled_left_position
Variable type: String
Name of icon for the left-hand position "disabled
state"
Picturedisabled_right_position
Variable type: String name of icon for the right-
hand position "disabled state"
Picturedisabled_upper_position
Variable type: String
Name of icon for the upper position "disabled state"
Picturedisabled_lower_position
Variable type: String
Name of icon for the lower position "disabled state"
Caption_left_position
Variable type: String
Text in the left-hand position
Caption_right_position
Variable type: String
Text in the right-hand position
Caption_upper_position
Variable type: String
Text in the upper position
Easy XML
210
Programming Manual, 10/2020, 6FC5397-1DP40-6BA4
Generating user dialogs
2.13 Configuring your own buttons
Control variable
Meaning/behavior
Caption_lower_position
Variable type: String
Text in the lower position
disabled
Variable type: Bool
Value:
1 = true - switch disabled
0 = false - switch can be operated
Horizontal display
<control name="name" xpos="x position" ypos="y position"
width="width" height="height" fieldtype="switch" alignment="hr">
<property left_position="value" picture="name" />
<property right_position="value" picture="name" />
</control>
Vertical display
<control name="name" xpos="x position" ypos="y position"
width="width" height="height" fieldtype="switch" alignment =“vr“>
<property upper_position="value" picture="name" />
<property lower_position="value" picture="name" />
</control>
Or assign handler function
<control name="name" xpos="x position" ypos="y position"
width="width" height="height" fieldtype="switch"
function="switch_handler" hotlink="true" alignment ="vr">
</control>
Example
icon_left.bmp
icon_right.bmp
<let name="switch_state" />
<control name="main_switch" xpos="100" ypos="53" width="40"
height="30" fieldtype="switch" refvar="switch_state" hotlink="true"
alignment="hr">
<property left_position=“10“ picture=“icon_left.bmp“ />
<property right_position=“11“ picture=“icon_right.bmp“ />
</control>
Easy XML
Programming Manual, 10/2020, 6FC5397-1DP40-6BA4
211
Generating user dialogs
2.13 Configuring your own buttons
Assigning properties by means of control variables
<control name="main_switch" xpos = "450" ypos="340" width="20"
height="46" fieldtype="switch" refvar="switch_statebf"
hotlink="true" alignment="vr">
<property upper_position="1" />
<property lower_position="0" />
</control>
…
…
…
<op>
main_switch.transparent = #ffffff;
main_switch.picture_upper_position = _T"switch_up.png";
main_switch.picture_lower_position = _T"switch_bottom.png";
main_switch.disable= 1;
</op>
2.13.5
Radio button
Radio buttons enable the selection of one of a number of options. A button must be created for
each option. All radio buttons belonging to one form, groupbox or scroll area interact with one
another in such a way that only one button is marked as selected. The button states are
transferred to the control variables.
Syntax
<control name="name" xpos="x position" ypos="y position"
width="width" height="height" fieldtype="radiobutton"
>
<caption>button text</caption>
</control>
2.13.6
Checkbox
Checkboxes enable the selection of a number of options. A button must be created for each
option. The state of the checkbox is transferred to the control variable.
Syntax
<control name="name" xpos="x position" ypos="y position"
width="width" height="height" fieldtype="checkbox"
>
<caption>button text</caption>
</control>
Easy XML
212
Programming Manual, 10/2020, 6FC5397-1DP40-6BA4
Generating user dialogs
2.13 Configuring your own buttons
2.13.7
Groupbox
A groupbox optically encloses a group of controls with a frame and and a title. It groups logically
related controls that are only intended to interact within the group. The coordinates of the
embedded controls refer to the upper left-hand corner below the title line.
All of the controls belonging to the group are embedded into the control tag as sub-controls.
When assigning the embedded control names and the Item_Data value, it is important to note
that they must be unique with respect to all controls belonging to the form.
The title of the groupbox is specified with the caption tag.
Syntax
<control name="name" xpos="x position" ypos="y position"
width="width" height="height" fieldtype="groupbox">
<caption>caption text</caption>
<control>…</control>
…
…
…
</control>
Easy XML
Programming Manual, 10/2020, 6FC5397-1DP40-6BA4
213
Generating user dialogs
2.13 Configuring your own buttons
2.13.8
Scroll area
A scroll area is used to display controls within a specified area. The coordinates of the embedded
controls refer to the upper left-hand corner of the scroll area. If controls are created outside of
the visible area, moving the visible area is enabled. All of the controls belonging to the area must
be embedded into the control tag as sub-controls.
When assigning the embedded control names and the Item_Data value, it is important to note
that they must be unique with respect to all controls belonging to the form.
Syntax
<control name="name" xpos="x position" ypos="y position"
width="width" height="height" fieldtype="scrollarea">
<control>…</control>
…
…
…
</control>
Touch operation
If focus is placed on a control that is currently not completely visible, the visible area is moved
until the control can be displayed in full.
Tab gesture
This gesture is forwarded to the script if the gesture cannot be assigned to an embedded control.
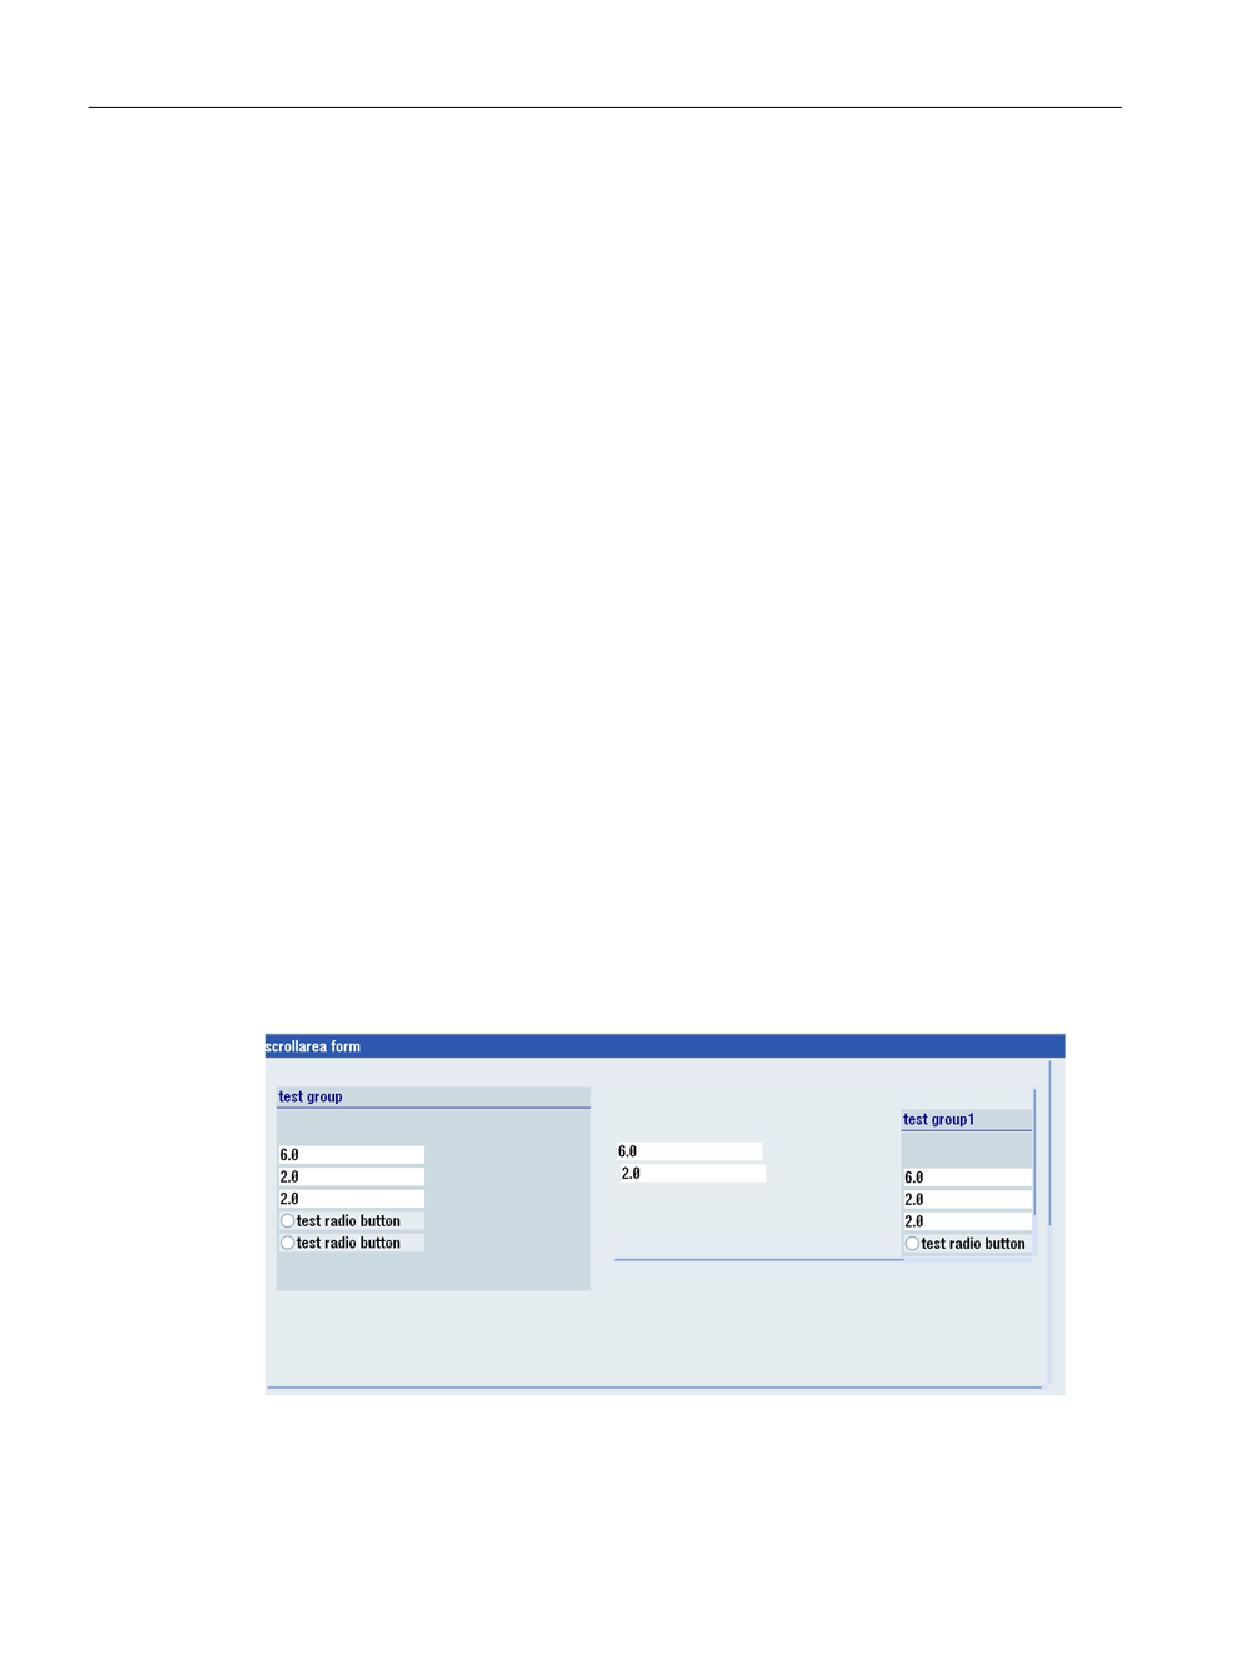
Example
Nested scroll areas
<let name="CB1" >1</let>
<let name="RB1" />
Easy XML
214
Programming Manual, 10/2020, 6FC5397-1DP40-6BA4
Generating user dialogs
2.13 Configuring your own buttons
<form name="scrollarea_form">
<init>
<caption>scrollarea form</caption>
<data_access type="true" />
<control name= "c_scroll" xpos = "2" ypos="24" width="520"
height="300" fieldtype="scrollarea" >
<control name= "c_group" xpos = "6" ypos="24" width="208"
height="186" fieldtype="groupbox" >
<caption>test group</caption>
<control name = "c18" xpos = "2" ypos = "54" refvar="nck/Channel/
Parameter/R[1]" hotlink="true" />
<control name = "c19" xpos = "2" ypos = "74" refvar="nck/Channel/
Parameter/R[2]" hotlink="true" />
<control name = "c20" xpos = "2" ypos = "94" refvar="nck/Channel/
Parameter/R[3]" hotlink="true" />
<control name="radiobg" xpos = "2" ypos="114"
fieldtype="radiobutton" >
<caption>test radio button</caption>
<property backg32roundpicture="f:\appl\cycle_my1.png" />
</control>
<control name="radiobg1" xpos = "2" ypos="134"
fieldtype="radiobutton" >
<caption>test radio button</caption>
<property backg32roundpicture="f:\appl\cycle_my1.png" />
</control>
</control>
<control name= "c_scroll_emb" xpos = "230" ypos="24" width="280"
height="160" fieldtype="scrollarea" >
<control name = "c18emb" xpos = "2" ypos = "54" refvar="nck/Channel/
Parameter/R[1]" hotlink="true" />
<control name = "c19emb" xpos = "4" ypos = "74" refvar="nck/Channel/
Parameter/R[2]" hotlink="true" />
<control name = "c20emb" xpos = "3" ypos = "194" refvar="nck/Channel/
Parameter/R[3]" hotlink="true" />
<control name= "c_group1" xpos = "190" ypos="24" width="208"
height="186" fieldtype="groupbox" >
<caption>test group1</caption>
<control name = "c18gemb" xpos = "2" ypos = "54" refvar="nck/Channel/
Parameter/R[1]" hotlink="true" />
<control name = "c19gemb" xpos = "2" ypos = "74" refvar="nck/Channel/
Parameter/R[2]" hotlink="true" />
<control name = "c20gemb" xpos = "2" ypos = "94" refvar="nck/Channel/
Parameter/R[3]" hotlink="true" />
<control name="radiobggemb" xpos = "2" ypos="114"
fieldtype="radiobutton" >
<caption>test radio button</caption>
<property backg32roundpicture="f:\appl\cycle_my1.png" />
</control>
<control name="radiobg1emb" xpos = "2" ypos="134"
fieldtype="radiobutton" >
Easy XML
Programming Manual, 10/2020, 6FC5397-1DP40-6BA4
215
Generating user dialogs
2.13 Configuring your own buttons
<caption>test radio button</caption>
<property backg32roundpicture="f:\appl\cycle_my1.png" />
</control>
</control>
</control>
<control name = "c22" xpos = "2" ypos = "400" refvar="nck/Channel/
Parameter/R[12]" hotlink="true" />
<control name="ChB1" xpos="208" ypos="430" width="50" height="30"
fieldtype="checkbox" refvar="PLC/M100.7" hotlink = "true"
color_bk="#00ffff">
<caption>Check1</caption>
</control>
<control name="ChB2" xpos="208" ypos="460" width="58" height="30"
fieldtype="checkbox" refvar="PLC/M100.6" hotlink = "true"
color_bk="#00ffff">
<caption>Check2</caption>
</control>
<control name="Radio1" xpos="208" ypos="490" width="40"
height="30" fieldtype="radiobutton" refvar="PLC/M100.0" hotlink =
"true" color_bk="#00ffff">
<caption>Radio1</caption>
</control>
<control name="Radio2" xpos="208" ypos="520" width="45"
height="30" fieldtype="radiobutton" refvar="PLC/M100.1" hotlink =
"true" color_bk="#00ffff">
<caption>Radio2</caption>
</control>
<control name="Radio3" xpos="208" ypos="550" width="50"
height="30" fieldtype="radiobutton" refvar="PLC/M100.2" hotlink =
"true" >
<caption>Radio3</caption>
</control>
<control name="VChB1" xpos="8" ypos="430" width="50" height="30"
refvar="PLC/MB100" hotlink = "true" color_bk="#00ffff"/>
<control name="VChB2" xpos="8" ypos="465" width="53" height="30"
refvar="PLC/MB100" hotlink = "true" color_bk="#00ffff"/>
</control>
<control name="ChB3" xpos="208" ypos="340" width="60" height="30"
fieldtype="checkbox" refvar="CB1" >
<caption>Check3</caption>
</control>
</init>
<timer>
</timer>
</form>
Easy XML
216
Programming Manual, 10/2020, 6FC5397-1DP40-6BA4
Generating user dialogs
2.14 Sidescreen application
2.14
Sidescreen application
2.14.1
Easy XML in the Sidescreen
The Easy XML scripting language can also be used to create dialogs in the Sidescreen area. The
Sidescreen components Page and Widget are available for displaying the dialogs. The
connection is made via the slsidescreen.ini file. Sidescreen components are automatically
started when the operating software starts up and are only terminated when the system shuts
down. This means that the parser loads the assigned scripts once when the Sidescreen
component is activated for the first time.
The dimension of the Sidescreen area is determined by the layout parameters from the
slsidescreen_<screen resolution>.ini file. To enable independent configuration, the usable
width for Easy XML scripts is 276 pixels. The usable height of an Easy XML dialog depends on the
Sidescreen component used. For a page, 768 pixels are available. For a widget, the height is
determined by the Sidescreen management and can be queried with the GETHMIResolution
function.
The script parser expects a menu to activate a shape or branch to other shapes. The main menu
must be named main. Sidescreen does not support softkey tags, so that you need to navigate
to other shapes using an operator control for the shape.
The number of Sidescreen pages or Sidescreen widgets is not limited by the parser.
Easy XML
Programming Manual, 10/2020, 6FC5397-1DP40-6BA4
217
Generating user dialogs
2.14 Sidescreen application
2.14.2
Integrating Sidescreen dialogs
The pages or widgets are integrated using the slsidescreen.ini file.
Pages are entered in the [Sidescreen] section. Each page must be specified with the keyword
PAGE followed by the sequential page number and the required attributes. The name attribute
defines the object name of the page. The implementation attribute specifies the
implementation library and the class name. Both attributes must be separated by a comma.
SlSideScreenPage type pages can include Sidescreen elements. This is done via the "ELEMENT"
entries. The rule for creating an ELEMENTxxx element line corresponds to the rule for creating
a page. If a page should only contain dialogs that were configured with Easy XML,
slagmforms.SlEESideScreenPage should be specified as value for the implementation
attribute.
Widgets can be added to a Sidescreen element in the section [Element_<name>].
The rule for creating a WIDGETxxx widget line corresponds to the rule for creating a page.
If an Easy XML Sidescreen widget is to be activated, slagmforms.SlEESideScreenWidget
should be specified as the value for the implementation attribute.
Syntax
ELEMENT002= name:=<name>, implementation:=SlSideScreenElement
…
…
[Element_<name>]
WIDGET001= name:=<Widget Name>, implementation:=
slagmforms.SlEESideScreenWidget
The widget identifier is used by default to form the main module name.
Example
PAGE004= name:=sidescreen_proginfluence,
implementation:=slagmforms.SlEESideScreenPage
Main module name: sidescreen_proginfluence.xml
Additional properties
Additional properties can be assigned to the pages or widgets by entering a section
named PAGE_<pagename>, ELEMENT_<elmentname> or WIDGET_<widgetname> in the
file slsidescreen.ini.
The following properties can be assigned to a page, an element or a widget:
Attribute
Meaning/behavior
TextId
Language-independent identifiers of the text
TextFile
Text file name
TextContext
Text context EASY_XML
Icon
Name of the icon
Easy XML
218
Programming Manual, 10/2020, 6FC5397-1DP40-6BA4
Generating user dialogs
2.14 Sidescreen application
Property
Meaning/behavior
maskPath
The property specifies the main module name to use.
maskName
The property specifies the main menu name to use.
focusable
The property determines whether the input focus can be set to the element.
Example
[Page_sidescreen_proginfluence]
PROPERTY001= name:=focusable, type:=bool, value:="true"
Icon=sidescreen_proginfluence.png
[PAGE_sidescreen_proginfluence]
Icon= sidescreen_proginfluence.png
PROPERTY001= name:=focusable, type:=bool, value:="true"
PROPERTY002= name:=maskPath, type:=QString, value:="
sidescreen_proginfluence.xml"
PROPERTY003= name:=maskName, type:=QString, value:="main"
2.14.3
Language and text management
To manage the language-independent texts, each component can be assigned a text file. The
text file name is formed from the name of the component, the language version and the
extension ".ts".
EASY_XML should be used as the text context.
Syntax
<name>_<language>.ts
Example
PAGE004= name:=sidescreen_proginfluence,
implementation:=slagmforms.SlEESideScreenPage
Text file name: sidescreen_proginfluence_eng.ts
If no text file is specified, the parser searches for the text identifier in the
oem_xml_screens_xxx.ts default text file.
Easy XML
Programming Manual, 10/2020, 6FC5397-1DP40-6BA4
219
Generating user dialogs
2.14 Sidescreen application
2.14.4
Sidescreen components
2.14.4.1
Sidescreen element
If a page is linked to the default implementation, elements can be assigned to this page.
A [Page_<page_name>] section is to be created for this and all elements associated with the
page are listed.
Example
[Sidescreen]
PAGE001= name:=<page_name>, implementation:=SlSideScreenPage
[Page_<page_name>]
ELEMENT<number>= name:=<Element name>,
implementation:=SlSideScreenElement
Each element requires an [Element_<element name>] section in which the properties and
associated widgets are listed.
[Element_<element_name>]
WIDGET001= name:=<widget_name>, implementation:= <implementation>
Easy XML
220
Programming Manual, 10/2020, 6FC5397-1DP40-6BA4
Generating user dialogs
2.14 Sidescreen application
2.14.4.2
Sidescreen widget
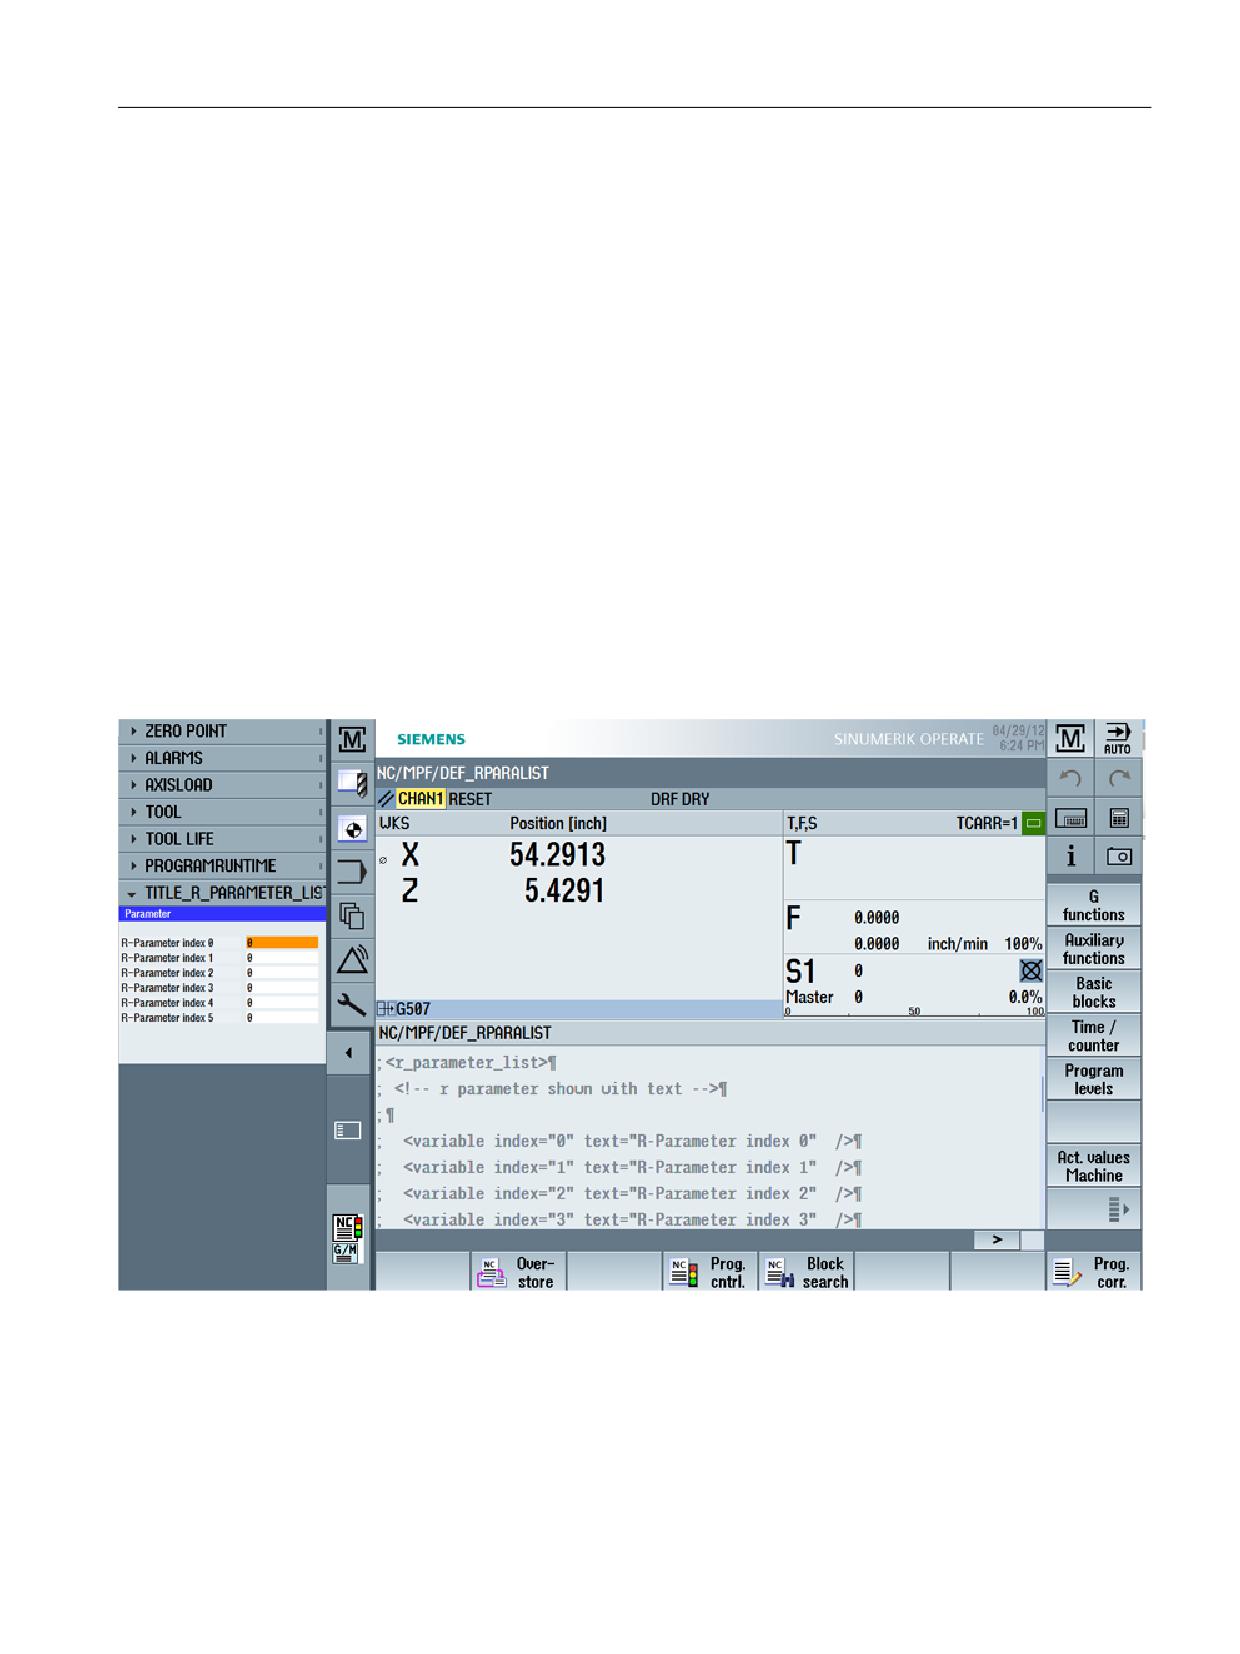
A widget is assigned an area by the Sidescreen management in which the configured shapes can
be displayed. By default, a widget does not obtain an input focus so that fields cannot be edited.
This behavior can be changed by specifying the focusable attribute. When the widget opens,
the parser opens the form associated with the main menu. Within the form, the user can branch
out to other menus with a navigation instruction.
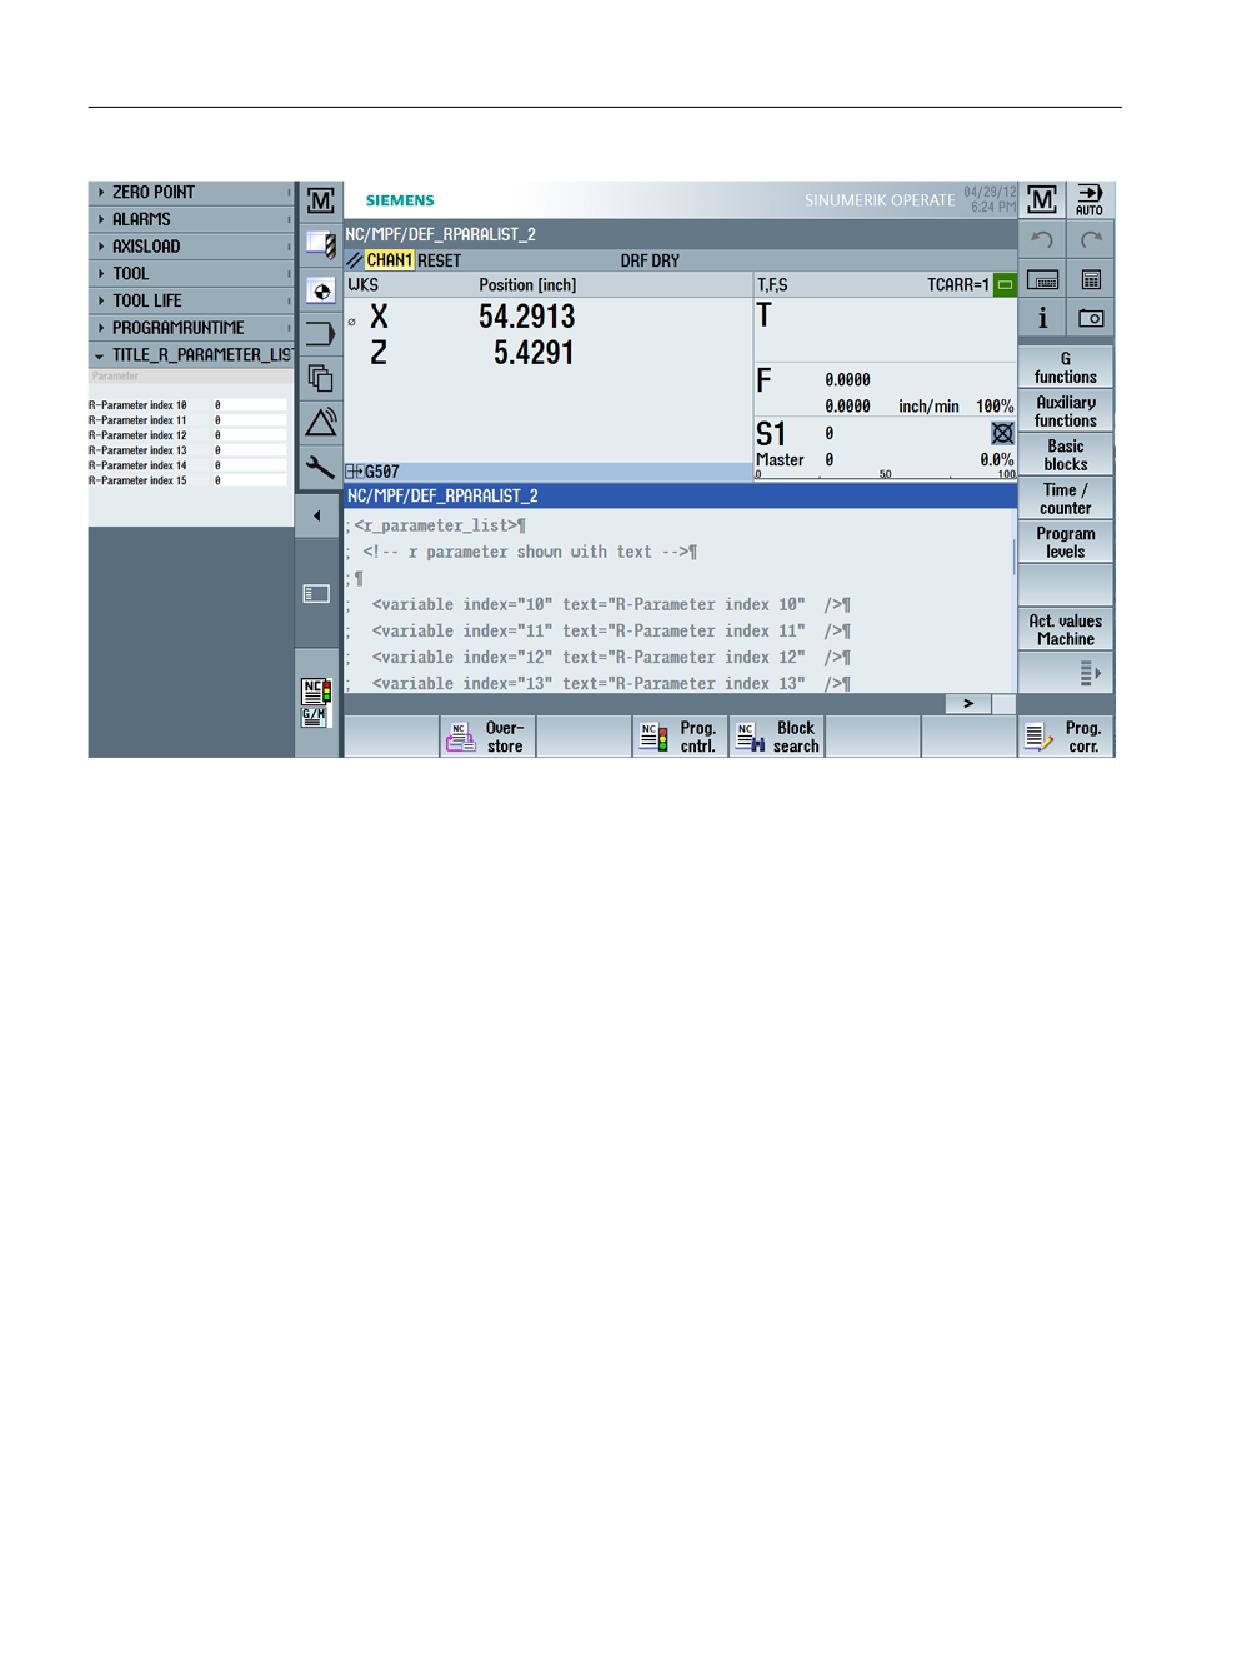
Example
The Easy XML script searches for the description for the data content of the widget in the active
part program. In this specific example, the description of a list with R parameters is expected that
are to be displayed. Each parameter can be assigned a description text.
Toolbox example
Custom Screen Sample\
side_screen_examples\sidescreenwidget\displayRparameter\rparameter_widget.xml
If another part program is selected, the widget is automatically reworked.
Easy XML
Programming Manual, 10/2020, 6FC5397-1DP40-6BA4
221
Generating user dialogs
2.14 Sidescreen application
Easy XML
222
Programming Manual, 10/2020, 6FC5397-1DP40-6BA4
Generating user dialogs
2.14 Sidescreen application
2.14.4.3
Sidescreen page
A page, which is started via the slagmforms.SlEESideScreenPage implementation, makes
available the entire Sidescreen area of a form. It has no title line so that a heading cannot be
configured with the Caption statement. By default, a page does not obtain an input focus so that
fields cannot be edited. This behavior can be changed by specifying the focusable attribute.
When the page opens, the parser opens the form associated with the main menu. Within the
form, the user can branch out to other menus with a navigation instruction.
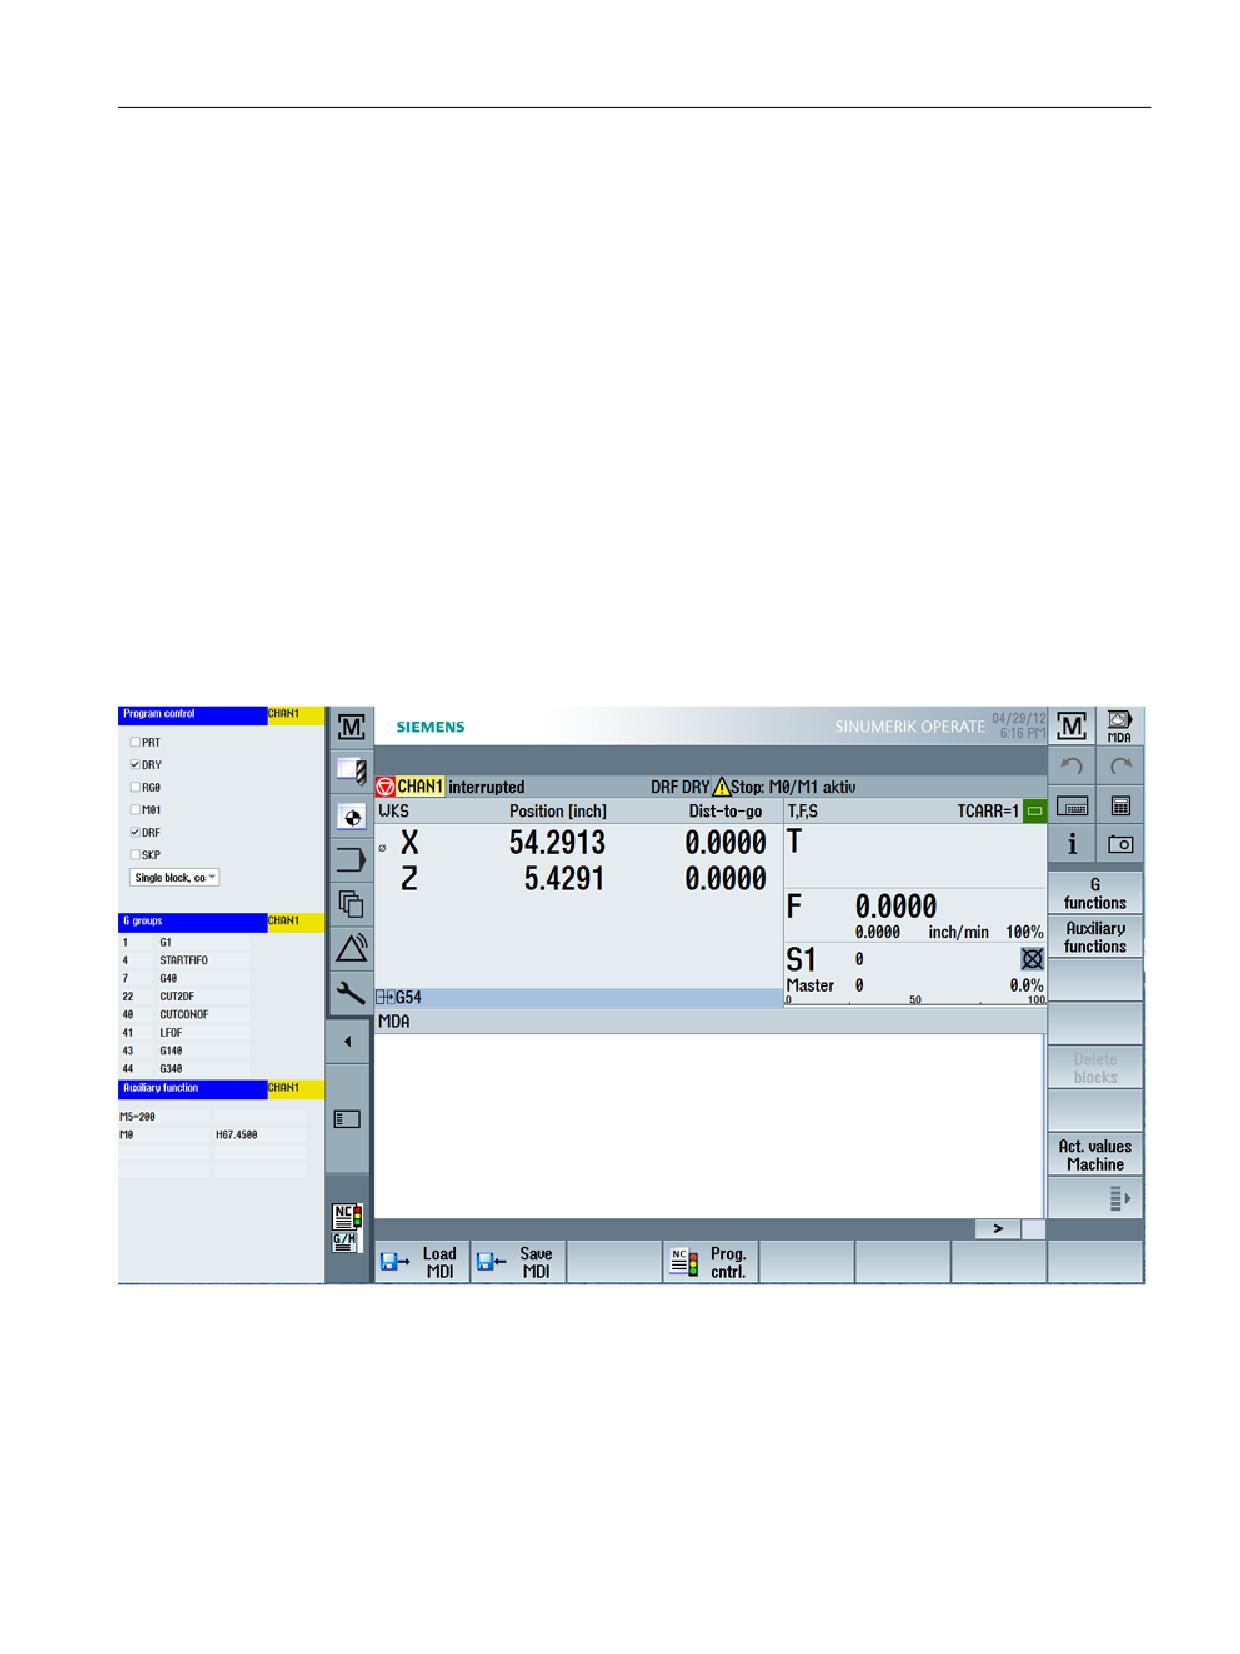
Example
The Sidescreen page is displayed as page which only shows an Easy XML form.
In this example, additional information is displayed in the Sidescreen area.
Toolbox example
Custom Screen Sample\side_screen_examples\sidecreenpage\sidescreen_proginfluence.xml
[Sidescreen]
PROPERTY001= name:=minimizable, type:=bool, value:="true"
PROPERTY002= name:=buttonBarVisible, type:=bool, value:="true"
PAGE001= name:=WidgetsPage, implementation:=SlSideScreenPage
PAGE004= name:=sidescreen_proginfluence,
implementation:=slagmforms.SlEESideScreenPage
Easy XML
Programming Manual, 10/2020, 6FC5397-1DP40-6BA4
223
Generating user dialogs
2.14 Sidescreen application
[Page_sidescreen_proginfluence]
PROPERTY001= name:=focusable, type:=bool, value:="true"
Icon=sidescreen_proginfluence.png
Text file: sidescreen_proginfluence_deu.ts
Easy XML
224
Programming Manual, 10/2020, 6FC5397-1DP40-6BA4
Generating user dialogs
2.15 Display Manager application
2.15
Display Manager application
2.15.1
Easy XML in the Display Manager
The Easy XML function can be included in the Display Manager configuration based on
dialog SlSideScreenPage. Depending on the space available, this dialog can display one or
more side screen pages. Several pages are displayed next to each other in the column format.
The available space (width) is evenly divided among the individual columns. The number of
pages to be displayed and their content are configured. Each page has its own configuration
file. The names of these configuration files are specified when configuring the dialog in
the systemconfiguration.ini file, in command line parameter cmdline.
Behind the parameter identifier -sidescreen1, is the name of the configuration file for the first
column; behind the parameter identifier -sidescreen2, is the name of the configuration file for
the second column, etc.
All applications are automatically started by the Display Manager at system start and closed
again when the system is shut down. This means that script changes only become active after
the HMI has been restarted.
2.15.2
Integrating the Customer Area in the Display Manager menu
The precondition for calling the Easy XML parser in the Customer Area is that an area has been
linked with the Easy XML dialog. This is the default scenario with the area definition AREA111 in
file systemconfiguration.ini.
Syntax
AREA0111= name:=CustomXML, dialog:=SlEECustomDialog,
panel:=SlHdStdHeaderPanel
This area is invisible when the system is delivered. Activation is realized using file
slamconfig.ini, in which visibility flag Visible should be set from false to true.
[CustomXML]
TextId=SL_AM_CUSTOM
SidescreenTextId=SL_SIDESCREEN_CUSTOM
TextFile=slam
TextContext=SlAmAreaMenu
SoftkeyPosition=12
Visible=false -> true
Easy XML
Programming Manual, 10/2020, 6FC5397-1DP40-6BA4
225
Generating user dialogs
2.15 Display Manager application
Examples
The Customer Area is integrated in a menu of the Display Manager using the resolution-
dependent INI files of the Display Manager.
In the relevant file, under switch Operate buttons , a menu item should be
created that contains the reference to area CustomXML:
MENUITEM107= name:=mieasyXML, menuItemStyle:=misMenu,
onClicked:="hidePopup(); sendCmd(OPERATE, CustomXML);
showApp(defaultFrame, OPERATE)", image:=<bild.png>,
textID:= <textid>
In turn, this menu element is assigned to menu in the Display Manager:
MENU020= name:=mOperate3, menuStyle:=msMenu,
defaultFrame:=fOperate3, items:="miMachine, miToolList,
miWorkOffset, miProgramEdit, miProgramManager, miDiagnosis,
mieasyXML, miStretch, miMaximizeOperate3"
Easy XML
226
Programming Manual, 10/2020, 6FC5397-1DP40-6BA4
Generating user dialogs
2.15 Display Manager application
2.15.3
Display Manager widget
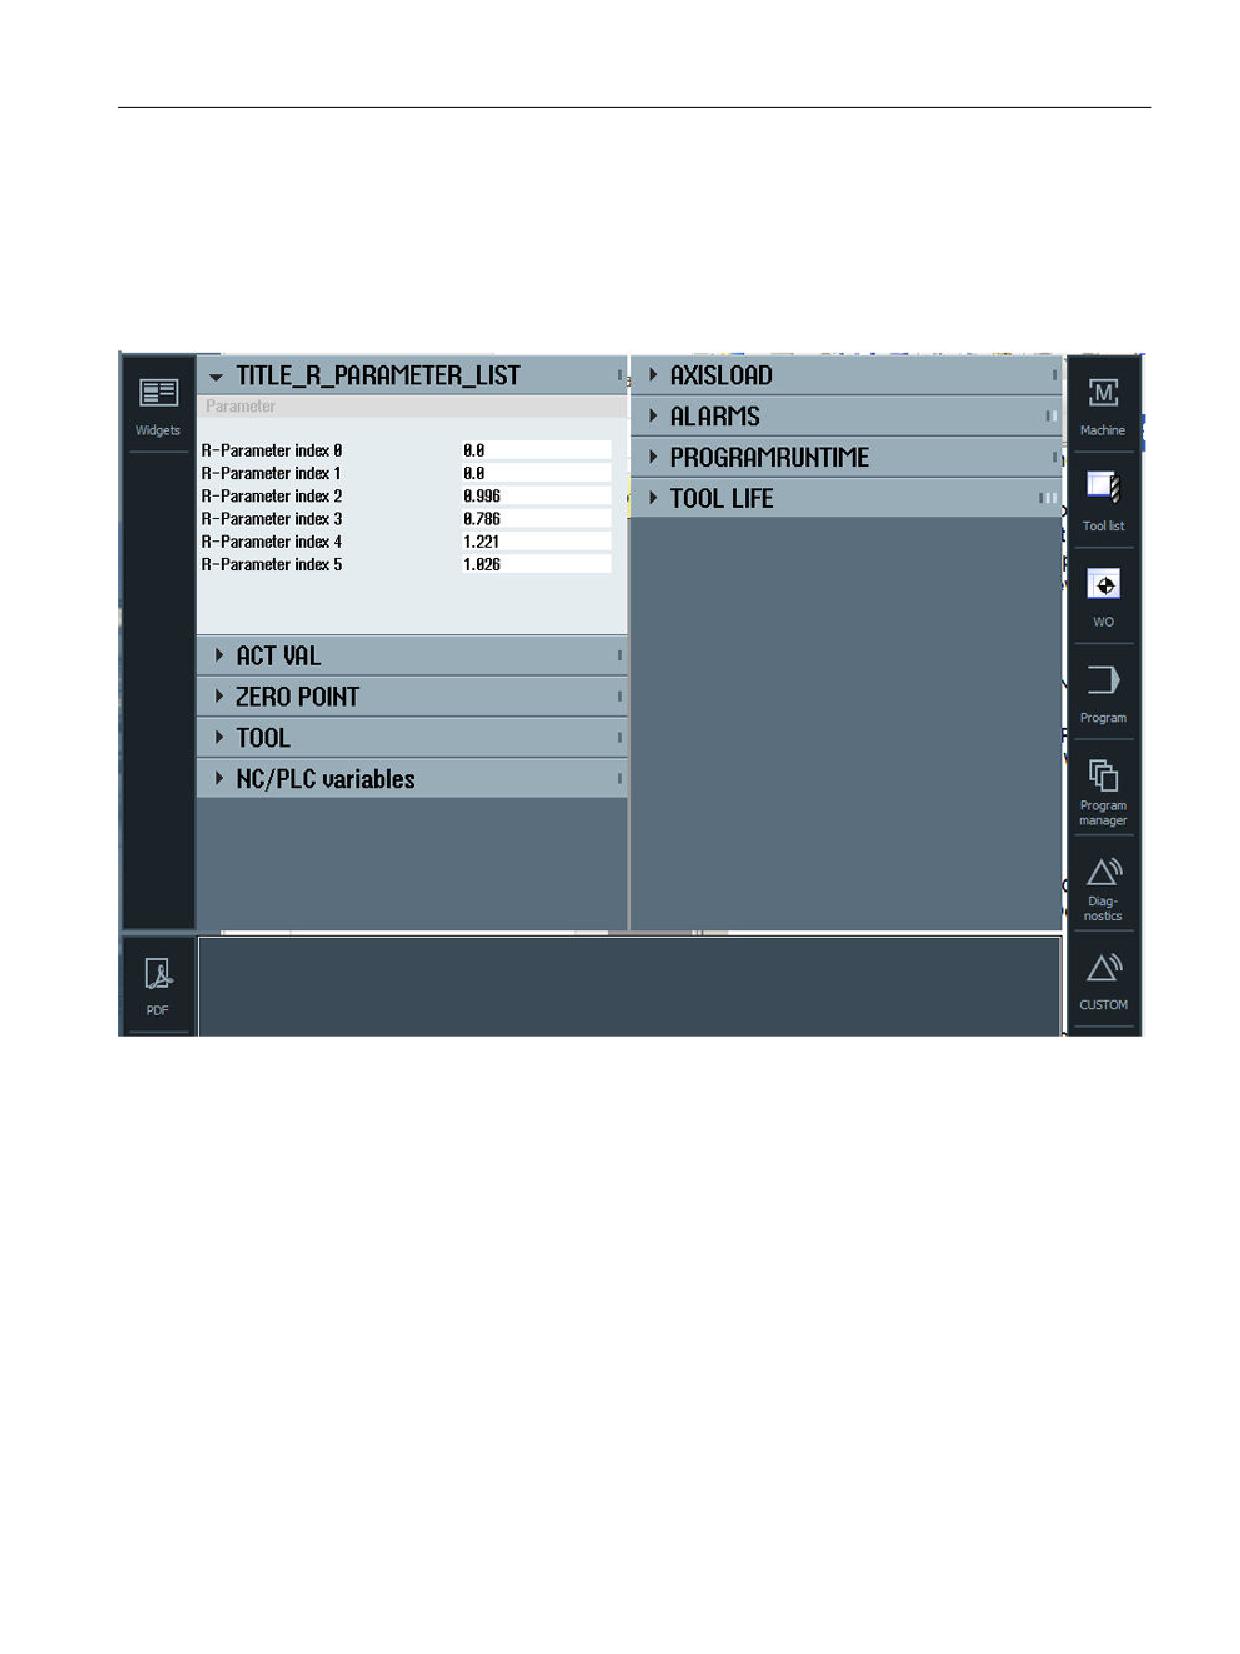
Widgets in the Display Manager are created and managed analogously to the sidescreen
widgets. However, "Sidescreen Widgets" are described in the configuration files of the Display
Manager, e.g. in the INI files sldmwidgets*.ini. The reference to the files is established
via systemconfiguration.ini.
An example with file rparameter_widget.xml is provided in Chapter "Sidescreen widget
(Page 221)".
Example
systemconfiguration.ini
DLG109= name:=SlWidgetsApp,
implementation:=sldmsidescreenapp.SlSideScreenDialog,
process:=SlHmiHost1, preload:=false, cmdline:="-sidescreen1
sldmwidgets1.ini -sidescreen2 sldmwidgets2.ini -spacing 3"
The dialog name is assigned a frame:
Easy XML
Programming Manual, 10/2020, 6FC5397-1DP40-6BA4
227
Generating user dialogs
2.15 Display Manager application
FRAME020= name:=fTop, x:=66, y:=66, width:=760, height:=505,
app:=SlWidgetsApp
The defined frames in a display:
DISPLAY001= name:=d3, frames:="fHeader, fOperate3, fMenuOperate3,
fTop, fMenuTop, fBottom, fMenuBottom"
sldmwidgets1.ini
The structure and the significance of the switches and elements is described in Chapter
"Sidescreen application (Page 217)".
[Sidescreen]
PAGE001= name:=WidgetsPage, implementation:=SlSideScreenPage
[Page_WidgetsPage]
ELEMENT001= name:=EE, implementation:=SlSideScreenElement
ELEMENT002= name:=AxesPosition, implementation:=SlSideScreenElement
ELEMENT003= name:=WorkOffset, implementation:=SlSideScreenElement
ELEMENT004= name:=ActTool, implementation:=SlSideScreenElement
ELEMENT005= name:=VariableView, implementation:=SlSideScreenElement
[Element_EE]
TextId=TITLE_R_PARAMETER_LIST
TextFile=rparameter_widget
TextContext=EASY_XML
WIDGET001= name:=rparameter_widget,
implementation:=slagmforms.SlEESideScreenWidget
WIDGET001 is assigned the script to be run (without file extension) and the implementation
slagmforms.SlEESideScreenPage.
Easy XML
228
Programming Manual, 10/2020, 6FC5397-1DP40-6BA4
Generating user dialogs
2.15 Display Manager application
2.15.4
Display Manager sidescreen page
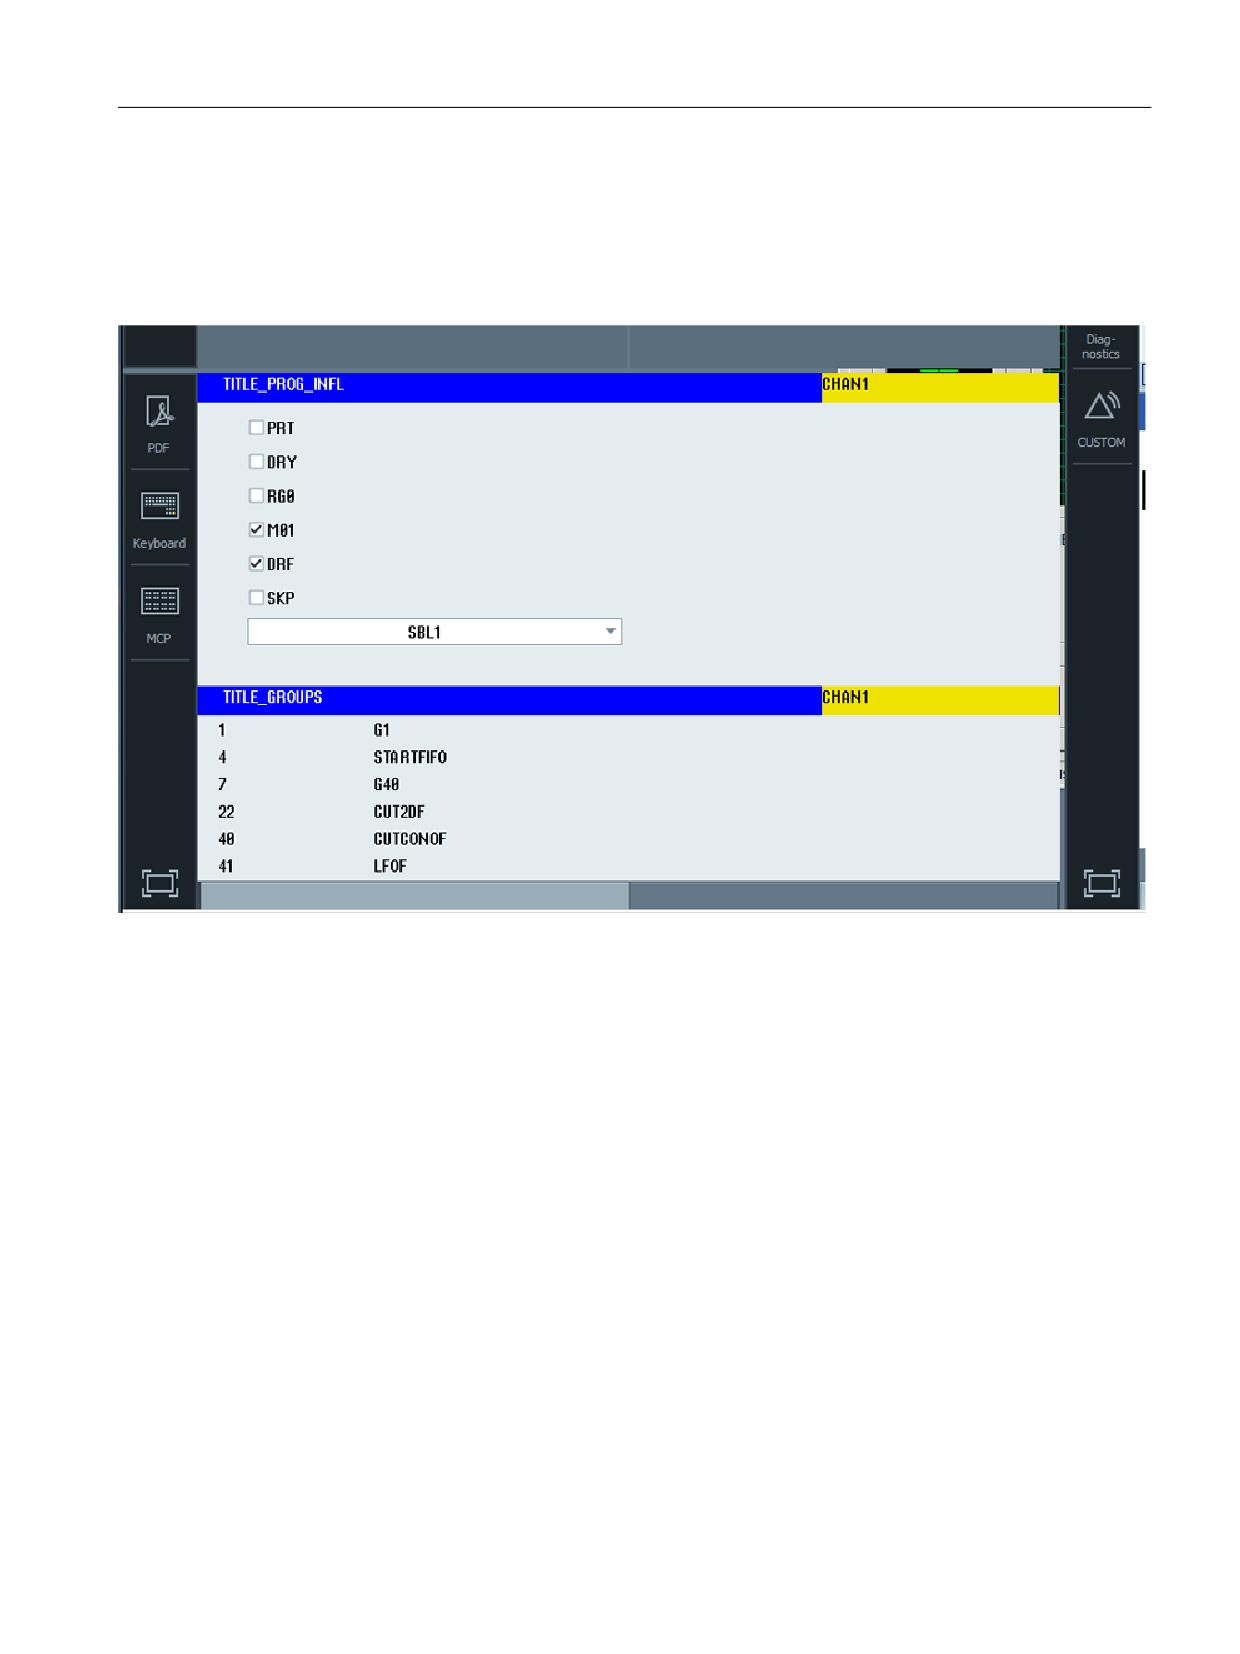
Sidescreen pages in the Display Manager is created and managed analogously to the sidescreen
pages. However, "Sidescreen pages" is described in INI files sldmxxxpage*.ini. The reference to
these files is established via file systemconfiguration.ini.
An example with file sidescreen_proginfluence.xml is provided in Chapter "Sidescreen page
(Page 223)".
Example
sldmmcppage.ini
DLG110= name:=SlMcpApp,
implementation:=sldmsidescreenapp.SlSideScreenDialog,
process:=SlHmiHost1, preload:=false, cmdline:="-sidescreen1
sldmmcppage.ini"
The dialog name is assigned a frame:
FRAME028= name:=fBelowOperate, x:=896, y:=838, width:=1024,
height:=242, app:=SlKeyboardApp, runnableApps:="SlKeyboardApp,
SlMcpApp"
Easy XML
Programming Manual, 10/2020, 6FC5397-1DP40-6BA4
229
Generating user dialogs
2.15 Display Manager application
The defined frames of a display:
DISPLAY002= name:=d4, frames:="fHeader, fOperate4, fMenuOperate4,
fBelowOperate, fMenuBelowOperate, fTop, fMenuTop, fBottom,
fMenuBottom"
MENUITEM124= name:=miMcp, menuItemStyle:=misMenu,
onClicked:="hidePopup(); showApp(defaultFrame, SlMcpApp)",
image:=dm_mcp.png, textID:=SL_DM_MCP
sldmmcppage.ini
[Sidescreen]
PAGE001= name:=McpPage,
implementation:=slsidescreenmcppage.SlSideScreenMcpPage
PAGE002= name:=sidescreen_proginfluence,
implementation:=slagmforms.SlEESideScreenPage
PAGE002 is assigned the script to be run (without file extension) and the implementation
slagmforms.SlEESideScreenPage.
Easy XML
230
Programming Manual, 10/2020, 6FC5397-1DP40-6BA4
Generating user dialogs
2.16 Dialog selection via PLC hardkeys
2.16
Dialog selection via PLC hardkeys
Field of application
The following functions can be initiated by the PLC in the operating software:
• Select an operating area
• Select certain scenarios within operating areas
• Execute functions configured at softkeys
Hardkeys
All keys - also the PLC keys - are subsequently referred to as hardkeys. A maximum of 254
hardkeys can be defined. The following allocation applies:
Key number
Application
Key 1 - key 9
Keys on the operator panel front
Key 10 - key 49
Reserved
Key 50 - key 254
PLC keys:
Key 50 - key 81
Reserved for OEMs
Key 255
Pre-assigned with control information
Hardkeys 1 - 9 are pre-assigned as follows:
Key designation
Action / effect
HK1
MACHINE
Selects "Machine" operating area, last dialog
HK2
PROGRAM
Selects "Program" operating area, last dialog or last program
HK3
OFFSET
Selects "Parameter" operating area, last dialog
HK4
PROGRAM MANAGER
Selects "Program" operating area, "Program manager" root screen
No function
HK5
ALARM
Selects "Diagnostics" operating area, "Alarm list" dialog
HK6
CUSTOM
Selects "Custom" operating area
Configuration
The configuring is realized in the systemconfiguration.ini configuration file in the section
[keyconfiguration]. Each line defines what is known as a hardkey event. A hardkey event is the
n-th actuation of a specific hardkey. For example, the second and third actuation of a specific
hardkey can result in different responses.
The entries in the systemconfiguration.ini configuration file can be overwritten with user-
specific settings. The directories [System user directory]/cfg and [System oem directory]/cfg are
available for this purpose.
Easy XML
Programming Manual, 10/2020, 6FC5397-1DP40-6BA4
231
Generating user dialogs
2.16 Dialog selection via PLC hardkeys
The lines for configuring the hardkey events have the following structure:
KEYx.n = area:=area, dialog:=dialog, screen:=screen, forms:=form,
menus:=menu, action:=menu.action, cmdline:=cmdline
KEYx.n = area:=area, dialog:=dialog, cmdline:=cmdline,
action:= action
x: Number of the hardkey, range of values: 1 - 254
n: Event number - corresponds to the nth actuation of the hardkey, range of values: 0 - 9
Requirement
The PLC user program must fulfill the following requirement:
Only one hardkey is processed. As a consequence, a new request can only be set if the operating
software has acknowledged the previous request. If the PLC user program derives the hardkey
from an MCP key, it must provide sufficient buffer storage of the key(s) to ensure that no fast
keystrokes are lost.
PLC interface
An area to select a hardkey is provided in the PLC interface. The area is in DB19.DBB10. Here, the
PLC can directly specify a key value of between 50 and 254.
Acknowledgment by the operating software takes place in two steps. This procedure is
necessary so that the operating software can correctly identify two separate events if the same
key code is entered twice consecutively. In the first step, control information 255 is written to
byte DB19.DBB10. This defined virtual key stroke enables the HMI to identify every PLC key
sequence uniquely. The control information is of no significance to the PLC user program and
must not be changed. In the second step, the actual acknowledgment takes place with respect
to the PLC by clearing DB19.DBB10. From this point in time, the PLC user program can specify a
new hardkey. In parallel, the actual hardkey request is processed in the operating software.
Example
Configuration file:
; configuration of OP hardkeys (KEY1-KEY9) and
; PLC hardkeys (KEY50-KEY254)
[keyconfiguration]
; MACHINE key (hardkey block)
KEY1.0 = area:=AreaMachine, dialog:=SlMachine
; PROGRAM key (hardkey block)
KEY2.0 = area:=AreaProgramEdit
; OFFSET key (hardkey block)
KEY3.0 = area:=AreaParameter
; PROGRAM MANAGER key (hardkey block)
KEY4.0 = area:=AreaProgramManager
; ALARM key (hardkey block)
Easy XML
232
Programming Manual, 10/2020, 6FC5397-1DP40-6BA4
Generating user dialogs
2.16 Dialog selection via PLC hardkeys
KEY5.0 = area:=AreaDiagnosis, dialog:=SlDgDialog,
cmdline:="-slGfwHmiScreen SlDgAeAlarmsScreen"
; CUSTOM (hardkey block)
KEY6.0 = area:=Custom
; MACHINE key (optional, Shift + F10)
KEY7.0 = area:=AreaMachine, dialog:=SlMachine,
cmdline:="-MKey"
; MENU USER (hardkey block, Ctrl + F10)
KEY10.0 = area:=MenuUser
; MENU FUNCTION (hardkey block, Ctrl + Shift + F10)
KEY11.0 = area:=MenuFunction
KEY50.0 = area:=CustomXML, dialog:=SlEECustomDialog
The area and dialog identifiers can be found in the systemconfiguration.ini from [System
Siemens directory]/cfg.
If only the SlEECustomDialog is used, the parser expects the xmldial.xml file in the application
directory as well as a menu tag with the name main. Other file names or main menu names can
be declared by adding the cmdline key. The -mainModule parameter specifies the XML
description to be loaded. The parser expects the main menu in this script. The -entry parameter
specifies the name of the main menu. If this parameter is missing, the parser uses the name
main to start the function. The -conf parameter with the value slagmdialog.hmi must always
be included.
Here is an example:
KEY50.0 = area:=CustomXML, dialog:=SlEECustomDialog,
cmdline:="-conf slagmdialog.hmi -mainModule restore.xml -entry cmc2"
KEY51.0 = area:=CustomXML, dialog:=SlEECustomDialog,
cmdline:="-conf slagmdialog.hmi -mainModule activate.xml
-entry cmc1"
User interface
The following entries in the systemconfiguration.ini file enable the use of Easy XML for the
function described above.
AREA0111= name:=CustomXML, dialog:=SlEECustomDialog,
panel:=SlHdStdHeaderPanel
DLG056= name:=SlEECustomDialog,
implementation:=slagmdialog.SlEECustomDialog, process:=SlHmiHost1,
preload:=false, terminate:=true, cmdline:="-conf slagmdialog.hmi"
Easy XML
Programming Manual, 10/2020, 6FC5397-1DP40-6BA4
233
Generating user dialogs
2.17 Assigning user dialogs to reserved softkeys
2.17
Assigning user dialogs to reserved softkeys
A softkey is reserved in all standard operating areas for expansion of the existing functionality.
Corresponding files are stored in the following directory in the system for activation and linking
of an OEM softkey with a user project:
/siemens/sinumerik/hmi/template/cfg
These files contain operating area-specific XML descriptions which are interpreted and
integrated in the menu tree of the operating area upon start-up of the operating software.
For integration of a separate application, the file relevant for the corresponding operating area
is to be copied from the template directory into the following directory and modified:
/oem/sinumerik/hmi/template/cfg
Easy XML
234
Programming Manual, 10/2020, 6FC5397-1DP40-6BA4
Generating user dialogs
2.17 Assigning user dialogs to reserved softkeys
2.17.1
Defining language-neutral softkey text
The TEXTFILE tag contains the file name of the text file which is to be assigned to the OEM area.
The file name is to be specified without language and file extension.
Syntax
<TEXTFILE>oemtextfile</TEXTFILE>
Example
oem_xml_screens_deu.ts
<TEXTFILE>oem_xml_screens</TEXTFILE>
The softkey text to be displayed is managed in the property tag in the softkey tag. The OEM
value is to be replaced by the desired text ID. The translationContext property references an
area in the text file to which the text is assigned. In the case of easyXML, the EASY_XML context
is to be specified.
Syntax
<PROPERTY name="textID" type="QString">OEM</PROPERTY>
<PROPERTY name="translationContext" type="QString">OEMContext</
PROPERTY>
Example
<PROPERTY name="textID" type="QString">MY_TEXT1</PROPERTY>
<PROPERTY name="translationContext" type="QString">EASY_XML</
PROPERTY>
Easy XML
Programming Manual, 10/2020, 6FC5397-1DP40-6BA4
235
Generating user dialogs
2.17 Assigning user dialogs to reserved softkeys
2.17.2
Assigning an Easy XML area
The navigation target must also be defined in the softkey tag. Thus, the navigation
target CustomXML is to be entered in the name attribute in the area tag. The attributes dialog
and screen are to be deleted as these parameters are defined automatically.
Syntax
<NAVIGATION target="area">
<AREA name="OEMArea" dialog="OEMDialog" screen="OEMScreen"/>
</NAVIGATION>
Example
<NAVIGATION target="area">
<AREA name="CustomXML" />
</NAVIGATION>
If navigation target area is used, the parser expects the file xmldial.xml as a start module and the
main menu as an entry point for menu management. In order to be able to offer multiple
applications at the same time, the switchToDialog function is to be used. The NAVIGATION tag
must then be replaced with the FUNCTION tag in this regard. The CustomXML area, the
SlEECustomDialog dialog, and the name of the start module and of the main menu are to be
transferred to this function as call arguments.
You return to the standard user area from the easyXML area with the switchToArea tag.
Syntax
<switchToArea name="<Area>"/>
<FUNCTION args="-area CustomXML -dialog SlEECustomDialog -mainModule
<Filename> -entry <Menuname>" name="switchToDialog"/>
Easy XML
236
Programming Manual, 10/2020, 6FC5397-1DP40-6BA4
Generating user dialogs
2.17 Assigning user dialogs to reserved softkeys
Example project
sldiagnose_oem.xml
<!DOCTYPE DIALOG>
<DIALOG>
<TEXTFILE>oem_xml_screens</TEXTFILE>
<!-- =====================================================================
-->
<!-- OEM softkey number 7 on first horizontal main menu in area diagnosis --
>
<!-- =====================================================================
-->
<MENU name="DgGlobalHu">
<ETCLEVEL id="0">
<SOFTKEYGROUP name="GroupEtc">
<SOFTKEY position="7">
<PROPERTY name="textID" type="QString">DG_SK</PROPERTY>
<PROPERTY name="translationContext" type="QString">EASY_XML</PROPERTY>
<NAVIGATION target="area">
<AREA name="CustomXML" />
</NAVIGATION>
</SOFTKEY>
</SOFTKEYGROUP>
</ETCLEVEL>
</MENU>
</DIALOG>
or
<!DOCTYPE DIALOG>
<DIALOG
<!-- =====================================================================
-->
<!-- OEM softkey number 7 on first horizontal main menu in area diagnosis --
>
<!-- =====================================================================
-->
<TEXTFILE>oem_xml_screens</TEXTFILE>
<MENU name="DgGlobalHu">
<ETCLEVEL id="0">
<SOFTKEYGROUP name="GroupEtc">
<SOFTKEY position="7">
<PROPERTY name="textID" type="QString">DG_SK</PROPERTY>
<PROPERTY name="translationContext" type="QString">EASY_XML</PROPERTY>
<FUNCTION args="-area CustomXML -dialog SlEECustomDialog -mainModule
dg.xml -entry main" name="switchToDialog"/>
</SOFTKEY>
</SOFTKEYGROUP>
</ETCLEVEL>
</MENU>
</DIALOG>
Easy XML
Programming Manual, 10/2020, 6FC5397-1DP40-6BA4
237
Generating user dialogs
2.17 Assigning user dialogs to reserved softkeys
dg.xml
<DialogGui>
<menu name = "main">
<open_form name = "R_PARAMETER_LIST" />
<softkey_back>
<switchToArea name="AreaDiagnosis" dialog="SlDgDialog"/>
</softkey_back>
</menu>
<!-- This form shows a R - parameter list -->
<form name = "R_PARAMETER_LIST">
<init>
<caption>R - Parameter list diagnosis</caption>
<data_access type="true" />
<control name = "c1" xpos = "322" ypos = "34" refvar="nck/Channel/
Parameter/R[0]" hotlink="true" />
<control name = "c2" xpos = "322" ypos = "54" refvar="nck/Channel/
Parameter/R[1]" hotlink="true" />
<control name = "c3" xpos = "322" ypos = "74" refvar="nck/Channel/
Parameter/R[2]" hotlink="true" />
<control name = "c4" xpos = "322" ypos = "94" refvar="nck/Channel/
Parameter/R[3]" hotlink="true" />
<control name = "c5" xpos = "322" ypos = "114" refvar="nck/Channel/
Parameter/R[4]" hotlink="true" />
<control name = "c6" xpos = "322" ypos = "134" refvar="nck/Channel/
Parameter/R[5]" hotlink="true" />
<control name = "c7" xpos = "322" ypos = "154" refvar="nck/Channel/
Parameter/R[6]" hotlink="true" />
<control name = "c8" xpos = "322" ypos = "174" refvar="nck/Channel/
Parameter/R[7]" hotlink="true" />
<control name = "c9" xpos = "322" ypos = "194" refvar="nck/Channel/
Parameter/R[8]" hotlink="true" />
<control name = "c10" xpos = "322" ypos = "214" refvar="nck/Channel/
Parameter/R[9]" hotlink="true" />
</init>
<paint>
<text xpos = "23" ypos = "34">R-Parameter 0</text>
<text xpos = "23" ypos = "54">R-Parameter 1</text>
<text xpos = "23" ypos = "74">R-Parameter 2</text>
<text xpos = "23" ypos = "94">R-Parameter 3</text>
<text xpos = "23" ypos = "114">R-Parameter 4</text>
<text xpos = "23" ypos = "134">R-Parameter 5</text>
<text xpos = "23" ypos = "154">R-Parameter 6</text>
<text xpos = "23" ypos = "174">R-Parameter 7</text>
<text xpos = "23" ypos = "194">R-Parameter 8</text>
<text xpos = "23" ypos = "214">R-Parameter 9</text>
</paint>
</form>
</DialogGui>
Easy XML
238
Programming Manual, 10/2020, 6FC5397-1DP40-6BA4
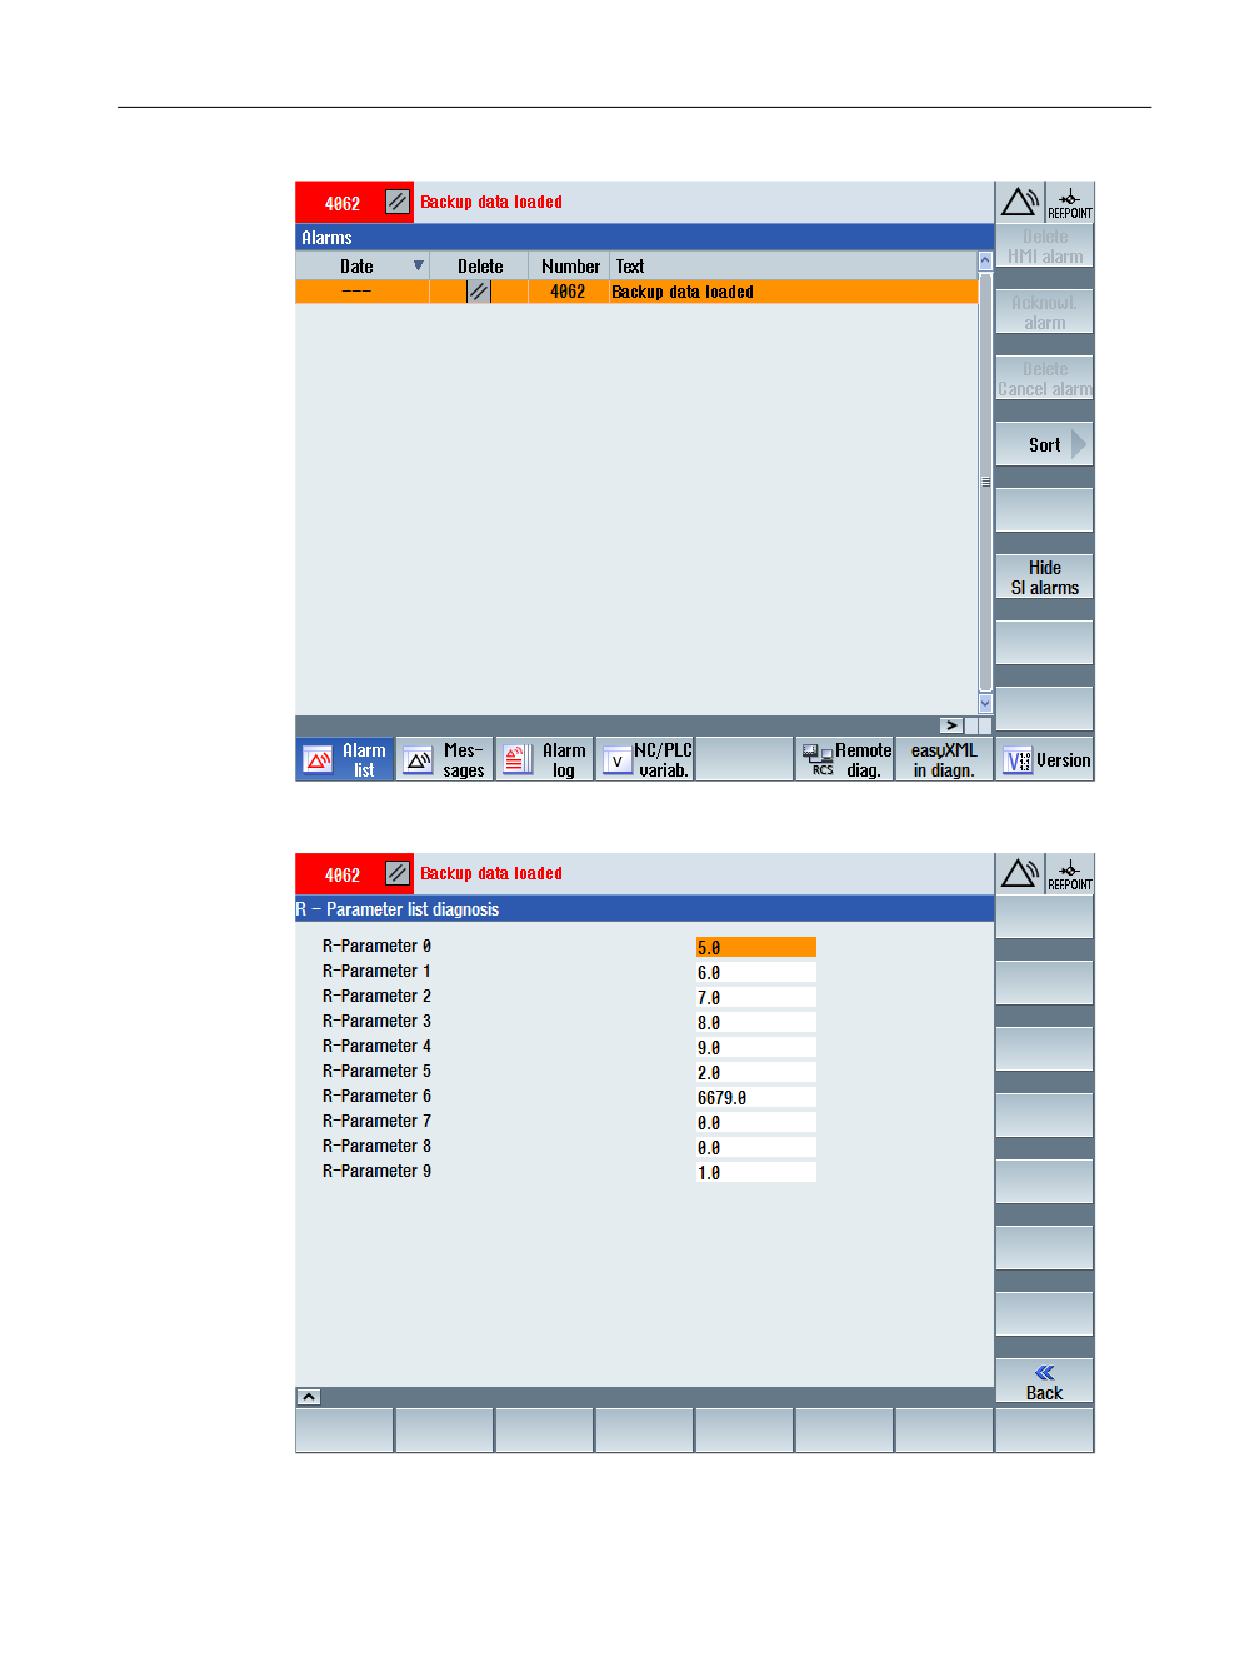
Generating user dialogs
2.17 Assigning user dialogs to reserved softkeys
Easy XML
Programming Manual, 10/2020, 6FC5397-1DP40-6BA4
239
Generating user dialogs
2.17 Assigning user dialogs to reserved softkeys
2.17.3
Tag descriptions
Tag softkey
Outside of the softkey tag, the softkey state can be set with the state attribute using the
POSITION attribute. The softkey number for which the state should be set is to be specified as the
attribute value.
Example
<menu name = "menu_sktest">
<state type="$$$define_sk_type" POSITION="2"/>
<softkey POSITION="2" type="user_controlled" picture="$$$bmp_name">
<caption>Toggle%nSK</caption>
<if>
<condition>sk_type == 0 </condition>
<then>
<op> sk_type = 1 </op>
<op> define_sk_type = _T"PRESSED" </op>
<op>bmp_name = _T"f:\appl\red_led_on.bmp"</op>
<state type="$$$define_sk_type" />
</then>
<else>
<op> define_sk_type = _T"NOTPRESSED" </op>
<op>bmp_name = _T"f:\appl\red_led_off.bmp"</op>
<op> sk_type = 0 </op>
<state type="$$$define_sk_type" />
</else>
</if>
<print text="%s">sk_type_name</print>
<navigation>menu_sktest</navigation>
</softkey>
Tag typedef
Note
Pre-allocation of the elements in the examples must be removed.
Within the type definition, a variable is declared with the element tag. The attributes of the tag
correspond with the attributes of the let instruction. The elements can be preallocated when
creating the variables.
Example
RECT:
Easy XML
240
Programming Manual, 10/2020, 6FC5397-1DP40-6BA4
Generating user dialogs
2.17 Assigning user dialogs to reserved softkeys
<typedef name="StructRect" type="struct" >
<element name="left" type="int" />
<element name="top" type="int" />
<element name="right" type="int" />
<element name="bottom" type="int" />
</typedef>
POINT:
<typedef name="StructPoint" type="struct" >
<element name="x" type="int" />
<element name="y" type="int" />
</typedef>
SIZE:
<typedef name="StructSize" type="struct" >
<element name="width" type="int" />
<element name="height" type="int" />
</typedef>
Tag let
The number of field elements is to be specified with the dim attribute. For a two-dimensional
field, the second dimension is specified after the first dimension separated by a comma. A field
element is accessed via the field index, which is specified in square brackets after the variable
name. Dimensions of the arrays can be defined directly or via the content of a variable.
Example
<let name="d1" >3</let>
<let name="list_string" dim="3" type="string" />
or
<let name="list_string" dim="$d1" type="string" />
<op>
list_string[2] = _T"test";
</op>
or
<let name="d1" >3</let>
<let name="d2" >6</let>
<let name="list_string3" dim="3, $d2" type="string" />
<op>
list_string3[2, 5] = _T"test";
</op>
Easy XML
Programming Manual, 10/2020, 6FC5397-1DP40-6BA4
241
Generating user dialogs
2.18 Creating language-neutral texts
2.18
Creating language-neutral texts
All texts used in the dialog forms can be managed language-neutral, where text identifiers are
used in the dialogs which are replaced with text in the currently selected language during
runtime. This text is to be saved together with the text identifier for every available language in
a text file in UTF8 format.
The file oem_xml_screens_<language code>.ts is assigned to the Easy XML function as a text
file by default. The EASY_XML identifier is to be specified as text context.
Two dollar symbols are to be prefixed to the text identifier in the script to mark a test identifier.
Structure
oem_xml_screens_deu.ts
<?xml version="1.0" encoding="UTF-8" ?>
<!DOCTYPE TS>
<TS>
<context>
<name>EASY_XML</name>
<message>
<source>MY_TEXT1</source>
<translation>text1 from textfile</translation>
</message>
<message>
<source>MY_TEXT2</source>
<translation>text2 from textfile</translation>
</message>
</context>
</TS>
Example
<text xpos ="120" ypos="158">$$MY_TEXT1</text>
Easy XML
242
Programming Manual, 10/2020, 6FC5397-1DP40-6BA4
Generating user dialogs
2.19 Project-specific text files
2.19
Project-specific text files
2.19.1
Creating project-specific text files
For managing separate projects, separate text files can be used for a project, each form, and each
menu. The TEXTFILE attribute gives notification in the corresponding tags.
The name of the text file is to be transferred as an attribute value without language identifier and
file extension. The texts can continue to be accessed until the form or the menu is closed. If a text
file is loaded with the tag DialogGui, the content may be accessed until the project is exited. The
search for the text identifier begins in the file last loaded.
Example
main_form_screens_deu.ts
<?xml version="1.0" encoding="UTF-8" ?>
<!DOCTYPE TS>
<TS>
<context>
<name>EASY_XML</name>
<message>
<source>MAIN_FORM_TITLE</source>
<translation>user text file title</translation>
</message>
</context>
</TS>
Activation
<DialogGui textfile="main_form_screens">
</DialogGui>
or
<form name="main_form" textfile="main_form_screens">
</form>
or
<menu name="main" textfile="main_form_screens">
</menu>
Easy XML
Programming Manual, 10/2020, 6FC5397-1DP40-6BA4
243
Generating user dialogs
2.19 Project-specific text files
Example dialog
main_form_screens_deu.ts
<?xml version="1.0" encoding="UTF-8" ?>
<!DOCTYPE TS>
<TS>
<context>
<name>EASY_XML</name>
<message>
<source>MAIN_FORM_TITLE</source>
<translation>user text file title</translation>
</message>
<message>
<source>MAIN_FORM_TEXT</source>
<translation>text from text file</translation>
</message>
</context>
</TS>
main2_sktext_screens_deu.ts
<?xml version="1.0" encoding="UTF-8" ?>
<!DOCTYPE TS>
<TS>
<context>
<name>EASY_XML</name>
<message>
<source>SK1</source>
<translation>Softkey1</translation>
</message>
</context>
</TS>
form2_screens_deu.ts
<?xml version="1.0" encoding="UTF-8" ?>
<!DOCTYPE TS>
<TS>
<context>
<name>EASY_XML</name>
<message>
<source>FORM2_TITLE</source>
<translation>Form2 Title</translation>
</message>
<message>
<source>FORM2_TEXT</source>
<translation>Form2 text from text file</translation>
</message>
</context>
</TS>
Easy XML
244
Programming Manual, 10/2020, 6FC5397-1DP40-6BA4