SINUMERIK 840D sl. Service - Configuring Commissioning. Manual (2011-2020) - page 28
Gu
ne configuration
Preface_______________
Fundamental safety______
1
nstructions
2
System overview_______
SINUMERIK, SINAMICS
3
SINUMERIK 840D sl _____
SINUMERIK 840D sl, SINAMICS
4
SINAMICS drive line-up____
S120
Guidelines for machine
5
configuration
system
System Manual
6
Line connection________
7
DC link____________
Connection of the
components in SINAMICS
8
drive system
9
Safety Integrated_______
10
Signal Interconnection____
11
Typical circuit diagrams____
Activate/Deactivate Drive
12
System____________
A
Appendix___________
Valid for NCU SW 4.5 SP1 and higher
MA 01/2013
6FC5397-6CP10-0BA2
Preface
SINUMERIK/SINAMICS documentation
The SINUMERIK and SINAMICS documentation is organized in the following categories:
● General documentation
● User documentation
● Manufacturer/service documentation
Further information
Click the following link to find information on the the following topics:
● Ordering documentation/overview of documentation
● Additional links to download documents
● Using documentation online (finding and searching in manuals/information)
Please send any questions about the technical documentation (e.g. suggestions for
improvement, corrections) to the following email address:
docu.motioncontrol@siemens.com
My Documentation Manager
Using the following link, you can find information on how to create your own individual
documentation based on Siemens' content, and adapt it for your own machine
documentation:
Training
Using the following link, you can find information on SITRAIN - training from Siemens for
products, systems and automation engineering solutions:
FAQs
You can find Frequently Asked Questions in the Service&Support pages under Product
Support:
Guidelines for machine configuration
System Manual, MA 01/2013, 6FC5397-6CP10-0BA2
3
Preface
Target group
This manual is intended for experienced drive and CNC configuration engineers. Its purpose
is to give you a compact guide to integrating the components of SINAMICS S120 and
SINUMERIK 840D sl.
Use and standard scope
This document supplements product-related equipment, software installation, and function
manuals for SINAMICS S120 and SINUMERIK 840D sl. It shows examples of the
mechanical layout of components, functional integration, as well as logical connections to the
signal interfaces of a processing machine.
This documentation is limited to the following series or functions:
● SINUMERIK 840D sl Type 1B (NCU 7x0.3, NX1x.3)
● SINAMICS in booksize format
● Communication between SINUMERIK NCU and the SINAMICS drives (communication
with operating, programming, and visualization units is not part of this documentation)
For reasons of clarity, this documentation does not contain all of the detailed information on
all of the product types. It also cannot take into consideration every conceivable type of
installation, operation, and service/maintenance. If you have any questions that go beyond
the scope of the information provided here, please contact your local representative.
Utilization phases and the available tools/documents
Where necessary for the understanding and for important general conditions, this guide
contains extracts from the product manuals listed below. You can find there detailed
descriptions for the product-internal functions and properties, and for the mechanical and
electrical user interfaces.
Table 1
Utilization phases and the available tools/documents
Utilization phase
Tools
Orientation
SINAMICS S sales documentation
Planning/engineering
• SIZER configuration tool
• Configuration manuals, motors
Decision making/ordering
SINAMICS S120 catalogs
• SIMOTION, SINAMICS S120 and Motors for Production Machines
(Catalog PM 21)
• SINAMICS and Motors for Single-Axis Drives (catalog D 31)
• SINUMERIK 840D sl Type 1B
Equipment for Machine Tools (Catalog NC 62)
Guidelines for machine configuration
4
System Manual, MA 01/2013, 6FC5397-6CP10-0BA2
Preface
Utilization phase
Tools
Configuring/installation
• SINAMICS S120 Equipment Manual for Control Units and Additional
System Components
• SINAMICS S120 Booksize Power Units Equipment Manual
• SINAMICS S120 Chassis Power Units Equipment Manual
• SINAMICS S120 Equipment Manual Liquid Cooled Chassis Power
Units
• SINAMICS S120 Equipment Manual for AC Drives
• SINAMICS S120M Equipment Manual Distributed Drive Technology
• SINUMERIK 840D sl Equipment Manual NCU 7x0.3 PN
Commissioning
• STARTER commissioning tool
• SIMATIC S7 Manager
• SINAMICS S120 Getting Started
• SINAMICS S120 Commissioning Manual
• SINAMICS S120 CANopen Commissioning Manual
• SINAMICS S120 Function Manual
• SINAMICS S120 Safety Integrated Function Manual
• SINAMICS S120/S150 List Manual
• SINUMERIK 840D sl Commissioning Manual CNC: NCK, PLC, drive
• SINUMERIK 840D sl Safety Integrated Function Manual
Using/operating
• SINAMICS S120 Commissioning Manual
• SINAMICS S120/S150 List Manual
Maintenance/Service
• SINAMICS S120 Commissioning Manual
• SINAMICS S120/S150 List Manual
References
• SINAMICS S120/S150 List Manual
Functionality
This documentation may also mention components that have not been released for use with
SINUMERIK 840D sl. The NC62 catalog is binding for the permitted combinations.
Technical Support
Country-specific telephone numbers for technical support are provided on the Internet under
Contact:
SINUMERIK
You can find information on SINUMERIK at:
Guidelines for machine configuration
System Manual, MA 01/2013, 6FC5397-6CP10-0BA2
5
Preface
SINAMICS
You can find information on SINAMICS at:
EC Declarations of Conformity
The EC Declaration of Conformity for the EMC Directive can be found on the Internet at:
Enter there the number 15257461 as a search term or contact your local Siemens office.
Guidelines for machine configuration
6
System Manual, MA 01/2013, 6FC5397-6CP10-0BA2
Table of contents
Preface
3
1
Fundamental safety instructions
15
1.1
General safety instructions
15
1.2
Safety instructions for electromagnetic fields (EMF)
18
1.3
Handling electrostatic sensitive devices (ESD)
18
1.4
Residual risks of power drive systems
19
2
System overview
21
2.1
Application
21
2.2
System configuration
22
2.3
Variants
24
2.4
SINAMICS S120 / SINUMERIK 840D sl Component Overview
25
2.5
User interface software (HMI software)
30
2.6
Function of installation altitude and ambient temperature
32
3
SINUMERIK 840D sl
33
3.1
Control Unit NCU 7x0.3 PN
33
3.1.1
Description
33
3.1.2
Interface description
34
3.1.3
Interfaces and their terminal assignments
35
3.1.3.1
DRIVE-CLiQ interfaces X100-X105 (X103)
35
3.1.3.2
Digital inputs/outputs X122, X132 and X142
37
3.1.3.3
PROFINET interface X150 P1, P2
40
3.1.3.4
PROFIBUS interface X126
41
3.1.4
LED displays
43
3.2
NX1x.3 extension units
45
3.2.1
Description
45
3.2.2
Representation of the NX1x.3
46
3.2.3
Interfaces and their terminal assignments
48
3.2.3.1
X122 digital inputs/outputs
48
3.2.4
NX1x3 wiring
50
3.3
Option Board CBE30-2
52
3.3.1
Description
52
4
SINAMICS drive line-up
55
4.1
Structure of the drive line-up
55
4.1.1
Description
55
4.1.2
Single row layout
57
4.1.3
Two-row/Multiple-row construction
59
4.1.4
Center infeed (single row construction) for 16 to 120 kW Line Modules
62
Guidelines for machine configuration
System Manual, MA 01/2013, 6FC5397-6CP10-0BA2
7
Table of contents
4.1.5
Distributed configuration
63
4.2
Connection of the SINUMERIK components
66
4.2.1
Layout and fastening of the NCU/NX modules
66
4.2.2
Layout of the NX for single row construction integrated in the power unit group
67
4.2.3
NCU/NX layout as offset solution
68
4.2.4
Direct installation of a CU-/NCU-/NX module on the Line Module
68
4.3
Shield Connection
69
4.3.1
SINAMICS Components Dimension Drawings (Internal Air Cooling)
69
4.3.2
SINAMICS Components Dimension Drawings (External Air Cooling)
73
4.3.3
Shield Connection for Internal Heat Dissipation
77
4.4
Note for the installation clearance for the connection cables
78
4.4.1
General information
78
4.4.2
Clearance of the Power Components
79
4.4.3
Ventilation Clearances of the SINUMERIK Components
79
4.5
Heat Dissipation of the Control Cabinet
80
4.5.1
Control cabinet cooling options
80
4.5.2
General information on ventilation
81
4.5.3
Cooling clearances
83
4.5.4
Dimensioning Climate Control Equipment
89
4.6
Cooling of power units
90
4.6.1
Internal Air Cooling
90
4.6.2
External Air Cooling
91
4.6.3
Cold plate cooling
92
4.6.4
Liquid cooling (liquid cooled)
94
5
Communication within the system
95
5.1
Communication overview
95
5.2
DRIVE-CLiQ Topologies
99
5.2.1
DRIVE-CLiQ topology
99
5.2.2
DRIVE-CLiQ wiring
101
6
Line connection
107
6.1
Power Supply Interface Variants
107
6.1.1
Ways of connecting the line supply
107
6.1.2
Operation of the line connection components on the supply network
108
6.1.3
Operating line connection components via an autotransformer
109
6.1.4
Operating line connection components via an isolating transformer
110
6.1.5
Residual-current operated circuit breakers (RCD)
112
6.1.6
Residual-current monitors (RCM)
114
6.2
Overcurrent protection by means of line fuses and circuit breakers
116
6.3
Line Contactor Control
117
6.3.1
Line contactor control for Line Modules without DRIVE-CLiQ interface (5 kW and 10 kW
versions)
118
6.3.2
Line Contactor Control for Line Modules with DRIVE-CLiQ Interface
120
6.3.3
Line Contactor Control Commissioning using an Example
121
6.4
Line filters
123
6.4.1
Safety instructions for line filters
123
6.4.2
Overview of line filters
125
Guidelines for machine configuration
8
System Manual, MA 01/2013, 6FC5397-6CP10-0BA2
Table of contents
6.4.3
Wideband Filter for Active Line Modules
126
6.4.4
Basic Line Filters for Active Line Modules
127
6.4.5
Basic Line Filter for Smart Line Modules
128
6.5
Active Interface Module (AIM)
129
6.5.1
Description
129
6.5.2
Safety instructions for Active Interface Modules
130
6.5.3
Interface description
132
6.5.3.1
Overview
132
6.5.3.2
Line/load connection
136
6.5.3.3
X121 temperature sensor and fan control
136
6.5.3.4
Electronics power supply X124
137
6.5.4
Operation on an isolated-neutral system (IT system)
137
6.5.4.1
IT systems
137
6.5.4.2
Operating an Active Interface Module on an isolated-neutral line supply (IT line supply)
138
6.5.5
Connection example
139
6.5.6
Technical data
140
6.6
Line reactors
141
6.6.1
Safety instructions for line reactors
141
6.6.2
HFD line reactors for Active Line Module
142
6.6.2.1
Description
142
6.6.2.2
Interface description
143
6.6.2.3
Dimension drawings
146
6.6.2.4
Technical data
151
6.6.3
Line reactors for Smart Line Modules
152
6.6.3.1
Interface description
152
6.6.3.2
Dimension drawings
154
6.6.3.3
Technical data
157
6.7
Possible combinations of line reactors and line filters
158
7
DC link
159
7.1
Function of the DC link
159
7.2
DC link components
159
7.2.1
Braking Module
160
7.2.2
Capacitor Module
161
7.3
Current Carrying Capacity of the DC Link Busbar
161
7.4
DC link rectifier adapter
164
7.5
DC link adapter
165
8
Connection of the components in SINAMICS drive system
167
8.1
Electronics Power Supply
167
8.1.1
External power supply (SITOP)
167
8.1.1.1
Selection of the Power Supply Devices
168
8.1.1.2
24 V current consumption of the components
169
8.1.1.3
Calculation of the 24 VDC Power Requirement Example
171
8.1.1.4
Assignment of the power supply to other components
172
8.1.1.5
Overcurrent protection
174
8.1.1.6
Line formation
175
8.1.1.7
Power Supply Connection Example
177
8.1.2
Internal power supply via the Control Supply Module (CSM)
178
Guidelines for machine configuration
System Manual, MA 01/2013, 6FC5397-6CP10-0BA2
9
Table of contents
8.1.2.1
Connection
180
8.1.2.2
Single operation
181
8.1.2.3
Parallel operation
182
8.2
Connection of a SINAMICS Control Unit CU320-2
187
8.3
Connection of line modules
189
8.3.1
Introduction
189
8.3.2
Safety instructions for Line Modules Booksize
192
8.3.3
Active Line Modules with internal air cooling
197
8.3.3.1
Description
197
8.3.3.2
Interface description
198
8.3.3.3
Connection example
203
8.3.3.4
Meaning of LEDs
204
8.3.3.5
Dimension drawings
205
8.3.3.6
Installation
209
8.3.3.7
Technical specifications
211
8.3.4
Active Line Modules with external air cooling
217
8.3.4.1
Description
217
8.3.4.2
Interface description
218
8.3.4.3
Connection example
223
8.3.4.4
Meaning of LEDs
224
8.3.4.5
Dimension drawings
225
8.3.4.6
Installation
228
8.3.4.7
Technical data
234
8.3.5
Active Line Modules with cold plate
240
8.3.5.1
Description
240
8.3.5.2
Interface description
241
8.3.5.3
Connection example
245
8.3.5.4
Meaning of LEDs
246
8.3.5.5
Dimension drawings
247
8.3.5.6
Installation
249
8.3.5.7
Technical specifications
252
8.3.6
Active Line Modules Liquid Cooled
257
8.3.6.1
Description
257
8.3.6.2
Interface description
258
8.3.6.3
Connection example
262
8.3.6.4
Meaning of LEDs
263
8.3.6.5
Dimension drawing
264
8.3.6.6
Installation
265
8.3.6.7
Technical specifications
266
8.3.7
Smart Line Modules with internal air cooling
270
8.3.7.1
Description
270
8.3.7.2
Product-specific safety information for the Smart Line Modules in booksize format
271
8.3.7.3
Interface description
273
8.3.7.4
Connection examples
283
8.3.7.5
Meaning of LEDs
285
8.3.7.6
Dimension drawings
287
8.3.7.7
Installation
291
8.3.7.8
Technical specifications
292
8.3.8
Smart Line Modules with external air cooling
295
8.3.8.1
Description
295
8.3.8.2
Product-specific safety information for the Smart Line Modules in booksize format
296
Guidelines for machine configuration
10
System Manual, MA 01/2013, 6FC5397-6CP10-0BA2
Table of contents
8.3.8.3
Interface description
298
8.3.8.4
Connection examples
308
8.3.8.5
Meaning of LEDs
310
8.3.8.6
Dimension drawings
312
8.3.8.7
Installation
316
8.3.8.8
Technical specifications
321
8.3.9
Smart Line Modules with cold plate
324
8.3.9.1
Description
324
8.3.9.2
Product-specific safety information for the Smart Line Modules in booksize format
325
8.3.9.3
Interface description
327
8.3.9.4
Connection example
331
8.3.9.5
Meaning of LEDs
332
8.3.9.6
Dimension drawings
333
8.3.9.7
Installation
334
8.3.9.8
Technical data
336
8.4
Connection of motor modules
341
8.4.1
Safety instructions for Motor Modules Booksize
341
8.4.2
Motor Modules with internal air cooling
345
8.4.2.1
Description
345
8.4.2.2
Interface description
346
8.4.2.3
Connection examples
353
8.4.2.4
Meaning of LEDs
355
8.4.2.5
Dimension drawings
356
8.4.2.6
Installation
361
8.4.2.7
Technical specifications
363
8.4.3
Motor Module with external air cooling
369
8.4.3.1
Description
369
8.4.3.2
Interface description
370
8.4.3.3
Connection examples
377
8.4.3.4
Meaning of LEDs
379
8.4.3.5
Dimension drawings
380
8.4.3.6
Mounting
385
8.4.3.7
Technical data
392
8.4.4
Motor Modules with cold plate
398
8.4.4.1
Description
398
8.4.4.2
Interface description
399
8.4.4.3
Connection examples
405
8.4.4.4
Meaning of LEDs
407
8.4.4.5
Dimension drawings
408
8.4.4.6
Mounting
412
8.4.4.7
Technical specifications
415
8.4.5
Motor Modules Liquid Cooled
421
8.4.5.1
Description
421
8.4.5.2
Interface description
422
8.4.5.3
Connection example
426
8.4.5.4
Meaning of LEDs
427
8.4.5.5
Dimension drawing
428
8.4.5.6
Installation
429
8.4.5.7
Technical specifications
430
8.5
DRIVE-CLiQ Hub Modules (DMC20, DME20)
435
8.5.1
DMC20
435
Guidelines for machine configuration
System Manual, MA 01/2013, 6FC5397-6CP10-0BA2
11
Table of contents
8.5.1.1
Description
435
8.5.1.2
Overview
435
8.5.1.3
Electronics power supply X524
436
8.5.1.4
DRIVE-CLiQ interface
436
8.5.1.5
Significance of the LED on the DMC20
437
8.5.1.6
Dimension drawing
437
8.5.1.7
Technical data
438
8.5.2
DME20
438
8.5.2.1
Description
438
8.5.2.2
Safety information
438
8.5.2.3
Overview
439
8.5.2.4
Electronics power supply X524
440
8.5.2.5
DRIVE-CLiQ interface
440
8.5.2.6
Cable lengths
441
8.5.2.7
Specifications for use with UL approval
441
8.5.2.8
Dimension drawing
443
8.5.2.9
Installation
444
8.5.2.10
Technical data
444
8.6
Connecting Terminal Modules
445
8.6.1
TM15: Terminal expansion for digital inputs/outputs
445
8.6.2
TM41: Emulating an incremental encoder
445
8.6.3
TM120: DRIVE-CLiQ component for temperature evaluation with safe electrical
separation
446
8.7
Sensor Systems Connection
447
8.7.1
Introduction
447
8.7.2
Overview of Sensor Modules
448
8.7.3
X200-X203 DRIVE-CLiQ interface
450
8.7.4
Examples of encoder connections
451
8.8
Motor Connection
452
8.8.1
Motor connection plug
452
8.8.1.1
Introducing the motor connector
452
8.8.1.2
Installation of the motor connection plug with locking mechanism
452
8.8.1.3
Installation of the motor connection plug with screwed joint
455
8.8.1.4
Removing the motor connector plug from prefabricated power cables
456
8.8.2
Brake connection
457
8.8.2.1
General Notes
457
8.8.2.2
Motor and brake connection
457
8.8.2.3
Connection of the Brake Directly on the Motor Module
459
8.8.2.4
Connection of the Brake using Interface Relay
460
8.8.2.5
Brake Control
461
8.8.3
X21/X22 EP terminals / temperature sensor Motor Module
466
8.9
Voltage Protection Module (VPM), external
467
8.10
Cables
471
8.10.1
General information
471
8.10.2
Cable shielding and routing
471
8.10.3
Equipotential Bonding
473
8.10.4
Protective Ground Connection
473
8.10.5
Maximum cable lengths
474
8.11
DRIVE-CLiQ cabinet bushings
475
Guidelines for machine configuration
12
System Manual, MA 01/2013, 6FC5397-6CP10-0BA2
Table of contents
8.11.1 Description
475
8.11.2 Interface description
476
8.11.2.1 Overview
476
8.11.3 Dimension drawings
477
8.11.4 Installation
478
8.11.4.1 DRIVE-CLiQ cabinet bushing for cables with RJ45 connectors
478
8.11.4.2 DRIVE-CLiQ cabinet bushing for cables with M12 plug/socket
480
8.11.5 Technical data
481
9
Safety Integrated
483
9.1
Safety Integrated terminology
483
9.2
SINAMICS Safety Integrated
485
9.2.1
Safety functions
485
9.2.2
Basic Functions
486
9.2.2.1
Safe Torque Off (STO)
486
9.2.2.2
Safe Stop 1 (SS1)
494
9.2.2.3
Safe Brake Control (SBC)
495
9.3
SINUMERIK Safety Integrated
497
9.3.1
Safety functions
497
9.3.2
Connecting safe sensors and actuators to the SINUMERIK
498
10
Signal Interconnection
503
11
Typical circuit diagrams
505
12
Activate/Deactivate Drive System
507
12.1
Overview of the Status Signals
507
12.2
Drive Group with Several Axes
508
A
Appendix
513
A.1
Screw terminals
513
A.2
Spring-loaded terminals
515
A.3
Power loss of components
516
A.3.1
Power Loss of the SINUMERIK Components
516
A.3.2
Power loss of SINAMICS components
516
A.3.2.1
Power loss for Control Units, Sensor Modules, and other system components
516
A.3.2.2
Power loss for line filters and line reactors
517
A.3.2.3
Power loss for power units with internal air cooling
518
A.3.2.4
Power loss for power units with external air cooling
520
A.3.2.5
Power loss for power units with cold plate
521
A.3.2.6
Power loss for liquid-cooled power units
522
A.3.3
Electronics losses of power units
523
A.3.4
Losses for power units in the partial load range
525
A.3.5
Typical power losses for Motor Modules
526
A.4
Abbreviations
528
Index
531
Guidelines for machine configuration
System Manual, MA 01/2013, 6FC5397-6CP10-0BA2
13
Table of contents
Guidelines for machine configuration
14
System Manual, MA 01/2013, 6FC5397-6CP10-0BA2
Fundamental safety instructions
1
1.1
General safety instructions
DANGER
Danger to life when live parts are touched
Death or serious injury can result when live parts are touched.
• Only work on electrical devices when you are qualified for this job.
• Always observe the country-specific safety rules.
Generally, six steps apply when establishing safety:
1. Prepare for shutdown and notify all those who will be affected by the procedure.
2. Disconnect the machine from the supply.
- Switch off the machine.
- Wait until the discharge time specified on the warning labels has elapsed.
- Check that it really is in a no-voltage condition, from phase conductor to phase
conductor and phase conductor to protective conductor.
- Check whether the existing auxiliary supply circuits are de-energized.
- Ensure that the motors cannot move.
3. Identify all other hazardous energy sources, e.g. compressed air, hydraulic systems,
water.
4. Isolate or neutralize all hazardous energy sources, e.g. by closing switches, grounding
or short-circuiting or closing valves.
5. Secure the energy sources against switching on again.
6. Make sure that the right machine is completely locked.
After you have completed the work, restore the operational readiness in the inverse
sequence.
WARNING
Danger to life through a hazardous voltage when connecting an unsuitable power supply
Death or serious injury can result when live parts are touched in the event of a fault.
• Only use power supplies that provide SELV (Safety Extra Low Voltage) or PELV-
(Protective Extra Low Voltage) output voltages for all connections and terminals of the
electronics modules.
Guidelines for machine configuration
System Manual, MA 01/2013, 6FC5397-6CP10-0BA2
15
Fundamental safety instructions
1.1 General safety instructions
WARNING
Danger to life when live parts are touched on damaged devices
Improper handling of devices can cause damage.
Hazardous voltages can be present at the housing or exposed components on damaged
devices.
• Ensure compliance with the limit values specified in the technical data during transport,
storage and operation.
• Do not use any damaged devices.
• Protect the components against conductive pollution, e.g., by installing them in a control
cabinet with IP54 degree of protection according to IEC 60529 or NEMA 12. Provided
conductive pollution can be prevented at the installation site, the degree of protection for
the cabinet can be decreased accordingly.
WARNING
Danger of fire spreading due to inadequate housing
Fire and smoke development can cause severe personal injury or material damage.
• Install devices without a protective housing in a metal control cabinet (or protect the
device by another equivalent measure) in such a way that contact with fire inside and
outside the device is prevented.
• Additionally, select the installation site so that an uncontrolled spreading of smoke can
be avoided in the case of a fire.
• Ensure that smoke can escape via designated paths.
WARNING
Danger to life through unexpected movement of machines when using mobile wireless
devices or mobile phones
Using mobile wireless devices or mobile phones with a transmitter power > 1 W closer than
approx. 2 m to the components may cause the devices to malfunction and influence the
functional safety of machines, therefore putting people at risk or causing material damage.
• Switch the wireless devices or mobile phones off in the immediate vicinity of the
components.
WARNING
Fire hazard for the motor due to overload of the insulation
There is a greater load on the motor insulation through a ground fault in an IT system. A
possible result is the failure of the insulation with a risk for personnel through smoke
development and fire.
• Use a monitoring device that signals an insulation fault.
• Correct the fault as quickly as possible so the motor insulation is not overloaded.
Guidelines for machine configuration
16
System Manual, MA 01/2013, 6FC5397-6CP10-0BA2
Fundamental safety instructions
1.1 General safety instructions
WARNING
Fire hazard due to overheating because of inadequate ventilation clearances
Inadequate ventilation clearances can cause overheating with a risk for personnel through
smoke development and fire. This can also result in increased downtime and reduced
service lives for devices / systems.
• Ensure compliance with the specified minimum clearance as ventilation clearance for
the respective component. They can be found in the dimension drawings or in the
"Product-specific safety instructions" at the start of the respective section.
WARNING
Danger to life through electric shock due to unconnected cable shields
Hazardous touch voltages can occur through capacitive cross-coupling due to unconnected
cable shields.
• Connect cable shields and unused conductors of power cables (e.g., brake conductors)
at least on one side to the grounded housing potential.
WARNING
Danger to life when safety functions are inactive
Safety functions that are inactive or that have not been adjusted accordingly can cause
operational faults on machines that could lead to serious injury or death.
• Observe the information in the appropriate product documentation before
commissioning.
• Carry out a safety inspection for functions relevant to safety on the entire system,
including all safety-related components.
• Ensure that the safety functions used in your drives and automation tasks are adjusted
and activated through appropriate parameterizing
• Run a function test.
• Only put your plant into live operation once you have guaranteed that the functions
relevant to safety are running correctly.
Note
Important safety notices for safety functions
If you want to use safety functions, you must observe the safety notices in the safety
manuals.
Guidelines for machine configuration
System Manual, MA 01/2013, 6FC5397-6CP10-0BA2
17
Fundamental safety instructions
1.2 Safety instructions for electromagnetic fields (EMF)
1.2
Safety instructions for electromagnetic fields (EMF)
WARNING
Danger to life from electromagnetic fields
Electromagnetic fields (EMF) are generated by the operation of electrical power equipment
such as transformers, converters or motors.
People with pacemakers or implants are at a special risk in the immediate vicinity of these
devices/systems.
• Keep a distance of at least 2 m.
1.3
Handling electrostatic sensitive devices (ESD)
Electrostatic sensitive devices (ESD) are individual components, integrated circuits, modules
or devices that may be damaged by either electric fields or electrostatic discharge.
NOTICE
Damage through electric fields or electrostatic discharge
Electric fields or electrostatic discharge can cause malfunctions through damaged
individual components, integrated circuits, modules or devices.
• Only pack, store, transport and send electronic components, modules or devices in their
original packaging or in other suitable materials, e.g conductive foam rubber of
aluminum foil.
• Only touch components, modules and devices when you are grounded by one of the
following methods:
- Wearing an ESD wrist strap
- Wearing ESD shoes or ESD grounding straps in ESD areas with conductive flooring
• Only place electronic components, modules or devices on conductive surfaces (table
with ESD surface, conductive ESD foam, ESD packaging, ESD transport container).
Guidelines for machine configuration
18
System Manual, MA 01/2013, 6FC5397-6CP10-0BA2
Fundamental safety instructions
1.4 Residual risks of power drive systems
1.4
Residual risks of power drive systems
Residual risks of power drive systems
The control and drive components of a drive system are approved for industrial and
commercial use in industrial line supplies. Their use in public line supplies requires a
different configuration and/or additional measures.
These components may only be operated in closed housings or in higher-level control
cabinets with protective covers that are closed, and when all of the protective devices are
used.
These components may only be handled by qualified and trained technical personnel who
are knowledgeable and observe all of the safety instructions on the components and in the
associated technical user documentation.
When assessing the machine's risk in accordance with the respective local regulations (e.g.,
EC Machinery Directive), the machine manufacturer must take into account the following
residual risks emanating from the control and drive components of a drive system:
1. Unintentional movements of driven machine components during commissioning,
operation, maintenance, and repairs caused by, for example:
- Hardware defects and/or software errors in the sensors, controllers, actuators, and
connection technology
- Response times of the controller and drive
- Operating and/or ambient conditions outside of the specification
- Condensation / conductive contamination
- Parameterization, programming, cabling, and installation errors
- Use of radio devices / cellular phones in the immediate vicinity of the controller
- External influences / damage
2. In the event of a fault, exceptionally high temperatures, including an open fire, as well as
emissions of light, noise, particles, gases, etc. can occur inside and outside the inverter,
e.g.:
- Component malfunctions
- Software errors
- Operating and/or ambient conditions outside of the specification
- External influences / damage
Inverters of the Open Type / IP20 degree of protection must be installed in a metal control
cabinet (or protected by another equivalent measure) such that the contact with fire inside
and outside the inverter is not possible.
Guidelines for machine configuration
System Manual, MA 01/2013, 6FC5397-6CP10-0BA2
19
Fundamental safety instructions
1.4 Residual risks of power drive systems
3. Hazardous shock voltages caused by, for example:
- Component malfunctions
- Influence of electrostatic charging
- Induction of voltages in moving motors
- Operating and/or ambient conditions outside of the specification
- Condensation / conductive contamination
- External influences / damage
4. Electrical, magnetic and electromagnetic fields generated in operation that can pose a
risk to people with a pacemaker, implants or metal replacement joints, etc. if they are too
close.
5. Release of environmental pollutants or emissions as a result of improper operation of the
system and/or failure to dispose of components safely and correctly.
Note
The components must be protected against conductive contamination (e.g. by installing them
in a control cabinet with degree of protection IP54 according to IEC 60529 or NEMA 12).
Assuming that conductive contamination at the installation site can definitely be excluded, a
lower degree of cabinet protection may be permitted.
For more information about residual risks of the components in a drive system, see the
relevant sections in the technical user documentation.
Guidelines for machine configuration
20
System Manual, MA 01/2013, 6FC5397-6CP10-0BA2
System overview
2
2.1
Application
Features
SINUMERIK 840D sl is a universal and flexible CNC system in which the SINAMICS S120
drive system is integrated.
● Maximum performance and flexibility, above all for complex multi-axis systems.
● Uniform openness from operation up to the NC core.
● Optimum integration into networks.
● Uniform structure in respect of operation, programming and visualization.
● Integrated safety functions for man and machine: SINUMERIK Safety Integrated
● Operating and programming software such as SINUMERIK Operate and SINUMERIK
Integrate can be used for the production sector.
Fields of application
The SINUMERIK 840D sl can be used worldwide for turning, drilling, milling, grinding, laser
machining, nibbling, punching, in tool and mold making, for high-speed cutting applications,
for wood and glass processing, for handling operations, in transfer lines and rotary indexing
machines, for mass production and Job Shop production.
The SINUMERIK 840DE sl is available as an export version for use in countries requiring an
export authorization.
Guidelines for machine configuration
System Manual, MA 01/2013, 6FC5397-6CP10-0BA2
21
System overview
2.2 System configuration
2.2
System configuration
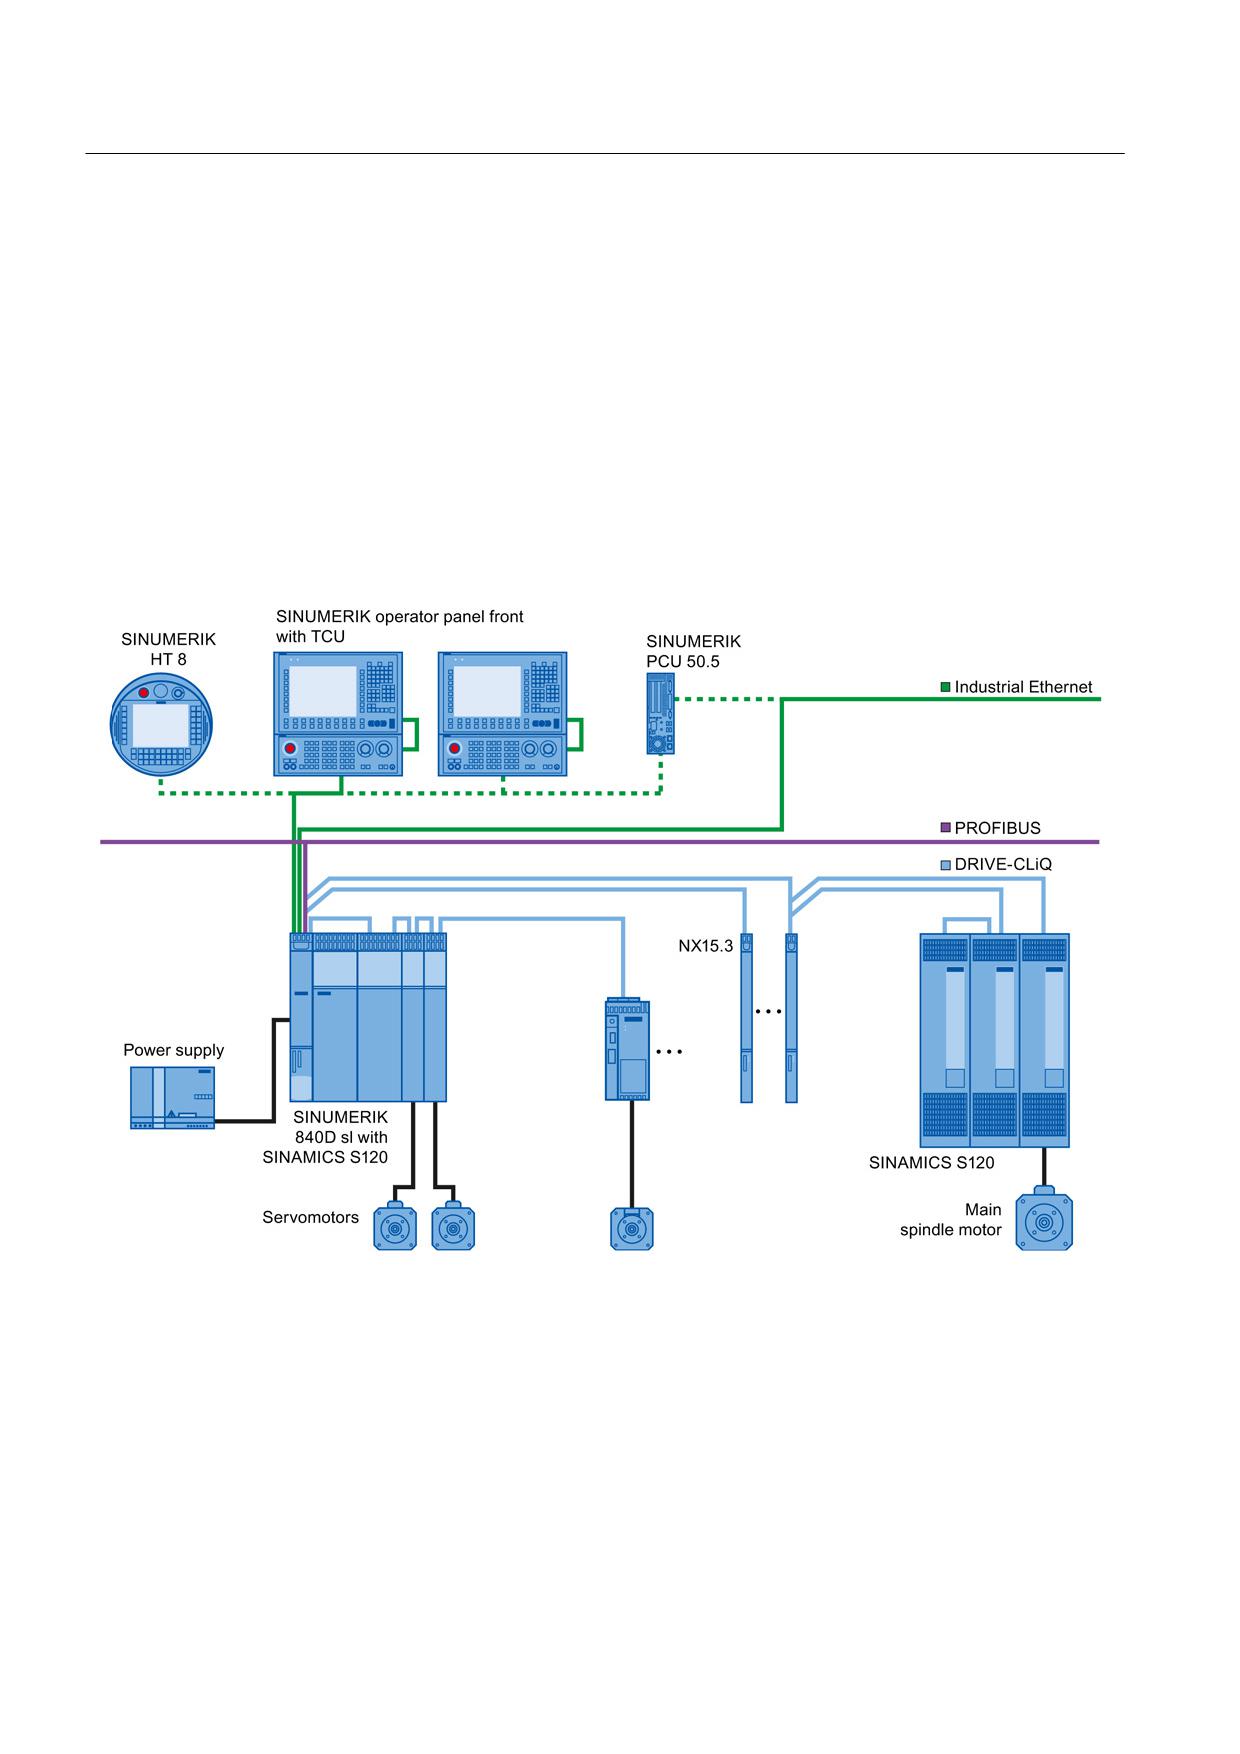
The heart of the SINUMERIK 840D sl is the Numerical Control Unit (NCU). It combines NCK,
HMI, PLC, closed-loop control and communication tasks.
Components
For operation, programming, and visualization purposes, the corresponding operating
software is already integrated into the CNC software for the NCU and therefore runs on the
high-performance NCU multi-processor module. For increased operating performance
requirements, the SINUMERIK PCU 50.5 industrial PC can be used.
With the TCU (Thin Client Unit), the operator panel can be installed as much as 100 meters
away. Up to four distributed operator panel fronts can be operated on an NCU or PCU 50.5.
Figure 2-1
Typical topology of the SINUMERIK 840D sl complete system
Guidelines for machine configuration
22
System Manual, MA 01/2013, 6FC5397-6CP10-0BA2
System overview
2.2 System configuration
The following components can be connected to the PPU:
● SINUMERIK operator panel front with TCU/PCU 50.5 and machine control
panel/pushbutton panel
● Handheld units
● SIMATIC CE panel
● SIMATIC S7-300 I/O
● Distributed PLC I/O via PROFIBUS DP connection or PROFINET IO
● Programming device
● SINAMICS S120 drive system with feed and main spindle motors, such as
- 1FT/1FK/1FN/1FW6/1FE1/2SP1 synchronous motors
- 1PH/1PM asynchronous motors
The SINUMERIK 840D sl offers integrated PROFINET functionality.
The following are supported:
● PROFINET CBA functionality (CBA = Component Based Automation)
The CBA functionality integrated in the NCU allows users to modularize machinery and
systems: Rapid real-time communication (up to 10 ms) between the controllers means
that systems lend themselves better to standardization and can be reused or expanded
more easily. Response to customer demands is faster and more flexible and startup is
simplified and speeded up by pretesting at component level.
● PROFINET IO
As part of PROFINET, PROFINET IO is a communication concept that is used to
implement modular, distributed applications. PROFINET IO is based on Industrial
Ethernet and allows distributed field and I/O equipment to be connected to the central
processing unit.
128 PROFINET IO devices can be operated on the NCU as an IO controller.
Guidelines for machine configuration
System Manual, MA 01/2013, 6FC5397-6CP10-0BA2
23
System overview
2.3 Variants
2.3
Variants
Thanks to the scalability of the hardware and software, both in the controller and operating
areas, the SINUMERIK 840D sl can be used in many sectors. The possibilities range from
simple positioning tasks up to complex multi-axis systems.
Application areas and performance
● Up to eight axes can be implemented on an NCU 710.3 PN in SERVO control mode, with
a sampling time of 125 µs for both the speed and current controllers. In order to achieve
this maximum number of axes, the NCU 710.3 PN must be extended by up to two NX
modules.
Note
Connection of SINAMICS S120 Combi
An NCU 710.3 PN is required in order to use a SINAMICS S120 Combi drive system.
This version is not discussed in this document.
● On the NCU 720.3 PN/730.3 PN, the number of axes can be increased to as many as 31
and/or the drive control performance can be improved in SERVO control mode, with a
sampling time of 125 µs for both the speed and current controllers. This is achieved by
using the NX10.3/NX15.3 module. The NCU 720.3 PN/730.3 PN can be extended by up
to five NX10.3/NX15.3 modules for the purposes of drive control performance and
number of axes.
● Using the Option Board CBE30-2, three NCU 7x0.3 PN can be linked to each other by
means of the NCU link functionality, so that 93 axes in total can be controlled by an NCU.
● The NCU 730.3 PN is recommended for maximum dynamics and accuracy in mold
making applications or the high-speed cutting sector. Since it has the highest PLC
capacity, it represents the most advanced configuration within the SINUMERIK 840D sl
range.
Further information
Please refer to the following for detailed information on the number of axes and controller
axis performance:
/FH1/ SINAMICS S120 Function Manual Drive Functions, 01/2012 edition, Chapter 12.12.
Guidelines for machine configuration
24
System Manual, MA 01/2013, 6FC5397-6CP10-0BA2
System overview
2.4 SINAMICS S120 / SINUMERIK 840D sl Component Overview
2.4
SINAMICS S120 / SINUMERIK 840D sl Component Overview
Introduction
Coordinated drives that carry out a drive and motion task together are used in many
mechanical and plant engineering applications. These require drives with a coupled DC link,
which allows for cost-saving energy compensation between braking and driving axes.
SINAMICS S120 features Line Modules (infeed modules) and Motor Modules (inverter
modules) covering a wide performance range which, having been designed in booksize
format for seamless installation, pave the way for compact multi-axis drive configurations.
The SINAMICS S120 control module, the CU320-2 Control Unit, is able to handle simple
technological tasks by itself. For challenging numerical tasks, it is replaced by or extended to
include powerful modules from the SINUMERIK 840D sl product range.
The SINUMERIK NCU 7x0.3 PN Numerical Control Units can be positioned in or next to the
SINAMICS S120 drive line-up and connected via DRIVE-CLiQ.
In the case of tasks that require a greater number of motion axes due to the machine
kinematics, the system base units can be expanded with the additional NX10.3/NX15.3
Control Units.
Guidelines for machine configuration
System Manual, MA 01/2013, 6FC5397-6CP10-0BA2
25
System overview
2.4 SINAMICS S120 / SINUMERIK 840D sl Component Overview
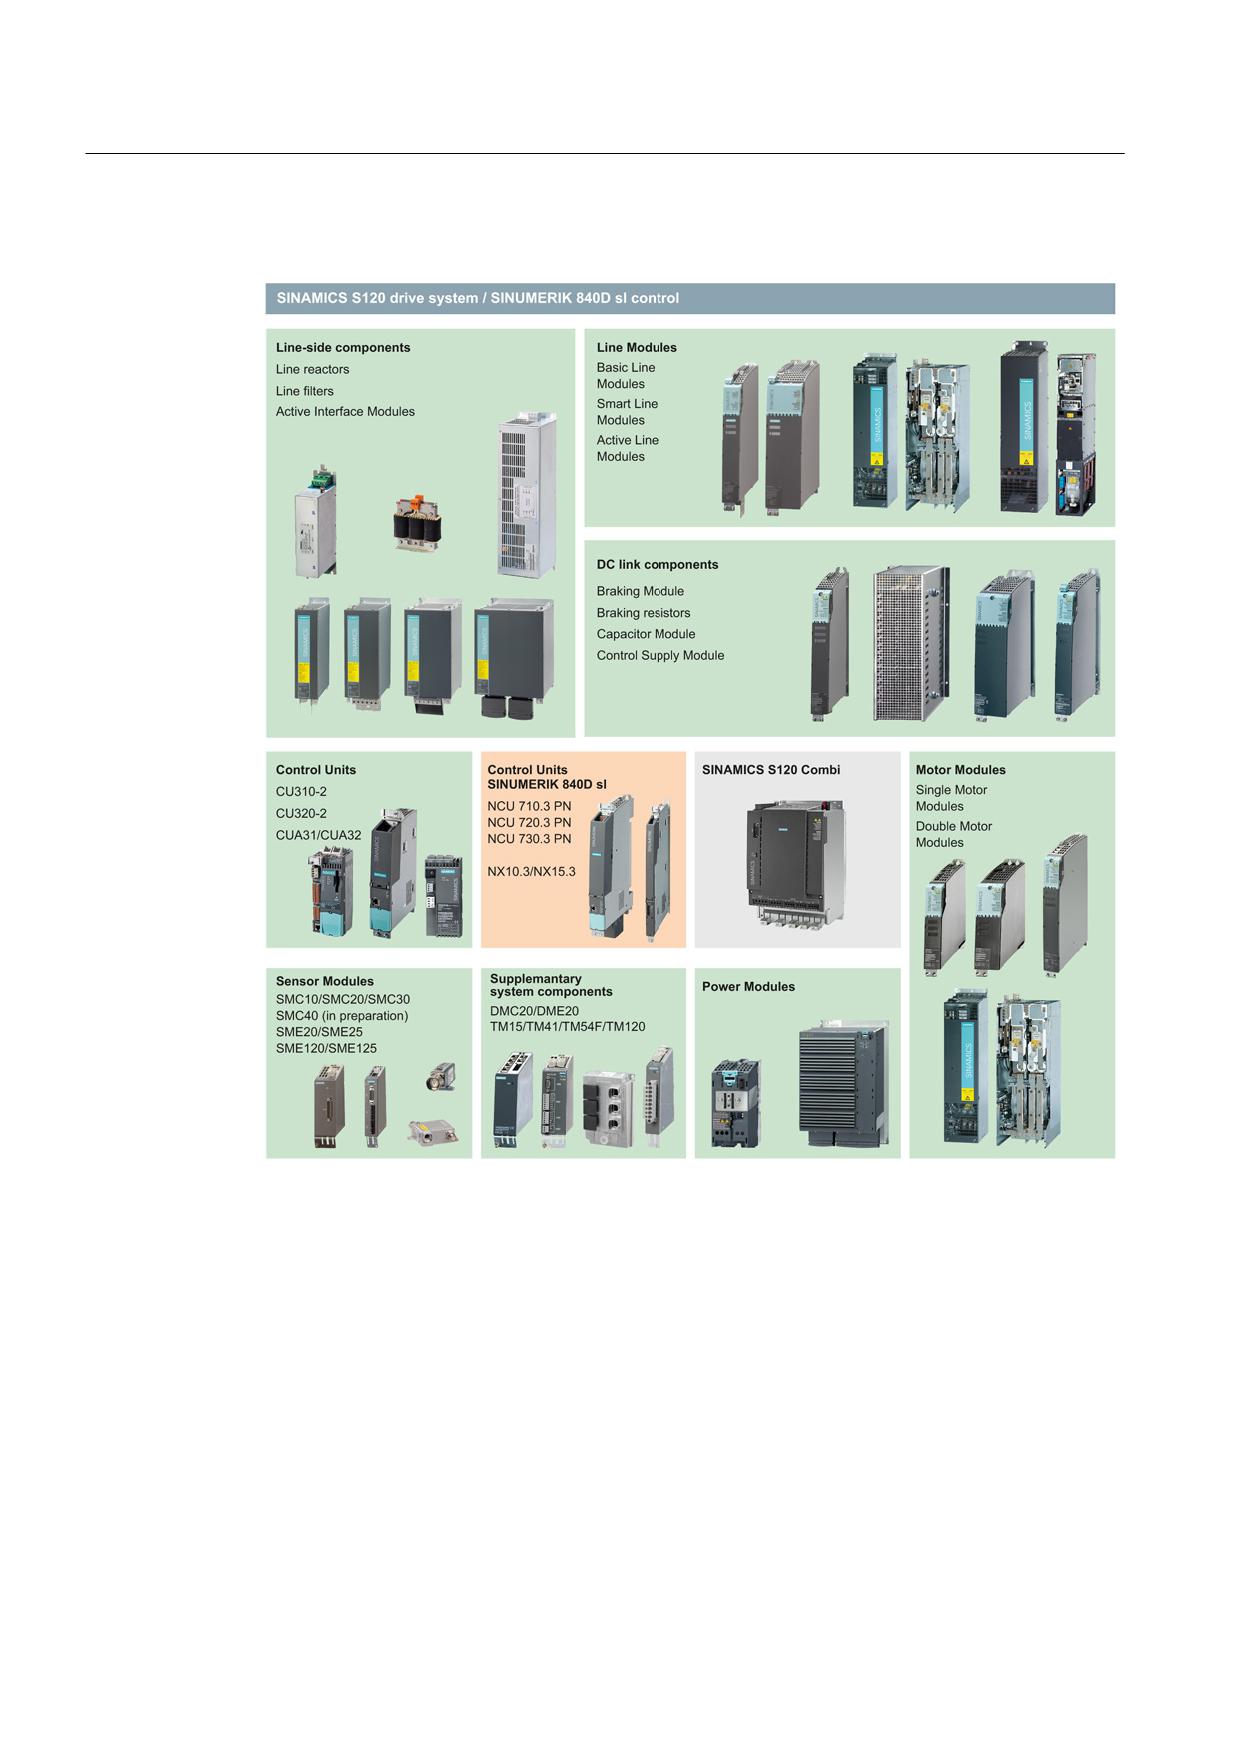
Components of the SINAMICS S120 drive system and SINUMERIK 840D sl control
Figure 2-2
SINAMICS and SINUMERIK components
Guidelines for machine configuration
26
System Manual, MA 01/2013, 6FC5397-6CP10-0BA2
System overview
2.4 SINAMICS S120 / SINUMERIK 840D sl Component Overview
Function of components
● Line-side power components such as fuses, contactors, reactors, and filters are used for
switching the energy supply and meeting EMC requirements.
● Line Modules generate DC voltage from the three-phase line voltage, and transfer the
central energy supply to the DC link and, if necessary, the regenerative feedback to the
network.
- Basic Line Modules (BLM) generate a non-stabilized DC link voltage and are not
capable of regenerative feedback. They are not generally used for multi-axis drive
configurations.
- Smart Line Modules generate a non-stabilized DC link voltage and are capable of
regenerative feedback.
- Active Line Modules generate a stabilized DC link voltage and are capable of
regenerative feedback.
● DC link components such as Braking Modules and Capacitor Modules are used as an
option for the purpose of stabilizing the DC link voltage.
● Motor Modules work as inverters. They draw their power from the DC link and supply the
connected motors.
● Additional system components expand the range of functions and cover different
interfaces for encoders and process signals.
● The Control Unit processes cross-axis drive and technological functions.
Overview
The table below only takes into account those SINAMICS S120 booksize format components
that are supported by SINUMERIK 840D sl.
Table 2- 1
SINAMICS and SINUMERIK components (selection)
Product family
Component group
Component/function
Types
SINUMERIK
Numerical Control Units
Control center
• NCU 710.3 PN
• NCU 720.3 PN
• NCU 730.3 PN
SINUMERIK
Numeric Control Extensions
Expansion modules for the NCU
• NX10.3
(computing power and DRIVE-
• NX15.3
CLiQ interfaces)
SINUMERIK
Operating unit
Industrial PC
• PCU 50.5
SINUMERIK
Operating unit
Thin Client Unit
• TCU
SINUMERIK
Operator panels
Operator panels with display and
• OP 08T
keyboard that can be connected
• OP 010/OP 010S/OP 010C
as distributed components
• OP 012
• OP 015/OP 015A/OP 015AT
• TP 015A/TP 015AT
• OP 019
Guidelines for machine configuration
System Manual, MA 01/2013, 6FC5397-6CP10-0BA2
27
System overview
2.4 SINAMICS S120 / SINUMERIK 840D sl Component Overview
Product family
Component group
Component/function
Types
SINUMERIK
Communication Board
CBE for NCU link
•
CBE30-2
Ethernet (CBE)
SINAMICS
Line-side components
Active Interface Module
•
16 kW
S120 Booksize
•
36 kW
•
55 kW
•
80 kW
•
120 kW
SINAMICS
Line-side components
High frequency line reactor with a
•
16 kW
S120 Booksize
damping resistor (HFD reactor) for
•
36 kW
ALM
•
55 kW
•
80 kW
•
120 kW
SINAMICS
Line-side components
Line reactor for SLM
•
5 kW
S120 Booksize
•
10 kW
•
16 kW
•
36 kW
•
55 kW
SINAMICS
Line-side components
Basic Line Filter for ALM
•
16 kW
S120 Booksize
•
36 kW
•
55 kW
SINAMICS
Line-side components
Wideband Line Filter for ALM
•
16 kW
S120 Booksize
•
36 kW
•
55 kW
•
80 kW
•
120 kW
SINAMICS
Line-side components
Line filters for SLM
•
5 kW
S120 Booksize
•
10 kW
•
16 kW
•
36 kW
•
55 kW
SINAMICS
Line Modules
Active Line Module (ALM)
•
16 kW
S120 Booksize
•
36 kW
•
55 kW
•
80 (64) kW
•
120 (84) kW
Guidelines for machine configuration
28
System Manual, MA 01/2013, 6FC5397-6CP10-0BA2
System overview
2.4 SINAMICS S120 / SINUMERIK 840D sl Component Overview
Product family
Component group
Component/function
Types
SINAMICS
Line Modules
Smart Line Module (SLM)
•
5 kW
S120 Booksize
•
10 kW
•
16 kW
•
36 kW
•
55 kW
SINAMICS
DC link components
Braking Module (BM)
•
1.5 kW/100 kW
S120 Booksize
SINAMICS
DC link components
Braking resistors
•
0.3 kW/25 kW
•
1.5 kW/100 kW
•
5 kW/30 kW
•
12.5 kW/75 kW
SINAMICS
DC link components
Capacitor Module
•
4000 μF
SINAMICS
DC link components
Control Supply Module (CSM)
•
3 AC 380 ... 480 V
SINAMICS
Control units
Control Unit for more
•
CU320-2 PN
straightforward functions
•
CU320-2 DP
SINAMICS
Motor Modules
Single Motor Module (SMM)
•
3 A/5 A/9 A/18 A/30 A/45 A/60
A/85 A/132 A/200 A
SINAMICS
Motor Modules
Double Motor Module (DMM)
•
2x3 A/2x5 A/2x9 A/2x18 A
SINAMICS
Sensor Modules
Sensor Modules Cabinet
•
SMC10/SMC20/SMC30
SMC40 (in development)
SINAMICS
Sensor Modules
Sensor Modules External
•
SME20/SME25
•
SME120/SME125
SINAMICS
DRIVE-CLiQ hubs
DRIVE-CLiQ hub Cabinet
•
DMC20
SINAMICS
DRIVE-CLiQ hubs
External DRIVE-CLiQ hub
•
DME20
SINAMICS
Terminal Modules
Terminal expansion
•
TM15
SINAMICS
Terminal Modules
Emulating an incremental encoder
•
TM41
SINAMICS
Terminal Modules
Temperature sensor evaluation
•
TM120
with safe electrical separation
SINAMICS
Voltage Protection Module
DC link voltage limit
•
VPM120
•
VPM200
•
VPM200 Dynamic
SINAMICS
Additional system component
Control Unit Adapter
•
CUA31
Guidelines for machine configuration
System Manual, MA 01/2013, 6FC5397-6CP10-0BA2
29
System overview
2.5 User interface software (HMI software)
2.5
User interface software (HMI software)
The HMI software is used to operate and program machine tools. It is available in several
versions as user interface software integrated into the CNC software:
● SINUMERIK Operate
● SINUMERIK Integrate
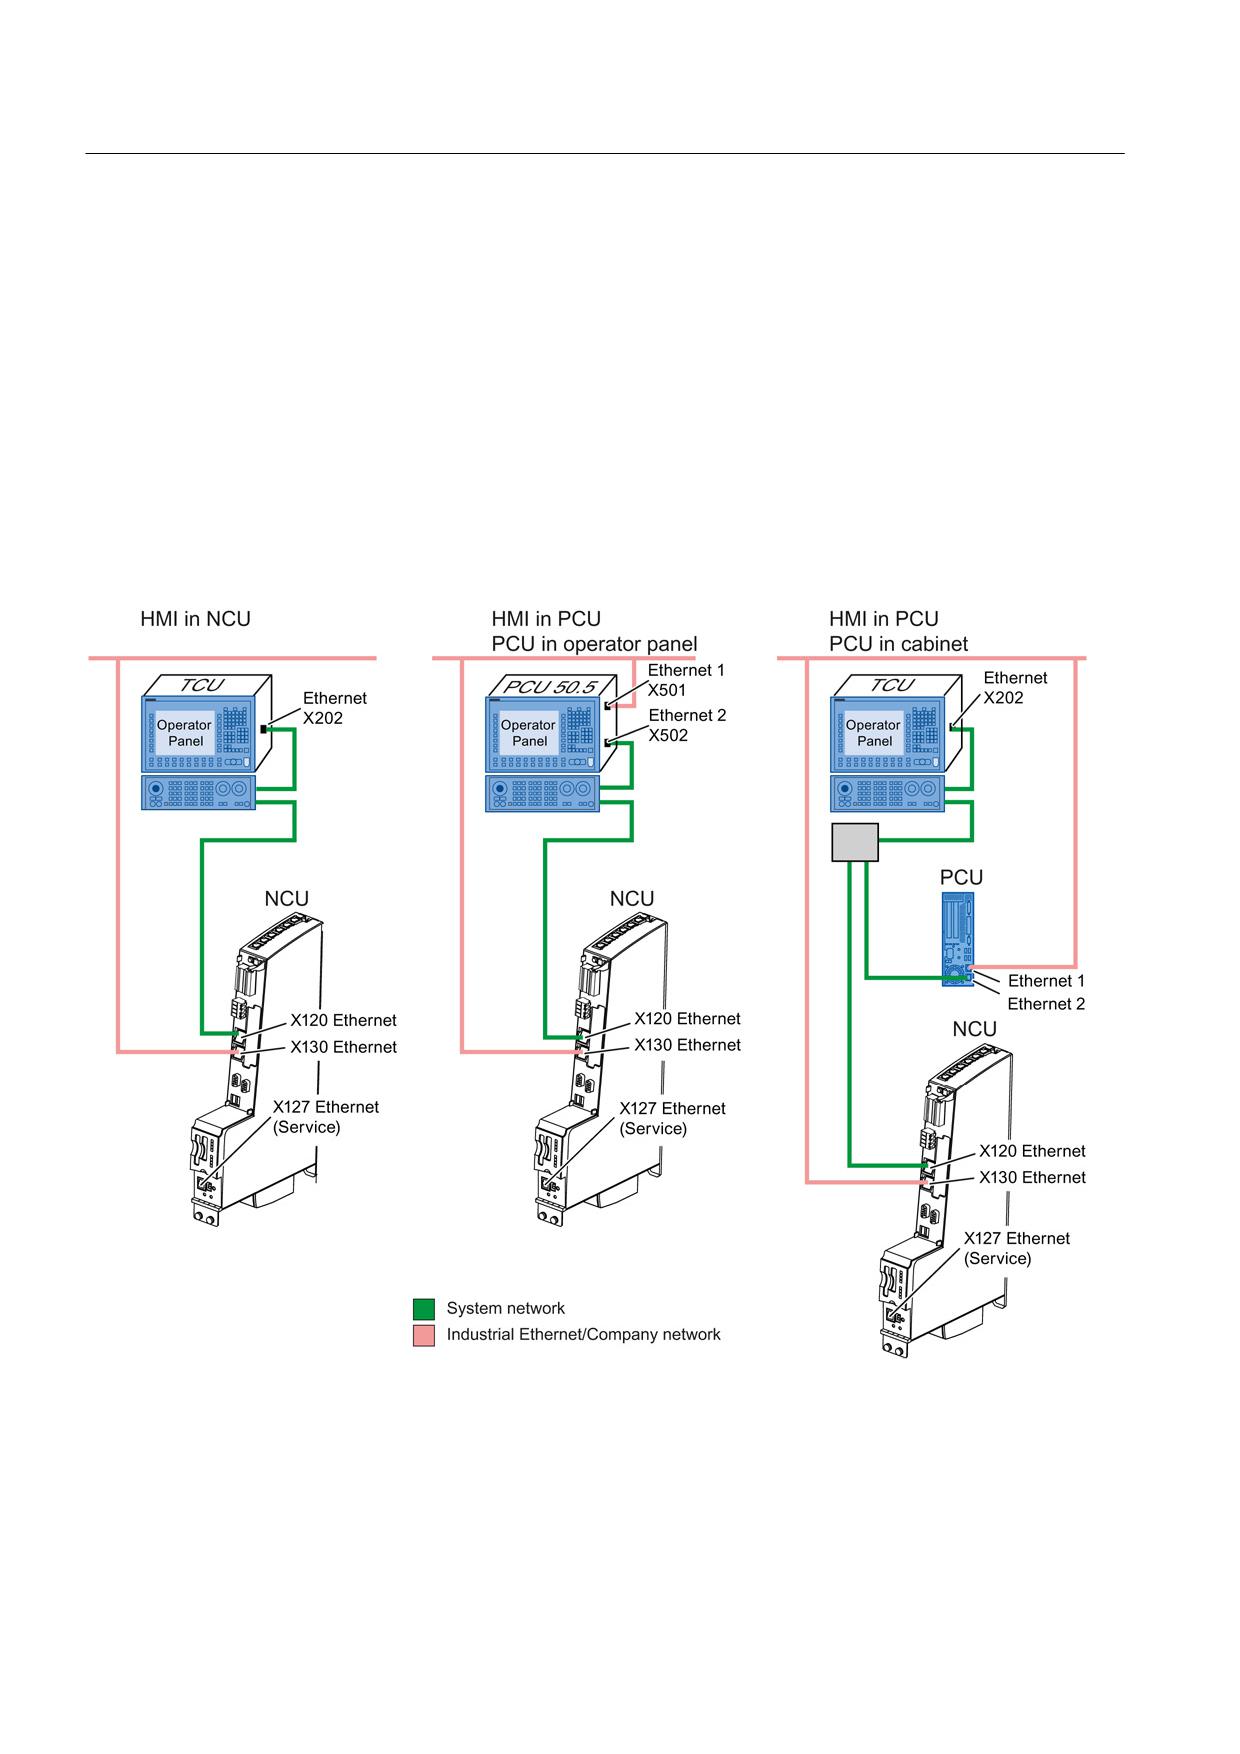
Connection of the NCU 7x0.3 to the HMI software
A Thin Client Unit (TCU) or, if higher operating performance is required, an industrial PC
PCU 50.5, is responsible for communication between the NCU and the operator panel front.
Figure 2-3
HMI software connection options
Guidelines for machine configuration
30
System Manual, MA 01/2013, 6FC5397-6CP10-0BA2
System overview
2.5 User interface software (HMI software)
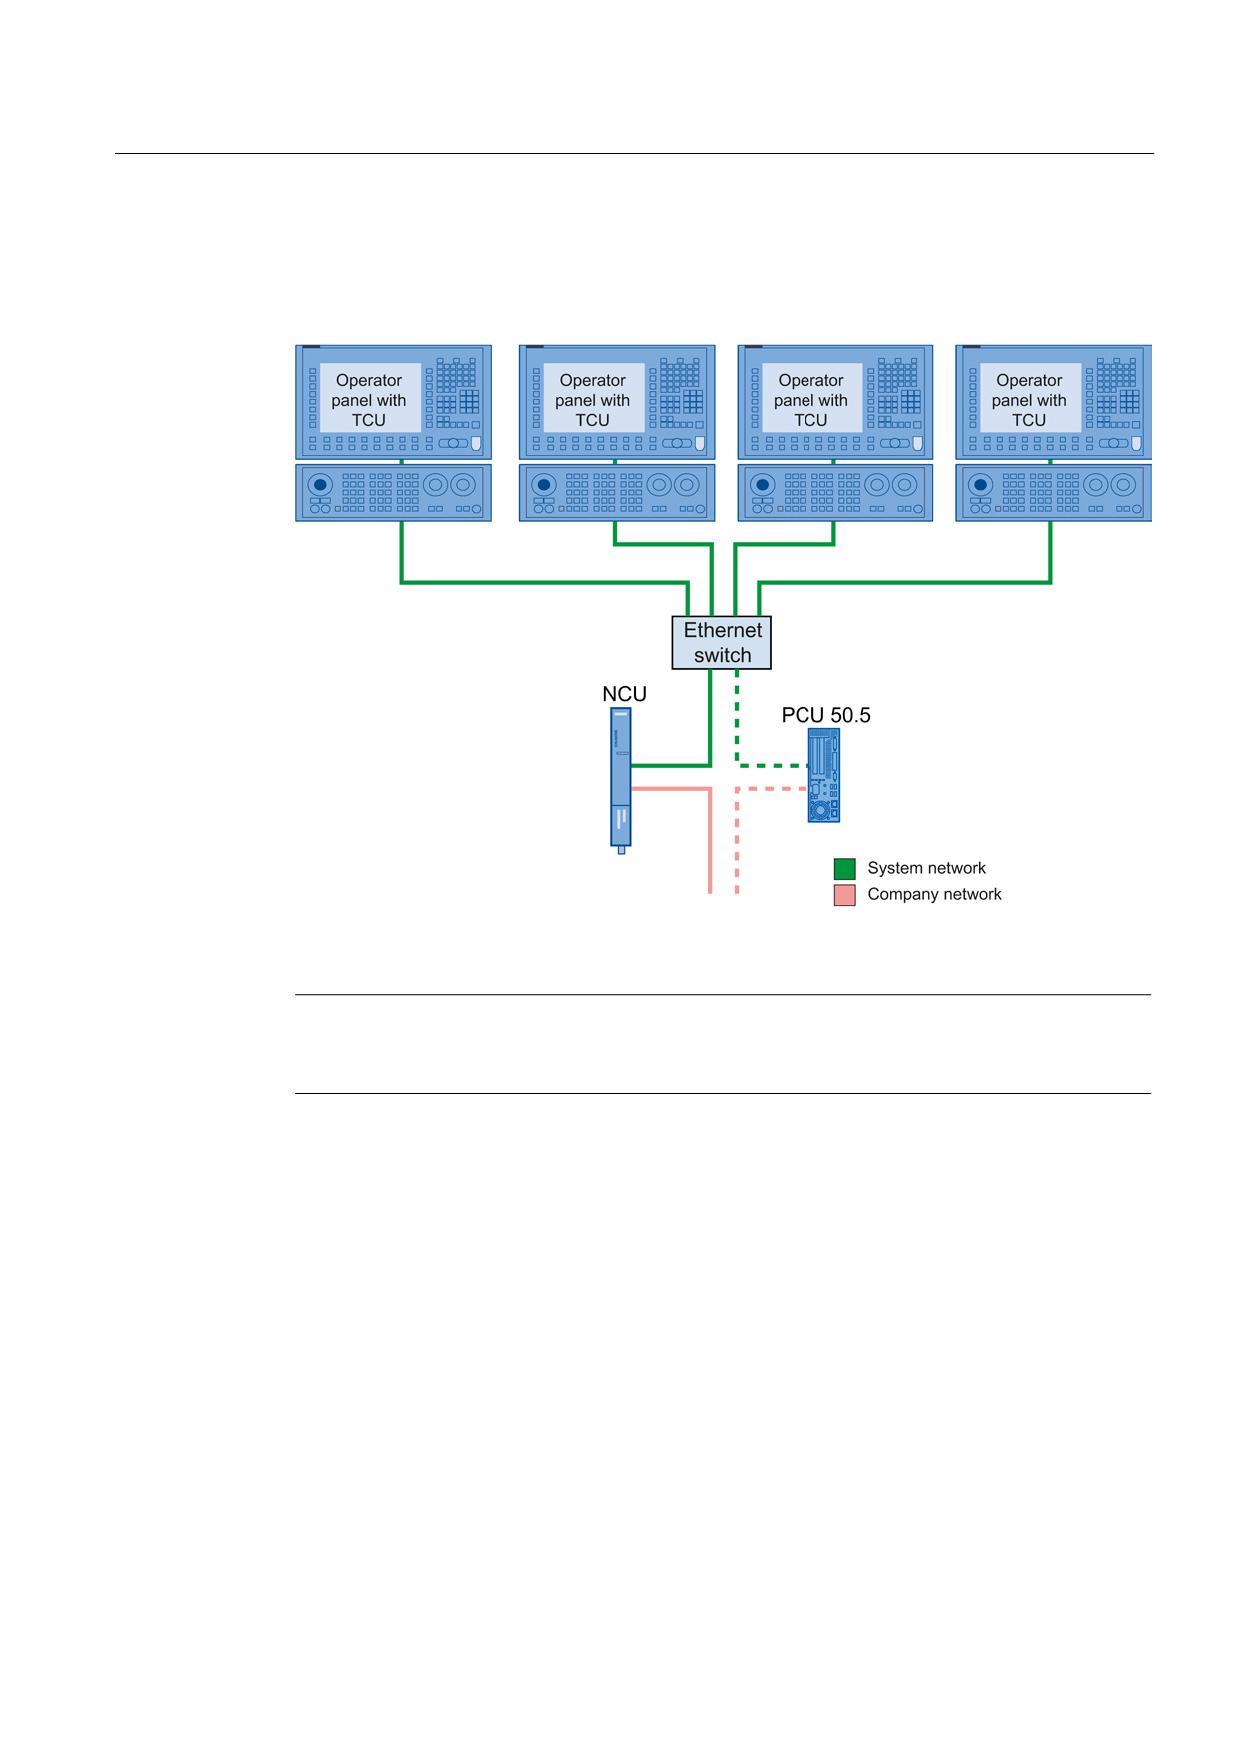
Switching between operator panels
When an Ethernet switch is used, you can switch between embedded HMI (available on
NCU) and HMI-Advanced (available on PCU 50.5).
Figure 2-4
HMI connection with switch
Note
Detailed information about the operator panels, TCU and PCU 50.5 is contained in the "sl
Operator Components Equipment Manual" and in "CNC Commissioning, Part 2 (HMI)".
Guidelines for machine configuration
System Manual, MA 01/2013, 6FC5397-6CP10-0BA2
31
System overview
2.6 Function of installation altitude and ambient temperature
2.6
Function of installation altitude and ambient temperature
The air pressure and therefore air density drop at altitudes above sea level. The same
quantity of air does not have the same cooling effect and the air clearance between two
electrical conductors can only insulate a lower voltage. Typical values for air pressure are
summarized in the table below:
Table 2- 2
Air pressure for various installation altitudes
Installation altitude above sea
0
1000
2000
3000
4000
5000
level in [m]
Air pressure in mbar [kPa]
100
90
80
70
62
54
SINUMERIK 840D sl components
The components of the SINUMERIK 840D sl system are intended for a weatherproof, fixed
location. The rated conditions exceed requirements according to EN 61131-2.
SINUMERIK components are designed for operation at ambient temperatures of 0° to 55 °C
and at installation altitudes of up to 1000 m above sea level. At altitudes of 1000 m and
higher, the max. ambient temperature decreases by 3 °C with every 1000 m increase in
altitude.
SINAMICS S120 power units
The Line Modules and Motor Modules are designed for operation at an ambient temperature
of 40 °C, installation altitudes up to 1000 m above sea level and the relevant specified pulse
frequency.
The output current must be reduced if the modules are operated at ambient temperatures
above 40 °C (see derating characteristics for the individual modules). Ambient temperatures
above 55 °C are not permissible.
The air gaps inside the devices can insulate surge voltages of surge voltage category III in
accordance with EN 60664-1 up to an installation altitude of 2000 m. At installation altitudes
above 2000 m, the Line Modules must be connected via an isolating transformer. The
isolating transformer reduces surge voltages of surge voltage category III in power supplies
to surge voltages of surge category II at the power terminals of the Line Modules and
thereby conforms to the permissible voltage values for air gaps inside the unit. The design of
the secondary line system must be as follows:
● TN system with grounded neutral point (no grounded line conductor)
● IT system
A reduction of the line supply voltage phase-phase is not necessary.
Guidelines for machine configuration
32
System Manual, MA 01/2013, 6FC5397-6CP10-0BA2
SINUMERIK 840D sl
3
3.1
Control Unit NCU 7x0.3 PN
3.1.1
Description
The modular concept behind the SINUMERIK 840D sl CNC is suitable for decentralized and
flexible system structures. A Numerical Control Unit (NCU) serves as the control center. It is
available in three configuration levels, which have largely identical structures.
Table 3- 1
Differences between the NCU configuration levels:
NCU 710.3 PN
NCU 720.3 PN
NCU 730.3 PN
CNC user memory
3 MB (max. 9 MB)
3 MB (max. 15 MB)
3 MB (max. 15 MB)
Max. power consumption
281 W
374 W
374 W
Power loss
21 W
46 W
46 W
DRIVE-CLiQ interfaces
4
6
6
Supported axes
8
31
31
Heat dissipation
Open-circuit
Open-circuit
Cooling fins;
ventilation; double
ventilation; double
double fan connected
fan connected if
fan connected if
if necessary
necessary
necessary
Guidelines for machine configuration
System Manual, MA 01/2013, 6FC5397-6CP10-0BA2
33
SINUMERIK 840D sl
3.1 Control Unit NCU 7x0.3 PN
3.1.2
Interface description
Overview
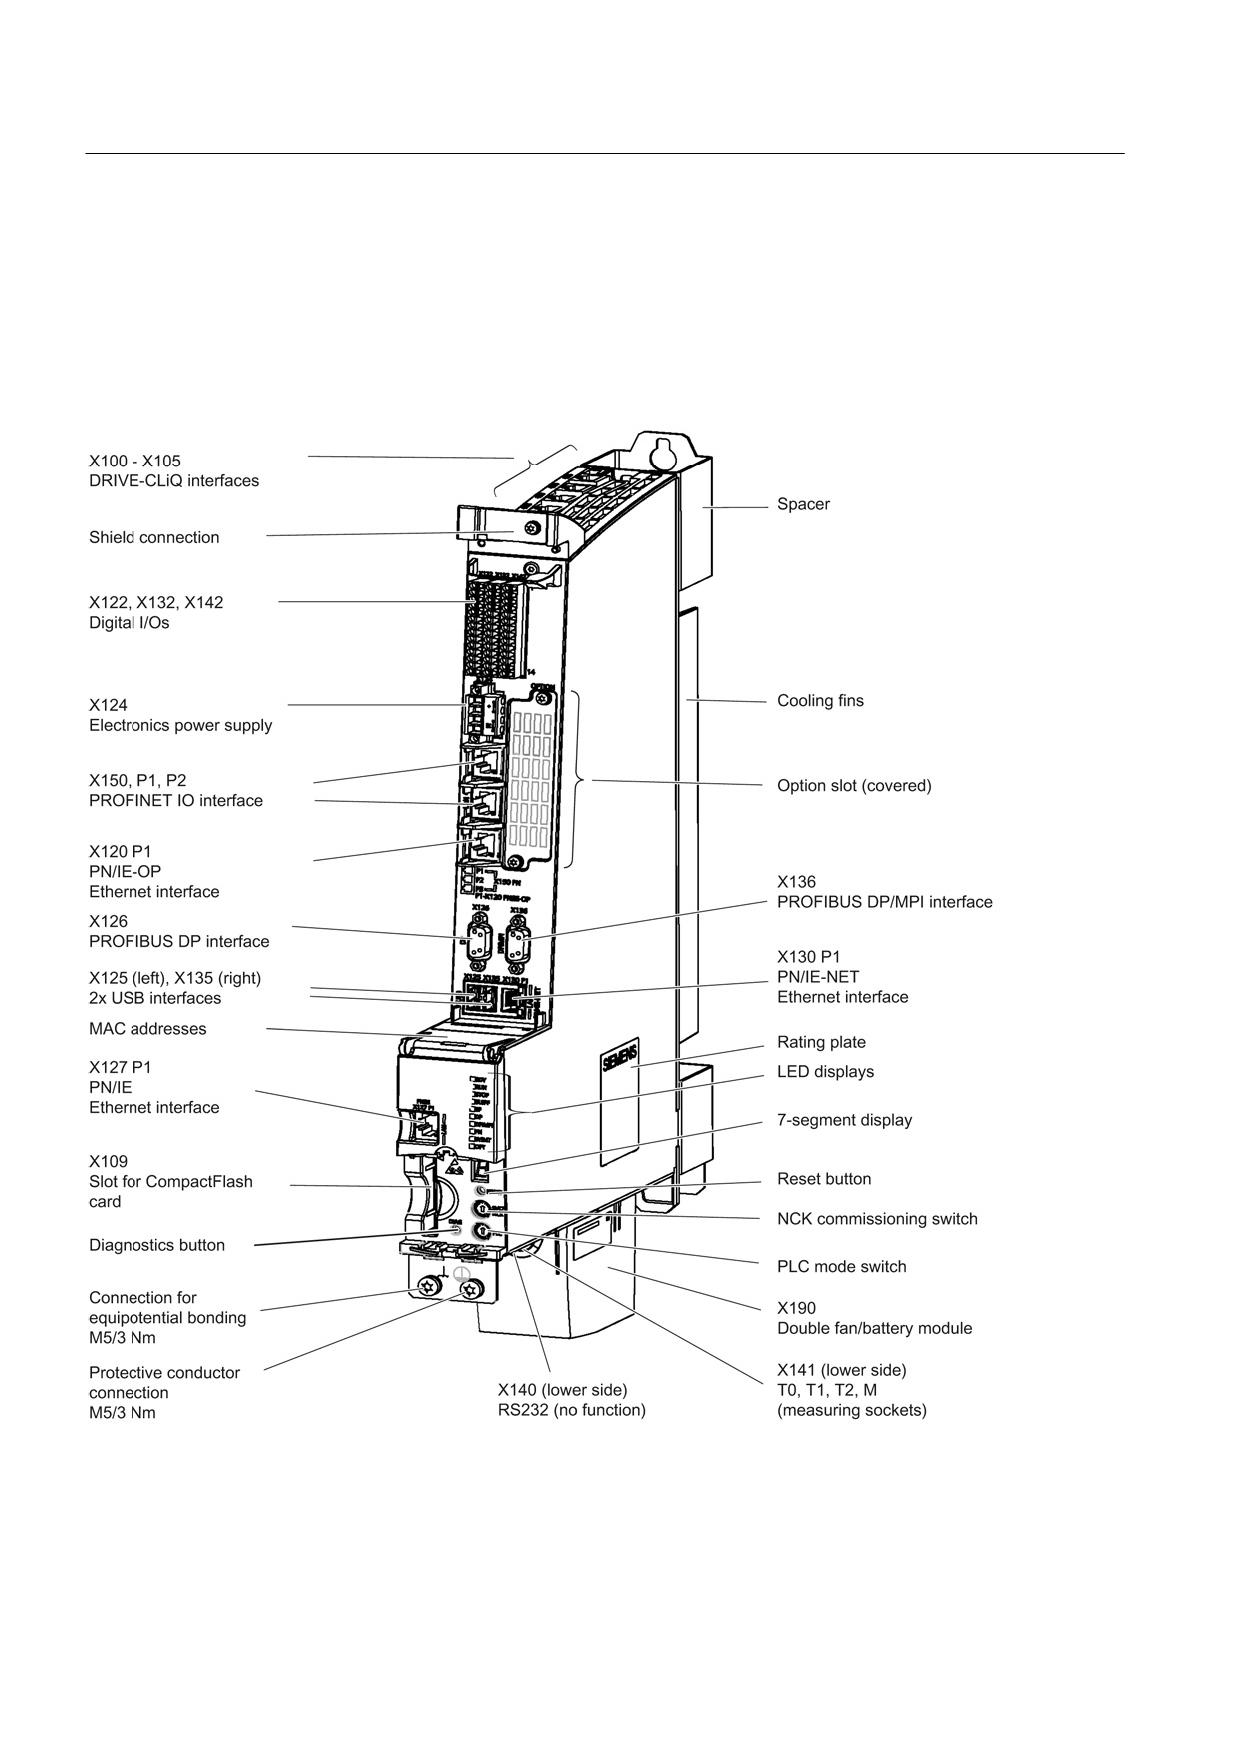
The following diagram shows an NCU 730.3 PN with its interfaces and control and display
elements (fault displays and status indicators):
Figure 3-1
NCU 730.3 PN interfaces
Guidelines for machine configuration
34
System Manual, MA 01/2013, 6FC5397-6CP10-0BA2
SINUMERIK 840D sl
3.1 Control Unit NCU 7x0.3 PN
The information below contains detailed descriptions of those interface terminal assignments
which are used to connect components of the SINAMICS drive line-up.
You can find information on the other interfaces in the "SINUMERIK 840D sl, NCU 7x0.3 PN"
Equipment Manual.
3.1.3
Interfaces and their terminal assignments
3.1.3.1
DRIVE-CLiQ interfaces X100-X105 (X103)
Properties
The NCU 7x0.3 PN and its NX1x.3 expansion units are connected to SINAMICS S120
components using the common serial interface DRIVE-CLiQ. Device data (electronic rating
plate) is also transmitted via these lines; this enables the correct data to be configured in a
straightforward way. The standardized cables and connectors reduce the variety of different
parts and cut storage costs.
Use
The following components can be connected via the DRIVE-CLiQ interfaces of the NCU
7x0.3 PN:
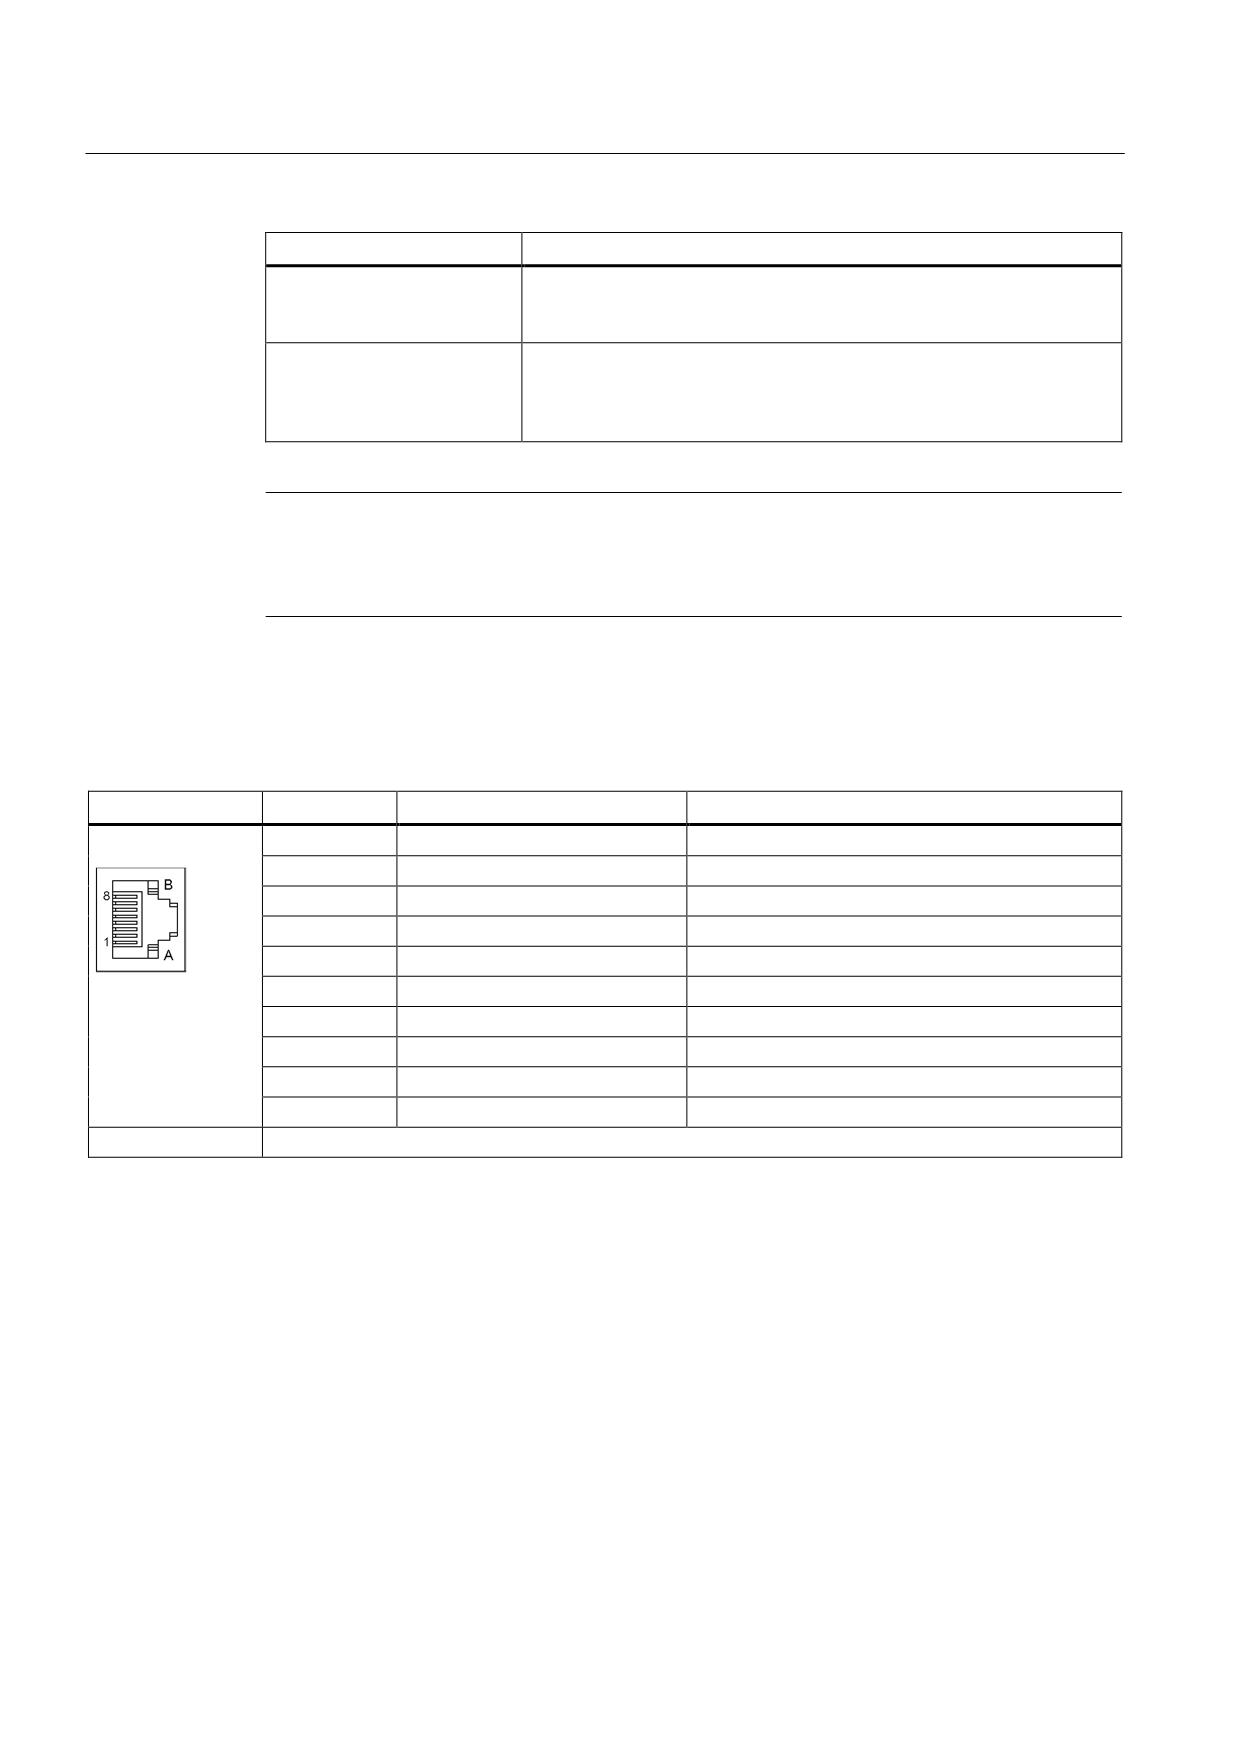
Table 3- 2
Components with DRIVE-CLiQ connection
Component
Description
NX10/15
Drive expansion module for three to six axes.
Active/Smart/Basic
Line Modules provide the central energy supply to the DC link.
Line Module
Single/Double Motor Module
Motor Modules draw their power from the DC link to supply the
connected motors.
SMC10/20/30
Sensor Modules Cabinet-Mounted are needed when a motor with a
DRIVE-CLiQ interface is not available and when external encoders
(SMC40 in development)
are required in addition to the motor encoder.
SME20/25
Measuring systems outside the cabinet can be connected directly to
SME120/125
the Sensor Module External.
DMC20/DME20
DRIVE-CLiQ Hub Modules are used to implement star-shaped
distribution of a DRIVE-CLiQ line.
TM15
The number of available digital inputs and outputs within a drive
system can be expanded with the TM15 Terminal Module.
TM41
An incremental encoder can be emulated using the TM41 Terminal
Module.
Guidelines for machine configuration
System Manual, MA 01/2013, 6FC5397-6CP10-0BA2
35
SINUMERIK 840D sl
3.1 Control Unit NCU 7x0.3 PN
Component
Description
TM120
The TM120 Terminal Module is used for temperature evaluation with
protective separation. It can be used for 1FN and 1FW6 motors as
well as motors from third-party manufacturers.
CUA31
The CUA31 Control Unit Adapter converts the PM-IF interface to a
DRIVE-CLiQ interface. The CUA31 Control Unit Adapter makes it
possible to operate Power Modules in blocksize format on an NCU
7x0.3 PN as well.
Note
Although the TM31, TM54F, and TM150 Terminal Modules and the CUA32 Control Unit
Adapter are DRIVE-CLiQ components, they are not supported by SINUMERIK 840D sl and
for this reason are not addressed in this documentation.
Terminal assignment
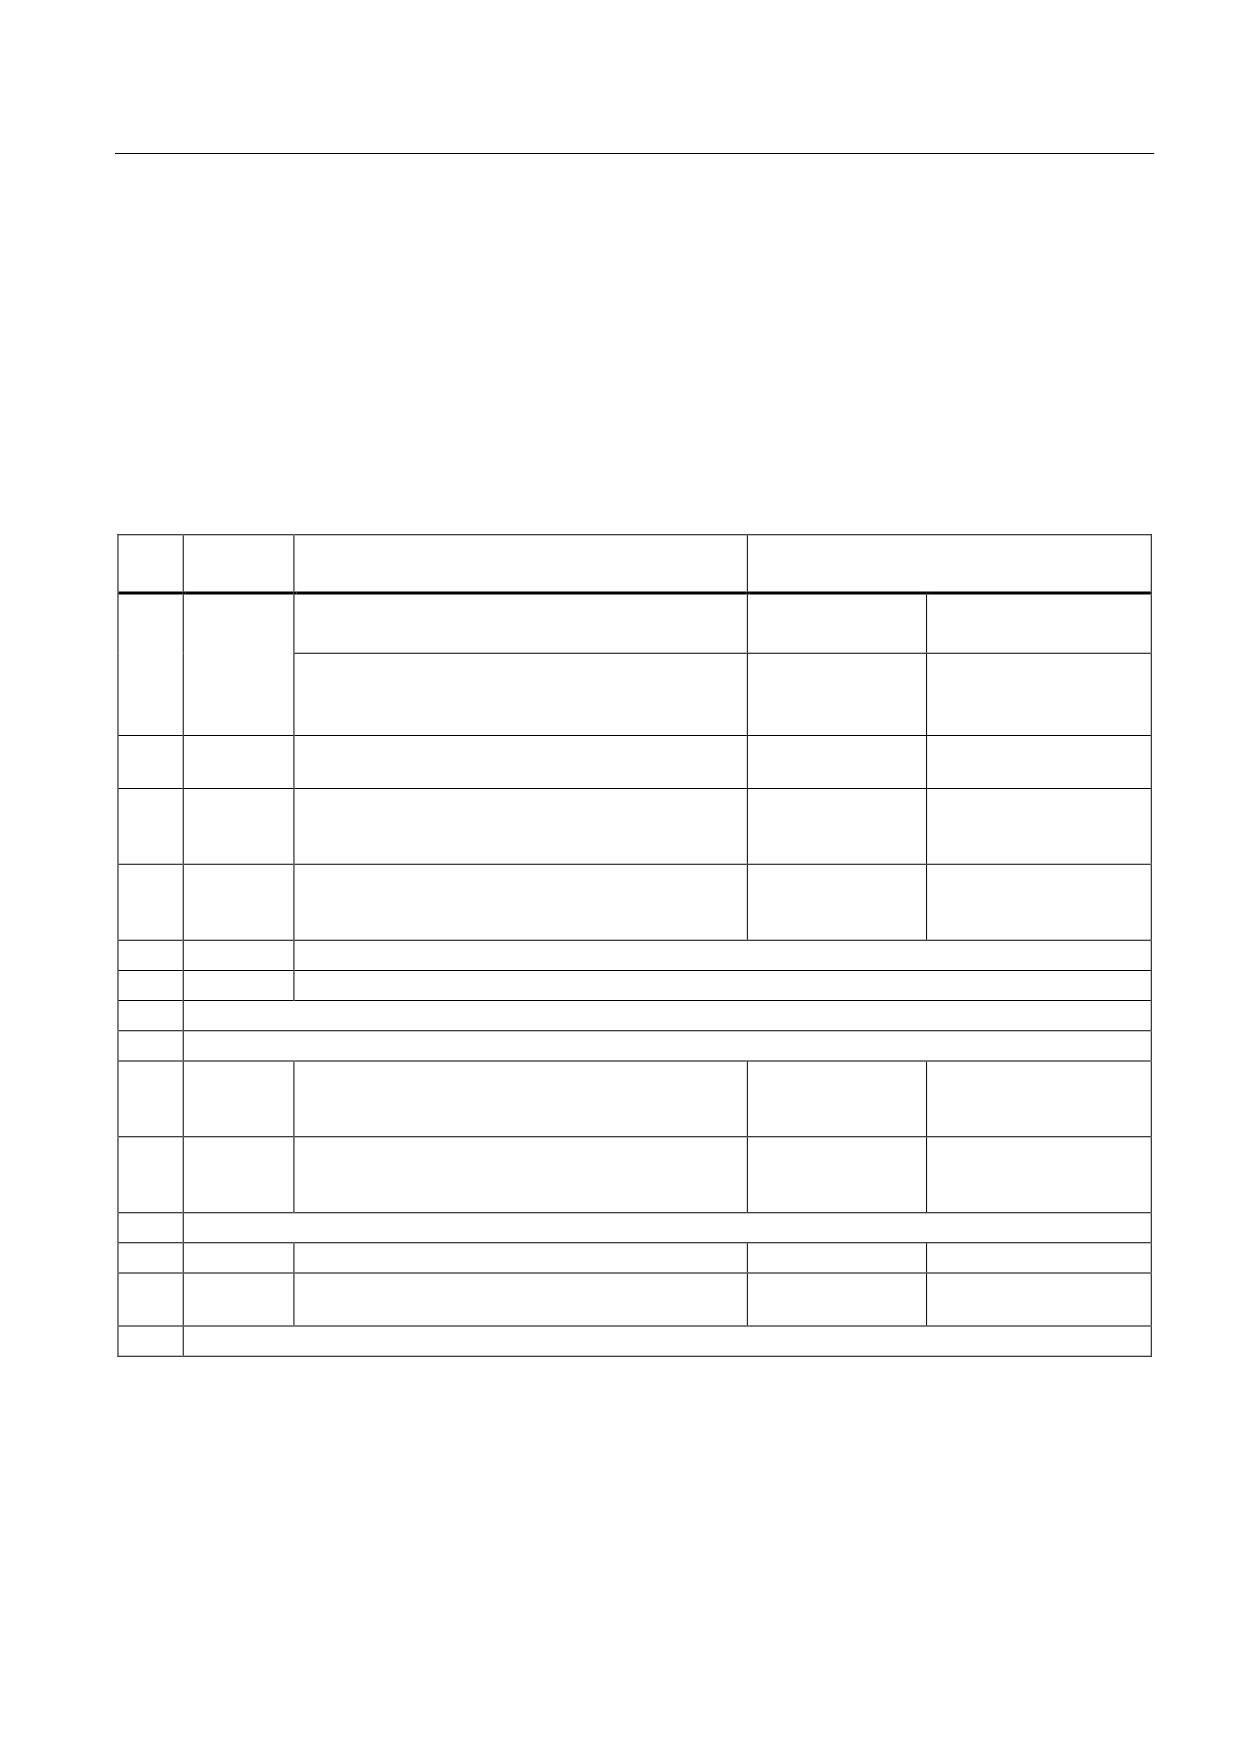
Table 3- 3
DRIVE-CLiQ interfaces X100-X105 (with NCU 710.3 PN only X100-X103)
Pin
Signal name
Technical data
1
TXP
Transmit data +
2
TXN
Transmit data -
3
RXP
Receive data +
4
Reserved, do not use
5
Reserved, do not use
6
RXN
Receive data -
7
Reserved, do not use
8
Reserved, do not use
A
+ (24 V)
Power supply
B
M (0 V)
Electronics ground
Connector type
RJ45 jack
The blanking covers for the DRIVE-CLiQ interfaces are included in the scope of delivery.
Blanking covers (50 pieces) Order number: 6SL3066-4CA00-0AA0
For additional specifications for the DRIVE-CLiQ interface and various DRIVE-CLiQ
topologies, see the chapter titled DRIVE-CLiQ topologies (Page 99).
Guidelines for machine configuration
36
System Manual, MA 01/2013, 6FC5397-6CP10-0BA2
SINUMERIK 840D sl
3.1 Control Unit NCU 7x0.3 PN
3.1.3.2
Digital inputs/outputs X122, X132 and X142
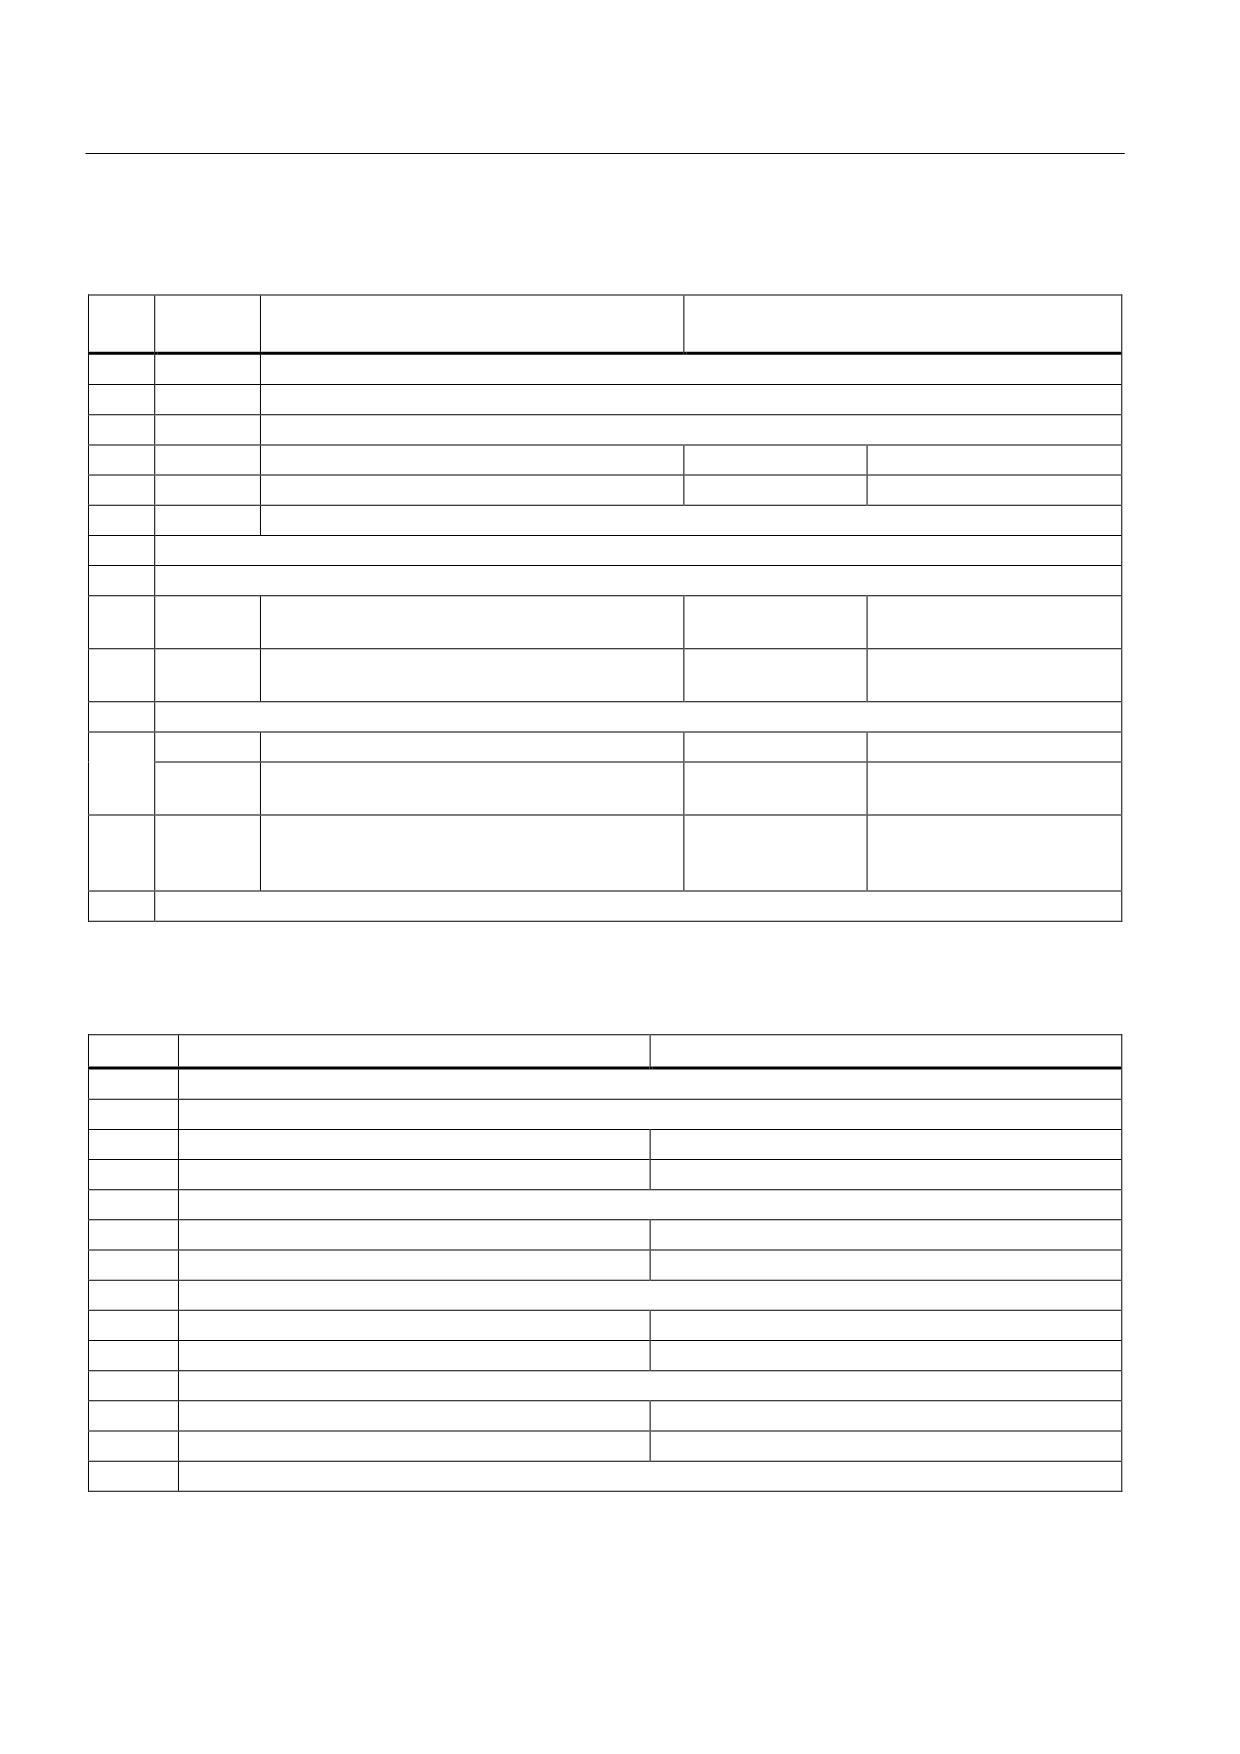
The NCU 7x0.3 PN has three terminal strips, each with 14 terminals. These are used to
control a total of 16 digital inputs, 4 digital outputs, and 8 digital input/outputs. The DIs/DOs
of terminal strips X122 and X132 are used for connecting SINAMICS drives, while the
DIs/DOs of X142 are used for controller connection purposes. When an NCU 7x0.3 PN is
commissioned using the integrated drive wizard in the SINUMERIK Operate HMI software, a
number of terminals are preassigned concrete functions.
X122 terminal assignment (NCU 7x0.3 PN) using the drive wizard
Pin
Function
Assignment recommendation
BICO source/sink
no.
1
Input1)
ON/OFF 1 infeed for:
CU: r0722.0
Line Module: p0840
Line Module with DRIVE-CLiQ connection
Alternative assignment:
"Infeed ready signal" for:
SLM X21.1
Each drive p0864
Line Module without DRIVE-CLiQ connection
2
Input
"OFF3 - rapid stop"
CU: r0722.1
Each drive
2. OFF3, p0849
3
Input
SH/SBC 1 - Group 1
CU: r0722.2
p9620 (all drives in the
SINAMICS Safety Integrated
group)
(STO enable = p9601)
4
Input
SH/SBC 1 - Group 2
CU: r0722.3
p9620 (all drives in the
SINAMICS Safety Integrated
group)
(STO enable = p9601)
5
Input
No system default
6
Input
No system default
7
Ground for pins 1 to 6
8
Ground for pins 9, 10, 12, 13
9
Output
SH/SBC 1 - Group 1
CU: p0738
p9774 Bit 1
SINAMICS Safety Integrated
BICO from CU after the
first drive in the group
10
Output
SH/SBC 1 - Group 2
CU: p0739
p9774 Bit 1
SINAMICS Safety Integrated
BICO from CU after the
first drive in the group
11
Ground for pins 9, 10, 12, 13
12
Input
BERO 1 - external zero mark
CU: r0722.10
p0495 = 2
13
Input
Probe 1 - central measuring (check that MD13210 =
CU: p0680[0] = 3
Each drive
0)
p0488[1...3] = 0
14
Ground for pins 9, 10, 12, 13
1) positive edge required!
Guidelines for machine configuration
System Manual, MA 01/2013, 6FC5397-6CP10-0BA2
37
SINUMERIK 840D sl
3.1 Control Unit NCU 7x0.3 PN
X132 terminal assignment (for NCU 7x0.3 PN) using the drive wizard
Pin
Function
Assignment recommendation
BICO source/sink
no.
1
Input
No system default
2
Input
No system default
3
Input
No system default
4
Input
Line contactor, feedback signal
CU: r0722.7
Line Module: p0860
5
Input
2. OFF 2
CU: r0722.20
Drive: p0845
6
Input
No system default
7
Ground for pins 1...6
8
Ground for pins 9, 10, 12, 13
9
Output
Infeed operation (Line Module with DRIVE-CLiQ
LM : r0863.0
CU: p0742
connection)
10
Output
Infeed ready to start (if Line Module with DRIVE-
LM : r0899.0
CU: p0743
CLiQ connection)
11
Ground for pins 9, 10, 12, 13
12
Output
Line contactor control
LM : r0863.1
CU: p0744
Otherwise:
BERO 2 - external zero mark
CU: r0722.14
Drive: p0495 = 5
Input
13
Input
Probe 2 - central measuring (check that
CU: p0680[1] = 6
Each drive
MD13210 = 0)
CU: p0728
p0489[1...3] = 0
Bit 15=0
14
Ground for pins 9, 10, 12, 13
X142 terminal assignment (for NCU 7x0.3 PN) using the drive wizard
Pin no
Function
1
Reserved (not connected)
2
Reserved (not connected)
3
Input
Digital input $A_IN[1]
4
Input
Digital input $A_IN[2]
5
Ground for pins 3, 4, 6, 7, 9, 10, 12, 13
6
Input
Digital input $A_IN[3]
7
Input
Digital input $A_IN[4]
8
Ground for pins 3, 4, 6, 7, 9, 10, 12, 13
9
Output
Digital output $A_OUT[1]
10
Output
Digital output $A_OUT[2]
11
Ground for pins 3, 4, 6, 7, 9, 10, 12, 13
12
Output
Digital output $A_OUT[3]
13
Output
Digital output $A_OUT[4]
14
Ground for pins 3, 4, 6, 7, 9, 10, 12, 13
Guidelines for machine configuration
38
System Manual, MA 01/2013, 6FC5397-6CP10-0BA2
SINUMERIK 840D sl
3.1 Control Unit NCU 7x0.3 PN
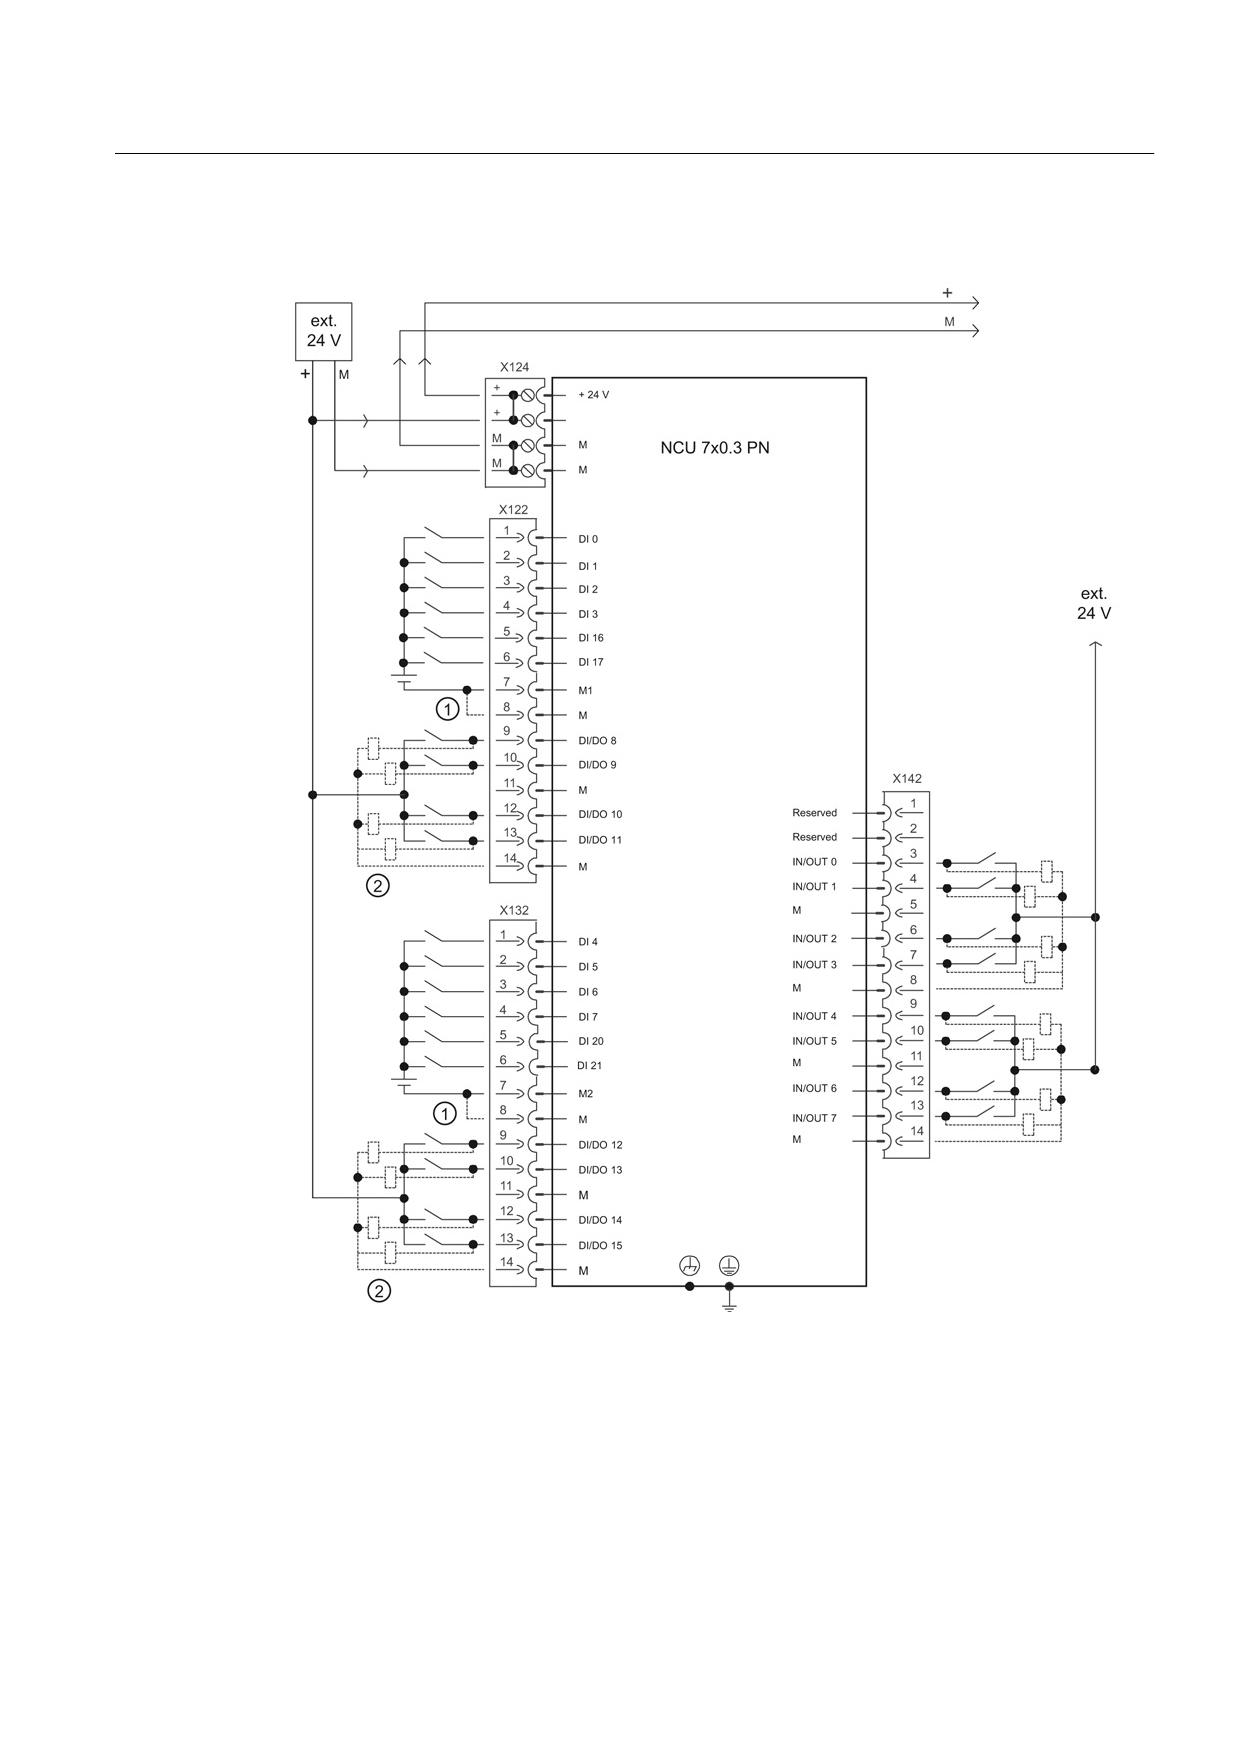
DI-DO block diagram of NCU 7x0.3 PN
①
Jumper open: galvanic isolation for digital inputs
②
Assign parameters as digital input/output
Figure 3-2
Block diagram of X122, X132, and X142 interfaces
Guidelines for machine configuration
System Manual, MA 01/2013, 6FC5397-6CP10-0BA2
39
SINUMERIK 840D sl
3.1 Control Unit NCU 7x0.3 PN
Note
On terminal strip X142, IN/OUT 0 to IN/OUT 3 are permanently assigned as digital inputs,
and IN/OUT 4 to IN/OUT 7 as digital outputs, via the software.
3.1.3.3
PROFINET interface X150 P1, P2
Properties
The PROFINET interface X150 is equipped with an integrated 2-port switch and a TCP/IP
address for both ports.
Use
You can install the following communication networks using the PROFINET interface:
● PROFINET CBA (Computer-Based Automation):
Communication between controllers as components in distributed systems
● PROFINET IO (input/output devices)
Communication between the PLC controller and field devices
- No support from isochronous mode (PROFINET IRT)
Cable specification
For PROFINET, you always require a data transmission rate of 100 Mbps (Fast Ethernet) in
full duplex mode. For data transfer purposes, you can use twisted-pair copper cables (4-wire,
100Base-T).
Table 3- 4
Cable specification for X150 ports 1, 2
Characteristic
Version
Connector type
RJ45 jack1)
Cable type
Industrial Ethernet cable (CAT5)
Max. cable length
100 m
1) please use the Fast Connect connector.
Guidelines for machine configuration
40
System Manual, MA 01/2013, 6FC5397-6CP10-0BA2
SINUMERIK 840D sl
3.1 Control Unit NCU 7x0.3 PN
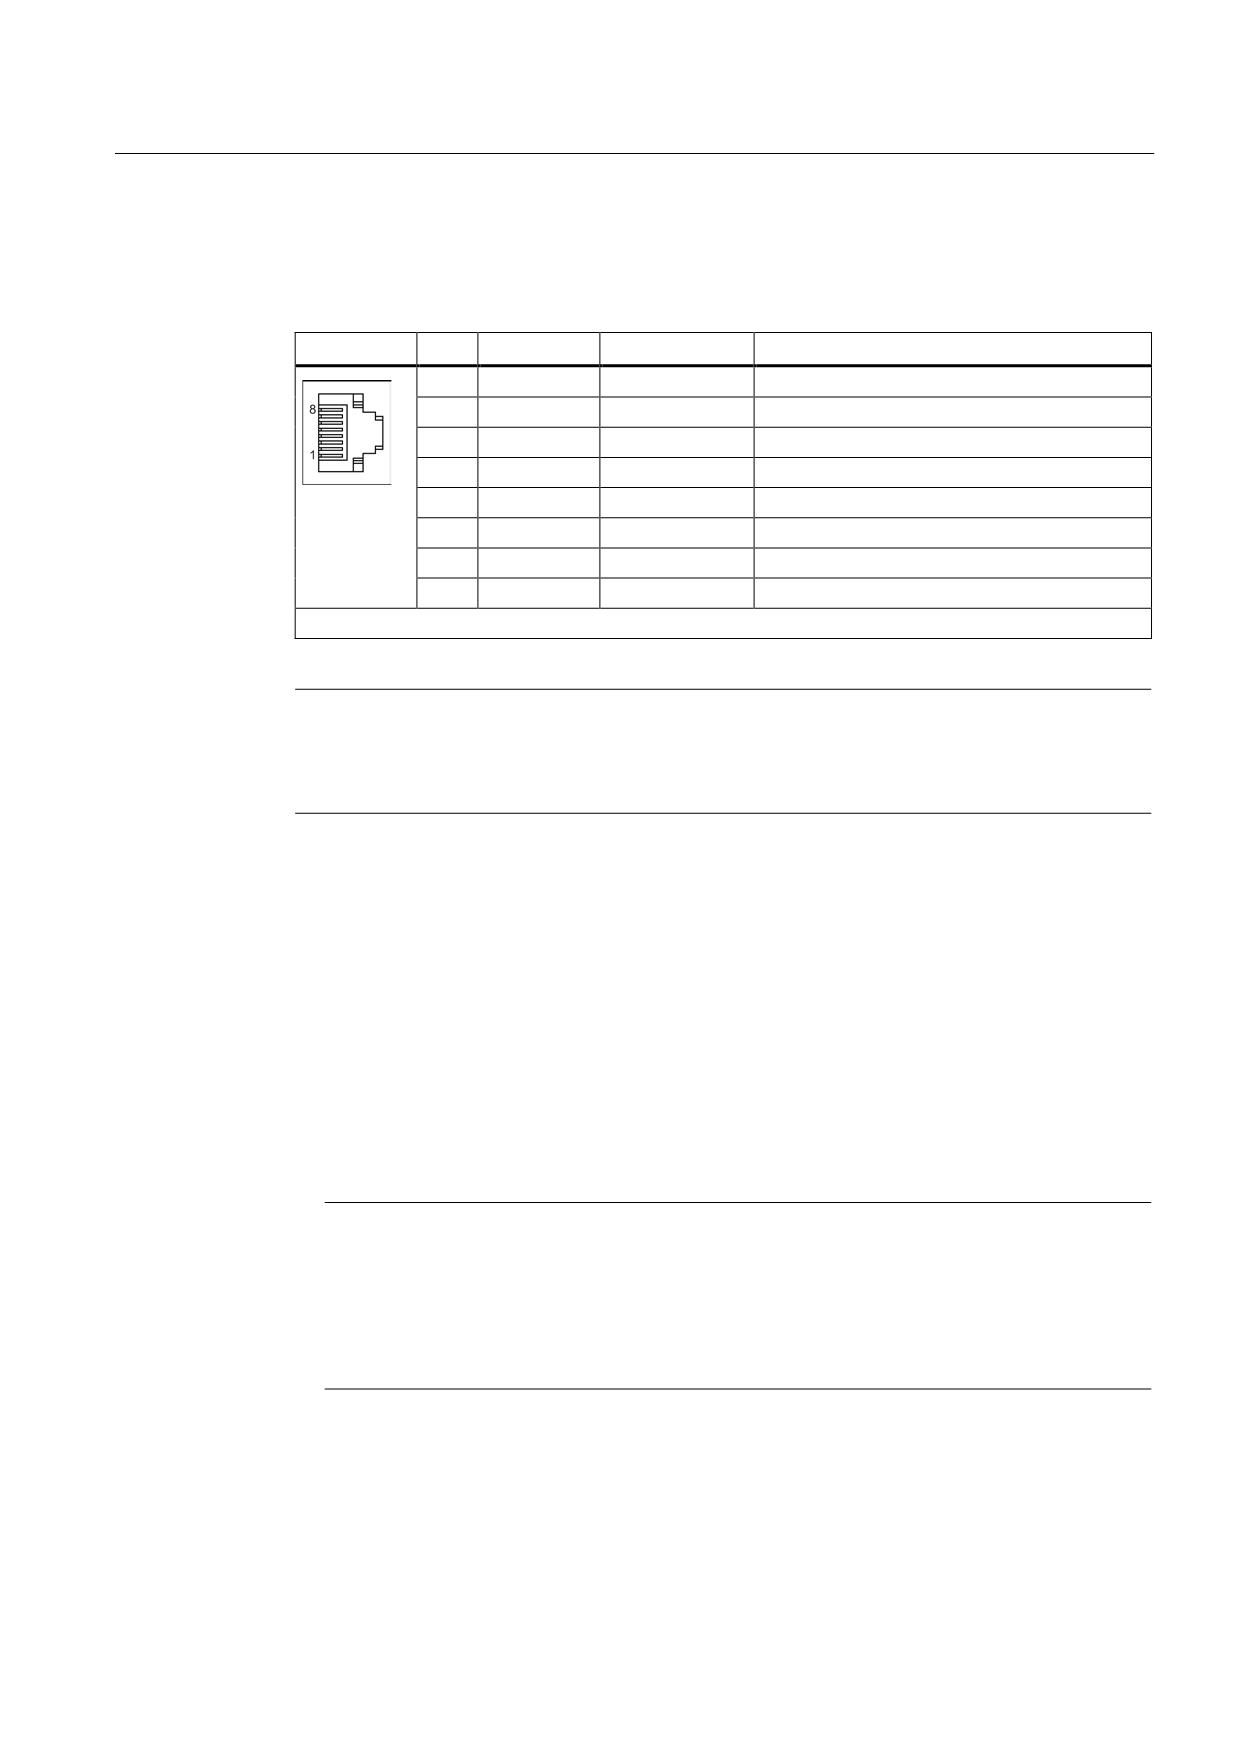
X150 pin assignment
Table 3- 5
PROFINET interface X150 ports 1, 2
Pin
Signal name
Signal type
Meaning
1
TXP
B
Transmit data +
2
TXN
B
Transmit data -
3
RXP
B
Receive data +
4
-
-
Reserved, do not use
5
-
-
Reserved, do not use
6
RXN
B
Receive data -
7
-
-
Reserved, do not use
8
-
-
Reserved, do not use
Signal type: B = bidirectional
Note
The PROFINET interface has what is known as MDI/MDI-X autocrossing functionality; i.e.
when required, transmit and receive lines are switched over. Thus, no crossover cables are
necessary.
3.1.3.4
PROFIBUS interface X126
Properties
● Isochronous mode possible
● Isolated RS 485 interface
● Max. data rate 12 MBaud
● Supports master/slave operation
● PROFIBUS address is set via configuration
Note
Isochronous operation with PROFIBUS DP for the NCU is only possible at the line of
terminal X126.
On the line of terminal X136, only signals from the PLC I/O, and not from SINAMICS drive
units, can be evaluated. Therefore, this terminal will not be taken into account in the
description that follows.
Guidelines for machine configuration
System Manual, MA 01/2013, 6FC5397-6CP10-0BA2
41
SINUMERIK 840D sl
3.1 Control Unit NCU 7x0.3 PN
Use
The following devices can be connected to PROFIBUS DP interface X126:
● Distributed I/O
● Drive units with PROFIBUS DP interface (standard slaves)
Cable specification
The PROFIBUS cable is 2-wire, twisted, and shielded with defined technical data.
Table 3- 6
Cable specifications for X126
Features
Version
Connector type
9-pin SUB D connector
Cable type
PROFIBUS cable
Max. cable length
100 m at 12 Mbps
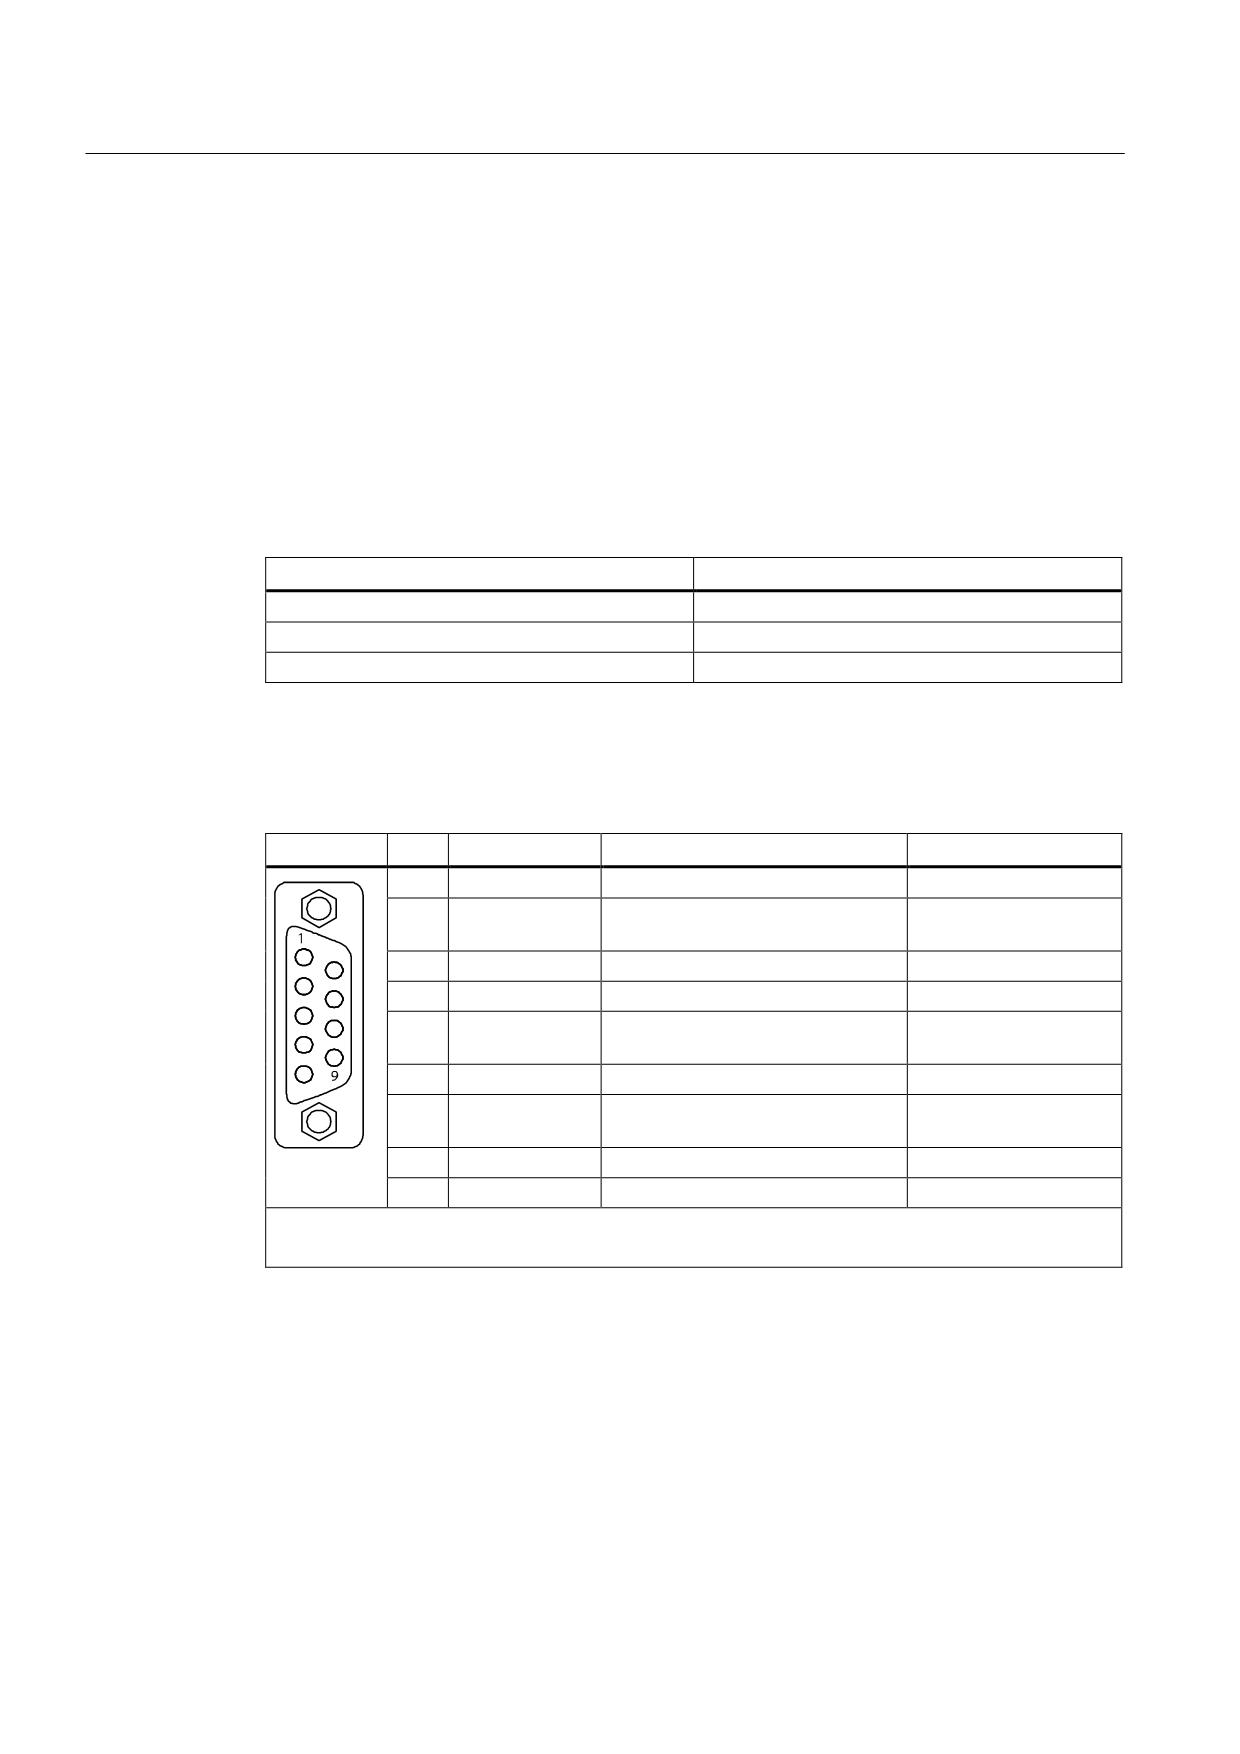
X126 pin assignment
Table 3- 7
PROFIBUS DP interface X126
Pin
Signal name
Meaning
Area
1
-
Reserved, not assigned
2
M24_SERV
Power supply for teleservice,
0 V
ground
3
RxD/TxD-P
Receive/transmit data P (B)
RS485
4
CNTR-P
Control signal
TTL
5
DGND
PROFIBUS data reference
potential
6
VP
Supply voltage plus
5 V ±10%
7
P24_SERV
24 V for teleservice, short-circuit
24 V (-15% to +20%)
proof, 150 mA maximum
8
RxD/TxD-N
Receive/transmit data P (A)
RS485
9
-
Reserved, not assigned
Connector type: 9-pin SUB-D connector
The supply voltage VP is provided exclusively for the bus terminal
A teleservice adapter can be connected to the PROFIBUS interface for remote diagnostics
purposes. The power supply for the teleservice (pins 2 and 7) can have a load of up to
150 mA.
Guidelines for machine configuration
42
System Manual, MA 01/2013, 6FC5397-6CP10-0BA2
SINUMERIK 840D sl
3.1 Control Unit NCU 7x0.3 PN
NOTICE
Destruction of components if equipotential bonding conductor is missing
If an equipotential bonding conductor is not used, high leakage currents that could destroy
the Control Unit or other PROFIBUS nodes can be conducted via the PROFIBUS cable.
• An equipotential bonding conductor with a cross-section of at least 25 mm² must be
used between components in a system that are located at a distance from each other.
PROFIBUS connector
For the first and last nodes in a bus line, the terminating resistors must be switched-in.
Otherwise, data transmission will not function correctly.
The bus terminating resistors are activated in the connector.
The cable shield must be connected at both ends through a large surface area.
3.1.4
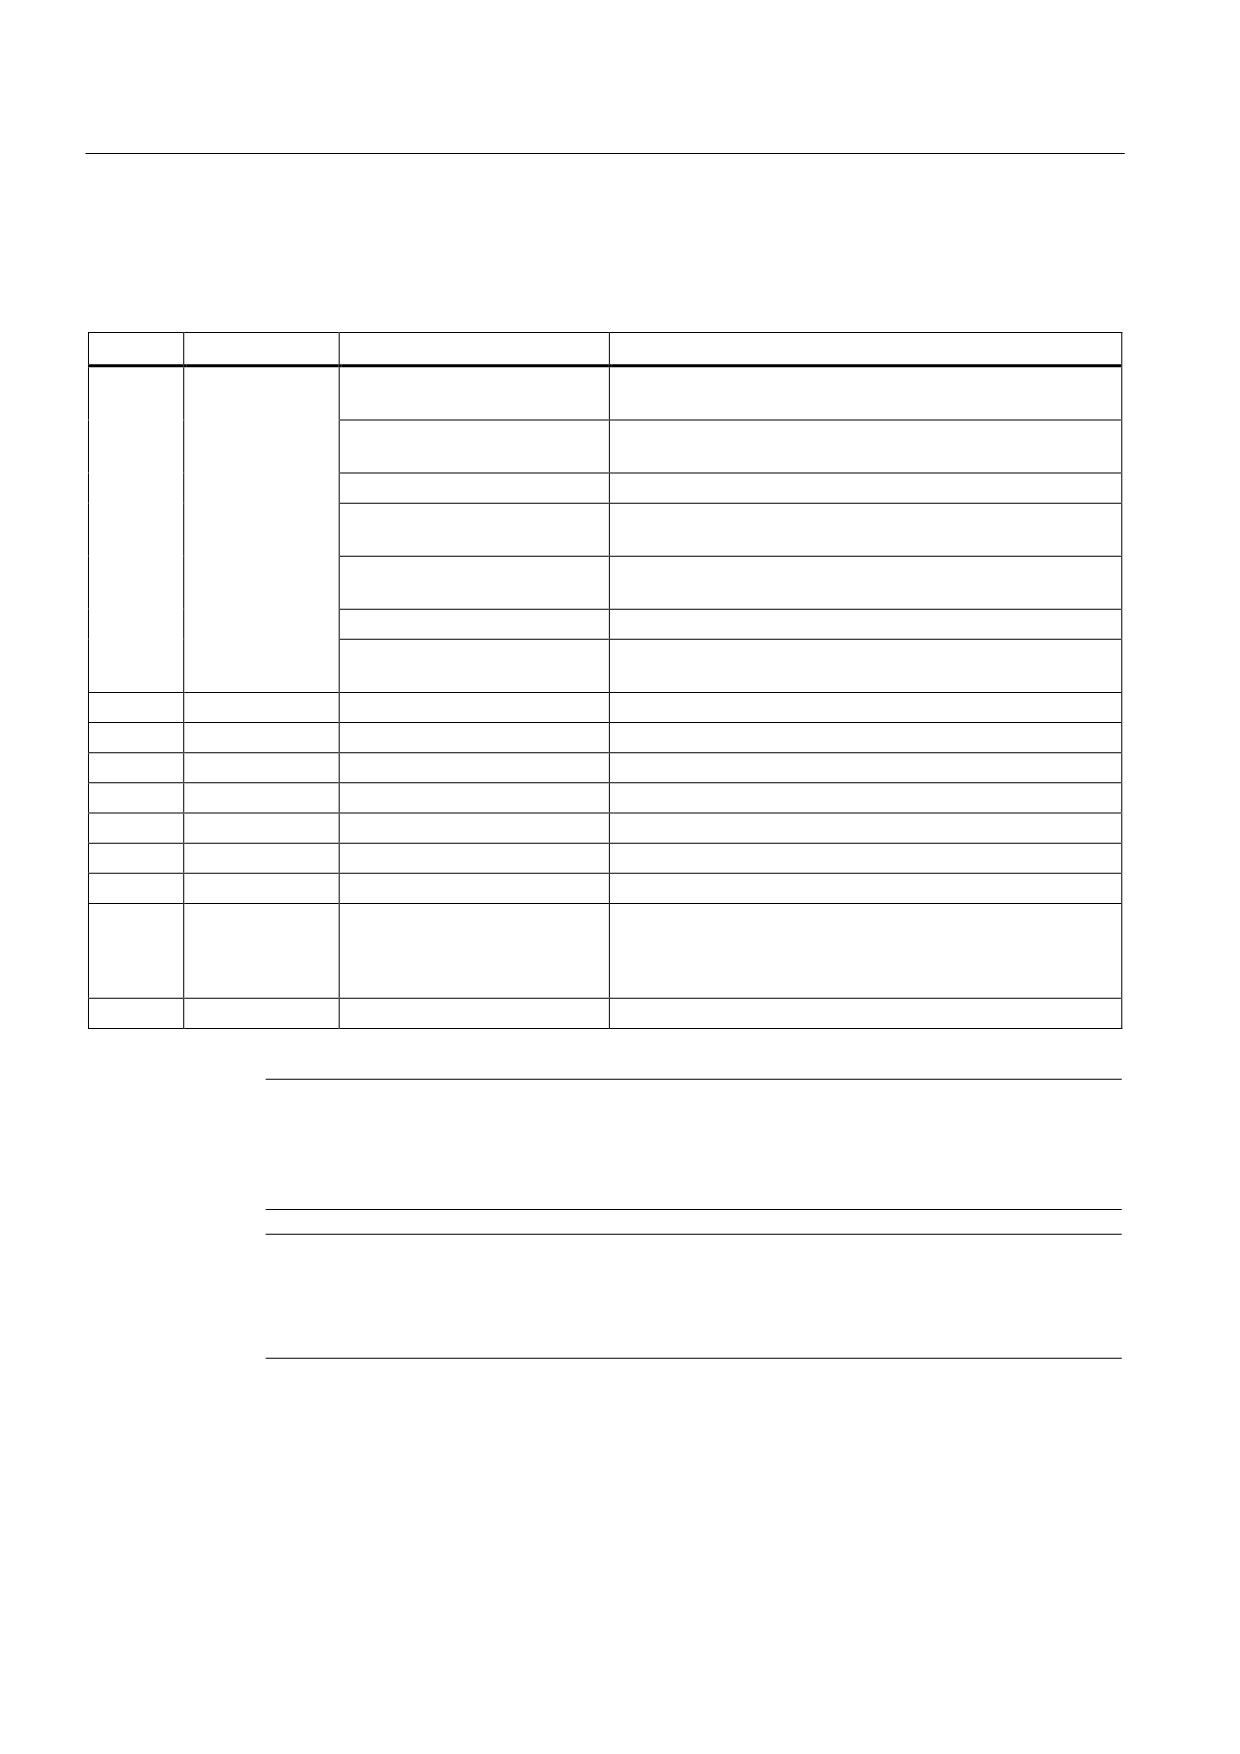
LED displays
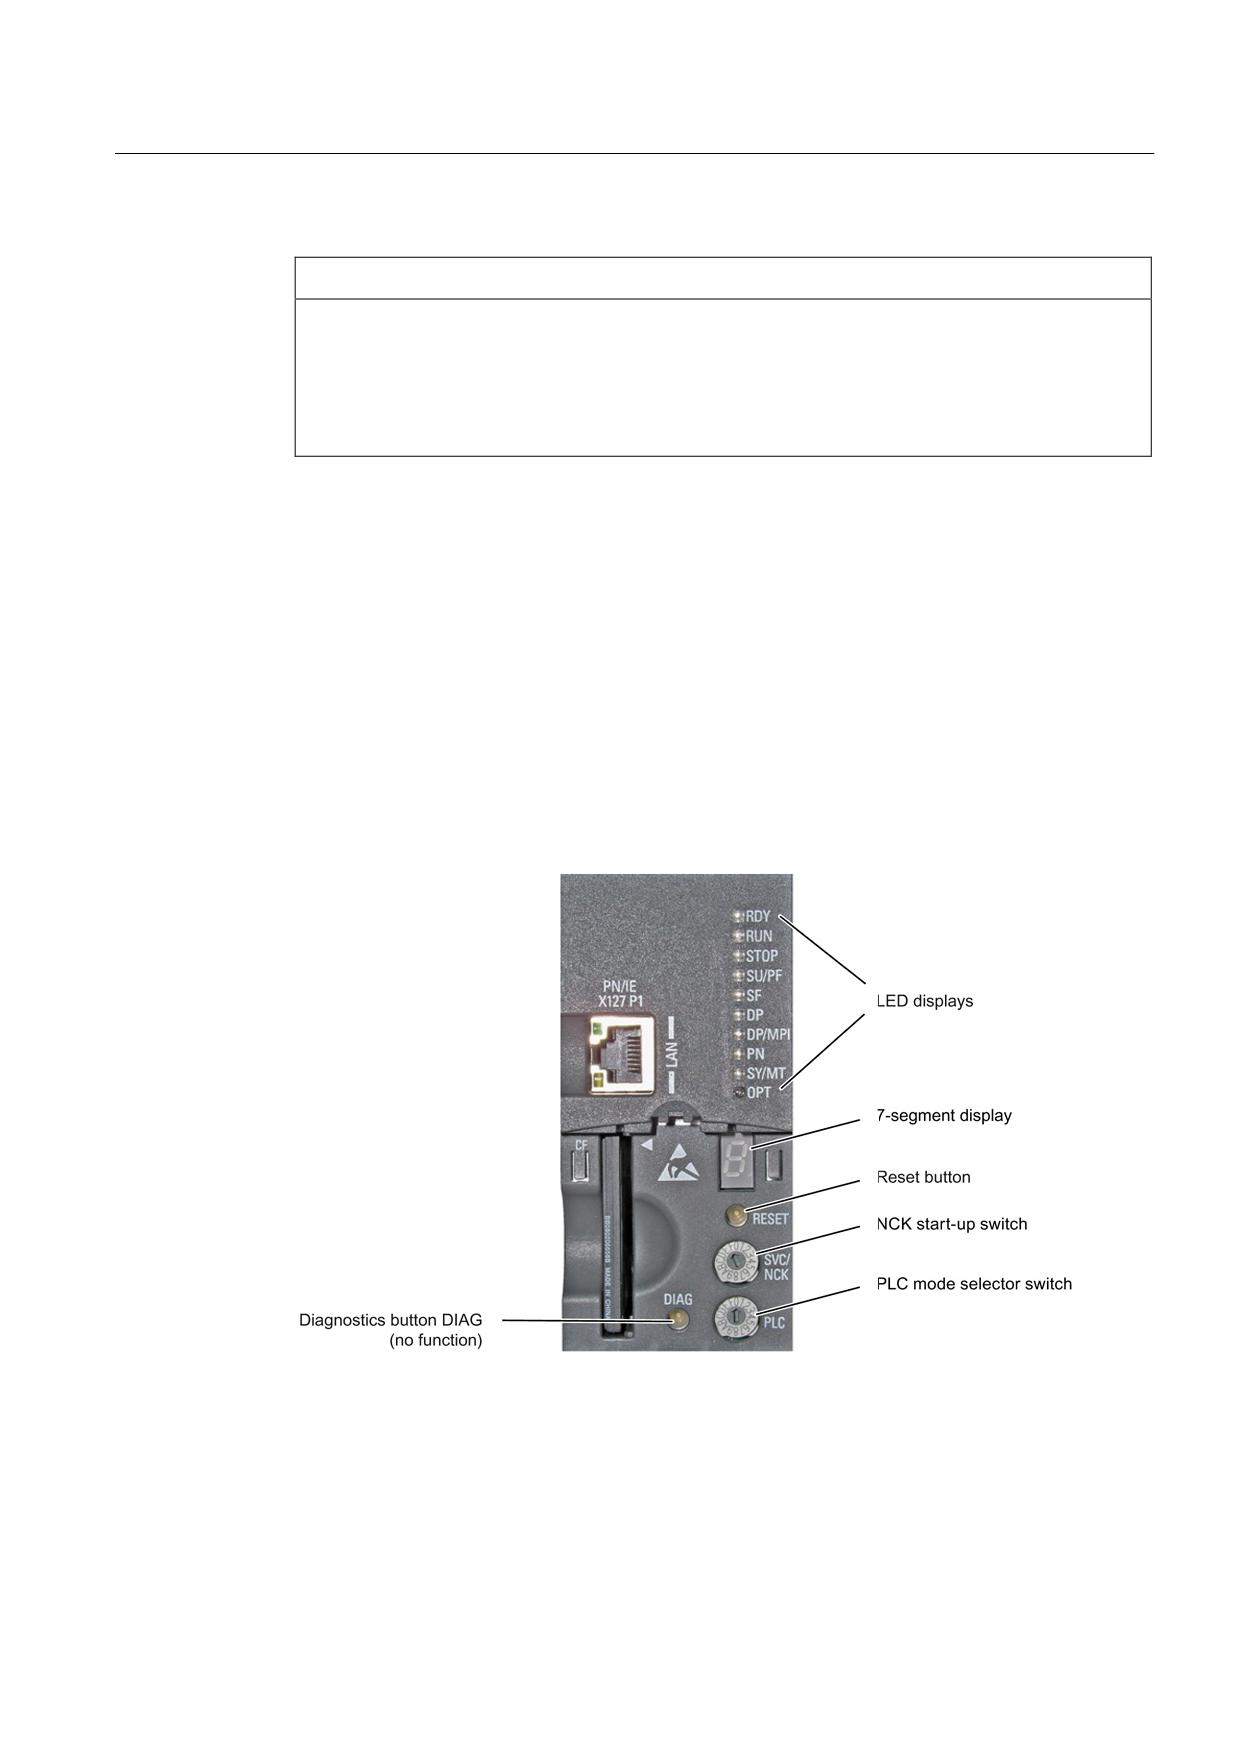
Position of the display and operator controls
Figure 3-3
NCU7x0.3 PN display and operator controls
Guidelines for machine configuration
System Manual, MA 01/2013, 6FC5397-6CP10-0BA2
43
SINUMERIK 840D sl
3.1 Control Unit NCU 7x0.3 PN
Meaning of LED states
Table 3- 8
Meaning of LED states
Name
Function
Status
Meaning
RDY
Ready
Red
There is at least one fault (e.g. RESET, watchdog
monitoring etc. ) or the Control Unit is booting up.
Flashing red/orange
Error accessing CompactFlash Card
(0.5 Hz)
Orange
Accessing CompactFlash Card
Flashing orange (0.5 Hz)
Updating the firmware of the connected DRIVE-CLiQ
components
Flashing orange (2 Hz)
Firmware update is complete for components. Wait for
POWER ON for the components in question.
Green
NC powered up and everything in cyclic mode
Flashing green/orange or
LED-supported recognition of connected DRIVE-CLiQ
red/orange (1 Hz)
component is activated: (p0124[0] = 1).
RUN
PLC RUN
Green
PLC (programmable logic controller) ready for operation
STOP
PLC STOP
Orange
PLC stopped
SU/PF
PLC FORCE
Red
FORCE activated
SF
PLC SF
Red
PLC group error
DP
BUS1 F
Red
PROFIBUS group error X126
DP/MPI
BUS2 F
Red
PROFIBUS group error X136
PN
PN Fault
Red
PROFINET IO group error X150
SY/MT
MAINT
Orange
• Synchronization status (SY): No function
• Maintenance status (MT) of the NCU:
Maintenance request pending
OPT
-
-
No function
Note
PLC memory reset
If all the LEDs are flashing, the PLC (programmable logic controller) must be reset via the
mode selector (move switch to position "3" to reboot).
Note
When a connected SINAMICS Control Unit is powering up, all LEDs on the NCU briefly light
up orange. You can carry out a detailed diagnosis using a PG/PC and the operating
software.
Guidelines for machine configuration
44
System Manual, MA 01/2013, 6FC5397-6CP10-0BA2
SINUMERIK 840D sl
3.2 NX1x.3 extension units
Meaning of the additional display and operator controls
7-segment display
Used during commissioning in order to issue test
and diagnostic messages, as well as during
power-up in order to display status messages.
Reset button
You can use the reset button to reset the NCU
and force a cold restart.
NCK commissioning switch
The NCK switch must be in the "0" position in
order to operate the NCU.
PLC mode switch
You can select the PLC operating mode using
this coding switch (0 = standard mode).
Diagnostics button DIAG
Currently has no function
Additional references
● You can find a detailed description of LED states during power-up in the "NCU Operating
System (IM7)" section of the Basesoftware and Operating Software Commissioning
Manual.
● For information on drive faults and alarms, see also:
SINAMICS S120/S150 List Manual (LH1)
3.2
NX1x.3 extension units
3.2.1
Description
Properties
You can use Numeric Control Extensions (NX1x.3) to enhance the performance of an axis
grouping of the CNC automation system SINUMERIK 840D sl. Each NX10 expands the axis
grouping by up to three additional axes, and each NX15 by up to six.
The NX10/15 has the following interfaces:
●
4 DRIVE-CLiQ (X100 - X103)
● Terminal strip (X122) for six digital inputs and four digital inputs/outputs
● Power supply (X124)
Guidelines for machine configuration
System Manual, MA 01/2013, 6FC5397-6CP10-0BA2
45
SINUMERIK 840D sl
3.2 NX1x.3 extension units
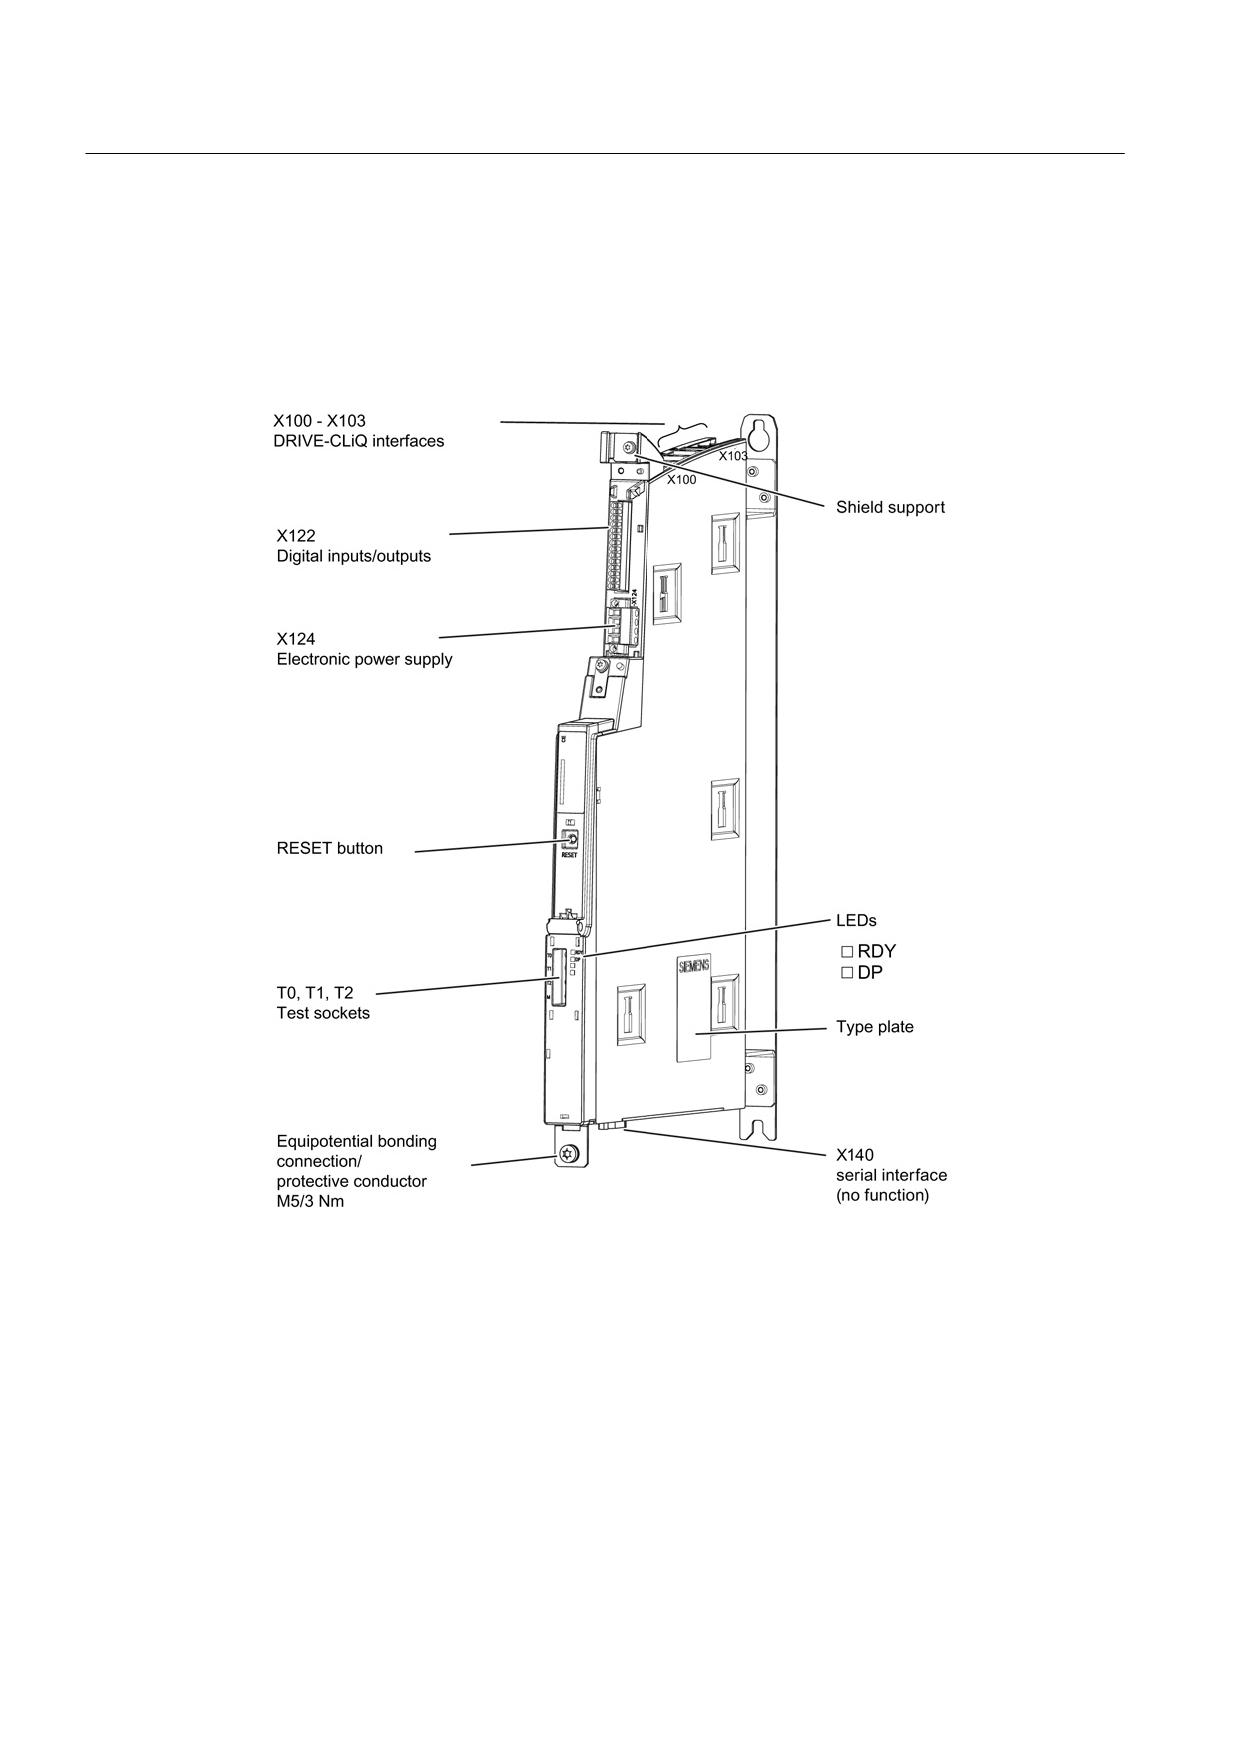
3.2.2
Representation of the NX1x.3
Interfaces
Figure 3-4
NX15.3 interfaces
Guidelines for machine configuration
46
System Manual, MA 01/2013, 6FC5397-6CP10-0BA2
SINUMERIK 840D sl
3.2 NX1x.3 extension units
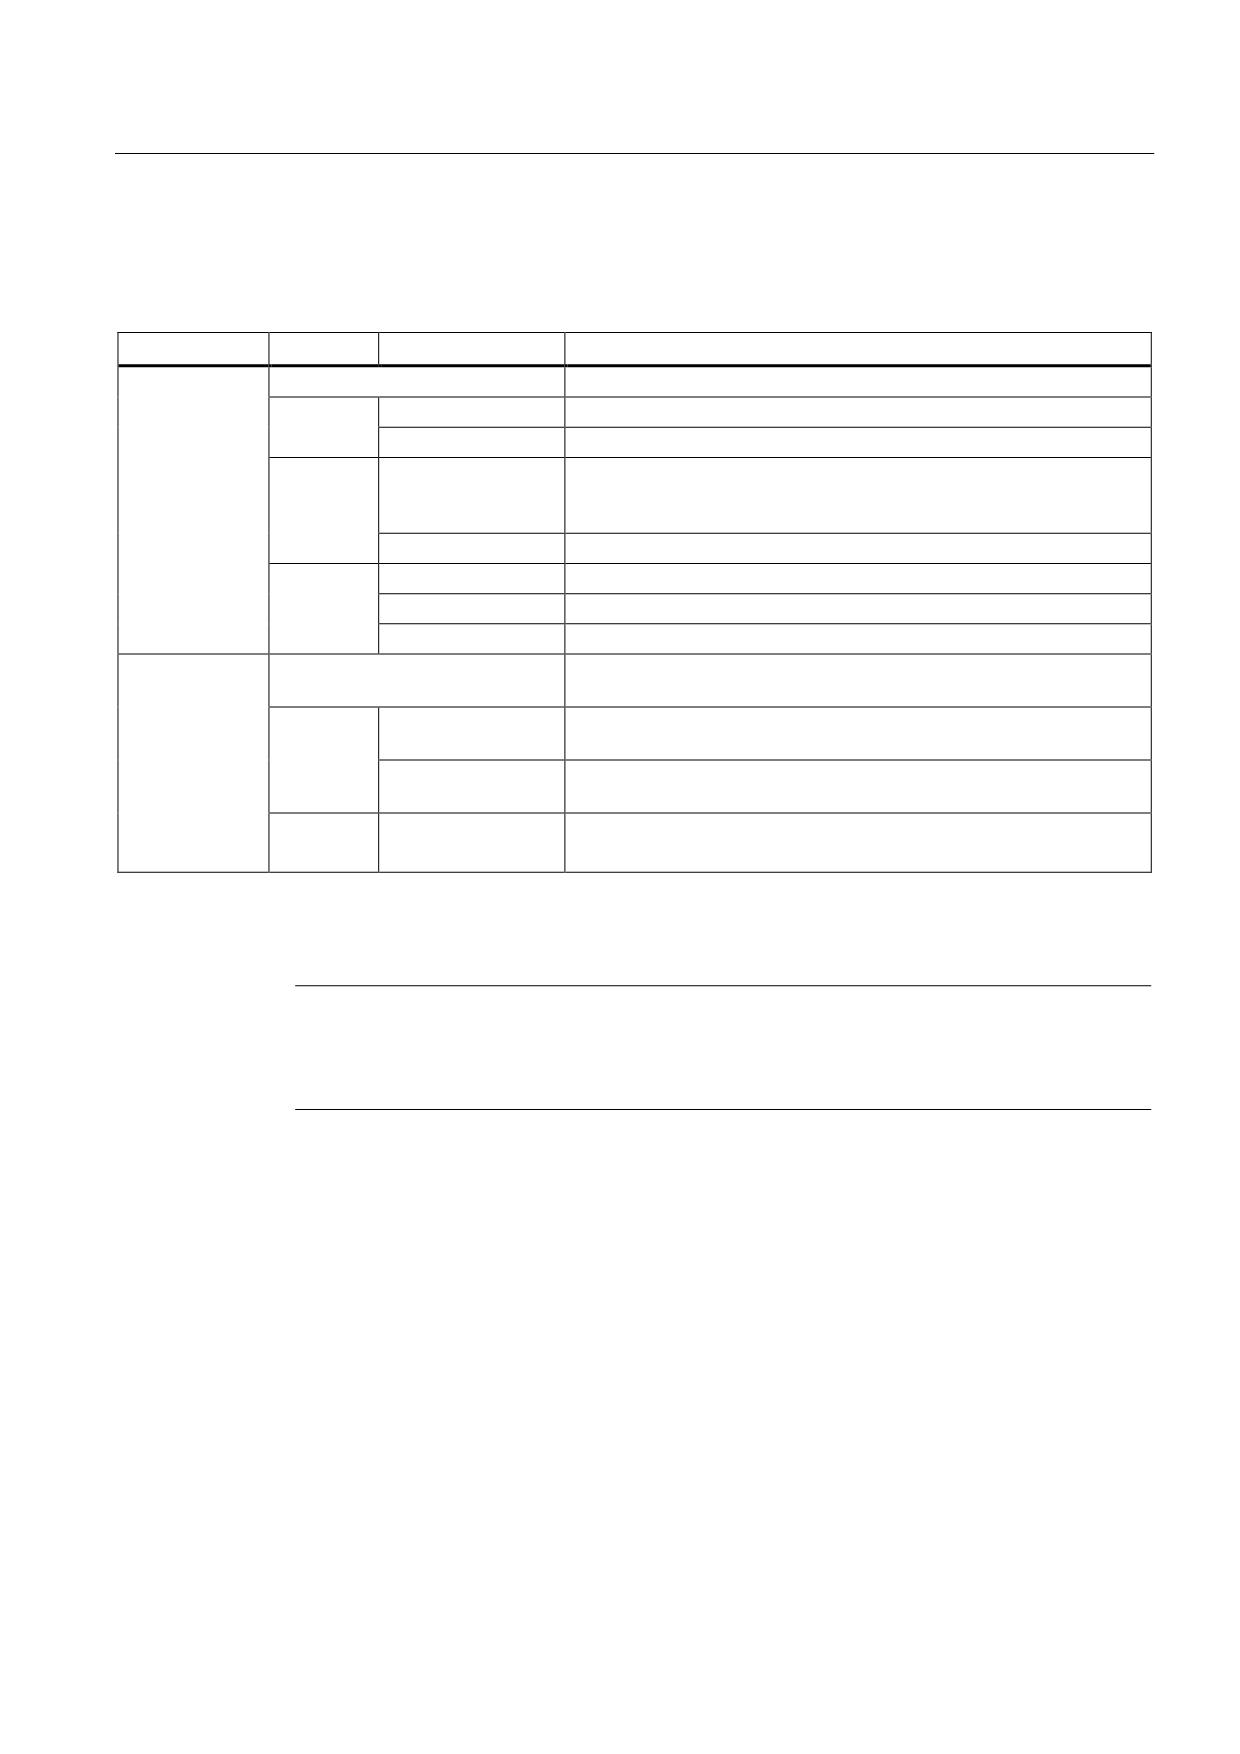
LED displays
Table 3- 9
Description of LEDs on the NX10/15
LED
Color
Status
Description
Off
Electronics power supply outside permissible tolerance range
Continuous light
NX10/15 is ready for operation
RDY,
Green
Flashing 2 Hz
Writing to CompactFlash card of the connected NCU
READY
H1
Continuous light
At least one fault is pending (e.g., RESET, watchdog monitoring,
Red
basic system fault).
NX10/15 is booting up.
Flashing 0.5 Hz
Boot error (e.g. firmware cannot be loaded into the RAM)
Orange
Continuous light
Firmware loading into RAM
Flashing 0.5 Hz
Unable to load firmware into RAM
Flashing 2 Hz
Firmware CRC fault
Off
Electronics power supply outside the permissible tolerance range,
NX10/15 is not ready for operation.
DP1,
Green
Continuous light
CU_LINK is ready for communication and cyclic communication is
CU_LINK
running
H2
Flashing 0.5 Hz
CU_LINK is ready for communication and no cyclic communication is
running
Red
Continuous light
At least one CU_LINK fault is present.
CU_LINK not ready for operation (e.g., after POWER ON)
RESET button
The RESET button is on the front of the module under the cover.
Note
When the button is pressed, the locally connected drive systems are brought to a standstill,
without feedback to the control. In other words, the drive and controller run asynchronously
once the drive has successfully booted up.
Guidelines for machine configuration
System Manual, MA 01/2013, 6FC5397-6CP10-0BA2
47
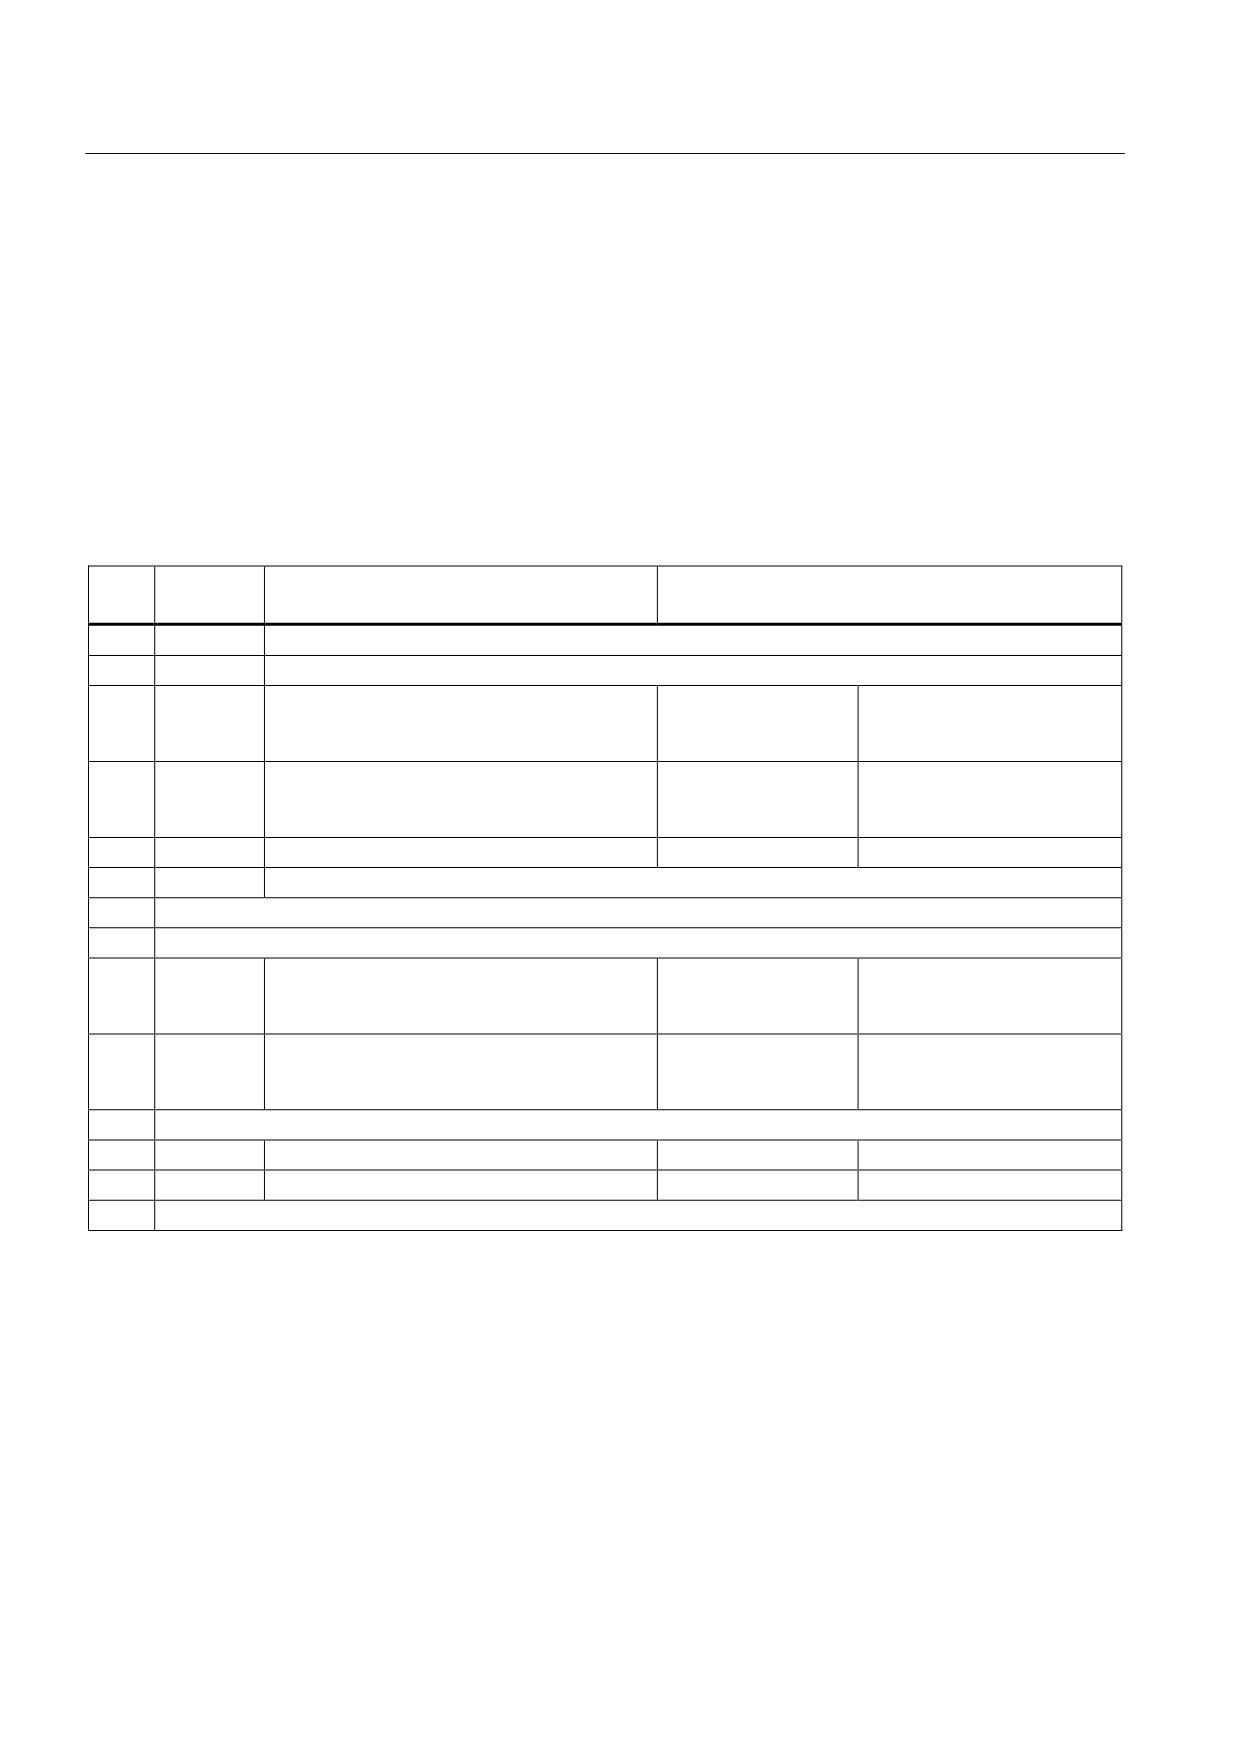
SINUMERIK 840D sl
3.2 NX1x.3 extension units
3.2.3
Interfaces and their terminal assignments
3.2.3.1
X122 digital inputs/outputs
The X122 terminal strip consists of 14 terminals, which are used to control 6 digital inputs
and 4 digital inputs/outputs. When an NX1x is commissioned using the integrated drive
wizard in the SINUMERIK Operate HMI software, a number of terminals are preassigned
concrete functions.
X122 (NX10/15) terminal assignment using the drive wizard
Pin
Function
Assignment recommendation
BICO source/sink
no.
1
Input
No system default
2
Input
No system default
3
Input
SH/SBC 1 - Group 1
NX: r0722.2
p9620 (all drives in the group)
SINAMICS Safety Integrated (STO enable =
p9601)
4
Input
SH/SBC 1 - Group 2
NX: r0722.3
p9620 (all drives in the group)
SINAMICS Safety Integrated (STO enable =
p9601)
5
Input
2. OFF 2
NX: r0722.16
Drive: p0845
6
Input
No system default
7
Ground for pins 1 to 6
8
Ground for pins 9, 10, 12, 13
9
Output
SH/SBC 1 - Group 1
NX: p0738
r9774 Bit 1
SINAMICS Safety Integrated
BICO from CU after the
first drive in the group
10
Output
SH/SBC 1 - Group 2
NX: p0739
p9774 Bit 1
SINAMICS Safety Integrated
BICO from CU after the first
drive in the group
11
Ground for pins 9, 10, 12, 13
12
Input
BERO 1 - external zero mark
NX: r0722.10
Drive: p0495 = 2
13
Input
BERO 2 - external zero mark
NX: r0722.11
Drive: p0495 = 3
14
Ground for pins 9, 10, 12, 13
Guidelines for machine configuration
48
System Manual, MA 01/2013, 6FC5397-6CP10-0BA2
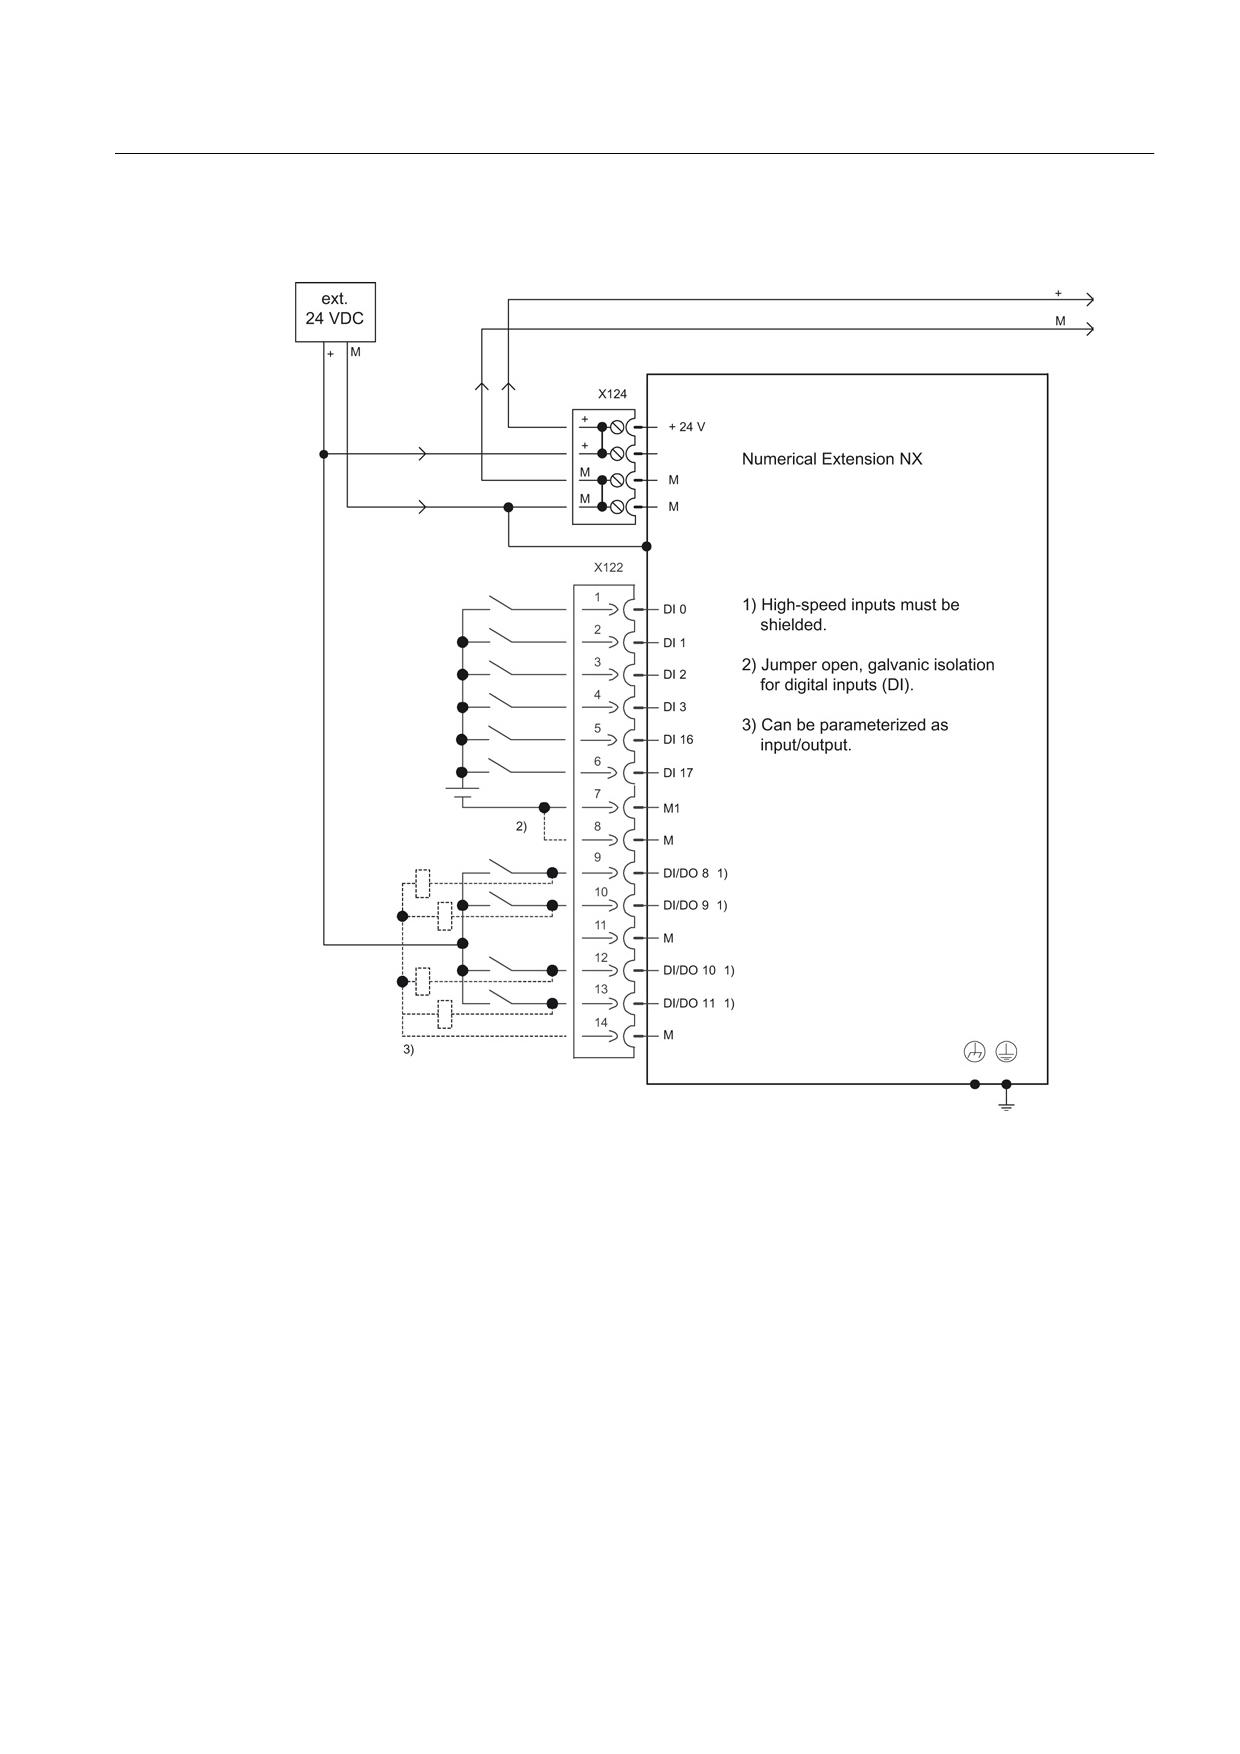
SINUMERIK 840D sl
3.2 NX1x.3 extension units
DI-DO block diagram of NX1x.3
Figure 3-5
Block diagram of X122 interface
Guidelines for machine configuration
System Manual, MA 01/2013, 6FC5397-6CP10-0BA2
49
SINUMERIK 840D sl
3.2 NX1x.3 extension units
3.2.4
NX1x3 wiring
NX10/15 components can be connected to the control unit via DRIVE-CLiQ. The following
rules apply to wiring of the NX10/15:
● Only one star topology is permitted between the NX10/15 and the Control Unit, as the
address assignment is fixed (HW configuration). This means that only one NX10/15 can
be operated per DRIVE-CLiQ port on a control unit.
● DRIVE-CLiQ ports not assigned to NX10/15 can be wired to other DRIVE-CLiQ
components
● Once an NX10/15 has been connected and configured, you cannot simply insert it into a
different DRIVE-CLiQ port, as the addresses of the integrated drives are set permanently
from the point of view of the PLC. The following table illustrates this relation:
Table 3- 10 NX10/15 PROFIBUS addresses
DRIVE-CLiQ port on the NCU
Drive PROFIBUS addresses
X105
15
X104
14
X103
13
X102
12
X101
11
The following figure shows a sample topology:
Guidelines for machine configuration
50
System Manual, MA 01/2013, 6FC5397-6CP10-0BA2
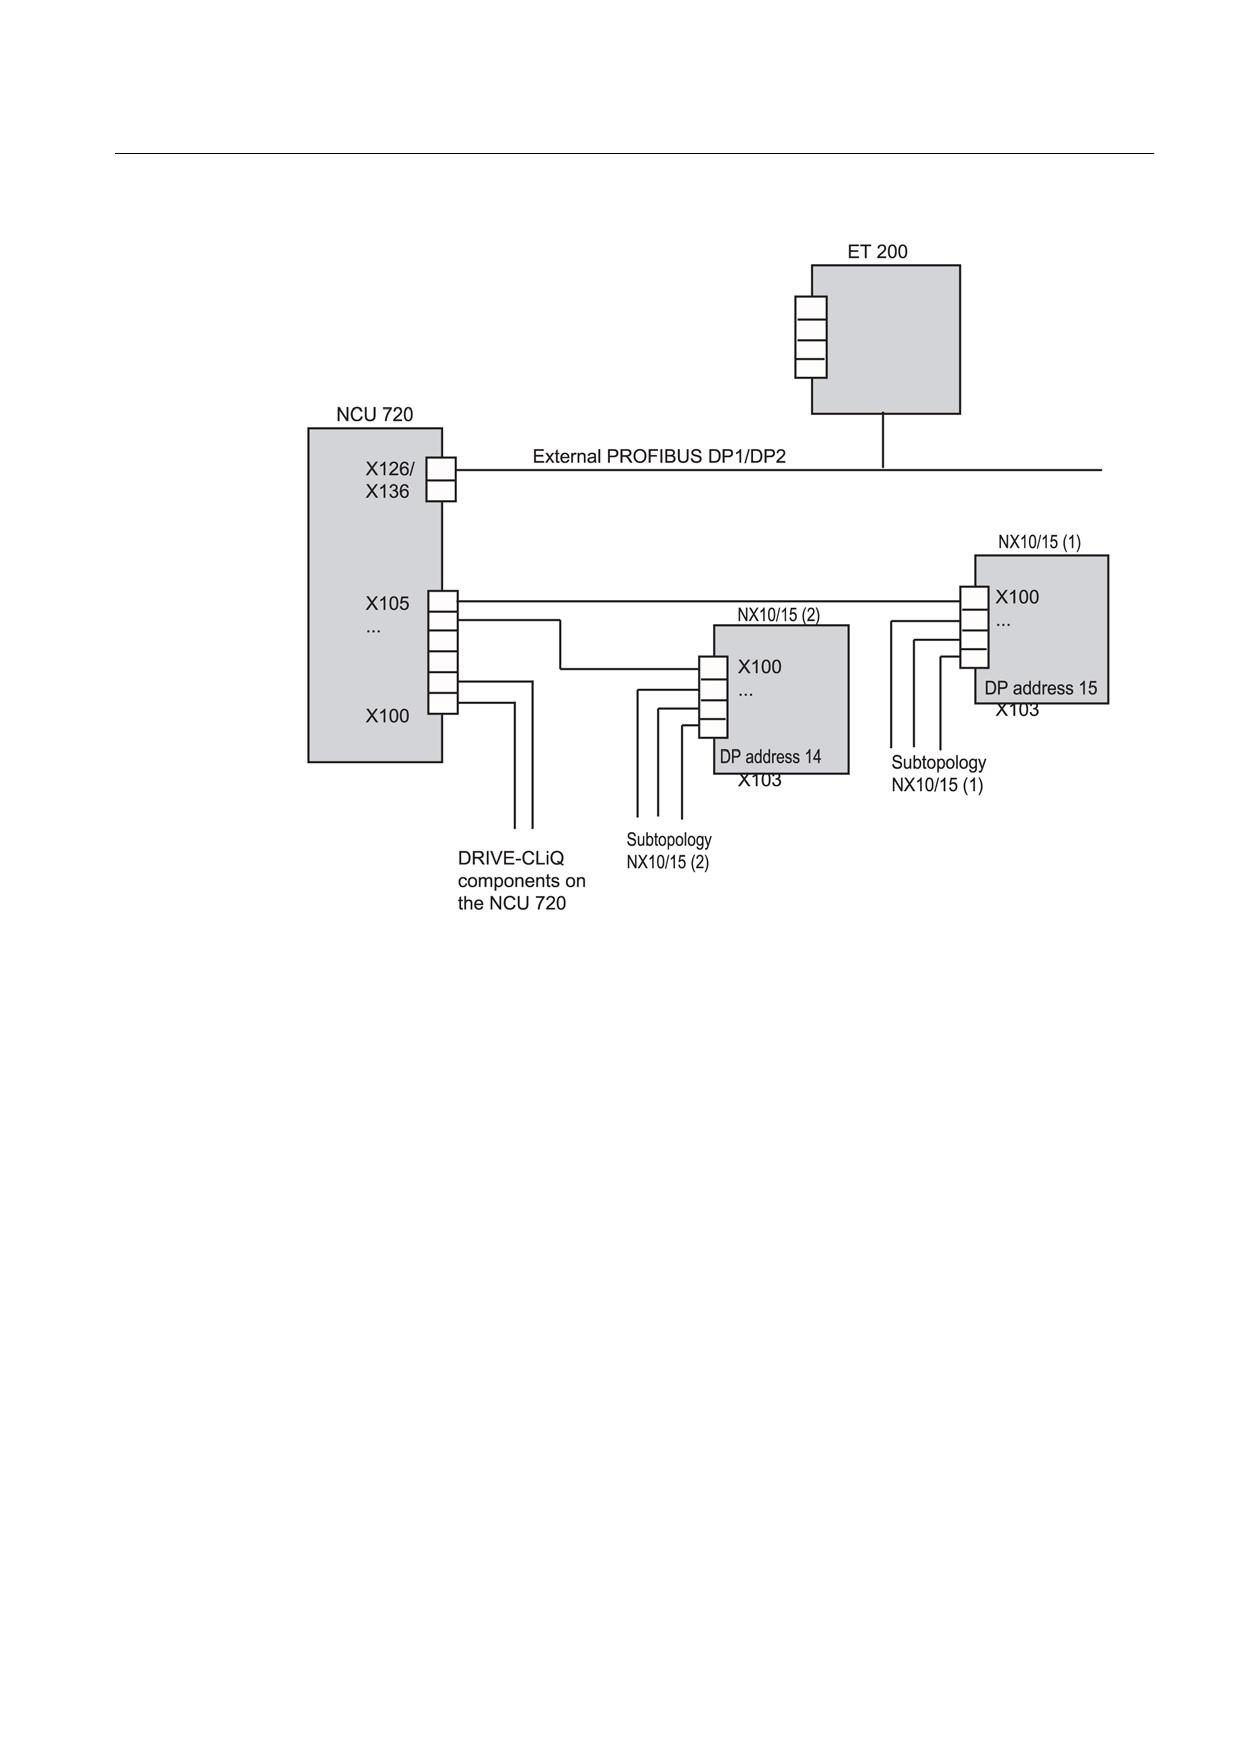
SINUMERIK 840D sl
3.3 Option Board CBE30-2
Figure 3-6
NX10/15 topology
Additional references
For information on commissioning NX components, please refer to the "IBN CNC: NCK,
PLC, Drive Commissioning Manual".
Guidelines for machine configuration
System Manual, MA 01/2013, 6FC5397-6CP10-0BA2
51
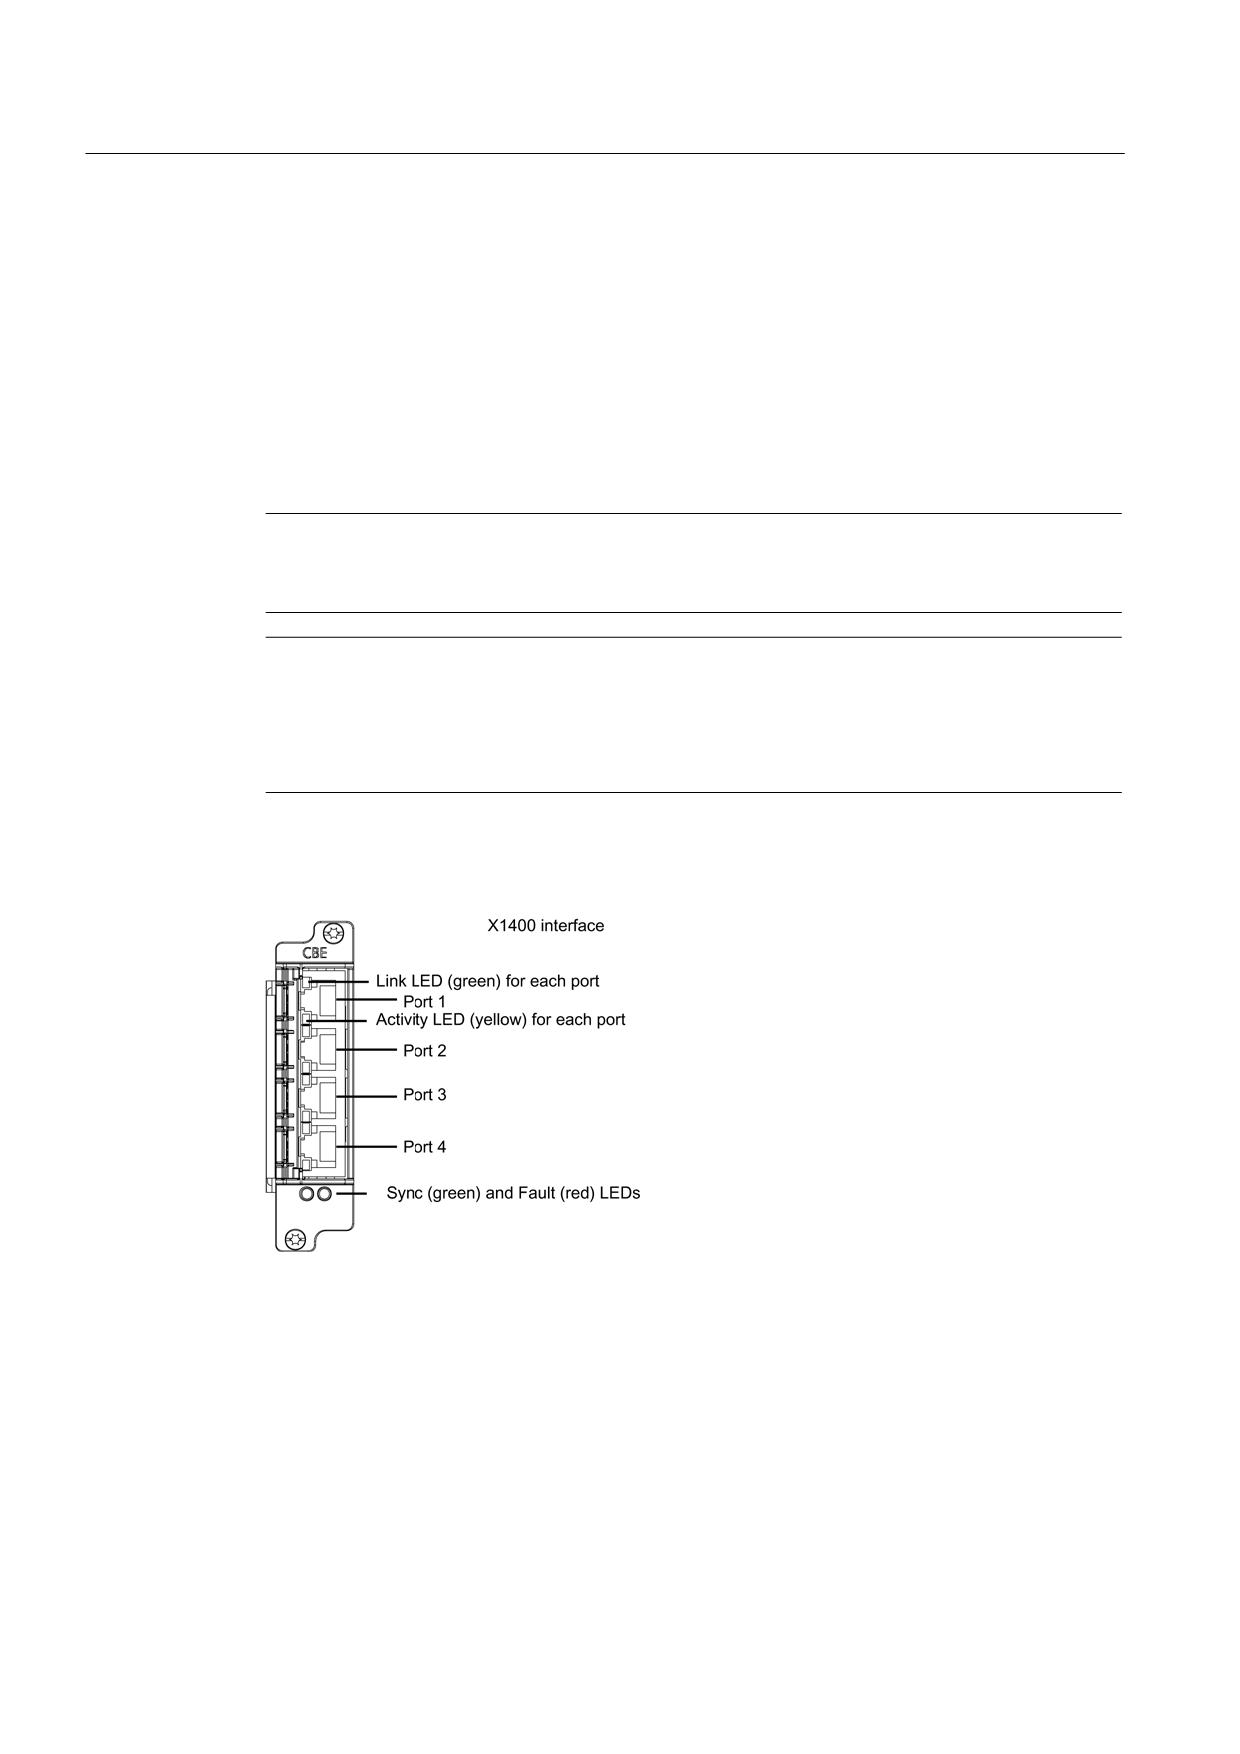
SINUMERIK 840D sl
3.3 Option Board CBE30-2
3.3
Option Board CBE30-2
3.3.1
Description
Using the Communication Board Ethernet CBE30-2, NCU link communication with up to
three NCU 7x0.3 PN Control Units can be configured on the basis of the generally released
standard configuration. In this way, up to 93 axes can be controlled using an NCU. For
CBE30-2, the option slot on the NCU is required.
Note
Only one option slot is available on an NCU 7x0.3 PN. This means that it is not possible to
use a CBE30-2 and other optional modules in parallel.
Note
Project-specific expansion
For a specific project, an NCU link group with more than three NCUs is available on request
from your regional Siemens contact person. Unless project-specific extensions are
implemented, more than three NCUs will be rejected with alarm 380020.
Illustration
Figure 3-7
CBE30-2 Ethernet communication board
Guidelines for machine configuration
52
System Manual, MA 01/2013, 6FC5397-6CP10-0BA2
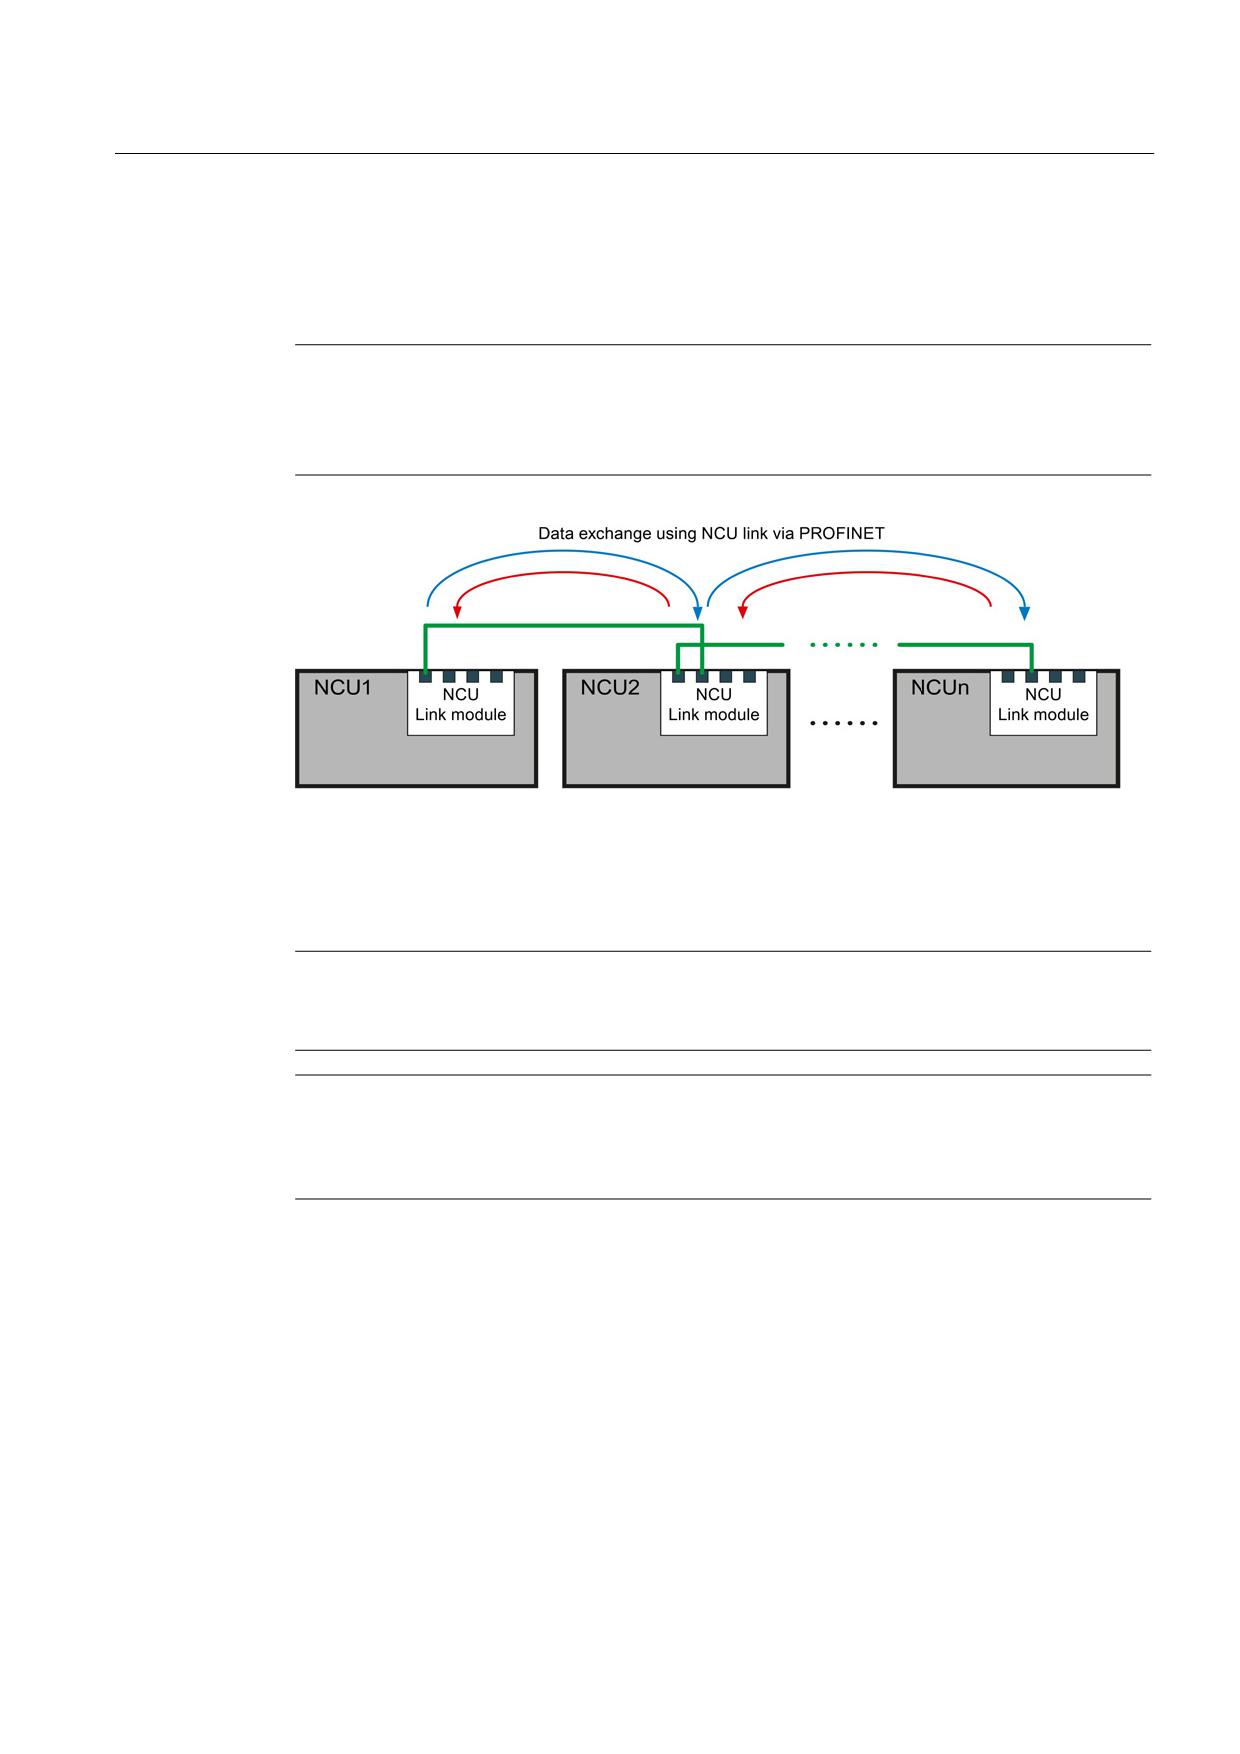
SINUMERIK 840D sl
3.3 Option Board CBE30-2
Link communication
The CBE30-2 is an optional PROFINET module for isochronous real-time communication
(IRT) via Ethernet.
Note
CBE30-2 only for use as link module
The CBE30-2 can only be used for NCU link communication. It is not possible to use it for
general PROFINET communication.
Figure 3-8
Principle of NCU link communication
The NCU link communication enables cross-NCU data exchange that is synchronous with
the interpolation cycle. Depending on the active functions, cyclic and non-cyclic data
transmissions occur between the NCUs involved in link communication.
Note
The NCU link communication is exclusively operated using ports 1 and 2. Ports 3 and 4
cannot be used and are not freely available.
Note
You can find more detailed information in the SINUMERIK 840D sl NCU 7x0.3 PN
Equipment Manual, as well as in the SINUMERIK 840D sl/828D Extension Functions
Function Manual.
Guidelines for machine configuration
System Manual, MA 01/2013, 6FC5397-6CP10-0BA2
53
SINUMERIK 840D sl
3.3 Option Board CBE30-2
Guidelines for machine configuration
54
System Manual, MA 01/2013, 6FC5397-6CP10-0BA2
SINAMICS drive line-up
4
4.1
Structure of the drive line-up
4.1.1
Description
The individual components, such as the Control Unit and power units, can be attached
directly to each other without any separation. The specified safety and ventilation clearances
above, below, and in front of the associated components must be observed. The maximum
configuration of the drive line-up depends on the rated power of the Line Module or on the
current-carrying capacity of the DC link busbars of the individual components.
The components can be arranged in a single row or multiple rows, or they can be distributed.
In a multiple-row arrangement, vertical installation or, in a cabinet row, side-by-side
installation in different cabinet sections is possible.
Line filters and line reactors are connected between the power supply and the Line Module
in order to stabilize the line infeed and energy recovery. In the case of Active Line Modules,
Active Interface Modules are generally used instead of line filters and reactors.
NOTICE
Risk of fire due to excessively long power cables
Excessively long power cables can lead to overheating and a risk of fire, which may result
in the components being destroyed.
• Make sure that the total length of all the power cables does not exceed the values listed
in the chapter titled Maximum cable lengths (Page 474).
Note
Arrangement of Motor Modules
Higher-power Motor Modules must be placed directly next to the Line Module. The lower-
power components then follow. This prevents the DC link busbar of the associated
component becoming overloaded (see the chapter titled Current-carrying capacity of the DC
link busbar (Page 161)).
Note
Take appropriate measures to fulfill EMC requirements (see the chapters titled Line filters
(Page 125) and Shielding and installing cables (Page 471)).
Guidelines for machine configuration
System Manual, MA 01/2013, 6FC5397-6CP10-0BA2
55
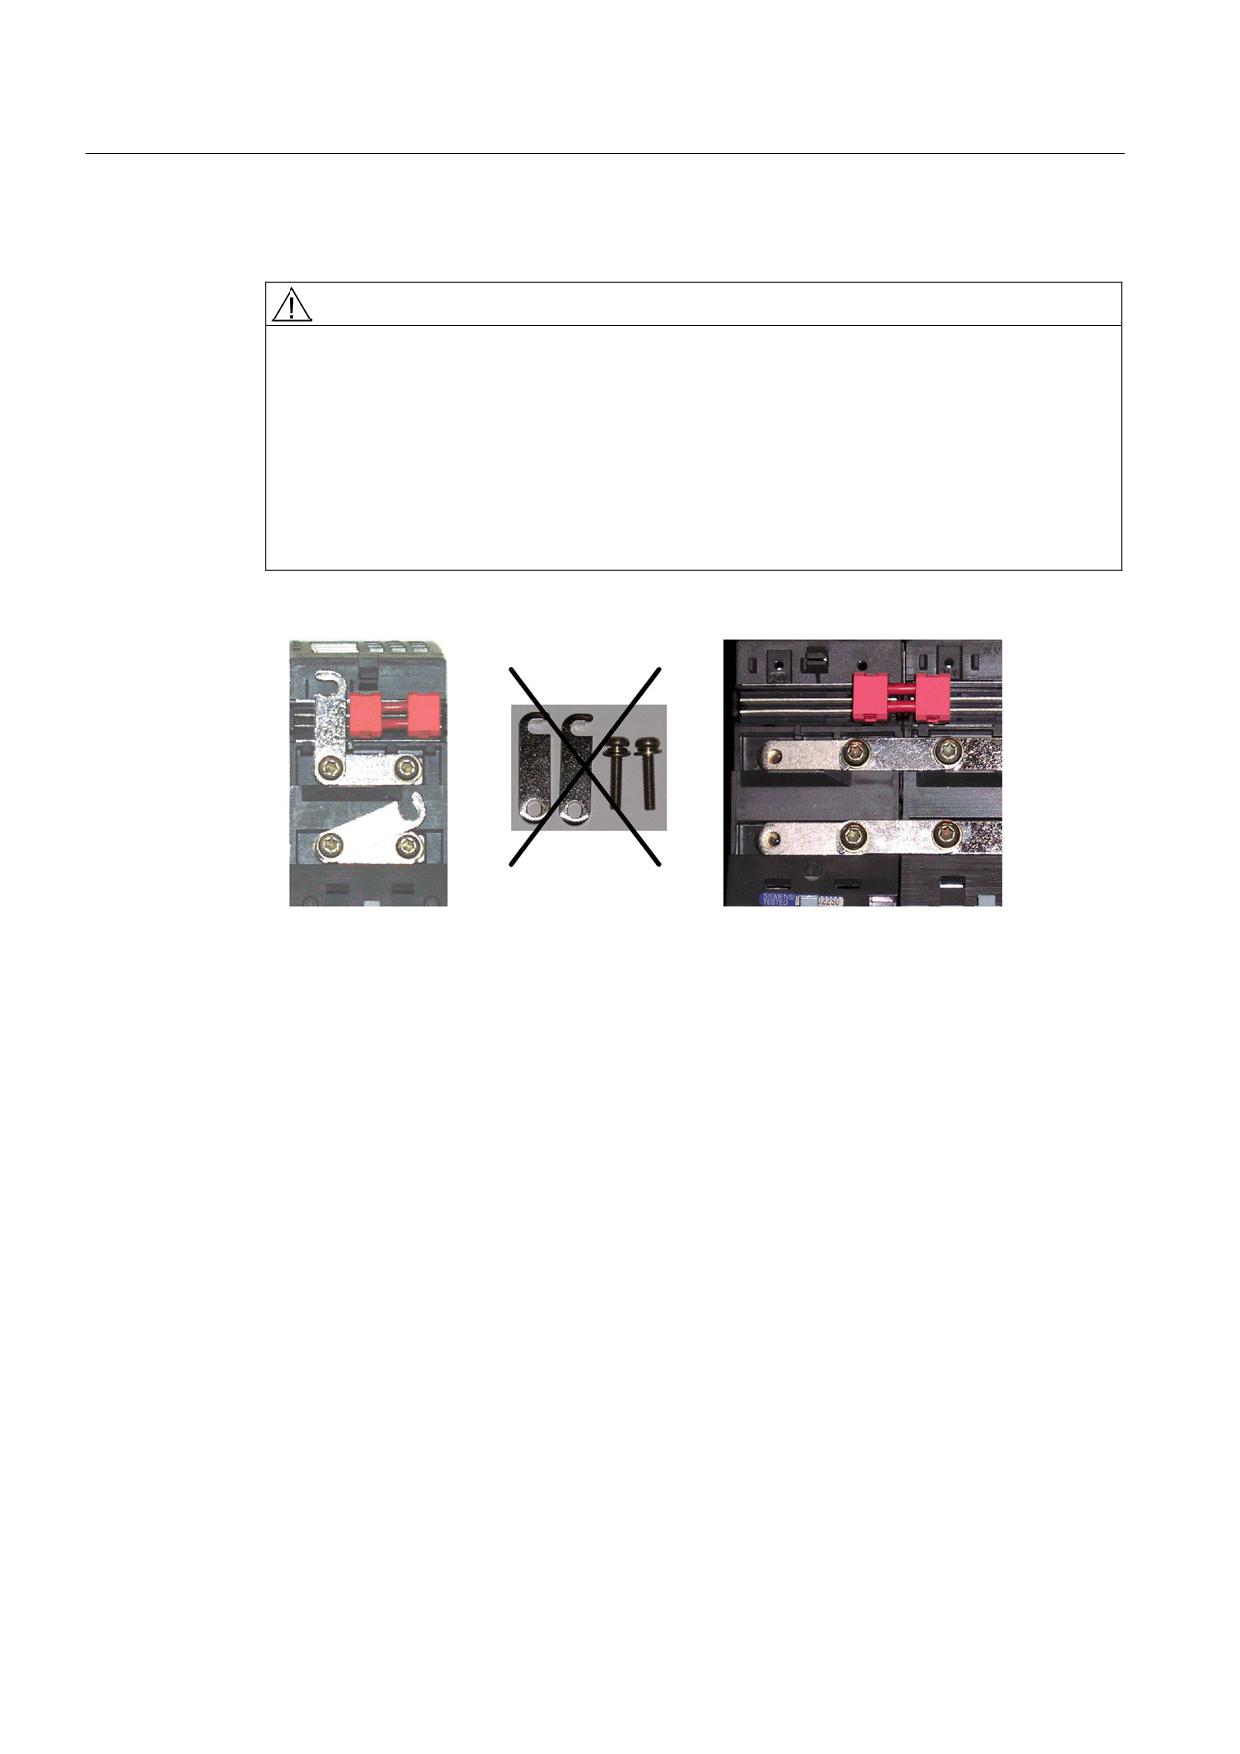
SINAMICS drive line-up
4.1 Structure of the drive line-up
Note concerning the use of components with a width of 50 mm
DANGER
Danger to life due to electric shock resulting from incorrectly installed DC link bridges
Incorrectly installed DC link bridges at the left-hand end of the drive line-up can cause an
electric shock.
• Remove the DC link bridges including the screws on a 50 mm-wide Motor Module or DC
link module.
• Do not tighten the screws without the DC link bridges.
• For all components that are 75 mm wide or wider, the DC link bridges must not be
moved to the left or removed.
Figure 4-1
Removal of the DC link bridge
The DC link bridges must be removed by loosening the M4 screws.
Guidelines for machine configuration
56
System Manual, MA 01/2013, 6FC5397-6CP10-0BA2
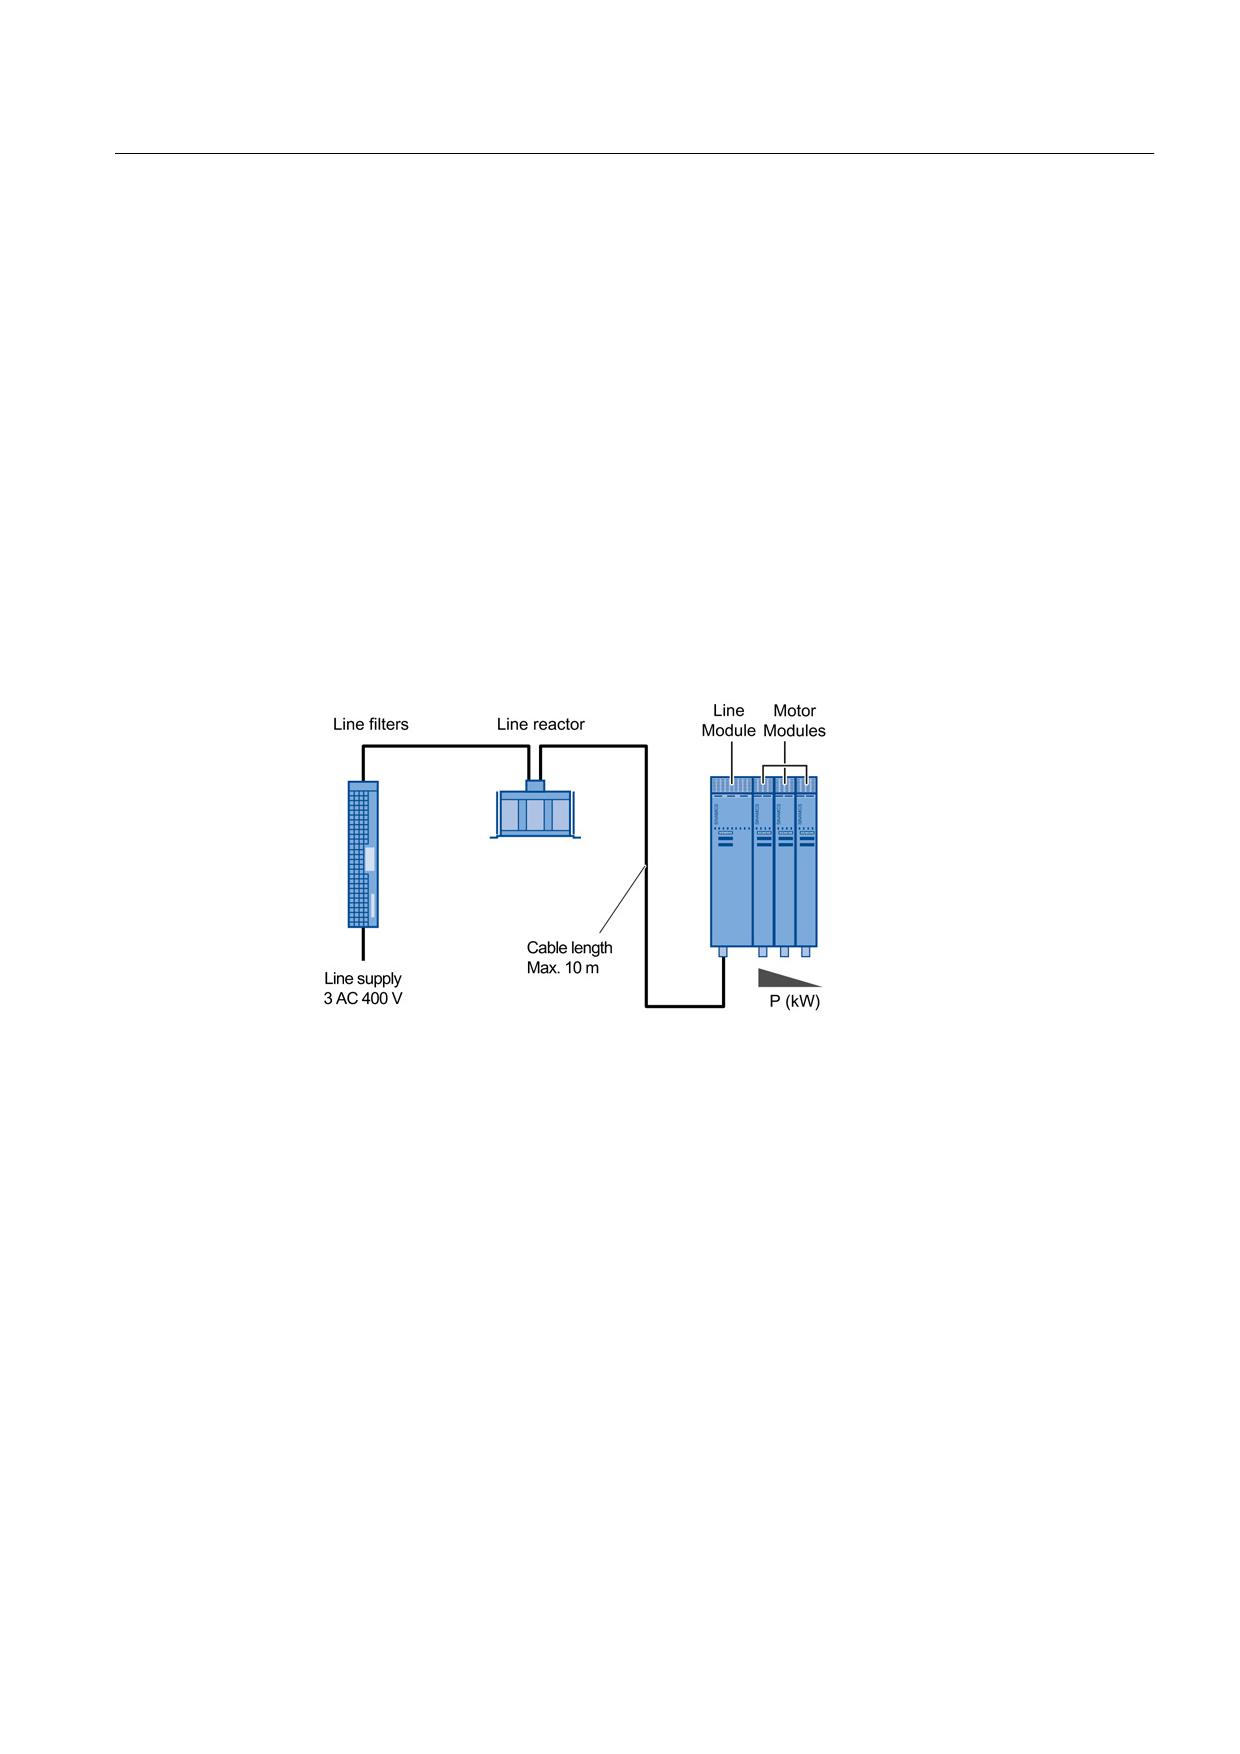
SINAMICS drive line-up
4.1 Structure of the drive line-up
4.1.2
Single row layout
All required components, such as Control Unit and power units are arranged in a row. The
drive line-up is constructed depending on the available space in the control cabinet.
The following rule is used as installation rule of the power units from left to right:
● Line Module
● Motor Modules depending on their power, starting with the highest power and ending with
the lowest power
● DC link components (e.g. Braking Module, Control Supply Module, Capacitor Module)
Single row construction with line filter and line reactor
With Smart Line Modules and Basic Line Modules, line stabilizing technology line filters and
line reactors are used.
Figure 4-2
Single row construction with line filter and line reactor
Guidelines for machine configuration
System Manual, MA 01/2013, 6FC5397-6CP10-0BA2
57
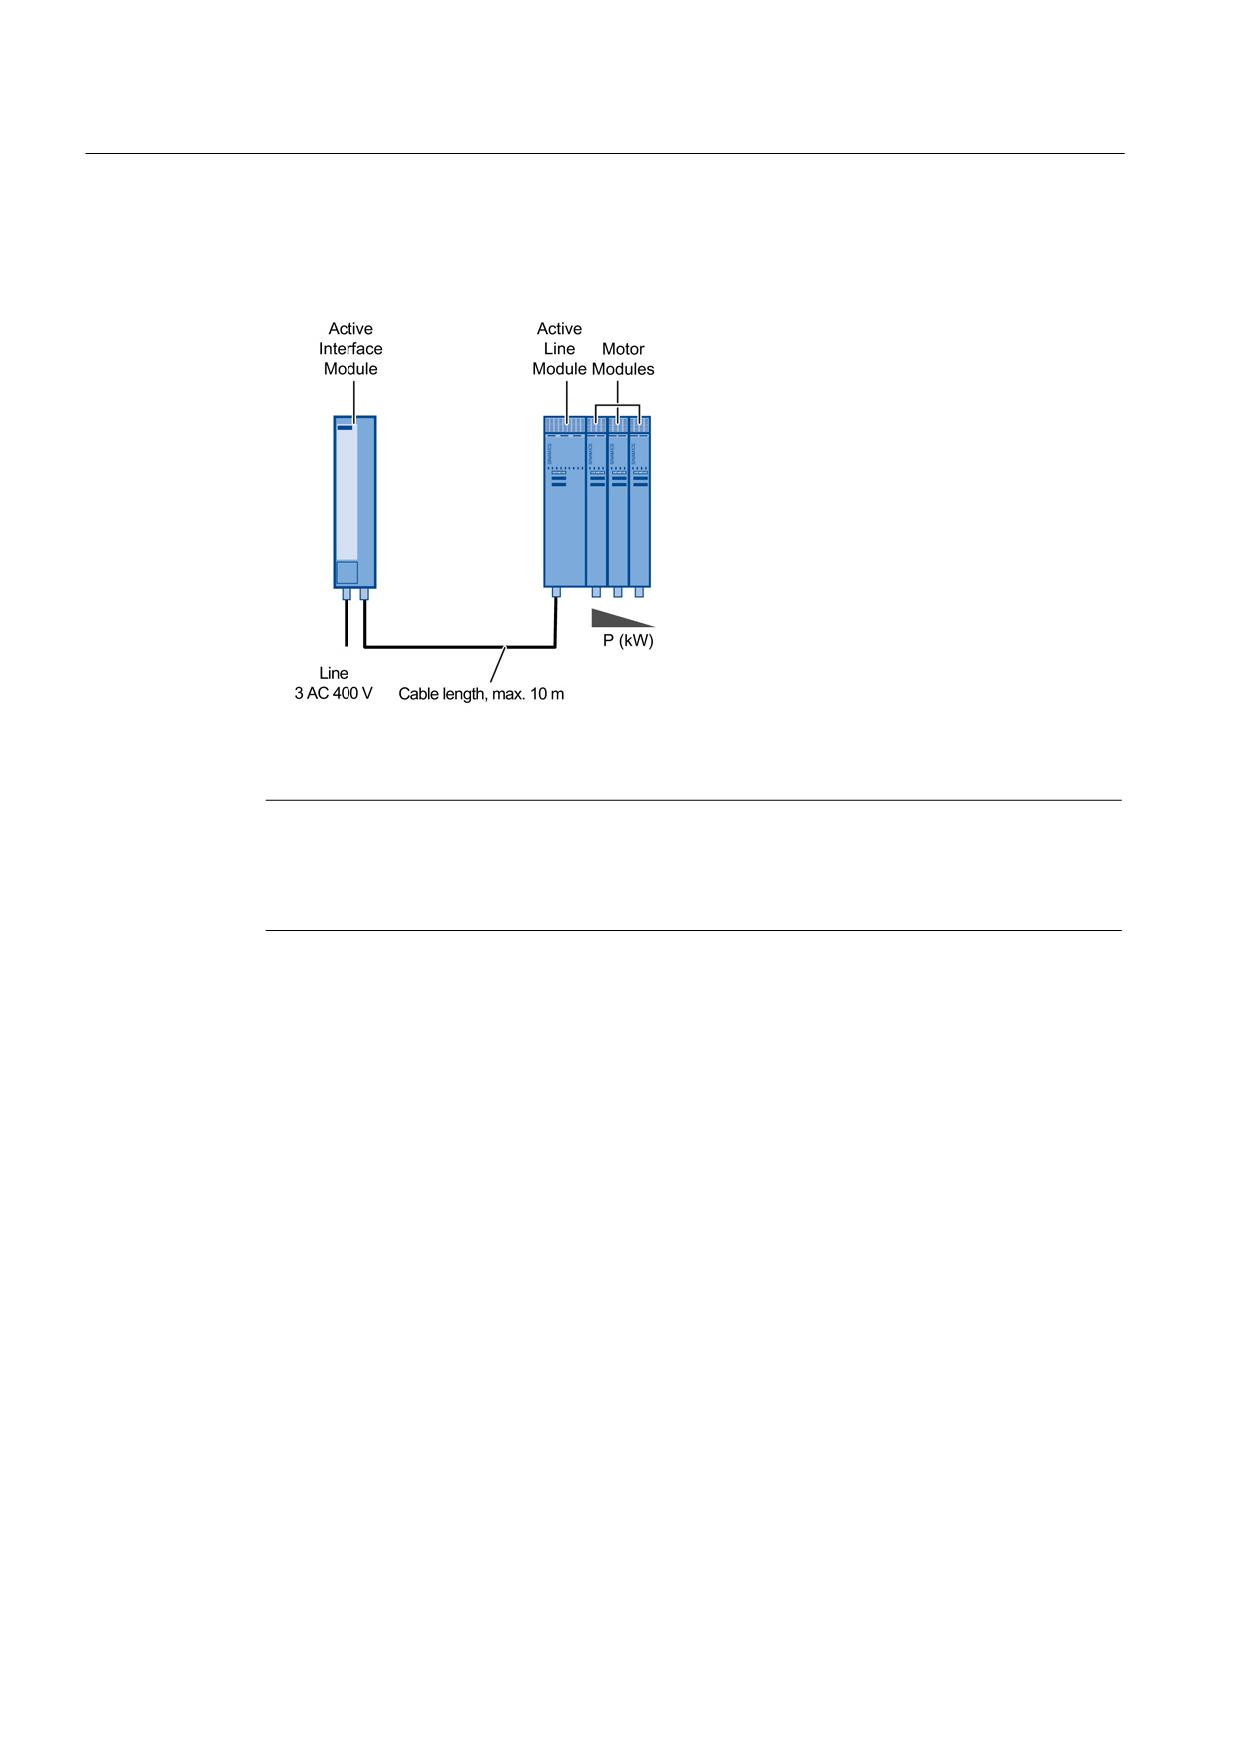
SINAMICS drive line-up
4.1 Structure of the drive line-up
Single row construction with Active Interface Module
Active Interface Modules are used exclusively in combination with Active Line Modules.
Figure 4-3
Single row construction with Active Interface Module
Note
Lower radio interference voltage through the use of a Basic Line Filter
Installing a Basic Line Filter before the AIM improves the radio interference voltage category
(see also the chapter titled Basic Line Filters for Active Line Modules (Page 127)).
See also
Connection of the SINUMERIK components (Page 66)
Guidelines for machine configuration
58
System Manual, MA 01/2013, 6FC5397-6CP10-0BA2
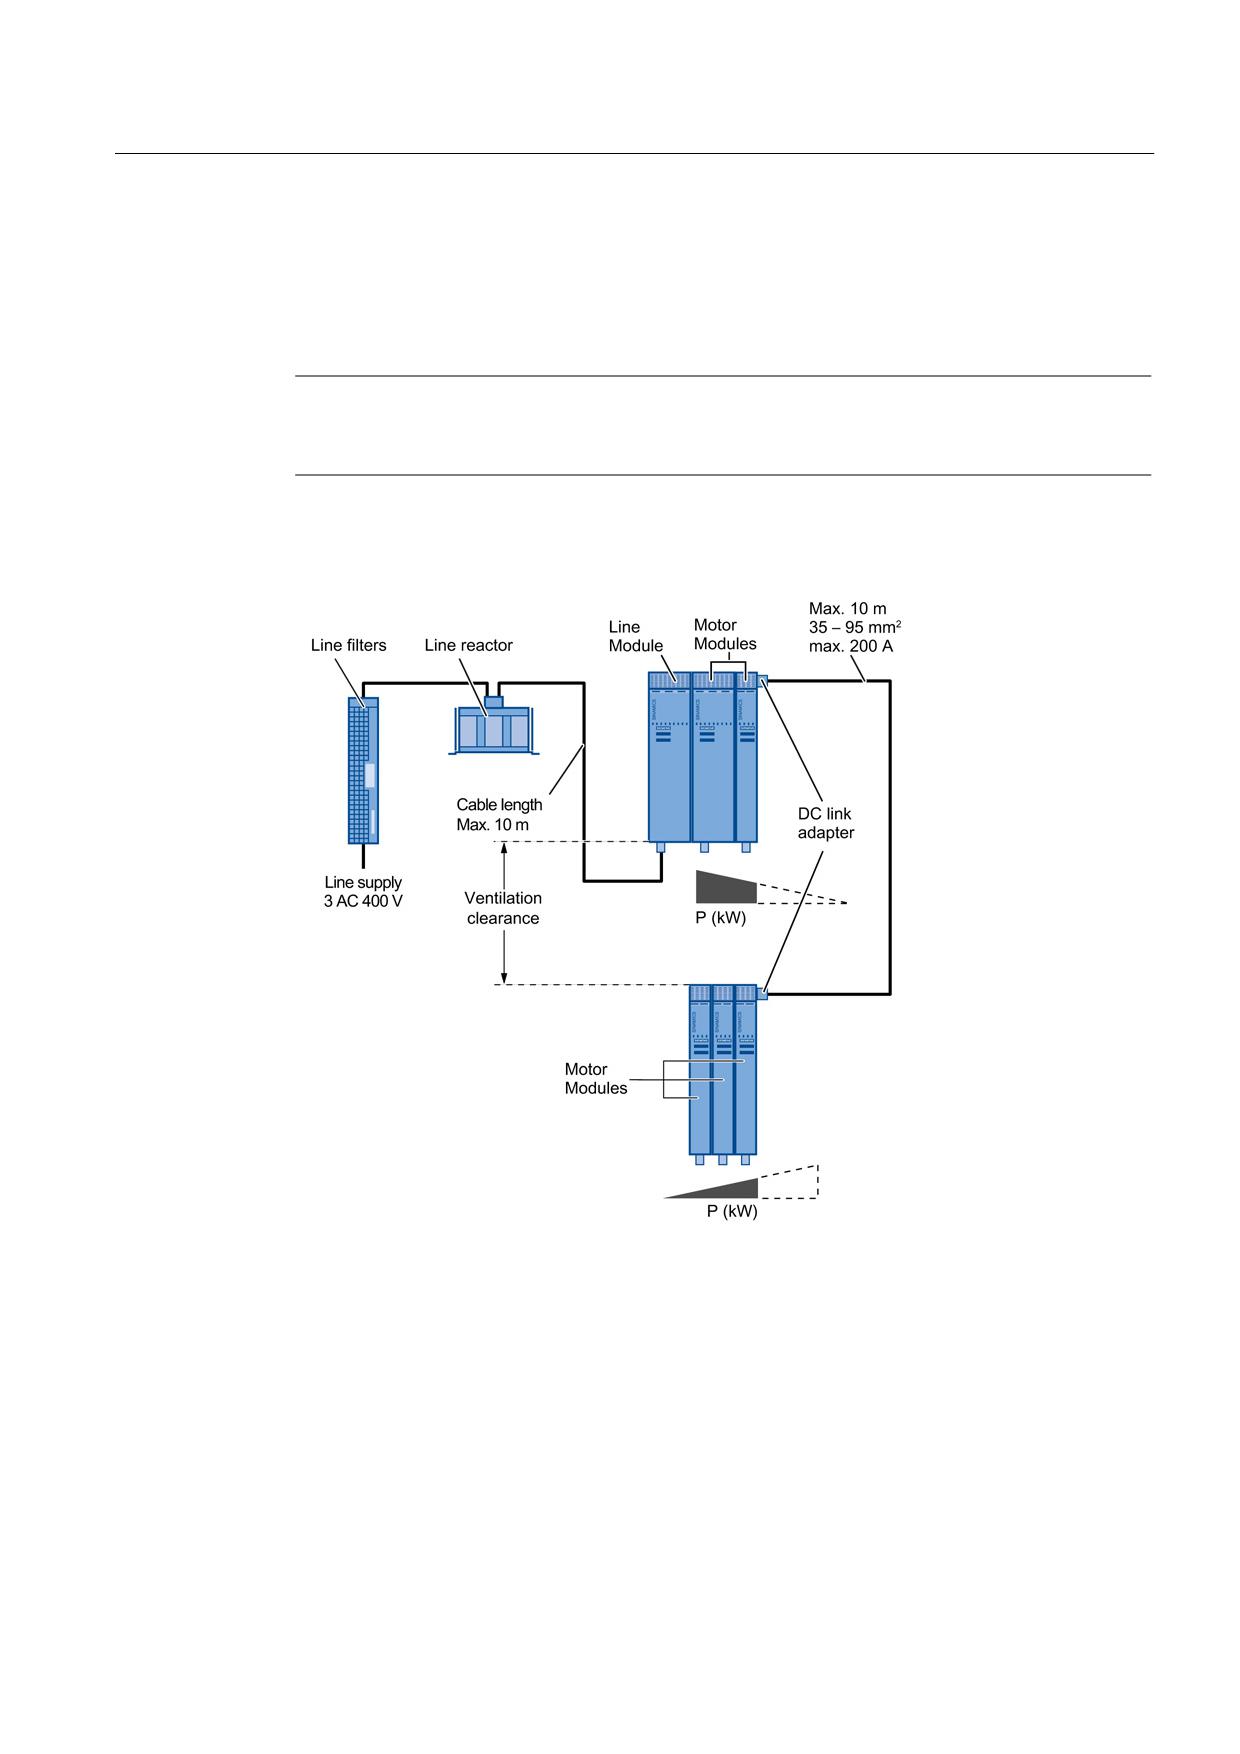
SINAMICS drive line-up
4.1 Structure of the drive line-up
4.1.3
Two-row/Multiple-row construction
The components of the SINAMICS system can also be constructed as two or more rows. As
described above, the limit is the maximum DC link length and the current-carrying capacity of
the DC link busbar.
Note
Observe the installation and ventilation clearances in the chapter titled Note for connection
cable installation clearance (Page 78).
Two/multi-row construction with line filter and line reactor
Figure 4-4
Two-row construction with line filter and line reactor
Guidelines for machine configuration
System Manual, MA 01/2013, 6FC5397-6CP10-0BA2
59
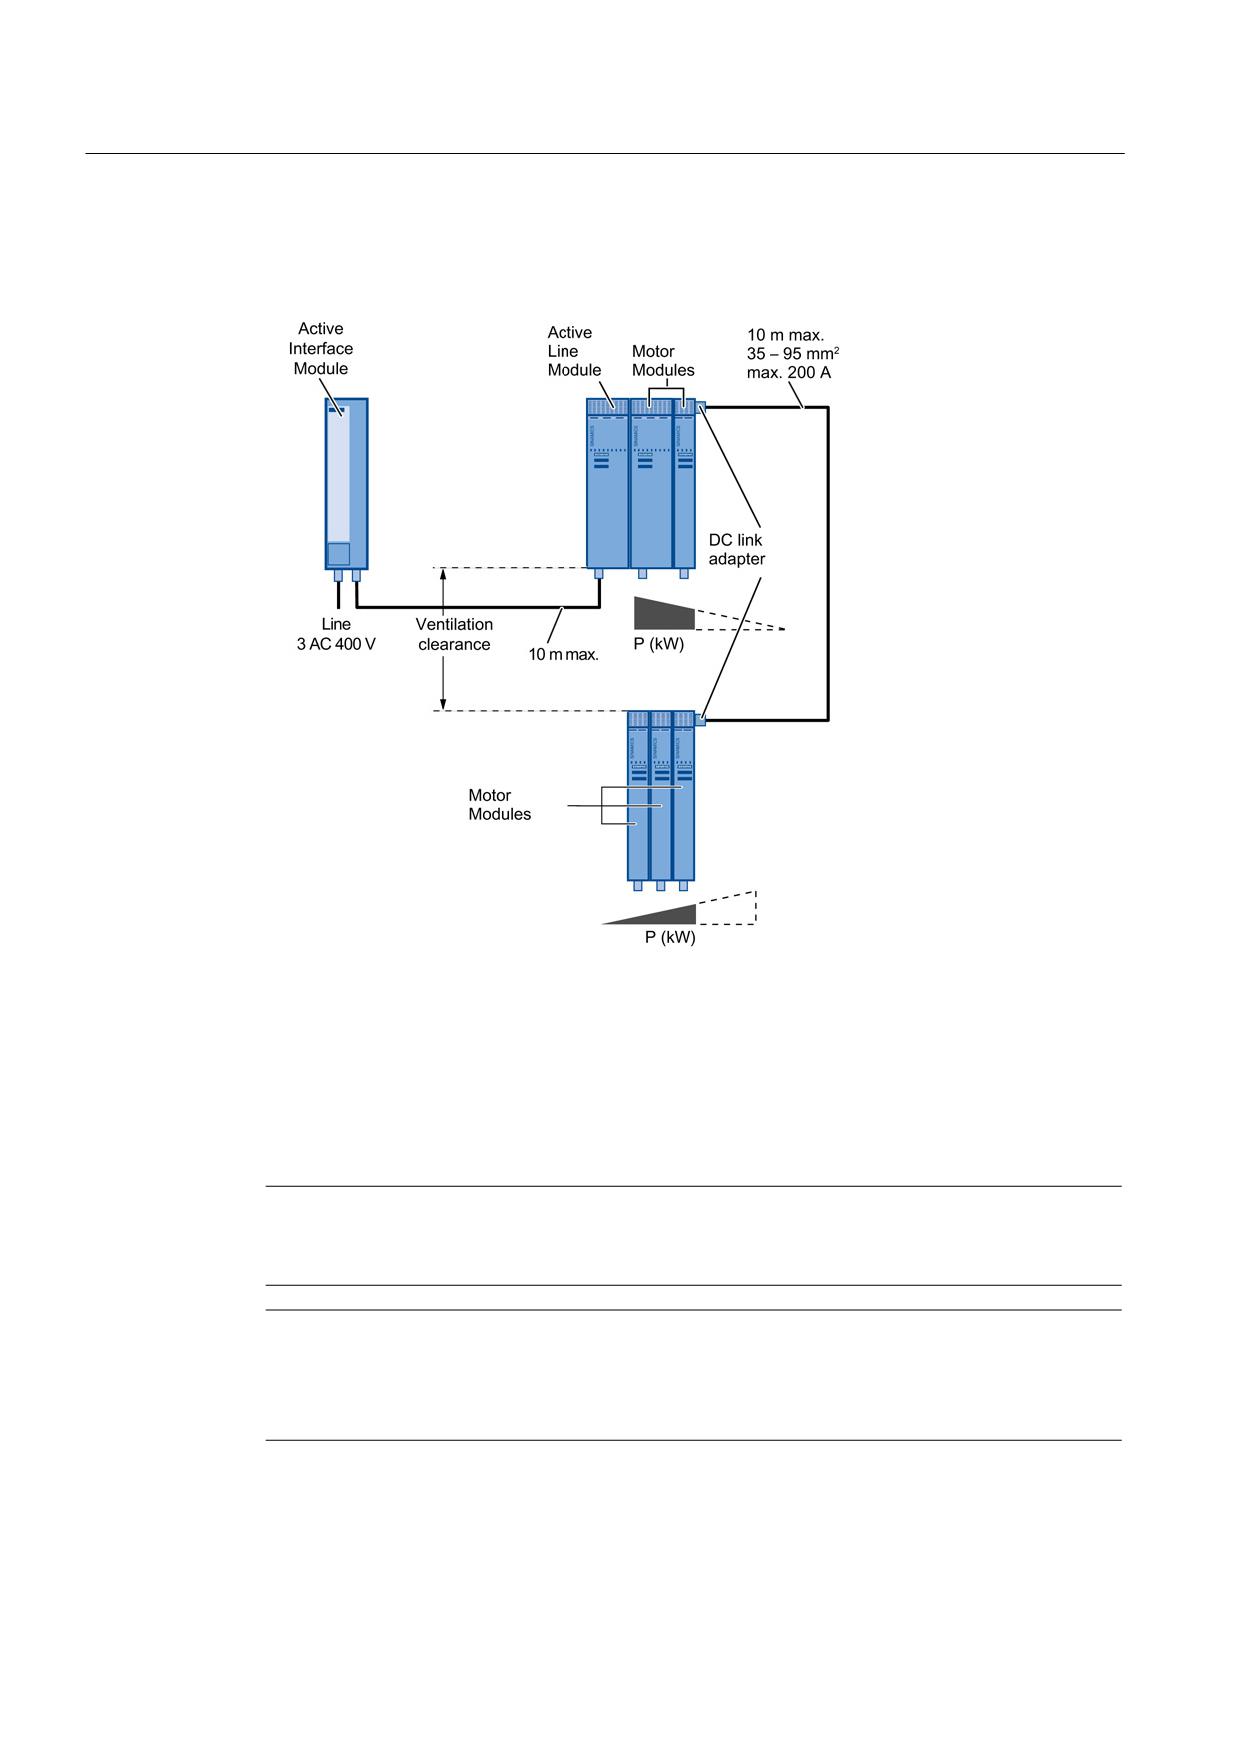
SINAMICS drive line-up
4.1 Structure of the drive line-up
Two/multi-row construction with Active Interface Module
Active Interface Modules are used exclusively in combination with Active Line Modules.
Figure 4-5
Two-row construction with Active Interface Module
DC link adapters are used to forward the DC link. Cross-sections of 35 mm² to 95 mm², max.
200 A, can be connected to the connection terminals.
The wiring outside the components is based on single-core, finely stranded, shielded cables.
These should be laid in such a way that they are inherently short-circuit and earth fault proof.
The individual wires must be shielded, and the shield must be attached at both ends.
Note
For information on the NCU 7x0 or NX1x layout, see Connection of the SINUMERIK
components (Page 66).
Note
Lower radio interference voltage through the use of a Basic Line Filter
Installing a Basic Line Filter before the AIM improves the radio interference voltage category
(see also the chapter titled Basic Line Filters for Active Line Modules (Page 127)).
Guidelines for machine configuration
60
System Manual, MA 01/2013, 6FC5397-6CP10-0BA2
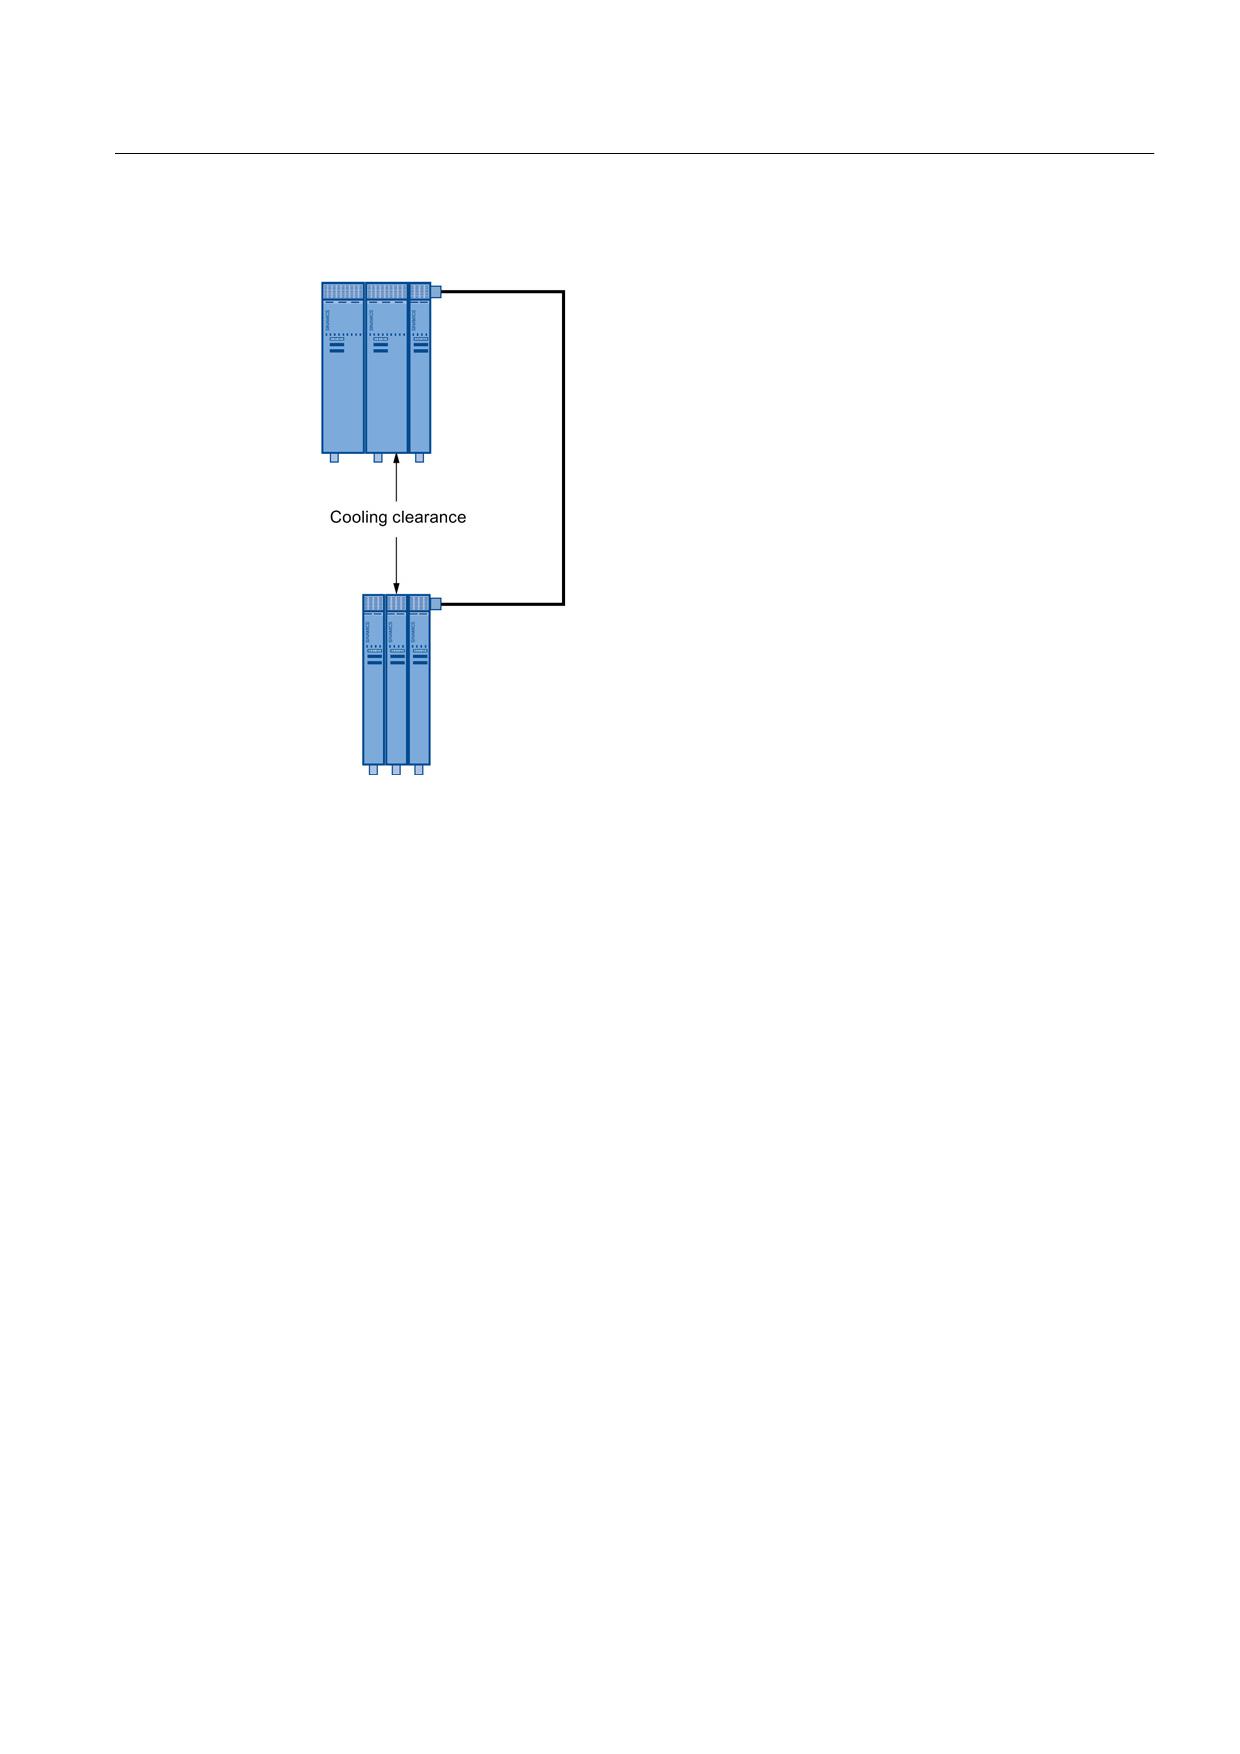
SINAMICS drive line-up
4.1 Structure of the drive line-up
Minimum size for the ventilation clearances for the two-/multi-row construction
Figure 4-6
Ventilation clearance for the two-row construction
● The distance between the rows of components largely depends on the wiring, the cable
cross-section, and the bending radius of the power cables to be connected.
● The inlet temperature of the air sucked in for cooling the components must not exceed
40 °C (with derating, it must not exceed 55 °C). This must be ensured by means of
suitable air guidance, e.g. involving the distance between the component rows or air
baffle plates.
Guidelines for machine configuration
System Manual, MA 01/2013, 6FC5397-6CP10-0BA2
61
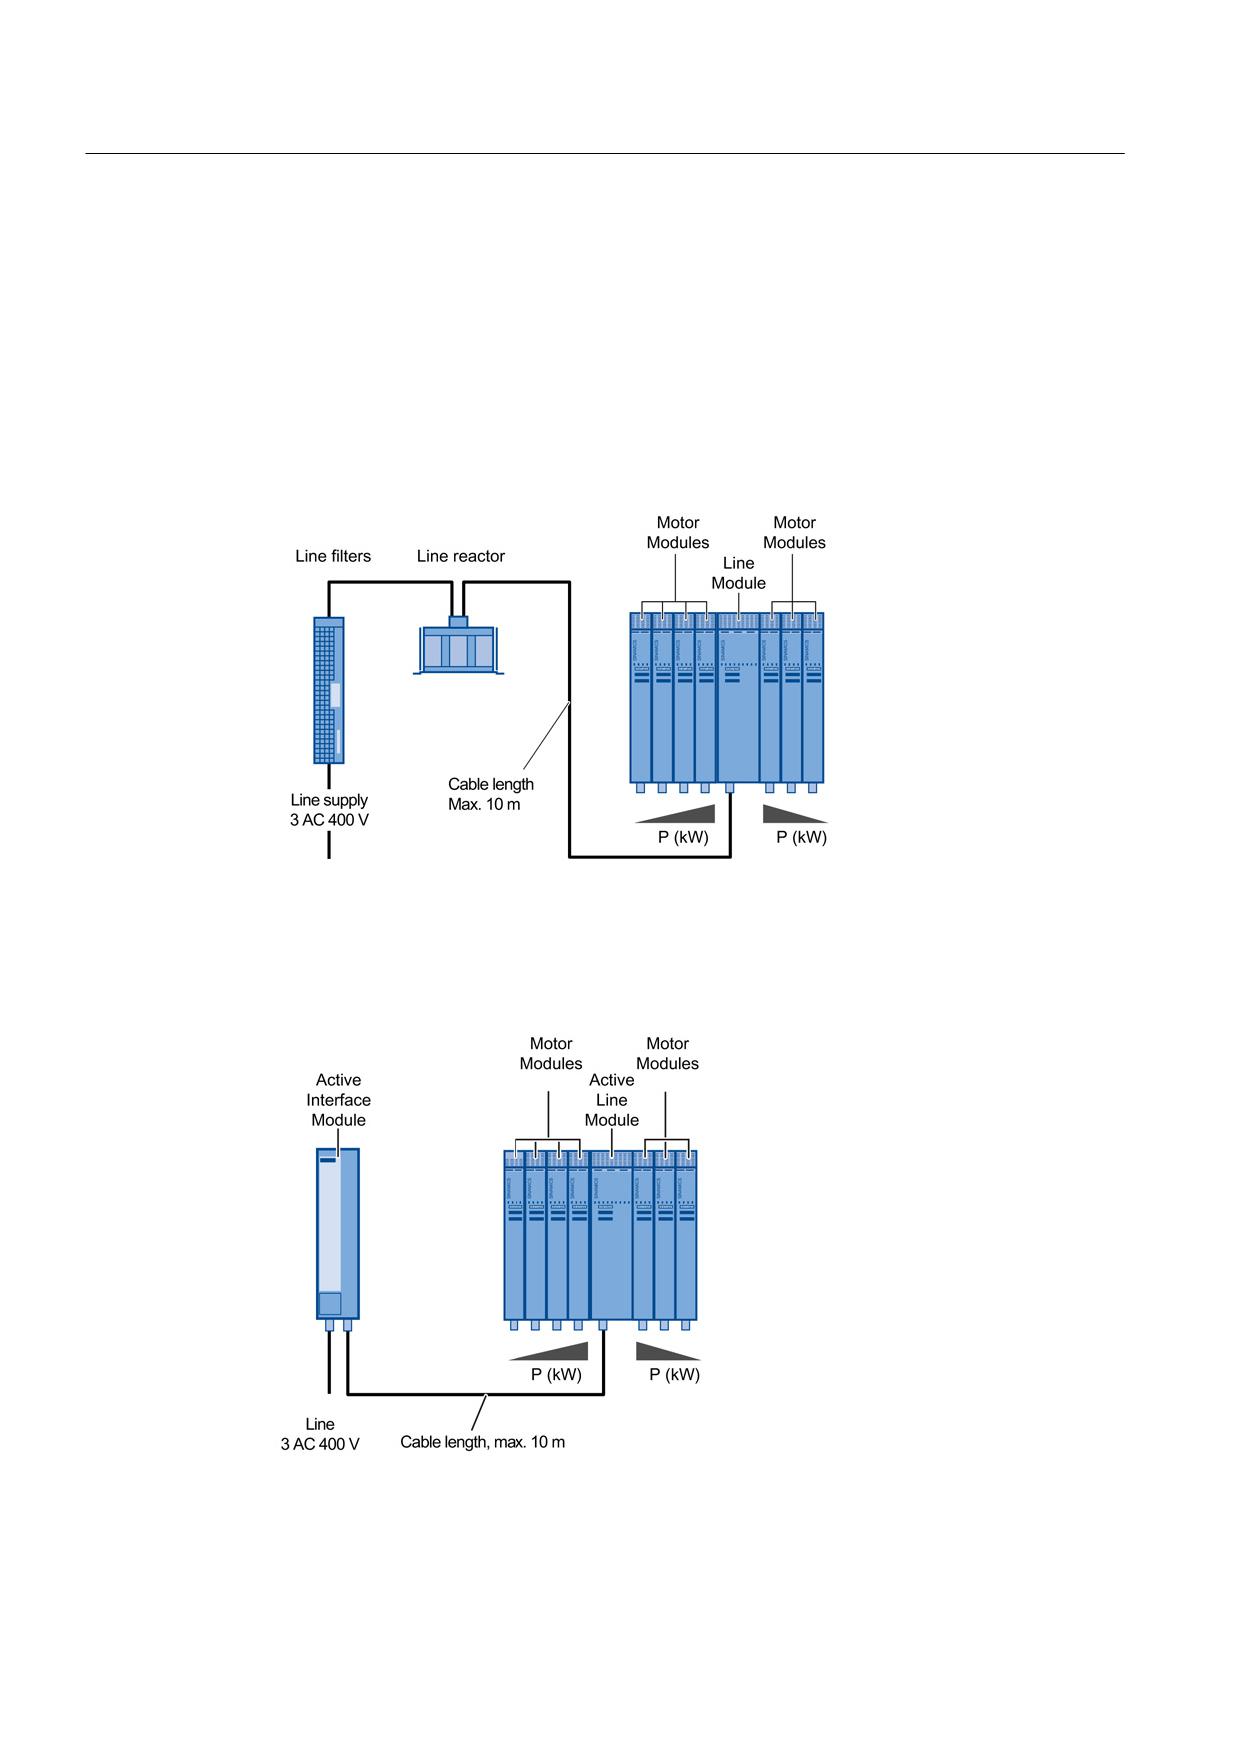
SINAMICS drive line-up
4.1 Structure of the drive line-up
4.1.4
Center infeed (single row construction) for 16 to 120 kW Line Modules
Another variant of the DC link supply is the center infeed. For the 16 to 120 kW Line
Modules, the DC link can be fed from both the left and right side of the device. This allows
the drive group to be mounted on both sides. The installation guidelines are the same as the
previous guidelines.
Center infeed with line filter and line reactor
Figure 4-7
Construction of center infeed with line filter and line reactor
Center infeed with Active Interface Module
Active Interface Modules are used exclusively in combination with Active Line Modules.
Figure 4-8
Center infeed installation with Active Interface Module
Guidelines for machine configuration
62
System Manual, MA 01/2013, 6FC5397-6CP10-0BA2
SINAMICS drive line-up
4.1 Structure of the drive line-up
Note
Lower radio interference voltage through the use of a Basic Line Filter
Installing a Basic Line Filter before the AIM improves the radio interference voltage category
(see also the chapter titled Basic Line Filters for Active Line Modules (Page 127)).
Note
For information on the NCU 7x0 or NX1x layout, see the chapter titled Connection of the
SINUMERIK components (Page 66).
4.1.5
Distributed configuration
For the distributed installation, an external busbar is used for the DC link connection. From
there, the cables are led to the power units. DC link rectifier adapters are used for the
connection to the power units..
Depending on the component width, two variants are available:
Component width 50/100 mm
DC link rectifier adapter with connection option from 0.5 mm² to 10 mm²,
max. 36 A.
Component width 150 ... 300 mm
DC link rectifier adapter with connection option from 35 mm² to 95 mm²,
max. 240 A.
Safety instructions
WARNING
Ground fault and short-circuit-proof installation
The DC link connection cables must be laid in such a way that they are ground-fault and
short-circuit proof in accordance with DIN/VDE 0100 or suitable fuse protection must be
provided.
The total length of the DC link (including the connection cables) must not exceed 10 m.
Guidelines for machine configuration
System Manual, MA 01/2013, 6FC5397-6CP10-0BA2
63
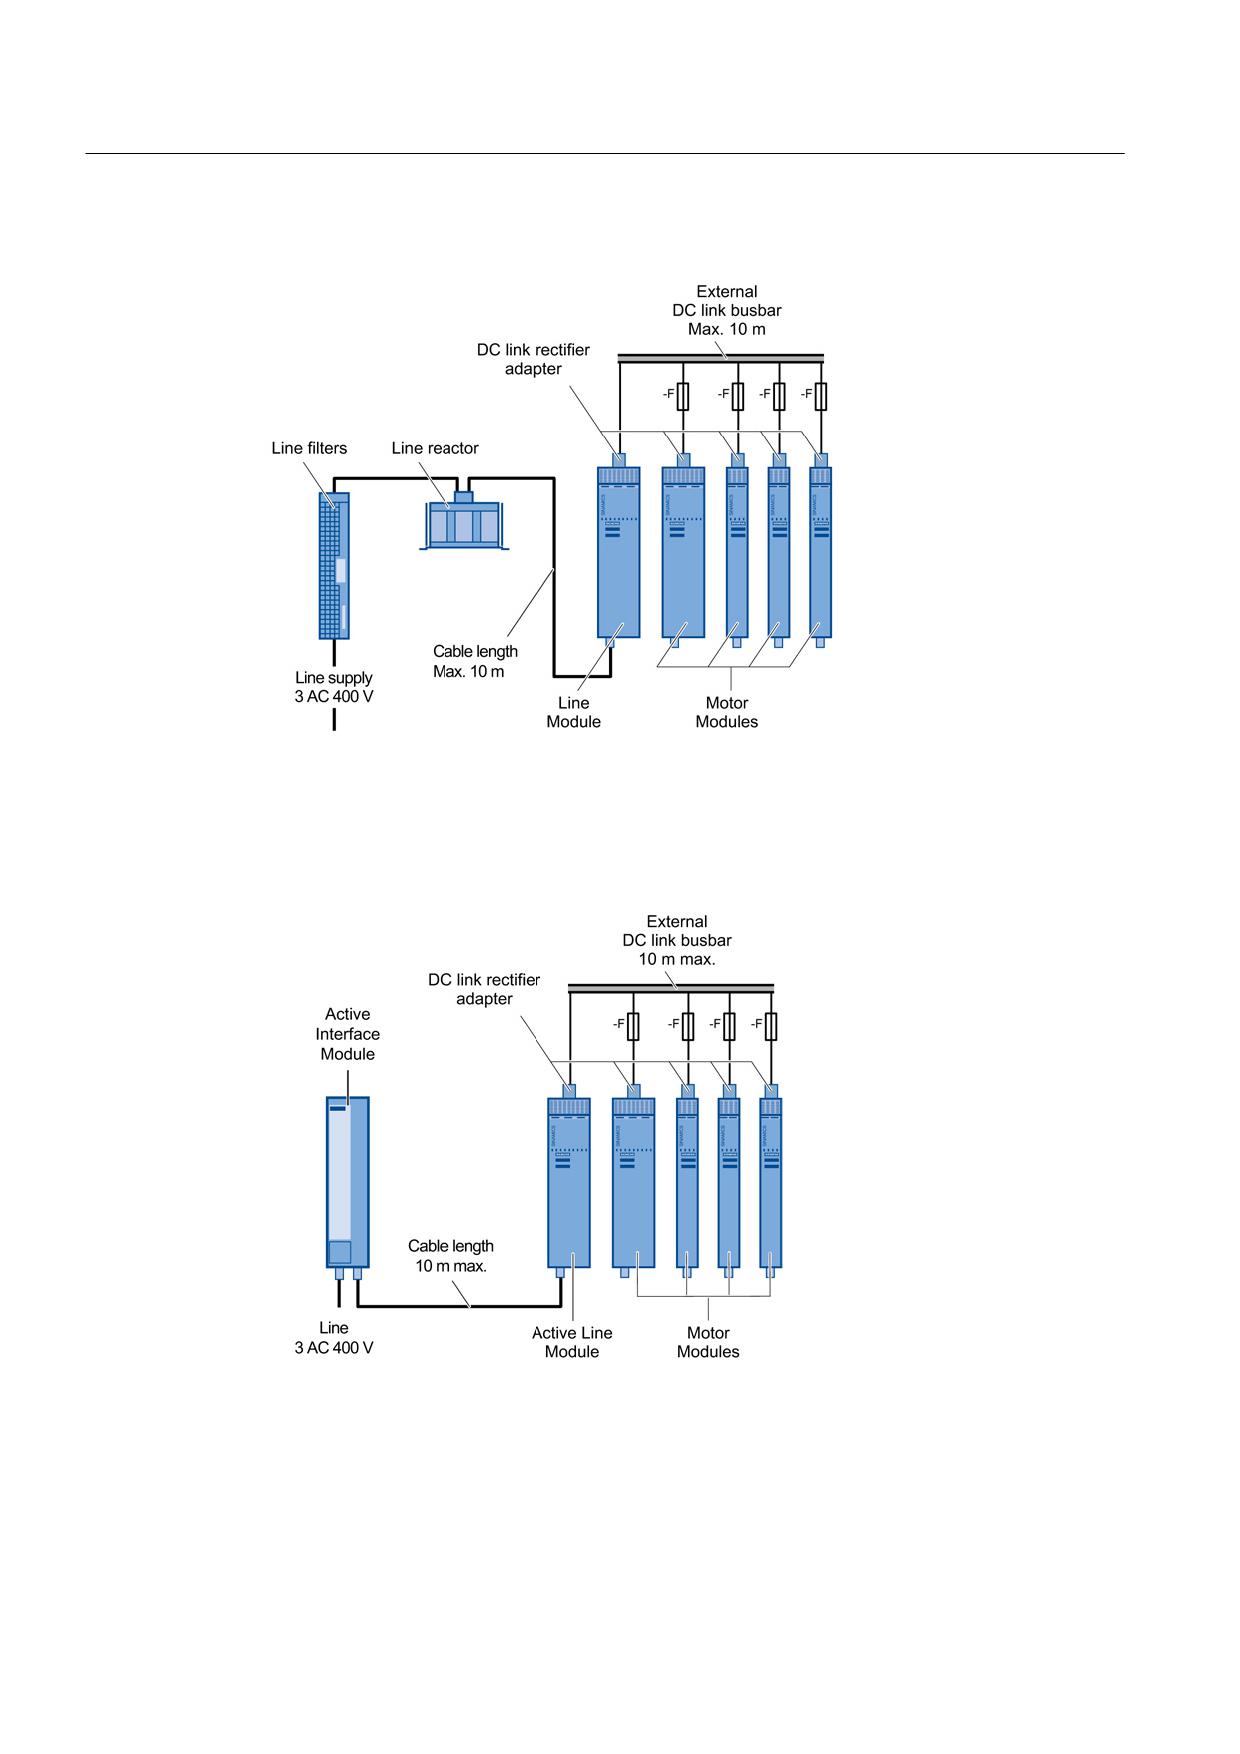
SINAMICS drive line-up
4.1 Structure of the drive line-up
Decentralized structure with line filter and line reactor
Figure 4-9
Decentralized structure with line filter and line reactor
Decentralized structure with Active Interface Module
Active Interface Modules are used exclusively in combination with Active Line Modules.
Figure 4-10 Decentralized structure with Active Interface Module
Guidelines for machine configuration
64
System Manual, MA 01/2013, 6FC5397-6CP10-0BA2
SINAMICS drive line-up
4.1 Structure of the drive line-up
Note
Lower radio interference voltage through the use of a Basic Line Filter
Installing a Basic Line Filter before the AIM improves the radio interference voltage category
(see also the chapter titled Basic Line Filters for Active Line Modules (Page 127)).
Note
Fuses in the power units
The fuses shown in the figures above are optional, as booksize power units already have
internal fuse protection. This also means that it is not essential to use short-circuit-proof
cables.
Additional references
For details of DC link rectifier adapters in booksize format and how to install them, as well as
information on cable installation, please refer to
/GH2/ SINAMICS S120/ Booksize Power Units Equipment Manual/.
Guidelines for machine configuration
System Manual, MA 01/2013, 6FC5397-6CP10-0BA2
65
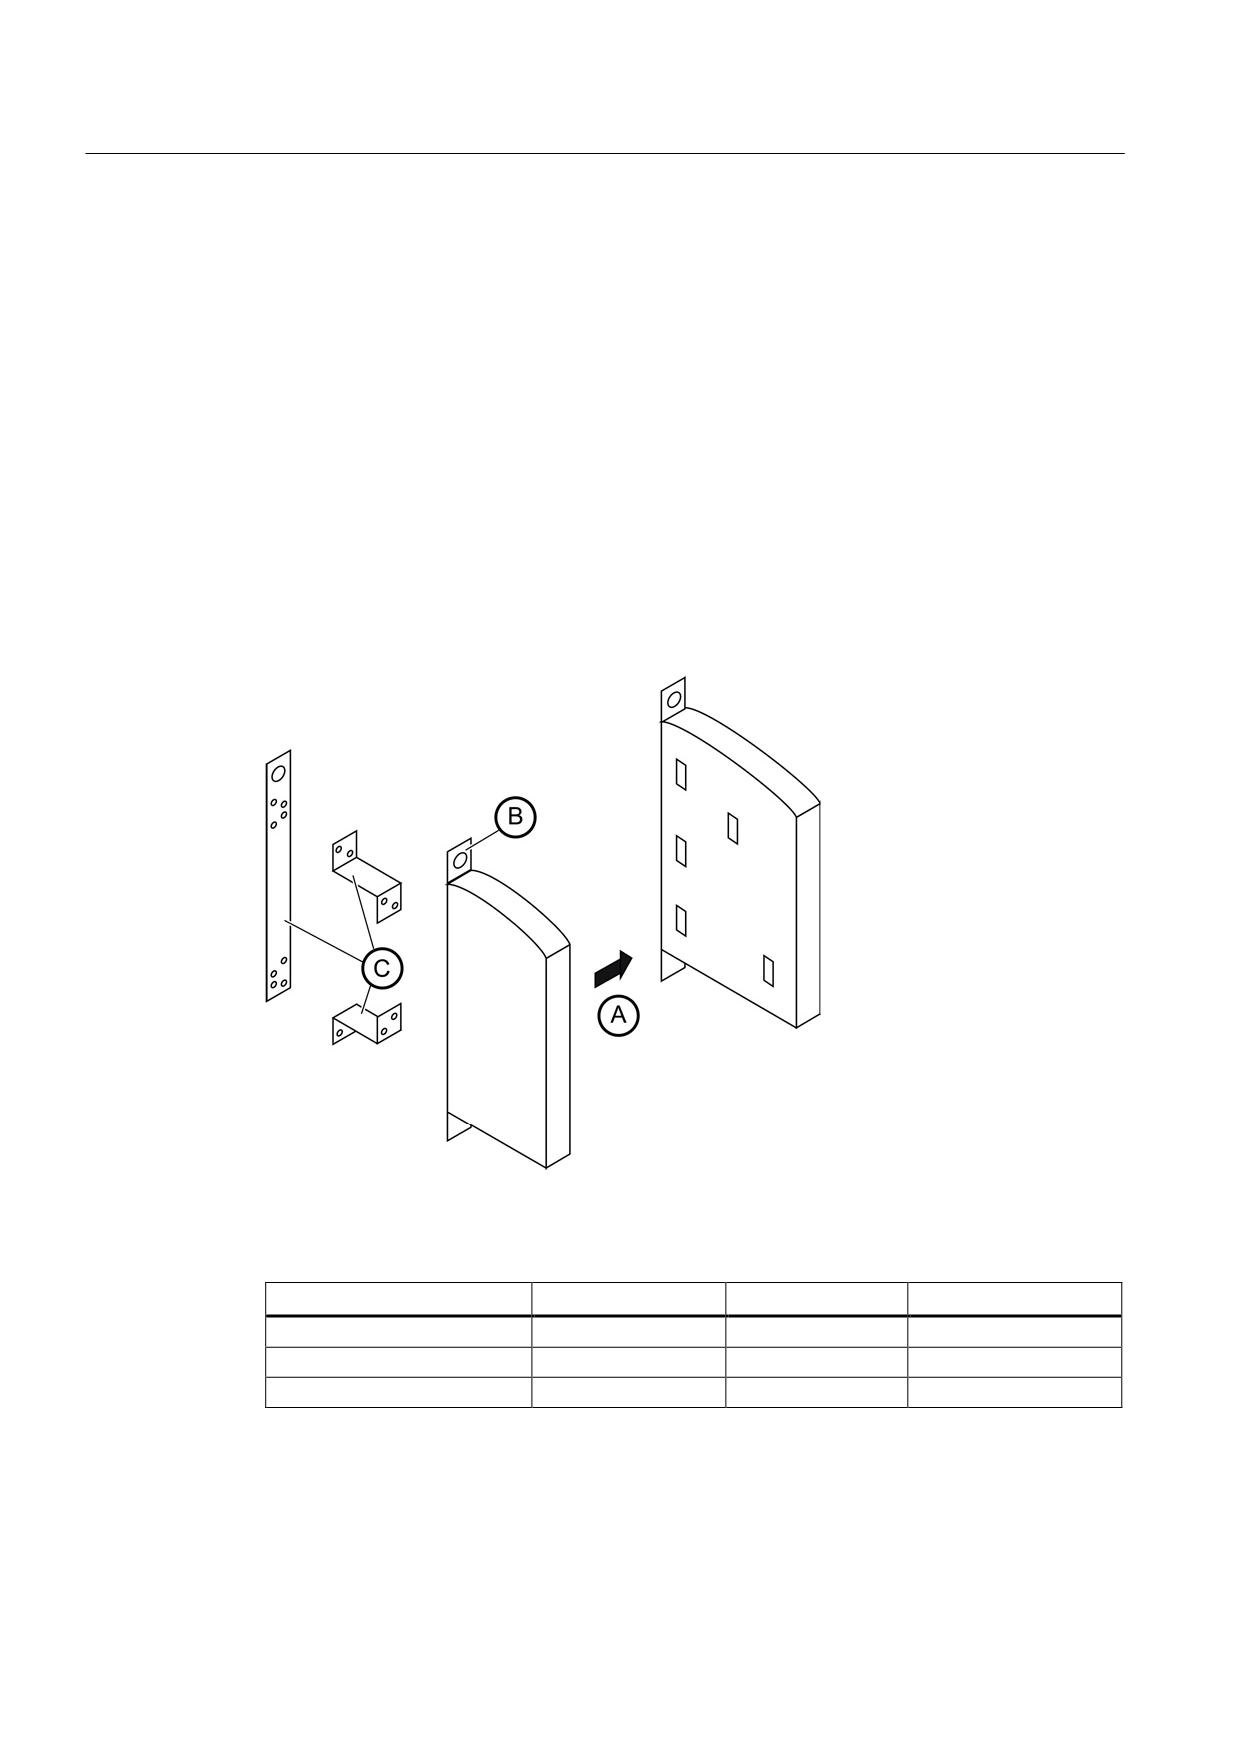
SINAMICS drive line-up
4.2 Connection of the SINUMERIK components
4.2
Connection of the SINUMERIK components
4.2.1
Layout and fastening of the NCU/NX modules
Fastening the NCU 7x0/NX modules
For the fastening of the NCU / NX modules, a differentiation is made between fastening
using direct installation, using fastening clip or using spacers.
The fastening of the NX component to the NCU differs depending on whether an NCU 710 or
an NCU 720/730 is used (cooling fins on the rear side of the NCU 720/730).
Fastening Possibilities
Figure 4-11 Main NCU-NX mounting types
Table 4- 1
Fastening possibilities for NCU 7x0 and NX
NCU 7x0
NX
NCU 7x0+NXs
A (direct to the Line Module)
possible
possible
-
B (with fastening clip)
-
possible
-
C (with spacer)
possible
possible
possible
Guidelines for machine configuration
66
System Manual, MA 01/2013, 6FC5397-6CP10-0BA2
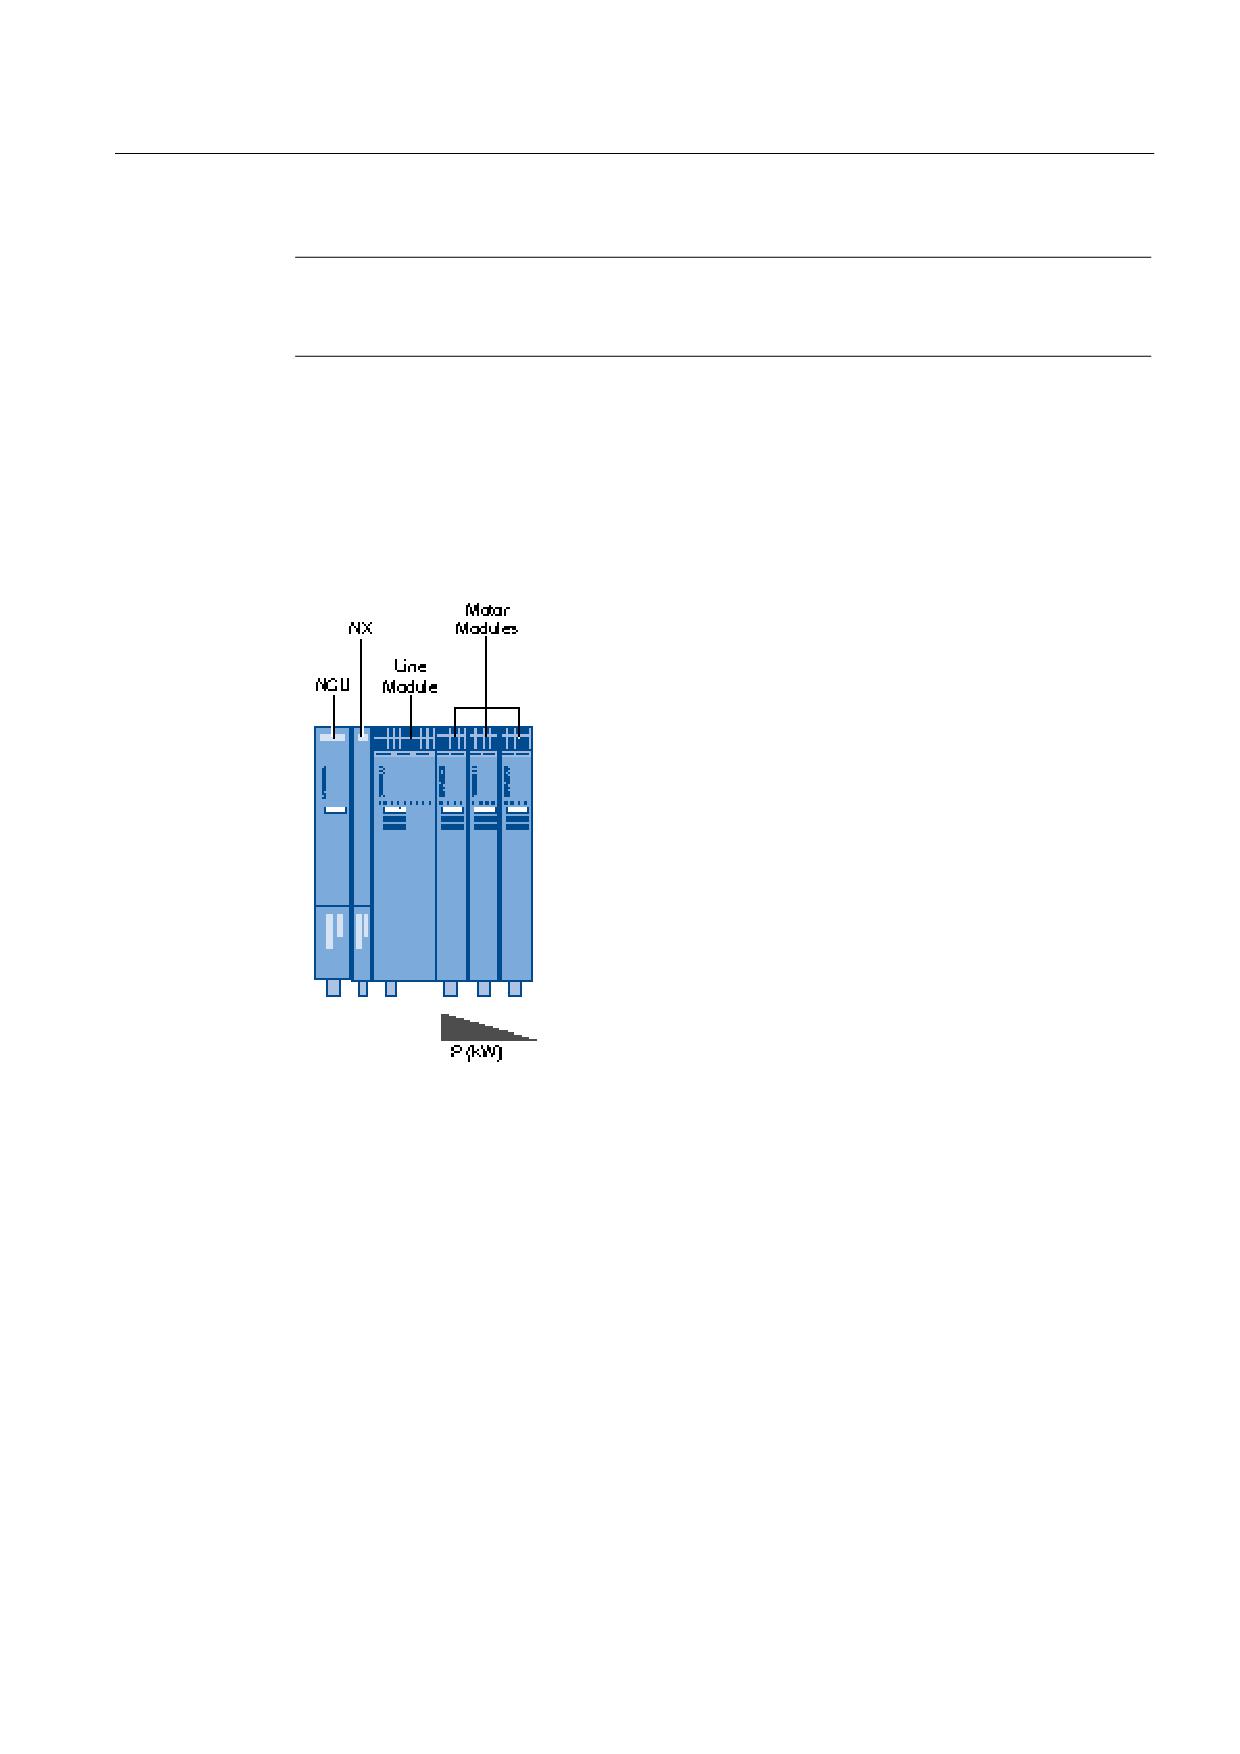
SINAMICS drive line-up
4.2 Connection of the SINUMERIK components
Note
To ensure the optimum reachability and the access to the connection plugs for digital signals
/ bus connections, the following placement notes should be observed.
4.2.2
Layout of the NX for single row construction integrated in the power unit group
If NX components are present, they should be added between the power unit and the NCU.
This ensures the best-possible reachability and access to the connection plugs for digital
signals / bus connections.
Figure 4-12 NX between NCU and Line Module
Guidelines for machine configuration
System Manual, MA 01/2013, 6FC5397-6CP10-0BA2
67
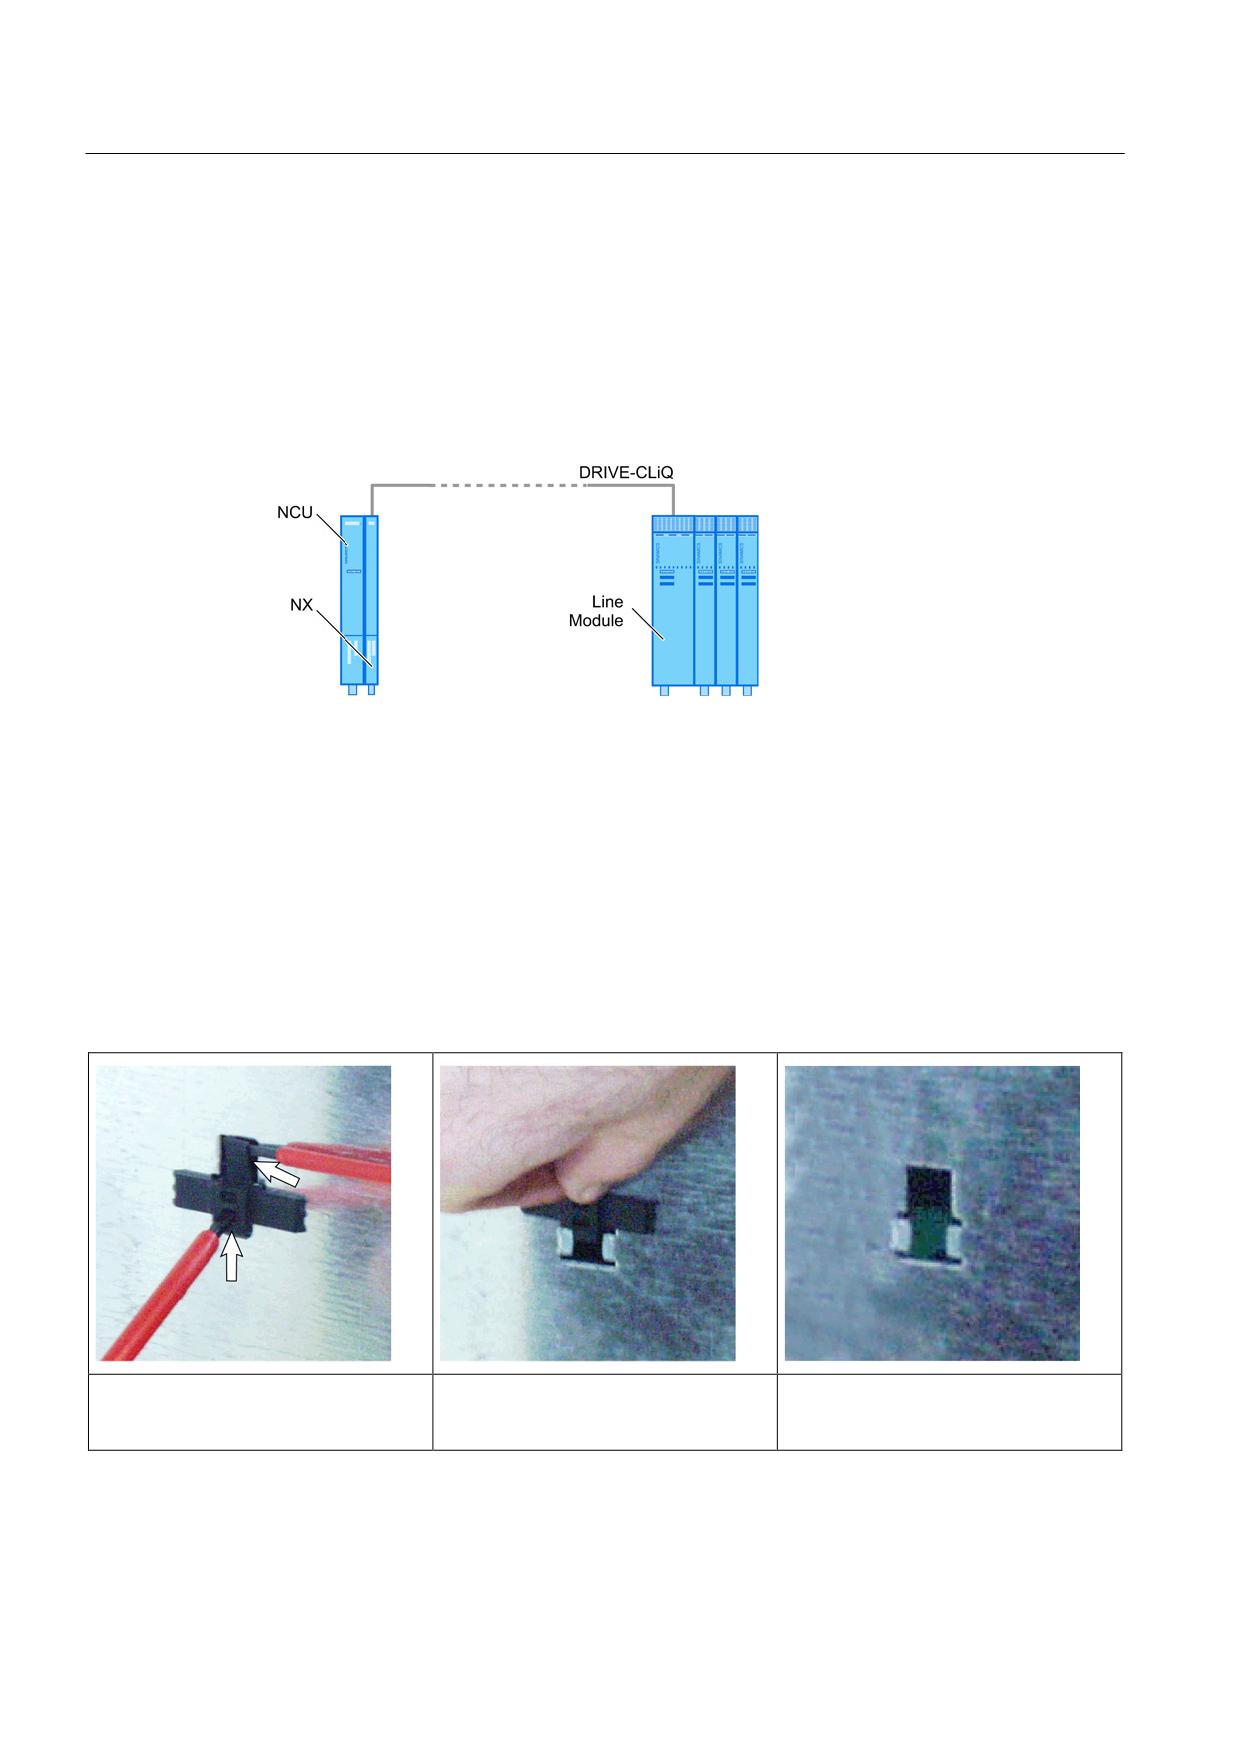
SINAMICS drive line-up
4.2 Connection of the SINUMERIK components
4.2.3
NCU/NX layout as offset solution
The DRIVE-CLiQ connection of the SINAMICS components permits any layout of the NCU /
NX modules. The layout of the NCU / NX directly in the drive group is thus not mandatory.
This type of installation involves fastening clips or spacers. To stabilize a group containing
several NX components, specially prepared connection brackets can be fastened to the front
of the NX between the components.
Figure 4-13 NCU/NX as offset solution
4.2.4
Direct installation of a CU-/NCU-/NX module on the Line Module
The Line Modules permit the docking of a CU320-/NCU-/NX component using the fastening
elements present as standard on the left-hand side of the housing.
Remove the holder for securing the Control Unit.
If an additional component is to be flush-mounted to the left of the component, the holders
for securing the Control Unit must be removed.
Use suitable tools to lift the interlocking
Remove the holder
After the removing the holder
mechanism and push up the holder
(e.g. two 0.8 x 4.0 screwdrivers)
Guidelines for machine configuration
68
System Manual, MA 01/2013, 6FC5397-6CP10-0BA2
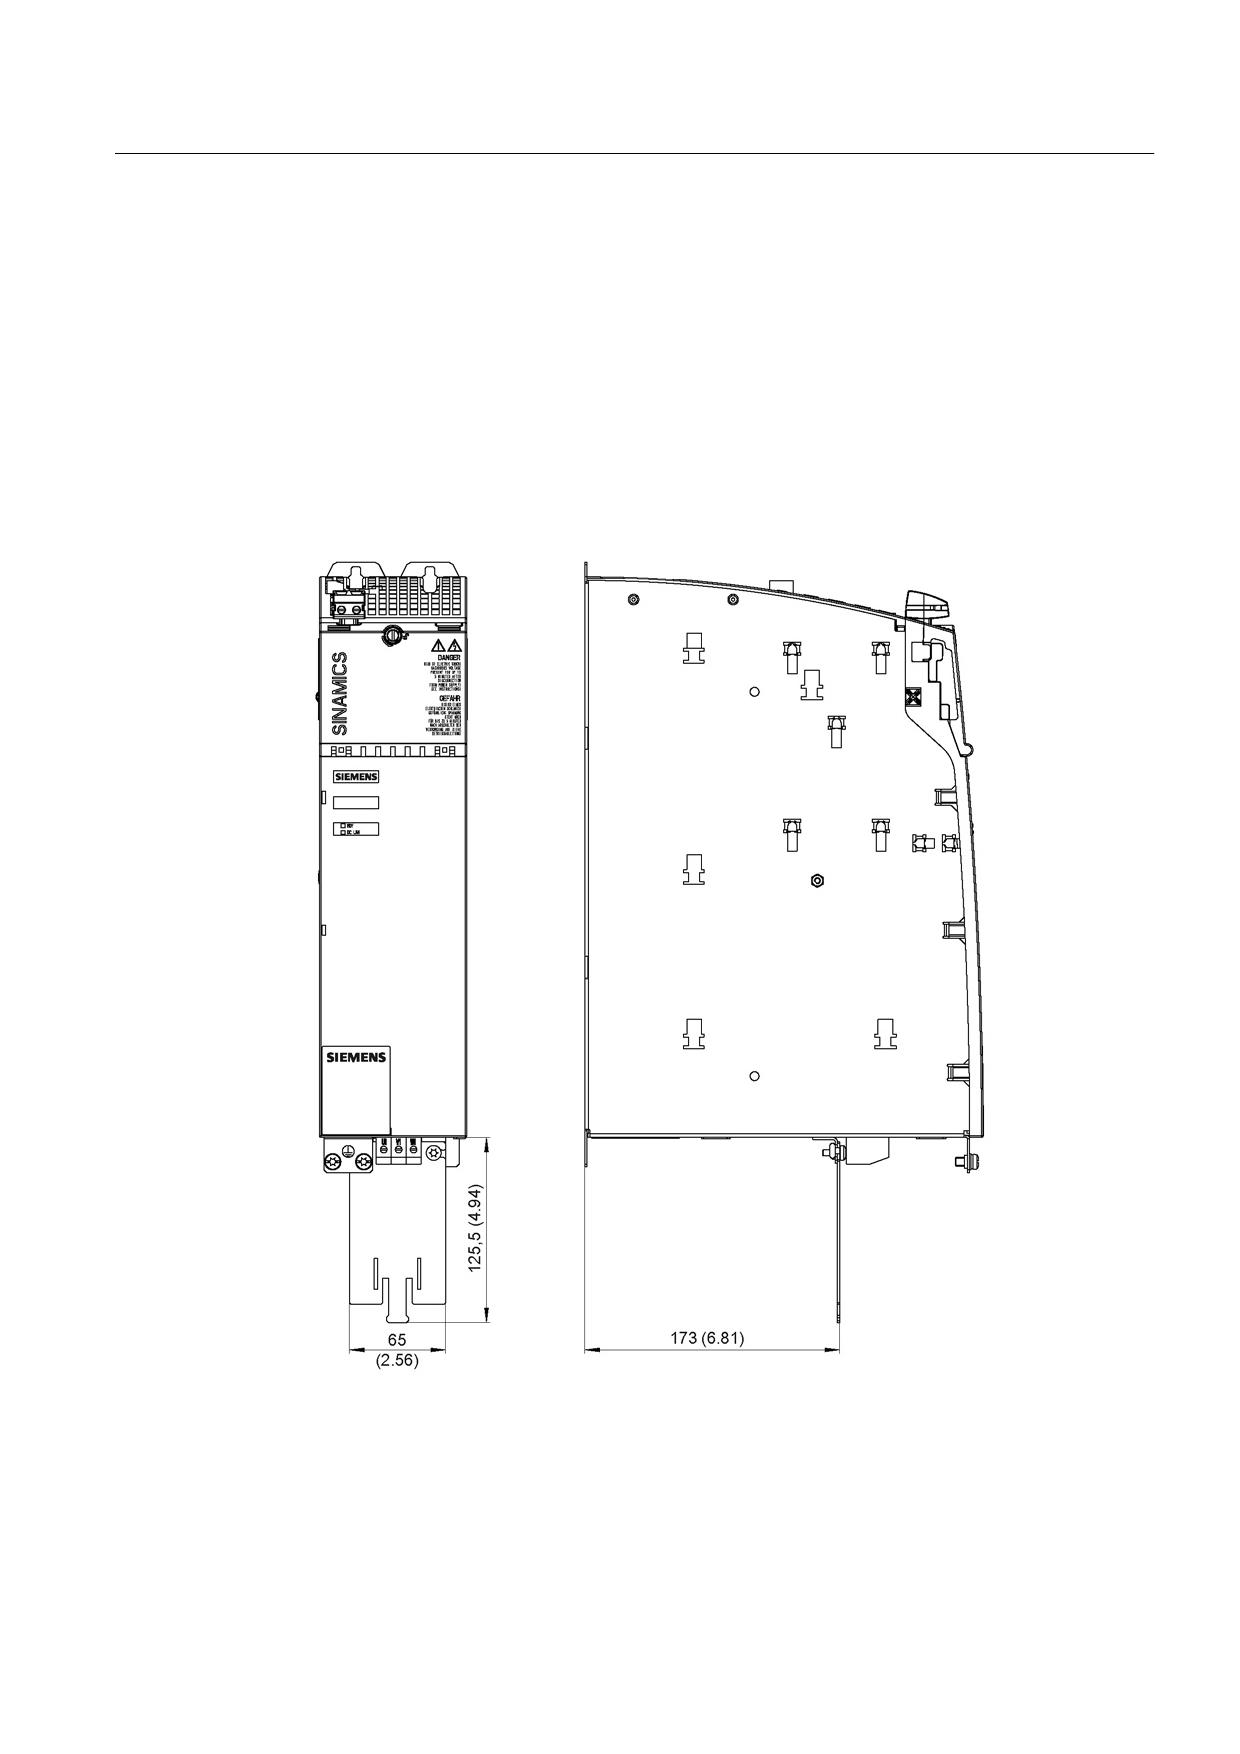
SINAMICS drive line-up
4.3 Shield Connection
4.3
Shield Connection
For information on the shield connection, please see the dimension drawings of the
SINAMICS components.
For details of the shield connections of Active Interface Modules, refer to the relevant figures
in the Overview chapter. The shield connections are located near the line supply
connections.
4.3.1
SINAMICS Components Dimension Drawings (Internal Air Cooling)
Figure 4-14 Dimension drawing of shield connecting plate on a 100 mm component with internal air
cooling, all dimensions in mm and (inches)
Guidelines for machine configuration
System Manual, MA 01/2013, 6FC5397-6CP10-0BA2
69