NB-series Programmable Terminals. NB-Designer OPERATION MANUAL (2026) - page 5
3 Functions of NB-Designer
4
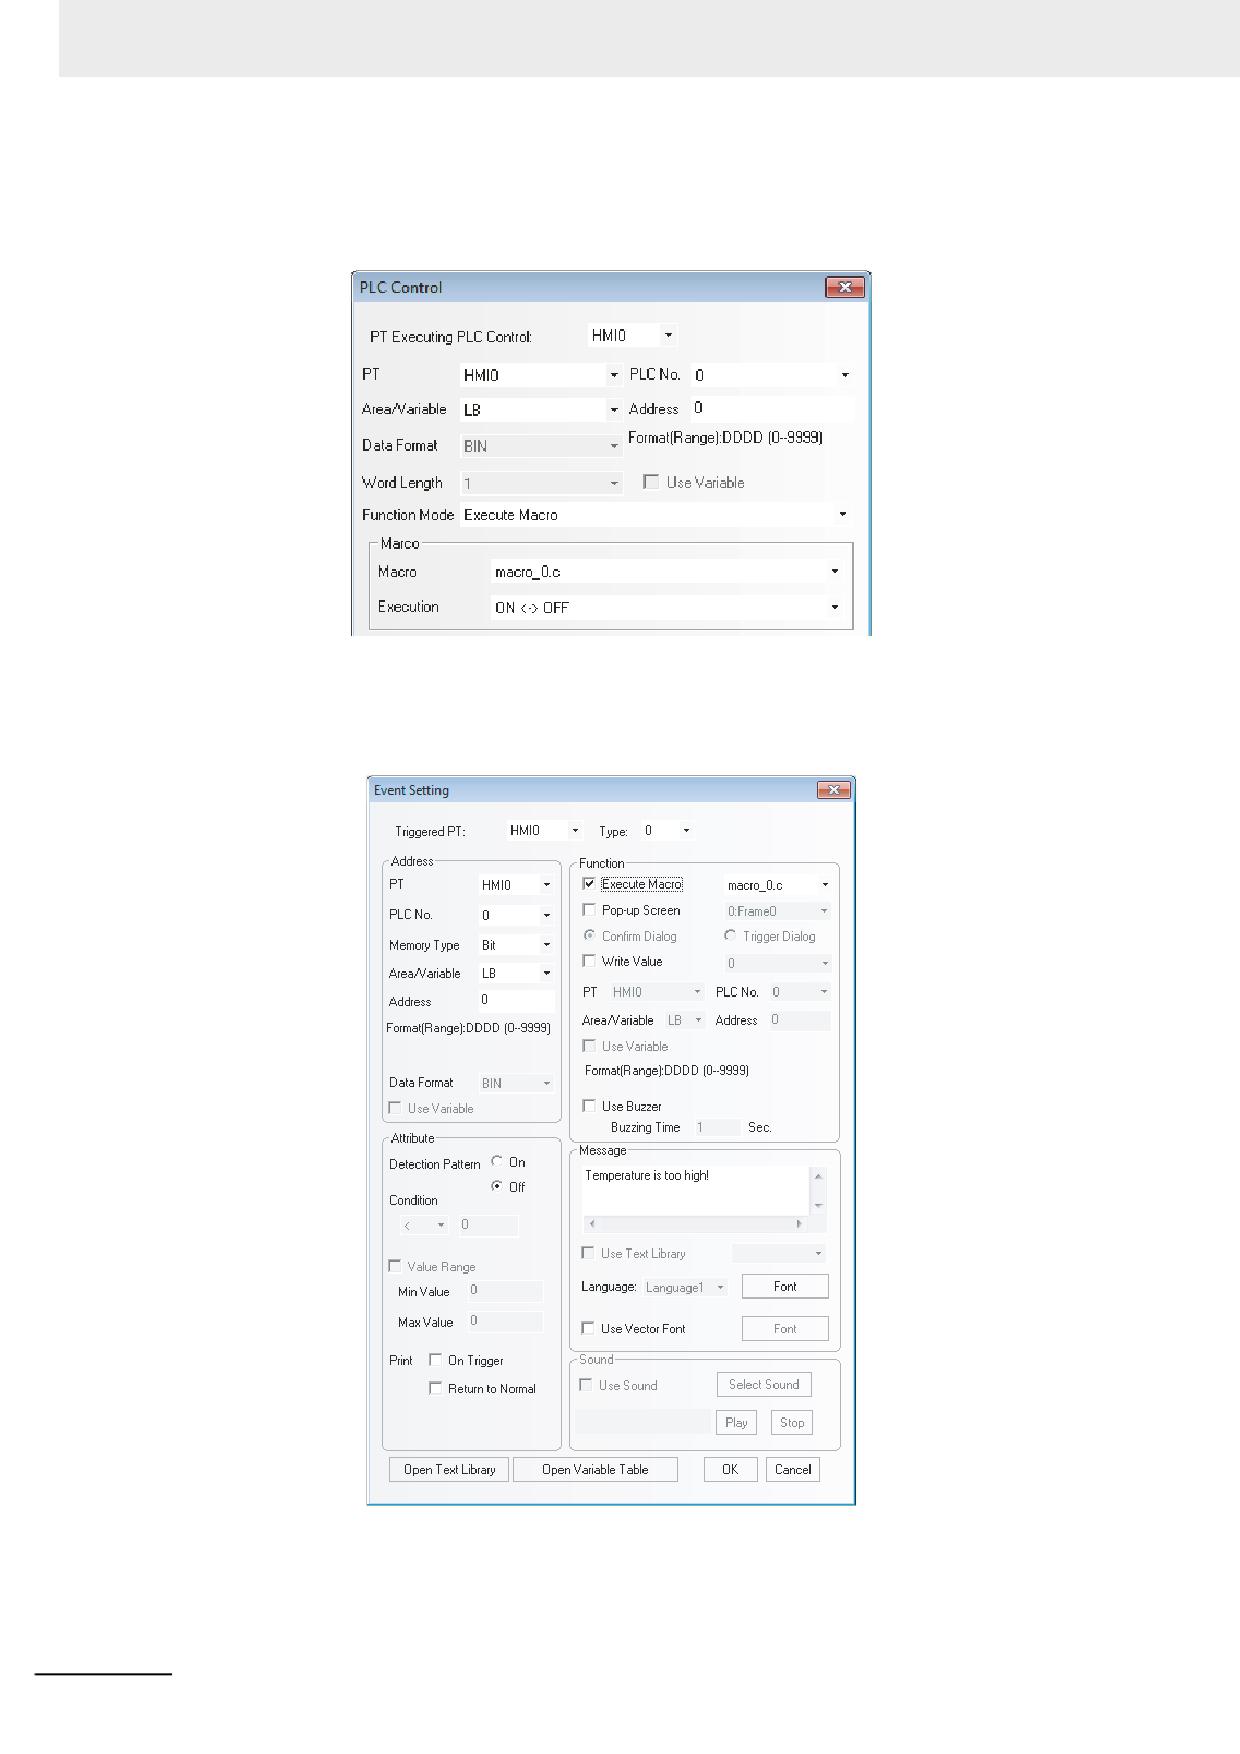
PLC Control
Specify the PLC Control as follows and select the [Execute Macro] and then the Macro will be
executed when the specific bits are matched to the condition previously specified.
5
Event
Setting the [Execute Macro] as below allows the Macro execution when a certain condition is
satisfied.
3-274
NB-series Programmable Terminals NB-Designer Operation Manual(V106)
3 Functions of NB-Designer
6
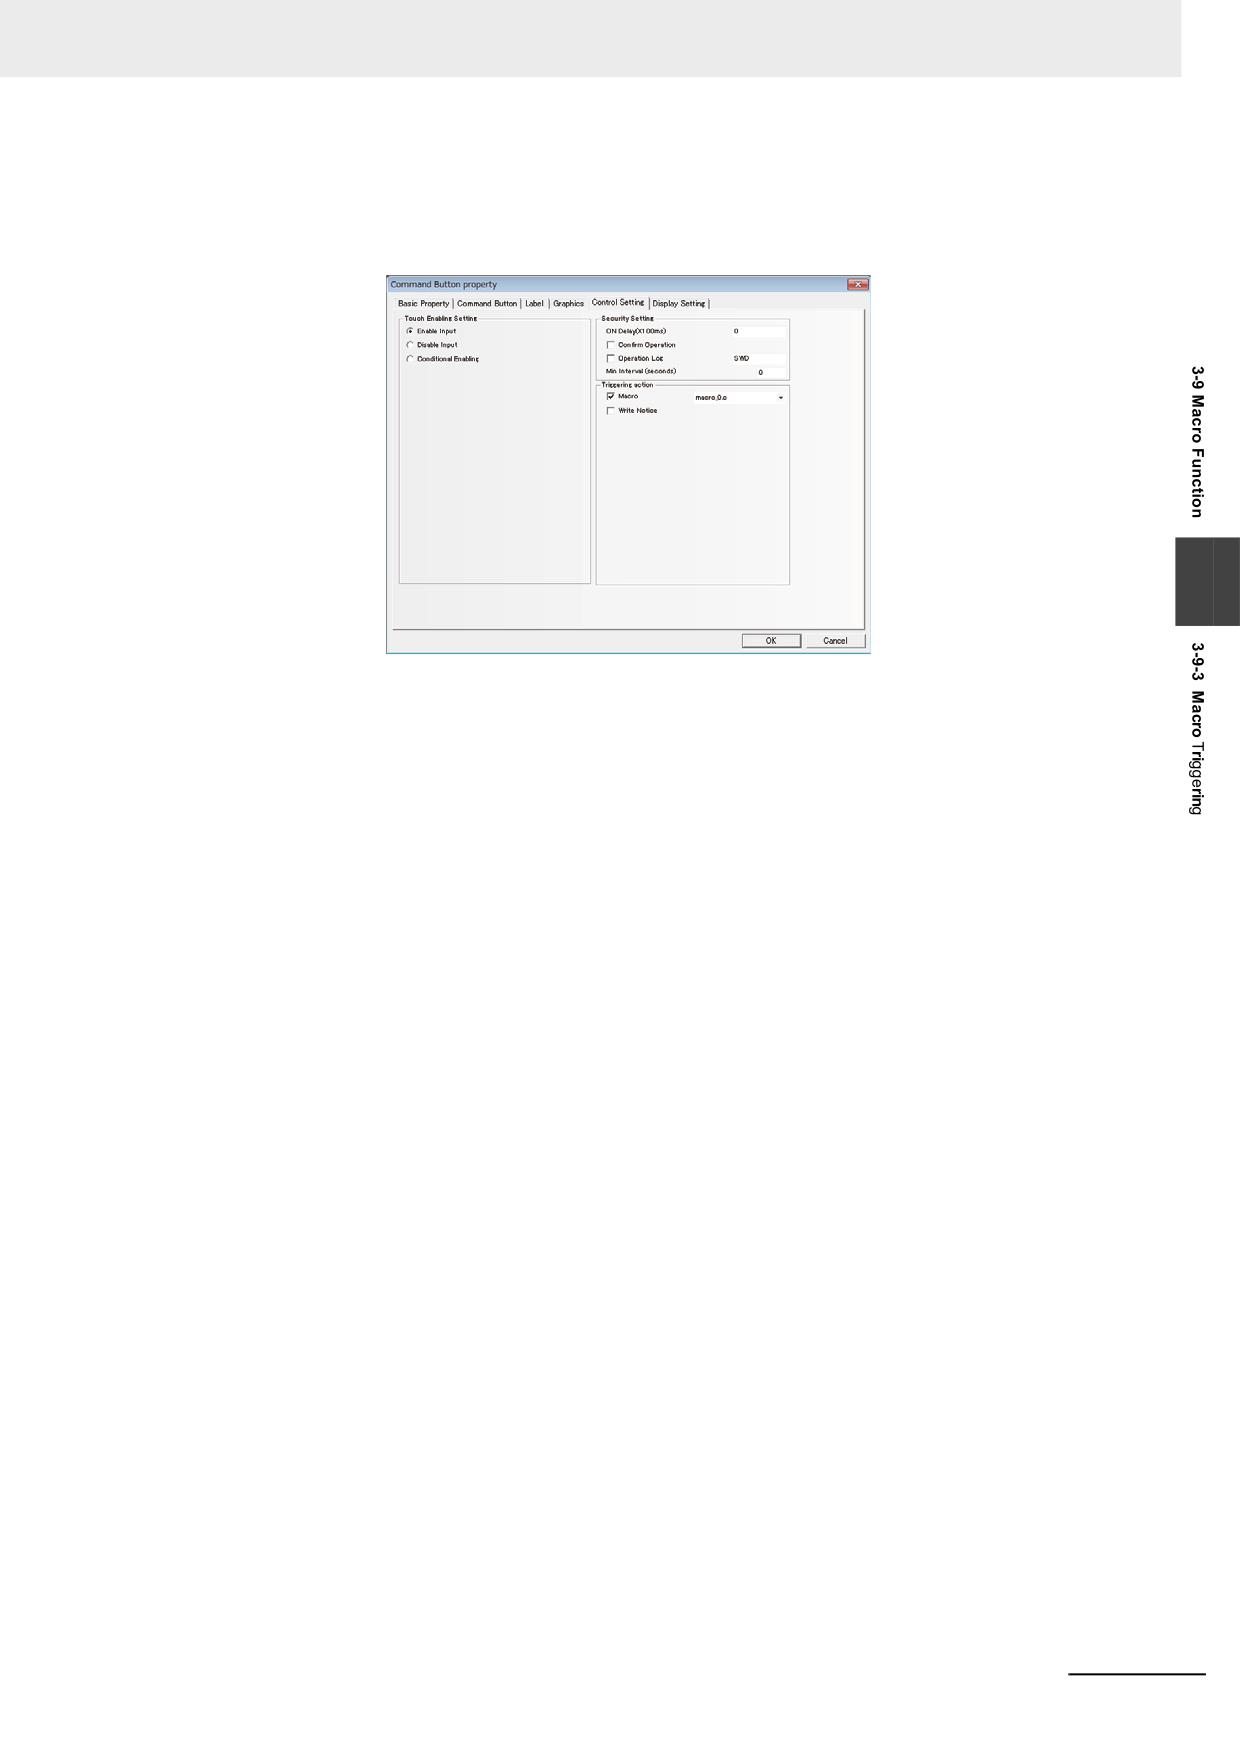
Control Setting of component
Checking [Macro] of Triggering action in the tab [Control Setting] as the lower figure shown
allows the Macro to be executed when the component is touched.
3
NB-series Programmable Terminals NB-Designer Operation Manual(V106)
3-275
3 Functions of NB-Designer
3-9-4
Other Descriptions
1
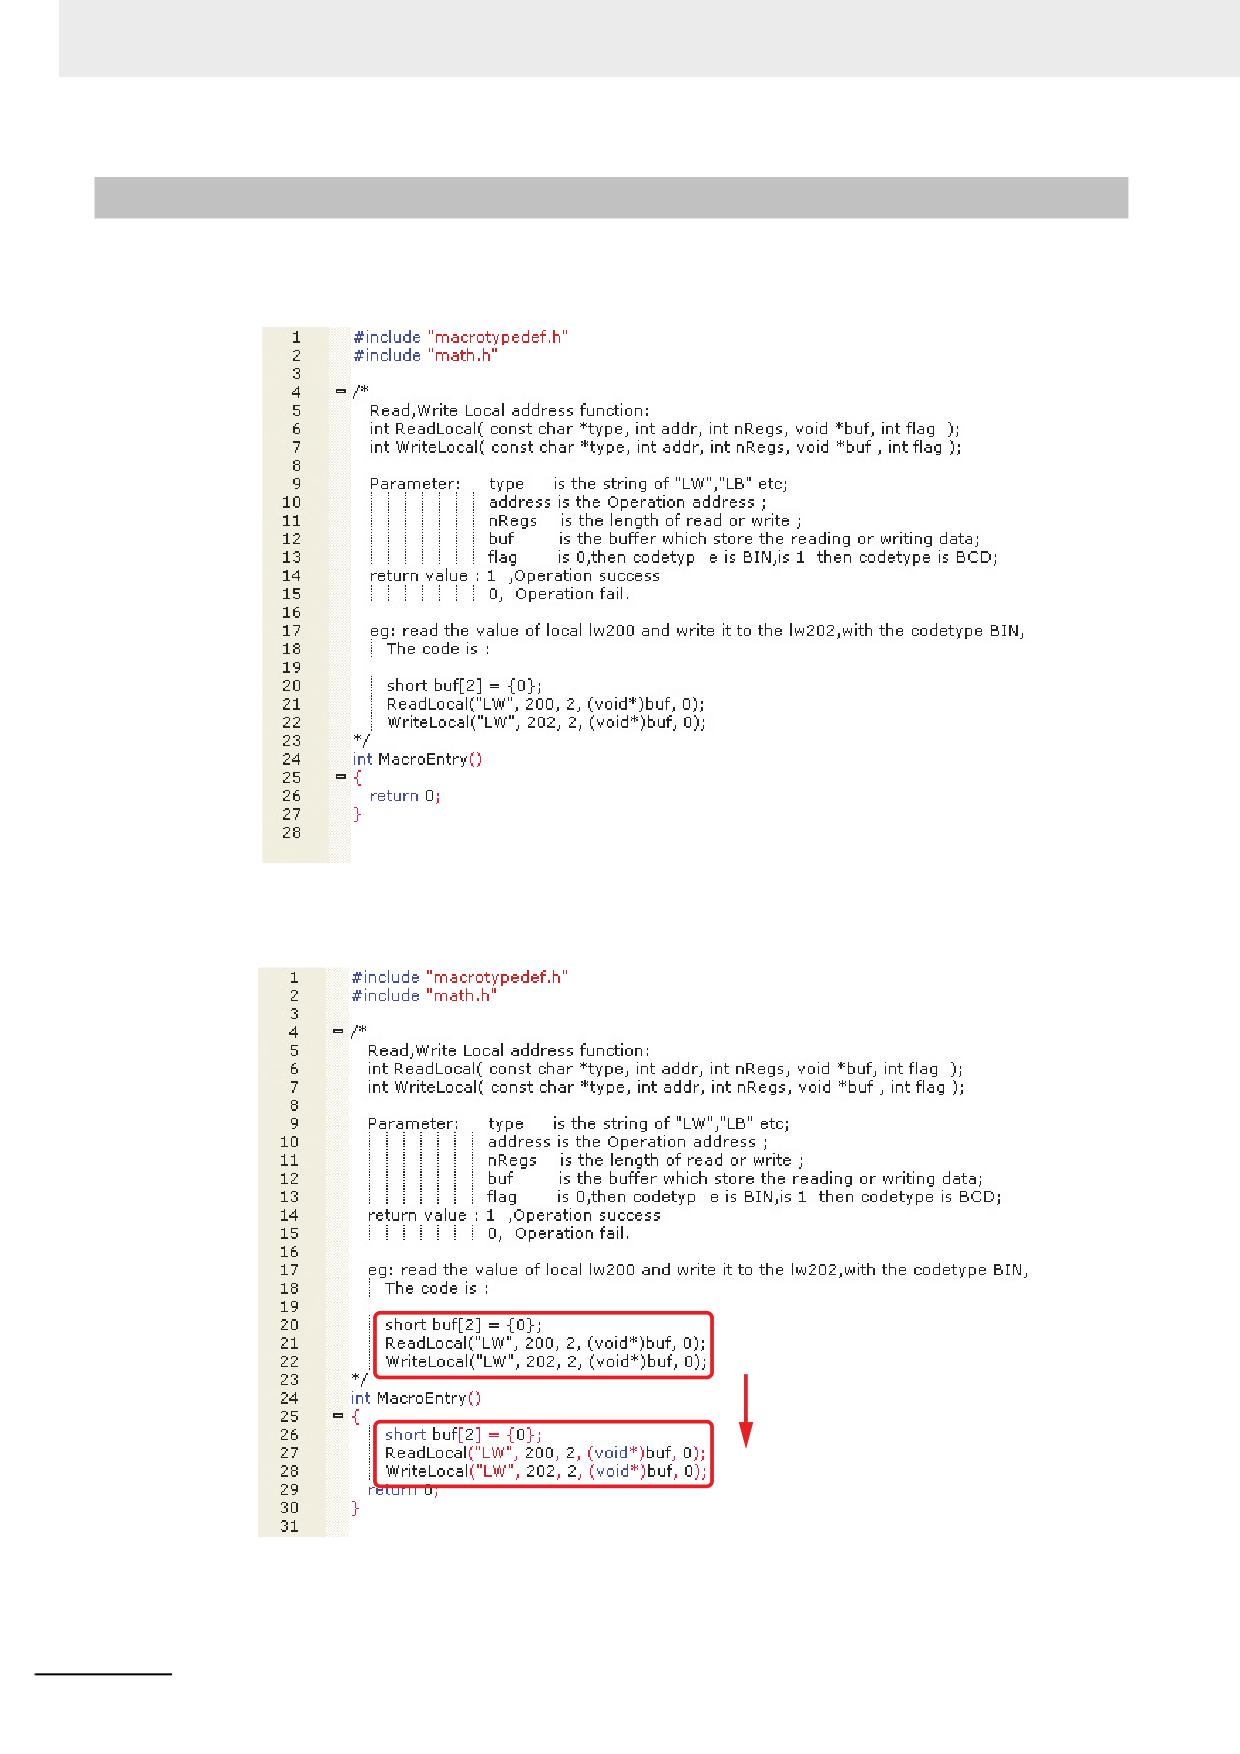
The Macro Editing Window can display the emphasis of the keywords.
In the top of the default Macro, a demo program is described for explanation.
If the entity part of the Macro program is copied and pasted in the following figure, you can see
that the color of the keywords is changed. The short/void are colored in blue and the LW is
colored in red. The part enclosed by “/*” and “*/” is the comment.
3-276
NB-series Programmable Terminals NB-Designer Operation Manual(V106)
3 Functions of NB-Designer
2
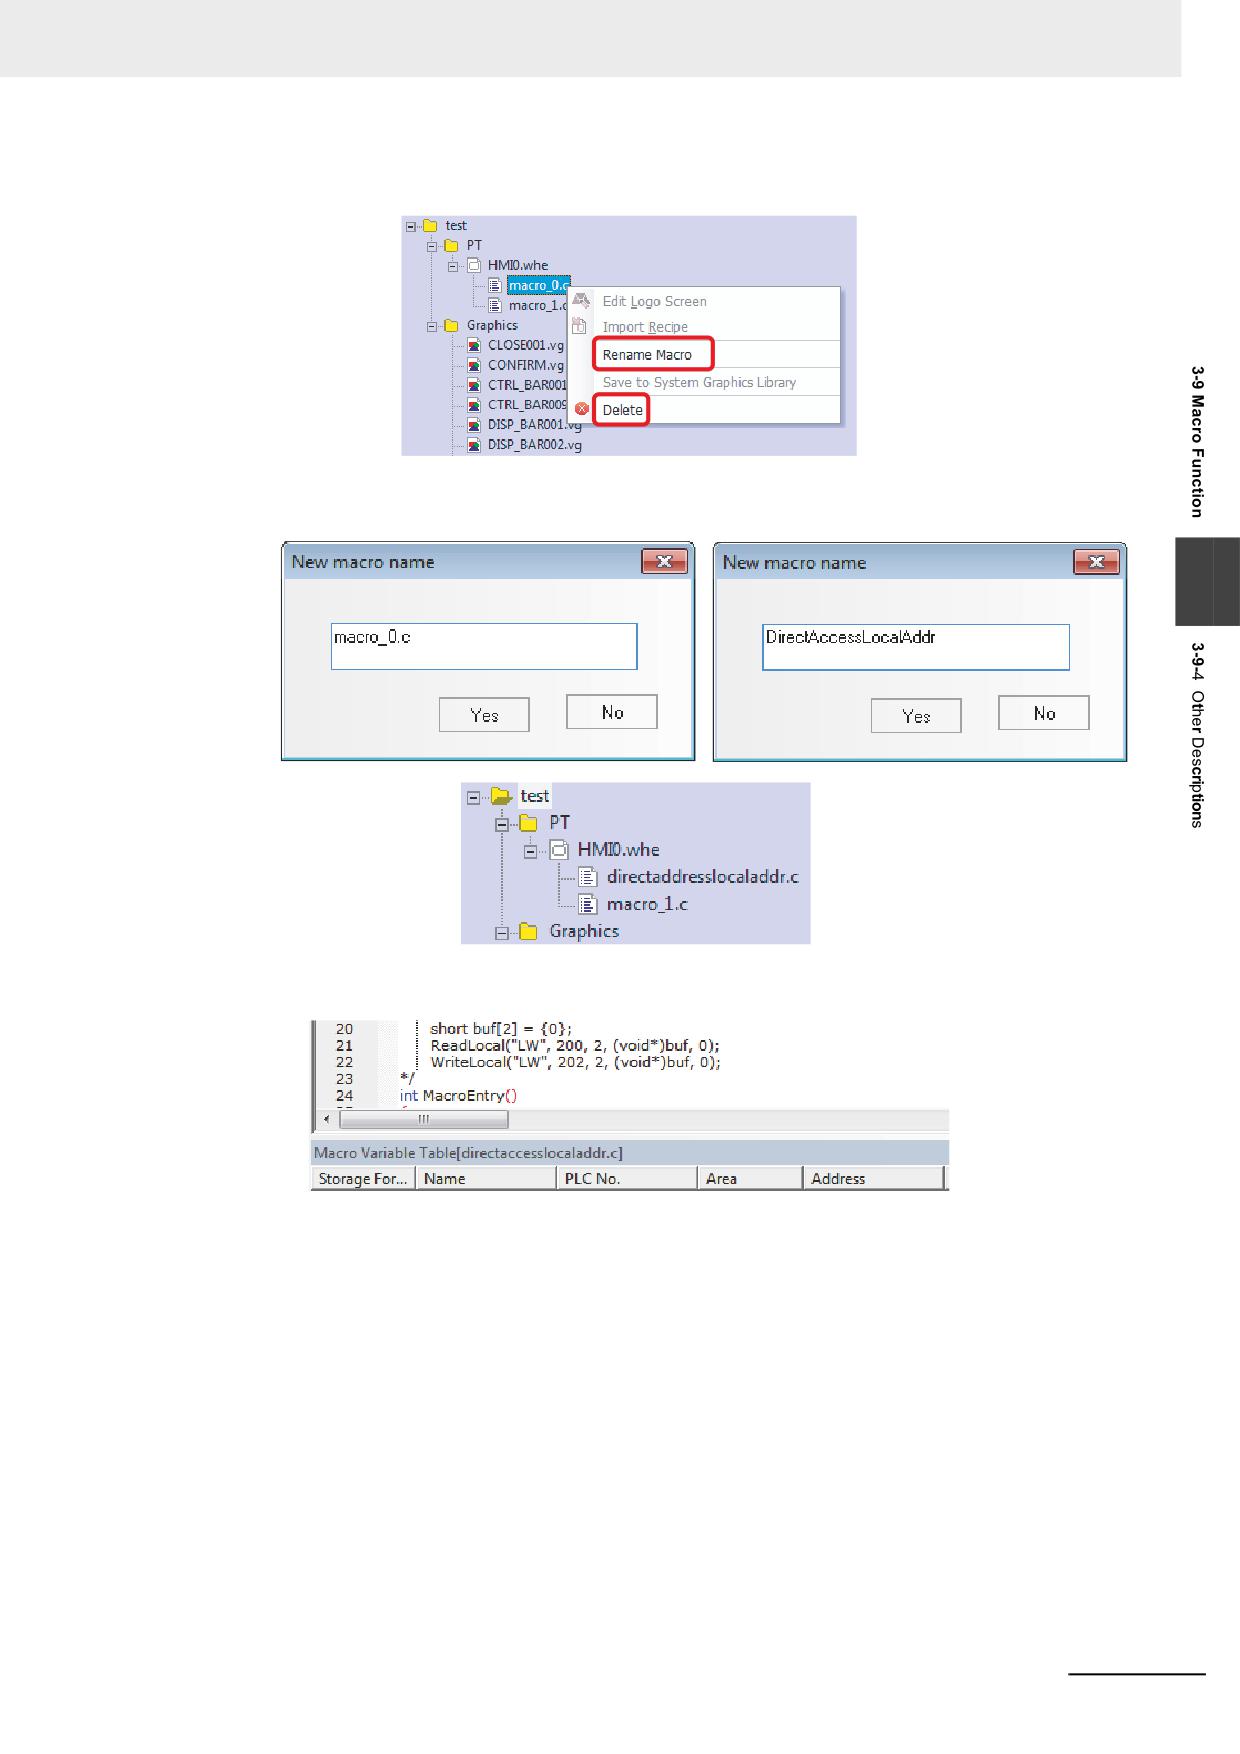
After the Macro creation, you can rename the Macro.
Right-click the Macro name, and you can see the options of [Rename Macro] and [Delete], and
input the new name after the dialog box pops up after clicking “Rename Macro”.
3
3
It supports the direct access to the local address of the PT without defining the variables.
As shown above, even if no variables are defined in the Macro, the direct access to the local
address of the PT, i.e. reading or writing the local address.
int ReadLocal(const char *type, int addr, int nRegs, void *buf, int flag);
int WriteLocal(const char *type, int addr, int nRegs, void *buf, int flag);
NB-series Programmable Terminals NB-Designer Operation Manual(V106)
3-277
3 Functions of NB-Designer
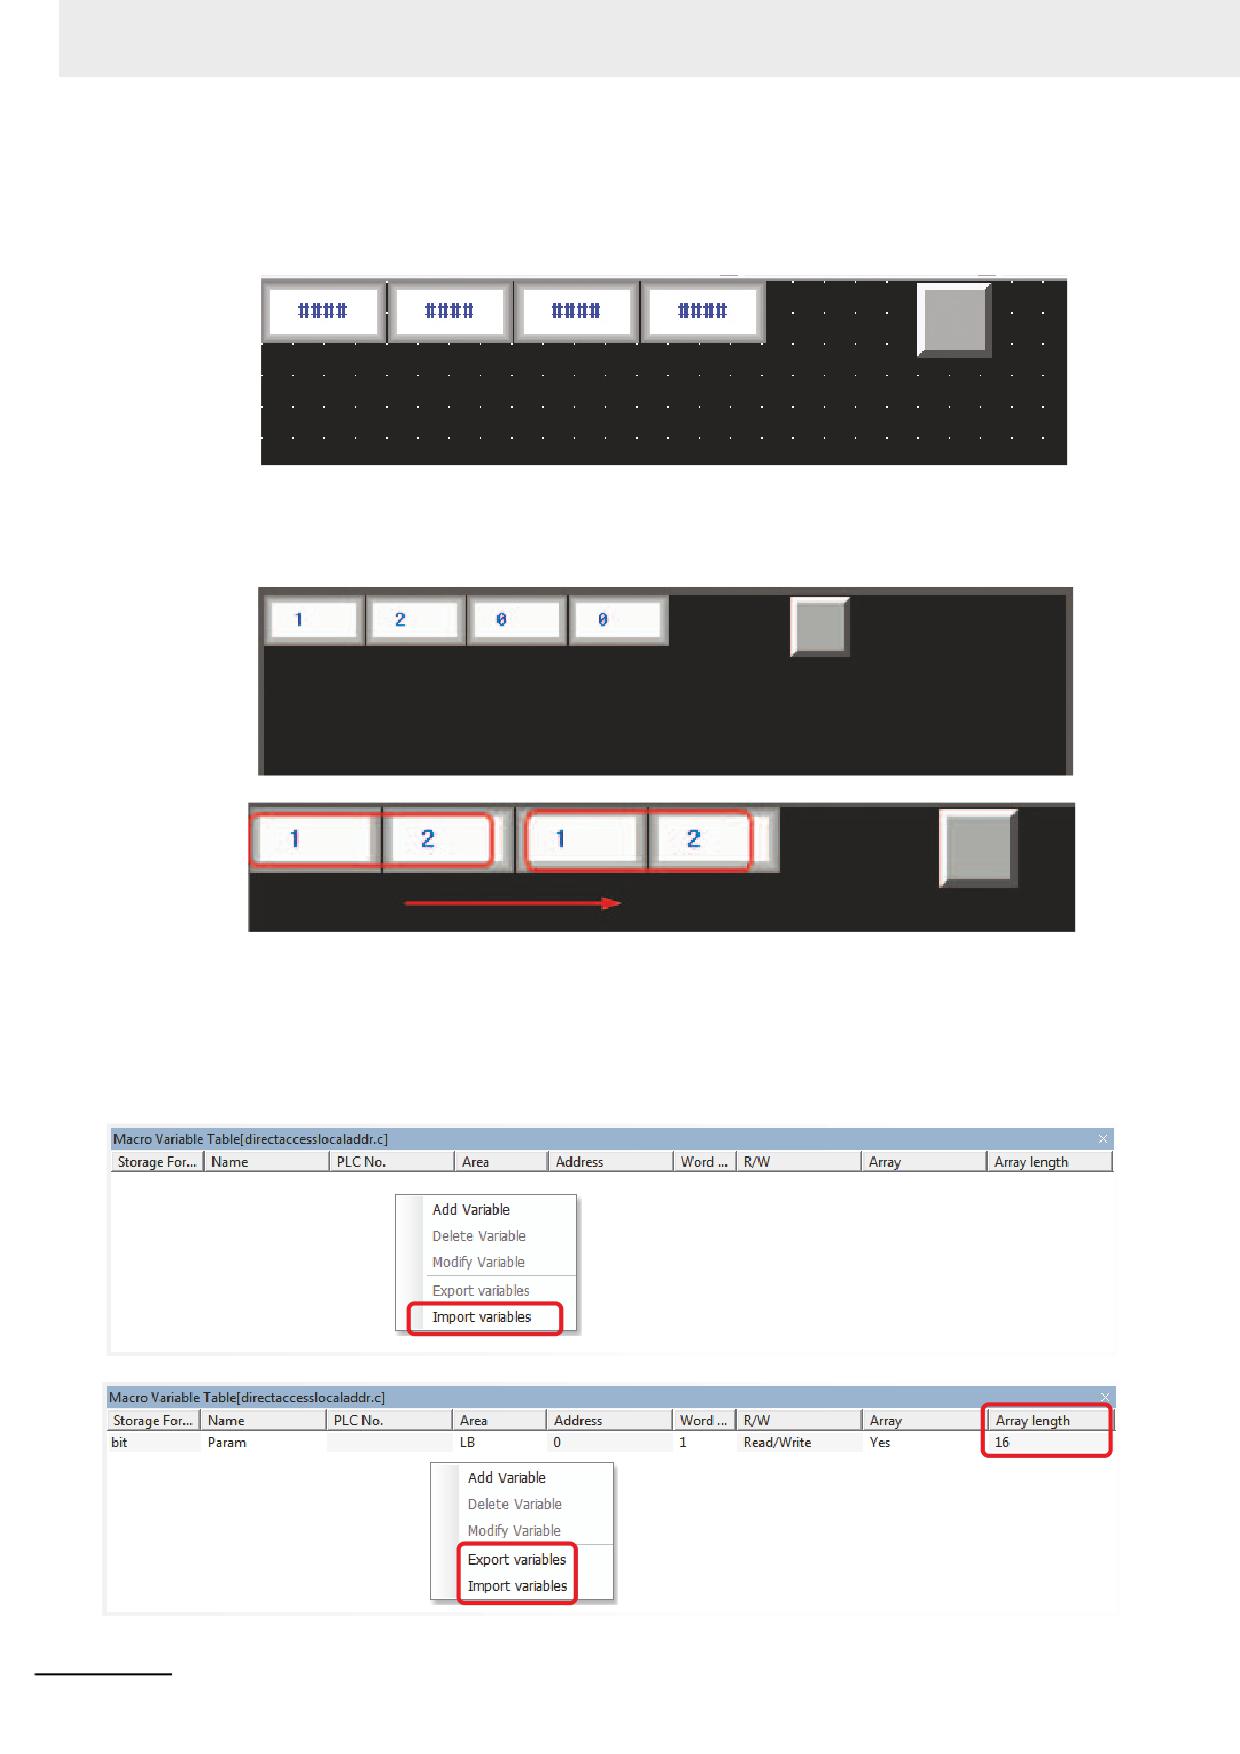
“nRegs” refers to number of words. That’s to say, the program will read 2-word data beginning
from LW200 and then write 2 words to LW202. In order to confirm this code segment will be
executed successfully, you should place 4 Number Input components and 1 Function Key to
execute the Macro in the Edit window, as shown below:
Macro
Perform the offline test:
Make LW200=1 and LW201=2, then click the [Macro] button, and you will find LW202=1 and
LW203=2. The Macro is executed normally.
Macro
Macro
4
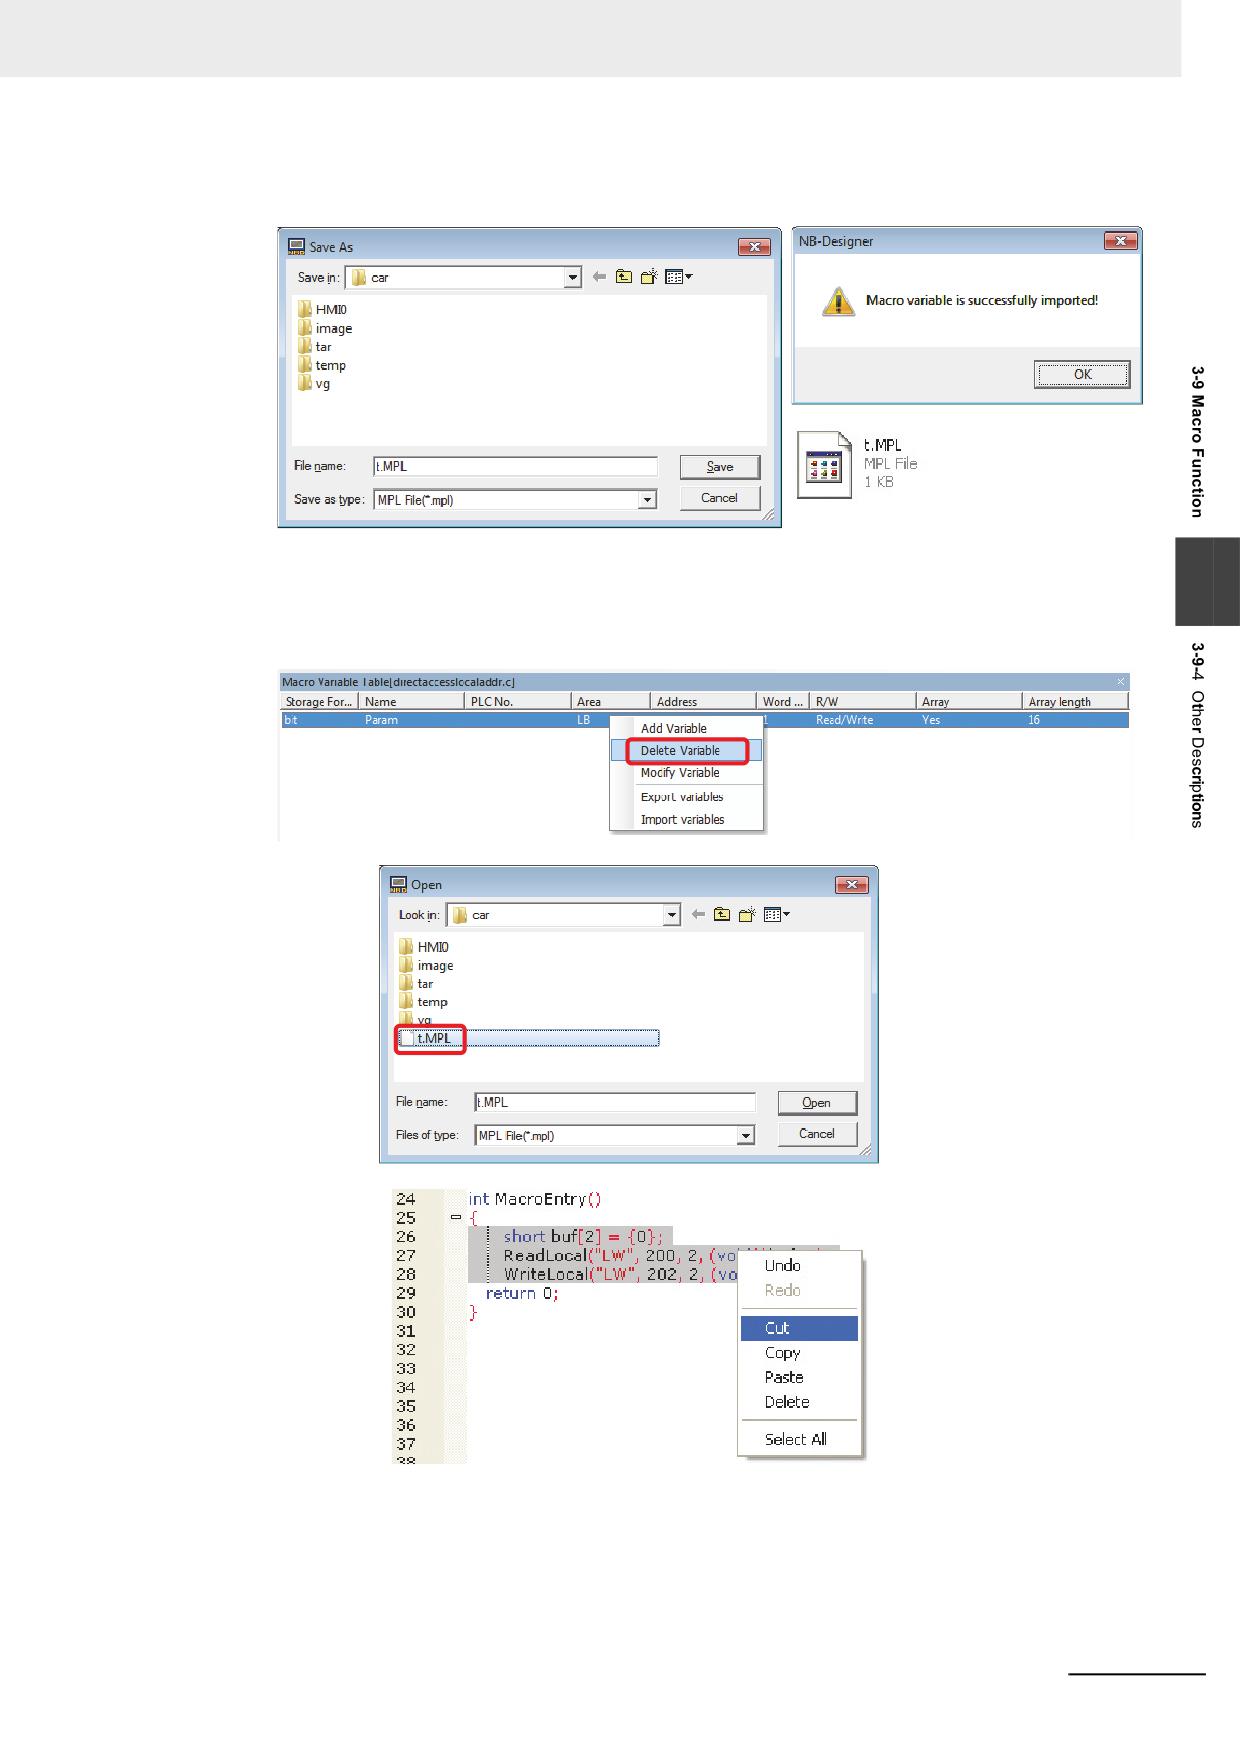
[Import variable/Export variable] functions are provided for user to copy Macro variables and
Macro.
Right-click “Macro Variable Table [directaccesslocaladdr.c]”, you will see the [Import variables]
option; and you will see the [Export variables] option is also valid after you have created a new
variable.
3-278
NB-series Programmable Terminals NB-Designer Operation Manual(V106)
3 Functions of NB-Designer
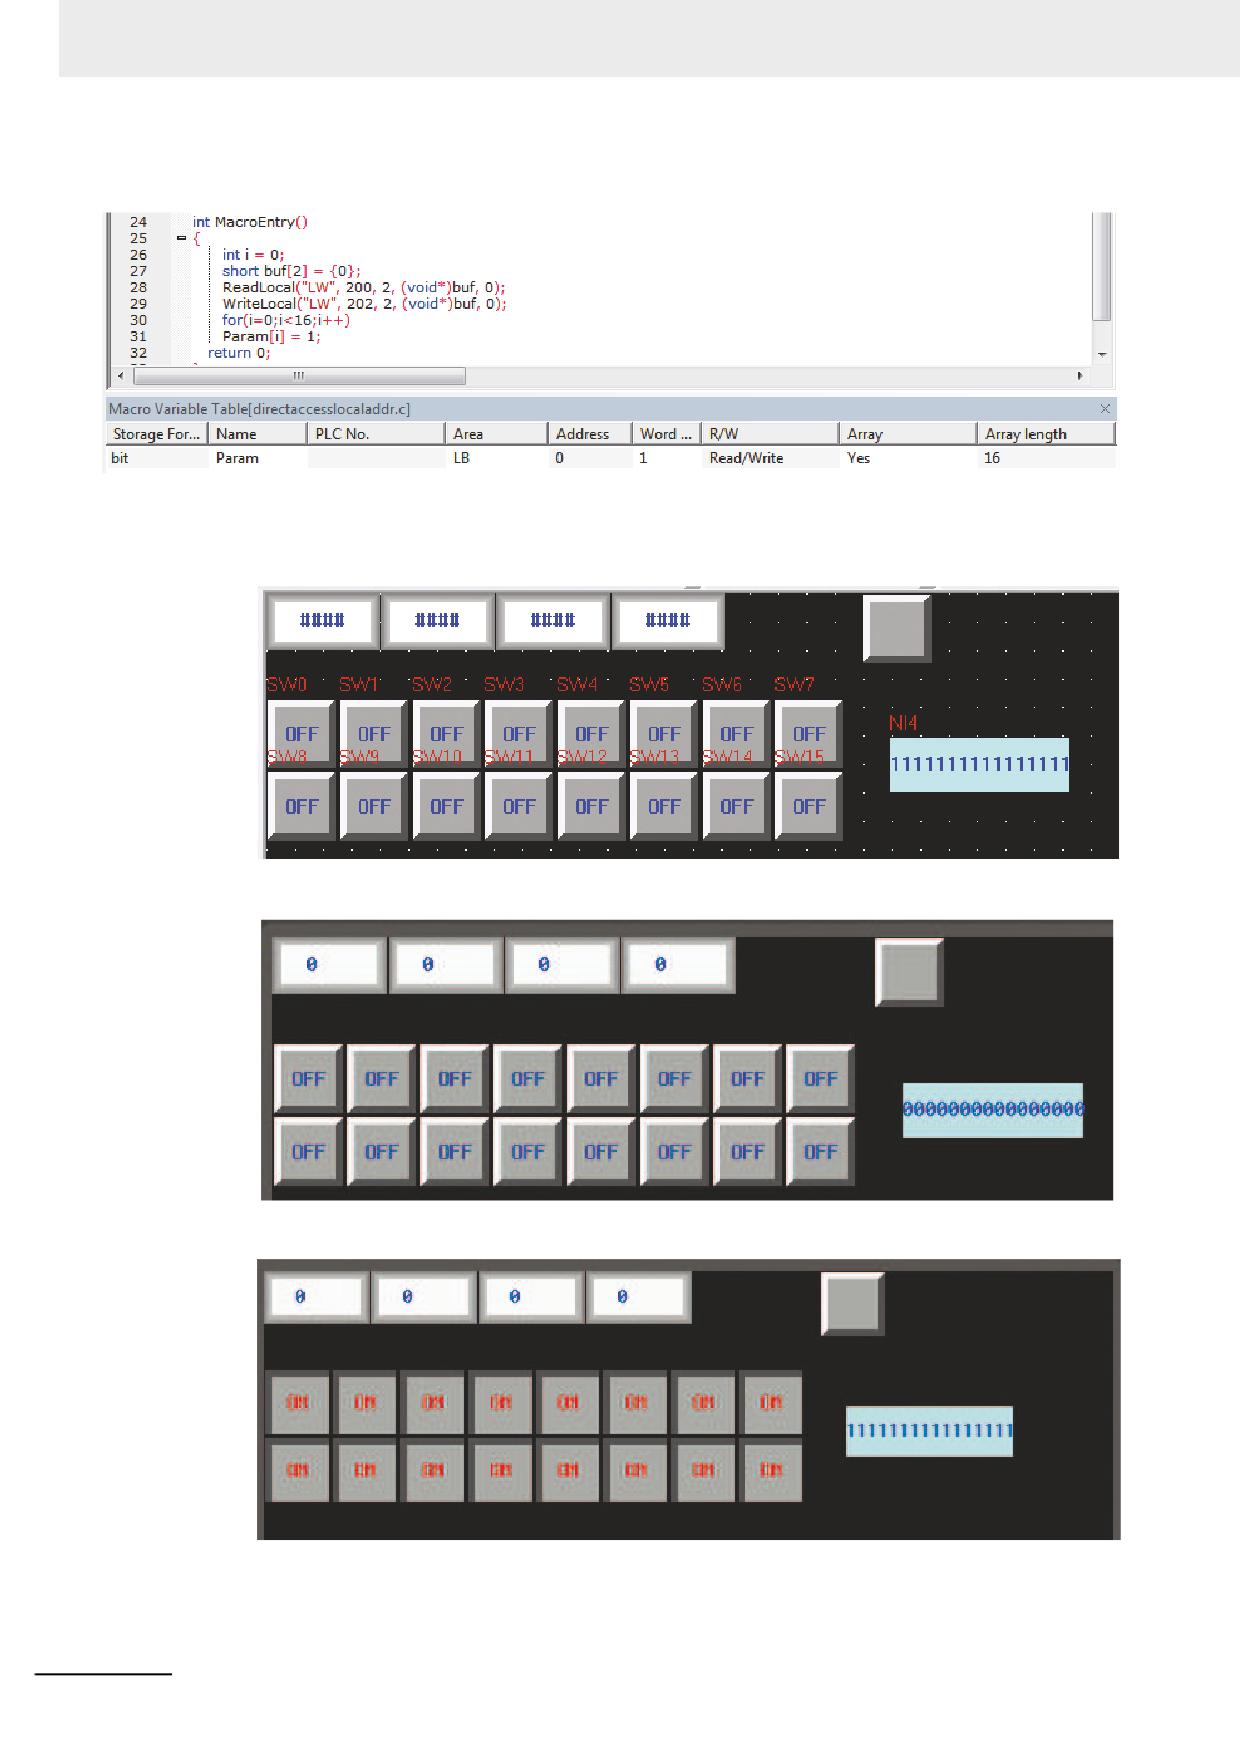
First click the [Export variables] option to make “Save As” dialog box, and input the file name “t”
with the extension as “.MPL”, then save it into the optional folder.
Clicking the [Delete Variable] option and the [Import Variables] option allows the importing
3
variables. Such operation can be made among the different projects. Select the code which
should be copied if it is a program and right-click the [Copy] followed by pasting the code to the
intended location.
NB-series Programmable Terminals NB-Designer Operation Manual(V106)
3-279
3 Functions of NB-Designer
5
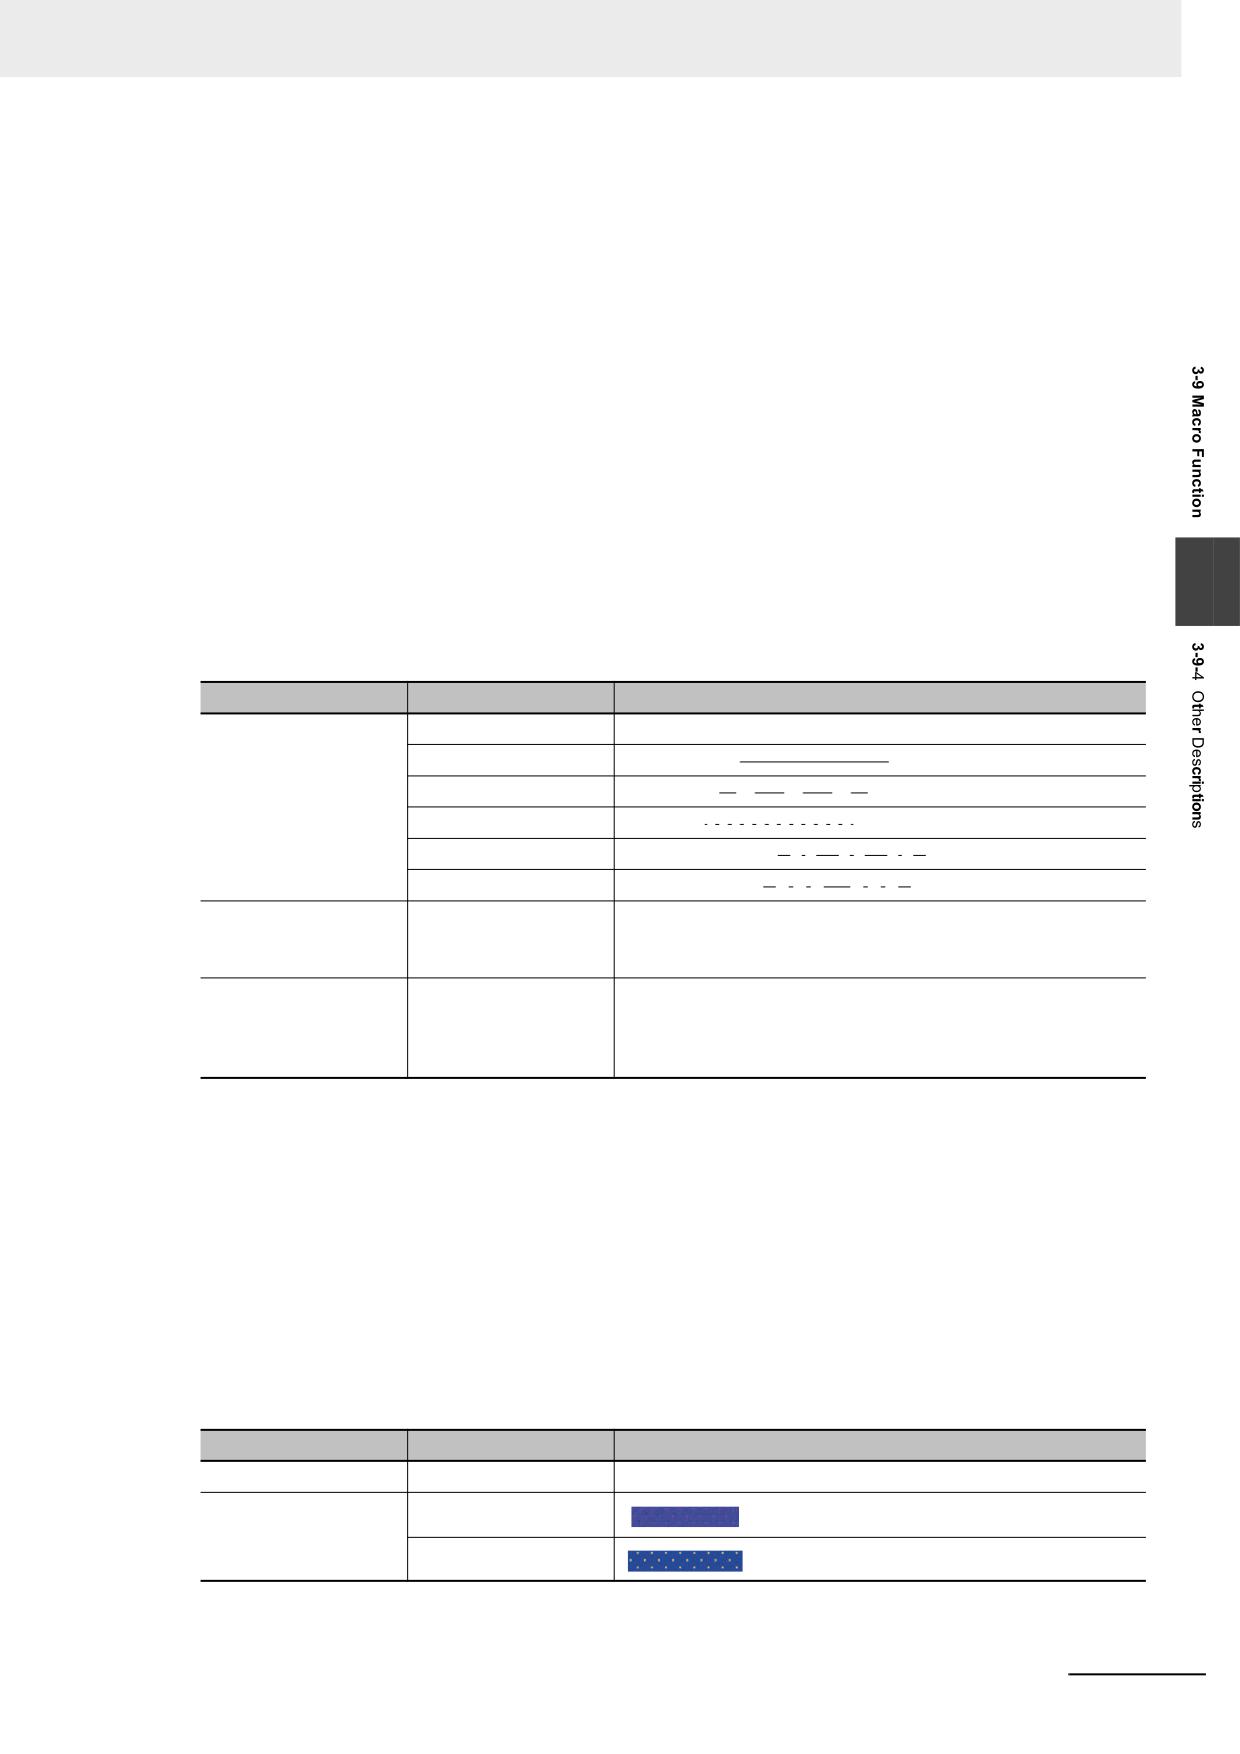
It supports the array variables in bit format.
Prepare array variables in bit format allocated L.W.B. 0.0 to 0.f and create a Macro which
writes “1” to all the elements in the array. Place 16 Bit Switches with the addresses of LW.B
0.0~0.f as well as 1 binary Number Input component with the address of LW0.
Macro
Perform the offline test:
Macro
After [Macro] is clicked, the display will be shown as below:
Macro
3-280
NB-series Programmable Terminals NB-Designer Operation Manual(V106)
3 Functions of NB-Designer
6
Supports Direct Drawing in the Screen (Description of PT Drawing Function)
The Macro executing function allows the user to call drawing function.
Drawing functions adopt rectangular coordinate system of screen: point of origin locates in the
upper-left corner, and the X-axis extends rightward while the Y-axis extends downward.
(1) Definition of Struct
Add 3 structs: PenParam, BrushParam and Point.
(a) Pen structure “PenParam”
typedef struct penparam
{
short type;
short width;
int color;
3
}PenParam;
PenParam is mainly used to set the type, width and the color Properties of the pen.
And the value range is as follows.
Parameter Name
Value
Descriptions
Type (Pen type)
PS_NULL
No pen
PS_SOLID
Smooth line (
)
PS_DASH
Dash line (
)
PS_DOT
Dot line (
)
PS_DASHDOT
Dash-dotted line (
)
PS_DASHDOTDOT
Dot-dotted line (
)
Width (Pen Size)
1~8 (Unit: pixel)
If the input value is less than the minimum value 1 or greater
than the maximum value 8, the system will automatically set it
to the minimum value or the maximum value respectively.
Color (Pen Color)
0~65535
It is recommended to use Macro RGB (r. g. b) to set the color,
and the range for r, g and b is 0~255. The system will convert
the value of RGB (r, g, b) according to the color parameters of
PT screen.
(b) Brush Structure “BrushParam”
typedef struct brushparam
{
int type;
int foreColor;
int backColor;
}BrushParam;
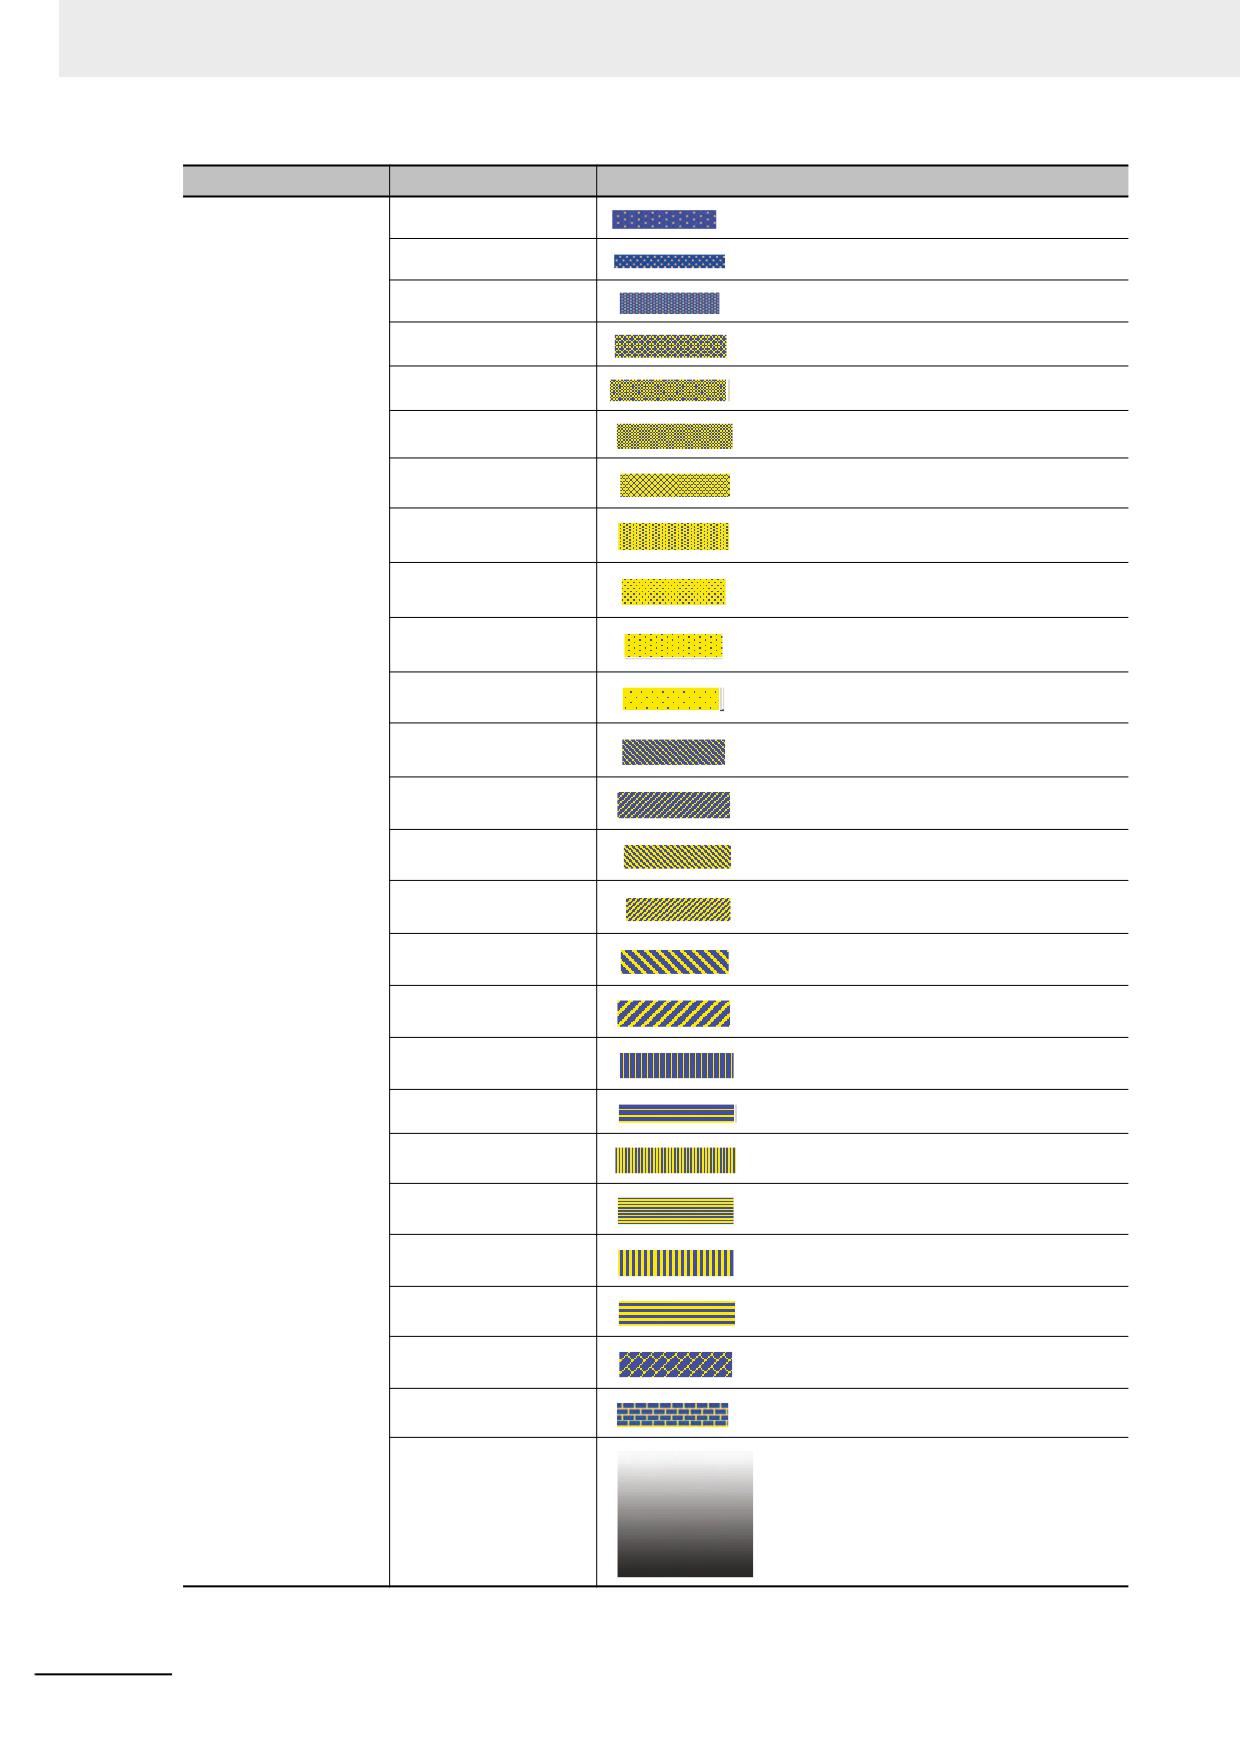
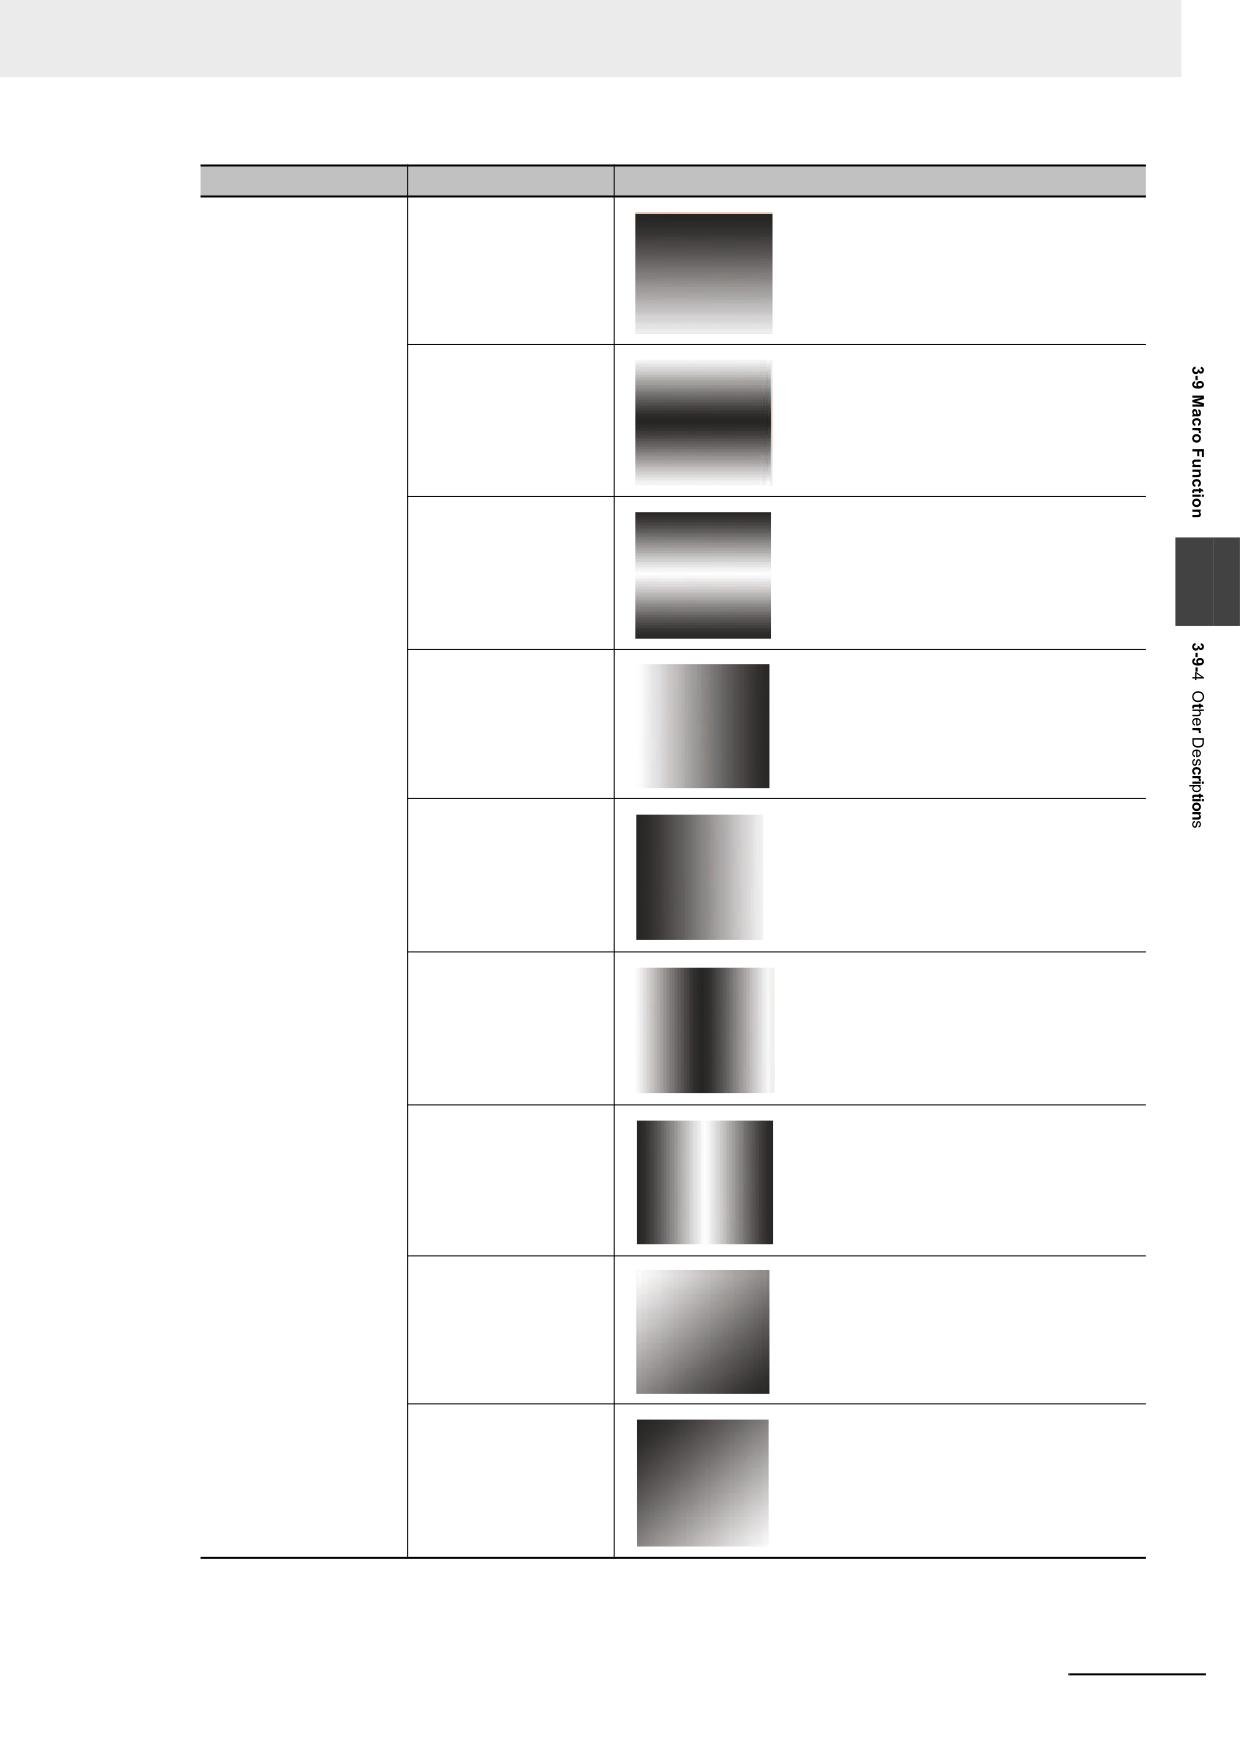
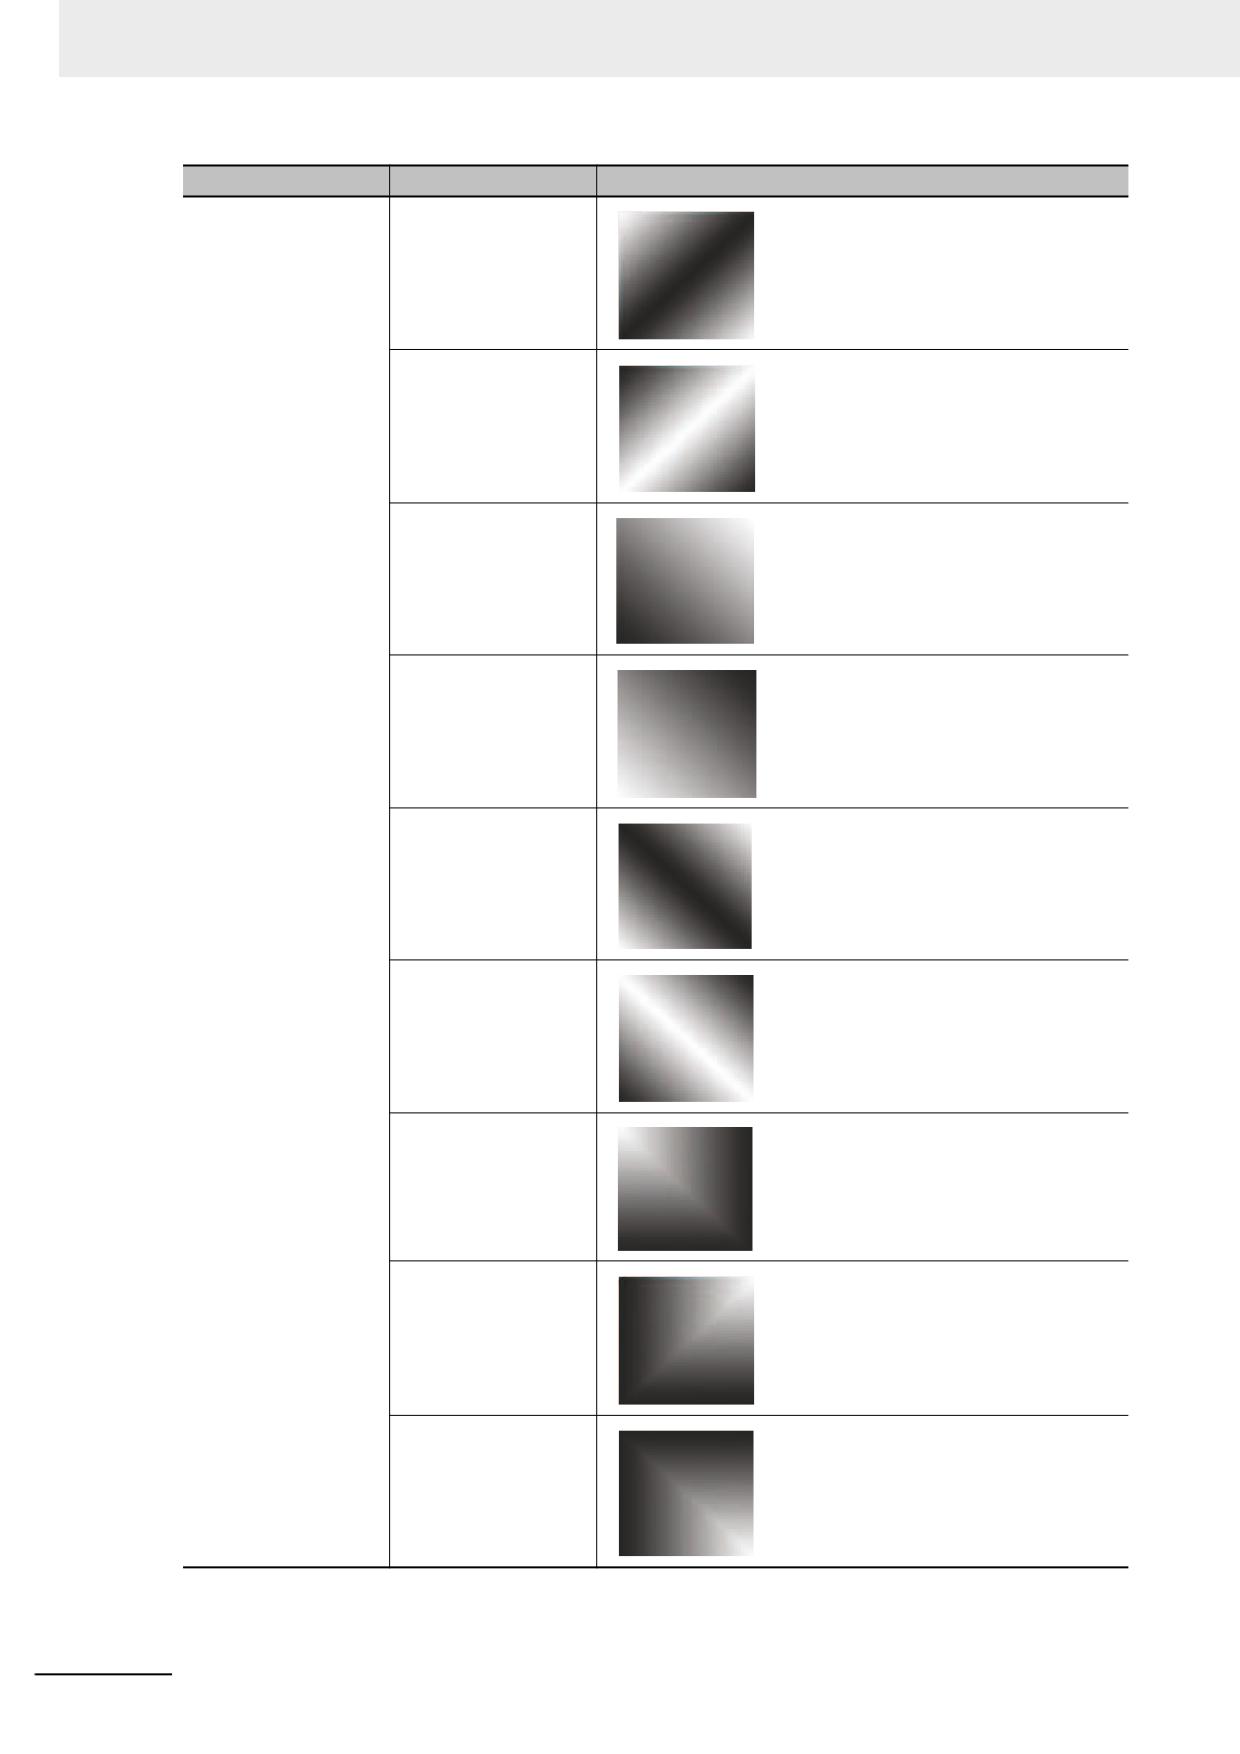
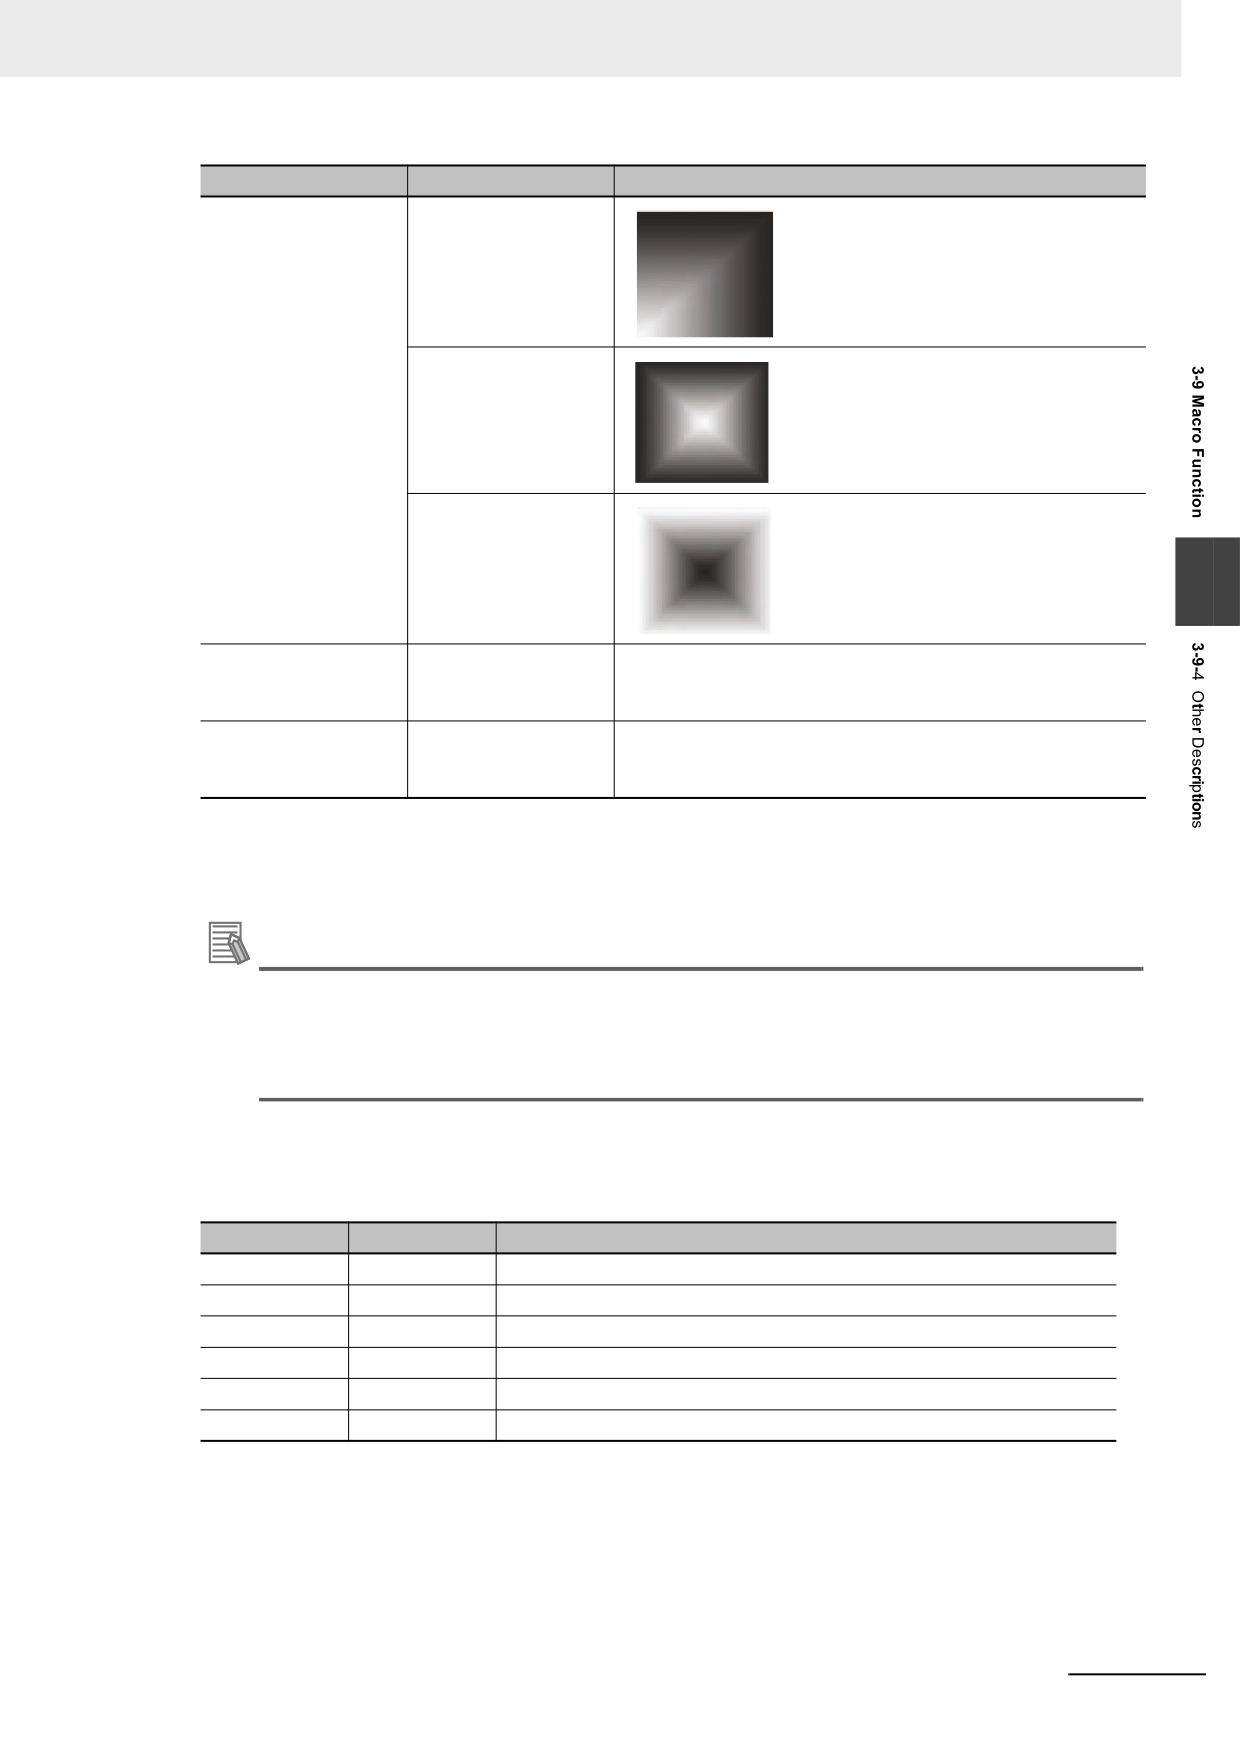
BrushParam is mainly used to set the type of the brush, the foreground color and
backg3round color. Brush type is mainly used to set the filling styles used by the brush:
graphics-filling and gradient-filling. And the value range is as follows.
Parameter Name
Value
Descriptions
Type (Brush type)
BFS_NOBRUSH
No filling
BFS_SOLID
BFS_DENSE1
NB-series Programmable Terminals NB-Designer Operation Manual(V106)
3-281
3 Functions of NB-Designer
Parameter Name
Value
Descriptions
BFS_DENSE2
BFS_DENSE3
BFS_DENSE4
BFS_DENSE5
BFS_DENSE6
BFS_DENSE7
BFS_DENSE8
BFS_DENSE9
BFS_DENSE10
BFS_DENSE11
BFS_DENSE12
BFS_FDIAG1
BFS_BDIAG1
BFS_FDIAG2
BFS_BDIAG2
BFS_FDIAG3
BFS_BDIAG3
BFS_VER1
BFS_HOR1
BFS_VER2
BFS_HOR2
BFS_VER3
BFS_HOR3
BFS_DIAGCROSS
BFS_CROSS
BFS_HORGRDT_FTTD
3-282
NB-series Programmable Terminals NB-Designer Operation Manual(V106)
3 Functions of NB-Designer
Parameter Name
Value
Descriptions
BFS_HORGRDT_FDTT
BFS_HORGRDT_FETC
BFS_HORGRDT_FCTE
3
BFS_VERGRDT_FLTR
BFS_VERGRDT_FRTL
BFS_VERGRDT_FETC
BFS_VERGRDT_FCTE
BFS_OUPGRDT_FLTTRD
BFS_OUPGRDT_FRDTLT
NB-series Programmable Terminals NB-Designer Operation Manual(V106)
3-283
3 Functions of NB-Designer
Parameter Name
Value
Descriptions
BFS_OUPGRDT_FETC
BFS_OUPGRDT_FCTE
BFS_ODWNGRDT_F
RTTLD
BFS_ODWNGRDT_F
LDTRT
BFS_ODWNGRDT_F
ETC
BFS_ODWNGRDT_F
CTE
BFS_CONGRDT_FLT
TRD
BFS_CONGRDT_FRT
TLD
BFS_CONGRDT_FR
DTLT
3-284
NB-series Programmable Terminals NB-Designer Operation Manual(V106)
3 Functions of NB-Designer
Parameter Name
Value
Descriptions
BFS_CONGRDT_FLD
TRT
BFS_CENGRDT_FETC
BFS_CENGRDT_FCTE
3
ForeColor
0~65535
It is recommended to use Macro RGB (r. g. b) to set the color, and
(Pattern color)
the range for r, g and b is 0~255. The system will convert the value
of RGB (r, g, b) according to the color parameters of PT screen.
BackColor
0~65535
It is recommended to use Macro RGB (r. g. b) to set the color, and
(Background color)
the range for r, g and b is 0~255. The system will convert the value
of RGB (r, g, b) according to the color parameters of PT screen.
(c) Point Structure “Point”
The parameter of point structure is simpler: x represents the X-axis coordinate and y
represents the Y-axis coordinate for the point.
Additional Information
To specify the color with a RGB function, you need to specify r and b as a multiples of 8, and
specify g as a multiples of 4. The remainder will be rounded down.
If you specify 0 for r, g, and b, the transparent color is specified. To draw a black line, you need to
specify the value except 0 as you do for RGB (8, 0, 0).
(1) Drawing Function
(a) Rectangle “DrawRect (x, y, w, h, pen, brh)”
The description of the parameter is as follows:
Parameter
Type
Descriptions
x
Int.
X-axis coordinate of the upper-left corner of the rectangle (Unit: pixel)
y
Int.
Y-axis coordinate of the upper-left corner of the rectangle (Unit: pixel)
w
Int.
Rectangle width (Unit: pixel)
h
Int.
Rectangle height (Unit: pixel)
pen
PenParam
Rectangular-border pen
brh
BrushParam
Rectangular filling brush
NB-series Programmable Terminals NB-Designer Operation Manual(V106)
3-285

3 Functions of NB-Designer
(b)
Rounded Rectangle “DrawRndRect (x, y, w, h, radius, pen, brh)”
The description of the parameter is as follows:
Parameter
Type
Descriptions
x
Int.
X-axis coordinate of the upper-left corner of the rectangle (Unit: pixel)
y
Int.
Y-axis coordinate of the upper-left corner of the rectangle (Unit: pixel)
w
Int.
Rectangle width (Unit: pixel)
h
Int.
Rectangle height (Unit: pixel)
radius
Int.
Rounded radius (Unit: pixel)
pen
PenParam
Rounded-rectangle-border brush
brh
BrushParam
Rounded-rectangle filling brush
(c)
Ellipse “DrawEclips (x, y, w, h, pen, brh)”
The description of the parameter is as follows:
Parameter
Type
Descriptions
x
Int.
X-axis coordinate of the upper-left corner of the circumscribed rectangle of ellipse (Unit: pixel)
y
Int.
Y-axis coordinate of the upper-left corner of the circumscribed rectangle of ellipse (Unit: pixel)
w
Int.
Width of the circumscribed rectangle of ellipse (Unit: pixel)
h
Int.
Height of the circumscribed rectangle of ellipse (Unit: pixel)
pen
PenParam
Ellipse-border pen
brh
BrushParam
Ellipse-filling brush
(d)
Line “DrawLine (x1, y1, x2, y2, pen)”
The description of the parameter is as follows:
Parameter
Type
Descriptions
x1
Int.
X-axis coordinate of line origin (Unit: pixel)
y1
Int.
Y-axis coordinate of line origin (Unit: pixel)
x2
Int.
X-axis coordinate of line end (Unit: pixel)
y2
Int.
Y-axis coordinate of line end (Unit: pixel)
pen
PenParam
Line brush
(e)
Polygon “DrawPolyg (pts, n, pen, brh)”
The description of the parameter is as follows:
Parameter
Type
Descriptions
pts
Point *
The first address of vertex-coordinate data for polygon
n
Int.
Vertex data of the polygon
pen
PenParam
Polygon-border pen
brh
BrushParam
Polygon-filling brush
(f)
Arc “DrawArc (x, y, w, h, start, end, pen)”
The description of the parameter is as follows:
Parameter
Type
Descriptions
x
Int.
X-axis coordinate of the upper-left corner of the circumscribed rectangle of arc (Unit: pixel)
y
Int.
Y-axis coordinate of the upper-left corner of the circumscribed rectangle of arc (Unit: pixel)
w
Int.
Width of the circumscribed rectangle of arc (Unit: pixel)
h
Int.
Height of the circumscribed rectangle of arc (Unit: pixel)
start
Int.
The starting angle of the arc (Unit: degree)
end
Int.
The end angle of the arc (Unit: degree)
pen
PenParam
Arc-border pen
3-286
NB-series Programmable Terminals NB-Designer Operation Manual(V106)

3 Functions of NB-Designer
(g) Sector “DrawPie (x, y, w, h, start, end, pen, brh)”
The description of the parameter is as follows:
Parameter
Type
Descriptions
x
Int.
X-axis coordinate of the upper-left corner of the circumscribed rectangle
of sector (Unit: pixel)
y
Int.
Y-axis coordinate of the upper-left corner of the circumscribed rectangle
of sector (Unit: pixel)
w
Int.
Width of the circumscribed rectangle of sector (Unit: pixel)
h
Int.
Height of the circumscribed rectangle of sector (Unit: pixel)
start
Int.
The starting angle of the sector (Unit: degree)
end
Int.
The end angle of the sector (Unit: degree)
pen
PenParam
Sector-border pen
brh
BrushParam
Sector-filling brush
3
For the drawing functions, RGB values can be used directly for the colors.
For the corresponding relationship between 65536 Color and RGB, the system will handle it directly.
int MacroEntry()
{
PenParam pen;
BrushParam brh;
Point pts[5];
short buf[2] = {0};
pts[0].x = 0;
pts[0].y = 0;
pts[1].x = 100;
pts[1].y = 0;
pts[2].x = 120;
pts[2].y = 150;
pen.type = 1;
pen.width = 0;
pen.color = RGB(0, 0, 0xFF);
brh.type = BFS_ODWNGRDT_FRTTLD;
brh.foreColor = RGB(0, 0, 0);
brh.backColor = RGB(255, 255, 255);
DrawRect(0, 0, 400, 400, pen, brh);
}
NB-series Programmable Terminals NB-Designer Operation Manual(V106)
3-287
3 Functions of NB-Designer
7
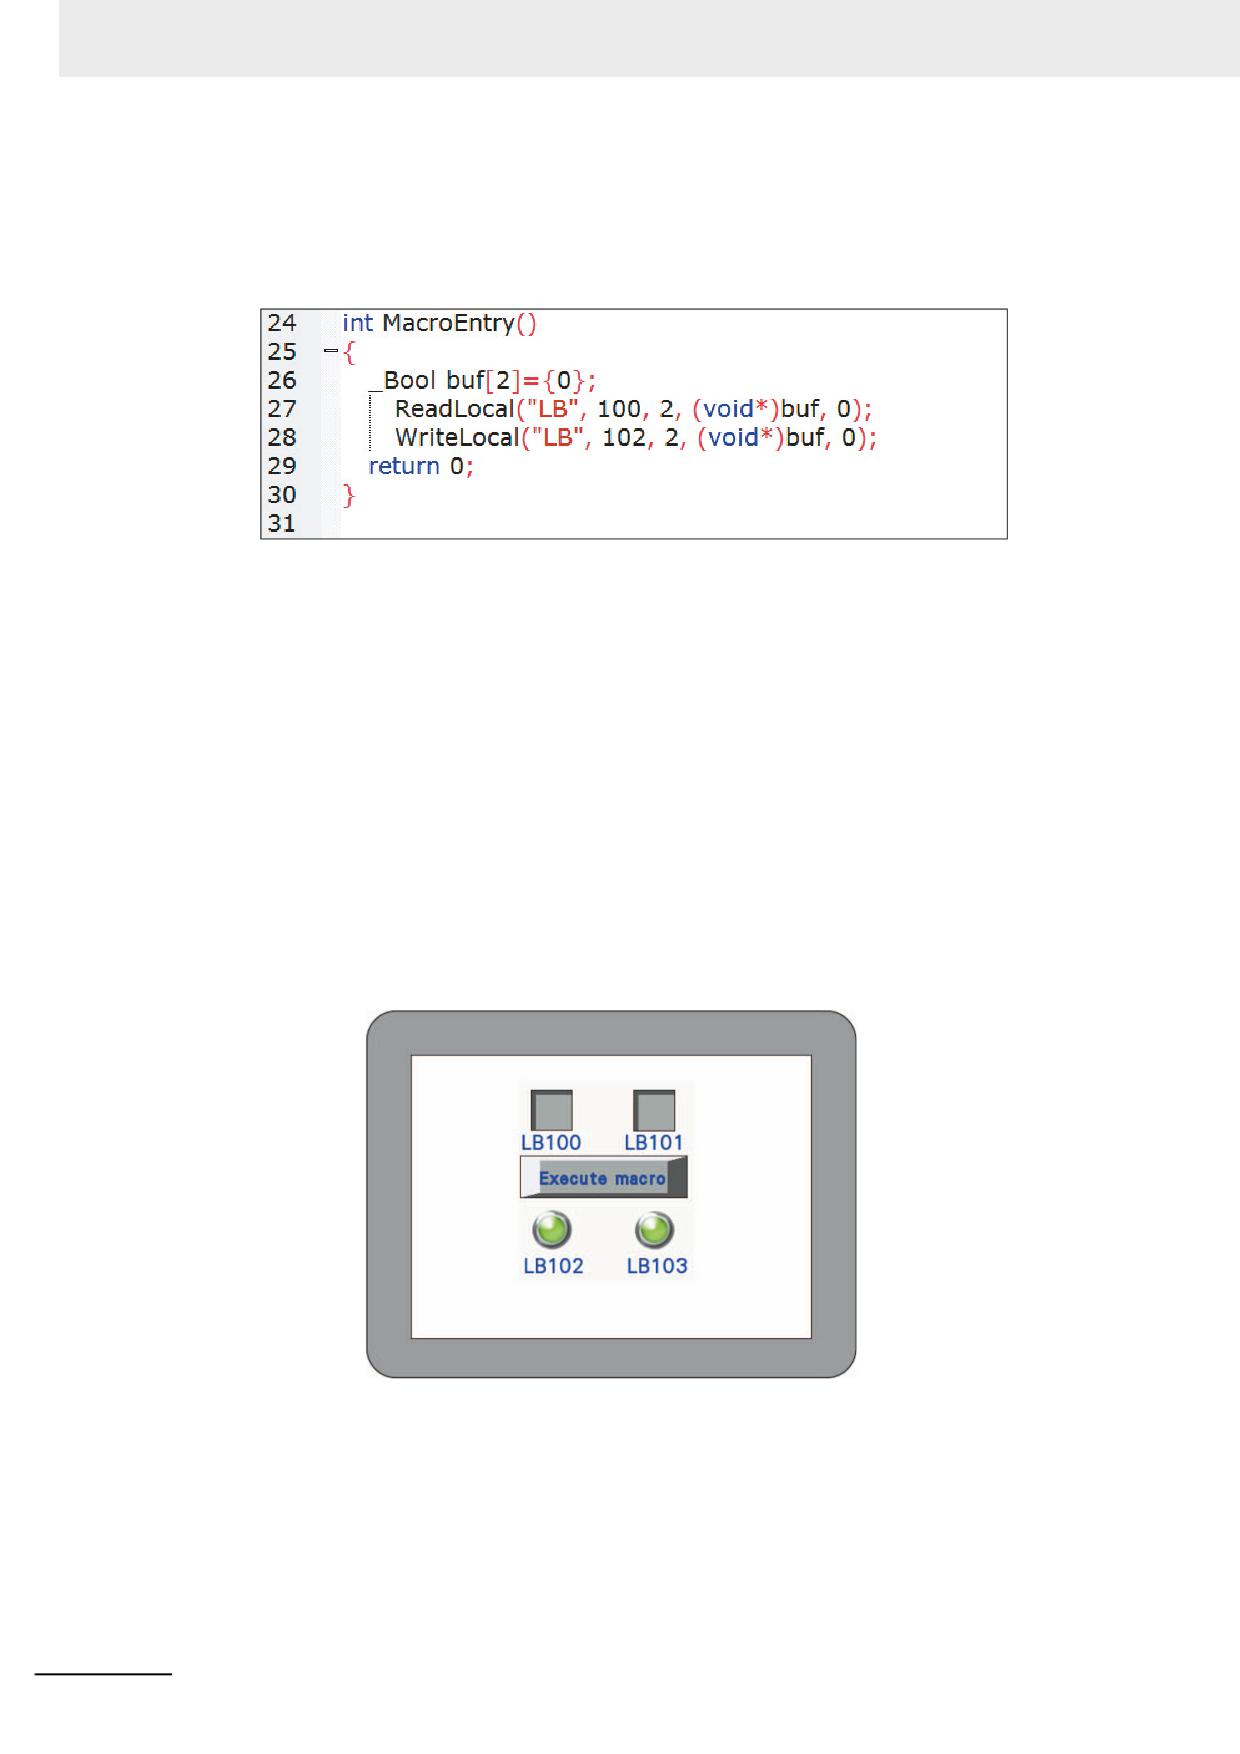
Example of how to use the local variable functions
When the Macro is created as below, the variables read from the value LB100 and LB101 (in
the PT local memory) are written to LB102 and LB103 (in the PT local memory).
The codes are compiled as follows:
Where,
The “buf” is defined as “_Bool”, and it can also be defined as “short” because each bit address
in local LB memories occupies one-word (16 bit) space (but in fact only one bit in each word is
used.)
ReadLocal(“LB”, 100, 2, (void*)buf, 0) indicates that the values read from LB100 and LB101
are written to buf[0] and buf[1], respectively. “2” located in the center of the parenthesis
indicates the number of bit that the LB100 reads.
WriteLocal (“LB”, 102, 2, (void*)buf, 0) indicates that writes the read values to LB102 and
LB103, respectively.
Firstly, add 2 Bit Switch components with addresses of LB100 and LB101, and then add 2 Bit
Lamp components with addresses of LB102 and LB103. Finally, add a Function Key to execute
the Macro.
After the Save and Compile operations are performed, then execute the Macro:
After the LB100 and LB101 are turned ON, when the Macro is executed, you can see the
LB102 and LB103 are turned ON.
3-288
NB-series Programmable Terminals NB-Designer Operation Manual(V106)
3 Functions of NB-Designer
8
Available standard functions
Following standard functions of C language is available. Refer to a commercial handbook of C
language for the details.
sin (double)
cos (double)
tan (double)
sinh (double)
cosh (double)
tanh (double)
asin (double)
acos (double)
atan (double)
3
atan2 (double, double)
exp (double)
log (double)
log10 (double)
pow (double, double)
sqrt (double)
ceil (double)
floor (double)
fabs (double)
ldexp (double, int)
frexp (double, int*)
modf (double, double*)
fmod (double, double)
isgreater(x, y)
isgreaterequal(x, y)
isless(x, y)
islessequal(x, y)
islessgreater(x, y)
isunordered(x, y)
NB-series Programmable Terminals NB-Designer Operation Manual(V106)
3-289
3 Functions of NB-Designer
3-10 System Parameters
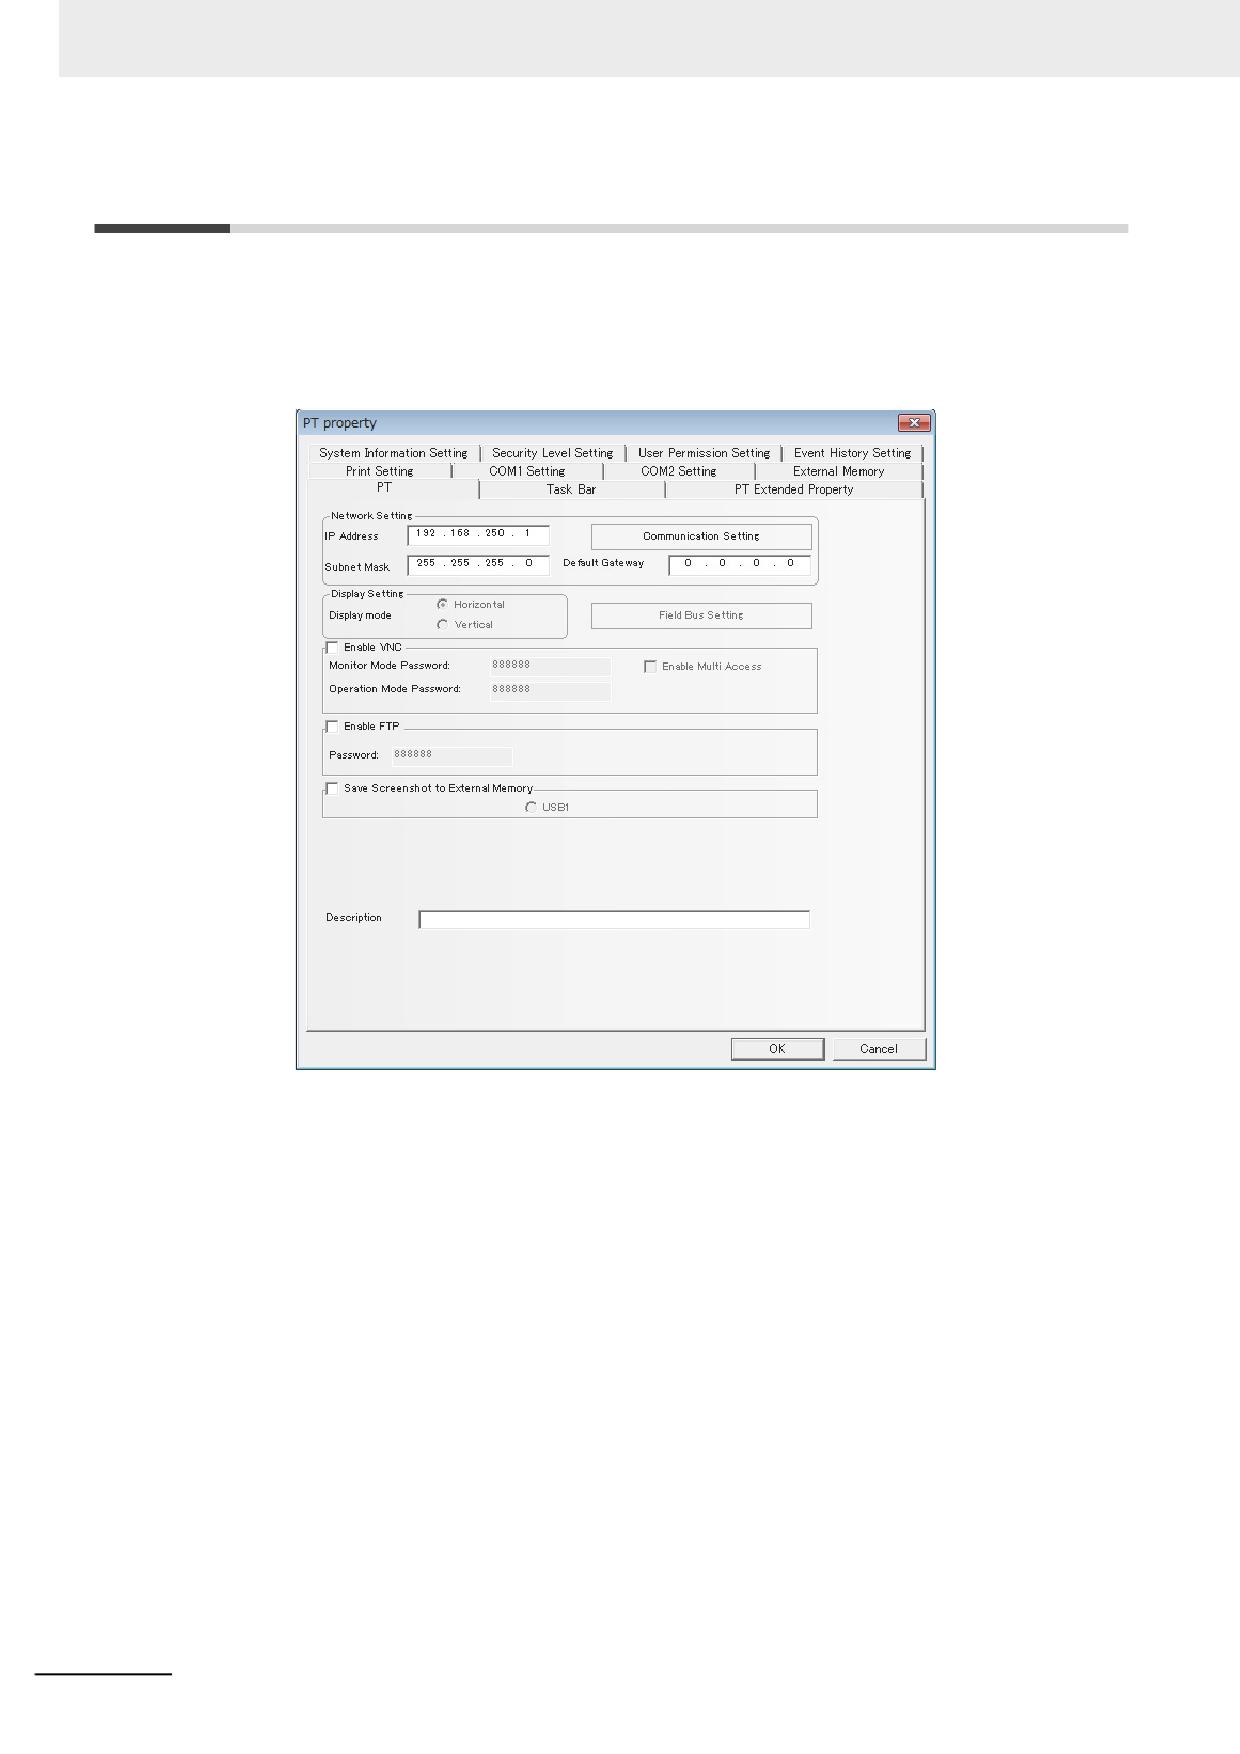
Specifications related to the NB units are performed in the PT Property.
The PT Property can specify the procedure to display the PT screens and the system specifications of
the PT units as well as the communications settings.
Double-clicking PT in Configuration and Setup Window can make system parameter dialog box pop up.
There are 11 tabs related to the communication: [PT], [Task Bar], [PT Extended Properties], [System
Information Setting], [User Permission Setting], [Security Level Setting], [Event History Setting], [Print
Setting], [COM1 Setting], [COM2 Setting], and [External Memory]. They will be described in the later
one by one.
3-290
NB-series Programmable Terminals NB-Designer Operation Manual(V106)
3 Functions of NB-Designer
3-10-1
PT
3
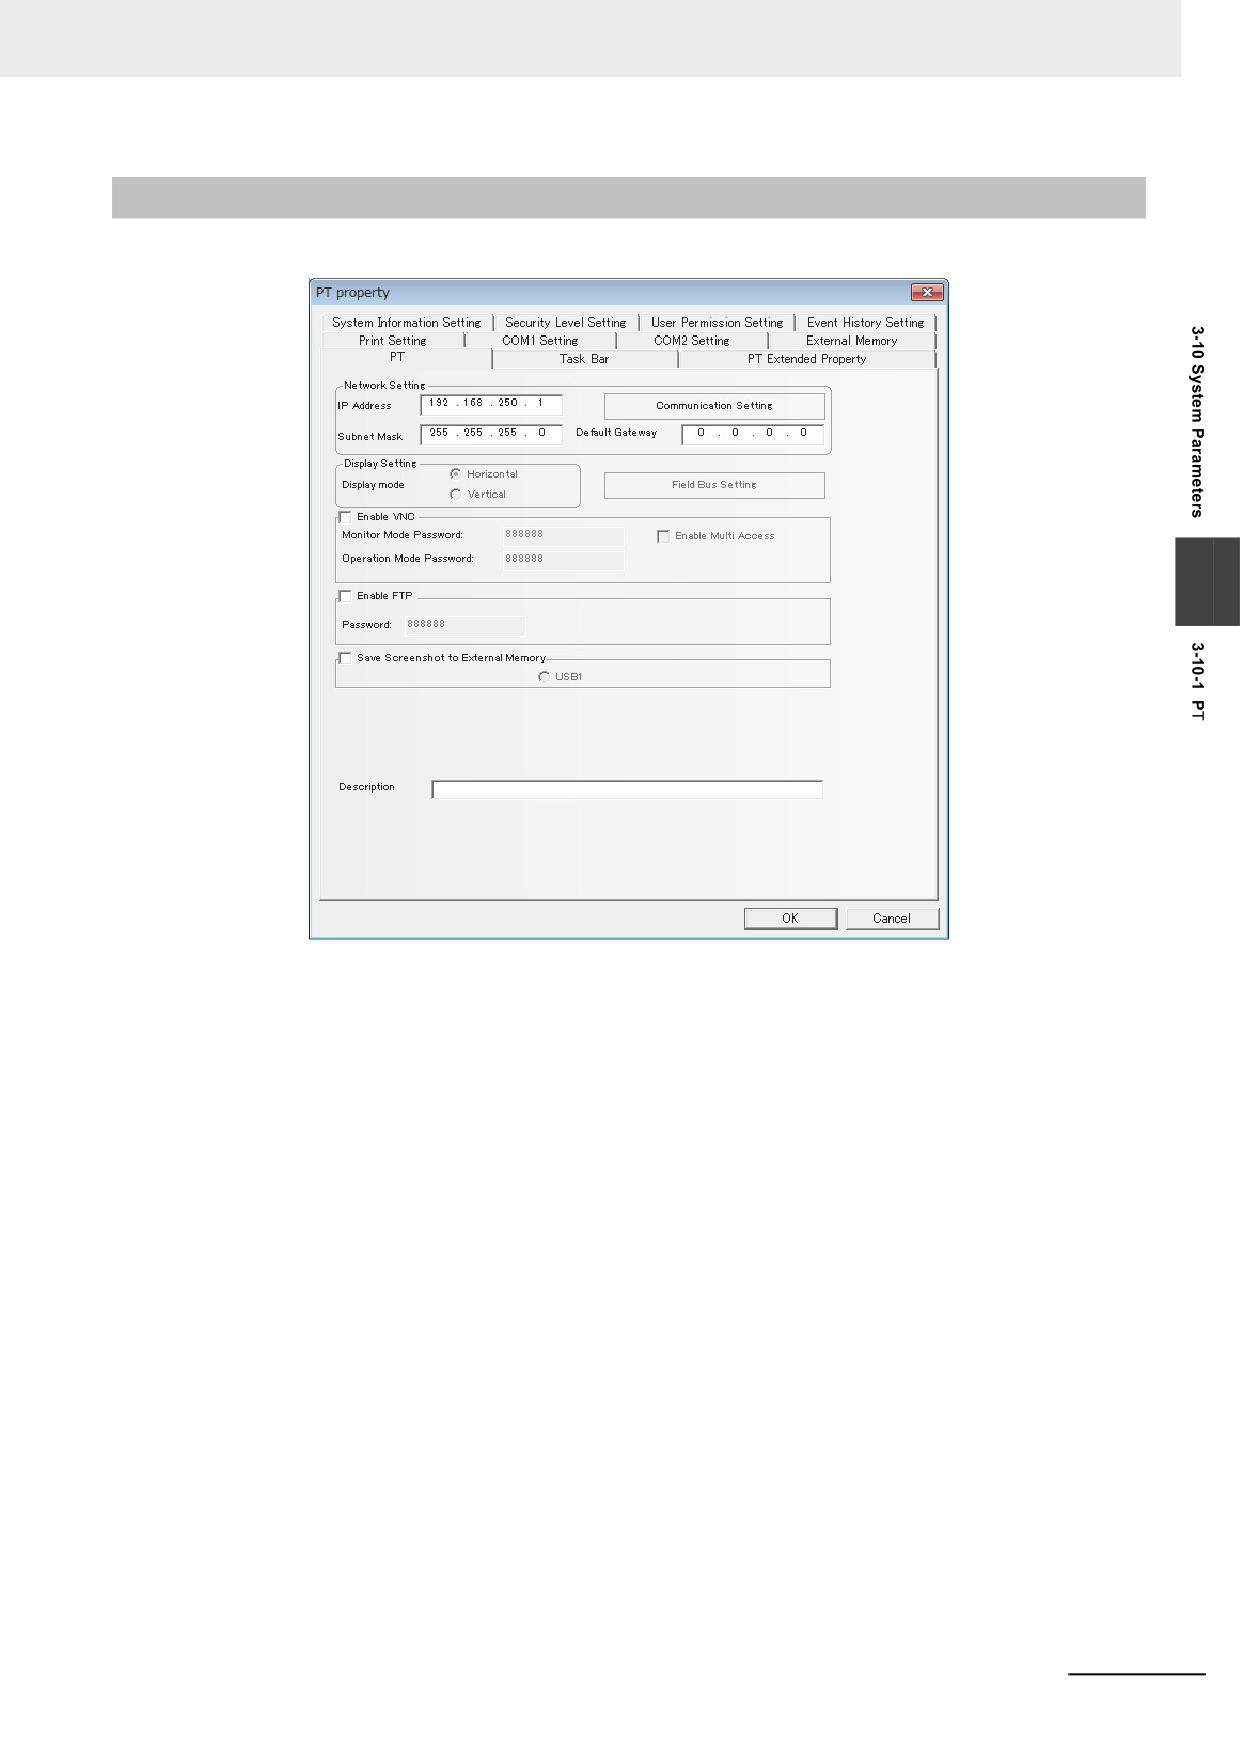
Network Setting: Refers to the network information such as IP Address, Subnet Mask, Default
Gateway and Display Setting etc.
Display Setting: Refers to the current display of PT (Horizontal or Vertical). Horizontal/Vertical display
is selected at dragging PT, once it is selected, it will not be switched again.
Enable VNC: Check the check box to enable VNC server function. VNC server status can be checked
by LB9290. Monitor mode and operation mode can be enabled/disabled by LB9291 -
LB9293.
A VNC client should be installed in landscape orientation. You cannot place an NB unit in
vertical orientation.
Monitor Mode Password / Operation Mode Password:
For VNC server function, a password setting is required for monitor mode and operation
mode, respectively. The default is 888888. The password only supports the number
instead of the other characters. The password ranges from 0 to 4294967295.
Enable Multi Access: Selecting this check box enables simultaneous multi-client access. However, we
recommend single-client connection. Simultaneous access from multiple clients
will deteriorate the performance of the NB. As a preventive measure, check the
load status on the processing on your actual system and adjust the load within
the appropriate range when you use this option.
NB-series Programmable Terminals NB-Designer Operation Manual(V106)
3-291
3 Functions of NB-Designer
Additional Information
If the connection to a client is lost, the client may reconnect on a new port. In this case, the con-
nection on the previous port remains inside the NB, waiting for the connection to be restored.
Therefore, the NB cannot accept connection requests on the new port. However, selecting this
option enables the NB to accept up to four connections, so even in this state, reconnection is
possible until the maximum limit of four connections is reached.
In order to clear the connections remaining inside the NB, you must wait for a certain period,
usually about 15 minutes, or cycle the NB.
Enable FTP: Check the check box to enable FTP server function. For FTP server function, a password
setting is required. The default is 888888. The password only supports the number
instead of the other characters. The password ranges from 0 to 99999999.
Whether FTP server is enabled or disabled can be checked by LB9296.
Save Screen Shots to External Memory: Check the check box to save screen shots to the external
memory.
Description: Refers to the description for this PT. And the description will be displayed in PT
description box at the downloading and test etc., thus making the differentiation among
several PTs conveniently.
3-292
NB-series Programmable Terminals NB-Designer Operation Manual(V106)
3 Functions of NB-Designer
3-10-2
Task Bar
3
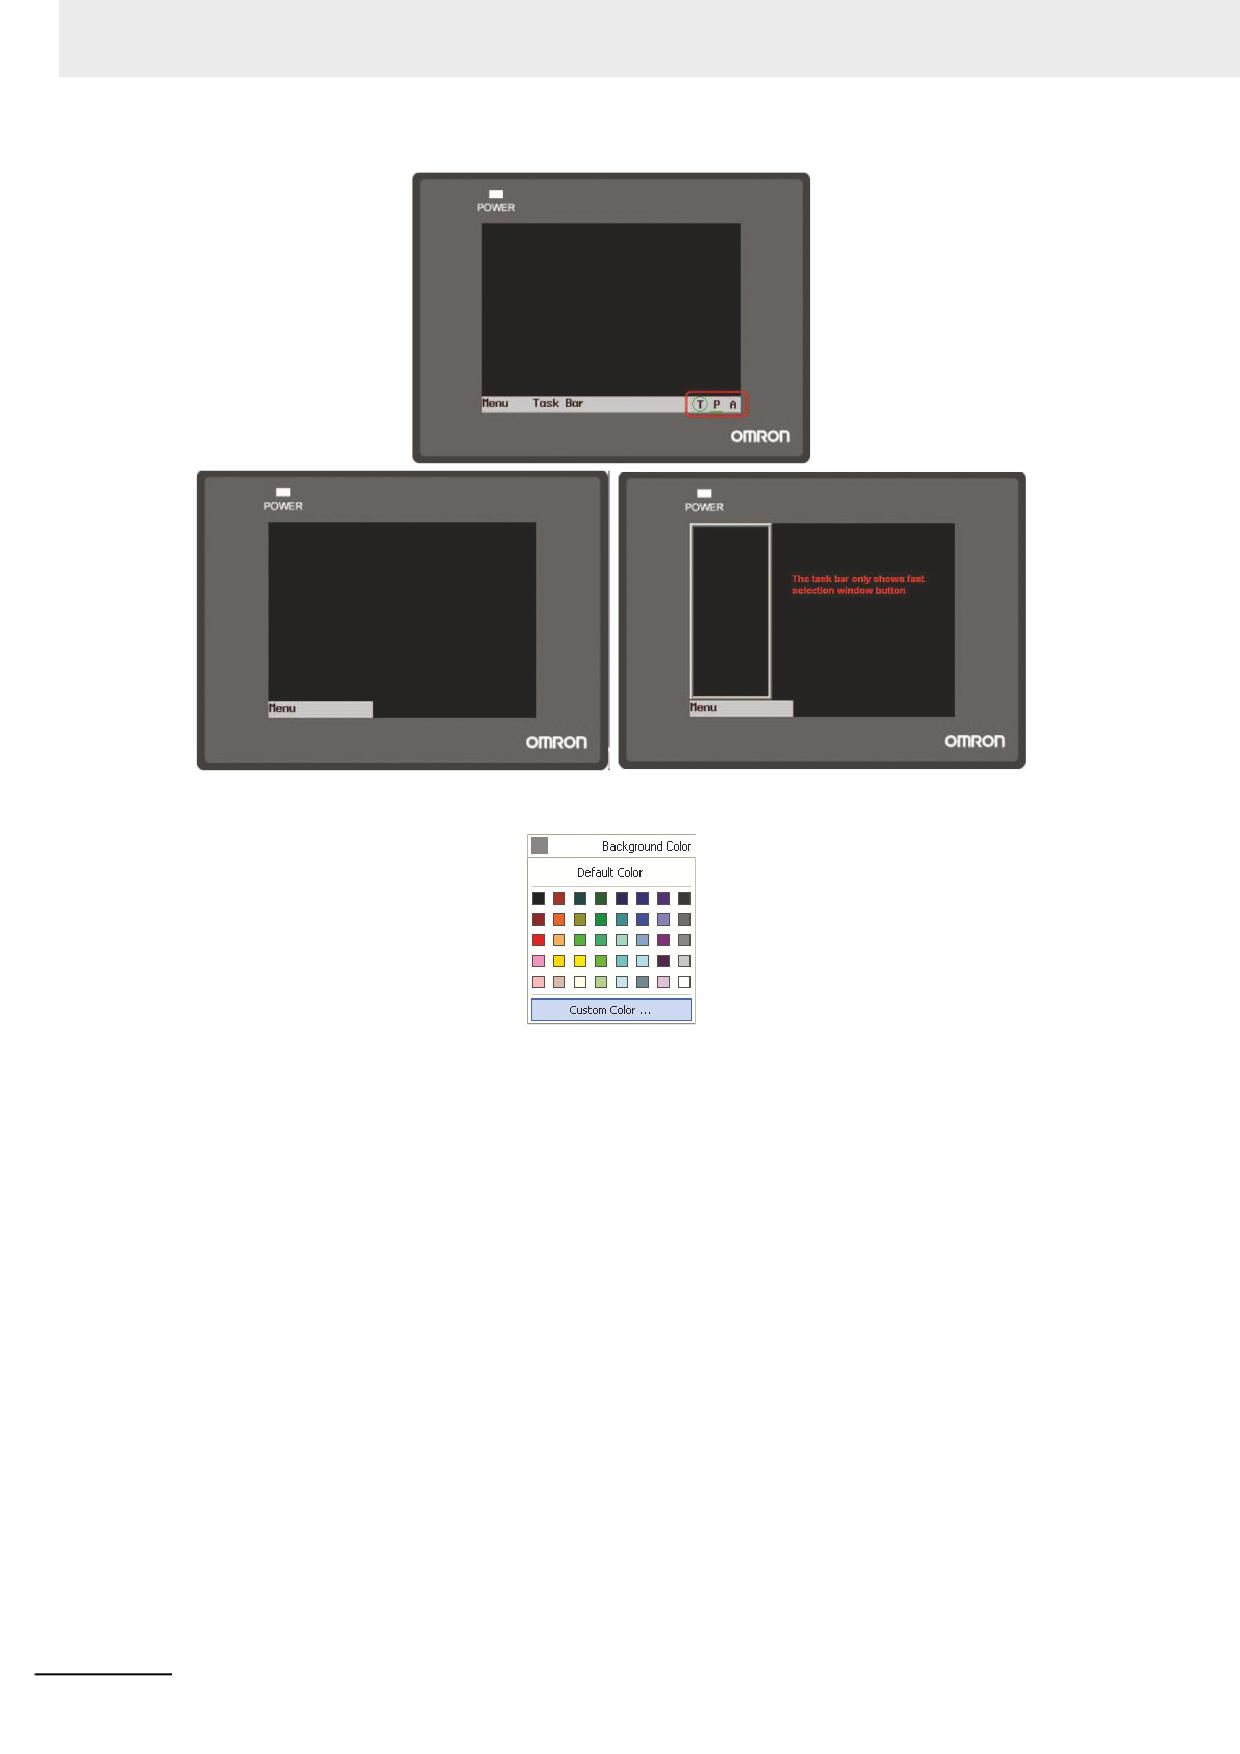
Menu Button
Alarm Indicator
Task Bar Button
Touch Indicator
CPU Indicator
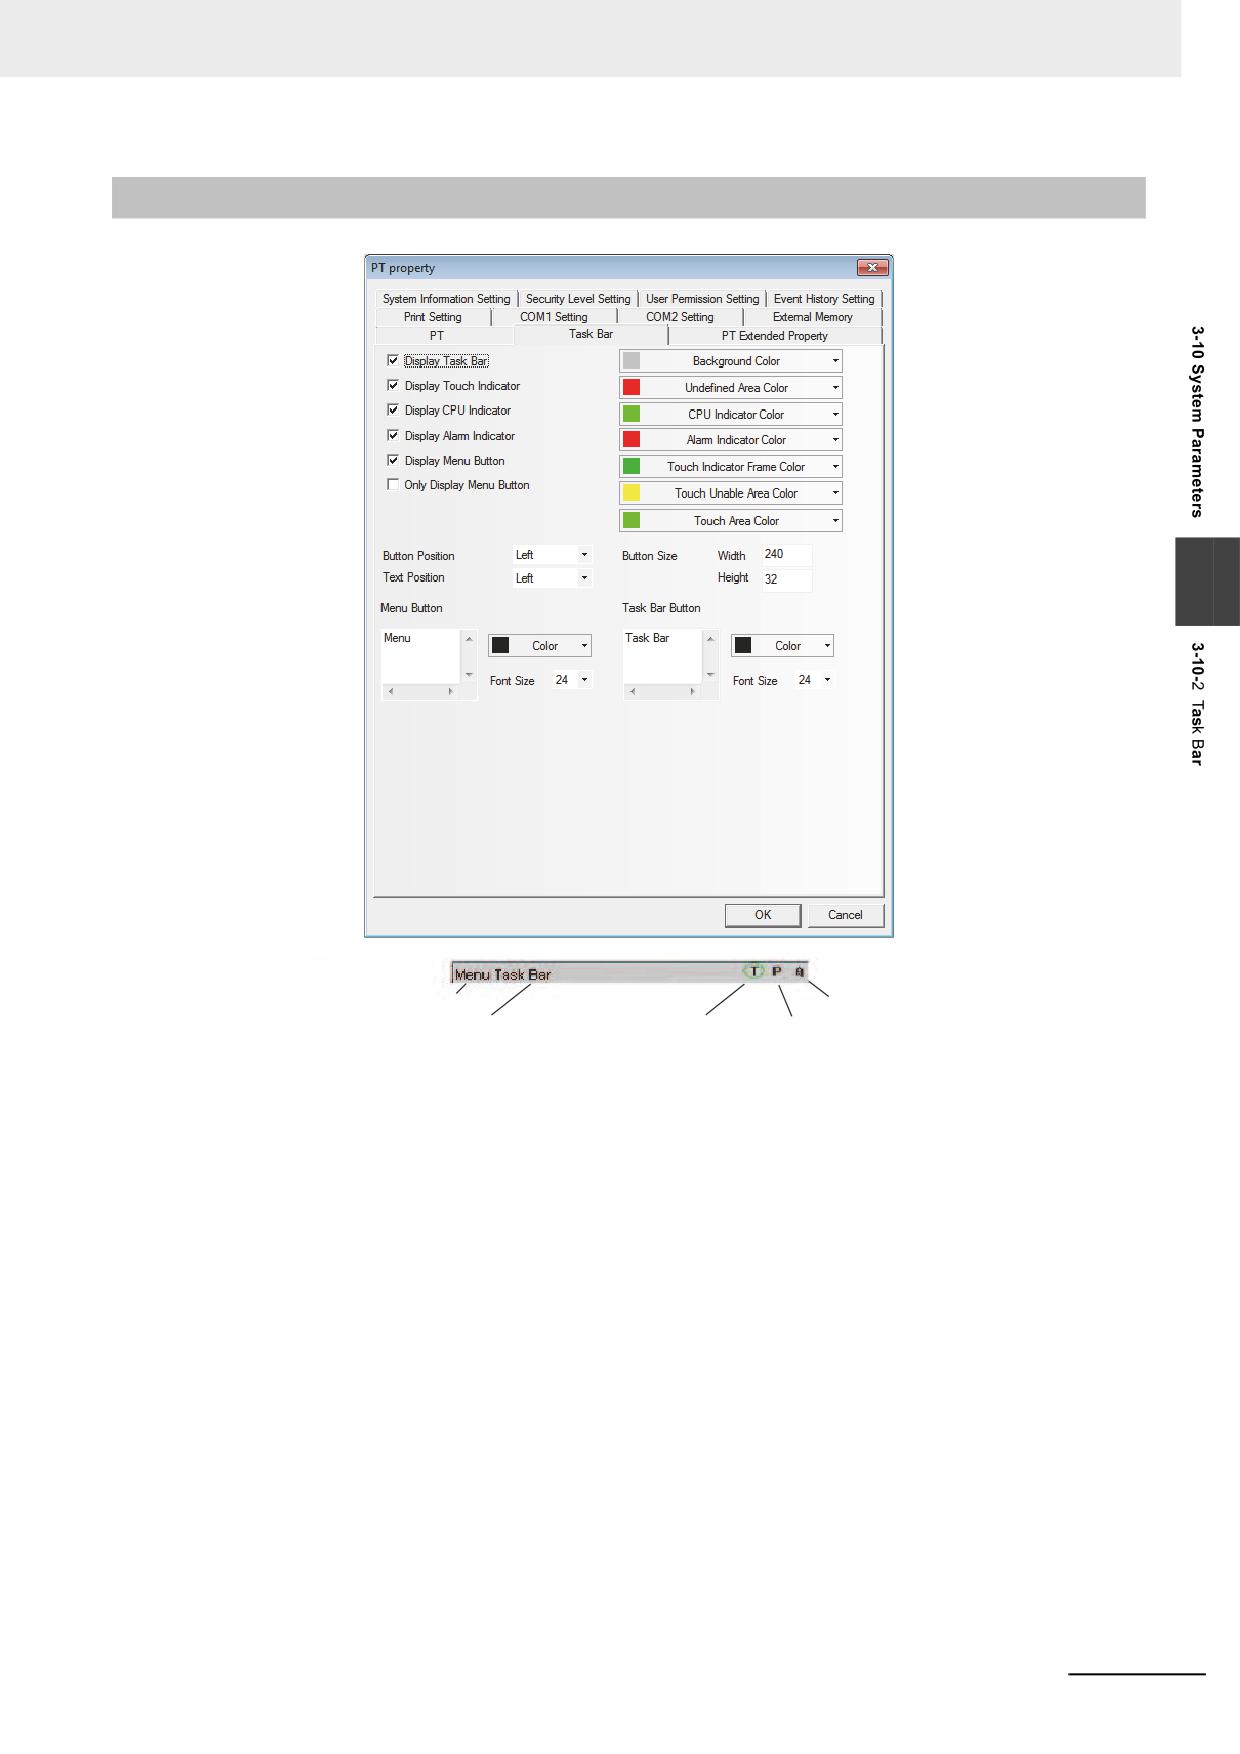
Display Task Bar: Determines whether to display the task bar or not. If the “Display Task Bar” is
selected, the task bar as shown above will be displayed at the bottom of the screen.
Display Touch Indicator: When the screen is touched, the touch indicator will change the color. If the
“Display Touch Indicator” is checked, the touch indicator will be displayed at
the right side of the task bar, as shown above. (The touch indicator is
expressed by “T” in simulator and the PT.)
Display CPU Indicator: CPU Indicator is a Level Meter showing the usage condition of CPU in
percentage form. If “Display CPU Indicator” is checked, CPU Indicator will be
displayed at the right side of the task bar, as shown above. (The CPU
Indicator is expressed by “P” in simulator and the PT.)
Display Alarm Indicator: Alarm Indicator is a Level Meter showing the ratio of the current alarm
numbers to the total alarm numbers logged in the alarm information. If
“Display Alarm Indicator” is checked, Alarm Indicator will be displayed at the
right side of the task bar, as shown above. (The alarm indicating lamp is
expressed by “A” in simulator and the PT.)
The Alarm Indicator is the bar to display the number in percentage which
divides the total number of the alarm the registered to Alarm Settings with
the number of the alarm currently occurring.
Display Menu Button: After this option is checked, you can use the Menu Screen. If this option isn't
checked, the Menu Screen will not pop up.
Only Show Menu Button: After this option is checked, only the Menu Screen button is displayed in the
task bar.
NB-series Programmable Terminals NB-Designer Operation Manual(V106)
3-293
3 Functions of NB-Designer
Background Color: Determines the backg3round color of the task bar. You can select the following colors
at “Default Colors” or select “Custom Colors” to configure any colors you want.
Undefined Area Color: When you click the undefined area, i.e. the area outside of working area for touchable
components or without the components, the Touch Indicator will change colors.
CPU Indicator Color: Refers to the color of CPU Indicator.
Alarm Indicator Color: Refers to the color of Alarm Indicator.
Touch Indicator Frame Color: Refers to the box color of the Touch Indicator.
Touch Unable Area Color: Refers to the Touch Indicator color shown when the nonclient area is
touched (including when expected effect is not realized after the
component(s) being touched).
Touch Area Color: Refers to the Touch Indicator color shown when the client area is touched (including
when related action(s) is (are) performed after corresponding component(s) or Menu
Bar etc. being touched).
Menu Button/Task Bar Button: Input the texts which should be displayed in the Task Bar and in the
location which displays the Menu Screen of the Task Bar.
Button Position: Refers to the positions of the Menu Button and Task Bar Button, i.e. “Left” and “Right”. If you
select “Right”, the Menu Button and the Task Bar Button will be placed in the lower-right corner
of the screen. On the contrary, they will be placed in the lower-left corner of the screen.
Text Position: The text alignment in the Menu Button and the Task Bar Button includes “Left”, “Right”
and “Center”.
Button Size: Refers to the width and height of the area where the button locates.
Font Size: Refers to the font size of the texts in the Menu Button and the Task Bar Button.
3-294
NB-series Programmable Terminals NB-Designer Operation Manual(V106)
3 Functions of NB-Designer
3-10-3
PT Extended Properties
3
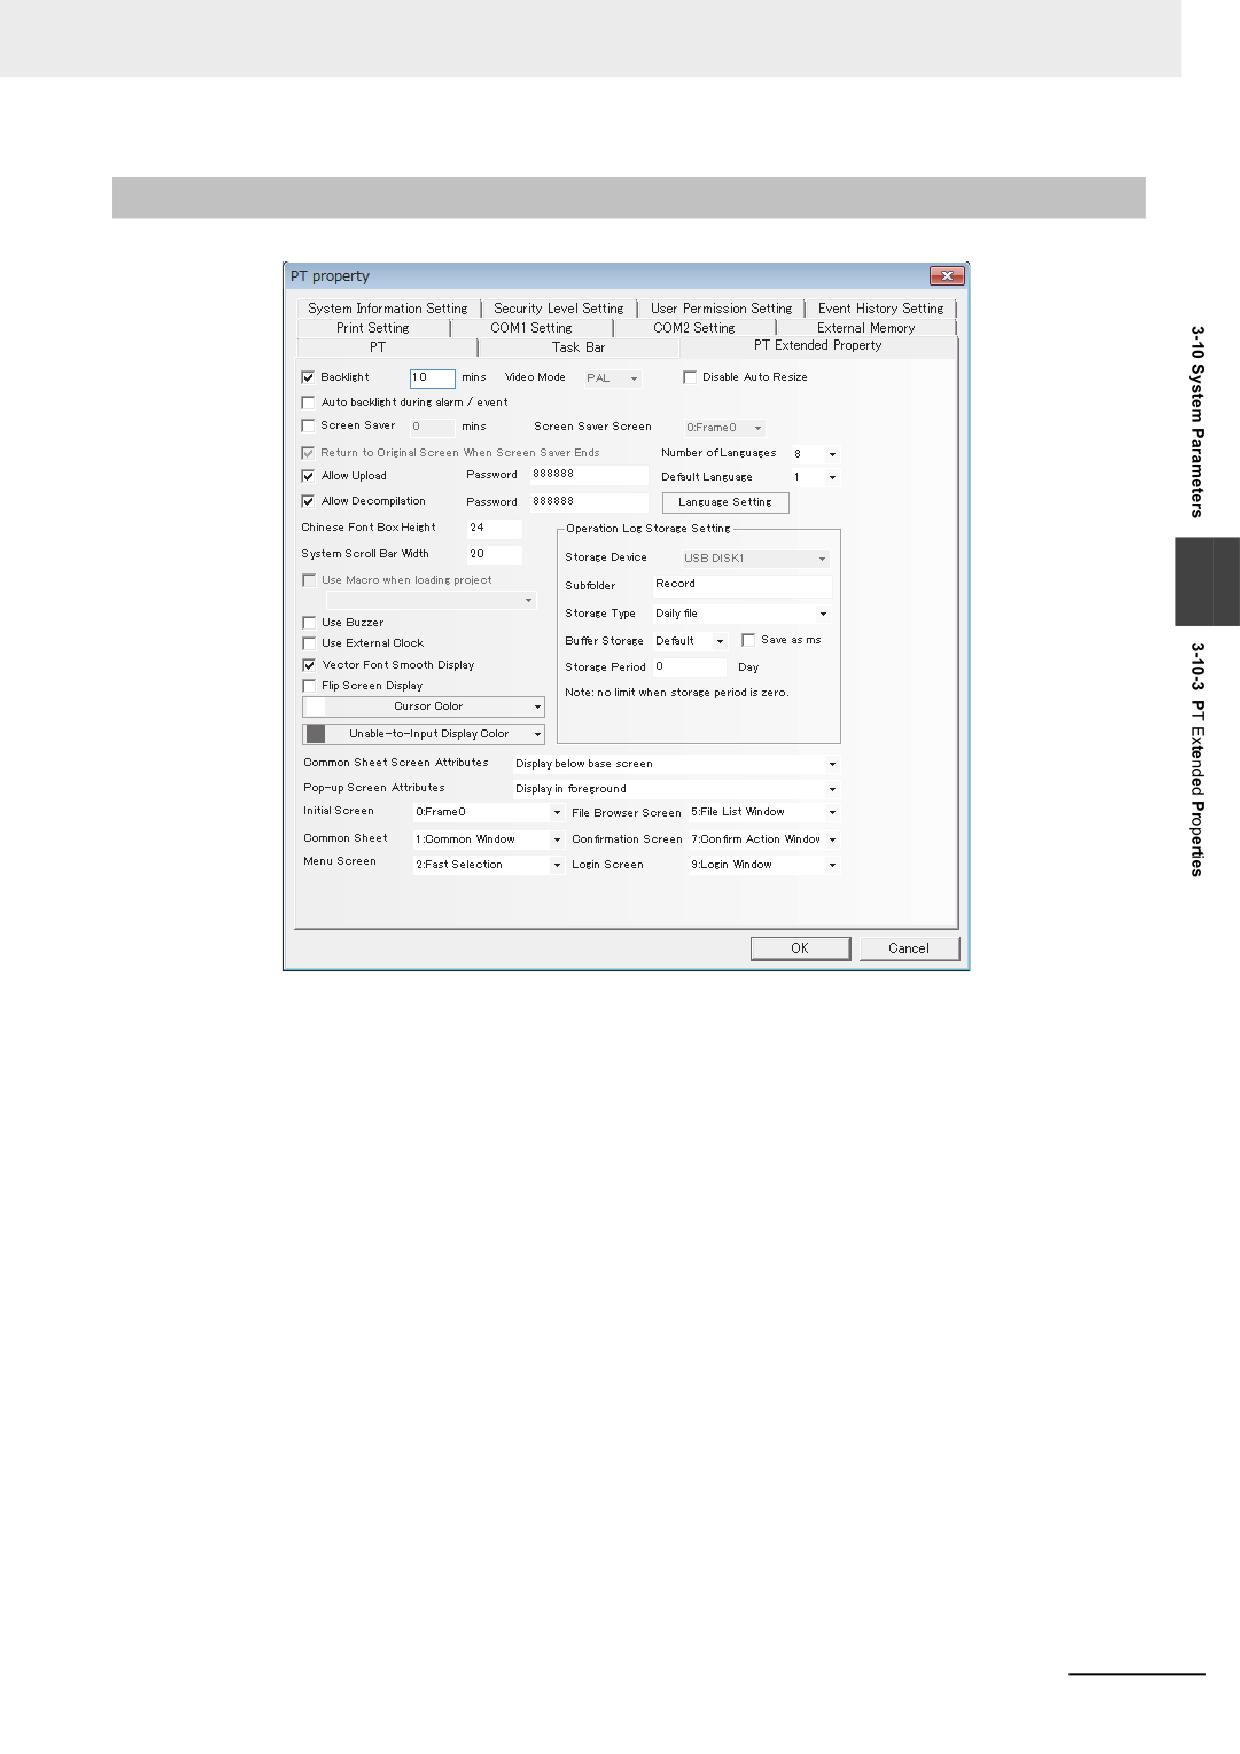
Backlight: How long (minute) the backlight will be closed when the screen is not touched.
Auto backlight during alarm/event: When it is checked, the backlight will automatically turn ON when
the alarm/event occurs.
Screen Saver: The duration until the screen saver is started after the inactivity.
Screen Saver Screen: After the screen. saver is checked, a certain screen can be selected as
Screensaver Screen.
Return to Original Screen when Screensavers Ends: When it is checked, the screen will return to the
Original Screen after the screensaver ends.
Allow Upload: Since the respects of the information disclosure, remove the check the check box when
prohibiting the upload.
Allow Decompilation: Allows the user to decompile and modify the pkg/pkgx files generated by
configuration compilation after it is checked. For this function, a password
setting is required.
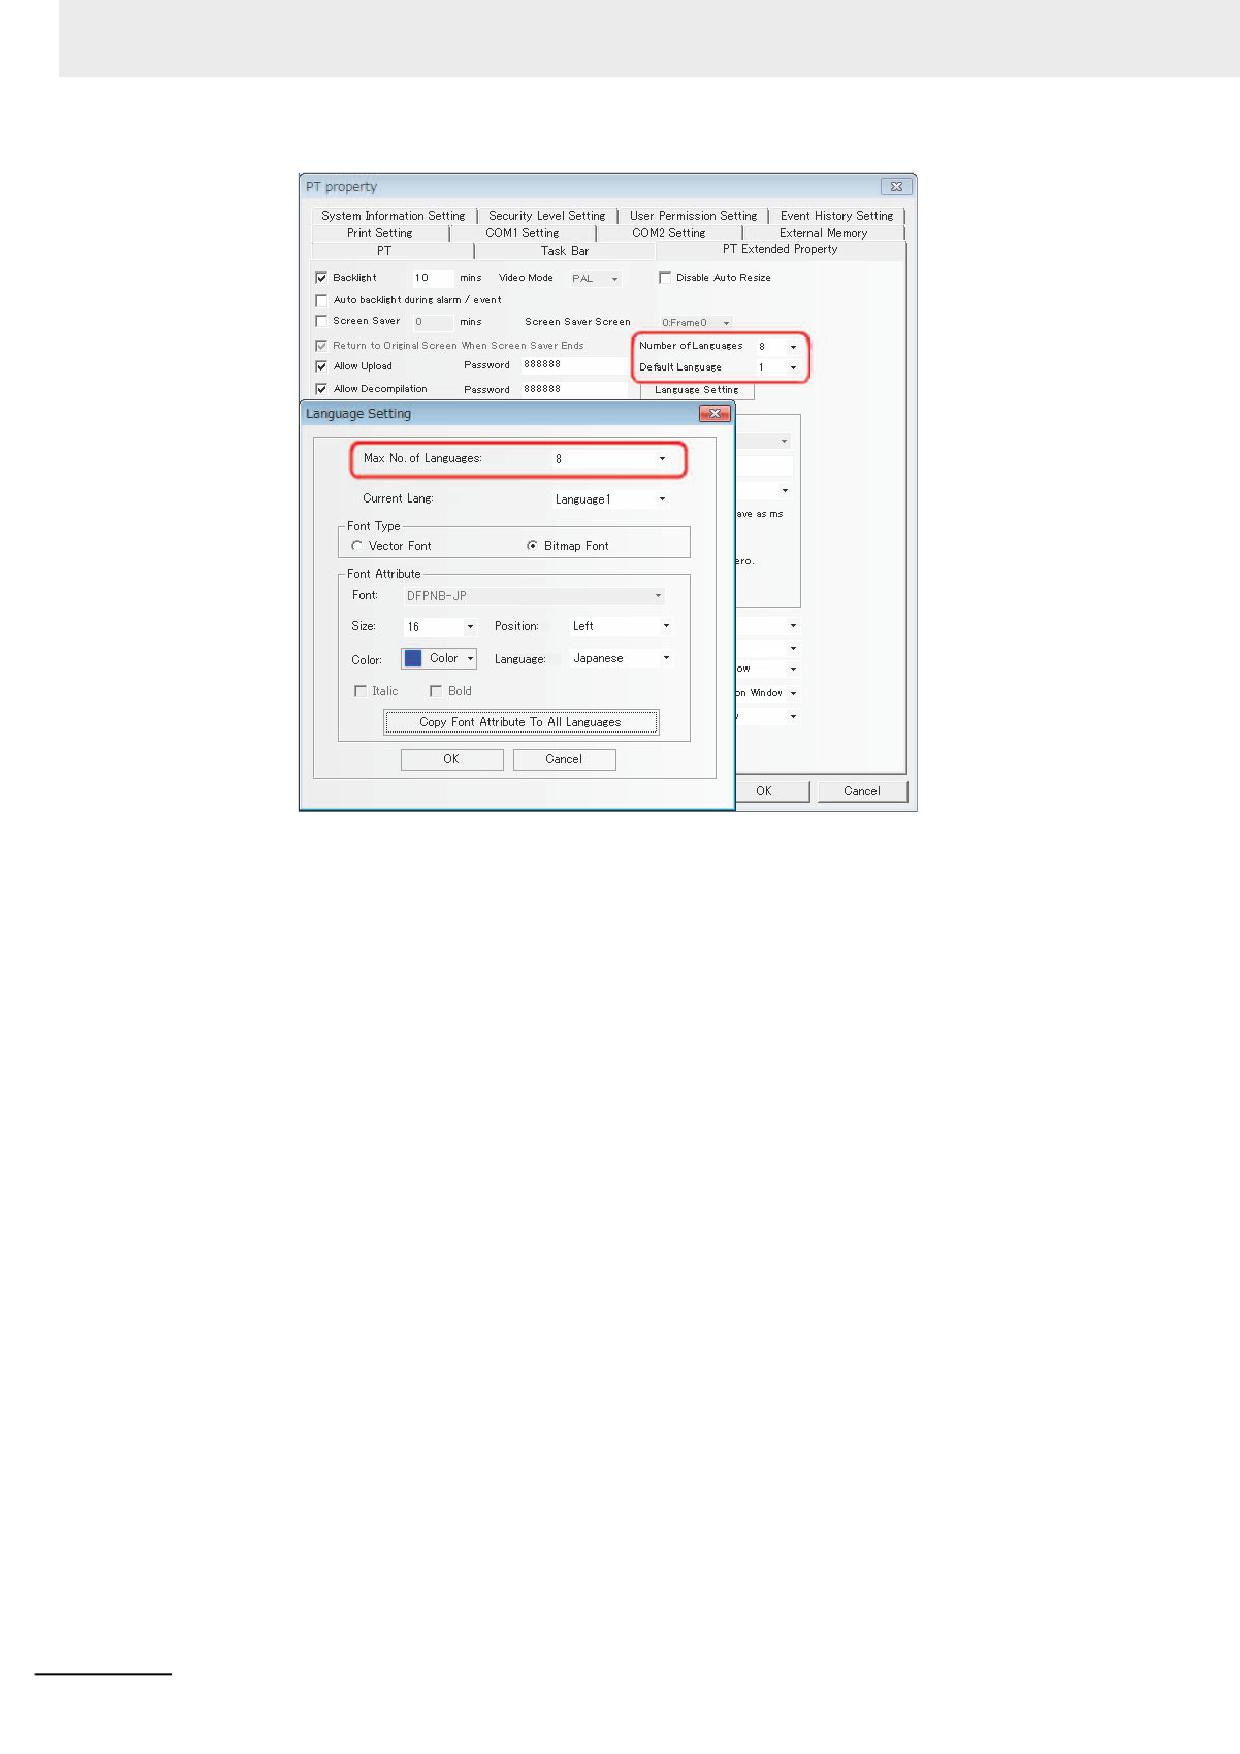
Number of Languages: Specify the number of the languages used in the project. The languages used
by the component of the PT is generally less than or equal to the maximum
language number. For example, the maximum language number is 7 and the
number of used languages is 5, the components in PT can only use 5 kinds of
languages. For the details, refer to 3-8-1 Text Library (Page 3-238).
Default Language: Refers to the default language when the project is opened originally.
NB-series Programmable Terminals NB-Designer Operation Manual(V106)
3-295
3 Functions of NB-Designer
Disable Auto Resize: Selecting this check box disables the auto-resizing function for all components
in a project data.
The length of a component will not change according to the length of a label.
When the label length changes, the font size will be adjusted.
3-296
NB-series Programmable Terminals NB-Designer Operation Manual(V106)
3 Functions of NB-Designer
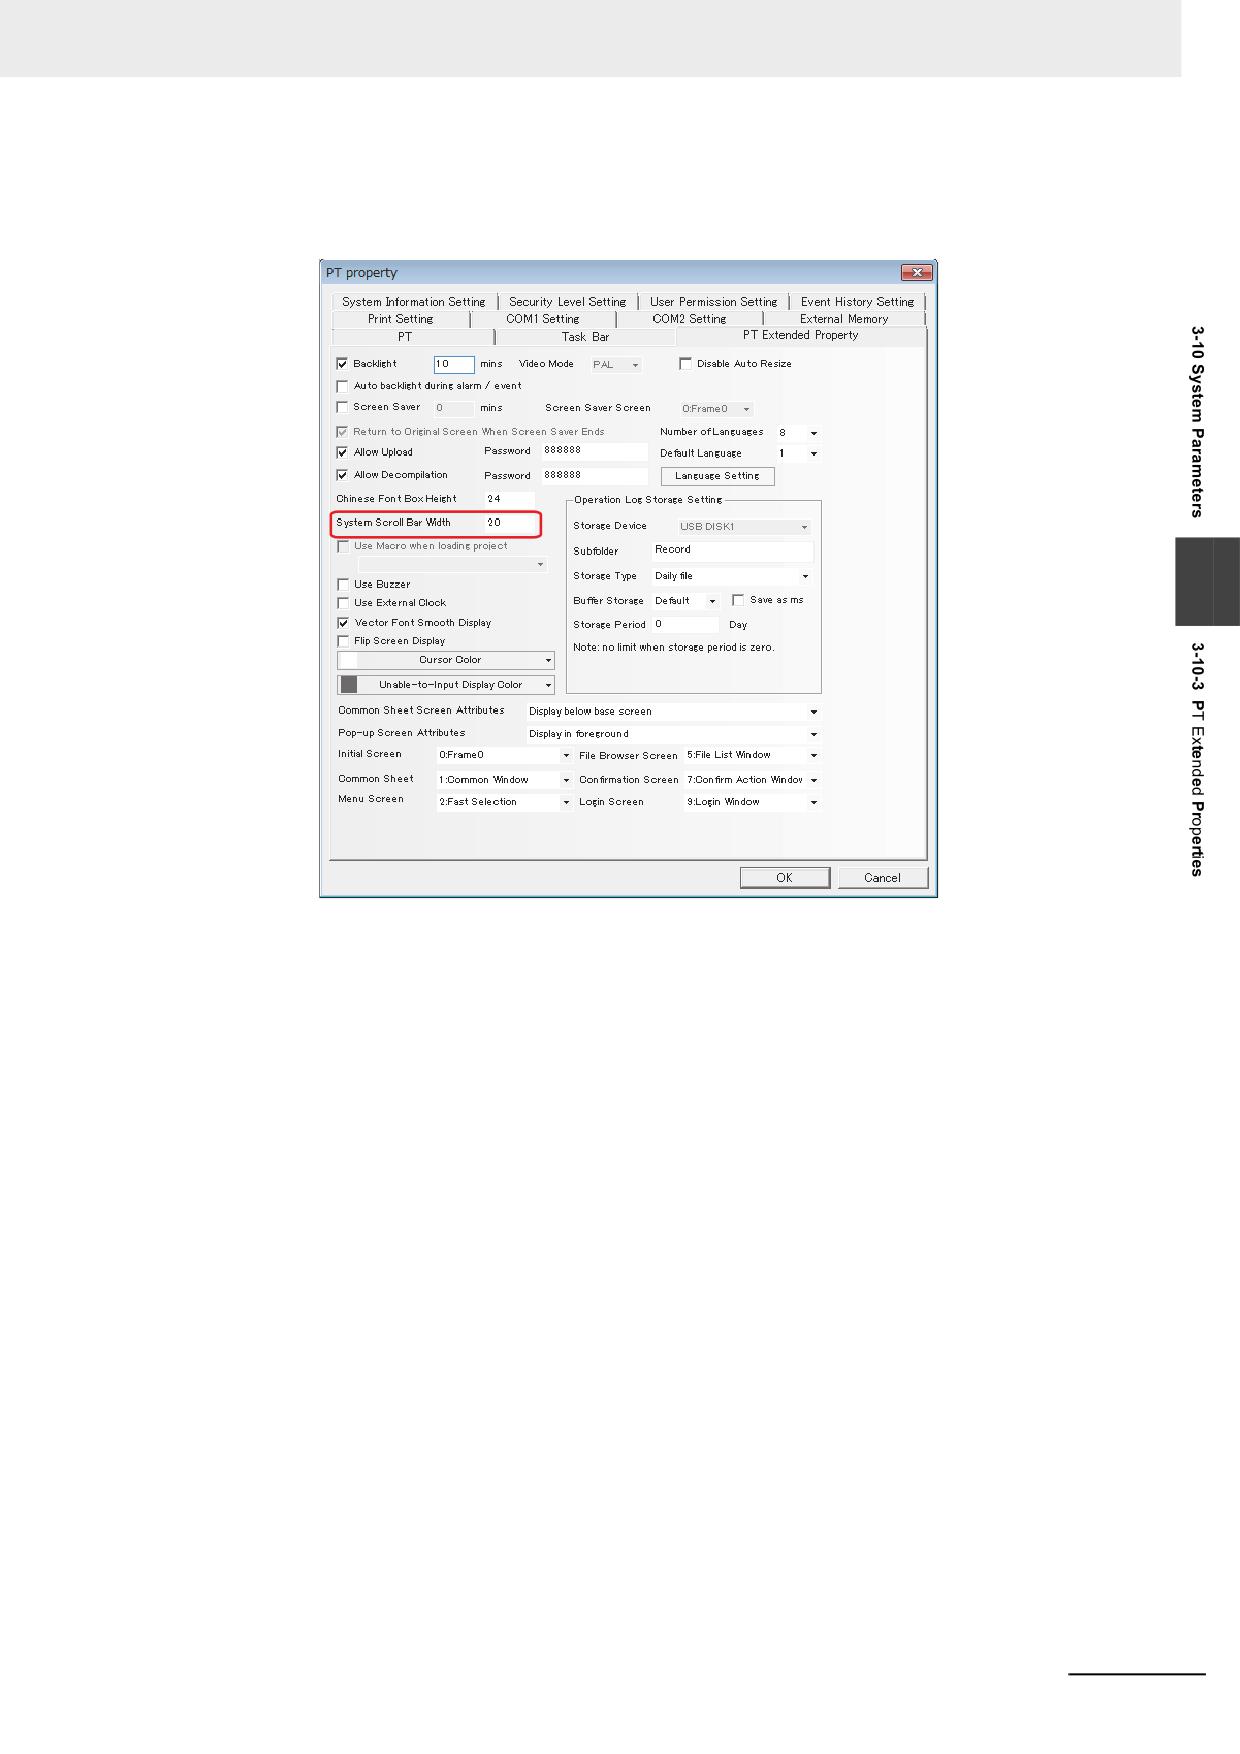
System Scroll Bar Width: Refers to the component with the scroll bar such as operation log
component. The width of the scroll bar can be set with this option and the
width range is from 20 to 120 pixel point. When the spacing is 4 (i.e. 20, 24,
28 and so on), the scroll bar can be displayed effectively.
3
Use Macro when loading project: Refers to the Macro file run firstly when the unit starts processing
the project file after it starts.
Use Buzzer: When the component of the PT is pressed or the “Beep Function” is set for the Alarm or
the Event, check the check box.
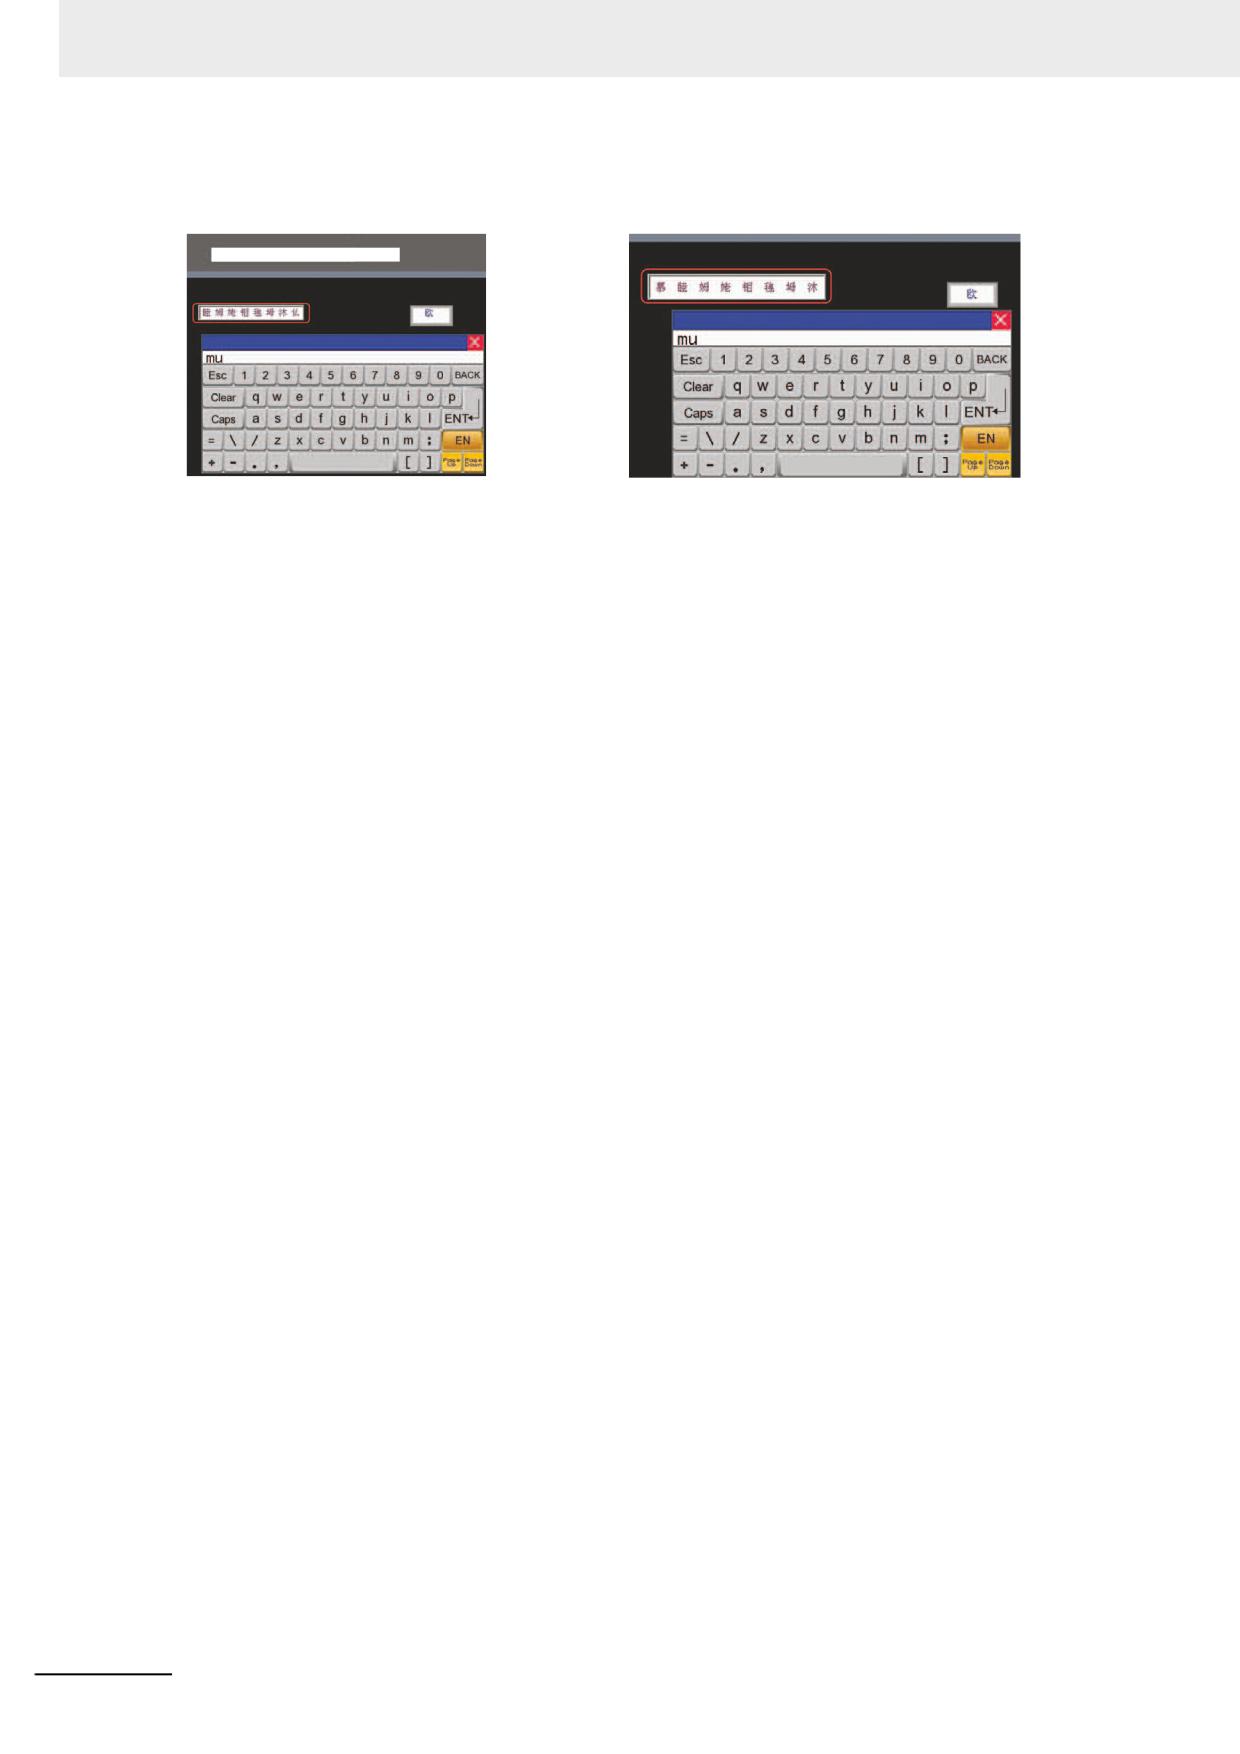
Chinese Font Box Height: Sets the height of text input box and the default value is 24.
When inputting the characters in Pinyin form, the Chinese font box height can be adjusted between 24
and 99 (pixel).
NB-series Programmable Terminals NB-Designer Operation Manual(V106)
3-297
3 Functions of NB-Designer
Perform the offline test and the effect is as shown below:
When the Chinese font box height is 24:
When the Chinese font box height is 34:
Chinese font box height can be adjusted
Use External Clock: After it is checked, the values in the memory of LW9010 to LW9017 are adopted
as the event occurrence time, and internal clock of the PT are not adopted.
Note To use this function, it is necessary to transfer PLC clock values to LW9010-LW9017 periodically with some
components, such as Data Transmission.
The transferred time value is used only for an event occurrence time. Other functions, such as Date/Time
Display and Data Log, use the time data from the PT internal clock.
NB-Designer uses the time in the PT to confirm an event, too. Therefore, there is a possibility that the time
an event occurred and the time NB-Designer confirms the event differ.
LW9010: Second
LW9011: Minute
LW9012: hour
LW9013: Date
LW9014: Month
LW9015: Year
LW9016: Week (unavailable)
LW9017: Millisecond
3-298
NB-series Programmable Terminals NB-Designer Operation Manual(V106)
3 Functions of NB-Designer
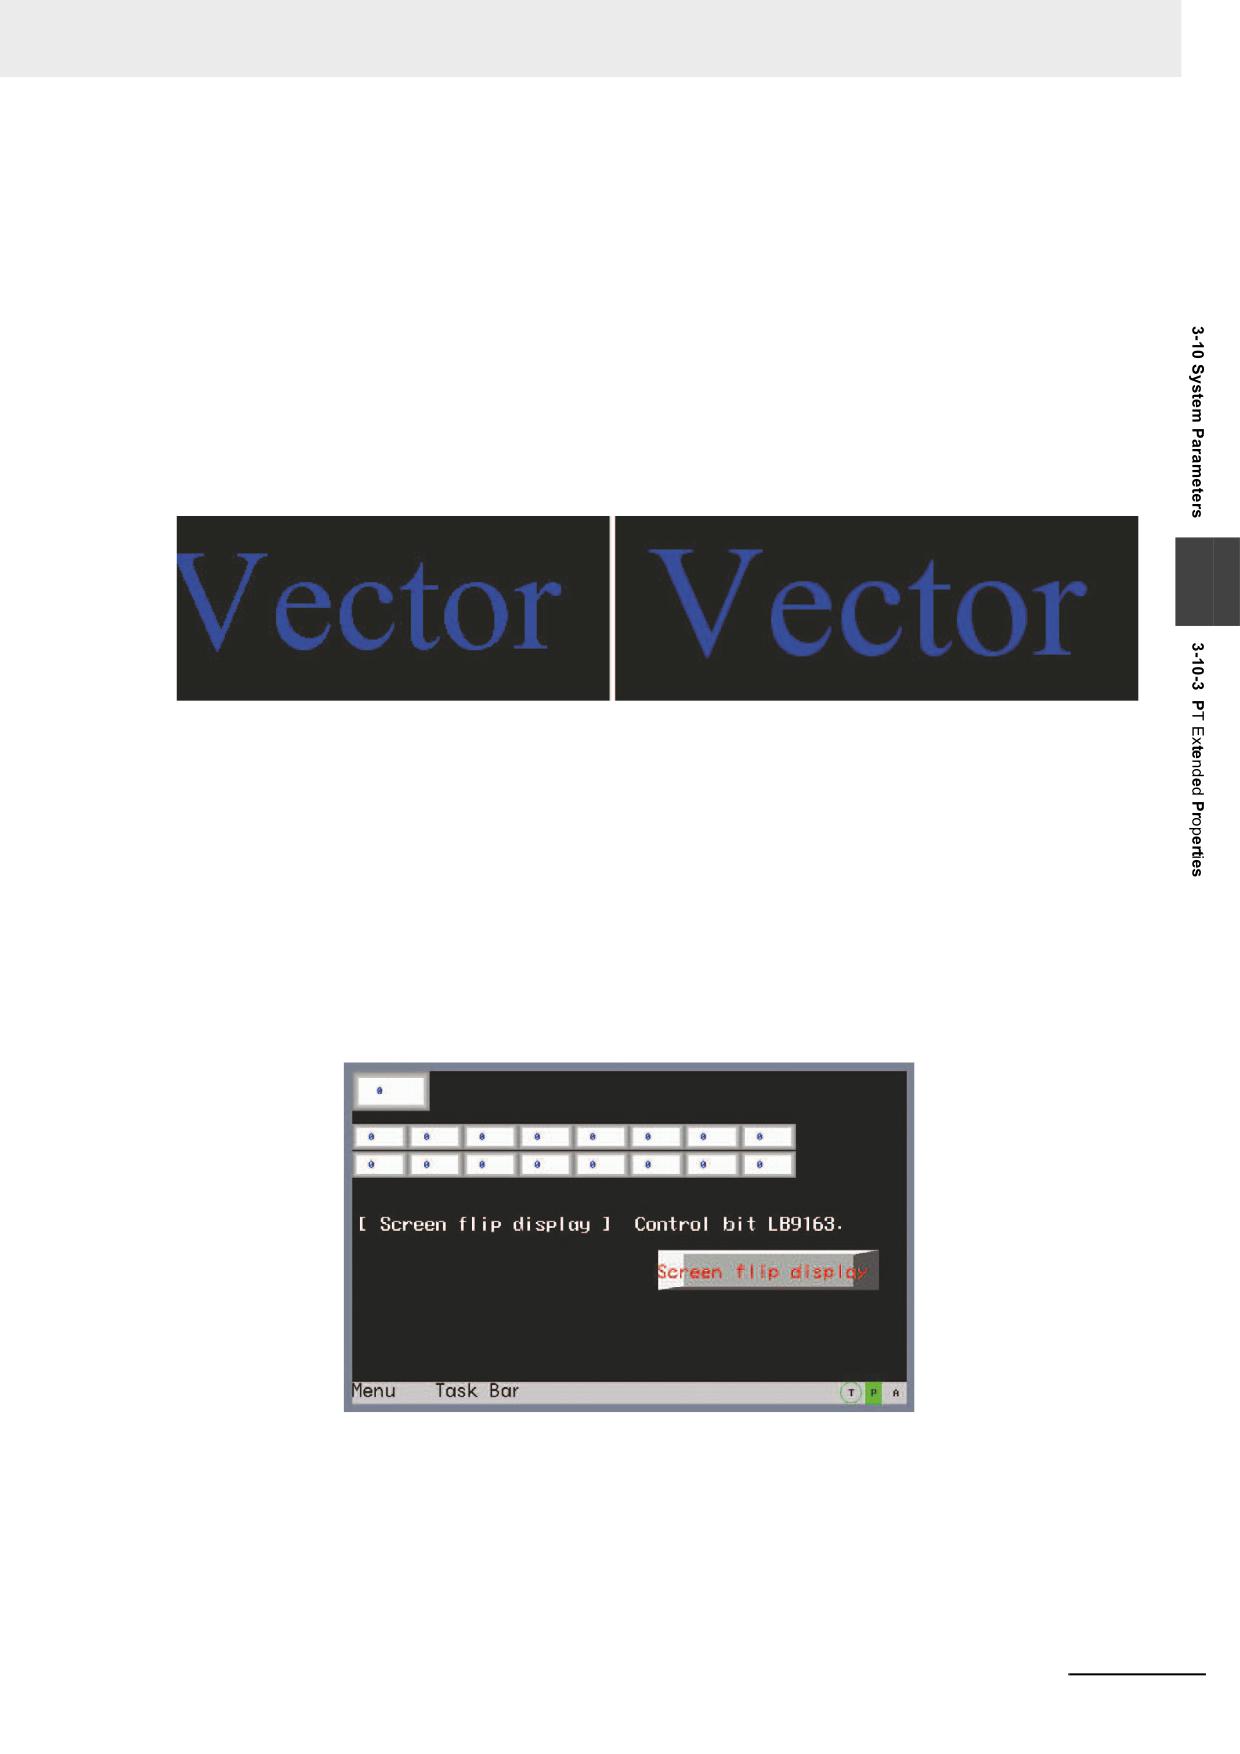
Vector Font Smooth Display:
The characters can be made smooth, beautiful and no-alias by using “Vector Font Smooth Display”. But
using this function can increase the computations of the PT, and may affect the processing speed of the
PT with the slower speed of refreshing of the PT. Therefore, if the user doesn’t have the higher
requirements for the vector font display but have the requirements for the faster refreshing speed of the
PT, please do not check this option. The default is checking “Vector Font Smooth Display”.
This function doesn’t support Event Setting, Event, Alarm, Alarm List, List, Drop-down List, Data History
components and Operation Log component.
The comparison effect of checking and not checking the [Vector Font Smooth Display] is shown as
below:
The effect of checking [Vector Font Smooth Display]: The effect of not checking [Vector Font Smooth
Display]:
3
It is obvious that the edges after being handled are more smooth and no-alias.
Flip Screen Display:
The optimal visual angle for the screen of the PT is front view. If the screen needs to be seen by the
overlooking method, i.e. from top to bottom, in some special occasions, the display effect will become
poor; and the “Flip Screen Display” is added to turn the screen reversely to obtain the same display
effect as viewed from the front.
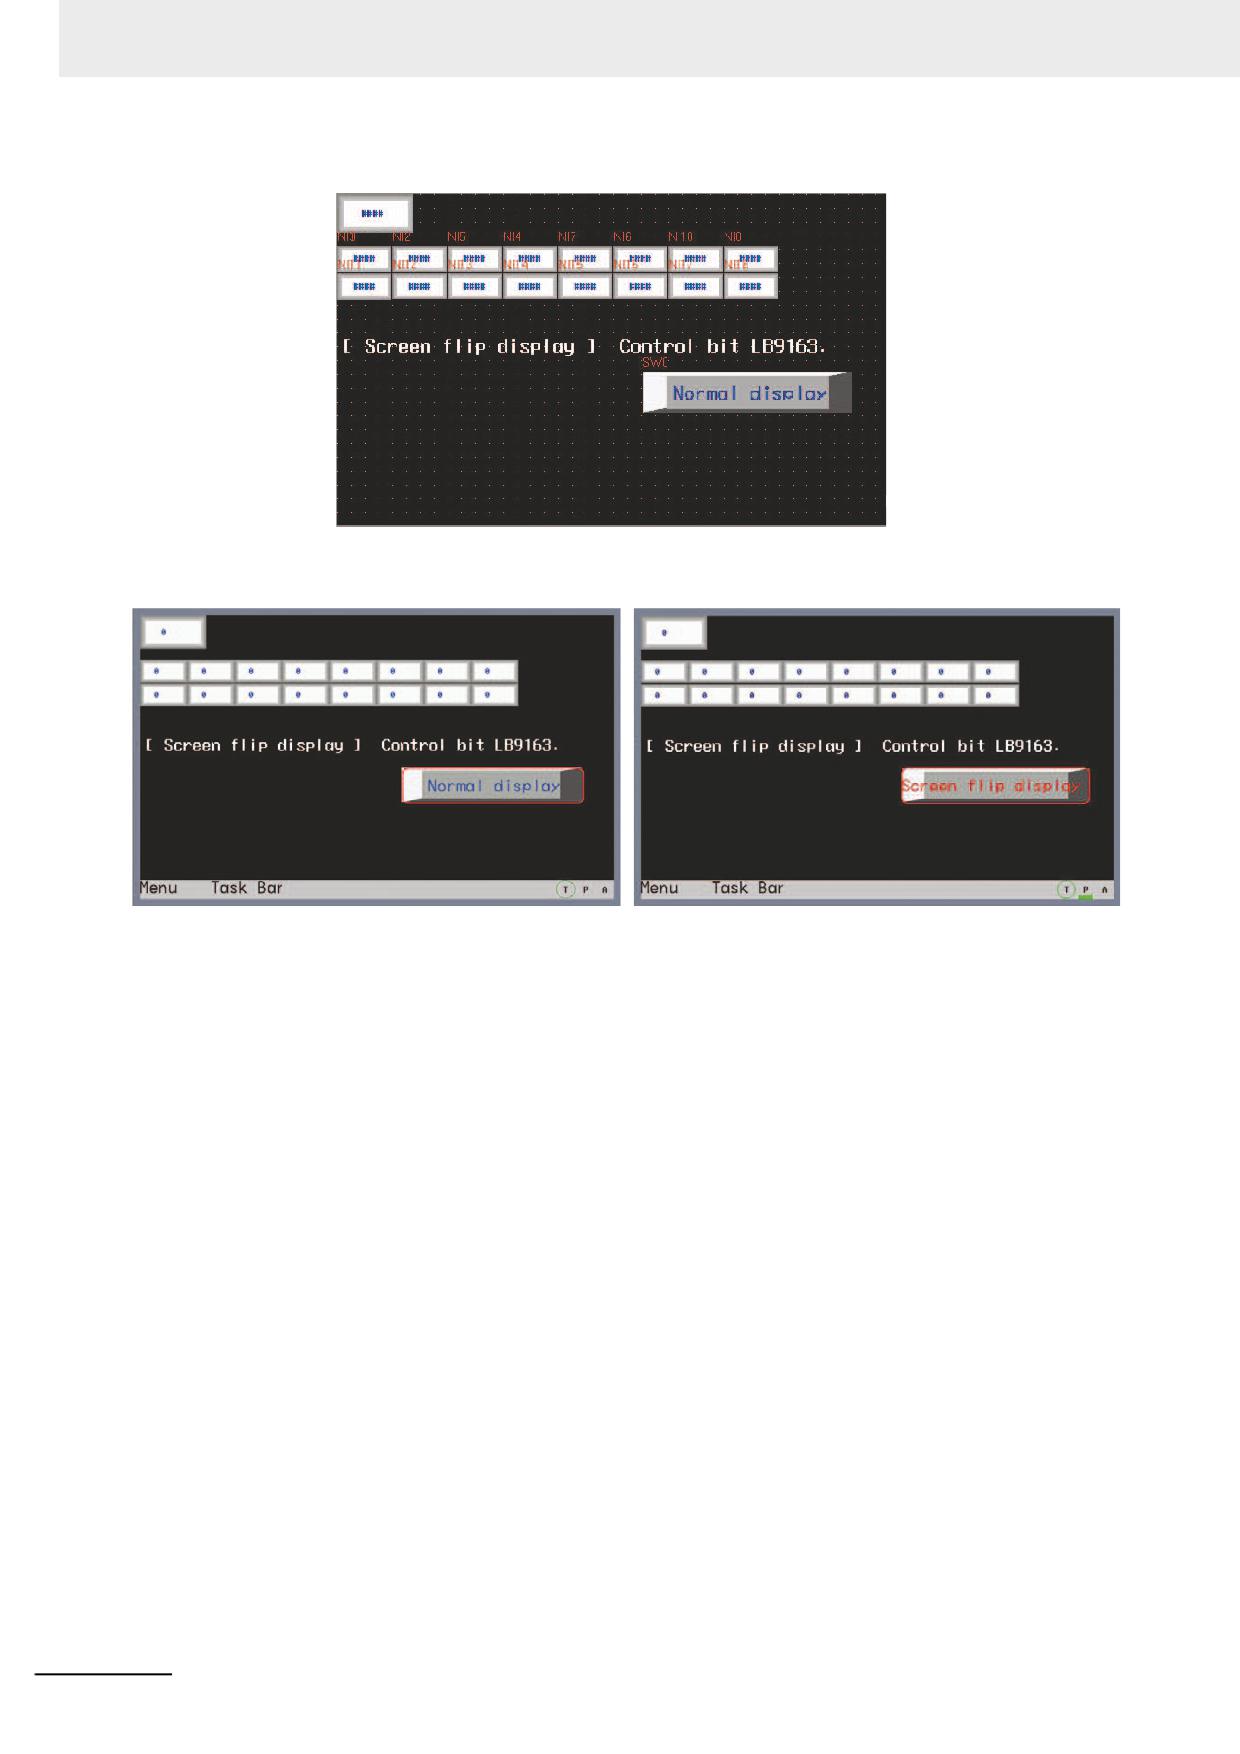
There are 2 methods for Flip Screen Display:
Method 1: Enter [PT Extended Properties] tab in PT Property, check [Flip Screen Display], and the
display is reversed after it is downloaded to the screen. And the screen will keep as Flipped Display
after the power failure or restart of the screen.
Perform the offline test and the effect is as shown below:
Method 2: The flipping of the screen is controlled by the local special memory LB9163 (LB9163 is
read/write type.). When LB9613 is turned ON, the screen is displayed vertically-flipped. When the
flipped screen display function is controlled by LB9163, the flipping function can’t be maintained after
the power failure or restart of the screen.
Example: Place a Bit Switch with the address of LB9163 and Property of “Alternate” in the screen.
NB-series Programmable Terminals NB-Designer Operation Manual(V106)
3-299
3 Functions of NB-Designer
When LB9163 is ON, the display is flipped; while LB9163 is OFF, the screen is displayed in the normal
direction. Perform the offline test and the effect is as shown below:
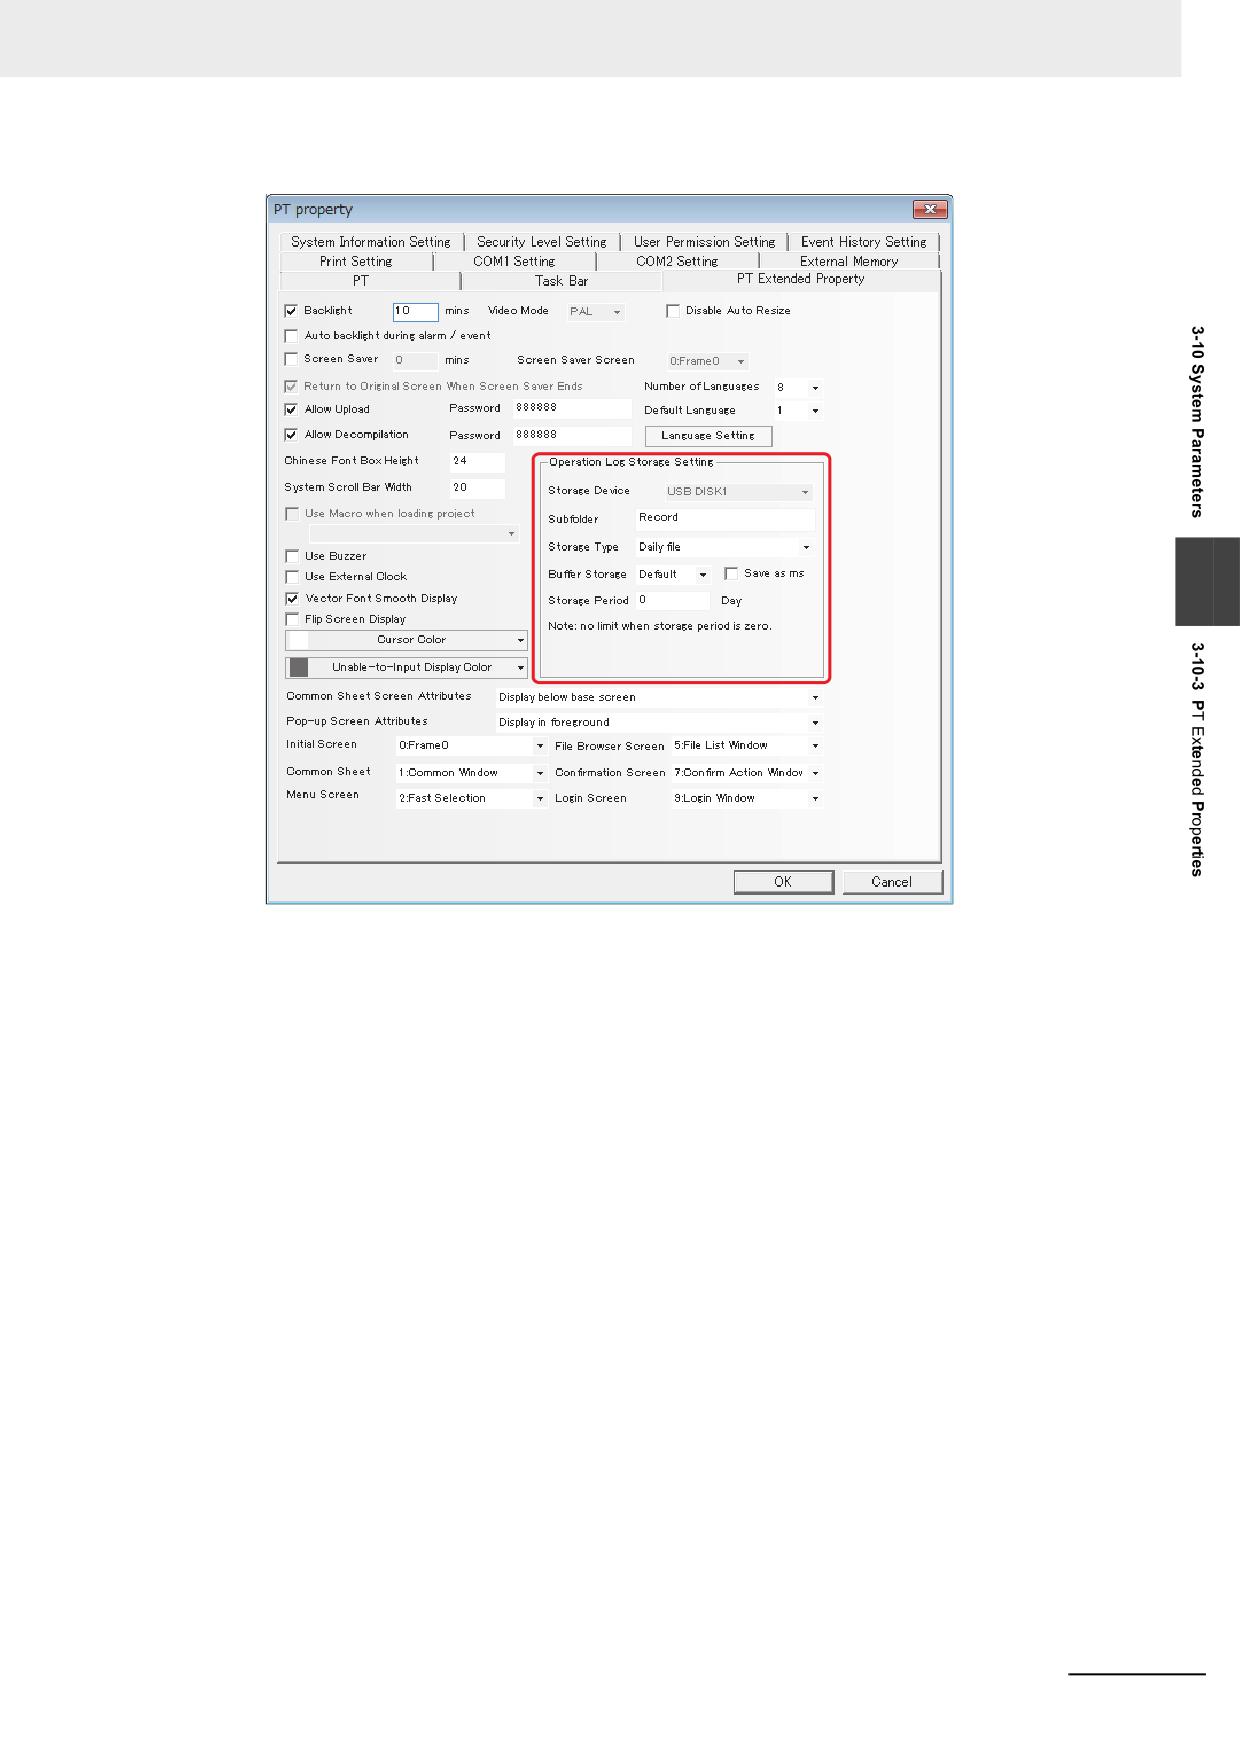
Operation Log Storage Setting: Stores the operation log in the specified subfolder of the specified
storage device. Two storage types are available; One is to "store the
operation log by day and record them into the file named in "yyyy
mmdd" form", and the other is to "store the operation log by the
number of records and record them into the file with the name of
"Subfolder Name".
By setting the size of Buffer Storage, the data is written into the
memory when the size is reached to the pre-set size. (Default:
writing operation will immediately be performed)
By setting the Storage Period, the upper limit can be set for the
operation logs amount with the unit of "Day" for Daily File and
"Record" for Single File. When the [Daily File] is selected, the file will
be named in "yyyy mmdd" form and the Storage Period is the upper
limits of the number of CSV files in this path; if the Storage Period is
exceeded, the oldest file will be deleted. If the [Single File] is
selected, the file will be named in "Subfolder Name" form, the
Storage Period is the upper limit of the records archived in the file;
the archived records are reached to the Storage Period, the storage
will not be continued.
By setting the Save as ms, the data sampling time accuracy
changes to the millisecond and records it into the CSV file.
3-300
NB-series Programmable Terminals NB-Designer Operation Manual(V106)
3 Functions of NB-Designer
3
Common Sheet Screen Attributes: Determines the Common Sheet for the project program to be
displayed above or below the Base Screen.
Pop-up Screen Attributes: Specify the pop-up screen whether if it is displayed on top of the screens
or not.
Initial Screen: The screen is displayed at first by the PT after the unit is started in user project mode.
The default is Frame 0.
Common Sheet: Refers to the No. of Common Sheet of the project. The default is Frame 1.
Menu Screen: Refers to the No. of Menu Screen of the project. The default is Frame 2.
File Browser Screen: Refers to the No. of Browser File Screen of the project. The default is Frame 5.
Confirmation Screen: Refers to the No. of Confirmation Screen of the project. The default is Frame 7.
Login Screen: Refer to the No. of Login Screen of the project. The default is Frame 9.
Unable-to-Input Display Color:
The role of invalid component marks: When the enable condition isn’t met or is invalid, using this option
can set invalid component mark to indicate this component can’t be used currently and the touch is not
effective. Only the control components such as switch and Command Button component etc. can use
invalid component marks, and the display components such as Lamp and Word Lamp component etc.
don’t support the invalid component marks.
NB-series Programmable Terminals NB-Designer Operation Manual(V106)
3-301
3 Functions of NB-Designer
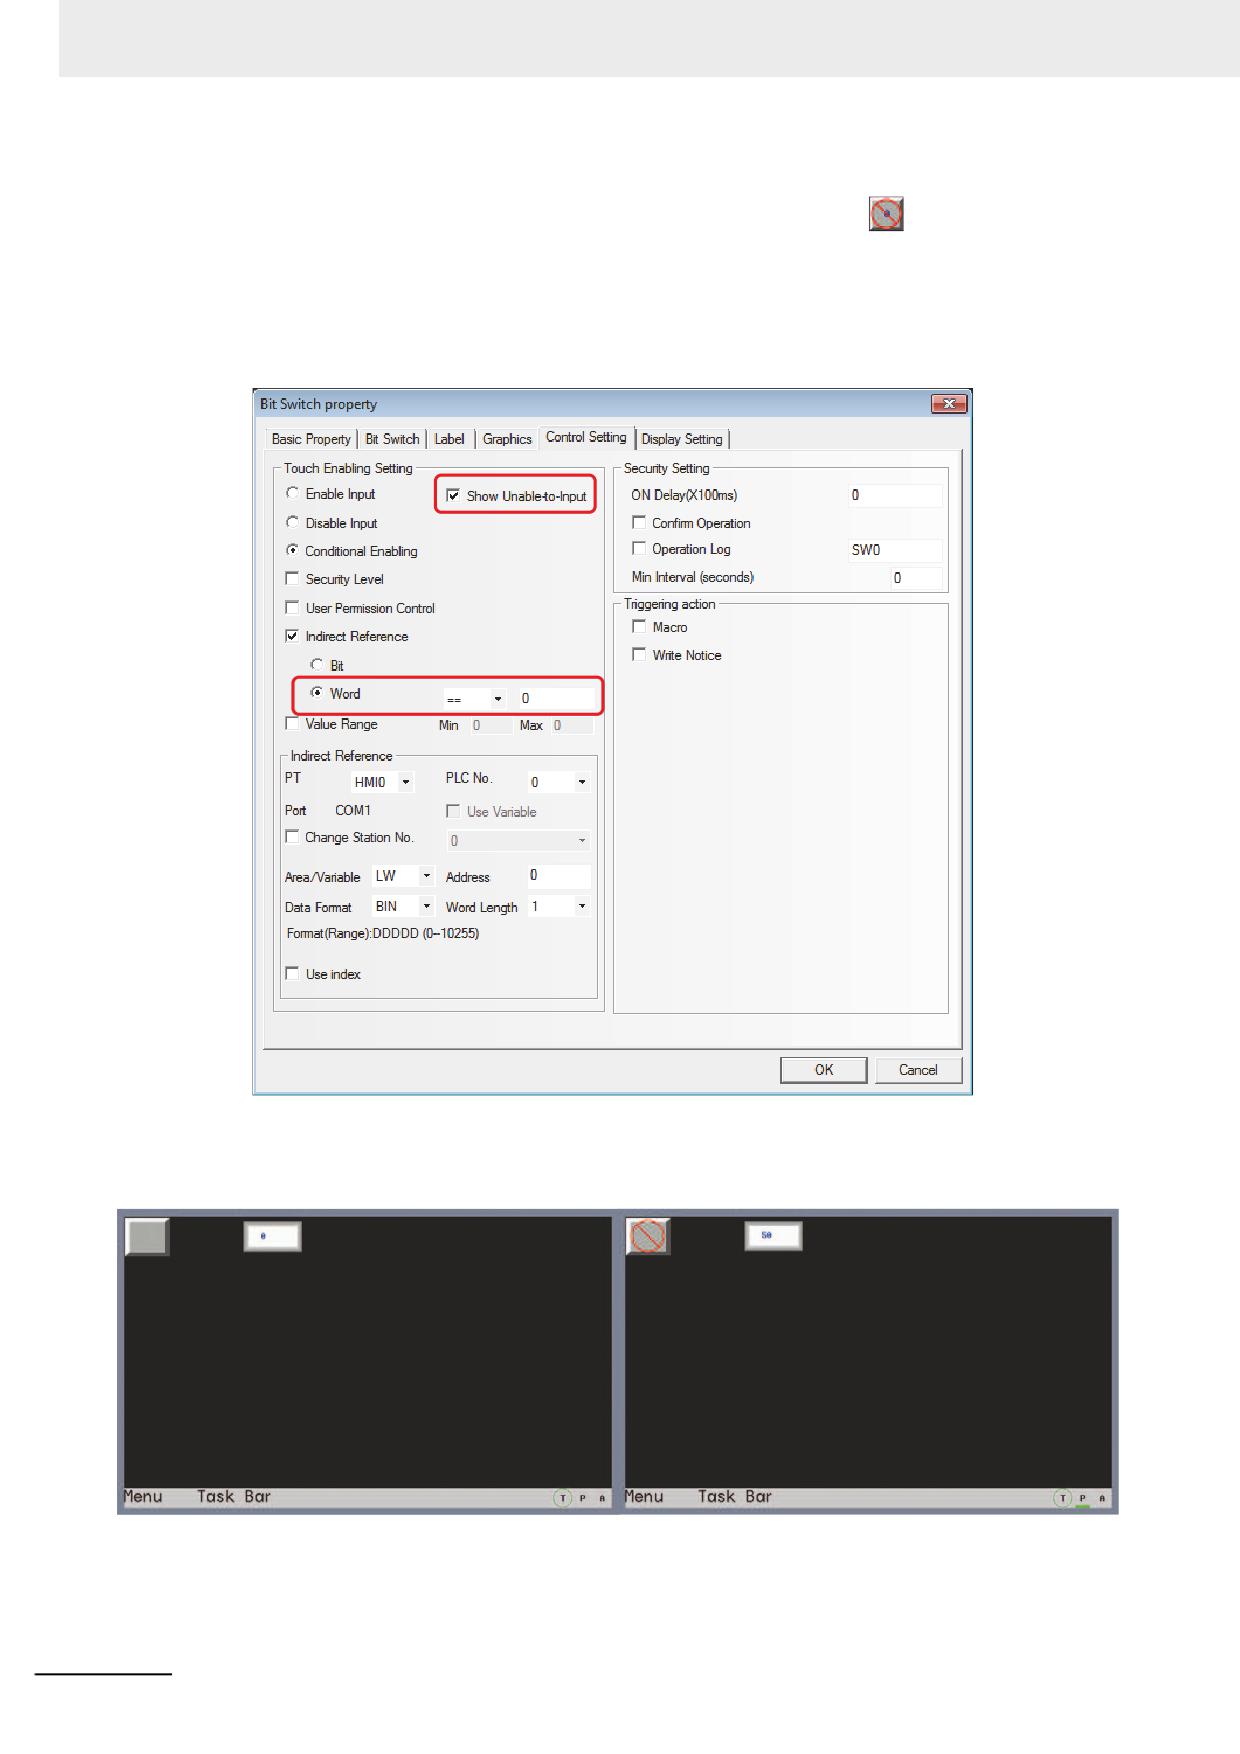
Example: When the value of LW0 is 0, only M0 (Bit Switch) can be operated. When the value of LW0
isn’t 0, M0 (Bit Switch) canot be operated, and the invalid mark
will be displayed in the
color which was specified.
(1) Setting of Unable-to-Input Display Color: Double-click PT Property and enter [PT Extended
Property] tab to select “red” as the Unable-to-Input Display Color.
(2) Place one Bit Switch, i.e. M0, and set the enable conditions in the [Control Setting] tab for it,
and then select [Conditional Enabling], [Word] LW0=0 and select [Show Unable-to-Input].
(3) Place one Number Input component LW0.
(4) Perform the offline test. And when LW0=0, M0 can be operated; and when LW0=50, M0
can’t be operated and the invalid mark will be displayed. The effect is shown as below.
Cursor Color: Sets the cursor color for the component with the cursor such as Number Input
component and Text Input component etc.
3-302
NB-series Programmable Terminals NB-Designer Operation Manual(V106)
3 Functions of NB-Designer
3-10-4
System Information Setting
3
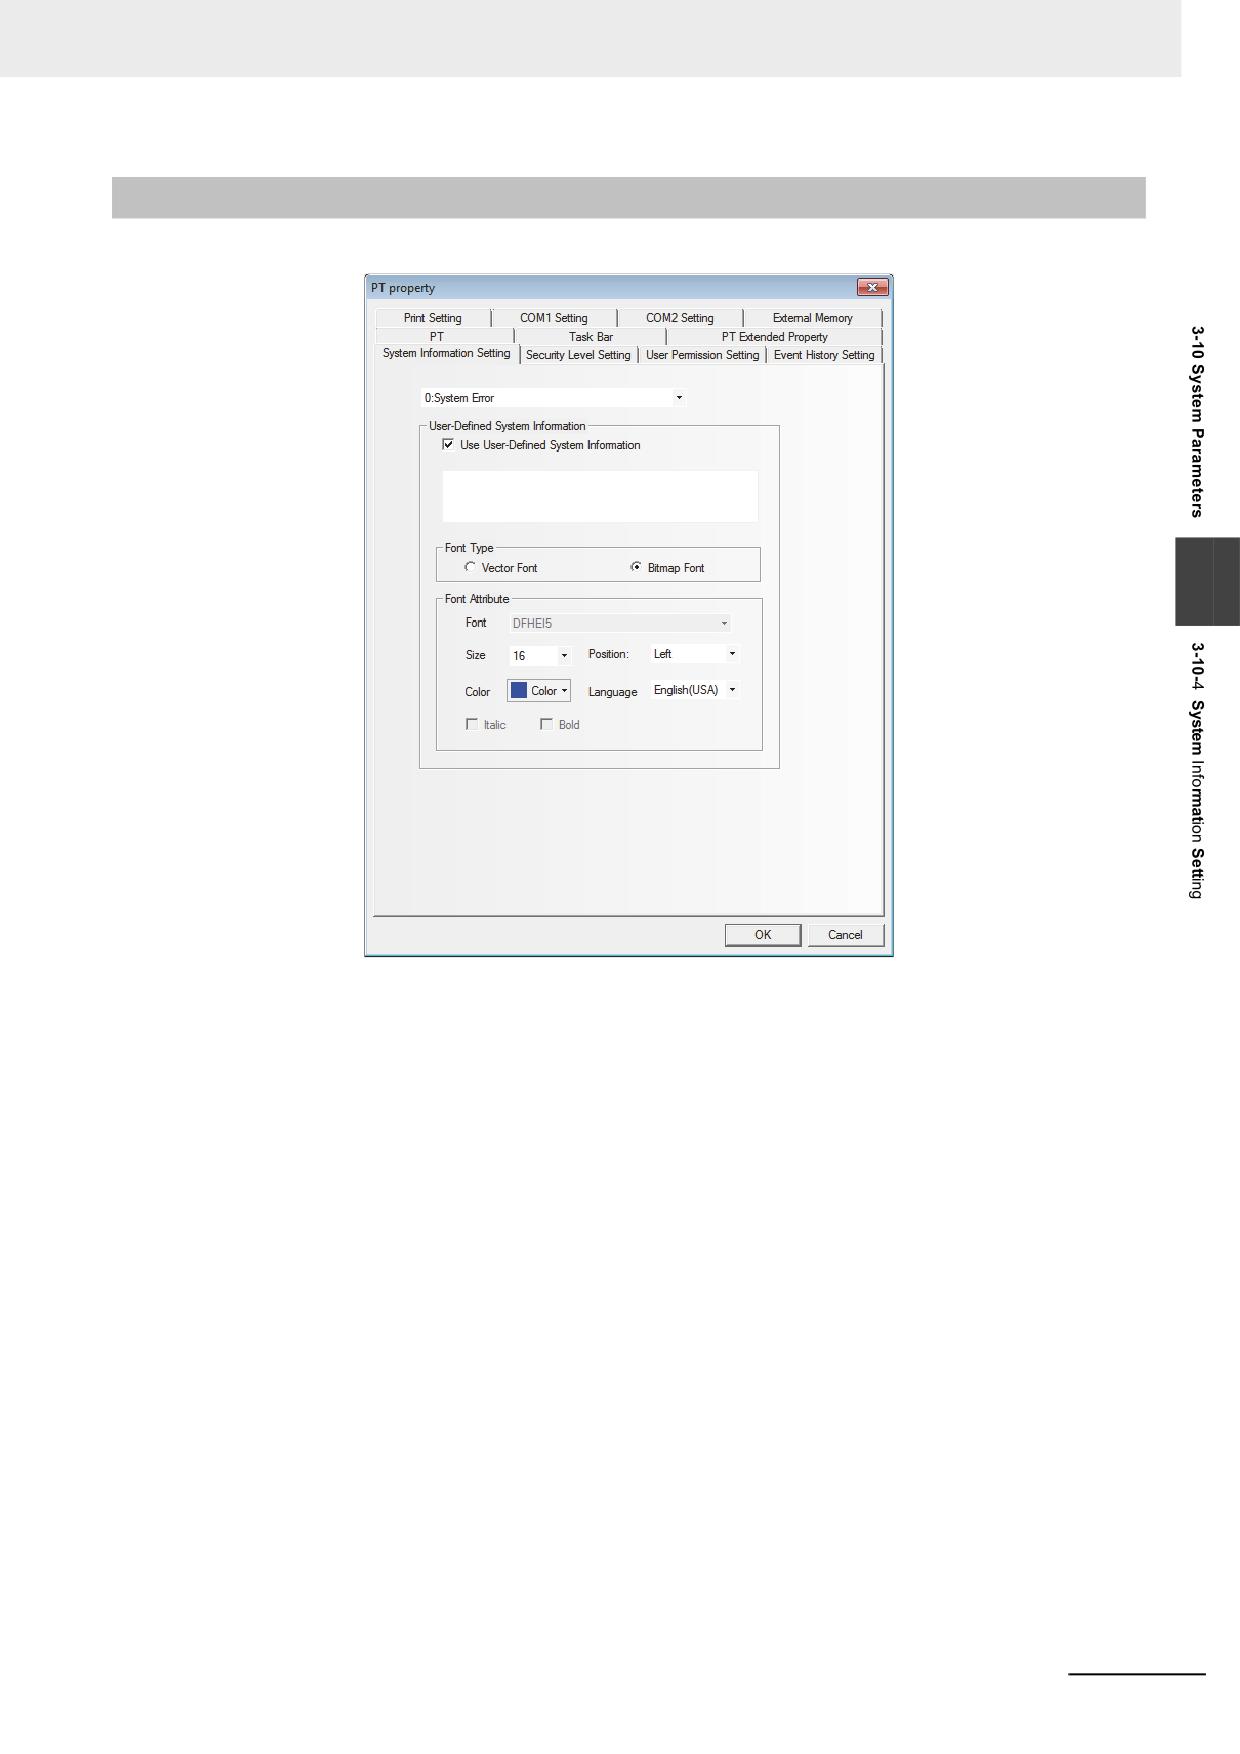
The message in default can be changed to the required text.
Enter the [System Information Setting] tab in PT Property, select the [Use User-Defined System
Information] option to enter the corresponding text to the item of selected system information in the text
box. This text supports Vector Font and Bitmap Font, as shown above.
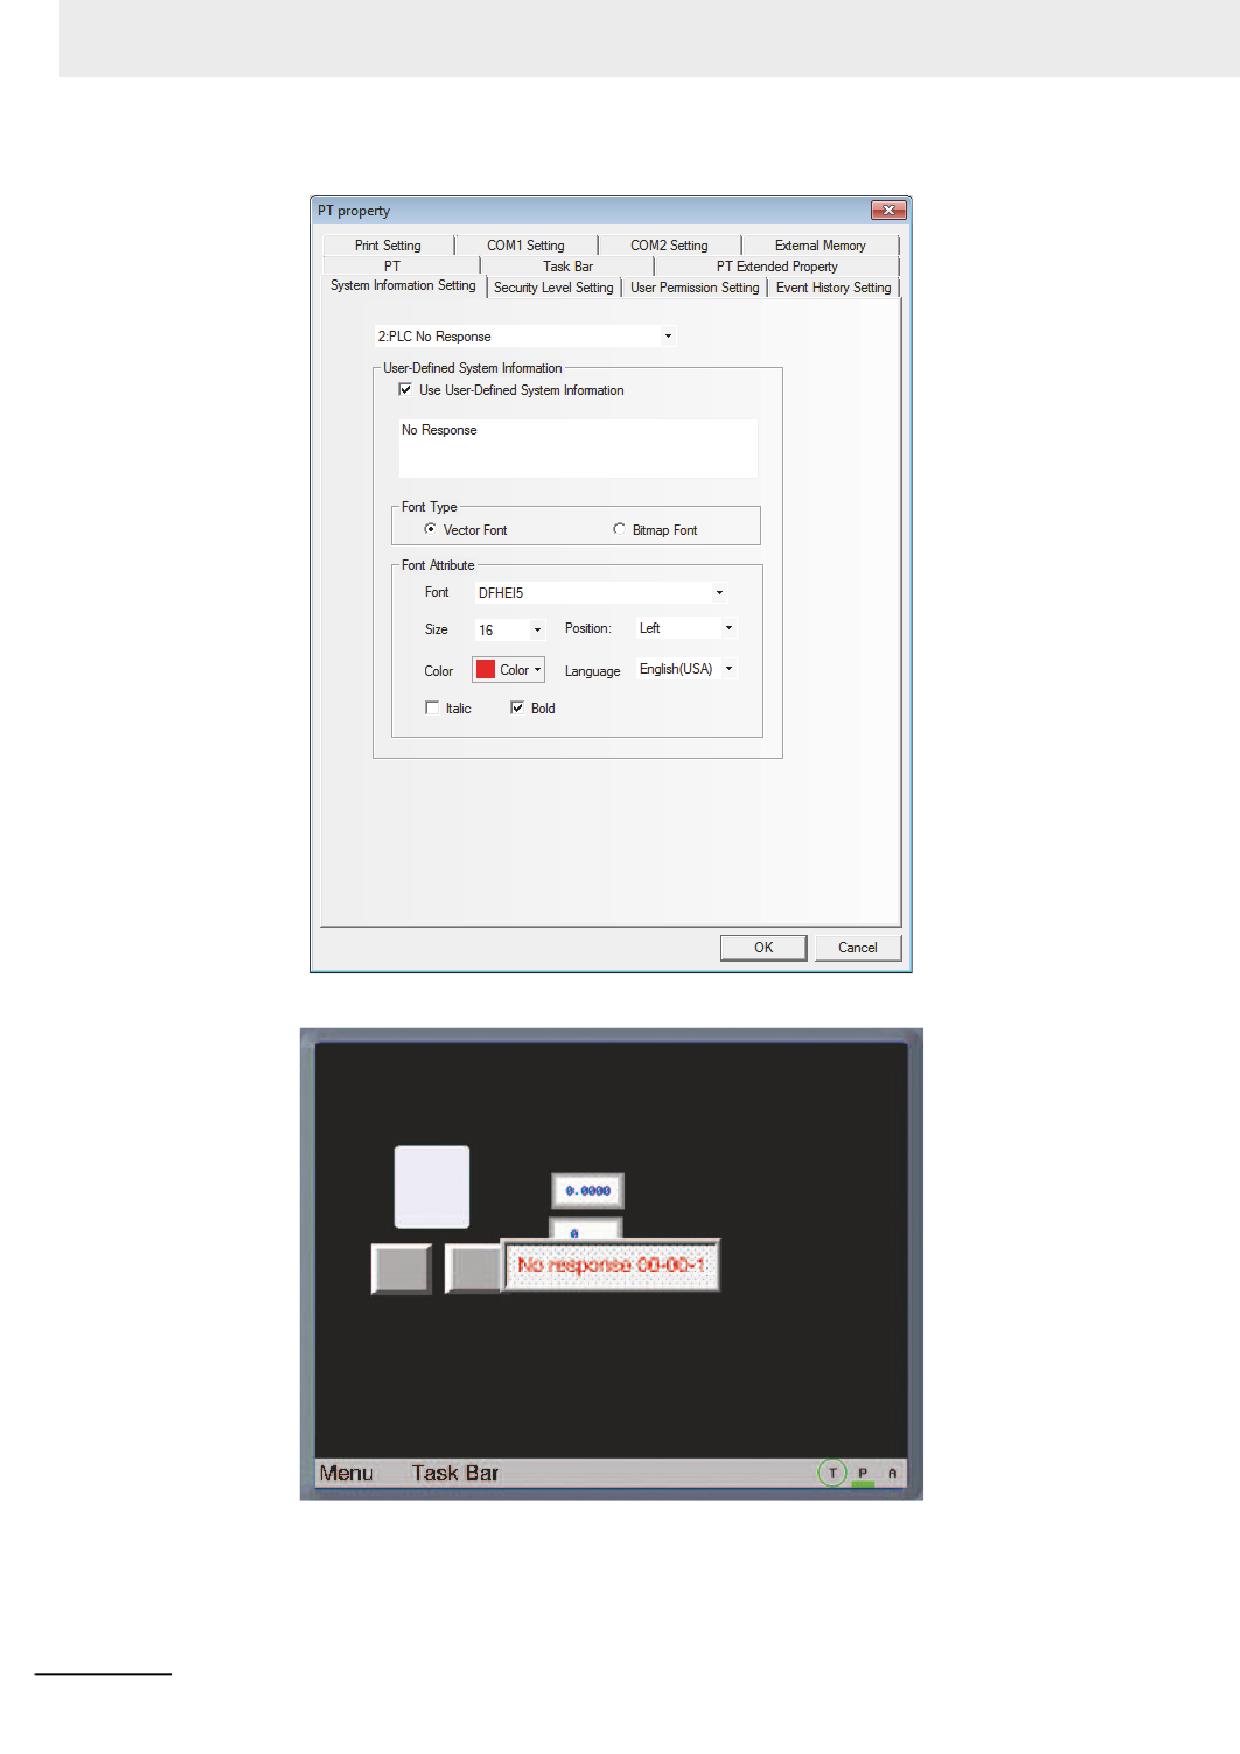
Example: Change “PLC No Response” to “No Response”.
(1) Enter the [System Information Setting] tab in PT Property.
(2) Select “2: PLC No Response” in the drop-down box of the system information, and check
the [Use User-Defined System Information] option and input “No Response” in the text
input box.
(3) Use the Vector Font with the following settings, i.e. AR PL UMing CN, the size of 16, red
and Bold.
NB-series Programmable Terminals NB-Designer Operation Manual(V106)
3-303
3 Functions of NB-Designer
When the PT can’t perform communications with PLC, “No Response” will be displayed.
3-304
NB-series Programmable Terminals NB-Designer Operation Manual(V106)
3 Functions of NB-Designer
3-10-5
Security Levels Setting
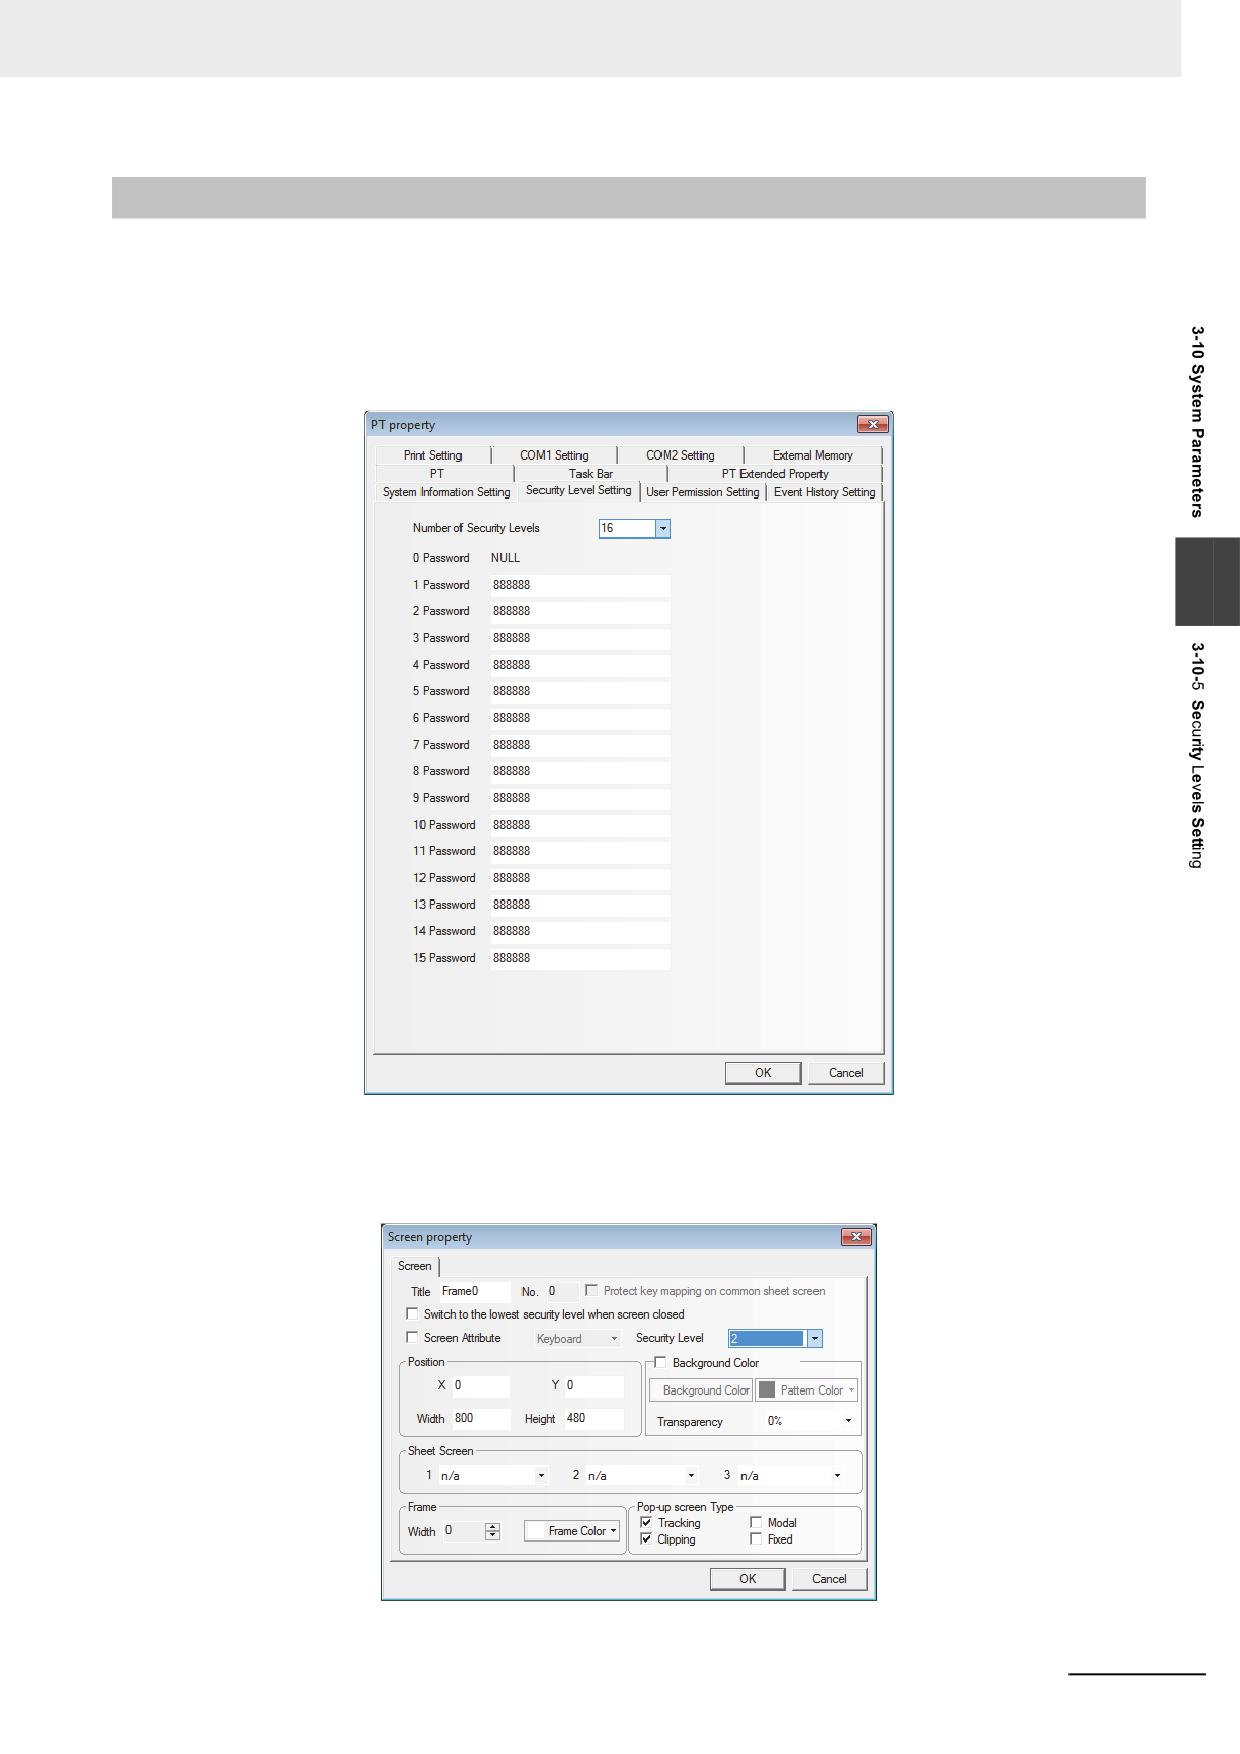
The security level is classified into 16 levels (0 to 15) in the NB-Designer. One 8-digit number password
can be set for each level at the request of the users, and the greater the level number, the higher the
level. 15-level is the highest and 0-level is the lowest. When the security level is 0, it means no
password. 0 can’t be used for setting the password.
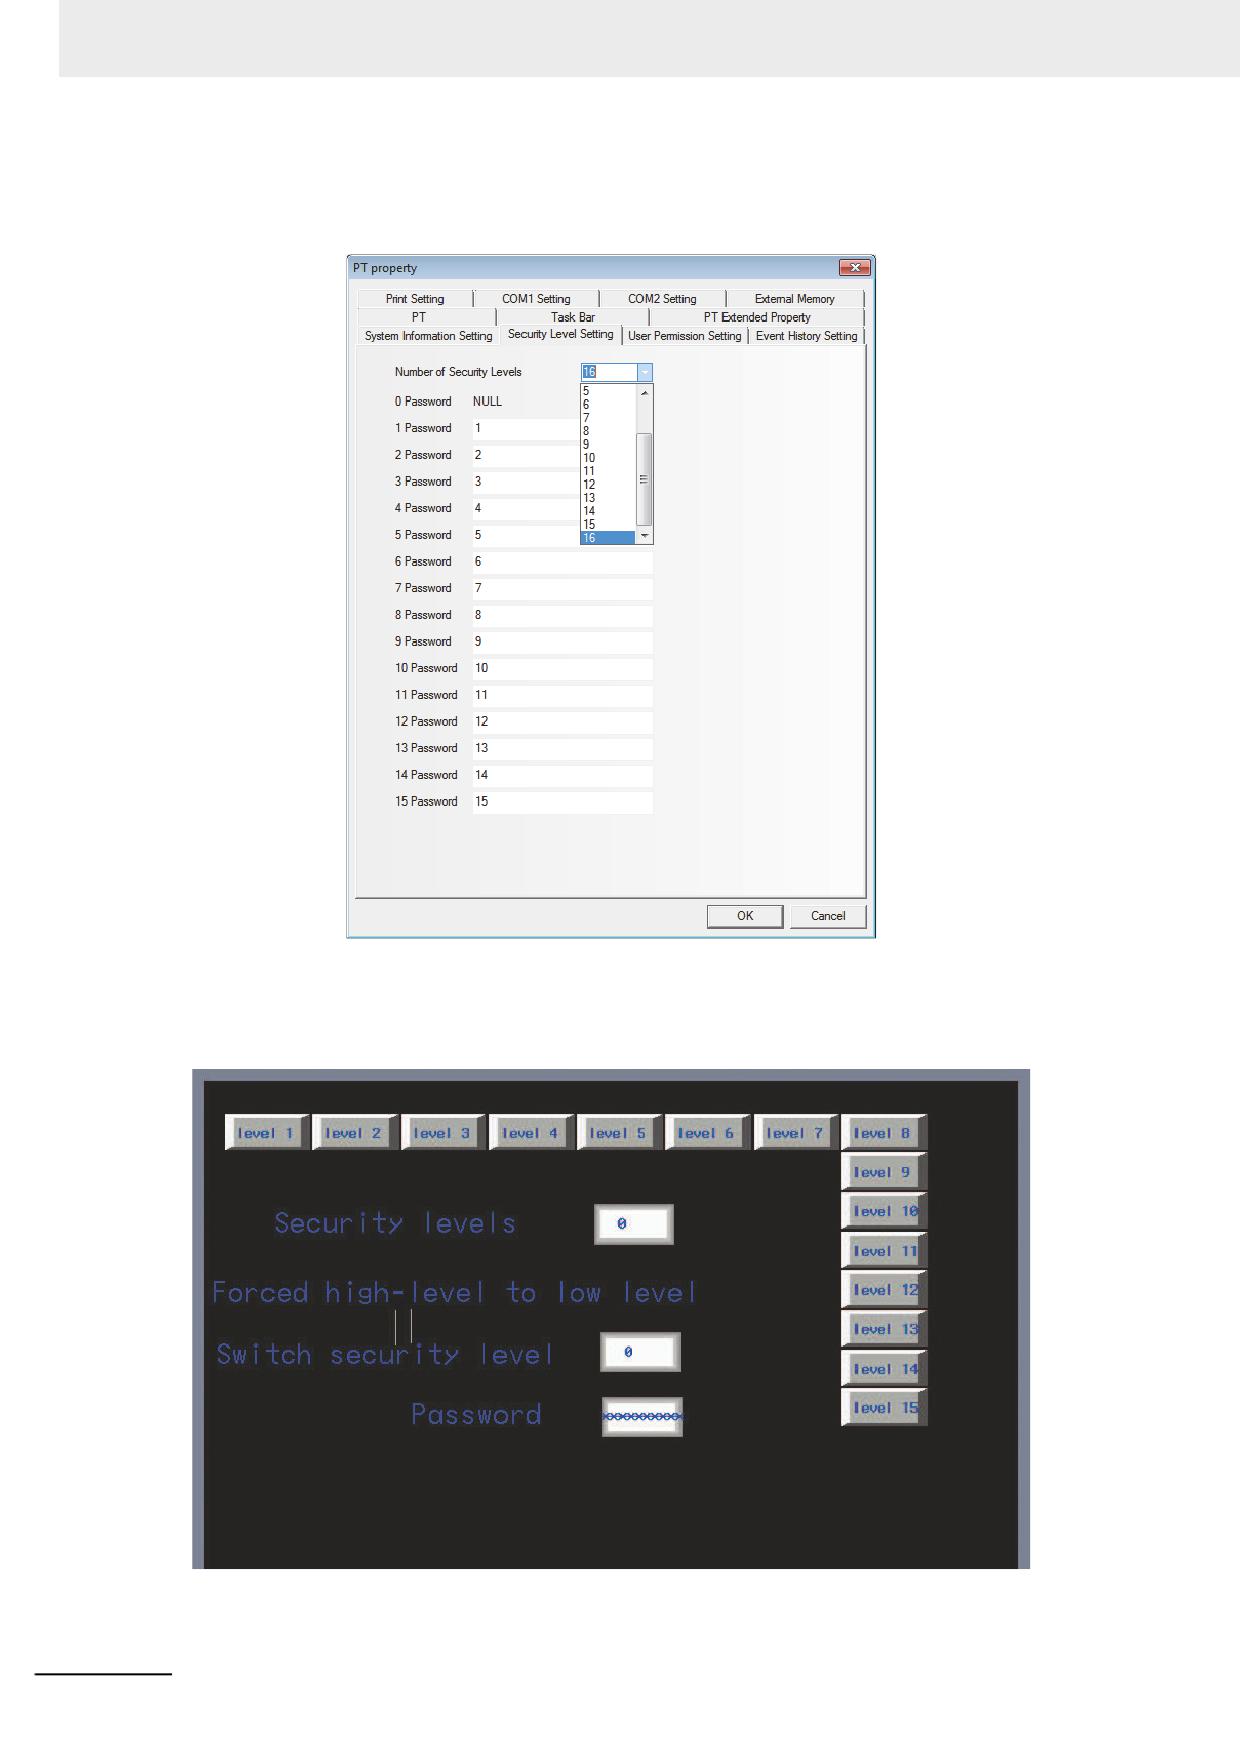
Number of Security Levels is 3 by default in PT Property, and it can be opened to 16 levels in the
Security Levels Setting tab.
3
After the security level password is set, the user can use each group of specified passwords to perform
screen and component managements. For example, after the screen security level is set to “2”, the
screen can be switched to by inputting the user password; otherwise this screen can’t be entered
during the operation.
NB-series Programmable Terminals NB-Designer Operation Manual(V106)
3-305
3 Functions of NB-Designer
Example: Set 16-level security passwords for the project.
(1) Set “Number of Security Levels” in PT Property to 16 accompanying the passwords for
each level of security level 1 to 15.
(2) Use a double-word Number Input component with address of LW9040 as Frame 0 for
inputting the password. LW9042 is used to display the security level and LW9043 is used to
switch the security level forcefully. The 15 Function Keys are used to switch Frame 8 to
Frame 22 respectively.
3-306
NB-series Programmable Terminals NB-Designer Operation Manual(V106)
3 Functions of NB-Designer
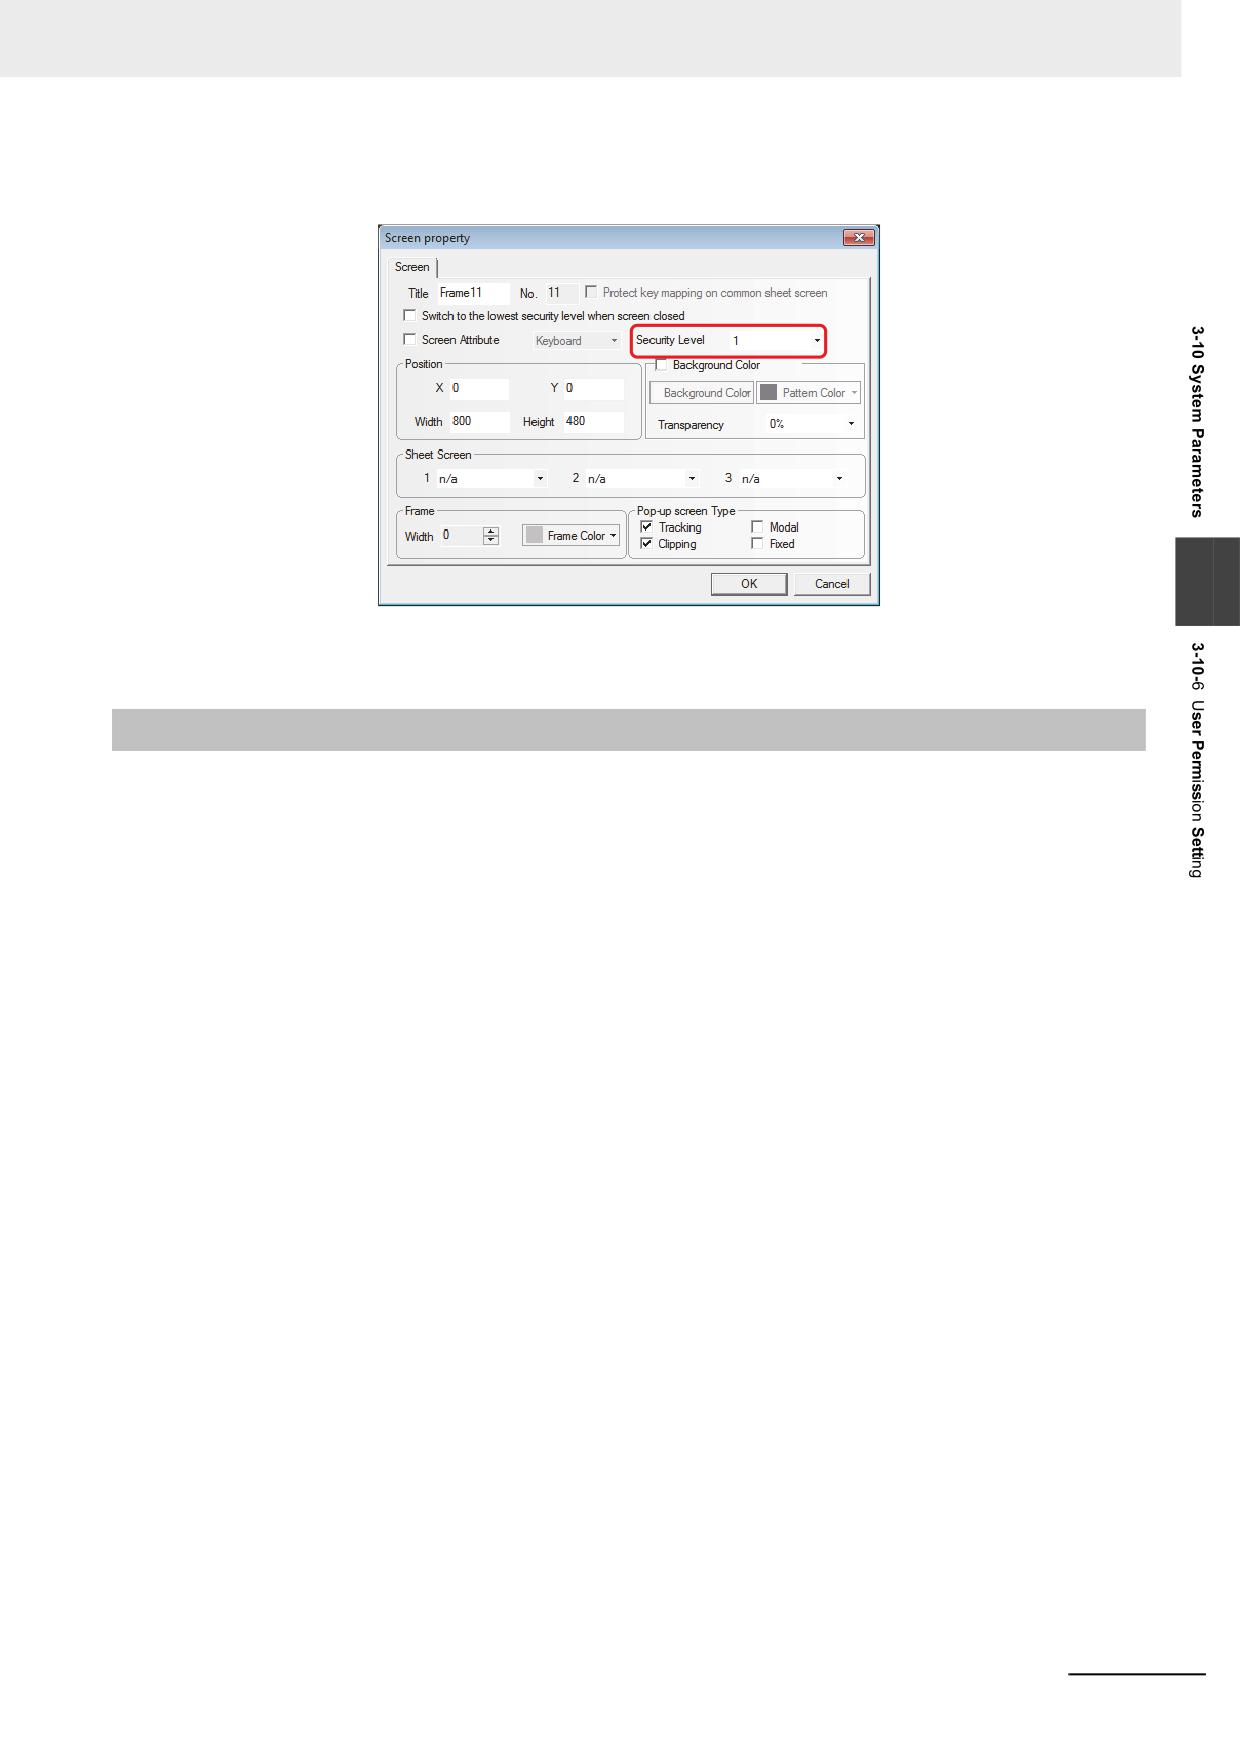
Set the screen security levels and make Frame 10 correspond to Security Level 1, Frame
11 correspond to Security Level 2, …, and Frame 24 correspond to Security Level 15.
3
(3) Perform the offline test or download it to the screen to check the password level function.
3-10-6
User Permission Setting
The software opens 32 users and 32 operation permissions for free use. The users and operation
permission can be set separately, and the operation permission is not limited to the users. And the
online user addition/deletion and permission modification can be done in the PT.
1
User Permission Setting
Check the [Enabled] option and input the contents to the User Name, Password, Logoff Time
and Authorization.
User Name: Refers to the login name and the defaults are usr0 to usr31. The user name
supports any characters.
Password: Refers to the login password, and the default is 888888. The password only
supports the number instead of the other characters. The password ranges from 1 to
4294967295. And 0 can’t be used for setting password.
Logout Time: Refers to the valid time for this user permission and the default is 10 minutes.
After 10 minutes, this user permission will be automatically cancelled, and the operation
permission can be obtained by inputting the password again. The logoff time ranges from 0 to
4294967295 minutes. When the Logout Time is specified to 0 minute, the user permission is
always valid.
NB-series Programmable Terminals NB-Designer Operation Manual(V106)
3-307
3 Functions of NB-Designer
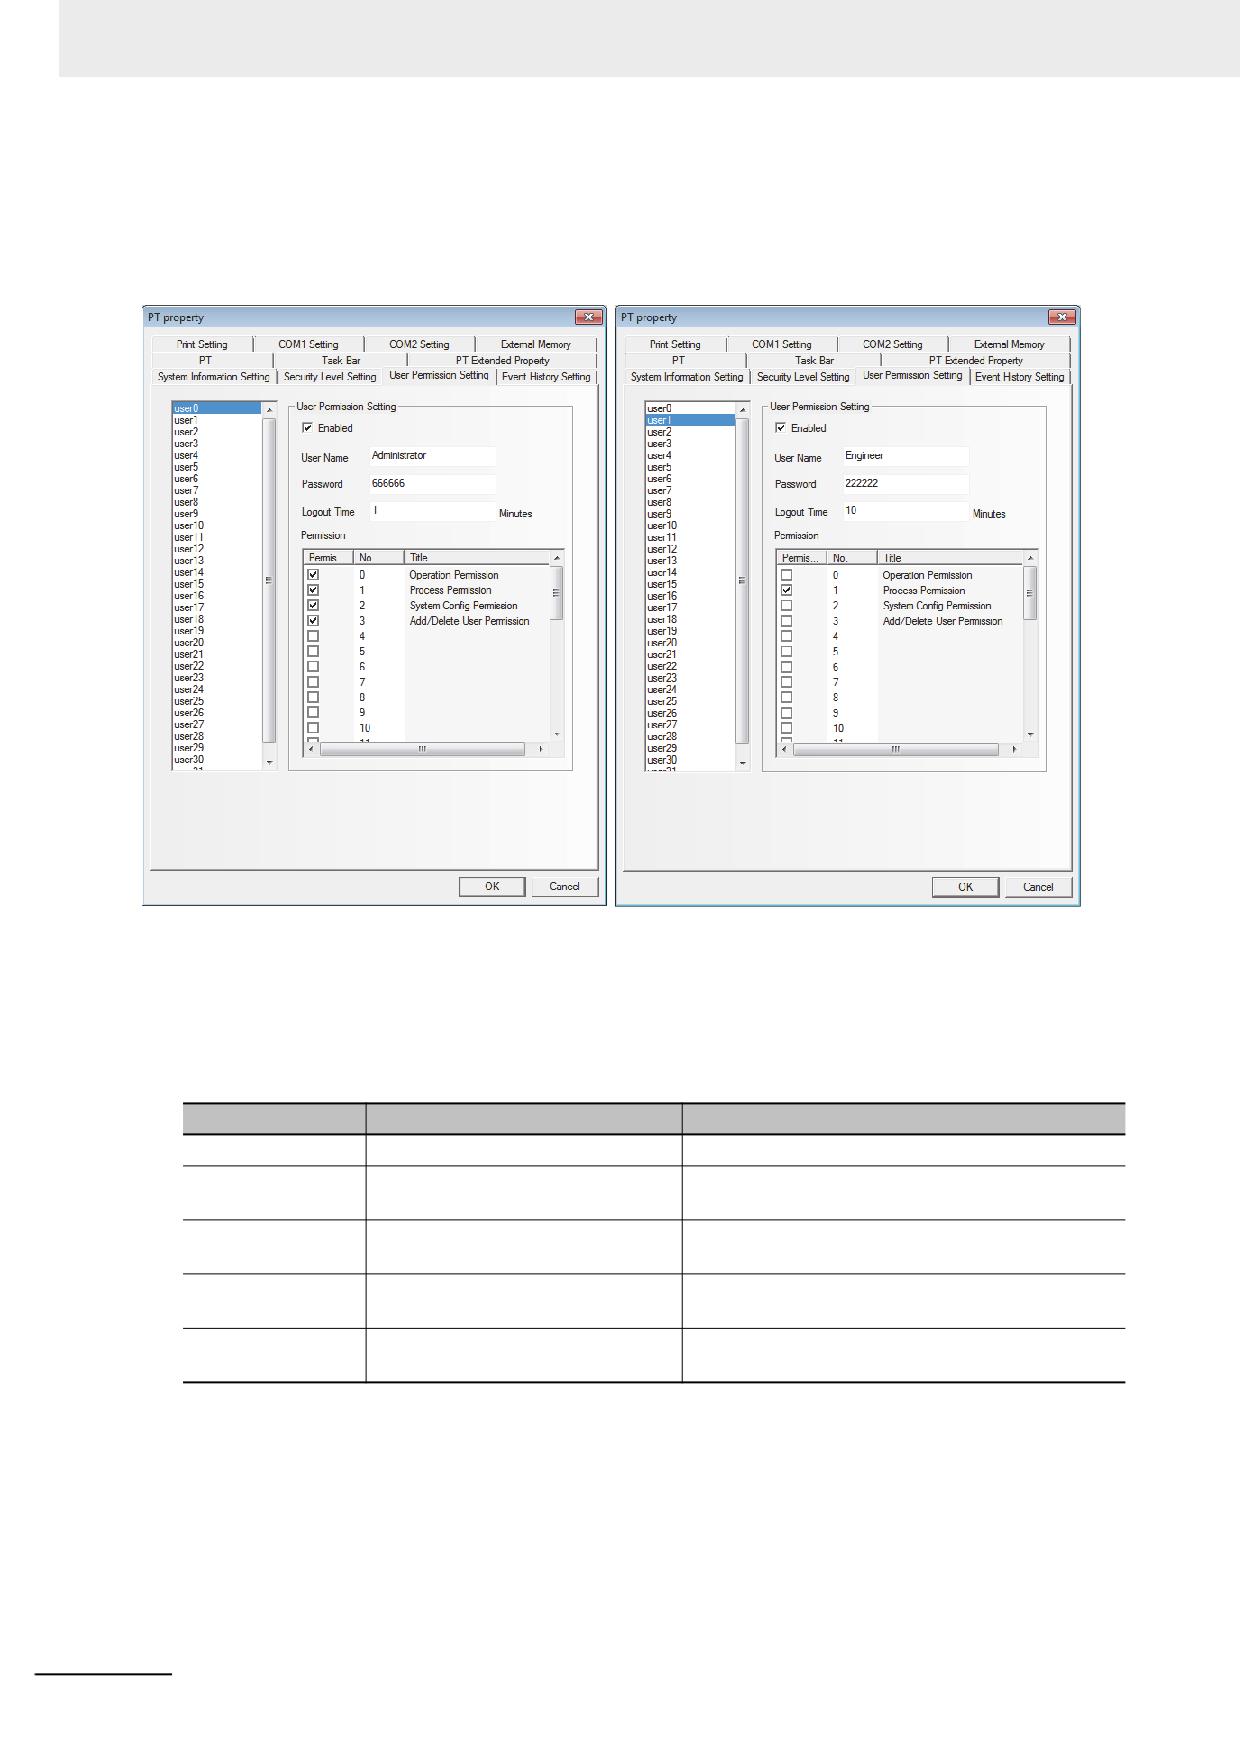
For example:
(1) For the User Permission Setting of User 0: Check the [Enabled] option and set the User
Name to Administrator, Password to 666666 and Logout Time to 1 minute. Assign 4
Authorities, i.e. Operation Permission, Process Permission, System Config Permission and
Add/Delete User Permission respectively for the “Administrator (User 0)”.
(2) For User Permission Setting of User 1: Check the [Enabled] tab and set the User Name to
Engineer, Password to 222222 and Logoff Time to 10 minutes. Assign 1 Authority, i.e.
Process Permission to the “Engineer (User 1)”.
Besides the User Permission Setting in PT Property, using the following internal memory
allows the operations concerning the user permission.
Addresses
Functions
Descriptions
LW9486~LW9501
Input the login user name.
32 characters max.
LW9502~LW9503
Input the password corresponding
Double-word
to the login user.
LW9504~LW9505
Display the current user authority.
Double-word, read-only component, the
corresponding 32 authorities.
LB9165
Execute the user login.
After it is turned ON, the login operation is
performed, and later it is turned OFF automatically.
LB9166
Execute the user logout.
After it is turned ON, the logout operation is
performed, and later it is turned OFF automatically.
2
Dynamically Add/Delete User Permission during operations.
Perform adding or deleting the user permission during operations in the PT. The following
internal memory is used for adding or deleting the user permission during operations.
3-308
NB-series Programmable Terminals NB-Designer Operation Manual(V106)
3 Functions of NB-Designer
Addresses
Functions
Descriptions
LW9486~LW9501
Input the login user name.
32 characters max.
LW9502~LW9503
Input the password
Double-word
corresponding to the login user.
LW9506~LW9507
Assign the user authority.
Double-word, Read/Write component, 32 authority
assignments. LW 9506 to LW 9507 corresponds to
32 authorities (No. 0 to 31) and LW.B corresponds
to each bit in LW 9506 to LW 9507. For example:
LW.B 9506.0 represents the authority of No. 0; and
LW.B 9506.A represents the authority of No. 10.
LW9508~LW9509
Logout time
Double-word, Unit: minute
LW9510~LW9511
Add/Delete user confirmed
Double-word
password.
LB9167
Add the user permission.
After it is turned ON, the operation is completed and
later it is turned OFF automatically.
3
LB9168
Delete the user permission.
After it is turned ON, the operation is completed and
later it is turned OFF automatically.
LB9169
Modify the password
After it is turned ON, the current user password will
be modified, and later it is turned OFF
automatically.
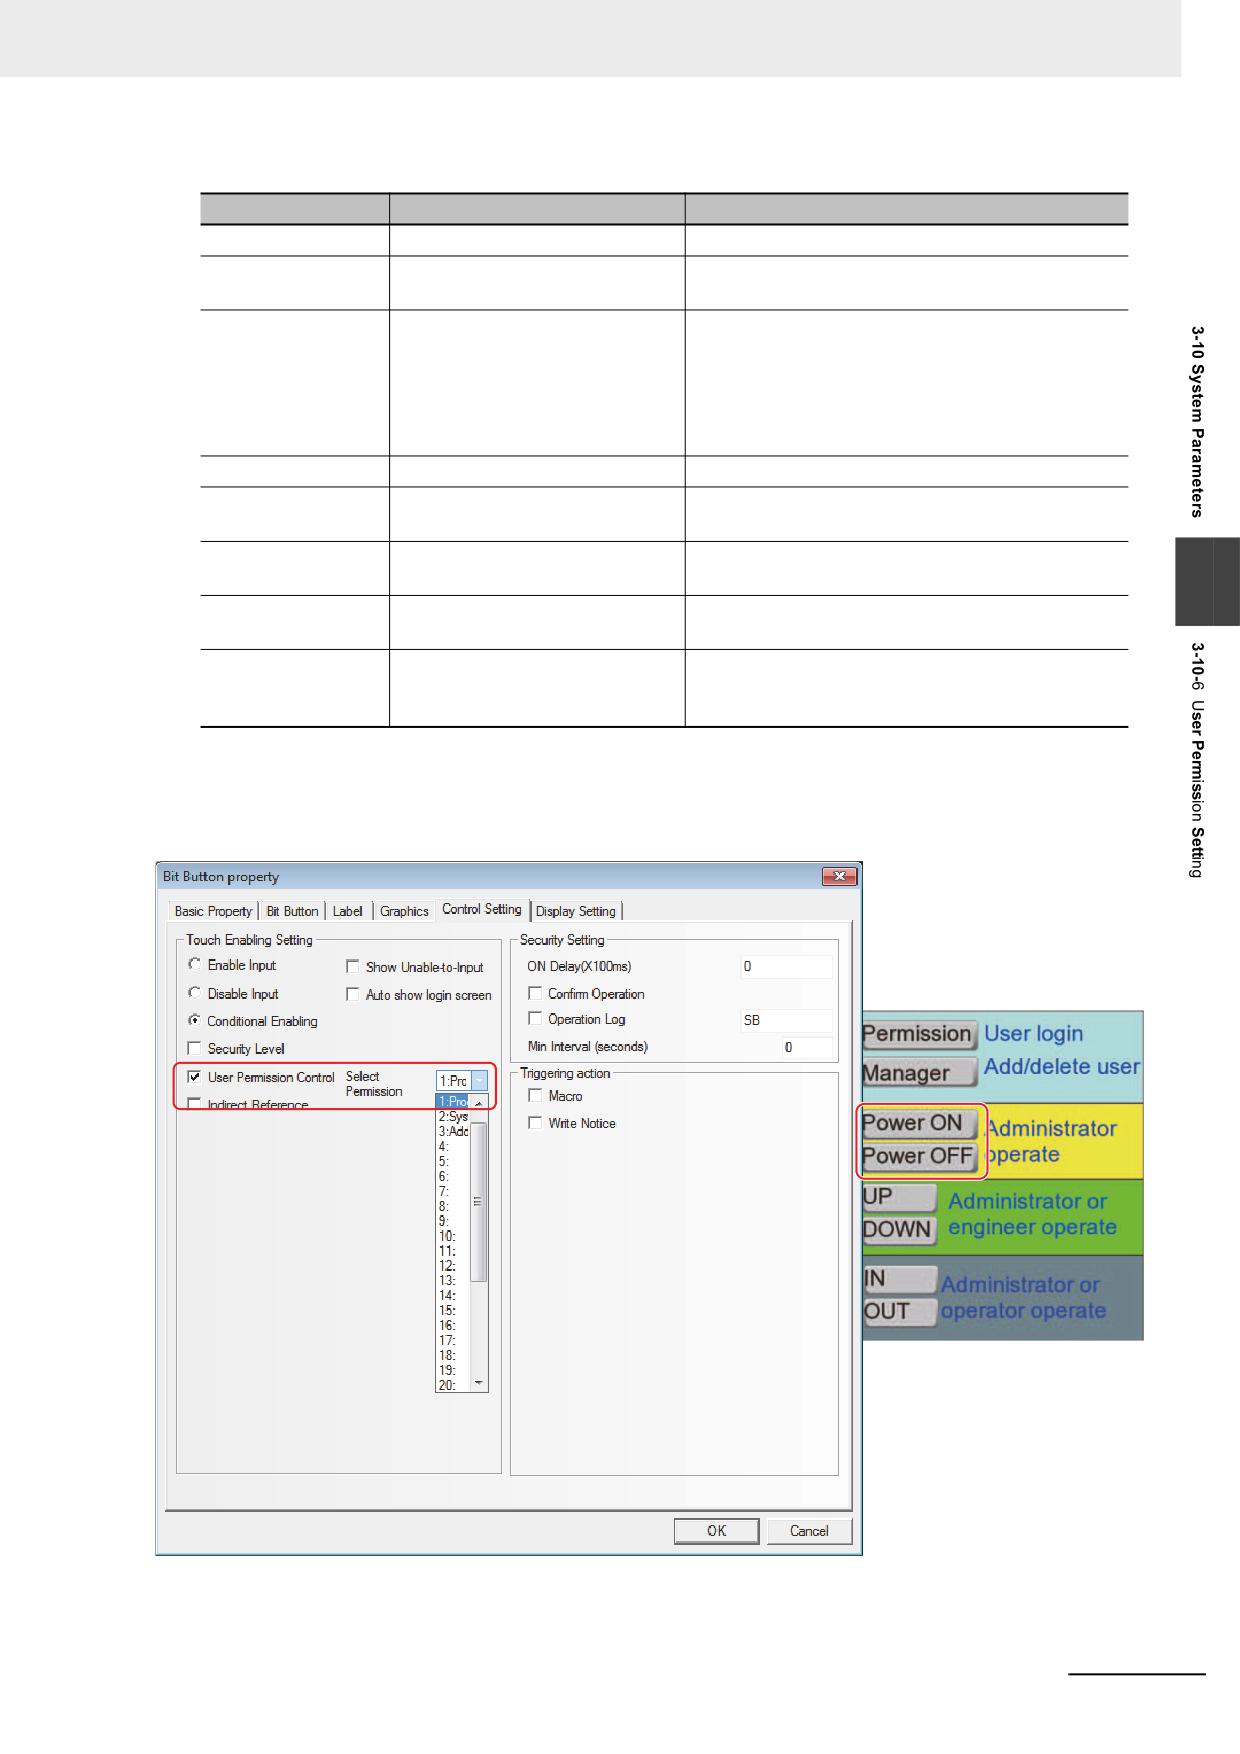
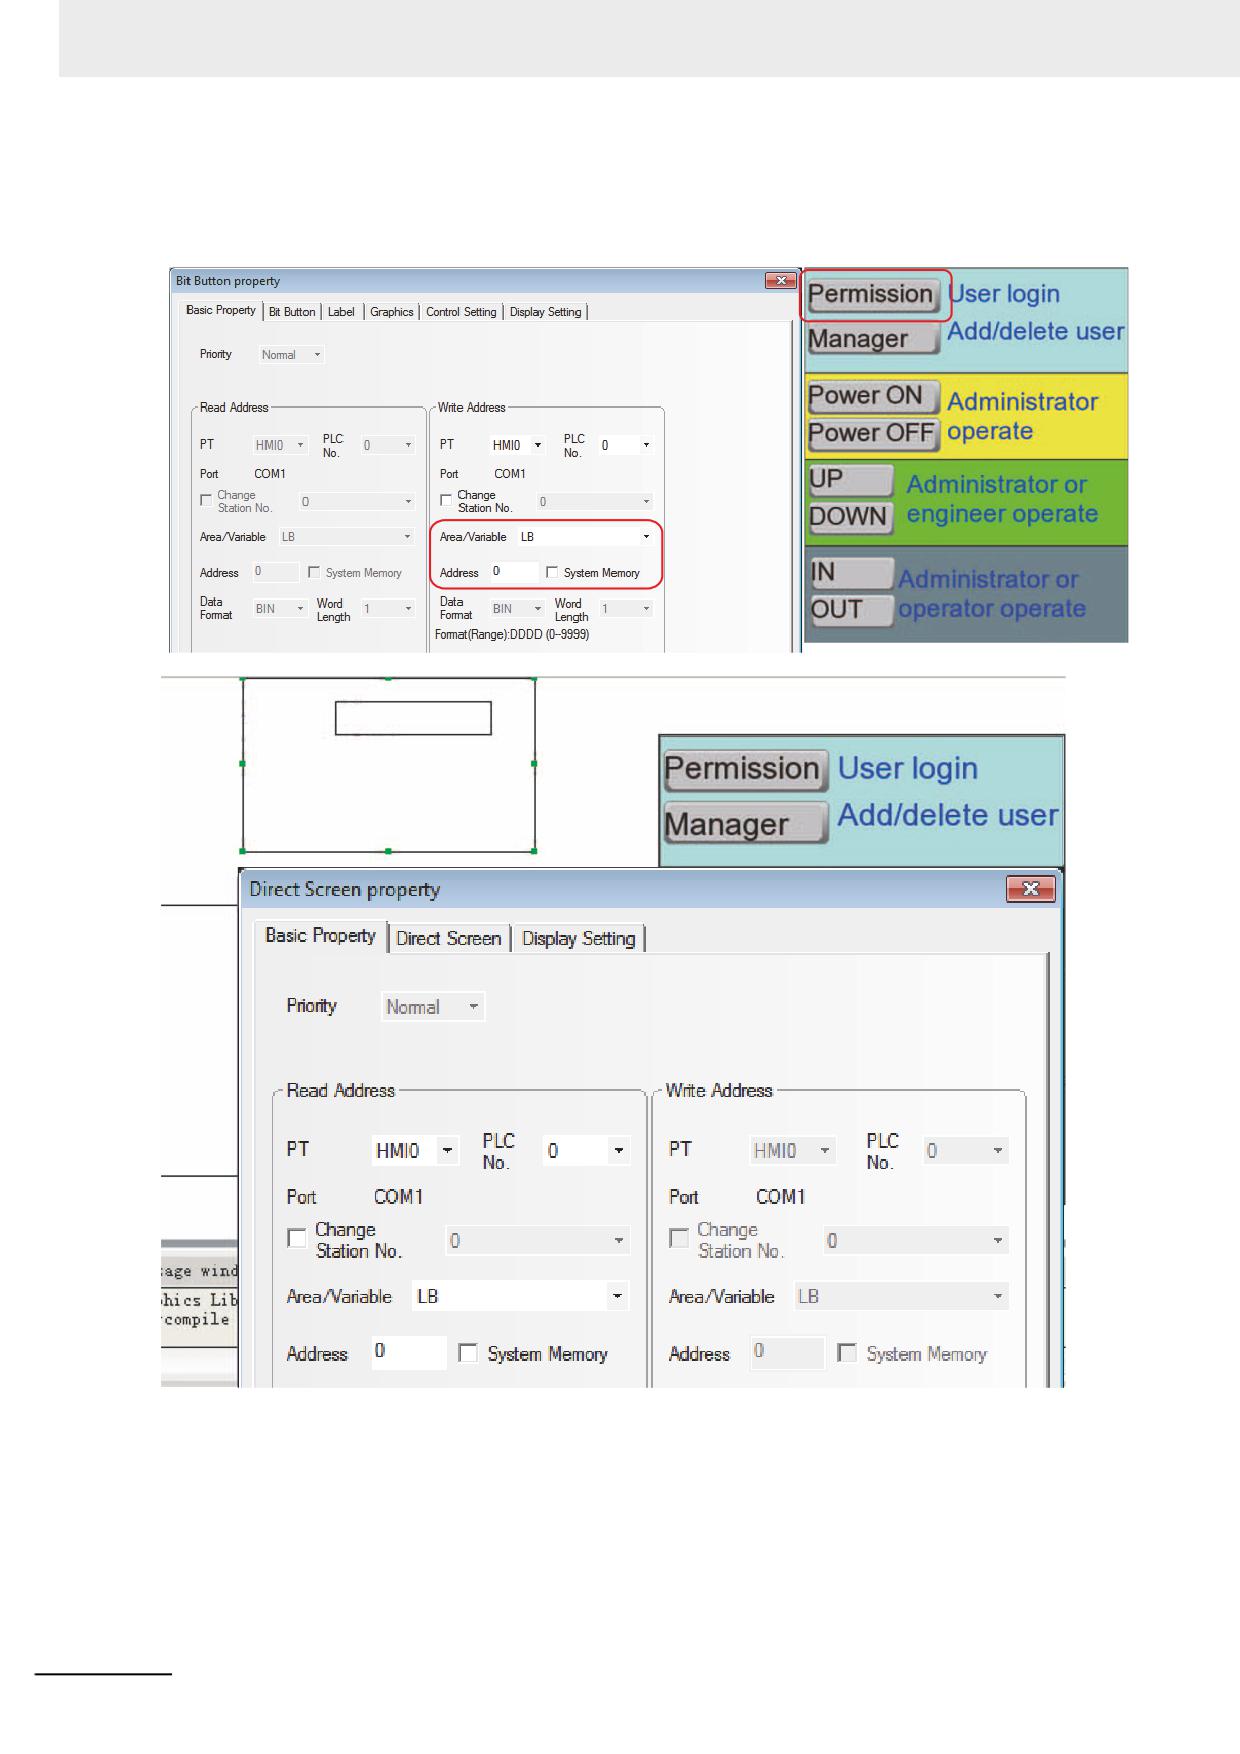
Setting Permission Control of Component:
Select the [Conditional Enabling] option in the [Control Setting] tab of “Bit Button Component
Property” and check [Use Permission Control], as shown below.
Setting “Use Permission Control” for the component means only the user having this operation
authority can operate the component restricted by this authority.
NB-series Programmable Terminals NB-Designer Operation Manual(V106)
3-309
3 Functions of NB-Designer
Login Screen for User Permission
Place one Bit Button component with the address LB0 and the [Set] format and pop-up the input
screen of the user permission password specifying the Direct Screen.
Current User: None
3-310
NB-series Programmable Terminals NB-Designer Operation Manual(V106)
3 Functions of NB-Designer
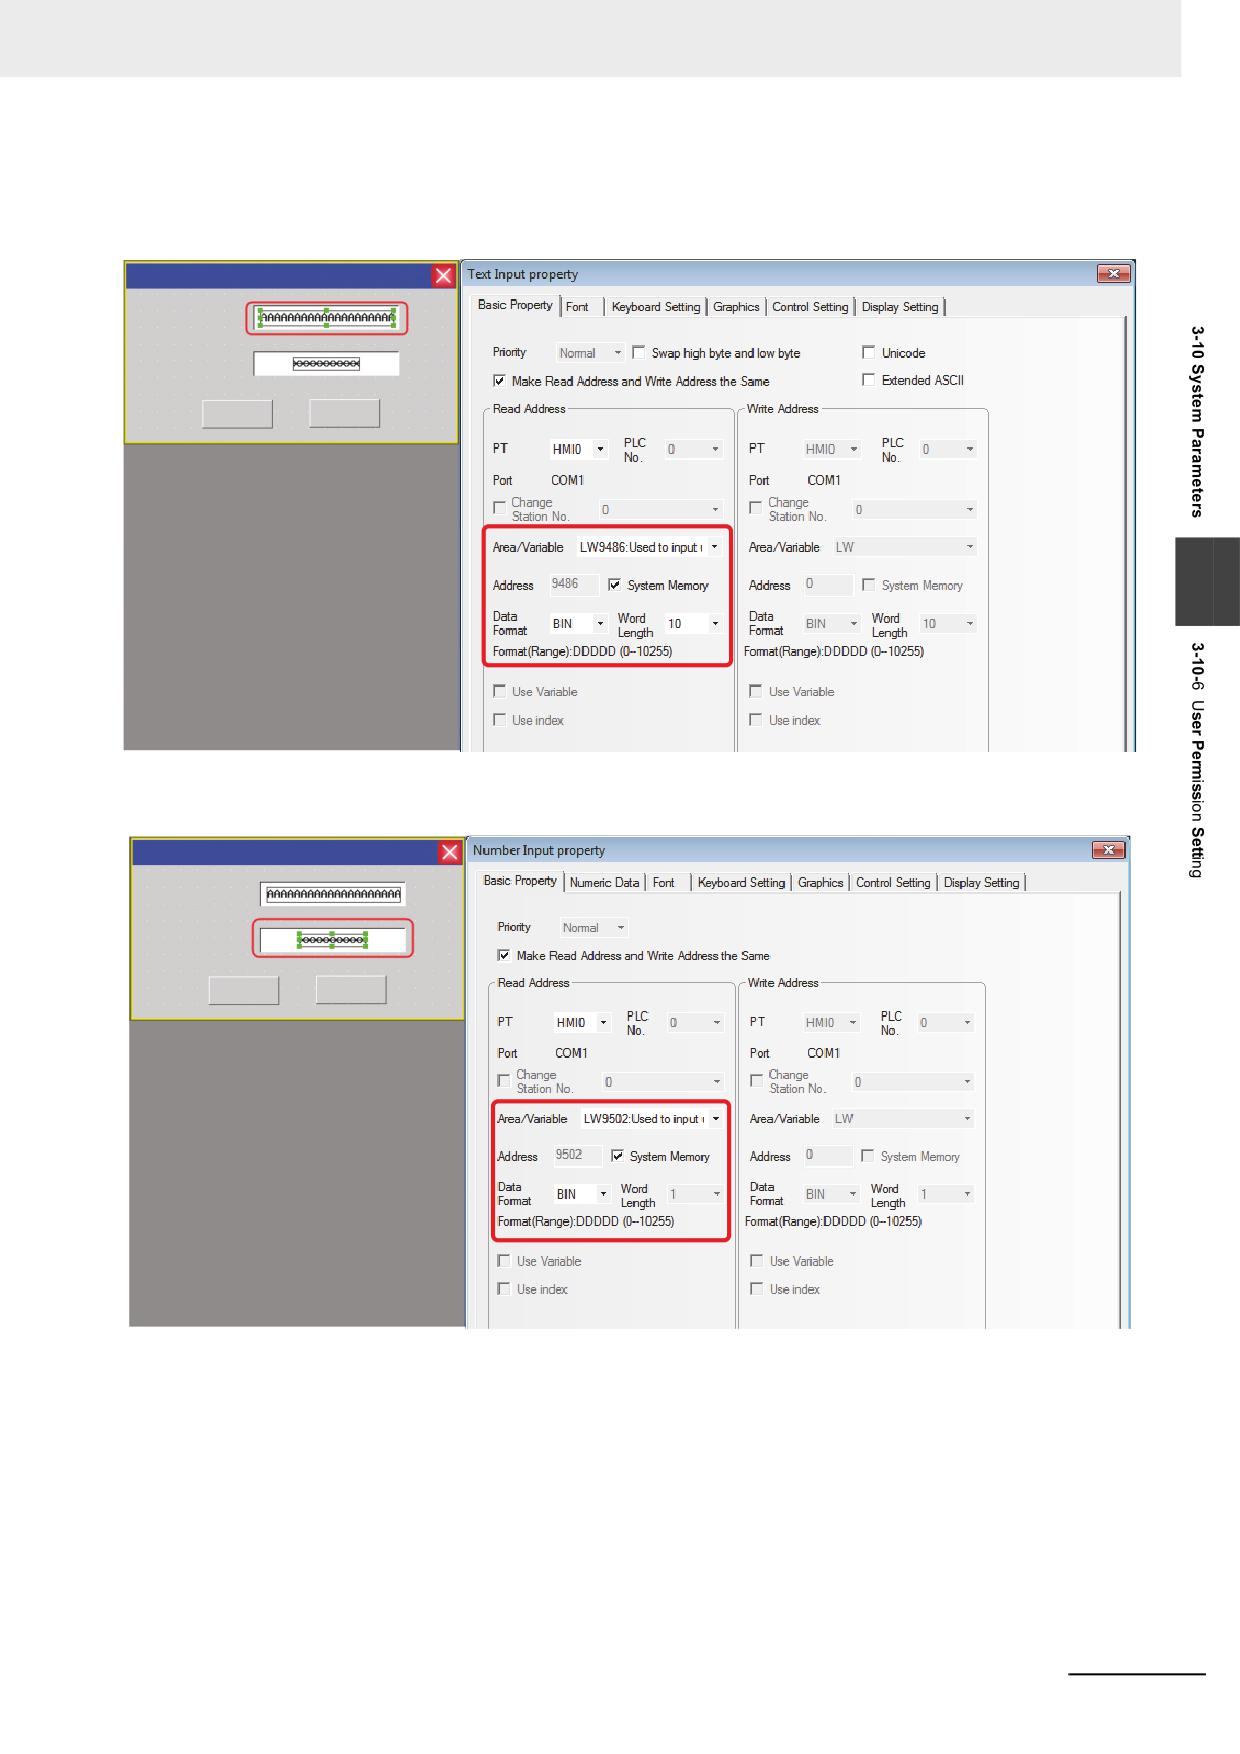
Create a new screen as the user permission password input screen:
Firstly, place one Text Input component for inputting the user name with the address of LW9486 and
the maximum word length up to 16 (Here it is 10.).
User Login
User Name:
Password:
Login
Login Out
3
Secondly, place one Number Input component for inputting the password with the address of
LW9502, the word length of 2 and the data type of [password].
User Login
User Name:
Password:
Login
Login Out
NB-series Programmable Terminals NB-Designer Operation Manual(V106)
3-311
3 Functions of NB-Designer
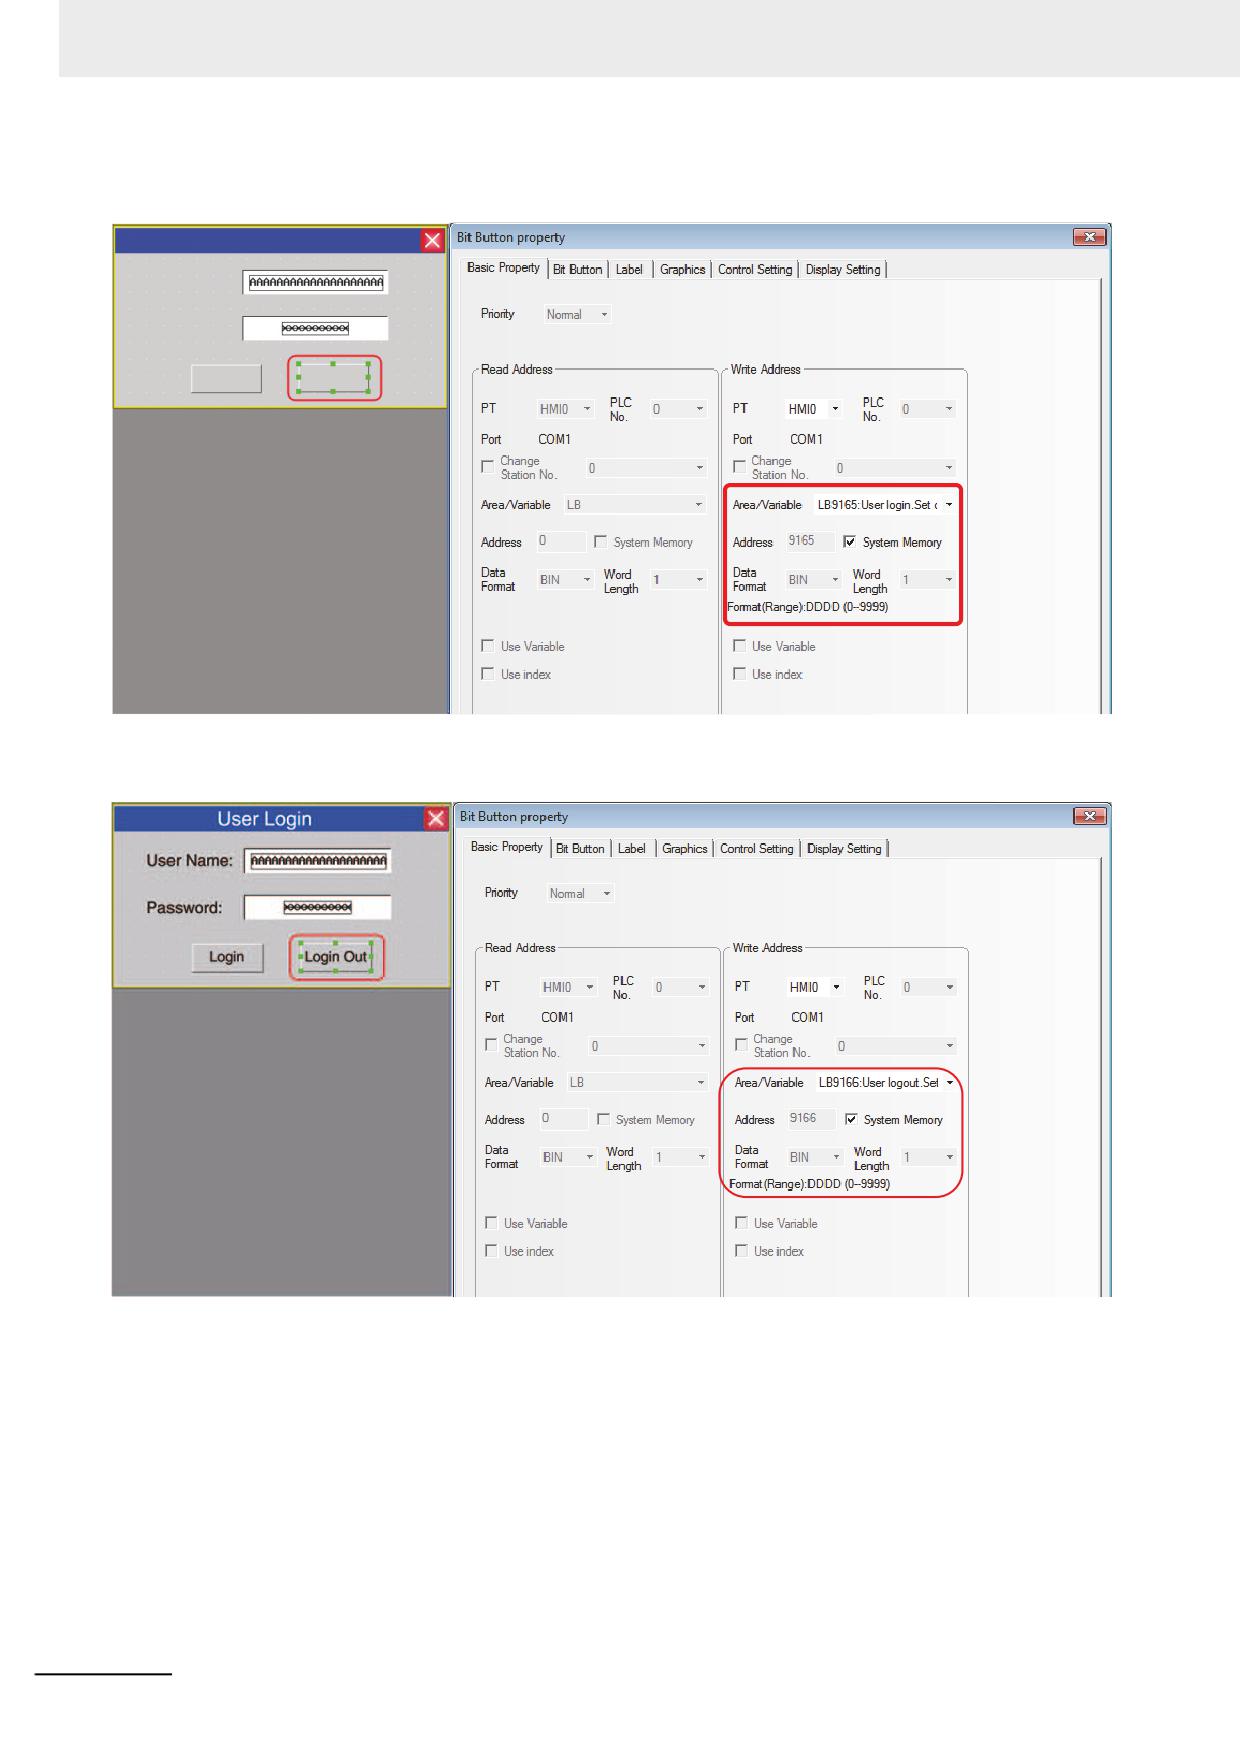
Thirdly, place one Bit Button component to perform “user login” with the address of LB9165, type of
[Set] and the label content of “Login”.
User Login
User Name:
Password:
Login
Login Out
Finally, place one Bit Button component to perform “user logout” with the address of LB9166, type of
[Set] and the label content of “Logout”.
3-312
NB-series Programmable Terminals NB-Designer Operation Manual(V106)
3 Functions of NB-Designer
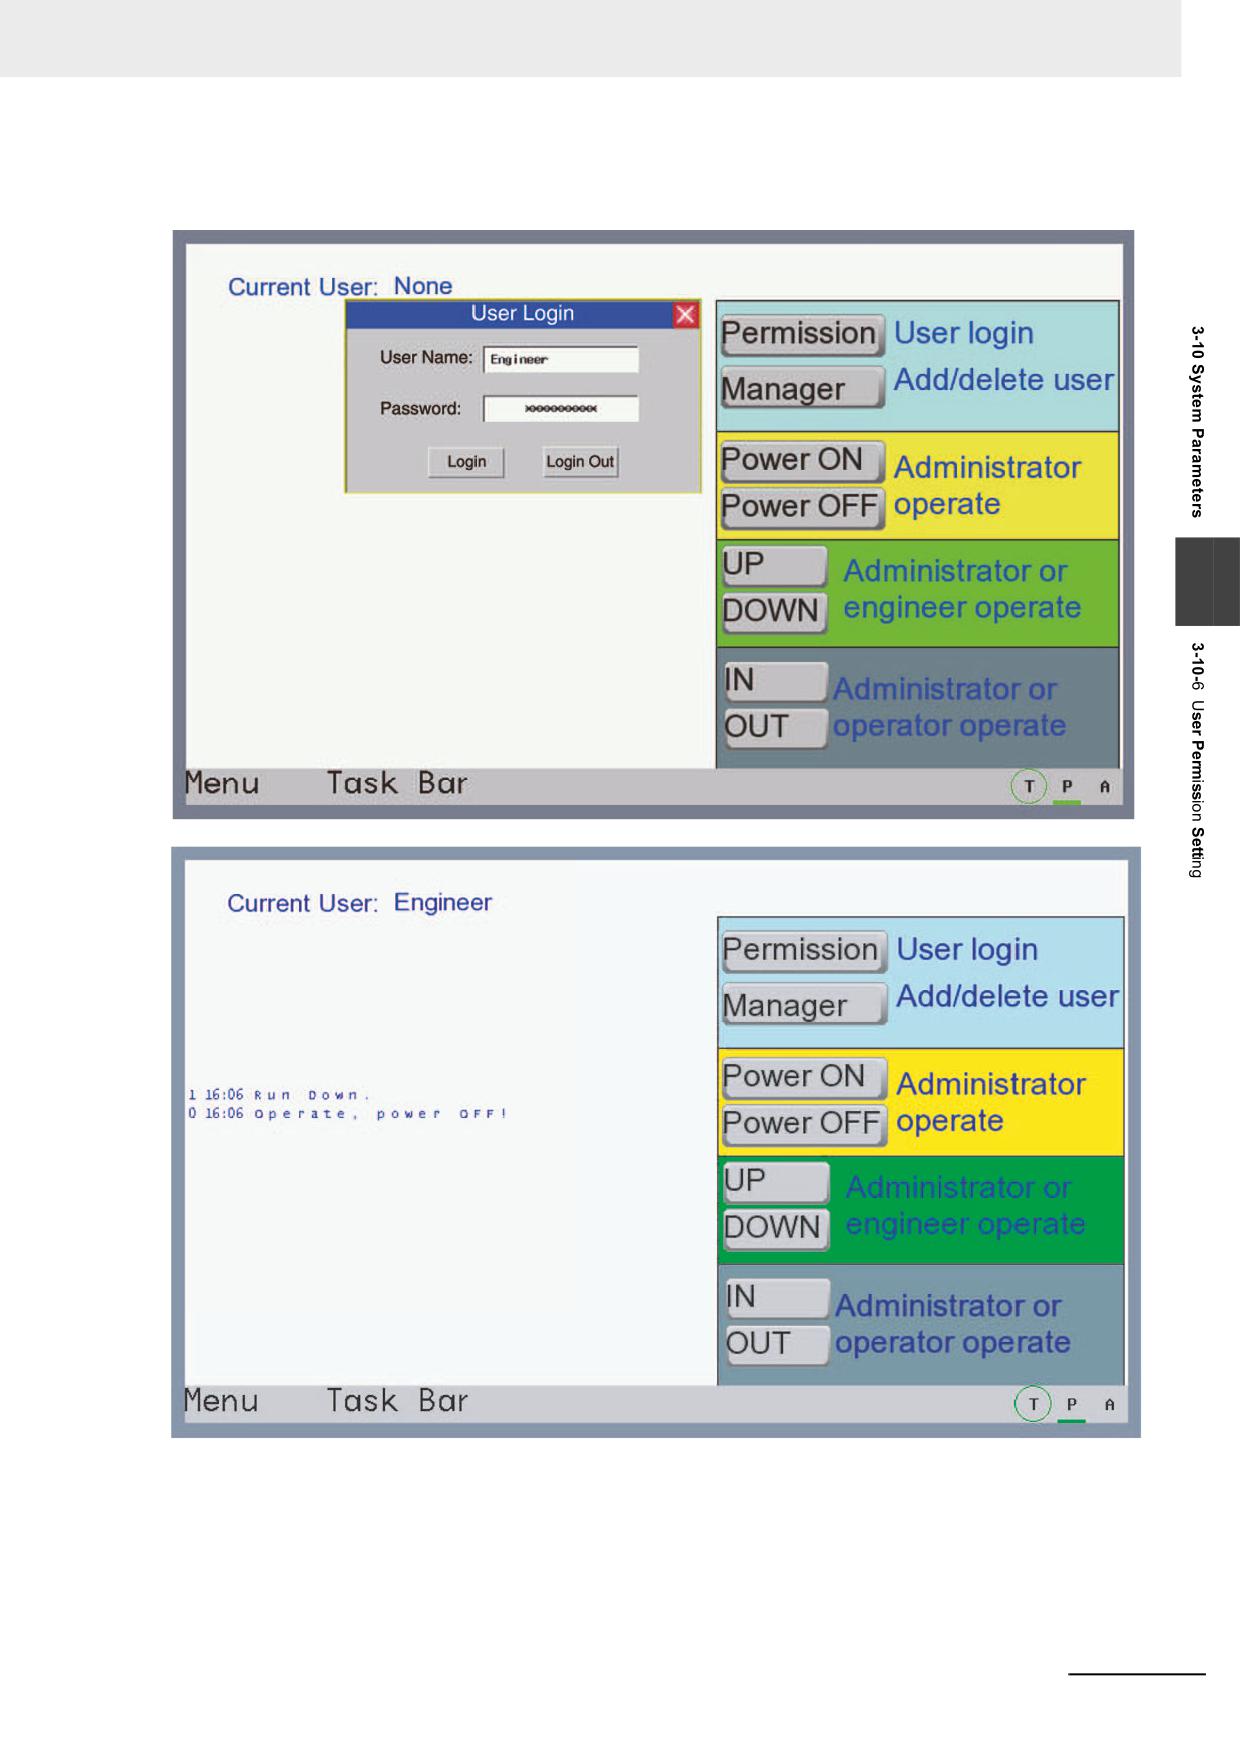
Perform the offline test and the effect is as shown below:
Input “Engineer” in [User Name] and “222222” in [Password] respectively, then click [Login].
3
NB-series Programmable Terminals NB-Designer Operation Manual(V106)
3-313
3 Functions of NB-Designer
Add/Delete User Permission:
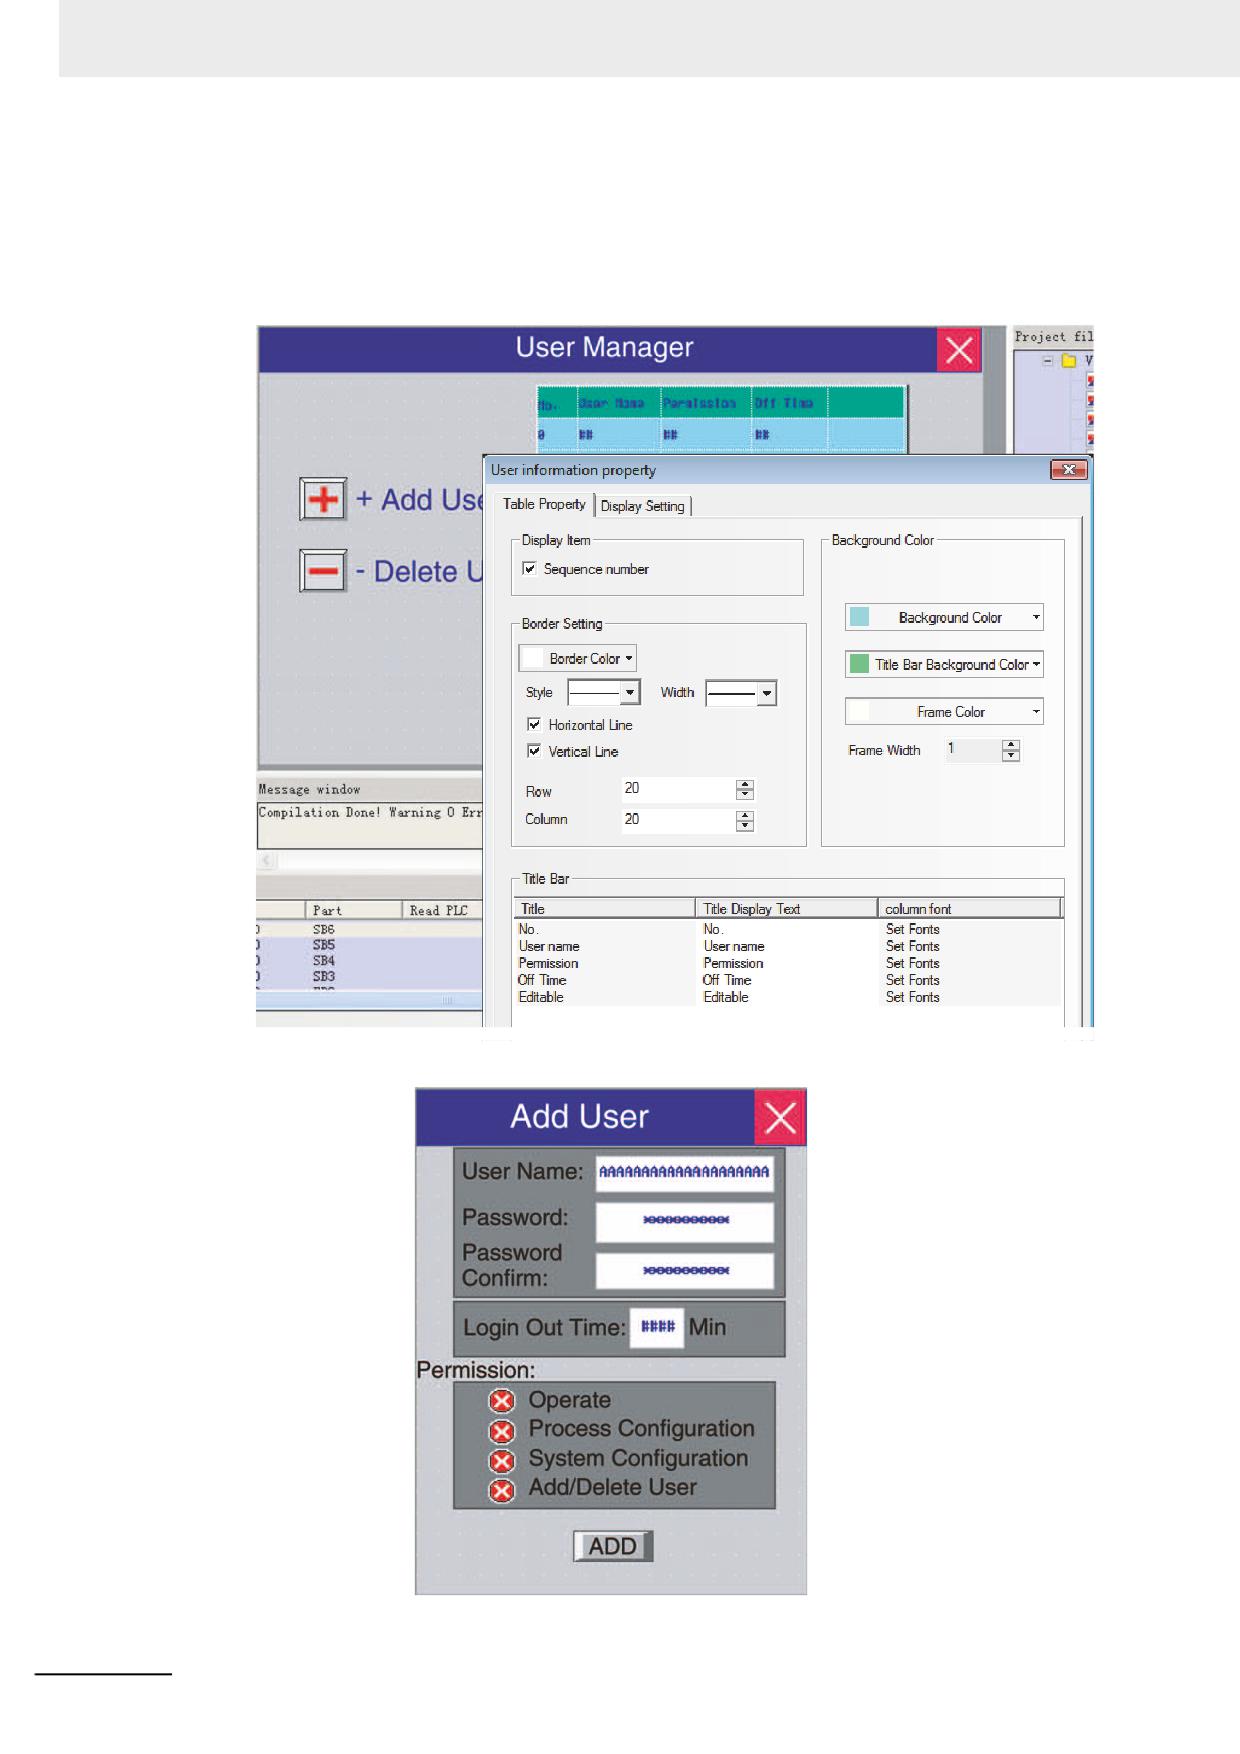
Place one User Information component in Add/Delete User Screen to display the user information of
the current system.
The “Table Property” in the “User Information Property” dialog can be edited according to the
requirement.
(a) Add User
3-314
NB-series Programmable Terminals NB-Designer Operation Manual(V106)
3 Functions of NB-Designer
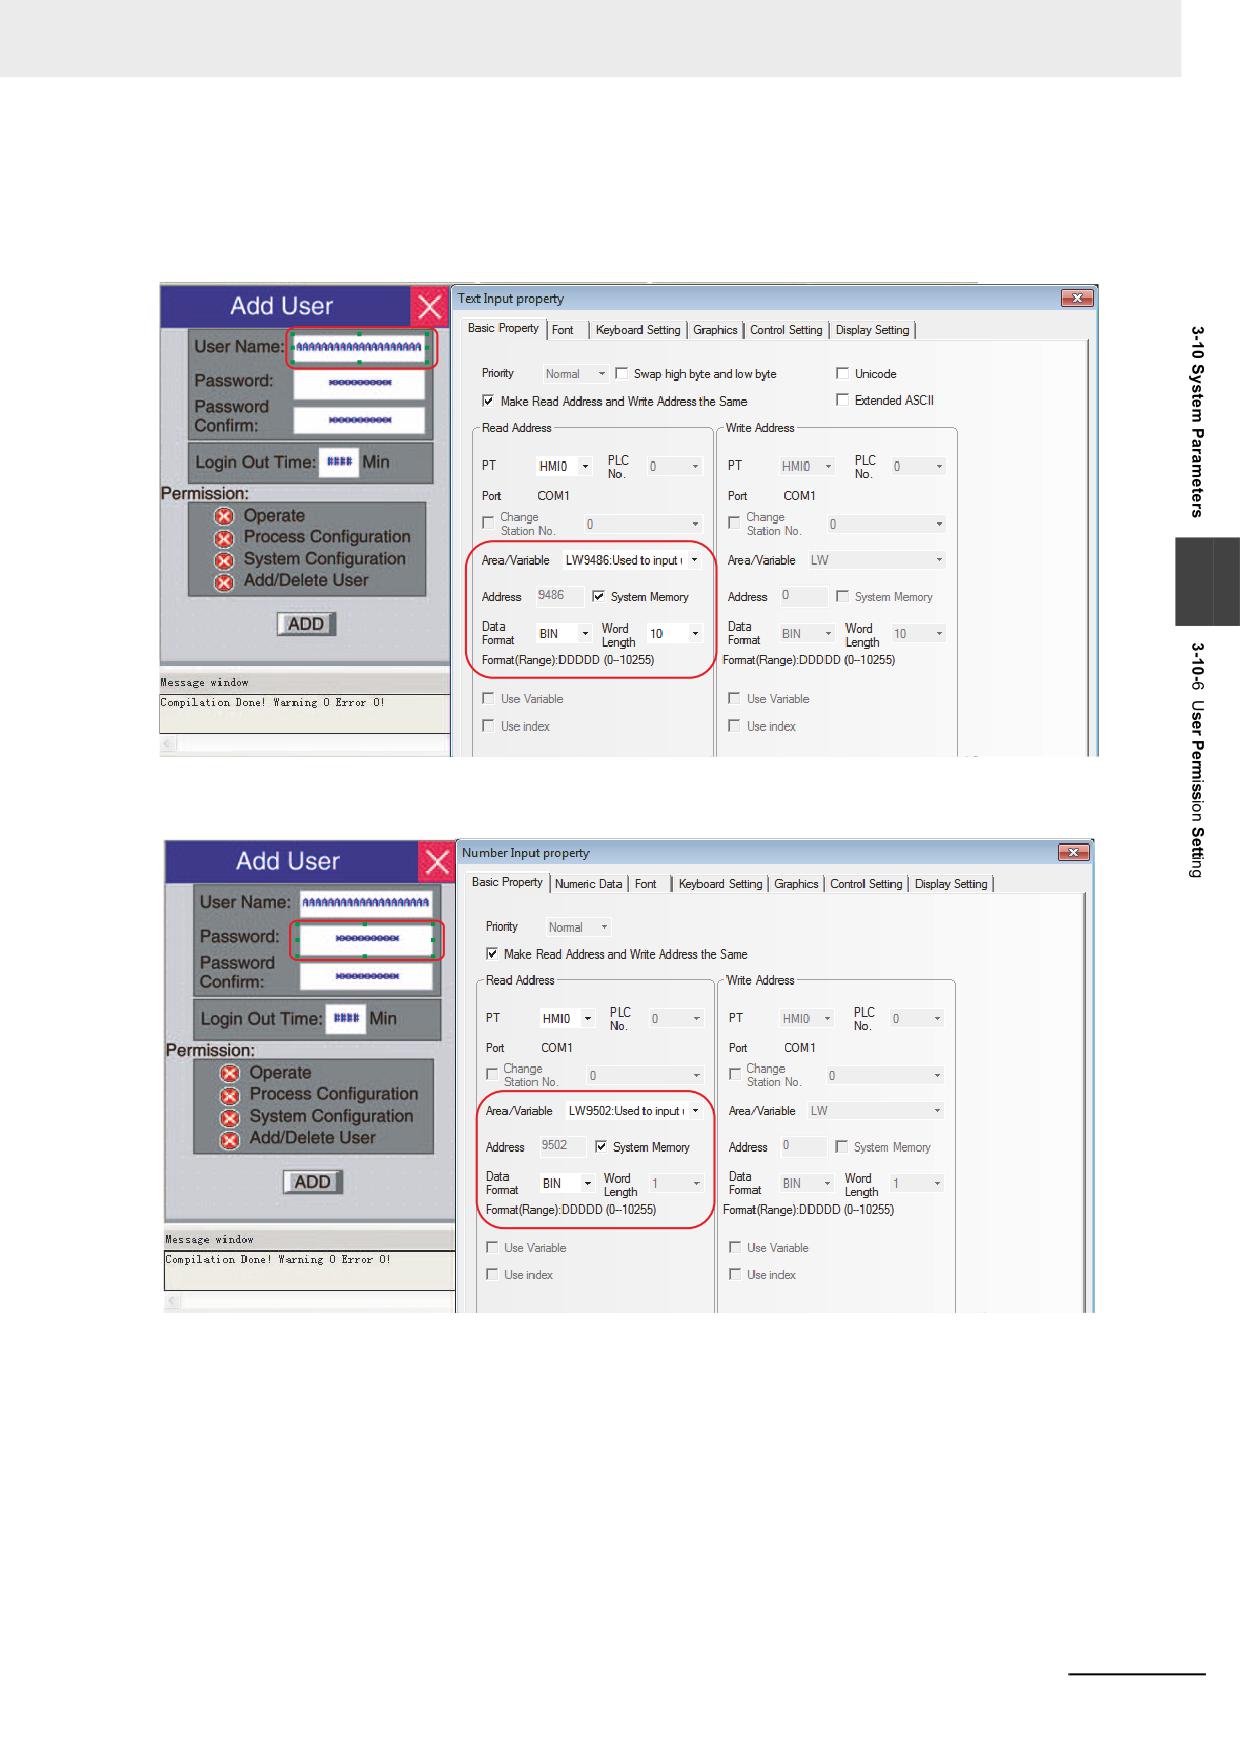
“Add User” screen contains User Name, Password, Password Confirm, Logout Time
and Permission.
User Name: Place one Text Input component for inputting the user name with the
address being LW9486 and the maximum word length up to 16 (Here it is 10.).
3
Password: Place one Number Input component with the address of LW9502, the word
length of 2 and the data type of [password] here.
NB-series Programmable Terminals NB-Designer Operation Manual(V106)
3-315
3 Functions of NB-Designer
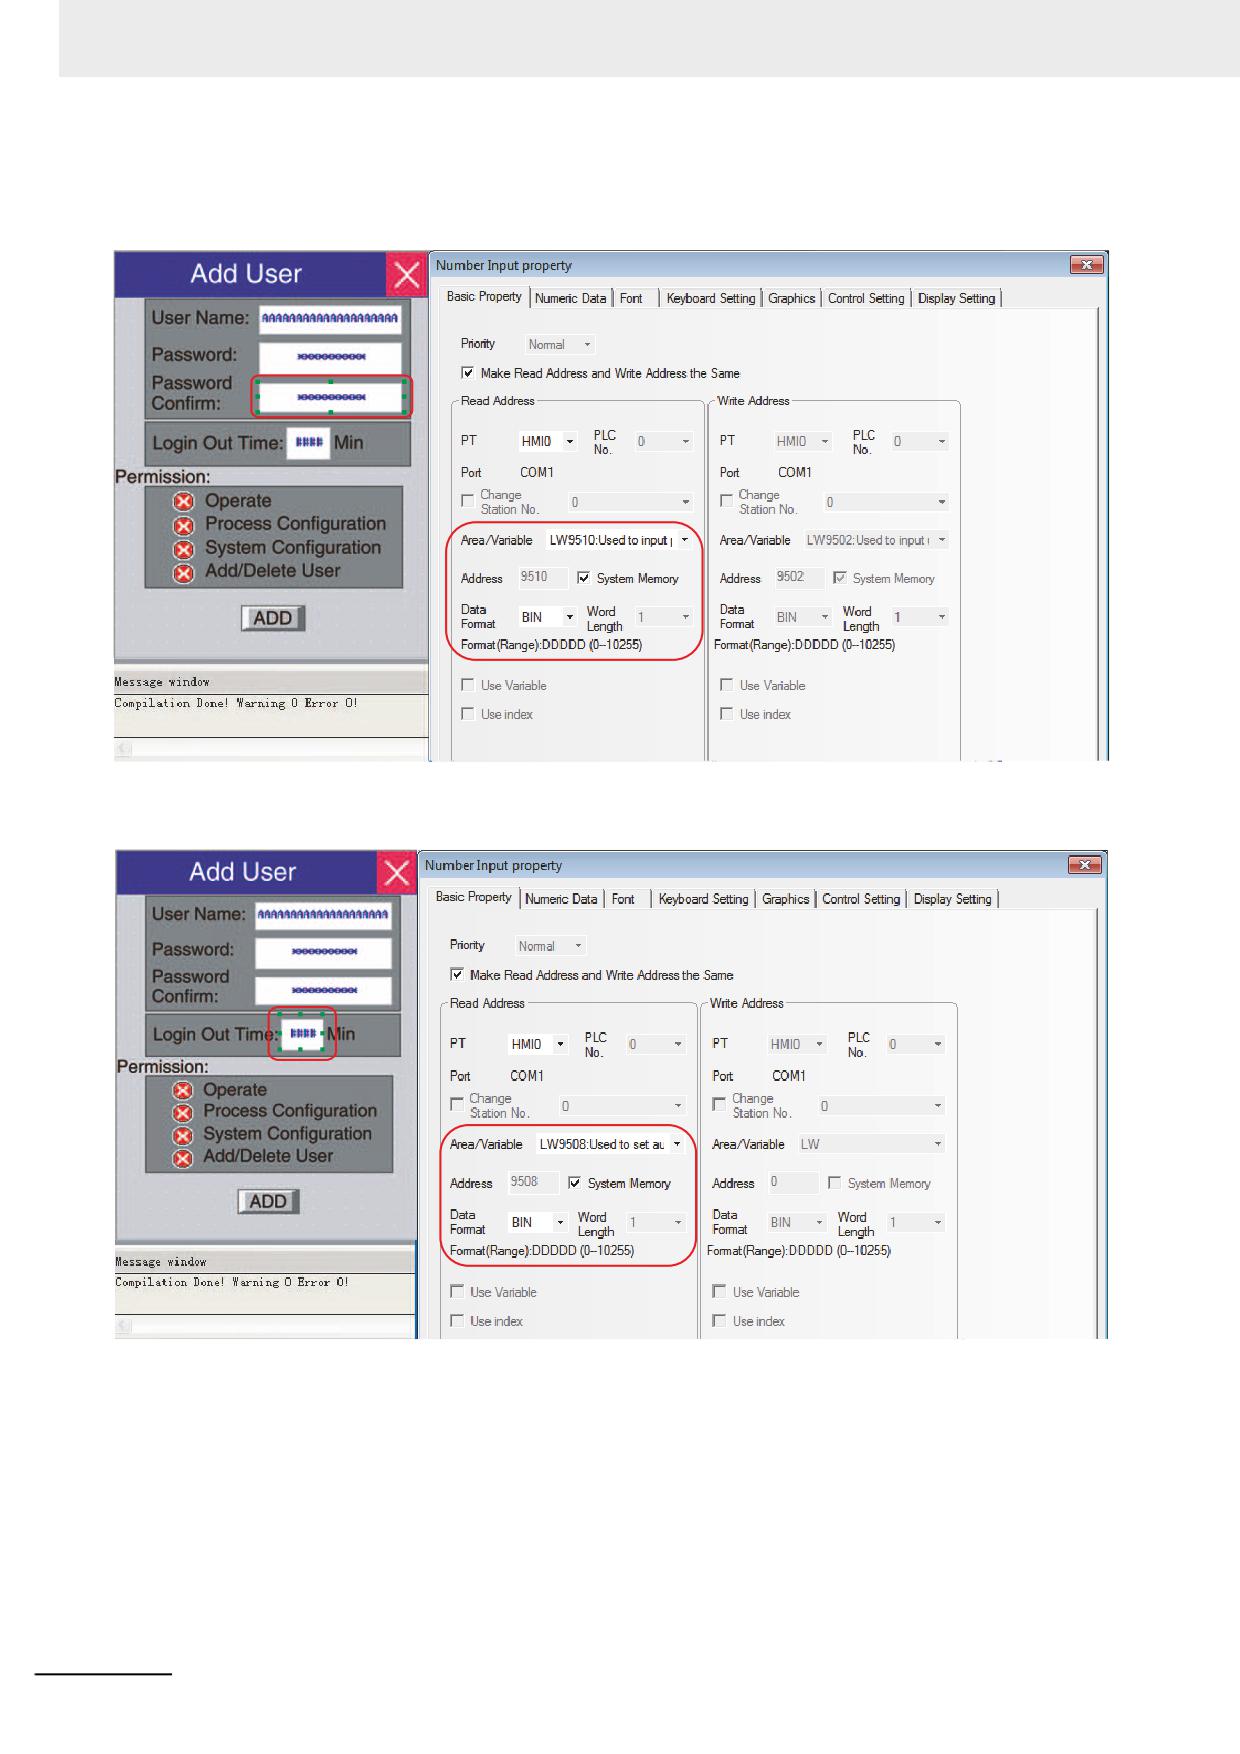
Password Confirm: Place one Number Input component by which the password is
entered again for confirmation with the address of LW9510, the word length of 2 and
the data type of [password] here.
Logout Time: Place one Number Input component with the address of LW9508, the
word length of 2 and the data type of [unsigned int] here.
3-316
NB-series Programmable Terminals NB-Designer Operation Manual(V106)
3 Functions of NB-Designer
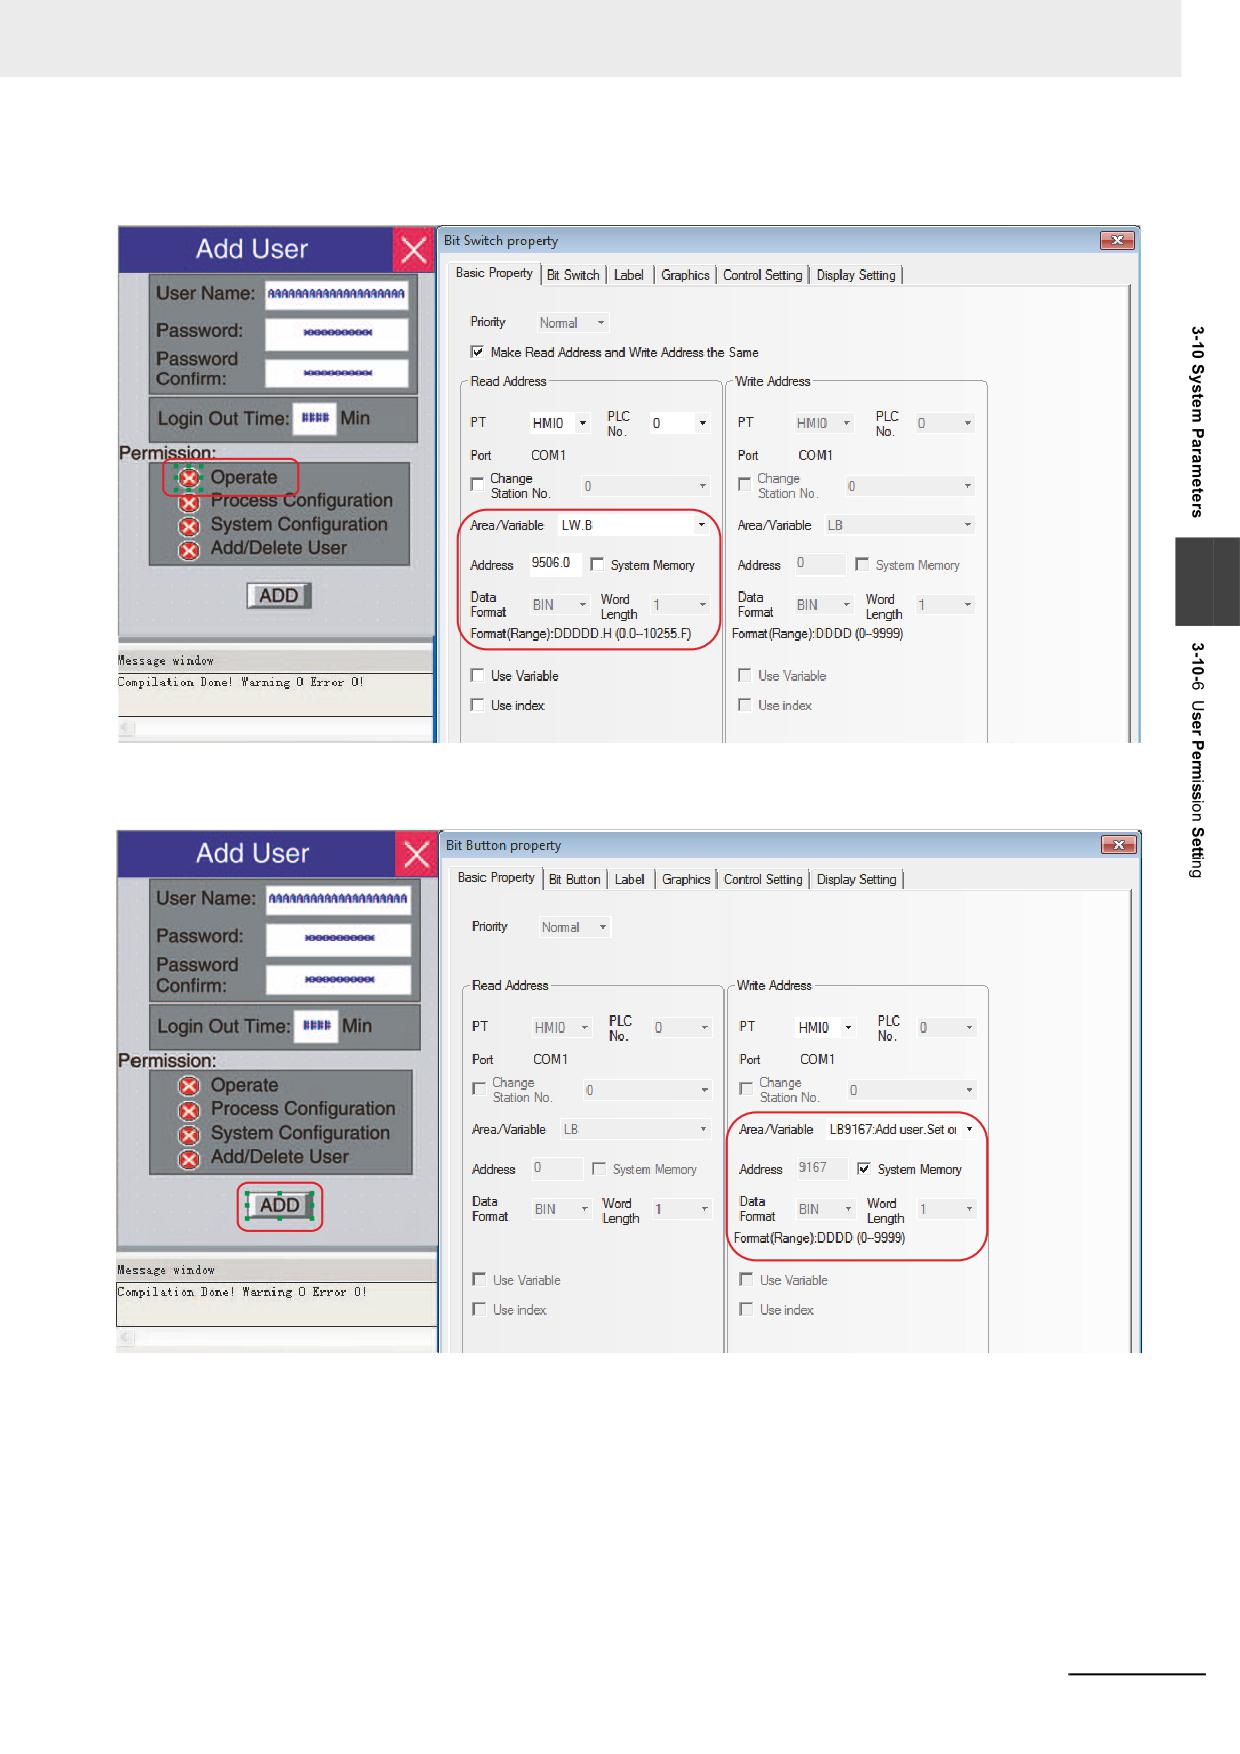
Permission: Place 4 Bit Switches with the addresses of LW.B 9506.0, LW.B 9506.1,
LW.B 9506.2, LW.B 9506.3 respectively and switch type of [Alternate] here.
3
Add User Operation Confirmation: Place one Bit Button component with the address of
LW9167 and switch type of “Set” for confirming the added user permission.
NB-series Programmable Terminals NB-Designer Operation Manual(V106)
3-317
3 Functions of NB-Designer
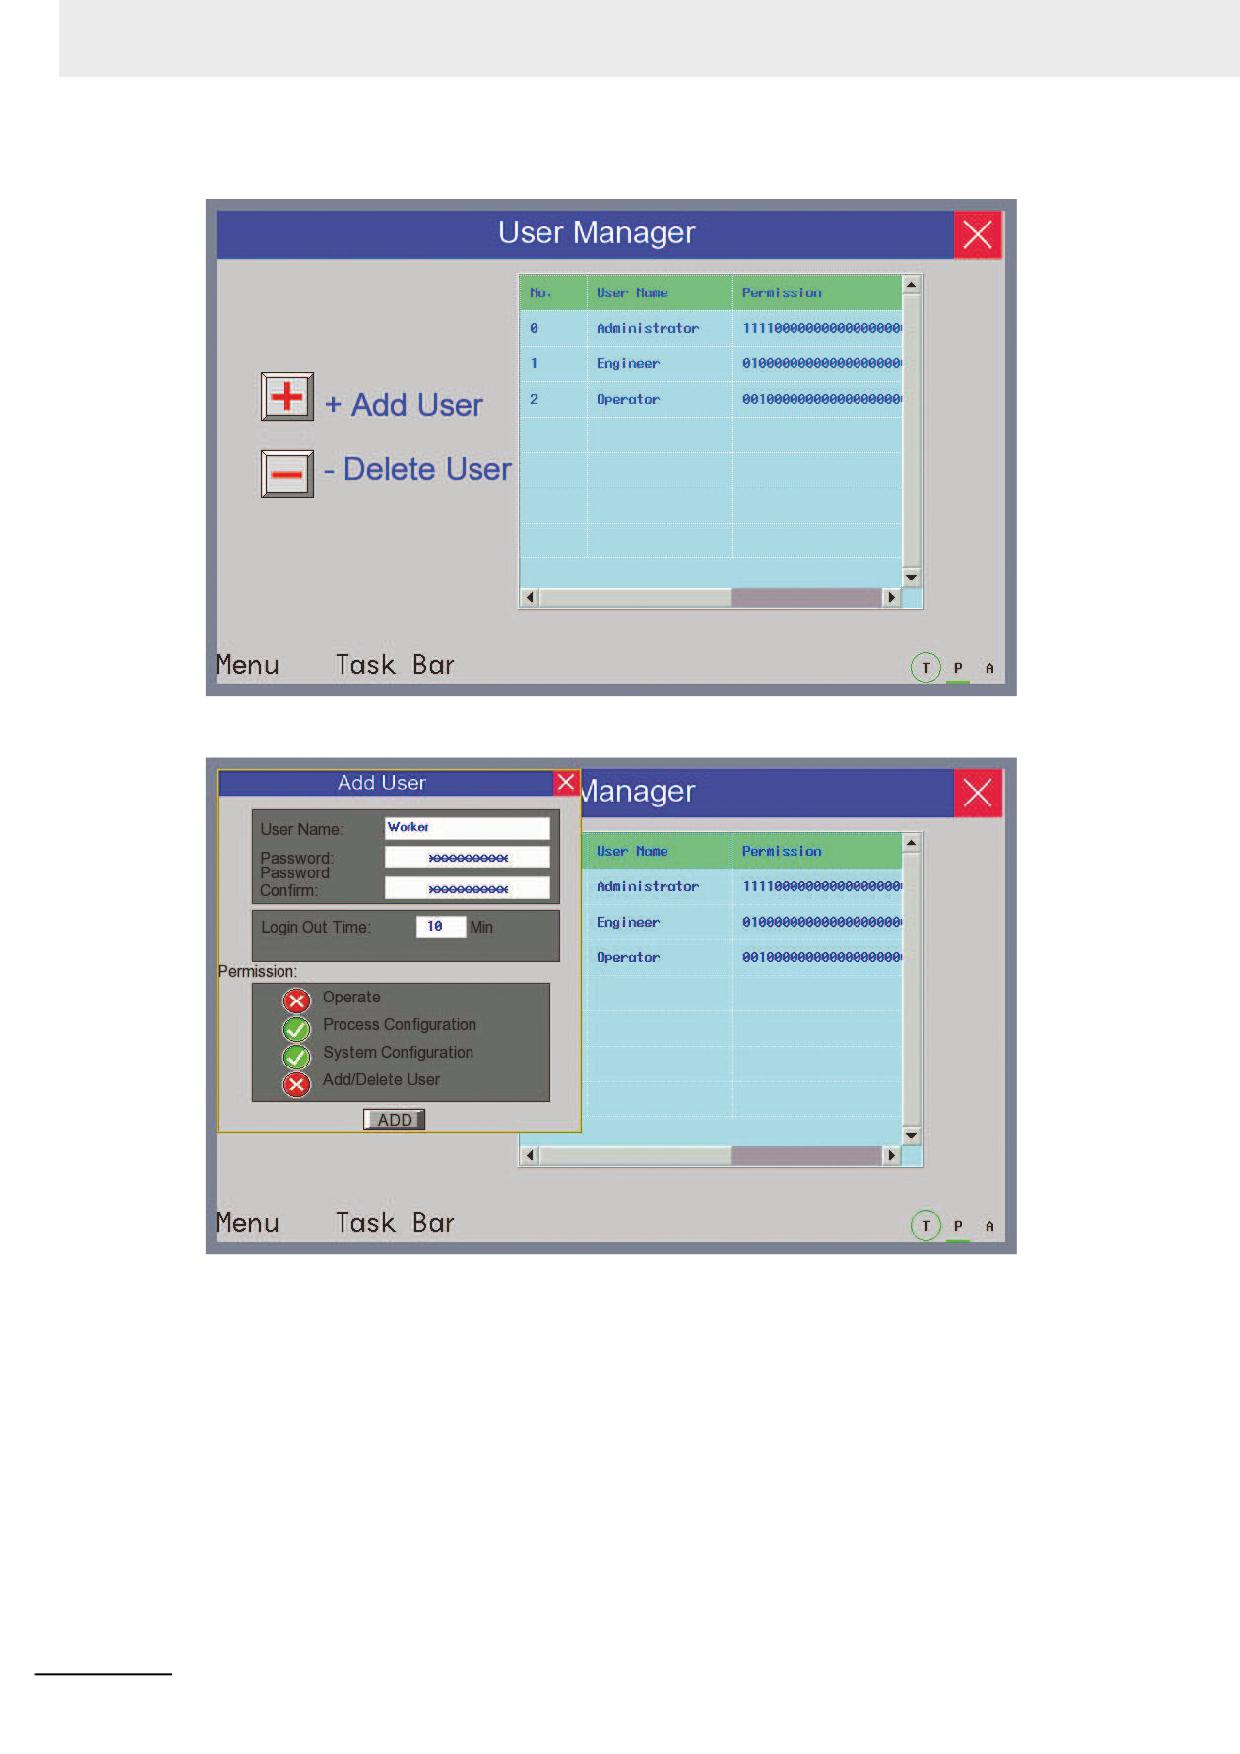
Perform the test and the effect is as shown below:
Click [Add User] to make add user dialog box pop up:
3-318
NB-series Programmable Terminals NB-Designer Operation Manual(V106)
3 Functions of NB-Designer
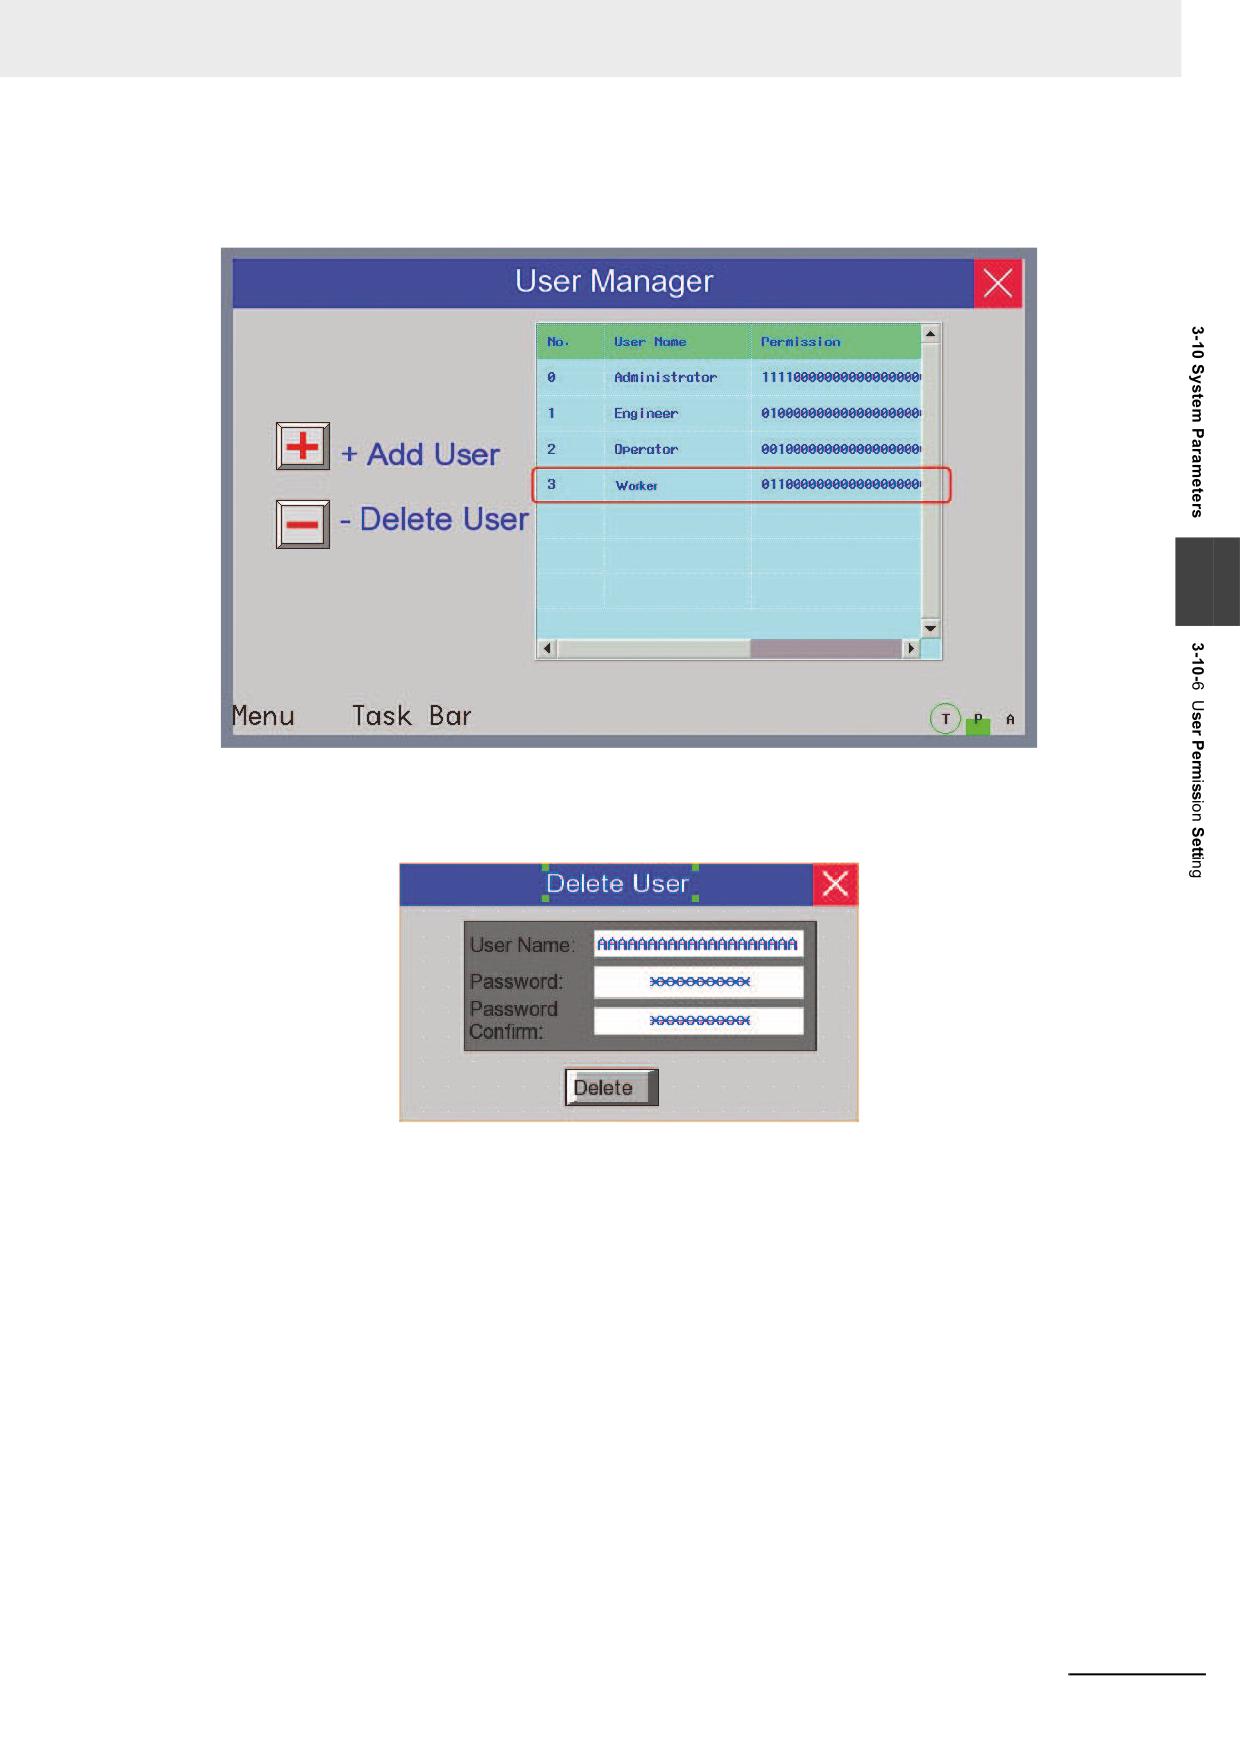
Input the User Name to be added, set the Password and the Password Confirm, and
then set the Logout Time for this user and assign the Permission. After the setting,
click “ADD” to complete “Add User” operation.
3
(b) Delete User
“Delete User” screen contains User Name, Password, Password Confirm, Delete User
Operation etc.
The settings of User Name, Password and Password Confirm are similar to that of
“Add User”.
Delete User Operation Confirmation: Place one Bit Button component and specify the
address to LW9168 and the switch format to [Set].
Note Delete user permission operation is only valid for the users added to the PT. The users set in the NB-
Designer can’t be deleted.
NB-series Programmable Terminals NB-Designer Operation Manual(V106)
3-319
3 Functions of NB-Designer
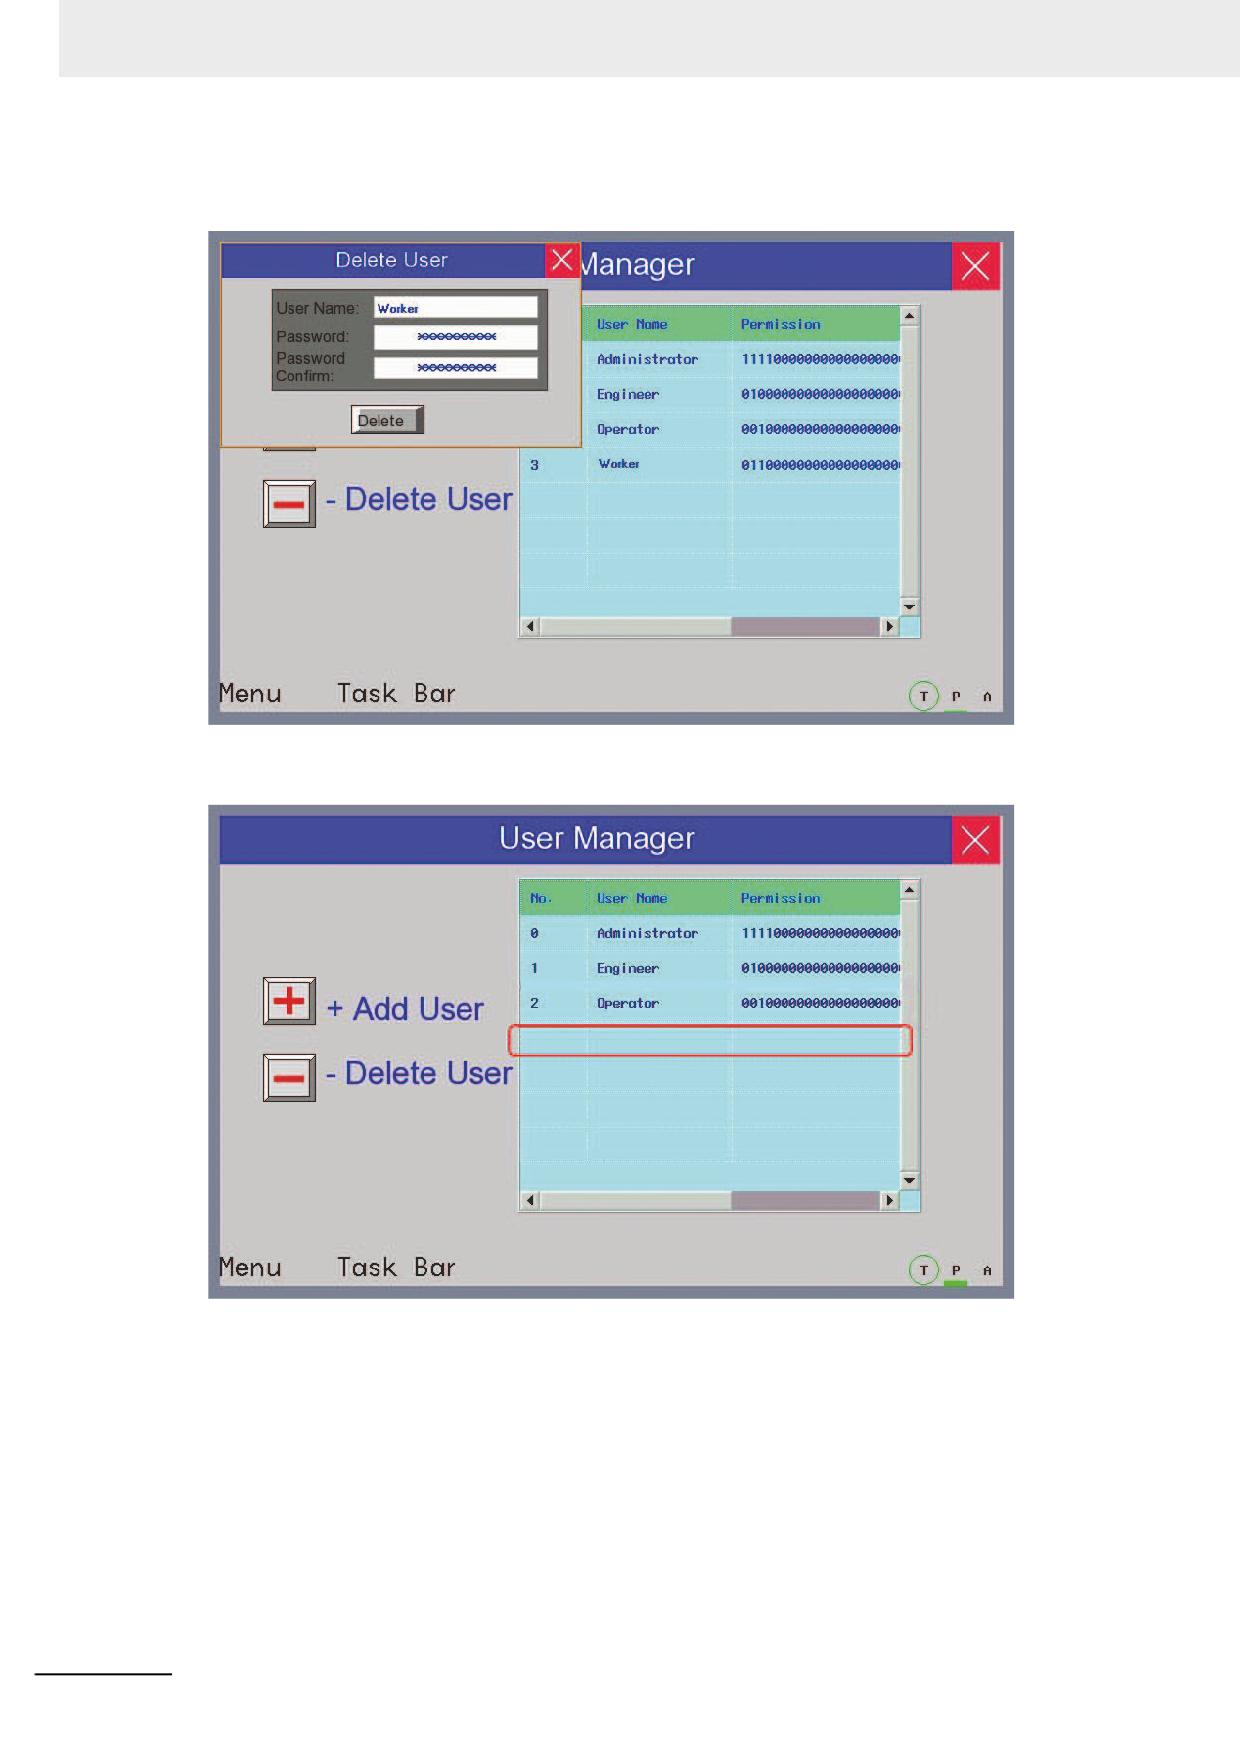
Perform the offline test and the effect is as shown below:
Click “Delete User” to make Delete User dialog box pop up:
Input the User Name to be deleted, the Password and Password Confirm for this user, then click
“Delete” to complete the operation of deleting users.
3-320
NB-series Programmable Terminals NB-Designer Operation Manual(V106)
3 Functions of NB-Designer
3-10-7
Event History Setting
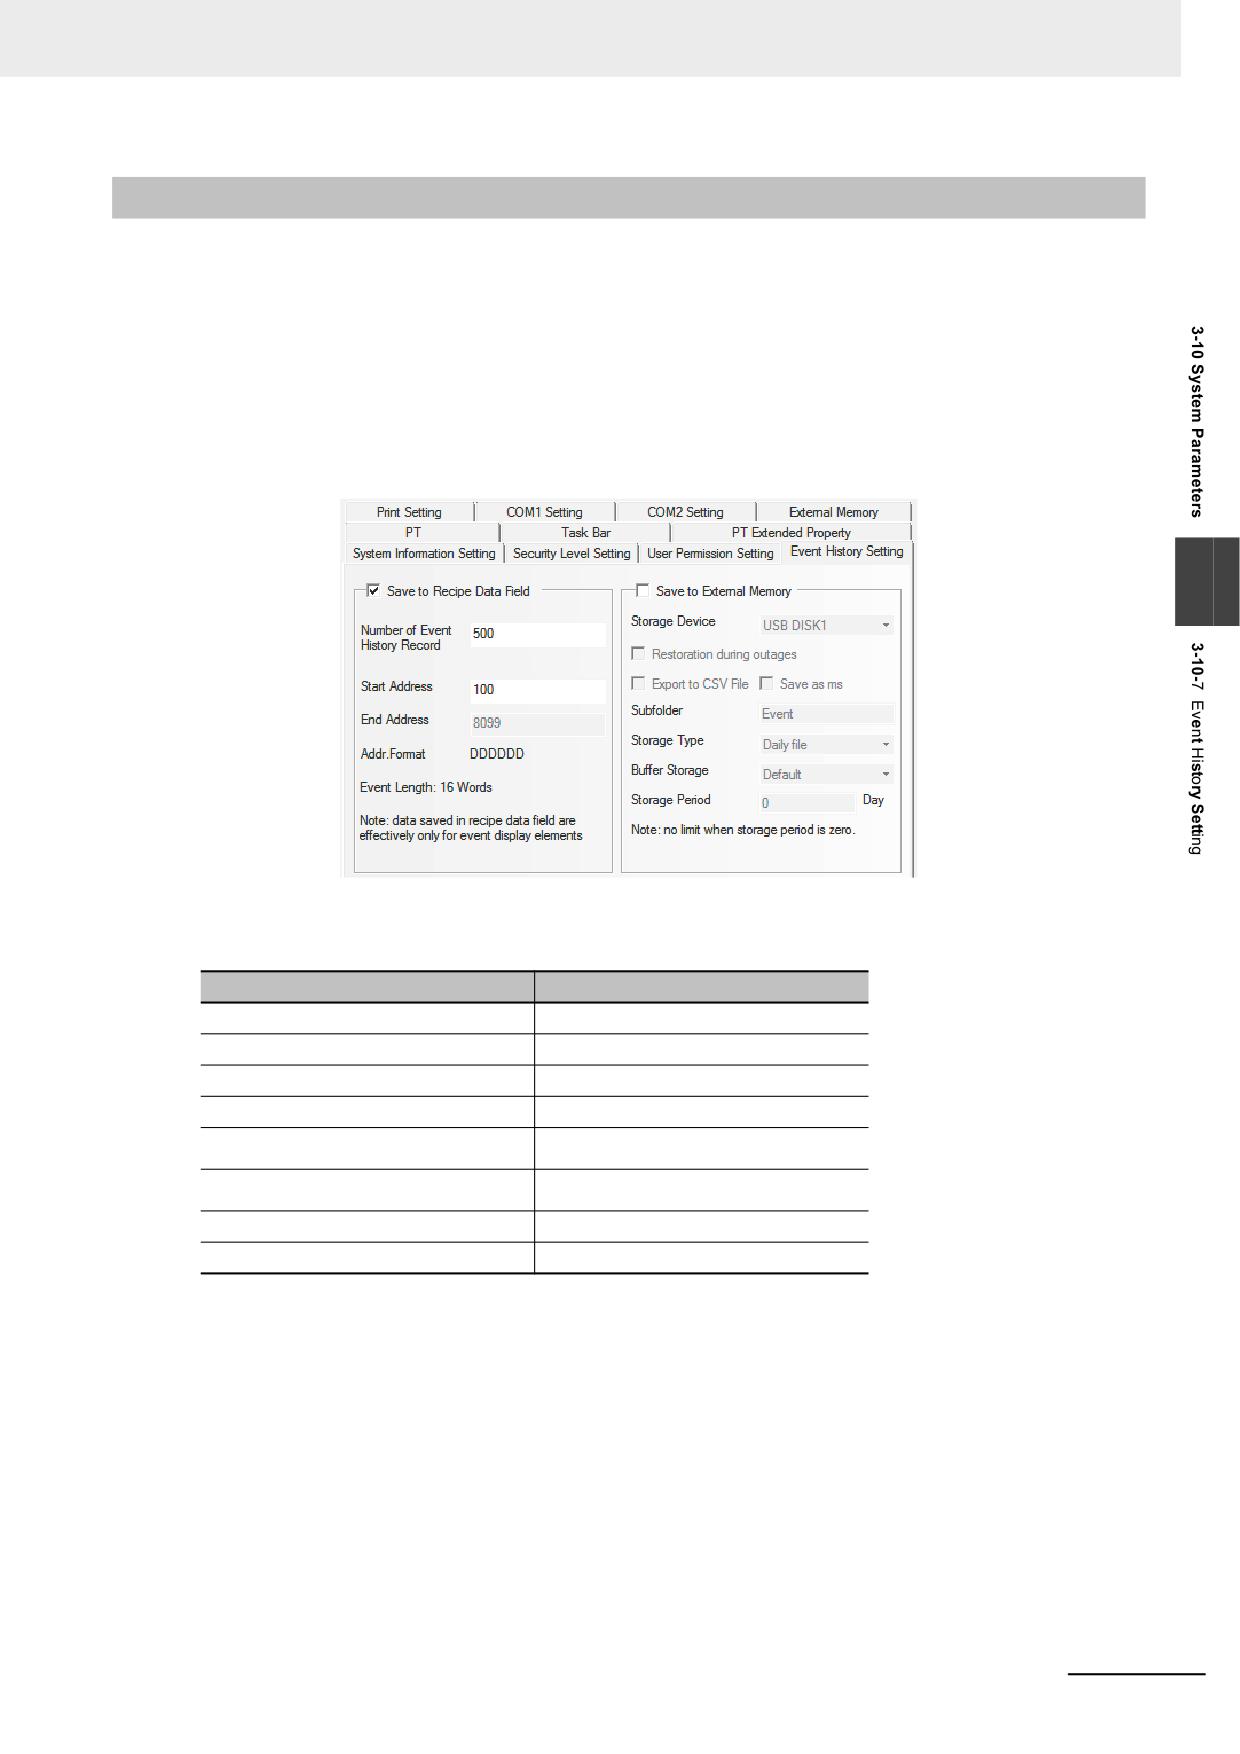
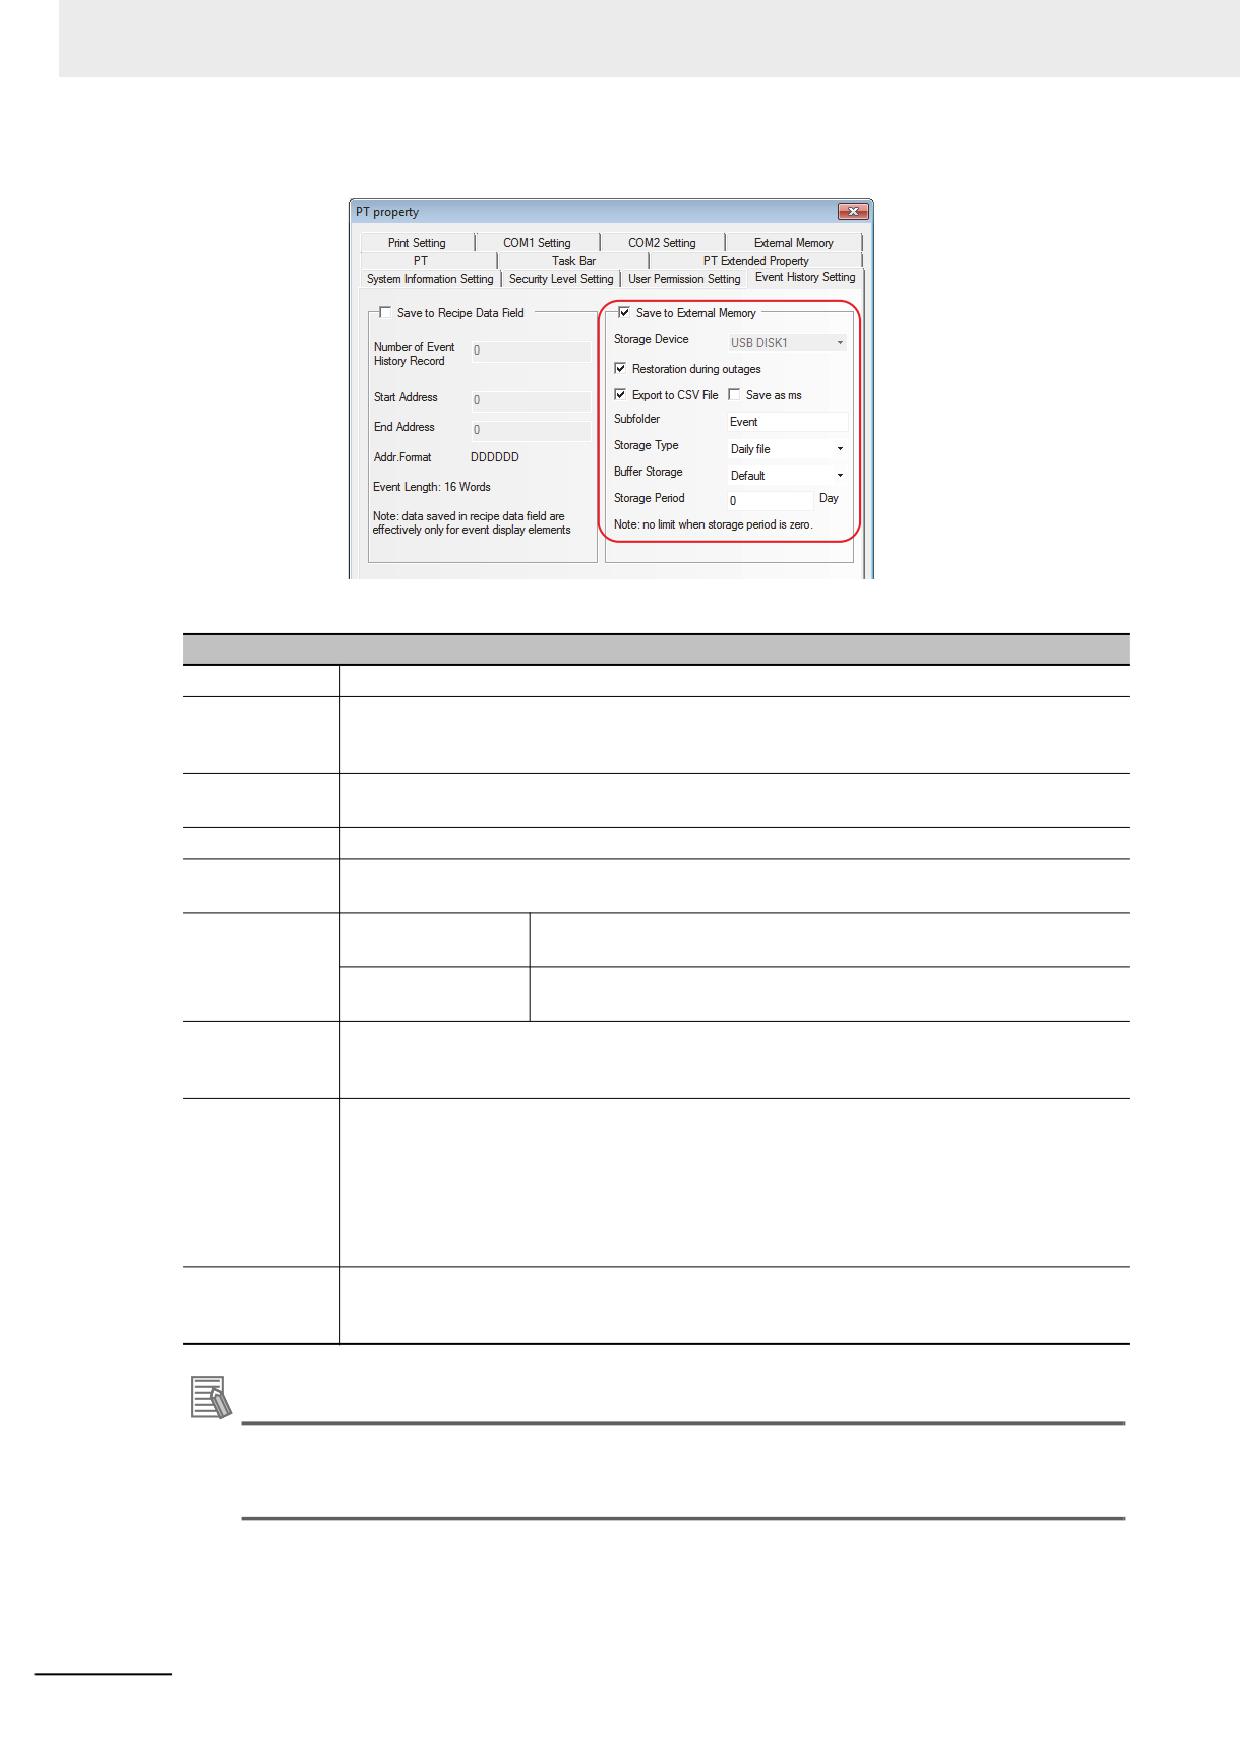
Event History information is stored in the Recipe Data Field.
When the check box [Save to Recipe Data Field] in the [PT Property] is checked, the system stores the Event
History information of executed Event to the Recipe Data Field. Since the system automatically performs the
storing, the user does not have to care about the method to store the Event History information.
The destination to store the data will be specified from the address set in [Start Address] of the system
parameters. The default address is “0”.
The data stored to the Recipe Data occupies 16 words for each event. The example of size calculation to
store the Event Log is shown as below. The data which was stored in the Recipe Data cannot be exported to
external memory.
An example when the starting address of the data to “100” in [Event History Setting] of [PT Property]
3
In order to store the Even Log Data, the system automatically reserves a memory area starting from
RW100 in the Recipe Data Field. For example, the Event Log management information and 200 of
Event History information are stored as below.
Recipe Data Field address
Data
RW100
1st Historical Event
RW116
2nd Historical Event
RW132
3rd Historical Event
RW148
4th Historical Event
RW3268
199th Historical Event
RW3284
200th Historical Event
The size of the stored memory is 200 x 16 = 3200 words. The address of Recipe Data Field is “read
only area”. If writing is performed to the area, it may result in unpredicted condition. Although the user
can specify the starting address freely, pay attentions to the following points.
(1) The specified addresses cannot be specified overlapped with other components and others.
• When the storage period is set, the file deletion is performed at the first sampling after the startup and
every 24 hours. At this moment any files which is beyond the storage period should be deleted.
NB-series Programmable Terminals NB-Designer Operation Manual(V106)
3-321
3 Functions of NB-Designer
Descriptions of Historical Events Storage
Storage Devices
USB 1
Restoration
When the NB unit is restarted by the power interruption, if this option is checked, 1024 items
during outages
of the event history which were archived until the power interruption can be displayed in the
Event.
Export to CSV
Exports the Event History information in CSV format to the external memory. The path for
File
storing this CSV file is “/event/subfolder name/file name”.
Save as ms
Makes the data sampling time accurate to the millisecond and records it into the CSV file.
Subfolder
Sets the subfolder name of the external memory where the CSV file will be stored. Although
the default name is “Event”, the user can modify it.
Storage Type
Daily File
Stores the Event History information by day and records them into the
CSV file named in “yyyy mmdd” format.
Single File
Stores the Event History information by the piece and records them
into the CSV file with the name of “Subfolder Name”.
Buffer Storage
When the data size written to the external memory reaches to the specified buffer size, the
writing is performed only once. “Default” means unbuffered, i.e. the writing operation will
immediately be performed once the data is generated.
Storage Period
Sets the upper limit for the event history with the unit of “Day” for Daily File and “Record” for
Single File. When the [Daily File] is selected, the file will be named in “yyyy mmdd” form and
the Storage Period is the upper limits of the number of CSV files in this path; if the Storage
Period is exceeded, the oldest file will be deleted. If the [Single File] is selected, the file will be
named in “Subfolder Name” form, the Storage Period is the upper limit of the records archived
in the file; the archived records are reached to the Storage Period, the storage will not be
continued. (yyyymmdd refers to the execution date.)
Additional
An operation on an event history file is executed when the conditions set in this section are
information
satisfied and an event occurs. A file operation may not be executed in some circumstances:
status of conditions and event generation timing.
Additional Information
A delete operation on an event history file is executed when the conditions set in this section are
satisfied and an event occurs. A file delete operation may not be executed in some circum-
stances: status of conditions and event generation timing.
3-322
NB-series Programmable Terminals NB-Designer Operation Manual(V106)
3 Functions of NB-Designer
3-10-8
COM1/COM2 Setting
3
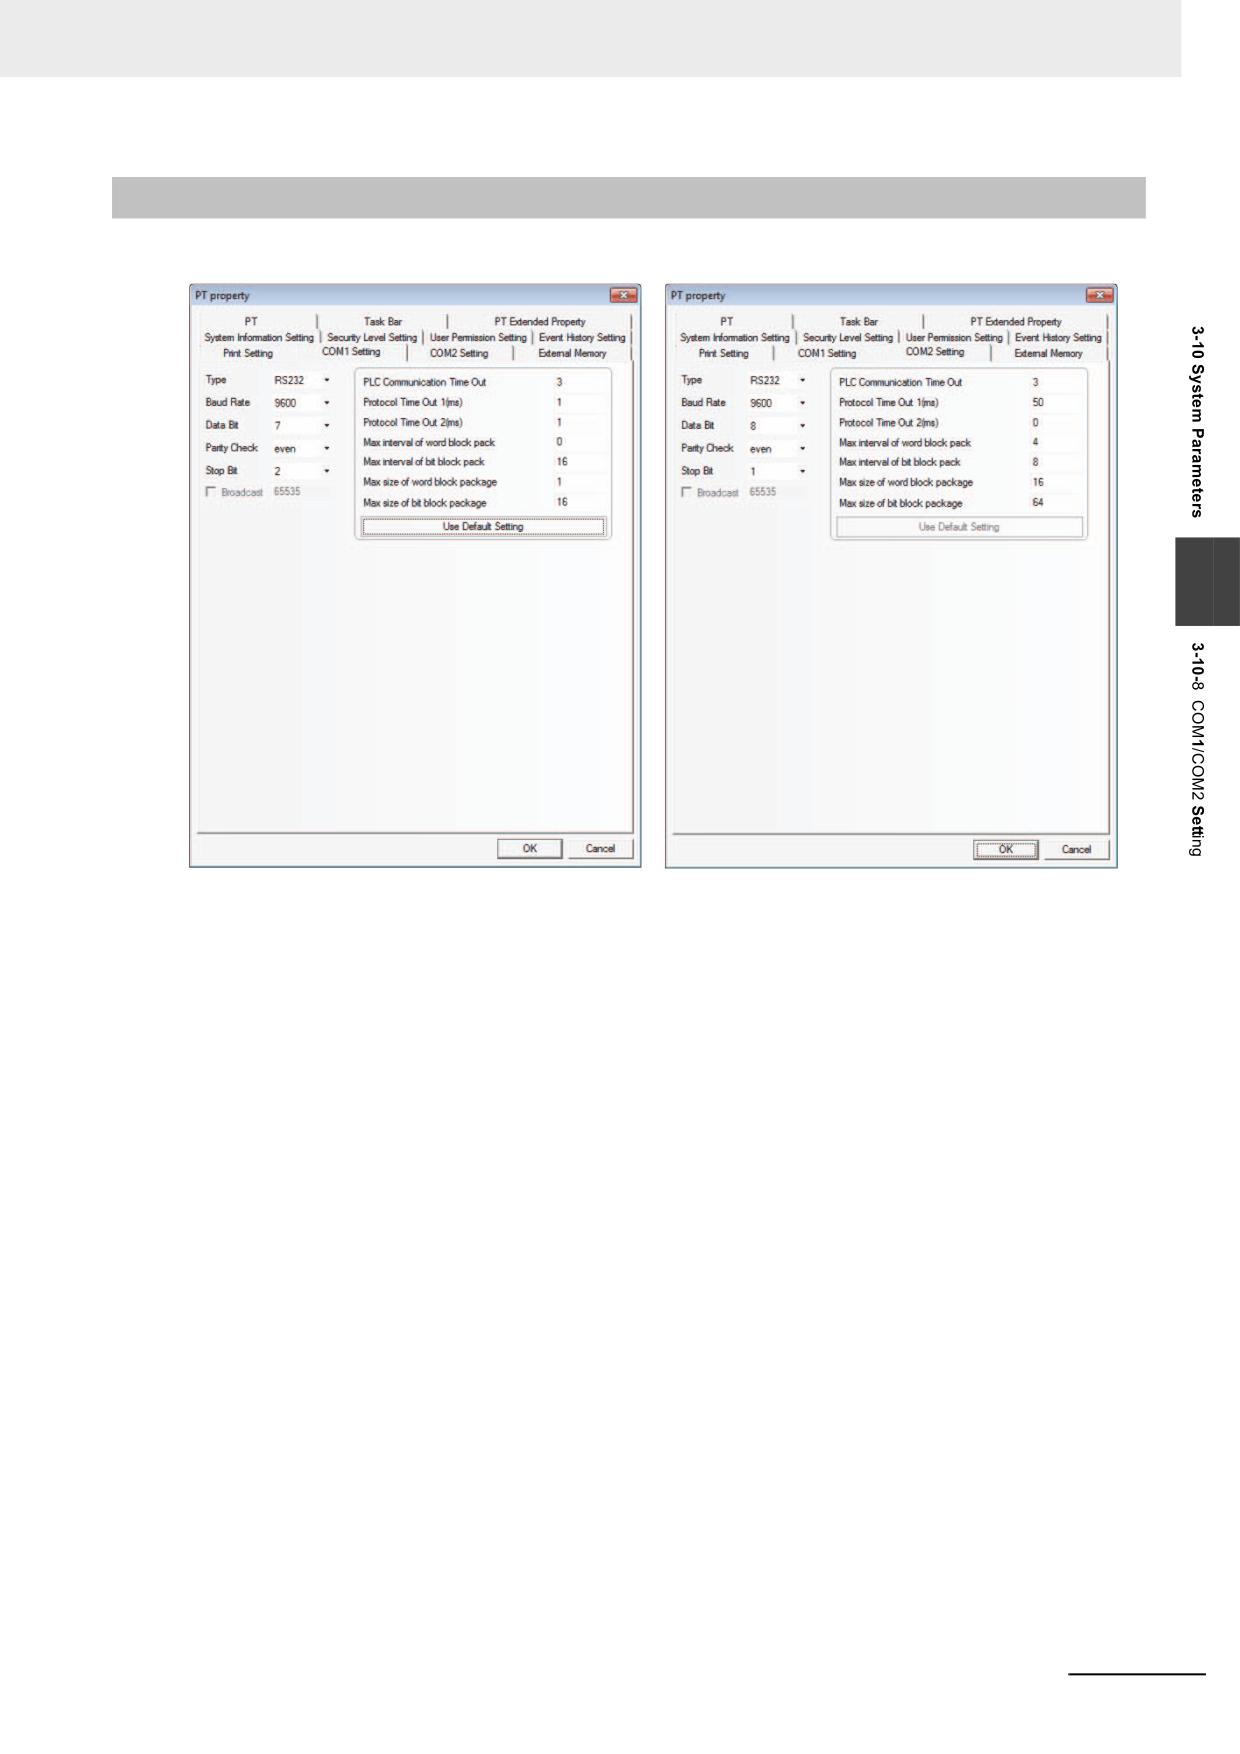
There are [COM1 Setting] and [COM2 Setting] here because NB Unit has 2 serial ports. You can make
the connection to 2 PLCs through these two serial ports.
Type: Selects the communication method between the PT and PLC from RS-232, RS-422 and RS-485.
Baud Rate, Data Bit, Parity Check and Stop Bit: Selects the communication parameters matching
the PLC.
PLC Communication Time Out: Determines the time that the PT needs to wait for the PLC response.
When the delay time of communication between PLC and the PT exceeds the time expressed by the
timeout constant, the system information “PLC No Response” will be displayed in the PT. Generally,
the timeout constant is set automatically during the PLC model selection, and doesn’t need to
be modified by the user.
Protocol Time Out: Refers to the protocol timeout, which is set automatically during the PLC
selection and doesn’t need to be modified.
Max interval of word block pack, Max interval of bit block pack, Max size of word block package
and Max size of bit block package: The PT will automatically collect all the PLC data with the
consecutive addresses and send one read command to read these data, thus improving
communication efficiency and reducing the response time substantially. Max size of word block
package and Max size of bit block package set the maximum numbers of bit memory and word
memory that can be read consecutively. These numbers are generally set automatically during the PLC
selection and don’t need to be modified by the user.
If these PLC data without the consecutive addresses, the PT will send the separate commands to read
them, i.e. a lot of read commands are needed to read these data. Therefore, we allow to modify the
intervals through the Max interval of word block pack and Max interval of bit block pack. When the
2 address intervals exceed the settings, they will be divided into 2 data packages to be read, otherwise
they will be combined into 1 package. Doing this allows reducing the number of the communications
package and improving the communications efficiency.
NB-series Programmable Terminals NB-Designer Operation Manual(V106)
3-323
3 Functions of NB-Designer
For example:
As shown below, for the reading of data stored in DM20 to DM29, when the PLC data package is set to
0, the system will use 3 read-commands to read these data respectively. While when “Max interval of
word block pack” is set to 1, it just needs 1 command to read these data. Generally speaking, the time
spent for reading extra 2 addresses (DM23 and DM25) is far less than the time spent for reading 2 data
package, thus reducing the time needed for the communication significantly.
DM20
DM21
DM22
DM24
DM25
DM27
DM28
DM29
3-10-9
External Memory
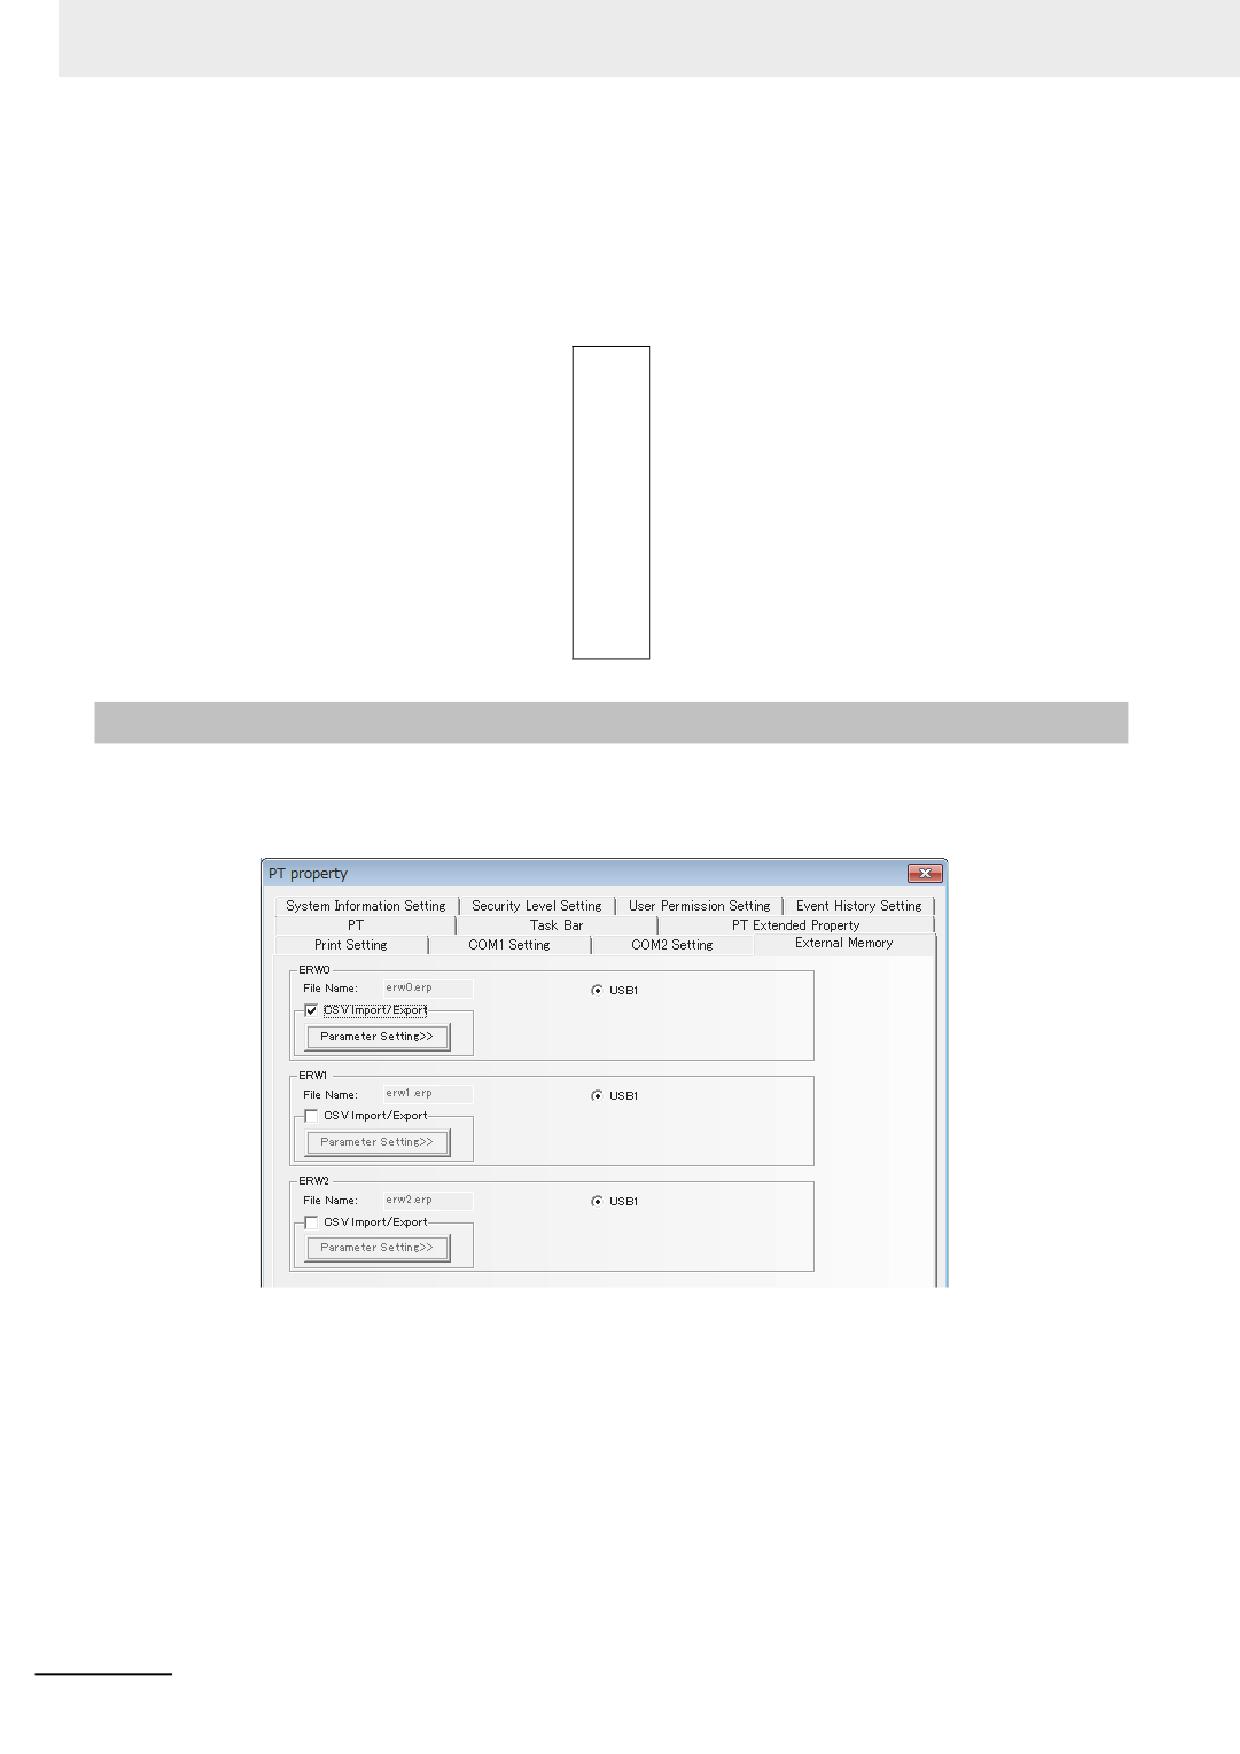
The [External Memory] tab allows checking the ERW0, ERW1, and ERW2 areas which were defined as
specific storage areas for the external memory.
The data in ERW will be stored into the specified external memory with “erp” as the file format and the
storage path of “/exmem/erwx.erp”. (x = 0, 1, 2)
• [CSV Import / Export]
Reads and writes data into the ERW area by using a file in ".csv" format. CSV files are stored in
"/exmem/[Subfolder]/ERWx_y.csv" (x=0, 1, 2, y=0 to 511).
• [Parameter Setting]
Makes settings for converting a file in ".csv" format into ".erp" formt.
3-324
NB-series Programmable Terminals NB-Designer Operation Manual(V106)
3 Functions of NB-Designer
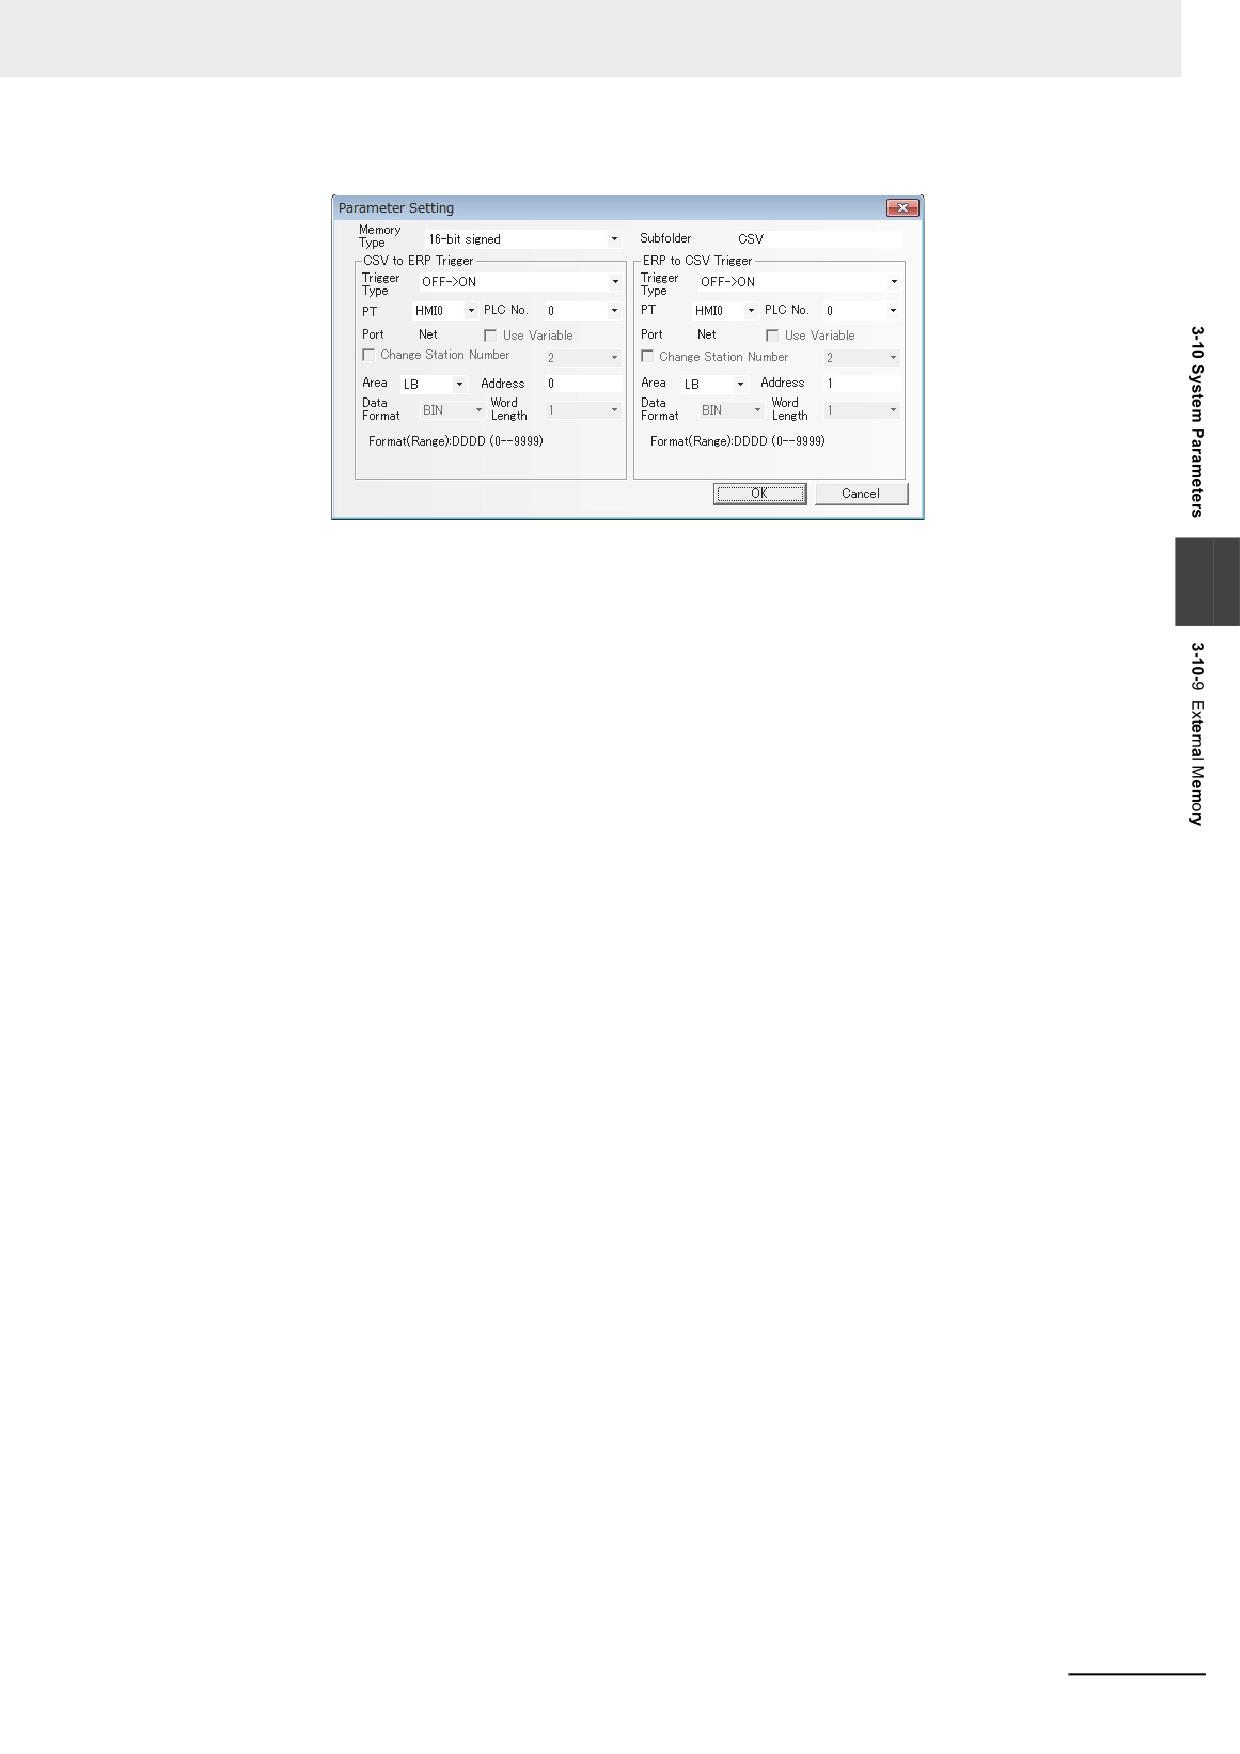
• [Memory Type]
Sets a data type in the CSV file. The set data type is used to read and write values.
3
• [Subfolder]
A subfolder name on the external memory where the CSV file will be stored.
• [CSV to ERP Trigger]
Make settings for writing the data in CSV file into the ERW area by reading data from a file in ".csv"
format and writing it into a file in ".erp" format.
Whether CSV is currently being converted to ERP can be checked by LB9231.
While this function is in progress, even when the conversion conditions are met, it will be ignored.
• [ERP to CSV Trigger]
Make settings for writing the data in the ERW area into the CSV file by reading data from a file in
".erp" format and writing it into a file in".csv" format.
Whether ERP is currently being converted to CSV can be checked by LB9221.
While this function is in progress, even when the conversion conditions are met, it will be ignored.
• [Trigger Type]
Detects the change in address that triggers the conversion.
• [Other Settings]
For PLC No. and address settings, refer to 3-5-10 Basic Properties of Component (Page 3-75).
NB-series Programmable Terminals NB-Designer Operation Manual(V106)
3-325
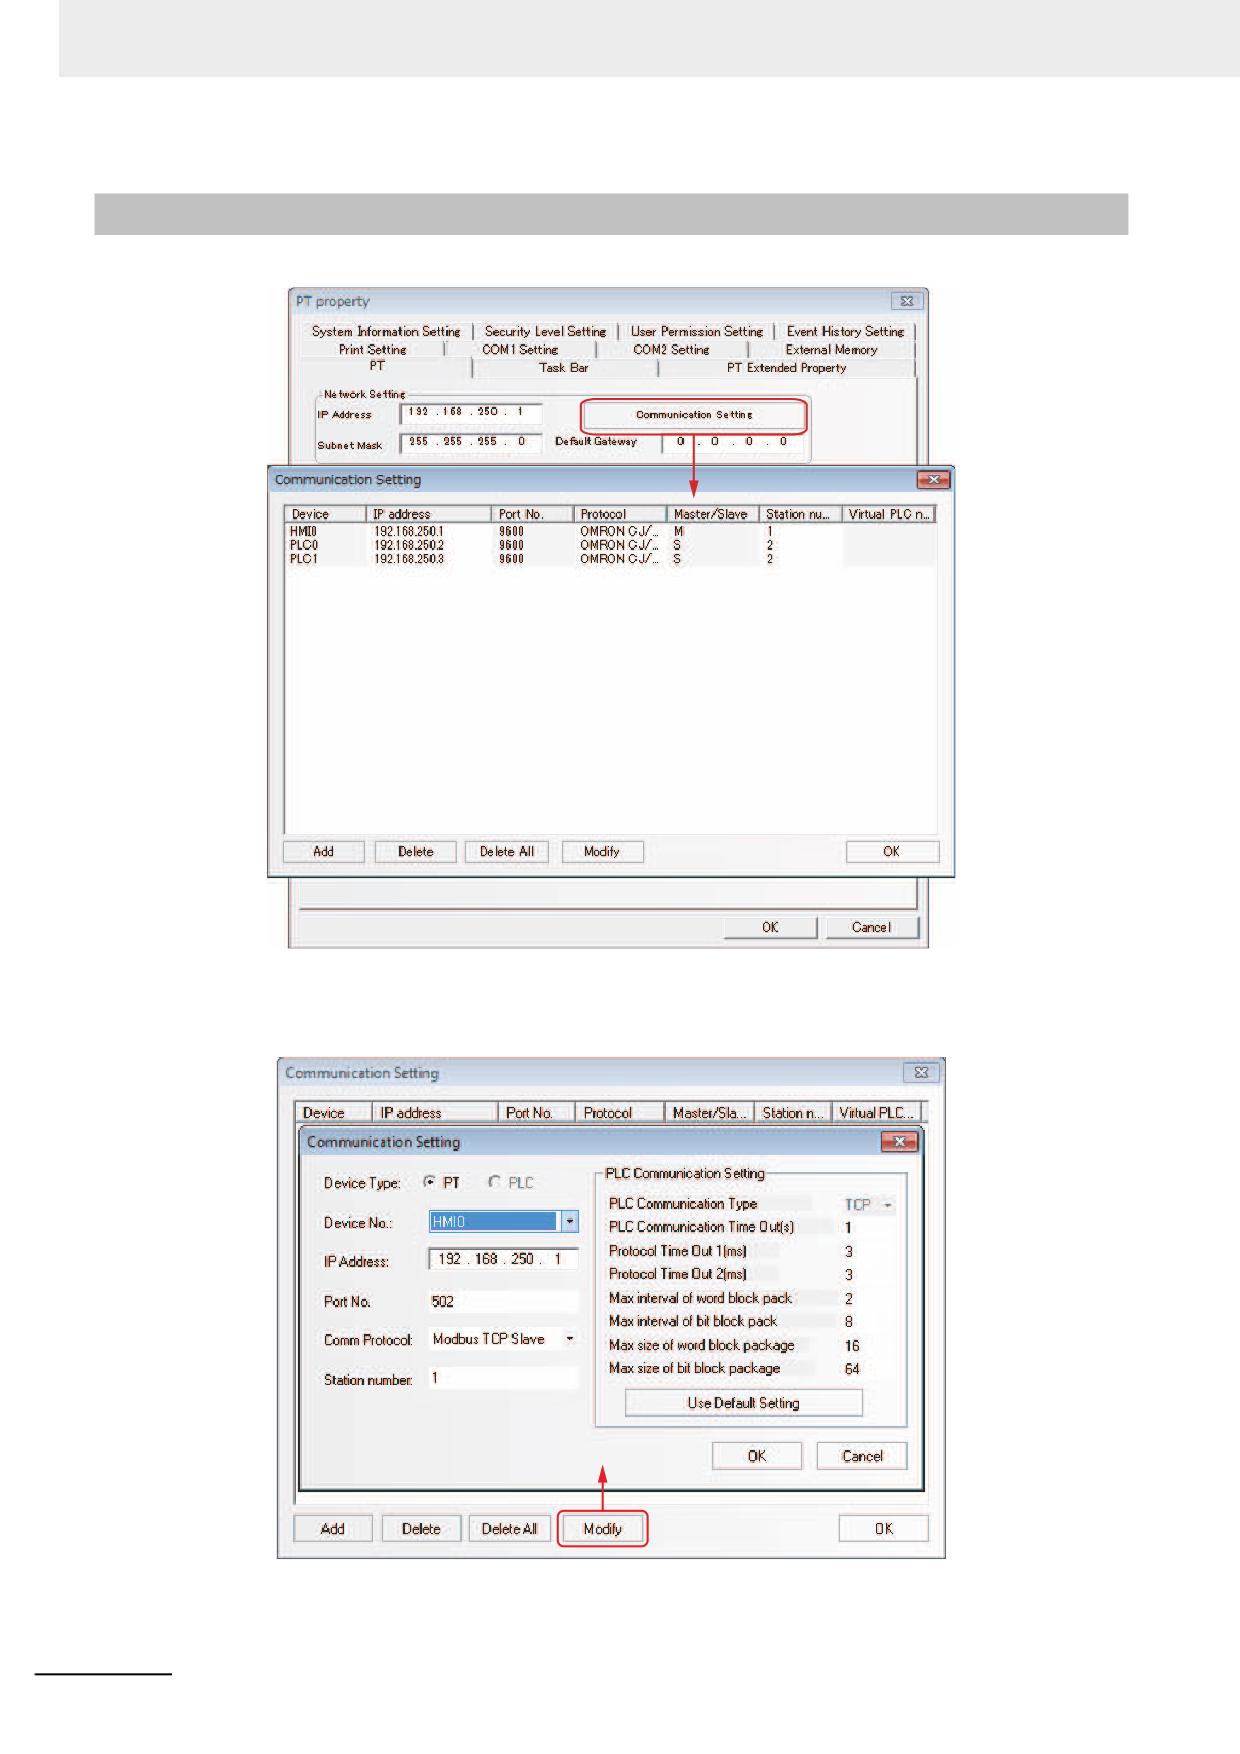
3 Functions of NB-Designer
3-10-10 Ethernet Communication Setting
The “Communication Setting” option is used to make the “Communication Setting” for the Ethernet
communication, i.e. to configure the Ethernet communication protocol and set some related
communication parameters.
3-326
NB-series Programmable Terminals NB-Designer Operation Manual(V106)
3 Functions of NB-Designer
3-11
Address of System Memory
The system reserves some addresses of Local Word (LW), Local Bit (LB), Nonvolatile Local Word (LW)
for the special purposes, and the user must use these memory addresses according to the related
descriptions.
• Local Bit (LB): The reserved range is from LB9000 to LB9999.
• Local Word (LW): The reserved range is from LW9000 to LW9999.
• Nonvolatile Local Word: The reserved range is from LW10000 to LW10255.
These ranges include the read area for the system to notify of its status and the write area for the users
to perform some control to the system.
3
Descriptions of internal BIT memory:
LB: Refers to the local bit address of PT, which can’t be retained when power is OFF.
RB: Refers to the absolute address of bit address saved in the recipe memory that is stored in the flash
memory, which can be retained when the power is OFF. Even if the battery is dead in PT, the data
stored in the recipe memory will not be lost.
RBI: Refers to the index address of bit address saved in the recipe memory that is stored in the flash
memory, which can be retained when the power is OFF. Even if the battery is dead in PT, the data
stored in the recipe memory will not be lost.
LW.B: Refers to the bit address corresponding to the local word address of PT, which can’t be retained
when the power is OFF.
FRB: Refers to the absolute address of bit address saved in flash memory, which can be retained when
the power is OFF. When the battery is dead in PT, the data saved in flash memory will not be affected,
but the number of write operations in flash memory is limited.
FRBI: Refers to the index address of bit address saved in flash memory, which can be retained when
the power is OFF. When the battery is dead in PT, the data saved in the flash memory will not be
affected, but the number of write operations in flash memory is limited.
Descriptions of internal WORD memory:
LW: Refers to the local word address of PT, which can’t be retained when power is OFF.
RW: Refers to the absolute address saved in the recipe memory that is stored in the flash memory,
which can be retained when the power is OFF. Even if the battery is dead in PT, the data stored in the
recipe memory will not be lost.
RWI: Refers to the index address saved in the recipe memory that is stored in the flash memory, which
can be retained when the power is OFF. Even if the battery is dead in PT, the data stored in the recipe
memory will not be lost.
FRW: Refers to the absolute address of word address saved in flash memory, which can be retained
when the power is OFF. When the battery is dead in PT, the data saved in flash memory will not be
affected, but the number of write operations in flash memory is limited.
FRWI: Refers to the index address of word address saved in flash memory, which can be retained
when the power is OFF. When the battery is dead in PT, the data saved in the flash memory will not be
affected, but the number of write operations in flash memory is limited.
ERW0-ERW2: Refers to the recipe word addresses saved in the external memory, which can be
retained when the power is OFF. When the battery is dead in PT, the data saved in the external memory
will not be affected.
Note RB and RW point to the same area. For example, RB5.0 to RB5.F and RW5 map the same area, i.e.
RB5.0 is the Bit0 of RW5. But LB and LW map different areas, and the addresses pointed by them in the
memory are different.
NB-series Programmable Terminals NB-Designer Operation Manual(V106)
3-327

3 Functions of NB-Designer
3-11-1
Local Bit (LB)
Addresses
Descriptions
Comments
9000~9009
Initialization setup is ON.
These bits can be used to make some components turn
ON when the system starts the initialization
(notification/control).
9010
Download Recipe
The user can use this bit address to confirm the
process of recipe download.
Set it to ON under download state and set it to OFF
after the download is completed (notification).
9011
Upload Recipe
The user can use this bit address to confirm the
process of recipe upload.
Set to ON under uploading status and to OFF after the
upload is completed (notification).
9012
Download / Upload Recipe
The user can use this bit address to confirm the
process of recipe download/upload (notification).
9013
Touch indicator
Set it to ON when touching the “Touch indicator”
(notification).
9014
CPU Indicator
Set it to ON when touching “CPU Indicator”
(notification).
9015
Alarm indicator
Set it to ON when touching “Alarm Indicator”
(notification).
9016
Printer error
ON-Error occurred, OFF-No error (notification).
9017
Printer control
ON-Enable printer; OFF-Disable printer; Enabling the
printing by system parameters is valid
(notification/control).
9018
Backlight state (OFF)
This bit will turn to 1 automatically when the backlight is
OFF, and turn to 0 when the backlight is ON
(notification).
9019
Backlight state (ON)
This bit will turn to 1 automatically when the backlight is
ON, and turn to 0 when the backlight is OFF
(notification).
9020
Pen (Turn ON under selected state)
It is one function of the Notepad.
It is used to judge whether the pen is under the
selected state currently (notification/control).
9021
Eraser (Turn ON under selected state)
It is one function of the Notepad.
It is used to judge whether the eraser is under selected
state currently (notification/control).
9022
Clear Block (Turn ON under clear block
It is one function of the Notepad.
state)
It is used to judge whether the block is under “clear
block” state currently (notification/control).
9030
Pen size of 1 pixel point
It is one function of the Notepad, which can set the pen
size to 1 pixel point (notification/control).
9031
Pen size of 2 pixel points
It is one function of the Notepad, which can set the pen
size to 2 pixel points (notification/control).
9032
Pen size of 3 pixel points
It is one function of the Notepad, which can set the pen
size to 3 pixel points (notification/control).
9040
Hide/Show Menu Screen
Set it to ON/OFF to hide/show the Menu Screen
(notification/control).
9041
Hide/Show task bar
Set it to ON/OFF to hide/show the task bar
(notification/control).
9042
Hide/Show operation button
Set it to ON/OFF to hide/show the operation button
(notification/control).
3-328
NB-series Programmable Terminals NB-Designer Operation Manual(V106)

3 Functions of NB-Designer
Addresses
Descriptions
Comments
9043
Hide/show all (Menu Screen, task bar,
Set it to ON/OFF to hide/show all the Menu Screens,
operation button)
task bars and operation buttons (notification/control).
9044
Reserved by system
9045
Restart PT
Set it to ON to perform this function
(notification/control).
9046
Beyond the security level
This bit will turn ON when you attempt to switch a
screen without a required security level. This bit does
not turn OFF automatically (notification).
9050
Return to the status set originally to the
Set it to ON to perform this function and the system will
project
set the values which are set in the project to the system
parameter area of LW10000 or later, and will
automatically clear this bit to zero after the settings
completed (notification/control).
9051
Control the execution of touch operation
Setting it to ON can disenable the touch operation of
when the backlight is off.
PT when the backlight is closed (notification/control).
3
9052
Disable to write the return value of [PLC
Set it to ON to disable to write Back function of PLC.
Control] / [Switch Screens]
And it is only applicable to Write Back function of [PLC
Control] / [Switch Screens]. The Write Back function is
not disenabled when the value of LB9052 is OFF. In
this case, if you want to switch from Base Screen 10 to
Base Screen 12 by using [PLC Control] / [Switch
Screens] (Read address: DM20), the switching can be
controlled only when the value of DM20 is 12. And the
PLC will write 12 back to the word address DM21
automatically after the screen is switched to the Base
Screen 12. If the Write Back function is disenabled, 12
will not be written back to DM21 (notification/control).
9053
Touch mark
It turns ON when the screen is touched and it turns
OFF when the touching is released (notification).
9055
Operation at disconnection: PLC
The operation when the PLC is disconnected with NB
Unit will be performed according to the contents of
LB9055. OFF: All the commands written to PLC are
invalid. ON: Operation is normal (notification/control).
9060~9061
System Keyboard display bits: being
When the user activates the Number Input Component
displayed in the right of the screen
or Text Input Component located in the left of the
screen, the bit turns ON automatically and the
keyboard is displayed at the same time.
When the input is completed or canceled, the bit turns
OFF automatically. The keyboard is closed at the same
time (notification).
9062
System Keyboard display bit: Keyboard
The bit turns ON when the keyboard is displayed from
is displayed from the component placed
the component placed at the upper left of the screen
the upper left of the screen.
and the bit turns OFF when the keyboard is closed from
it (notification).
9063
System Keyboard display bit: Keyboard
The bit turns ON when the keyboard is displayed from
is displayed from the component placed
the component placed at the lower left of the screen
the lower left of the screen.
and the bit turns OFF when the keyboard is closed from
it (notification).
9064~9065
System Keyboard Display bits: Keyboard
The bit turns ON when the keyboard is displayed from
is displayed in the left of the screen
the component located in the left of the screen and the
bit turns OFF when the keyboard is closed from it
(notification).
9066
System Keyboard display bit: Keyboard
The bit turns ON when the screen is displayed and the
is displayed from the component located
bit turns OFF when the screen is closed (notification).
in the upper right of the screen
9067
System Keyboard display bit: Keyboard
The bit turns ON when the screen is displayed and the
is displayed from the component located
bit turns OFF when the screen is closed (notification).
in the lower right of the screen
9068~9069
System Keyboard display bits: Keyboard
The bit turns ON when the screen is displayed and the
is displayed from the component located
bit turns OFF when the screen is closed (notification).
in the screen
NB-series Programmable Terminals NB-Designer Operation Manual(V106)
3-329

3 Functions of NB-Designer
Addresses
Descriptions
Comments
9080
System Keyboard display bit: Keyboard
The bit turns ON when the screen is displayed and the
is displayed from the component located
bit turns OFF when the screen is closed (notification).
in the upper half of the screen
9081
System Keyboard display bit: Keyboard
The bit turns ON when the screen is displayed and the
is displayed from the component located
bit turns OFF when the screen is closed (notification).
in the lower half of the screen
9093
Increase backlight brightness
When the bit turns ON, the function to increase the
brightness will be executed. After completing the
processing, the bit turns OFF (notification/control).
9094
Decrease backlight brightness
When the bit turns ON, the function to decrease the
brightness will be executed. After completing the
processing, the bit turns OFF (notification/control).
9100
Switch input mode from Pinyin
When the LB9100 is ON it will switch to Pinyin input
mode, and when LB9100 is OFF, it will switch to
English input mode (notification/control).
9108
Update graphics
When the LB9108 is ON, the bitmap referred by the
component on the screen will be updated. After
completing the processing, the bit turns OFF
(notification/control).
9110
Indicating mode of the data log
Only when LB9110 is ON, the zoom and view functions
can be activated, otherwise the traditional default view
method of Data Log will be used (notification/control).
9118
Macro operation instruction
This bit will be set to ON during the execution of Macro
(reading and writing of memory) and to OFF after the
execution is completed (notification).
9120
Trigger buzzer with a long beep
When this bit is set to ON, buzz a long beep. After the
beeping, the bit turns OFF (notification/control).
9121
Trigger buzzer with a short beep
When this bit is set to ON, buzz a short beep. After the
beeping, the bit turns OFF (notification/control).
9124
Alarm count displaying
When this bit is set to ON, the starting item of Alarm
component will display the alarm count
(notification/control).
9129
Trigger Base Screen for inputting
When this bit is set to ON, the input components in the
Base Screen will be triggered (notification/control).
9130
Executing to clear RW memory
When this bit is set to ON, the RW clearing (The start
address and word length are determined by LW9260
and LW9262.) will be triggered (notification/control).
9131
Trigger Number Input automatically
When this bit is set to ON, the Number Input
components will be automatically triggered after the
screen is opened (notification/control).
9135
Cursor lock
When this bit is set to ON, the cursor will be locked at
current Input component and can be switched to other
input components only after the input is completed
(notification/control).
9136
Filter PLC communication without
When this bit is set to ON, the PLC communication
response
without response is filtered (notification/control).
9137
Endian Display Text Display Component
When this bit is set to ON, the bytes will be displayed
with the endian reversed, i.e. the low bytes are
displayed on the right side of the Text Display
component (notification/control).
9138
Mask text characters
When this bit is set to ON, the Text Display component
only displays the character codes from 0x21 to 0x7F
encoded to the space (0x20) (notification/control).
9139
Set at screen switching
When the screen is switched, this bit is set to ON. Even
when the screen switching is completed, this bit is not
set to OFF automatically (notification).
3-330
NB-series Programmable Terminals NB-Designer Operation Manual(V106)

3 Functions of NB-Designer
Addresses
Descriptions
Comments
9140
Caps Lock
When this bit is set to ON, the alphabets will be input in
capital form. Numeric keys are switched into symbol
keys; numerical entry with a numeric keypad is
disabled (notification/control).
9141
Turning OFF the current beep
When this bit is set to ON, the current beeping is
stopped and the bit turns OFF (notification/control).
9142
Trigger the input component of pop-up
When this bit is set to ON, the input component located
screen
on the top of the pop-up screen will be executed
(notification/control).
9143
USB printer status
ON-Connecting, OFF-No connecting (notification).
9144
Hide component with communication
When this bit is set to ON, the components with the
failure
communication failure will not be displayed
(notification/control).
9145
Restart automatically after system
When this bit is set to ON, the PT will restart
collapse
automatically 5 seconds after PT collapse
3
(notification/control).
9150
Execute project/recipe import/export
When this bit is set to ON, the import/export operation
function
of project or recipe will be executed
(notification/control).
9151
Protection bit for project export
This bit will be set to OFF after the upload password is
input correctly during the project export; otherwise it will
be set to ON (notification/control).
9152
Switch between tree folder and list folder
ON is for tree folder and OFF is for list folder
respectively (notification/control).
9154
Inserting and Ejecting USB memory
When USB memory is inserted, it will turn ON and it
should be turned OFF before removal to ensure the
safe removal of USB memory (notification/control).
9157
Deleting files in USB memory
When this bit is set to ON, all the files in the USB
memory generated by PT will be deleted (control).
9161
Align-left display on keyboard
When this bit is set to ON, the display component
(LW9060) on the keyboard will be displayed in left-
aligned way during the input (notification/control).
9162
Vector font optimized display
When this bit is set to ON, the vector font edge display
effect will be optimized (notification/control).
9163
Screen display state
When this bit is set to ON, the screen will be displayed
vertically reversed. This bit is applicable when the
display is horizontally oriented (notification/control).
9165
User login
When this bit is set to ON, the user login operation is
performed, and later the bit will be set to OFF
automatically (control).
9166
User logout
When this bit is set to ON, the user logoff operation will
be performed, and later the bit will be set to OFF
automatically (control).
9167
Add user
When this bit is set to ON, the user addition operation
will be performed, and later the bit will be set to OFF
automatically (control).
9168
Delete user
When this bit is set to ON, the user deletion operation
will be performed, and later the bit will be set to OFF
automatically (control).
9175
Web interface
When the bit is ON, the Web interface is valid
(notification/control).
9210
Soft power off
When this bit set to ON, the software exits. To restore,
press the reset button on the back or turn on the power
again (control).
NB-series Programmable Terminals NB-Designer Operation Manual(V106)
3-331

3 Functions of NB-Designer
Addresses
Descriptions
Comments
9221
Upload CSV
The bit turns ON while the data in ERW is being copied
into the CSV file (notification).
9231
Download CSV
The bit turns ON while the data in the CSV file is being
copied into the ERW area (notification).
9251
Printing event manually (not currently
When it is set to ON, forced printing of triggered events
support)
up to now will be executed (notification/control).
9272
Enable to change communication setting
This bit is set in the area to change communication
setting. A permitted communication setting by the bit
takes effect after a reboot. Be sure to reboot the NB
after setting communications (control).
Communication setting change area:
LW9685-LW9691
9290
Enable VNC
When this bit is set to ON, the VNC server will be
enabled (notification/control).
9291
VNC mode setting
When this bit is set to ON, the VNC server will be
enabled only in monitor mode.
When this bit is set to OFF, the VNC server will be
enabled both in monitor mode and operation mode
(notification/control).
9292
Setting VNC operation mode password
When this bit is set to ON, the password for VNC
server's operation mode will be enabled
(notification/control).
9293
Setting VNC monitor mode password
When this bit is set to ON, the password for VNC
server's monitor mode will be enabled
(notification/control).
9296
Enable FTP
When this bit is set to ON, the FTP server will be
enabled (notification/control).
3-332
NB-series Programmable Terminals NB-Designer Operation Manual(V106)
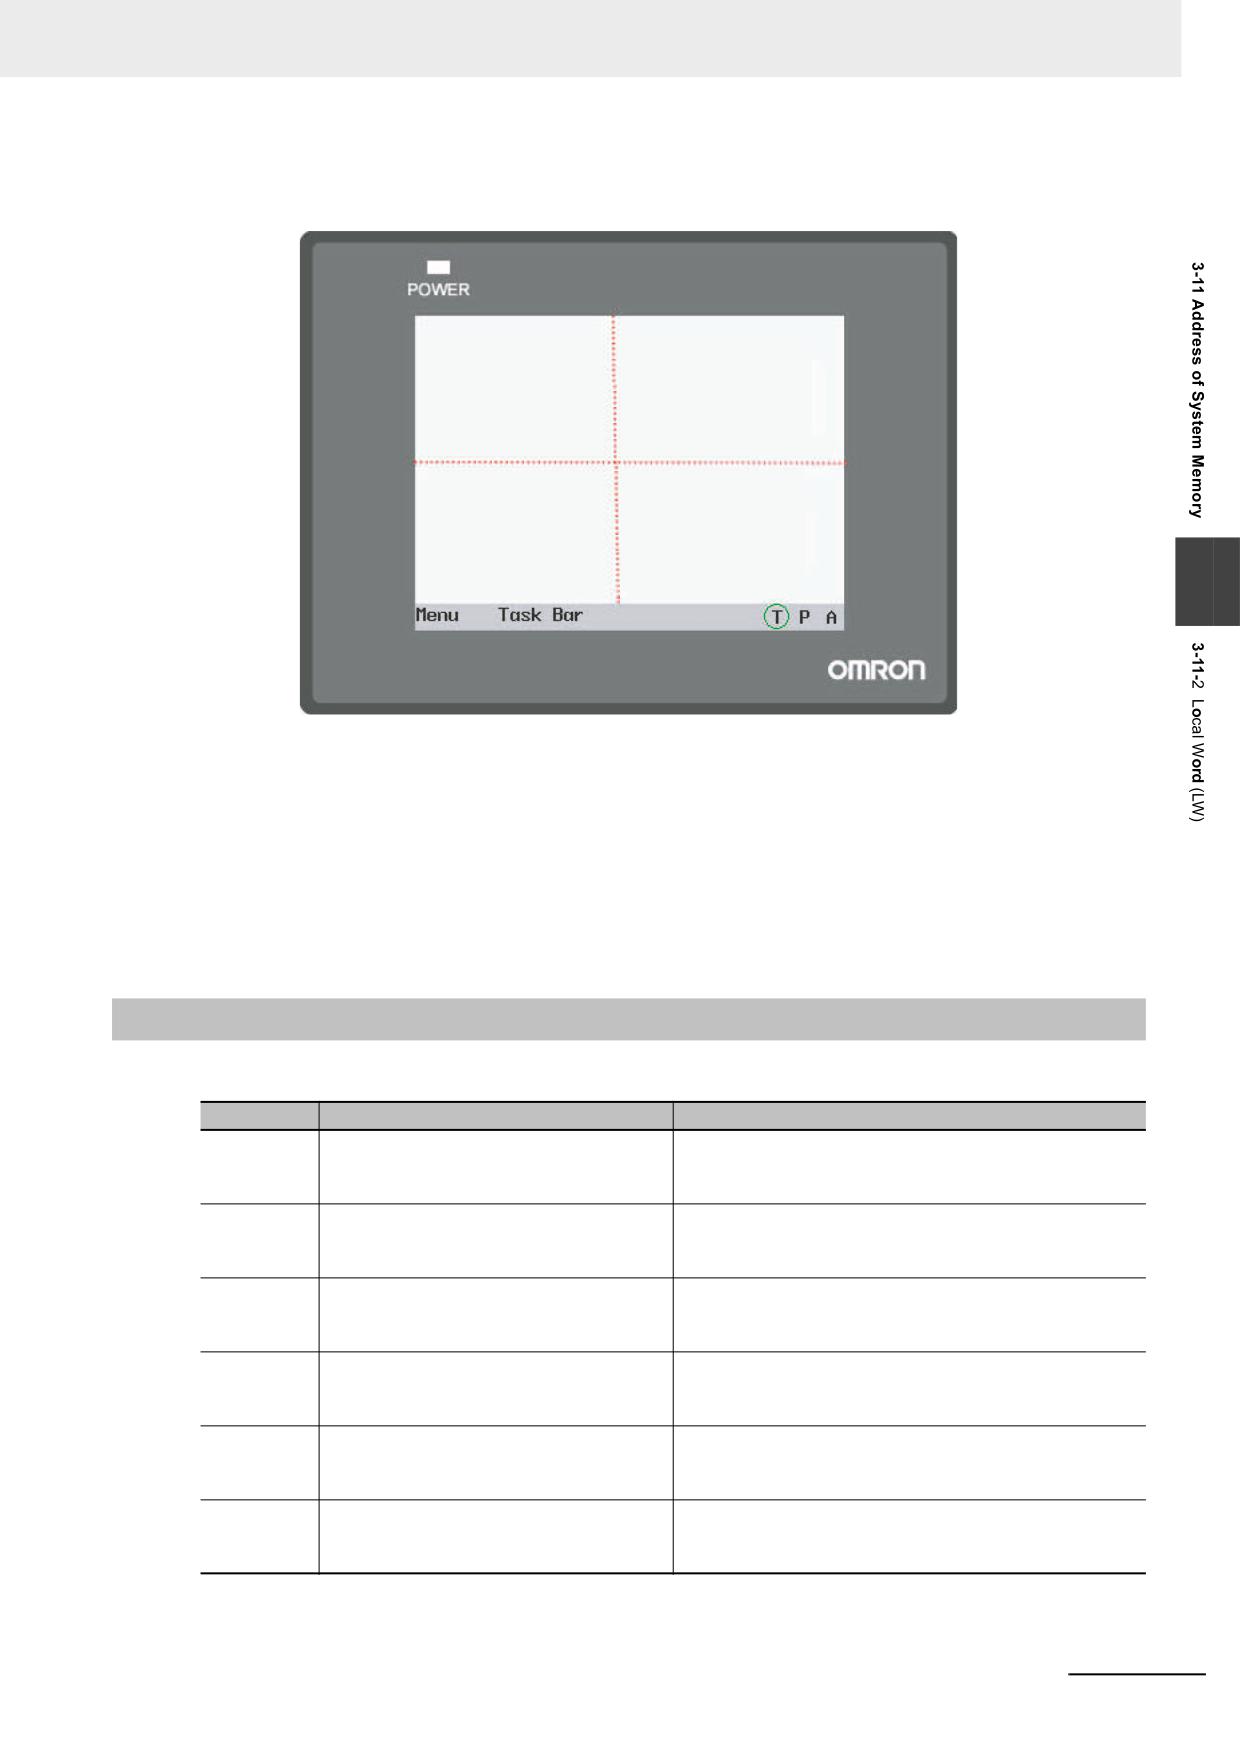
3 Functions of NB-Designer
About Keyboard Display Bits:
NB Unit divides the whole screen into 4 areas with the same size from the center, as shown below:
upper left
upper
upper right
(LB9062)
(LB9080)
(LB9066)
left
Arbitrary
right
(LB9060)
(LB9068)
(LB9065)
lower left
lower
lower right
(LB9063)
(LB9081)
(LB9067)
3
For each area, there is/are one or more address bit(s) corresponding to it. When the Text Input or
Number Input in the screen is triggered, the corresponding address bit(s) will be turned ON.
For example: When the Text Input or Number input in the left side of the screen is triggered, a
keyboard will pop up in the position where the specified Direct Screen locates, and at the same time,
LB9060, LB9061, LB9068 and LB9069 will be turned ON by the system. If the component is in the
upper left side, LB9062 and LB9080 will also be turned ON.
Note LB9060 and LB9061 have the same display function (i.e. to turn ON or OFF simultaneously) and it is the
same with LB9064 and LB9065, LB9068 and LB9069.
3-11-2
Local Word (LW)
Addresses
Descriptions
Comments
9000~9001
Index address of recipe data
RWI and RBI use this index address to access the
recipe data with low byte address of 9000 and high
byte address of 9001 (notification/control).
9002~9003
Maximum input number
The maximum number will be specified when the
Number Input component is activated. Otherwise the
bits will be specified to 0 (notification).
9004~9005
Minimum input number
The minimum number will be specified when the
Number Input component is activated. Otherwise the
bits will be specified to 0 (notification).
9006
Notepad operation mode
It is one function of the Notepad, which can be used to
select the operation modes from Pen (0), Eraser (1),
and Clear Block (2) (notification/control).
9007
Pen Size
It is one function of the Notepad, which can be used to
select different pen size from 1 to 8 pixels with Word
Length of 1 (notification/control).
9008
Pen Color
It is one function of the Notepad, which can be used to
select the pen color from 0 to 65535 (16-bit color)
(notification/control).
NB-series Programmable Terminals NB-Designer Operation Manual(V106)
3-333
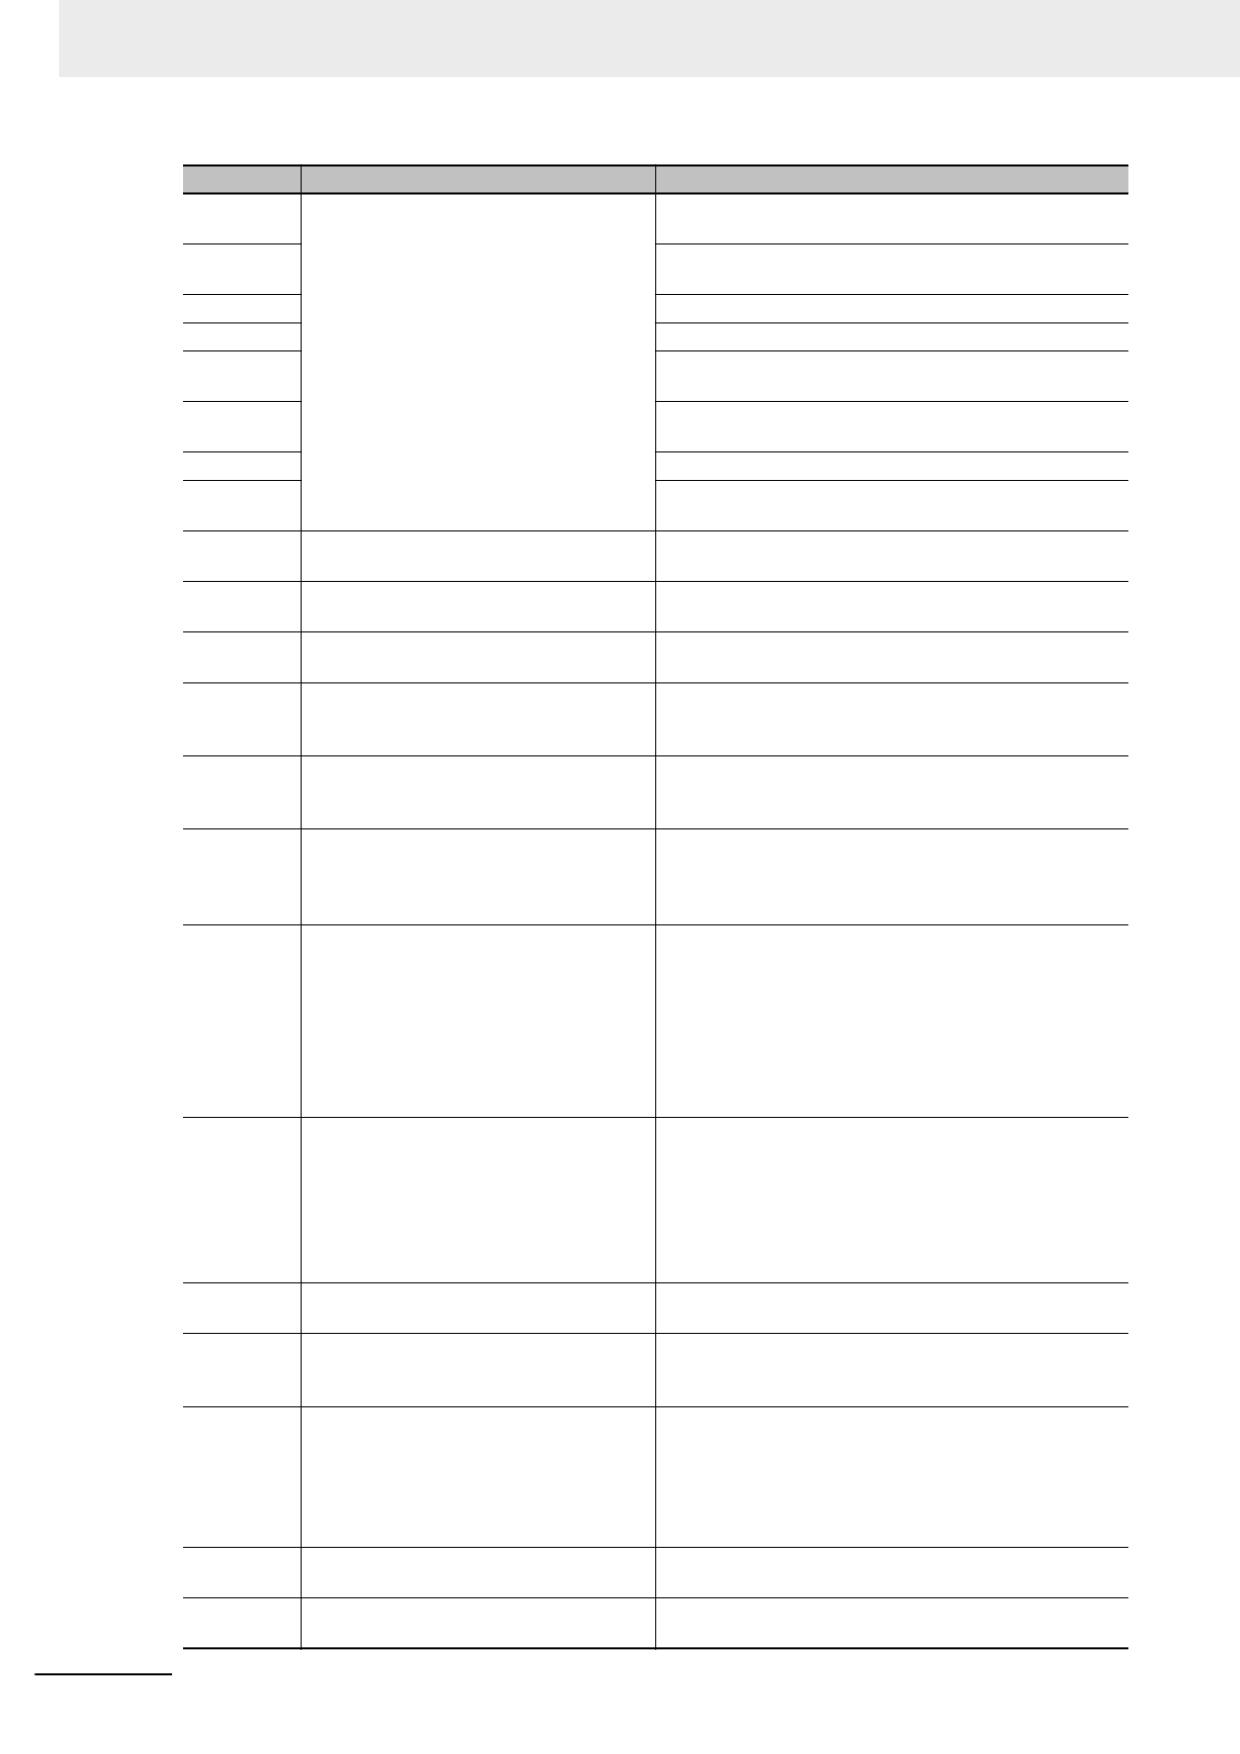
3 Functions of NB-Designer
Addresses
Descriptions
Comments
9010
Local time
Second: Effective value ranges from 0 to 59
(notification).
When the [Use External Clock] option is
9011
checked in the [PT Extended Properties]
Minute: Effective value ranges from 0 to 59
tab in the [PT Property] dialog box, the
(notification).
9012
event will not use the PT time but read
Hour: Effective value ranges from 0 to 23 (notification).
the values from LW9010 to LW9017.
9013
Day: Effective value ranges from 1 to 31 (notification).
Using this function needs to transfer the
9014
Mouth: Effective value ranges from 1 to 12
values in the time memories of PLC to
(notification).
LW9010~LW9017 accordingly in
9015
Year: Effective value ranges from 2000 to 2037
advance.
(notification).
9016
Week: Effective value ranges from 0 to 6 (notification).
9017
Millisecond: Effective value ranges from 0 to 999
(notification).
9030~9031
Touch coordinate
Records the touch coordinate taking the upper left side
of screen as origin (notification).
9034~9035
System time
Double-word. The time calculated with 0.1s as unit is
displayed (notification).
9040~9041
Security level password
Double-word. Refer to 3-13 Security Level (Page 3-
353) for details (control).
9042
Security level
Displays the security level of current Base Screen.
Refer to 3-13 Security Level (Page 3-353) for details
(notification).
9043
Switch security level forcefully
Forcefully switches from higher security level (e.g. level
2) to lower security level (e.g. level 0). Refer to 3-13
Security Level (Page 3-353) for details (control).
9050
Display Screen No.
The number of Display Screen No. is specified.
Synchronizing with the PLC by Data Transmitting
Component allows the PLC to execute the screen
transition (notification/control).
9054
Printing format1
• Bit0: Text (0:No print, 1:Print)
• Bit1: Analog meter (0:No print, 1:Print)
• Bit2: Data log (0:No print, 1:Print)
• Bit3: Bitmap (0:No print, 1:Print)
• Bit4: Vector graphics (0:No print, 1:Print)
• Bit5: Screen backg3round (0:No print, 1:Print)
(notification/control)
9055
Printing format2
• Bit0~7:Zoom (x~0.1) (Range:1~50)
• Bit8: Color mode (0:Color, 1:Monochrome)
• Bit9: Print page (0:Current page, 1:Reserved)
• Bit10: Orientation (0:Landscape, 1:Portrait)
• Bit12: Invert color (0:Normal, 1:Inverted)
(notification/control)
9057
Size of each item of the event history
The recipe memory is used to save the size of each
item by the event log data (notification).
9058~9059
Size of event log data
The recipe memory is used to store the size of event
history including management information
(notification).
9060~9075
Display of number input or text input
Displays the data input by Number Input or Text Input
process
component in real time, and clears it after completion of
input. If input component is set to 1 word, only LW9075
is used; while LW9074 and LW9075 are both used if
input component is set to 2 words, and so on
(notification).
9091
Project compilation [year]
Records the project compilation time [year]
(notification).
9092
Project compilation [month]
Records the project compilation time [month]
(notification).
3-334
NB-series Programmable Terminals NB-Designer Operation Manual(V106)

3 Functions of NB-Designer
Addresses
Descriptions
Comments
9093
Project compilation [day]
Records the project compilation time [day]
(notification).
9100
Modify dynamically the address in the
9100 is the Screen No. The 9101 is the offset
9101
screen (internal address)
(notification/control).
When LW9100 is set to 11 and LW9101 is set to 20, the
PLC addresses of all the component in the screen 11
will be modified dynamically to the addresses in which
the offset are added. i.e. D10 will become D30 and the
offset of 20×16=320 will be added to all bit addresses,
i.e. M20 will become M340.
9130
Dynamic modification of Text Library
The value of this LW represents the index of Text
Library (notification/control).
9136~9137
Currently used memory space [byte]
Double-word. The currently used memory space is
stored. Do not write values (notification).
9138~9139
Currently available memory space [byte]
Double-word. The currently available memory space is
stored. Don't exceed the currently available memory
3
space with the currently used memory space. Do not
write values (notification).
9140
Display brightness level
Displays the brightness level for NB Unit with the range
from 0 (completely dark) to 32 (completely bright).
The setting is linked with Brightness of the System
Menu of NB Unit. The value is retained when power is
OFF (notification/control).
9150
Character code displayed in the current
The value of LW9150 is the No. of Chinese characters
screen when using Pinyin
displayed in the current Chinese character display
screen (notification).
9152~9167
Characters displayed by Chinese pinyin
Display Pinyin character input currently when using
input
Pinyin (notification).
9170
Page up/down of Note Book component
The value of this LW means the start line of input area
(notification).
9180~9187
Maximum value of Number Input
Text display of maximum value of Number Input
(notification).
9190~9197
Minimum value of Number Input
Text display of minimum value of Number Input
(notification).
9200~9205
Time value of browsing point of Data Log
These six words are used to display second, minute,
hour, day, month and year respectively in BIN code
(notification).
9210
Display values of each channel during
The current value of each channel is displayed one by one
referencing
according to the bit width of the browsed Data Log
(notification).
9260~9261
Start address for RW clearing operation
Sets the start address for RW clearing operation
triggered by LB9130 (notification/control).
9262~9263
Word length of RW clearing operation
Sets the word length for RW clearing operation
triggered by LB9130 (notification/control).
9264~9279
Mask code of PLC Station No.(COM 2)
Each bit corresponds to one Station No. of COM 2 (i.e.
9264.0 corresponds to Station No. 0... and 9279.F
corresponds to Station No. 255). When the bit is turned
ON, the communication corresponding to Station No.
will be stopped. The value is retained when power is
OFF (notification/control).
9296~9299
Mask code of error information
Each bit corresponds to one piece of error information.
When the bit is turned ON, the corresponding prompt
error information will not be displayed. Refer to 3-11-4
System Information Table (Page 3-340) in NBDesigner
Operation Manual for details (notification/control).
9300
Name of path referred by File List
The name of path currently referred (32 words) by the
component
File List Component will be specified (notification).
9332
Name of file selected by File List
The name of file selected (32 words) by the File List
component
Component will be specified (notification/control).
NB-series Programmable Terminals NB-Designer Operation Manual(V106)
3-335

3 Functions of NB-Designer
Addresses
Descriptions
Comments
9364
Setting Import and Export
Specify the Import and Export of the project and the
Recipe (notification/control).
9366
Description of processing File Browsing
“1” indicates Copy, “2” does Cut, and “3” does Paste,
Component
respectively (control).
9370
Confirm Operation method
Confirm Operation method: 1: Confirm; 2: Cancel
(control).
9371
General-purpose PLC control time-out
Automatically stops a general-purpose PLC control if
the general-purpose PLC control has not been
performed before elapsing the time (second) that you
set here. The default is 0 (not to stop the control)
(notification/control).
9380~9395
History value of Number Input component
Specify the data set before the input operation
(notification).
9416~9431
Index memory for Station No. variable
Each word corresponds to the index (0~15) for Station
No. variable (notification/control).
9432~9447
memory for indicating communication
Each bit corresponds to one station number: 9432.0
state (COM 2)
corresponds to 0,..., and 9447.F to 255. When a PLC
has timed out and does not response, the bit relevant
to the PLC station number turns ON. The bit is ordinary
set to OFF.
This address is used on COM2 port in NB5Q, NB7W,
and NB10W. Because NB3Q has only one port, the
address is used on COM1 port. (notification)
9465
Time-out ratio of Macro
Specify the maximum time allocating to the execution of a
Macro. The time multiplying the default value, 200 ms with
the specified value will be the maximum time
(notification/control).
9470~9485
File name of the screen shot
The prefix text string of 16 words naming the screen
shot which is stored in USB memory
(notification/control).
9486~9501
User name
Inputs the login user name of up to 32 characters
(notification/control).
9502~9503
User password
Inputs the password corresponding to the login user
(notification/control).
9504~9505
Current user permission
Displays 32 authorities corresponding to current login
users (notification).
9506~9507
Authority setting
Double-words and 32 authorities’ assignments.
LW9506 to LW9507 corresponds to 32 authorities (No.
0 to No. 31) and LW.B corresponds to each bit in
LW9506 to LW9507. For example: LW.B 9506.0
represents the authority of No. 0; and LW.B 9506.A
represents the authority of No. 10 (control).
9508~9509
Automatic Logout Time setting
Sets the unit of automatic logout time to minute during
the addition of user information (control).
9510~9511
Password Confirm
Inputs the password again for consistency confirmation
during the addition of user information (control).
9520~9521
Curser position
Refers to the curser position (X,Y) in input component
(notification).
9535
The multiplication factor of the
If it is specified to “N”, the maximum communication
communication time for the Macro
time of the Macro external value is N times as long as
instruction
the default (notification/control).
9536
The multiplication factor of the
Sets a time-out period of writing by data transmission
communication time for writing operation
component. The setting value is the coefficient for the
by the data transmission component
maximum size of a block package that is set in the
communication settings.
Refer to 5-3 Abnormality Handling (page 5-6) for details
(notification/control).
3-336
NB-series Programmable Terminals NB-Designer Operation Manual(V106)

3 Functions of NB-Designer
Addresses
Descriptions
Comments
9537
The multiplication factor of the
Sets a time-out period of reading by data transmission
communication time for reading
component. The setting value is the coefficient for the
operation by the data transmission
maximum size of a block package that is set in the
component
communication settings.
Refer to 5-3 Abnormality Handling (page 5-6) for details
(notification/control).
9550~9553
Notifying error information
Each bit corresponds to each error information. When
the bit turns ON, the bit indicates that the corresponded
error information occurs. Refer to 3-11-4 System
Information Table (Page 3-340) in NBDesigner
Operation Manual for details (notification).
9605~9606
Communication Control
Communication via a port is stopped when a bit for
each port is ON. The value is retained when power is
OFF (notification/control).
Note: OFF (communication allowed) is default.
9605.0: COM2 port
3
9605.1: Reserved
9605.2: COM1 port
9605.3-9606.A: An Ethernet host is allocated in
ascending order of the PLC number (24 hosts).
9606.B and later: Reserved
9607~9608
Number of flash memory rewrites
Indicates the number of times the block on the flash
memory has been rewritten most frequently
(notification).
9609~9610
Number of bad blocks on flash memory
Indicates the number of bad blocks on the flash
memory (notification).
9685
Communication setting change for a
Set a PLC number to designate a host whose Ethernet
host
communication setting is to be changed. PLC number
is set from 3 in ascending order, not from the PLC
number itself. Used in combination with LB9272
(control).
9686~9689
IP address for communication setting-
Set a host's IP address whose communication setting
changed host
is to be changed. Used in combination with LB9272
(notification/control).
[Sample]
IP address: 192.168.250.1
LW9686:192, LW9687:168, LW9688:250, LW9689:1
9690
Port number for communication setting-
Set a host's port number whose communication setting
changed host
is to be changed. Used in combination with LB9272
(notification/control).
9691
Node number for communication setting-
Designate a host's FINS node address whose
changed host
communication setting is to be changed (notification
/control). Enter the same value as the least IP address.
9800~9801
Error code of the triggering error
(notification/control)
NB-series Programmable Terminals NB-Designer Operation Manual(V106)
3-337

3 Functions of NB-Designer
3-11-3
Nonvolatile Local Word (LW10000~10255)
RTC
Addresses
Descriptions
Comments
10000
RTC (second)
BIN code with effective value ranging from 0 to 59
(notification/control)
10001
RTC (minute)
BIN code with effective value ranging from 0 to 59
(notification/control)
10002
RTC (hour)
BIN code with effective value ranging from 0 to 23
(notification/control)
10003
RTC (day)
BIN code with effective value ranging from 0 to 31
(notification/control)
10004
RTC (month)
BIN code with effective value ranging from 1 to 12
(notification/control)
10005
RTC (year)
BIN code with effective value ranging from 1971 to
2037 (notification/control)
10006
RTC (week)
BIN code with effective value ranging from 0 to 6
(notification/control)
Description of RTC:
Users can use the related “Component” to display the time. Pay attention to the effective range. The operation
when the values out of the effective range is not ensured.
For example: “second” can not be written as 78 (BIN), otherwise RTC will continue in sequence (78 79 80 ...),
which may result in unexpected error.
Others:
The following notification or control addresses are retained even if power failure occurs. The addresses
other than Backlight saver, Buzzer, Password will be valid after the restart.
System parameter settings
Addresses
Descriptions
Comments
10010
No. of Initial Screen
It ranges from 0 to 32767.
10011
Backlight saver
0 (Disable Backlight saver)
1 to 600 minutes (enabled)
10012
Buzzer
0: Disabled, 1: Enabled
10013
Common Sheet/Pop-up Screen
0: Normal, 1: At the top of all the other screens
10014
Placing Common Sheet
0: At the bottom of Base Screen, 1: At the top of Base Screen
10015
Number of stored events
It ranges from 0 to 65535. If it is set to “0”, the event
data will be cleared after the restart.
10016
Source of RTC
0: Internal RTC, 1: PLC (LW)
10017
Default language
It ranges from 0 to 31.
10018
Reserved by system
Security level
Addresses
Descriptions
Comments
10022~
Password/0
Reserved.
10023
10024~
Password/1
Double-word is occupied.
10025
10026~
Password/2
Double-word is occupied.
10027
10118~
Password/3 to 15
Double-word is occupied × 13.
10143
3-338
NB-series Programmable Terminals NB-Designer Operation Manual(V106)

3 Functions of NB-Designer
Initial Communications Parameters
Addresses
Descriptions
Comments
9039
FINS node address of NB Units
If it is changed, restart is needed.
10030~
IP Address of NB Units
If it is changed, restart is needed.
10033
i.e. IP Address: 192.168.250.1
LW10030:1,
LW10031:250,
LW10032:168,
LW10033:192
10034
Port Number of NB Units
If it is changed, restart is needed.
10035
Reserved by system
10036
COM 2 operation mode
0: RS-232, 1: RS-422, 2: RS-485.
10037~
COM 2 Baud Rate
Double-word.
10038
10039
COM 2 Data Bit
10040
COM 2 Parity Bit
10041
COM 2 Stop Bit
3
10042
COM 2 Station No. (PT Station No.)
10043~
COM 2 PLC timeout duration
10044
10045~
COM 2 Protocol Time Out 1
10046
10047~
COM 2 Protocol Time Out 2
10048
10110~
Default Gateway of NB Units
If it is changed, restart is needed.
10113
For specific value settings, please refer to the
Comments of 10030: IP Address.
10114~
Subnet Mask of NB Units
If it is changed, restart is needed.
10117
For specific value settings, please refer to the
Comments of 10030: IP Address.
Note The addresses 9,039 and greater than 10,000 cannot be modified during simulation. But the read operation
is available (For example, the Number Input component with the address of LW10005 will be displayed as
2006 during the test, and it can’t be modified to the other value during the test. But it can be modified only
after it is downloaded to the PT. ).
NB-series Programmable Terminals NB-Designer Operation Manual(V106)
3-339
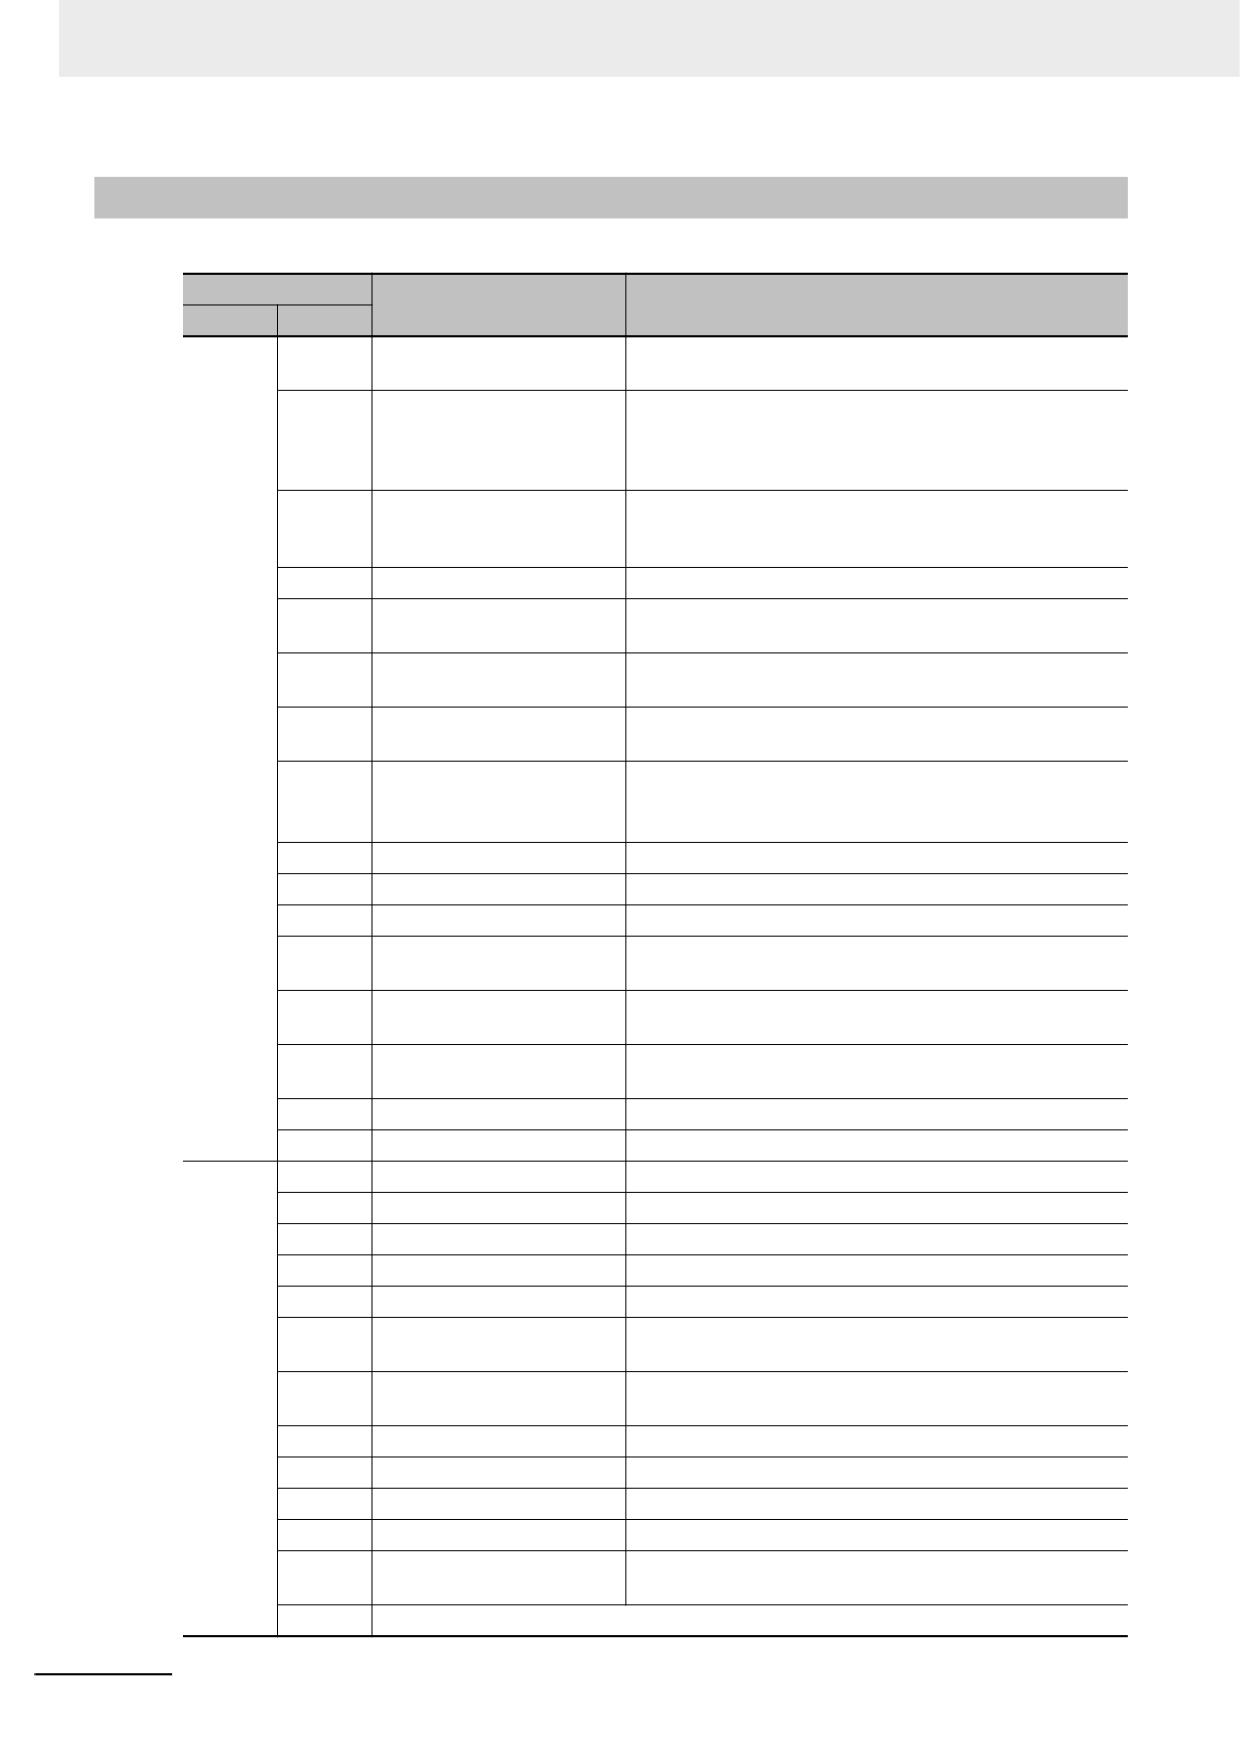
3 Functions of NB-Designer
3-11-4
System Information Table
Address
Information
Descriptions
Word
Bit
Mask
0
System Error
It is system error which means the error occurs inside the
9296
PT.
1
PLC Response Error
PLC Response Error: PLC responds with one piece of
Notify
unexpected information which may caused by the read or
9550
write command. Please check if the device functions well,
or verify the Tag Variable settings.
2
PLC No Response: cc-pp-d
PLC No Response: the 3 groups of numbers following PLC
No Response represent the PT No., PLC Station No. and
Serial Port No. respectively.
3
Reserved by system
4
Socket Connect Error
Connection with the PLC and others failed. Check if the
devices function normally.
5
Socket COMM Error
An error occurred during the connection with the PLC and
others. Check if the devices function normally.
6
Macro Code Error: [xxxx]
An error occurred during executing a Macro. The
(Macro No.)
description enclosed by the parenthesis is the Macro No.
7
Print Error
Printing error: It is followed by the error code. Refer to 7-5
List of Error Codes for Printing (Page 7-9) in NB-
Designer Operation Manual for details.
8
Send Package Error
Message transmission fails.
9
Memory Shortage
Memory is not enough.
10
BCD Transform Overflow
BCD conversion overflows.
11
MacroCode Timeout: [xxxx]
A timeout occurred during executing a Macro. The
(Macro No.)
description enclosed by the parenthesis is the Macro No.
12
Warn: Flash is worn out
The number of write cycles for the flash memory has
exceeded the recommended limit of 100,000 cycles.
13
Err: Flash is worn out
The number of write cycles for the flash memory has
exceeded 655,359 cycles.
14
RW Area Access Overflow
RW area access exceeds the limits.
15
Waiting to Print
It indicates waiting for print.
Mask
0
Server Not Ready
The data in server is not ready.
9297
1
Reserved by system
2
Transmit Data Failed
The data transmission failed.
Notify
3
Data Input Failed
The number input failed.
9551
4
Device Error
Failure occurs in the device.
5
Copying File ...
The file is being copied (This is the normal prompt during
the project export or screenshot operation).
6
Copy File Failed
The file copy failed (during exporting the project or
performing screen shot).
7
Invalid File
The files objected of importing are invalid.
8
Password Error
The password is invalid.
9
Reserved by system
10
USB Disk1 Full
USB memory 1 is full already.
11
Host connections exceed 32.
The number of hosts has exceeded 32. (This message is
displayed only in the simulator.)
12-15
Reserved by system
3-340
NB-series Programmable Terminals NB-Designer Operation Manual(V106)
3 Functions of NB-Designer
Address
Information
Descriptions
Word
Bit
Mask
0
RTC Device Error
An error occurred in RTC clock.
9298
1
Reserved by system
2
Invalid UserName
The user name is invalid (The input user name is invalid
Notify
during the user login or user addition/deletion operations.)
9552
3
Operation Complete
It indicates the operation is successful (This is the correct
prompt displayed after user addition/deletion or password
modification.)
4
Print Busy
It indicates printing.
5-15
Reserved by system
Mask
0-15
Reserved by system
9299
Notify
3
9553
NB-series Programmable Terminals NB-Designer Operation Manual(V106)
3-341
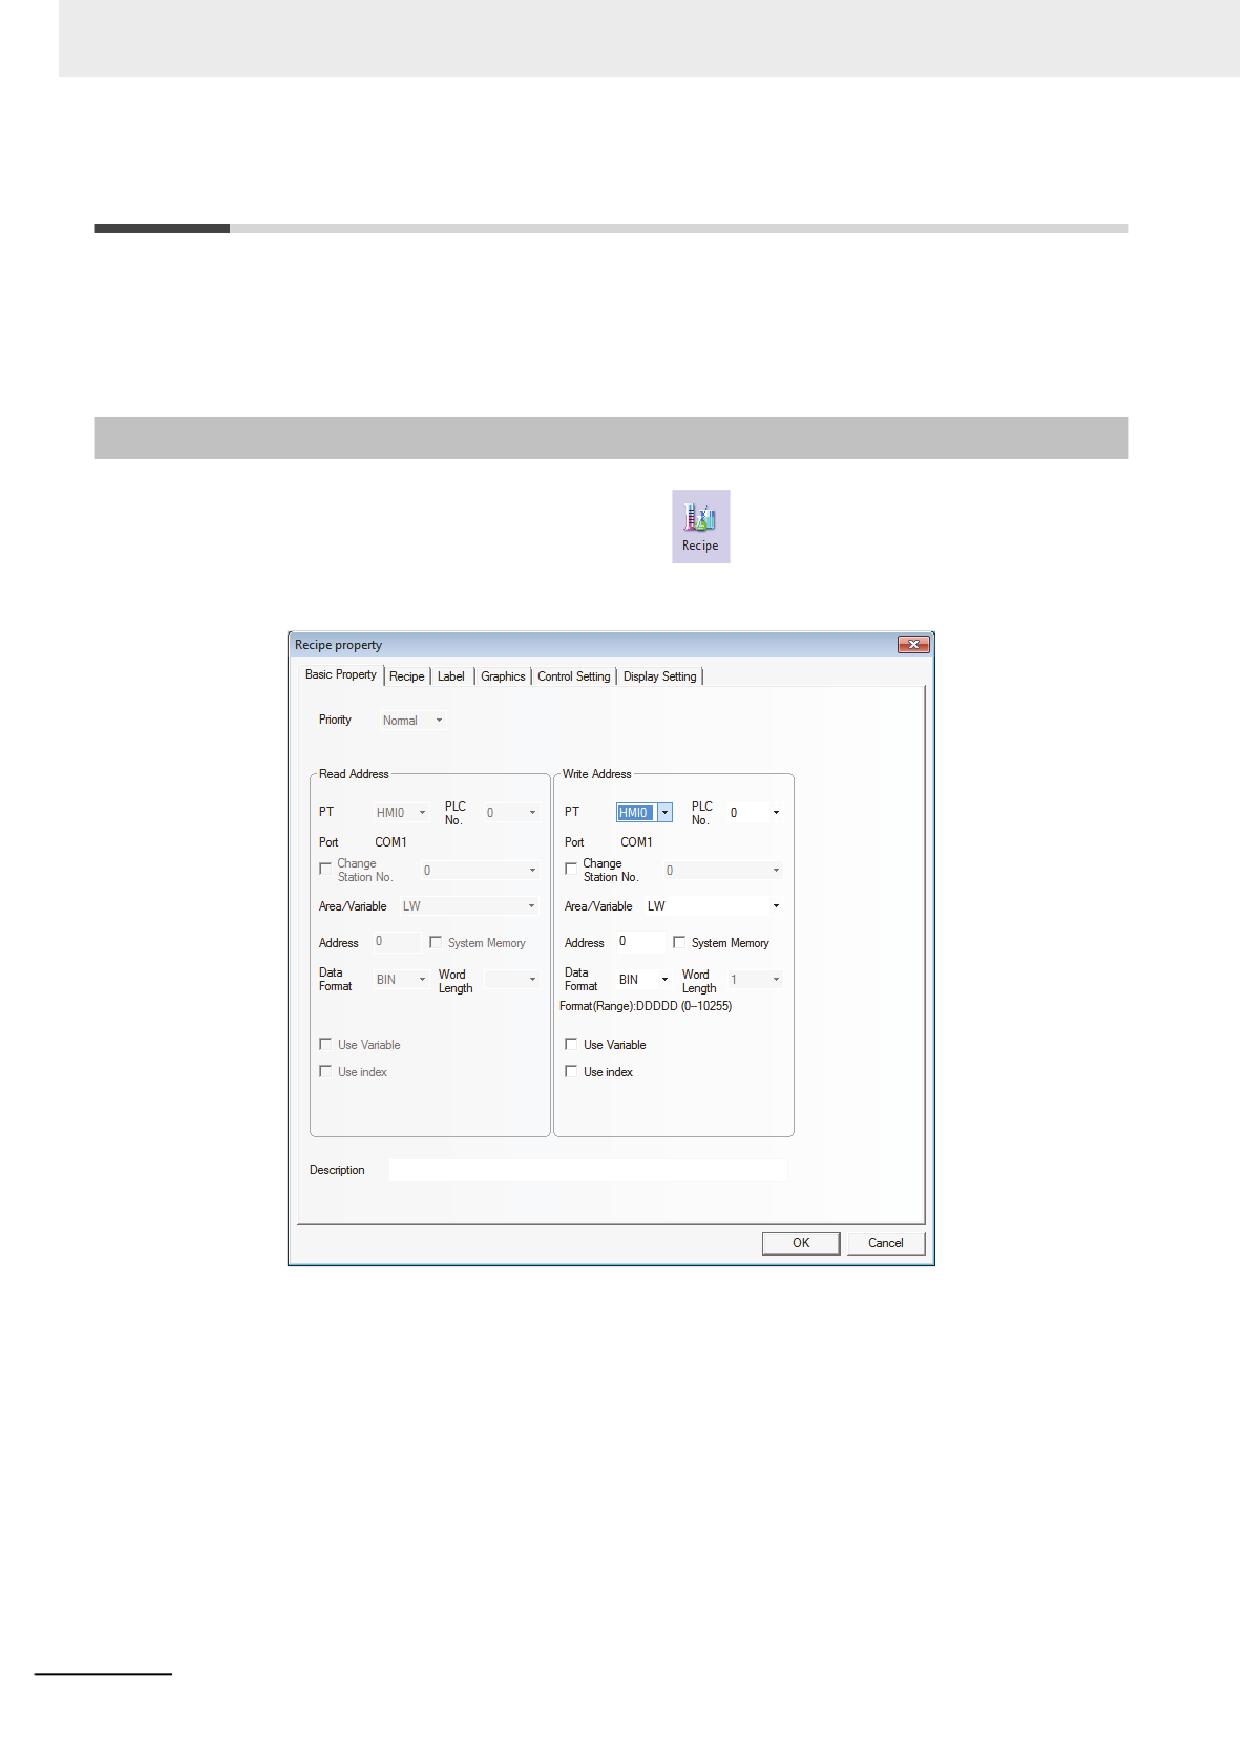
3 Functions of NB-Designer
3-12 Recipe Data
The component of the Recipe transmits the data with consecutive memories. And the data can be
downloaded from the recipe memory to the PLC or uploaded from the PLC to the recipe memory. The
size of the data to be transferred can be set. For the NB Unit, the recipe memory with 128K word can be
selected for recipe data storage.
3-12-1
Process of Creating One Recipe Component
1
Drag the icon of Recipe to the Edit Window,
and then fill the contents in [Basic
Properties] tab:
Write Address: Specify the starting address of the PLC which transmits the Recipe data. The
address for [Data Length] specified in the [Recipe] tab of the [Recipe Property]
dialog box are used for the data transmission with the Read Address on the
top.
Address: Specify the starting address at the PLC to transmit the Recipe data.
Word Length: The function does not support the parameter.
3-342
NB-series Programmable Terminals NB-Designer Operation Manual(V106)
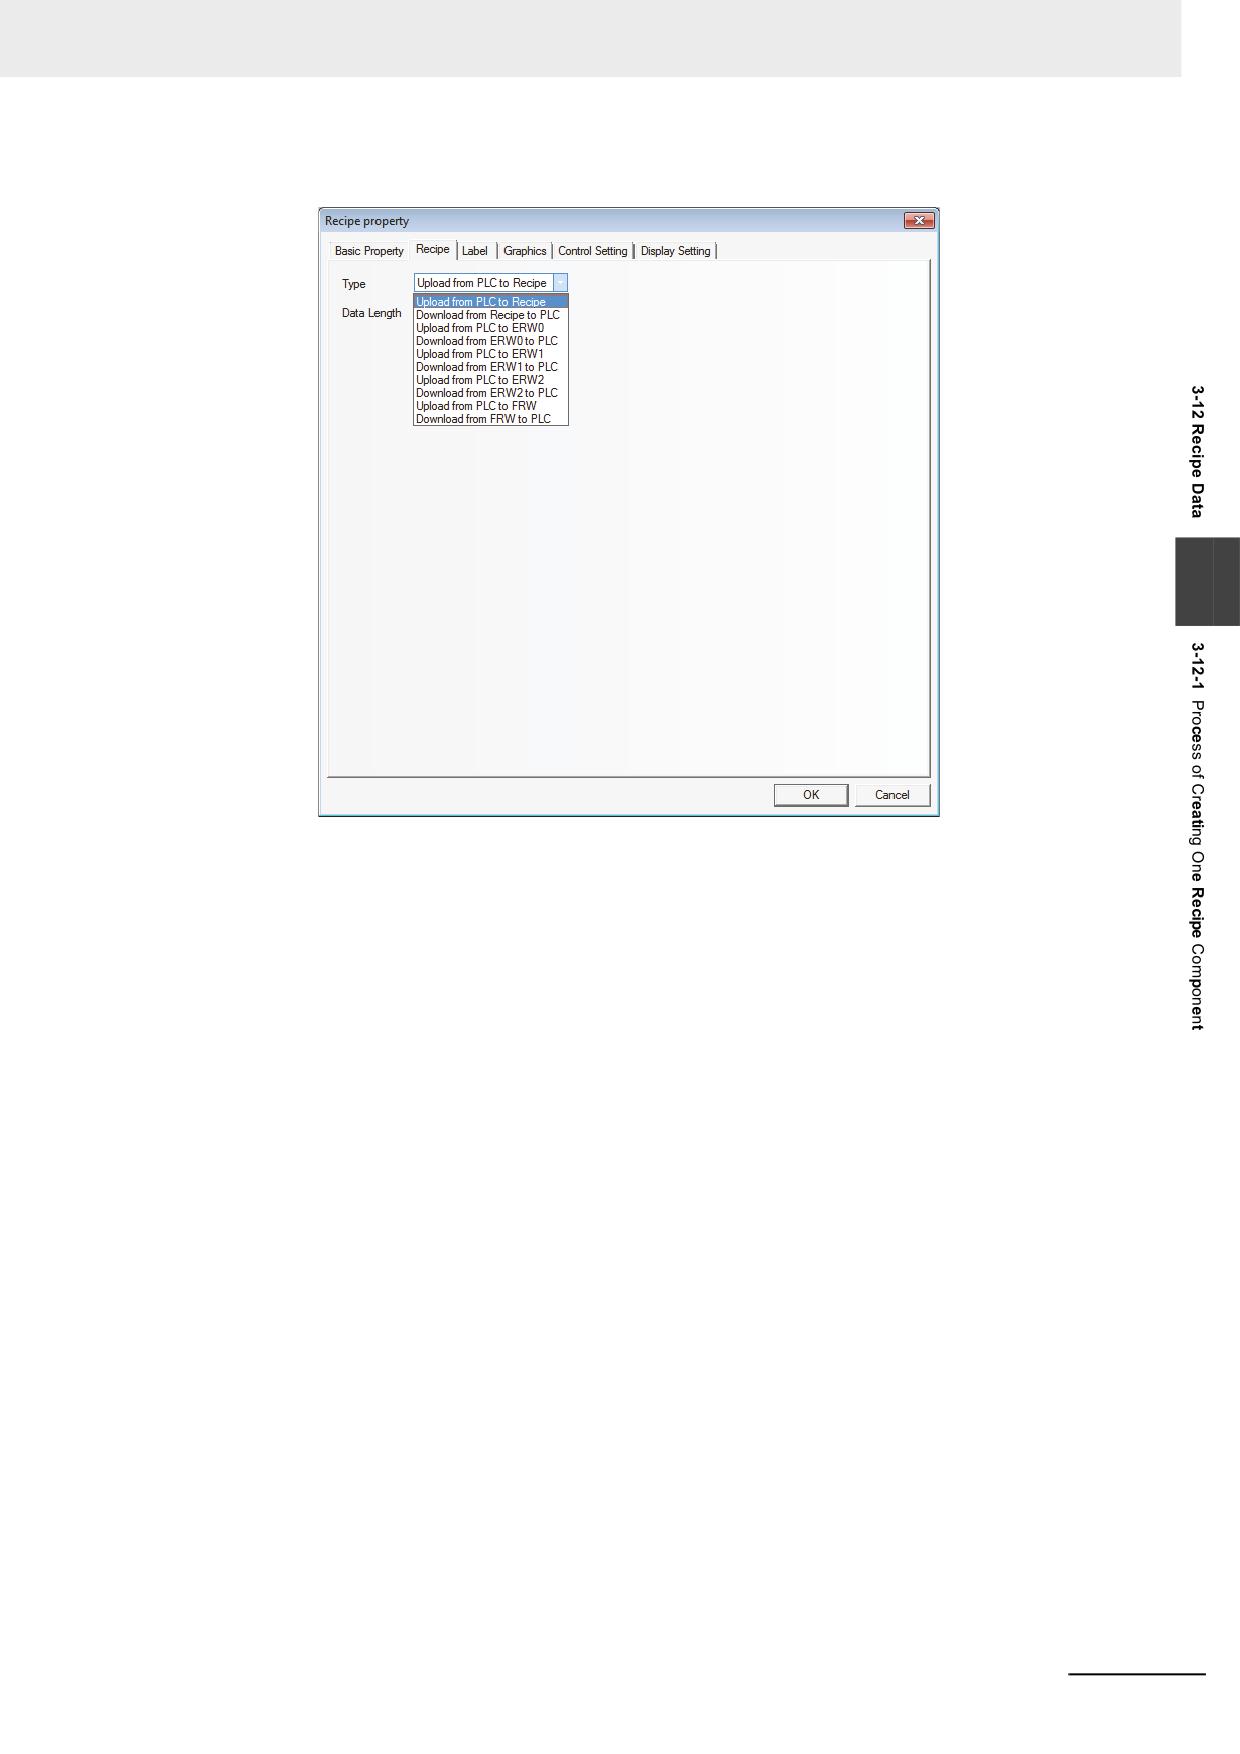
3 Functions of NB-Designer
2
Switch to the [Recipe] tab and set the Function and Data Length.
3
Function:
Upload from PLC to Recipe: Transfers the data from PLC to the recipe memory of PT.
Download from Recipe to PLC: Transfers the data from the recipe memory of PT to PLC.
Transmit from PLC to FRW: Transmit the data from PLC to the Recipe memory ERW.
Transmit from ERW to PLC: Transmit the data from the Recipe memory ERW of PT to PLC.
Upload from PLC to FRW: Transfers the data from PLC to the recipe memory FRW of PT.
Download from FRW to PLC: Transfers the data from the recipe memory FRW of PT to PLC.
Data Length: Refers to the word length of the data to be transferred.
3
Switch to the [Label] tab and add the different displayed texts corresponding to the different
states.
4
Switch to the [Graphics] tab and select the Vector Graphics or Bitmap to display the graphics
corresponding to the state of the Recipe Data component.
5
Switch to the [Control Setting] tab and make the Security Setting and set the Triggering action.
6
Press the [OK] button, and adjust the position and size of the component.
NB-series Programmable Terminals NB-Designer Operation Manual(V106)
3-343
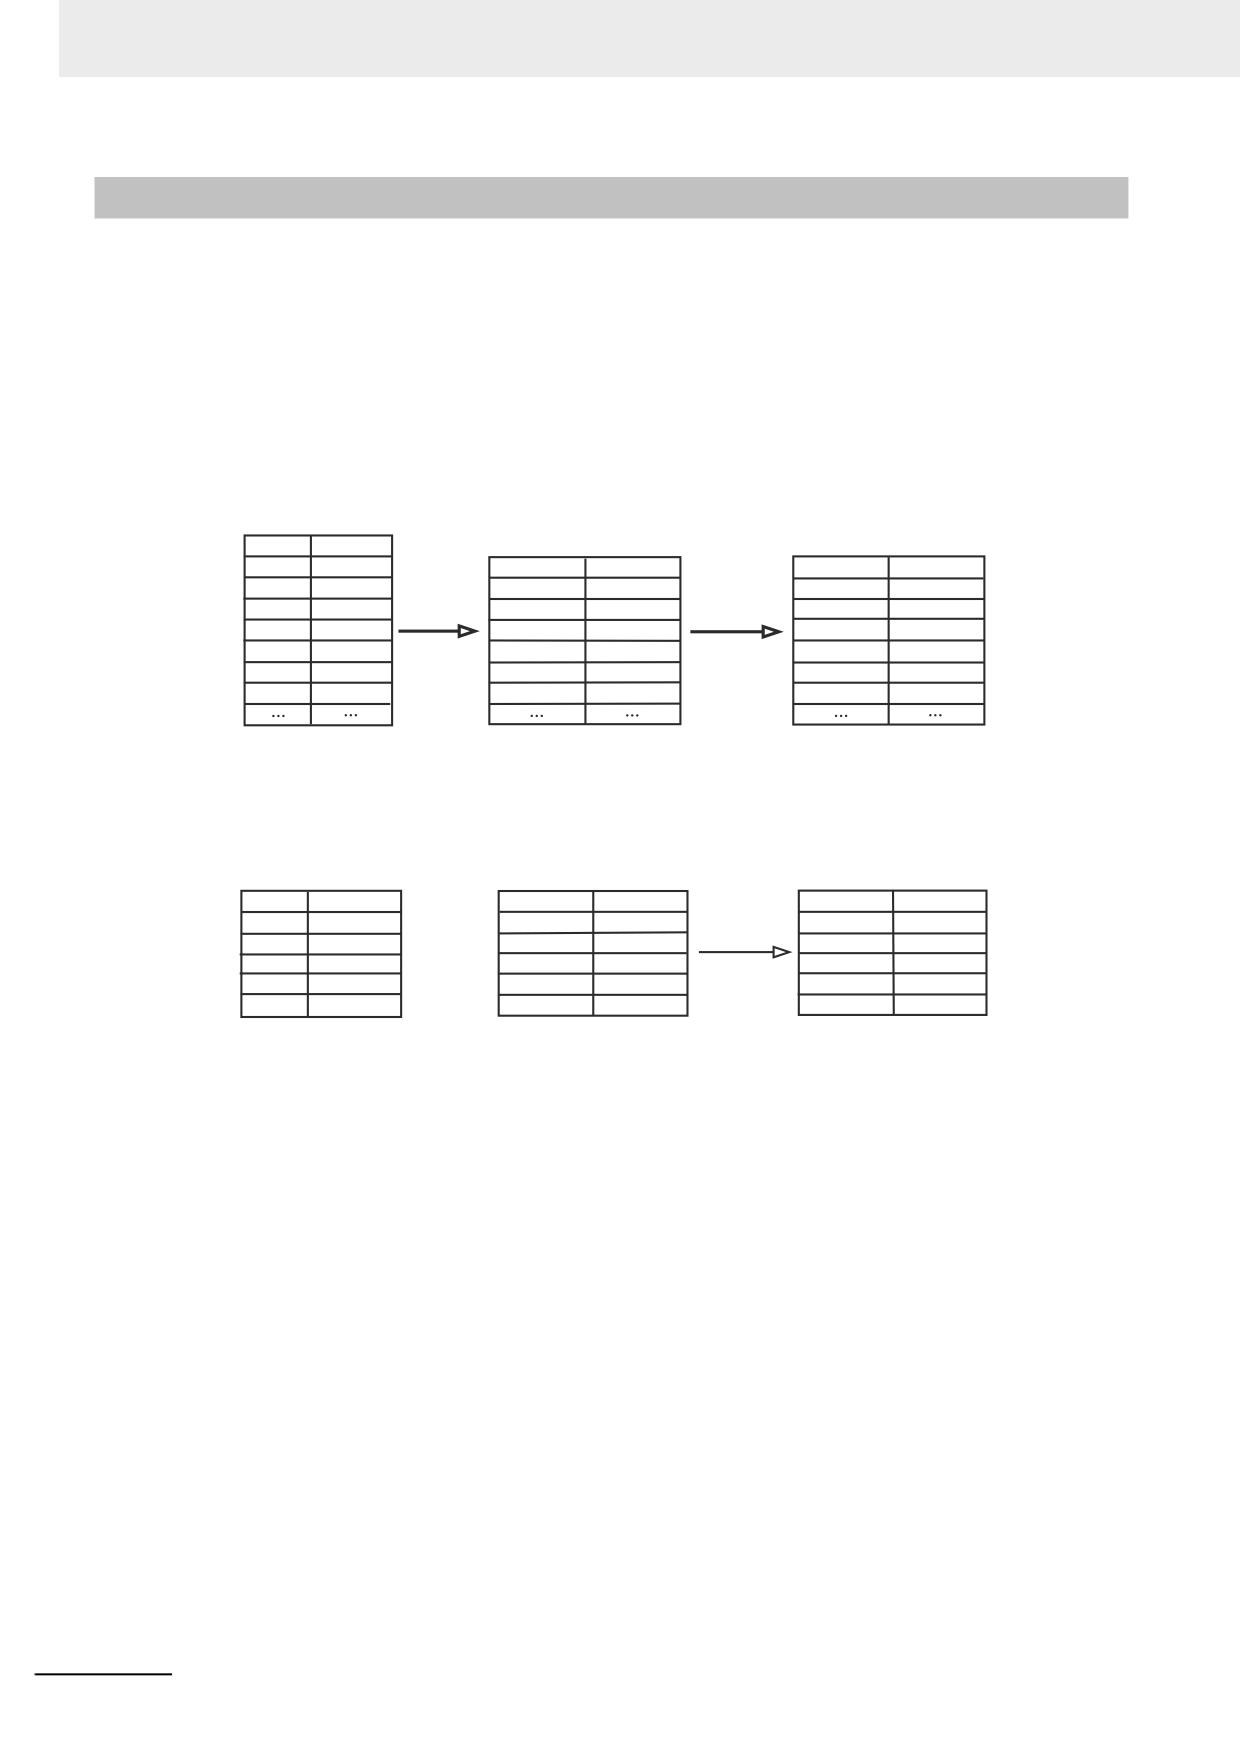
3 Functions of NB-Designer
3-12-2
Recipe Memory
The recipe memory stores in a flash memory, and even if power interruption occurs, the data can be
retained.
The recipe memory space of NB3Q/NB5Q-TWB(-V1) model is 128K (Word), and for that of
NB7W/NB10W-TWB(-V1) model, it is 256K (Word).
There are 2 indication methods for the recipe memory, i.e. “RW” represents the absolute address while
“RWI” represents the index address. The data in “LW9000” is the offset of the index address. For
example, when the data in LW9000 is 50, the index address RWI0 will point to the data in address
RW50. In this case, if we change the data in LW9000 to 51, then the index address RWI0 will point to
the data in address RW51, as shown below:
LW9000=50
LW9000=51
Address
Data
RW50
0x1111
Address
Data
Address
Data
RW51
0x2222
RWI0
0x1111
RWI0
0x2222
RW52
0x3333
RWI1
0x2222
RWI1
0x3333
RW53
0x4444
RWI2
0x3333
RWI2
0x4444
RW54
0x5555
RWI3
0x4444
RWI3
0x5555
RW55
0x6666
RWI4
0x5555
RWI4
0x6666
RW56
0x7777
RWI5
0x6666
RWI5
0x7777
For example, we specify one project and select [MODBUS RTU] as the PLC Type in system
parameters. The function of transferring the 5-word text beginning from address 200 with the address
type of 4X to the address of recipe memory (RW300) is as shown below:
Before uploading
After uploading
Address
Data
Address
Data
Address
Data
4X200
'A','B'
RW300
'B','B'
RW300
'A','B'
4X201
'C','D'
RW301
'C','C'
RW301
'C','D'
4X202
'E','F'
RW302
'D','D'
RW302
'E','F'
4X203
'G','H'
RW303
'E','E'
RW303
'G','H'
4X204
'I','J'
RW304
'F','F'
RW304
'I','J'
Create a new project and select [MODBUS RTU] as the PLC type in [Project Library Window].
Firstly, create a component to upload the recipe data with the Area/Variable of 4X, Address of 200,
Function of Upload, Word Length of 5, and [Transport Font] being checked, and the Label of “Upload”,
as shown below:
3-344
NB-series Programmable Terminals NB-Designer Operation Manual(V106)
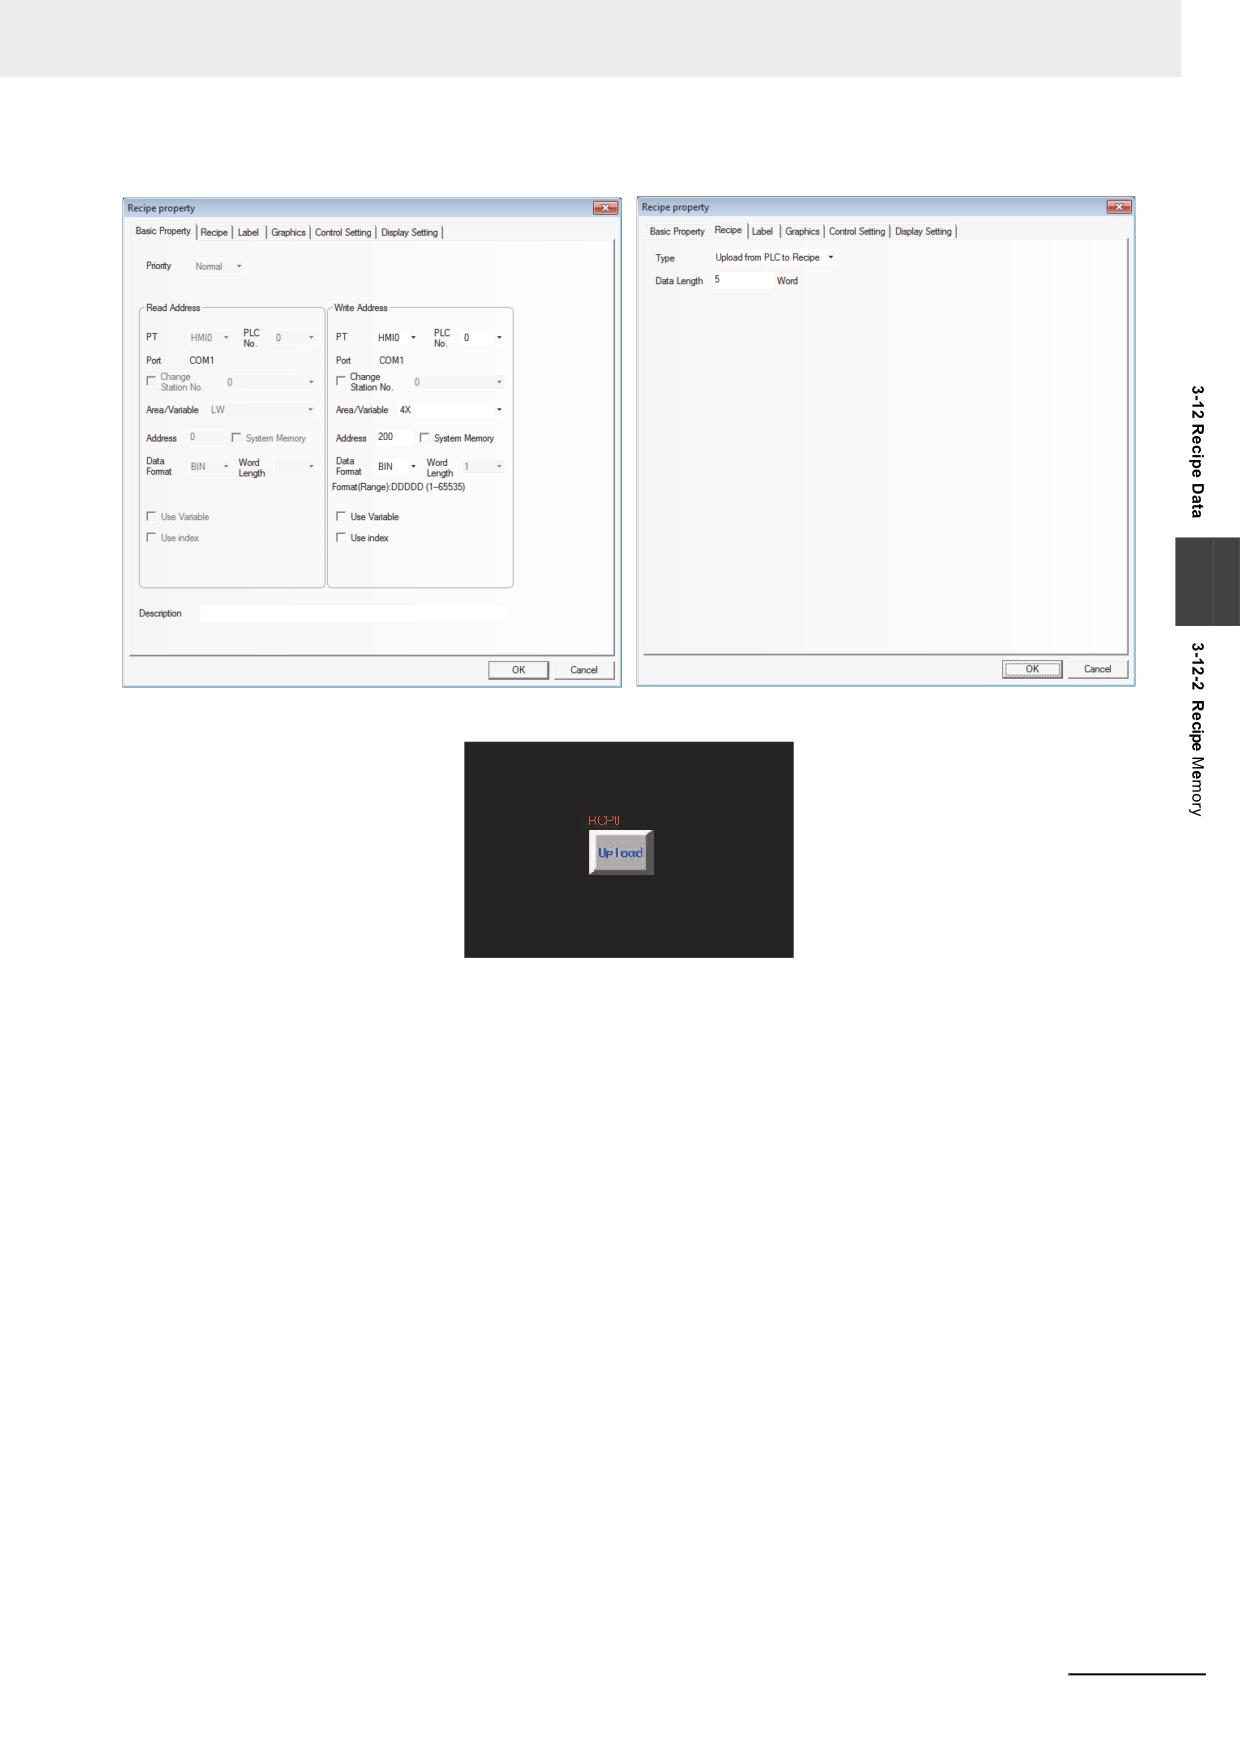
3 Functions of NB-Designer
3
Then place the component in the screen.
Now the recipe data transmission component is created, but it can only specify to transfer the 5 words
beginning from address of 4X200 to the recipe memory instead of the specific position of the recipe
memory. Set the LW9000 to 300 and press “Upload” button, then the 5 words beginning from 4X200 will
be transferred to the 5-word addresses after the start address of RW300. If you want to transfer the 5
words beginning from the address of 4X200 to RW100 again, then you just need to set LW9000 to 100,
and then press “Upload” button to complete the data transmission.
Place 3 Text Input components to modify/display the data.
(1) 4X200: Area/Variable of 4X, Address of 200 and Word Length of 5.
(2) RWI0: Area/Variable of RWI, Address of 0 and Word Length of 5.
(3) RW300: Area/Variable of RW, Address of 300 and Word Length of 5.
Then create one Number Input component to modify the data of LW9000. Specify LW for
[Area/Variable] and 9000 for [Address].
NB-series Programmable Terminals NB-Designer Operation Manual(V106)
3-345
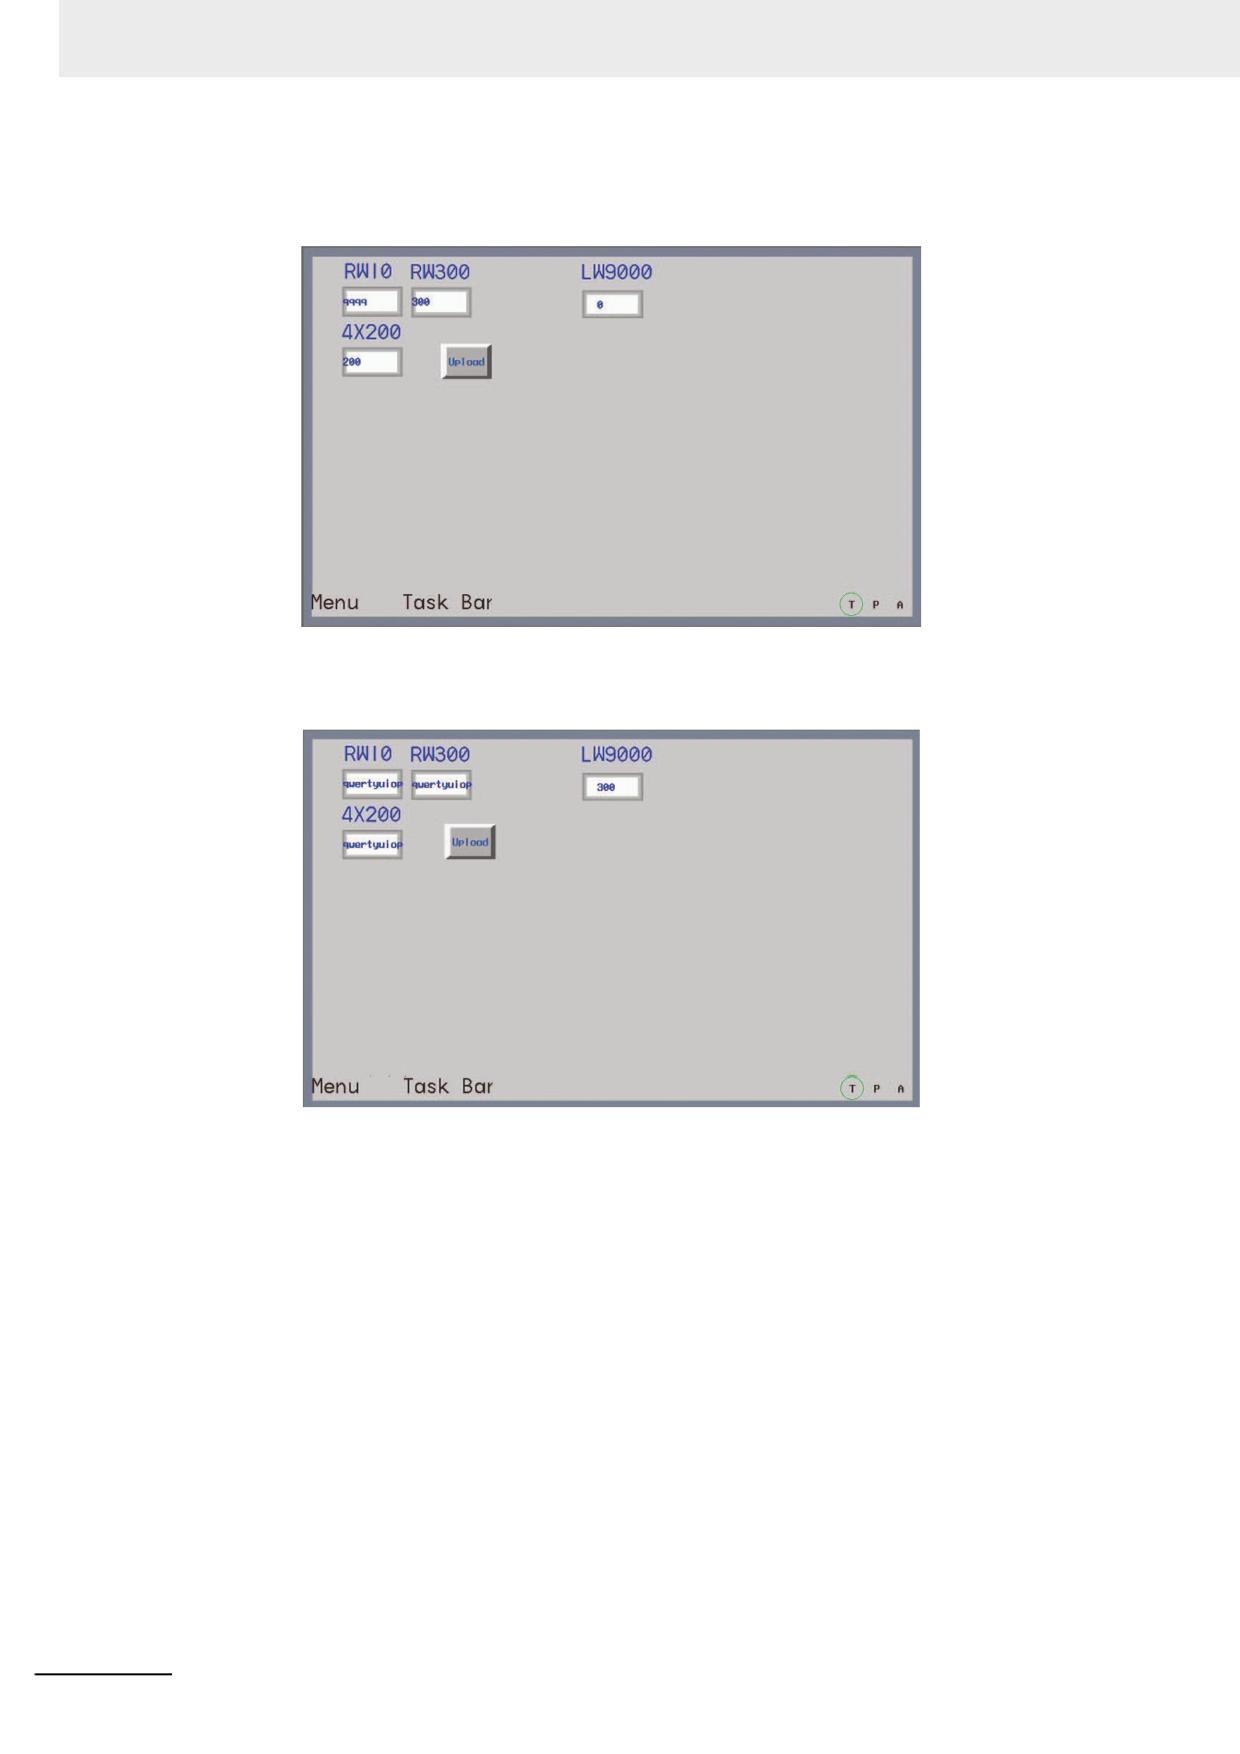
3 Functions of NB-Designer
After Save, Compile operations, perform the offline test for the project. Firstly, change LW9000 to 300
(because LW9000 represents the offset of the index address, RWI0 will display the data in the address
of RW300), as shown below:
Input “QWERTYUIOP” to 4X200, and 300 to LW9000, then you will find the data displayed by RWI0,
RW300 and 4X200 is the same after the Upload button is pressed, as shown below, which means the
upload is successful.
How to download the 5 words with the start address of RW300 to the position with the start address of
4X200? The specific operation process is described as follows. Add one recipe data transmission
component in the project just mentioned above with the Area/Variable of 4X, Address of 200, Function
of Download from Recipe to PLC, Word Length of 5 and Label of “Download”.
3-346
NB-series Programmable Terminals NB-Designer Operation Manual(V106)
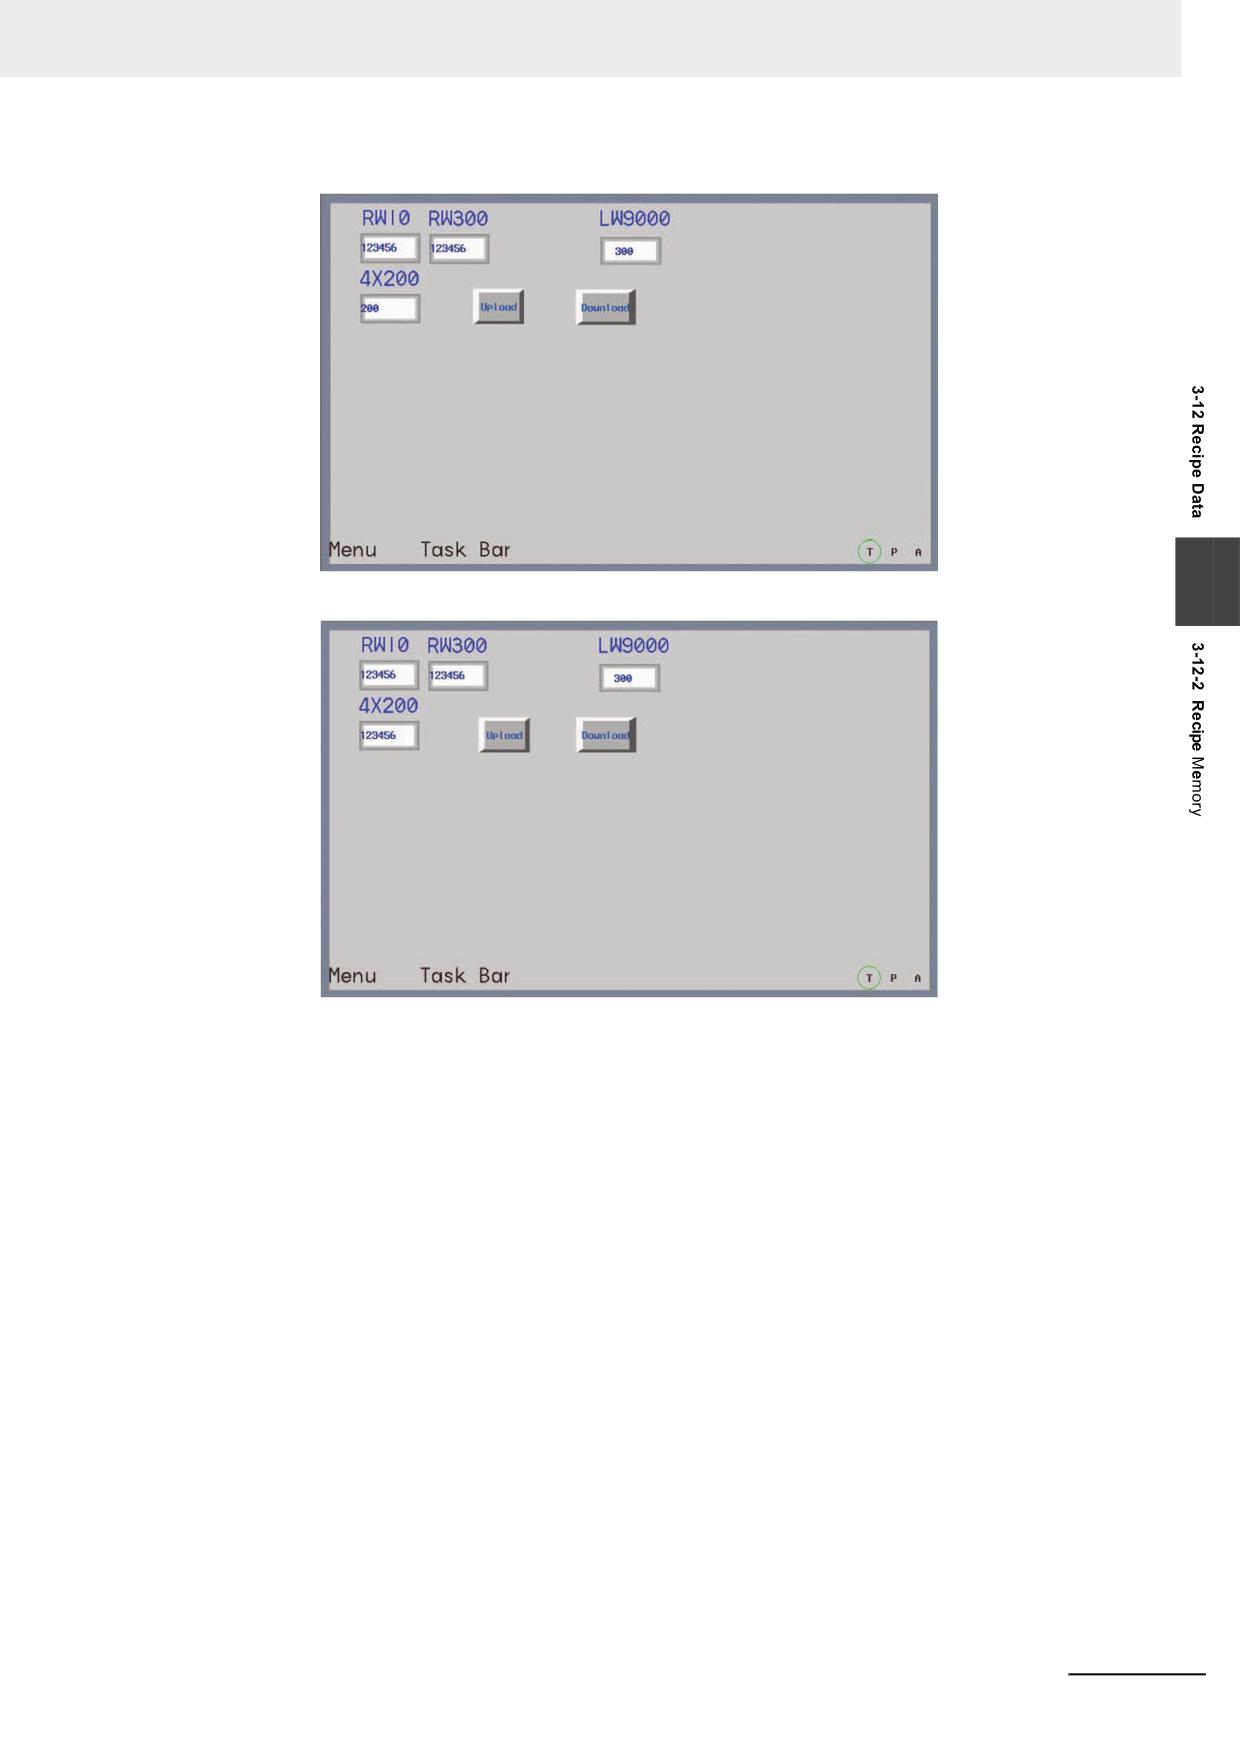
3 Functions of NB-Designer
Perform the offline test, change LW9000 to 300 and input “123456” to RWI0, as shown below:
3
Press the Download button, then you will find the text data will be transferred to 4X200 from RW300.
Whether we upload the data from PLC to recipe or download the data from recipe to PLC, the start
address of data in recipe is always the value corresponding to LW9000.
NB-series Programmable Terminals NB-Designer Operation Manual(V106)
3-347
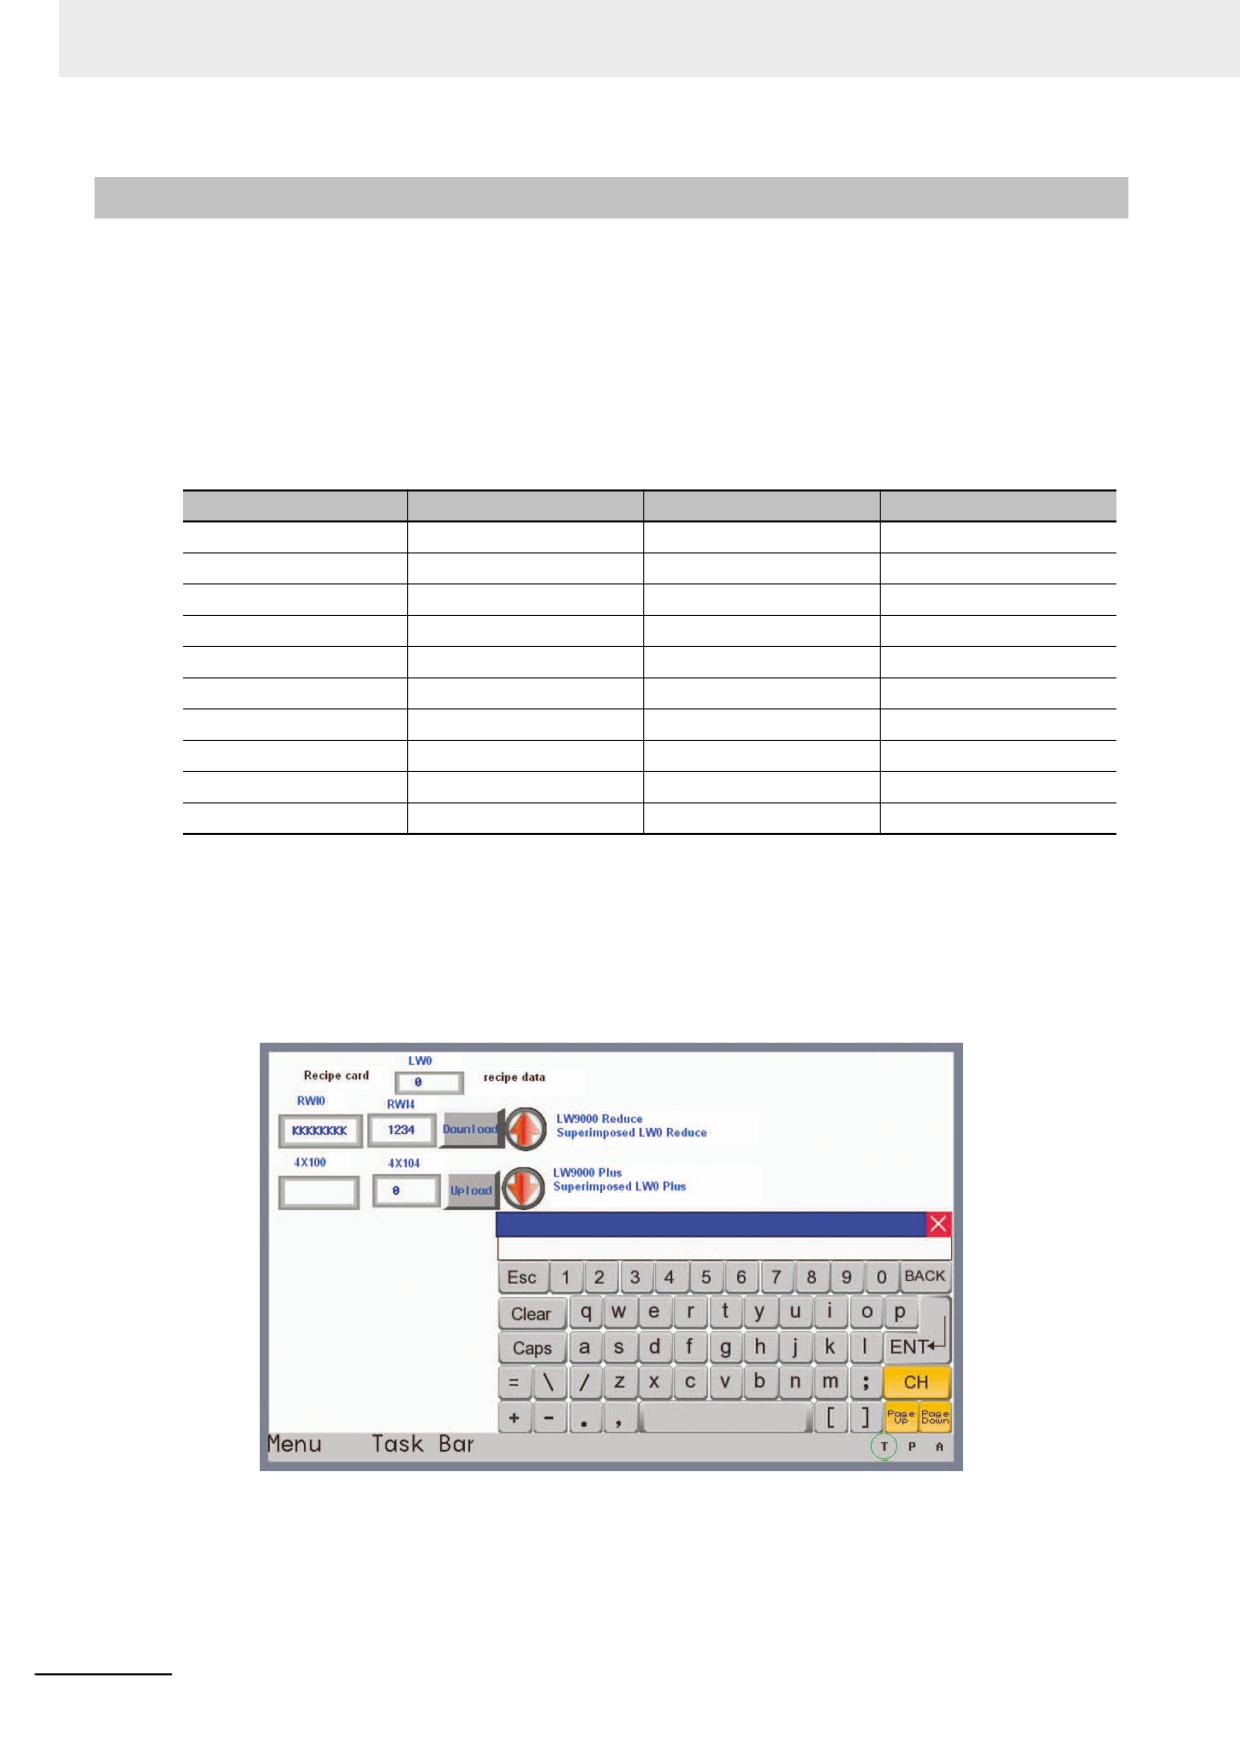
3 Functions of NB-Designer
3-12-3
Upload/Download of Recipe Data between PT and PLC
The recipe data is significantly useful. For example, the production device can operate differently
according to the different parameters assigned to them on the industrial production line. Now, we can
save this group of data in the specific format in the recipe memory, then we can call them out directly,
thus enhancing productivity.
Example of how to call several recipe data conveniently
It is assumed that we have 10 groups of recipes; each group is made of 5 words, recipe name
occupying 4 words and recipe data occupying 1 word. Then we configure the recipe from RW0, as
shown below:
Recipe No.
memory Address
Recipe Name (4 words)
Recipe Data (1 word)
Group 0
RW0-RW4
“AAAAAAAA”
0
Group 1
RW5-RW9
“BBBBBBBB”
1111
Group 2
RW10-RW14
“CCCCCCCC”
2222
Group 3
RW15-RW19
“DDDDDDDD”
3333
Group 4
RW20-RW24
“EEEEEEEE”
4444
Group 5
RW25-RW29
“FFFFFFFF”
5555
Group 6
RW30-RW34
“GGGGGGGG”
6666
Group 7
RW35-RW39
“HHHHHHHH”
7777
Group 8
RW40-RW44
“IIIIIIII”
8888
Group 9
RW45-RW49
“JJJJJJJJ”
9999
We hope each group of recipe in the above table can perform data swap with 4X100 memory of our
PLC conveniently through design. First, let’s see the following created project to obtain the general
understanding. RWI0 and RWI4 in the project display the data in Group 0, and pressing the Download
button can download the recipe data to 4X100 while pressing the Upload button can upload the data in
4X100 to the recipe memory. The Up button on the right is used to modify the Recipe No. to a level
smaller, which is convenient to change or transfer the recipe data; and the Down button on the right
side is used to modify the Recipe No. to a level larger.
3-348
NB-series Programmable Terminals NB-Designer Operation Manual(V106)
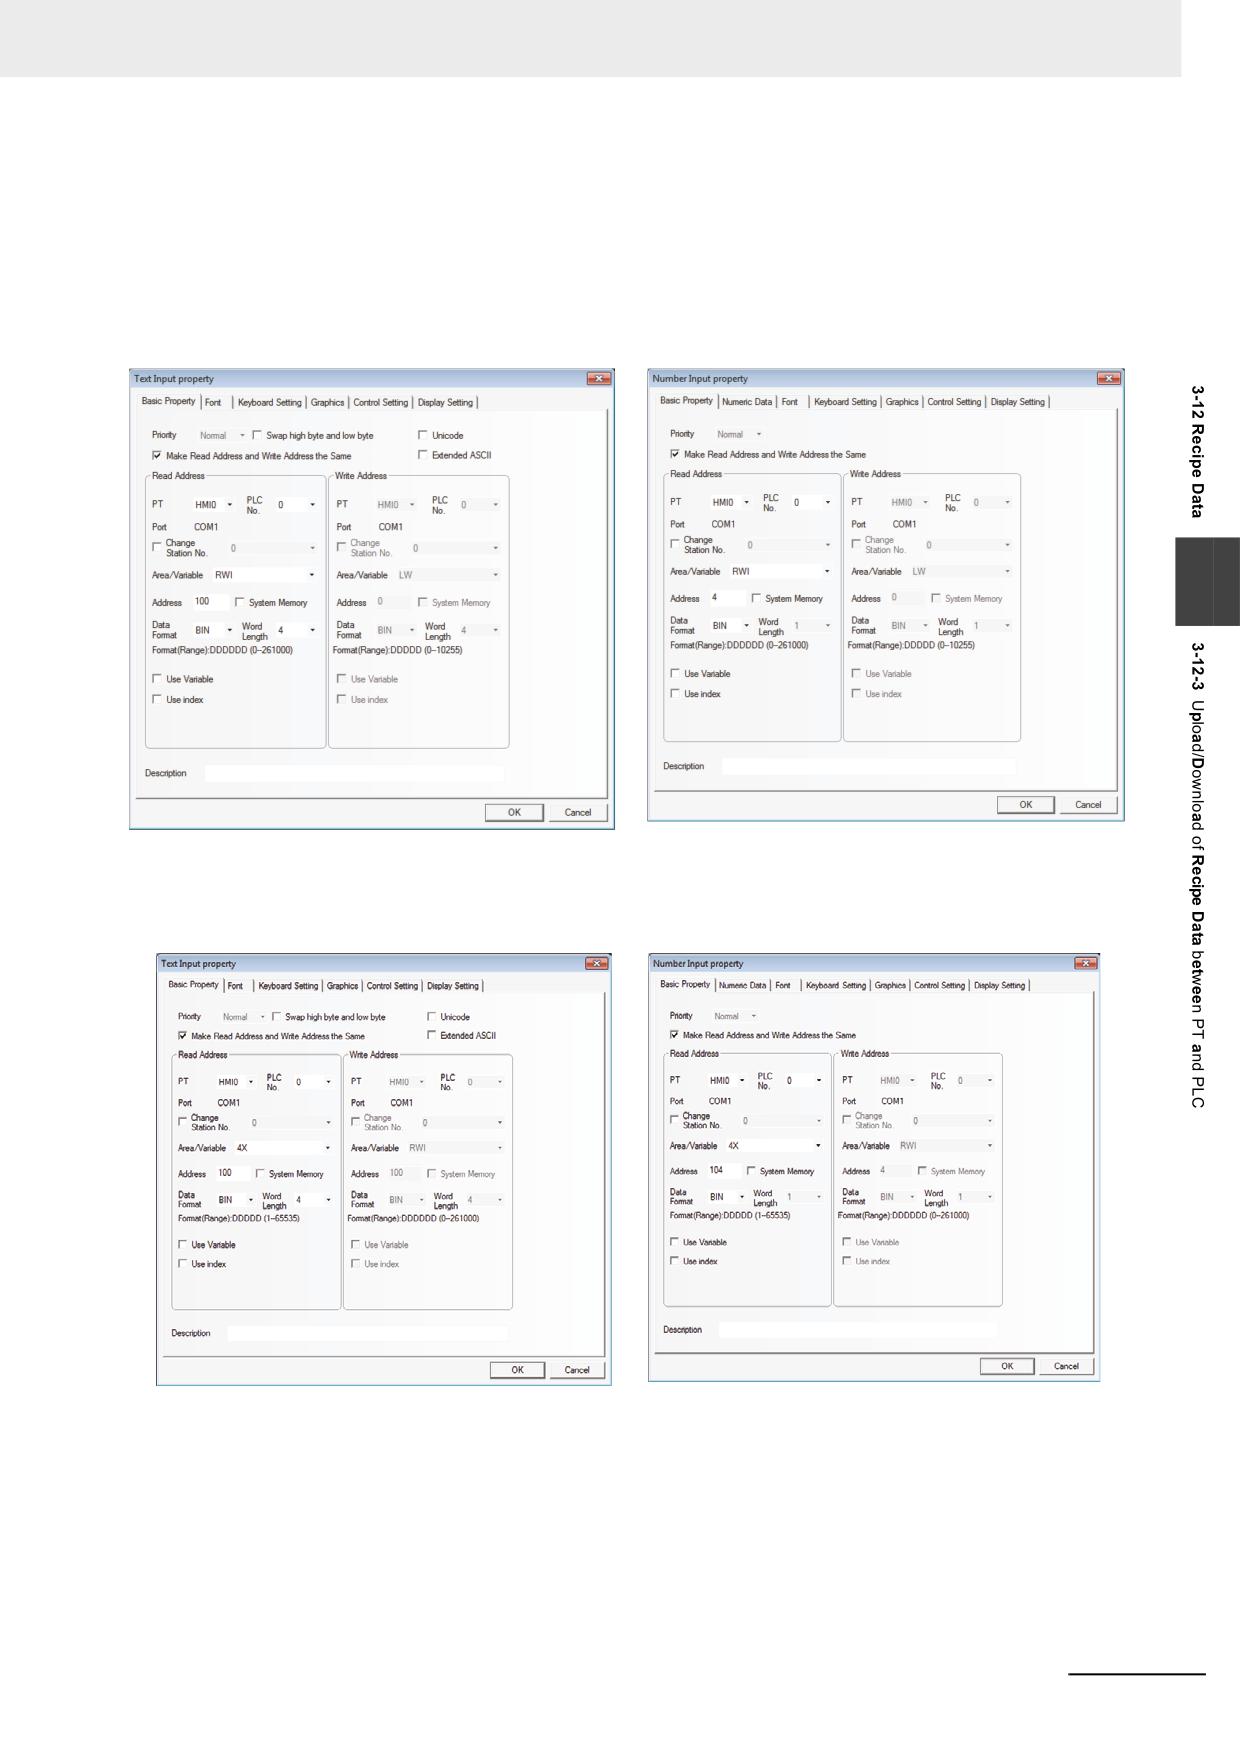
3 Functions of NB-Designer
Firstly create a new project, and select the [MODBUS RTU] as the PLC in [Project Library Window].
1
Create one Text Input component with Word Length of 4 to display and change the name of
each group of recipes.
2
Create one Number Input component to display and change each group of recipe data.
3
3
Create one Text Input component and one Number Input component to display and change the
recipe data in PLC.
NB-series Programmable Terminals NB-Designer Operation Manual(V106)
3-349
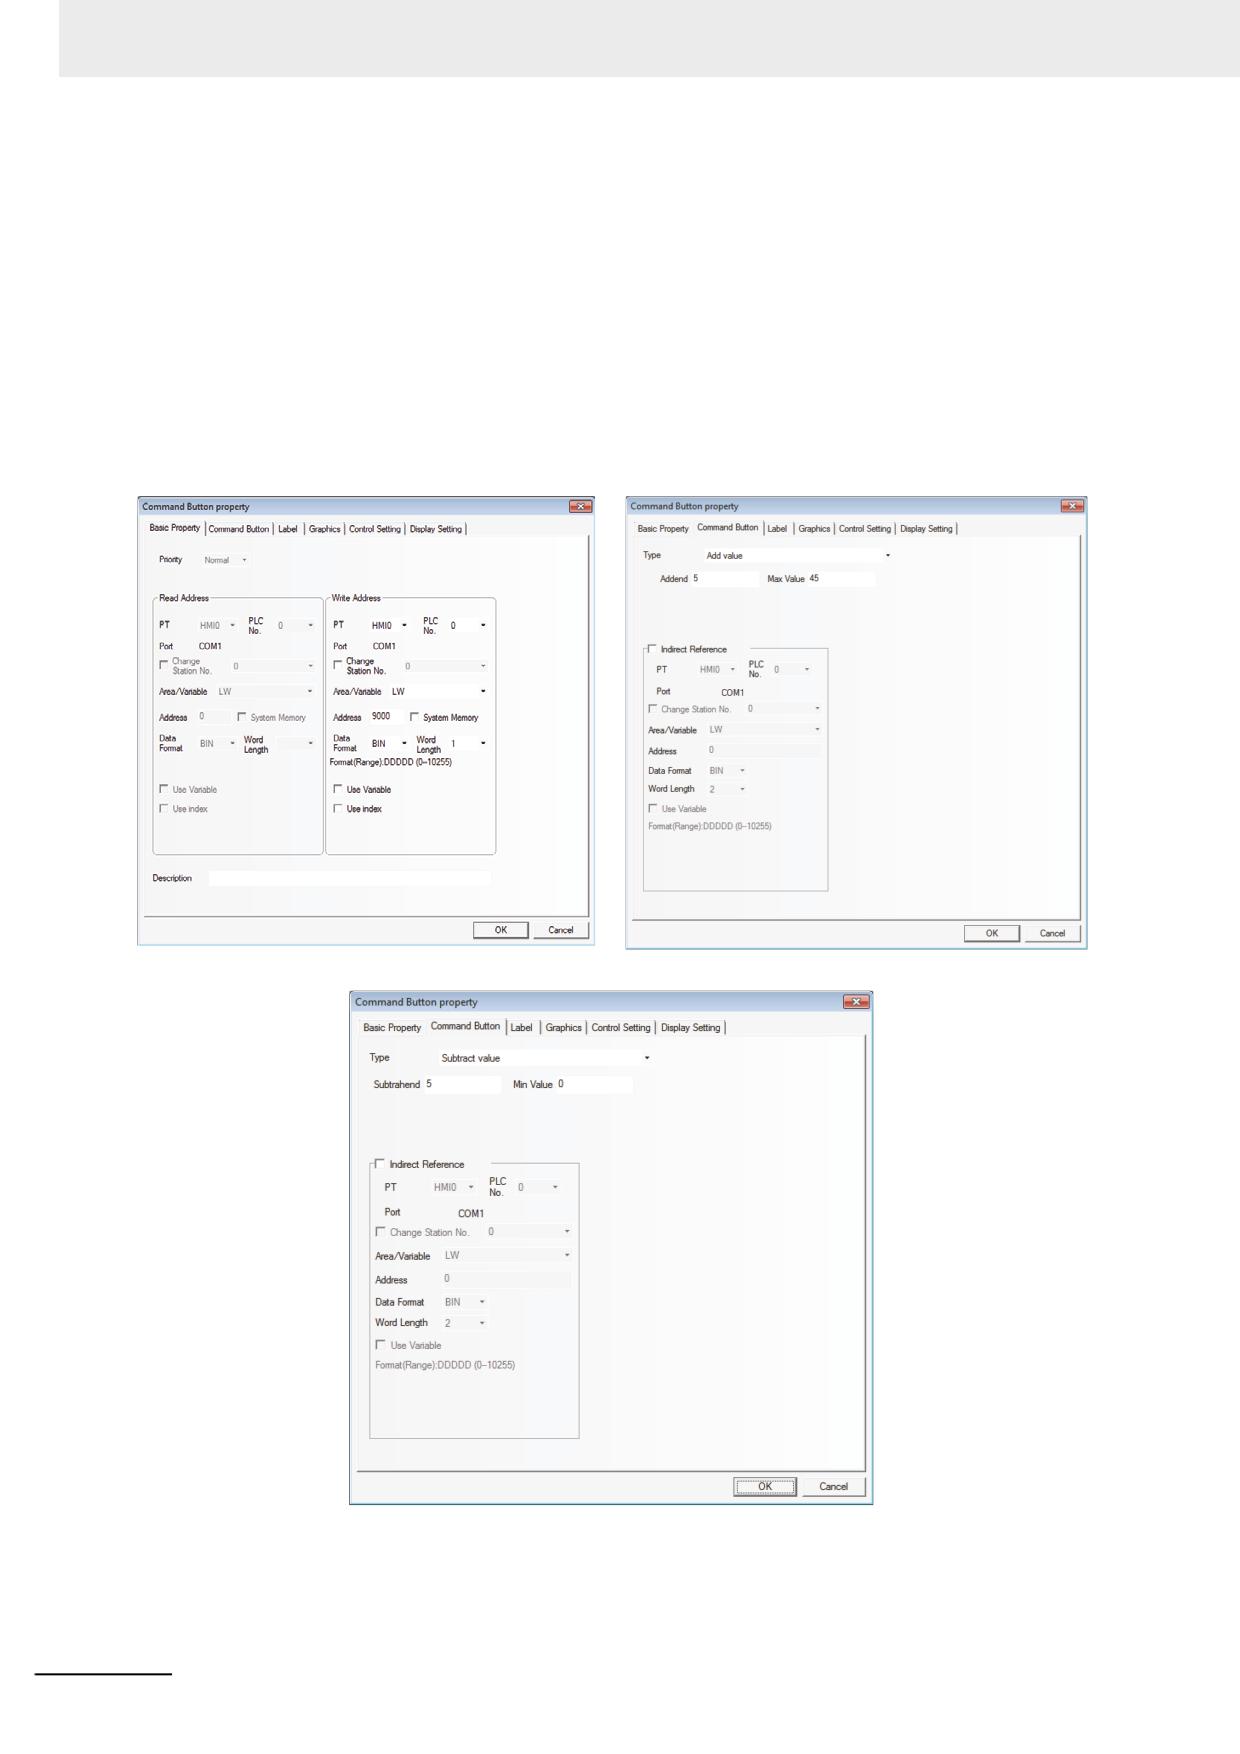
3 Functions of NB-Designer
4
Create two recipe data transmission components with both addresses of 4X100, and one
component is used to download the recipe data and the other is used to upload the recipe data.
5
Design two Command Button components (Up and Down) for the user to retrieve and change
each group of recipe data conveniently. After the Up button is pressed for retrieving data
upwards, the system will subtract 5 from LW9000. Because each group of recipe data is made
of 5 words, each time the Up button is pressed, RWI0 displays the Recipe data with a smaller
Recipe No. group. After the Down button is pressed for retrieving data downwards, the system
will add 5 to LW9000. Because each group of recipe data is made of 5 words, so each time the
Down button is pressed, RWI0 displays the Recipe data with a larger Recipe No. group. The
upper limit of recipe data is 45 (10 groups of recipes), as shown below:
3-350
NB-series Programmable Terminals NB-Designer Operation Manual(V106)
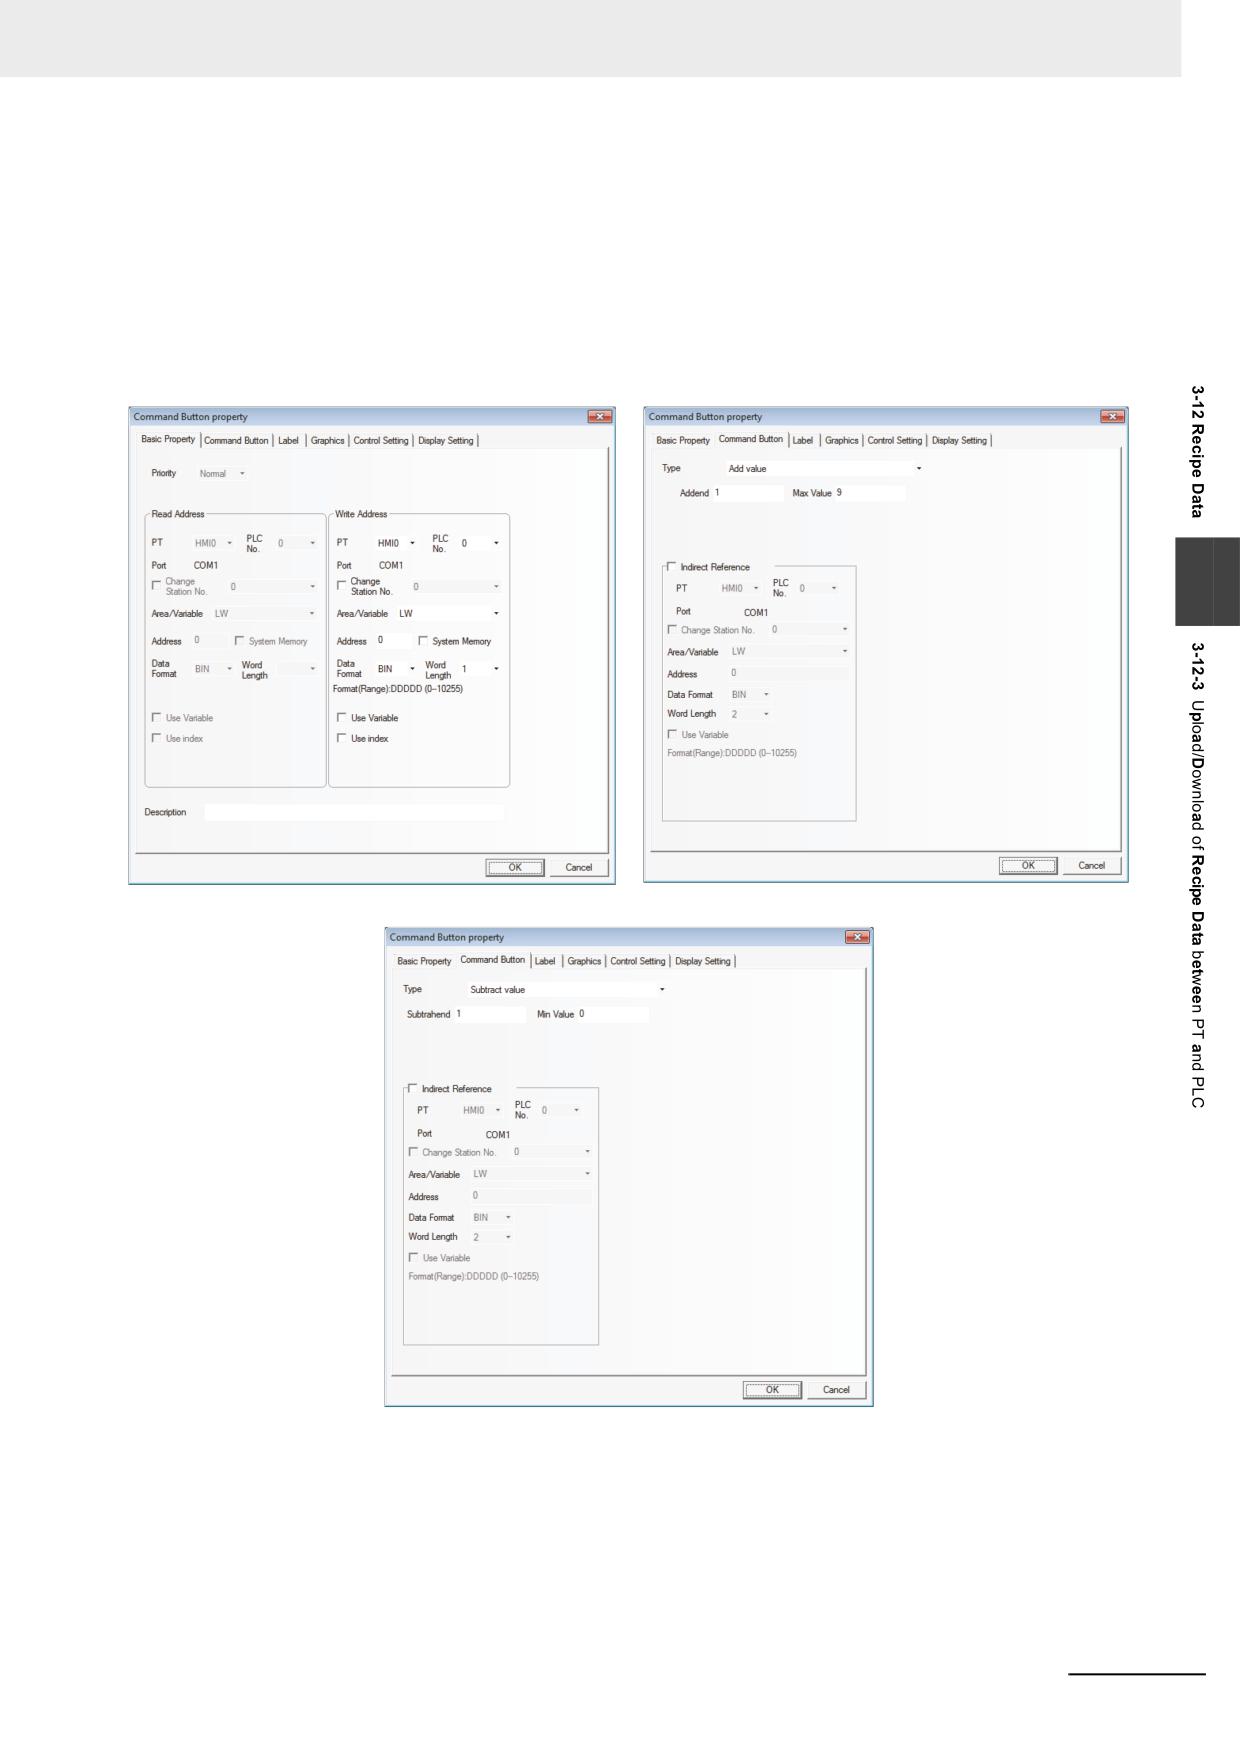
3 Functions of NB-Designer
6
Show which group is selected currently.
Later, create another two Command Button components with address of LW0 for both of them,
and Setting Mode of “Subtract value” and “Add value” respectively. And no graphics is needed.
Overlay the component of “Add value” on “Down” button which was created at the step 4.
Overlay the component of “Subtract Value” on “Up” button which was created at step 4. The
value of LW0 will vary accordingly, and it will display the group where the current recipe data
locate, as shown below:
3
NB-series Programmable Terminals NB-Designer Operation Manual(V106)
3-351
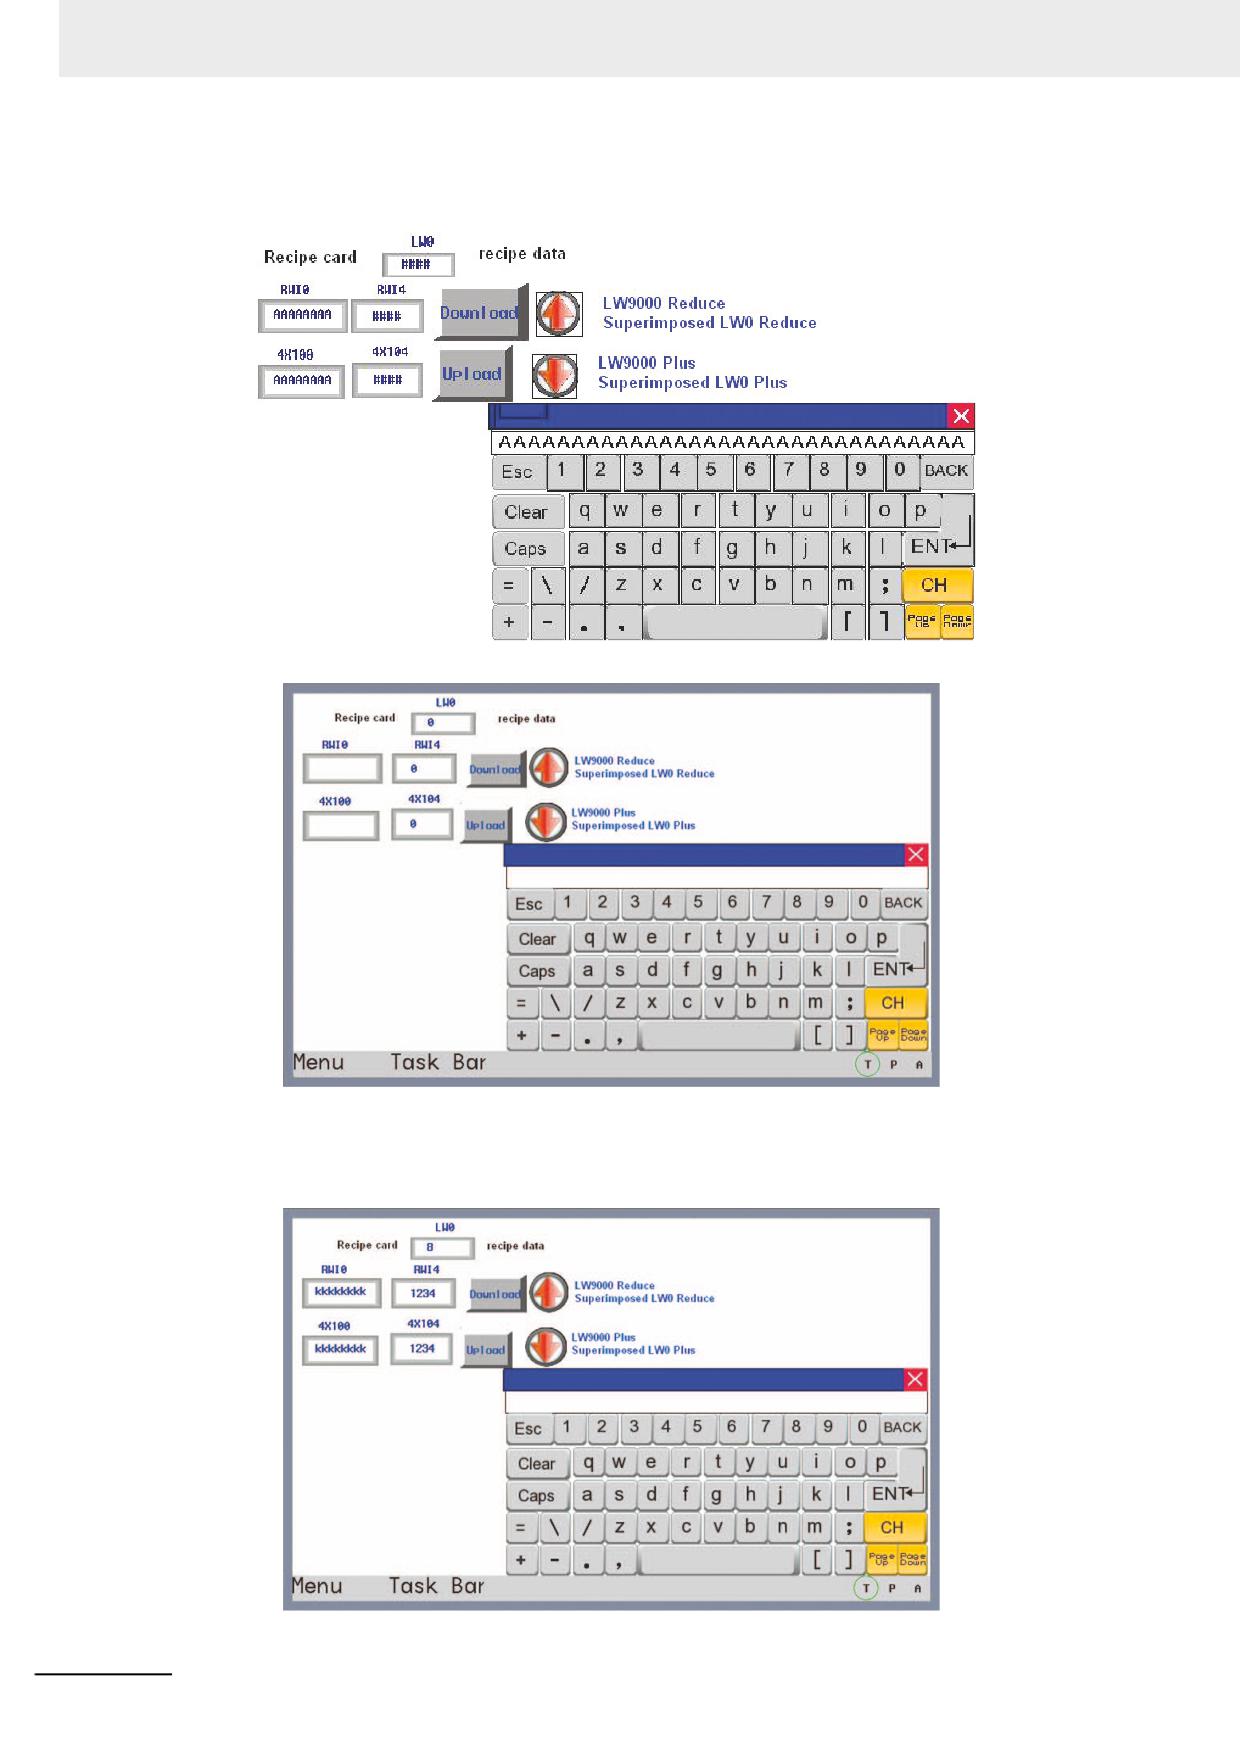
3 Functions of NB-Designer
7
Place another keyboard in the screen, and add some texts for decoration, then the project is
thoroughly completed.
After Save, Compile operations, perform the offline test for the project.
Input the 10 groups of recipe data into the recipe memory one by one, then switch to Group 8
of recipe data to change the name to “KKKKKKKK”, recipe data to “1234”, then you will see the
data in 4X100 and 4X10⁴ will become “KKKKKKKK” and “1234” respectively after the
Download button is pressed, as shown below:
3-352
NB-series Programmable Terminals NB-Designer Operation Manual(V106)
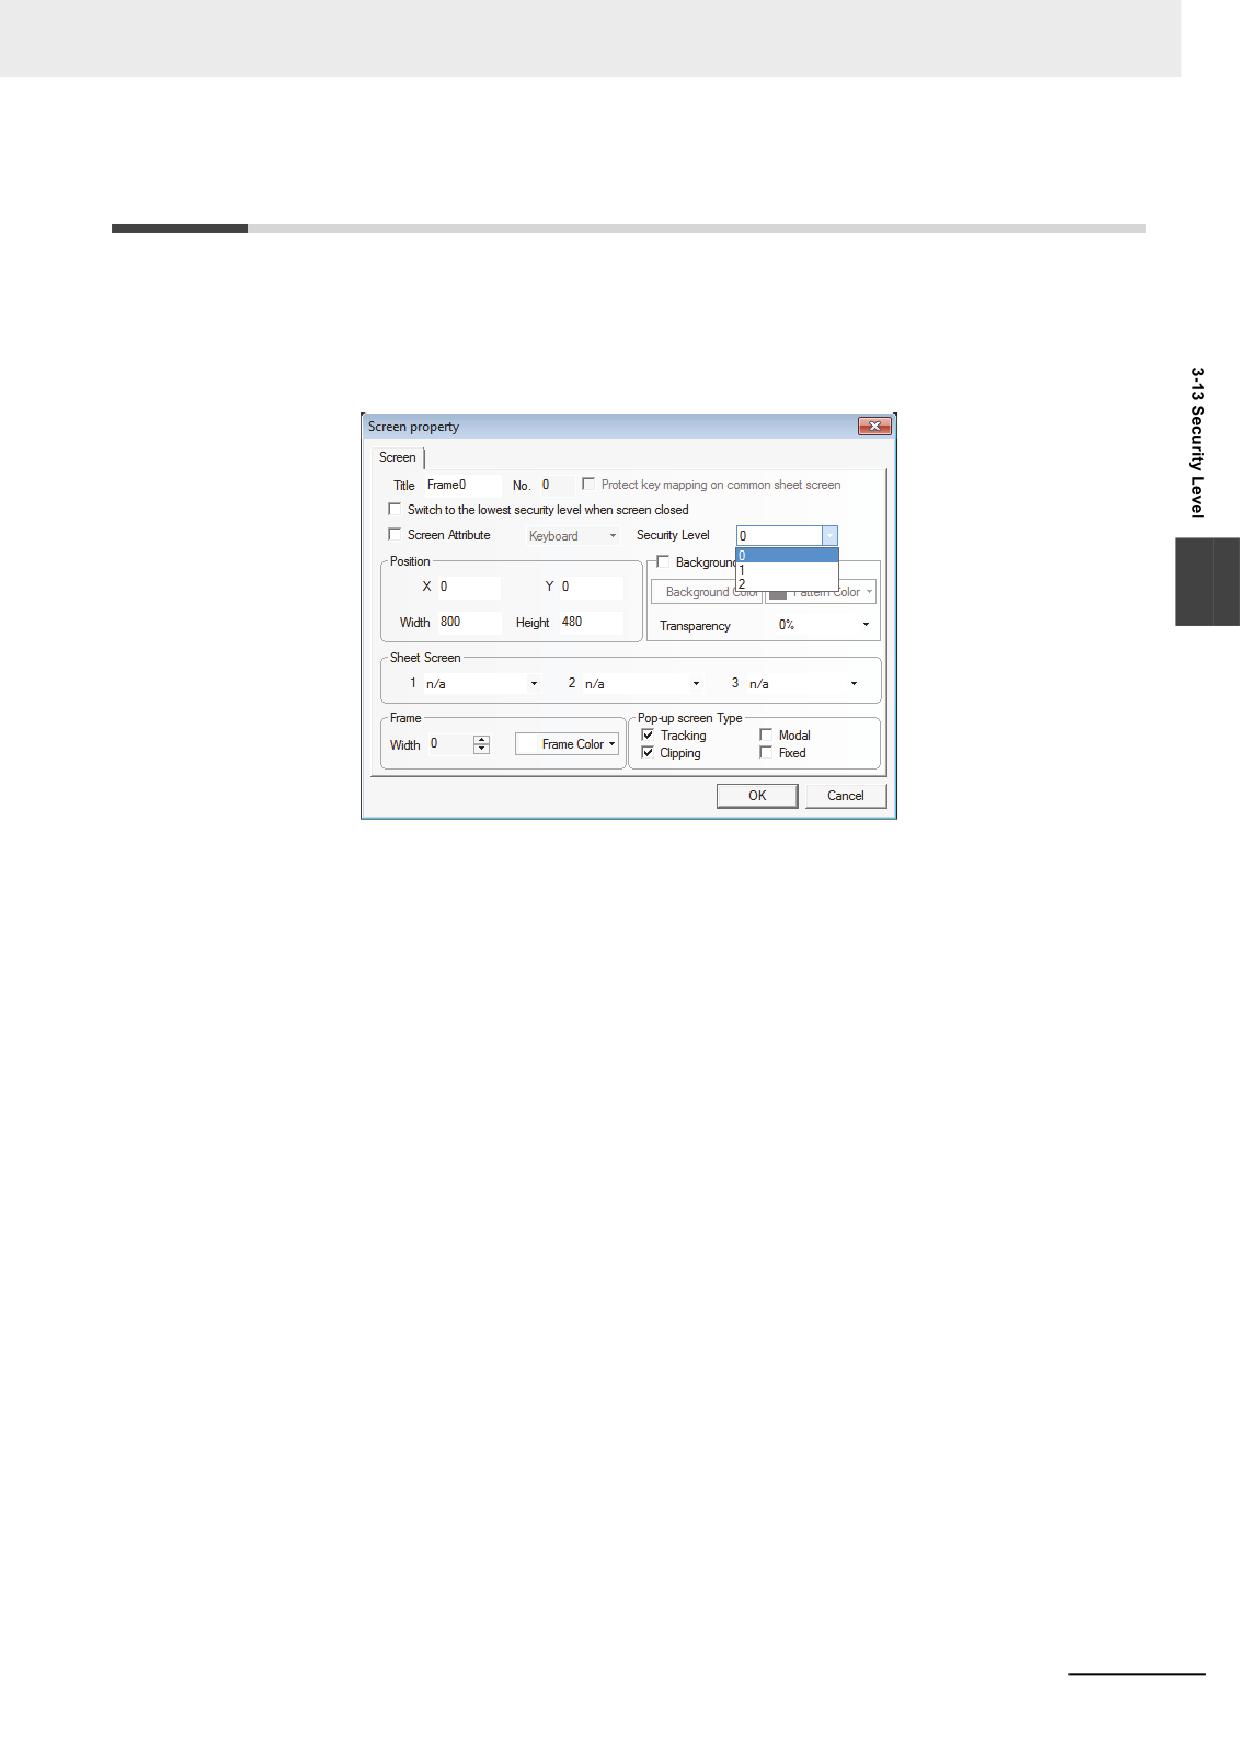
3 Functions of NB-Designer
3-13 Security Level
Security Level is used to set the access authority for different users to enhance the security of the
project. Only the user having the high-level password can access the high-level screen, thus enhancing
the security of the project significantly.
When setting Screen Property, we can see one column of “Security Level”. That’s to say, we can
specify the Security Level for any screen, as shown below:
3
The Security Level is only valid for the Base Screen. One project has 3 Security Levels, i.e. High
(2), Common (1) and Low (0) by default. The default security level is Low when creating a new screen.
You can set different passwords for each security level in the [PT Property]. The user with higher
security level can access the screen with the lower security level, while the user with the lower
security level can’t access the screen with the higher security level. Such kind of method is helpful
to the security management. For example, we can place the important switches into the screen with the
higher security level, so the user can’t access them after they enter this screen, and the contents can
be accessed only after the password for the higher security level is input.
Here is an example about security level usage: Firstly, select [File] / [New], and double-click PT in the
Project Work Space, then set The number of Security Levels to 3, 1-level Password to 1111 and 2-level
Password to 888888 in Security Levels Setting tab of PT Property dialog box, as shown below:
NB-series Programmable Terminals NB-Designer Operation Manual(V106)
3-353
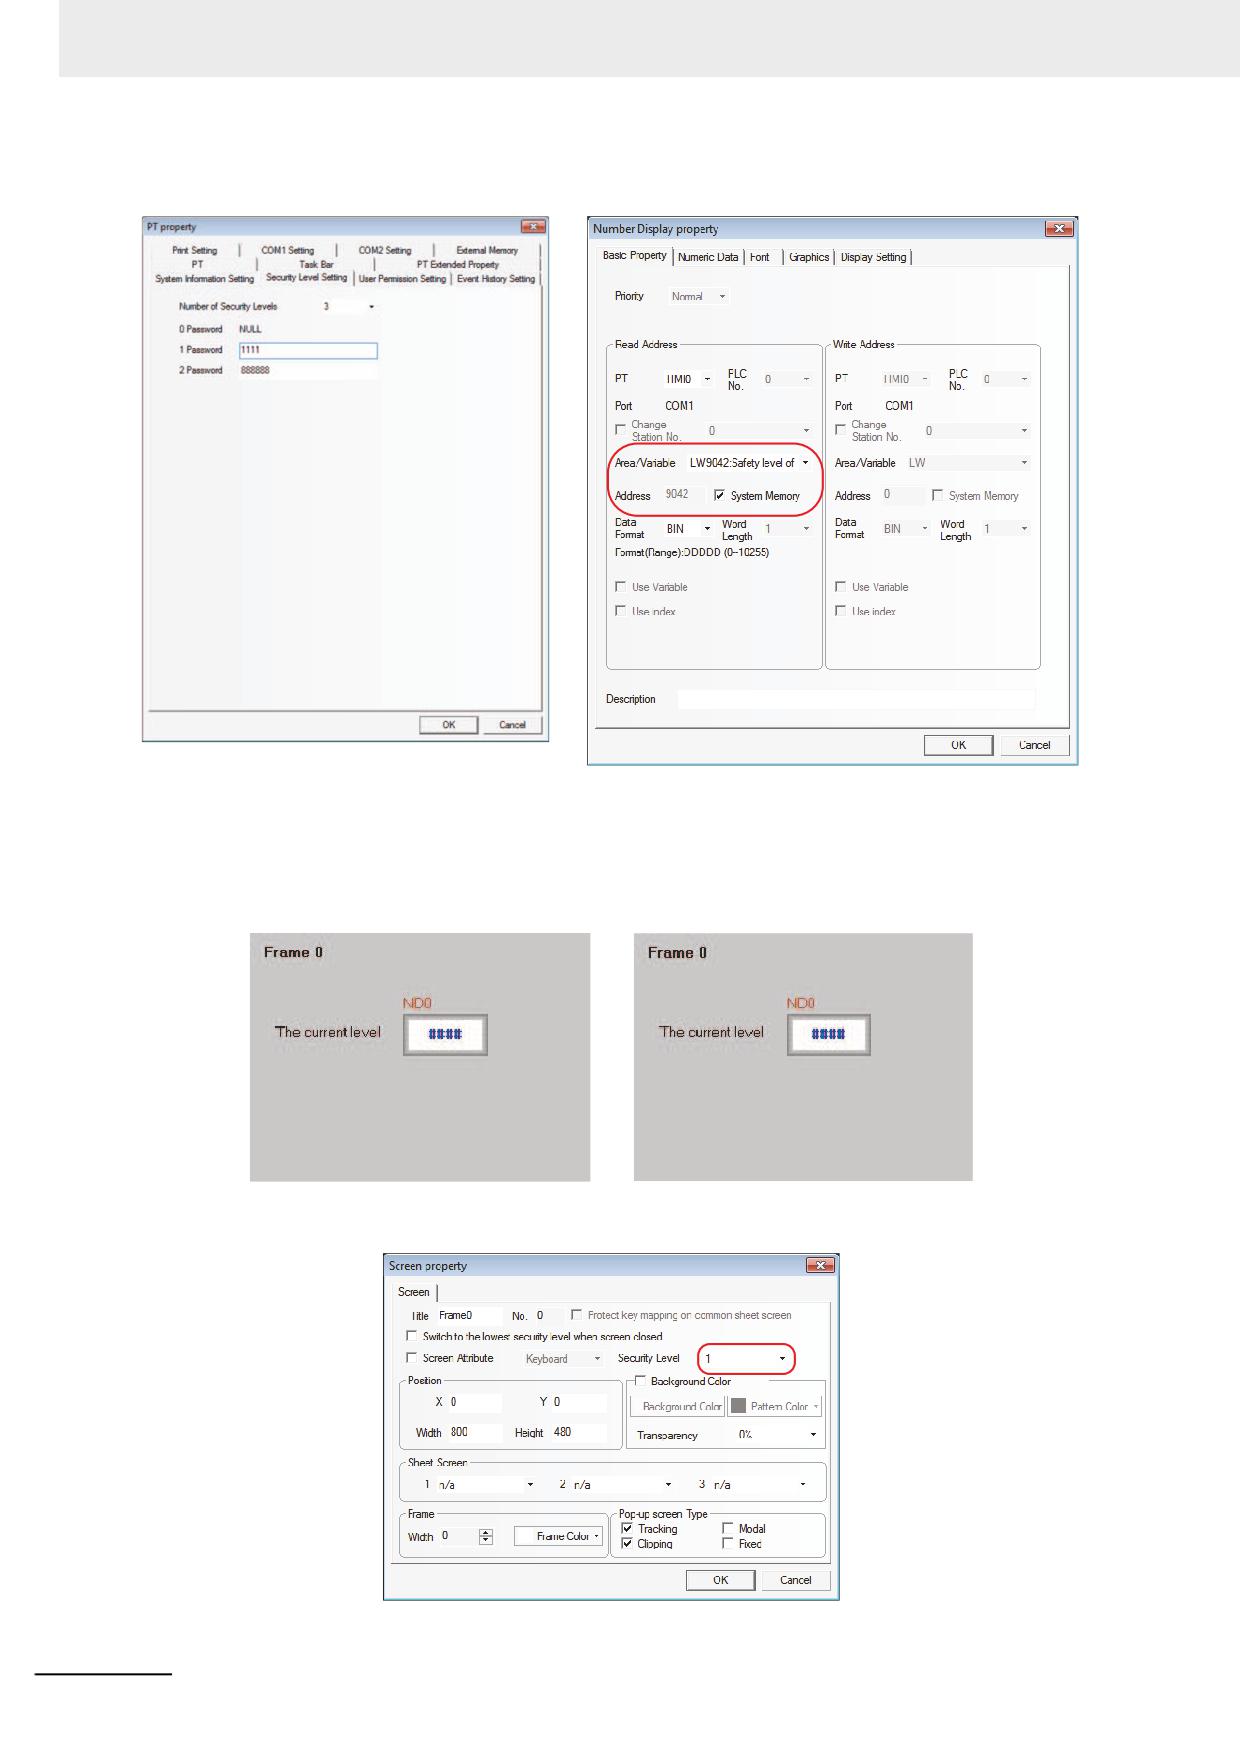
3 Functions of NB-Designer
LW9042 reserved by the system is used to indicate the security level of the current Base Screen.
Create one Number Display component and place it into Frame 0 to display the current security level,
as shown below.
The project is shown as the lower left graphics and the effect is as shown in the lower right graphics
after Save, Compile and Offline test operations are done.
Because no password is input, the security level at initial state should be 0. Then specify the security
level to Common (1) in Screen Property of Frame 10 as below.
3-354
NB-series Programmable Terminals NB-Designer Operation Manual(V106)
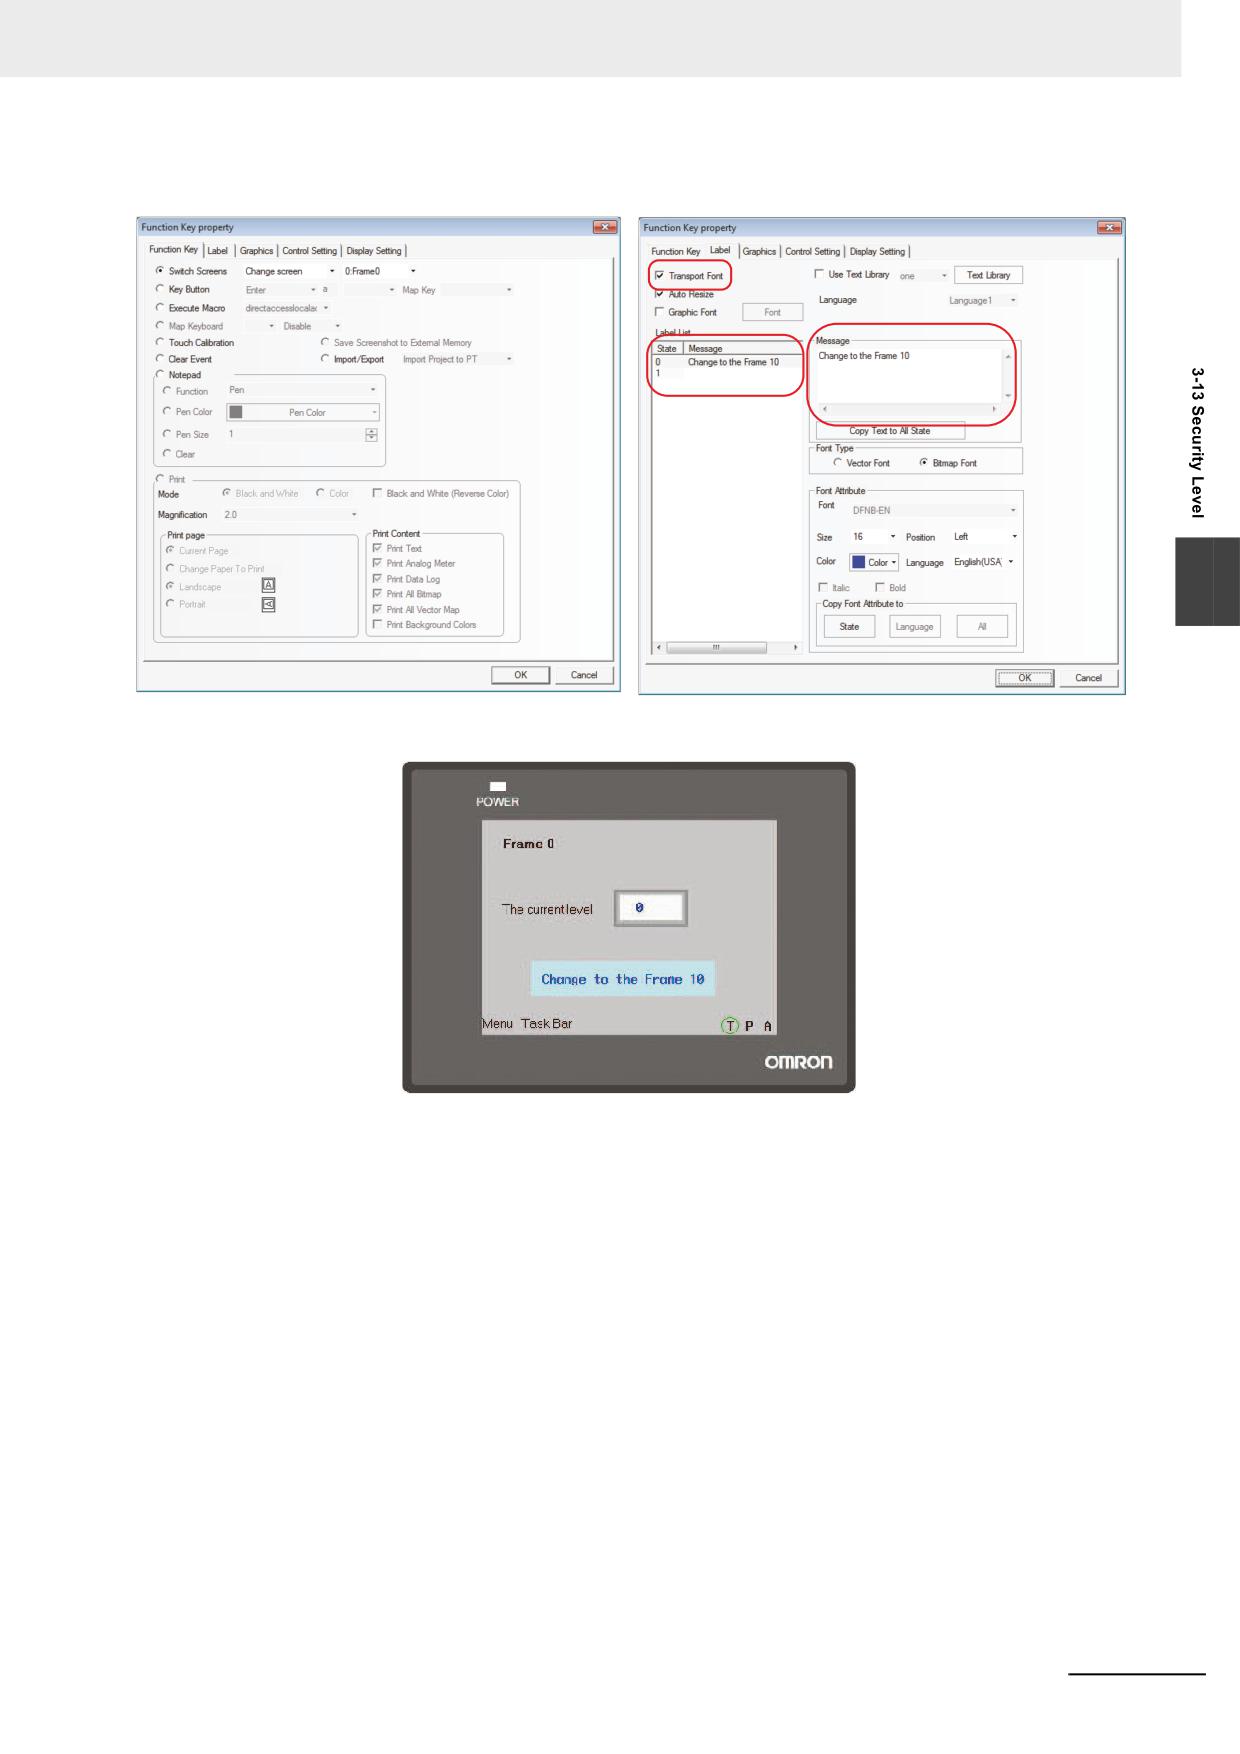
3 Functions of NB-Designer
Create one Function Key in Frame 0 with the Properties as follows:
3
Perform Save, Compile and Offline test operations, and the effect is as shown below:
Pressing the Function Key button can’t switch to Frame 10. It is because the current security level is 0
while the security level of Frame 10 is 1, so the screen with the higher security level can’t be accessed
from the screen with the lower security level. We can access the higher security level screen only after
inputting the password corresponding to the higher security level. LW9040 to LW9041 reserved by the
system are used to input the security level passwords. Then place another Number Input
component with the Storage Format of “password” in Frame 0, as shown below:
NB-series Programmable Terminals NB-Designer Operation Manual(V106)
3-355
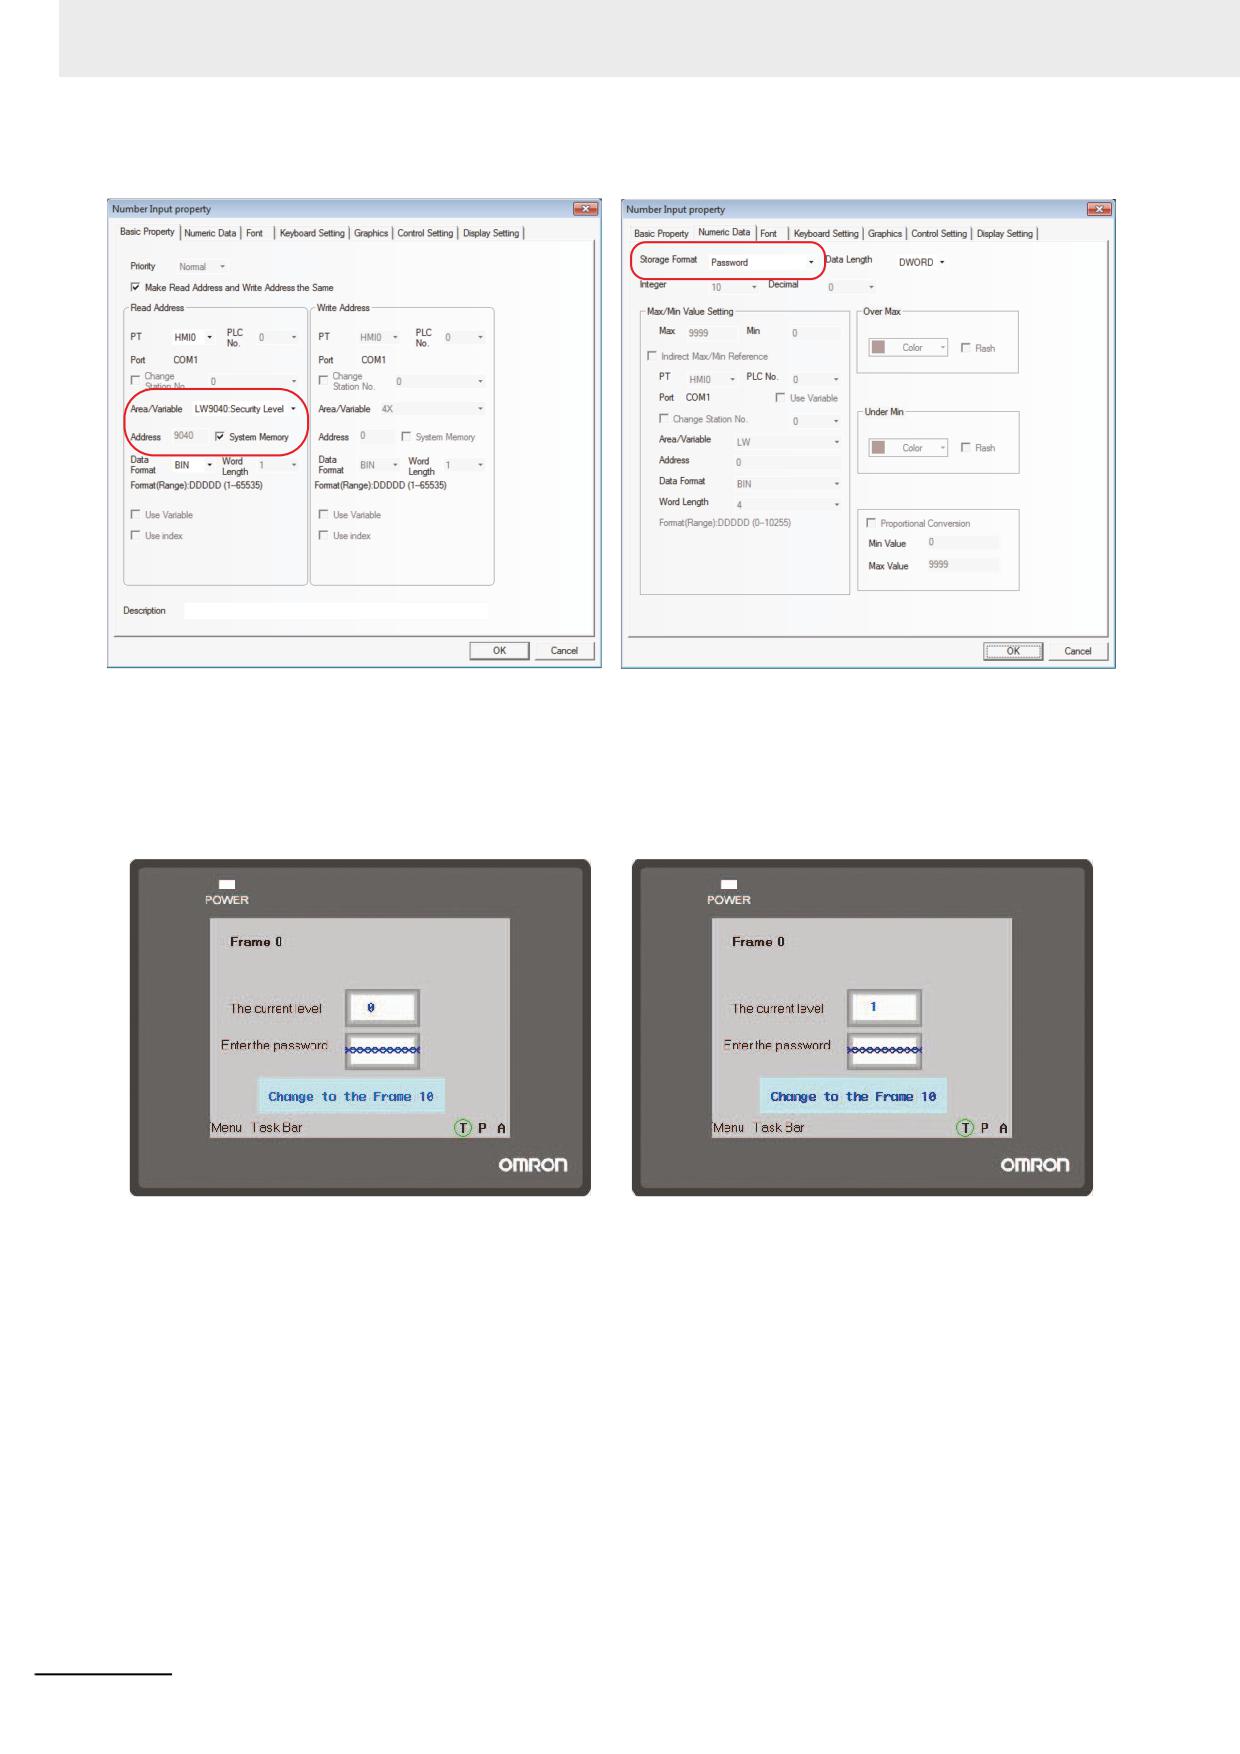
3 Functions of NB-Designer
Note Since the system memories from LW9040 to LW9041 are used because of password input, the word length
should be set to 2 words.
After the Save, Compile and Offline test operations are performed; the effect is shown as the lower left
graphics: Pressing Change screen button is invalid for the current level is 0, and when the password of
1111 is input, the current security level becomes 1, as shown below:
3-356
NB-series Programmable Terminals NB-Designer Operation Manual(V106)
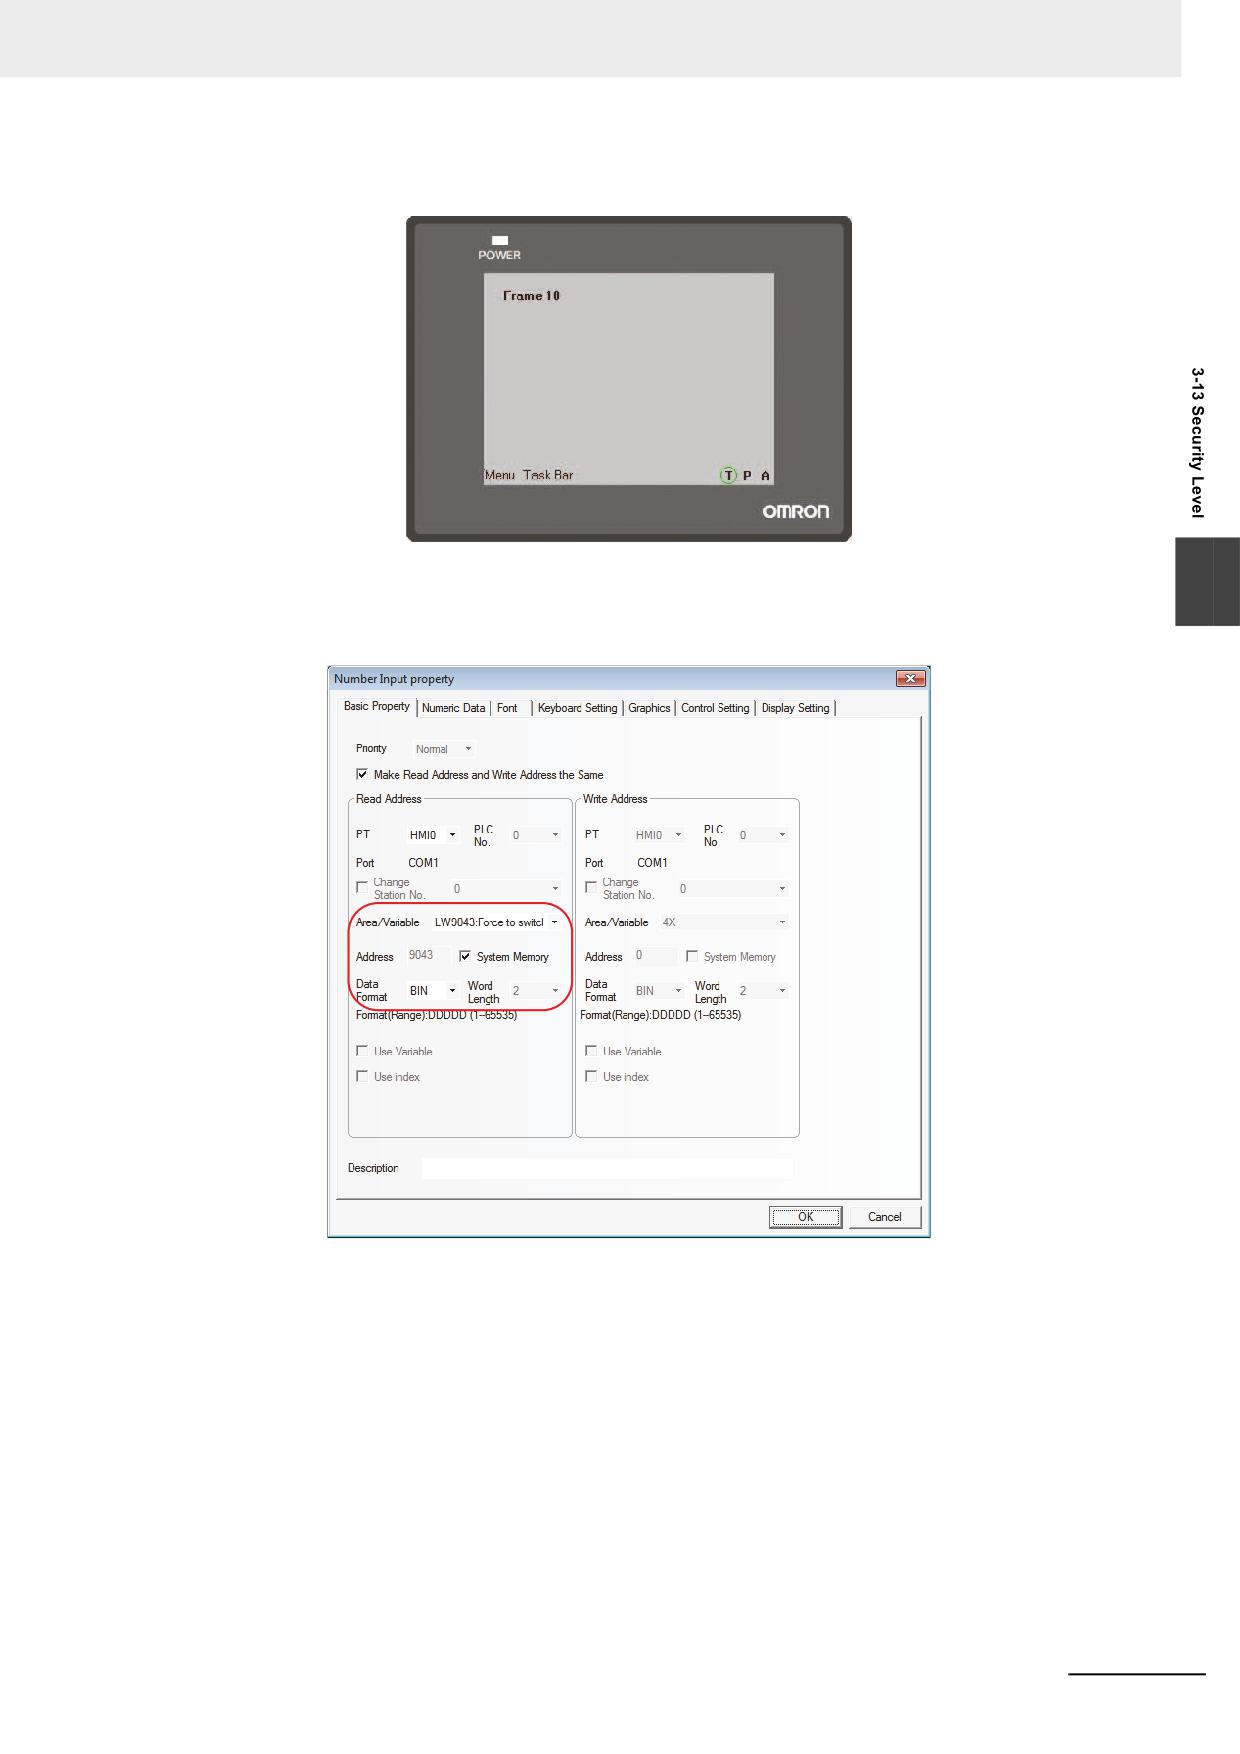
3 Functions of NB-Designer
Now the current security level has become 1, the screen will switch to Frame 10 successfully when the
Change screen button is pressed, as shown below:
When the current security level is High, how to switch to Low level? LW9043 reserved by the system
3
is used to perform the switching from the higher level to lower level. And the switching from
lower level to higher level is impossible. Place one Number Input component in Frame 0, as shown
below:
NB-series Programmable Terminals NB-Designer Operation Manual(V106)
3-357
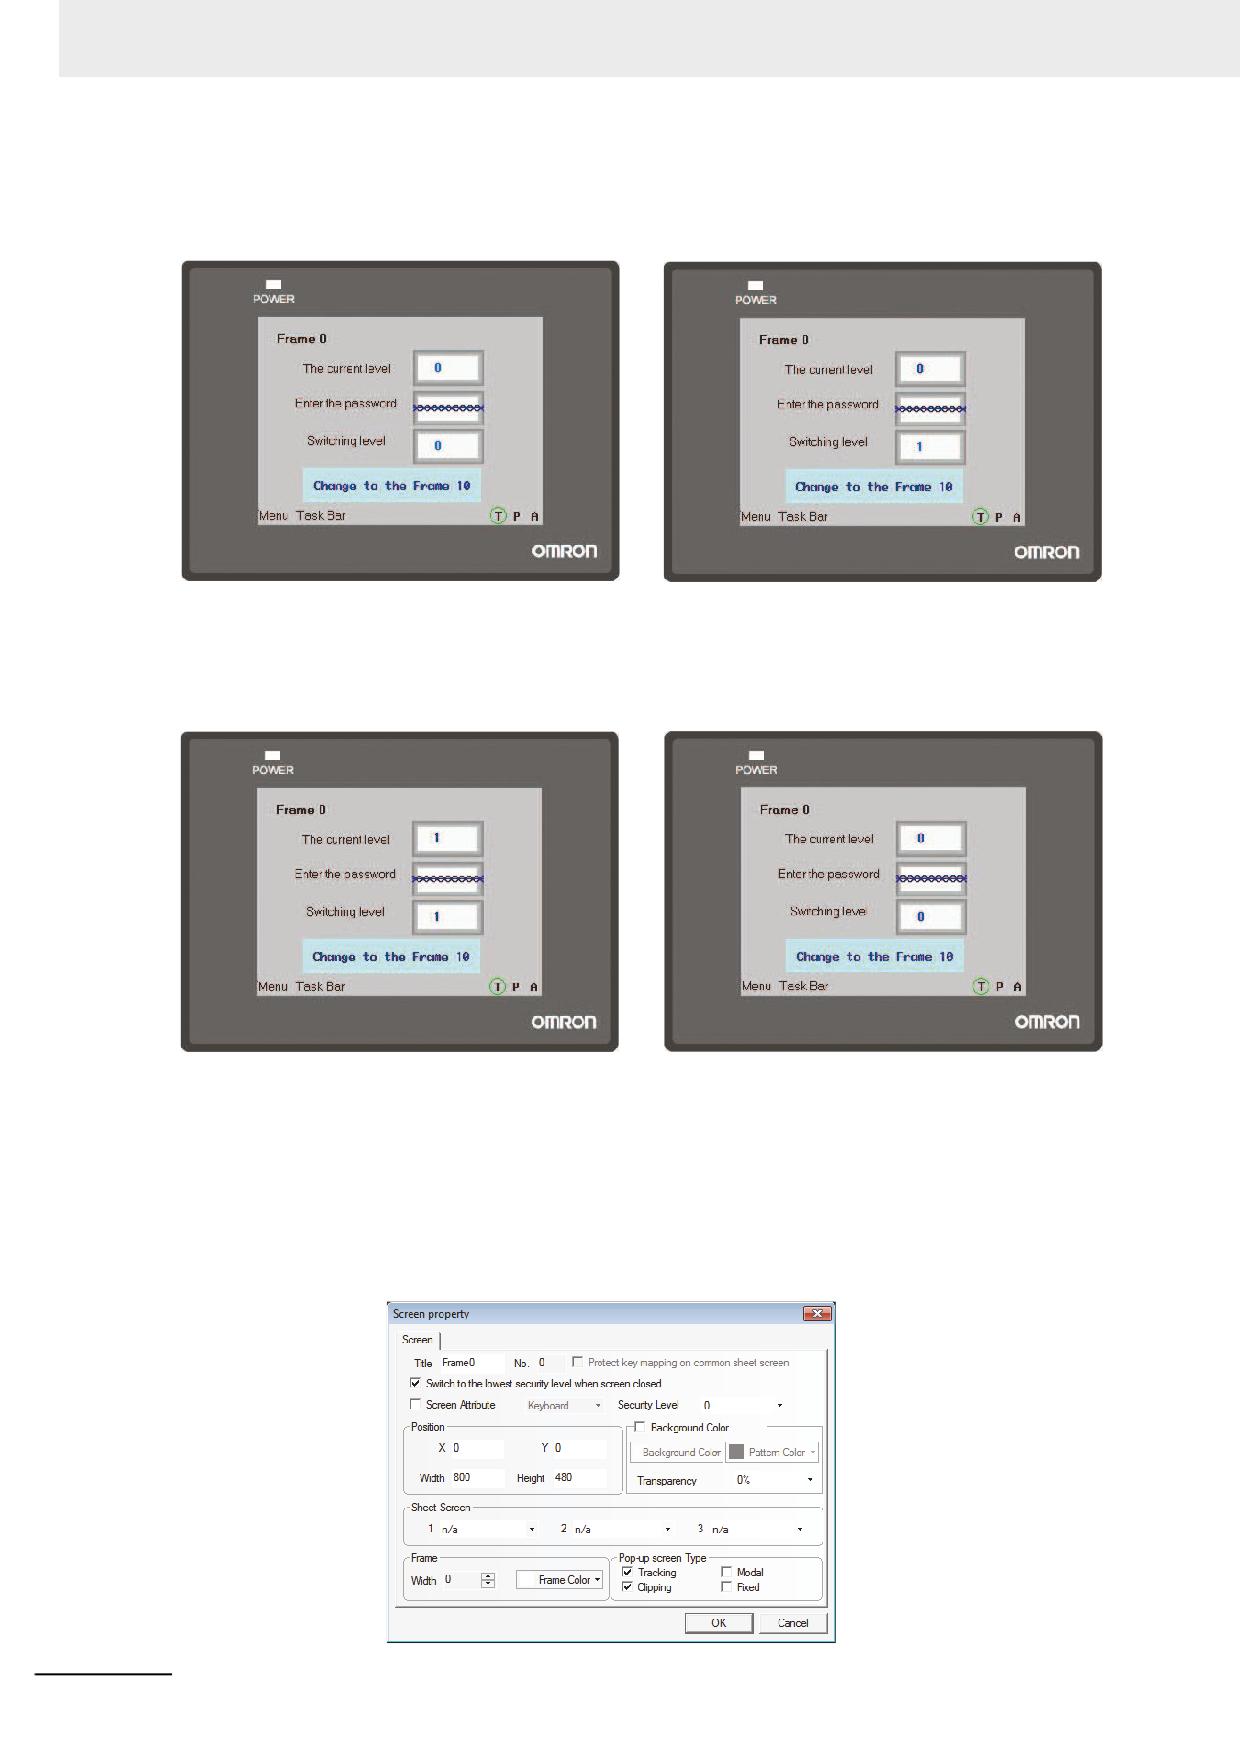
3 Functions of NB-Designer
After the Save, Compile and Offline test operations are performed, the state is shown as below. After 1
is input at Switching Level, the current security level will not become 1 because the switching from
lower level to higher level is impossible, as the lower right graphics shows.
Then input the password 1111 to make the current security level become 1, as the lower left graphics
shows. At this time, pressing the Function Key button can realize the switching to Frame 10. But if 0 is
input at Switching Level, the current security level will be switched to 0, then the switching to Frame 10
will be impossible, as the lower right graphics shows.
Designing the project by using the level password properly and giving the users permission with
different level each allow the security of application enhanced.
Switching to the lowest security level when screen closed
If the security level is set for one screen to realize the following function: the password will be
cleared automatically when the screen is closed, and the password needs to be input again when
the screen is entered again. The security level will become 0 every time the screen is closed. The
settings are as shown below:
3-358
NB-series Programmable Terminals NB-Designer Operation Manual(V106)
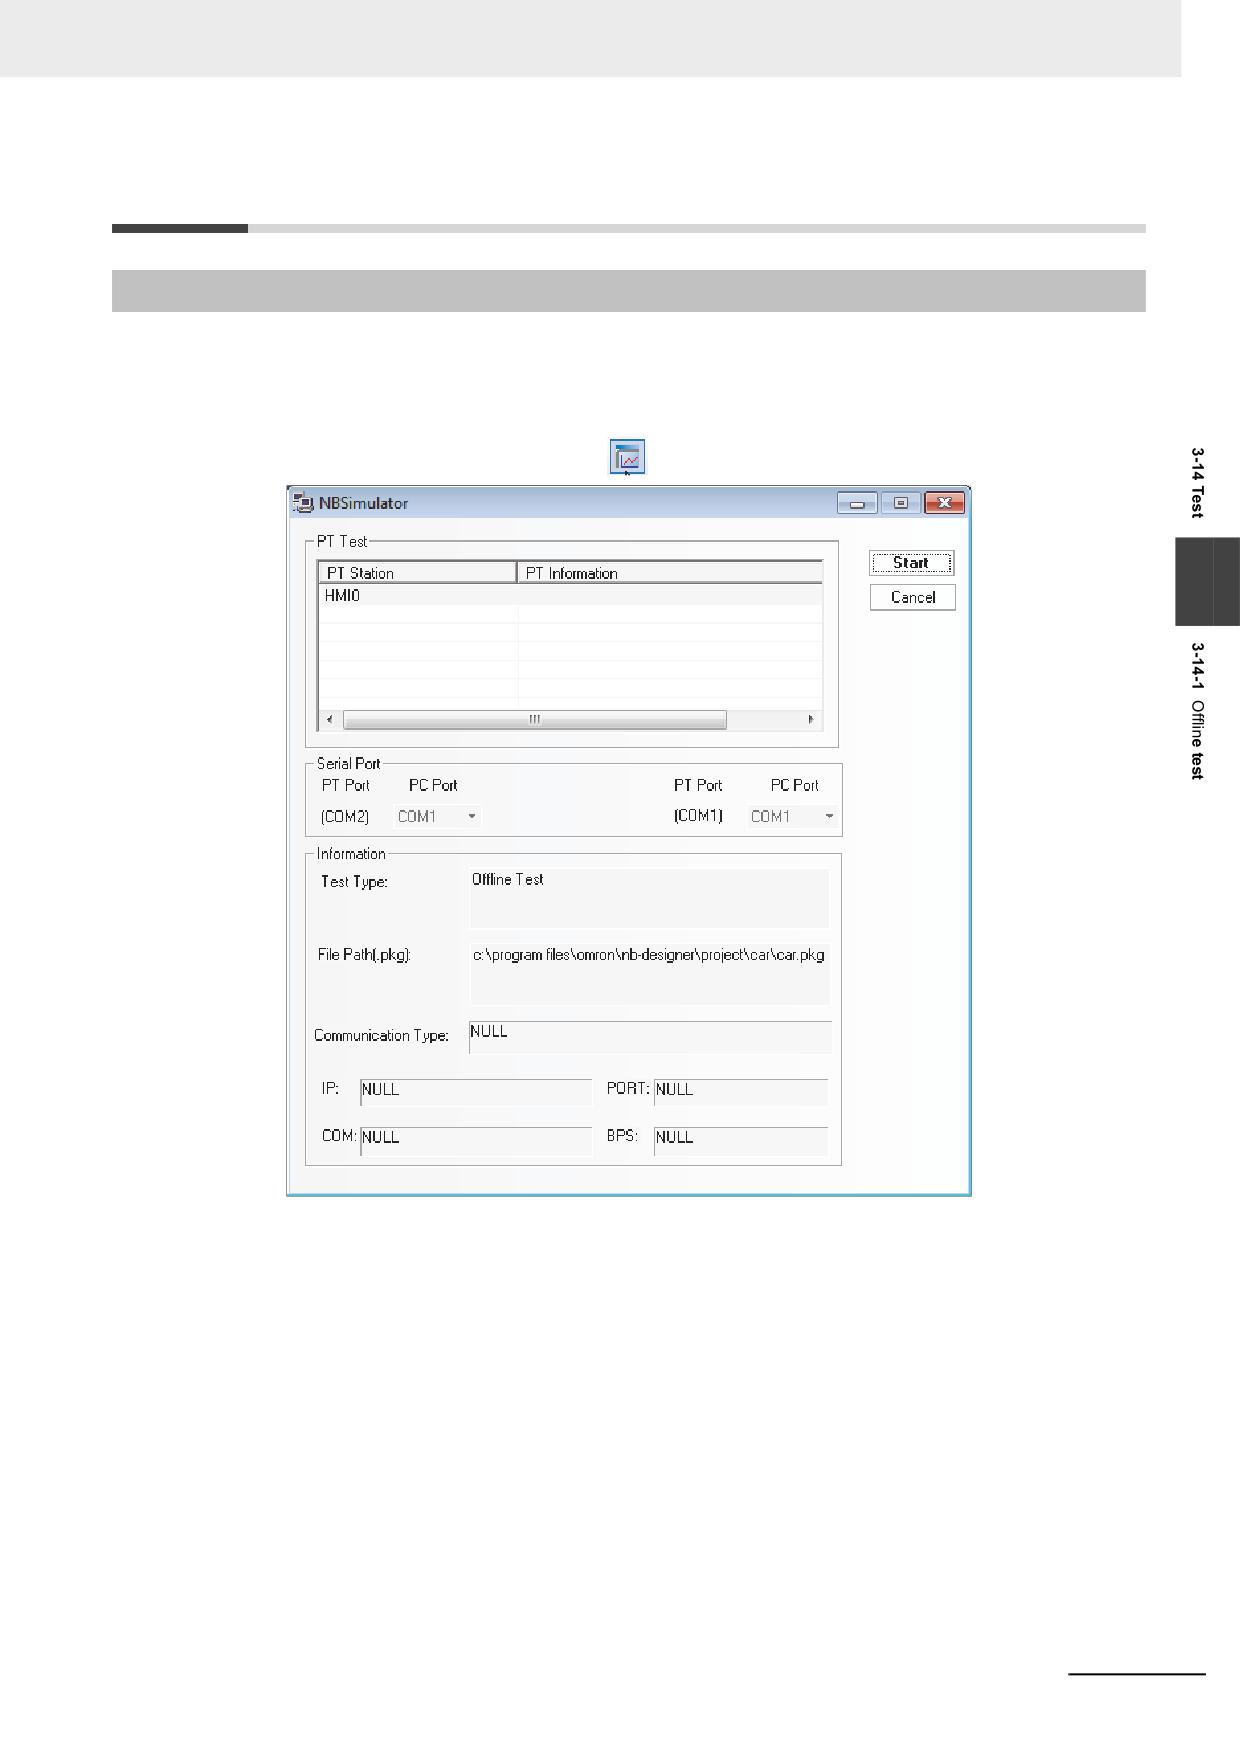
3 Functions of NB-Designer
3-14 Test
3-14-1
Offline test
NB-Designer supports the offline test function. Since the users can review the operation of the screen
data on creation without downloading the screen data to PT, the Offline Test can improve efficiency of
the screen creating.
Select [Offline test] in [Tools] menu or press
icon, then the following dialog box will pop up:
3
Click the “Start” button after selecting the PT to be simulated, then you will see the offline test window.
NB-series Programmable Terminals NB-Designer Operation Manual(V106)
3-359
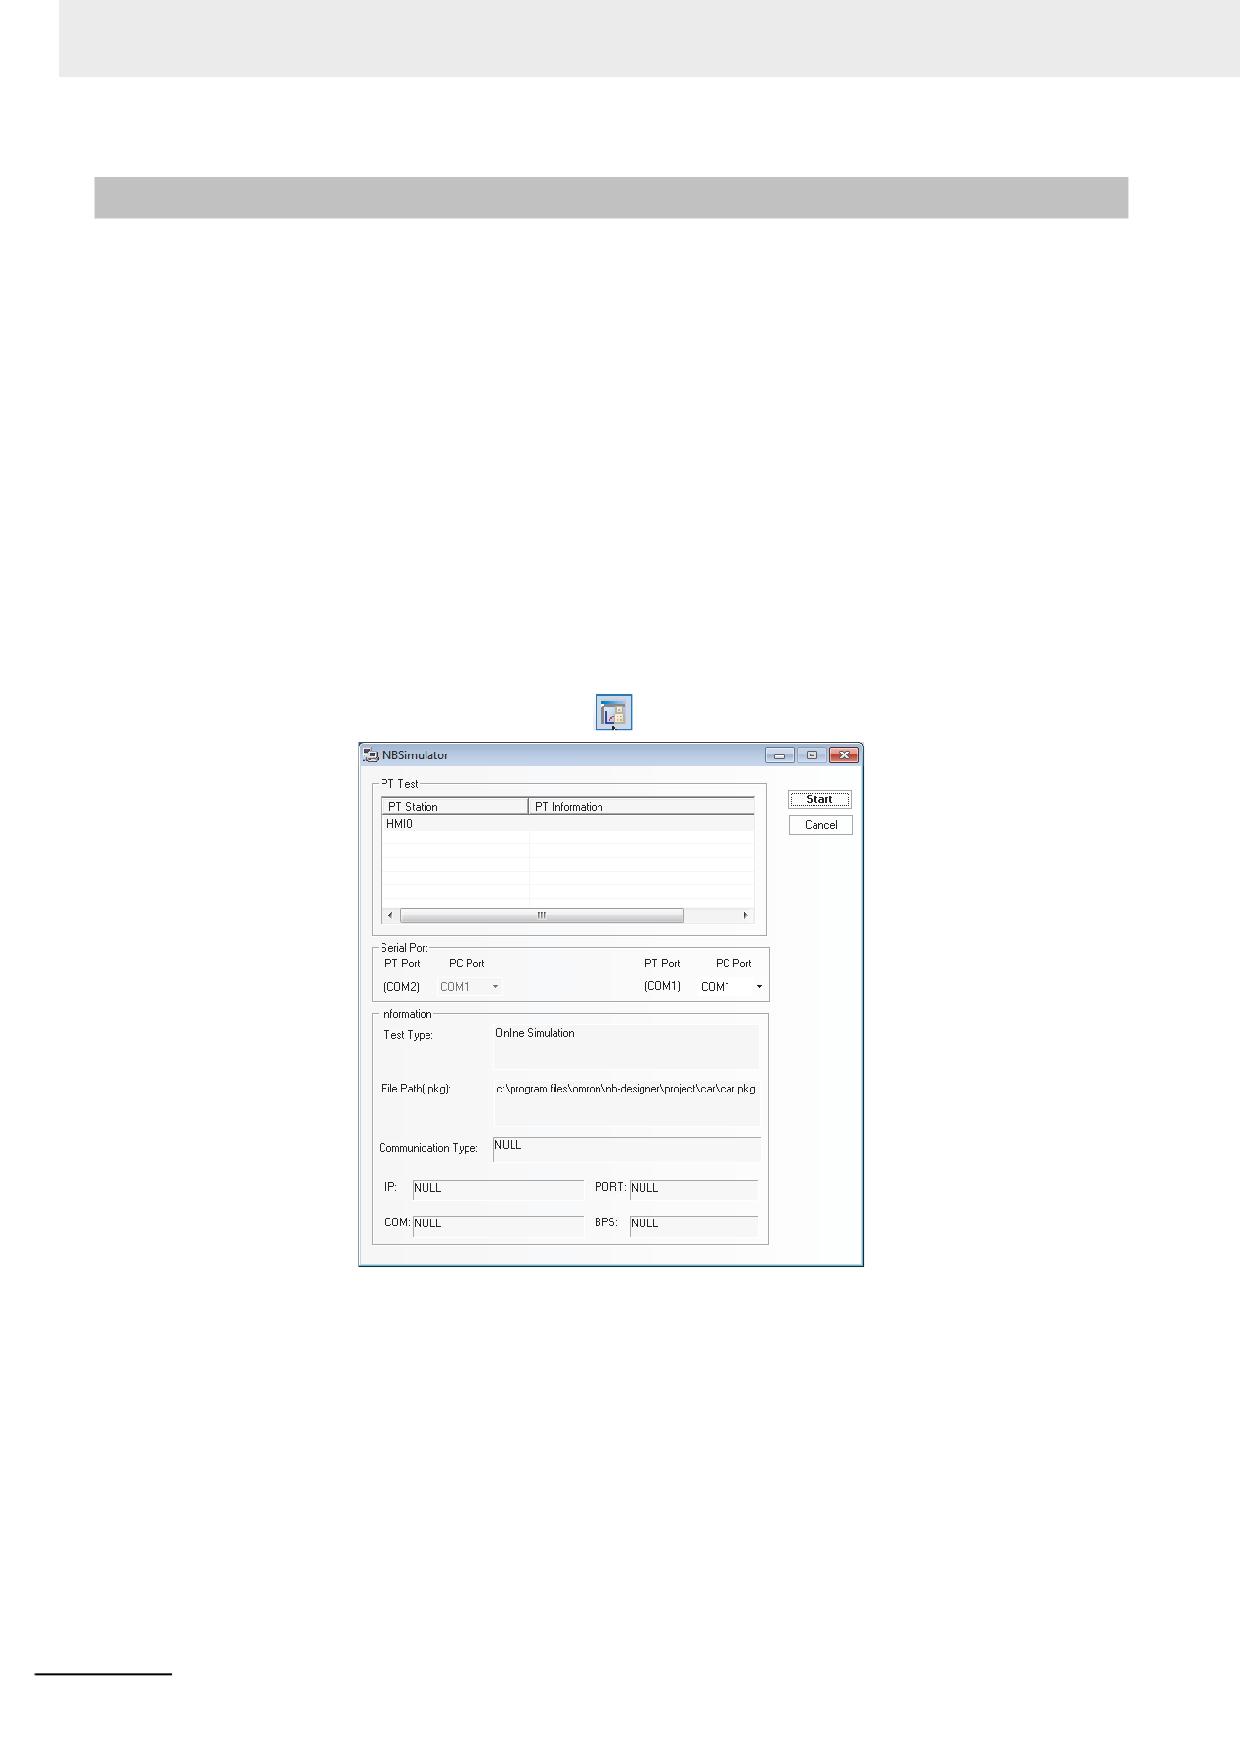
3 Functions of NB-Designer
3-14-2
Direct Online test
NB-Designer supports online test operation. The online test provides the result which is equivalent with
the operation executed after downloading to PT and it allows to test directly on PC. Using the online
test during debugging can save a lot of time taken by the repeated downloading. The online test is
classified into direct online test and indirect online test, which are described as follows:
Direct online test is a test method that directly connects the PLC with the serial port of PC to test the
operation. Obtaining the dynamic PLC data without need to connect the PT is its advantage but the
communication between the PC and the PLC can support only RS-232 communications. During
debugging of PLC with RS-485 port, the adaptor that can convert RS-232 to RS-485/422 must be used.
Note 1
The test time of direct online test is 15 minutes. When 15 minutes is exceeded, the following prompt infor-
mation “The test time is exceeded, please perform the test again.” will appear. Then, the window of the
test will be closed automatically.
2
The direct online test can be done only through the RS-232 communication method.
3
The wiring method of direct online test is the direct connection of the PLC programming cable with the
serial port of PC.
4
It does not support the direct connection with the PLC of Ethernet connection type.
5
It does not support the direct online test with the other PLC than that manufactured by OMRON.
After the screen data is compiled, press the
button, then the following dialog box will pop up:
Select the PT No. to be tested and the COM No. of PC to be connected to the PLC, then click the “Start”
button to start the direct online test.
3-360
NB-series Programmable Terminals NB-Designer Operation Manual(V106)
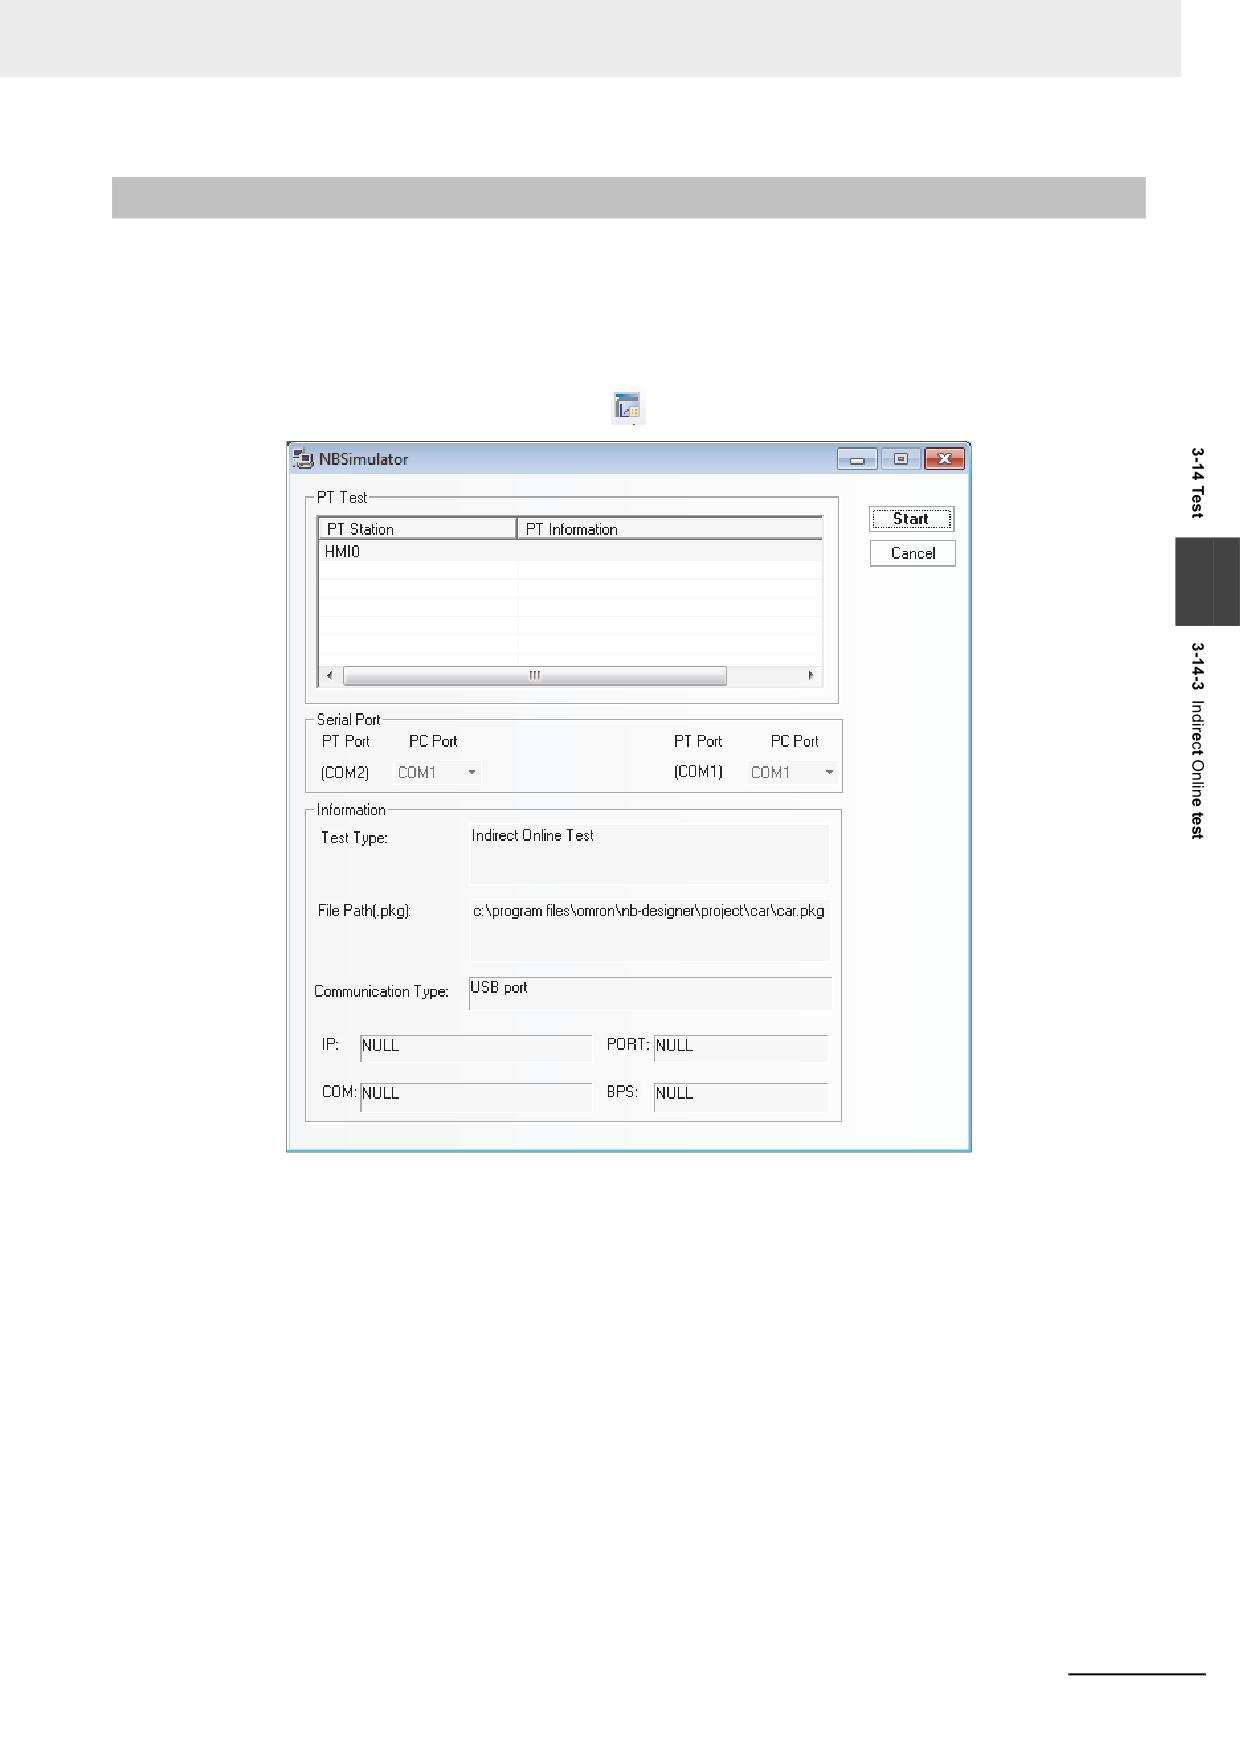
3 Functions of NB-Designer
3-14-3
Indirect Online test
The indirect online test is a method to obtain the data from the PLC through the PT and to test the
operations of PT. The indirect online test can obtain the data from the PLC dynamically, and the
operating environment is the same as that after the downloading except that the inconvenience of
downloading each time is avoided, thus it is quick and convenient, but it can’t be used independently
without the PT.
After the screen data is compiled, press the
button, then the following dialog box will pop up:
3
Select the PT to be tested, and click the “Start” button to start the test. NB Unit performs the indirect
online test through the USB, Ethernet or serial port.
Caution It does not support the indirect online test with the other PLC than that manufactured by OMRON.
NB-series Programmable Terminals NB-Designer Operation Manual(V106)
3-361
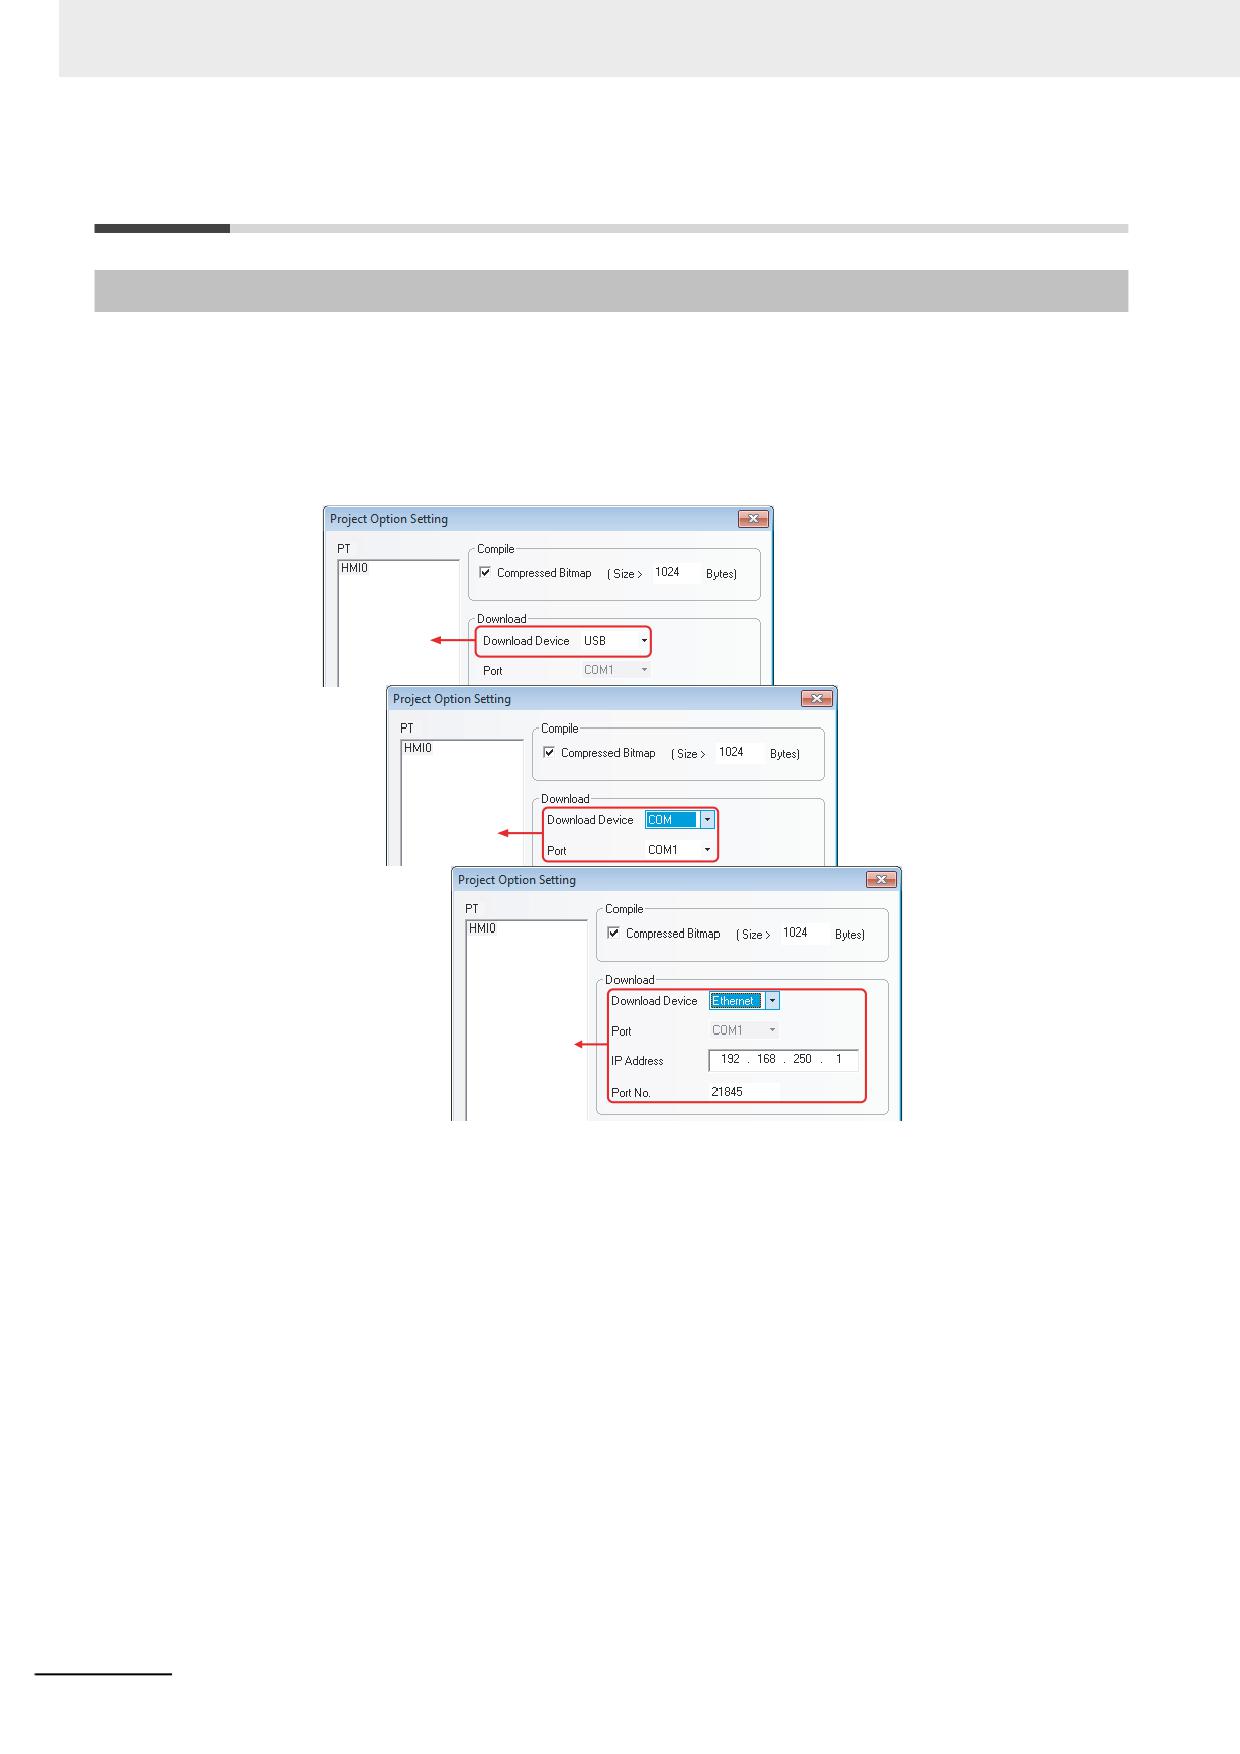
3 Functions of NB-Designer
3-15 Download
3-15-1
Transmission Setting
After the project is edited, it can be downloaded to the PT to perform the actual operations. NB-
Designer provides 3 download methods, i.e. USB, serial port, and Ethernet (The Ethernet is only
applicable to NB-TW01B(-V1).). Before the upload and download, you must set the communication
parameters firstly. You can select [Tools]-[Transmission Setting] menu to set the communication
parameters. After the [Project Option Setting] dialog box pops up, click the [Download Device] drop-
down list and select the required download way.
Download
via USB
Download via serial
port - used to select
the correct PC
Serial No.
Download via
Ethernet - used to
set the current IP
Address and Port
No. of PT
3-362
NB-series Programmable Terminals NB-Designer Operation Manual(V106)
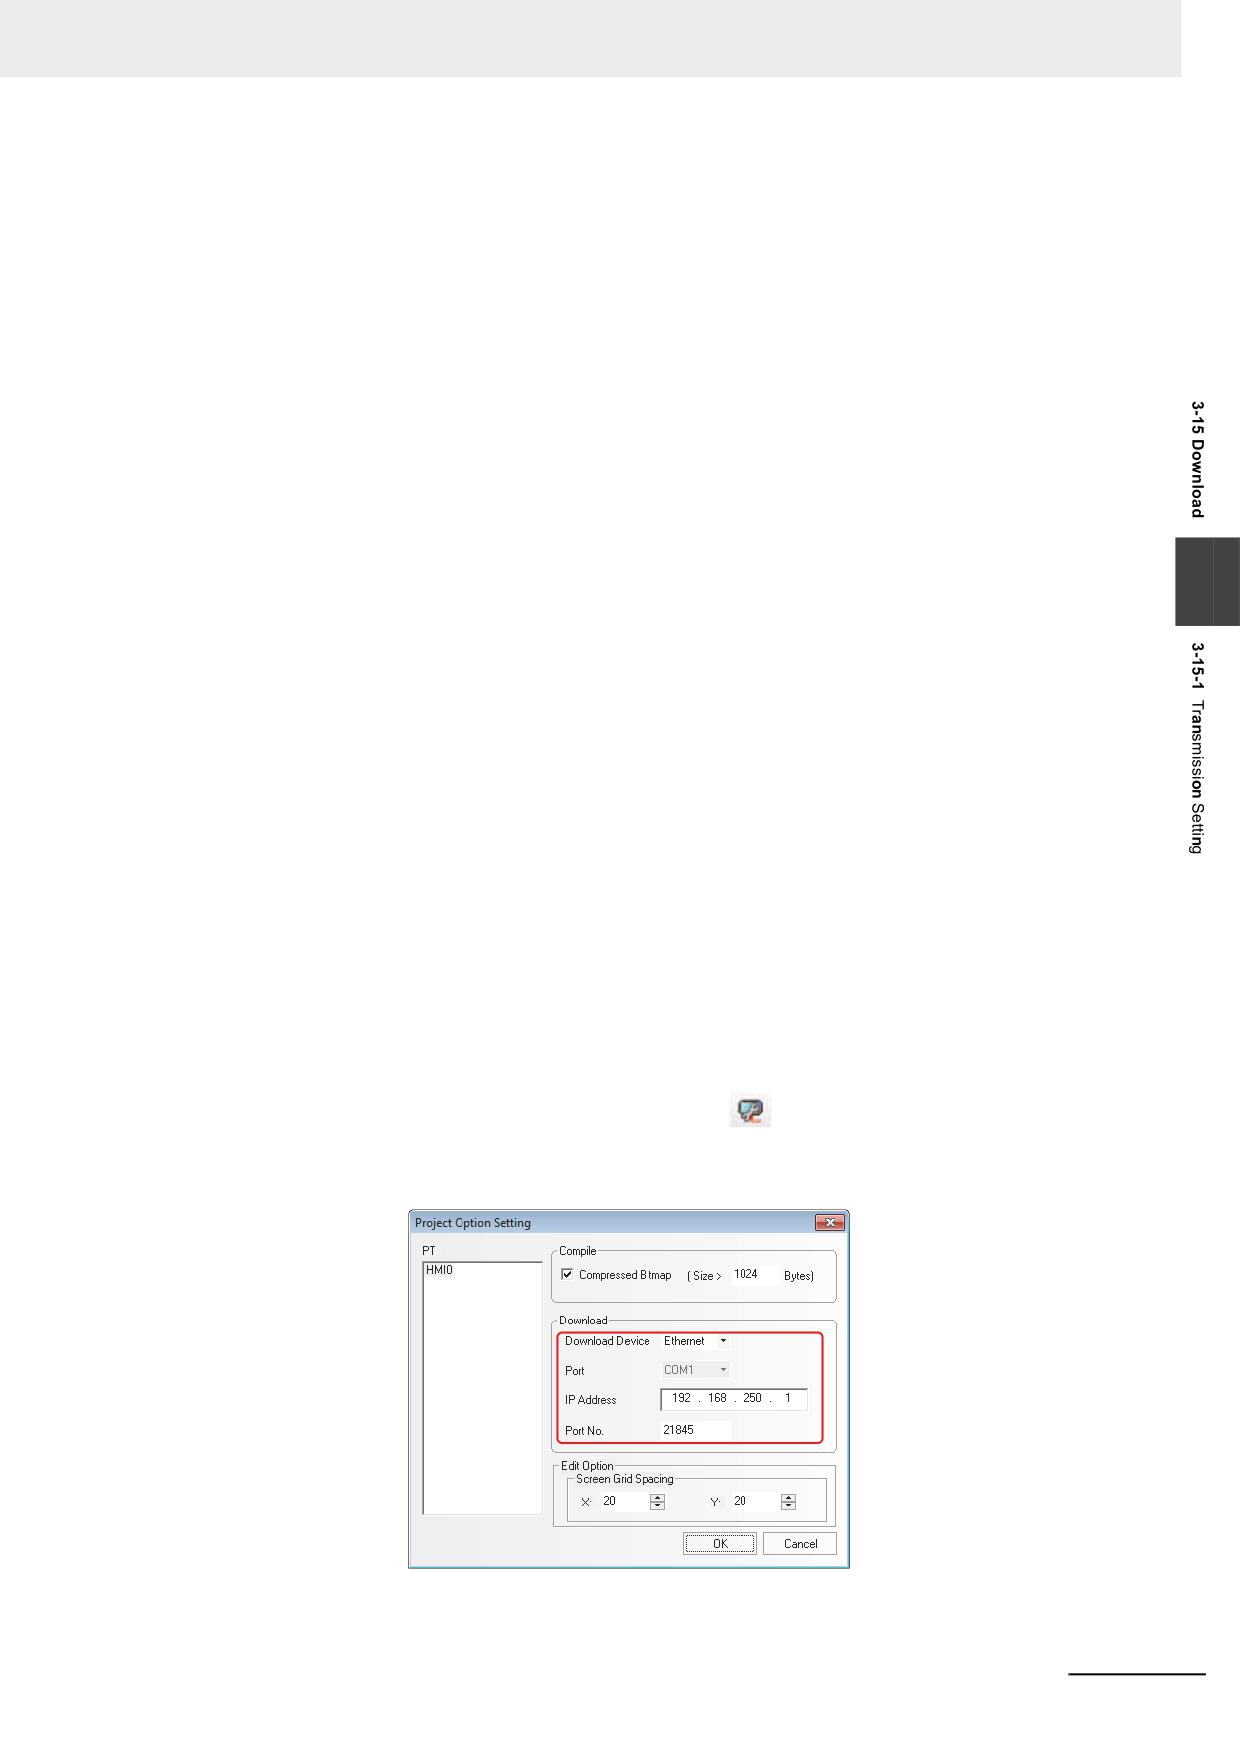
3 Functions of NB-Designer
1. USB
When using the USB to perform download for the first time, you should install the driver manually.
For the installation of the driver, please refer to 2-4 Installation of USB Driver for NB (Page 2-5).
When you use USB, you just need to select “USB” as download device and click the “OK” button to
start the download.
Compressed Bitmap: When this size is larger than the specified size, compress way will be used to
perform the compilation and download, thus saving a lot of space. Compressed Bitmap is checked
by default.
Note1
Checking Compressed Bitmap can reduce the size of the edited project.
2
Removing the check in the Compressed Bitmap option allows the switching speed of PT faster.
3
In order to ensure the PT with a faster communication speed during the operation, it is recommended
not to use too many bitmaps during the project editing.
4
Use less raster fonts as far as possible. The raster fonts occupy the same size as the normal graphics.
5
When the “Enable Printer Function” option is checked in the System Setting Mode, the USB Slave port
3
can be used only for printing function rather than the download function in User Project Mode. For
details, refer to Section 7 PictBridge Printing (Page 7-1) in NB-Designer Operation Manual.
2.Serial Port
Note
The download through the serial port is slower for the edited project being too large, therefore it is not
recommended to use the serial port.
3.Ethernet
Precautions for download through Ethernet and setting methods of IP
address:
The IP address of PC and that of PT should locate in the same network segment with the first 3
parts being same and the last part not being overlapped. If the LAN is used, the IP address can’t be
modified to prevent the conflict with the other IP addresses in the network.
First, set the network IP address in the “Control Panel” for Windows to the same network segment
as that for PT Unit. The IP address of PT Unit can be checked from the PT in the System Setting
Mode (with the DIP switches SW1 and SW2 on the back side both set to ON).
Then, make various settings in the Project Option Setting dialog box:
In the NB-Designer, select “Ethernet” from the Download Device option in Project Option Setting
dialog box after clicking [Transmission Setting] option
in the [Tools] menu, and then set the IP
address to be same as that of PT Unit. At that time, the project created in NB-Designer can be
downloaded into the PT.
NB-series Programmable Terminals NB-Designer Operation Manual(V106)
3-363
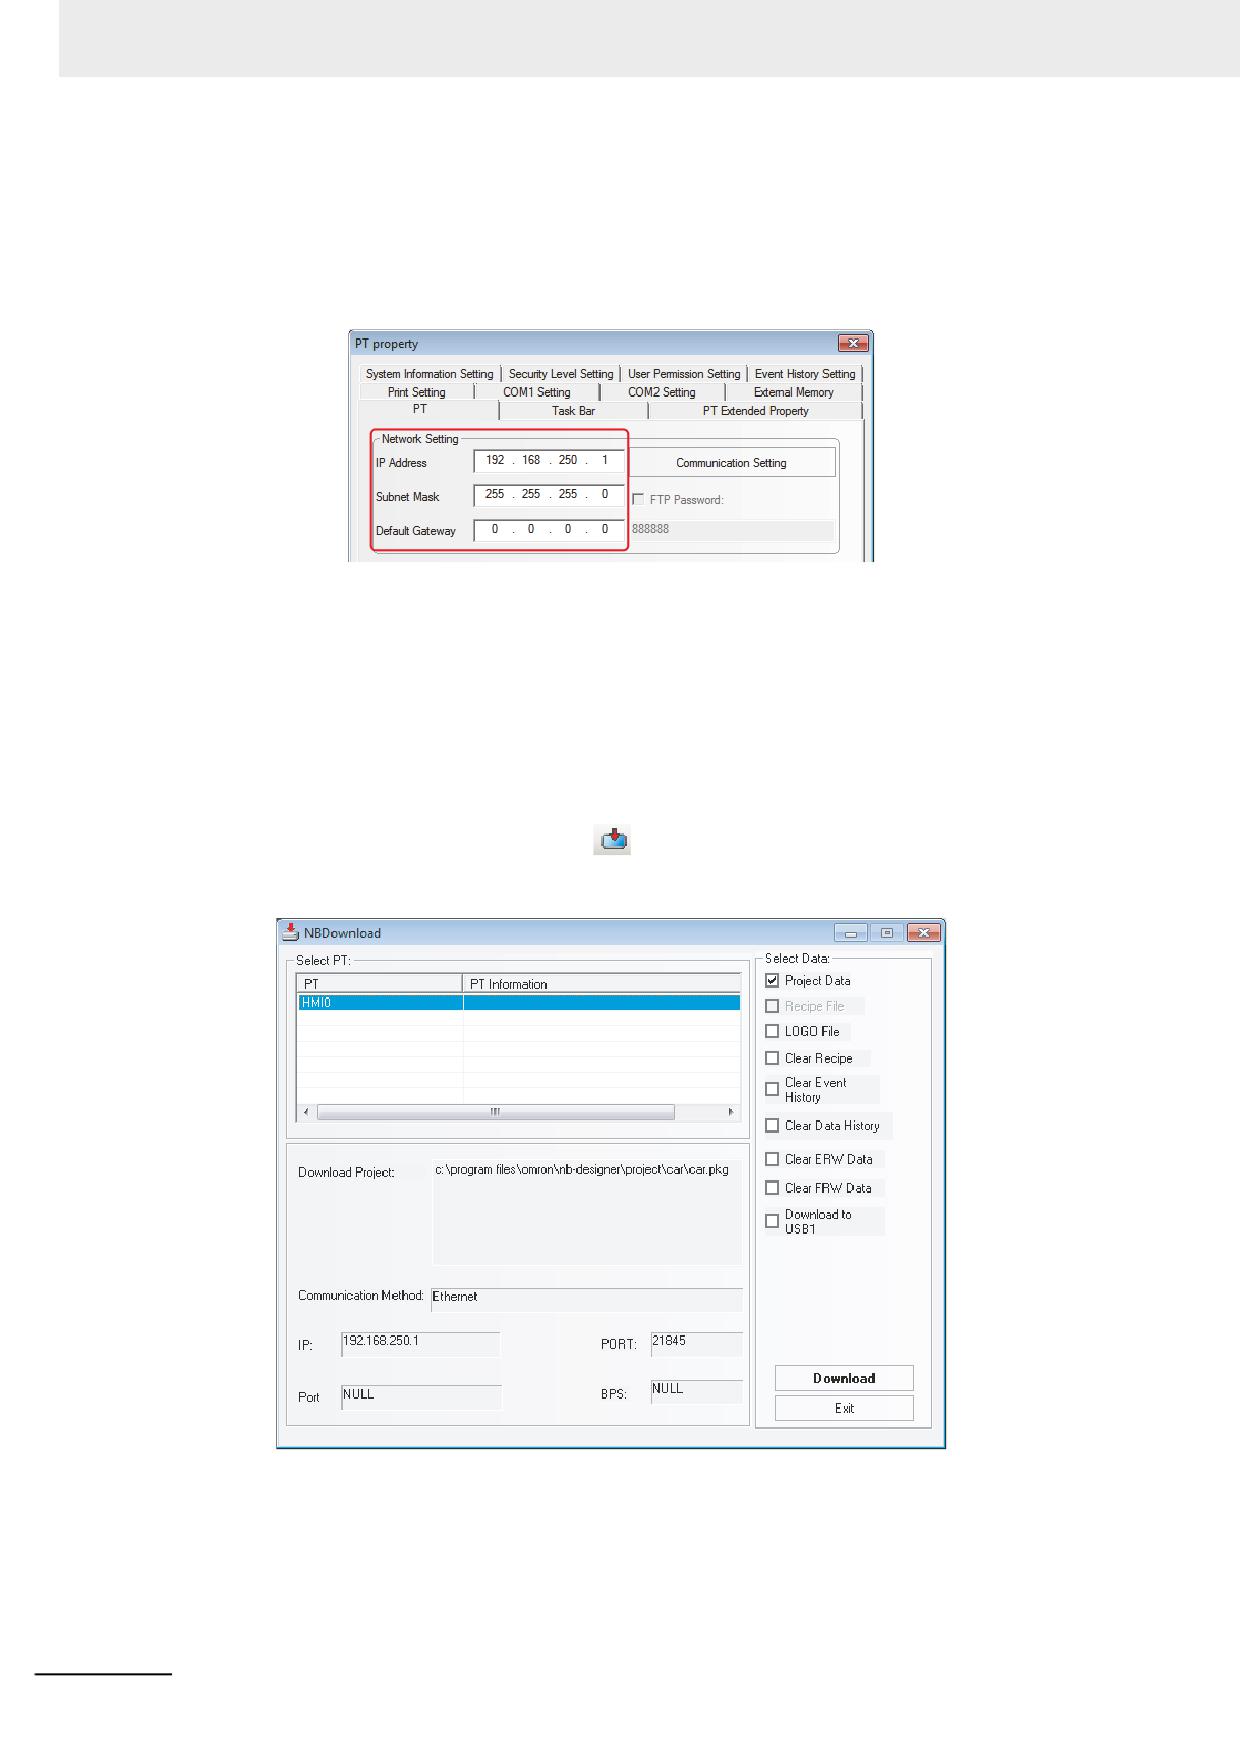
3 Functions of NB-Designer
Changing Network Setting of PT Unit:
After confirming the download function, set the IP option in the [PT] tab in the [PT Property] dialog
box to the IP address and others, and then download it into PT after Compile operation is
performed. At that time, the IP address of PT is same as that set in the project. (If download through
Ethernet is performed again, please specify the modified IP address and port number in the Project
Option Setting dialog box.)
Setting IP address in System Setting Mode:
For more details of Setting IP address in System Setting Mode, refer to the NB Series Setup Manual
(SBSA-550).
Setting IP address by using [Set IP Address/Port] in NBManager:
For more details of Setting IP address by using [Set IP Address/Port] in NBManager, refer to 4-2-1
Communication Setting (Page 4-3).
After the settings mentioned above, click
icon to download the screen data.
The download method is shown as below:
3-364
NB-series Programmable Terminals NB-Designer Operation Manual(V106)
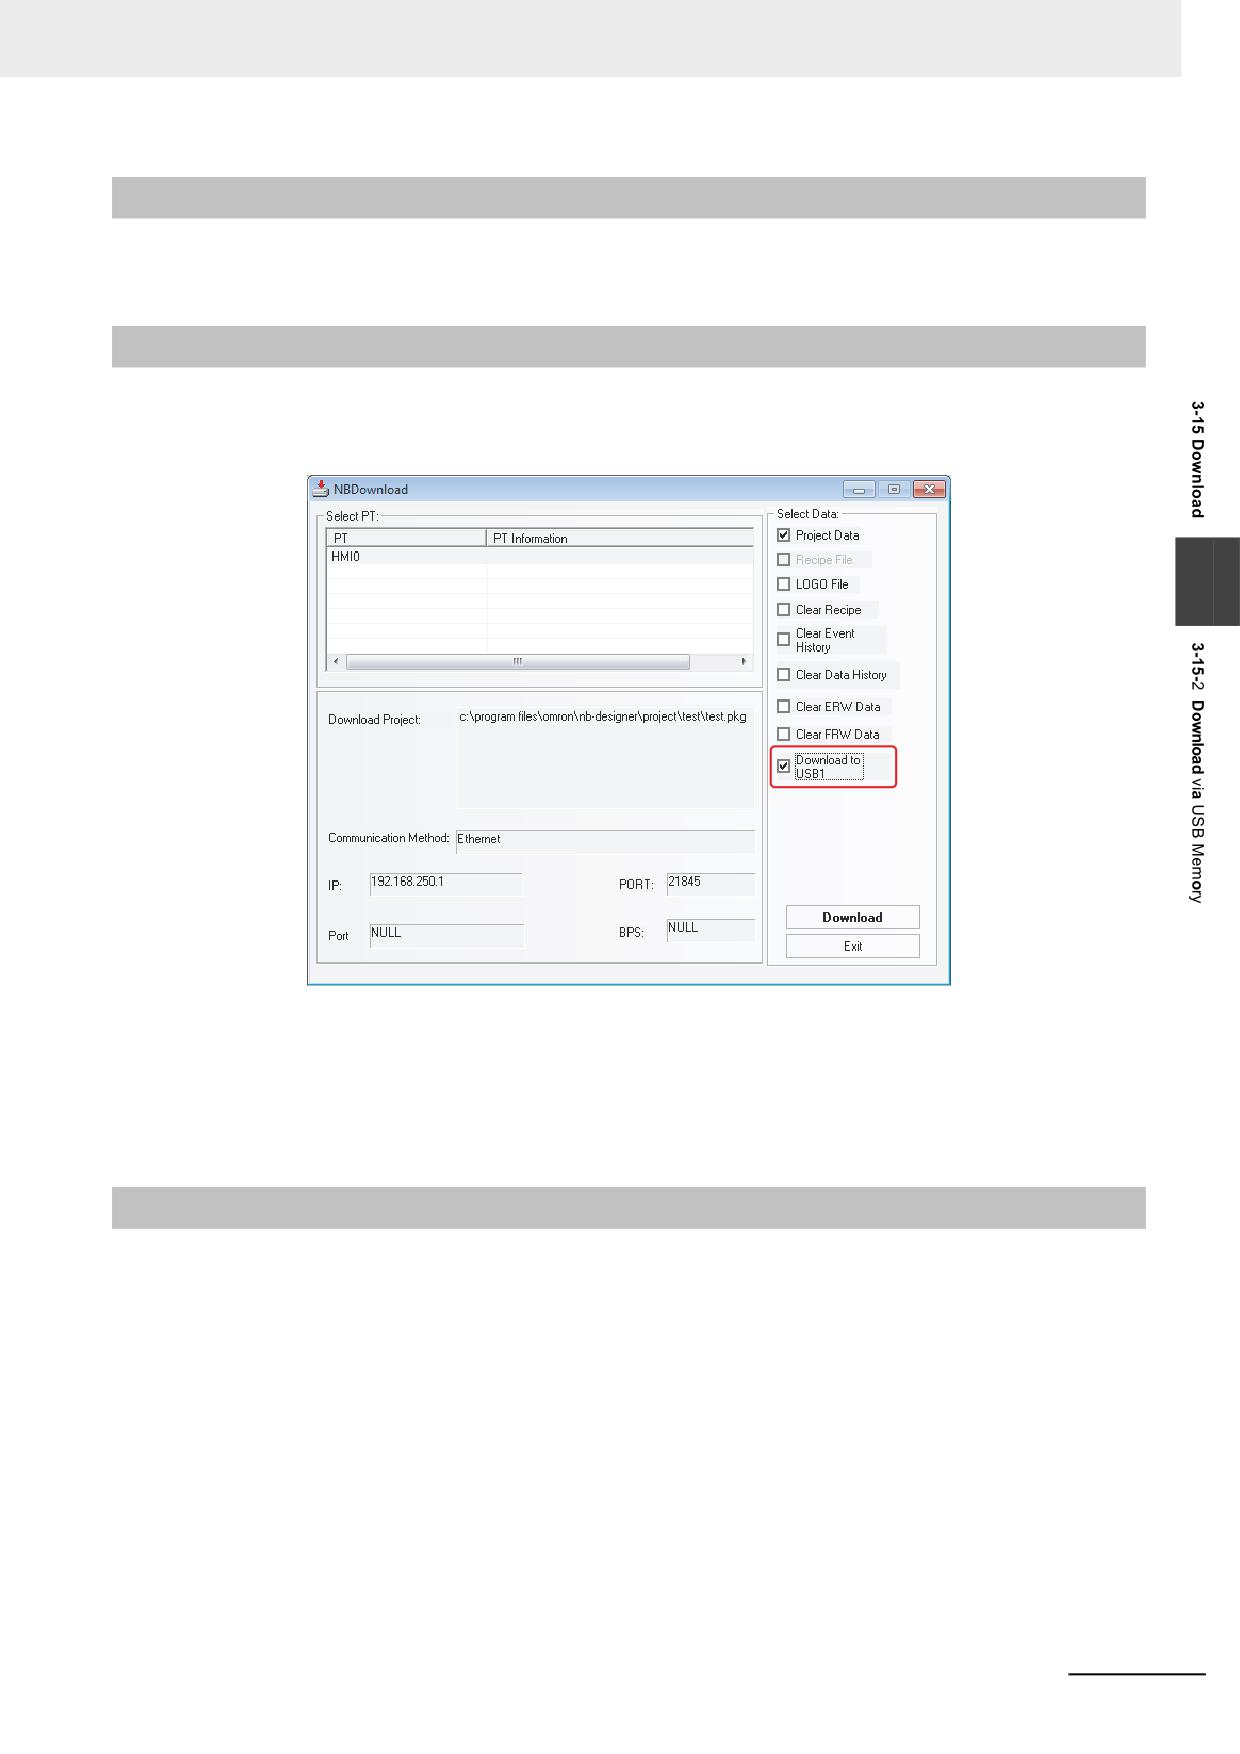
3 Functions of NB-Designer
3-15-2
Download via USB Memory
For more details of download via USB memory, refer to 3-2 Menus (Page 3-7) in NB-series Setup
Manual.
3-15-3
Download to USB1
When the project is too large, it can be directly downloaded to the external memory to operate. During
the download, check the [Download to USB1] in [Select Section] option in the [NBDownload] dialog
box, as shown below:
3
Click the [Download] button and then the project file will be downloaded to the external memory.
Note 1
If the project file is copied directly to the external memory without using Download, the project will not be
operated.
2
Do not remove the external memory during the operation of the NB. The project may not operate correctly.
3
Use the recommended device for the external memory.
3-15-4
Specification of Downloading Contents
In the [NBDownload] dialog box, check the required contents in the [Select Section] option to download
the required files.
NB-series Programmable Terminals NB-Designer Operation Manual(V106)
3-365
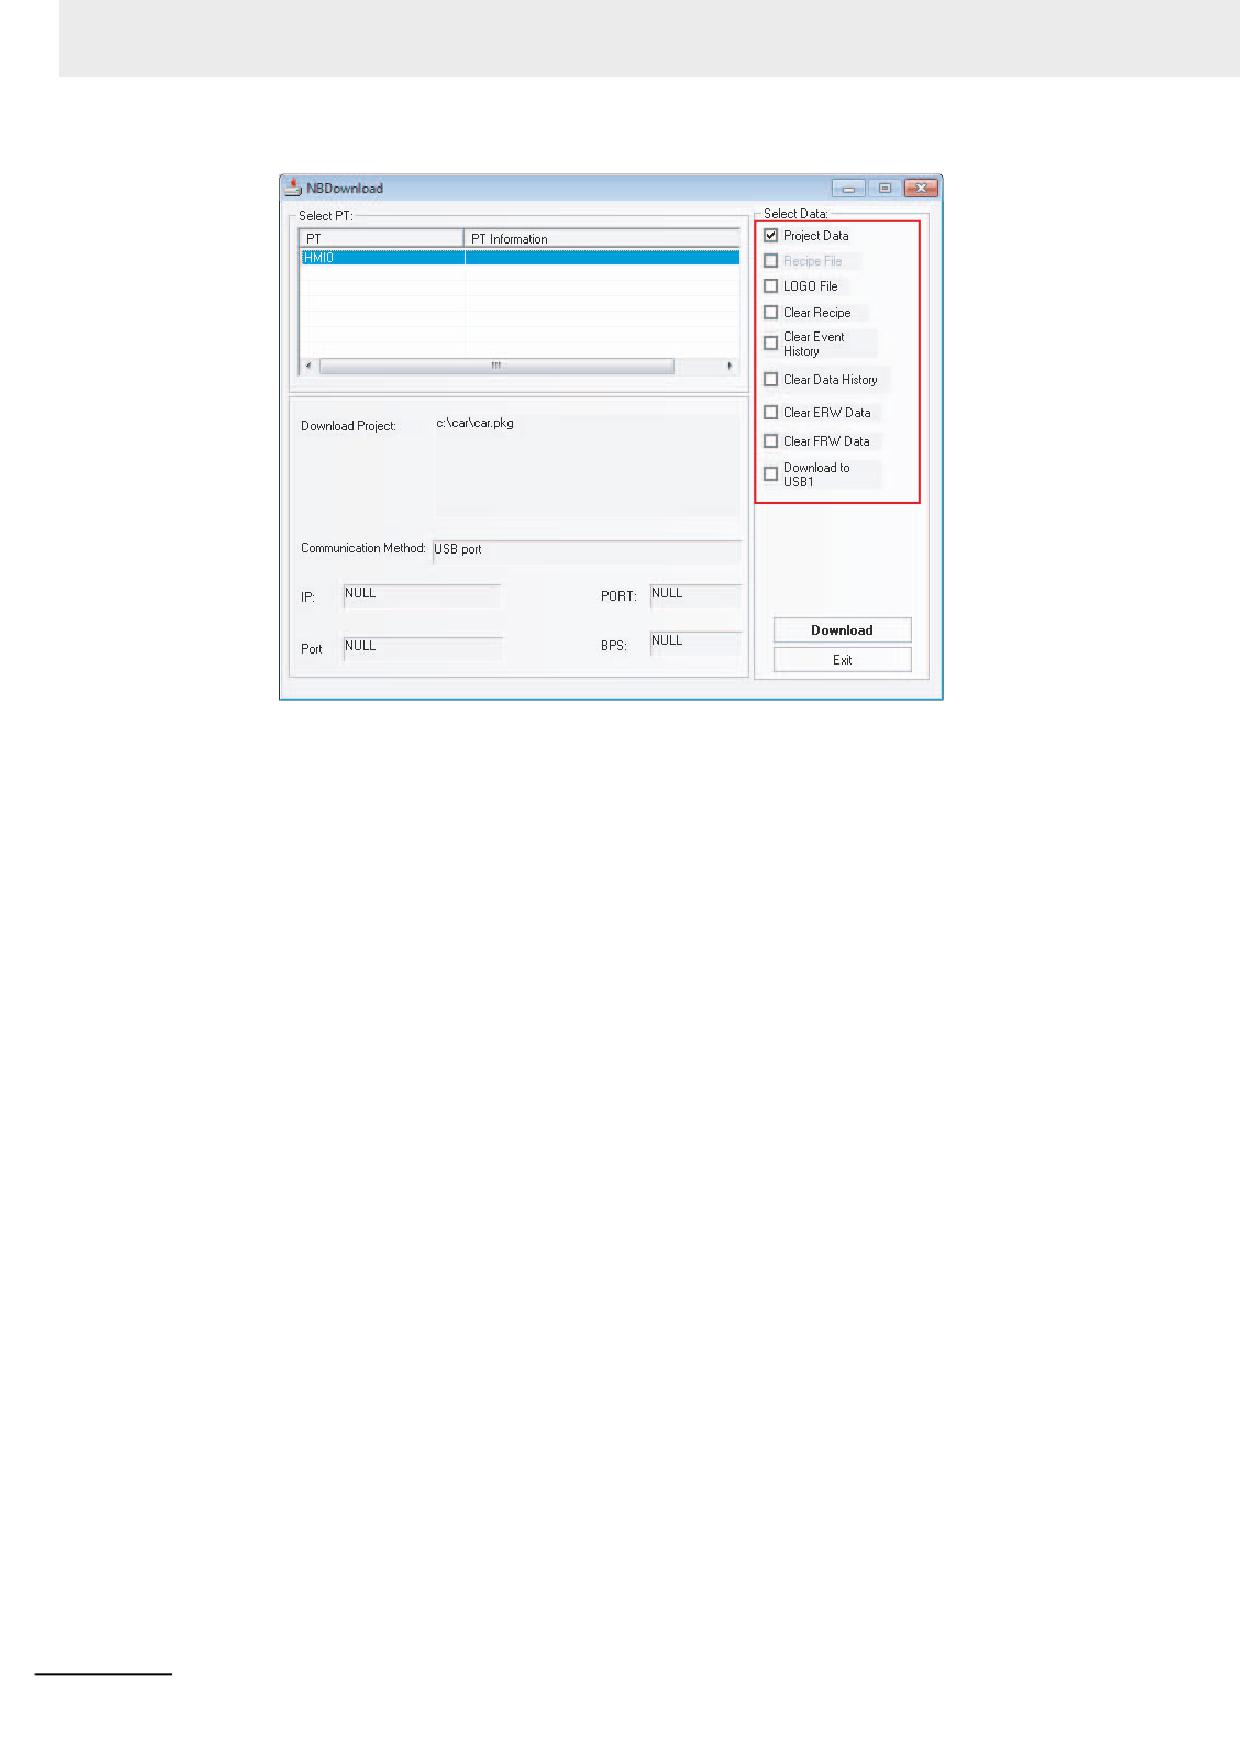
3 Functions of NB-Designer
Data File: Refers to the data information of all the components created by the user in PT screen. Only
after this option is checked, the downloaded project can work normally.
LOGO File: Download the initial screen (LOGO screen) displayed when starting PT. If the update of the
LOGO screen is needed, check the [LOGO file] check box and click [Download] to
download the screen.
3-366
NB-series Programmable Terminals NB-Designer Operation Manual(V106)
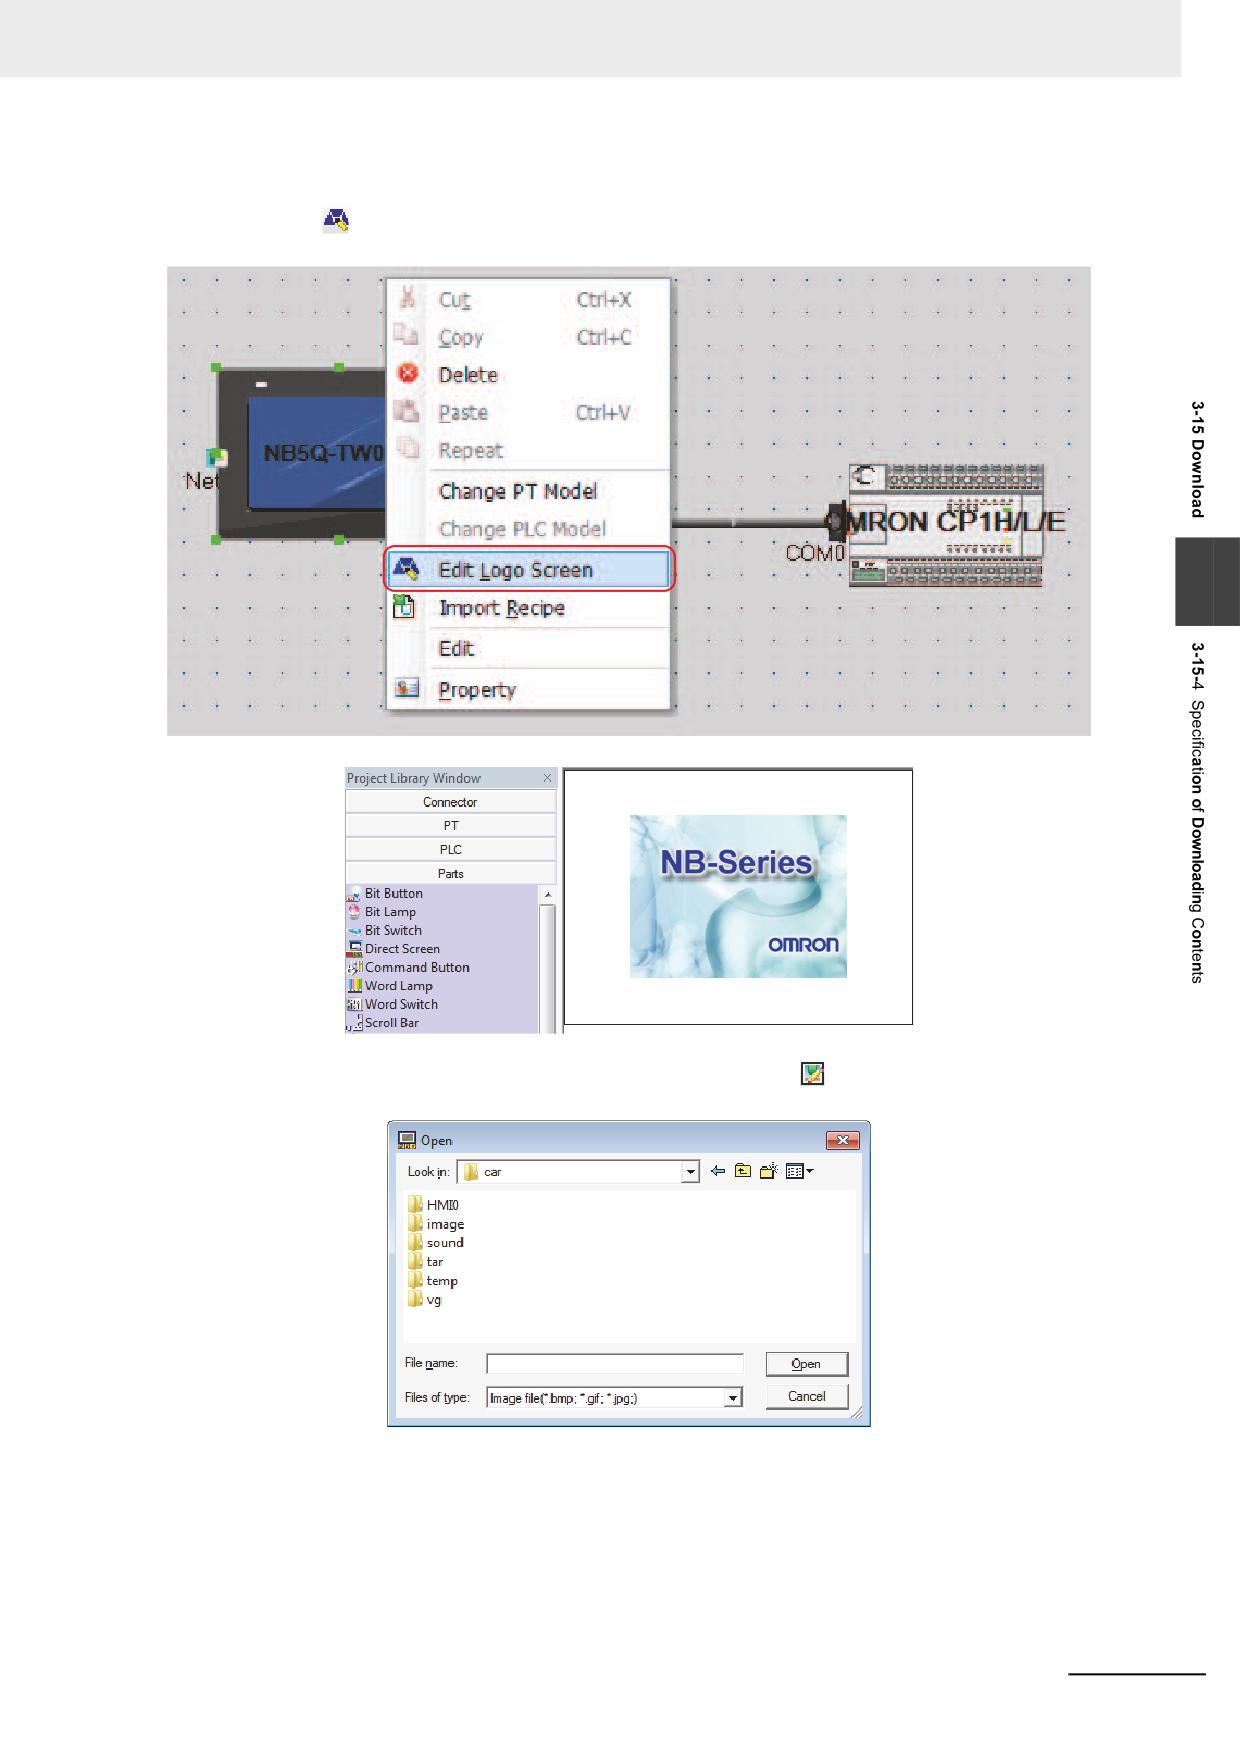
3 Functions of NB-Designer
Editing LOGO Screen
Press the
icon in the toolbar, or select and click the PT in the Project Work Space to display the
Edit Window as below.
3
You can apply the optional LOGO screen. And if you click the
icon in the toolbar, the following
dialog box will appear:
Find the required LOGO graphic, and click it to open it.
NB-series Programmable Terminals NB-Designer Operation Manual(V106)
3-367
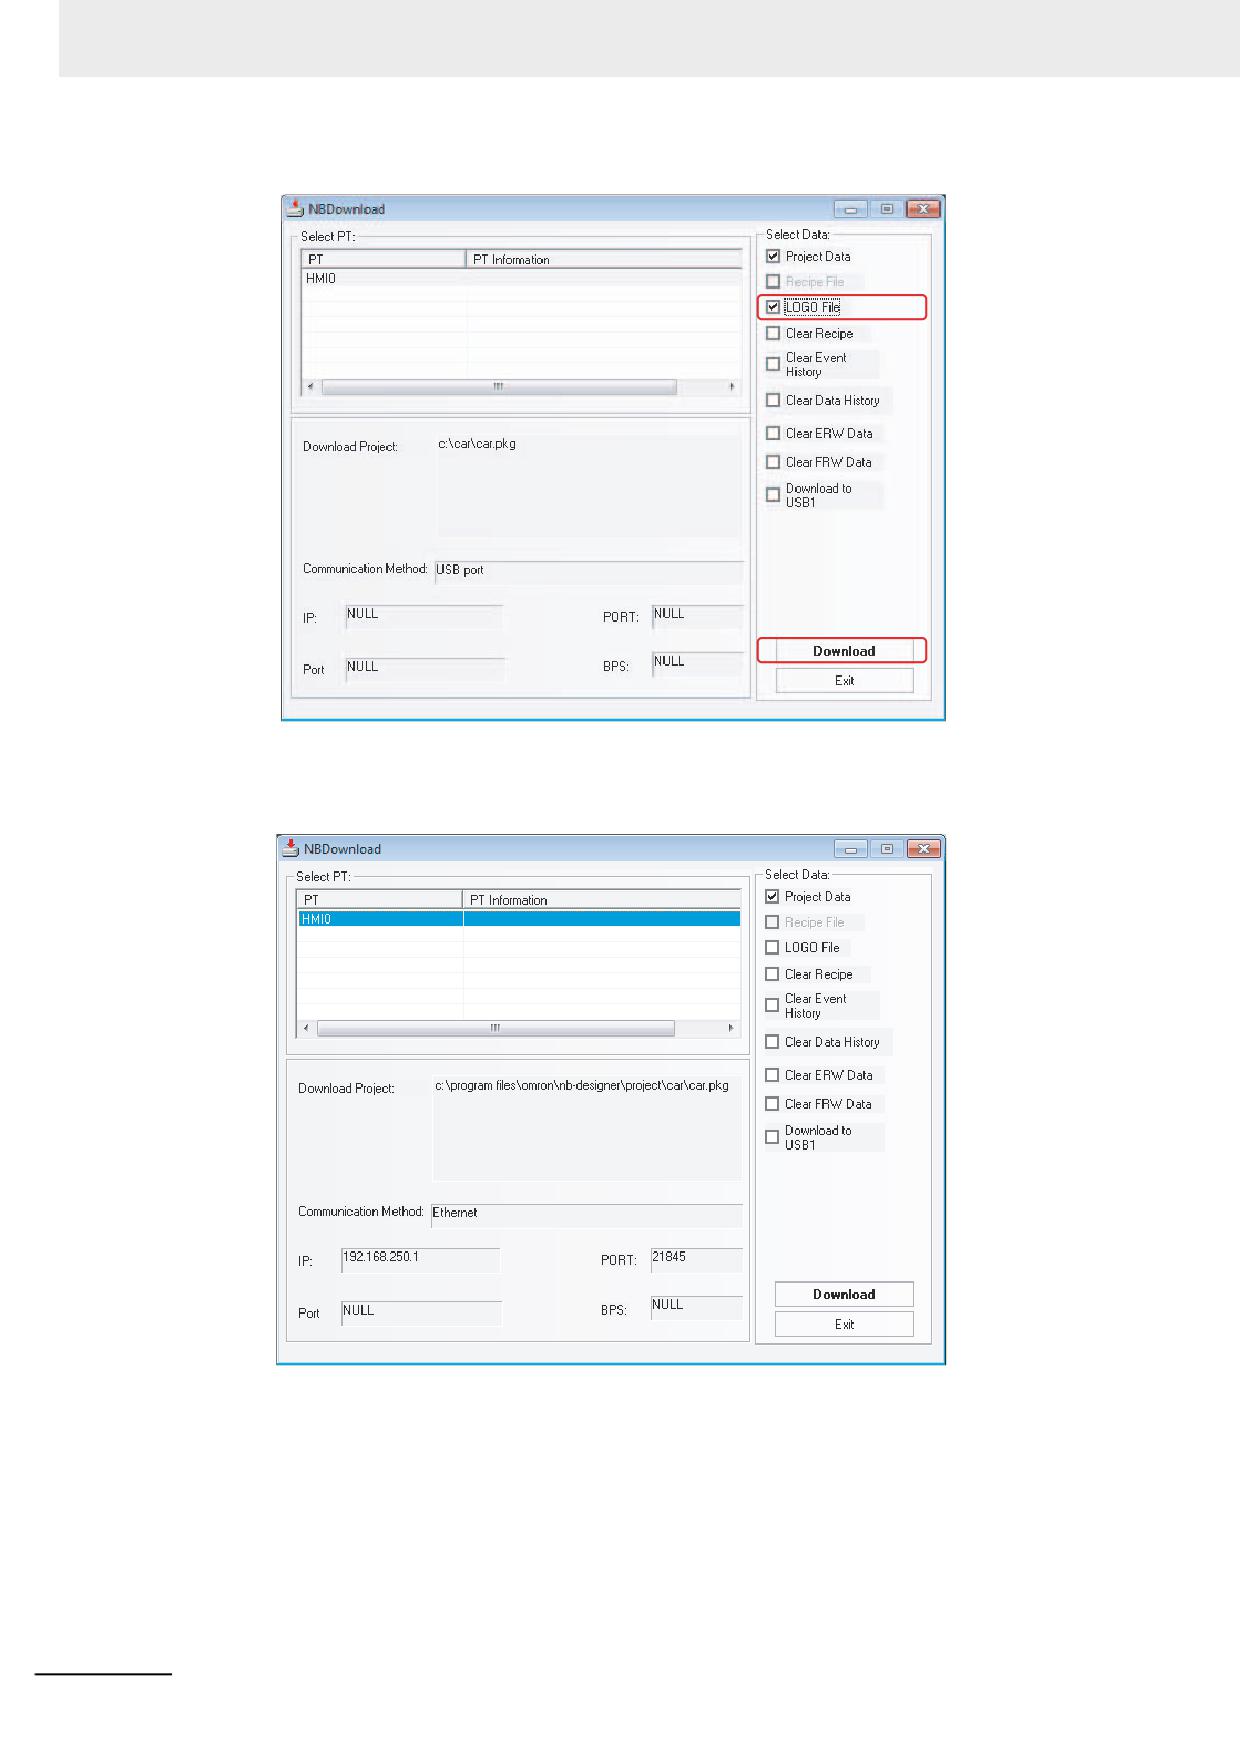
3 Functions of NB-Designer
After the compilation, check “LOGO File” and then click the “Download” button.
After the download is completed, “Download succeed” will be displayed.
Download Window
3-368
NB-series Programmable Terminals NB-Designer Operation Manual(V106)
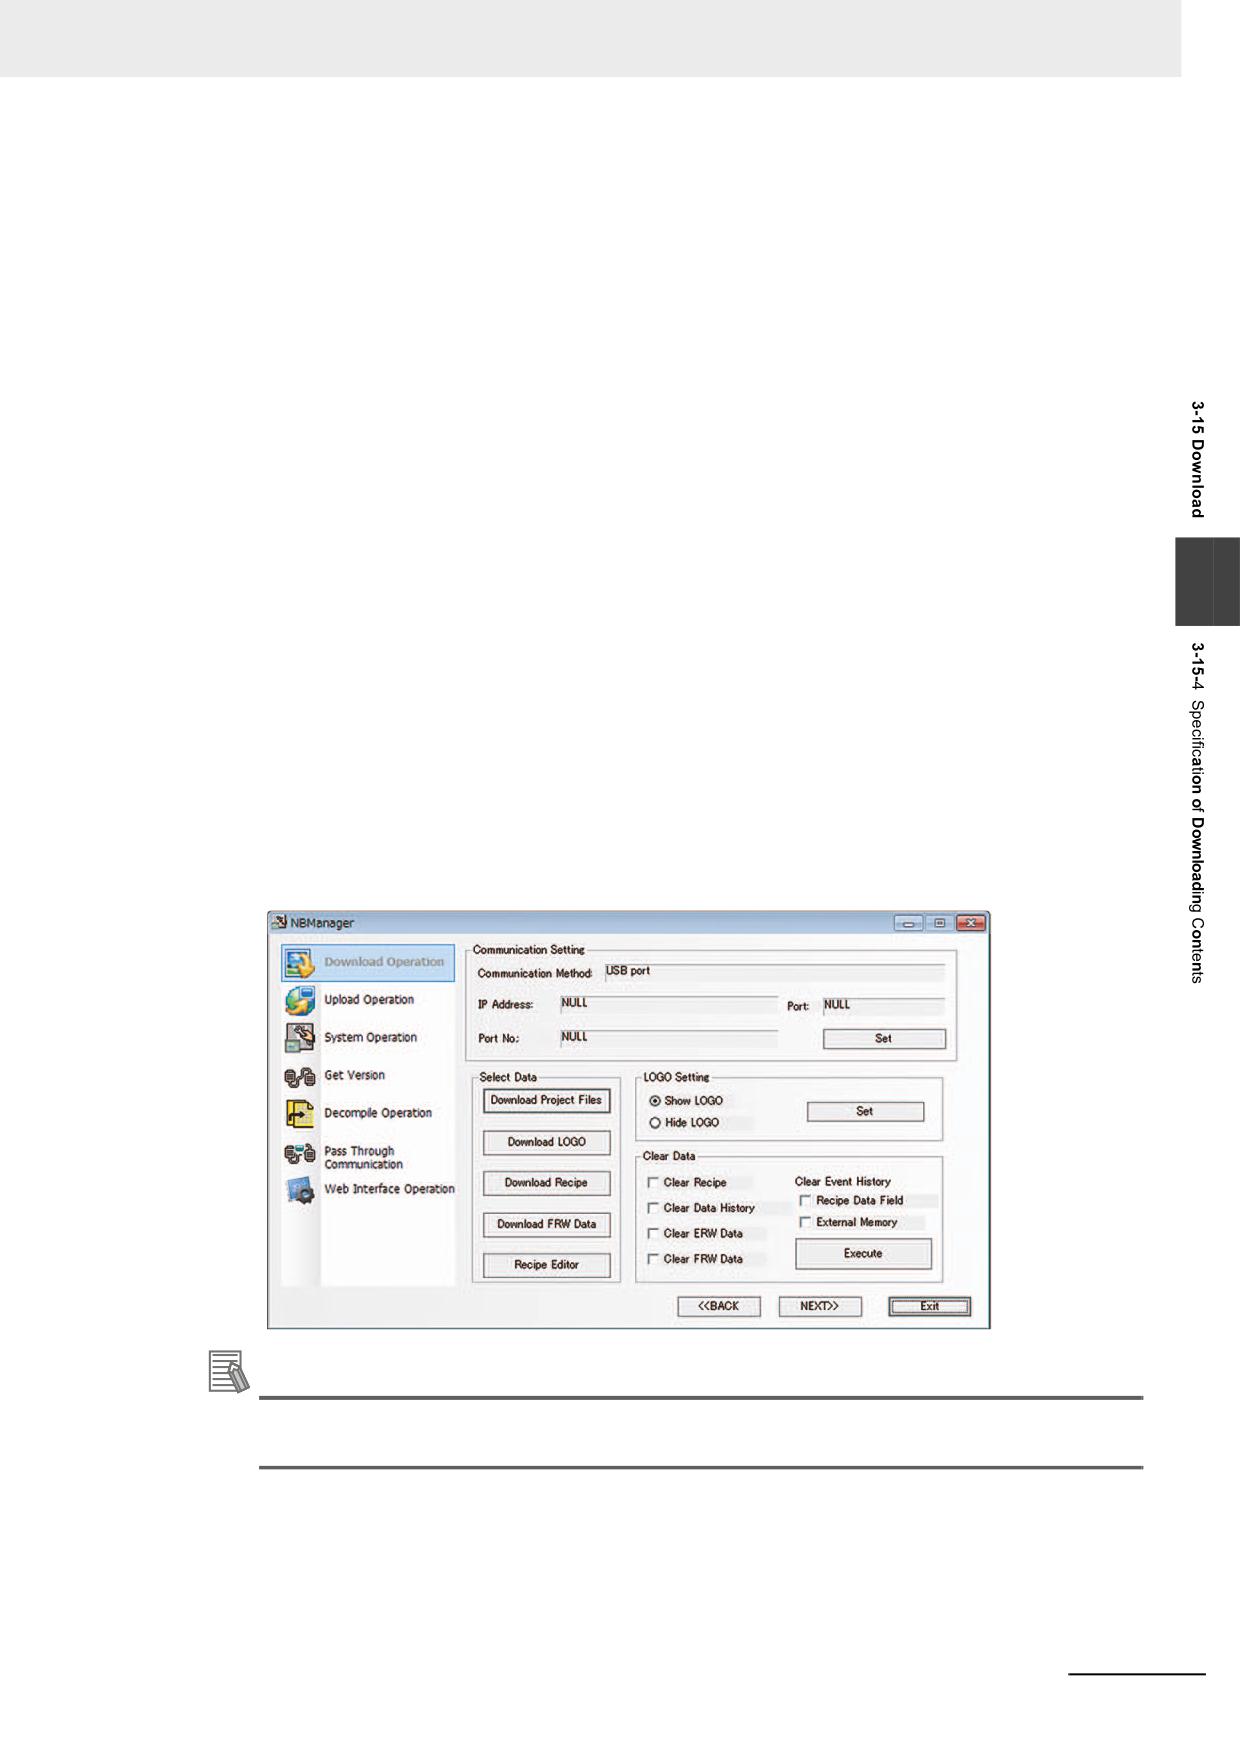
3 Functions of NB-Designer
Each function is described as follows:
1
Data File: It is used to download the current project.
2
Recipe File: The NB Series does not support this function. When downloading the Recipe
(.rcp), use NBManager.
3
LOGO File: Download the graphics used for LOGO screen. When the graphic is modified in
[LOGO Screen Edit], you need to check in the [LOGO file] option to download the modified
LOGO file to the PT.
4
Clear Recipe: If this check box is checked, the Recipe memory will be cleared to 0.
5
Clear Event History: Clears the saved events.
3
6
Clear Data History: Clears the saved sampling data.
7
Clear ERW Data: Clears the data in the ERW.
8
Clear FRW Data: Clears the data in the FRW.
9
Download to USB1: Download the project file to the external memory inserted to NB unit
(USB1). For the details of download to USB1, refer to 3-15-3 Download to USB1 (Page 3-365).
You can also select whether to clear the recipe data, FRW data, ERW data, data history, or event
history by using the Download Operate in NBManager.
Additional Information
To download the screen data of a different version, download the Kernel from NB Manger as
required.
NB-series Programmable Terminals NB-Designer Operation Manual(V106)
3-369
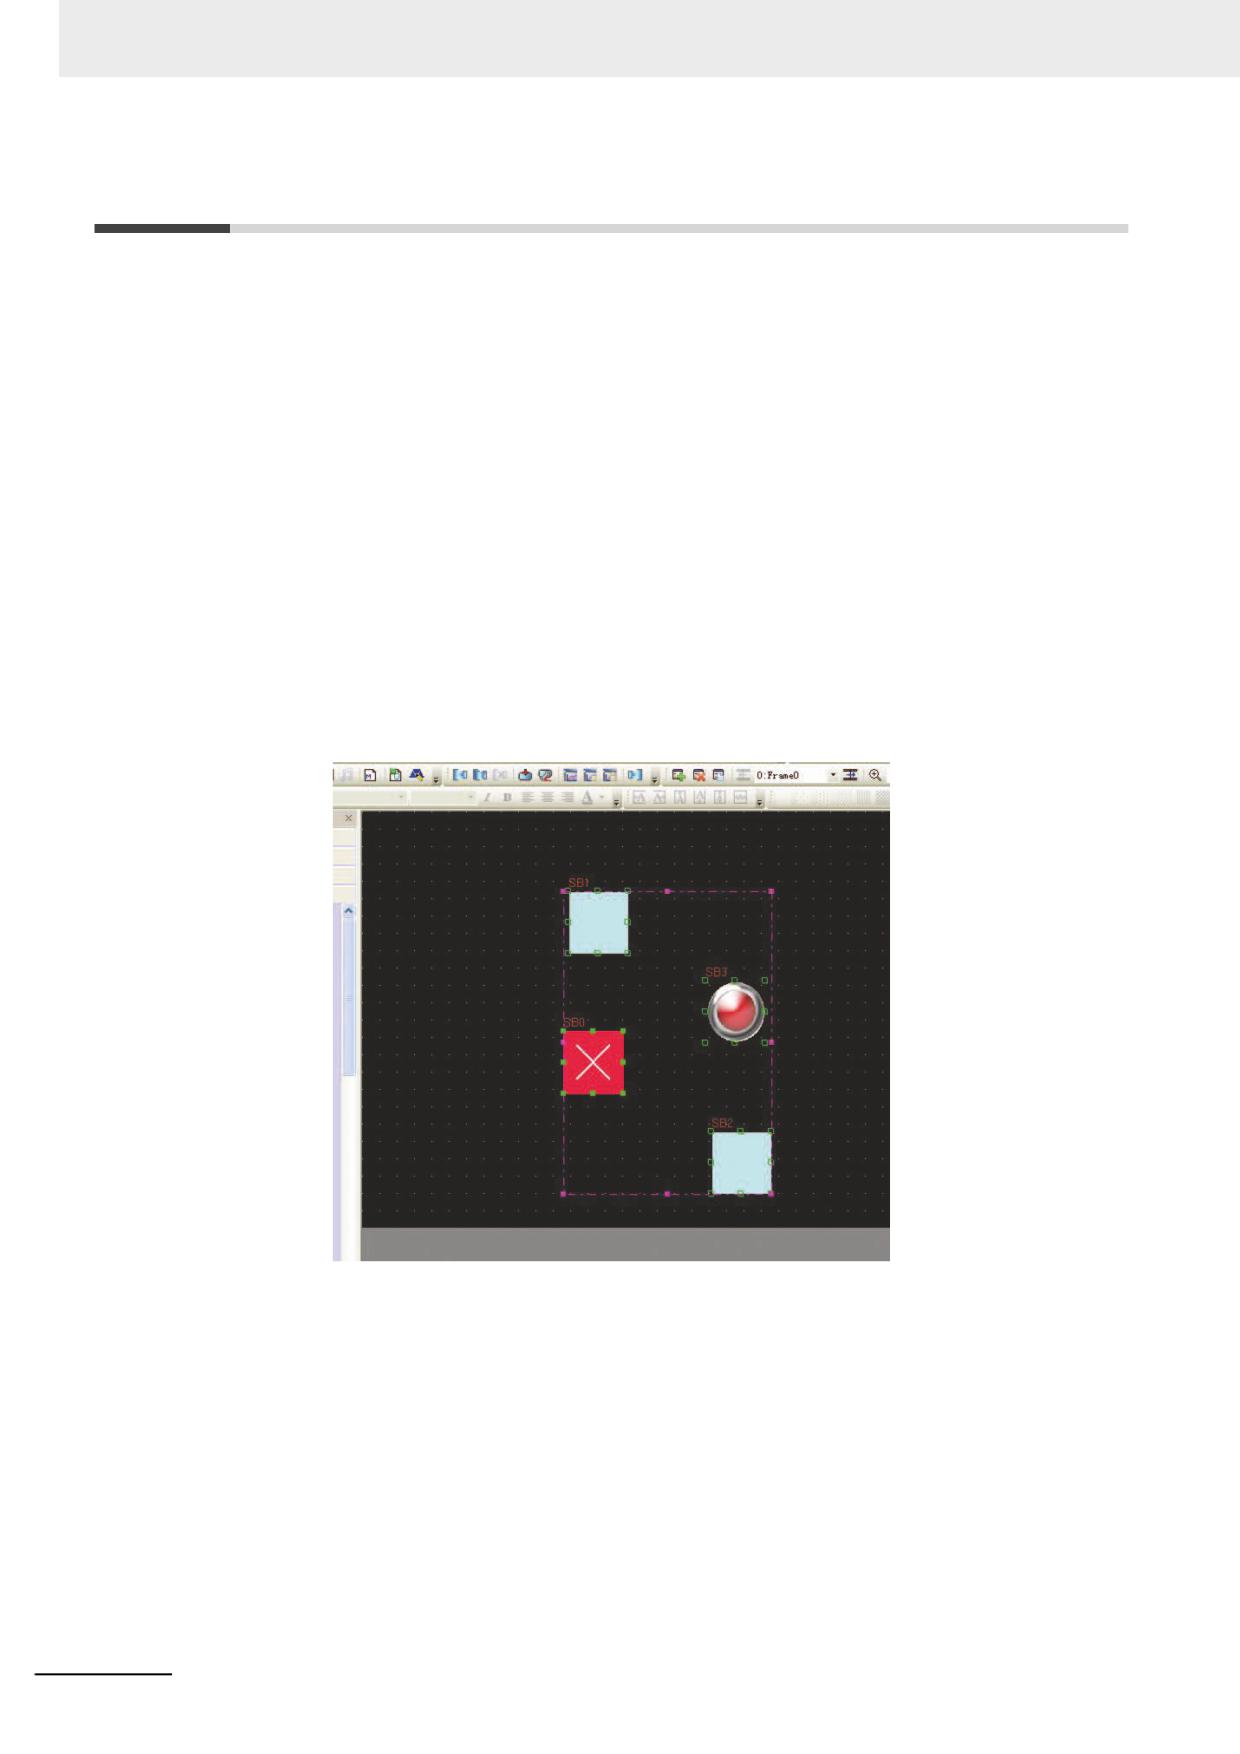
3 Functions of NB-Designer
3-16 Other Functions
1
Editing component function
For the Copy and Paste operations, if a component is copied in the same screen, the copied
component will be placed in the position deviated 10-pixel away the original position. If the
component is copied in different screen, the copied component will be placed in the position of
the original position.
If multiple components are operated by the functions such as “Arrange Width”, “Arrange
Height”, and “Arrange Size”, the specific operation process is as follows: Select one
component as the reference, then perform “Width”, “Height”, or “Size” modifications. (If you use
the “Shift” key to select, then the component firstly selected should be as the reference, while
the component at the leftmost should be used as the reference during the selection made by
dragging the mouse. The selected mark for the reference is indicated by the solid rectangle,
while the selected mark for the other components is indicated by the hollow rectangle.)
2
Proportionally zoom multiple components simultaneously
When the multiple components in the editing screen are selected together, selected area will
appear, and the user resize the multiple components simultaneously dragging by mouse each
point on the corners.
Resize the multiple components simultaneously dragging by mouse each point on the corners.
Above, the selected area is pink.
3-370
NB-series Programmable Terminals NB-Designer Operation Manual(V106)
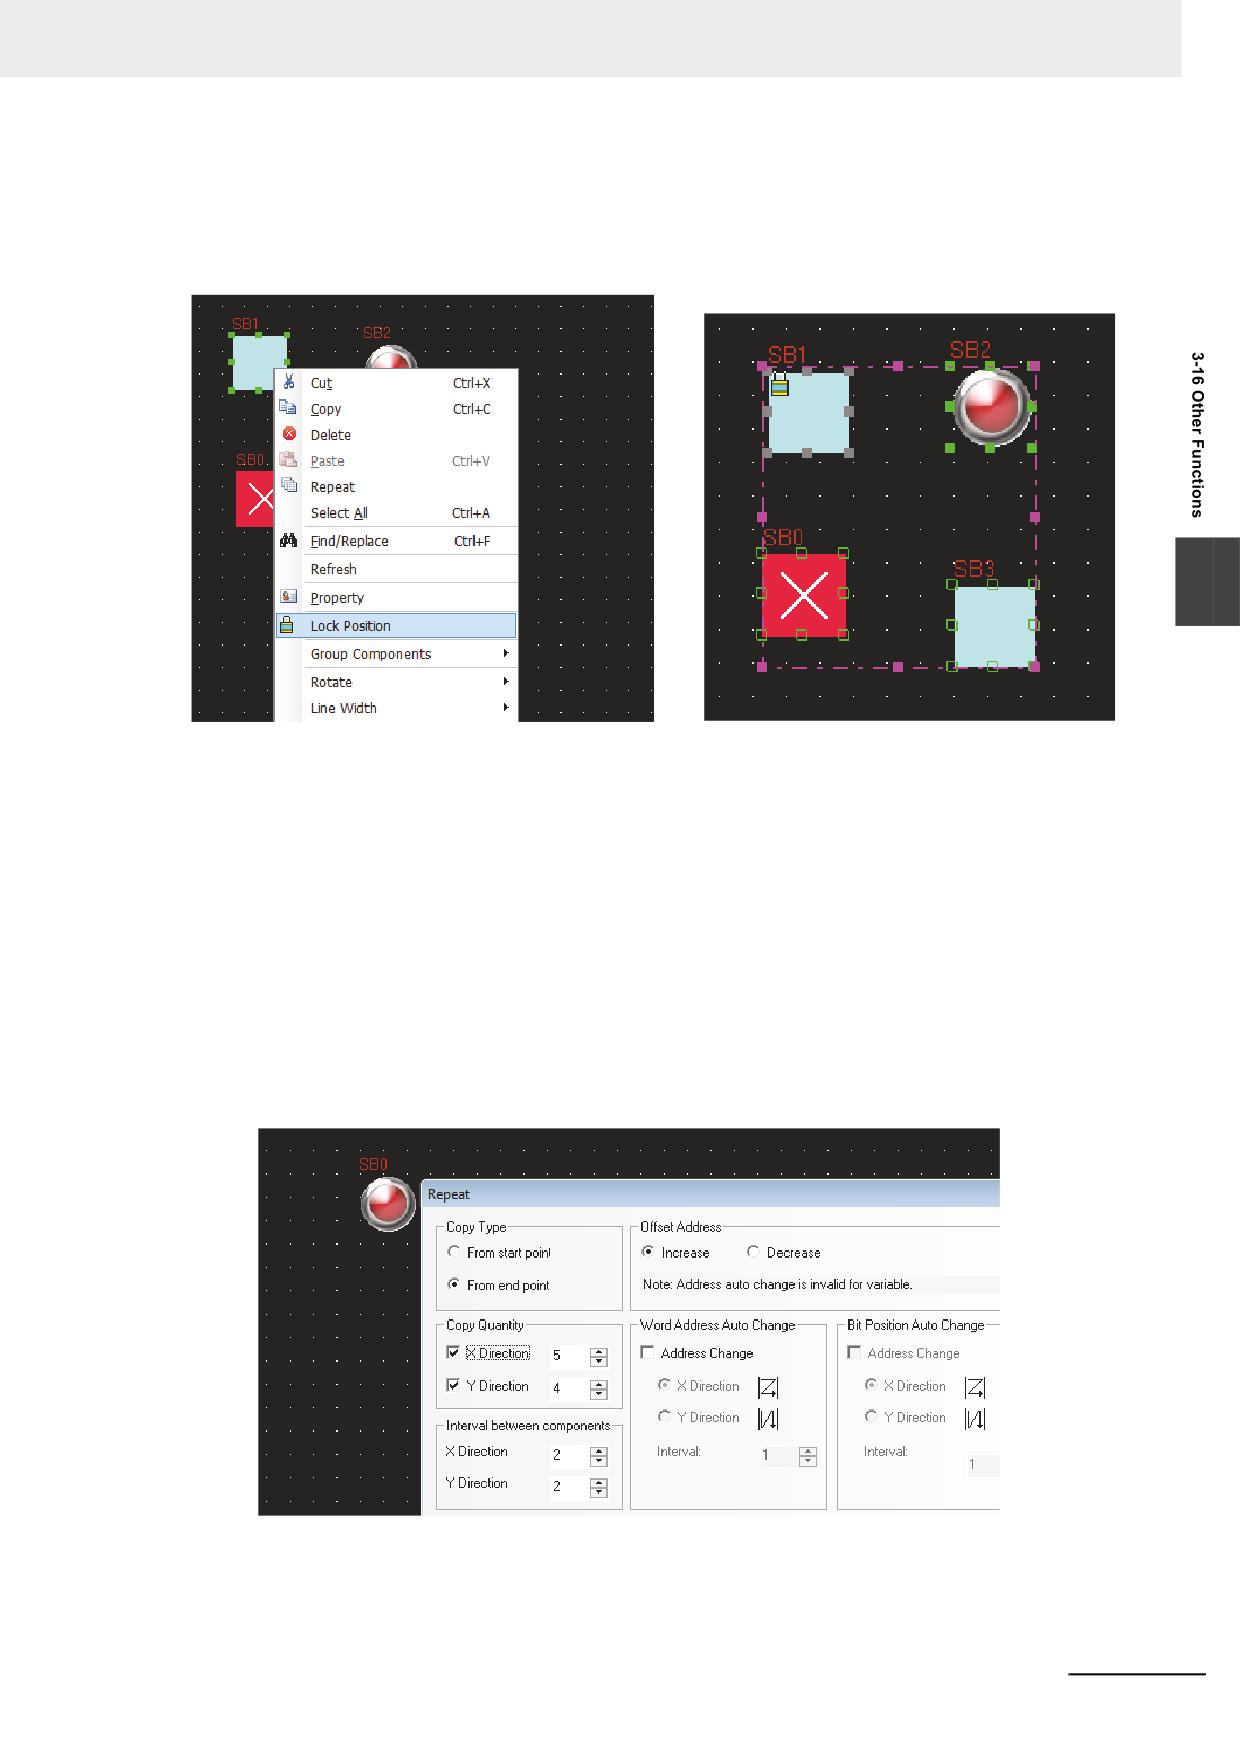
3 Functions of NB-Designer
3
Lock Component
NB-Designer provides one function of “Lock Position” as shown below. Right-click the
component and select the “Lock Position”, and the effect is as shown below.
3
When the user selects the multiple components including the locked component to perform the
operation of movement etc, this locked component will have no response to this operation.
Please note that there will be one lock-shape mark on its original icon, as shown above.
4
Multiple Copy of Component
Single Copy: When the user selects one component to perform single copy, he just needs to
click the component while pressing the Ctrl key, which is equivalent to the operation of “Copy +
Paste”.
Repeat: It is intended for the multiple copy of a certain component, and the software can
automatically increase or decrease the component address and set the interval after the
component copy operation. Right-click the component to be copied, and select “Repeat” from
the Context menu, then the following dialog box will pop up. The user can make settings
according to the requirement.
NB-series Programmable Terminals NB-Designer Operation Manual(V106)
3-371
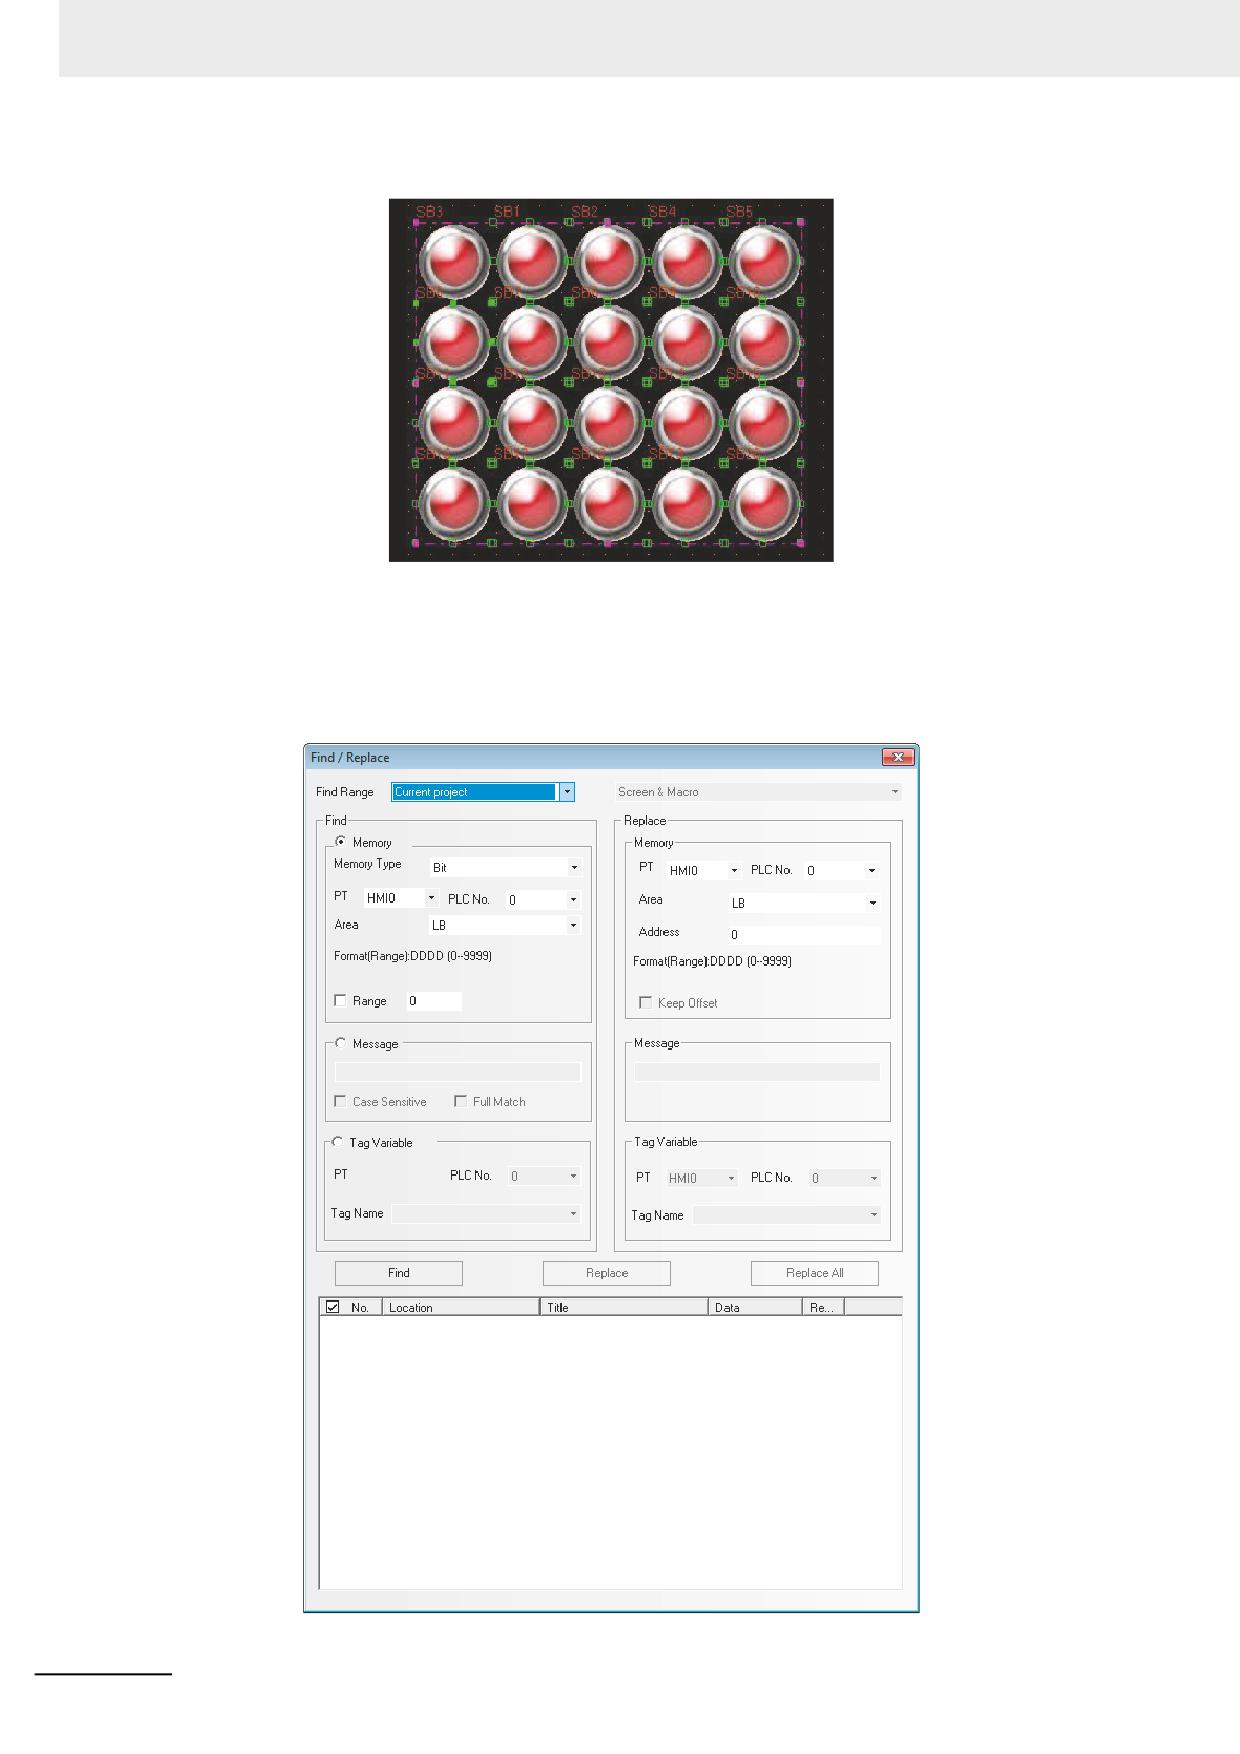
3 Functions of NB-Designer
The effect of repeat is shown as above.
5
Find/Replace
Select [Find/Replace] in the drop-down menu of the [Edit] menu or press the “Find/Replace”
icon, then the following dialog box will pop up.
3-372
NB-series Programmable Terminals NB-Designer Operation Manual(V106)
3 Functions of NB-Designer
Find Range
Refers to the content of the edit screen in NB-Designer to be searched, and it is classified into 4
kinds, as shown below.
Descriptions of Find Range
Find Range
Current Project
All the Screens, Macros and backg3round database in PT will be searched.
Background
Only the backg3round components such as Event Setting, Alarm Setting and Data
Database
Log etc. will be searched.
All PT
Screens and
All the Screens and Macros in the current project will be
Macros
searched.
All Screens
All the Screens in the current project will be searched.
All Macros
All the Macros in the current project will be searched.
Current PT
Screens and
All the Screens and Macros in the selected PT will be
Macros
researched.
All Screens
All the components in all the Screens in the selected PT will
be searched.
3
Current Screens
All the components in the current Screen in the selected PT
will be searched.
All Macros
Only all Macro in the current PT will be searched.
Find
Descriptions of Find Type
memory
memory Type
It means to find the device with Bit type or Word type.
Area/Variable
It represents the device type and device address in the controller where the
search is performed. Checking “Range” means the search will be performed in
the set range of address.
Message
Not checking “Match Case” and “Full Match” means the judgment of the case of the characters
and the consistency in the whole text will not be done during the search.
Case Sensitive
It means the match of the case of the characters in the text to be searched is
required.
Full Match
It means the match of the text to be searched in the whole text is required.
Tag
Tag name
It represents the name of the tag in the controller where the search is performed.
Variables
Replace
After this option is set, the area and address found according to the set conditions will be replaced
by the specified area and address.
“Keep Offset” in the Replace part will take effect once the “Range” in Find part is checked. If “Keep
Offset” is not checked, the replace address is the same; while if “Keep Offset” is checked, the
replace address is the consecutive address which will automatically deviate by making the set
replace address as the start address.
When the above parameters are set, if the “Find” button in the dialog box is clicked, the search of
address meeting the condition will be performed the screen locating in the Find Range. If the
component is found, then No., Location, Name and Data will be displayed in the bottom white box.
When the components displayed in the search result is double-clicked, the window will be switched
to the screen placed the matched components and Property dialog box will be displayed.
Clicking “Replace” or “Replace All” means the found component meeting the conditions will be
replaced by the component with the address type and address set in the “Replace” part.
If the “Replace All” dialog box shown as below is clicked, the Write/Read Address of all component
which are specified to “MW0” in the current project, are replaced to “MW0”.
NB-series Programmable Terminals NB-Designer Operation Manual(V106)
3-373
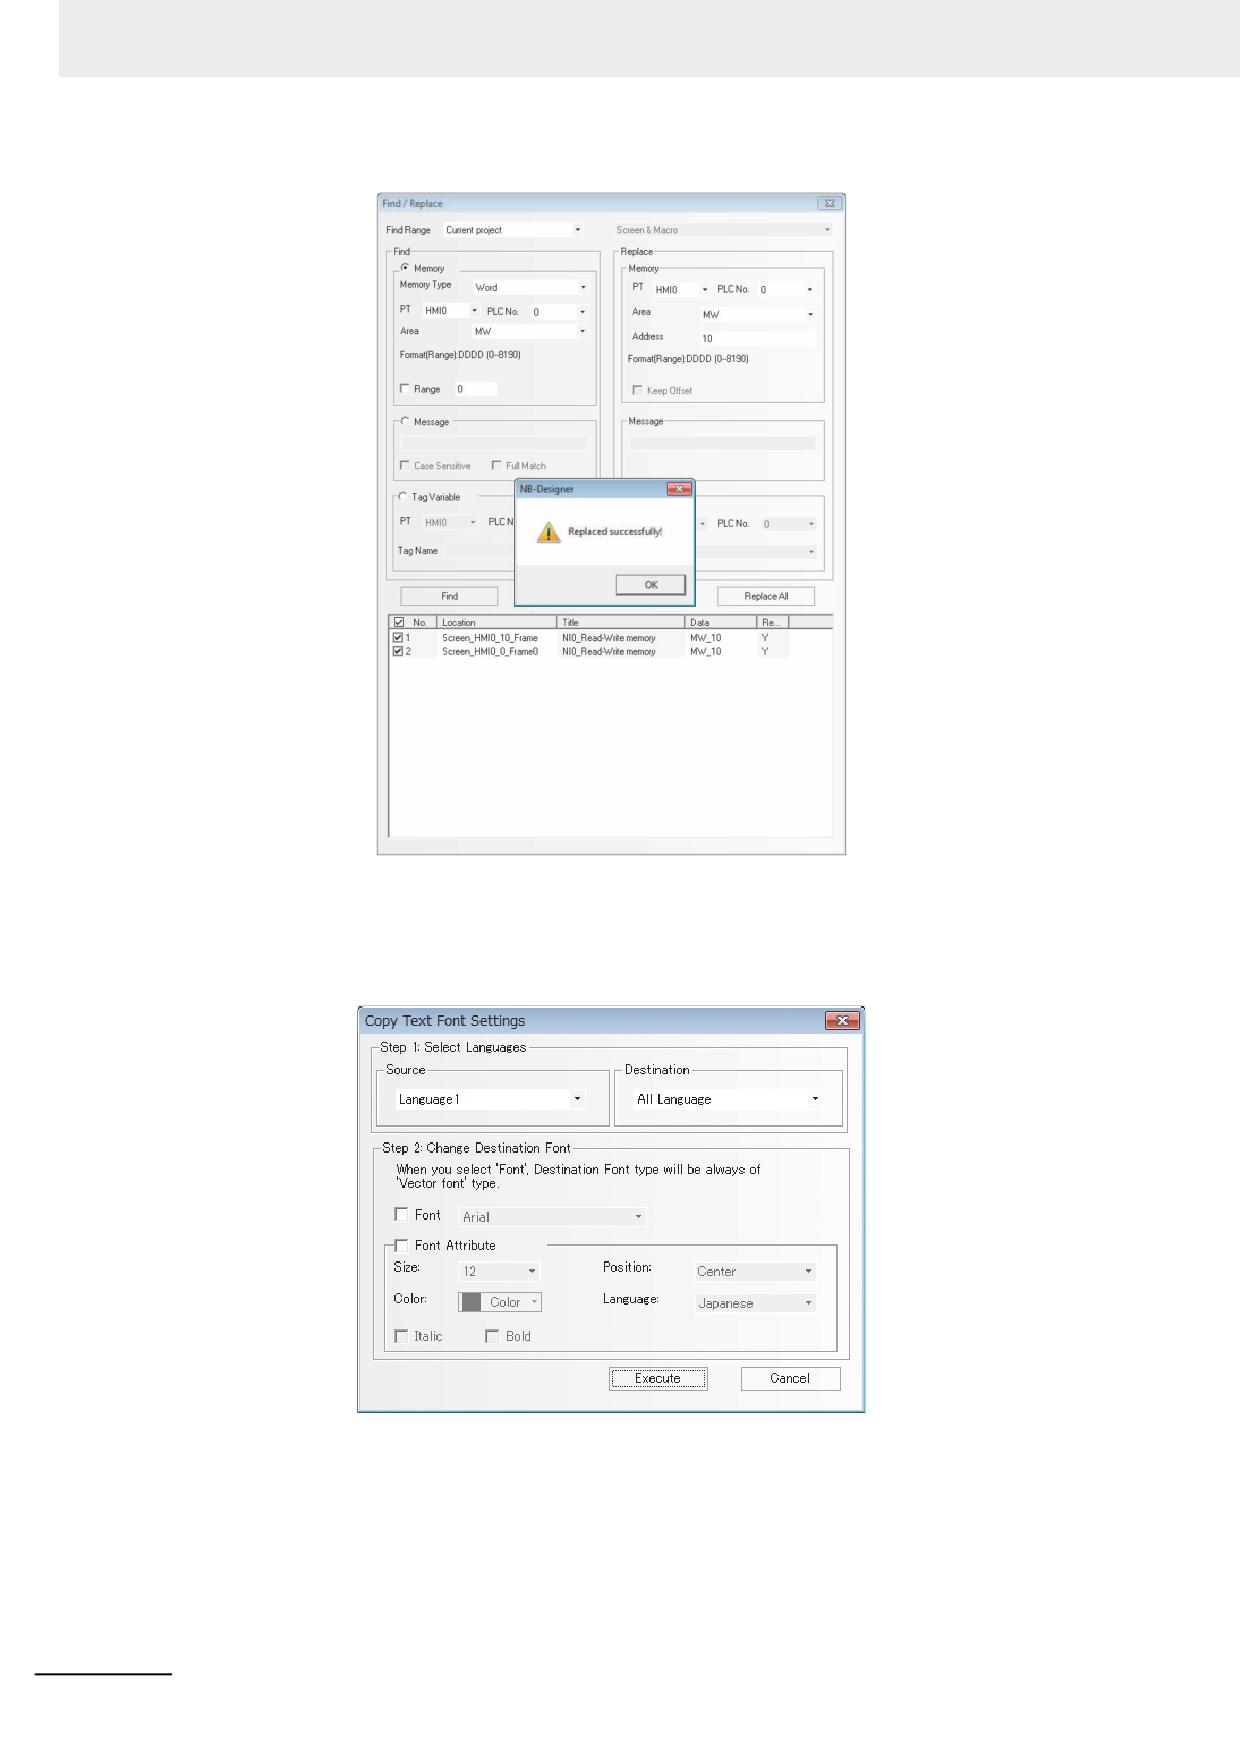
3 Functions of NB-Designer
6
Copy Text Font Settings
To change font settings of text parts where the Text Library is used, select [Edit] - [Copy text
font settings] in the Menu.
(1) Select a language you copy font setting.
Set the languages in [Source] and [Destination].
(2) Click Execute.
The settings will be copied from [Source] Language to [Destination] Language. It may take
a long time.
3-374
NB-series Programmable Terminals NB-Designer Operation Manual(V106)
3 Functions of NB-Designer
Example) The following project has Text 1 and Text 2. Language 1 is set in [Source], and
Language 2 is set in [Destination].
Before
After
Text 1
Language 1 Font
DFNB-EN
Language 1 Font
DFNB-EN
Language 2 Font
DFNB-JP
Language 2 Font
DFNB-EN
Text 2
Language 1 Font
DFNB-JP
Language 1 Font
DFNB-JP
Language 2 Font
DFNB-EN
Language 2 Font
DFNB-JP
As for Text 1, DFNB-EN set as Language 1 will be copied to Language 2. Thus, both Language
1 and Language 2 will be DFNB-EN.
As for Text 2, DFNB-JP set as Language 1 will be copied to Language 2. Thus, both Language
1 and Language 2 will be DFNB-JP.
The font attributes (Size, Position, Color, Italic, and Bold) will be copied as well.
3
Additional Information
To change the settings regardless of Source settings, execute [Change Destination Font].
When check box in [Change Destination Font] is checked, after settings are copied, the
specified settings are overwritten.
To designate overwriting items, check the [Font] box and the [Font attribute] box.
Example) The following project has Text 1 and Text 2. The [Font] box is checked and DFHEI5
is set as the font.
Before
After
Text 1
Language 1 Font
DFNB-EN
Language 1 Font
DFNB-EN
Language 2 Font
DFNB-JP
Language 2 Font
DFHEI5
Text 2
Language 1 Font
DFNB-JP
Language 1 Font
DFNB-JP
Language 2 Font
DFNB-EN
Language 2 Font
DFHEI5
First, Language 1 set as Text 1 and Text 2 will be copied to Language 2. Next, Language 2
Font set in [Destination] will be overwritten to the designated font. As a result, Language 2 Font
on both Text 1 and Text 2 will be DFHEI5.
Note Copying and overwriting will not be performed if the part becomes larger than the screen size due to the
change in the font size. Please specify an appropriate size.
NB-series Programmable Terminals NB-Designer Operation Manual(V106)
3-375
3 Functions of NB-Designer
7
Check Missing Font
Click [Tool] - [Check Missing Font] in the menu to identify a font that not exist in your Windows
system and to replace it with the existing font collectively.
If your Windows system equips all the fonts, this function is not available.
8
About the overlay of component
Overlaying the multiple components together can realize many special functions. NB Unit
supports the overlay of multiple components. When these components are triggered, the
program will perform the corresponding operations according to the layer sequence, i.e. the
component on the top layer will be triggered firstly, then the component in the 2nd layer will be
triggered and so on. For example, if 6 Bit Switch components are overlaid together to control
the Y0 (top layer) to Y5 (bottom layer), then when these components are triggered, the NB Unit
will execute the functions in the following order:
First, execute the command Y0
Command execution Y1
Finally, command execution Y5
The control process is as follows: Y0 ON/OFFY1 ON/OFF (Step 2) Y2 ON/OFF (Step 3), ...,
Y5 ON/OFF (Step 6).
3-376
NB-series Programmable Terminals NB-Designer Operation Manual(V106)
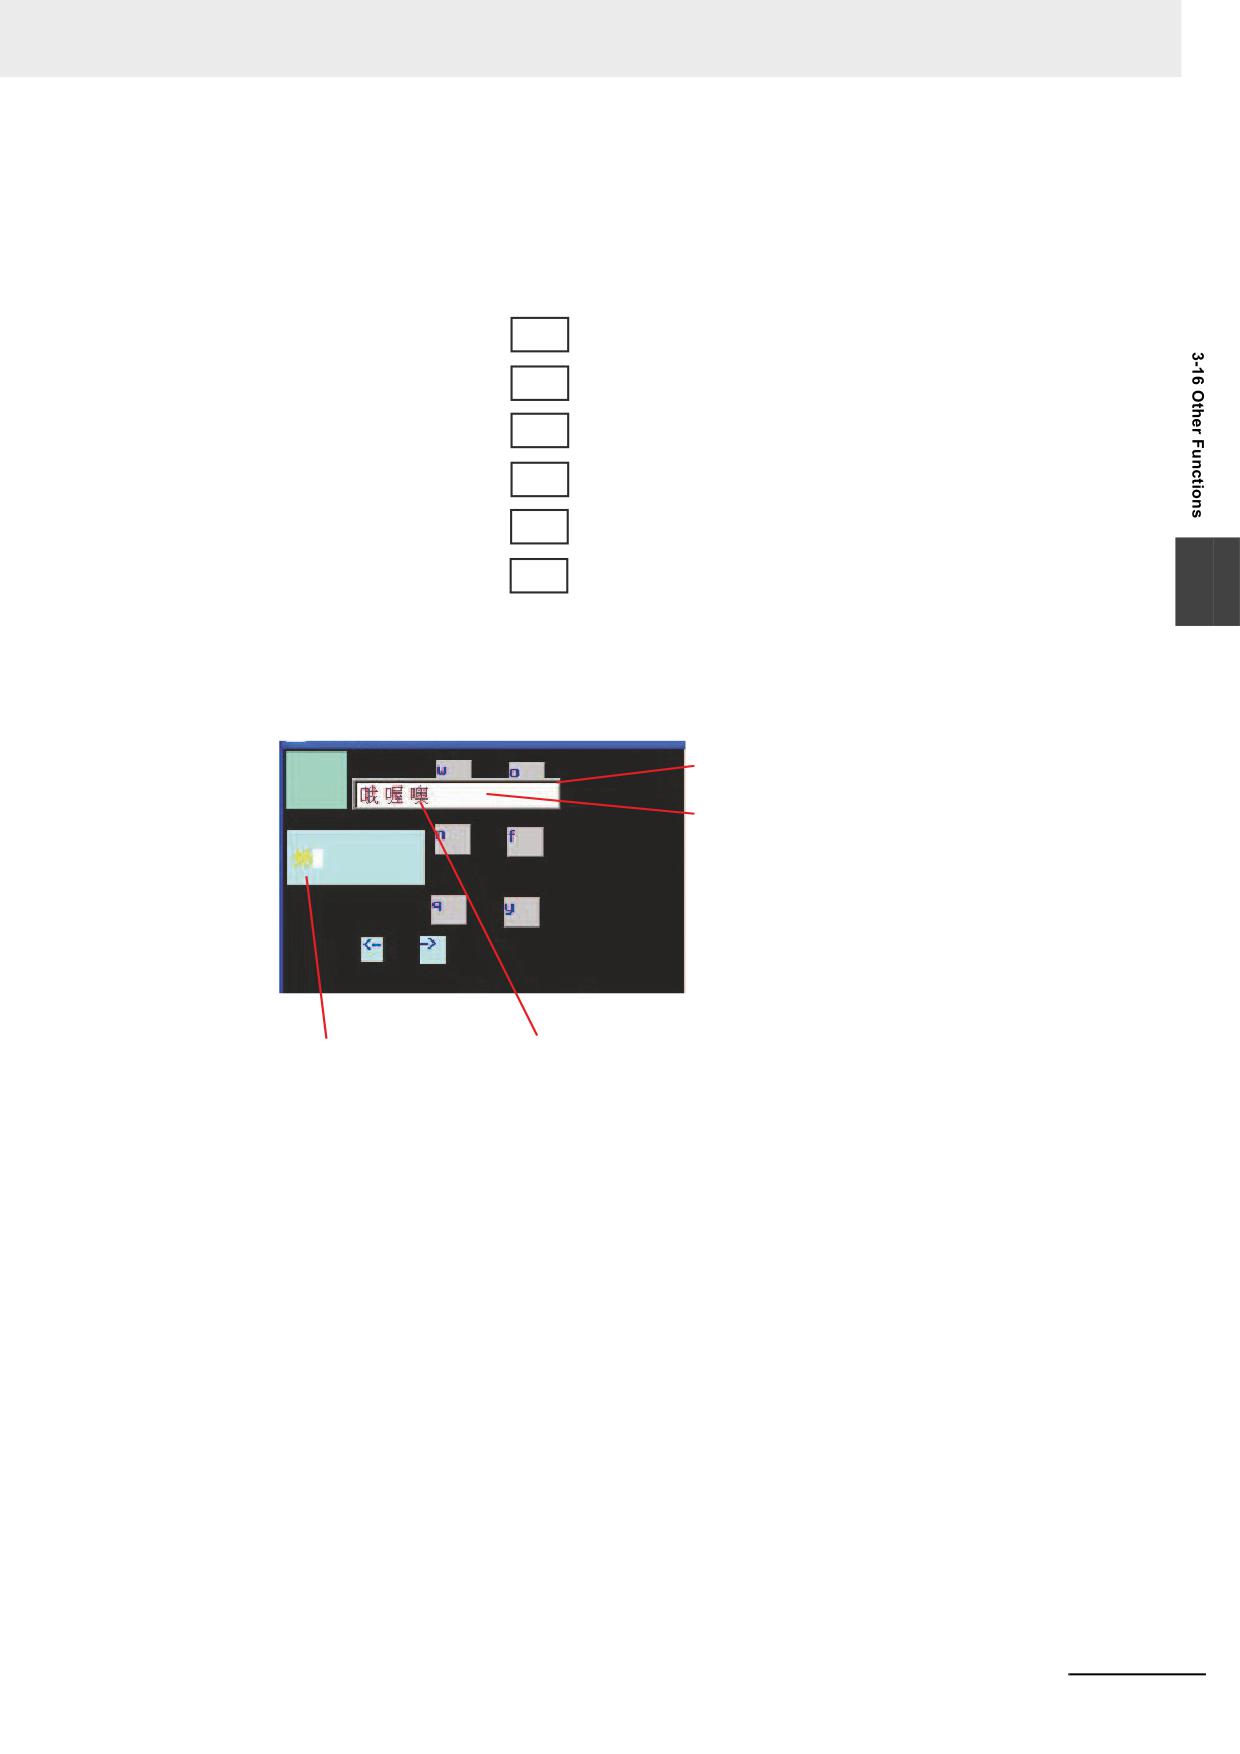
3 Functions of NB-Designer
However, if the overlaid components include the function key of changing screen, the screen is
changed so that the other component behind the function key by are also unable to be
operated by the function. Therefore, the function key of the changing screen should be
arranged at the behind of all the component.
1st layer
Y0
First, execute the command Y0
2nd layer
Y1
Command execution Y1
3rd layer
Change Screen
Y2
4th layer
Y3
5th layer
Y4
Ignore all
6th layer Y5
3
9
Pinyin Input Method
NB-Designer can be used to input common Chinese characters. Only Text Input component
and Not Book component support Pinyin Input method.
Chinese character
display screen
Touching a blank area
allows the component
moved.
Pinyin input text input
Touch characters, the
element as a carrier
completion of an operation
The memory related to the Pinyin input method is described as follows:
LB9100: Used for input method switching,
i.e. LB9100 = 1 for Pinyin input method, and LB9100 = 0 for English input method.
LW9150: Used for PageUp and PageDown operation to Chinese characters display screen.
Due to that 8 Chinese characters (max.) can be displayed in one Chinese character display
screen, the PageUp and PageDown functions are needed to display more Chinese characters.
The value of LW9150 is the No. of Chinese characters displayed in the current Chinese
character display screen. For example, it is assumed that the number of Chinese homophones
of Pinyin “wo” is M, when the value of LW9150 is N, then the Nth Chinese character and the
follow-up characters will be displayed in the Chinese character display screen.
LW9152 to LW9167: Used to display the Pinyin characters input currently.
NB-series Programmable Terminals NB-Designer Operation Manual(V106)
3-377