NB-series Programmable Terminals. NB-Designer OPERATION MANUAL (2026) - page 3
3 Functions of NB-Designer
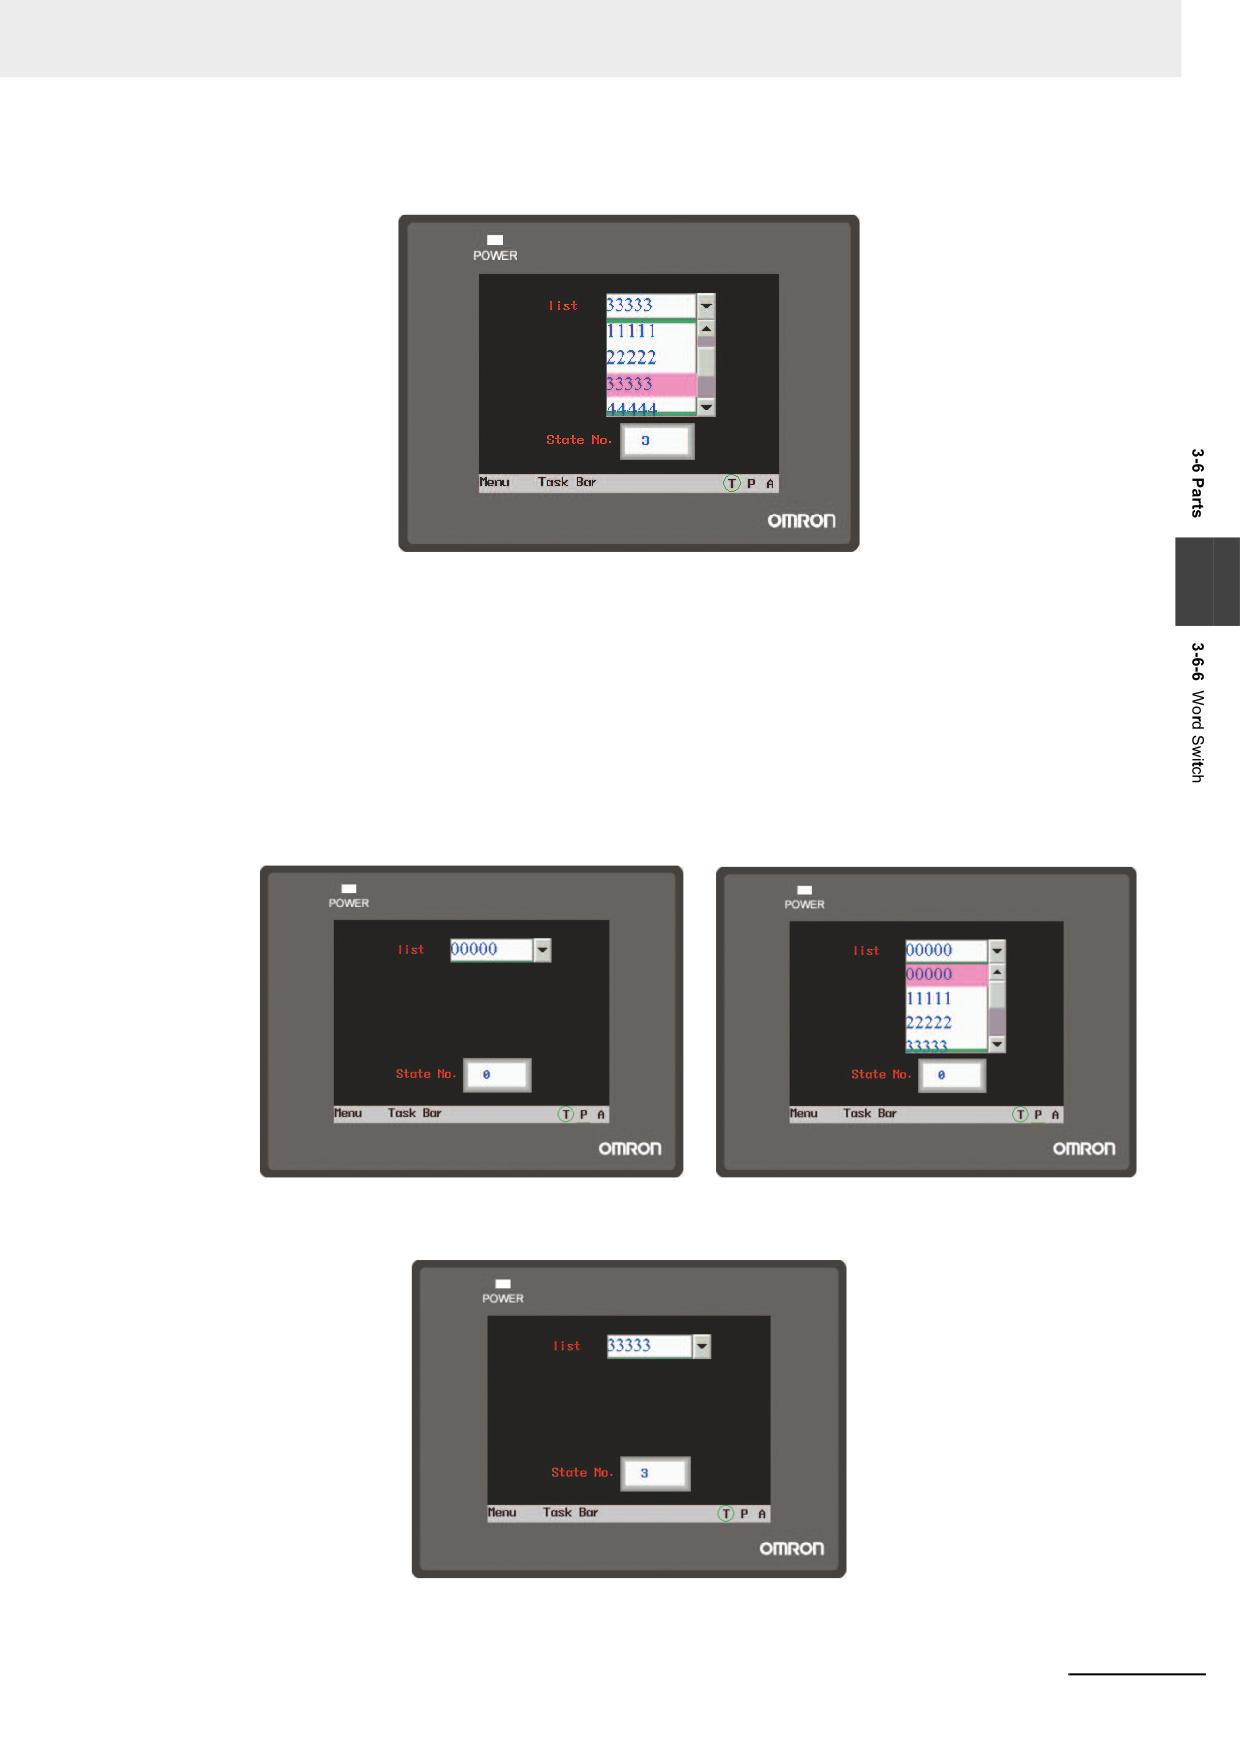
(4) Perform the test and select “33333” in the list component, and “3” will be displayed in the
State No.
3
Dropdown List: When this component is touched, one list will pop up under this component. All the
options are available in this list, and it will automatically disappear when one option
is selected.
For example:
(1) Create one Word Switch with read address and write address both of LW0 and one Number
Display component with the address of LW0.
(2) Set the Control Mode and State No. to “Dropdown List” and “6” respectively.
(3) Set the label contents to “00000” to “55555”.
(4) When performing the offline test and selecting the list, the status will be displayed with a list
shown in the following figure on the right.
(5) Touch this component, and the list option will pop up as the above right graphics shown.
(6) After one option is selected, the list will disappear automatically.
NB-series Programmable Terminals NB-Designer Operation Manual(V106)
3-101
3 Functions of NB-Designer
3-6-7
XY Graph
XY Graph reflects the correlation of two variables visually. If you want to monitor the XY
Graph reflecting the changes of address values, the NB Unit can clearly displayed it out only by using
this component.
When the sampling number with M channel per page is set to N, the values are stored to the PLC, e.g.
X11, Y11, X12, Y12, ..., X1N, Y1N, ..., XM1, YM1, ..., XMN, YMN. The number of the memory
addresses occupied by the PLC is M×N×2.
Note For “Xij, Yij”, subscript “i” represents the channel number, “j” represents the sampling point, and “Xij”
represents the coordinate position of X for sampling point j in channel i.
Process of adding one XY Graph component
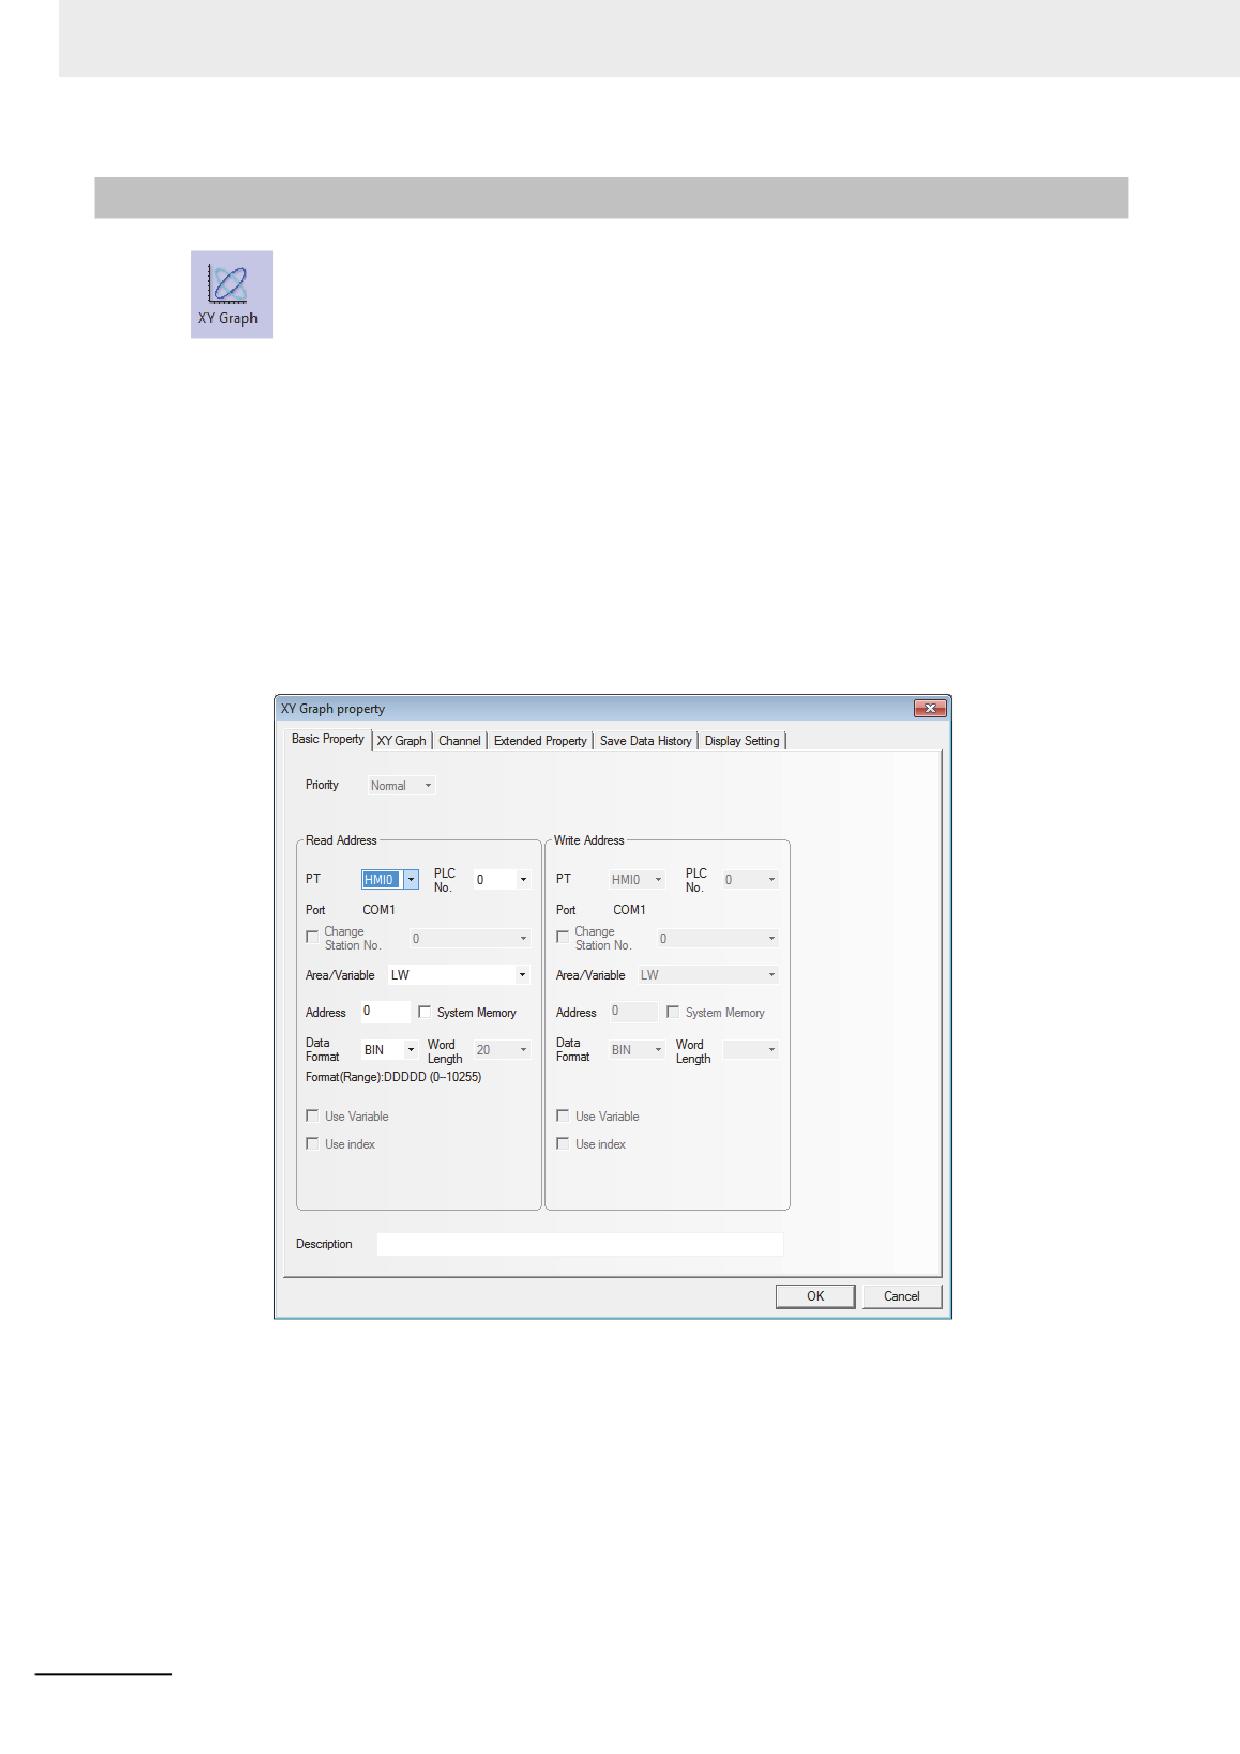
1
Press the XY Graph component icon, drag it to the screen, then the [Basic Properties] dialog
box of XY Graph component will pop up.
Read Address: Specifies the word address of PLC corresponding to the data of X-axis trajectory,
and the word address corresponding to Y-axis is “read address + 1”. If the channel
number is greater than 1, the addresses corresponding to the 2nd channel are as
follows: “read address +2 × sampling points” for X-axis and “read address + 2 ×
sampling point +1” for Y-axis and so on.
Address: Refers to the first address of the word address corresponding to XY Graph.
Data Format: Includes BIN or BCD.
Word Length: It is determined by the channel number, sampling points, and the type of selected
type of storing. The word length cannot be changed manually.
3-102
NB-series Programmable Terminals NB-Designer Operation Manual(V106)
3 Functions of NB-Designer
2
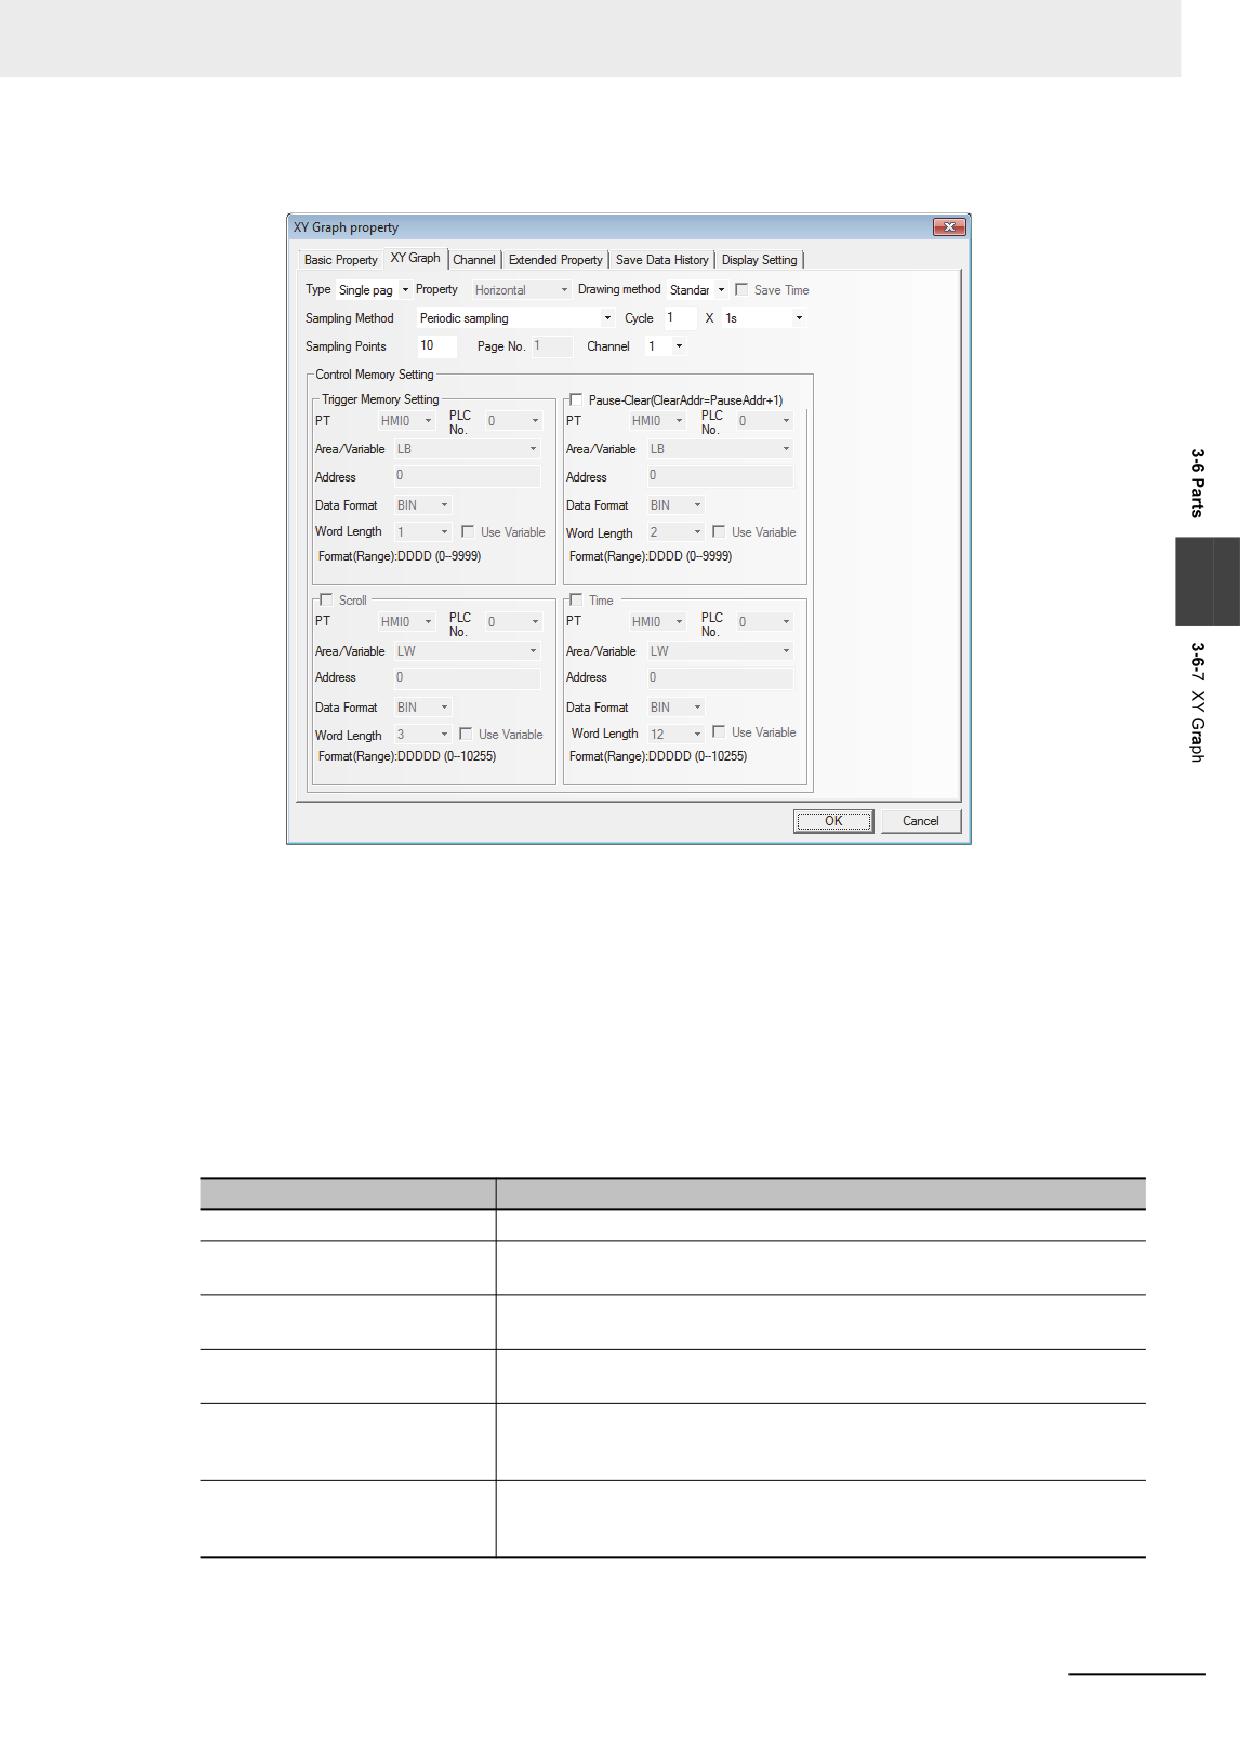
Go to the [XY Graph] tab and set the parameters related to the XY Graph.
3
Type: Includes Single page and Multiple pages.
If “Single page” display is selected, only the data change information of the sampling value in
the current page is displayed, and the points out of the sampling points in single page will not
be saved and displayed. If “Multiple pages” display is selected, the old data can be displayed
by scrolling and the data in the past can be saved. In this way, when the XY Graph is scrolled
forward, the previous sampling data will not be lost. The history data is stored in the memory
for the reference in future.
Property (it is available option when [Trend] is selected for [Draw Type]:
Refers to the horizontal direction and vertical direction, i.e. the graphics is displayed in
horizontal direction or vertical direction when the sampling data is displayed.
Sampling Methods: They are shown as below.
Sampling Method
Descriptions
Periodic sampling
The data is sampled periodically.
OFFON trigger sampling
Only when the state of the specified bit address turns ON from OFF, the
sampling is triggered.
ONOFF trigger sampling
Only when the state of the specified bit address turns OFF from ON, the
sampling is triggered.
OFFON trigger sampling
Only when the state of the specified bit address changes, the sampling is
triggered.
OFFON reset trigger sampling
Only the state of the specified bit address turns ON from OFF, the sampling
is triggered, and the state of the specified bit address will be reset
automatically after the triggering.
ONOFF reset trigger sampling
Only the state of the specified bit address turns OFF from ON, the sampling
is triggered, and the state of the specified bit address will be reset
automatically after the triggering.
Cycle: Refers to the interval between the sampling points each 2 pages with the unit of “s” or
“100 ms”.
NB-series Programmable Terminals NB-Designer Operation Manual(V106)
3-103
3 Functions of NB-Designer
DrawType: Includes Standard, Track and Trend. The sampling methods vary with the types.
Draw Type
Descriptions
Standard
Multiple points are sampled each time, and X and Y components are included.
Number of the occupied memory depends on the number of channel and sampling
points. For example, if there are m channels and n sampling points, number of the
occupied memory is “m×n×2”.
Track
One point is sampled each time, and X and Y components are included. Number of
the occupied memory depends on the number of channel. For example, if there are
m channels and n sampling points, the number of occupied memory is “m×2”.
Trend
Multiple points are sample each time, and only Y component instead of X
component is included. Number of the occupied memory depends on the number of
channel and sampling points. For example, if there are m channels and n sampling
points, number of the occupied memory is “m×n”.
Sampling Points: Refers to the number of the sampling point displayed in the screen.
PageNum: When [Multiple pages] is selected in [Type], this option is valid. And it ranges from
1 to 32767.
Channel: Refers to the number of track line to be displayed, and it corresponds to the word
length of read address to be set. And 2 word addresses correspond to one track line.
The channel ranges from 1 to 16.
Pause-Clear: Set the bit address to control the pause of creating a line graph or the clear of
creating a graph. [Clear] bit address = [Pause] bit address + 1. When [Clear] bit
is ON, the sampling data will be cleared and when the bit turns OFF again, the
sampling will continue and the changes in XY Graph will be displayed
dynamically.
Scroll: The address specified by this bit is used in combination with the scroll components, i.e.
the XY Graph can be viewed by directly moving the scroll bar. The scroll address
should be set in consistent with the address used by the related scroll bar component.
For details, refer to [3-6-22 Scroll Bar].
Time: When “Save Time” is checked, the below “Time” option can be selected. This option
includes 12 words, and it is used to save the time for the latest sampling point currently.
“Second, minute, hour, day, month, year” for the starting point and “Second, minute,
hour, day, month, year” for the end point of the current page are stored in these 12
words respectively, and each word represent a point in time.
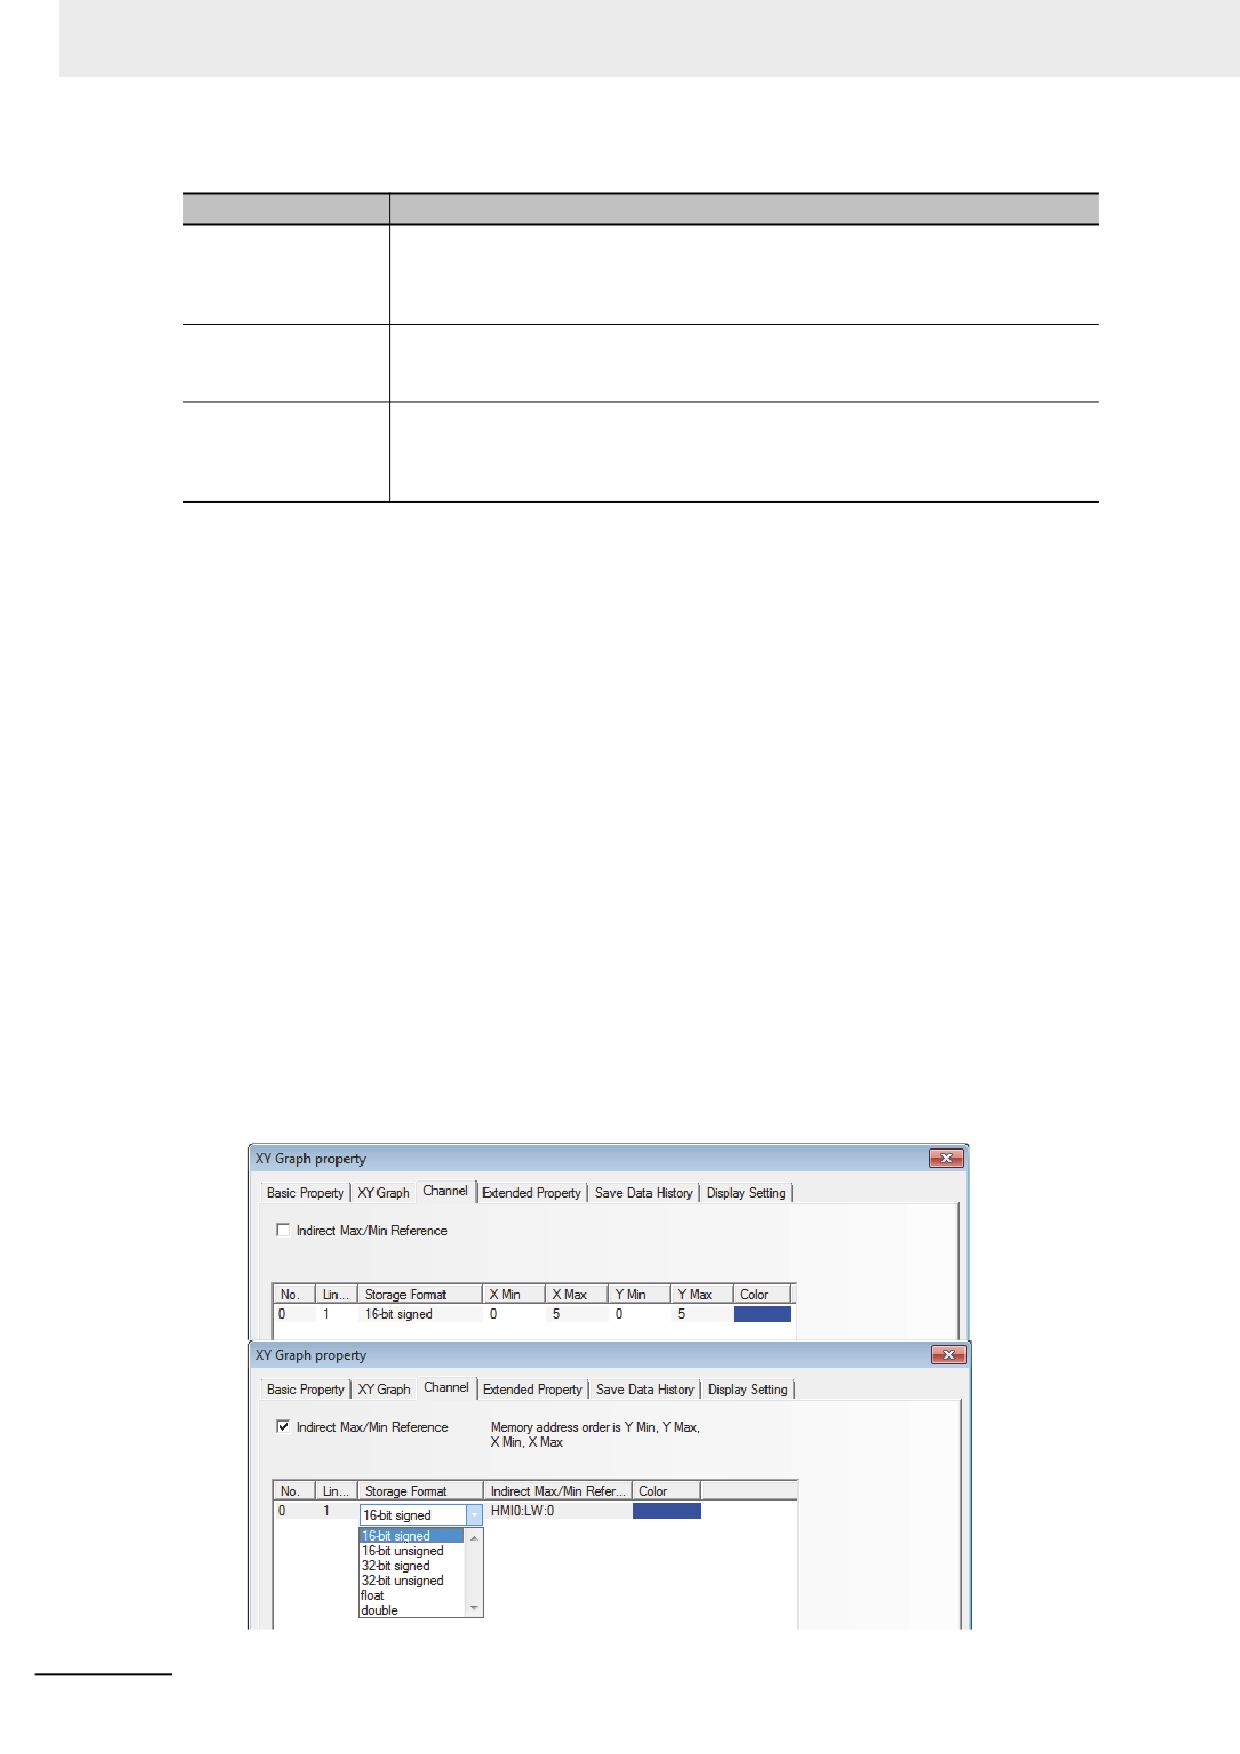
3
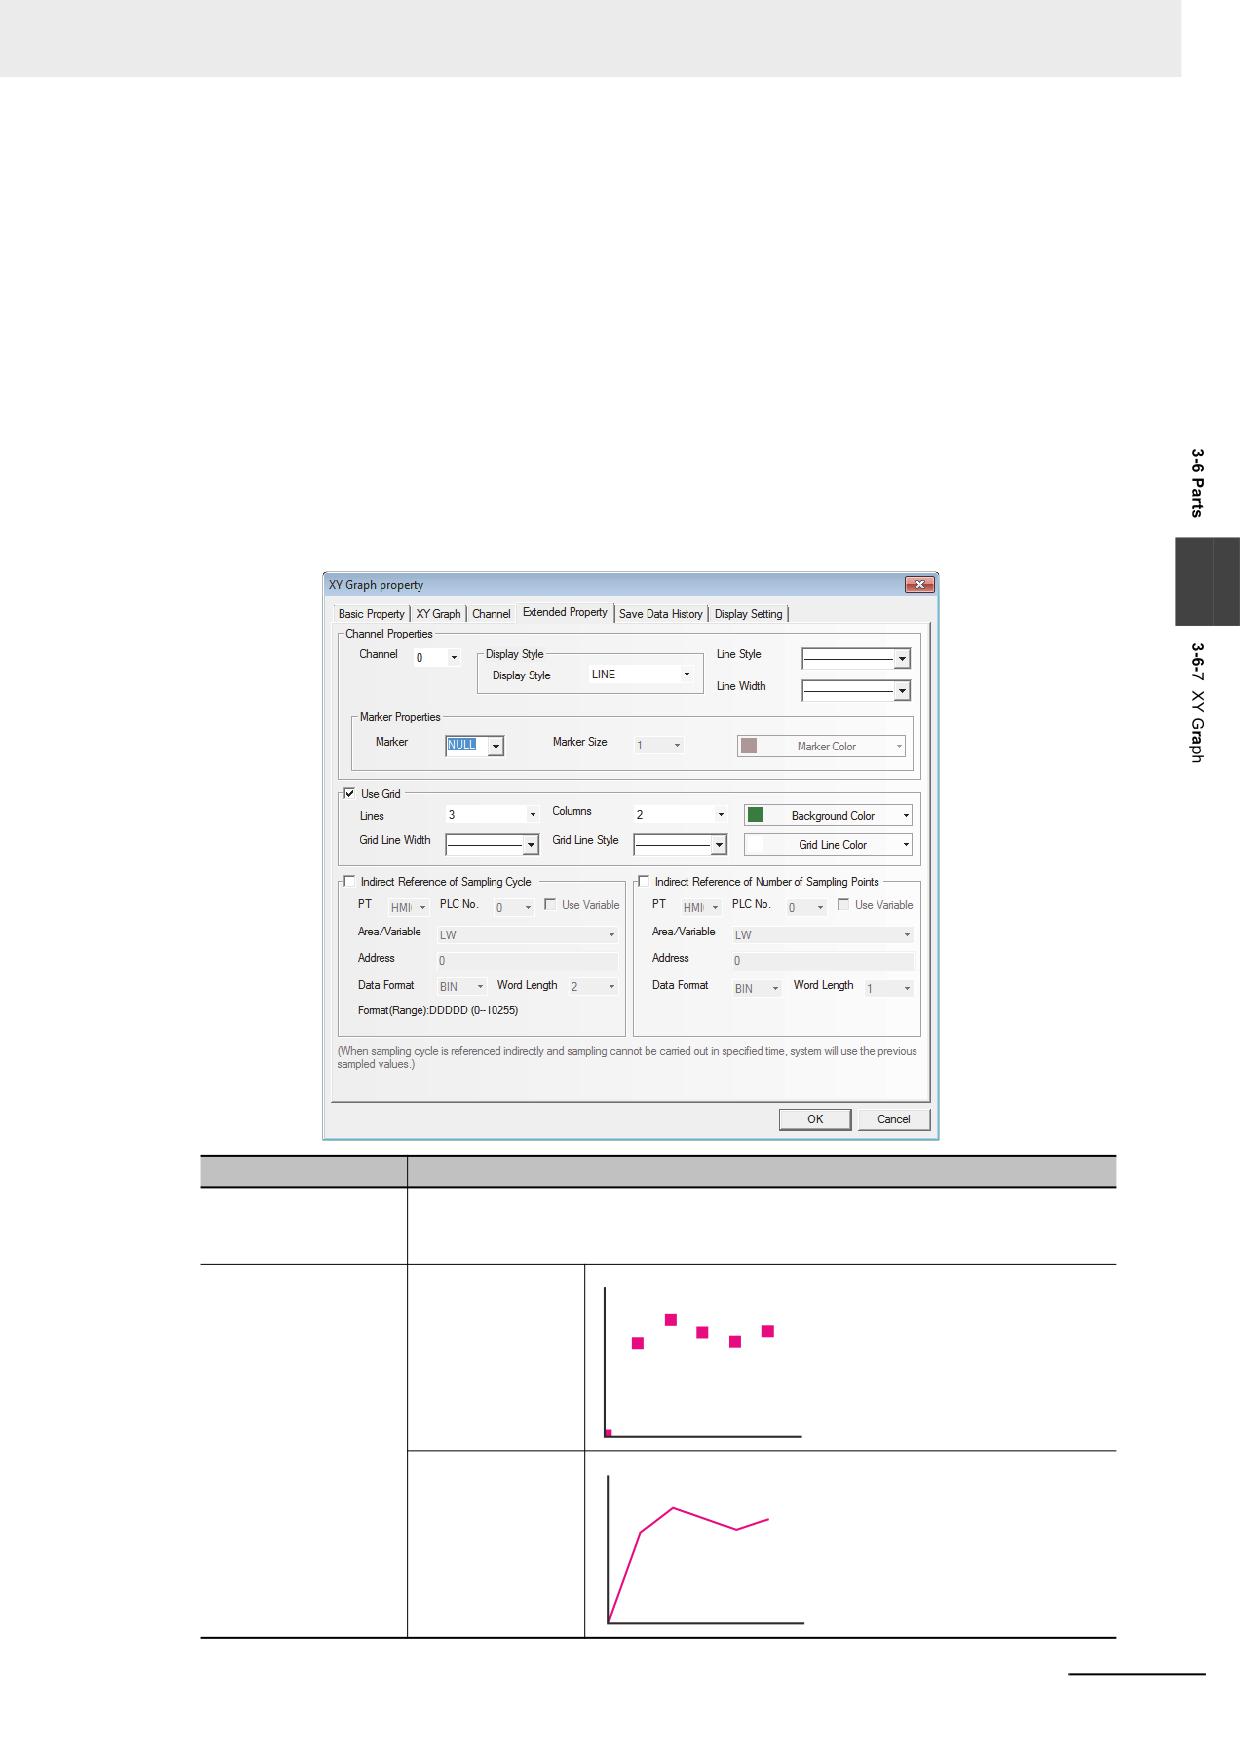
Switch to the [Channel] tab and set the parameters related to each track line.
3-104
NB-series Programmable Terminals NB-Designer Operation Manual(V106)
3 Functions of NB-Designer
Color: Specifies the color for each track line.
Line Width: Refers to the thickness of the line, and 8 kinds of line width are available here.
Storage Format: Sets the data type used by the user and 6 kinds are available.
Y Min/Y Max: Sets the minimum value and maximum value of the data corresponding to each
track line in Y direction. When the read value is greater than the maximum value
or less than the minimum value, only the maximum value or minimum value will
be displayed in the XY Graph.
X Min/X Max: Sets the minimum value and maximum value of the data corresponding to each
track line in X direction. When the read value is greater than the maximum value
or less than the minimum value, only the maximum value or minimum value will
be displayed in the XY Graph.
4
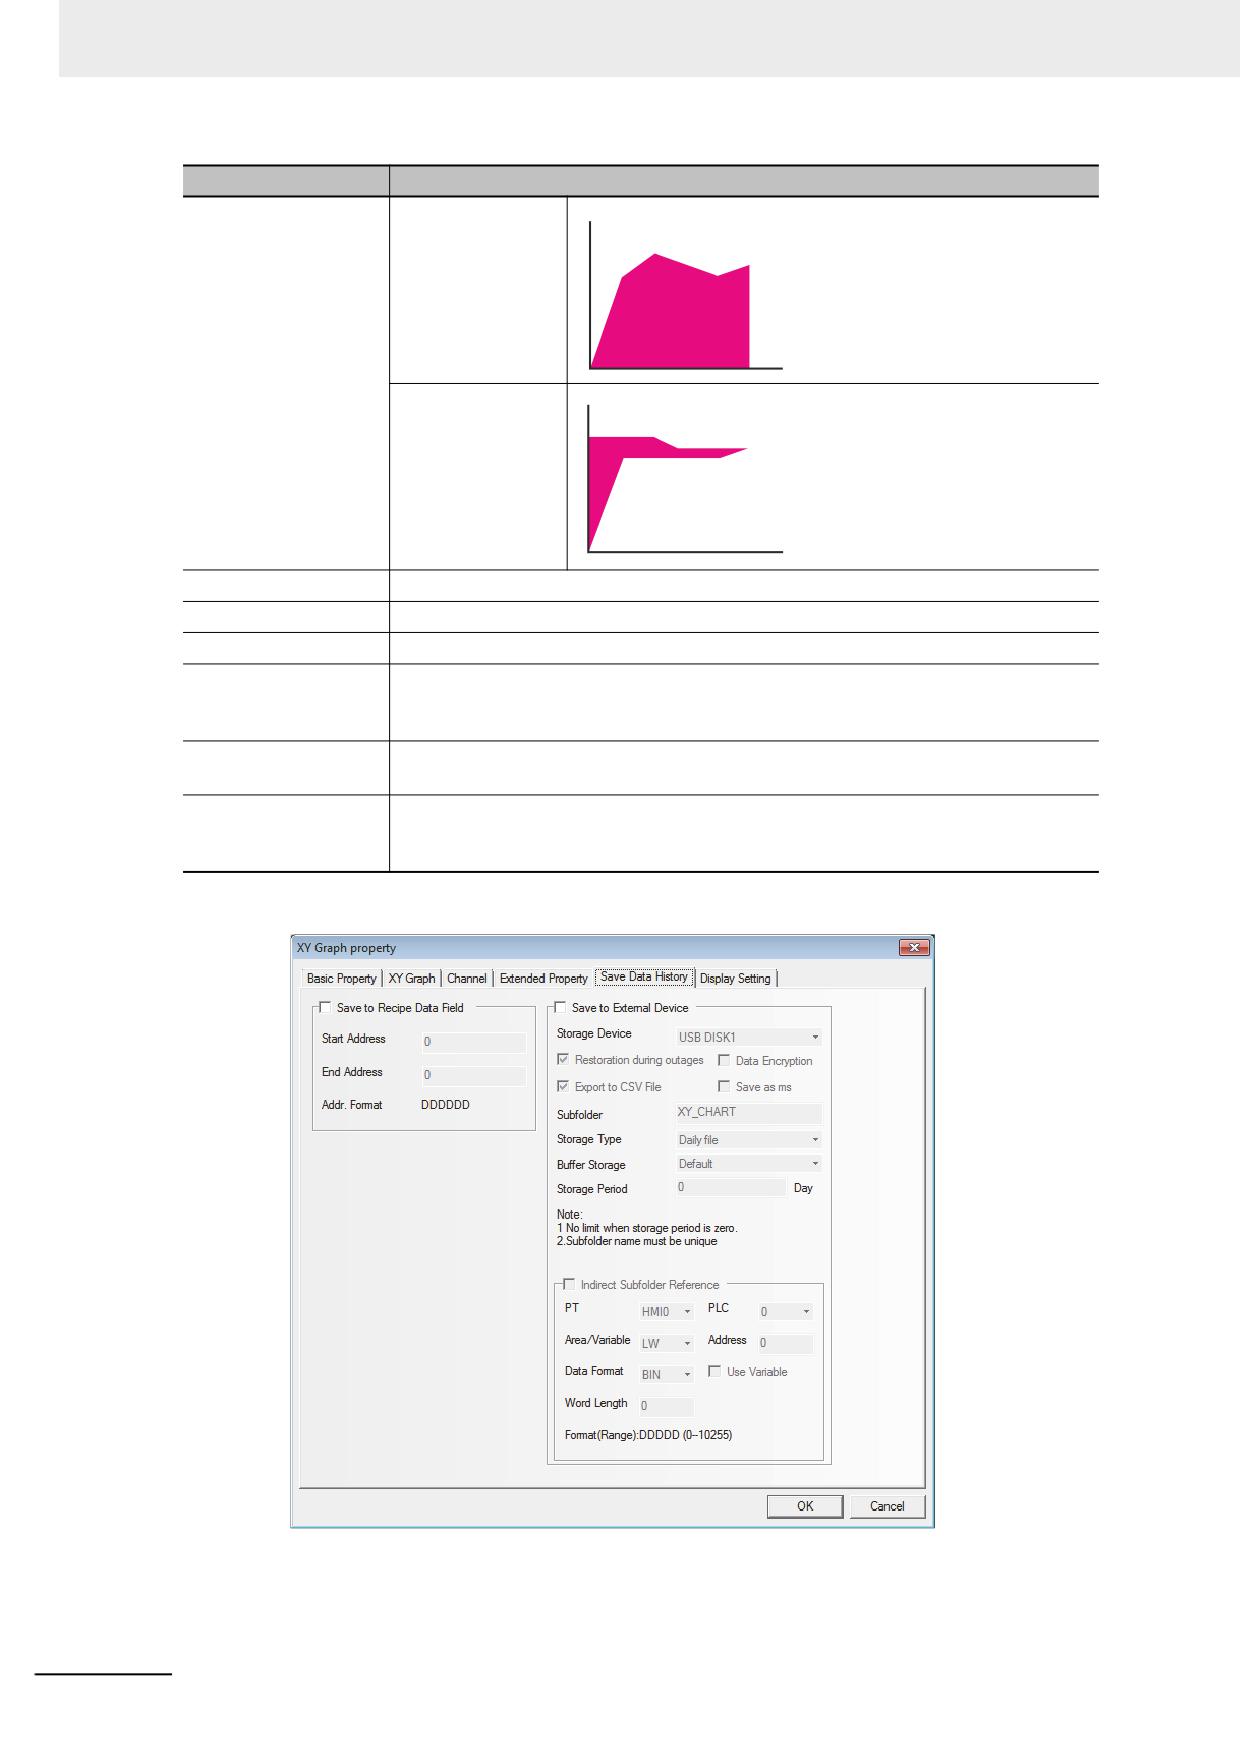
Switch to the [Extended Properties] tab and set Channel Properties, Grid Properties and
Variable Period etc.
3
Extended Properties
Descriptions
Channel Properties
Select the channel to be edited. The optional channel depends on the channel
number set in “Data Log” Property tab. And the set the Line Style and Line Width of
track line corresponding to the channel.
Display Style
Dot
LINE
NB-series Programmable Terminals NB-Designer Operation Manual(V106)
3-105
3 Functions of NB-Designer
Extended Properties
Descriptions
Connect Type
X axis projection
Y axis projection
Marker Properties
Select the Marker graphics from the 7 available graphics SU×.
Marker Size
Sets the size of Marker.
Marker Color
Sets the color of Marker.
Use Grid
Checking this option means the Data Log will use the backg1round and grid effect
provided by the system, and the lines and columns of the grid to be displayed and
the color, width and type of grid line, etc. can be set respectively.
Indirect Reference of
When periodical sampling is used, the sampling time will be read from the specified
Sampling Cycle
memory.
Indirect Reference of
The sampling points will be read from the specified address.
Number of Sampling
Points
5
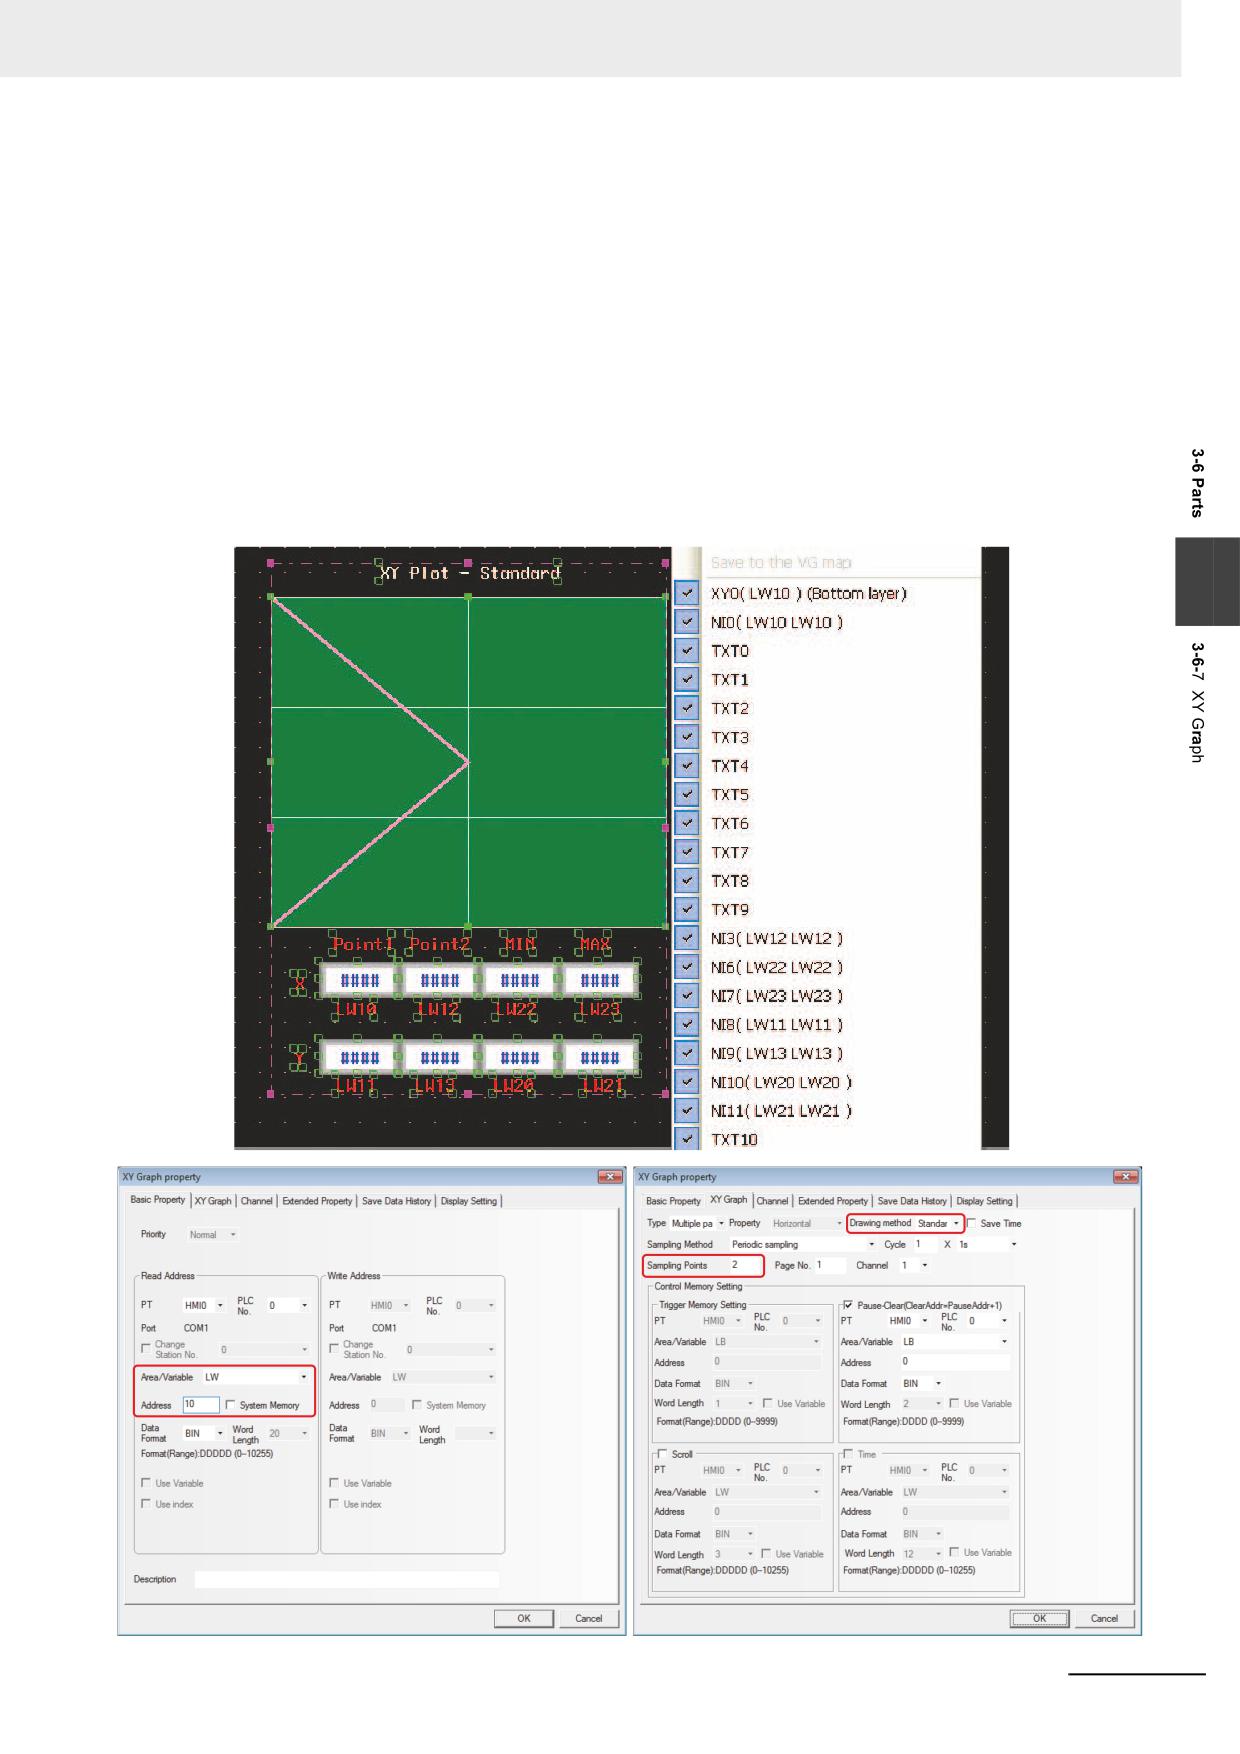
Switch to the [Save Data History] tab and set information to be saved.
Save to Recipe Data Field: Checking this option means the data will be saved into the
address of memory for recipe memory in the PT (i.e. RW
memory).
3-106
NB-series Programmable Terminals NB-Designer Operation Manual(V106)
3 Functions of NB-Designer
The area used for storing data can be calculated with those formulas as follows.
Standard or Track:
20 + Sampled pages x 4 + Sampled pages x Sampled points x Number of
Channels x 2
Trend:
20 + Sample pages x Sampled points x 4 + Sampled pages x Sampled
points x Number of Channels
6
Press the [OK] button to complete the setup of the XY Graph component.
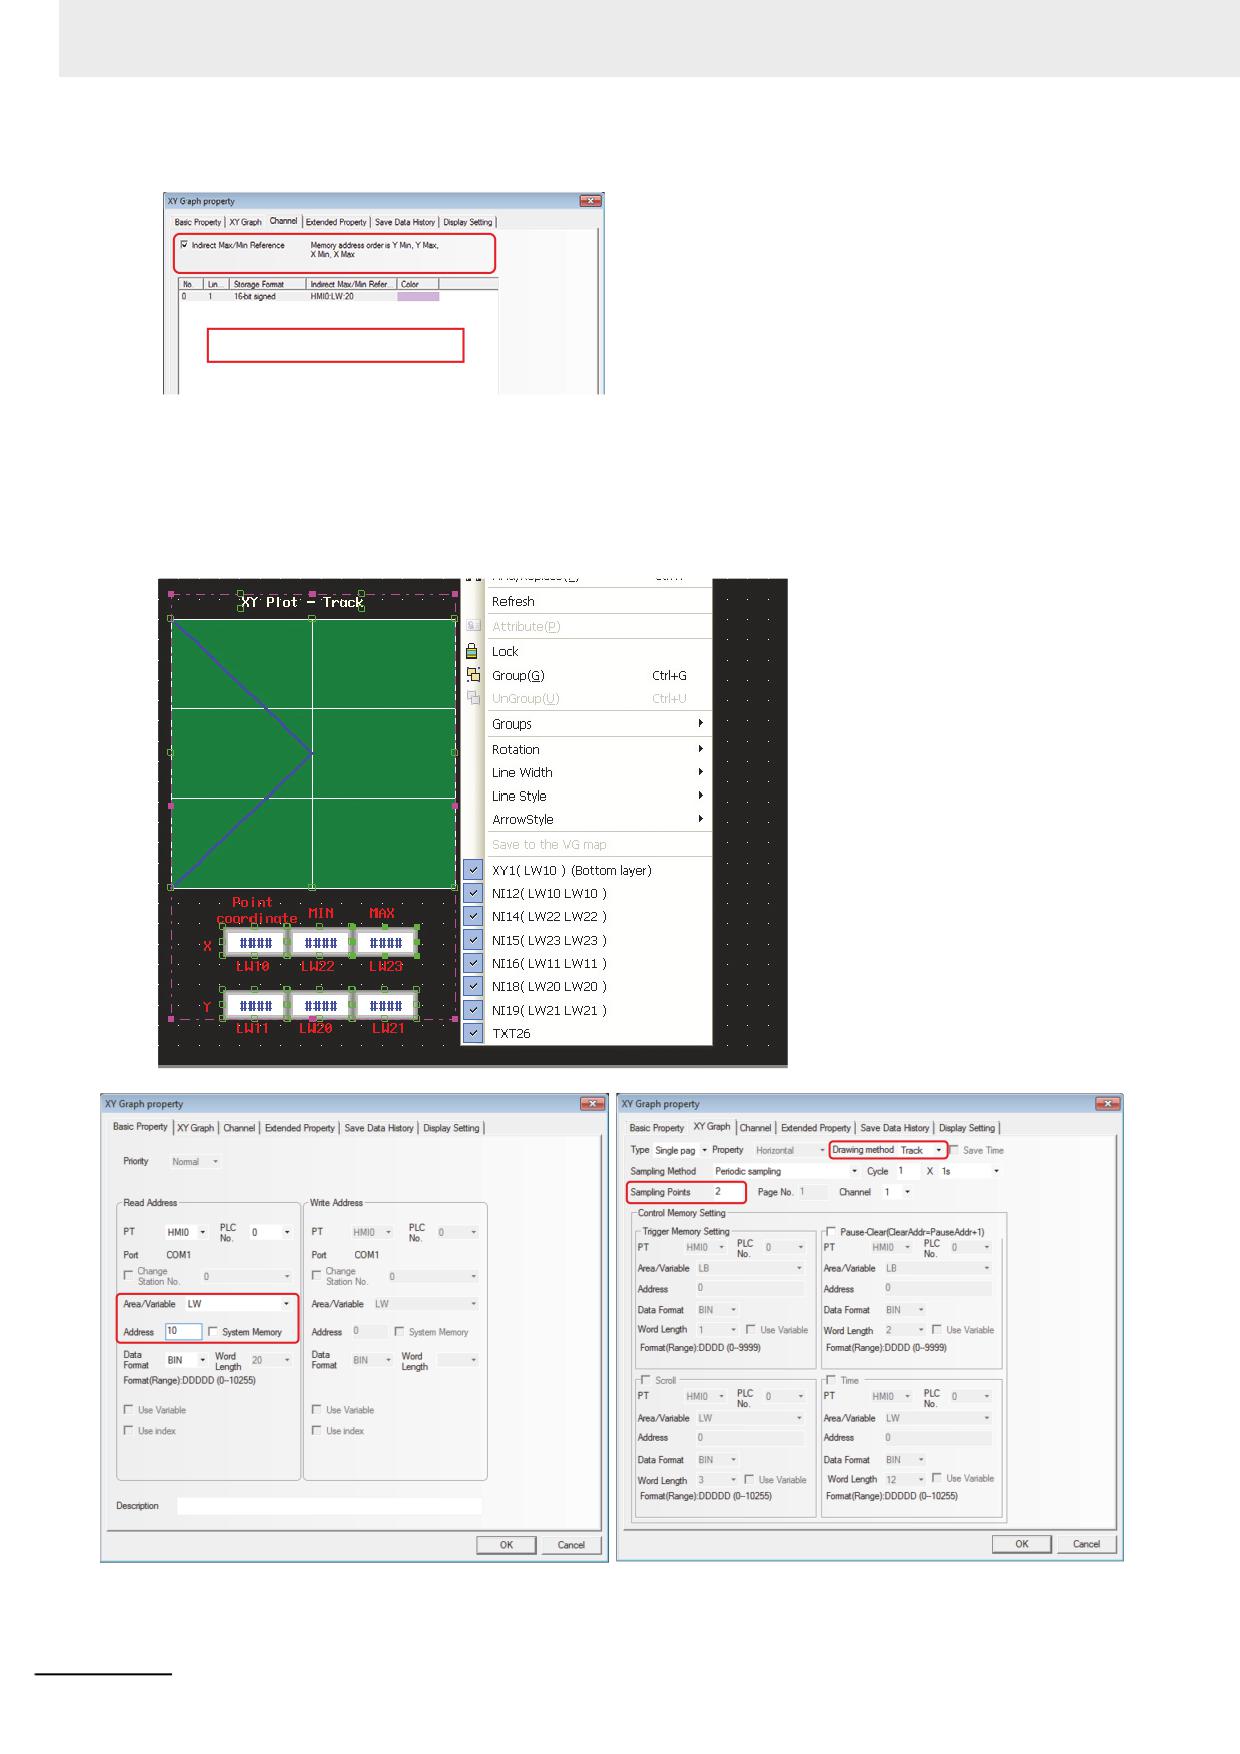
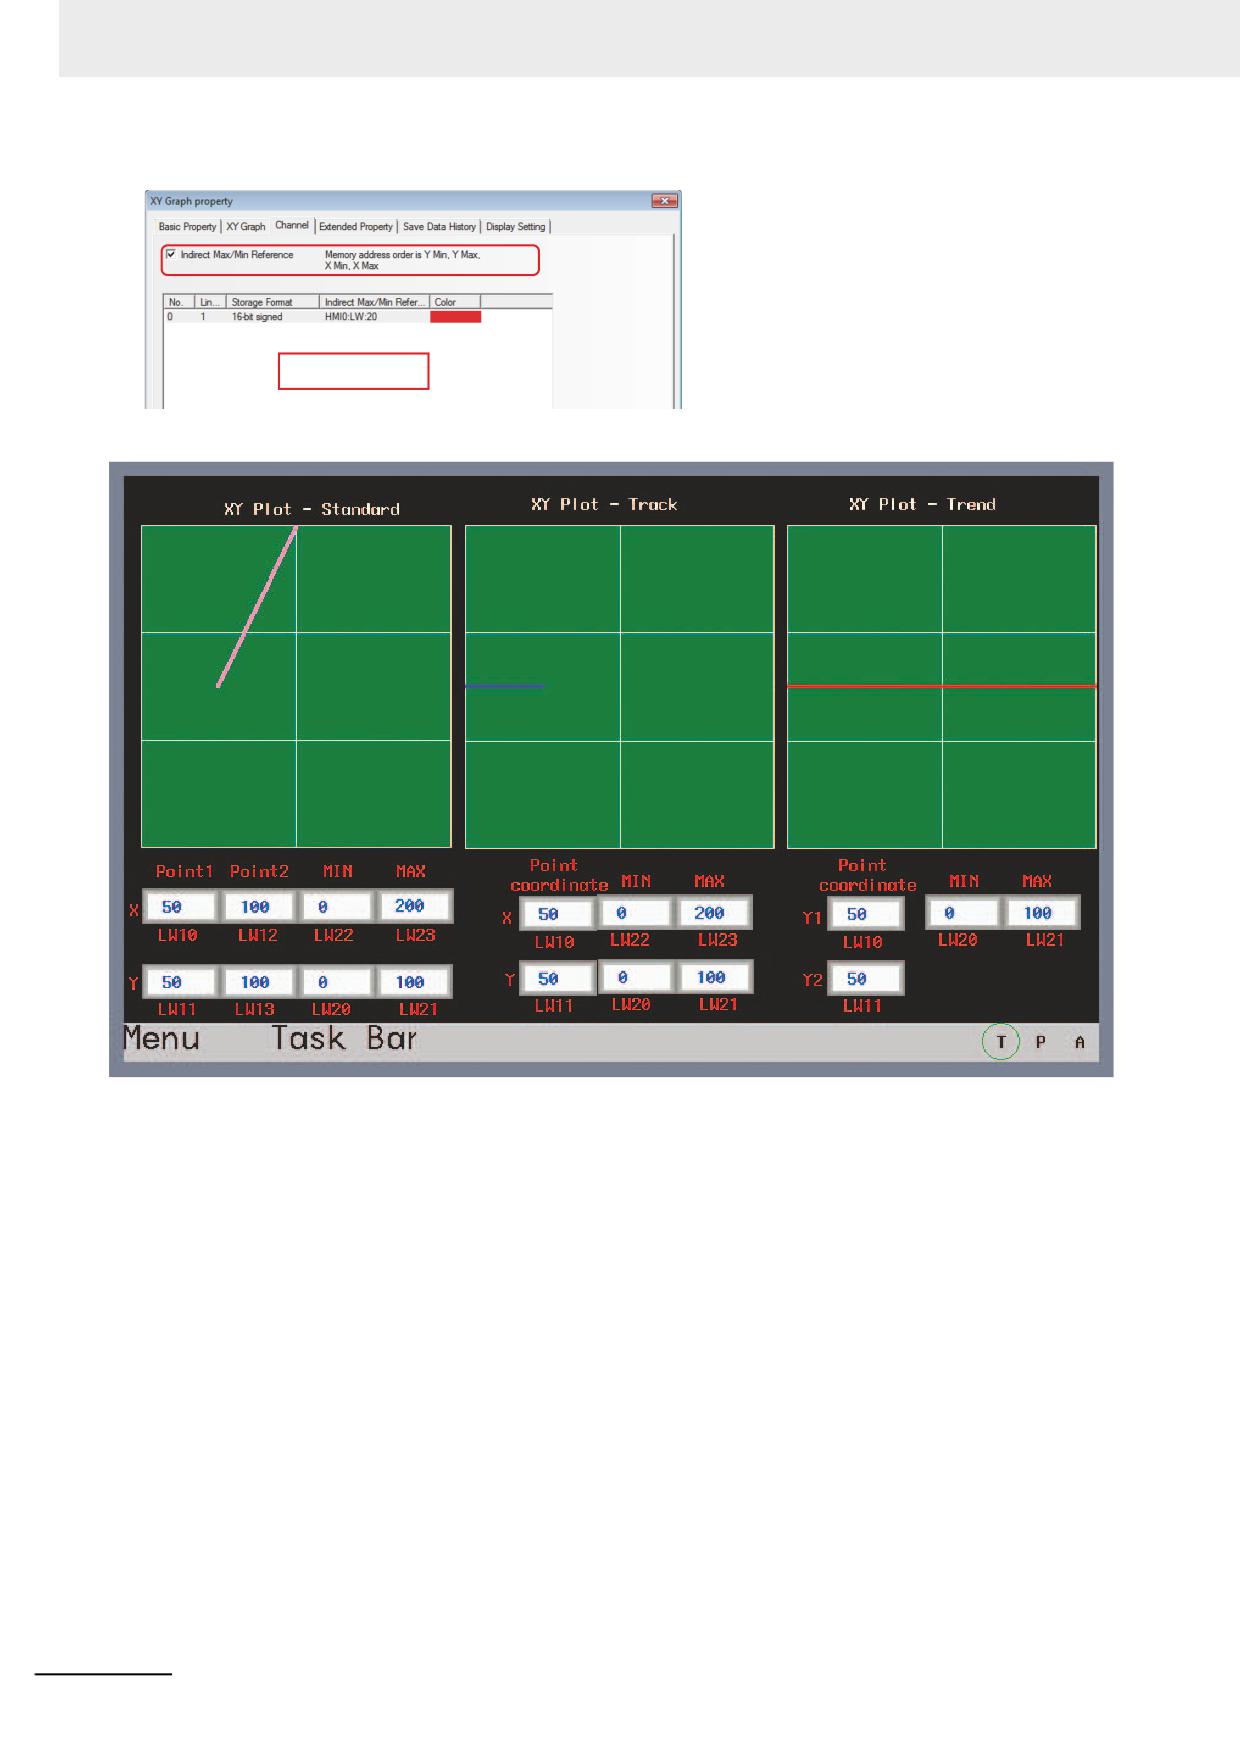
Example: When the maximum value and minimum value of a line graph (Drawing method:
Standard) are specified indirectly.
Descriptions: The coordinate position of sampling point 1 and sampling point 2 correspond to
“x, y (LW10, LW11)” and “x, y (LW12, LW13)”; and the minimum values and
maximum values of y coordinate and x coordinate are LW20 & LW21 and LW22
& LW23 respectively.
3
NB-series Programmable Terminals NB-Designer Operation Manual(V106)
3-107
3 Functions of NB-Designer
Y coordinate min = LW20; Y coordinate max = LW21
X coordinate min = LW22; X coordinate max = LW23
Example: When the maximum value and minimum value of a line graph (Drawing method:
Track) are specified indirectly.
Descriptions: The position coordinate is allocated as below.
There is only 1 sampling point whose coordinate value corresponds to “x, y”
(LW10, LW11), and the minimum values and maximum values for y coordinate
and x coordinate are “ LW20 & LW21” and “LW22, LW23” respectively.
3-108
NB-series Programmable Terminals NB-Designer Operation Manual(V106)
3 Functions of NB-Designer
Y coordinate min = LW20; Y coordinate max = LW21
X coordinate min = LW22; X coordinate max = LW23
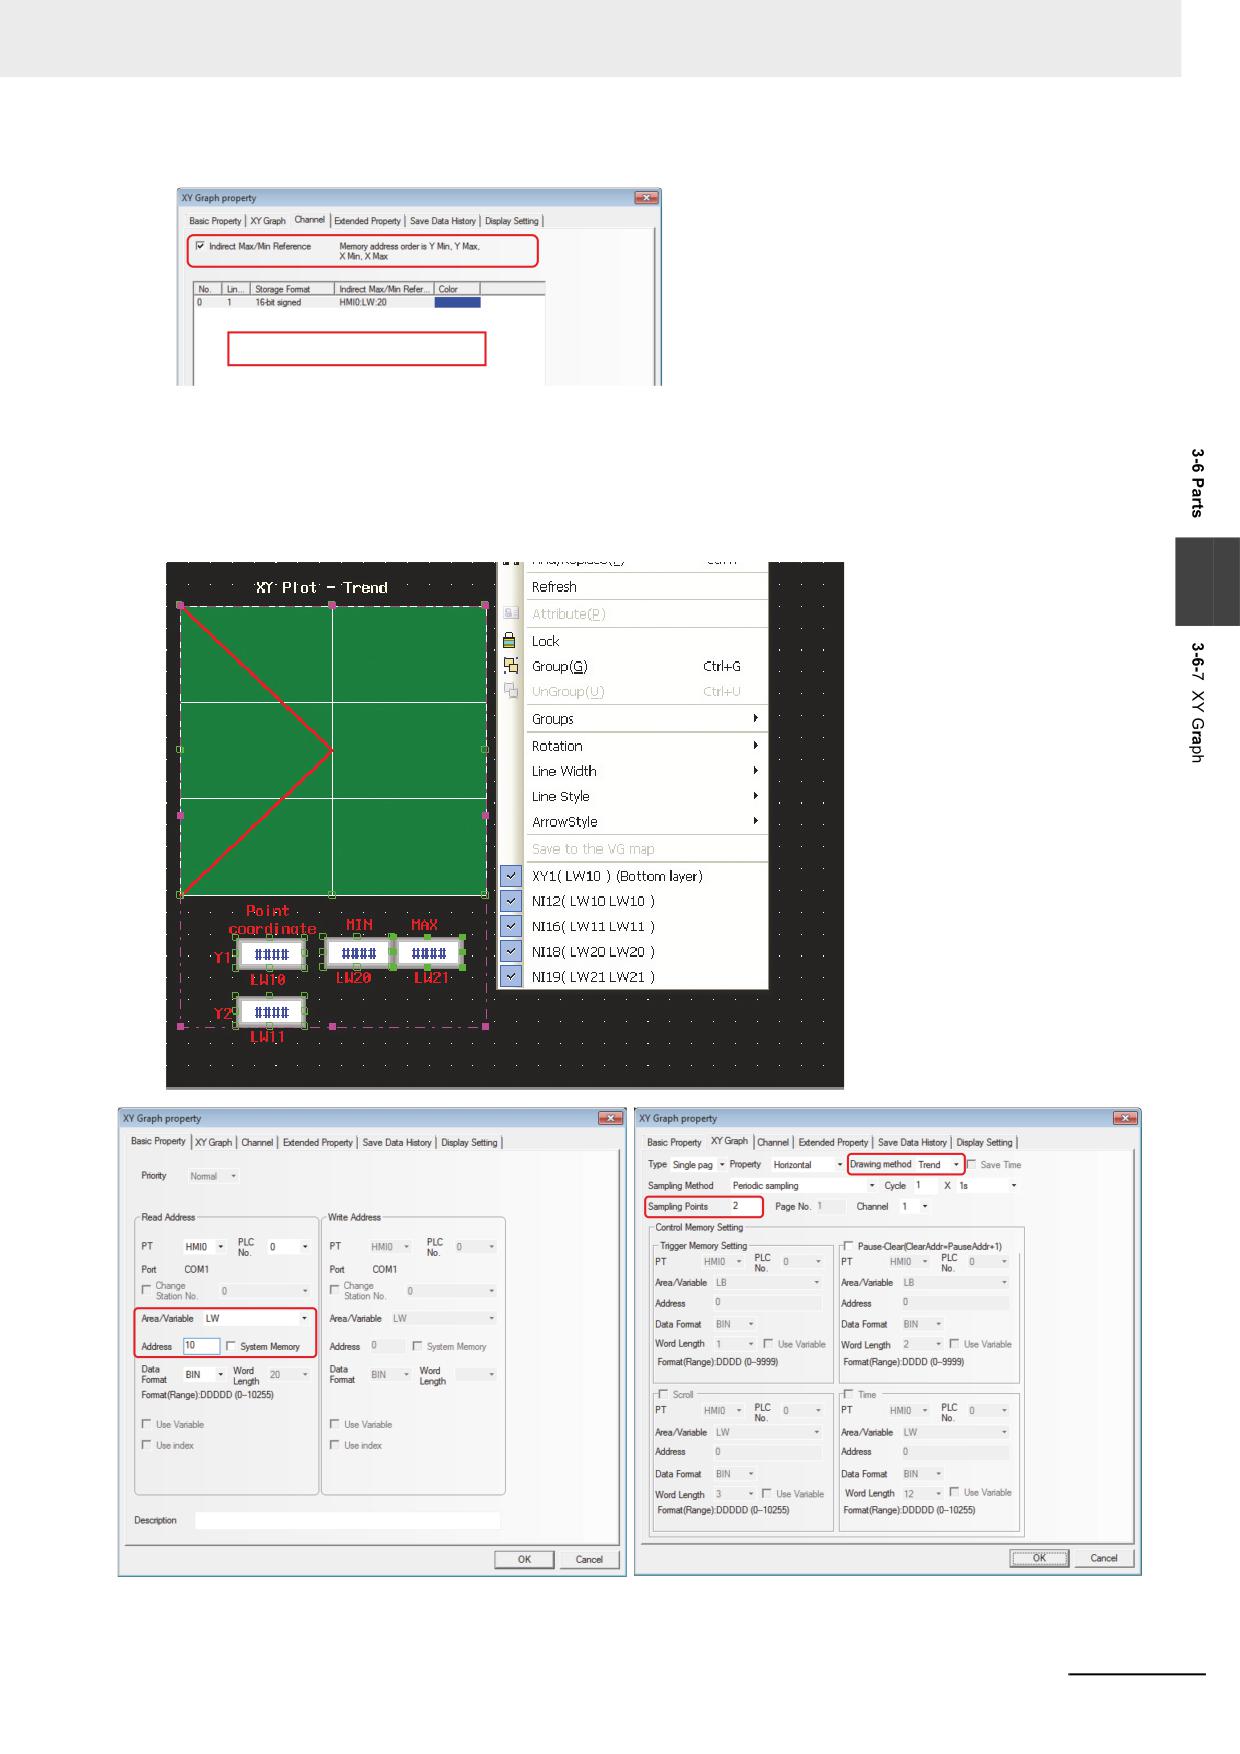
Example: When the maximum value and the minimum value of a line graph (Drawing method:
Trend) are specified indirectly.
Descriptions: The position coordinate is allocated as below:
There are 2 sampling points corresponding to y1 (LW10) and y2 (LW11), and
LW20 and LW21 correspond to the minimum (lower limit of Y) and the maximum
value (upper limit of Y) respectively.
3
NB-series Programmable Terminals NB-Designer Operation Manual(V106)
3-109
3 Functions of NB-Designer
Y coordinate min = LW20;
Y coordinate max = LW21
Perform the test and the effect is as shown below.
3-110
NB-series Programmable Terminals NB-Designer Operation Manual(V106)
3 Functions of NB-Designer
3-6-8
Moving Component
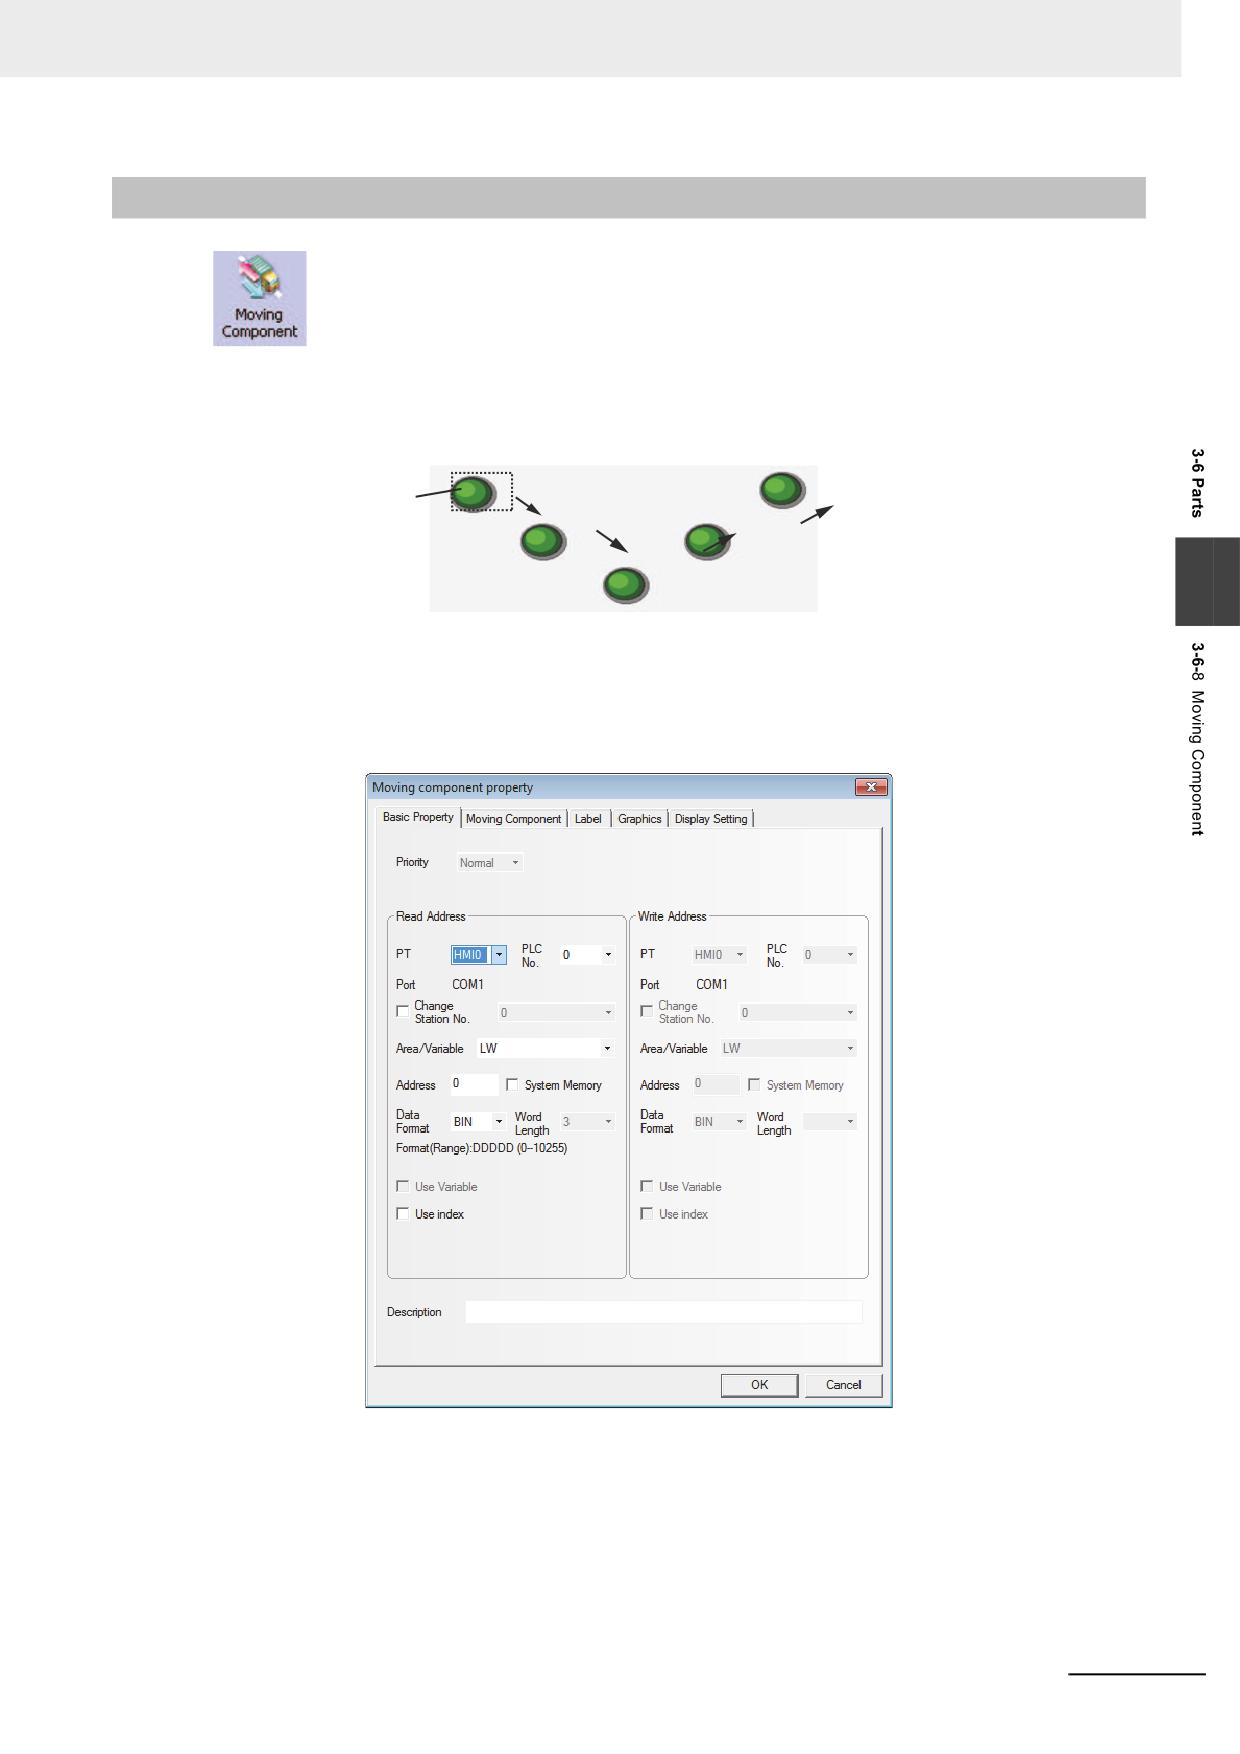
Moving Component can be used to put one Vector Graphics or bitmap into the position
specified by PLC in the PT. The state and absolute position are provided by the 3 consecutive
memories in PLC. The read address controls the status of the component, the address of the Read
Address + 1 controls the coordinate position X, and the address of the Read Address + 2 controls the
coordinate position Y.
3
Process of adding one Moving Component
1
Press the Moving Component icon, drag it to the screen, then the [Basic Properties] dialog box
of the Moving Component will pop up.
Read Address: Controls the first address of the word address controlling the displayed
information (such as the state, graphics, label and so on) of the Moving
Component in PLC.
Address: Refers to the first address of the word address corresponding to the Moving
Component.
Word Length: Displays the data length of the read address, which is fixed to “3”.
NB-series Programmable Terminals NB-Designer Operation Manual(V106)
3-111
3 Functions of NB-Designer
2
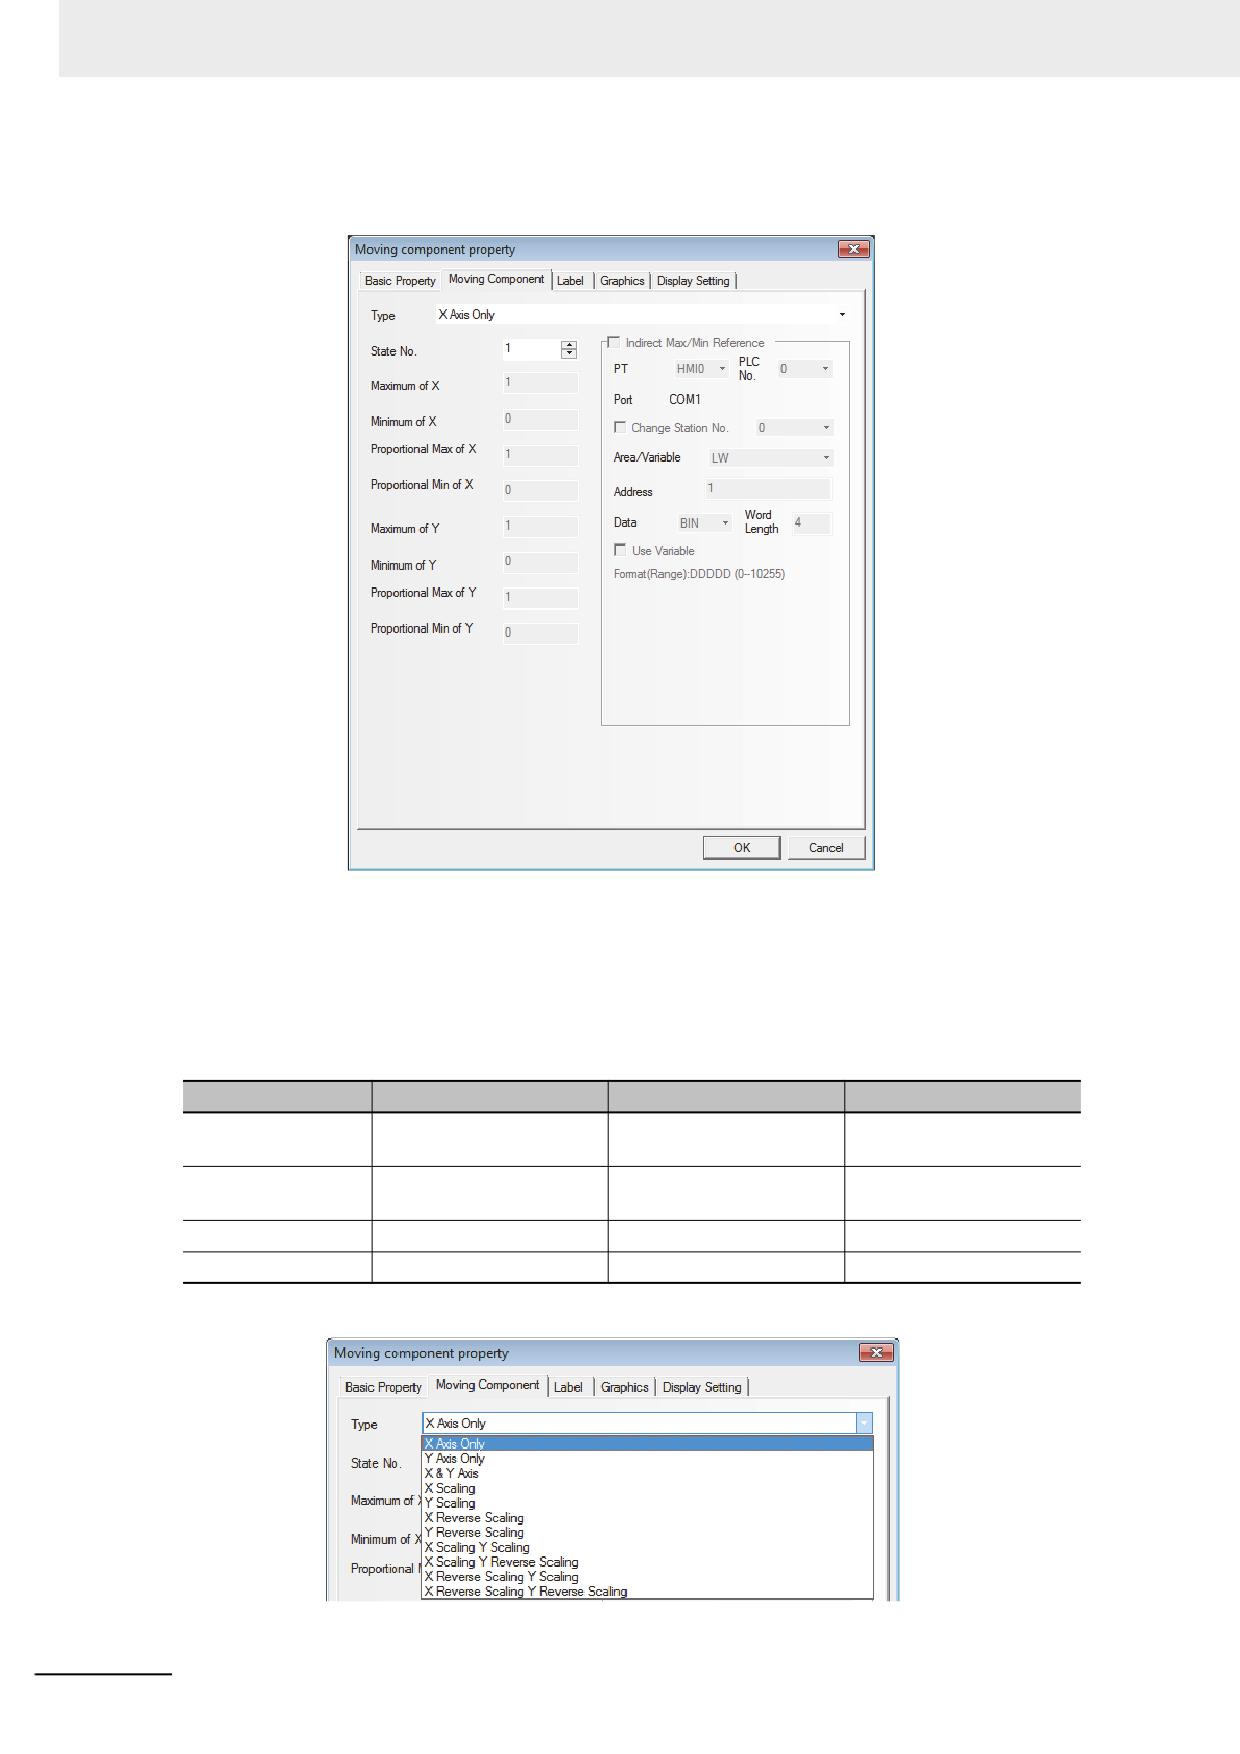
Switch to the [Moving Component] tab and set the Type, State Number, the Minimum of X,
Maximum of X, Minimum of Y and Maximum of Y.
Type and Function Tables:
NB-Designer can assign up to 256 kinds of different states to the components. When State
Number is set to "1" in the tab [Moving Component], make sure that the stored value specified
to the [Read Address] is 0. Otherwise, the components will not be displayed, States 1 to 256
correspond to the internal values of 0 to 255. The position control is as shown below, and its
position is relative to the original position (X-axis and Y-axis represent abscissa and ordinate
respectively.)
Control Mode
X
Y
X & Y
Number of Read
2 words
2 words
3 words
Address
Read Address
States of Vector Graphics
States of Vector Graphics
States of Vector Graphics
or bitmap
or bitmap
or bitmap
Read Address + 1
X-axis displacement
Y-axis displacement
X-axis displacement
Read Address + 2
-
-
Y-axis displacement
The Type includes the items as follows.
3-112
NB-series Programmable Terminals NB-Designer Operation Manual(V106)
3 Functions of NB-Designer
The descriptions of the Type are as follows.
X Axis Only
When this option is selected, the Moving Component can only move horizontally along X-axis
and the input maximum (minimum ) value is invalid and the Read Address and the Read
Address + 1 are used to store the component state and position respectively in this case.
Y Axis Only
When this option is selected, the Moving Component can only move vertically along Y-axis and
the input maximum (minimum ) value is invalid and the Read Address and the Read Address +
1 are used to store the component state and position respectively in this case.
X & Y Axis
When this option is selected, the Moving Component can move along X-axis and Y-axis, and
the Read Address, the Read Address + 1 and the Read Address + 2 are used to store the
component state, X-axis position and Y-axis position respectively.
X Scaling
When this option is selected, the Moving Component can only move horizontally along X-axis,
but the relative moving position can be set through the input value and proportional value (For
example, when the value of PLC to be read ranges from 0 to 1000, but the relative position to be
moved in the PT ranges from 0 to 640, the minimum values and maximum values of proportion
value and input value are 0 & 640 and 0&1000 respectively.) and the Read Address and the
Read Address + 1 can be used to store the component state and the position respectively.
Y Scaling
When this option is selected, the Moving Component can only move vertically along Y-axis, but
3
the relative moving position can be set through the input value and proportional value (For
example, when the value of PLC to be read ranges from 0 to 1000, but the relative position to be
moved in the PT ranges from 0 to 480, the minimum values and maximum values of proportion
value and input value are 0 & 480 and 0&1000 respectively.) and the Read Address and the
Read Address + 1 can be used to store the component state and the position respectively.
X Reverse
This option functions are similar with “X Scaling” but the component moves toward the opposite
Scaling
direction. When the value of position coordinate increases, the component moves leftward.
When it decreases, the component move rightward.
Y Reverse
This option functions are similar with “Y Scaling” but the component moves toward the opposite
Scaling
direction. When the value of position coordinate increases, the component moves upward.
When it decreases, the component move downward.
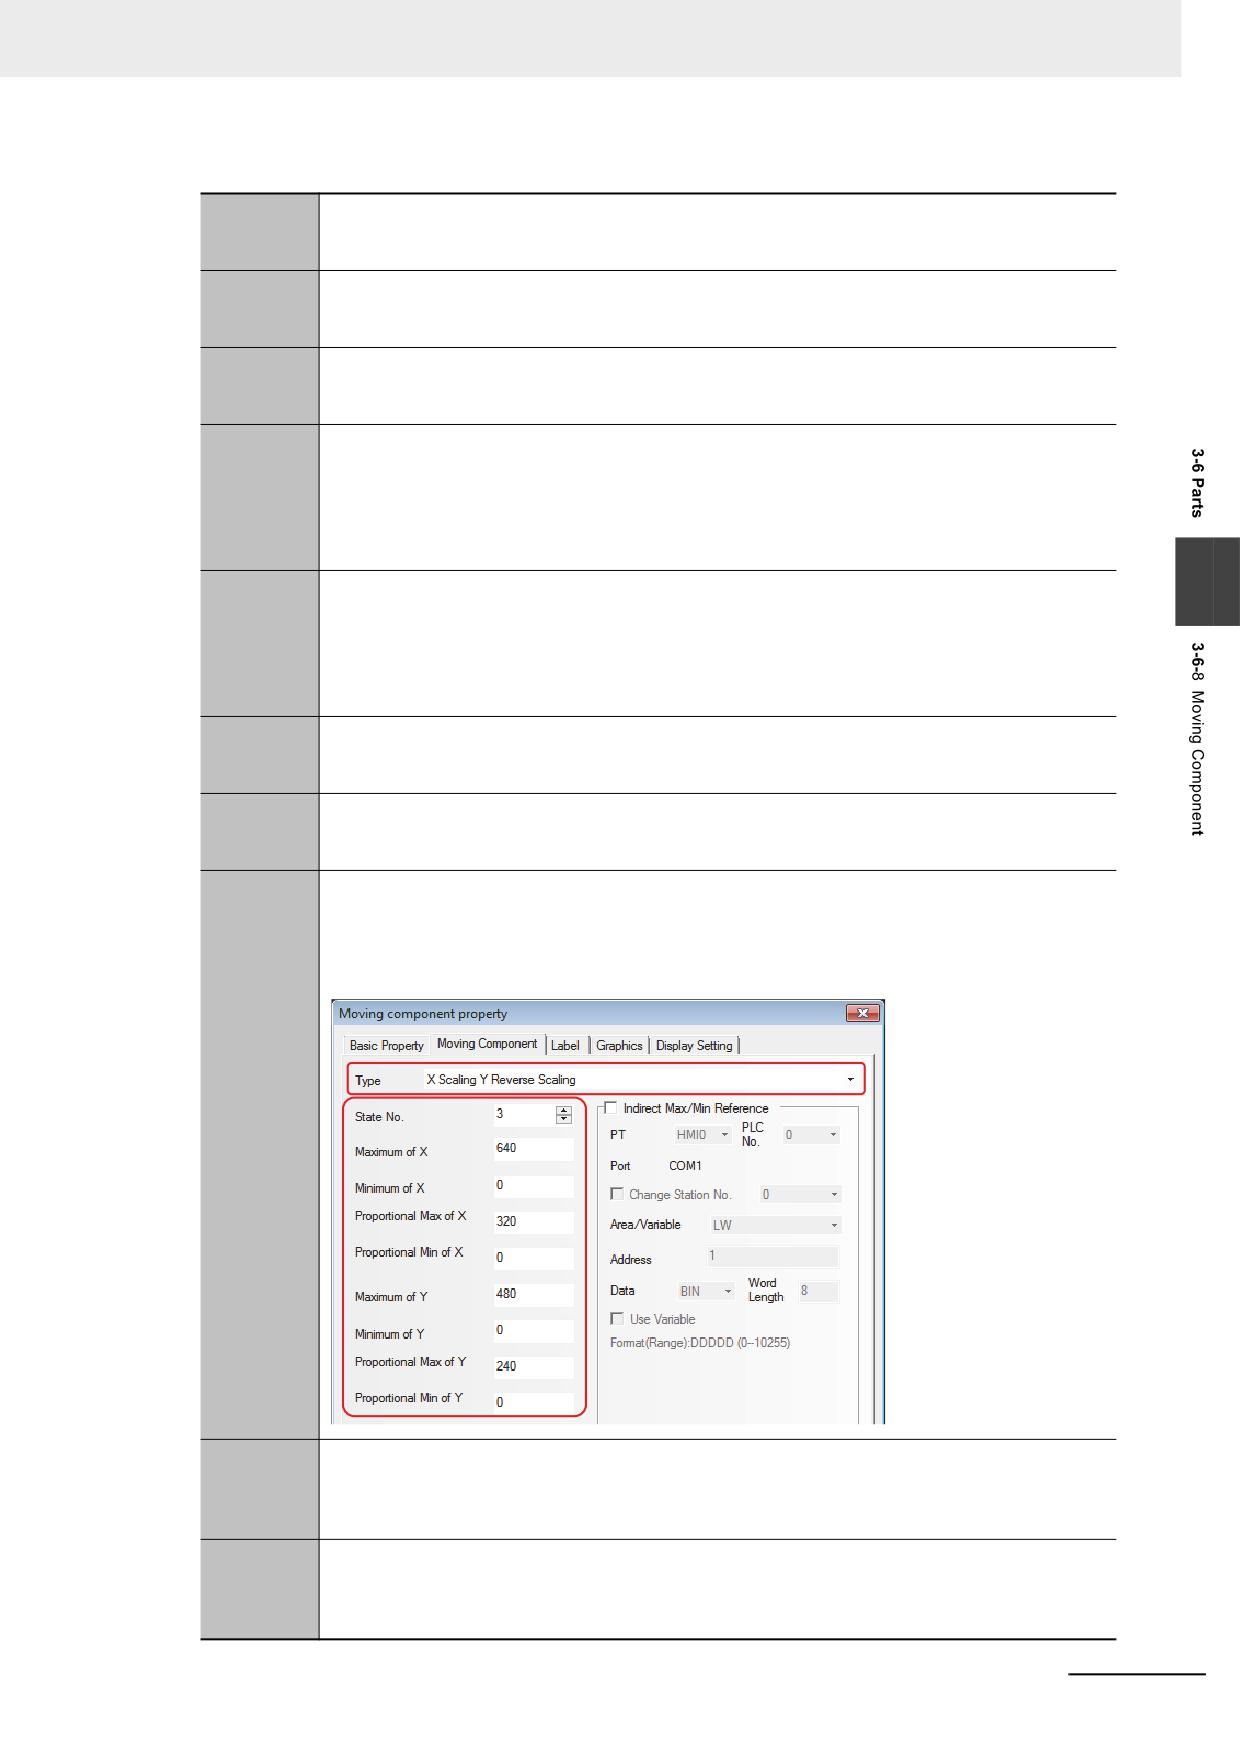
X Scaling Y
The Moving Component moves horizontally along X-axis and Y-axis, and the relative position can
Scaling
be set through the input value and the proportion value (For example, set the parameters as below.
When the stored PLC address specified to X axis ranges from 0 to 640, but should set the value to
be moved relatively in the range from 0 to 320 and the stored PLC address specified to Y axis
ranged from 0 to 480, but should set the value to be moved relatively in the range from 0 to 240.).
X Scaling Y
The Moving Component moves horizontally along X-axis and Y-axis, and the relative position
Reverse
to be moved can be set, and the component can move along the opposite direction of Y-axis.
Scaling
When the value of Y-axis is increased, the moving component moves upward, and when the
value of Y-axis is decreased, it moves downward.
X Reverse
The Moving Component moves horizontally along X-axis and Y-axis, and the relative position
Scaling Y
to be moved can be set, and the component can move along the opposite direction of X-axis.
Scaling
When the value of X-axis is increased, the Moving Component moves leftward and when the
value of X-axis in decreased, it moves rightward.
NB-series Programmable Terminals NB-Designer Operation Manual(V106)
3-113
3 Functions of NB-Designer
X Reverse
The Moving Component moves horizontally along X-axis and Y-axis, and the relative position
Scaling Y
to be moved can be set, and the component can move along the opposite directions of X-axis
Reverse
and Y-axis. When the value of X-axis is increased, the Moving Component moves leftward, and
Scaling
when the value is decreased, it moves rightward. When the value of Y-axis is increased, it
moves upward and when the value is decreased, it moves downward.
When the Scaling is selected, the relation is as shown below.
Read
Minimum
Maximum
Minimum
(
-
)
×
(
-
)
Value
Input Value
Proportianal Value
Proportianal Value
Display Position=Current Position+
(Maximum Input Value-Minimum Input Value)
When the reverse scaling is selected, the relation is as shown below.
Minimum
Read
Maximum
Minimum
(
-
)
×
(
-
)
Input Value
Value
Proportianal Value
Proportianal Value
Display Position=Current Position+
(Maximum Input Value-Minimum Input Value)
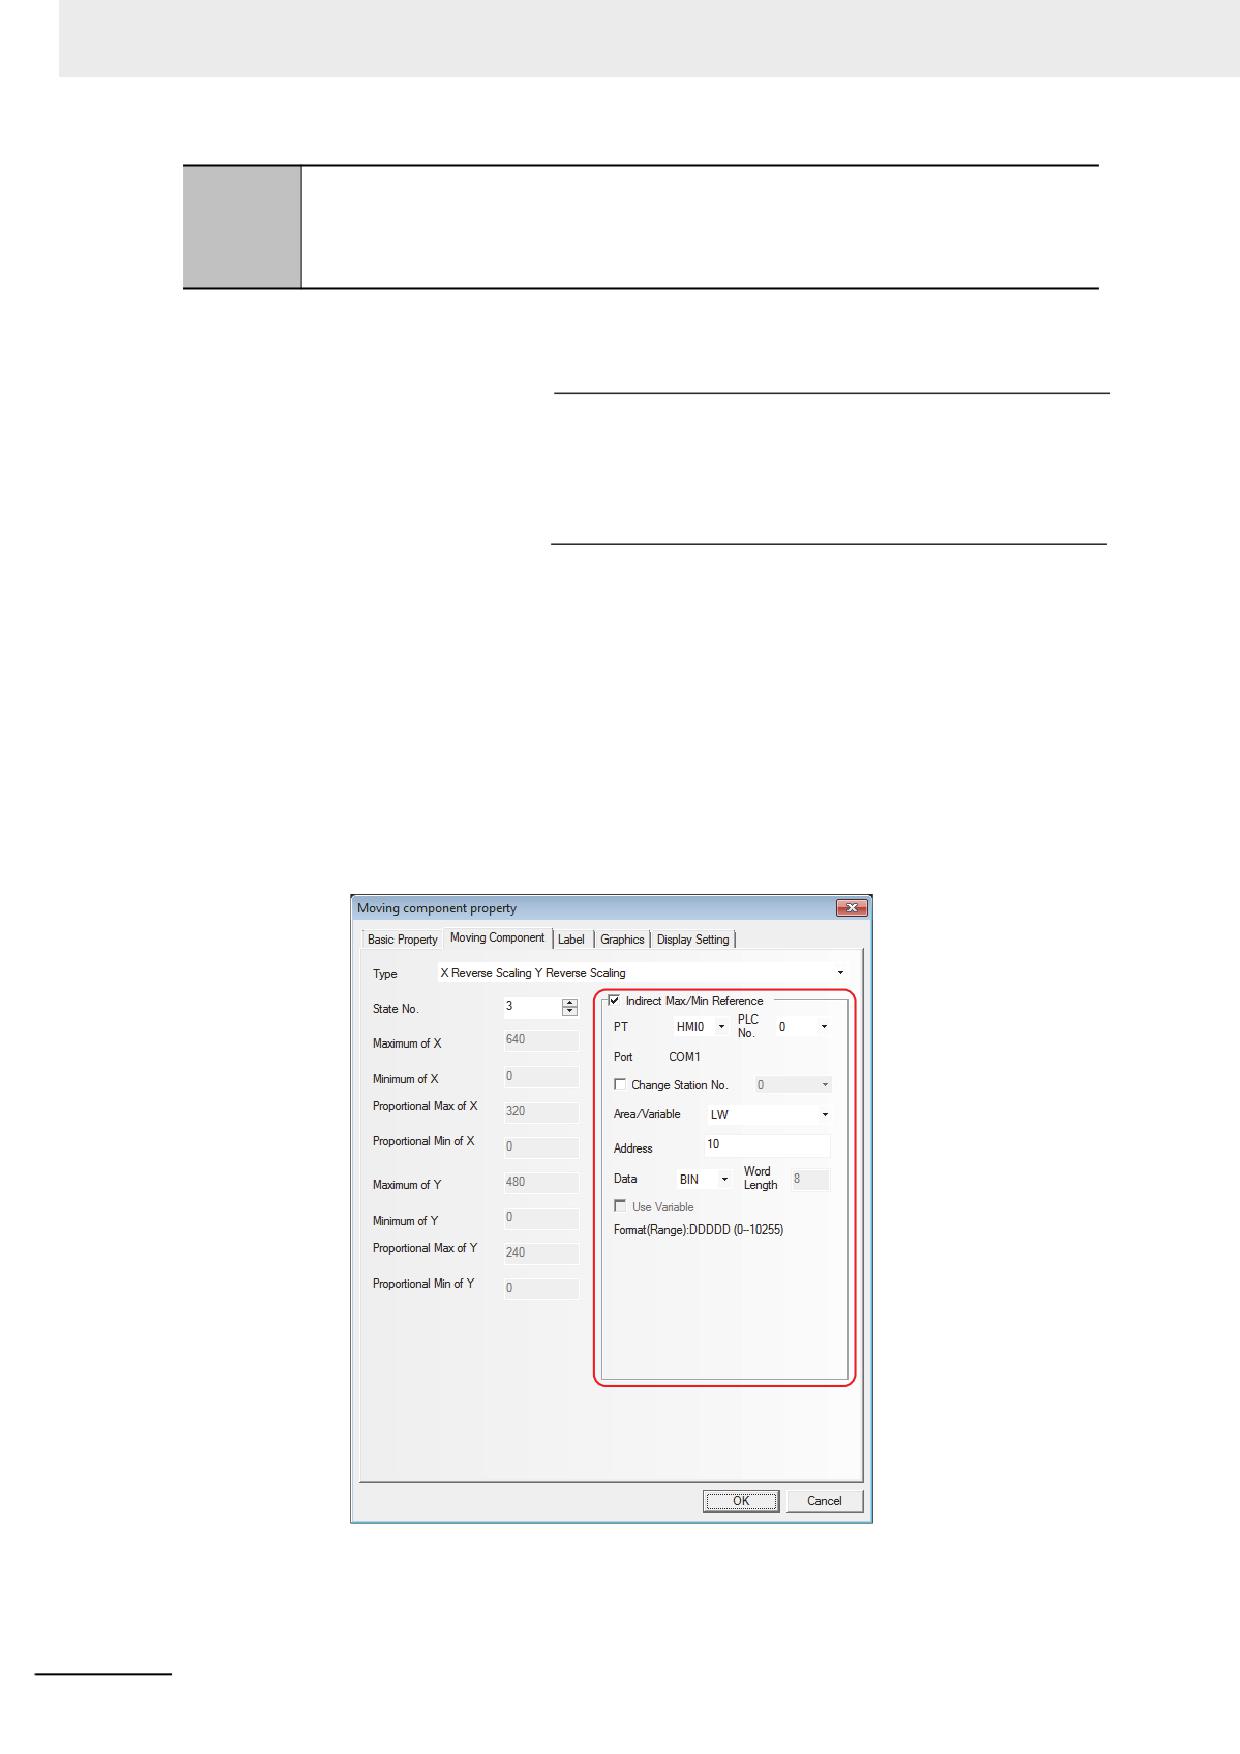
Indirect Max/Min Reference: The upper limits and lower limits of X-axis and Y-axis are directly
read from the memory address.
For example:
It is assumed that the type of the Moving Component is “X Reverse Scaling Y Reverse Scaling”
and the type of indirect address is LW10, then the Minimum of X and Maximum of X are the
values of LW10 and LW11 respectively, and Proportional Lower Limit of X and Proportional
Upper Limit of X are the values of LW12 and LW13 respectively, and the Minimum of Y and
Maximum of Y are the values of LW14 and LW15 respectively, and the Proportional Lower Limit
of Y and Proportional Upper Limit of Y are the values of LW16 and LW17 respectively.
as shown below.
3
Switch to the [label] tab and add the corresponding texts to be displayed.
3-114
NB-series Programmable Terminals NB-Designer Operation Manual(V106)
3 Functions of NB-Designer
4
Switch to the [Graphics] tab and select Vector Graphics or bitmap to move or display the state.
5
Press the [OK] button to complete the setup of the Moving Component.
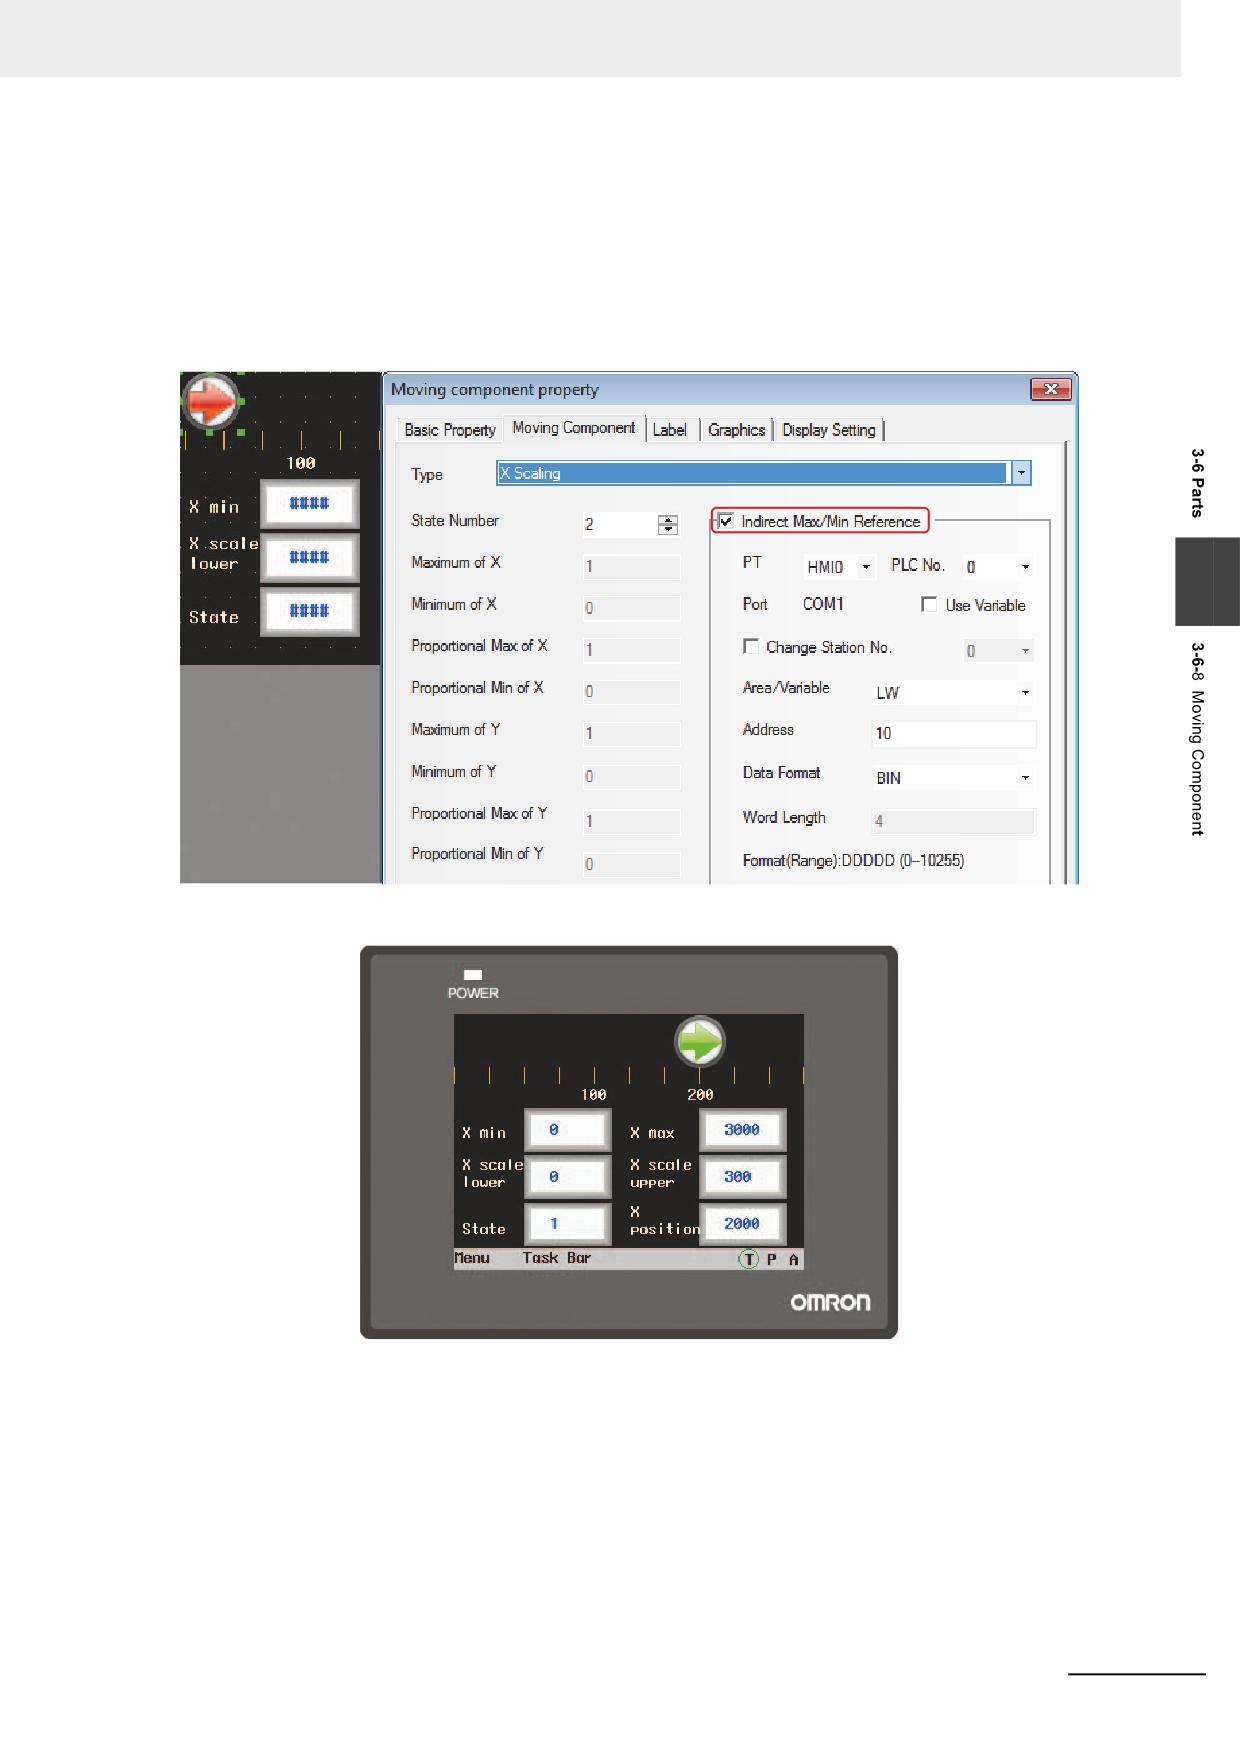
If it is Scaling Type, specify the Max/Min value.
The maximum value and minimum value of Moving Component supports Indirect Max/Min
Reference.
3
NB-series Programmable Terminals NB-Designer Operation Manual(V106)
3-115
3 Functions of NB-Designer
3-6-9
Animation
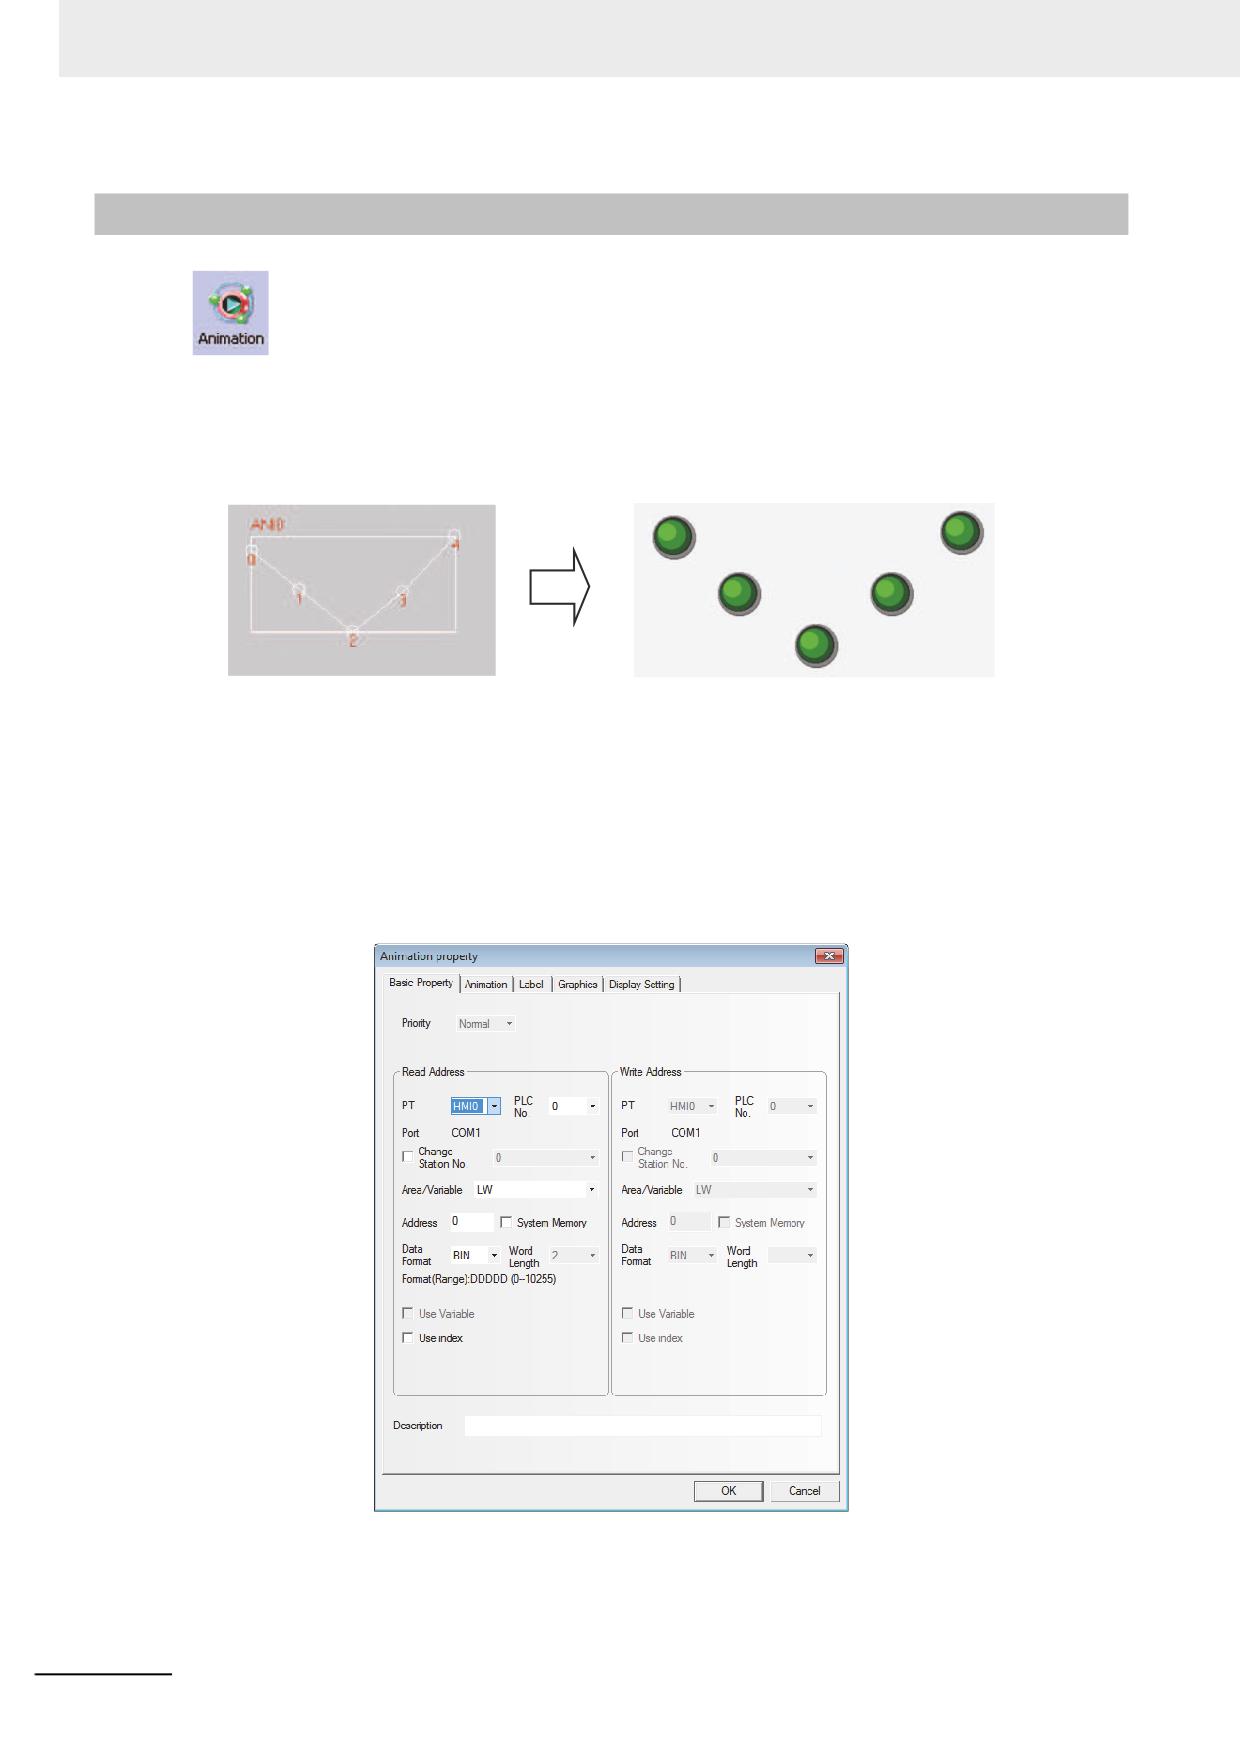
The Animation component is used to put the component into the position with the specified
track in the PT, and this position is determined by the preset path and the data of PLC. The status and
absolute position of the component in the PT is determined by the data in the 2 consecutive PLC
memories. Generally speaking, the Read Address and the Read Address + 1 are used to store the
state and the position in the preset path respectively. When the values in the position memory of PLC
(Read Address + 1) change, the Vector Graphics or bitmap will jump to the next position in the preset
path.
Process of adding one Animation component
1
Click the Animation component icon and drag it on the screen.
2
Set the path and moving point for the component in the PT, left click the mouse one by one on
each moving node, and right-click the mouse after the setup of path and moving nodes to
complete the setup.
3
Enter the parameters in [Basic Properties] tab in the [Animation Property] dialog box.
Read Address: Refers to the word address controlling the state and label of the Animation
Component in PLC, and [Read Address + 1] refers to the word address
controlling the position of the Animation component. The data in the memory
will be converted into BIN or BCD format (Refer to the Word Lamp
component.). Here, [Word Length] is limited to 2.
3-116
NB-series Programmable Terminals NB-Designer Operation Manual(V106)
3 Functions of NB-Designer
Read Address Assignment:The word address specifying the position on the path which was
set previously is set automatically to Read Address + 1.
Read Address
States of Vector Graphics or bitmap
Read Address + 1
Position No. in the preset path.
Address: Refers to the first address of the word address corresponding to the Animation
component.
Word Length: Displays the data length of the read address, which is fixed to “2”.
4
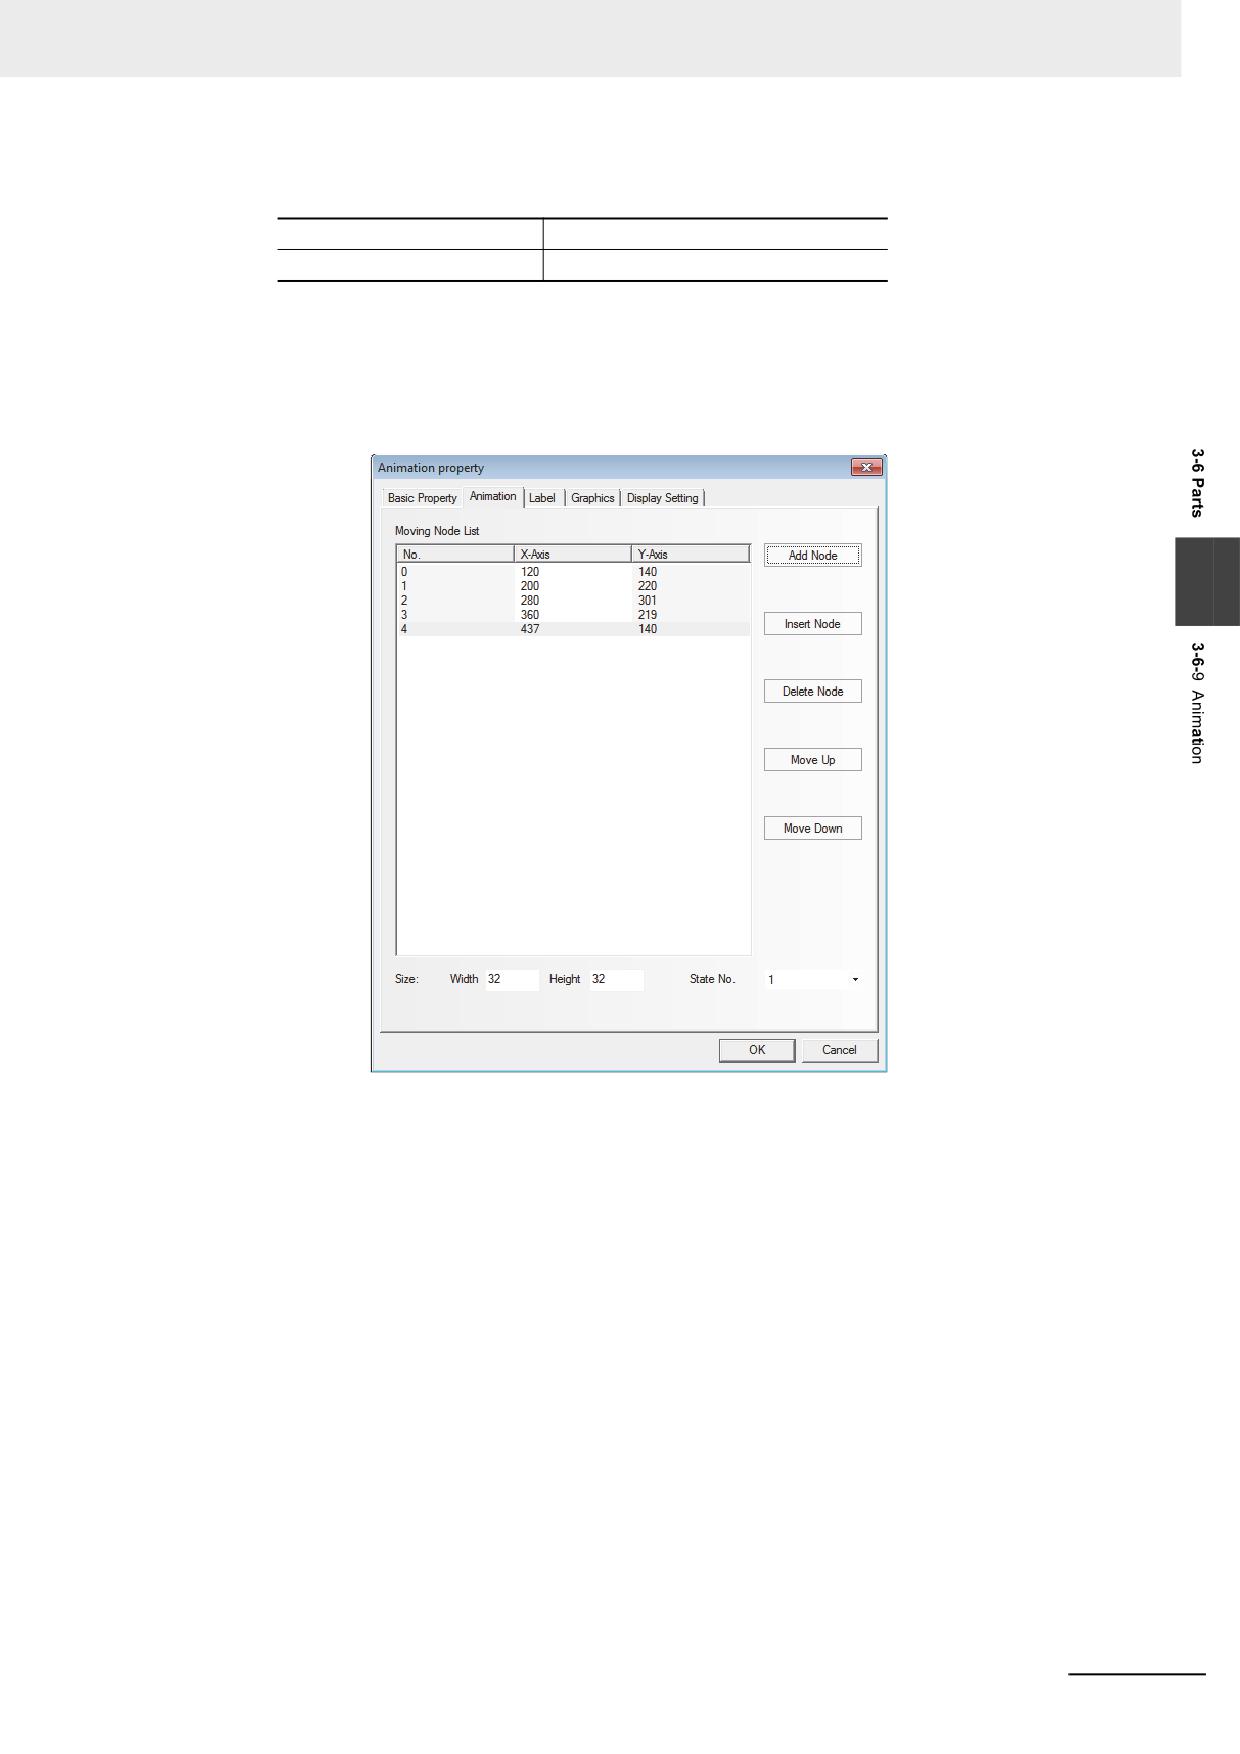
Switch to the [Animation] tab.
3
State No.: Selects the total states displayed by the Animation component. It determines the
number of states of the Vector Graphics or bitmap displayed in the preset path.
Add Node: Adds one moving node in the end of the preset path.
Insert Node: Inserts one moving node after the moving node pointed by the mouse.
Delete Node: Deletes one moving node.
Move Up: Moves the moving node pointed by the mouse into the place before the previous
node.
Move Down: Moves the moving node pointed by the mouse into the place after the next node.
Graphics Size (Width/Height): This is the size of Animation Components displayed on the
path. On all moving nodes, vector graphics or bitmap are
displayed in the state which was resized with the parameter
specified by this item.
Moving Node List: Displays all the numbers and coordinate values for all the track nodes, and
No.0 is for the 1st moving node, and No.1 is for the 2nd moving node, and
so on. The total number of the moving node is determined by the number
of moving node when you put the component in the PT at the beginning.
X(Y) represent the coordinate position corresponding to the moving node,
and you can reset the coordinate position for each moving node here.
NB-series Programmable Terminals NB-Designer Operation Manual(V106)
3-117
3 Functions of NB-Designer
5
Switch to the [Label] tab and add the corresponding texts to be displayed.
6
Switch to the [Graphics] tab and select Vector Graphics or bitmap to move or display the state.
7
Press the [OK] button to complete the setup of the Animation component.
3-6-10
Number Input
The Number Input component can be used to display the current data contained in word
address inside a specified PT or of PLC, to input data through the pop-up keyboard and to change the
data contained in this address by pressing “ENTER” button.
Process of adding one Number Input component
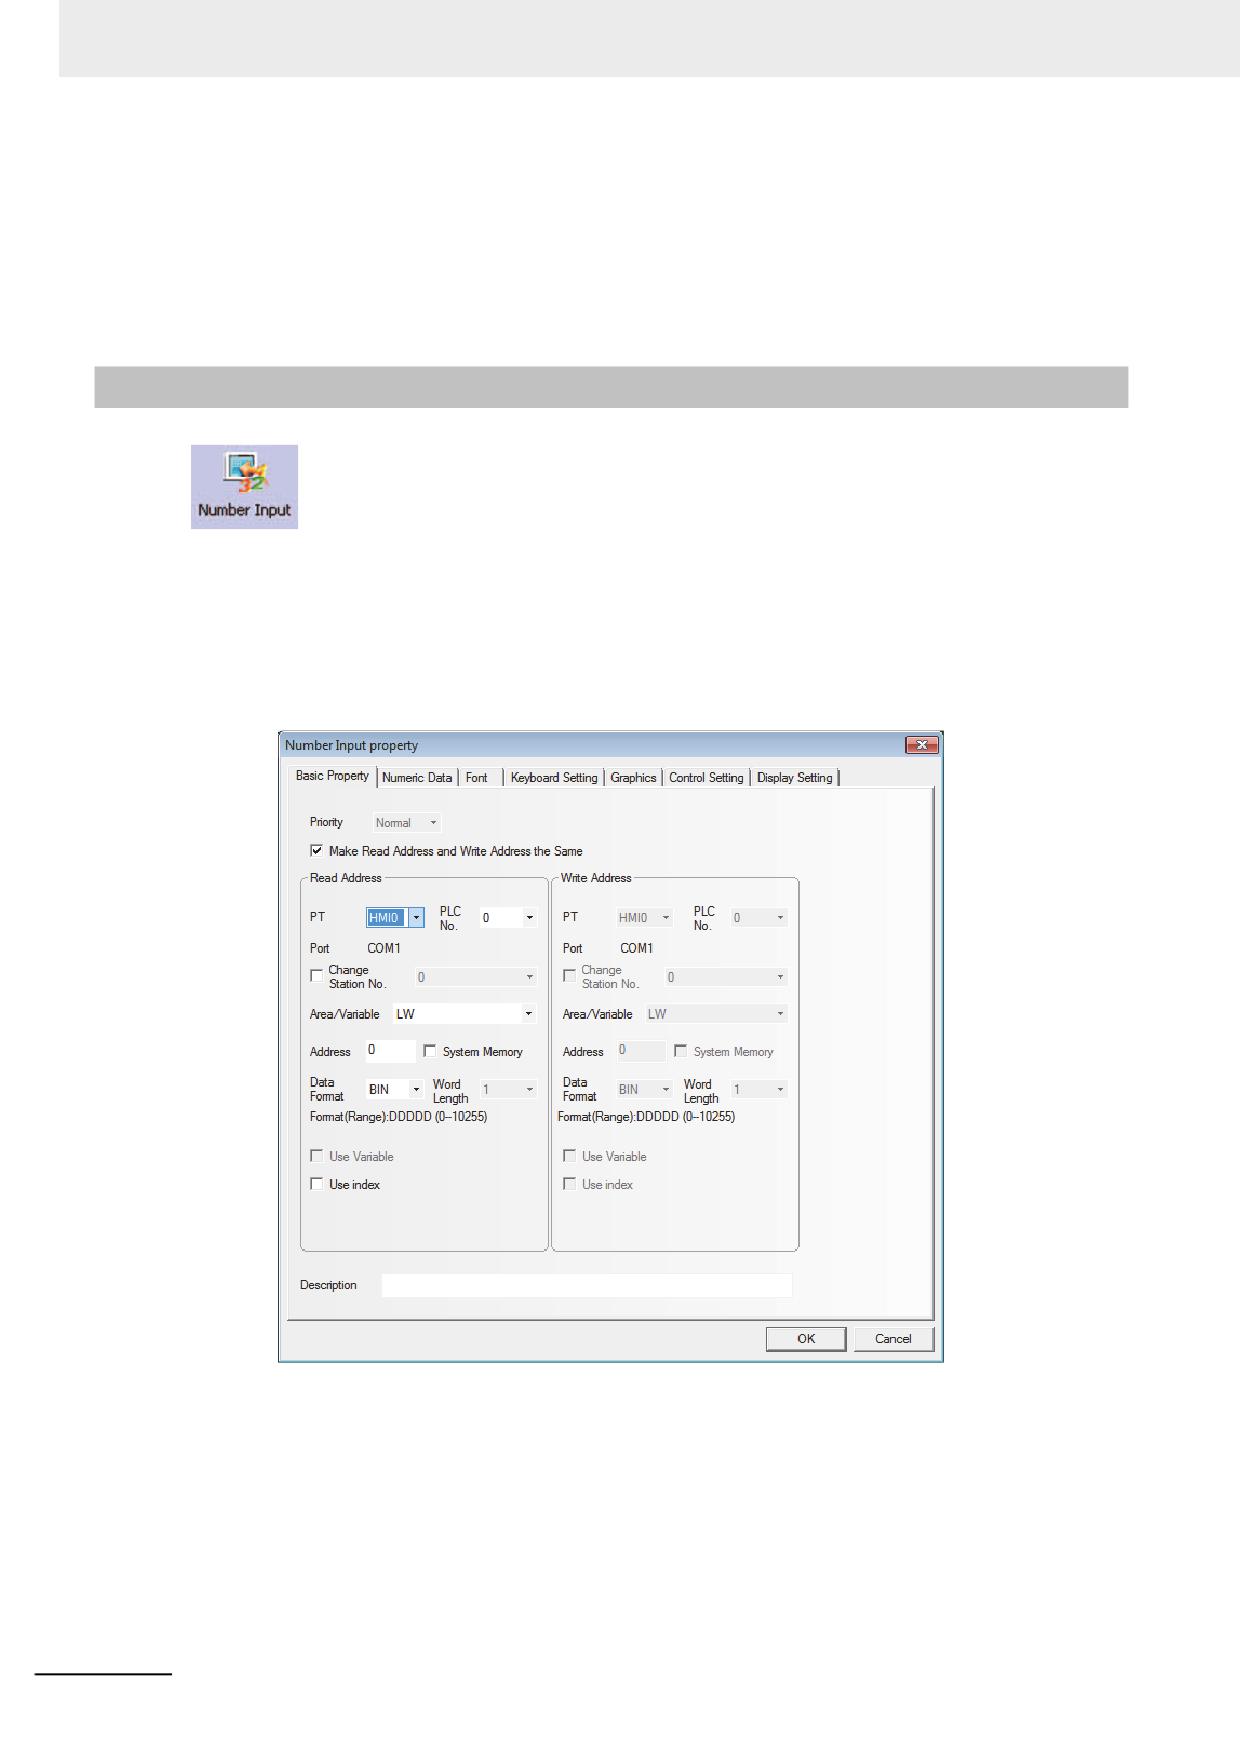
1
Press the Number Input component icon, drag it to the screen, then the [Basic Properties]
dialog box of the Number Input component will pop up.
Read/Write Addresses: Refers to the specified word address read and written by the Number
Input component.
Address: Refers to the first address of the word address corresponding to the Number Input
component.
Word Length: Displays the data length of the address.
3-118
NB-series Programmable Terminals NB-Designer Operation Manual(V106)
3 Functions of NB-Designer
2
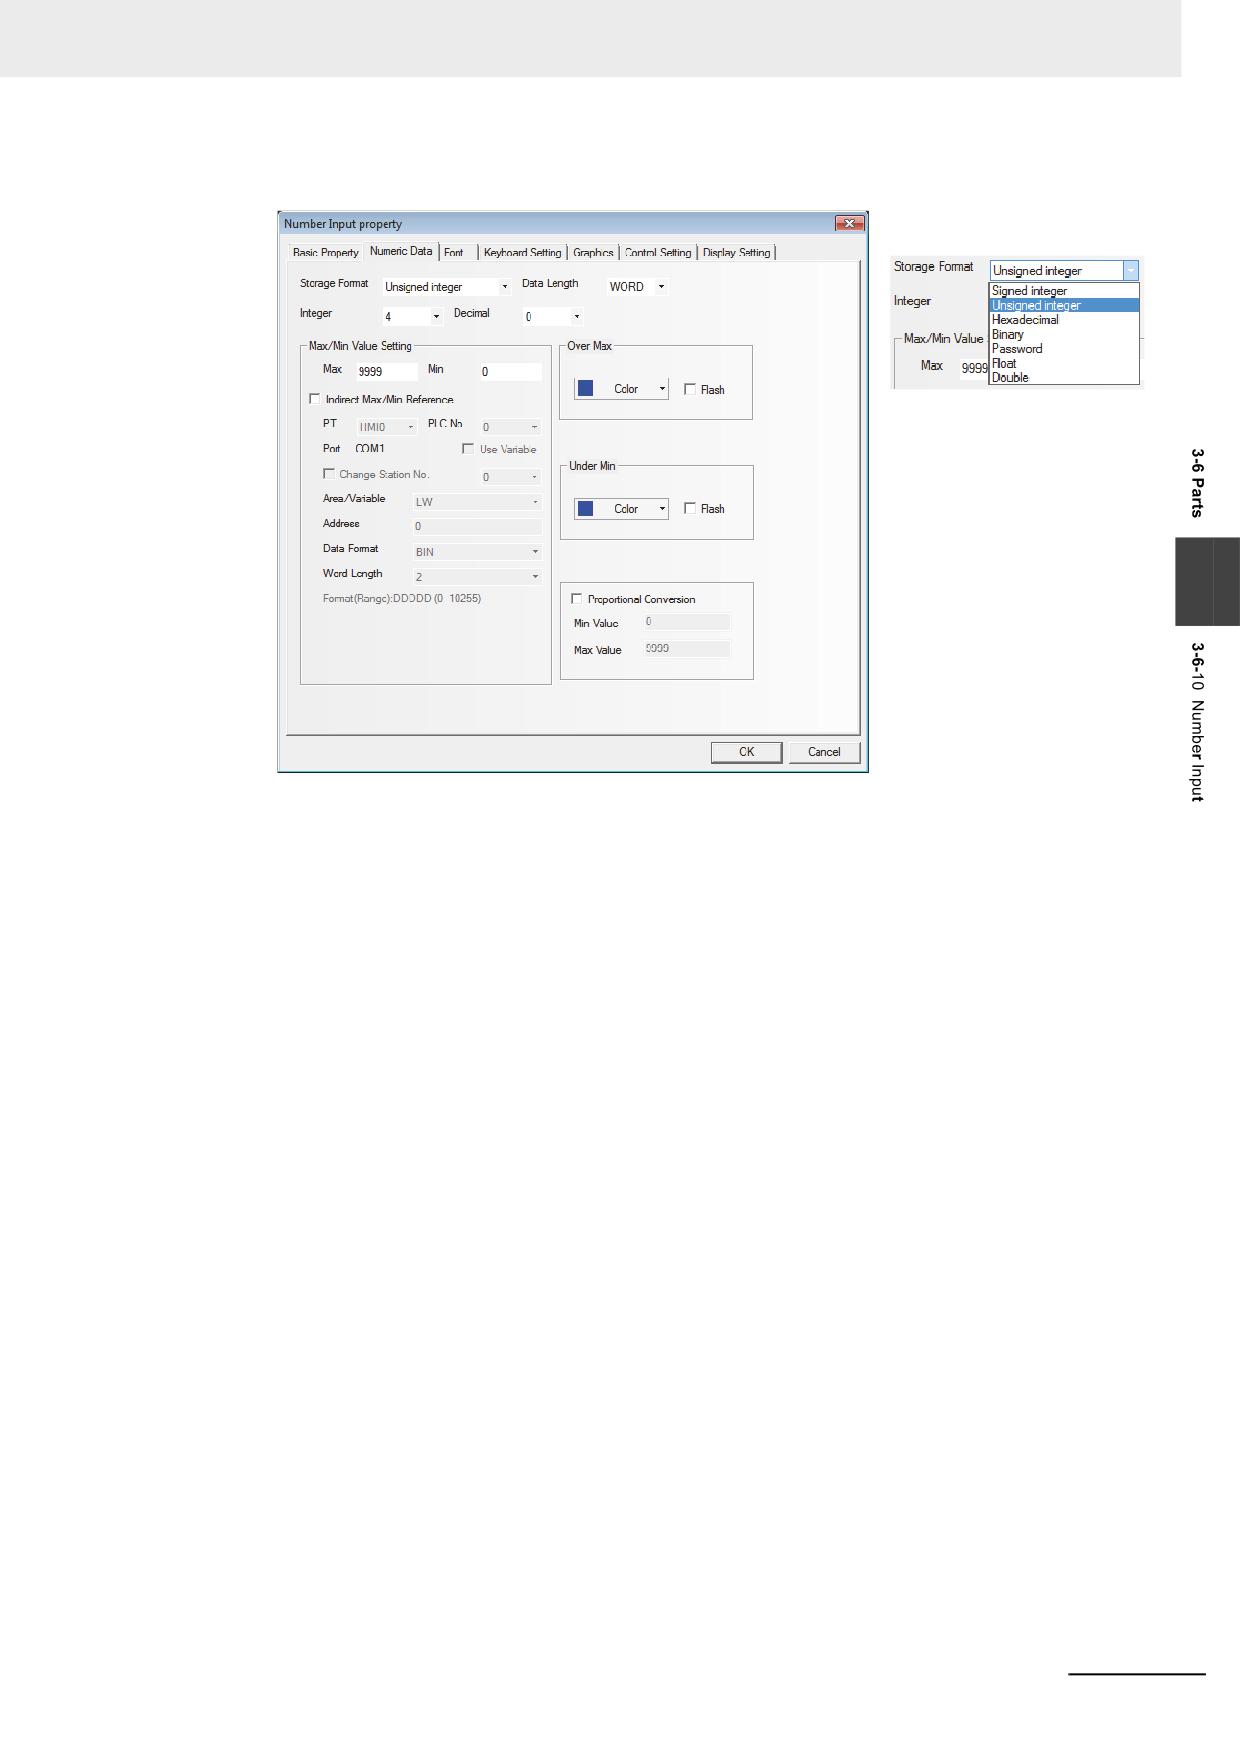
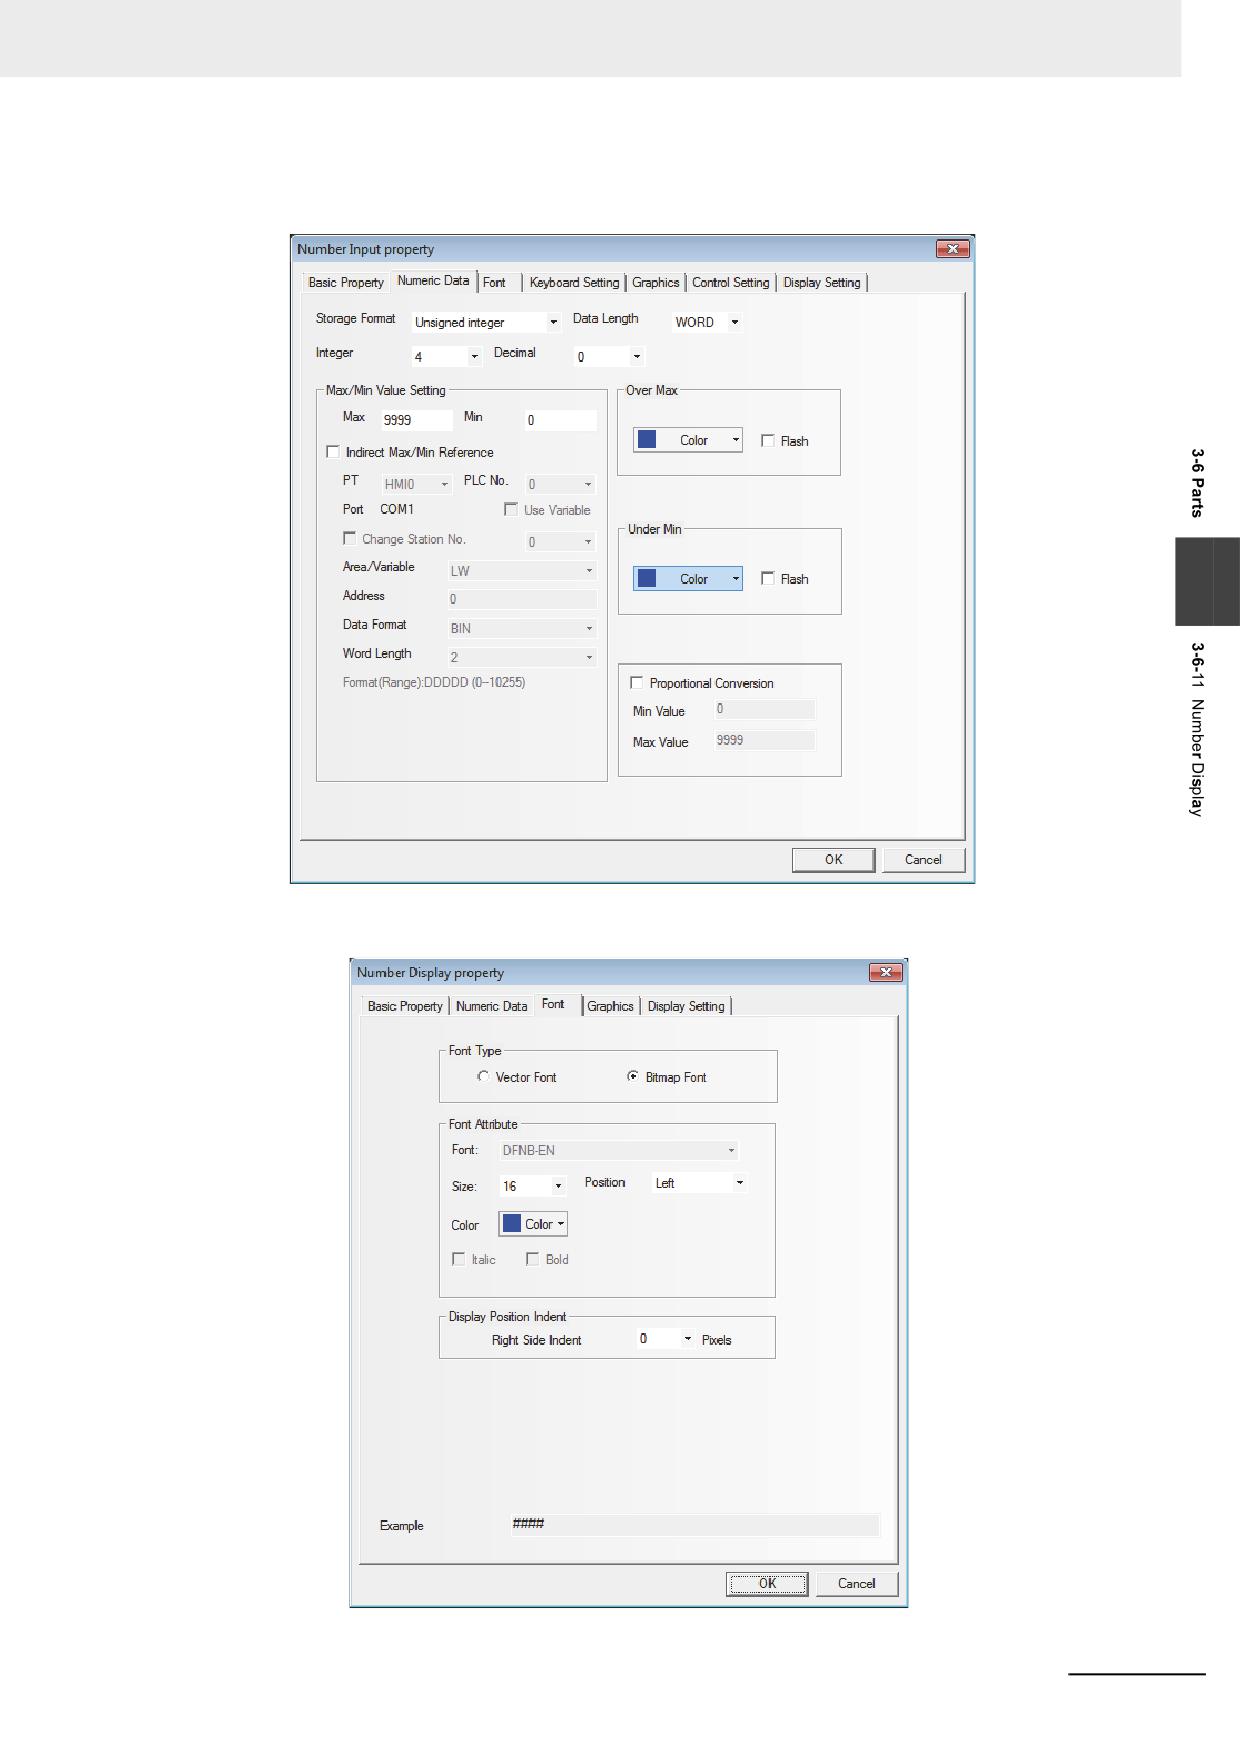
Go to the [Numeric Data] tab.
3
Data Format: Sets the data format corresponding to data contained in specified word address
and 7 types are available.
Max/Min Value Setting: Setting the range of input available value.
Over Max/Under Min: Specifying color of the value displayed when it exceeds the Max or the
Min of the value.
Flash: When the value of the specified word address is greater than the Max or less than the
Min, the value of the component will be flashed to make the transfinite alarm more
visible.
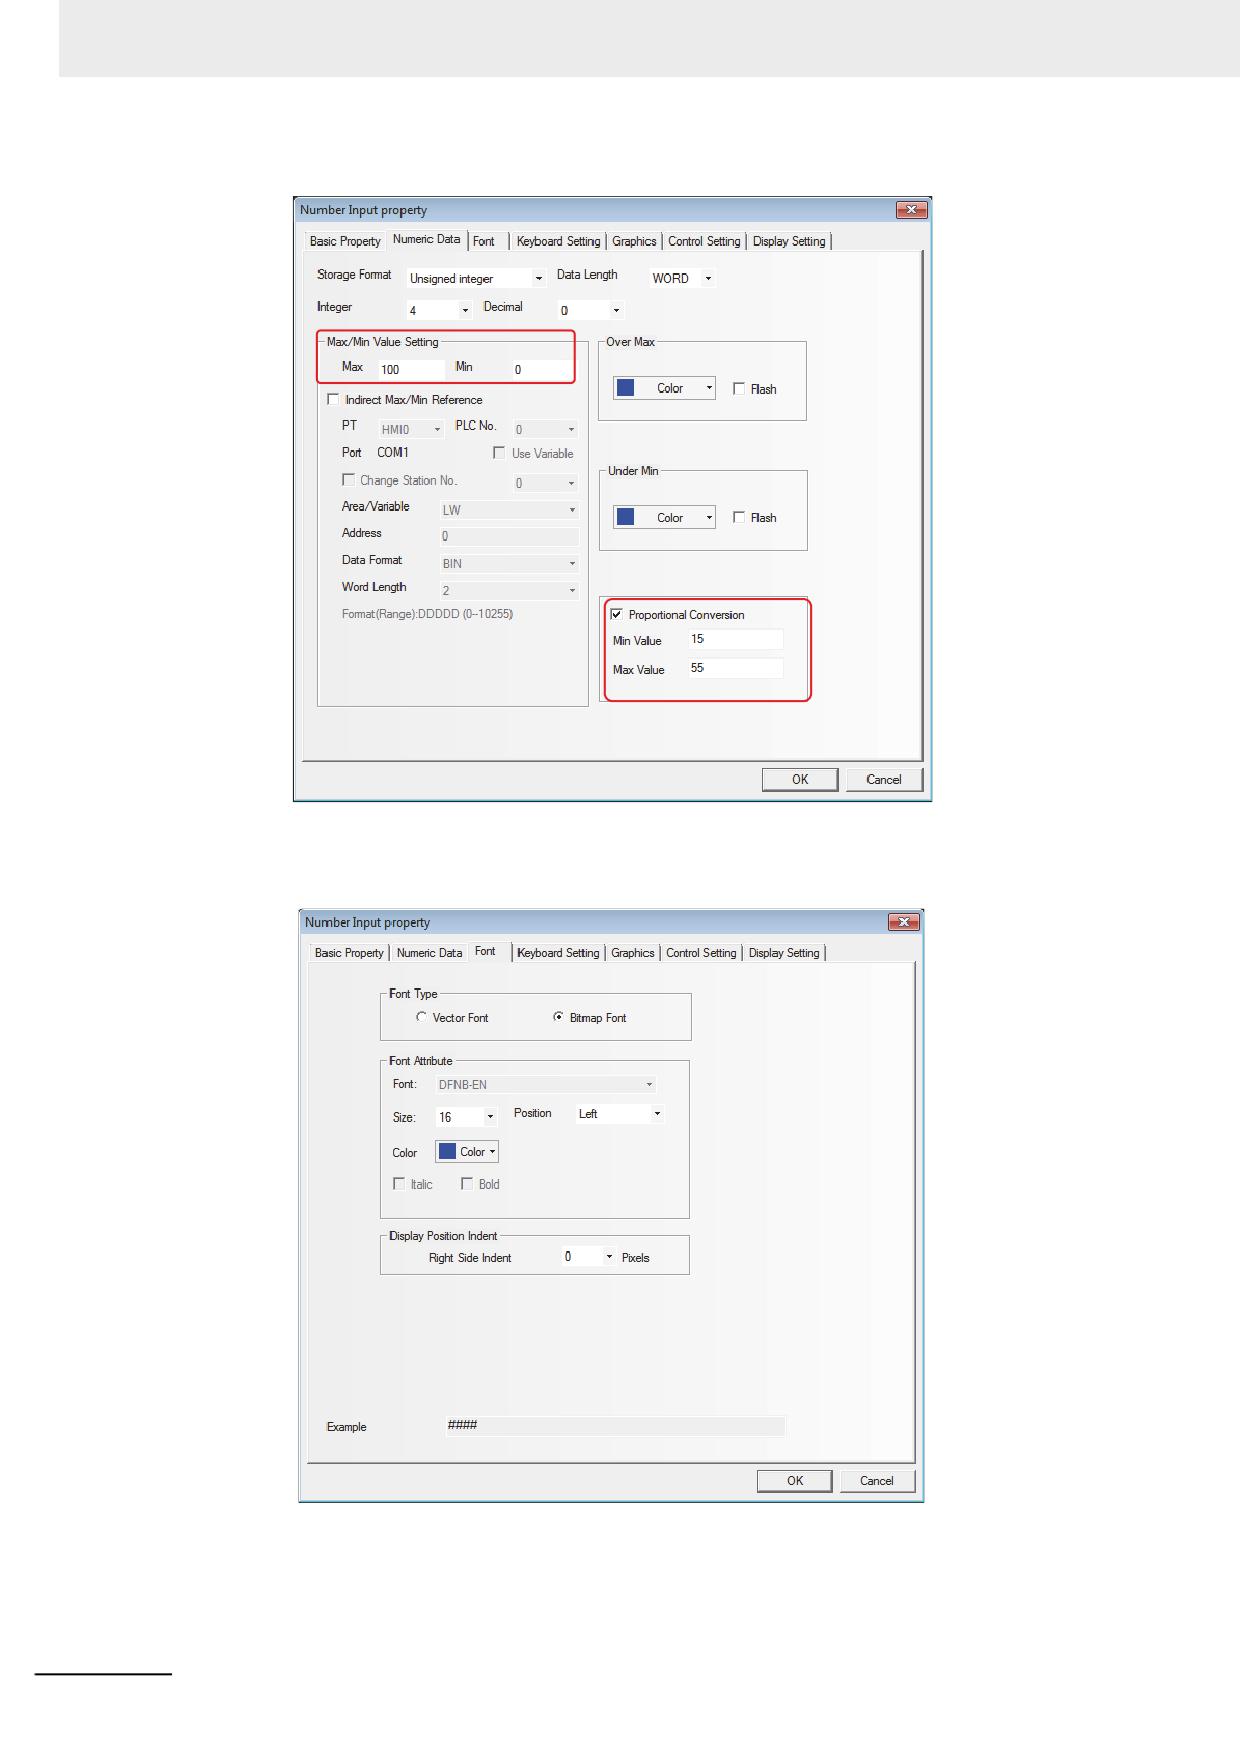
Proportional Conversion: The value of the specified word address will be converted
according to the settings and displayed on number input
component. To select this function, [Min Value] and [Max Value]
must be set.
For example: it is assumed that the original data is represented by “A” and the displayed data
by “B”, then the data B can be obtained by the following conversion formula:
B = [Minimum Proportional Value] + (A - [Minimum Value of Original Data]) × Proportion
Where, Proportion = ([Maximum Proportional Value] - [Minimum Proportional Value]) /
([Maximum Value of Original Data] - [Minimum Value of Original Data])
Take the following graphics as example, when the original data is 20, then the value after
conversion is 15 + (20-0) × (55-15) / (100-0) = 23, so the value displayed in the component will
be 23.
NB-series Programmable Terminals NB-Designer Operation Manual(V106)
3-119
3 Functions of NB-Designer
3
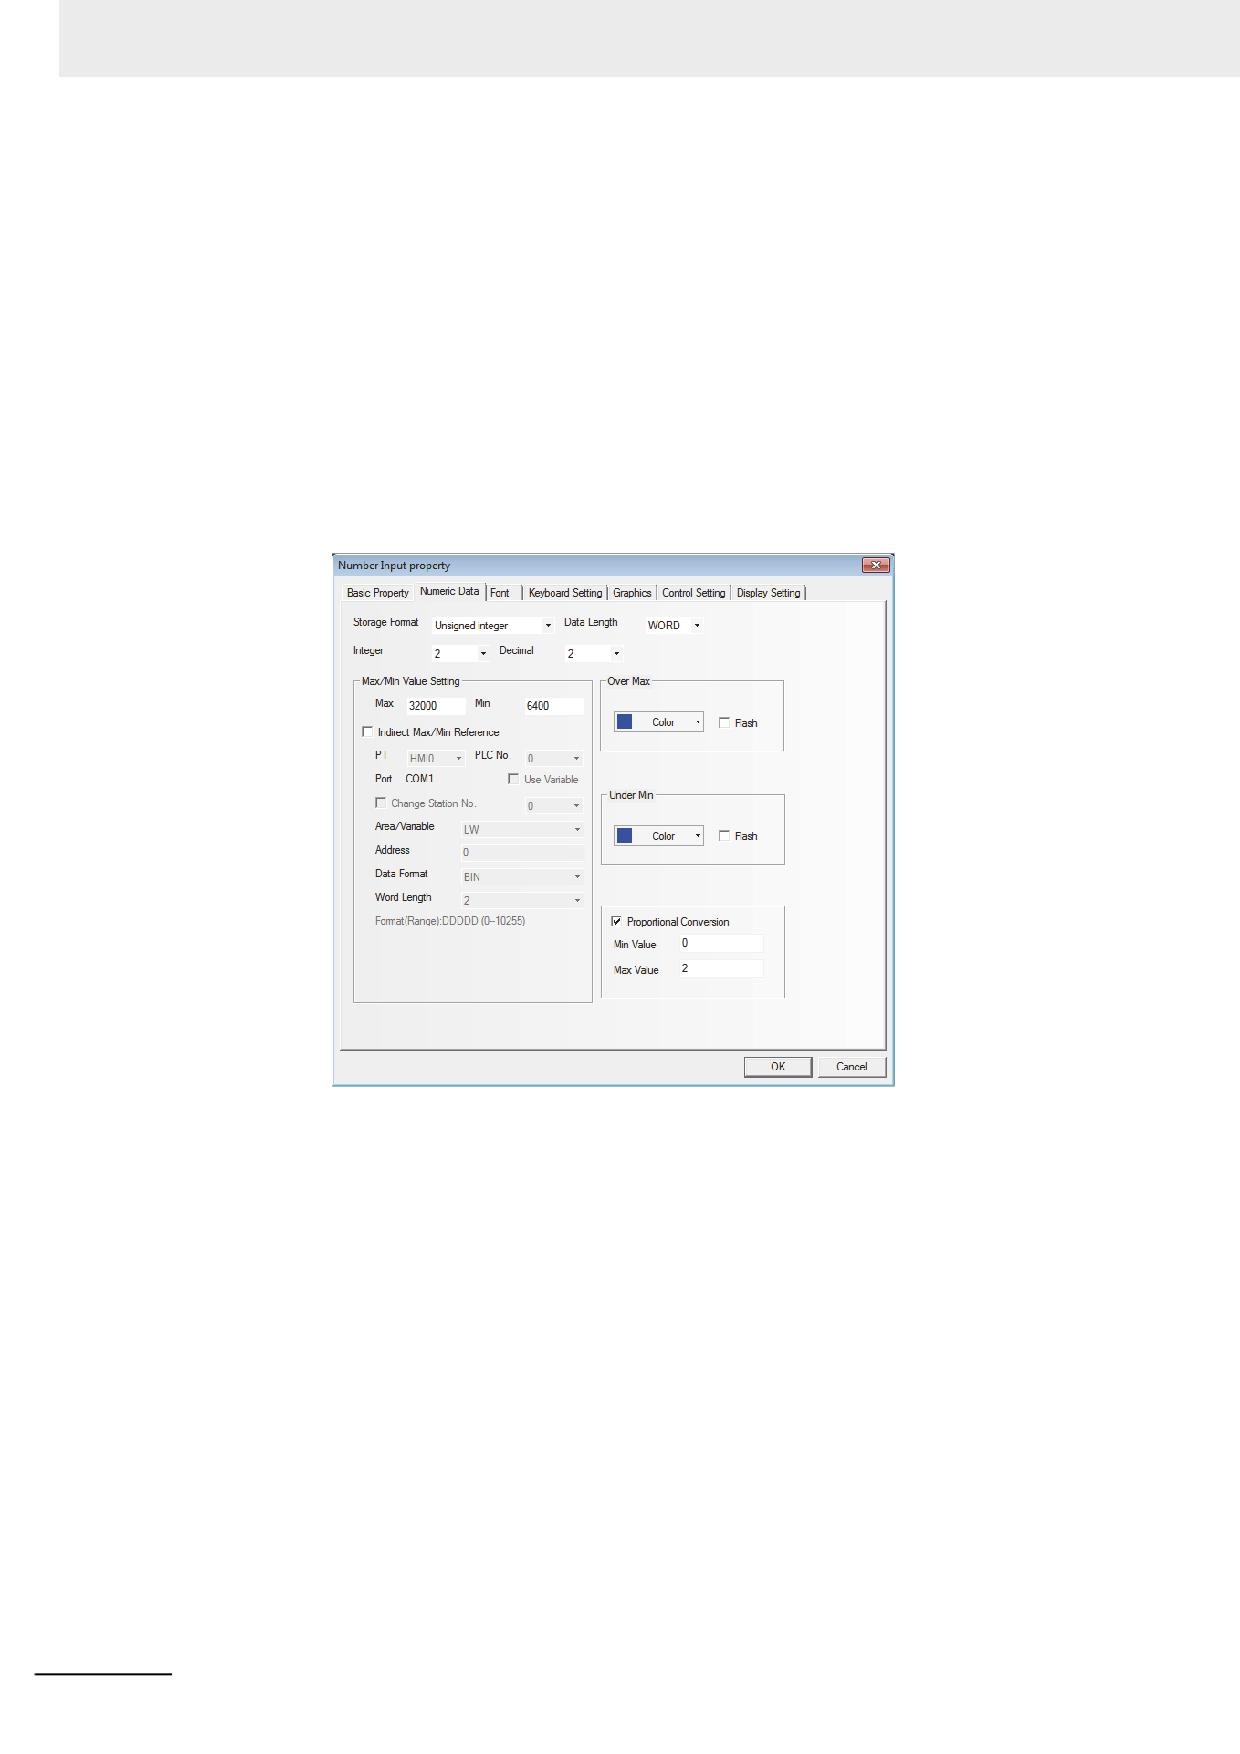
Switch to the [Font] tab and set the font size, color and alignment method, etc. for the displayed
value.
Font Size: Sets the size of the font.
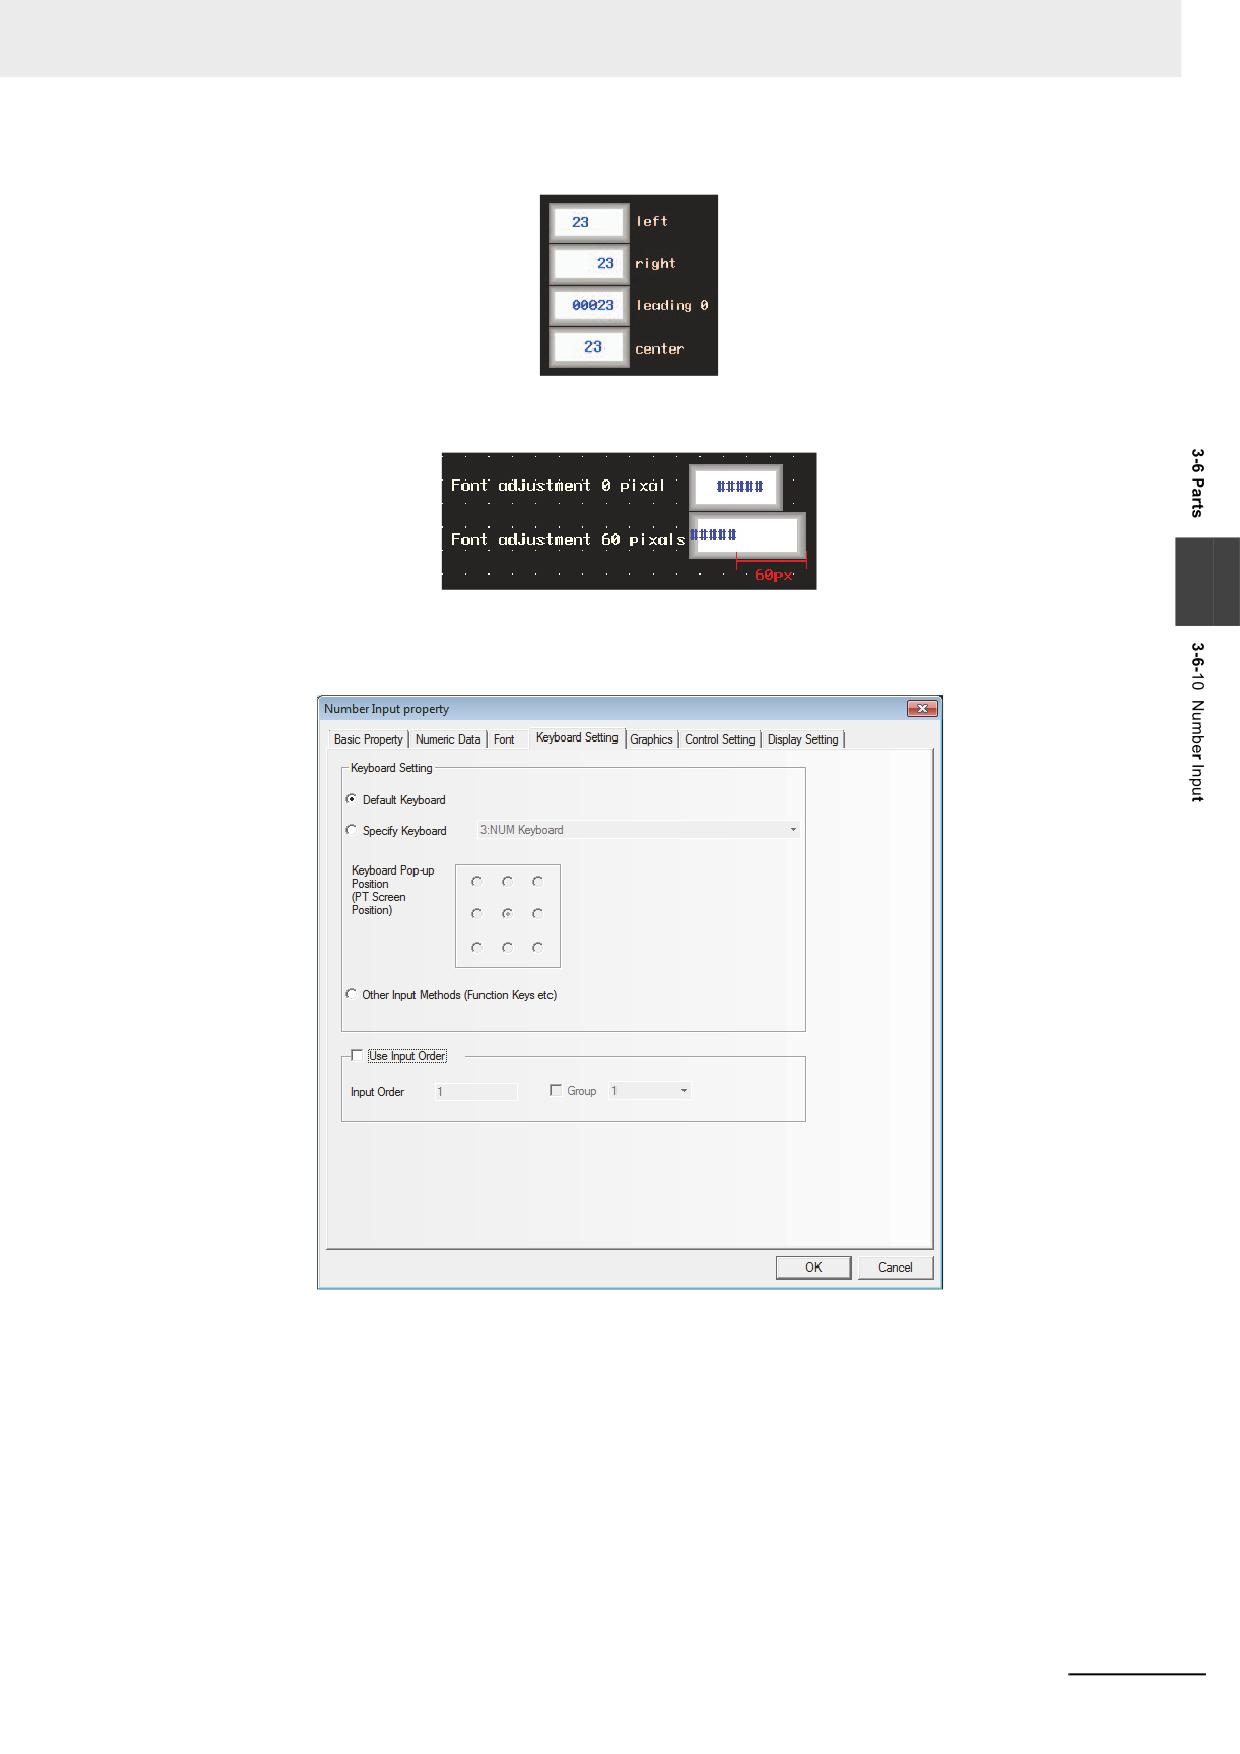
Position: Sets the displayed position of the value. For example, set “Integer”, “Decimal” and
the input value to “5”, “0” and “23” respectively, then the formats as shown below will
be displayed.
3-120
NB-series Programmable Terminals NB-Designer Operation Manual(V106)
3 Functions of NB-Designer
Display Position Indent: Increases the width of the display area for the font rightward with the
unit of pixel point.
3
4
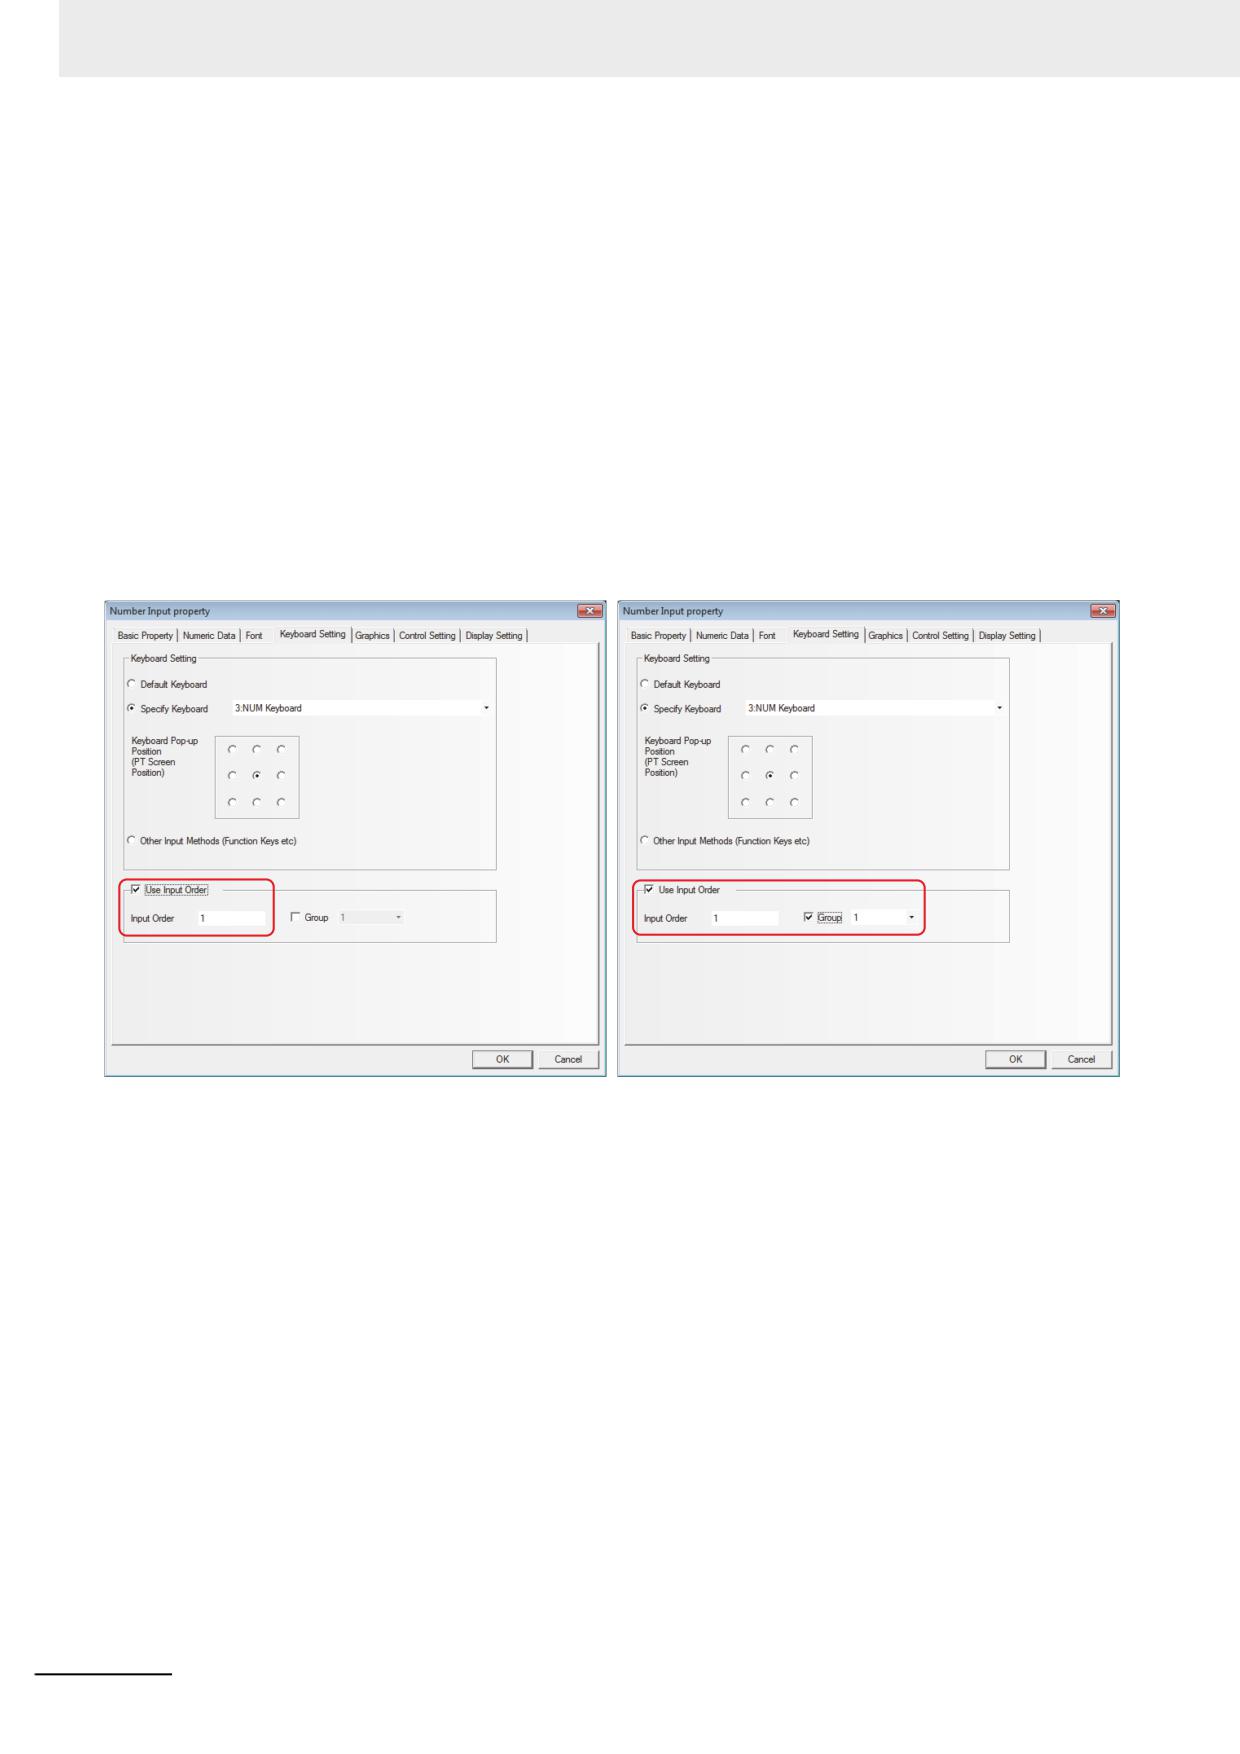
Switch to the [Keyboard Setting] tab and make Keyboard Setting for the pop-up keyboard type
and check Use Input Order.
Default Keyboard: Refers to the keyboard used by the Common Sheet, all of the Number
Input components will call the 3:NUM keyboard. The default setting of
Number Input is “Use [Default Keyboard]”.
Specified Keyboard: One specified keyboard will be called and only after checking in the
[Screen Attribute] check box of the [Screen Property] dialog box for the
page set by function keys and others and setting [Keyboard] for [Screen
Property], the keyboard can be displayed in the dropdown list of the
[Specify Keyboard].
Keyboard Pop-up Position: 9 positions can be adjusted.
Other Input Methods (Function Key etc): Using the function keys, the keyboard is specified
when entering numbers.
NB-series Programmable Terminals NB-Designer Operation Manual(V106)
3-121
3 Functions of NB-Designer
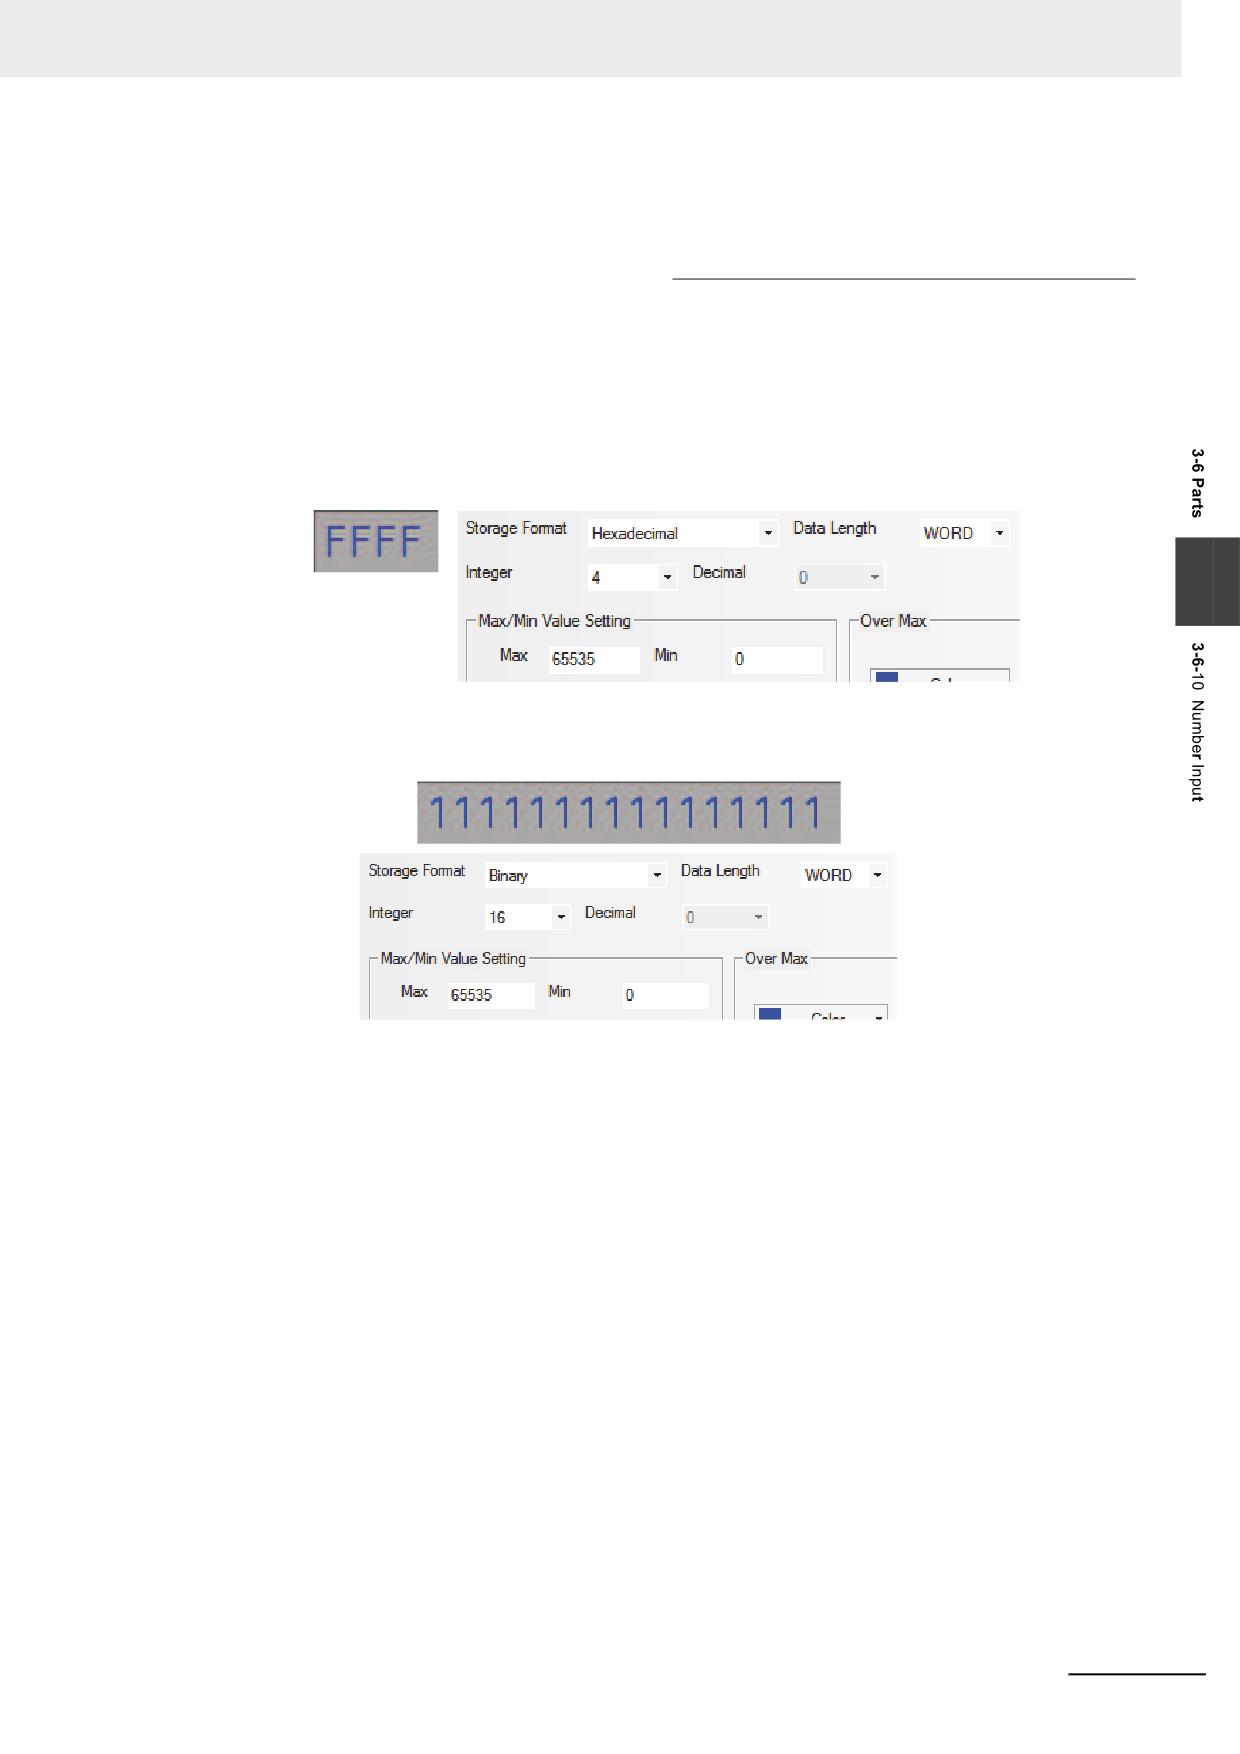
Use Input Order: In the order of number input of [Input Order] specified to number input, text
input, or Note book, numbers and text strings can be entered continuously.
Touching [Enter] during data entry allows to move the cursor among input
components in the order of the numbers of [Input Order] which were
specified by [Use Input Order] (Ascending order: 1-->2-->...-->last No.-->1--
>...) In this settings, the keyboard will not be closed automatically and will be
kept to be displayed on the screen until touching to [X] (closing component)
displayed on the keyboard.
Group is used to classify the multi-group of components needing consecutive inputs. The
components with the same group number belong to the same group, and the cursor will be
cyclic in the same group of components. When the “Enter” is pressed, the keyboard will not be
closed automatically, but will always be displayed in the screen until the close button “X” in the
keyboard is touched.
Setting of [Use Input Order]
Go to [Keyboard Setting] Property tabs for the Number Input component, Text Input component
and Note Book component respectively, and check the [Use Input Order].
5
Switch to the [Graphics] tab and select the Vector Graphics or bitmap representing the
touching area and touching state.
6
Switch to the [Control Setting] tab and make the Security Setting and set the Triggering action.
7
Press the [OK] button to complete the setup of the Number Input component.
Storage Format:
(1) Decimal System (signed int/unsigned int):
The data is displayed in decimal (0~9).
The data is displayed according to the instructions for the digits after the decimal point and
the data will be arranged from the digits after the decimal point. For example, the digits after
the decimal point is 2, then “14561” will be displayed as “145.61”. "-"(minus) is treated as an
Integer.
3-122
NB-series Programmable Terminals NB-Designer Operation Manual(V106)
3 Functions of NB-Designer
Data after Proportional Conversion:
The value of the communication addresses set is converted proportionally before
displaying. The conversion formula is as follows.
Read
Minimum
Maximum Value after
Minimum Value after
(
-
)
×
(
-
)
Value after
Minimum Value after
Value
Input Value
Proportion Conversion
Proportion Conversion
=
+
Proportion Conversion
Proportion Conversion
(Maximum Input Value-Minimum Input Value)
The converted value will display the data according to “the digits before the decimal point”
and “the digits after the decimal point”. For example, the value to be converted is 123.456,
but “the digits after the decimal point” and “the digits before the decimal point” are “2” and
“3” respectively, so the converted value is displayed as “123.45” and the last digit is cut.
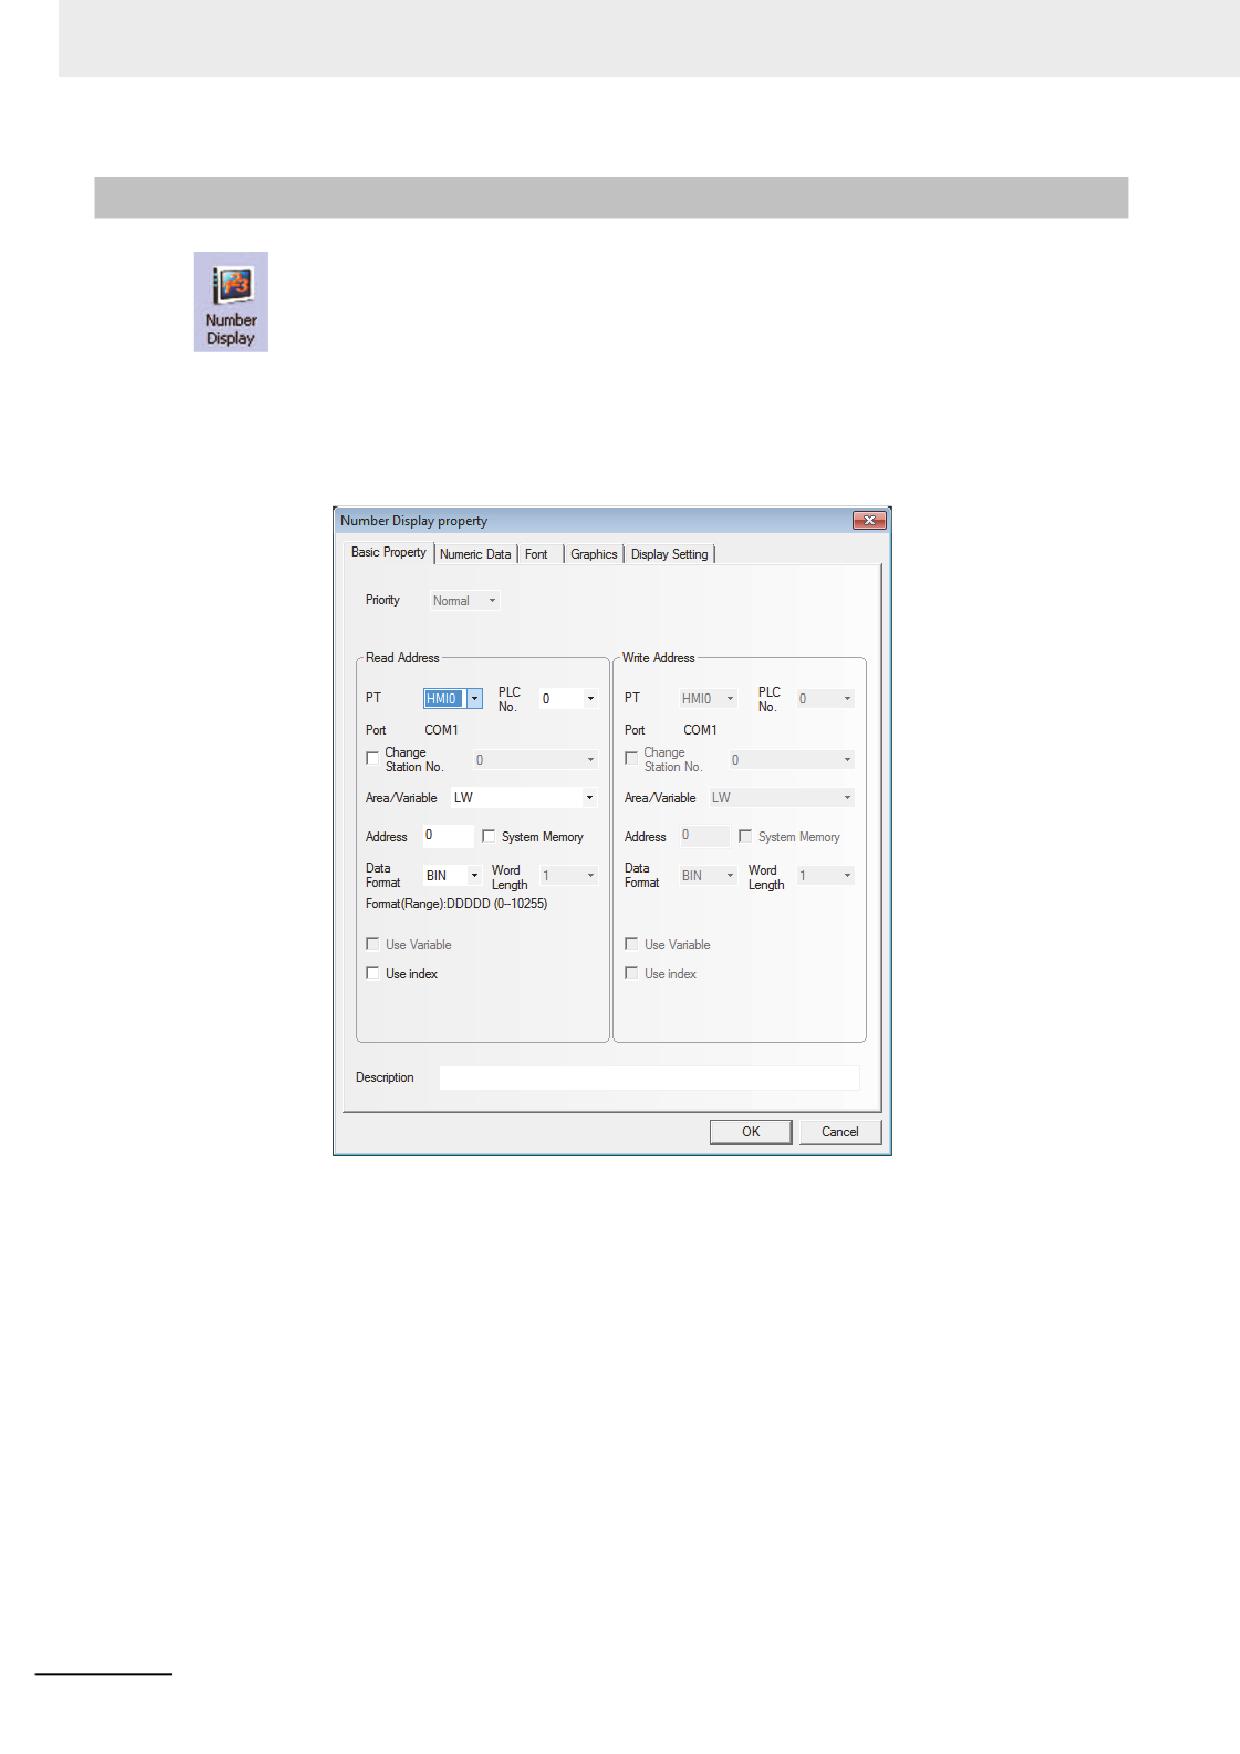
(2) Hexadecimal System (hex):
The data is displayed in hexadecimal format (0~F), and the conversion ratio and the
decimal point are eliminated.
3
(3) Binary System (bin):
The data is displayed in binary format (0 and 1), and the conversion ratio and the decimal
point are eliminated.
In the hexadecimal and binary formats, the input maximum value or minimum value are
treated as unsigned integer.
(4) Password (password):
Only “****” can be displayed and all the values to be read are hidden, and it is used to input
the password. Its conversion ratio and the decimal point are eliminated.
(5) Single-precision Floating-point Value (float):
The data in the controller will be converted into the decimal data from the data in 32-digit
IEEE floating format and will be displayed in decimal format.
(6) Double-precision Floating-point Value (double):
The data in the controller will be converted into the decimal data from the data in 64-digit
IEEE floating format and will be displayed in decimal format.
For details about the single-precision floating-point value and double-precision floating-
point value, refer to IEEE-754 Standard.
NB-series Programmable Terminals NB-Designer Operation Manual(V106)
3-123
3 Functions of NB-Designer
3-6-11
Number Display
The Number Display component is used to display the data in the specified word memory.
Process of adding one Number Display component
1
Press the Number Display component icon, drag it to the window, then the [Basic Properties]
dialog box of the Number Display component will pop up.
Read Address: Refers to the word address displayed by the Number Display component.
Address: Refers to the first address of the word address corresponding to the Number Display
component.
Word Length: Displays the data length of the read address.
3-124
NB-series Programmable Terminals NB-Designer Operation Manual(V106)
3 Functions of NB-Designer
2
Refer to the relevant contents of the [Number Input] component, and fill in the contents in the
[Numeric Data] tab.
3
3
Switch to the [Font] tab and make related settings referring to the Number Input component.
NB-series Programmable Terminals NB-Designer Operation Manual(V106)
3-125
3 Functions of NB-Designer
4
Press the [OK] button to complete the setup, and place the Number Display component in a
proper position.
How to use the “Proportional Conversion” in the Numeric Data tab in Number
Display Component Property dialog box.
Quite a number of PLCs or other controllers don’t support decimals or negatives, and in many
cases, the actual values registered in PLCs or other controllers are different from the values the
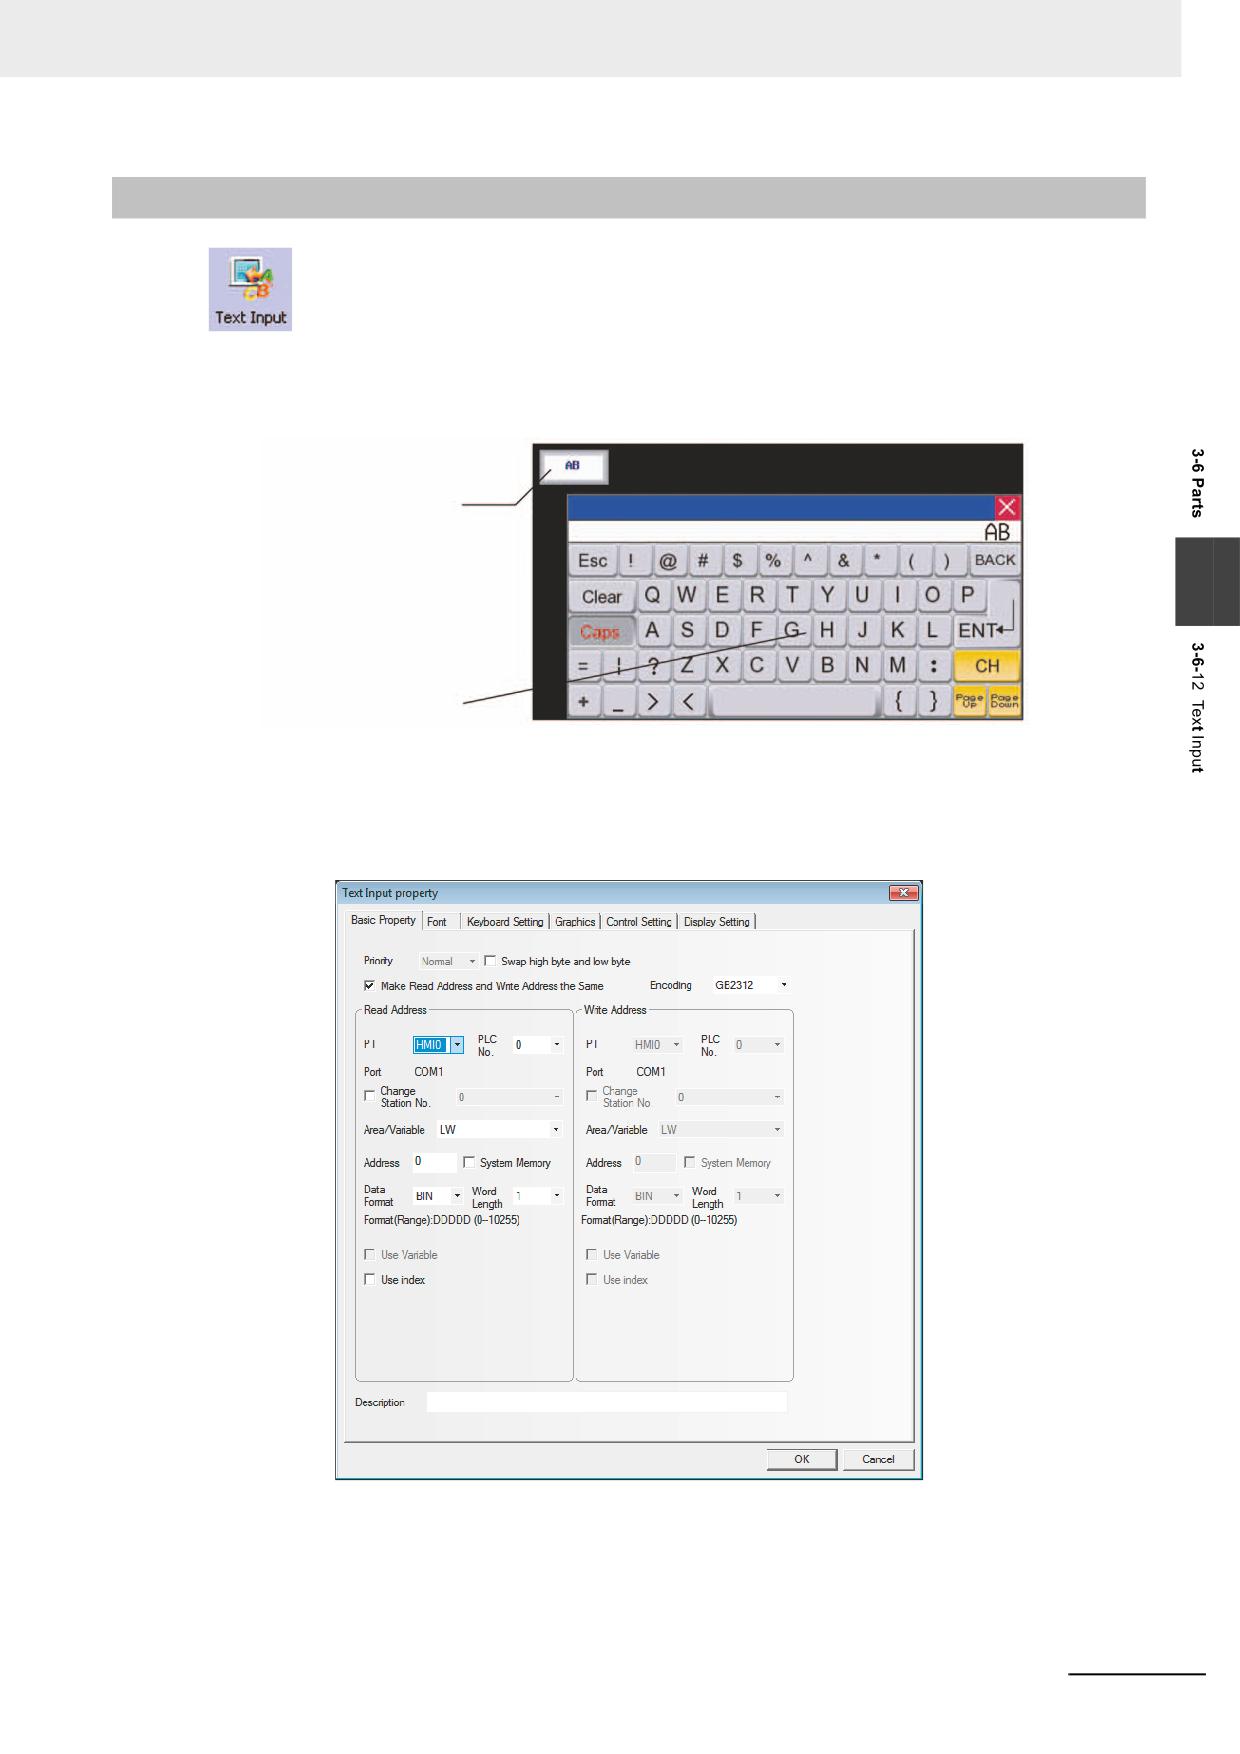
users want to display on the PT, thus Proportional Conversion is required. For example, the actual
frequency of an inverter is 0~5000, while what is expected on the PT is 0~50 HZ, and in this case,
Proportional Conversion can be used.
Another example: the range of values sampled from the PLC is 6400~32000, while the range
desired to be displayed on the PT is 0.00~2.00.
This can be realized with settings shown below:
3-126
NB-series Programmable Terminals NB-Designer Operation Manual(V106)
3 Functions of NB-Designer
3-6-12
Text Input
Text Input component can modify or display the data in the specified word memory, which is
analyzed through the EUC-CN character table as default settings. EUC-CN is Chinese character
codeset and it consists of ASCII characters and Chinese characters. The input data is saved to a
consecutive memory with the “Registered Address” as the first address. Low-byte character codes are
displayed on the left, while high-byte character codes are displayed on the right.
Enable the touching area and enter
the input state
3
Input from the keyboard
Process of adding one Text Input component
1
Press the Text Input component icon, drag it to the window, then the [Basic Properties] dialog
box of the Text Input component will pop up.
NB-series Programmable Terminals NB-Designer Operation Manual(V106)
3-127
3 Functions of NB-Designer
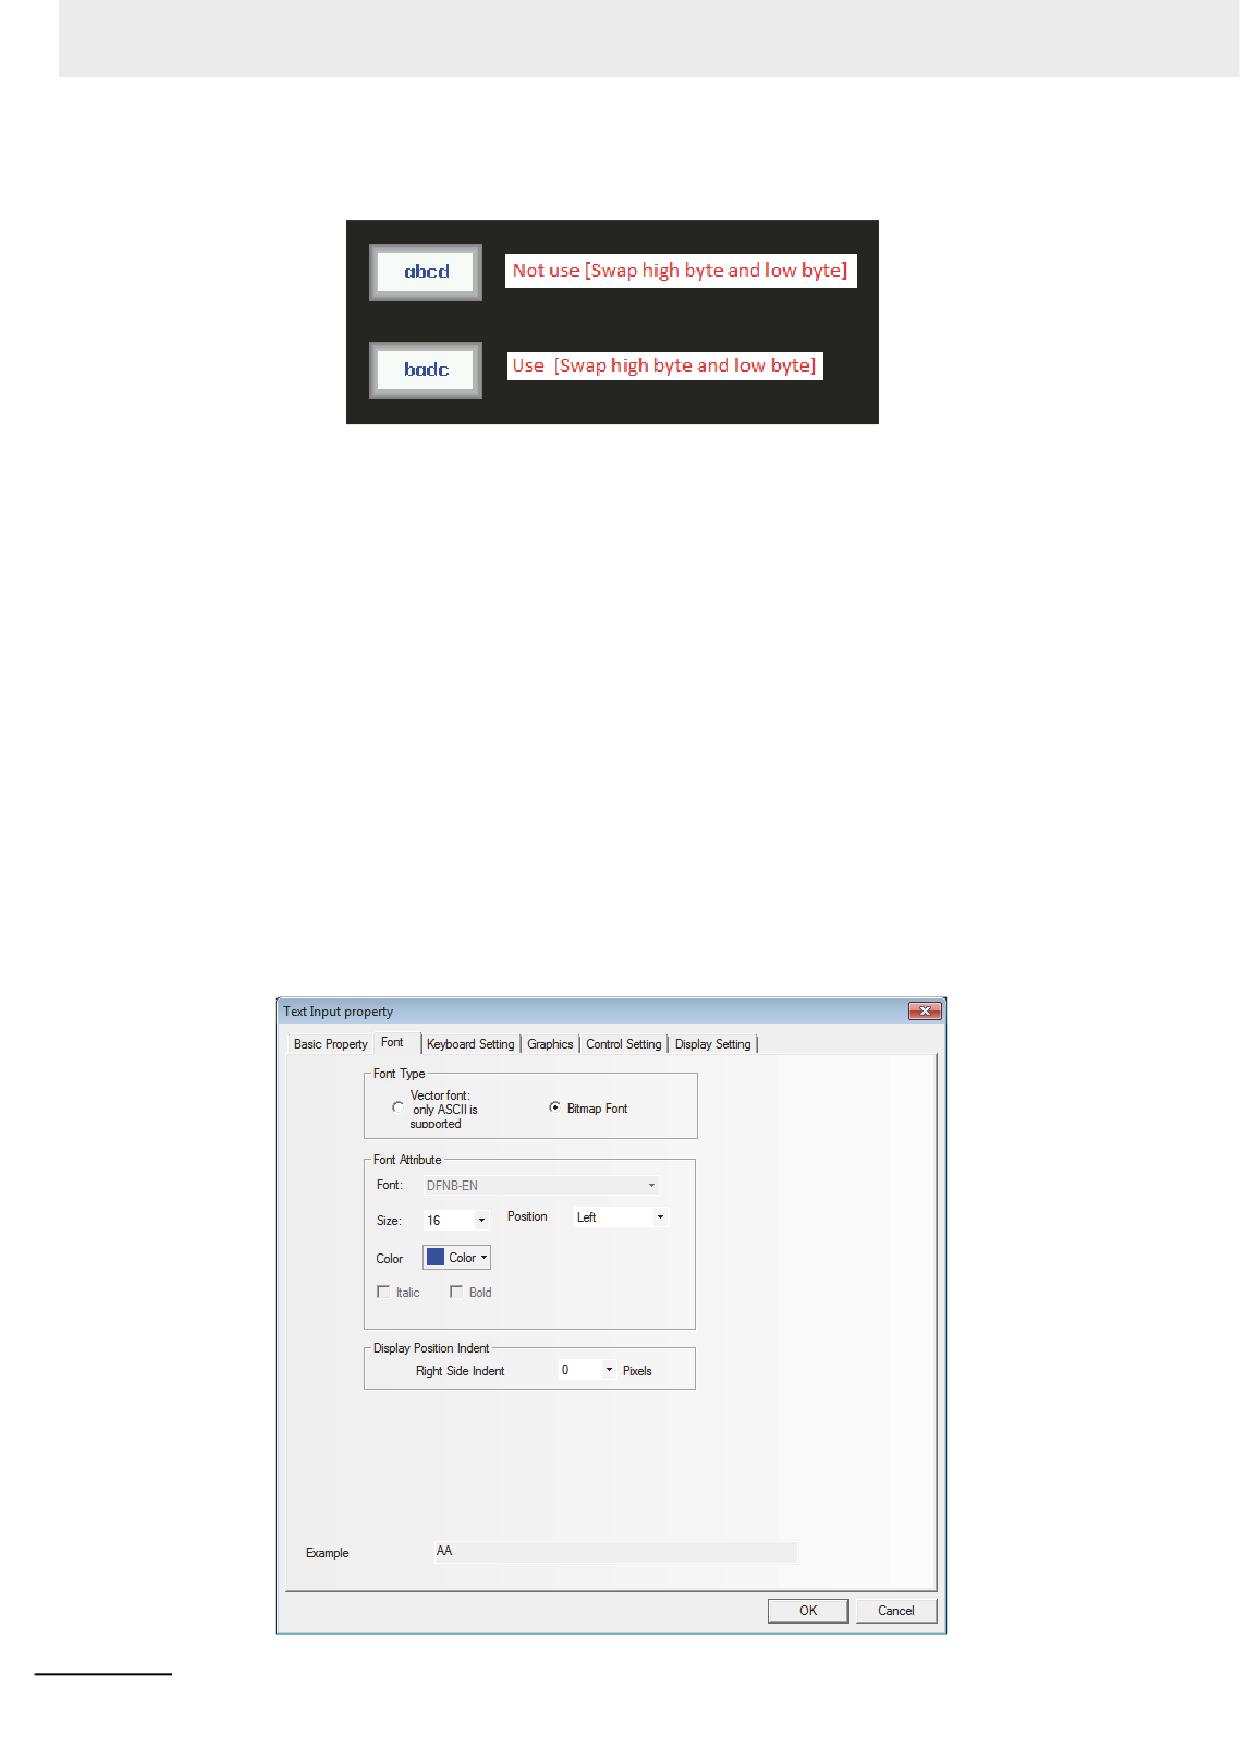
Swap high byte and low byte: Refers to the interchange of the high-byte and the low-byte for
the same byte, as shown below.
Encoding Format Selection
The following encoding options are available:
GB2312: Selecting this option can display the Chinese characters in the Text Input, Text
Display, and Note Book components.
Unicode: If you select this option, the specified data is dealt as Unicode UTF-16 Big Endian.
Extended ASCII: Selecting this option can display the extended ASCII characters between
0x80 and 0xff in the ASCII codes. When it is selected, Chinese cannot be
displayed in the Text Input component, Text Display component and Note
Book component.
UTF-8: Selecting this option, data will be processed as UTF-8. If a tag address is selected, the
encoding will automatically switch to UTF-8.
Read/Write Address: Refers to the word address (It contains up to 16 words, each of which
contains 2 ASCII characters) displayed and modified by Text Input
component in PLC.
Address: Refers to the first address of the word address corresponding to the Text Input
component.
Word Length: 1~16 are available for the Read/Write Address.
2
Switch to the [Font] tab and fill in the Properties of displayed data referring to that for the
Number Input component.
3-128
NB-series Programmable Terminals NB-Designer Operation Manual(V106)
3 Functions of NB-Designer
3
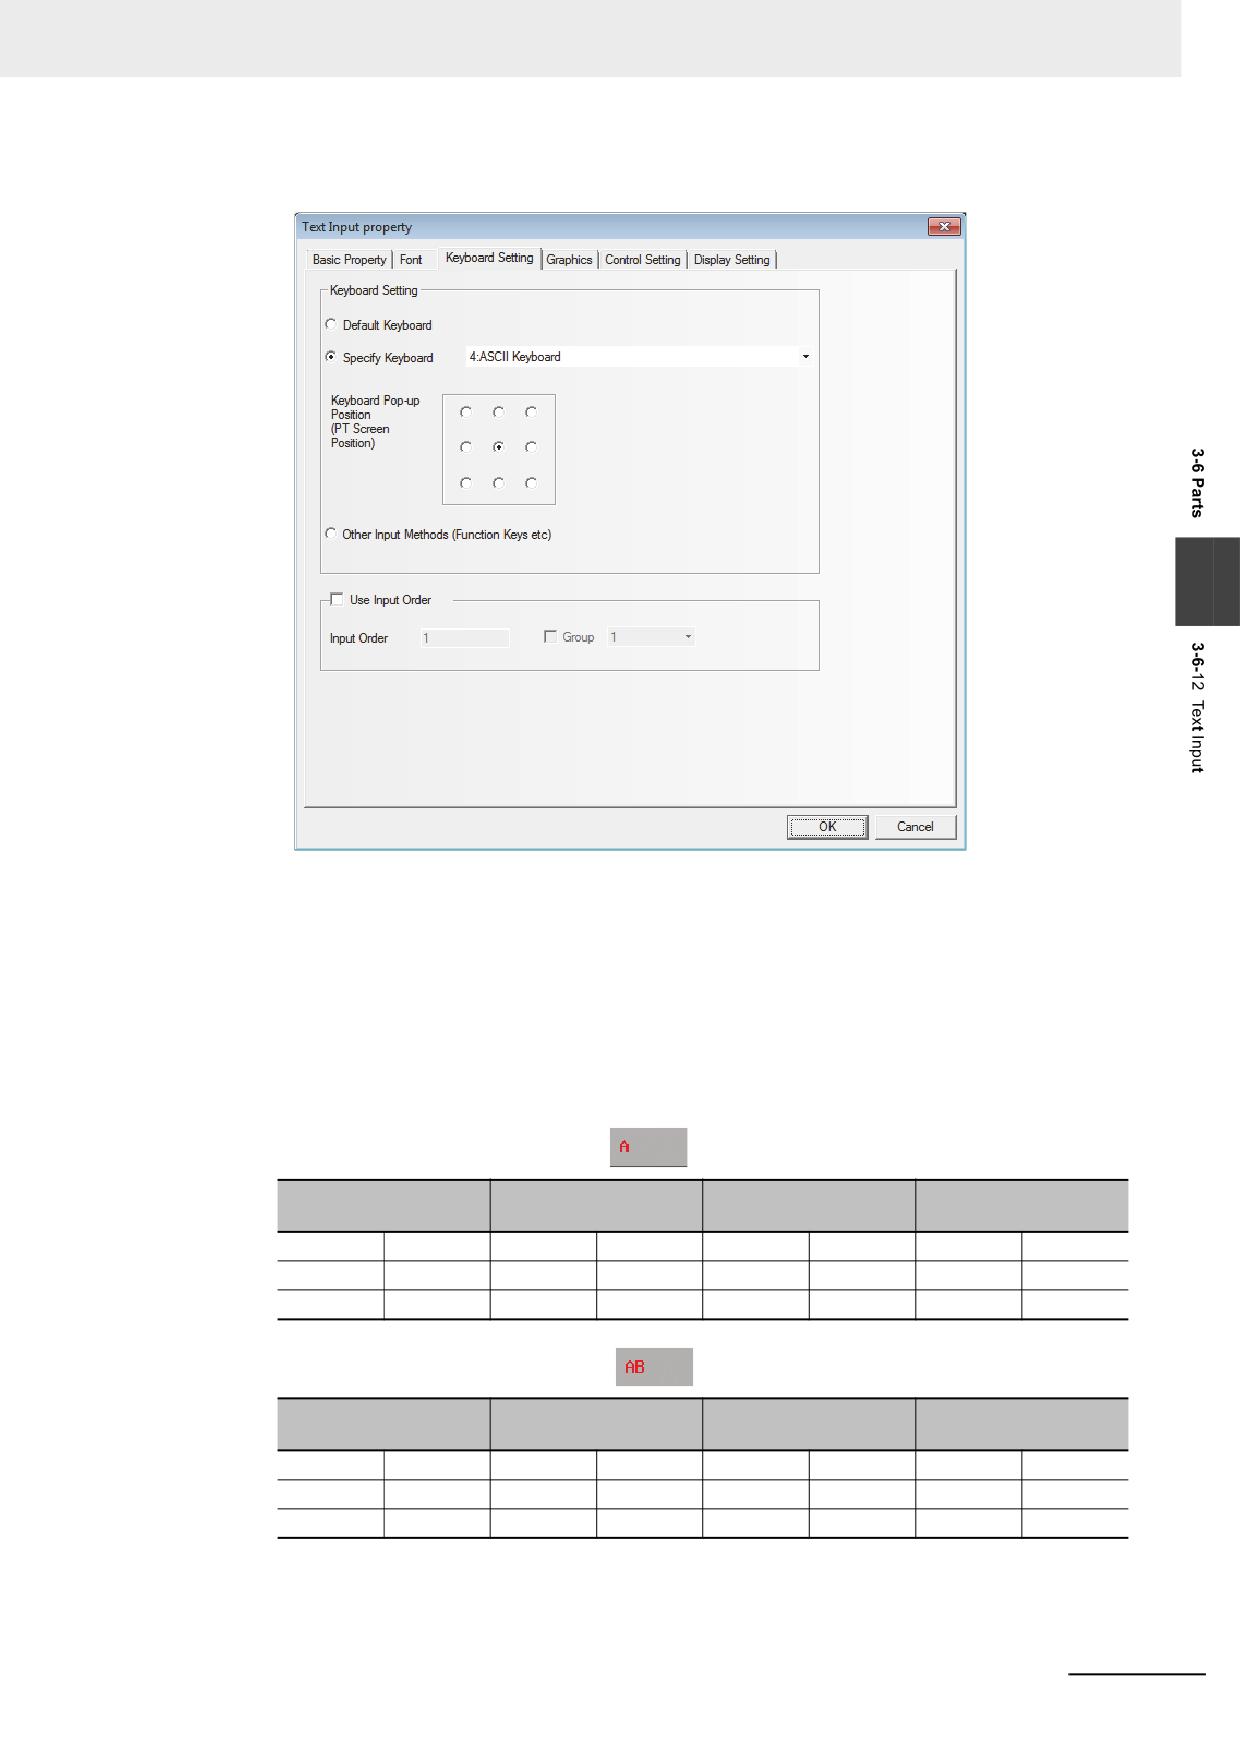
Switch to the [Keyboard Setting] tab and select the keyboard type.
3
4
Switch to [Graphics] tab and select the Vector Graphics or bitmap representing the touching
area and touching state.
5
Switch to the [Control Setting] tab and make the Security Setting and set the Triggering action.
6
Press the [OK] button to complete the setup of the Text Input component.
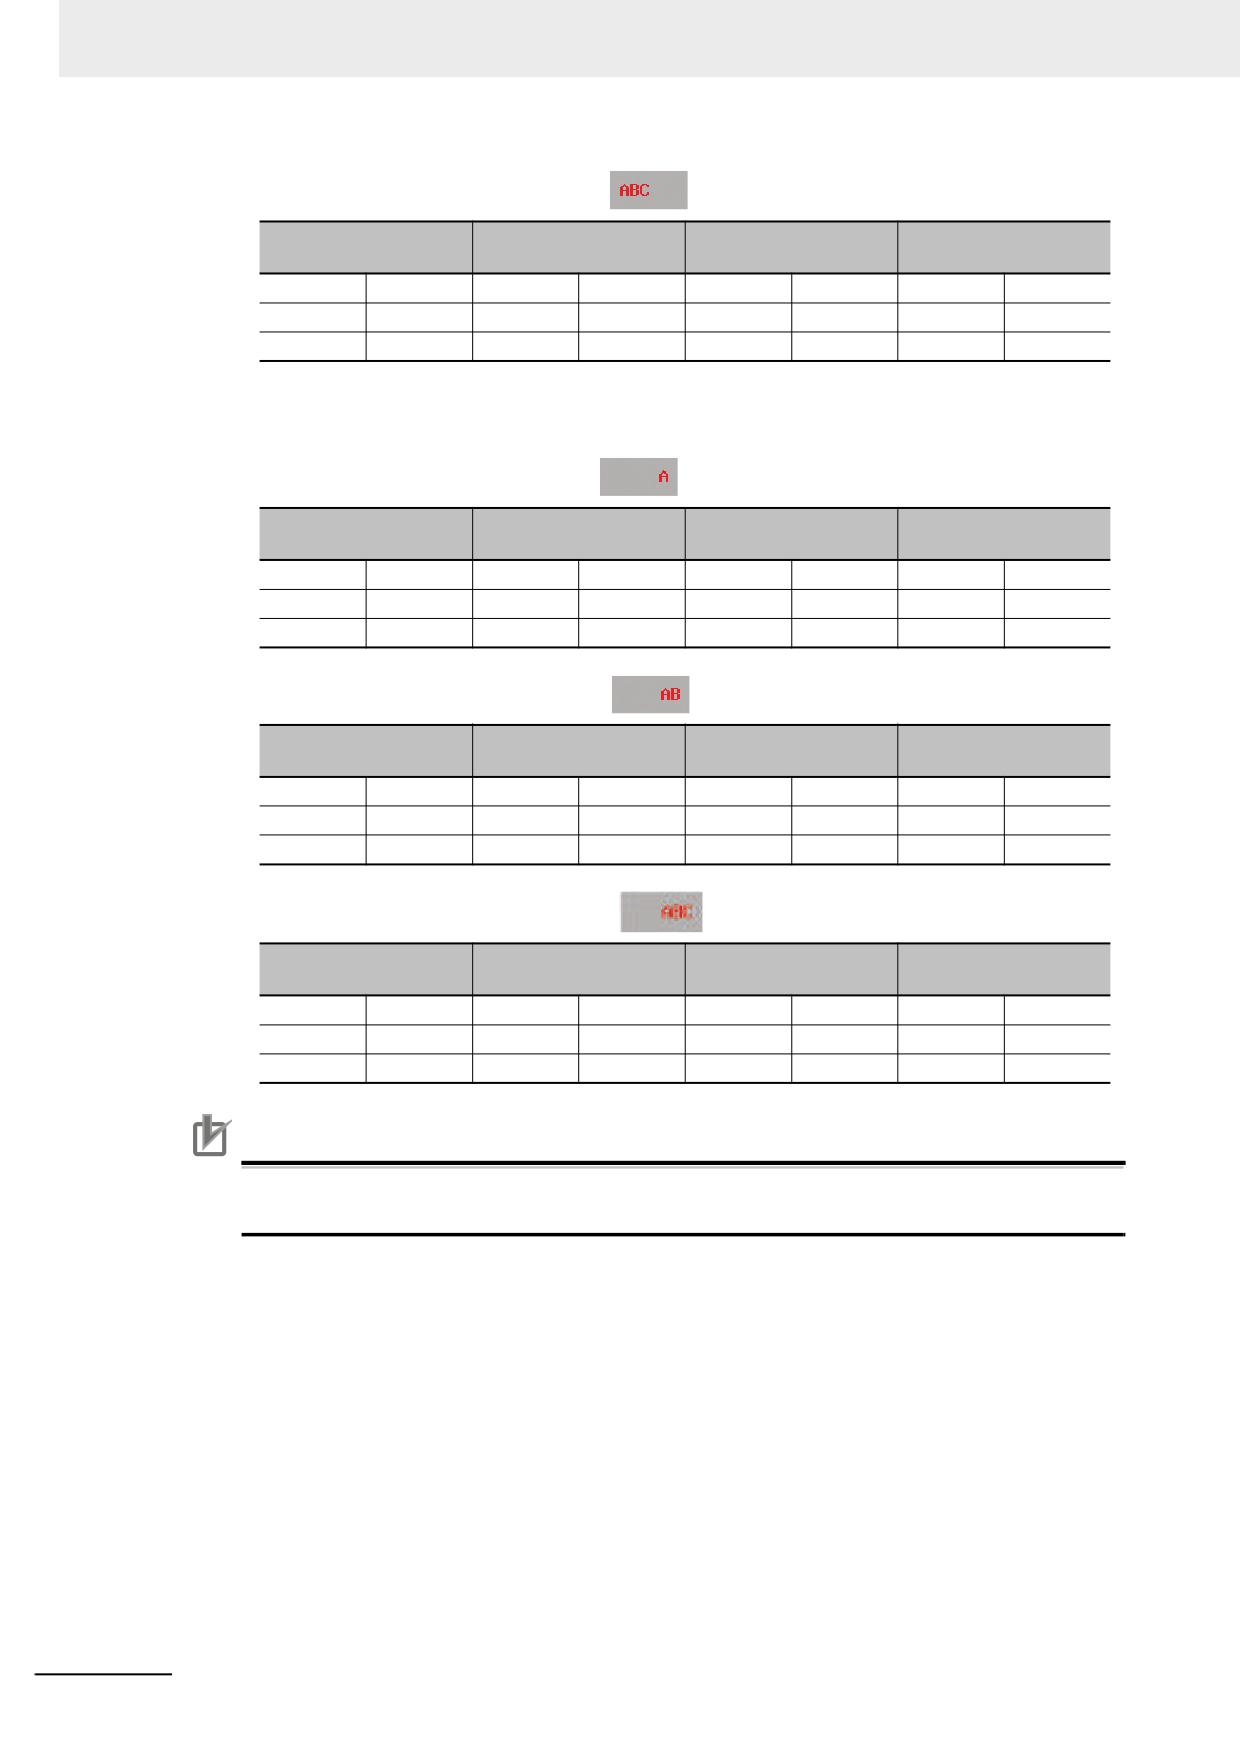
The storage method of the text input is explained as below.
(1) Select [Left] in [Alignment] of [Font Property]
When the character “A” is input
Lowest Word (Word
Highest Word
Word 2
Word 1
0)
High byte
Low byte
High byte
Low byte
High byte
Low byte
High byte
Low byte
20(H)
20(H)
20(H)
20(H)
20(H)
20(H)
20(H)
41(H)
A
When characters “AB” are input
Lowest Word (Word
Highest Word
Word 2
Word 1
0)
High byte
Low byte
High byte
Low byte
High byte
Low byte
High byte
Low byte
20(H)
20(H)
20(H)
20(H)
20(H)
20(H)
42(H)
41(H)
B
A
NB-series Programmable Terminals NB-Designer Operation Manual(V106)
3-129
3 Functions of NB-Designer
When characters “ABC” are input
Lowest Word (Word
Highest Word
Word 2
Word 1
0)
High byte
Low byte
High byte
Low byte
High byte
Low byte
High byte
Low byte
20(H)
20(H)
20(H)
20(H)
20(H)
43(H)
42(H)
41(H)
C
B
A
(2) Select [Right] in [Alignment] of [Font Property]
When the character “A” is input
Lowest Word (Word
Highest Word
Word 2
Word 1
0)
High byte
Low byte
High byte
Low byte
High byte
Low byte
High byte
Low byte
41(H)
20(H)
20(H)
20(H)
20(H)
20(H)
20(H)
20(H)
A
When characters “AB” are input
Lowest Word (Word
Highest Word
Word 2
Word 1
0)
High byte
Low byte
High byte
Low byte
High byte
Low byte
High byte
Low byte
42(H)
41(H)
20(H)
20(H)
20(H)
20(H)
20(H)
20(H)
B
A
When characters “ABC” are input
Lowest Word (Word
Highest Word
Word 2
Word 1
0)
High byte
Low byte
High byte
Low byte
High byte
Low byte
High byte
Low byte
43(H)
42(H)
41(H)
20(H)
20(H)
20(H)
20(H)
20(H)
C
B
A
Precautions for Correct Use
When you enter language-sensitive characters such as Japanese katakana with a Text Input
component, the characters may not be vertically aligned.
3-130
NB-series Programmable Terminals NB-Designer Operation Manual(V106)
3 Functions of NB-Designer
3-6-13
Text Display
Text Input component can modify or display the data in the specified word memory, which is
analyzed through the EUC-CN character table as default settings. EUC-CN is Chinese character
codeset and it consists of ASCII characters and Chinese characters. Low-byte character codes are
displayed on the left, while high-byte character codes are displayed on the right.
Process of adding one Text Display component
1
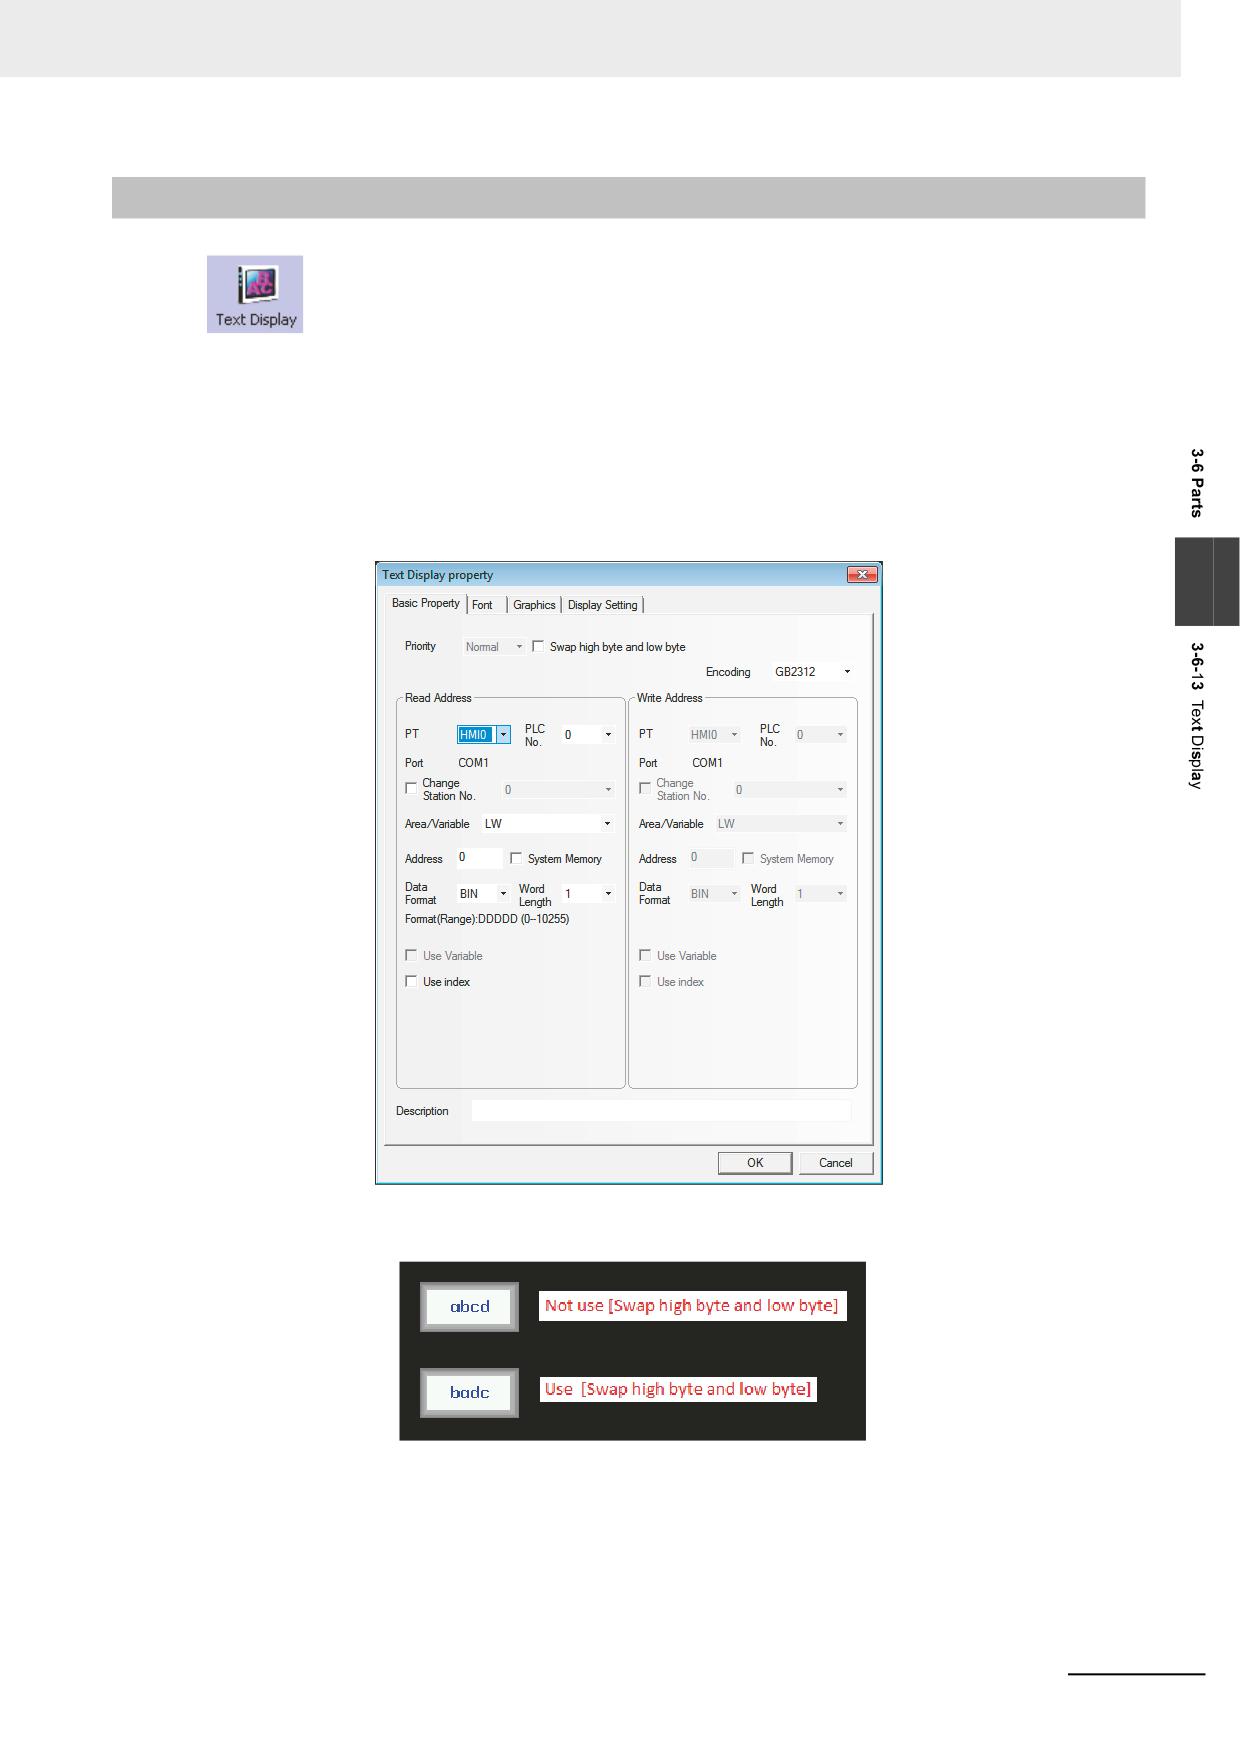
Press the Text Display component icon, drag it to the window, then the [Basic Properties]
dialog box of the Text Display component will pop up.
3
Swap high byte and low byte: Refers to the interchange of the high byte and the low byte for
the same byte, as shown below.
Encoding Format Selection
The following encoding options are available:
GB2312: Selecting this option can display the Chinese characters in the Text Input, Text
Display, and Note Book components.
Unicode: If you select this option, the specified data is dealt as Unicode UTF-16 Big Endian.
NB-series Programmable Terminals NB-Designer Operation Manual(V106)
3-131
3 Functions of NB-Designer
Extended ASCII:Selecting this option can display the extended ASCII characters between
0x80 and 0xff in the ASCII codes. When it is selected, Chinese cannot be
displayed in the Text Input component, Text Display component and Note
Book component.
UTF-8: Selecting this option, data will be processed as UTF-8. If a tag address is selected, the
encoding will automatically switch to UTF-8.
Read Address: Refers to word address memory of PLC to be displayed (It contains up to 16
words, each of which contains 2 ASCII codes).
Address: Refers to the first address of the word address corresponding to the Text Display
component.
Word Length: Displays the data length of the read address with 1 to 16 available.
2
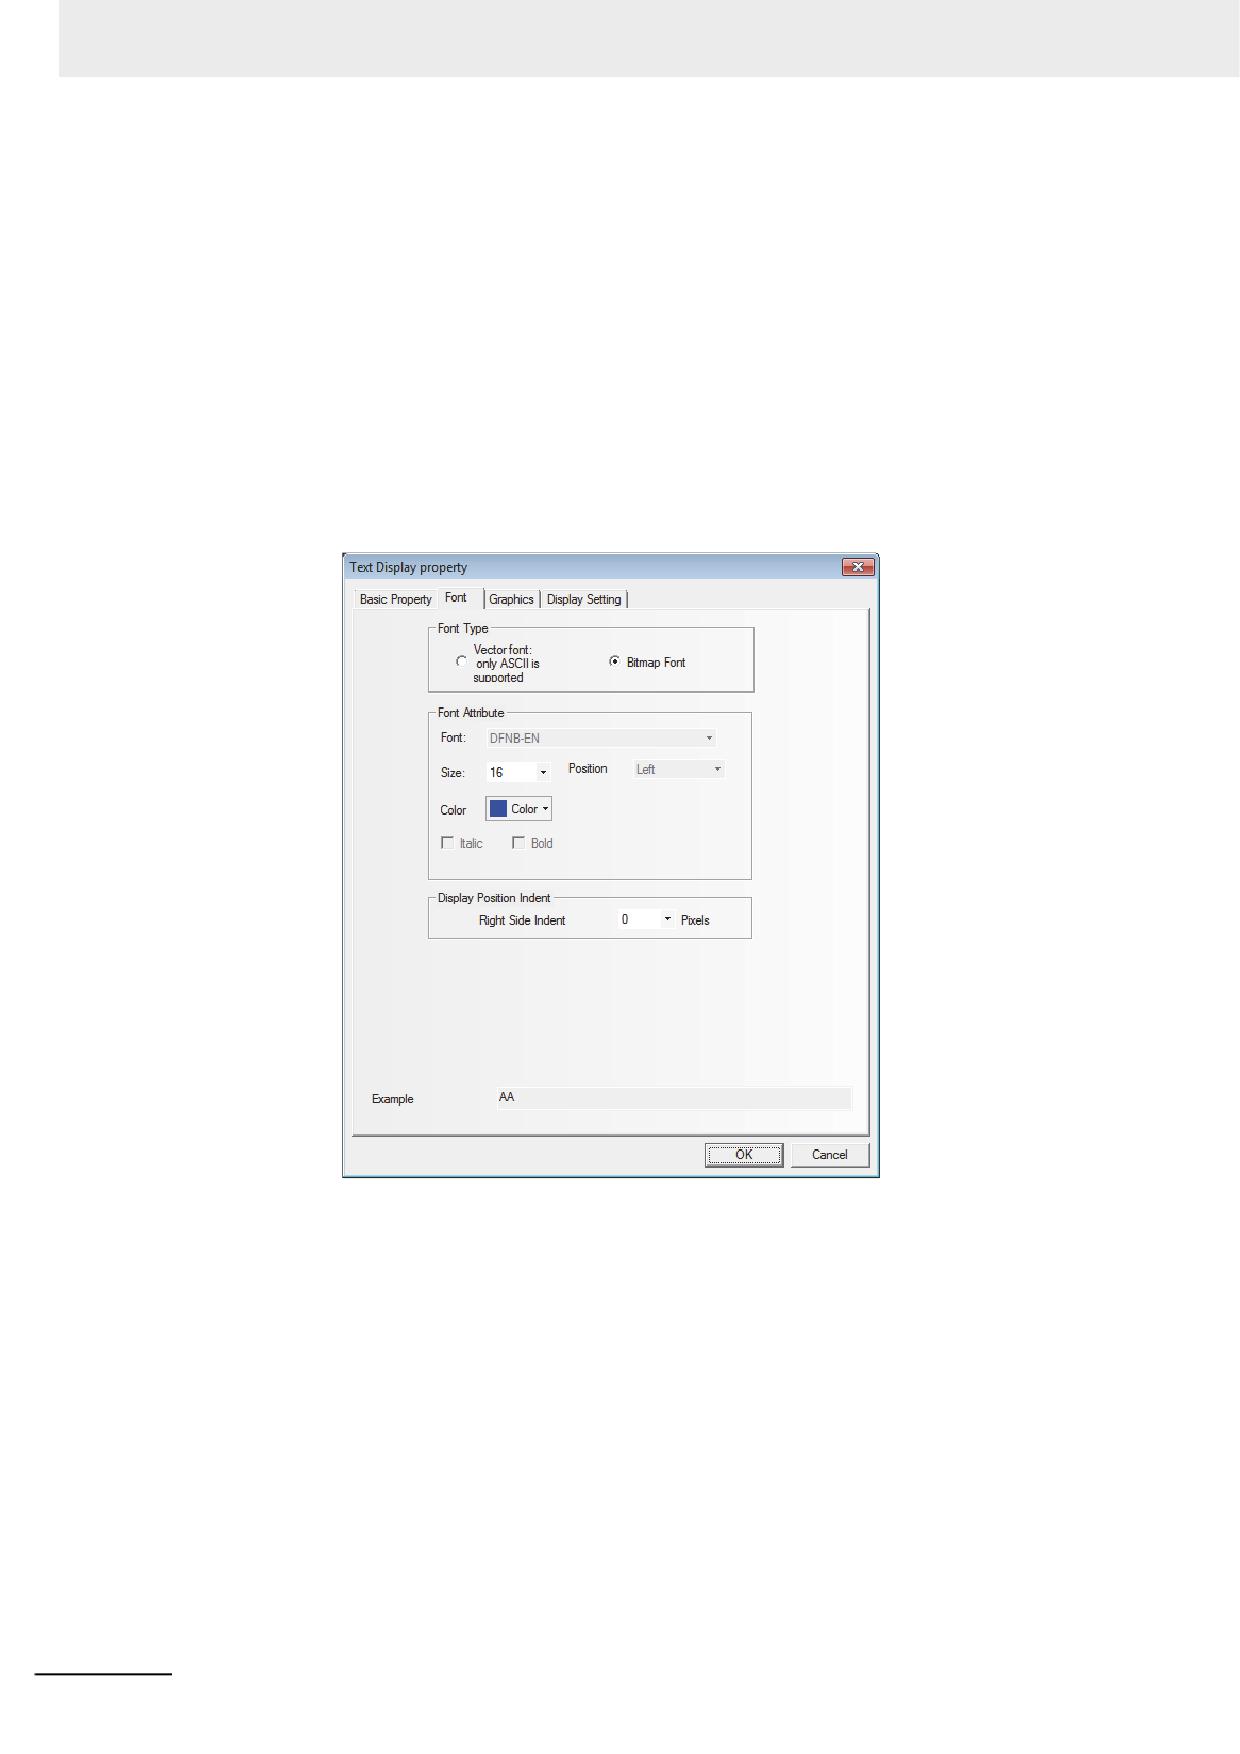
Switch to the [Font] tab and set the font size, alignment and color of the text to be displayed.
3
Switch to the [Graphics] tab and select the Vector Graphics or bitmap representing the
touching area and touching state.
4
Switch to the [Control Setting] tab and make the Security Setting and set the Triggering action.
5
Press the [OK] button to complete the setup of the Text Display component.
3-132
NB-series Programmable Terminals NB-Designer Operation Manual(V106)
3 Functions of NB-Designer
3-6-14
Level Meter
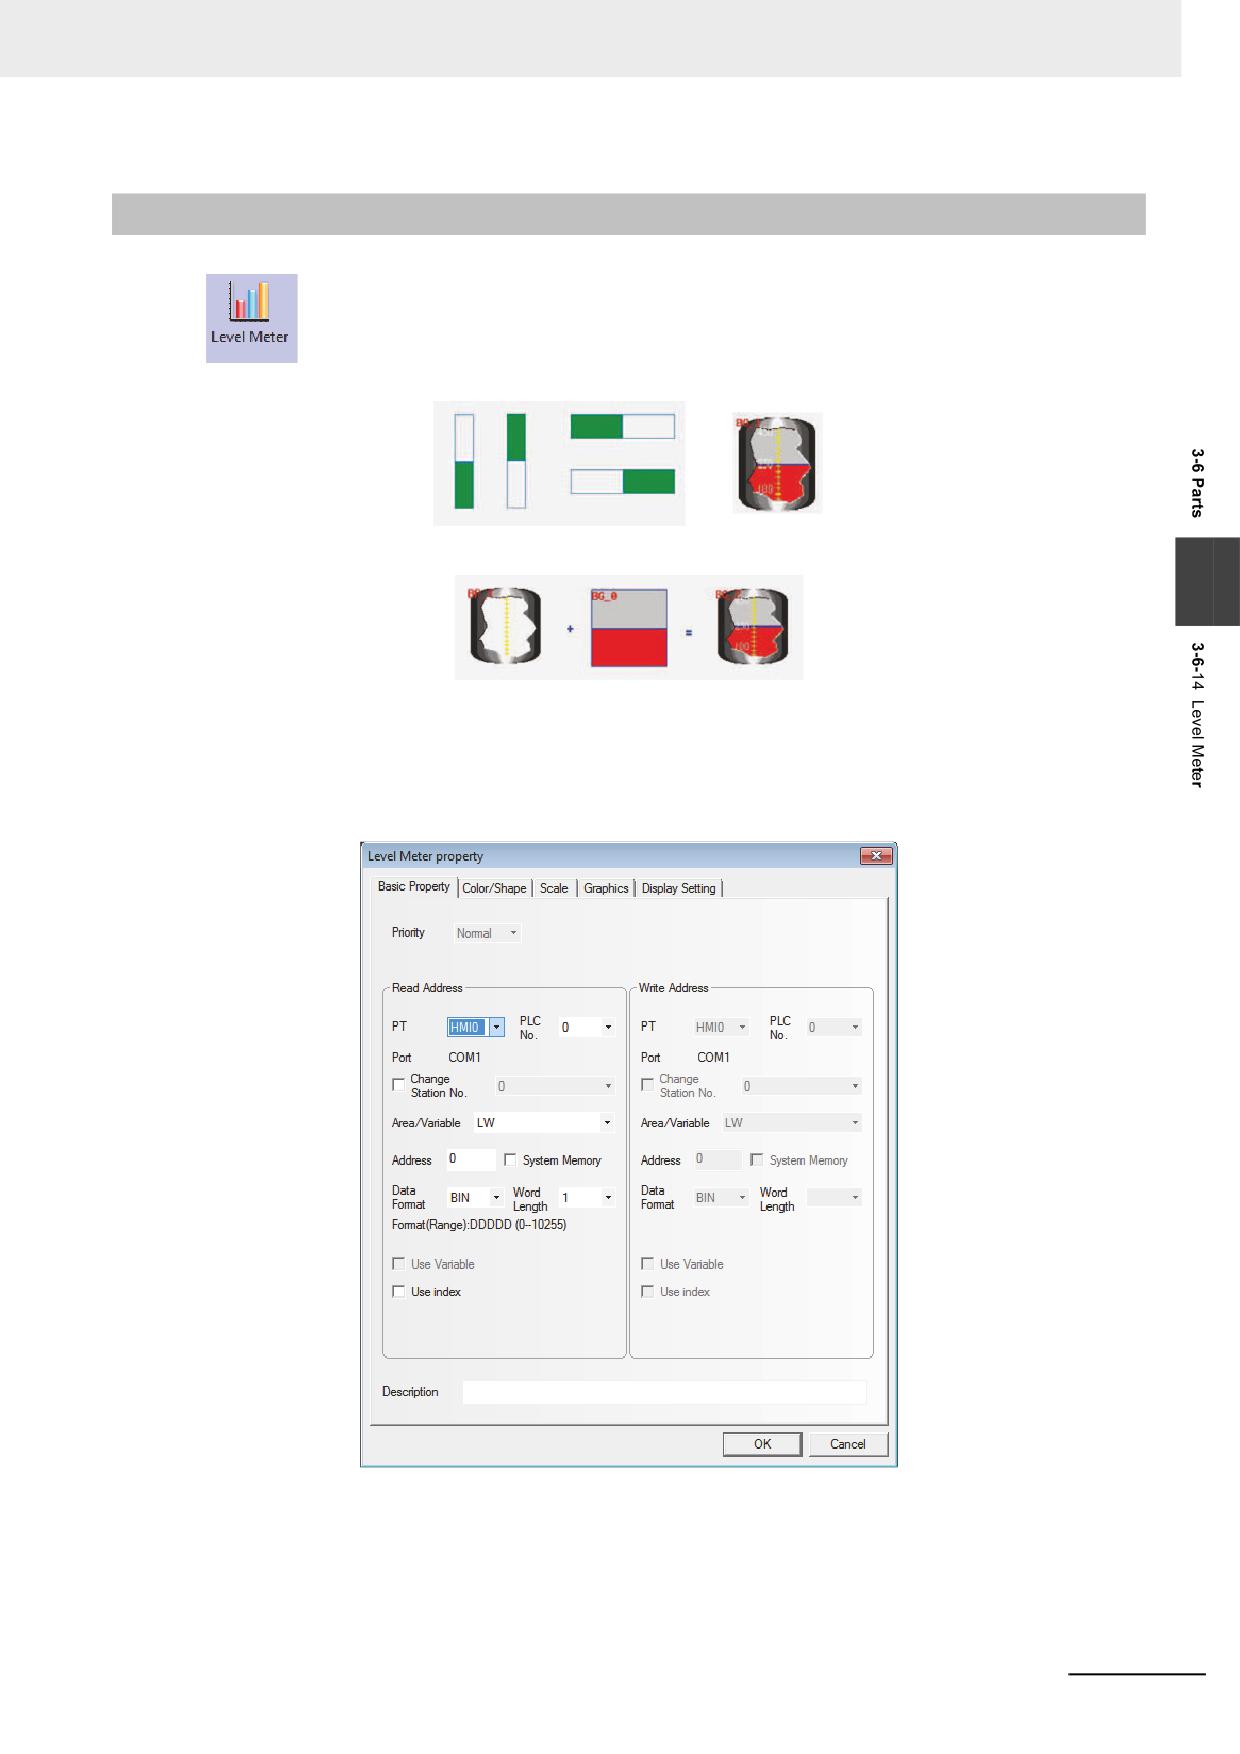
The value specified of the communication address is displayed in level picture based on the
upper limit value and the lower limit value set by [Level Meter Property].
As shown as below, the user can customize Level Meter with any desired shape.
3
Process of adding one Level Meter component
1
Press the Level Meter component icon, drag it to the window, then the [Basic Properties] dialog
box of the Level Meter component will pop up.
Read Address: Refers to the first address of the word address corresponding to the Level
Meter component.
Word Length: Displays the data length of the read address, supporting sing-word and double-
word.
NB-series Programmable Terminals NB-Designer Operation Manual(V106)
3-133
3 Functions of NB-Designer
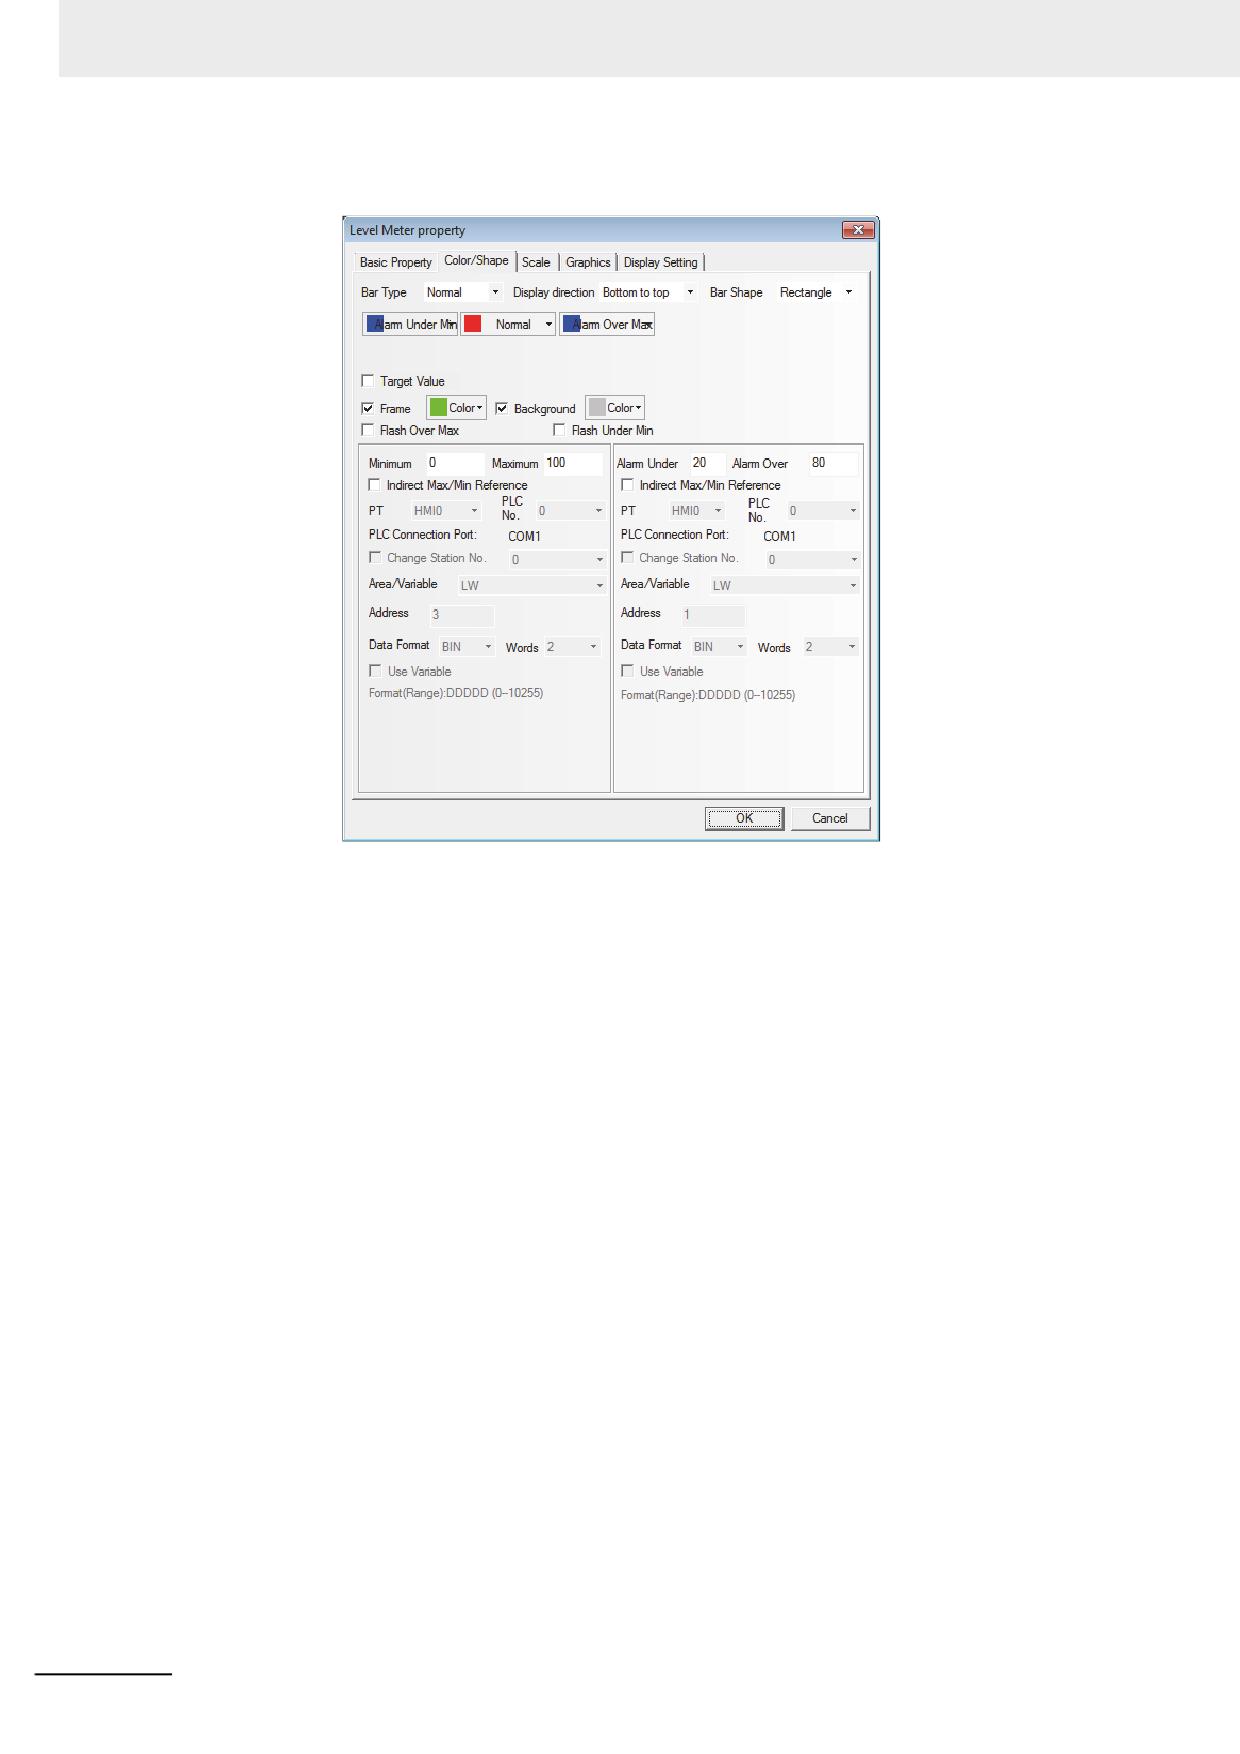
2
Switch to the [Color/Shape] tab and make settings as shown below.
3-134
NB-series Programmable Terminals NB-Designer Operation Manual(V106)
3 Functions of NB-Designer
Detailed descriptions of the Level Meter Properties
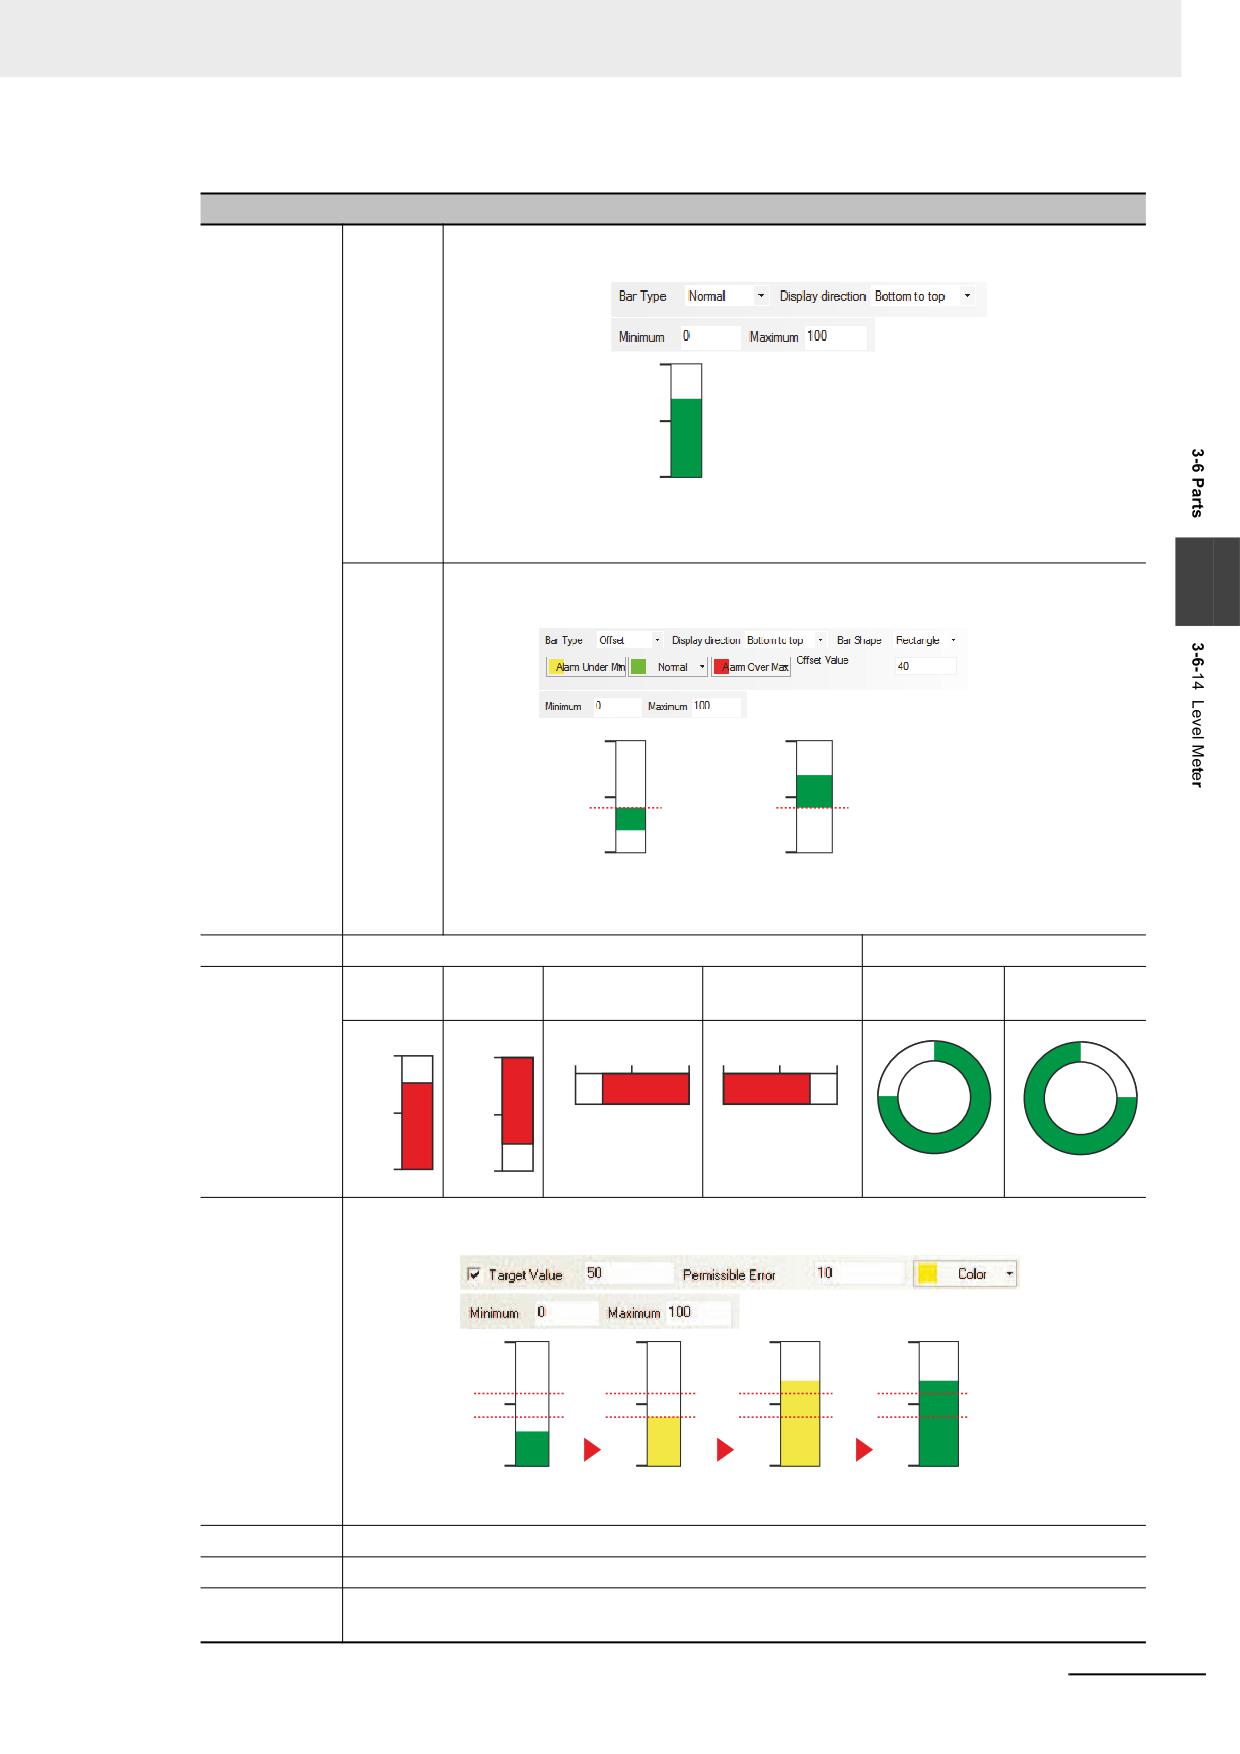
Bar Type
Normal
Indicates the percentage relationship between the actual value and the set range
by means of a Level Meter.
100
50
0
D100=70
Offset
Displaying the value over the [Offset] for the actual value by means of a Level Meter.
3
Example: Maximum 100, Minimum 0, Offset Value 40
100
100
50
50
40
40
0
0
D100=20
D100=70
Bar Shape
Rectangle
Circle
Display
Bottom to
Top to
Right to left
Left to Right
Clockwise
Counterclockwise
direction
Top
Bottom
100
0
100
50
0
0
50
100
50
50
0
100
Target Value
When the value of the specified memory falls to the range [target value [allowable] gap]) specified
to the [Allowable gap], the fill area of the Level Meter will be displayed in the specified color.
100
100
100
100
60
60
60
60
50
50
50
50
40
40
40
40
0
0
0
0
D100=30
D100=40
D100=60
D100=70
Meter Width
When the Level Meter is of a Circle shape, the width of the fan can be set with the unit of pixel point.
Start Angle
When the Level Meter is of a Circle shape, the Start Angle of the fan can be set.
End Angle
When the Level Meter is of a sector shape, the End Angle of the sector ring can be set. If the
start angle is different from the end angle, shape of the meter will be fan-shaped.
NB-series Programmable Terminals NB-Designer Operation Manual(V106)
3-135
3 Functions of NB-Designer
Detailed descriptions of the Level Meter Properties
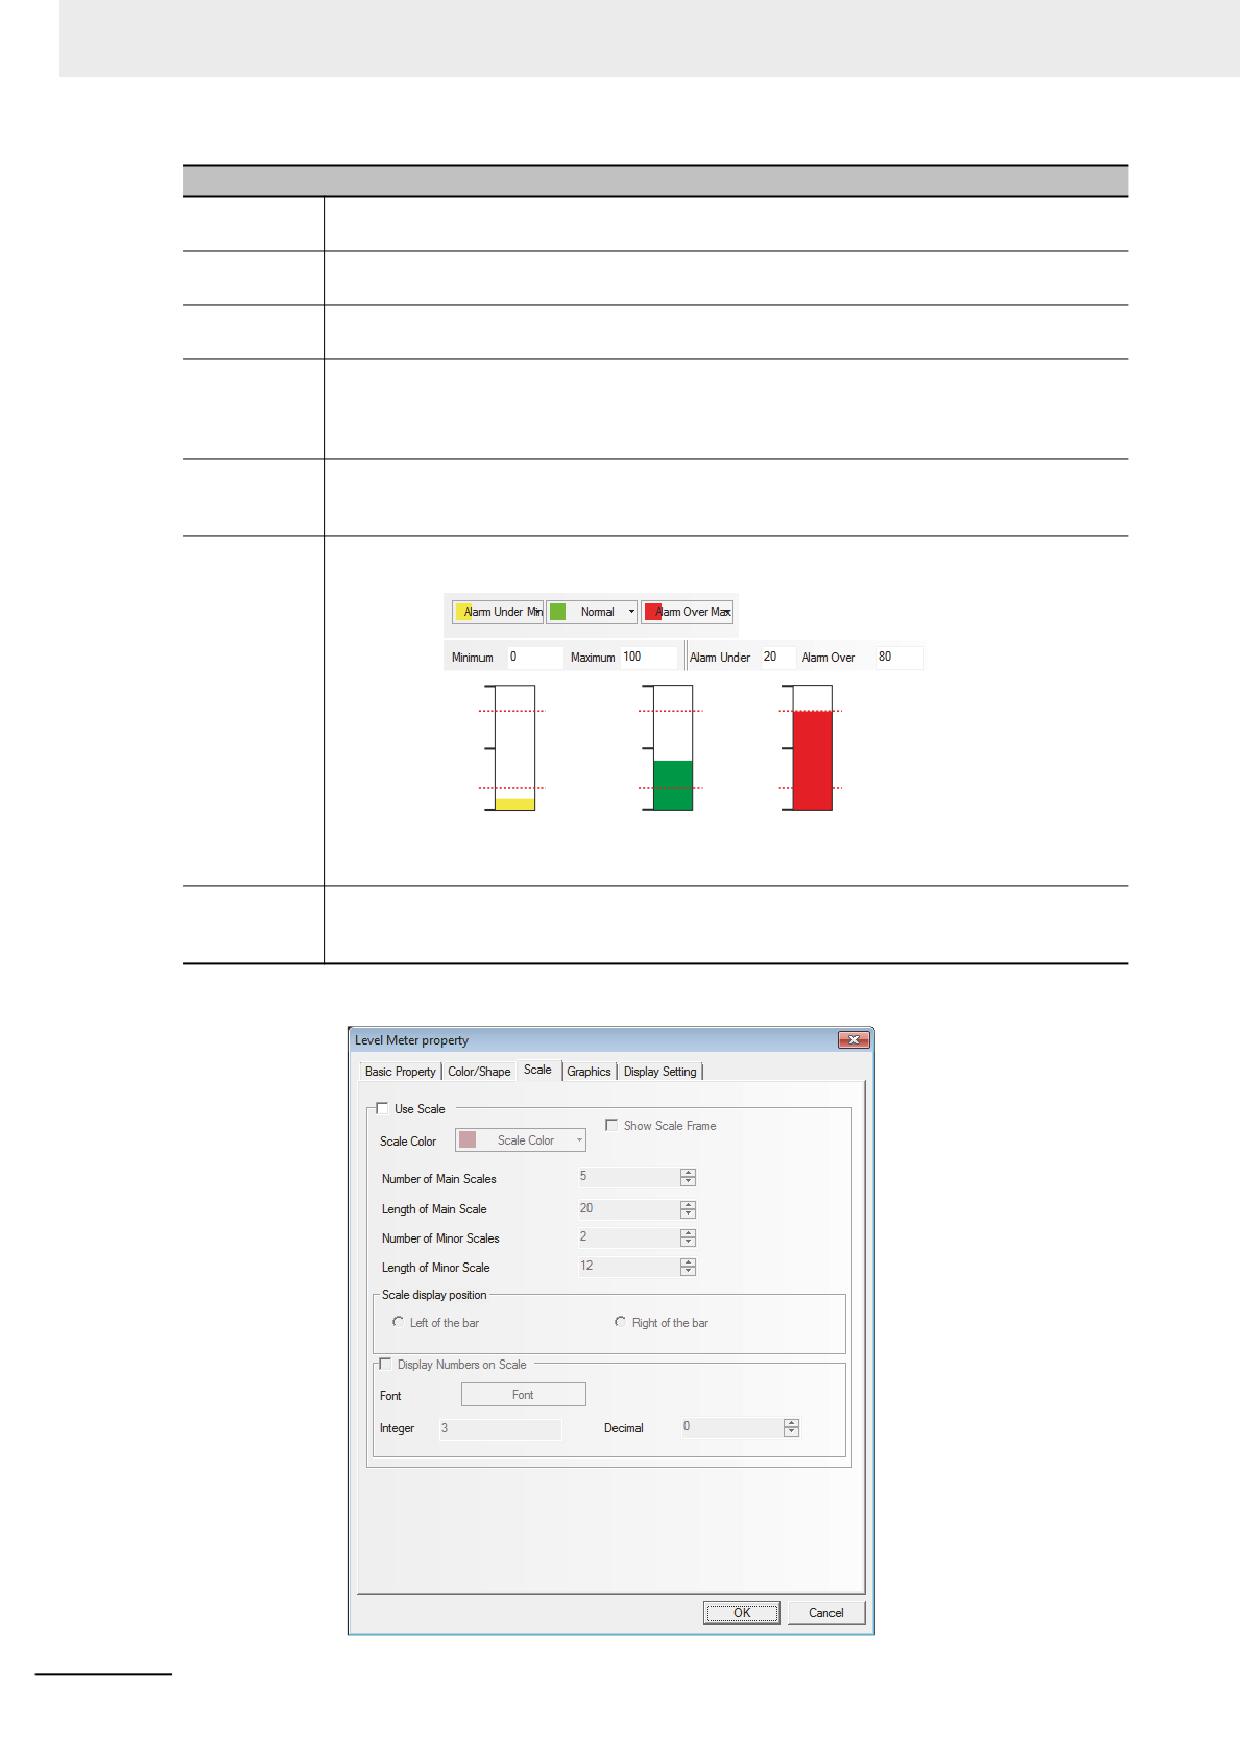
Color
This option is used to set the colors for the normal state, warning the upper or lower limit value,
border and backg1round of the Level Meter.
Flash Over
When the value of the specified memory exceeds the set Alarm Upper, the filled area of the
Max
Level Meter flashes.
Flash Under
When the value of the specified memory falls below the set Alarm Lower, the filled area of the
Min
Level Meter flashes.
Minimum/
Sets the upper and lower limit values of the display area for the Level Meter. The percentage of
Maximum
filled area in the Level Meter can be derived from the following formula: Percentage of filled
area in the Level Meter = (Value read by the memory - [Minimum value])/([Maximum value] -
[Minimum value]) ×100%
Indirect
Sets the upper, lower limit values and offset value of the Level Meter display area to be read
Max/Min
from the specified memories.
Reference
Alarm Upper/
Sets the range of the alarm area. When the value of the specified memory falls below the Alarm
Alarm Lower
Lower or exceeds the Alarm Upper, the filled area will be displayed in the specified color.
100
100
100
80
80
80
50
50
50
20
20
20
0
0
0
D100=10
D100=40
D100=80
Indirect Alarm
Sets the upper and lower limit values of the alarm area in the Level Meter display area to be
Over/Alarm
read from the specified memories.
Upper Reference
3
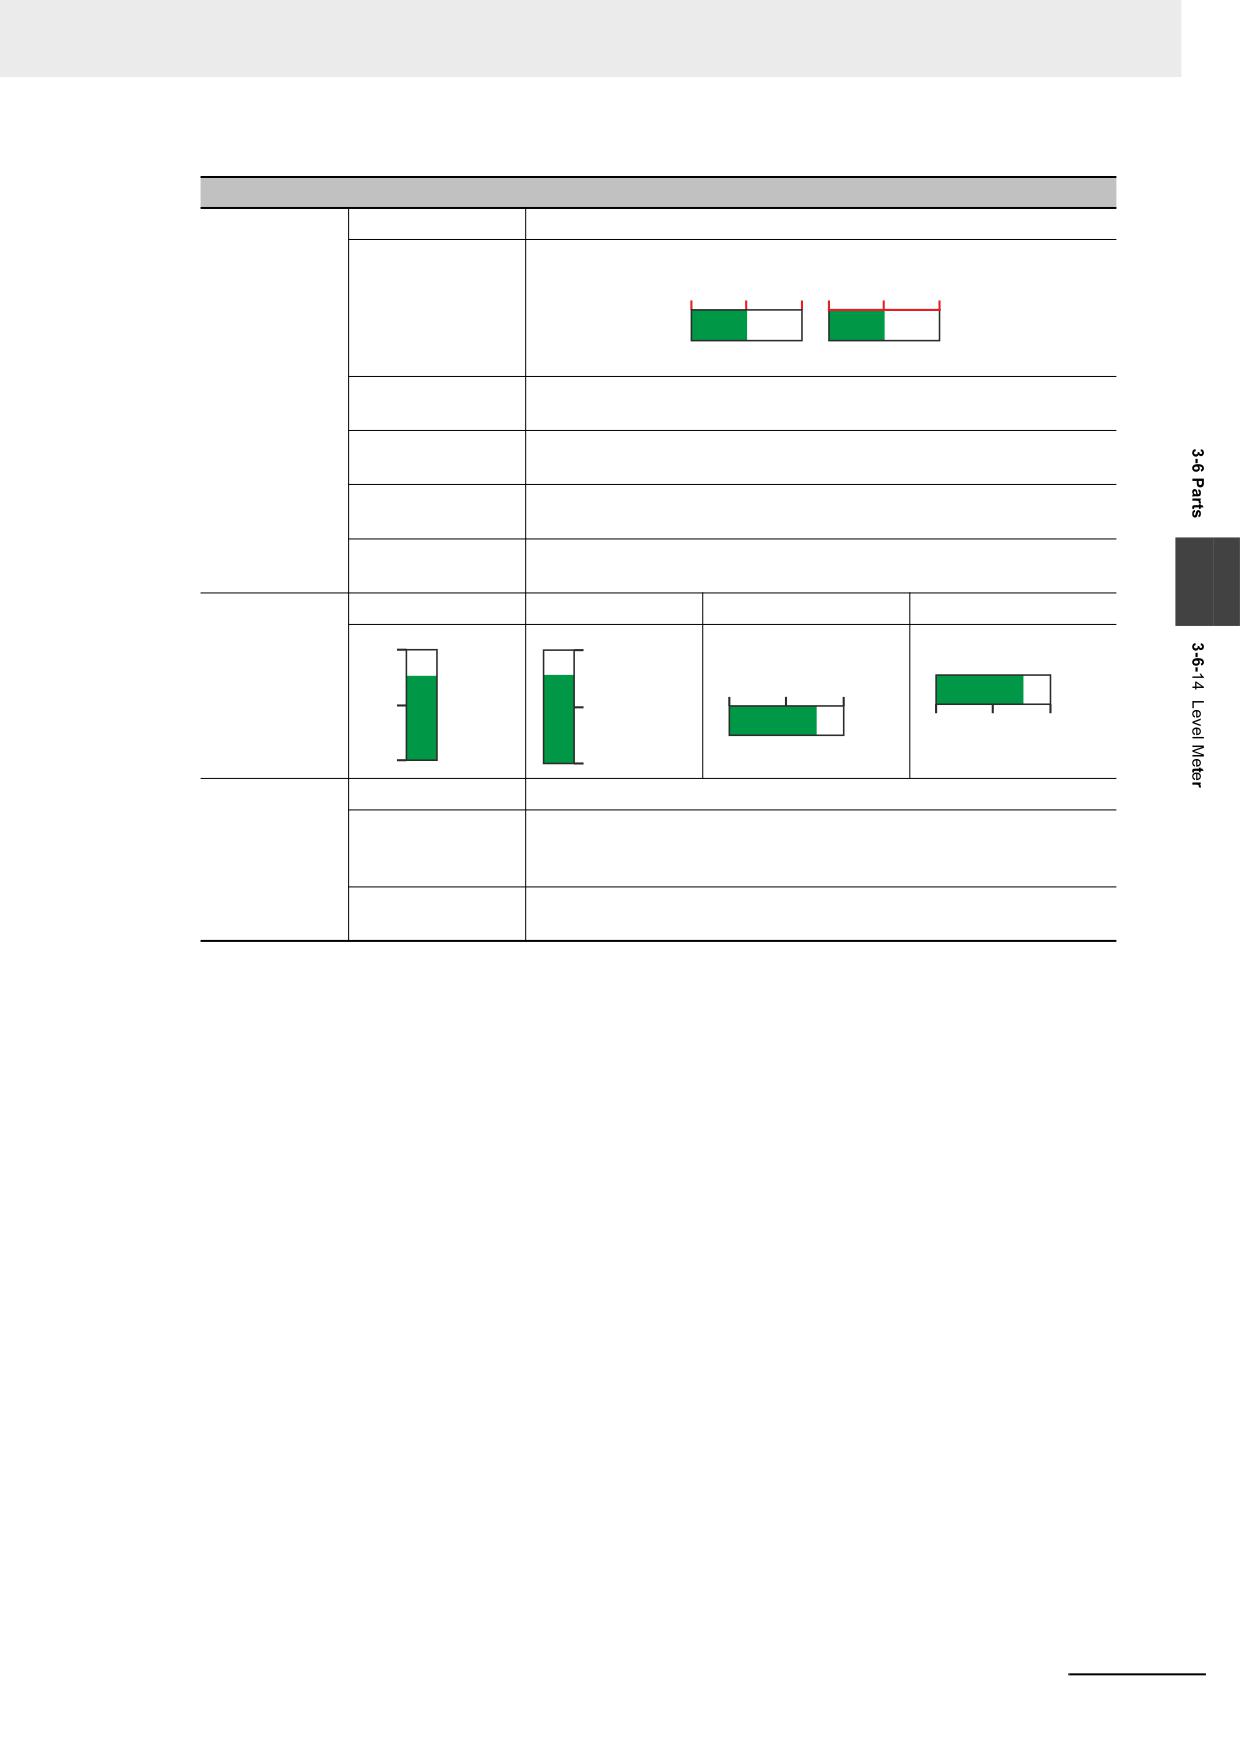
Switch to the [Scale] tab and make settings as shown below.
3-136
NB-series Programmable Terminals NB-Designer Operation Manual(V106)
3 Functions of NB-Designer
Scale Properties
Use Scale
Scale Color
Sets the scale color of the Level Meter.
Show Scale Frame
Determines whether to show the scale frame.
0
50
100 0
50
100
Disable
Enable
Number of Main
Sets the main scale number to be displayed.
Scales
Length of Main
Sets the length of the main scale with the unit of pixel point.
Scale
Number of Minor
Sets the minor scale number to be displayed.
Scales
Length of Minor
Sets the length of the minor scale with the unit of pixel point.
Scale
3
Scale display
Left of the bar
Right of the bar
Top of the bar
Bottom of the bar
position
100
100
0
50
100
50
50
0
50
100
0
0
Display
Font
Sets scale font Properties.
Number on
Integer
Refers to the integer places displayed by the scale, which can’t be
Scale
changed by the user himself and is decided by the number of digits
specified by the decimal.
Decimal
Refers to the decimal places displayed by the scale, which can be
changed by the user himself.
Note When the Level Meter is of a Circle shape, scale display is not supported.
NB-series Programmable Terminals NB-Designer Operation Manual(V106)
3-137
3 Functions of NB-Designer
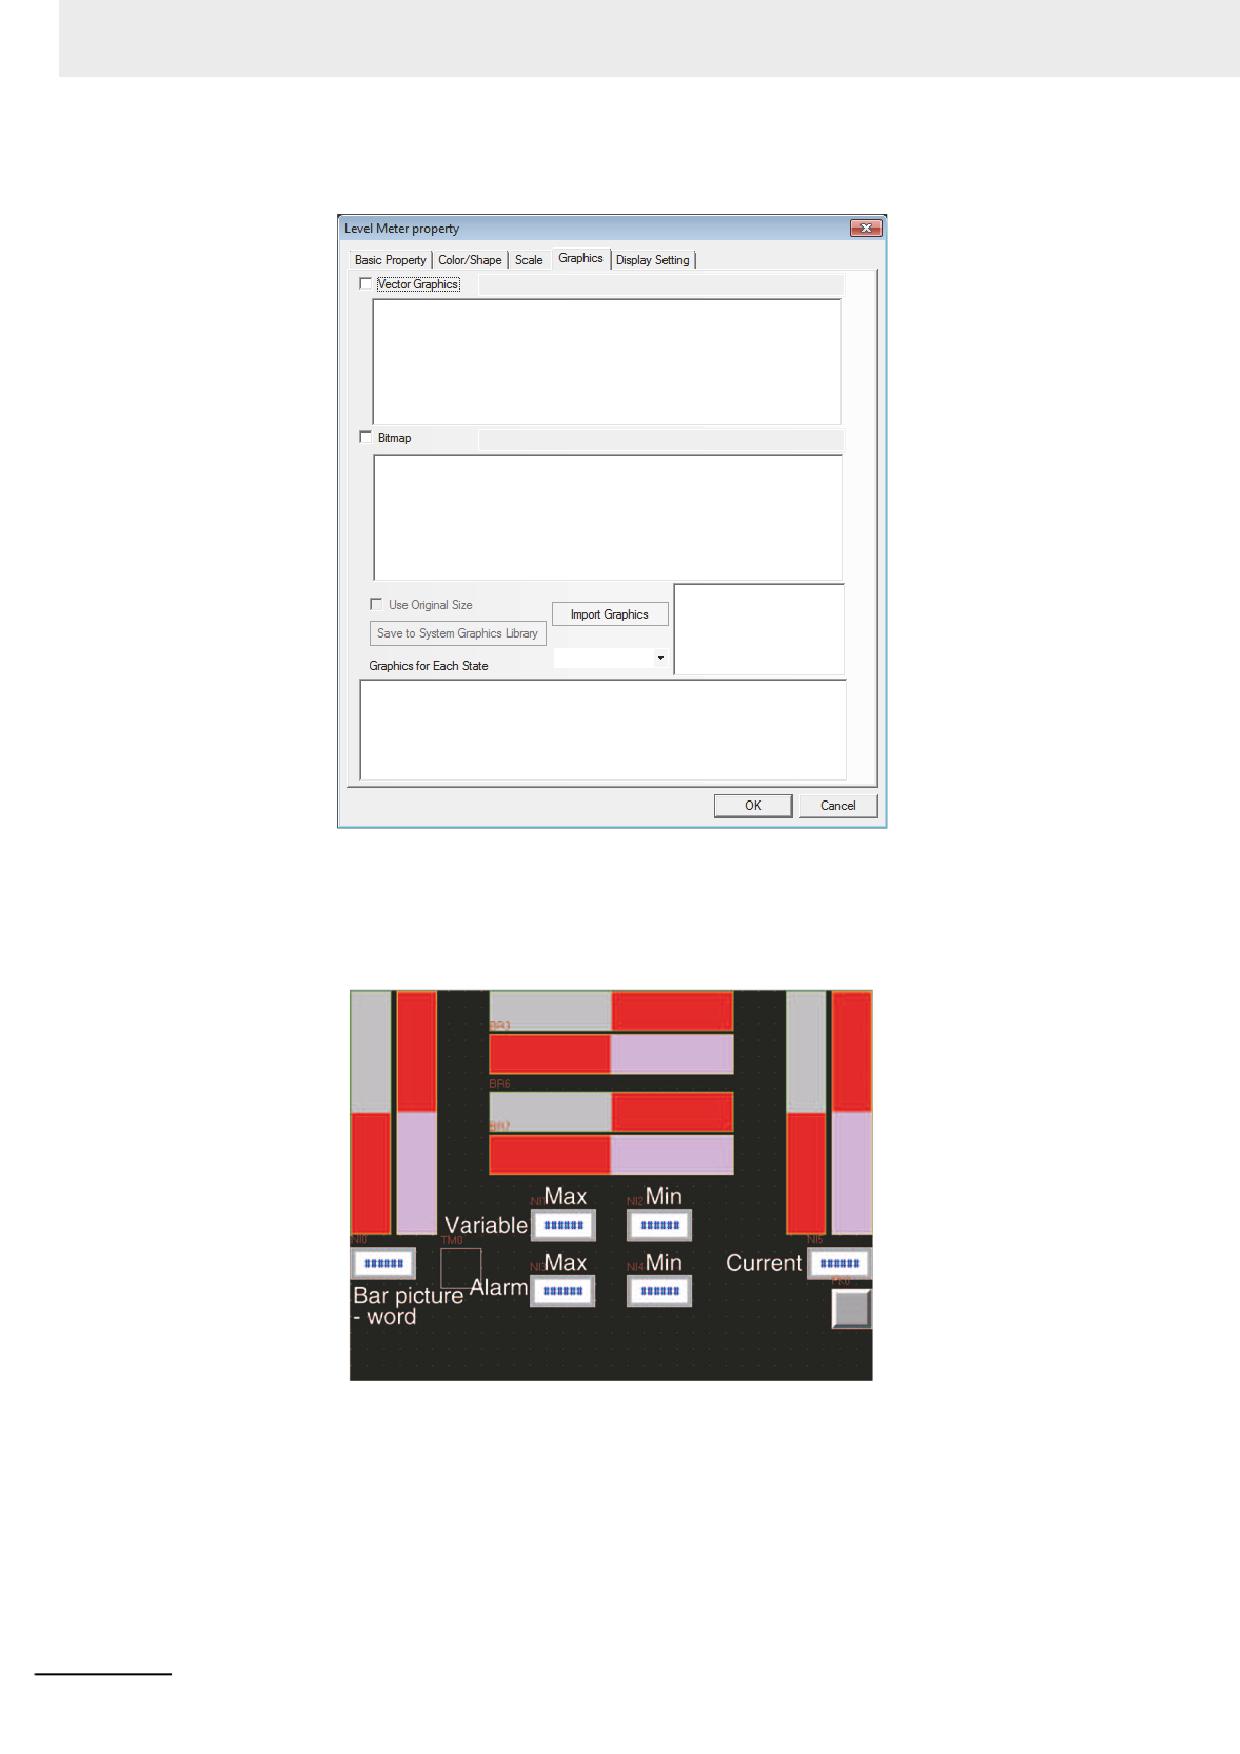
4
Switch to the [Graphics] tab and make settings as shown below.
Select proper graphics for the Bar Picture to improve the display effect.
5
Press the [OK] button to complete the setup of the Level Meter component.
• Level Meter - Word
3-138
NB-series Programmable Terminals NB-Designer Operation Manual(V106)
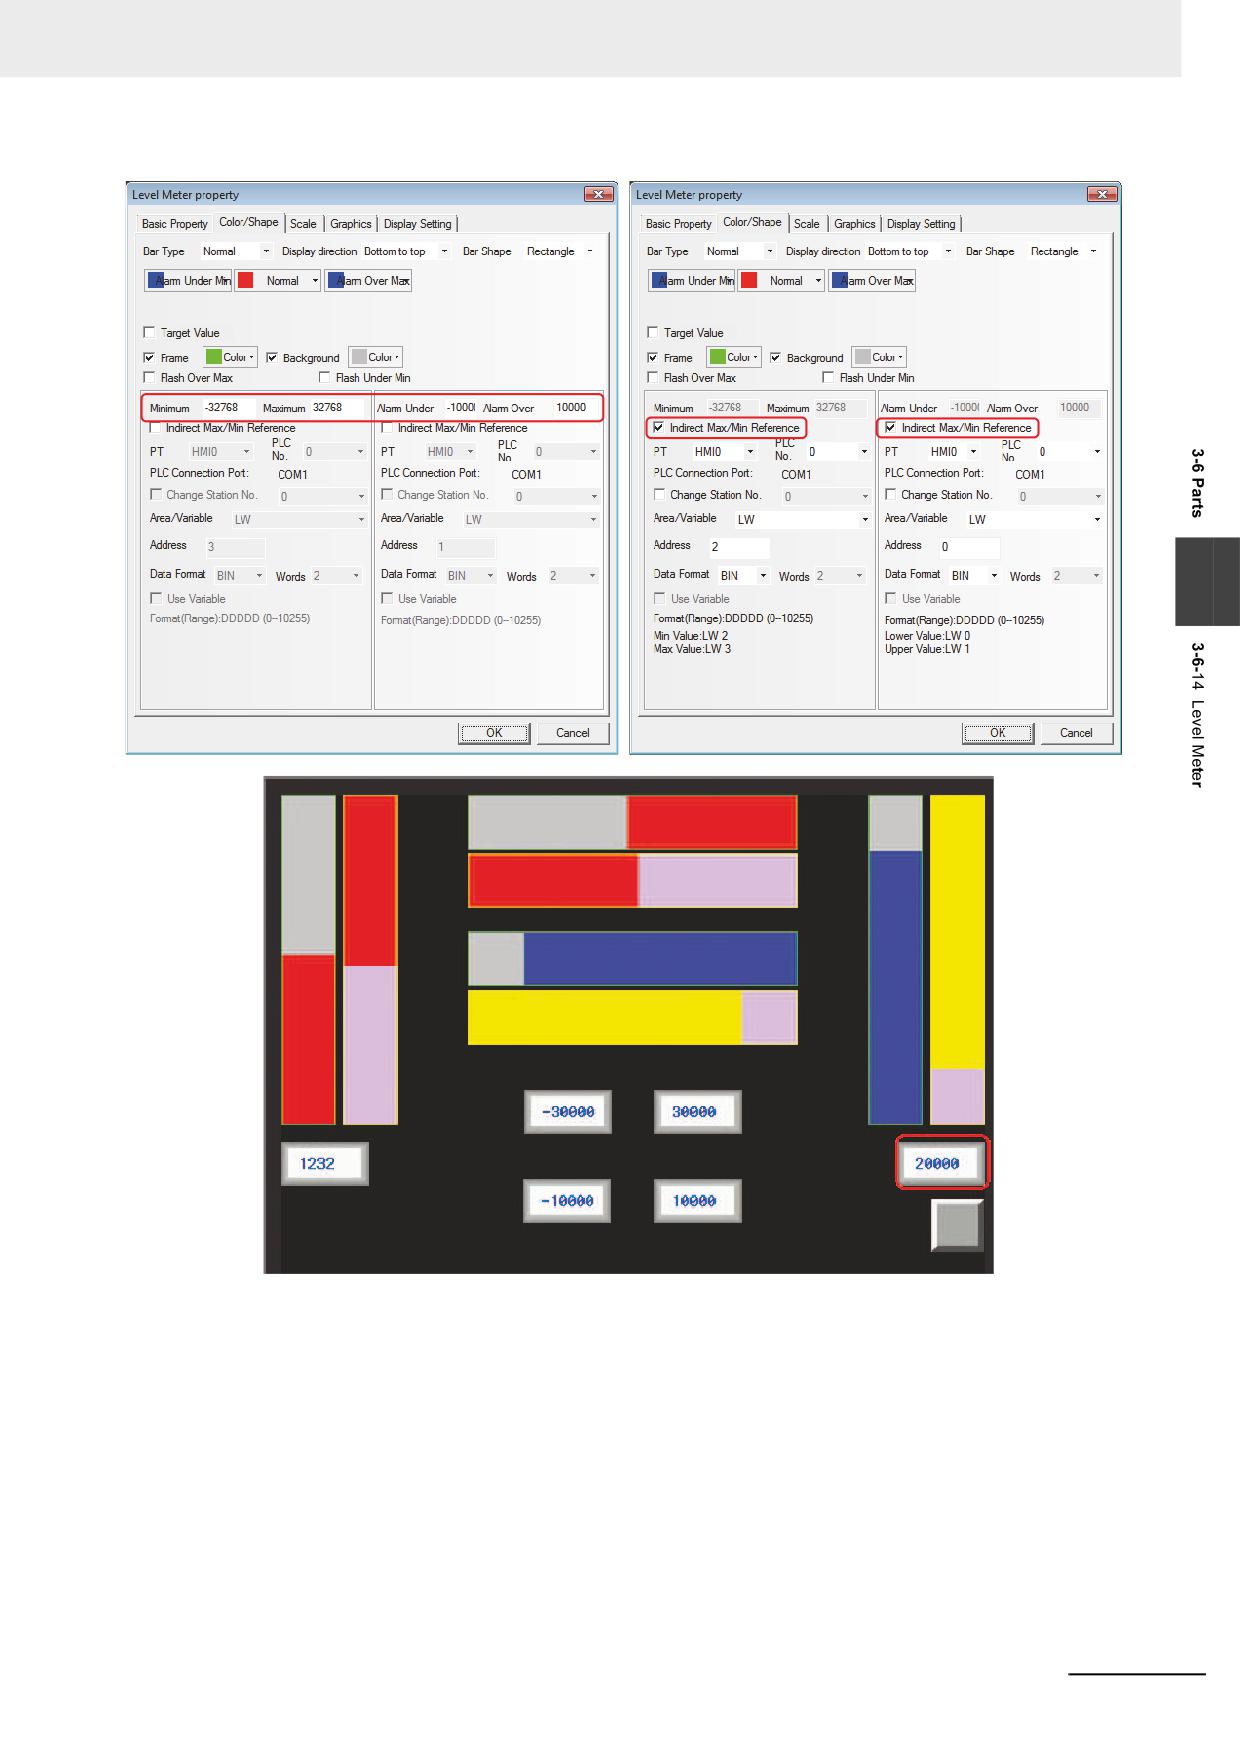
3 Functions of NB-Designer
3
Max
Min
Variable
Max
Min
Current
Alarm
Bar picture
- word
NB-series Programmable Terminals NB-Designer Operation Manual(V106)
3-139
3 Functions of NB-Designer
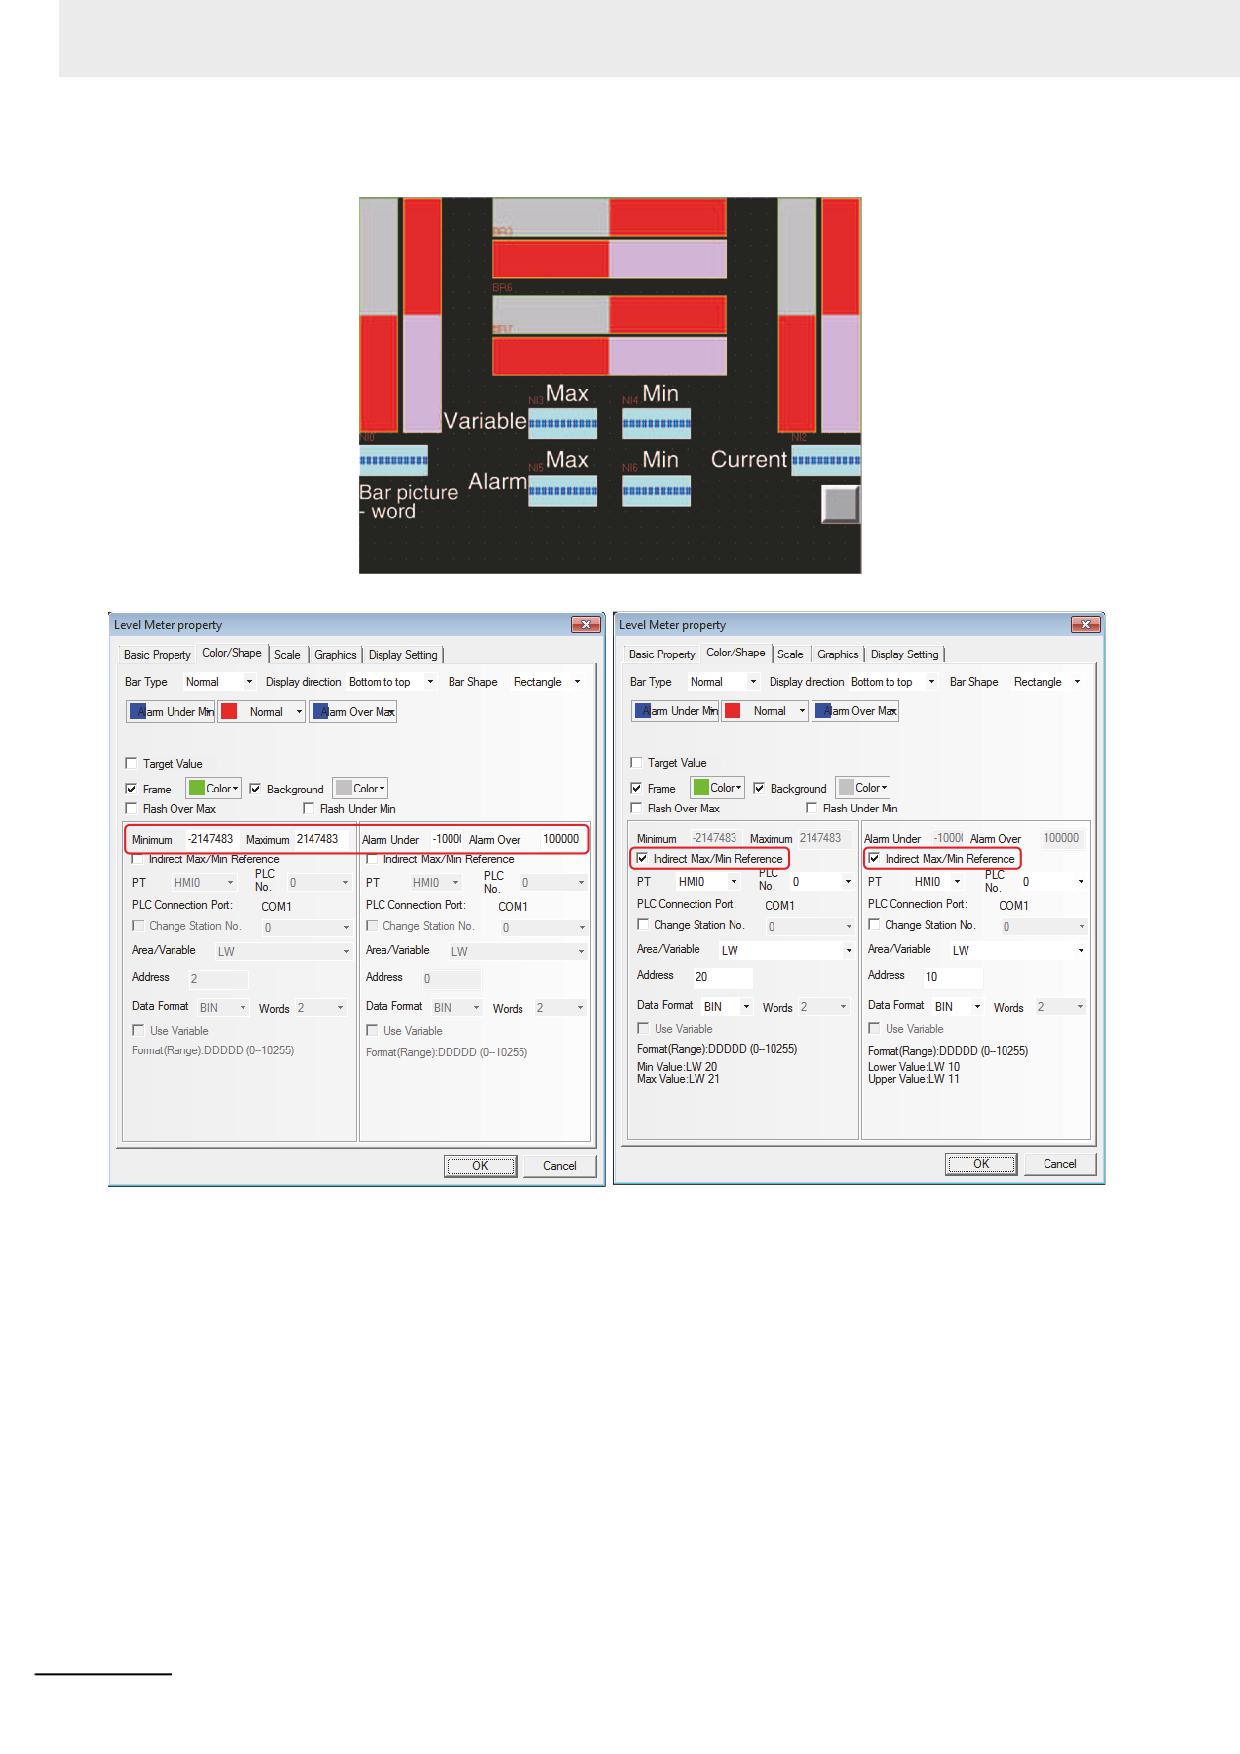
• Level Meter - Double-word
3-140
NB-series Programmable Terminals NB-Designer Operation Manual(V106)
3 Functions of NB-Designer
3
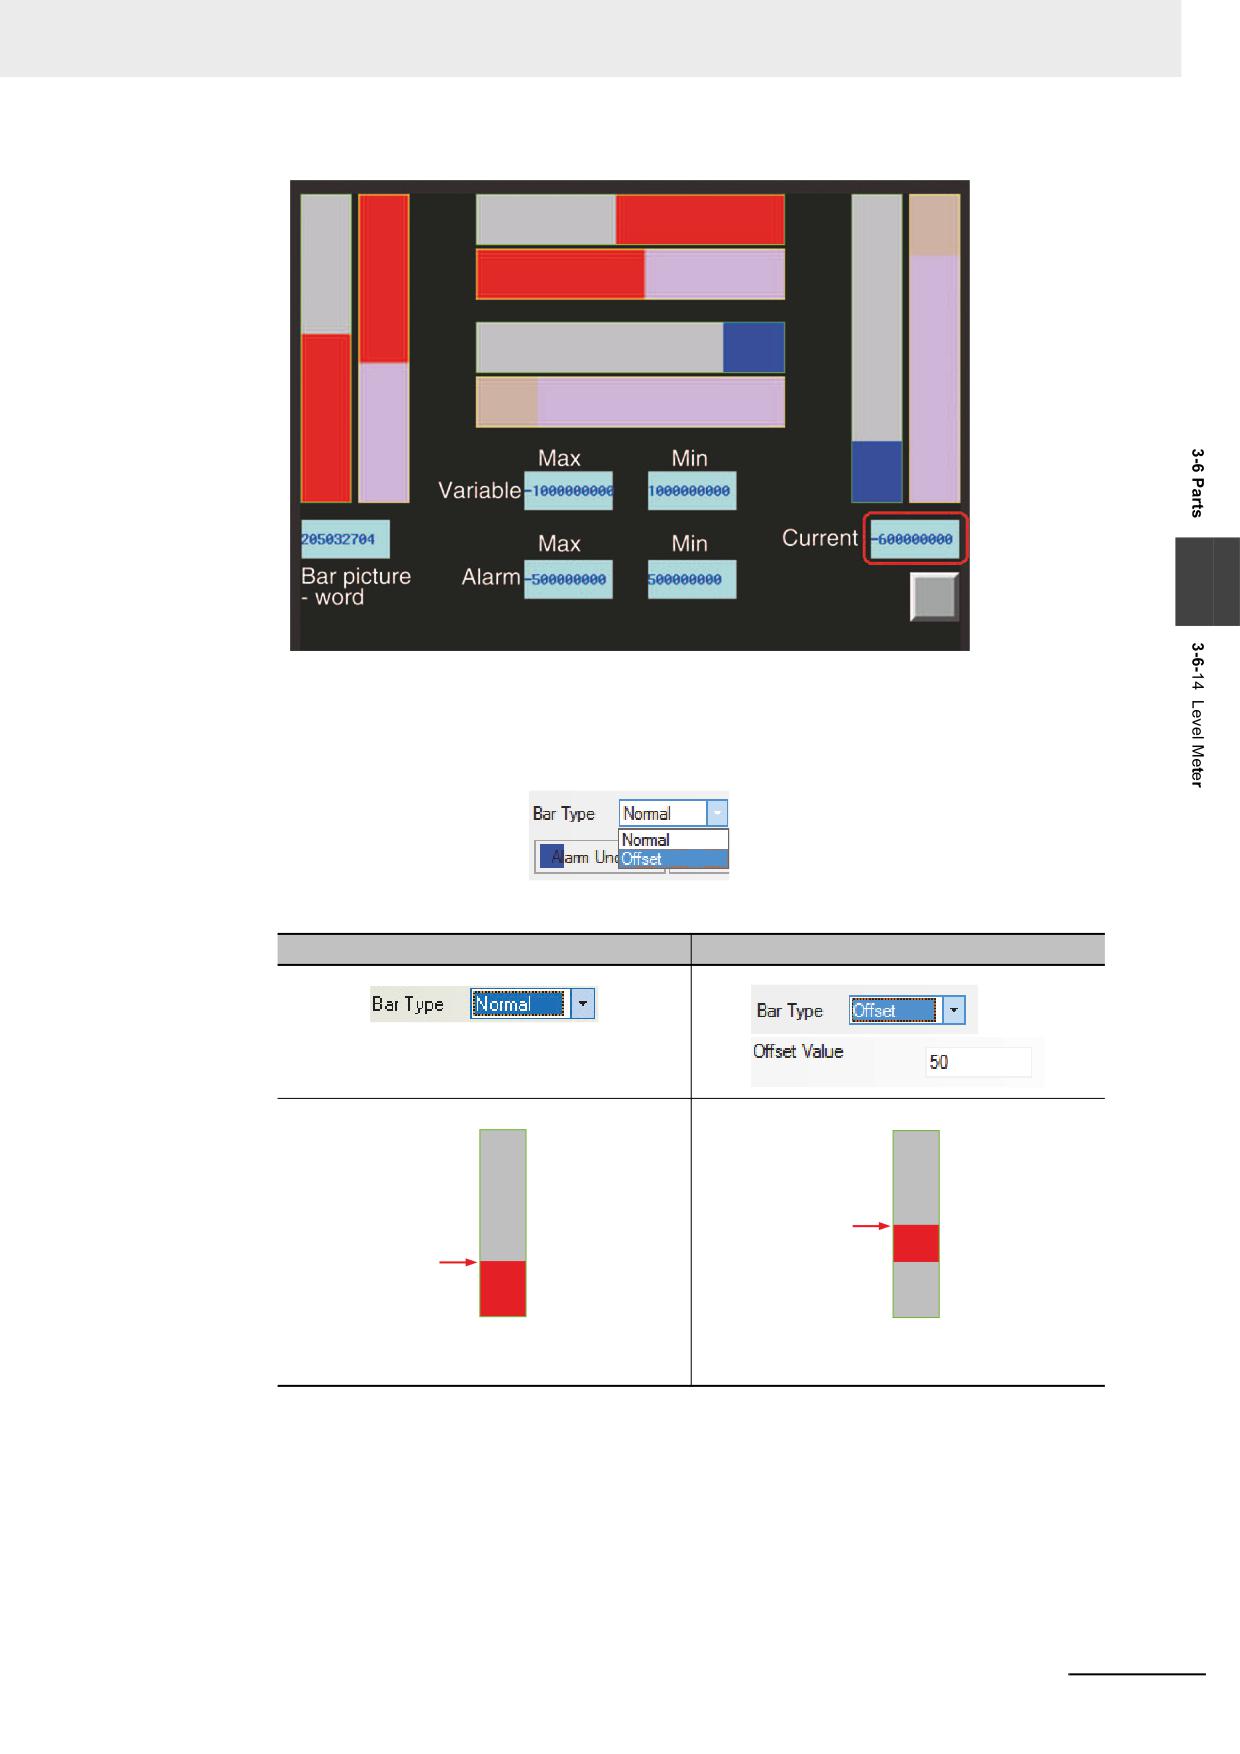
•
Normal and Offset
When the [Offset] is selected, only the greater part of the values set by the offset value. For
example, setting “50” to [Offset value] and storing “60” in the communications address, only the
area corresponding to 50 to 60 of level meter will be filled.
Comparison of display effects between Normal and Offset:
Normal
Offset
Indicating the range from the current value to
Indicating the range from the current value to
lower limit value.
the [Offset].
NB-series Programmable Terminals NB-Designer Operation Manual(V106)
3-141
3 Functions of NB-Designer
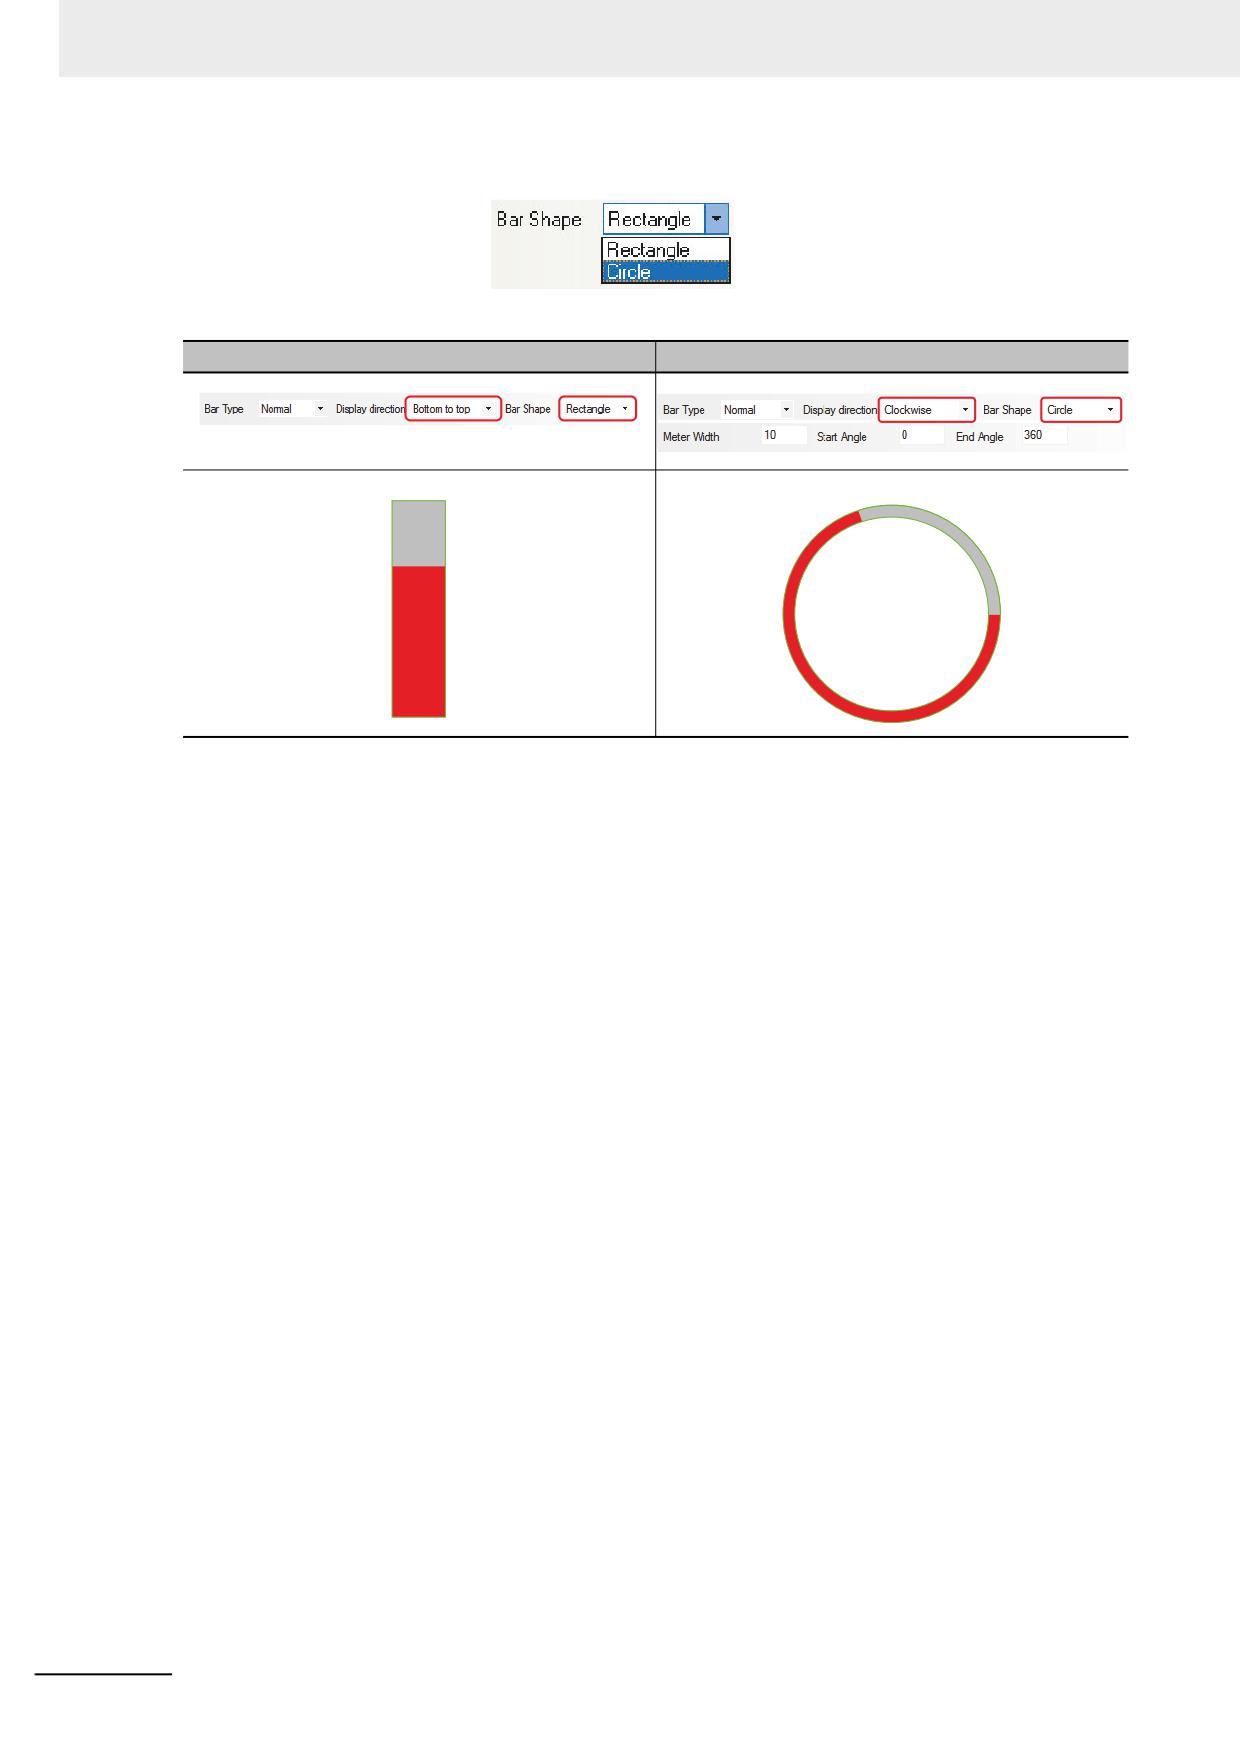
• Rectangle and Circle
Comparison of display effects between the Rectangle and Circle.
Rectangle
Circle
3-142
NB-series Programmable Terminals NB-Designer Operation Manual(V106)
3 Functions of NB-Designer
3-6-15
Analog Meter
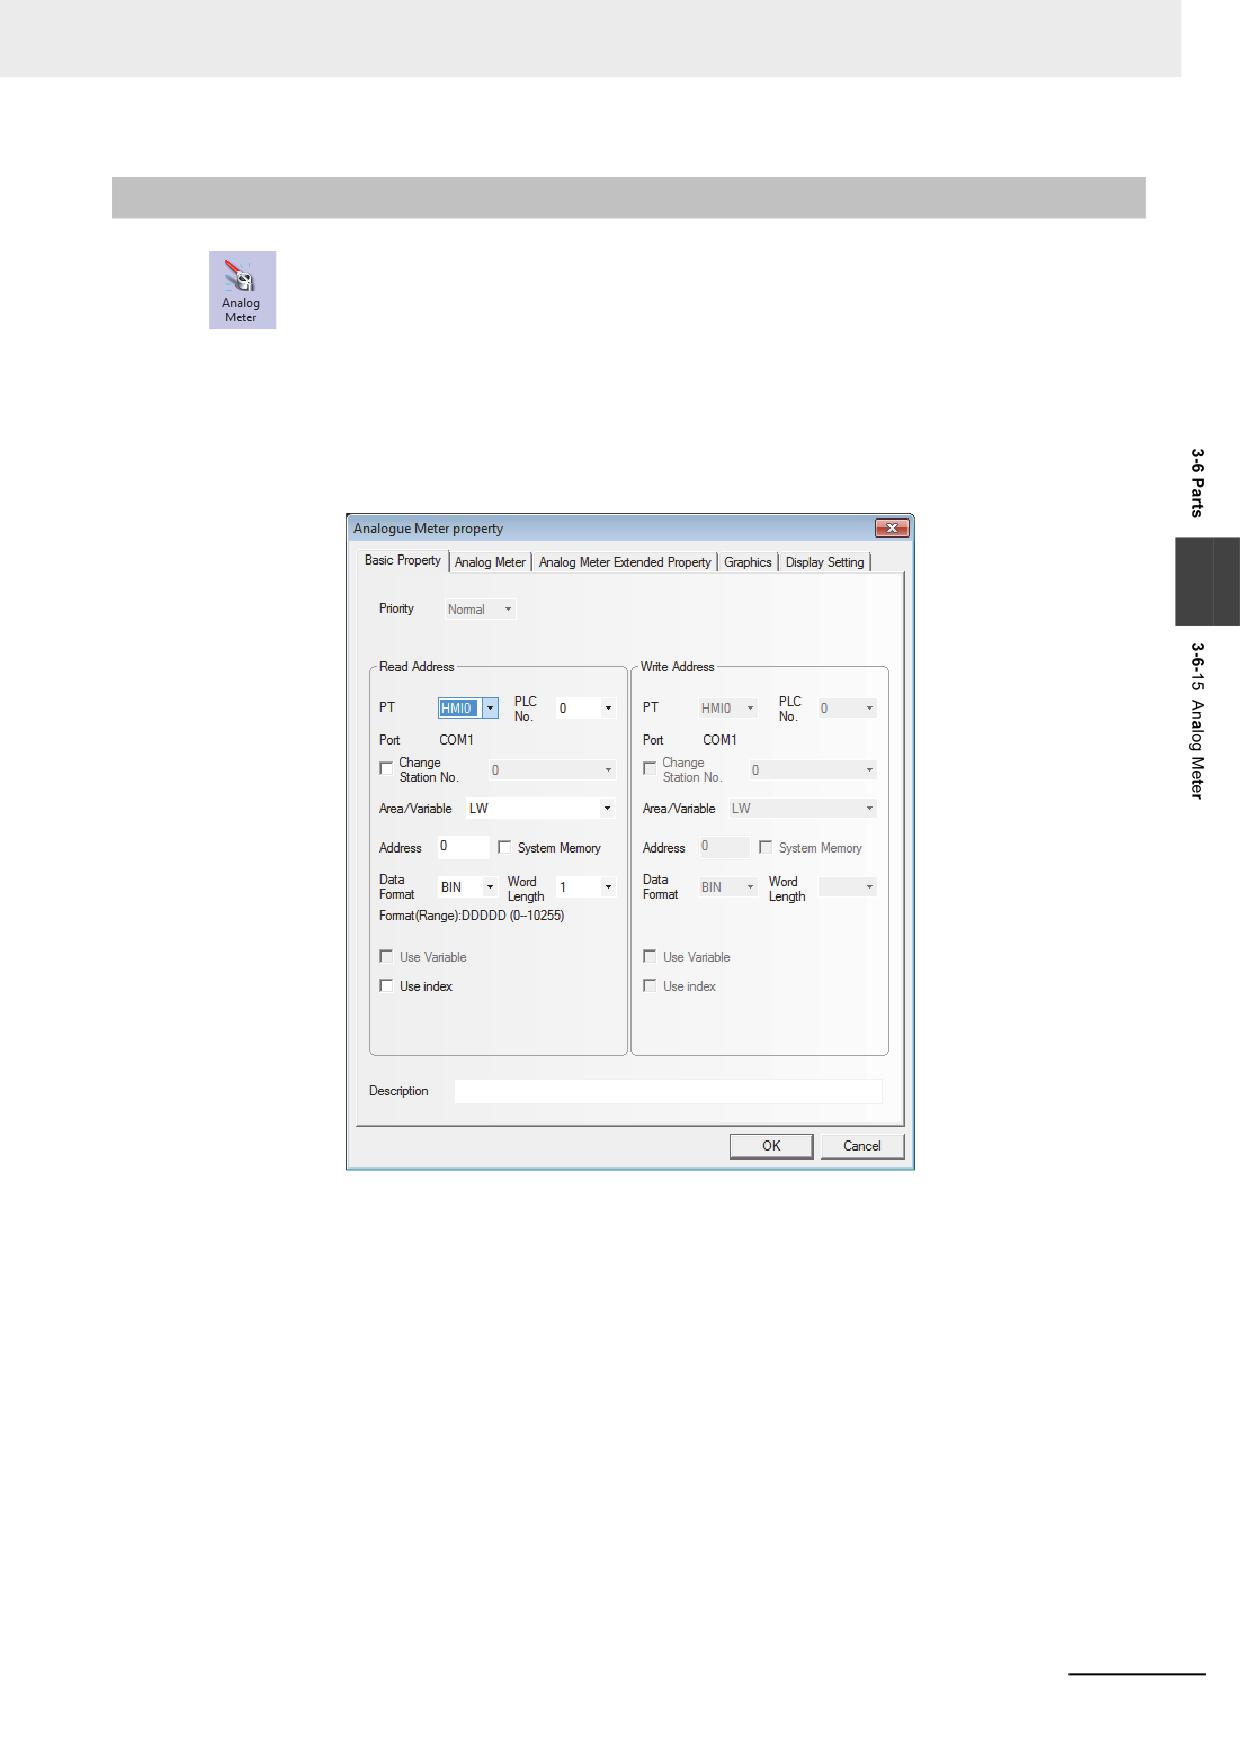
Analog Meter can display the data in the specified memory by means of a Analog Meter
diagram.
Process of adding one Analog Meter component
1
Press the Analog Meter component icon, drag it to the screen, then the [Basic Properties]
dialog box of the Analog Meter component will pop up.
3
Read Address: Refers to the word address of the value displayed by the component.
Address: Refers to the first address of the word address corresponding to the Analog Meter
component.
Word Length: 1 and 2 are available for the read address.
NB-series Programmable Terminals NB-Designer Operation Manual(V106)
3-143
3 Functions of NB-Designer
2
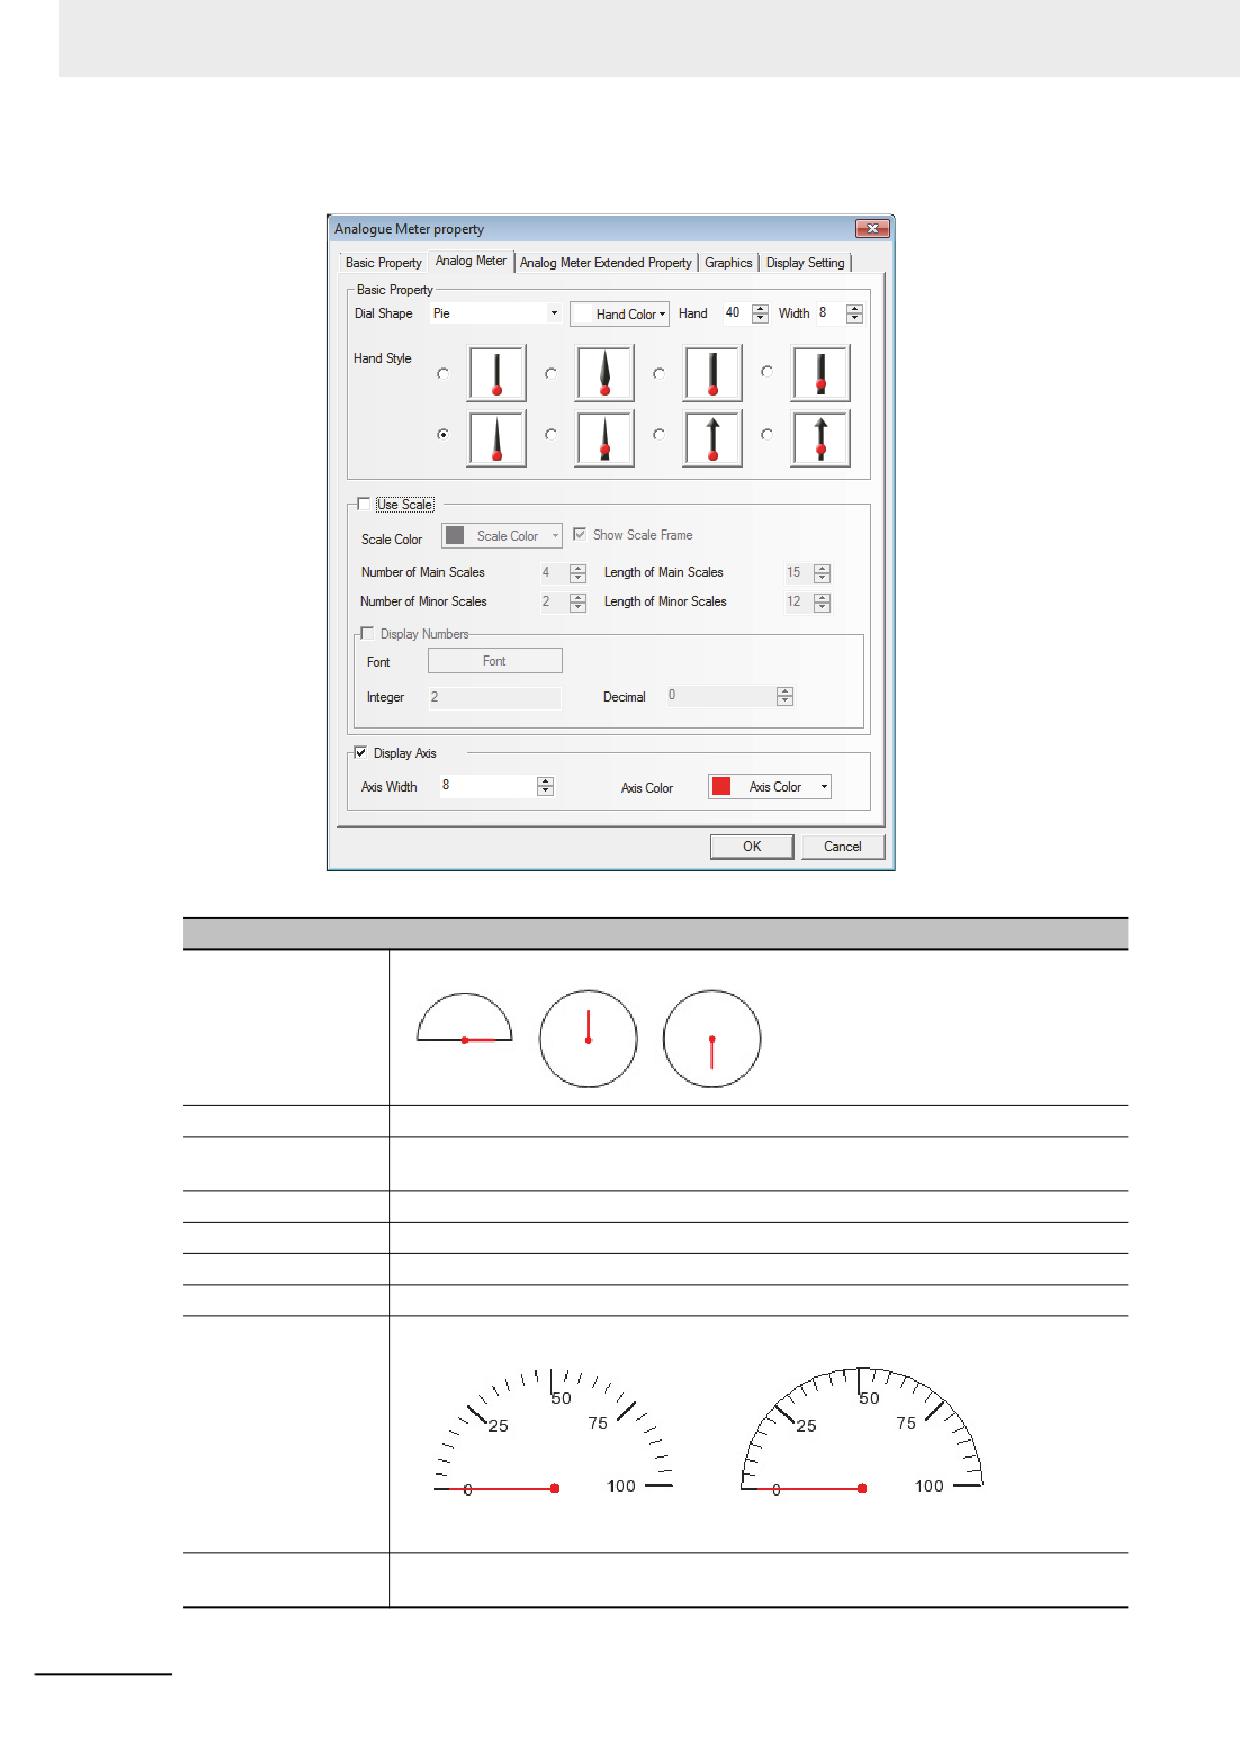
Switch to the [Analog Meter] tab.
Descriptions of Analog Meter Component Properties
Dial Shape
Includes Pie, Circularity (up pointer) and Circularity (down pointer).
Hand Color
Selects the color of the hand of the Analog Meter component.
Length
Sets the length of the hand of the Analog Meter component. The maximum length
cannot be longer than the radius of the meter.
Width
Sets the width of the hand of the Analog Meter component.
Hand Style
Sets the style of the hand of the Analog Meter component.
Use Scale
Check the check box to use the scale.
Scale Color
Selects the color of the display scale of the Analog Meter component.
Show Scale Frame
Checking it means the scale frame needs to be displayed.
No use show scale frame
Use show scale frame
Number of Main
Sets the number of the main scale of the Analog Meter component. (0 to 50 available)
Scales
3-144
NB-series Programmable Terminals NB-Designer Operation Manual(V106)
3 Functions of NB-Designer
Descriptions of Analog Meter Component Properties
Length of Main Scales
Sets the length of the main scale of the Analog Meter component. The maximum length
cannot be longer than the radius of the meter.
Number of Minor Scale
Sets the number of the minor scale of the Analog Meter component. (0 to 10 available)
Length of Minor Scale
Sets the length of the minor scale of the Analog Meter component. The maximum
length cannot be longer than the radius of the meter.
Display Numbers
Checking it means the scale notation needs to be displayed.
Font
Clicking “Font” can set the font used by the scale notation.
Integer
Refers to the number of integer places of the scale notation of the Analog Meter
component. (not settable, but adjusted automatically according to the number of places
of the maximum value of the Analog Meter component)
Decimal
Sets the number of decimal places of the scale notation of the Analog Meter
component. (0 to 8 available)
Display Axis
Checking it means the size and color of the dial axis of the Analog Meter component
need to be set.
3
Axis Width
Sets the size of the dial axis of the Analog Meter component. The maximum width
cannot be wider than the radius of the meter.
Axis Color
Sets the color of the dial axis of the Analog Meter component.
3
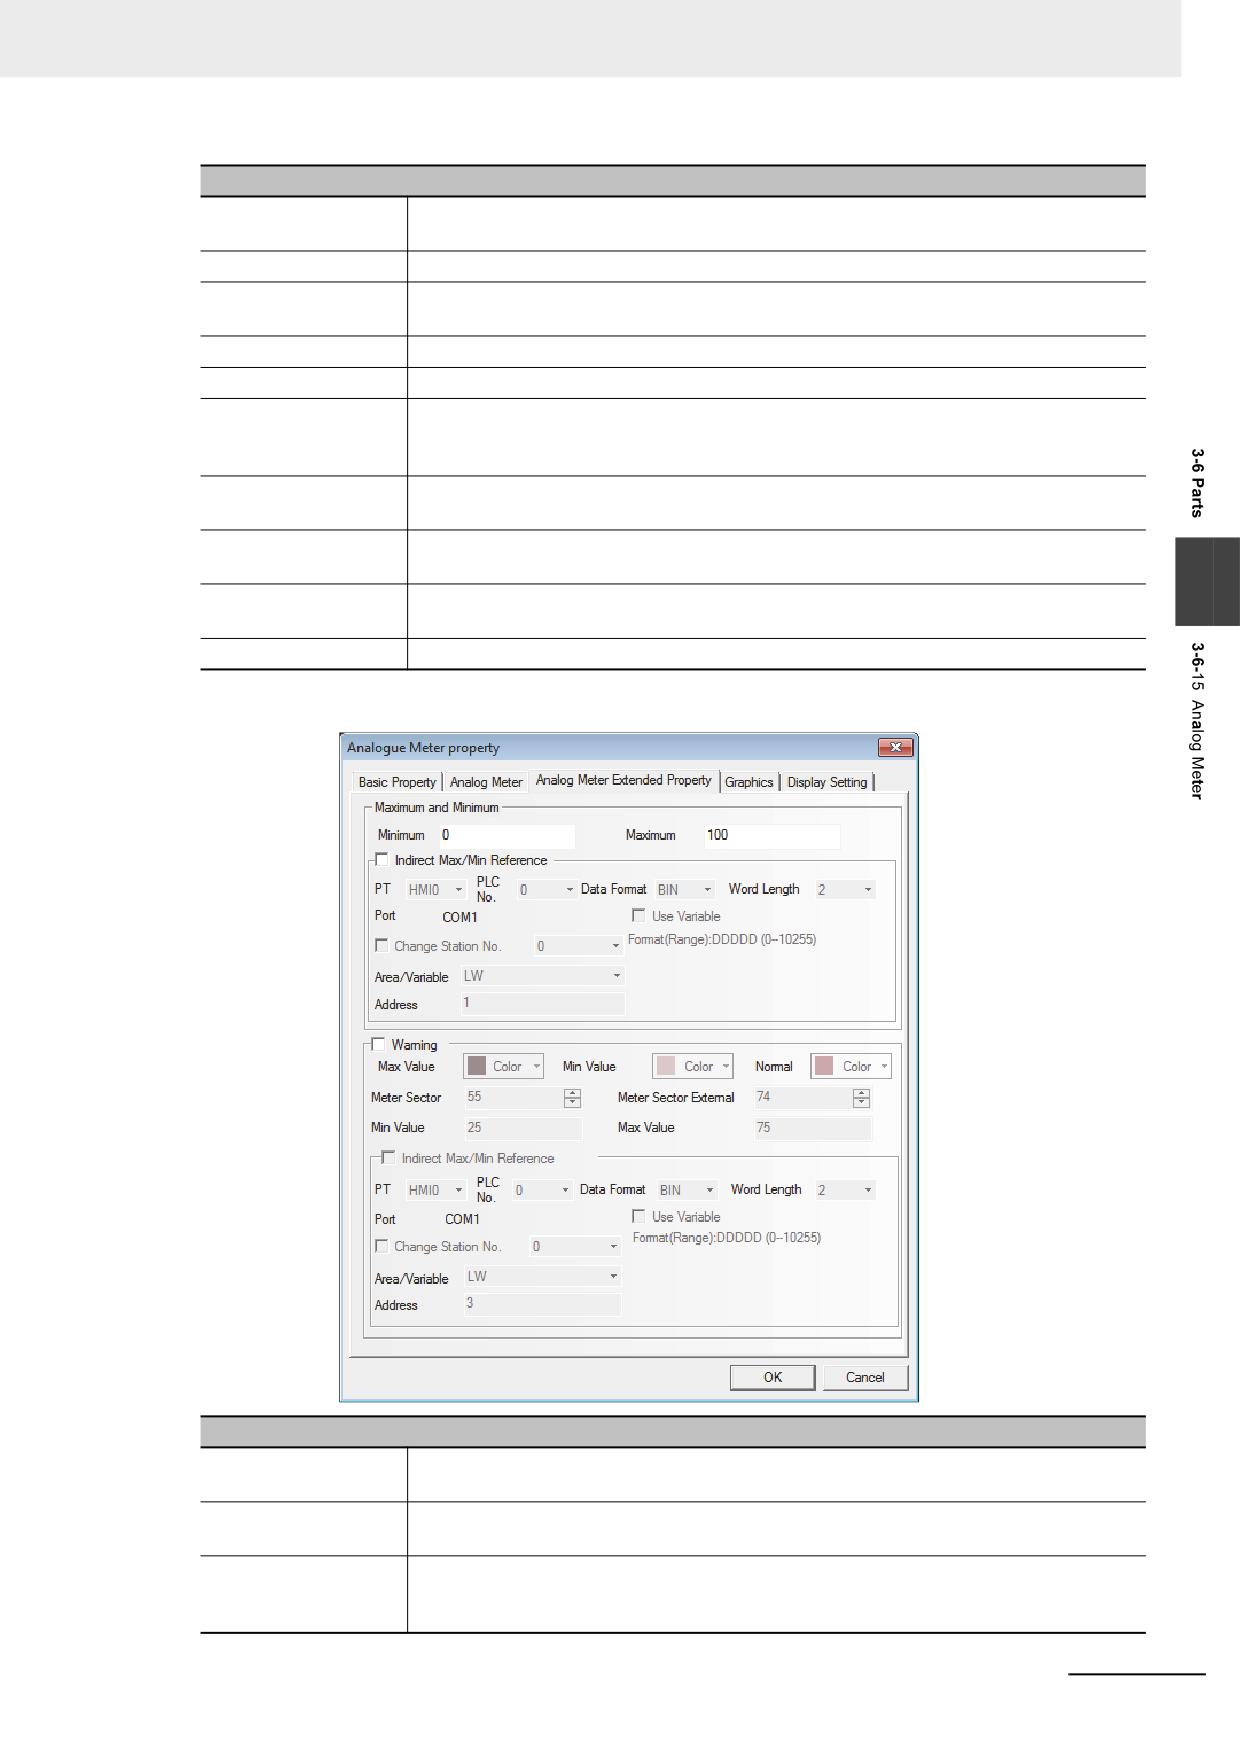
Switch to the [Analog Meter Component Extended Property] tab.
Descriptions of Analog Meter Component Extended Property
Maximum and
Sets the display range of the Analog Meter component to the constants.
Minimum
Indirect Max/Min
The upper limit value and lower limit value of displaying range for the analog meter will
Reference
be read from the value of specified address.
Warning
Checking it means the meter component displays by the color specifying the normal
range and warning range (the range exceeds the upper limit value and the range falls
the lower limit value).
NB-series Programmable Terminals NB-Designer Operation Manual(V106)
3-145
3 Functions of NB-Designer
Descriptions of Analog Meter Component Extended Property
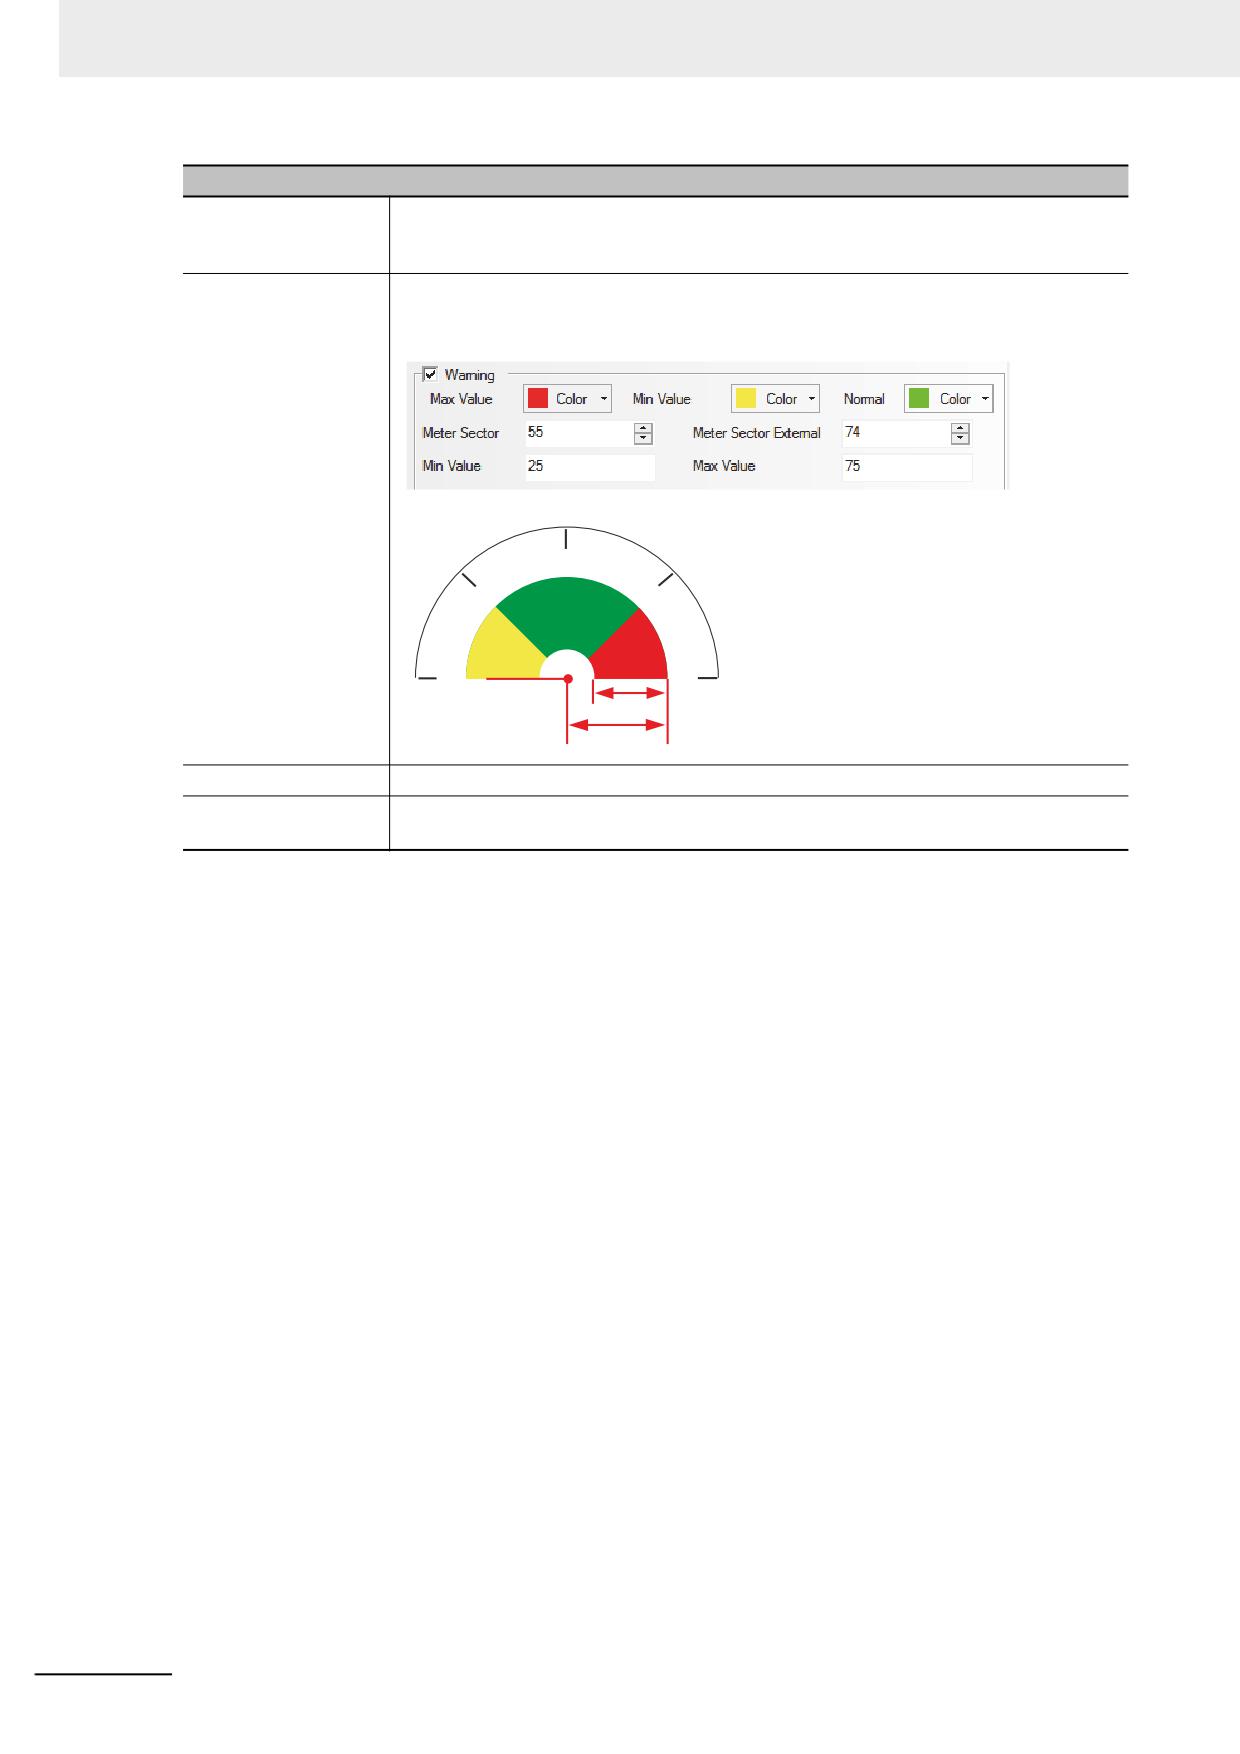
Meter Sector
Sets the thickness of the alarm range and the thickness of the fan block. The maximum
thickness can’t exceed the radius of the actual circle formed by the Analog Meter
component, but must be equivalent to or less than Meter Sector External
Meter Sector External
Sets the radius of the fan block. The maximum radius can’t exceed the radius of the
actual circle formed by the Analog Meter component, but must be equivalent to or
greater than the Meter Sector.
50
25
75
1) Meter Sector
2) Meter Sector External
0
100
1)
2)
Max Value/Min Value
Sets the normal range of the Analog Meter component to constants.
Indirect Max/Min
Sets the normal range of the Analog Meter component to variables, and specifies the
Reference
memory address for reading data.
4
Switch to the [Graphics] tab and select the Vector Graphics or bitmap representing the
touching area and touching state.
5
Press the [OK] button to complete the setup of the Analog Meter component.
3-146
NB-series Programmable Terminals NB-Designer Operation Manual(V106)
3 Functions of NB-Designer
3-6-16
Indirect Screen
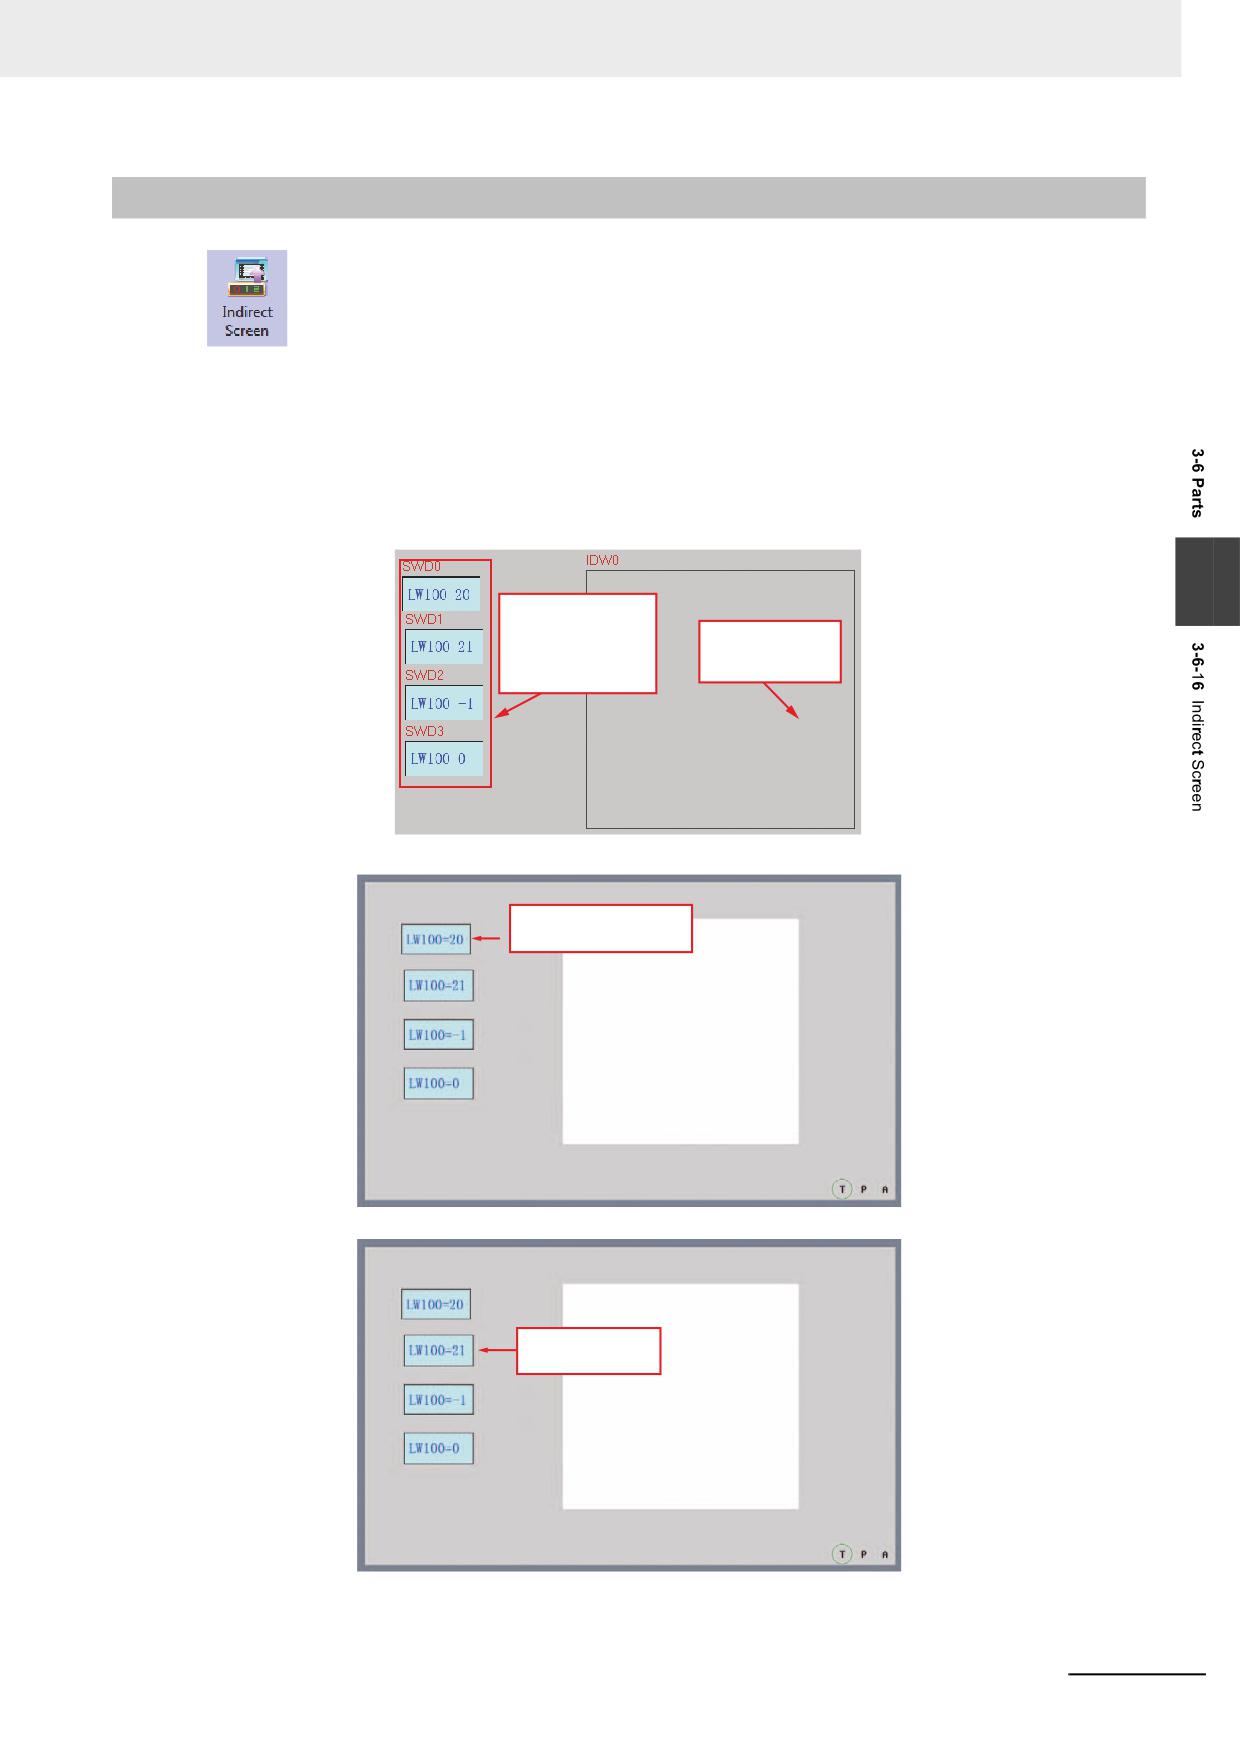
Indirect Screen can make an already created screen pop up on the current screen. Please
refer to [3-4-3 Screen Creation]. Generally, the screen called by the Indirect Screen is smaller than the
full screen (but it can also be of the same size as the full screen). In Indirect Screen specifications, pop-
up displays the screen of the screen No. supporting the stored value of the word address specified to
the [Read Address]. The number arranging indirect screens is not restricted in NB-Designer, but the
pop-up screens can be displayed simultaneously up to 16 screens at max.
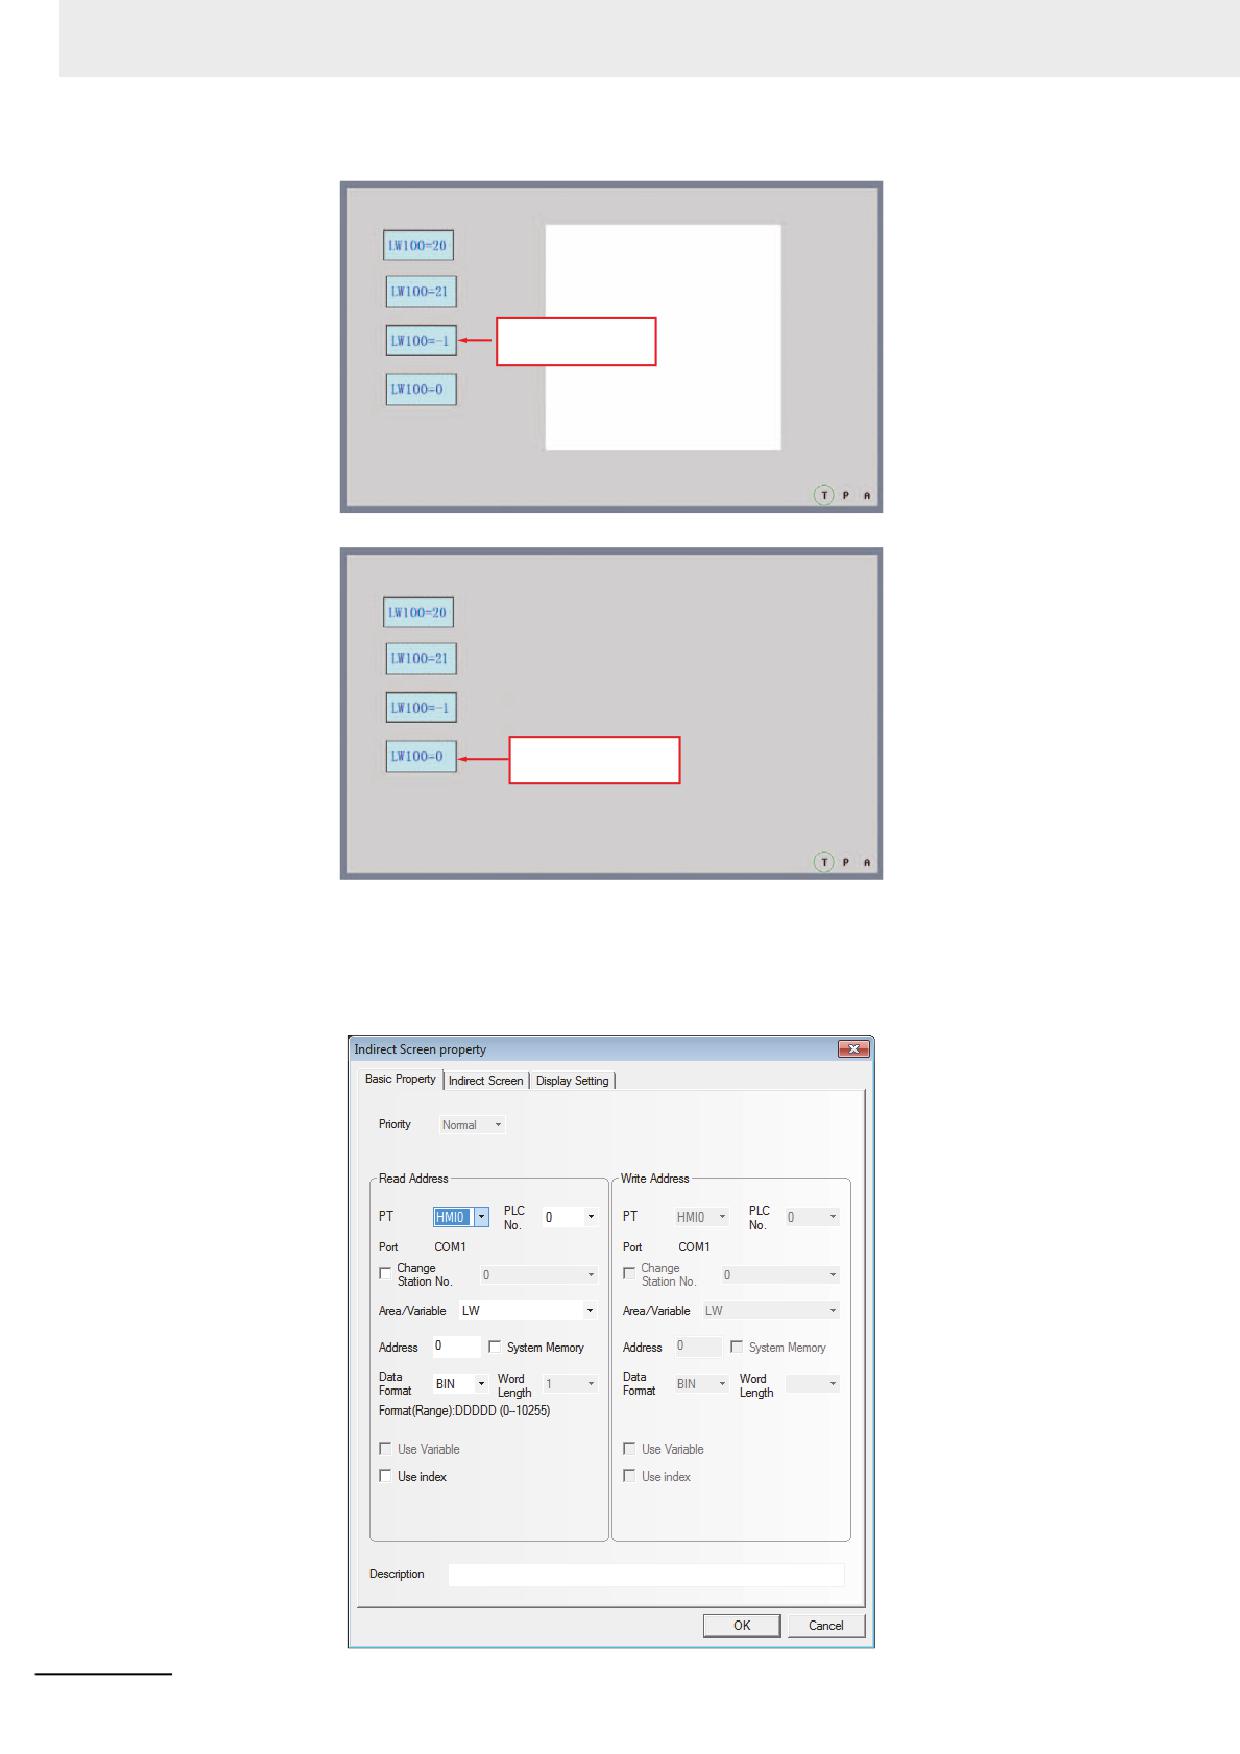
Value 0 is used to close the screen, and value -1 means to make screen 0 pop up, while the values
other than 0 or -1 mean to make the corresponding screens pop up.
3
Command Button,
write address is
Indirect screen,
LW100, setting
read address is
mode is
LW100.
"Set Constant"
Press this button,
pop-up screen 20
screen 20
screen 21
Press this button,
pop-up screen 21
NB-series Programmable Terminals NB-Designer Operation Manual(V106)
3-147
3 Functions of NB-Designer
screen 0
Press this button,
pop-up screen 0
Press this button,
close indirect screen
Process of adding one Indirect Screen component
1
Press the Indirect Screen component icon, drag it to the screen, then the [Basic Properties]
dialog box of the Indirect Screen component will pop up.
3-148
NB-series Programmable Terminals NB-Designer Operation Manual(V106)
3 Functions of NB-Designer
Read Address: It defines a display area and is able to display screen contents. The screen of
the No. supporting the stored address specified to the read address will be
displayed as pop-up screen. For example, if the value turns to 20, screen 20
will pop up (However, this screen must be created already.), while, when the
value turns to 0, the Pop-up Screen will be closed. If the pop-up screen is
closed using the function key, the value of the address specified to the read
address cannot be updated. When closing the pop-up screen, set “0” to the
read address.
Address: Specifies the word memory address storing the Indirect Screen No.
Word Length: Displays the data length of the read address, which is 1 by default.
2
Switch to the [Indirect Screen] tab and specify the displaying position of the screen which is
displayed in the pop-up screen specified by the [Indirect Screen] and check “Indirect Reference
of Display Position” for the Indirect Screen.
Indirect Reference of Display Position: Checking it means the position coordinates of the
3
popup Indirect Screen are read by the specified
memories; and Not-checking means the position
coordinates of the popup Indirect Screen will
depend on where the component is placed in the
screen.
X coordinate and Y coordinate are controlled by the specified address and the “specified
address + 1” respectively.
3
Press the [OK] button and properly adjust the position and the size of the Indirect Screen
component.
The size of the Indirect Screen limits the display area of the pop-up screens. The pop-up screen area
that goes beyond the Indirect Screen edge will not be displayed. Related function keys can be added to
move or minimize the screens (Refer to the “Pop-up screen title bar” and “Minimize” in 3-7-2 Function
Key (Page 3-201)).
Task Bar: If the pop-up screen comes with the [Pop-up screen title bar] and [Minimize] function keys,
each time a screen pops up, a small icon supporting the pop-up screen will be reserved for
this screen in the task bar. Pressing the small icon for this screen will push the
corresponding screen to the top of the screen. Pressing the icon for the second time will
minimize the screen, and another click will restore it to its initial state.
NB-series Programmable Terminals NB-Designer Operation Manual(V106)
3-149
3 Functions of NB-Designer
3-6-17
Direct Screen
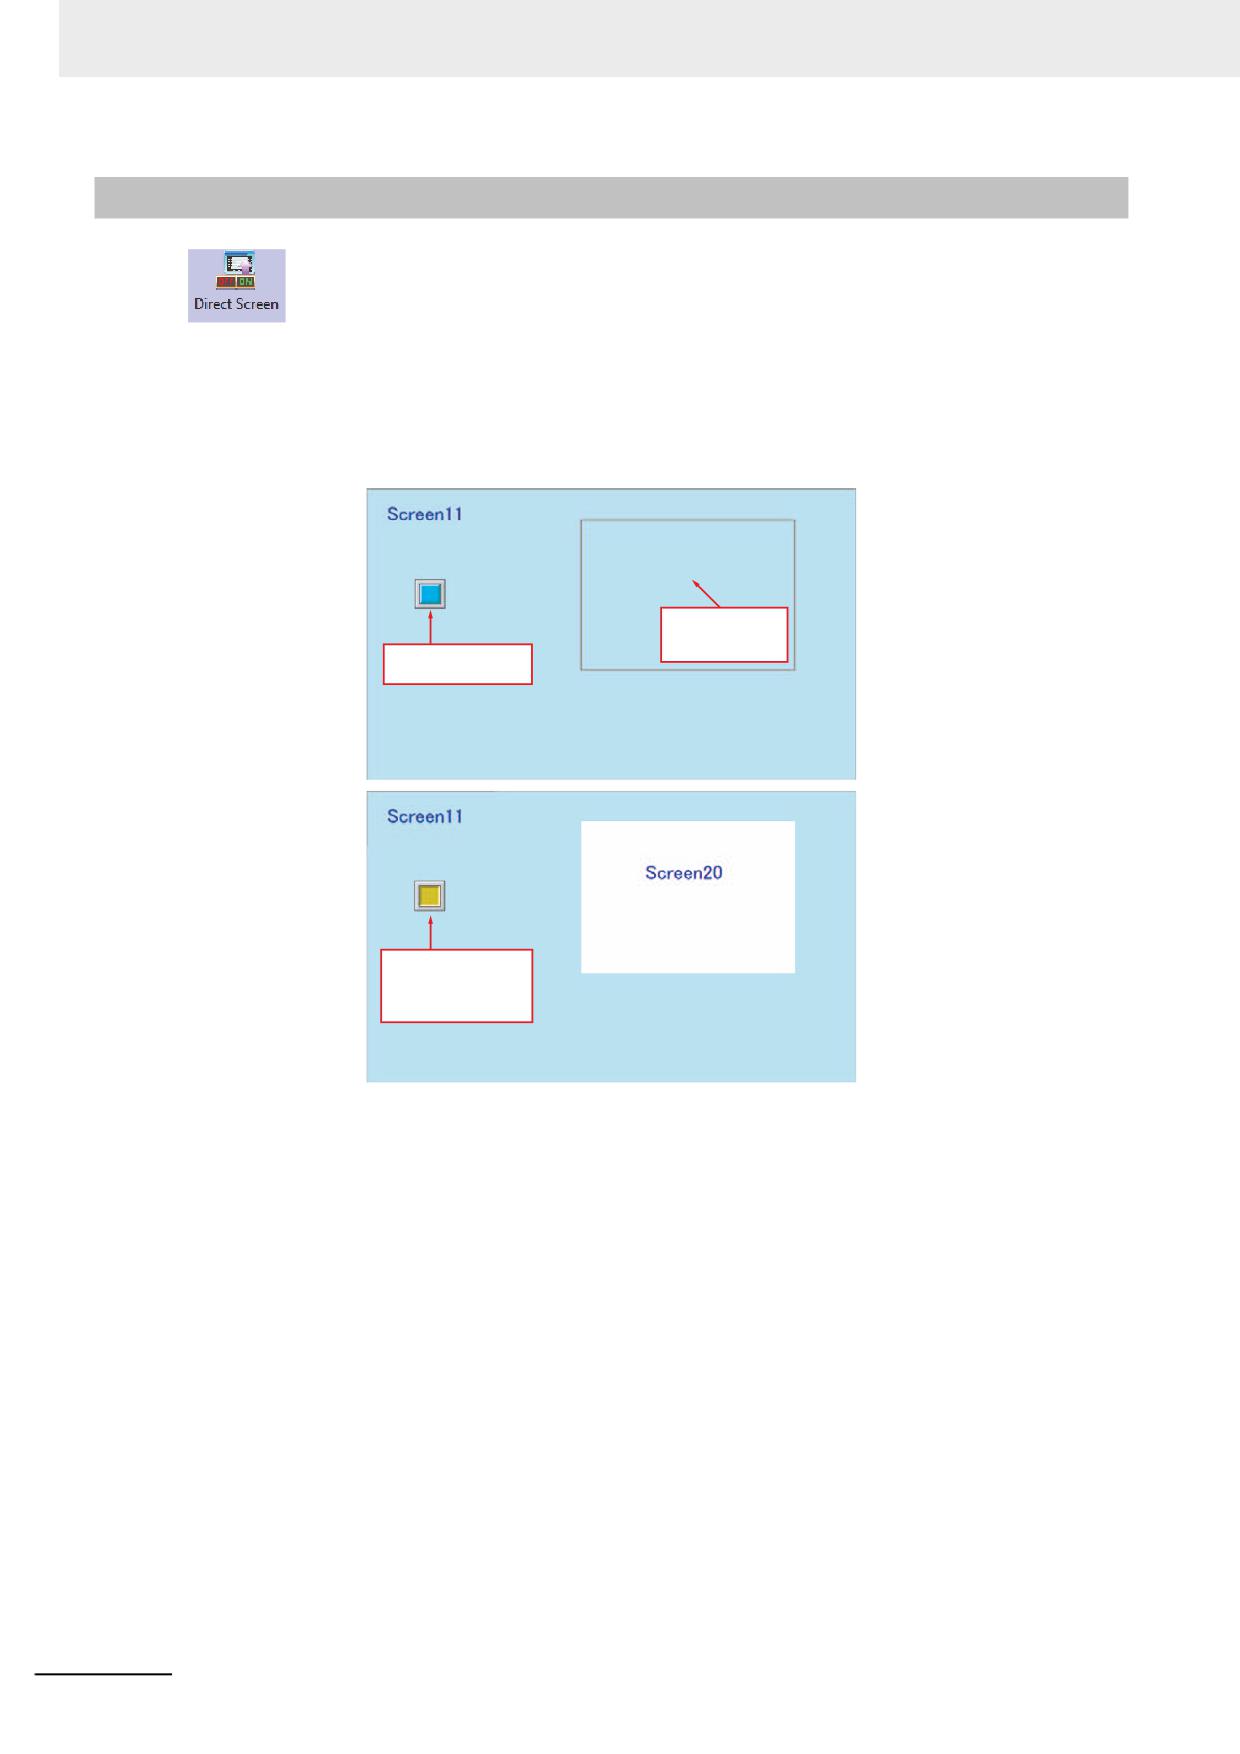
Direct Screen can make a specified screen pop up onto the current screen. The pop-up
screen will be displayed within the area of the [Direct Screen]. Normally, the Direct Screen size should
be set to same as that of the pop-up screen. There is no absolute limitation on the number of Direct
Screen. However, a maximum of 16 Direct Screens can be displayed simultaneously during operation.
The closing or opening of the Direct Screen is only determined by the bit address of the [Read Address]
that control it, while Function Key can’t be used to close it. When this bit address is ON, the screen will
pop up, and when it is OFF, the screen will be closed.
Direct screen, read
address is LB11,
screens No. is 20
Bit Switch, read/write
address is LB11
Press this button, set
all the bit of read/wirte
address memery to '1',
and popup screen 20
Process of adding one Direct Screen component
1
Press the Direct Screen component icon, drag it to the screen, then the [Basic Properties]
dialog box of the Direct Screen component will pop up.
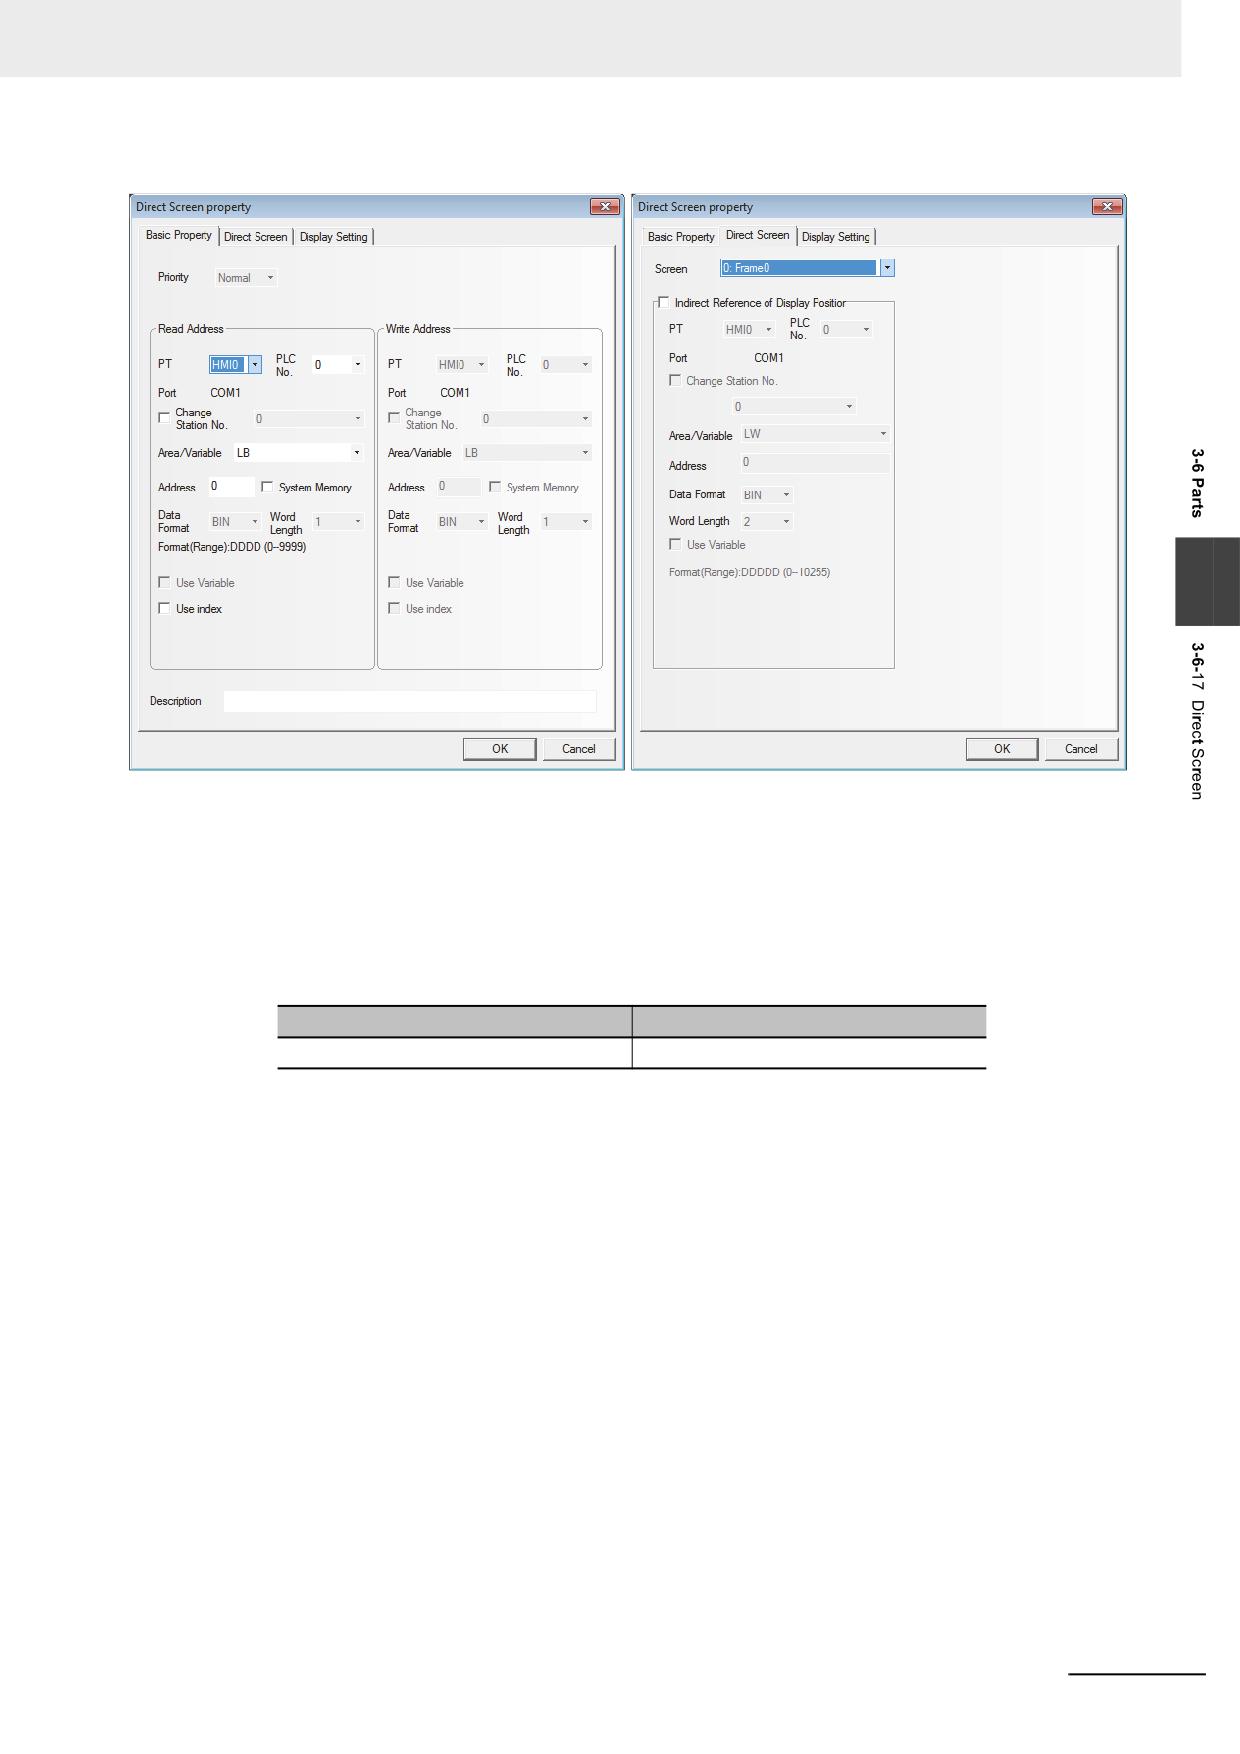
Read Address: When the specified read address is ON, the content of the specified screen
will be displayed in the Direct Screen component area.
If the pop-up screens is closed using a function key, the value of the address
specified by the read address cannot be turned OFF. When closing the pop-up
screen, set “0” to the read address.
3-150
NB-series Programmable Terminals NB-Designer Operation Manual(V106)
3 Functions of NB-Designer
Address: Specifying the address controlling the display of the pop-up screen.
3
2
Switch to the [Direct Screen] tab and select the Destination Screen No. to be ejected in
[Screen].
Indirect Reference of Display Position: Checking it means the position coordinates of the
popup Direct Screen are read by the specified
memories; and Not-checking means the position
coordinates of the popup Direct Screen will depend
on where the component is placed in the screen.
X Coordinate of Pop-up Screen
Y Coordinate of Pop-up Screen
First address
First address + 1
The position of the pop-up screen is controlled by 2 memories, i.e. the X coordinate is
controlled by the First address, while the Y coordinate is controlled by the “First address + 1”.
But for some special PLCs (such as S7-200 etc.), the address must be an even number. For
example, VW80 is the memory controlling X coordinate, and VW82 is that controlling Y
coordinate.
3
Press the [OK] button to complete the setup, and adjust the position and the size of the Direct
Screen component. The size of the screen will limit the display area. The pop-up screen area
that goes beyond the Direct Screen edge will not be displayed. Function keys can be used to
move or minimize the screens. Please refer to the contents related to the function key such as
“Pop-up screen title bar” and “Minimize”, etc. in 3-7-2 Function Key (Page 3-201).
NB-series Programmable Terminals NB-Designer Operation Manual(V106)
3-151
3 Functions of NB-Designer
3-6-18
Alarm
The Alarm component will display all the alarm information enabled in the set area. The
content it displays is the same as that displayed by the Alarm Display, and both of them are about the
alarm information of a certain node switch (bit address). When the bit address which worked as alarm
trigger is released, the alarm display will be removed. The alarm information displayed by the alarm is
necessarily registered by “Alarm Setting”. When multiple alarms occur, the alarms will be displayed in
the order descending to the newer (the top is the oldest and the bottom is the newest).
Process of adding one Alarm component
1
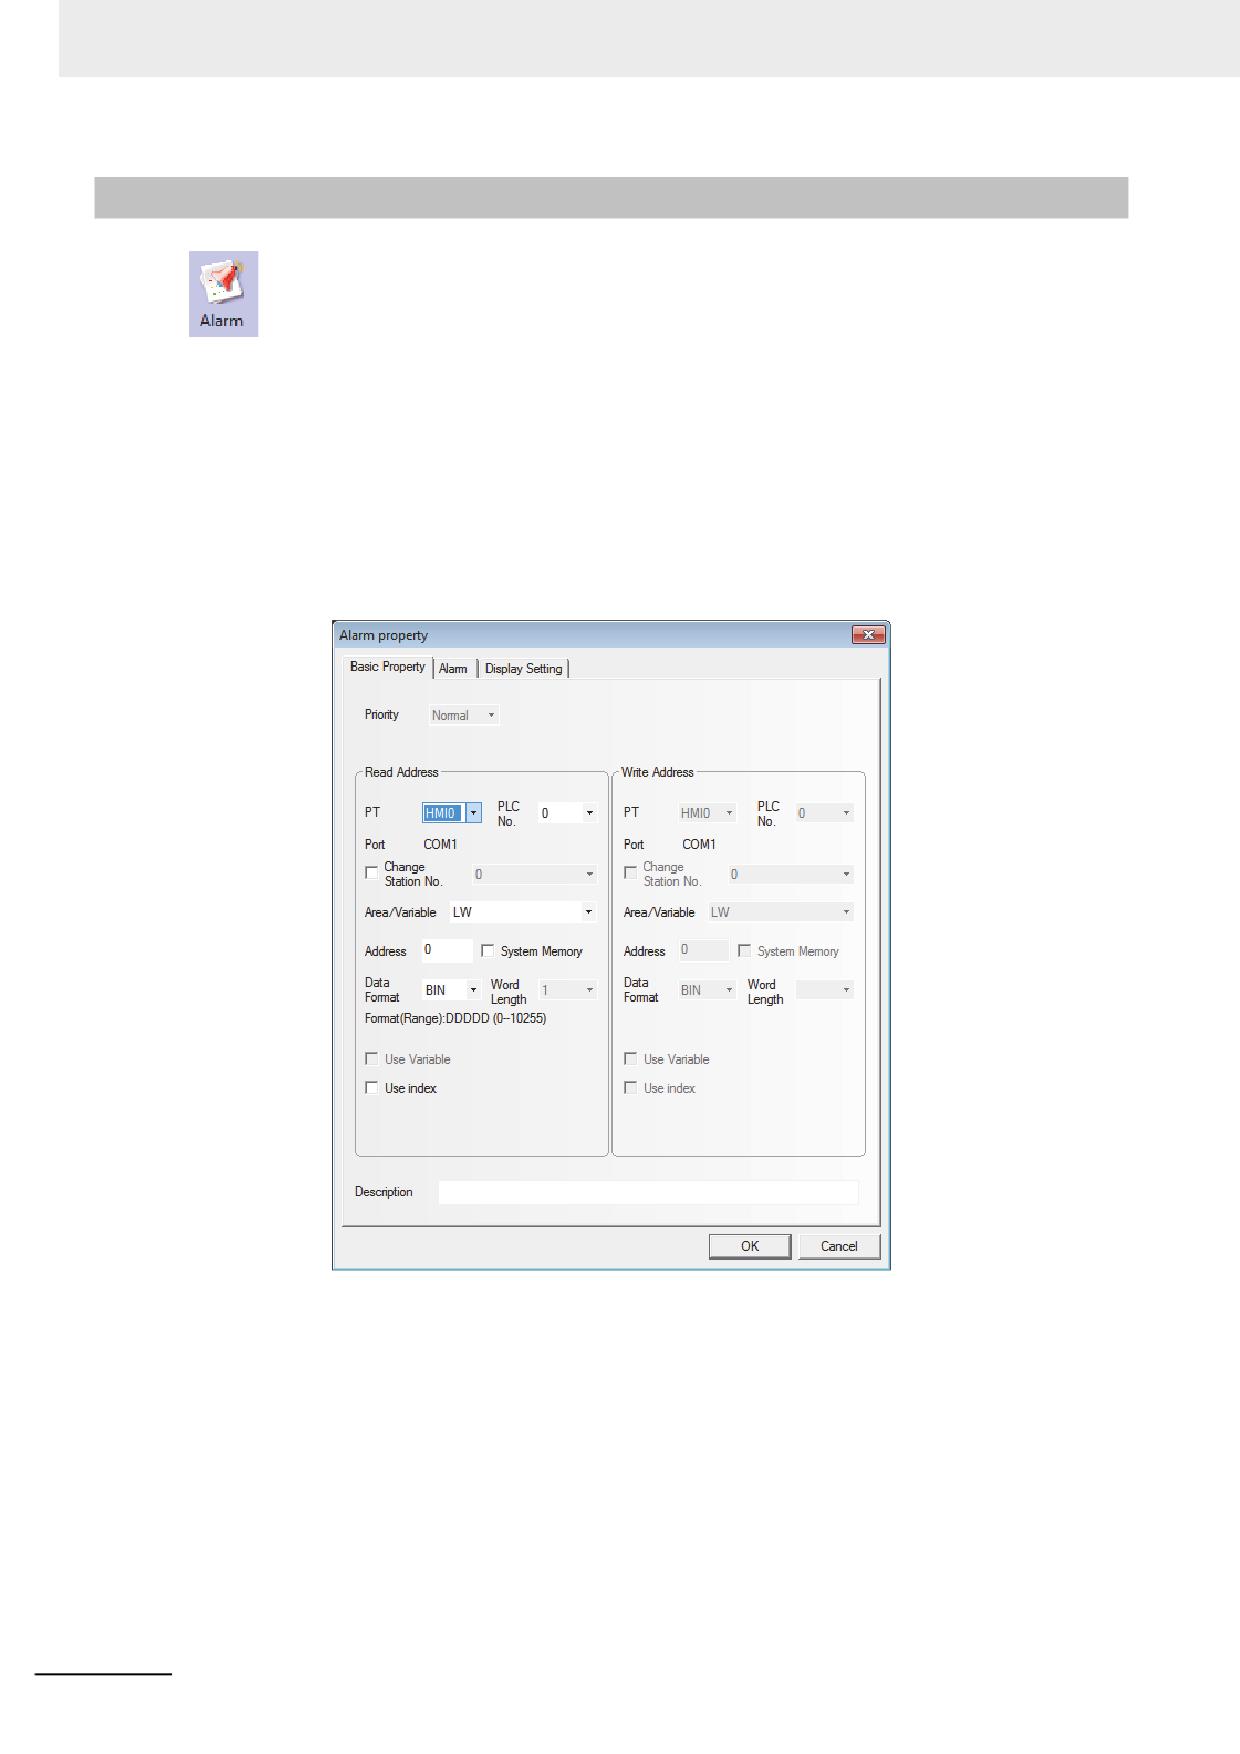
Press the Alarm component icon, drag it to the screen, then the [Basic Properties] dialog box of
the Alarm component will pop up.
Read Address: The address specifying the display of the alarm is specified. All the alarm
information is displayed from the latest to the oldest, i.e. if the value of the read
address is N, the Nth alarm will be displayed on the first line, the alarm of the
smaller No. than N will be removed.
Address: Refers to the word address using for controlling display.
Word Length: Displays the data length of the read address, which is 1 by default.
3-152
NB-series Programmable Terminals NB-Designer Operation Manual(V106)
3 Functions of NB-Designer
2
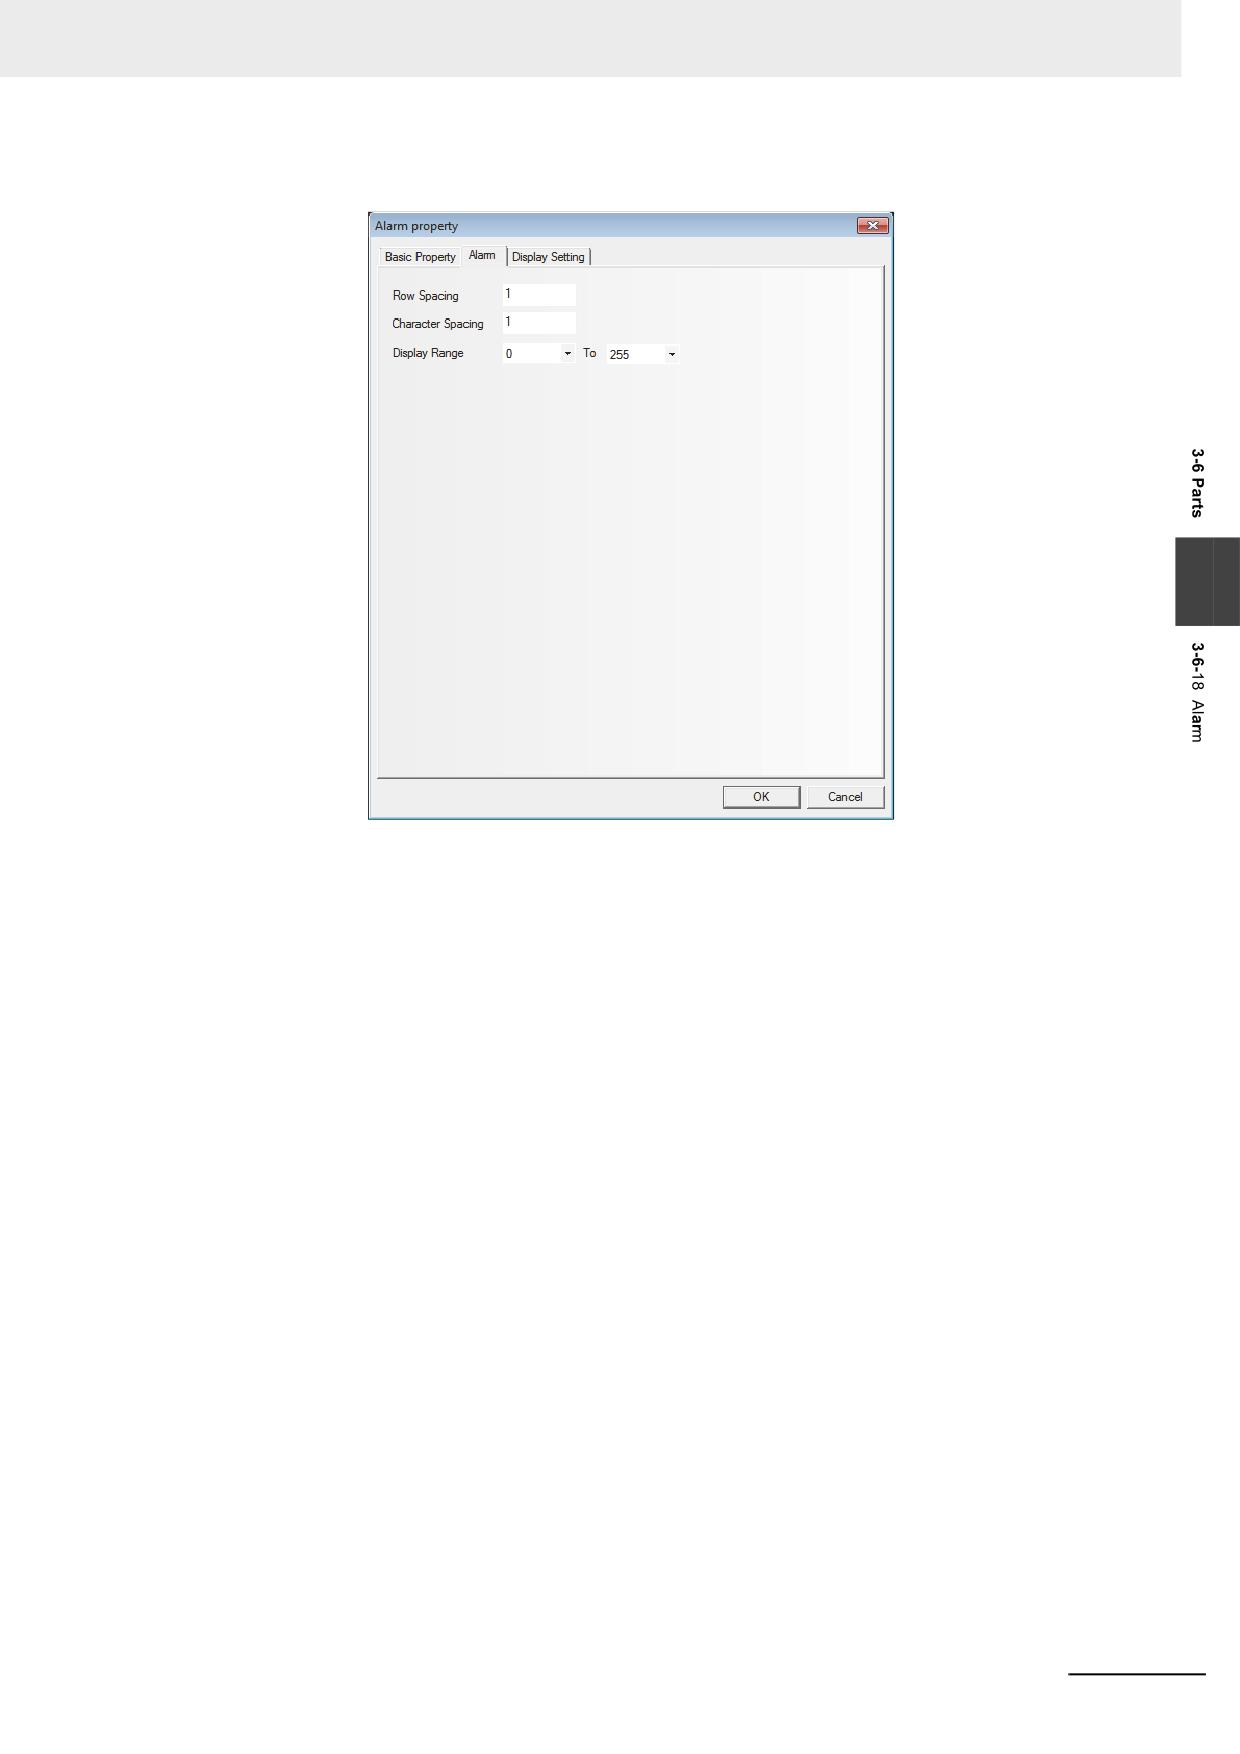
Go to the [Alarm] tab, as shown below:
3
Row Spacing and Character Spacing: Specifying the row space and character space of the
displayed alarm. Graphic font ignores this setting.
Display Range: “0 To 255” are available. When memory the alarm information, you need to
assign a type for each piece of alarm information. For example, 3 pieces of
information are registered, with 0, 1 and 2 as their types. Add an Alarm
component in the screen, and set the [Display Range] to “0 To 1”. Then when
all of the 3 alarms occur, set to the Type0 and Type1 will be displayed in the
screen.
3
Press the [OK] button to complete the setup, and adjust the position and the size of the Alarm
component.
NB-series Programmable Terminals NB-Designer Operation Manual(V106)
3-153
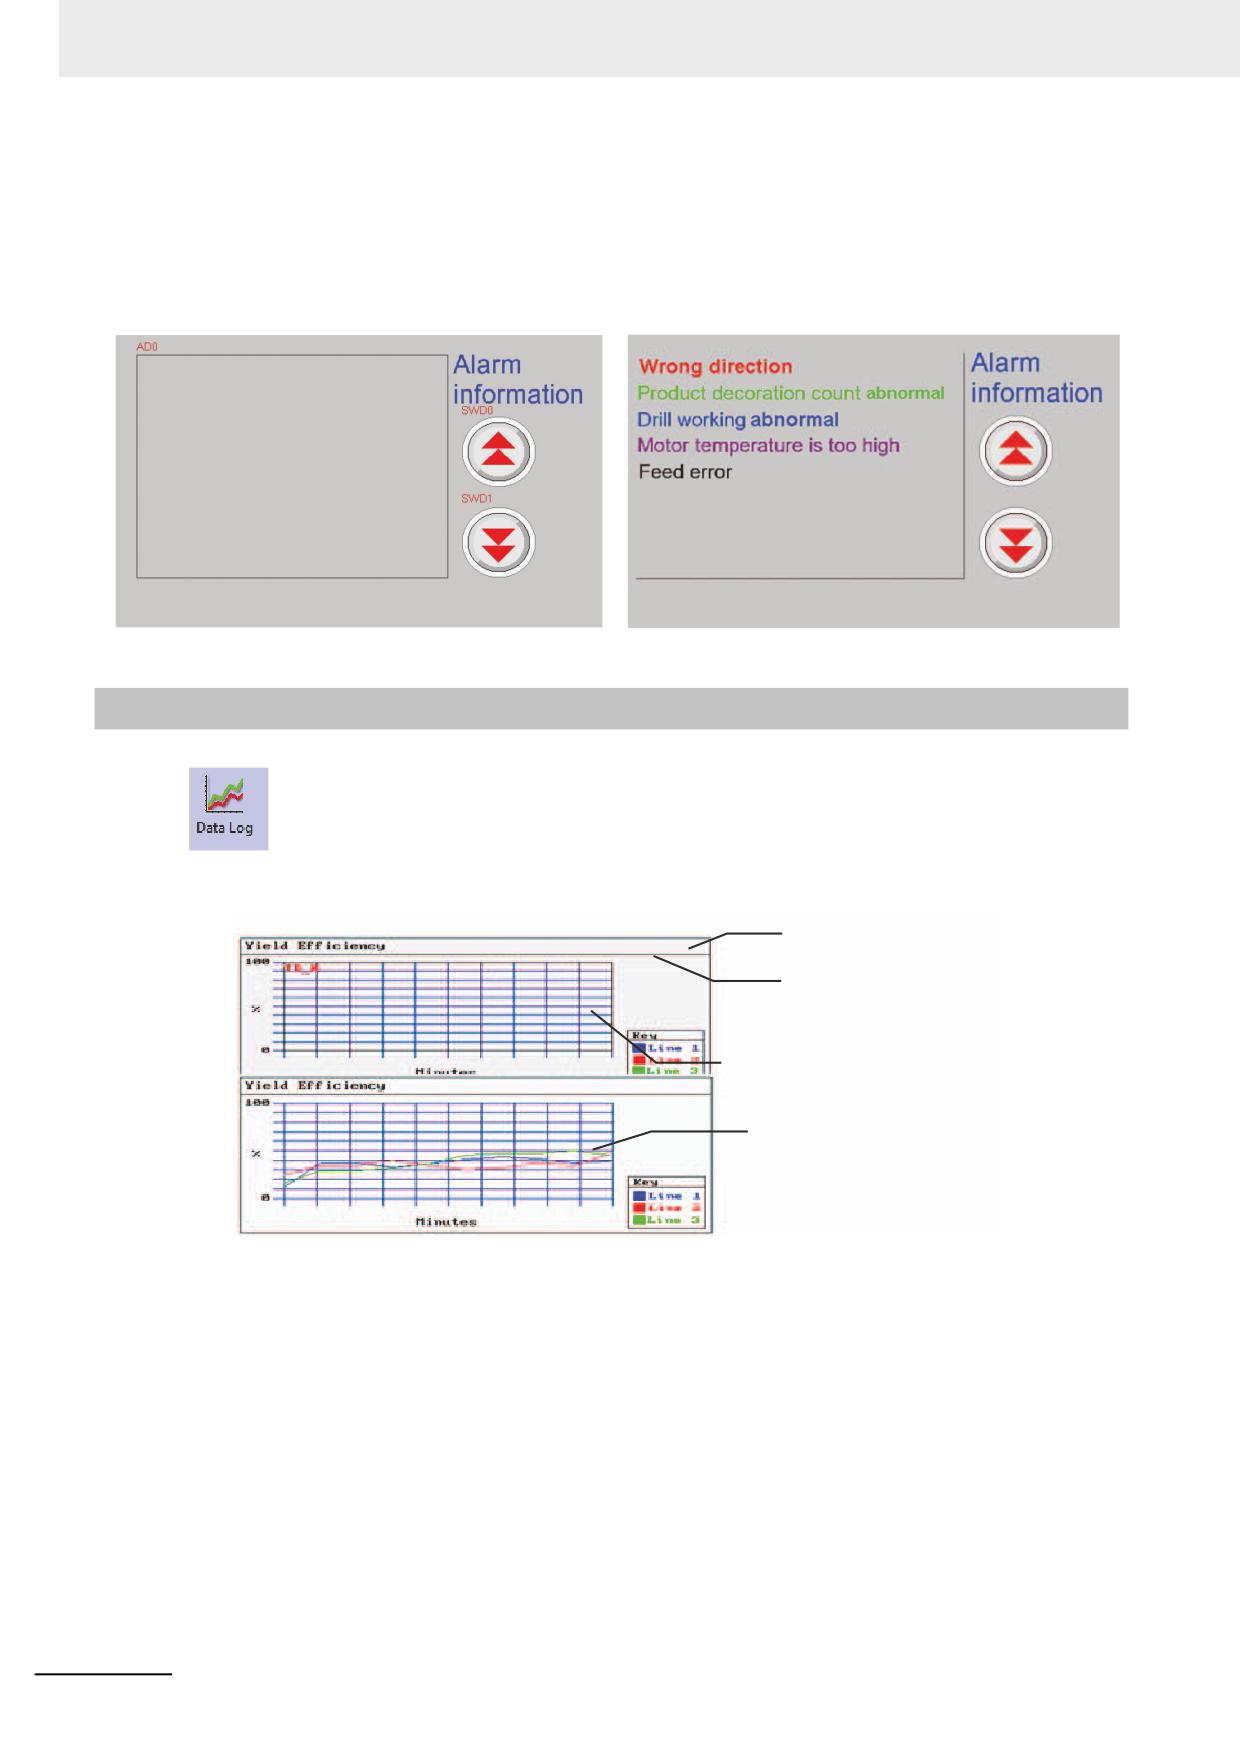
3 Functions of NB-Designer
Example of Alarm component
Use a Vector Graphics (VG0) as the rectangle backg1round and another Vector Graphics (VG1) as
the sunken display area. Use 2 Command Button components (SWD0, SWD1) to increase or
decrease the starting lines of alarm information displayed (i.e. controlling the increase or decrease
of the “Read Address” data). Two command button components (SWD0 and SWD1) allow the start
line No. ([Read Address] of the alarm) increased or decreased to scroll the displayed alarm.
3-6-19
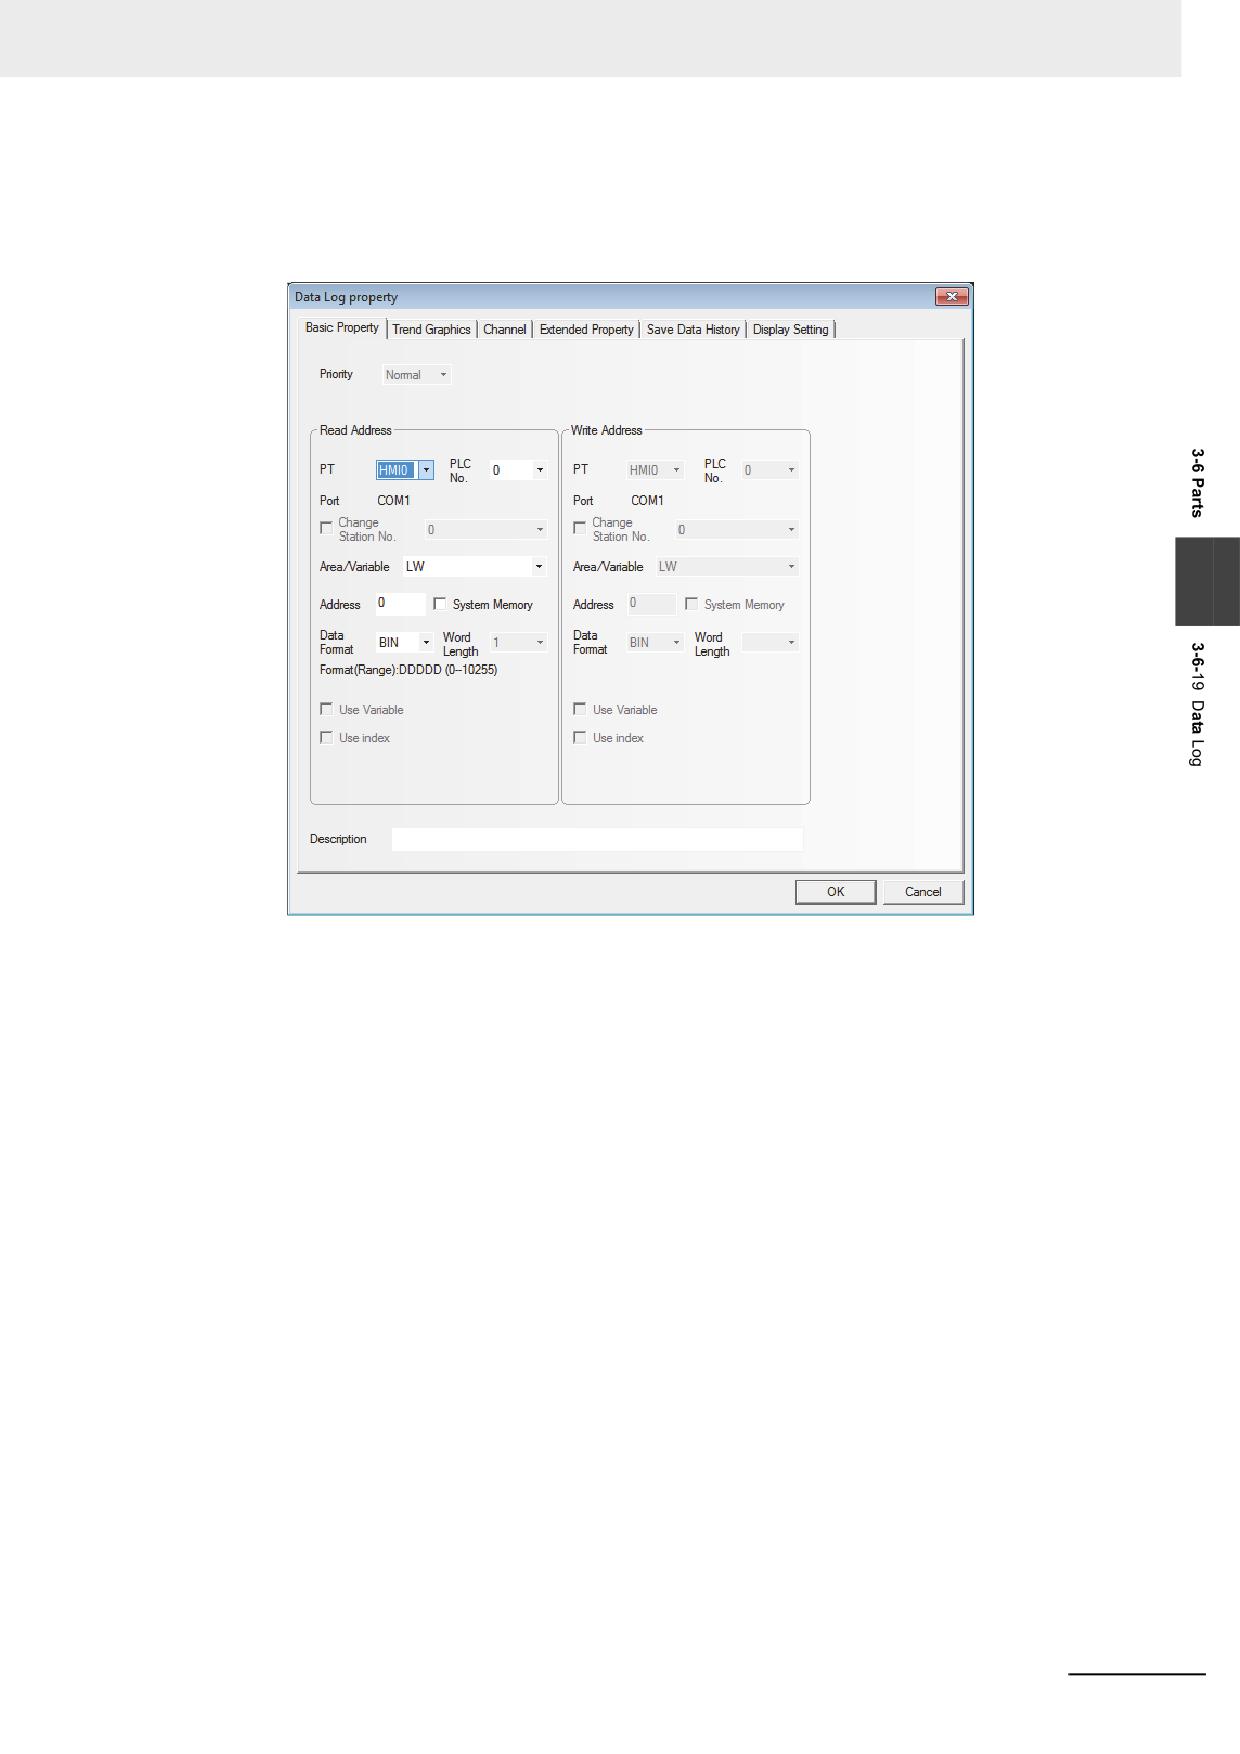
Data Log
The Data Log component acquires some PLC data and displays it in the manner of a Data
Log at regular intervals. When each sampling period comes to an end, new data will be read from the
PLC and displayed on the right of the Data Log, which ensures the real-time display.
Vector Graphic
Scale
Trends
The latest data shows
on the left, and the
track moves right.
A typical example of Data Log is as above shown. Use one Vector Graphics as backg1round, and use
the Scale component to express the information on the related Data Logs. Then place the Data Log
component above the Vector Graphics.
When the trend curve should be stored in the external memory, refer to 6-1-3 Data History, Data Log
and XY Graph (Page 6-7)
3-154
NB-series Programmable Terminals NB-Designer Operation Manual(V106)
3 Functions of NB-Designer
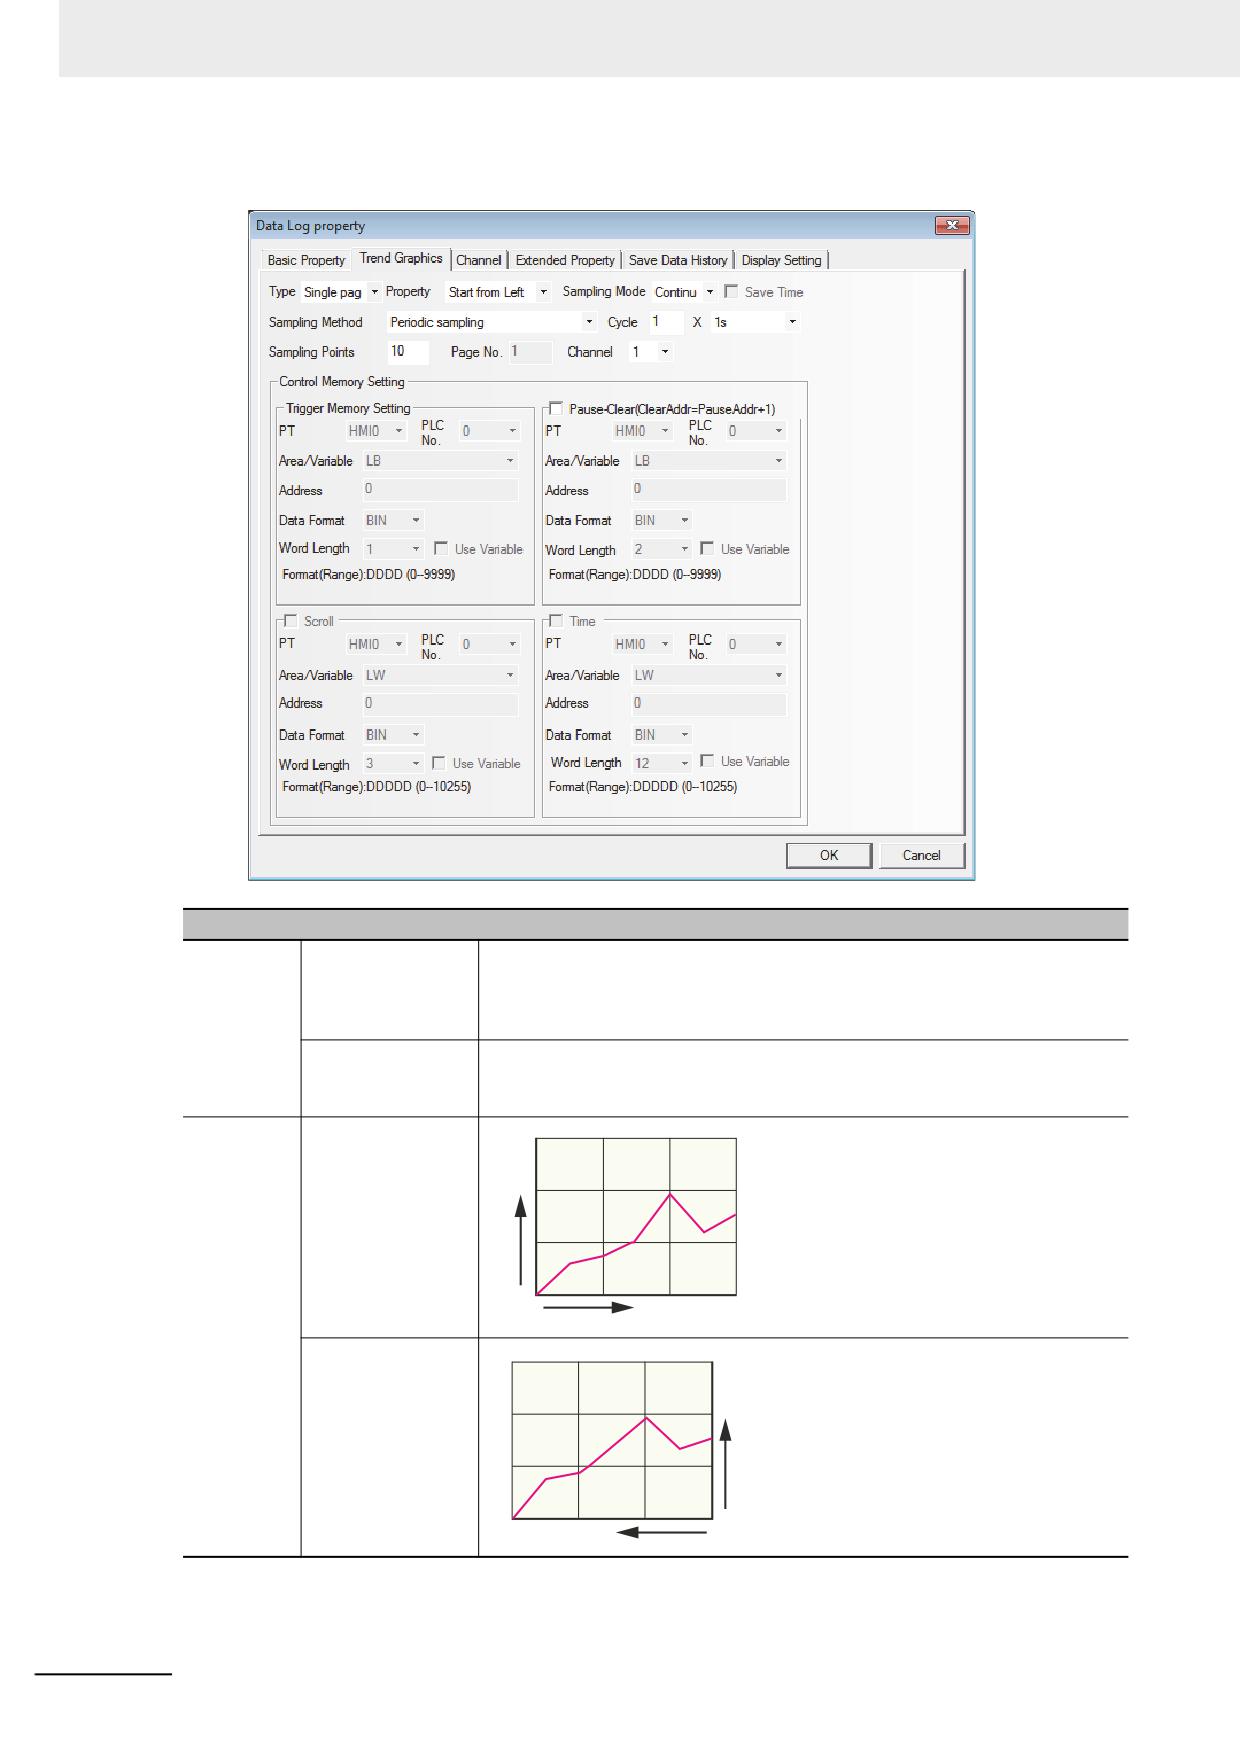
Process of adding one Data Log component
1
Press the Data Log component icon, drag it to the screen, then the [Basic Properties] dialog
box of the Data Log component will pop up.
3
Read Address: Refers to the word address of PLC corresponding to the 1st line data. And the
word address corresponding to the 2nd line is “Read Address + 1”, and the 3rd
line is “Read Address + 2” and so on.
Address: Refers to the first address of the word address corresponding to the Data Log.
Word Length: It is determined by the sampling channels and the storage format for each
channel. When the stored style of all the channel is signed 16-bit, if the channel
number is N (where, 1<=N<=16), the Word Length will be N.
NB-series Programmable Terminals NB-Designer Operation Manual(V106)
3-155
3 Functions of NB-Designer
2
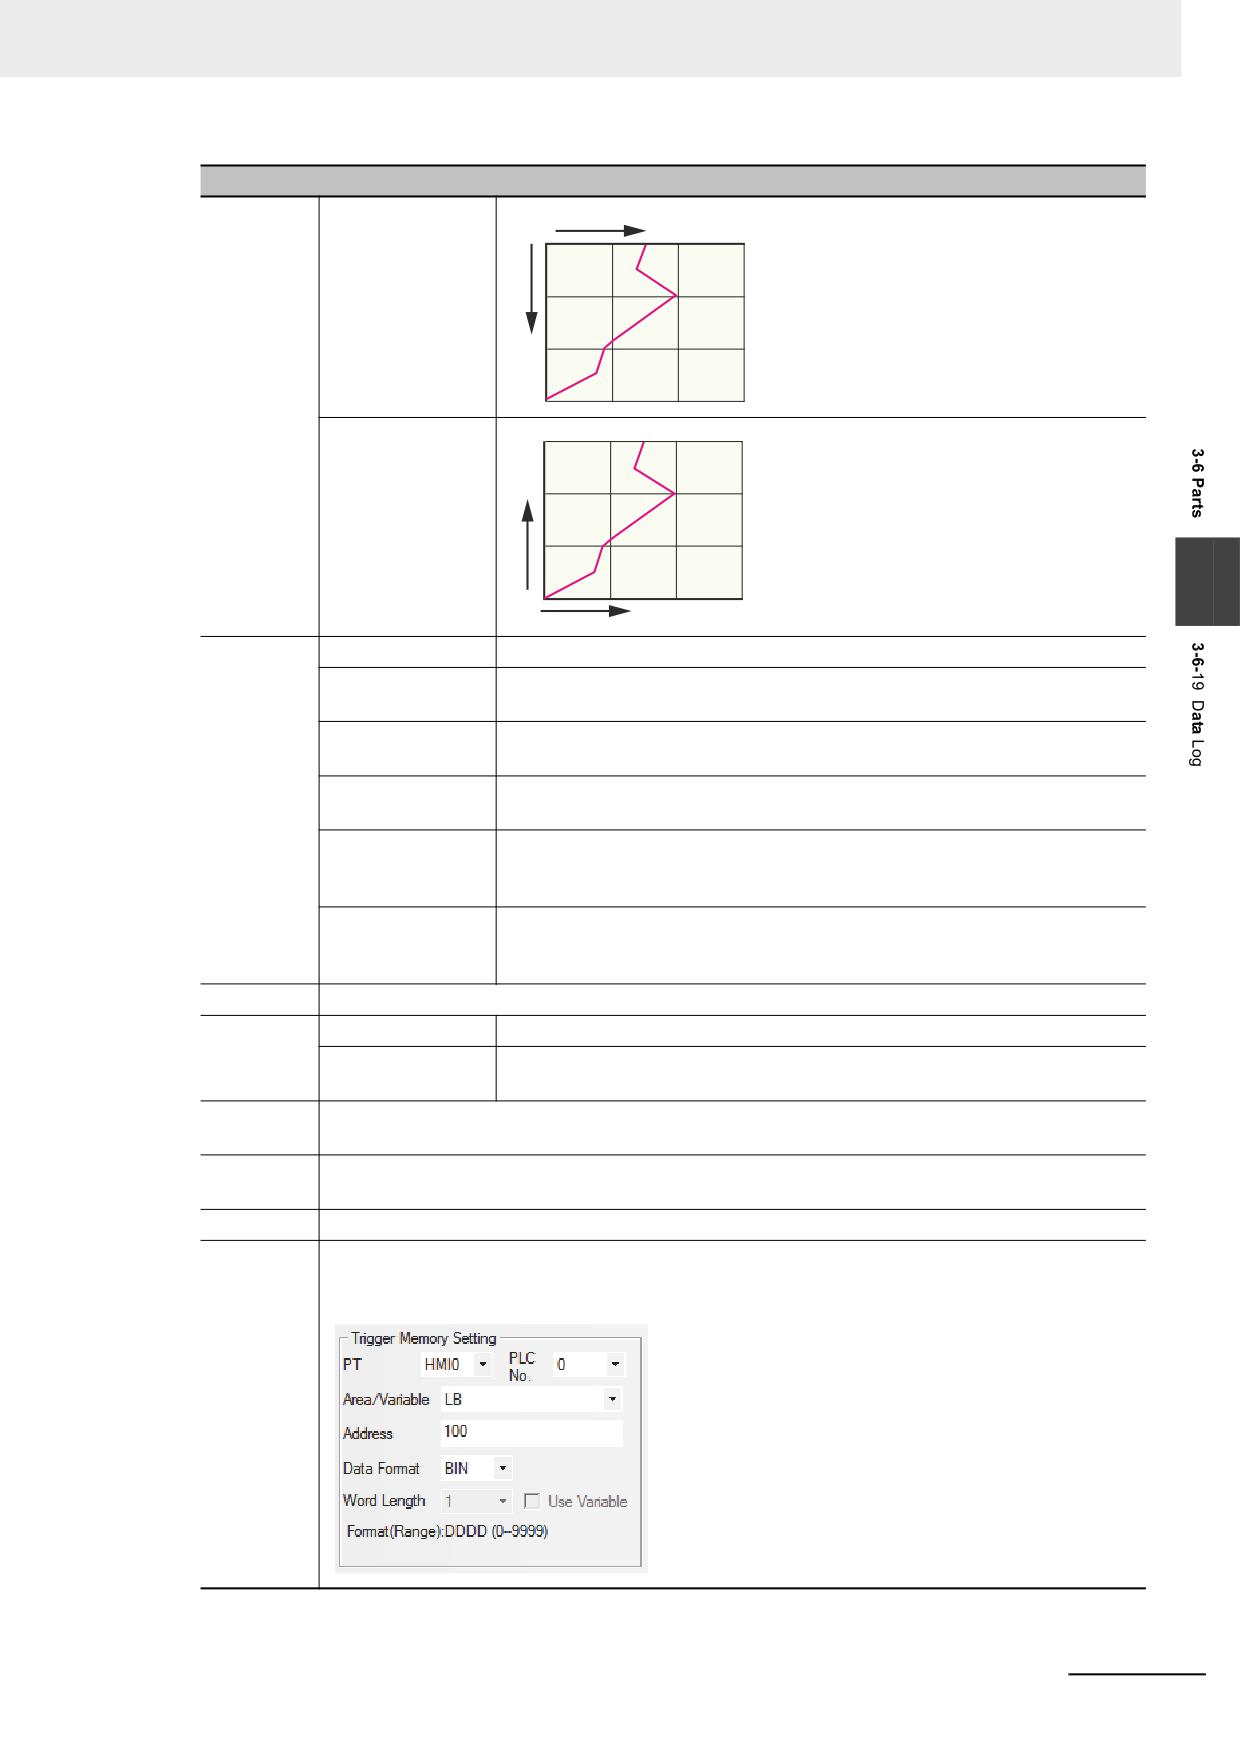
Go to the [Trend Graphics] tab and set the parameters related to the Data Log.
Descriptions of Data Log Properties
Type
Single page
Only the data change information of the sampling data in the current page is
displayed, and extension of Data Log is not allowed. In this style, the data
which data log was updated and scrolled to be removed from the screen
cannot be retained. The extension of the data log is impossible.
Multiple pages
The extension of Data Log is possible. In this way, when the Data Log is
scrolled forward, the data displayed previously will be retained. The historical
data is stored in the memory for the reference in future.
Property
Start from Left
Y
O
X
Start from Right
Y
X
3-156
NB-series Programmable Terminals NB-Designer Operation Manual(V106)
3 Functions of NB-Designer
Descriptions of Data Log Properties
Property
Start from Top
Y
O
X
Start from Bottom
X
3
O
Y
Sampling
Periodic sampling
The data is sampled periodically.
Methods
OFFON trigger
When the state of the specified bit memory address turns ON from OFF, the
sampling
sampling is triggered.
ONOFF trigger
When the state of the specified bit memory address turns OFF from ON, the
sampling
sampling is triggered.
OFFON trigger
When the state of the specified bit memory address changes, the sampling is
sampling
triggered.
OFFON reset
When the state of the specified bit memory address turns ON from OFF, the
trigger sampling
sampling is triggered, and the state of the specified bit memory will be set
automatically to be turned OFF after the triggering.
ONOFF reset
When the state of the specified bit memory address turns OFF from ON, the
trigger sampling
sampling is triggered, and the state of the specified bit memory will be set
automatically to be turned ON after the triggering.
Cycle
Setting the interval to perform sampling with the unit of “s” or “100 ms”.
Sampling
Continue
When all the sampling points end, the sampling still continues.
Mode
Once
When all the sampling points end, the sampling will stop, which means
sampling is only performed once.
Sampling
Refers to the number of sampling point displayed in each screen.
Points
Page No.
When the [Type] in the [Trend Graphics] tab is set to [Multiple pages], specify the number of page
displayed.
Channel
Refers to the number of the track line to be displayed. And the channel can be set is up to 16.
Trigger
It is valid when “Trigger sampling” is selected as “Sampling Methods”. As the parameters are set
memory
as follows, when the state change of the specified LB100 conforms to the settings in Sampling
Methods, the sampling will be triggered.
Setting
NB-series Programmable Terminals NB-Designer Operation Manual(V106)
3-157
3 Functions of NB-Designer
Descriptions of Data Log Properties
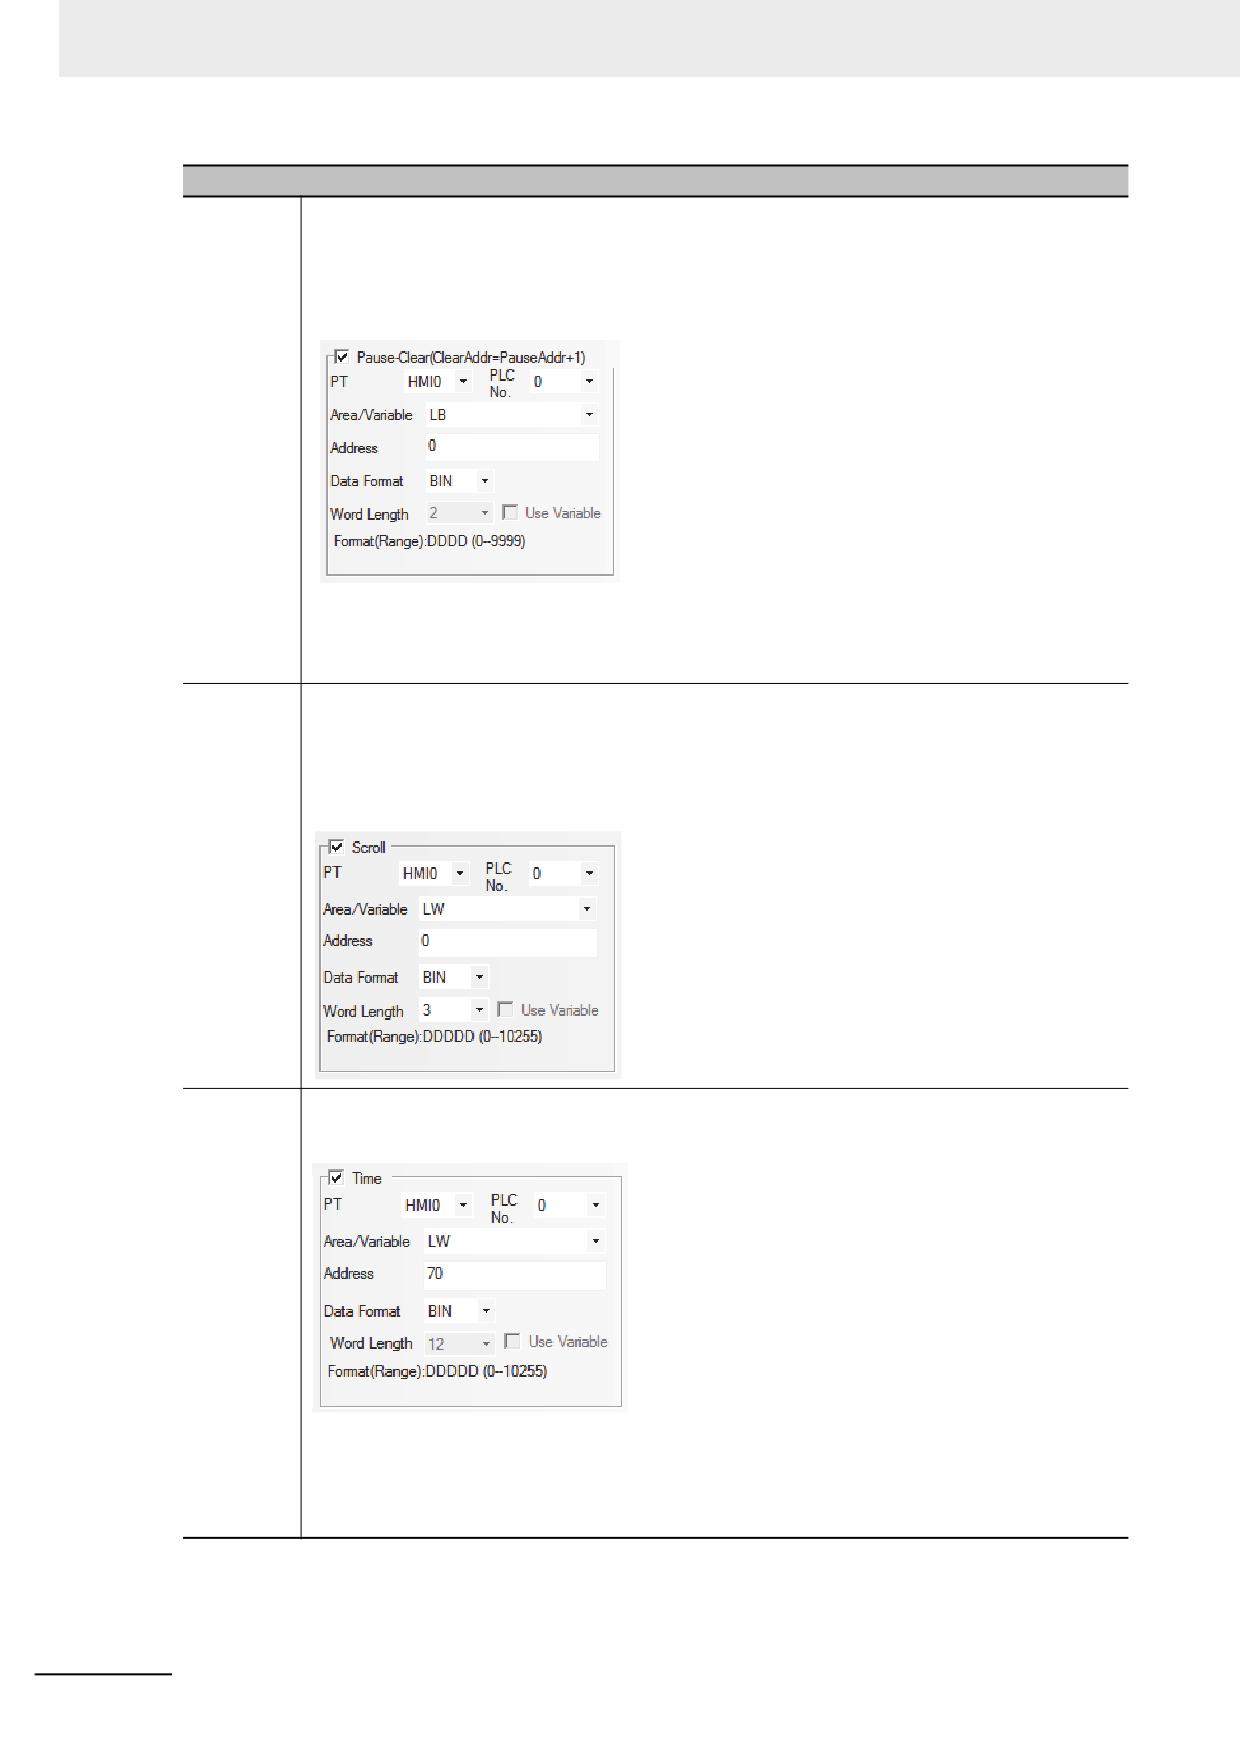
Pause-
The default Word Length is 2. “Pause” function only stops to refresh the changes in the curve
Clear
temporarily, and the sampling operation will not be stopped temporarily. When “Pause-Clear” is
checked as shown blow, and the state of the specified bit address LB0 is set “ON”, the screen will
stop refreshing temporarily When the specified bit address LB0 is set “OFF”, the changes in Data
Log will be refreshed and displayed.
“Pause” stop temporarily the update of the graph so that the sampling is stopped temporarily.
The address can be the trigger for “Clear” is “temporarily allocated address + 1”.
If the parameters are specified as above, the bit address LB0 functions as “Pause” and the bit
adress LB1 functions as “Clear”. Setting in this way, the displayed Data log screen can be cleared
only the changes occurred in LB1 state.
Scroll
The default value is 3. For example, if the specified memory is LW0, LW0, LW1 and LW2 will be the
current browsing index value (the newest data on the index value is 0 and the value is greater, the
data is older.), the starting browsing index value and the maximum browsing index value of Scroll
Bar respectively. This option is valid only when “Multiple pages” is selected. “Scroll” can be used to
browse the multiple Data Logs and can be in combination with the Scroll Bar. For the specific using
method of Scroll Bar, refer to 3-6-22 Scroll Bar (Page 3-168).
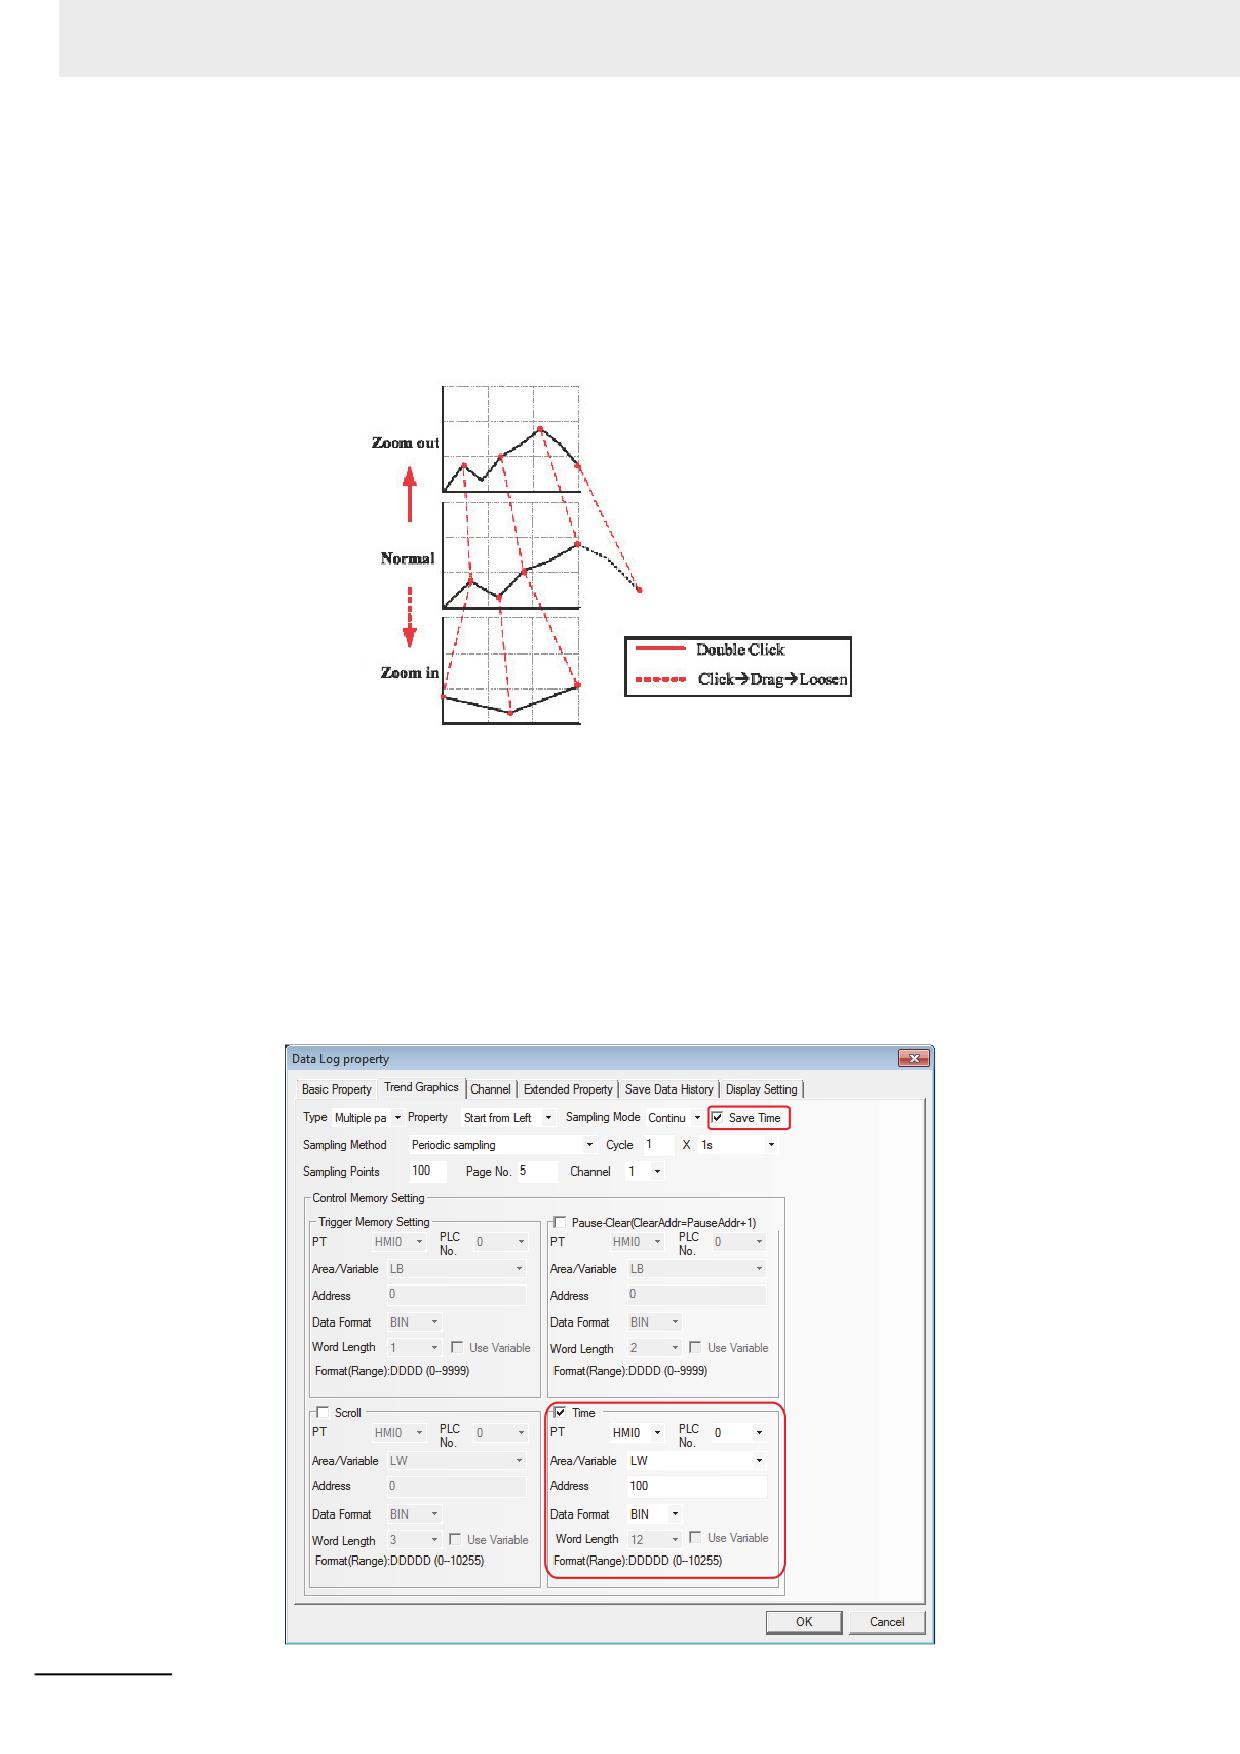
Time
It is used to save the time when the latest sampling point is performed. “Time” option in “Control
memory Setting” is valid only when the “Save Time” is checked. The default memory is LW and the
Word Length is 12.
As shown above, when the specified address is LW70, each data is stored as below:
• The sampling time of the oldest data within the displayed page
Second: LW70, Minute: LW71, Hour: LW72, Day: LW73, Month: LW74, Year: LW75
• The sampling time of the newest data within the displayed page
Second: LW76, Minute: LW77, Hour: LW78, Day: LW79, Month: LW80, Year: LW81
Note When the trigger sampling is used, if multiple samplings are performed at the same timing, only single value
might be acquired.
When such a state is assumed, place the Data Transmission component and others on the Common Sheet
and acquire the necessary data at local memory to perform the sampling for the local memory.
3-158
NB-series Programmable Terminals NB-Designer Operation Manual(V106)
3 Functions of NB-Designer
3
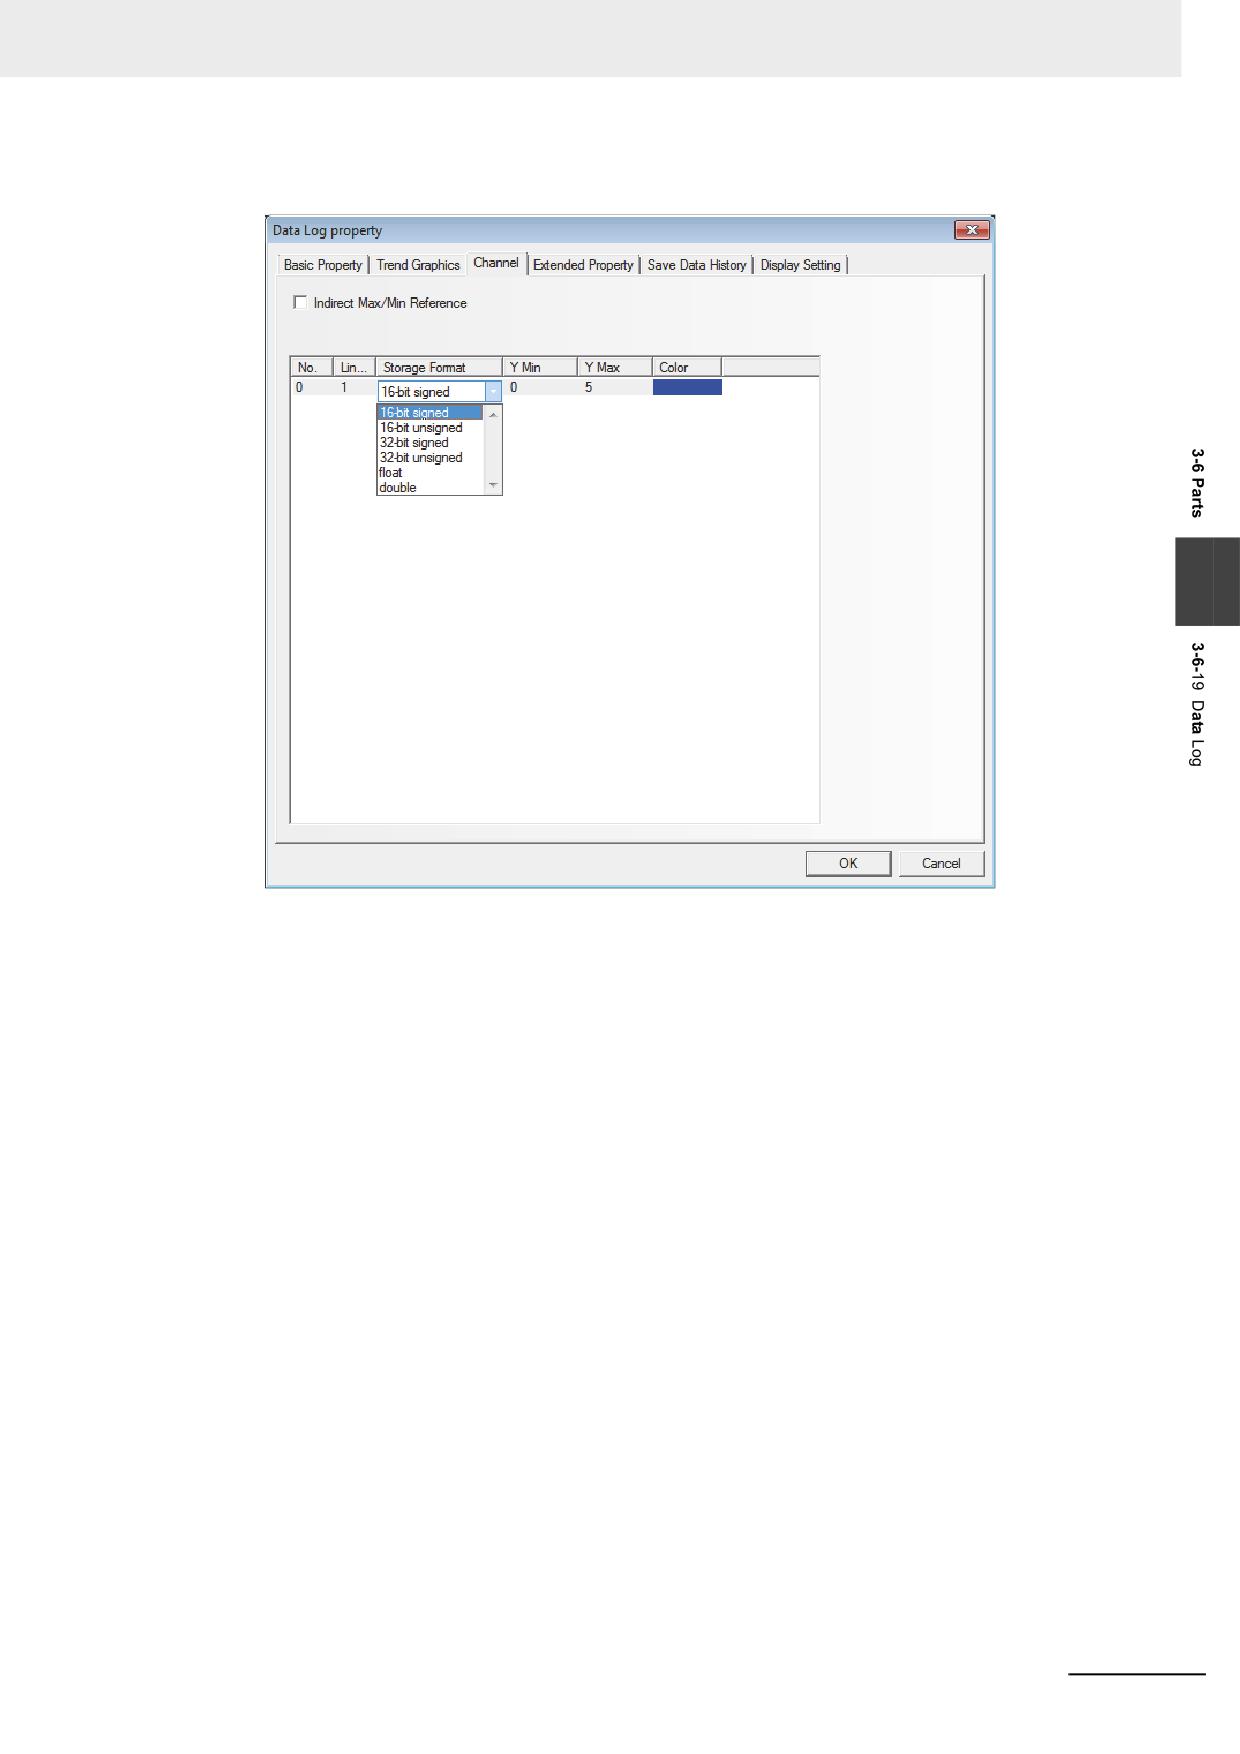
Switch to the [Channel] tab and set the parameters related to each track line.
3
Color: Specifies the color for each track line.
Line Width: Refers to the thickness of the line, and 8 kinds of line width are available here.
Storage Format: Sets the data type used by the user and 6 kinds are available.
Y Min/Y Max: Sets the minimum value and maximum value of the data corresponding to each
track line in Y direction.
Indirect Max/Min Reference: Sets the display range of channel track to variable, and
specifies the memory address for reading range value. For the
multiple channels, the memory can be specified independently,
and [The Specified Indirect memory Address] is Y Min, and [The
Specified Indirect memory Address + 1] is Y Max.
NB-series Programmable Terminals NB-Designer Operation Manual(V106)
3-159
3 Functions of NB-Designer
4
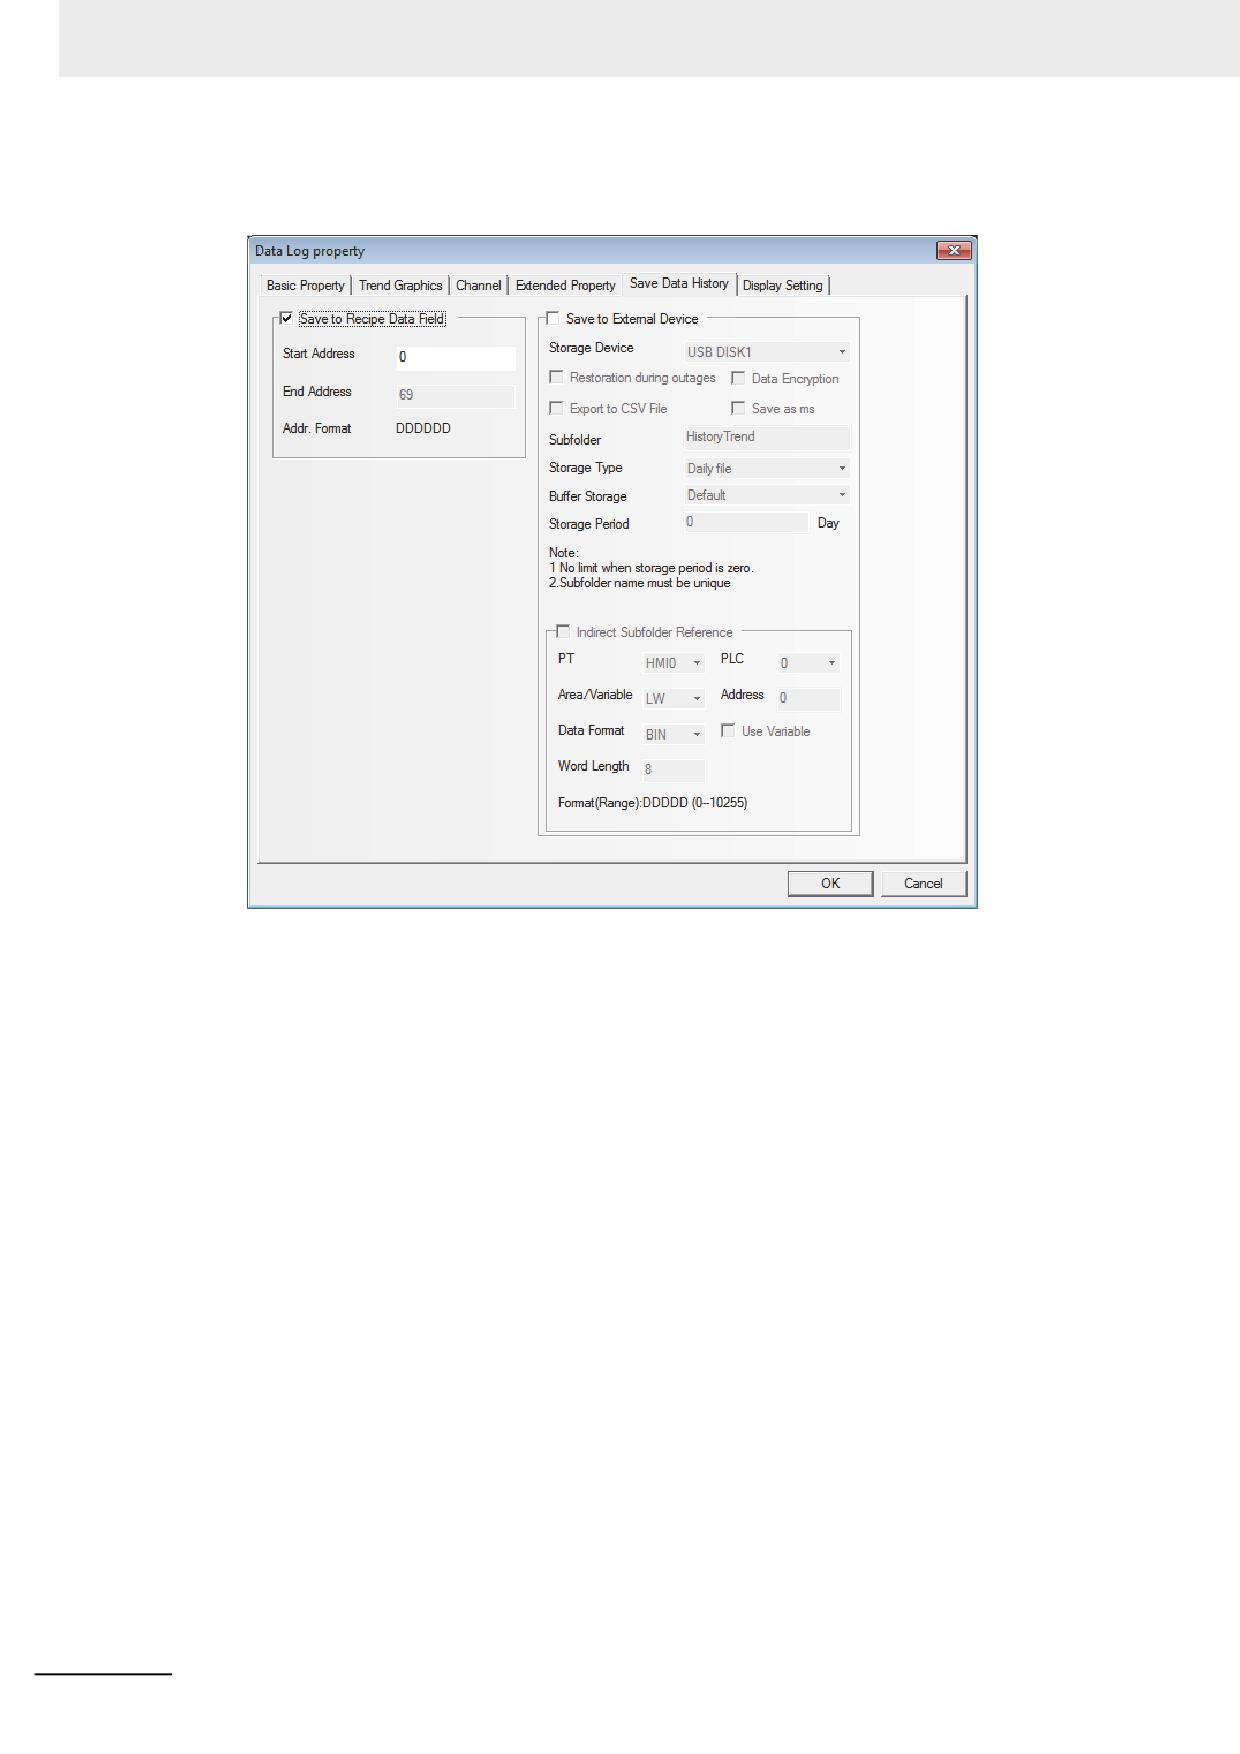
Switch to the [Save Data History] tab and determine whether to check “Save to Recipe Data
Field”.
Save to Recipe Data Field: After this option is checked and the Start Address. is set, the
sampling data can be saved to the Recipe Data Field(RW).
Data History for the Data Log is saved in the [Start Address] as the top, and the memory area
includes the Information Area with the size of 40 bytes (i.e. 20 words), and the Time Area with
the size of Sampling Pages × Sampling Points/Page × 4 words and the Data Area with the size
of Sampling Pages × Sampling Points/Page × Word Length.
When the multiple historical Data Logs saved into the recipe are used, the user must ensure
that the memory area of each trend curves will not overlap each other, otherwise, the data
mistakes will occur.
5
Press the [OK] button to adjust the position and size of the Data Log component.
3-160
NB-series Programmable Terminals NB-Designer Operation Manual(V106)
3 Functions of NB-Designer
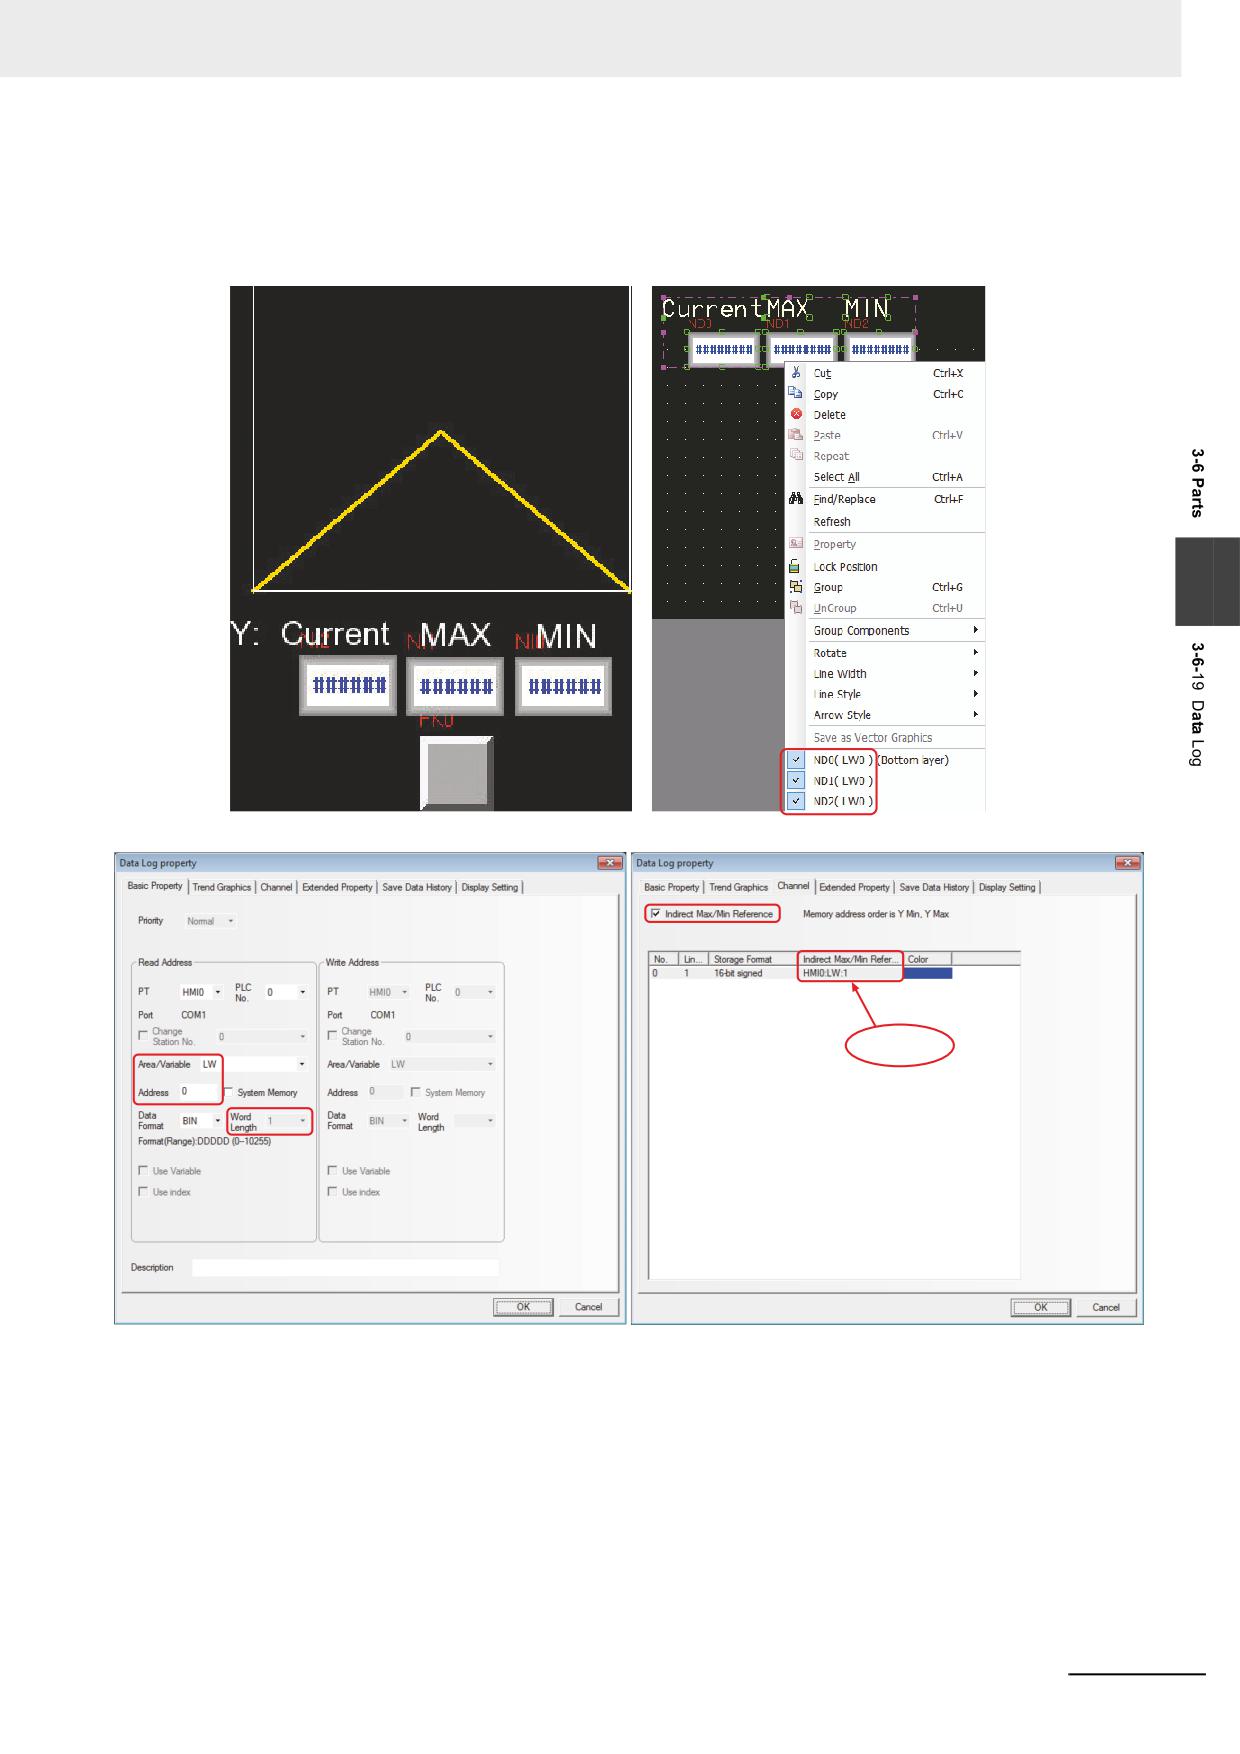
Indirect Max/Min Reference of Data Log
Descriptions: LW0 represents the variable making sampling for the Y coordinate, and the horizontal
axis represents the Time Axis. And LW1 and LW2 correspond to the minimum value (lower limit of Y)
and the maximum value (upper limit of Y) respectively.
3
LW1: Y Min
LW0: Y Max
NB-series Programmable Terminals NB-Designer Operation Manual(V106)
3-161
3 Functions of NB-Designer
Checking and Zooming Functions
The zooming function can be enabled or disabled by the special system memory LB9110, i.e. the
zooming function will be valid when the LB9110 is turned ON and invalid when the LB9110 is turned
OFF. In order to use this function, it is necessary to set the [Type] option to “Multiple pages” and
[PageNum] option to more than 1 in the [Trend Graphics] tab respectively. With the LB9110 being
turned ON, zoom-out status of the curve can be checked only by double clicking on the Data Log, and
the zoom-in status of selected curve can be checked by clicking at the start point of the curve and
loosening it after dragging it to the end point of the curve.
Query of Sampling Time
When LW9200 to LW9205 are used to store the time for sampling points, the user can place the
Number Display components corresponding to these addresses to display the time for sampling points.
Procedures:
1
Checking the [Save Time] option and [Time] check boxes ( Note this is not the sampled time) in
the [Trend Graphics] tab in the [Data Log Property] dialog box:
The [Time] option can be used to set the first address for saving the time, which covers 12-
word-length address for saving the starting time of the Data Log (the former 6 words) and the
time value of the current Data Log (the latter 6 words) in “ssmmhhddmmyyyy” format and BIN
Data Format respectively.
3-162
NB-series Programmable Terminals NB-Designer Operation Manual(V106)
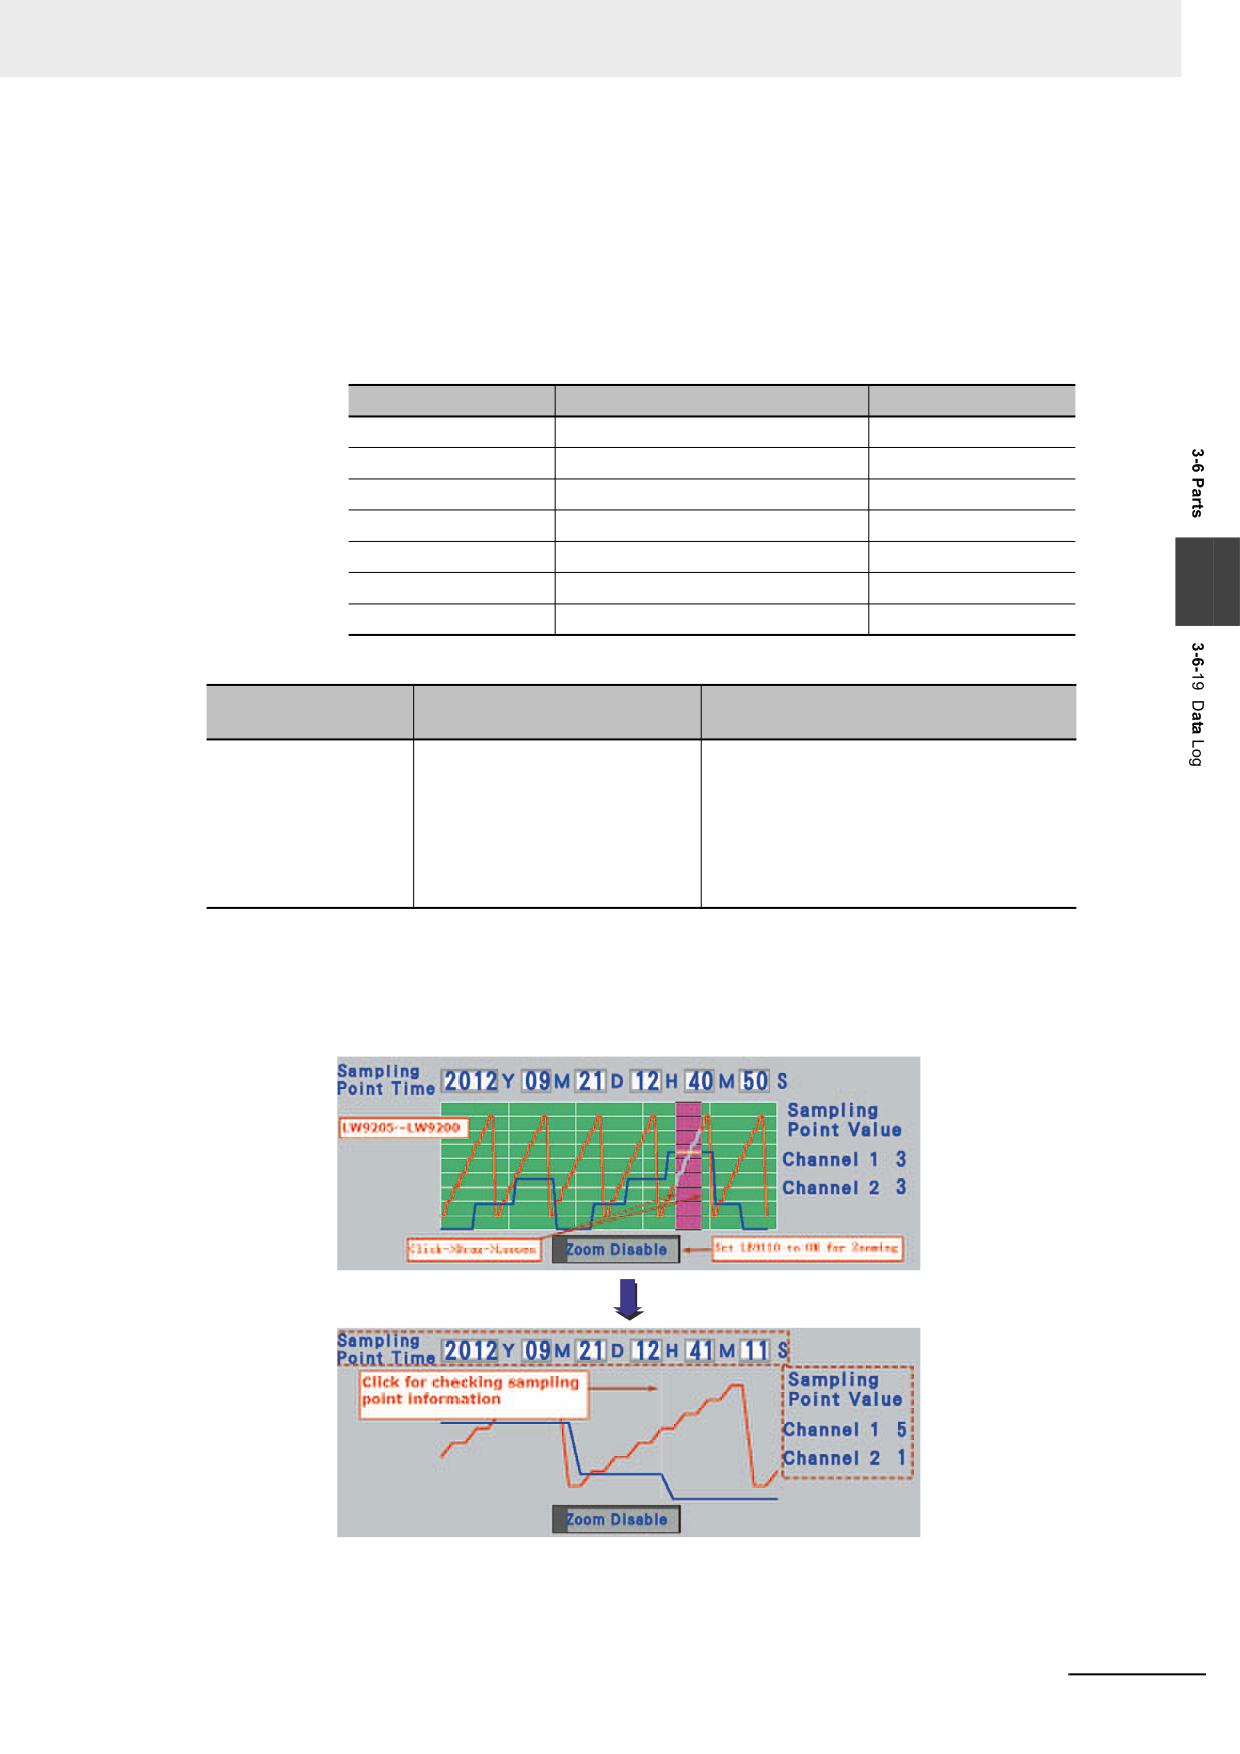
3 Functions of NB-Designer
2
The function of query of sampling time is only enabled by LB9110 when the zooming function is
used. And when the LB9110 is turned ON, the zooming and checking functions can be
activated. When the above functions are enabled, even if the sampling is performed, the user
can choose the sampling point(s) in the real-time Data Log directly, and the time for sampling
point will be stored to LW9200 to LW9205 at this time. And the time query is also available with
the sampling point(s) from the Data Log being selected after the zooming in of one selected
section.
Description list of related addresses:
memory Address
Descriptions
Addr. Type
LB9110
Control bit of zooming function
Bit address
LW9200
Second
Word address
LW9201
Minute
Word address
LW9202
Hour
Word address
LW9203
Day
Word address
LW9204
Month
Word address
3
LW9205
Year
Word address
Query of sampling point value
Addresses of Special
Function
Descriptions
memories
LW9210~ LW9210+N
Displays values of each channel
N represents the channel number, and the
of browsed points.
sampling value of browsed points for each
channel is stored. For example, if the
channel number is 2, the sampling value of
current browsed points for channel 1 will be
stored to LW9210, and that for channel 2
will be stored to LW9211.
Example of checking the operation result of sampling point information
The following shows the checking of sampling point information after the Data Log with 2-channel data
is zoomed in:
NB-series Programmable Terminals NB-Designer Operation Manual(V106)
3-163
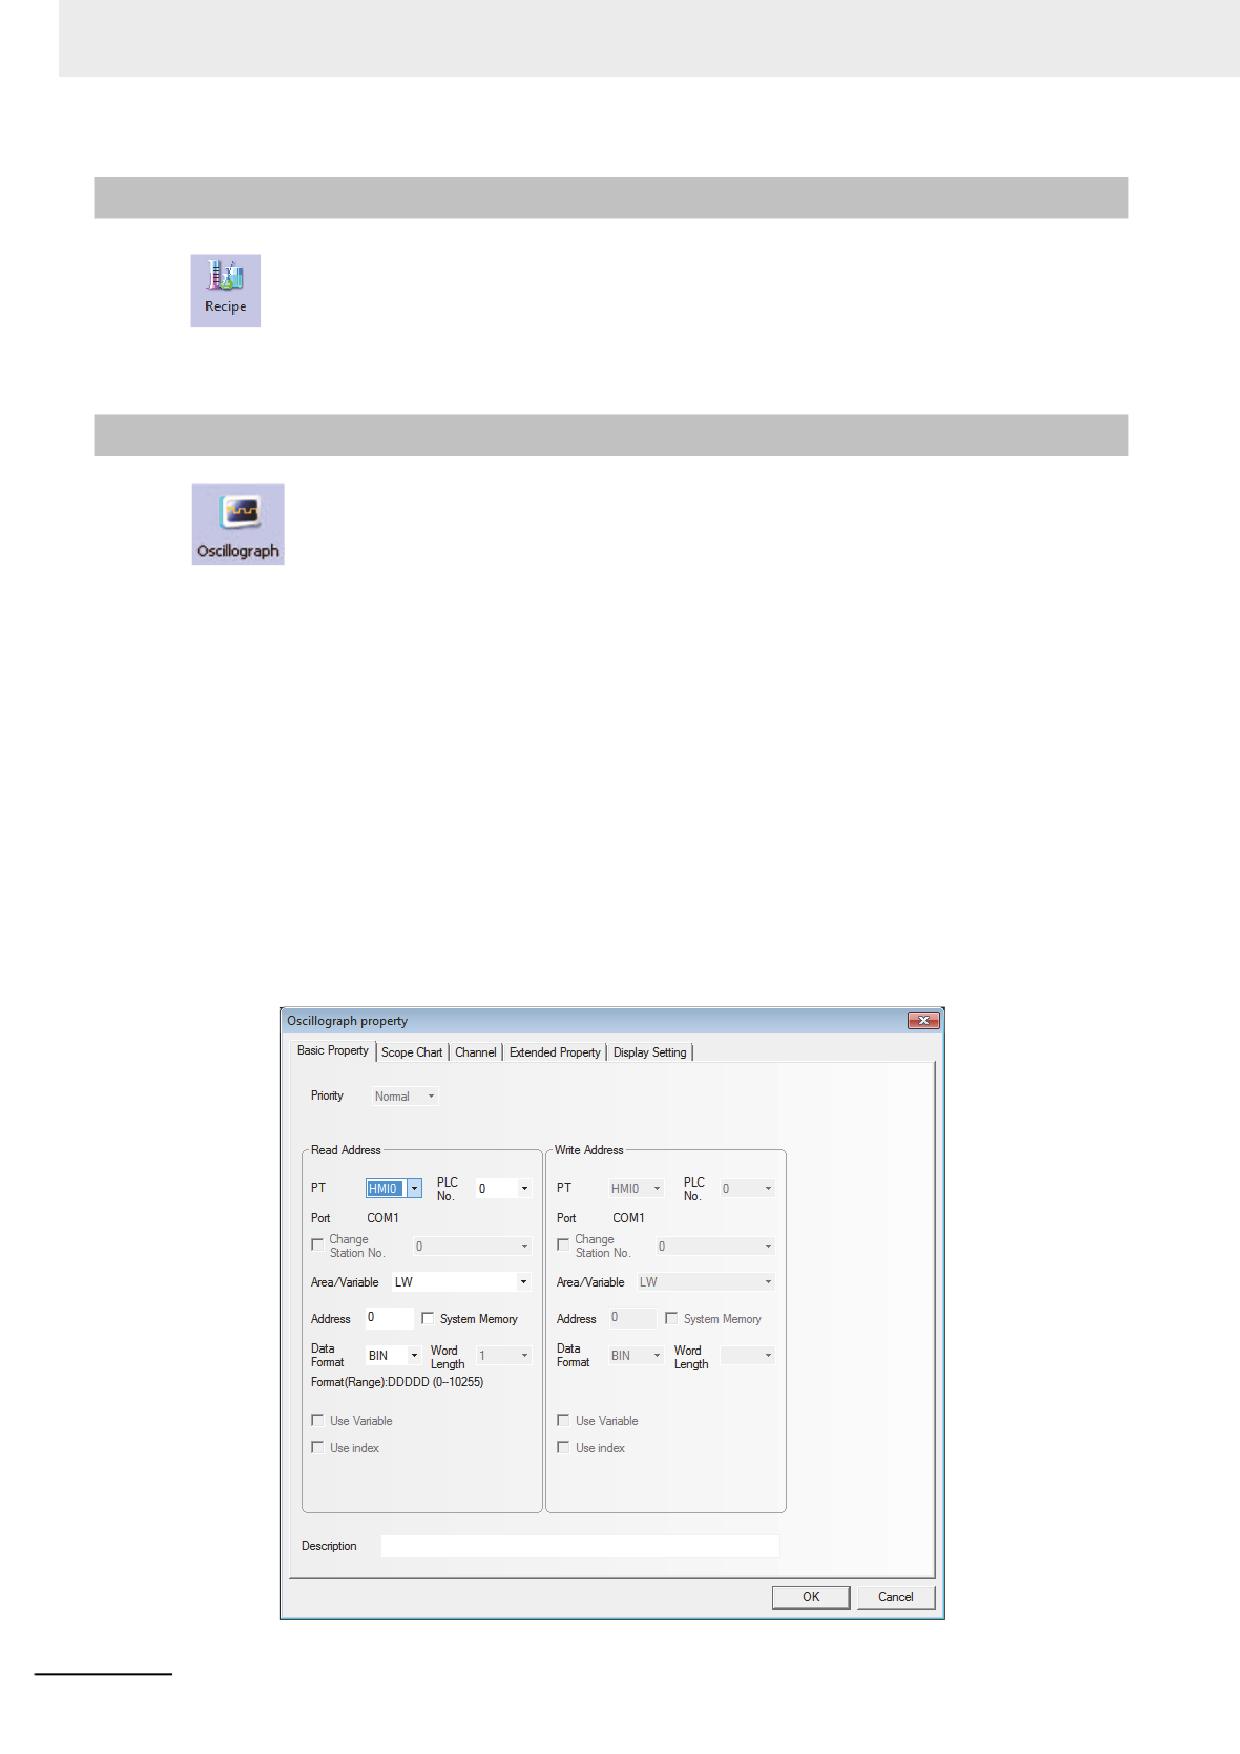
3 Functions of NB-Designer
3-6-20
Recipe
Recipe component can realize the data transmission from the recipe memory of PT to PLC, or
vice versa. For details, refer to 3-12 Recipe Data (Page 3-342).
3-6-21
Oscillograph
The Oscillograph functions similarly to the Data Log, and the difference between them is as
follows: For the Data Log, the backg1round communication still continue to do when the current screen
where the Data Log locates is closed, the sampling information before the switching can be obtained
when the Data Log is switched to at any time. But the data sampling of the Oscillograph is valid only in
the current page, which means the Oscillograph data will not be read but be lost each time when the
page is switched, and the data sampling will start from the beginning when the Oscillograph screen is
switched to. The advantages of Oscillograph are as follows: The user can monitor several waveforms
that don’t need to be recorded for the long period, and no backg1round communication burden will be
brought. Meanwhile, the user can use the “Sampling Rate” function provided by the Oscillograph, the
combination with the PLC allows to change the frequency of sampling point instead of only being
limited on the frequency of 1s/sampling point.
Process of adding one Oscillograph component
1
Press the Oscillograph component icon, drag it to the screen, then the [Basic Properties] dialog
box of the Oscillograph component will pop up.
3-164
NB-series Programmable Terminals NB-Designer Operation Manual(V106)
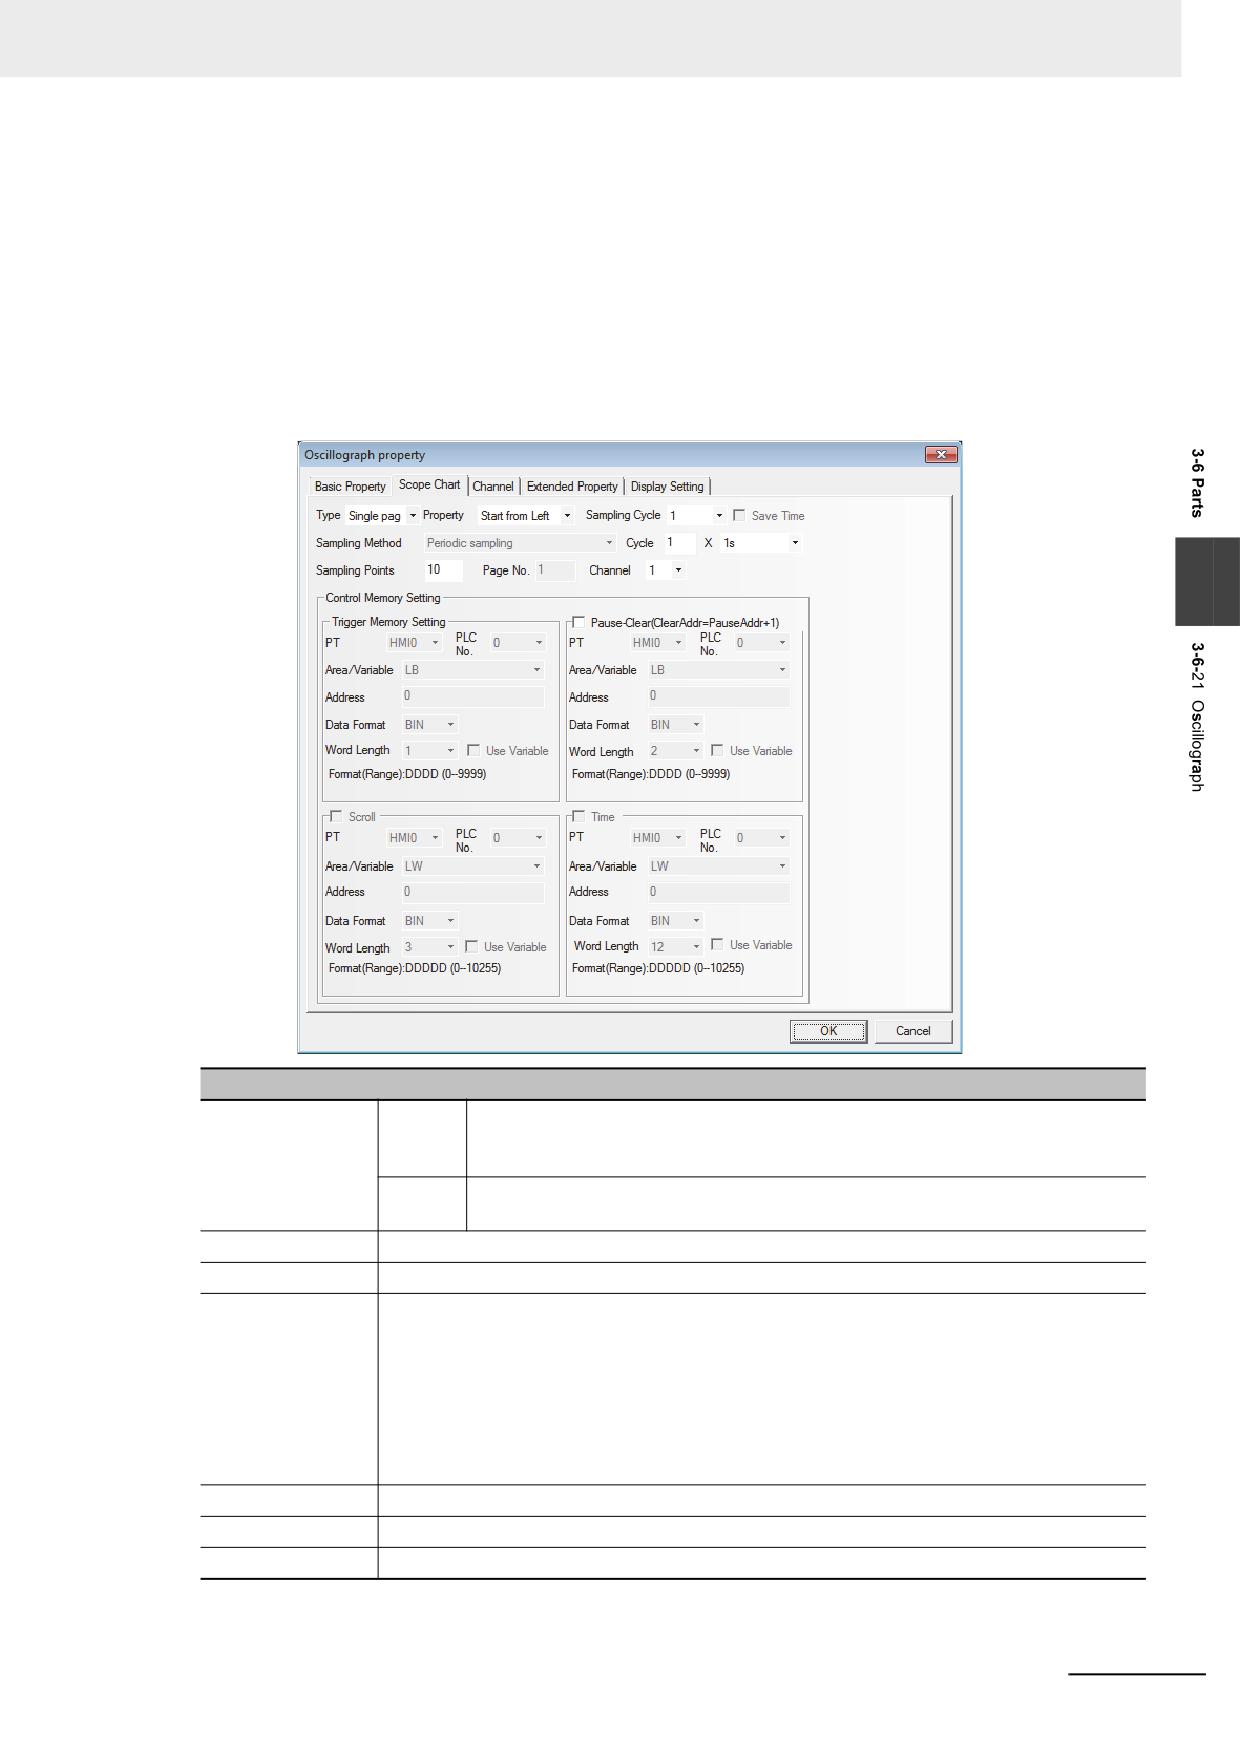
3 Functions of NB-Designer
Read Address: Refers to the word address of PLC corresponding to the 1st graph. And the
word address corresponding to the 2nd graph is “Read Address + 1”, and the
3rd graph is “Read Address + 2” and so on.
Address: Refers to the first address of the word address corresponding to the graph.
Word Length: It is determined by the sampling channels. If the channel number is N (where,
1<=N<=16), the Word Length will be N.
2
Go to the [Scope Chart] tab and set the parameters related to the Oscillograph component.
3
Descriptions of Scope Chart
Type
Single
Only the data change information of the sampling data in the current page is
page
displayed. In this type, the data which was scrolled and removed from the screen
will not be retained.
Multiple
The extension of Data Log is allowable. In this type, even if the Oscillograph is
pages
scrolled, the data displayed before the scrolling will be retained.
Property
Refers to the start movement direction of Oscillograph track.
Cycle
Refers to the interval to perform sampling with the unit of “s” or “100 ms”.
Sampling Rate
When the Sampling Rate is selected, the Oscillograph component will read the group data
with the sampling rate and display them at a time. For example, when the Read Address is
LW10, Sampling Rate is 2 and channel is 3, the values stored to the memory from LW10 to
LW15 for each sampling rate can be read. And the assignment is as follows: two of the data
is read for each sampling. The values will be read in the order of LW10, LW13 for channel
1, LW11, LW13 for channel 2, LW12, LW15 for channel 3. When the sampling time is 1 s,
the above-mentioned two group data will be read each second. And when the sampling
rate is used, the chart is more accurate and smooth.
Sampling Points
Refers to the number of sampling point displayed in each screen.
Page No.
This option is valid only when “Multiple pages” is selected.
Channel
Refers to the number of the graph to be displayed (16 channels at max.).
NB-series Programmable Terminals NB-Designer Operation Manual(V106)
3-165
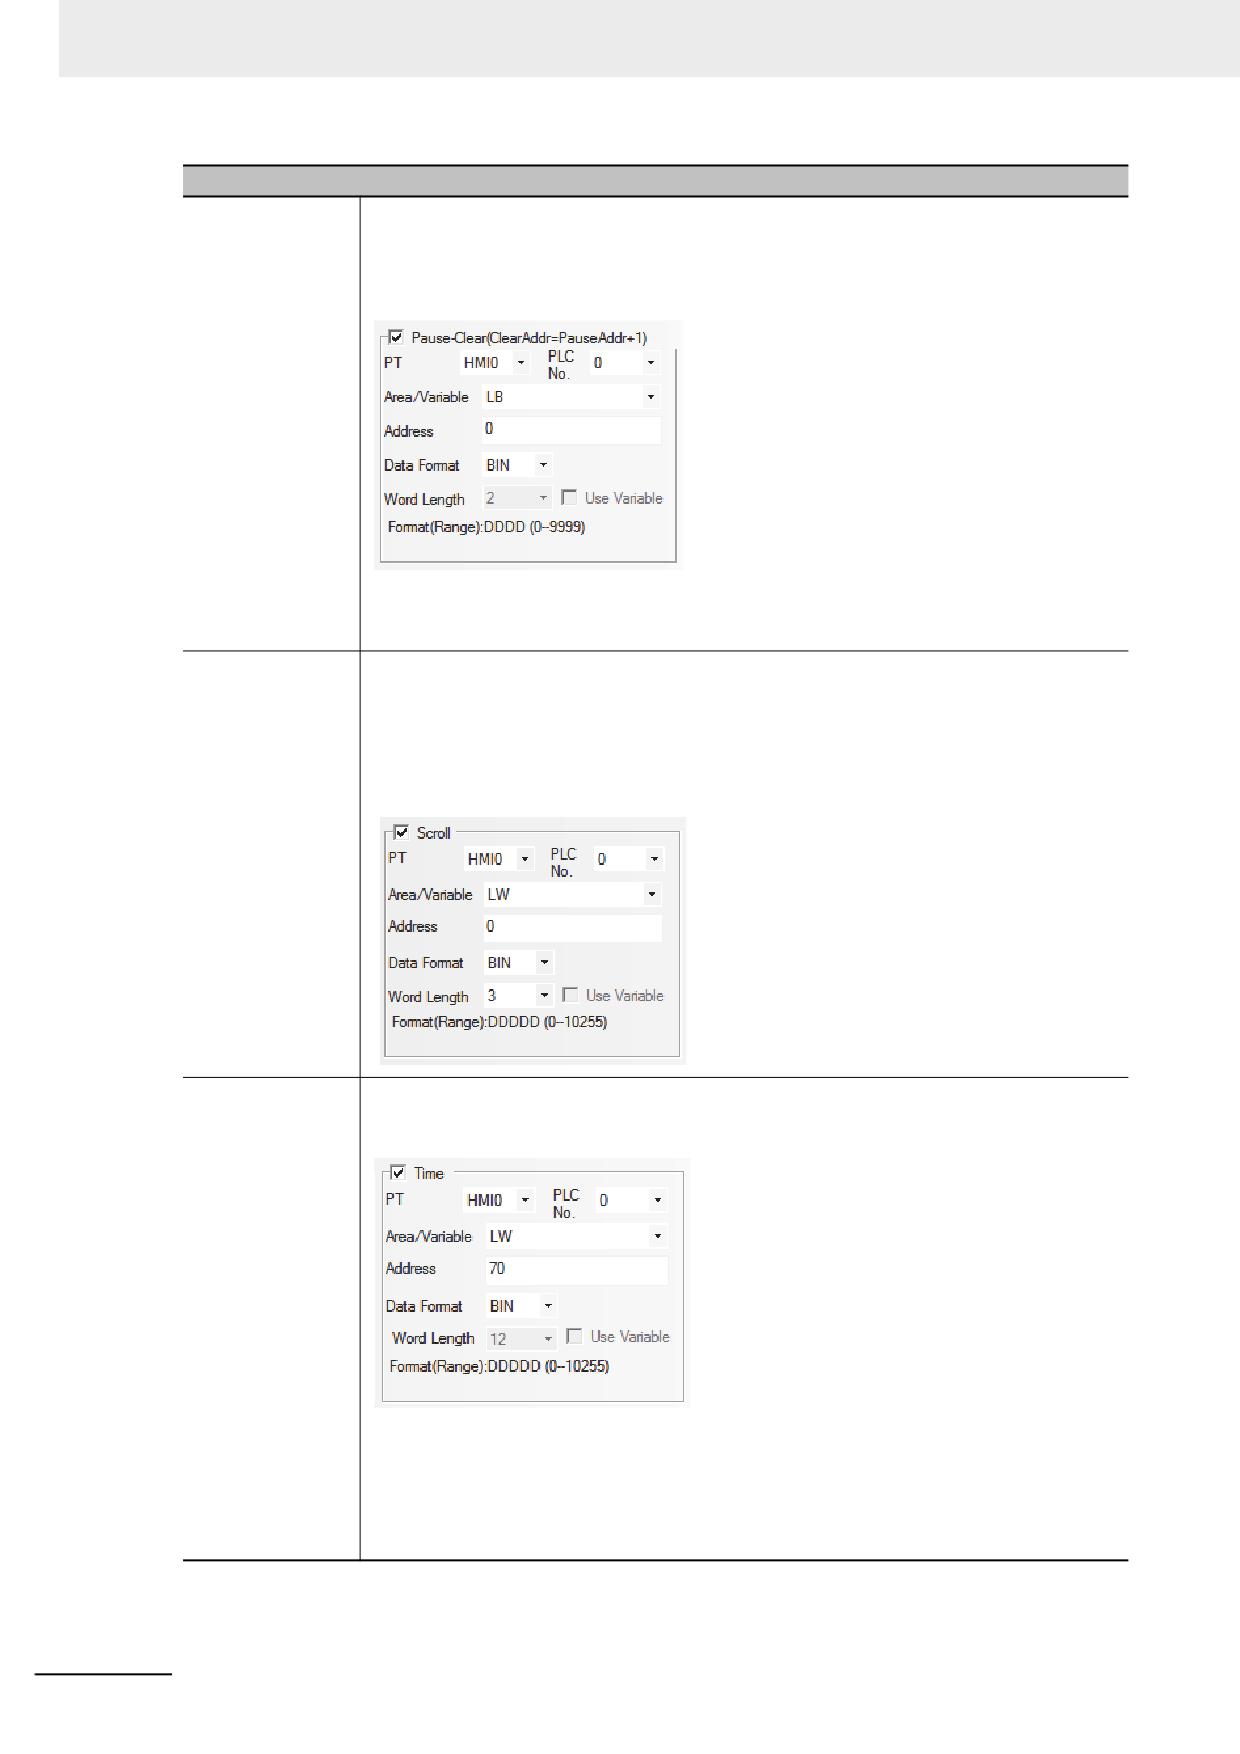
3 Functions of NB-Designer
Descriptions of Scope Chart
Pause-Clear
The default Word Length is 2. “Pause” function stops temporarily the refresh of the graph
and the sampling operation will not be stopped temporarily. When “Pause-Clear” is checked
as shown blow, and the state of the specified bit address LB0 is set “ON”, the screen will
stop refreshing temporarily When the specified bit address LB0 is set “OFF”, the graph will
be refreshed and displayed.
“Clear” corresponds to the “address allocated temporarily to Pause + 1”. Specifying the
parameters as above, the bit address LB0 functions as “Pause” and the bit address LB1
functions as “Clear”. Displayed graph can be cleared only the changes occurred in LB1 state.
Scroll
The default value is 3. For example, if the specified memory is LW0, LW0, LW1 and LW2
will be the current browsing index value (the newest index value is 0 and the value is
greater, the data is older), the starting browsing index value and the maximum browsing
index value of Scroll Bar respectively. This option is valid only when “Multiple pages” is
selected. “Scroll” can be used to browse the multiple graph and can be in combination with
the Scroll Bar. For the specific using method of Scroll Bar, refer to 3-6-22 Scroll Bar (Page
3-168).
Time
It is used to save the time when the latest sampling point is performed. “Time” option in
“Control memory Setting” is valid only when the “Save Time” is checked. The default
memory is LW and the Word Length is 12.
As shown as above, when the allocated address is specified to LW70, each data is stored
as below:
• The sampling time of the oldest data within the displayed page
Second: LW70, Minute: LW71, Hour: LW72, Day: LW73, Month: LW74, Year: LW75
• The sampling time of the newest data within the displayed page
Second: LW76, Minute: LW77, Hour: LW78, Day: LW79, Month: LW80, Year: LW81
3-166
NB-series Programmable Terminals NB-Designer Operation Manual(V106)
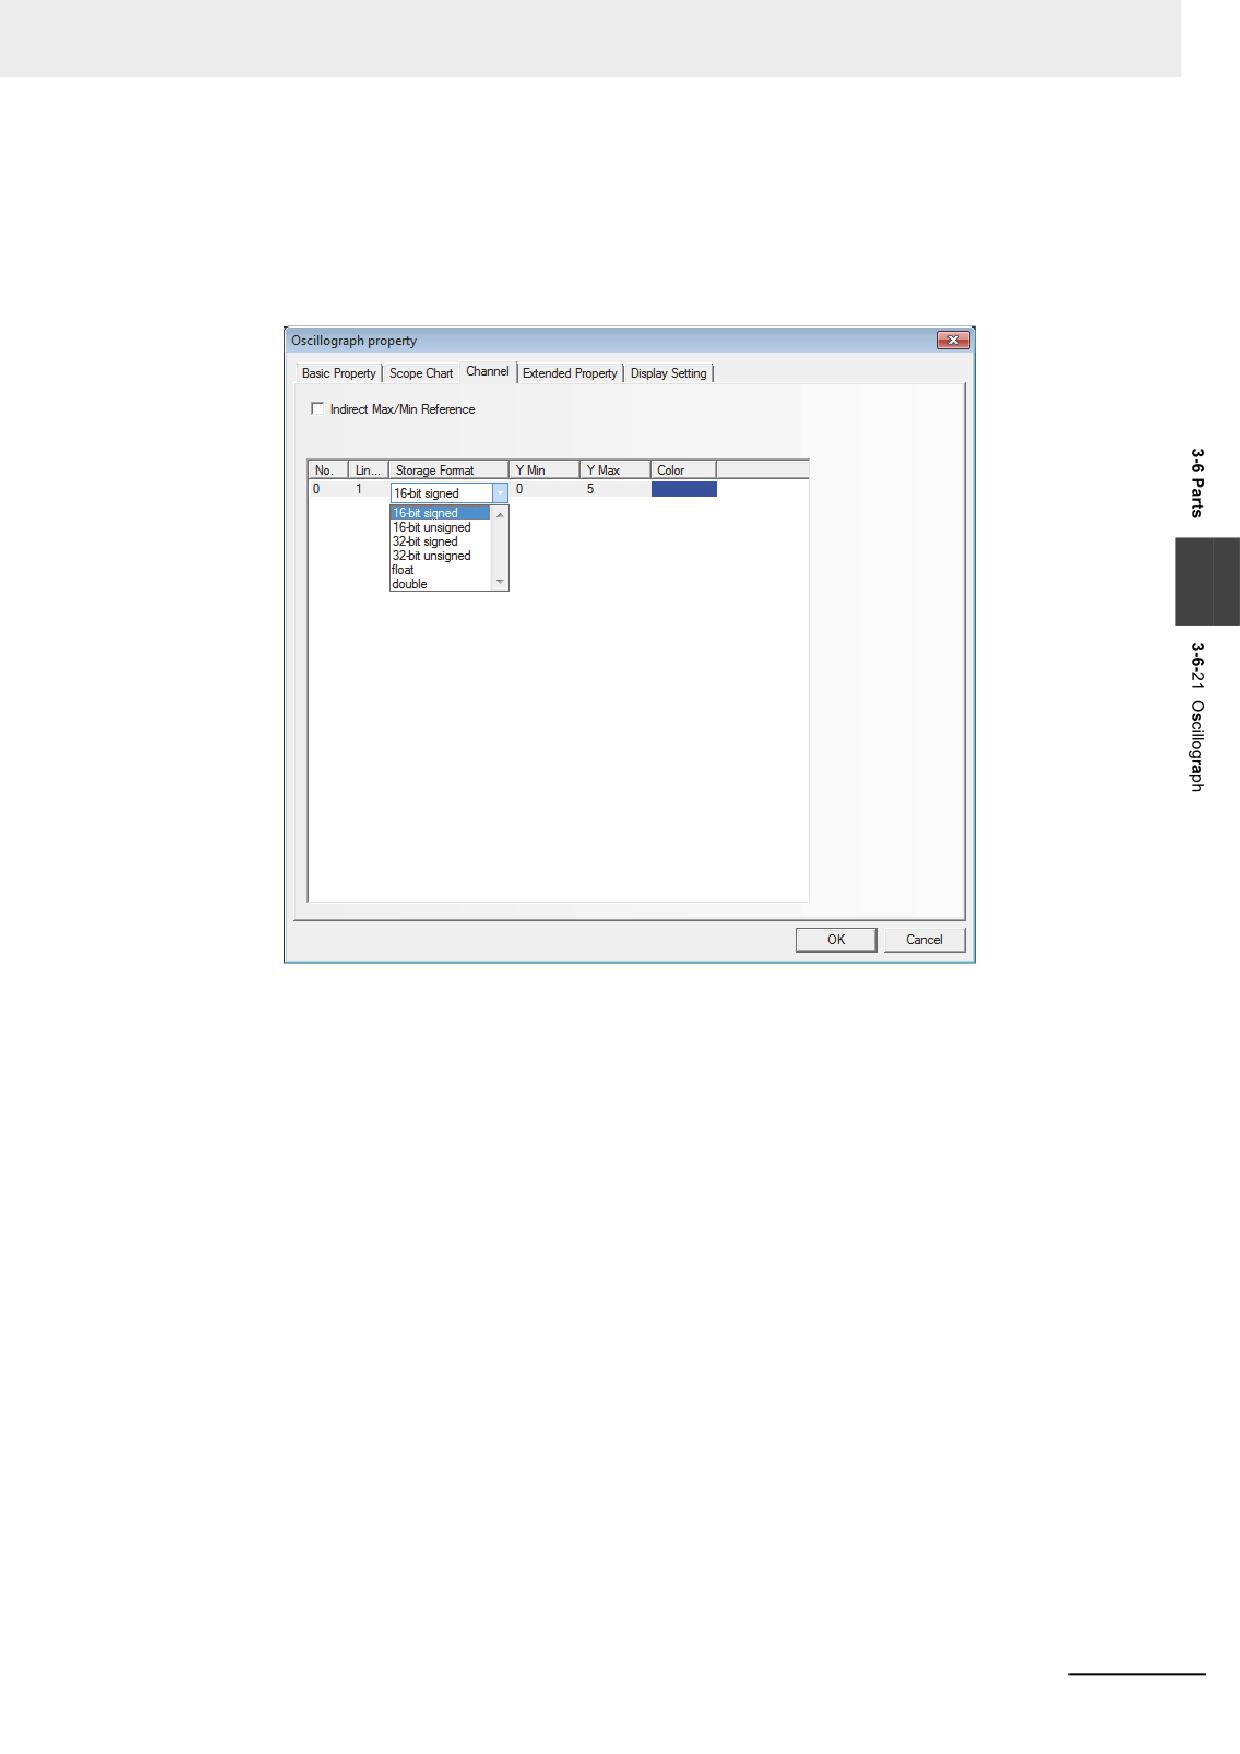
3 Functions of NB-Designer
Note When the trigger sampling is used, if multiple samplings are performed at the same timing, only single value
might be acquired.
When such a state is assumed, place the Data Transmission component and others on the Common Sheet
and acquire the necessary data at local memory to perform the sampling for the local memory.
3
Switch to the [Channel] tab and set the parameters related to each graph.
3
Color: Specifies the color for each track line.
Line Width: Refers to the thickness of the line, and 8 kinds of line width are available here.
Storage Format: Sets the data type used by the user and 6 kinds are available.
Y Min/Y Max: Sets the minimum value and maximum value of the data corresponding to each
track line in Y direction.
Indirect Max/Min Reference: Sets the display range of channel track to variable, and
specifies the memory address for reading range value. For the
multiple channels, the memory can be specified independently,
and [The Specified Indirect memory Address] is Y Min, and [The
Specified Indirect memory Address + 1] is Y Max.
4
Press the [OK] button, and then adjust the position and size of the Oscillograph component.
NB-series Programmable Terminals NB-Designer Operation Manual(V106)
3-167
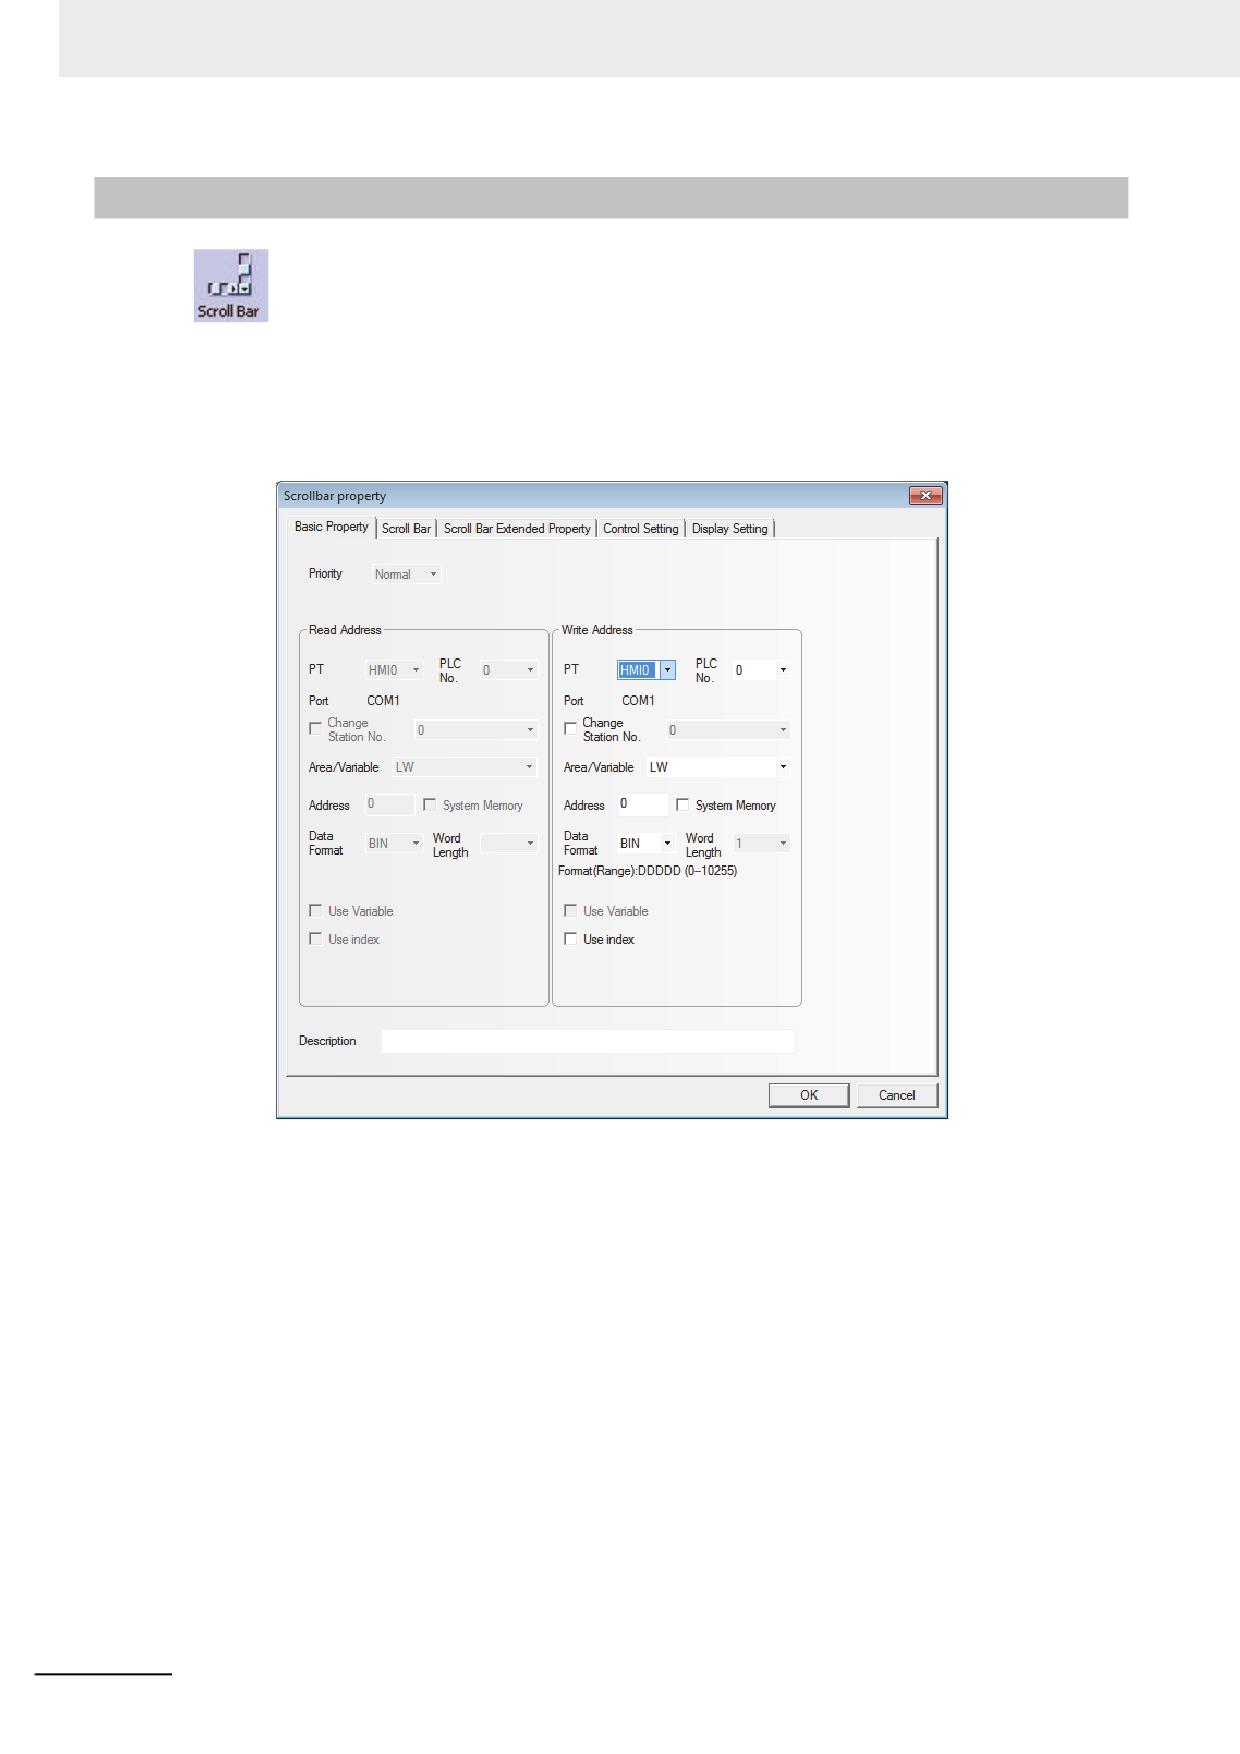
3 Functions of NB-Designer
3-6-22
Scroll Bar
Scroll Bar is used to change the value in the specified word memory by pressing the slider.
Process of adding one Scroll Bar component
1
Press the Scroll Bar component icon, drag it to the screen, then the [Basic Properties] dialog
box of the Scroll Bar component will pop up.
Write Address: Refers to the address of word memory of the current browsing index value for
the Scroll Bar component.
Address: Refers to the first address of the word address corresponding to Scroll Bar.
Word Length: Displays the data length of the write address, which is 1 by default.
3-168
NB-series Programmable Terminals NB-Designer Operation Manual(V106)