FM 3-05.70 Field Manual Survival (17 May 2002) - page 6
• Lime. You can get lime from commercial sources and in
agricultural areas that use large quantities of it. You may
produce your own by burning coral or seashells. Throw the
lime into the water.
• Nut husks. Crush green husks from butternuts or black
walnuts. Throw the husks into the water.
COOKING AND STORAGE OF FISH AND GAME
8-70. You must know how to prepare fish and game for cooking
and storage in a survival situation. Improper cleaning or storage
can result in inedible fish or game.
FISH
8-71. Do not eat fish that appears spoiled. Cooking does not
ensure that spoiled fish will be edible. Signs of spoilage are—
• Sunken eyes.
• Peculiar odor.
• Suspicious color. (Gills should be red to pink. Scales should
be a pronounced shade of gray, not faded.)
• Dents that stay in the fish’s flesh after pressed with your
thumb.
• Slimy, rather than moist or wet, body.
• Sharp or peppery taste.
8-72. Eating spoiled or rotten fish may cause diarrhea, nausea,
cramps, vomiting, itching, paralysis, or a metallic taste in the
mouth. These symptoms appear suddenly, 1 to 6 hours after
eating. Induce vomiting if symptoms appear.
8-73. Fish spoils quickly after death, especially on a hot day.
Prepare fish for eating as soon as possible after catching it. Cut
out the gills and the large blood vessels that lie near the spine.
Gut fish that are more than 10 centimeters (4 inches) long. Scale
or skin the fish.
8-74. You can impale a whole fish on a stick and cook it over an
open fire. However, boiling the fish with the skin on is the best
way to get the most food value. The fats and oil are under the
skin and, by boiling, you can save the juices for broth. You can
use any of the methods used to cook plant food to cook fish. Pack
8-35
fish into a ball of clay and bury it in the coals of a fire until the
clay hardens. Break open the clay ball to get to the cooked fish.
Fish is done when the meat flakes off. If you plan to keep the fish
for later, smoke or fry it. To prepare fish for smoking, cut off the
head and remove the backbone.
SNAKES
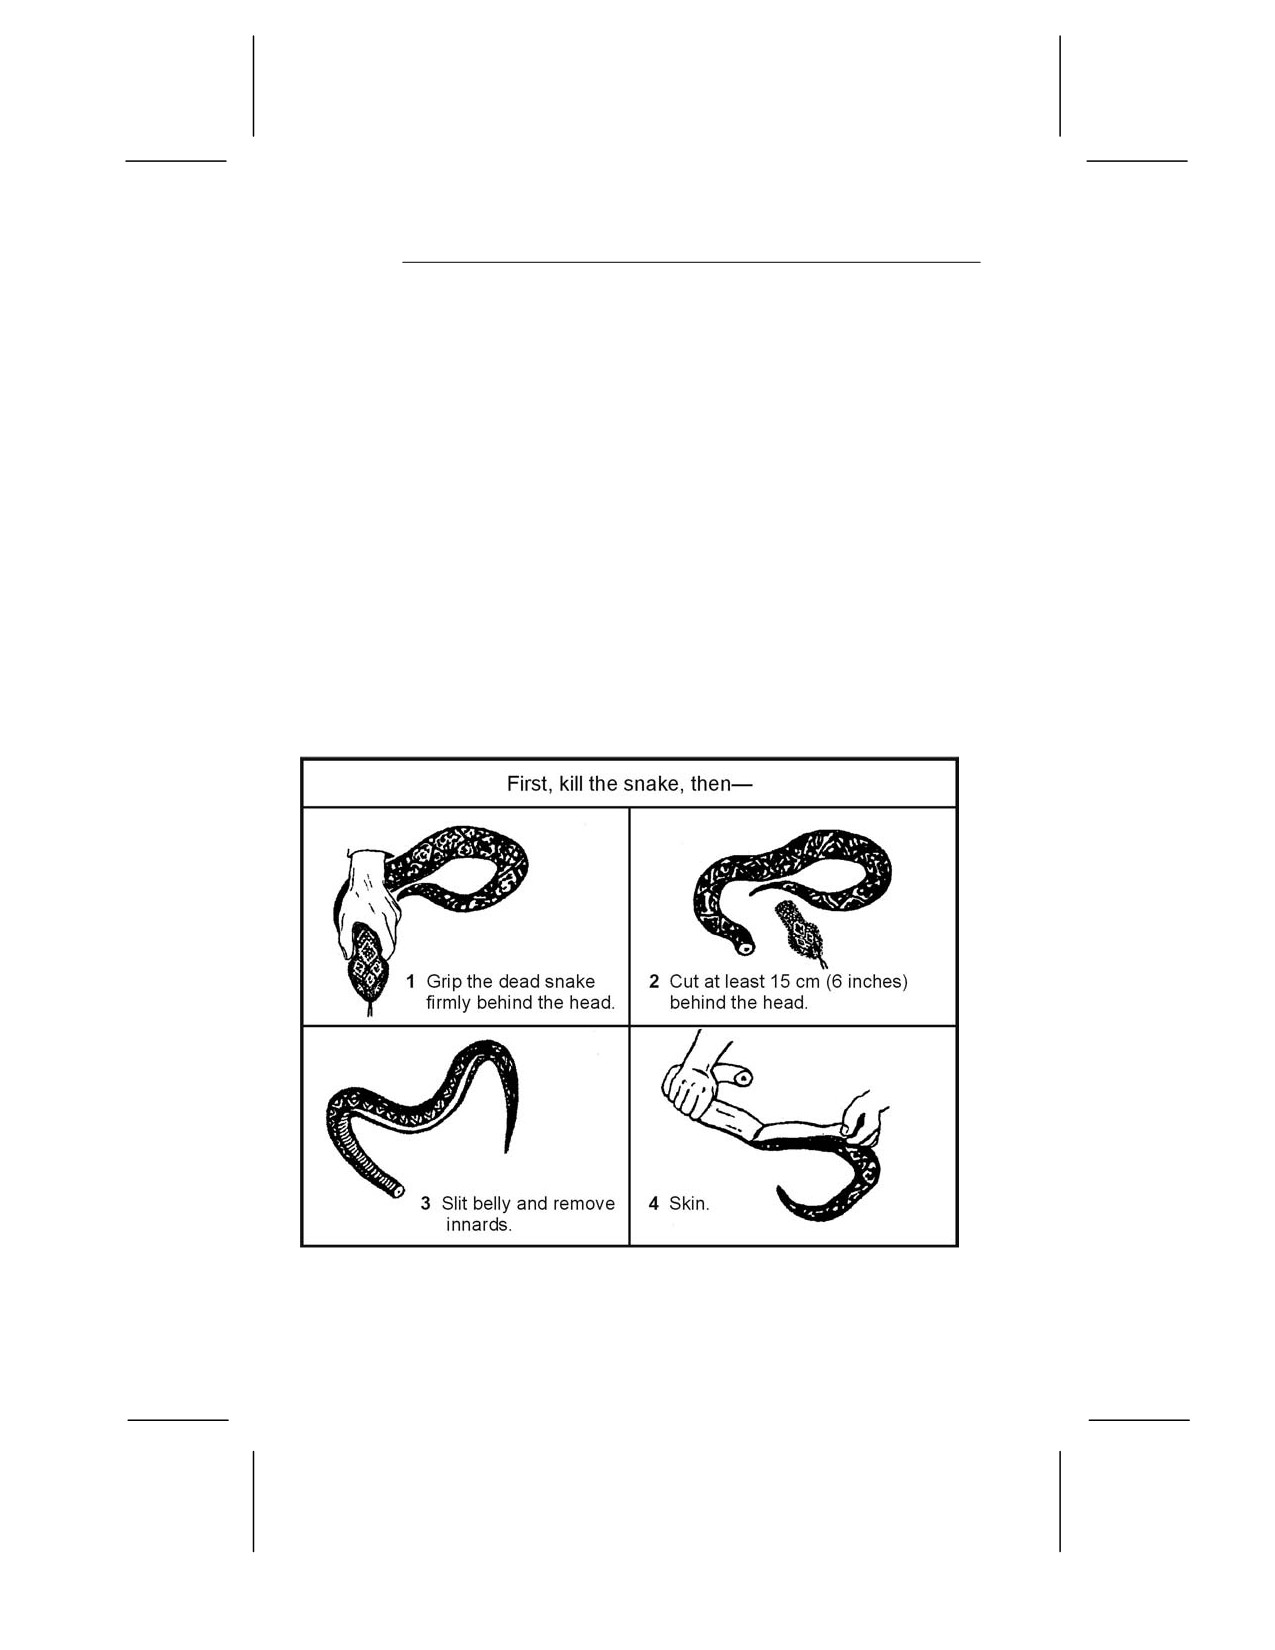
8-75. To skin a snake, first cut off its head, to include 10 to 15
centimeters (4 to 6 inches) behind the head. This will ensure you
remove the venom sac, which is located at the base of the head.
Bury the sac to prevent further contact. Then cut the skin down
the body 2 to 4 centimeters (1 to 1 1/2 inches). Peel the skin back,
then grasp the skin in one hand and the body in the other and
pull apart
(Figure
8-25). On large, bulky snakes it may be
necessary to slit the belly skin. Cook snakes in the same manner
as small game. Remove the entrails and discard. Cut the snake
into small sections and boil or roast it.
Figure 8-25. Cleaning a Snake
8-36
BIRDS
8-76. After killing the bird, remove its feathers by either plucking
or skinning. Remember, skinning removes some of the food value.
Open up the body cavity and remove the entrails, saving the craw
(in seed-eating birds), heart, and liver. Cut off the feet. Cook by
boiling or roasting over a spit. Before cooking scavenger birds,
boil them at least 20 minutes to kill parasites.
SKINNING AND BUTCHERING GAME
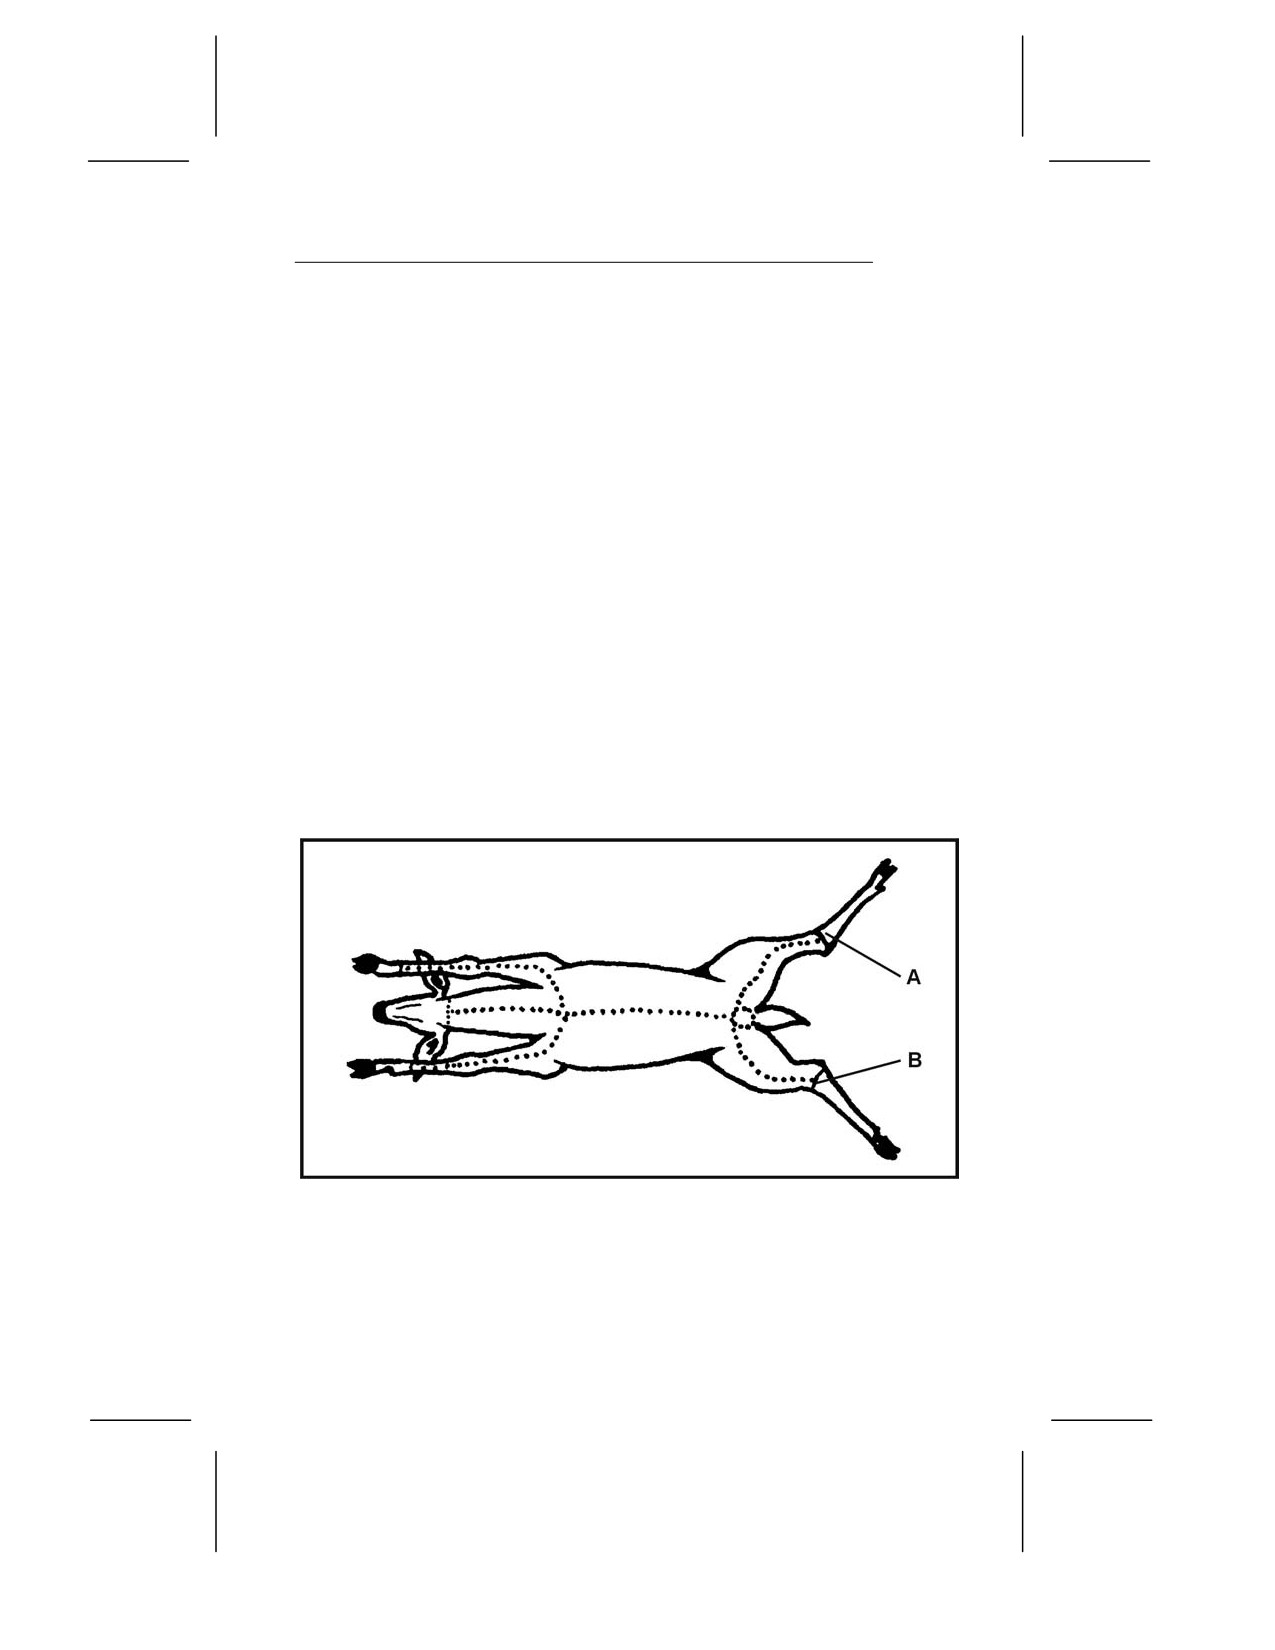
8-77. Bleed the animal by cutting its throat. If possible, clean the
carcass near a stream. Place the carcass belly up and split the
hide from throat to tail, cutting around all sexual organs (Figure
8-26). Remove the musk glands at points A and B to avoid
tainting the meat. For smaller mammals, cut the hide around the
body and insert two fingers under the hide on both sides of the
cut and pull both pieces off (Figure 8-27, page 8-38).
NOTE: When cutting the hide, insert the knife blade under the
skin and turn the blade up so that only the hide gets cut. This
will also prevent cutting hair and getting it on the meat.
Figure 8-26. Skinning and Butchering Large Game
8-37
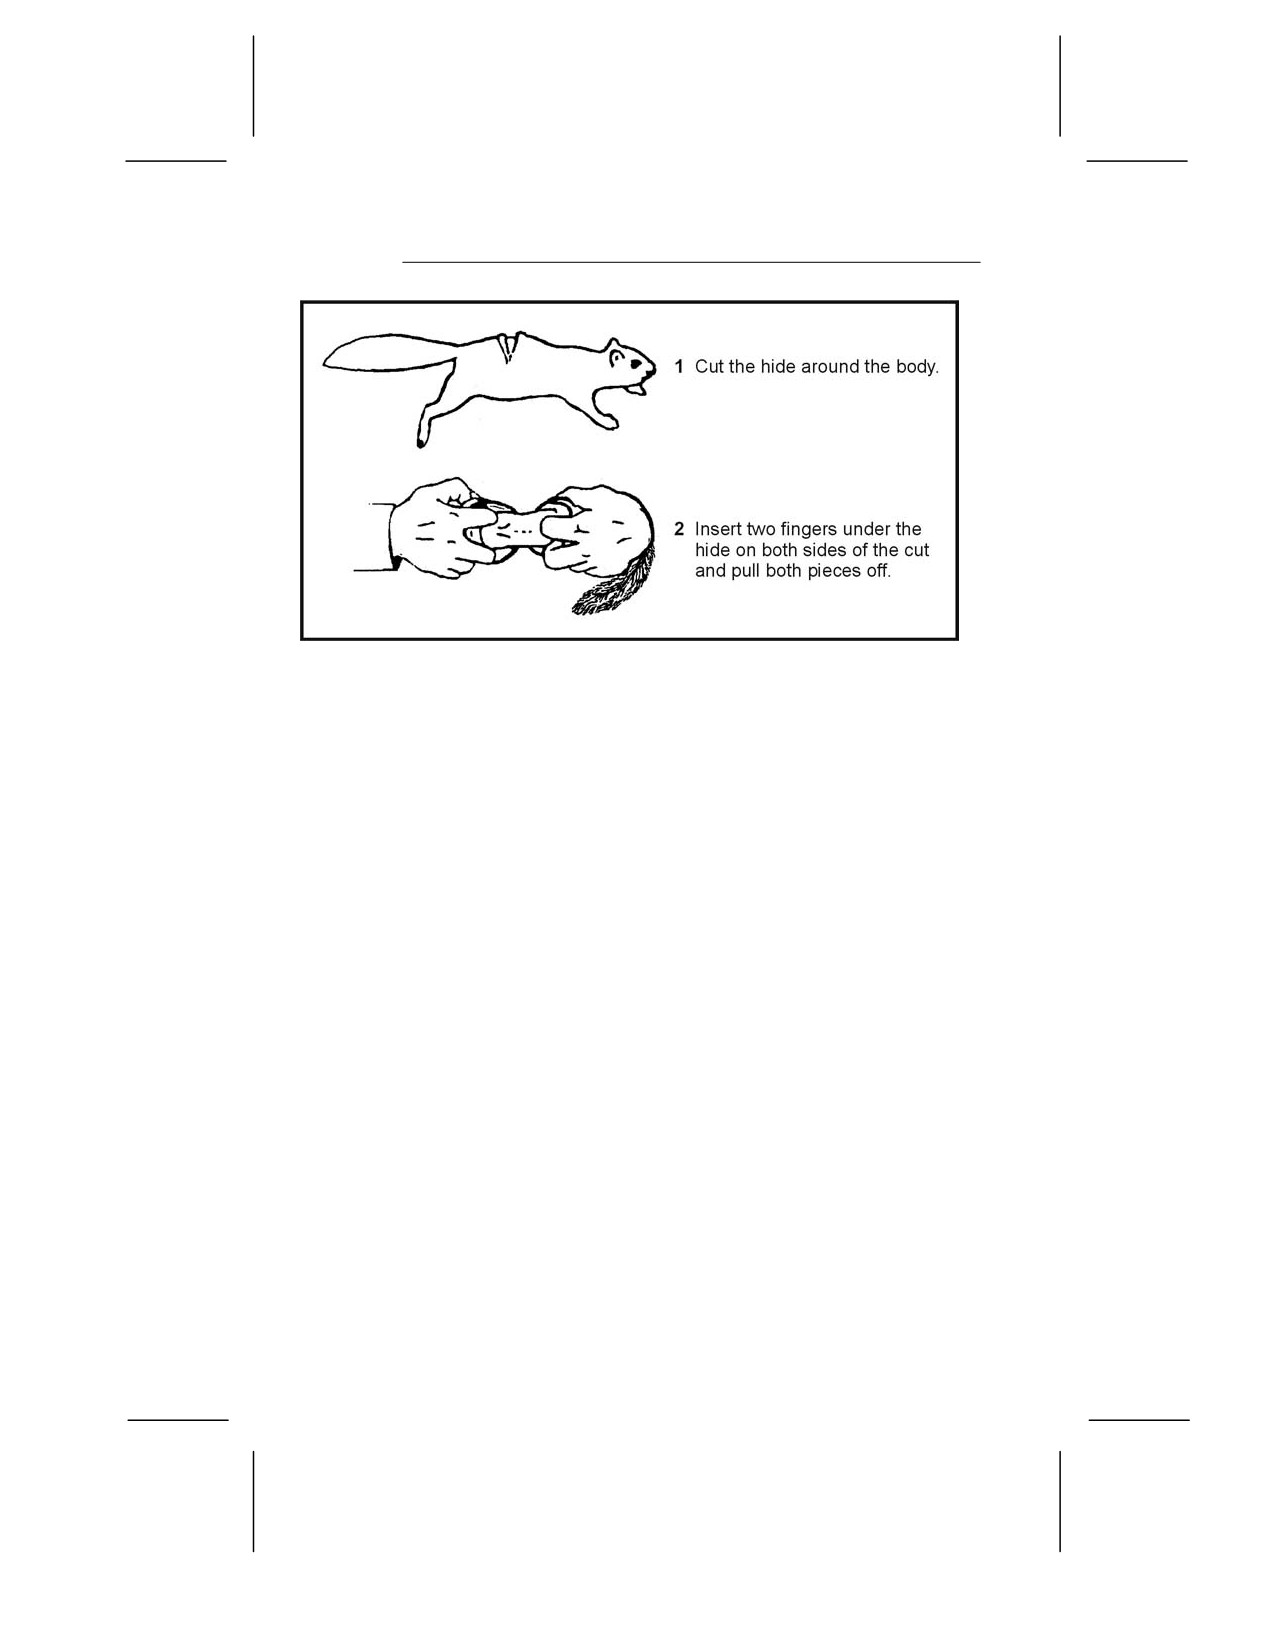
Figure 8-27. Skinning Small Game
8-78. Remove the entrails from smaller game by splitting the body
open and pulling them out with the fingers. Do not forget the chest
cavity. For larger game, cut the gullet away from the diaphragm.
Roll the entrails out of the body. Cut around the anus, then reach
into the lower abdominal cavity, grasp the lower intestine, and pull
to remove. Remove the urine bladder by pinching it off and cutting
it below the fingers. If you spill urine on the meat, wash it to avoid
tainting the meat. Save the heart and liver. Cut these open and
inspect for signs of worms or other parasites. Also inspect the
liver’s color; it could indicate a diseased animal. The liver’s surface
should be smooth and wet and its color deep red or purple. If the
liver appears diseased, discard it. However, a diseased liver does
not indicate you cannot eat the muscle tissue.
8-79. Cut along each leg from above the foot to the previously
made body cut. Remove the hide by pulling it away from the
carcass, cutting the connective tissue where necessary. Cut off the
head and feet.
8-80. Cut larger game into manageable pieces. First, slice the
muscle tissue connecting the front legs to the body. There are no
bones or joints connecting the front legs to the body on four-
legged animals. Cut the hindquarters off where they join the
body. You must cut around a large bone at the top of the leg and
cut to the ball-and-socket hip joint. Cut the ligaments around the
8-38
joint and bend it back to separate it. Remove the large muscles
(the tenderloin or “backstrap”) that lie on either side of the spine.
Separate the ribs from the backbone. There is less work and less
wear on your knife if you break the ribs first, then cut through
the breaks.
8-81. Boil large meat pieces or cook them over a spit. You can
stew or boil smaller pieces, particularly those that remain
attached to bone after the initial butchering, as soup or broth.
You can cook body organs such as the heart, liver, pancreas,
spleen, and kidneys using the same methods as for muscle meat.
You can also cook and eat the brain. Cut the tongue out, skin it,
boil it until tender, and eat it.
SMOKING MEAT
8-82. To smoke meat, prepare an enclosure around a fire
Figure 8-28, page 8-40). Two ponchos snapped together will work.
The fire does not need to be big or hot. The intent is to produce
smoke and heat, not flame. Do not use resinous wood because its
smoke will ruin the meat. Use hardwoods to produce good smoke.
The wood should be somewhat green. If it is too dry, soak it. Cut
the meat into thin slices, no more than 6 millimeters (about 1/4
inch) thick, and drape them over a framework. Make sure none of
the meat touches another piece. Keep the poncho enclosure
around the meat to hold the smoke and keep a close watch on the
fire. Do not let the fire get too hot. Meat smoked overnight in this
manner will last about 1 week. Two days of continuous smoking
will preserve the meat for 2 to 4 weeks. Properly smoked meat
will look like a dark, curled, brittle stick and you can eat it
without further cooking. You can also use a pit to smoke meat
(Figure 8-29, page 8-40).
8-39
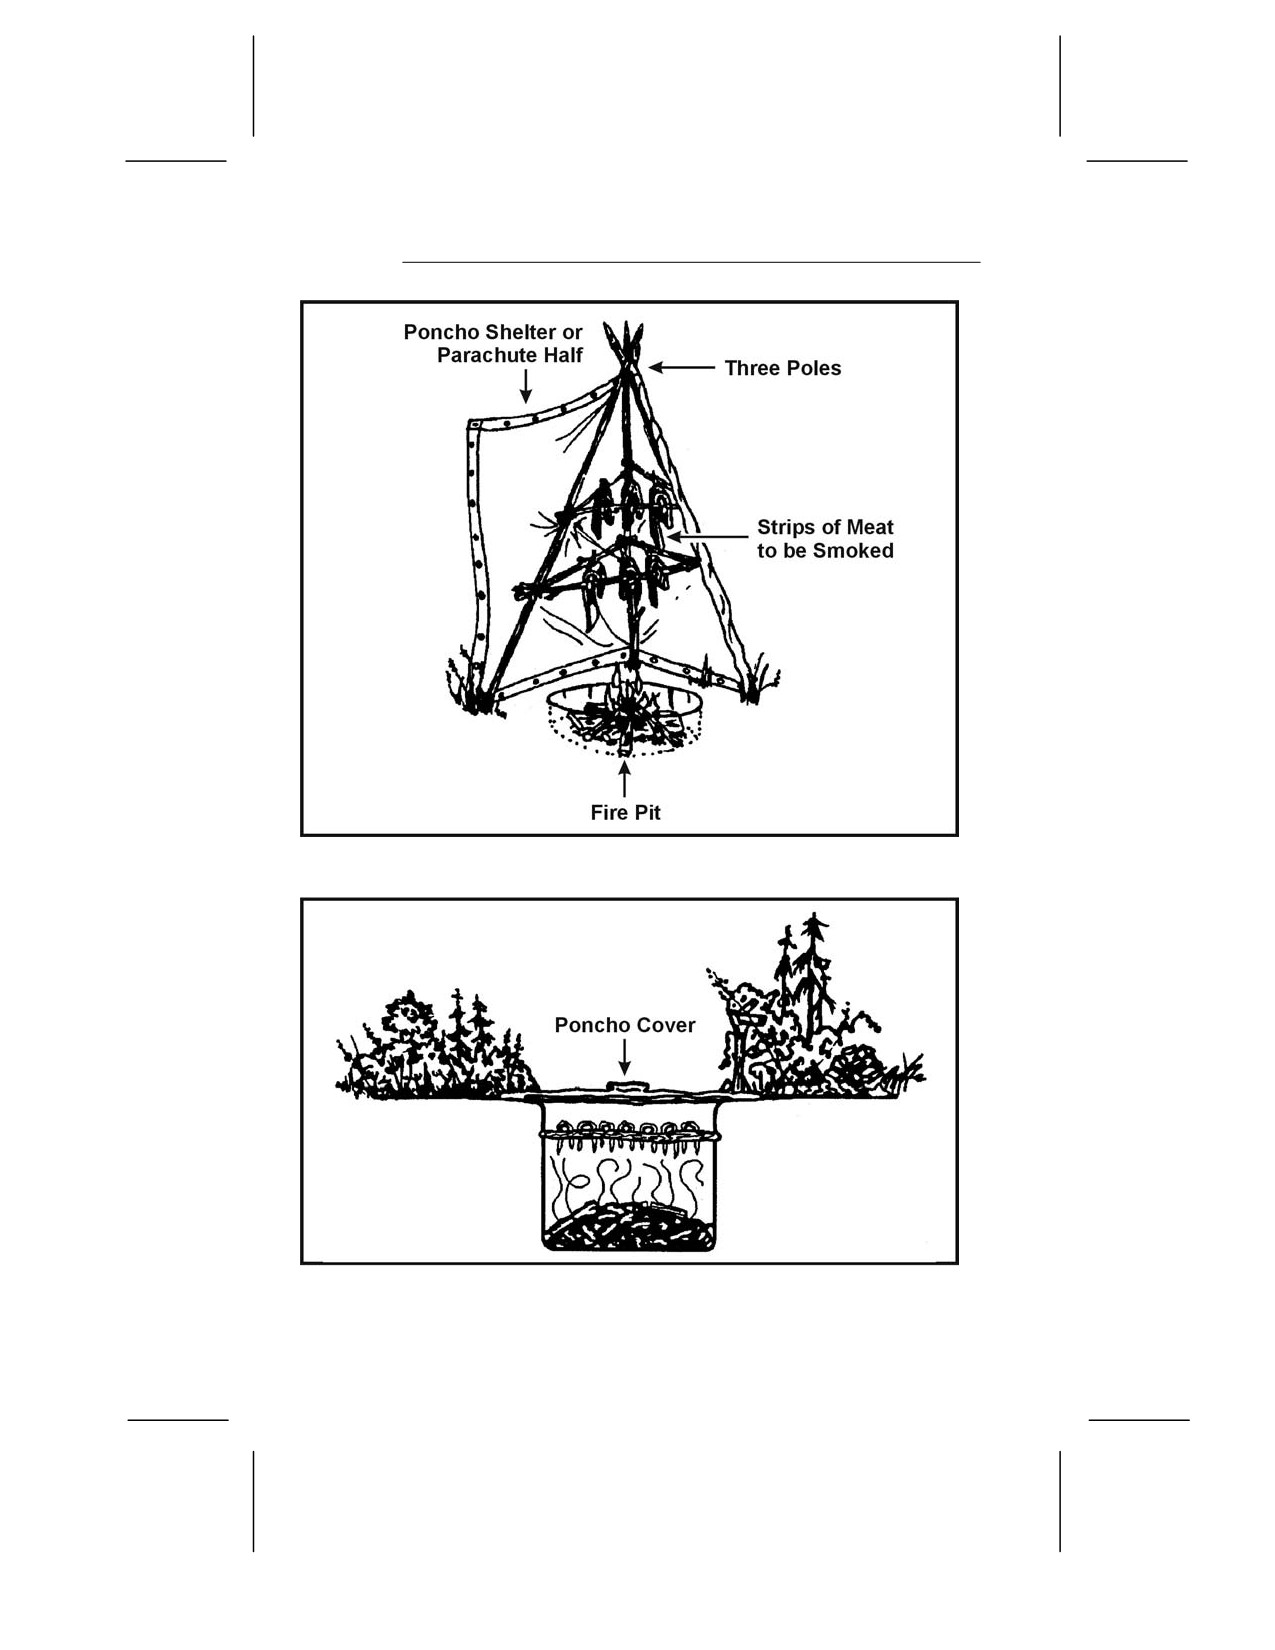
Figure 8-28. Tepee Smoker
Figure 8-29. Smoking Meat Over a Pit
8-40
DRYING MEAT
8-83. To preserve meat by drying, cut it into
6-millimeter
(1/4-inch) strips with the grain. Hang the meat strips on a rack in
a sunny location with good airflow. Keep the strips out of the
reach of animals. Cover the strips to keep off blowflies. Allow the
meat to dry thoroughly before eating. Properly dried meat will
have a dry, crisp texture and will not feel cool to the touch.
OTHER PRESERVATION METHODS
8-84. You can also preserve meats using the freezing or brine and
salt methods. In cold climates, you can freeze and keep meat
indefinitely. Freezing is not a means of preparing meat. You must
still cook it before eating. You can also preserve meat by soaking
it thoroughly in a saltwater solution. The solution must cover the
meat. You can use salt by itself but make sure you wash off the
salt before cooking.
8-41
Chapter 9
Survival Use of Plants
After having solved the problems of finding
water, shelter, and animal food, you will have to
consider the use of plants you can eat. In a
survival situation you should always be on the
lookout for familiar wild foods and live off the
land whenever possible.
You must not count on being able to go for days
without food as some sources would suggest.
Even in the most static survival situation,
maintaining health through a complete and
nutritious diet is essential to maintaining
strength and peace of mind.
Nature can provide you with food that will let
you survive almost any ordeal, if you don’t eat
the wrong plant. You must therefore learn as
much as possible beforehand about the flora of
the region where you will be operating. Plants
can provide you with medicines in a survival
situation. Plants can supply you with weapons
and raw materials to construct shelters and build
fires. Plants can even provide you with chemicals
for poisoning fish, preserving animal hides, and
for camouflaging yourself and your equipment.
NOTE: You will find illustrations of the plants described in this
chapter in Appendixes B and C.
EDIBILITY OF PLANTS
9-1. Plants are valuable sources of food because they are widely
available, easily procured, and, in the proper combinations, can
meet all your nutritional needs.
9-1
WARNING
The critical factor in using plants for food is to avoid
accidental poisoning. Eat only those plants you can
positively identify and you know are safe to eat.
9-2. Absolutely identify plants before using them as food. Poison
hemlock has killed people who mistook it for its relatives, wild
carrots and wild parsnips.
9-3. You may find yourself in a situation where you have had
the chance to learn the plant life of the region in which you must
survive. In this case you can use the Universal Edibility Test to
determine which plants you can eat and which to avoid.
9-4. It is important to be able to recognize both cultivated and
wild edible plants in a survival situation. Most of the information
in this chapter is directed toward identifying wild plants because
information relating to cultivated plants is more readily available.
9-5. Consider the following when collecting wild plants for food:
• Plants growing near homes and occupied buildings or
along roadsides may have been sprayed with pesticides.
Wash these plants thoroughly. In more highly developed
countries with many automobiles, avoid roadside plants, if
possible, due to contamination from exhaust emissions.
• Plants growing in contaminated water or in water
containing Giardia lamblia and other parasites are
contaminated themselves. Boil or disinfect them.
• Some plants develop extremely dangerous fungal toxins.
To lessen the chance of accidental poisoning, do not eat any
fruit that is starting to spoil or is showing signs of mildew
or fungus.
• Plants of the same species may differ in their toxic or
subtoxic compounds content because of genetic or
environmental factors. One example of this is the foliage of
the common chokecherry. Some chokecherry plants have
high concentrations of deadly cyanide compounds but
others have low concentrations or none. Horses have died
from eating wilted wild cherry leaves. Avoid any weed,
9-2
leaves, or seeds with an almondlike scent, a characteristic
of the cyanide compounds.
• Some people are more susceptible to gastric distress (from
plants) than others. If you are sensitive in this way, avoid
unknown wild plants. If you are extremely sensitive to
poison ivy, avoid products from this family, including any
parts from sumacs, mangoes, and cashews.
• Some edible wild plants, such as acorns and water lily
rhizomes, are bitter. These bitter substances, usually
tannin compounds, make them unpalatable. Boiling them
in several changes of water will usually remove these
bitter properties.
• Many valuable wild plants have high concentrations of
oxalate compounds, also known as oxalic acid. Oxalates
produce a sharp burning sensation in your mouth and
throat and damage the kidneys. Baking, roasting, or
drying usually destroys these oxalate crystals. The corm
(bulb) of the jack-in-the-pulpit is known as the “Indian
turnip,” but you can eat it only after removing these
crystals by slow baking or by drying.
WARNING
Do not eat mushrooms in a survival situation! The
only way to tell if a mushroom is edible is by positive
identification. There is no room for experimentation.
Symptoms caused by the most dangerous
mushrooms affecting the central nervous system may
not show up until several days after ingestion. By that
time, it is too late to reverse their effects.
PLANT IDENTIFICATION
9-6. You identify plants, other than by memorizing particular
varieties through familiarity, by using such factors as leaf shape
and margin, leaf arrangements, and root structure.
9-7. The basic leaf margins (Figure 9-1, page 9-4) are toothed,
lobed, and toothless or smooth.
9-3
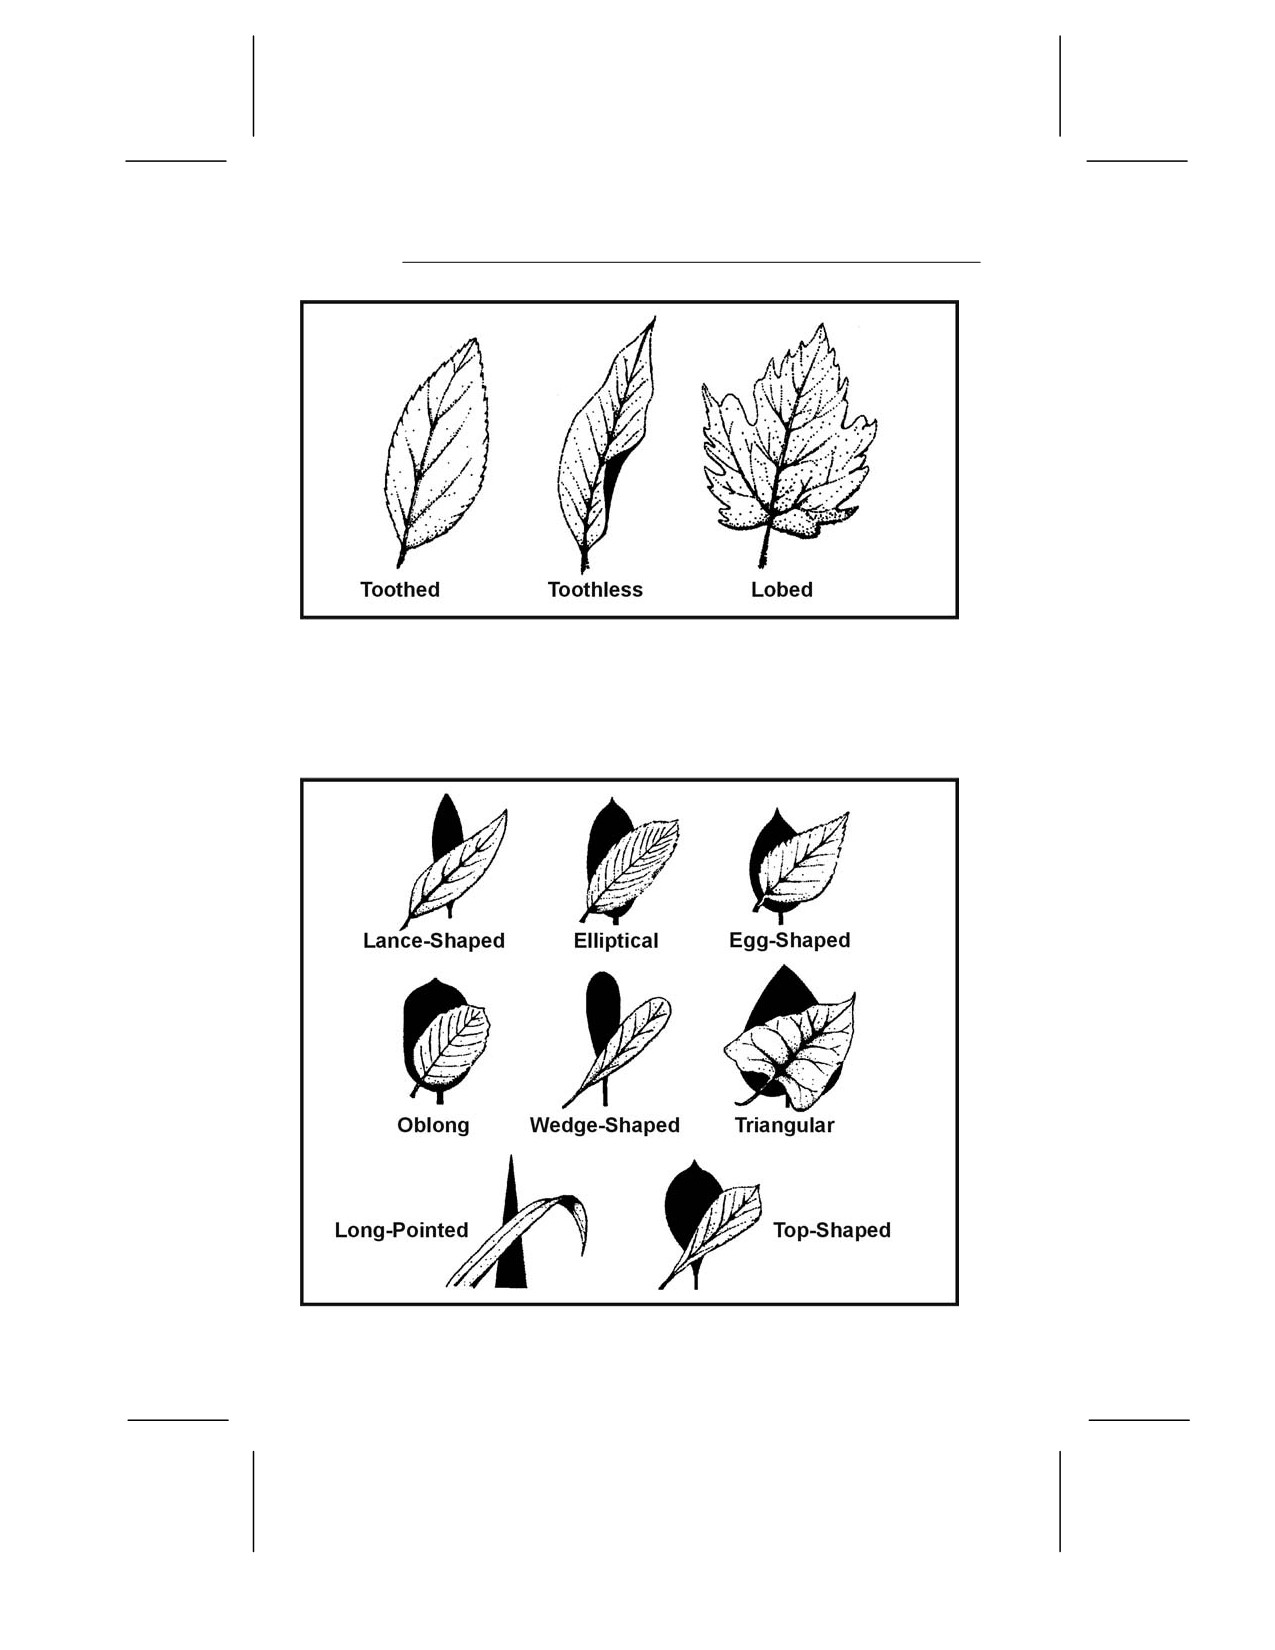
Figure 9-1. Leaf Margins
9-8. These leaves may be lance-shaped, elliptical, egg-shaped,
oblong, wedge-shaped, triangular, long-pointed, or top-shaped
(Figure 9-2).
Figure 9-2. Leaf Shapes
9-4
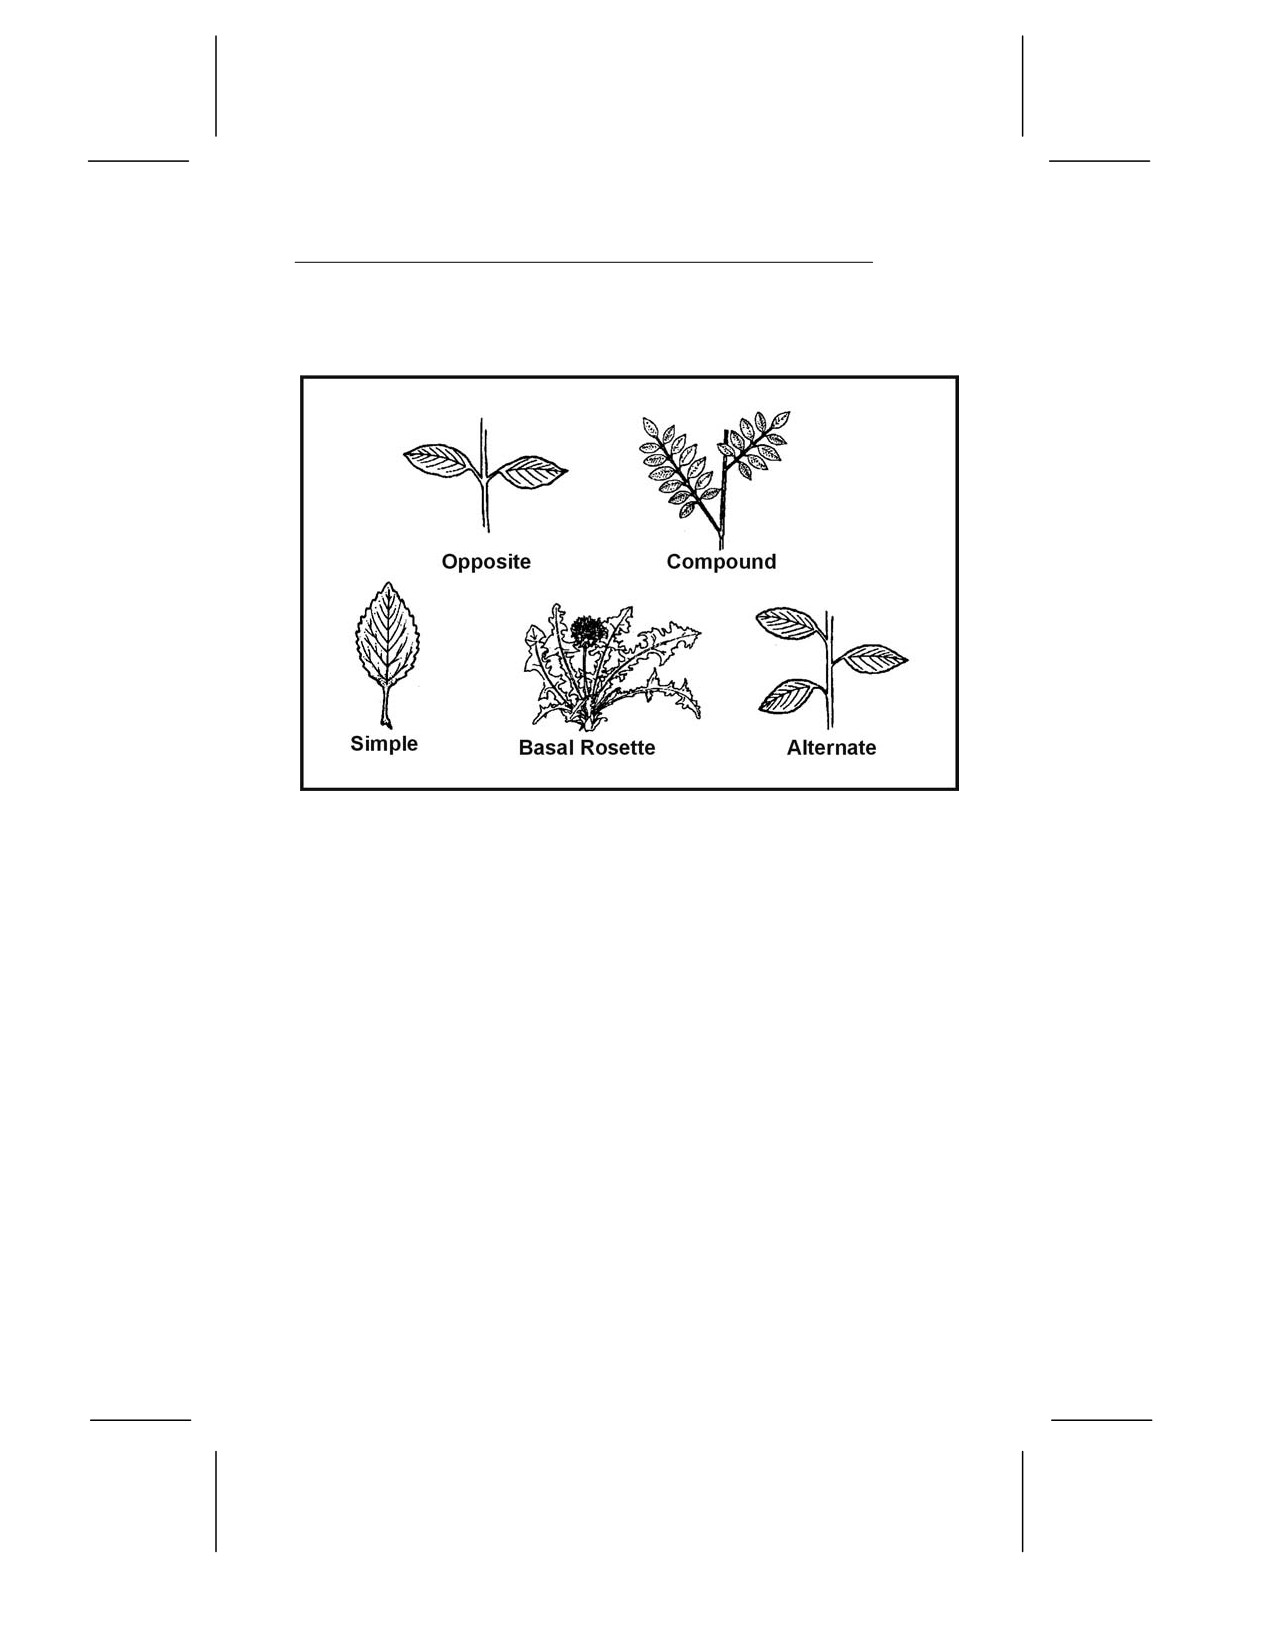
9-9. The basic types of leaf arrangements
(Figure
9-3) are
opposite, alternate, compound, simple, and basal rosette.
Figure 9-3. Leaf Arrangements
9-10. The basic types of root structures are the taproot, tuber, bulb,
rhizome, clove, corm, and crown (Figure 9-4, page 9-6). Bulbs are
familiar to us as onions and, when sliced in half, will show
concentric rings. Cloves are those bulblike structures that remind
us of garlic and will separate into small pieces when broken apart.
This characteristic separates wild onions from wild garlic. Taproots
resemble carrots and may be single-rooted or branched, but usually
only one plant stalk arises from each root. Tubers are like potatoes
and daylilies. You will find these structures either on strings or in
clusters underneath the parent plants. Rhizomes are large
creeping rootstock or underground stems. Many plants arise from
the “eyes” of these roots. Corms are similar to bulbs but are solid
when cut rather than possessing rings. A crown is the type of root
structure found on plants such as asparagus. Crowns look much
like a mophead under the soil’s surface.
9-5
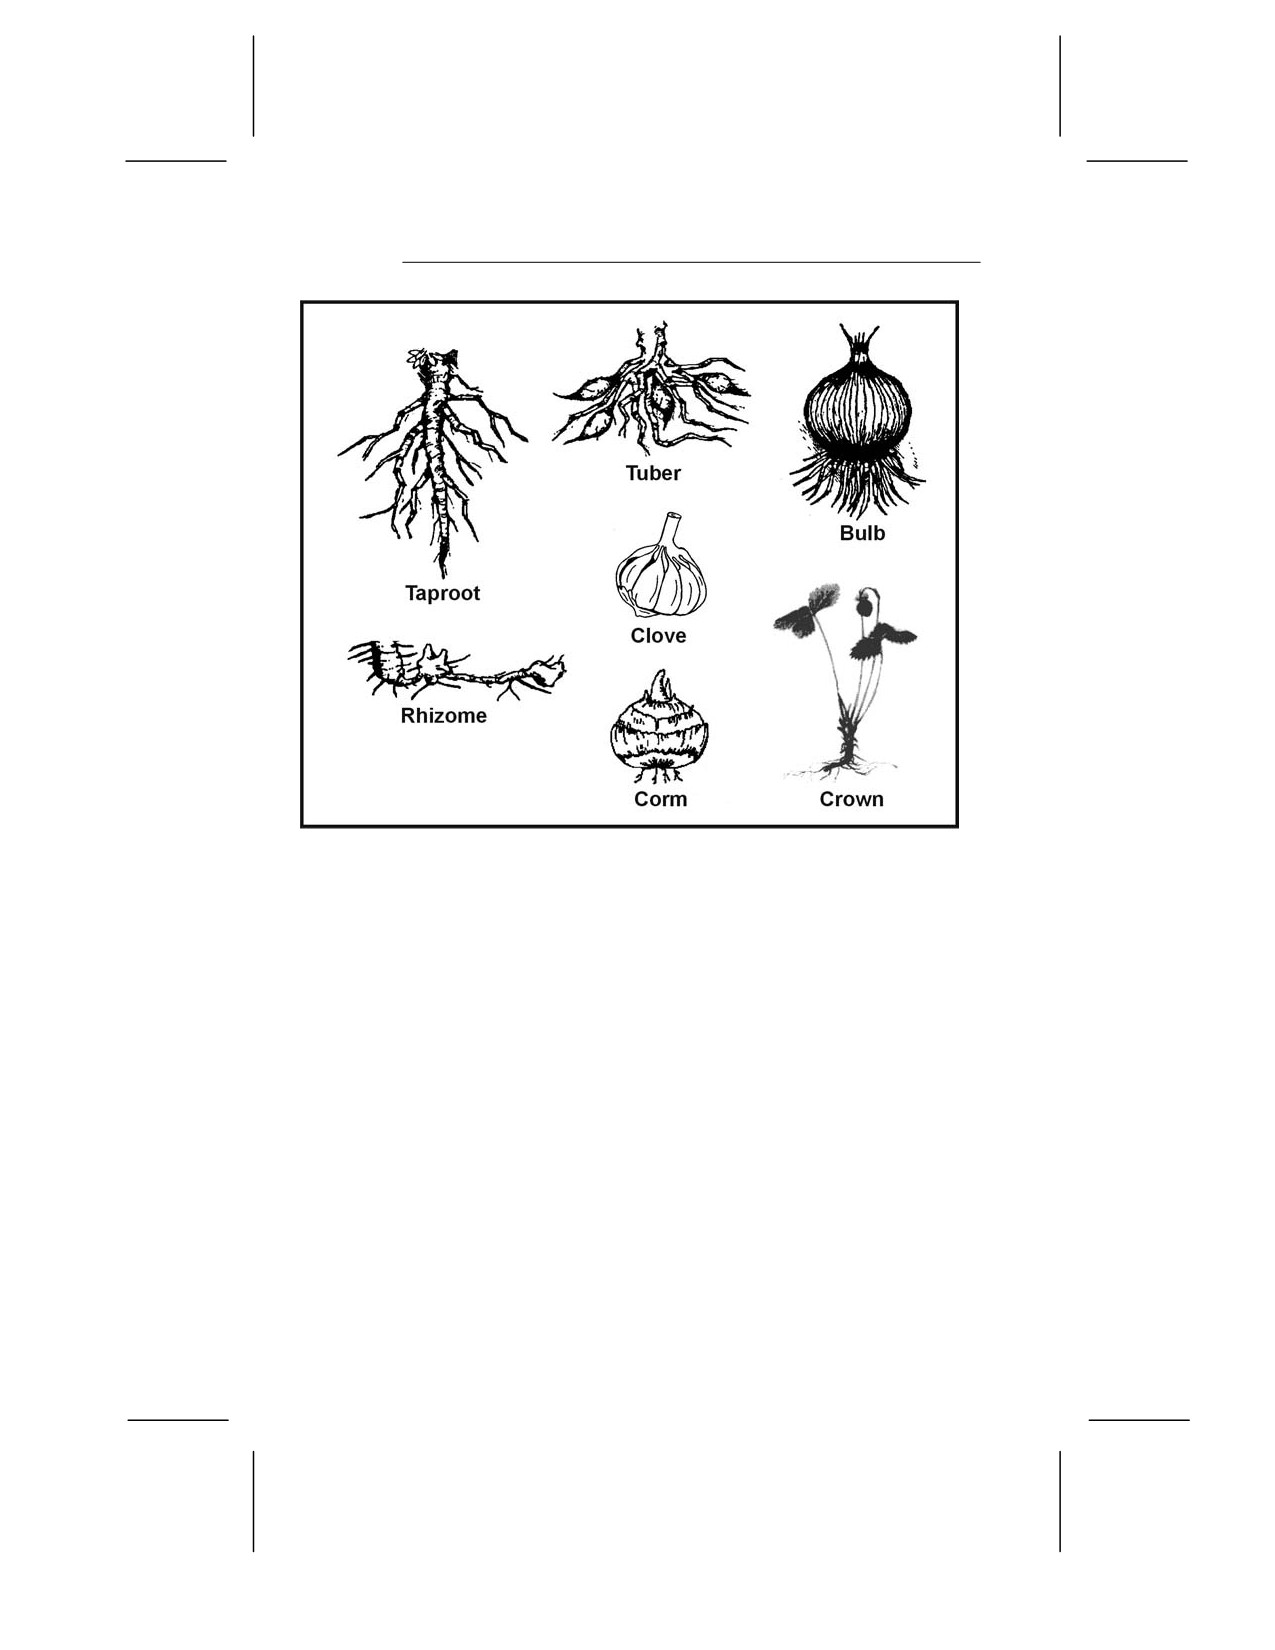
Figure 9-4. Root Structures
9-11. Learn as much as possible about the unique characteristics
of plants you intend to use for food. Some plants have both edible
and poisonous parts. Many are edible only at certain times of the
year. Others may have poisonous relatives that look very similar
to the varieties you can eat or use for medicine.
UNIVERSAL EDIBILITY TEST
9-12. There are many plants throughout the world. Tasting or
swallowing even a small portion of some can cause severe
discomfort, extreme internal disorders, and even death.
Therefore, if you have the slightest doubt about a plant’s edibility,
apply the Universal Edibility Test (Figure 9-5, page 9-7) before
eating any portion of it.
9-6
1.
Test only one part of a potential food plant at a time.
2.
Separate the plant into its basic components—leaves, stems, roots,
buds, and flowers.
3.
Smell the food for strong or acid odors. Remember, smell alone does
not indicate a plant is edible or inedible.
4.
Do not eat for 8 hours before starting the test.
5.
During the 8 hours you abstain from eating, test for contact poisoning
by placing a piece of the plant part you are testing on the inside of
your elbow or wrist. Usually 15 minutes is enough time to allow for a
reaction.
6.
During the test period, take nothing by mouth except purified water
and the plant part you are testing.
7.
Select a small portion of a single part and prepare it the way you plan
to eat it.
8.
Before placing the prepared plant part in your mouth, touch a small
portion (a pinch) to the outer surface of your lip to test for burning or
itching.
9.
If after 3 minutes there is no reaction on your lip, place the plant part
on your tongue, holding it there for 15 minutes.
10.
If there is no reaction, thoroughly chew a pinch and hold it in your
mouth for 15 minutes. Do not swallow.
11.
If no burning, itching, numbing, stinging, or other irritation occurs
during the 15 minutes, swallow the food.
12.
Wait 8 hours. If any ill effects occur during this period, induce vomiting
and drink a lot of water.
13.
If no ill effects occur, eat 0.25 cup of the same plant part prepared the
same way. Wait another 8 hours. If no ill effects occur, the plant part
as prepared is safe for eating.
CAUTION
Test all parts of the plant for edibility, as some plants have both
edible and inedible parts. Do not assume that a part that proved
edible when cooked is also edible when raw. Test the part raw to
ensure edibility before eating raw. The same part or plant may
produce varying reactions in different individuals.
Figure 9-5. Universal Edibility Test
9-7
9-13. Before testing a plant for edibility, make sure there are
enough plants to make the testing worth your time and effort.
Each part of a plant (roots, leaves, flowers, and so on) requires
more than 24 hours to test. Do not waste time testing a plant that
is not relatively abundant in the area.
9-14. Remember, eating large portions of plant food on an empty
stomach may cause diarrhea, nausea, or cramps. Two good
examples of this are such familiar foods as green apples and wild
onions. Even after testing plant food and finding it safe, eat it in
moderation.
9-15. You can see from the steps and time involved in testing for
edibility just how important it is to be able to identify edible
plants.
9-16. To avoid potentially poisonous plants, stay away from any
wild or unknown plants that have—
• Milky or discolored sap.
• Beans, bulbs, or seeds inside pods.
• A bitter or soapy taste.
• Spines, fine hairs, or thorns.
• Foliage that resembles dill, carrot, parsnip, or parsley.
• An almond scent in woody parts and leaves.
• Grain heads with pink, purplish, or black spurs.
• A three-leafed growth pattern.
9-17. Using the above criteria as eliminators when choosing
plants for the Universal Edibility Test will cause you to avoid
some edible plants. More important, these criteria will often help
you avoid plants that are potentially toxic to eat or touch.
9-18. An entire encyclopedia of edible wild plants could be
written, but space limits the number of plants presented here.
Learn as much as possible about the plant life of the areas where
you train regularly and where you expect to be traveling or
working. Figure 9-6, pages 9-9 and 9-10, list some of the most
common edible and medicinal plants. Detailed descriptions and
photographs of these and other common plants are in Appendix B.
9-8
Temperate Zone
•
Amaranth (Amaranths retroflex and other species)
•
Arrowroot (Sagittarius species)
•
Asparagus (Asparagus officials)
•
Beechnut (Fags species)
•
Blackberries (Rubes species)
•
Blueberries (Vaccinium species)
•
Burdock (Arctium lappa)
•
Cattail (Typha species)
•
Chestnut (Castanea species)
•
Chicory (Cichorium intybus)
•
Chufa (Cyperus esculentus)
•
Dandelion (Taraxacum officinale)
•
Daylily (Hemerocallis fulva)
•
Nettle (Urtica species)
•
Oaks (Quercus species)
•
Persimmon (Diospyros virginiana)
•
Plantain (Plantago species)
•
Pokeweed (Phytolacca americana)
•
Prickly pear cactus (Opuntia species)
•
Purslane (Portulaca oleracea)
•
Sassafras (Sassafras albidum)
•
Sheep sorrel (Rumex acetosella)
•
Strawberries (Fragaria species)
•
Thistle (Cirsium species)
•
Water lily and lotus (Nuphar, Nelumbo, and other species)
•
Wild onion and garlic (Allium species)
•
Wild rose (Rosa species)
•
Wood sorrel (Oxalis species)
Figure 9-6. Food Plants
9-9
Tropical Zone
•
Bamboo (Bambusa and other species)
•
Bananas (Musa species)
•
Breadfruit (Artocarpus incisa)
•
Cashew nut (Anacardium occidental)
•
Coconut (Cocoa nucifera)
•
Mango (Mangifera indica)
•
Palms (various species)
•
Papaya (Carica species)
•
Sugarcane (Saccharum officinarum)
•
Taro (Colocasia species)
Desert Zone
•
Acacia (Acacia farnesiana)
•
Agave (Agave species)
•
Cactus (various species)
•
Date palm (Phoenix dactylifera)
•
Desert amaranth (Amaranths palmer)
Figure 9-6. Food Plants (Continued)
SEAWEEDS
9-19. One plant you should never overlook is seaweed. It is a form
of marine algae found on or near ocean shores. There are also some
edible freshwater varieties. Seaweed is a valuable source of iodine,
other minerals, and vitamin C. Large quantities of seaweed in an
unaccustomed stomach can produce a severe laxative effect.
Figure 9-7, page 9-11, lists various types of edible seaweed.
9-20. When gathering seaweed for food, find living plants
attached to rocks or floating free. Seaweed washed onshore any
length of time may be spoiled or decayed. You can dry freshly
harvested seaweed for later use.
9-10
9-21. Different types of seaweed should be prepared in different
ways. You can dry thin and tender varieties in the sun or over a
fire until crisp. Crush and add these to soups or broths. Boil
thick, leathery seaweeds for a short time to soften them. Eat
them as a vegetable or with other foods. You can eat some
varieties raw after testing for edibility.
• Dulse (Rhodymenia palmata)
• Green seaweed (Ulva lactuca)
• Irish moss (Chondrus crispus)
• Kelp (Alaria esculenta)
• Laver (Porphyra species)
• Mojaban (Sargassum fulvellum)
• Sugar wrack (Laminaria saccharina)
Figure 9-7. Types of Edible Seaweed
PREPARATION OF PLANT FOOD
9-22. Although some plants or plant parts are edible raw, you
must cook others for them to be edible or palatable. Edible means
that a plant or food will provide you with necessary nutrients;
palatable means that it is pleasing to eat. Many wild plants are
edible but barely palatable. It is a good idea to learn to identify,
prepare, and eat wild foods.
9-23. Methods used to improve the taste of plant food include
soaking, boiling, cooking, or leaching. Leaching is done by
crushing the food (for example, acorns), placing it in a strainer,
and pouring boiling water through it or immersing it in running
water.
9-24. Boil leaves, stems, and buds until tender, changing the
water, if necessary, to remove any bitterness.
9-25. Boil, bake, or roast tubers and roots. Drying helps to
remove caustic oxalates from some roots like those in the Arum
family.
9-11
9-26. Leach acorns in water, if necessary, to remove the
bitterness. Some nuts, such as chestnuts, are good raw, but taste
better roasted.
9-27. You can eat many grains and seeds raw until they mature.
When they are hard or dry, you may have to boil or grind them
into meal or flour.
9-28. The sap from many trees, such as maples, birches, walnuts,
and sycamores, contains sugar. You may boil these saps down to a
syrup for sweetening. It takes about 35 liters of maple sap to
make 1 liter of maple syrup!
PLANTS FOR MEDICINE
9-29. In using plants for medical treatment, positive
identification of the plants involved is as critical as when using
them for food. Proper use of these plants is equally important.
TERMS AND DEFINITIONS
9-30. The following terms and their definitions are associated
with medicinal plant use:
• Poultice. This is crushed leaves or other plant parts,
possibly heated, that are applied to a wound or sore either
directly or wrapped in cloth or paper. Poultices, when hot,
increase the circulation in the affected area and help
healing through the chemicals present in the plants. As
the poultice dries out, it draws the toxins out of a wound. A
poultice should be prepared to a “mashed potatoes-like”
consistency and applied as warm as the patient can stand.
• Infusion or tisane or tea. This blend is the preparation of
medicinal herbs for internal or external application. You
place a small quantity of a herb in a container, pour hot
water over it, and let it steep (covered or uncovered) before
use. Care must always be taken to not drink too much of a
tea in the beginning of treatment as it may have adverse
reactions on an empty stomach.
• Decoction. This is the extract of a boiled-down or simmered
herb leaf or root. You add herb leaf or root to water. You
bring them to a sustained boil or simmer them to draw
9-12
their chemicals into the water. The average ratio is about
28 to 56 grams (1 to 2 ounces) of herb to 0.5 liter of water.
• Expressed juice. These are liquids or saps squeezed from
plant material and either applied to the wound or made
into another medicine.
9-31. Many natural remedies work slower than the medicines you
know. Therefore, start with smaller doses and allow more time for
them to take effect. Naturally, some will act more rapidly than
others. Many of these treatments are addressed in more detail in
Chapter 4.
SPECIFIC REMEDIES
9-32. The following remedies are for use only in a survival
situation. Do not use them routinely as some can be potentially
toxic and have serious long- term effects (for example, cancer).
•
Antidiarrheals for diarrhea. This can be one of the most
debilitating illnesses for a survivor or prisoner of war.
Drink tea made from the roots of blackberries and their
relatives to stop diarrhea. White oak bark and other barks
containing tannin are also effective when made into a
strong tea. However, because of possible negative effects on
the kidneys, use them with caution and only when nothing
else is available. Clay, ashes, charcoal, powdered chalk,
powdered bones, and pectin can be consumed or mixed in a
tannic acid tea with good results. These powdered
mixtures should be taken in a dose of two tablespoons
every 2 hours. Clay and pectin can be mixed together to
give a crude form of Kaopectate. Pectin is obtainable from
the inner part of citrus fruit rinds or from apple pomace.
Tea made from cowberry, cranberry, or hazel leaves works,
too. Because of its inherent danger to an already under-
nourished survivor, several of these methods may need to
be tried simultaneously to stop debilitating diarrhea,
which can quickly dehydrate even a healthy individual.
•
Antihemorrhagics for bleeding. Make medications to stop
bleeding from plantain leaves, or, most effectively, from
the leaves of the common yarrow or woundwort (Achillea
millefolium). These mostly give a physical barrier to the
bleeding. Prickly pear (the raw, peeled part) or witch hazel
can be applied to wounds. Both are good for their
9-13
astringent properties
(they shrink blood vessels). For
bleeding gums or mouth sores, sweet gum can be chewed
or used as a toothpick. This provides some chemical and
antiseptic properties as well.
•
Antiseptics to clean infections. Use antiseptics to cleanse
wounds, snake bites, sores, or rashes. You can make
antiseptics from the expressed juice of wild onion or garlic,
the expressed juice from chickweed leaves, or the crushed
leaves of dock. You can also make antiseptics from a
decoction of burdock root, mallow leaves or roots, or white
oak bark (tannic acid). Prickly pear, slippery elm, yarrow,
and sweet gum are all good antiseptics as well. All these
medications are for external use only. Two of the best
antiseptics are sugar and honey. Sugar should be applied
to the wound until it becomes syrupy, then washed off and
reapplied. Honey should be applied three times daily (see
Chapter 4). Honey is by far the best of the antiseptics for
open wounds and burns, with sugar being second.
•
Antipyretics for fevers. Treat a fever with a tea made from
willow bark, an infusion of elder flowers or fruit, linden
flower tea, and aspen or slippery elm bark decoction.
Yarrow tea is also good. Peppermint tea is reportedly good
for fevers.
•
Colds and sore throats. Treat these illnesses with a
decoction made from either plantain leaves or willow bark.
You can also use a tea made from burdock roots, mallow or
mullein flowers or roots, and yarrow or mint leaves.
•
Analgesics for aches, pains, and sprains. Treat these
conditions with externally applied poultices of dock,
plantain, chickweed, willow bark, garlic, or sorrel. Sweet
gum has some analgesic (pain relief) properties. Chewing
the willow bark or making a tea from it is the best for pain
relief as it contains the raw component of aspirin. You can
also use salves made by mixing the expressed juices of
these plants in animal fat or vegetable oils.
•
Antihistamines and astringents for itching or contact
dermatitis. Relieve the itch from insect bites, sunburn, or
plant poisoning rashes by applying a poultice of jewelweed
(Impatiens biflora) or witch hazel, which give a cooling
relief and dry out the weeping (Hamamelis virginiana)
9-14
leaves. The jewelweed juice will help when applied to
poison ivy, rashes, or insect stings. Jewelweed and aloe
vera help relieve sunburn. In addition, dandelion sap,
crushed cloves of garlic, and sweet gum have been used.
Crushed leaves of burdock have received only so-so reports
of success, but crushed, green plantain leaves show relief
over a few days. Jewelweed is probably the best of these
plants. Tobacco will deaden the nerve endings and can also
be used to treat toothaches.
•
Sedatives. Get help in falling asleep by brewing a tea made
from mint leaves or passionflower leaves.
•
Hemorrhoids. Treat them with external washes from elm
bark or oak bark tea, from the expressed juice of plantain
leaves, or from a Solomon’s seal root decoction. Tannic acid
or witch hazel will provide soothing relief because of their
astringent properties.
•
Heat rash. Tannic acid or witch hazel will provide soothing
relief because of their astringent properties but cornstarch
or any crushed and powdered, nonpoisonous plant should
help to dry out the rash after a thorough cleansing.
•
Constipation. Relieve constipation by drinking decoctions
from dandelion leaves, rose hips, or walnut bark. Eating
raw daylily flowers will also help. Large amounts of water
in any form are critical to relieving constipation.
•
Antihelminthics for worms or intestinal parasites. Most
treatment for worms or parasites are toxic—just more so
for the worms or parasites than for humans. Therefore, all
treatments should be used in moderation. Treatments
include tea made from tansy (Tanacetum vulgare) or from
wild carrot (poisonous) leaves. Very strong tannic acid can
also be used with caution as it is very hard on the liver.
See Chapter 4 for more deworming techniques.
•
Antiflatulents for gas and cramps. Use a tea made from
carrot seeds; use tea made from mint leaves to settle the
stomach.
•
Antifungal washes. Make a decoction of walnut leaves, oak
bark, or acorns to treat ringworm and athlete’s foot. Apply it
frequently to the site, alternating with exposure to direct
sunlight. Broad-leaf plantain has also been used with
9-15
success but any treatment should be used in addition to
sunlight if possible. Jewelweed and vinegar make excellent
washes but are sometimes difficult to find.
•
Burns. Tannic acid, sugar, and honey can be used as
explained in Chapter 4.
•
Dentifrices for teeth. See Chapter 4 for other techniques in
addition to using twigs of sweet gum for its anti-
inflammatory, analgesic, and antiseptic properties.
•
Insect repellents. Garlic and onions can be eaten and the
raw plant juice rubbed on the skin to repel some insects.
Sassafras leaves can be rubbed on the skin. Cedar chips
may help repel insects around your shelter.
•
Tannic acid. Because tannic acid is used for so many
treatments
(burns, antihemorrhagics, antihelminthics,
antiseptics, antidiarrheals, antifungals, bronchitis, skin
inflammation, lice), a note as to its preparation is in order.
All thready plants, especially trees, contain tannic acid.
Hardwood trees generally contain more than softwood
trees. Of the hardwoods, oak—especially red and
chestnut—contain the highest amount. The warty looking
knots in oak trees can contain as much as 28 percent
tannic acid. This knot, the inner bark of trees, and pine
needles (cut into 2-centimeter [1-inch] strips), can all be
boiled down to extract tannic acid. Boiling can be done in
as little as 15 minutes (very weak), to 2 hours (moderate),
through 12 hours to 3 days (very strong). The stronger
concoctions will have a dark color that will vary depending
on the type of tree. All will have an increasingly vile taste
in relation to their concentration.
MISCELLANEOUS USES OF PLANTS
9-33. Plants can be your ally as long as you use them cautiously.
Be sure that you know the plant and how to use it. Some
additional uses of plants are as follows:
• Make dyes from various plants to color clothing or to
camouflage your skin. Usually, you will have to boil the
plants to get the best results. Onionskins produce yellow,
walnut hulls produce brown, and pokeberries provide
purple dye.
9-16
• Make fibers and cordage from plant fibers. Most commonly
used are the stems from nettles and milkweeds, yucca
plants, and the inner bark of trees like the linden.
• Make tinder for starting fires from cattail fluff, cedar bark,
lighter knot wood from pine trees, or hardened sap from
resinous wood trees.
• Make insulation by fluffing up female cattail heads or
milkweed down.
• Make insect repellents by placing sassafras leaves in your
shelter or by burning or smudging cattail seed hair fibers.
9-34. Whether you use plants for food, medicine, or the
construction of shelters or equipment, the key to their safe use is
positive identification.
9-17
Chapter 10
Poisonous Plants
Successful use of plants in a survival situation
depends on positive identification. Knowing
poisonous plants is as important to you as
knowing edible plants. Knowing the poisonous
plants will help you avoid sustaining injuries
from them.
HOW PLANTS POISON
10-1. Plants generally poison by—
• Contact. This contact with a poisonous plant causes any
type of skin irritation or dermatitis.
• Ingestion. This occurs when a person eats a part of a
poisonous plant.
• Absorption or inhalation. This happens when a person
either absorbs the poison through the skin or inhales it
into the respiratory system.
10-2. Plant poisoning ranges from minor irritation to death. A
common question asked is, “How poisonous is this plant?” It is
difficult to say how poisonous plants are because—
• Some plants require a large amount of contact before you
notice any adverse reaction although others will cause
death with only a small amount.
• Every plant will vary in the amount of toxins it contains
due to different growing conditions and slight variations in
subspecies.
• Every person has a different level of resistance to toxic
substances.
• Some persons may be more sensitive to a particular plant.
10-3. Some common misconceptions about poisonous plants
are—
• Watch the animals and eat what they eat. Most of the time
this statement is true, but some animals can eat plants
that are poisonous to humans.
10-1
• Boil the plant in water and any poisons will be removed.
Boiling removes many poisons, but not all.
• Plants with a red color are poisonous. Some plants that are
red are poisonous, but not all.
10-4. The point is there is no one rule to aid in identifying
poisonous plants. You must make an effort to learn as much
about them as possible.
ALL ABOUT PLANTS
10-5. Many poisonous plants look like their edible relatives or
like other edible plants. For example, poison hemlock appears
very similar to wild carrot. Certain plants are safe to eat in
certain seasons or stages of growth but poisonous in other stages.
For example, the leaves of the pokeweed are edible when it first
starts to grow, but they soon become poisonous. You can eat some
plants and their fruits only when they are ripe. For example, the
ripe fruit of May apple is edible, but all other parts and the green
fruit are poisonous. Some plants contain both edible and
poisonous parts; potatoes and tomatoes are common plant foods,
but their green parts are poisonous.
10-6. Some plants become toxic after wilting. For example, when
the black cherry starts to wilt, hydrocyanic acid develops. Specific
preparation methods make some plants edible that are poisonous
raw. You can eat the thinly sliced and thoroughly dried (drying
may take a year) corms of the jack-in-the-pulpit, but they are
poisonous if not thoroughly dried.
10-7. Learn to identify and use plants before a survival situation.
Some sources of information about plants are pamphlets, books,
films, nature trails, botanical gardens, local markets, and local
natives. Gather and cross-reference information from as many
sources as possible, because many sources will not contain all the
information needed.
RULES FOR AVOIDING POISONOUS PLANTS
10-8. Your best policy is to be able to positively identify plants by
sight and to know their uses or dangers. Many times absolute
certainty is not possible. If you have little or no knowledge of the
10-2
local vegetation, use the rules to select plants for the Universal
Edibility Test. Remember, avoid—
• All mushrooms. Mushroom identification is very difficult
and must be precise—even more so than with other plants.
Some mushrooms cause death very quickly. Some
mushrooms have no known antidote. Two general types of
mushroom poisoning are gastrointestinal and central
nervous system.
• Contact with or touching plants unnecessarily.
CONTACT DERMATITIS
10-9. Contact dermatitis from plants will usually cause the most
trouble in the field. The effects may be persistent, spread by
scratching, and particularly dangerous if there is contact in or
around the eyes.
10-10. The principal toxin of these plants is usually an oil that
gets on the skin upon contact with the plant. The oil can also get
on equipment and then infect whoever touches the equipment.
Never burn a contact poisonous plant because the smoke may be
as harmful as the plant. You have a greater danger of being
affected when you are overheated and sweating. The infection
may be local or it may spread over the body.
10-11. Symptoms may take from a few hours to several days to
appear. Symptoms can include burning, reddening, itching,
swelling, and blisters.
10-12. When you first contact the poisonous plants or when the
first symptoms appear, try to remove the oil by washing with soap
and cold water. If water is not available, wipe your skin
repeatedly with dirt or sand. Do not use dirt if you have blisters.
The dirt may break open the blisters and leave the body open to
infection. After you have removed the oil, dry the area. You can
wash with a tannic acid solution and crush and rub jewelweed on
the affected area to treat plant-caused rashes. You can make
tannic acid from oak bark.
10-13. Poisonous plants that cause contact dermatitis are—
• Cowhage.
• Poison ivy.
10-3
• Poison oak.
• Poison sumac.
• Rengas tree.
• Trumpet vine.
INGESTION POISONING
10-14. Ingestion poisoning can be very serious and could lead to
death very quickly. Do not eat any plant unless you have
positively identified it first. Keep a log of all plants eaten.
10-15. Symptoms of ingestion poisoning can include nausea,
vomiting, diarrhea, abdominal cramps, depressed heartbeat
and respiration, headaches, hallucinations, dry mouth,
unconsciousness, coma, and death.
10-16. If you suspect plant poisoning, try to remove the poisonous
material from the victim’s mouth and stomach as soon as
possible. If the victim is conscious, induce vomiting by tickling the
back of his throat or by giving him warm saltwater. If the victim
is conscious, dilute the poison by administering large quantities of
water or milk.
10-17. The following plants can cause ingestion poisoning if eaten:
• Castor bean.
• Chinaberry.
• Death camas.
• Lantana.
• Manchineel.
• Oleander.
• Pangi.
• Physic nut.
• Poison and water hemlocks.
• Rosary pea.
• Strychnine tree.
10-18. Appendix C provides photographs and descriptions of these
plants.
10-4
10-5
Chapter 11
Dangerous Animals
The threat from animals is less than from other
parts of the environment. However, common
sense tells you to avoid encounters with lions,
bears, and other large or dangerous animals. You
should also avoid large grazing animals with
horns, hooves, and great weight. Move carefully
through their environment. Caution may prevent
unexpected meetings. Do not attract large
predators by leaving food lying around your
camp. Carefully survey the scene before entering
water or forests.
Smaller animals actually present more of a
threat to you than large animals. To compensate
for their size, nature has given many small
animals weapons such as fangs and stingers to
defend themselves. Each year, a few people are
bitten by sharks, mauled by alligators, and
attacked by bears. Most of these incidents were
in some way the victim’s fault. However, each
year more victims die from bites by relatively
small venomous snakes than by large dangerous
animals. Even more victims die from allergic
reactions to bee stings. These smaller animals
are the ones you are more likely to meet as you
unwittingly move into their habitat, or they slip
into your environment unnoticed.
Keeping a level head and an awareness of your
surroundings will keep you alive if you use a few
simple safety procedures. Do not let curiosity and
carelessness kill or injure you.
11-1