FM 3-05.70 Field Manual Survival (17 May 2002) - page 7
INSECTS AND ARACHNIDS
11-1. Insects, except centipedes and millipedes, have six legs;
arachnids have eight. All these small creatures become pests
when they bite, sting, or irritate you.
11-2. Although their venom can be quite painful, bee, wasp, and
hornet stings rarely kill a person who is not allergic to that
particular toxin. Even the most dangerous spiders rarely kill, and
the effects of tick-borne diseases are very slow-acting. However,
in all cases, avoidance is the best defense. In environments
known to have spiders and scorpions, check your footgear and
clothing every morning. Also check your bedding and shelter. Use
care when turning over rocks and logs. See Appendix D for
examples of dangerous insects and arachnids.
SCORPIONS
11-3. You find scorpions (Buthotus species) in deserts, jungles,
and forests of tropical, subtropical, and warm temperate areas of
the world. They are mostly nocturnal. Desert scorpions range
from below sea level in Death Valley to elevations as high as
3,600 meters (12,000 feet) in the Andes. Typically brown or black
in moist areas, they may be yellow or light green in the desert.
Their average size is about 2.5 centimeters (1 inch). However,
there are 20-centimeter (8-inch) giants in the jungles of Central
America, New Guinea, and southern Africa. Fatalities from
scorpion stings are rare, but do occur with children, the elderly,
and ill persons. Scorpions resemble small lobsters with raised,
jointed tails bearing a stinger in the tip. Nature mimics the
scorpions with whip scorpions or vinegarroons. These are
harmless and have a tail like a wire or whip, rather than the
jointed tail and stinger of true scorpions.
SPIDERS
11-4. The brown recluse, or fiddleback spider, of North America
(Loxosceles reclusa) is recognized by a prominent violin-shaped
light spot on the back of its body. As its name suggests, this
spider likes to hide in dark places. Though its bite is rarely fatal,
it can cause excessive tissue degeneration around the wound,
leading to amputation of the digits if left untreated.
11-2
11-5. Members of the widow family (Latrodectus species) may be
found worldwide, though the black widow of North America is
perhaps the most well-known. Found in warmer areas of the
world, the widows are small, dark spiders with often hourglass-
shaped white, red, or orange spots on their abdomens.
11-6. Funnelwebs
(Atrax species) are large, gray or brown
Australian spiders. Chunky, with short legs, they are able to
move easily up and down the cone-shaped webs from which they
get their name. The local populace considers them deadly. Avoid
them as they move about, usually at night, in search of prey.
Symptoms of their bite are similar to those of the widow’s—severe
pain accompanied by sweating and shivering, weakness, and
disabling episodes that can last a week.
11-7. Tarantulas are large, hairy spiders
(Theraphosidae and
Lycosa species) best known because they are often sold in pet
stores. There is one species in Europe, but most come from
tropical America. Some South American species do inject a
dangerous toxin, but most simply produce a painful bite. Some
tarantulas can be as large as a dinner plate. They all have large
fangs for capturing food such as birds, mice, and lizards. If bitten
by a tarantula, pain and bleeding are certain, and infection is
likely.
CENTIPEDES AND MILLIPEDES
11-8. Centipedes and millipedes are mostly small and harmless,
although some tropical and desert species may reach 25 centimeters
(10 inches). A few varieties of centipedes have a poisonous bite, but
infection is the greatest danger, as their sharp claws dig in and
puncture the skin. To prevent skin punctures, brush them off in the
direction they are traveling.
BEES, WASPS, AND HORNETS
11-9. Bees, wasps, and hornets come in many varieties and have
a wide diversity of habits and habitats. You recognize bees by
their hairy and usually thick body, while the wasps, hornets, and
yellow jackets have more slender, nearly hairless bodies. Some
bees, such as honeybees, live in colonies. They may be either
domesticated or living wild in caves or hollow trees. You may find
other bees, such as carpenter bees, in individual nest holes in
wood or in the ground like bumblebees. The main danger from
11-3
bees is the barbed stinger located on their abdomens. When a bee
stings you, it rips its stinger out of its abdomen along with the
venom sac, and dies. Except for killer bees, most bees tend to be
more docile than wasps, hornets, and yellow jackets, which have
smooth stingers and are capable of repeated attacks.
11-10. Avoidance is the best tactic for self-protection. Watch out for
flowers or fruit where bees may be feeding. Be careful of meat-
eating yellow jackets when cleaning fish or game. The average
person has a relatively minor and temporary reaction to bee stings
and recovers in a couple of hours when the pain and headache go
away. Those who are allergic to bee venom have severe reactions
including anaphylactic shock, coma, and death. If antihistamine
medicine is not available and you cannot find a substitute, an
allergy sufferer in a survival situation is in grave danger.
TICKS
11-11. Ticks are common in the tropics and temperate regions.
They are familiar to most of us. Ticks are small, round arachnids.
They can have either a soft or hard body. Ticks require a blood
host to survive and reproduce. This makes them dangerous
because they spread diseases like Lyme disease, Rocky Mountain
spotted fever, encephalitis, and others that can ultimately be
disabling or fatal. There is little you can do to treat these diseases
once they are contracted, but time is your ally since it takes at
least 6 hours of attachment to the host for the tick to transmit the
disease organisms. Thus, you have time to thoroughly inspect
your body for their presence. Beware of ticks when passing
through the thick vegetation they cling to, when cleaning host
animals for food, and when gathering natural materials to
construct a shelter. Always use insect repellents, if possible.
LEECHES
11-12. Leeches are bloodsucking creatures with a wormlike
appearance. You find them in the tropics and in temperate zones.
You will certainly encounter them when swimming in infested
waters or making expedient water crossings. You can find them
when passing through swampy, tropical vegetation and bogs. You
can also find them while cleaning food animals, such as turtles,
found in fresh water. Leeches can crawl into small openings;
therefore, avoid camping in their habitats when possible.
11-4
Keep your trousers tucked in your boots. Check yourself
frequently for leeches. Swallowed or eaten, leeches can be a great
hazard. It is therefore essential to treat water from questionable
sources by boiling or using chemical water treatments. Survivors
have developed severe infections from wounds inside the throat or
nose when sores from swallowed leeches became infected.
BATS
11-13. Despite the legends, bats
(Desmodus species) are a
relatively small hazard to you. There are many bat varieties
worldwide, but you find the true vampire bats only in Central and
South America. They are small, agile fliers that land on their
sleeping victims, mostly cows and horses, to lap a blood meal after
biting their victim. Their saliva contains an anticoagulant that
keeps the blood slowly flowing while they feed. All bats are
considered to carry rabies. Any physical contact is considered to
be a rabies risk. They can carry other diseases and infections and
will bite readily when handled. However, taking shelter in a cave
occupied by bats presents the much greater hazard of inhaling
powdered bat dung, or guano. Bat dung carries many organisms
that can cause diseases. Eating thoroughly cooked flying foxes or
other bats presents no danger from rabies and other diseases, but
again, the emphasis is on thorough cooking.
VENOMOUS SNAKES
11-14. There are no infallible rules for expedient identification of
venomous snakes in the field, because the guidelines all require
close observation or manipulation of the snake’s body. The best
strategy is to leave all snakes alone. Where snakes are plentiful
and venomous species are present, the risk of their bites negates
their food value. Apply the following safety rules when traveling
in areas where there are venomous snakes:
• Walk carefully and watch where you step. Step onto logs
rather than over them in a survival situation. During
evasion, always step over or go around logs to leave fewer
signs for trackers.
• Look closely when picking fruit or moving around water.
11-5
• Do not tease, molest, or harass snakes. Snakes cannot
close their eyes. Therefore, you cannot tell if they are
asleep. Some snakes, such as mambas, cobras, and
bushmasters, will attack aggressively when cornered or
guarding a nest.
• Use sticks to turn logs and rocks.
• Wear proper footgear, particularly at night.
• Carefully check bedding, shelter, and clothing.
• Be calm when you encounter serpents. Snakes cannot hear
and you can occasionally surprise them when they are
sleeping or sunning. Normally, they will flee if given the
opportunity.
• Use extreme care if you must kill snakes for food or safety.
Although it is not common, warm, sleeping human bodies
occasionally attract snakes.
11-15. Appendix E provides detailed descriptions of the snakes
listed in Figure 11-1, pages 11-6 and 11-7.
The Americas
• American Copperhead (Agkistrodon contortrix)
• Bushmaster (Lachesis muta)
• Coral snake (Micrurus fulvius)
• Cottonmouth (Agkistrodon piscivorus)
• Fer-de-lance (Bothrops atrox)
• Rattlesnake (Crotalus species)
Europe
• Common adder (Vipers berus)
• Pallas’ viper (Agkistrodon halys)
Africa and Asia
• Boomslang (Dispholidus typus)
• Cobra (Naja species)
Figure 11-1. Venomous Snakes of the World
11-6
Africa and Asia (Continued)
• Gaboon viper (Bitis gabonica)
• Green tree pit viper (Trimeresurus gramineus)
• Habu pit viper (Trimeresurus flavoviridis)
• Krait (Bungarus caeruleus)
• Malayan pit viper (Callaselasma rhodostoma)
• Mamba (Dendraspis species)
• Puff adder (Bitis arietans)
• Rhinoceros viper (Bitis nasicornis)
• Russell’s viper (Vipera russellii)
• Sand viper (Cerastes vipera)
• Saw-scaled viper (Echis carinatus)
• Wagler’s pit viper (Trimeresurus wagleri)
Australia
• Death adder (Acanthophis antarcticus)
• Taipan (Oxyuranus scutellatus)
• Tiger snake (Notechis scutatus)
• Yellow-bellied sea snake (Pelamis platurus)
Figure 11-1. Venomous Snakes of the World (Continued)
SNAKE-FREE AREAS
11-16. The polar regions are free of snakes due to their
inhospitable environments. Other areas considered to be free of
venomous snakes are New Zealand, Cuba, Haiti, Jamaica, Puerto
Rico, Ireland, Polynesia, and Hawaii.
DANGEROUS LIZARDS
11-17. The Gila monster (Heloderma suspectrum) of the American
Southwest and Mexico is a dangerous and poisonous lizard with
dark, highly textured skin marked by pinkish mottling. It is
typically 35 to 45 centimeters (14 to 18 inches) in length and has
a thick, stumpy tail. The Gila monster is unlikely to bite unless
molested but has a poisonous bite.
11-7
11-18. The Mexican beaded lizard (Heloderma horridum) resembles
its relative, the Gila monster. However, it has more uniform spots
rather than bands of color. It also is poisonous and has a docile
nature. You may find it from Mexico to Central America.
11-19. The komodo dragon is a giant lizard
(Varanus
komodoensis) that grows to more than 3 meters (10 feet) in
length. It can be dangerous if you try to capture it. This
Indonesian lizard can weigh more than
135 kilograms
(300 pounds).
DANGERS IN RIVERS
11-20. Common sense will tell you to avoid confrontations with
hippopotami, alligators, crocodiles, and other large river
creatures. However, there are also the following smaller river
creatures with which you should be cautious.
11-21. Electric eels (Electrophorus electricus) may reach 2 meters
(7 feet) in length and 20 centimeters (8 inches) in diameter. Avoid
them. They are capable of generating up to 500 volts of electricity
in certain organs of their body. They use this shock to stun prey
and enemies. Normally, you find these eels in the Orinoco and
Amazon River systems in South America. They seem to prefer
shallow waters that are more highly oxygenated and provide
more food. They are bulkier than American eels. Their upper body
is dark gray or black with a lighter-colored underbelly.
11-22. Piranhas (Serrasalmo species) are another hazard of the
Orinoco and Amazon River systems, as well as the Paraguay
River Basin, where they are native. These fish vary greatly in size
and coloration, but usually have a combination of orange
undersides and dark tops. They have white, razor-sharp teeth
that are clearly visible. They may be as long as 50 centimeters (20
inches). Use great care when crossing waters where they live.
Blood attracts them. They are most dangerous in shallow waters
during the dry season.
11-23. Be careful when handling and capturing large freshwater
turtles, such as the snapping turtles and soft-shelled turtles of
North America and the matamata and other turtles of South
America. All of these turtles will bite in self-defense and can
amputate fingers and toes.
11-8
11-24. The platypus or duckbill (Ornithorhyncus anatinus) is the
only member of its family and is easily recognized. It has a long
body covered with grayish, short hair, a tail like a beaver, and a
bill like a duck. Growing up to 60 centimeters (24 inches) in
length, it may appear to be a good food source, but this egg-laying
mammal, the only one in the world, is very dangerous. The male
has a poisonous spur on each hind foot that can inflict intensely
painful wounds. You find the platypus only in Australia, mainly
along mud banks on waterways.
DANGERS IN BAYS AND ESTUARIES
11-25. In areas where seas and rivers come together, there are
dangers associated with both freshwater and saltwater. In
shallow saltwaters, there are many creatures that can inflict pain
and cause infection to develop. Stepping on sea urchins, for
example, can produce pain and infection. When moving about in
shallow water, wear some form of footgear and shuffle your feet
along the bottom, rather than picking up your feet and stepping.
11-26. Stingrays (Dasyatidae species) are a real hazard in shallow
waters, especially tropical waters. The type of bottom appears to
be irrelevant. There is a great variance between species, but all
have a sharp spike in their tail that may be venomous and can
cause extremely painful wounds if stepped on. All rays have a
typical shape that resembles a kite. You find them along the
coasts of the Americas, Africa, and Australia.
SALTWATER DANGERS
11-27. There are several fish that you should not handle, touch, or
contact. There are also others that you should not eat. These fish
are described below.
11-28. Sharks are the most feared animal in the sea. Usually,
shark attacks cannot be avoided and are considered accidents.
You should take every precaution to avoid any contact with
sharks. There are many shark species, but in general, dangerous
sharks have wide mouths and visible teeth, while relatively
harmless ones have small mouths on the underside of their heads.
However, any shark can inflict painful and often fatal injuries,
either through bites or through abrasions from their rough skin.
11-9
11-29. Rabbitfish or spinefoot (Siganidae species) live mainly on
coral reefs in the Indian and Pacific oceans. They have very
sharp, possibly venomous spines in their fins. Handle them with
care, if at all. This fish, like many others of the dangerous fish in
this section, is considered edible by native peoples where the fish
are found, but deaths occur from careless handling. Seek other
nonpoisonous fish to eat if possible.
11-30. Tang or surgeonfish (Acanthuridae species) average 20 to
25 centimeters (8 to 10 inches) in length and often are beautifully
colored. They are called surgeonfish because of the scalpel-like
spines located in the tail. The wounds inflicted by these spines
can bring about death through infection, envenomation, and loss
of blood, which may incidentally attract sharks.
11-31. Toadfish (Batrachoididae species) live in tropical waters off
the Gulf Coast of the United States and along both coasts of
Central and South America. These dully-colored fish average 18
to 25 centimeters (7 to 10 inches) in length. They typically bury
themselves in the sand to await fish and other prey. They have
sharp, very toxic spines along their backs.
11-32. Poisonous scorpion fish or zebra fish
(Scorpaenidae
species) are mostly around reefs in the tropical Indian and Pacific
oceans and occasionally in the Mediterranean and Aegean seas.
They average 30 to 75 centimeters (12 to 29 inches) in length.
Their coloration is highly variable, from reddish brown to almost
purple or brownish yellow. They have long, wavy fins and spines
and their sting is intensely painful. Less poisonous relatives live
in the Atlantic Ocean.
11-33. Stonefish (Synanceja species) are in the Pacific and Indian
oceans. They can inject a painful venom from their dorsal spines
when stepped on or handled carelessly. They are almost
impossible to see because of their lumpy shape and drab colors.
They range in size up to 40 centimeters (16 inches).
11-34. Weever fish (Trachinidae species) average 30 centimeters
(12 inches) long. They are hard to see as they lie buried in the
sand off the coasts of Europe, Africa, and the Mediterranean.
Their color is usually a dull brown. They have venomous spines
on the back and gills.
11-10
NOTE: Appendix F provides more details on these venomous fish
and toxic mollusks.
11-35. The livers of polar bears are considered toxic due to high
concentrations of vitamin A. There is a chance of death after eating
this organ. Another toxic meat is the flesh of the hawksbill turtle.
These animals are distinguished by a down-turned bill and yellow
polka dots on their neck and front flippers. They weigh more than
275 kilograms (605 pounds) and are unlikely to be captured.
11-36. Many fish living in lagoons, estuaries, or reefs near shore
are poisonous to eat, though some are only seasonally dangerous.
Although the majority are tropical fish; be wary of eating any
unidentifiable fish wherever you are. Some predatory fish, such
as barracuda and snapper, may become toxic if the fish they feed
on in shallow waters are poisonous. The most poisonous types
appear to have parrotlike beaks and hard shell-like skins with
spines and can often inflate their bodies like balloons. However,
at certain times of the year, indigenous populations consider the
puffer a delicacy.
11-37. The blowfish or puffer (Tetraodontidae species) are more
tolerant of cold water. They live along tropical and temperate
coasts worldwide, even in some of the rivers of Southeast Asia
and Africa. Stout-bodied and round, many of these fish have short
spines and can inflate themselves into a ball when alarmed or
agitated. Their blood, liver, and gonads are so toxic that as little
as 28 milligrams (1 ounce) can be fatal. These fish vary in color
and size, growing up to 75 centimeters (29 inches) in length.
11-38. The triggerfish (Balistidae species) occur in great variety,
mostly in tropical seas. They are deep-bodied and compressed,
resembling a seagoing pancake up to 60 centimeters (24 inches) in
length, with large and sharp dorsal spines. Avoid them all, as
many have poisonous flesh.
11-39. Although most people avoid them because of their ferocity,
they occasionally eat barracuda (Sphyraena barracuda). These
predators of mostly tropical seas can reach almost 1.5 meters (5
feet) in length and have attacked humans without provocation.
They occasionally carry the poison ciguatera in their flesh,
making them deadly if consumed.
11-11
OTHER DANGEROUS SEA CREATURES
11-40. The blue-ringed octopus, jellyfish, and the cone and auger
shells are other dangerous sea creatures. Therefore, you should
always be alert and move carefully in any body of water.
11-41. Most octopi are excellent when properly prepared.
However, the blue-ringed octopus (Hapalochlaena lunulata) can
inflict a deadly bite from its parrotlike beak. Fortunately, it is
restricted to the Great Barrier Reef of Australia and is very
small. It is easily recognized by its grayish white overall color and
irridescent blue rings. Authorities warn that all tropical octopus
species should be treated with caution because of their poisonous
bites, although their flesh is edible.
11-42. Deaths related to jellyfish are rare, but the sting they
inflict is extremely painful. The Portuguese man-of-war
resembles a large pink or purple balloon floating on the sea. It
has poisonous tentacles hanging up to 12 meters (40 feet) below
its body. The huge tentacles are actually colonies of stinging cells.
Most known deaths from jellyfish are attributed to the man-of-
war. Other jellyfish can inflict very painful stings as well. Avoid
the long tentacles of any jellyfish, even those washed up on the
beach and apparently dead.
11-43. The subtropical and tropical cone shells (Conidae species)
have a venomous harpoonlike barb. All have a fine netlike
pattern on the shell. A membrane may possibly obscure this
coloration. There are some very poisonous cone shells, even some
lethal ones in the Indian and Pacific oceans. Avoid any shell
shaped like an ice cream cone.
11-44. The auger shell or terebra (Terebridae species) are much
longer and thinner than the cone shells, but can be nearly as
deadly. They are found in temperate and tropical seas. Those in
the Indian and Pacific oceans have a more toxic venom in
their stinging barb. Do not eat these snails, as their flesh may
be poisonous.
11-12
Chapter 12
Field-Expedient Weapons, Tools,
and Equipment
As a soldier, you know the importance of proper
care and use of your weapons, tools, and
equipment. This is especially true of your knife.
You must always keep it sharp and ready to use.
A knife is your most valuable tool in a survival
situation. Imagine being in a survival situation
without any weapons, tools, or equipment except
your knife. It could happen! You might even be
without a knife. You would probably feel helpless,
but with the proper knowledge and skills, you can
easily improvise needed items.
In survival situations, you may have to fashion
any number and type of field-expedient tools and
equipment to survive. The need for an item must
outweigh the work involved in making it. You
should ask, “Is it necessary or just nice to have?”
Remember that undue haste makes waste.
Examples of tools and equipment that could make
your life much easier are ropes (Appendix G),
rucksacks, clothes, and nets.
Weapons serve a dual purpose. You use them to
obtain and prepare food and to provide self-
defense. A weapon can also give you a feeling of
security and provide you with the ability to hunt
on the move.
STAFFS
12-1. A staff should be one of the first tools you obtain. For
walking, it provides support and helps in ascending and
descending steep slopes. It provides some weapon’s capabilities if
used properly, especially against snakes and dogs. It should be
12-1
approximately the same height as you or at least eyebrow height.
The staff should be no larger than you can effectively wield when
tired and undernourished. It provides invaluable eye protection
when you are moving through heavy brush and thorns in
darkness.
CLUBS
12-2. You hold clubs; you do not throw them. However, the club
can extend your area of defense beyond your fingertips. It also
serves to increase the force of a blow without injuring yourself.
The three basic types of clubs are explained below.
SIMPLE CLUB
12-3. A simple club is a staff or branch. It must be short enough
for you to swing easily, but long enough and strong enough for
you to damage whatever you hit. Its diameter should fit
comfortably in your palm, but it should not be so thin as to allow
the club to break easily upon impact. A straight-grained
hardwood is best if you can find it.
WEIGHTED CLUB
12-4. A weighted club is any simple club with a weight on one
end. The weight may be a natural weight, such as a knot on the
wood, or something added, such as a stone lashed to the club.
12-5. To make a weighted club, first find a stone that has a shape
that will allow you to lash it securely to the club. A stone with a
slight hourglass shape works well. If you cannot find a suitably
shaped stone, then fashion a groove or channel into the stone by
“pecking,” repeatedly rapping the club stone with a smaller hard
stone.
12-6. Next, find a piece of wood that is the right length for you.
A straight-grained hardwood is best. The length of the wood
should feel comfortable in relation to the weight of the stone.
Finally, lash the stone to the handle using a technique shown in
Figure 12-1, page 12-3. The technique you use will depend on the
type of handle you choose.
12-2
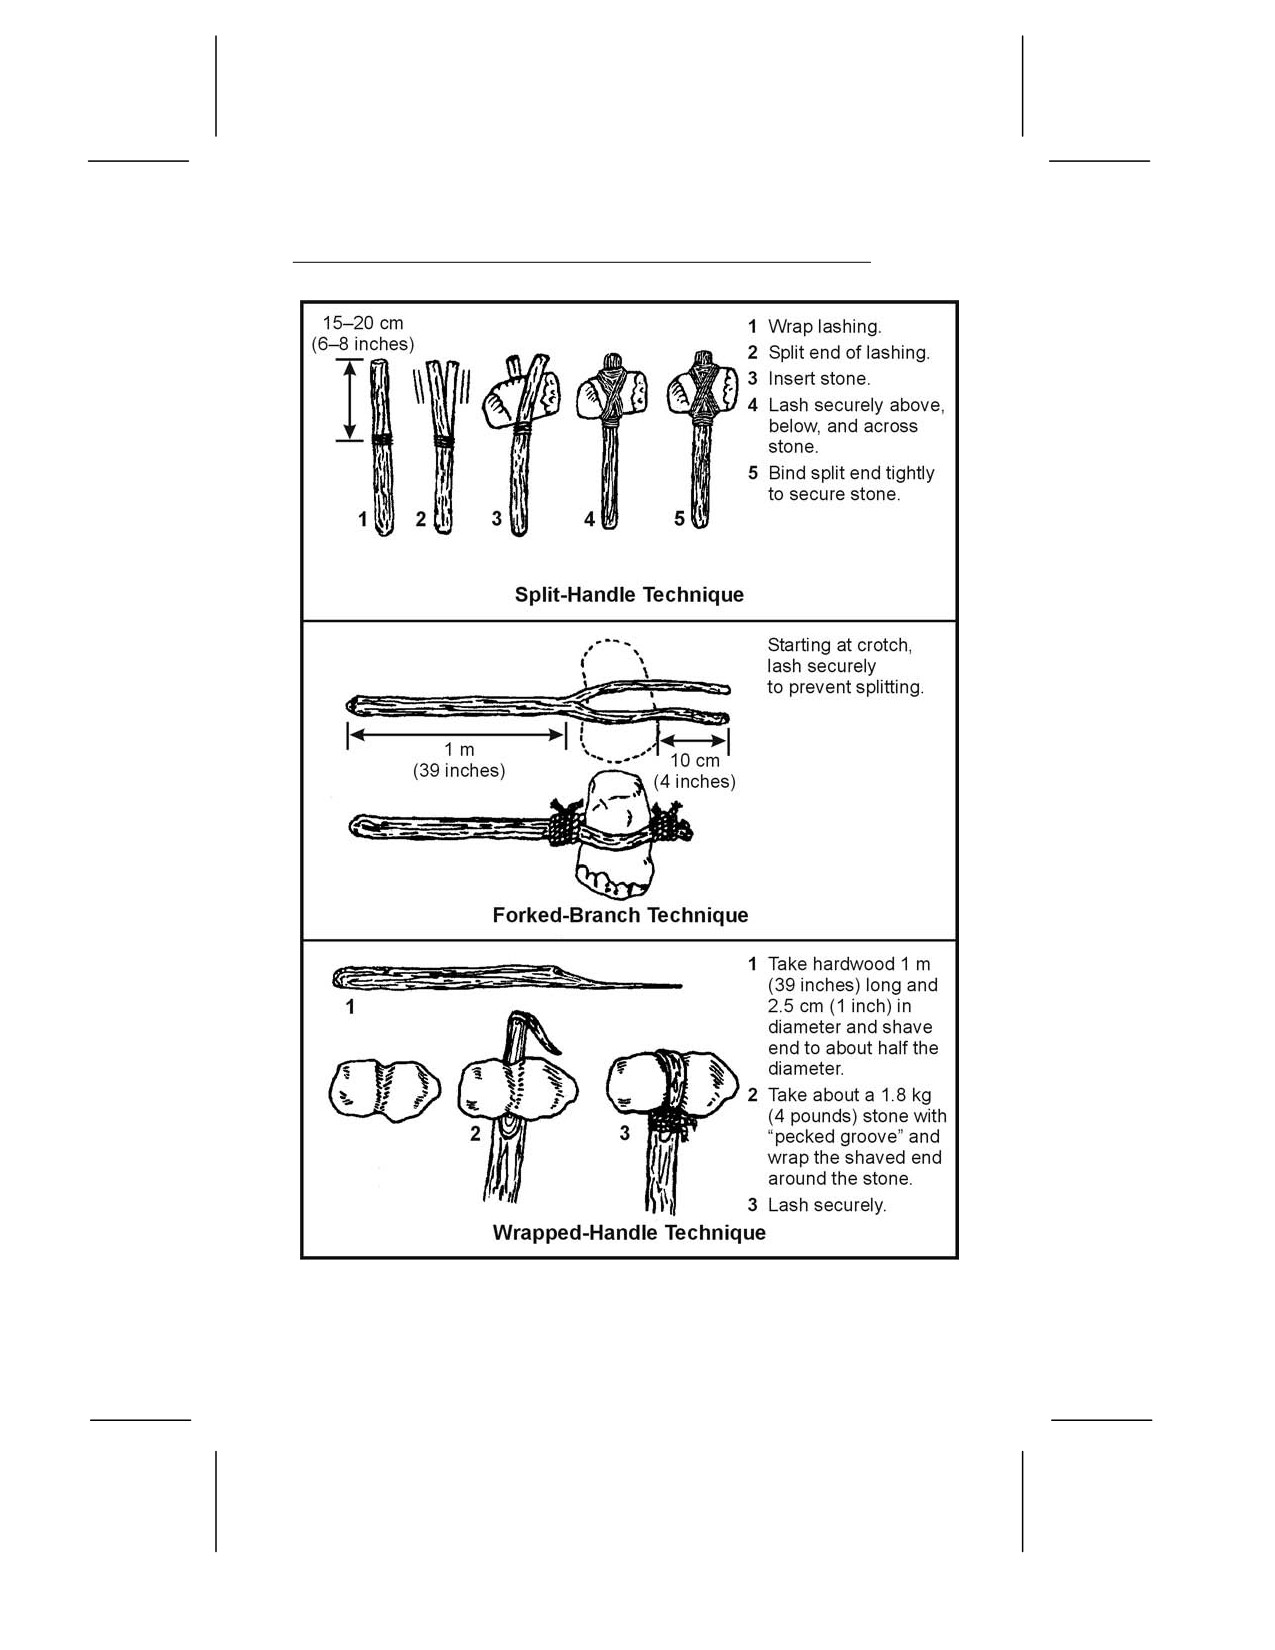
Figure 12-1. Lashing Clubs
12-3
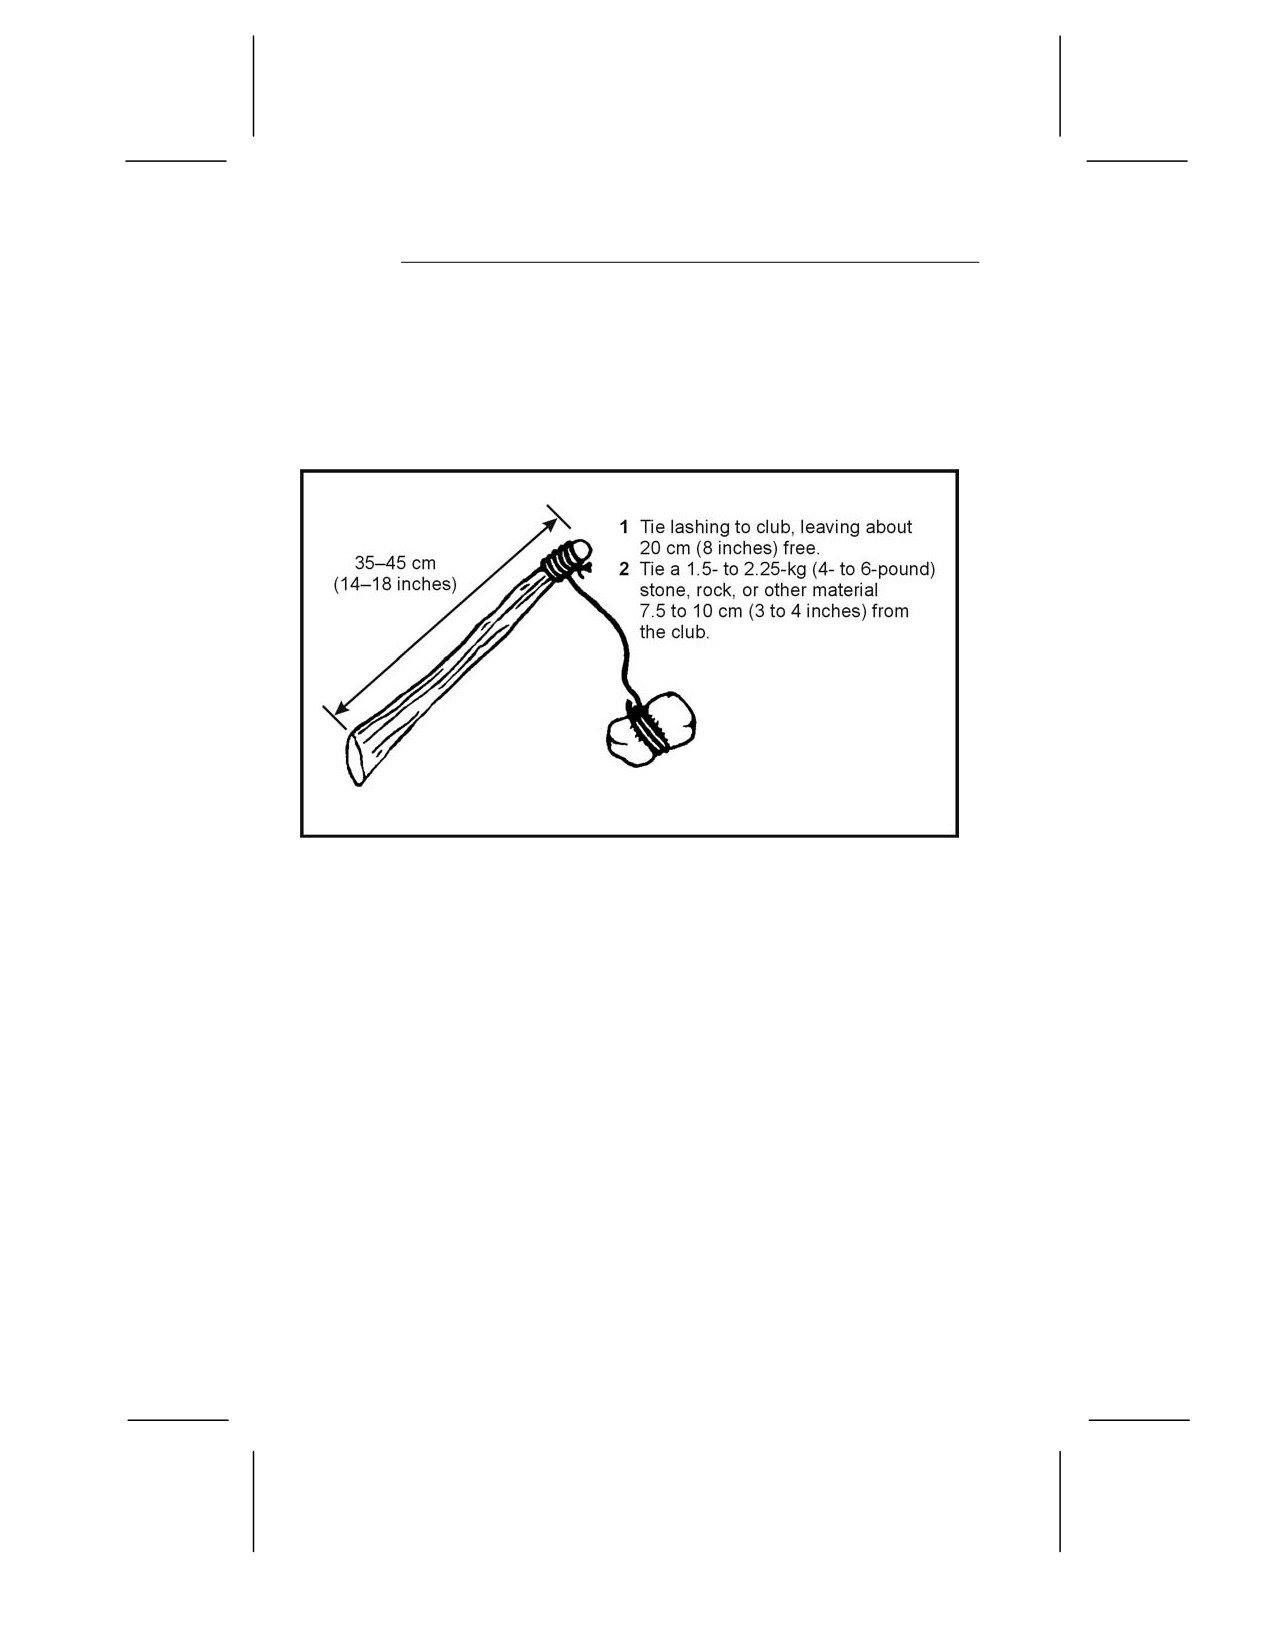
SLING CLUB
12-7. A sling club is another type of weighted club. A weight
hangs 8 to 10 centimeters (3 to 4 inches) from the handle by a
strong, flexible lashing
(Figure
12-2). This type of club both
extends the user’s reach and multiplies the force of the blow.
Figure 12-2. Sling Club
EDGED WEAPONS
12-8. Knives, spear blades, and arrow points fall under the
category of edged weapons. The following paragraphs explain how
to make such weapons.
KNIVES
12-9. A knife has three basic functions. It can puncture, slash or
chop, and cut. A knife is also an invaluable tool used to construct
other survival items. You may find yourself without a knife or you
may need another type knife or a spear. To improvise you can use
stone, bone, wood, or metal to make a knife or spear blade.
Stone
12-10. To make a stone knife, you will need a sharp-edged piece of
stone, a chipping tool, and a flaking tool. A chipping tool is a light,
blunt-edged tool used to break off small pieces of stone. A flaking
12-4
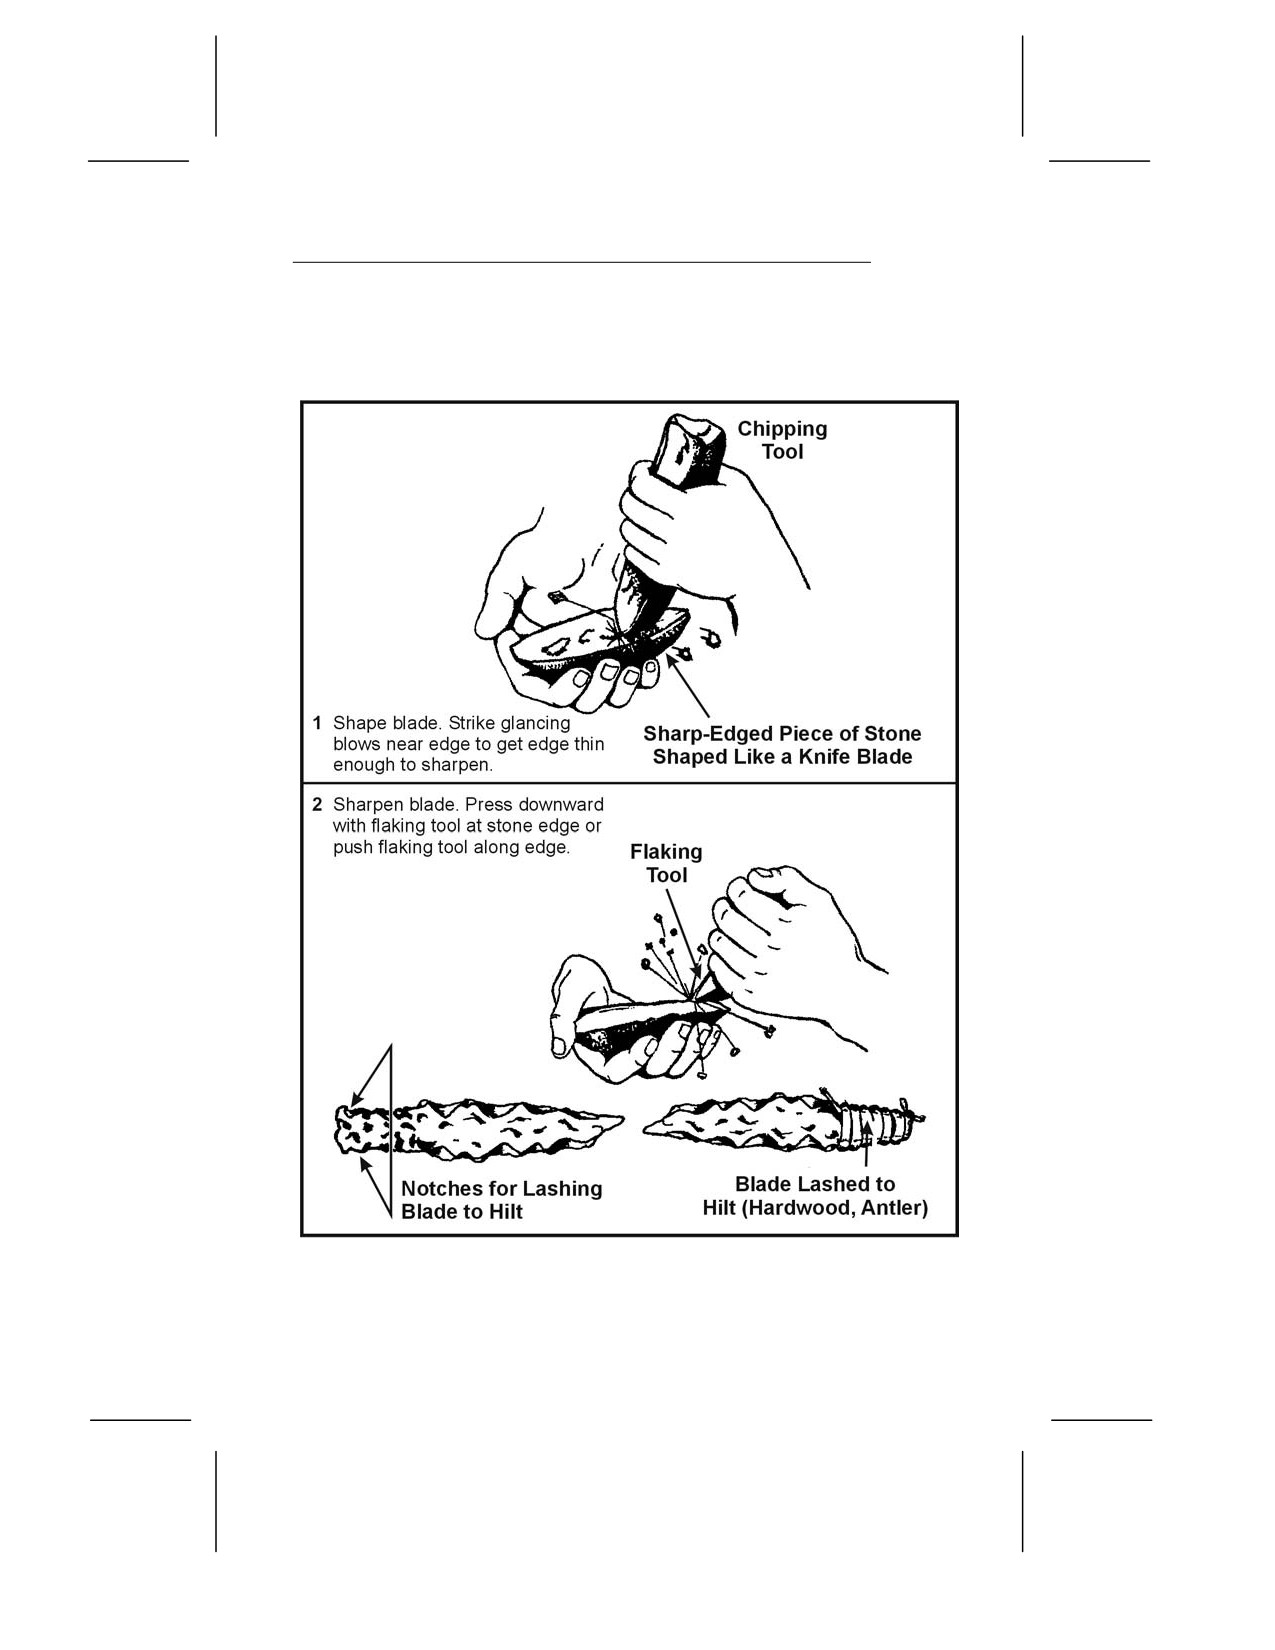
tool is a pointed tool used to break off thin, flattened pieces of
stone. You can make a chipping tool from wood, bone, or metal, and
a flaking tool from bone, antler tines, or soft iron (Figure 12-3).
Figure 12-3. Making a Stone Knife
12-5
12-11. Start making the knife by roughing out the desired shape
on your sharp piece of stone, using the chipping tool. Try to make
the knife fairly thin. Then, press the flaking tool against the
edges. This action will cause flakes to come off the opposite side of
the edge, leaving a razor-sharp edge. Use the flaking tool along
the entire length of the edge you need to sharpen. Eventually, you
will have a very, sharp cutting edge that you can use as a knife.
12-12. Lash the blade to some type of hilt (Figure 12-3, page 12-5).
NOTE: Stone will make an excellent puncturing tool and a good
chopping tool but will not hold a fine edge. Some stones such as
chert or flint can have very fine edges.
Bone
12-13. You can also use bone as an effective field-expedient edged
weapon. First, you will need to select a suitable bone. The larger
bones, such as the leg bone of a deer or another medium-sized
animal, are best. Lay the bone upon another hard object. Shatter
the bone by hitting it with a heavy object, such as a rock. From
the pieces, select a suitable pointed splinter. You can further
shape and sharpen this splinter by rubbing it on a rough-surfaced
rock. If the piece is too small to handle, you can still use it by
adding a handle to it. Select a suitable piece of hardwood for a
handle and lash the bone splinter securely to it.
NOTE: Use the bone knife only to puncture. It will not hold an
edge and it may flake or break if used differently.
Wood
12-14. You can make field-expedient edged weapons from wood.
Use these only to puncture. Bamboo is the only wood that will
hold a suitable edge. To make a knife from wood, first select a
straight-grained piece of hardwood that is about 30 centimeters
(12 inches) long and 2.5 centimeters (1 inch) in diameter. Fashion
the blade about 15 centimeters (6 inches) long. Shave it down to a
point. Use only the straight-grained portions of the wood. Do not
use the core or pith, as it would make a weak point.
12-15. Harden the point by a process known as fire hardening. If
a fire is possible, dry the blade portion over the fire slowly until
lightly charred. The drier the wood, the harder the point. After
lightly charring the blade portion, sharpen it on a coarse stone.
12-6
If using bamboo and after fashioning the blade, remove any other
wood to make the blade thinner from the inside portion of the
bamboo. Removal is done this way because bamboo’s hardest part
is its outer layer. Keep as much of this layer as possible to ensure
the hardest blade possible. When charring bamboo over a fire,
char only the inside wood; do not char the outside.
Metal
12-16. Metal is the best material to make field-expedient edged
weapons. Metal, when properly designed, can fulfill a knife’s
three uses—puncture, slice or chop, and cut. First, select a
suitable piece of metal, one that most resembles the desired end
product. Depending on the size and original shape, you can obtain
a point and cutting edge by rubbing the metal on a rough-
surfaced stone. If the metal is soft enough, you can hammer out
one edge while the metal is cold. Use a suitable flat, hard surface
as an anvil and a smaller, harder object of stone or metal as a
hammer to hammer out the edge. Make a knife handle from wood,
bone, or other material that will protect your hand.
Other Materials
12-17. You can use other materials to produce edged weapons.
Glass is a good alternative to an edged weapon or tool, if no other
material is available. Obtain a suitable piece in the same manner
as described for bone. Glass has a natural edge but is less durable
for heavy work. You can also sharpen plastic—if it is thick enough
or hard enough—into a durable point for puncturing.
SPEAR BLADES
12-18. To make spears, use the same procedures to make the
blade that you used to make a knife blade. Then select a shaft (a
straight sapling) 1.2 to 1.5 meters (4 to 5 feet) long. The length
should allow you to handle the spear easily and effectively. Attach
the spear blade to the shaft using lashing. The preferred method
is to split the handle, insert the blade, then wrap or lash it
tightly. You can use other materials without adding a blade.
Select a 1.2- to 1.5-meter (4- to 5-foot) long straight hardwood
shaft and shave one end to a point. If possible, fire-harden the
point. Bamboo also makes an excellent spear. Select a piece 1.2 to
12-7
1.5 meters (4 to 5 feet) long. Starting 8 to 10 centimeters (3 to 4
inches) back from the end used as the point, shave down the end
at a 45-degree angle (Figure 12-4). Remember, to sharpen the
edges, shave only the inner portion.
Figure 12-4. Bamboo Spear
ARROW POINTS
12-19. To make an arrow point, use the same procedures for
making a stone knife blade. Chert, flint, and shell-type stones are
best for arrow points. You can fashion bone like stone—by flaking.
You can make an efficient arrow point using broken glass.
OTHER EXPEDIENT WEAPONS
12-20. You can make other field-expedient weapons such as the
throwing stick, archery equipment, and the bola. The following
paragraphs explain how to make these.
THROWING STICK
12-21. The throwing stick, commonly known as the rabbit stick, is
very effective against small game
(squirrels, chipmunks, and
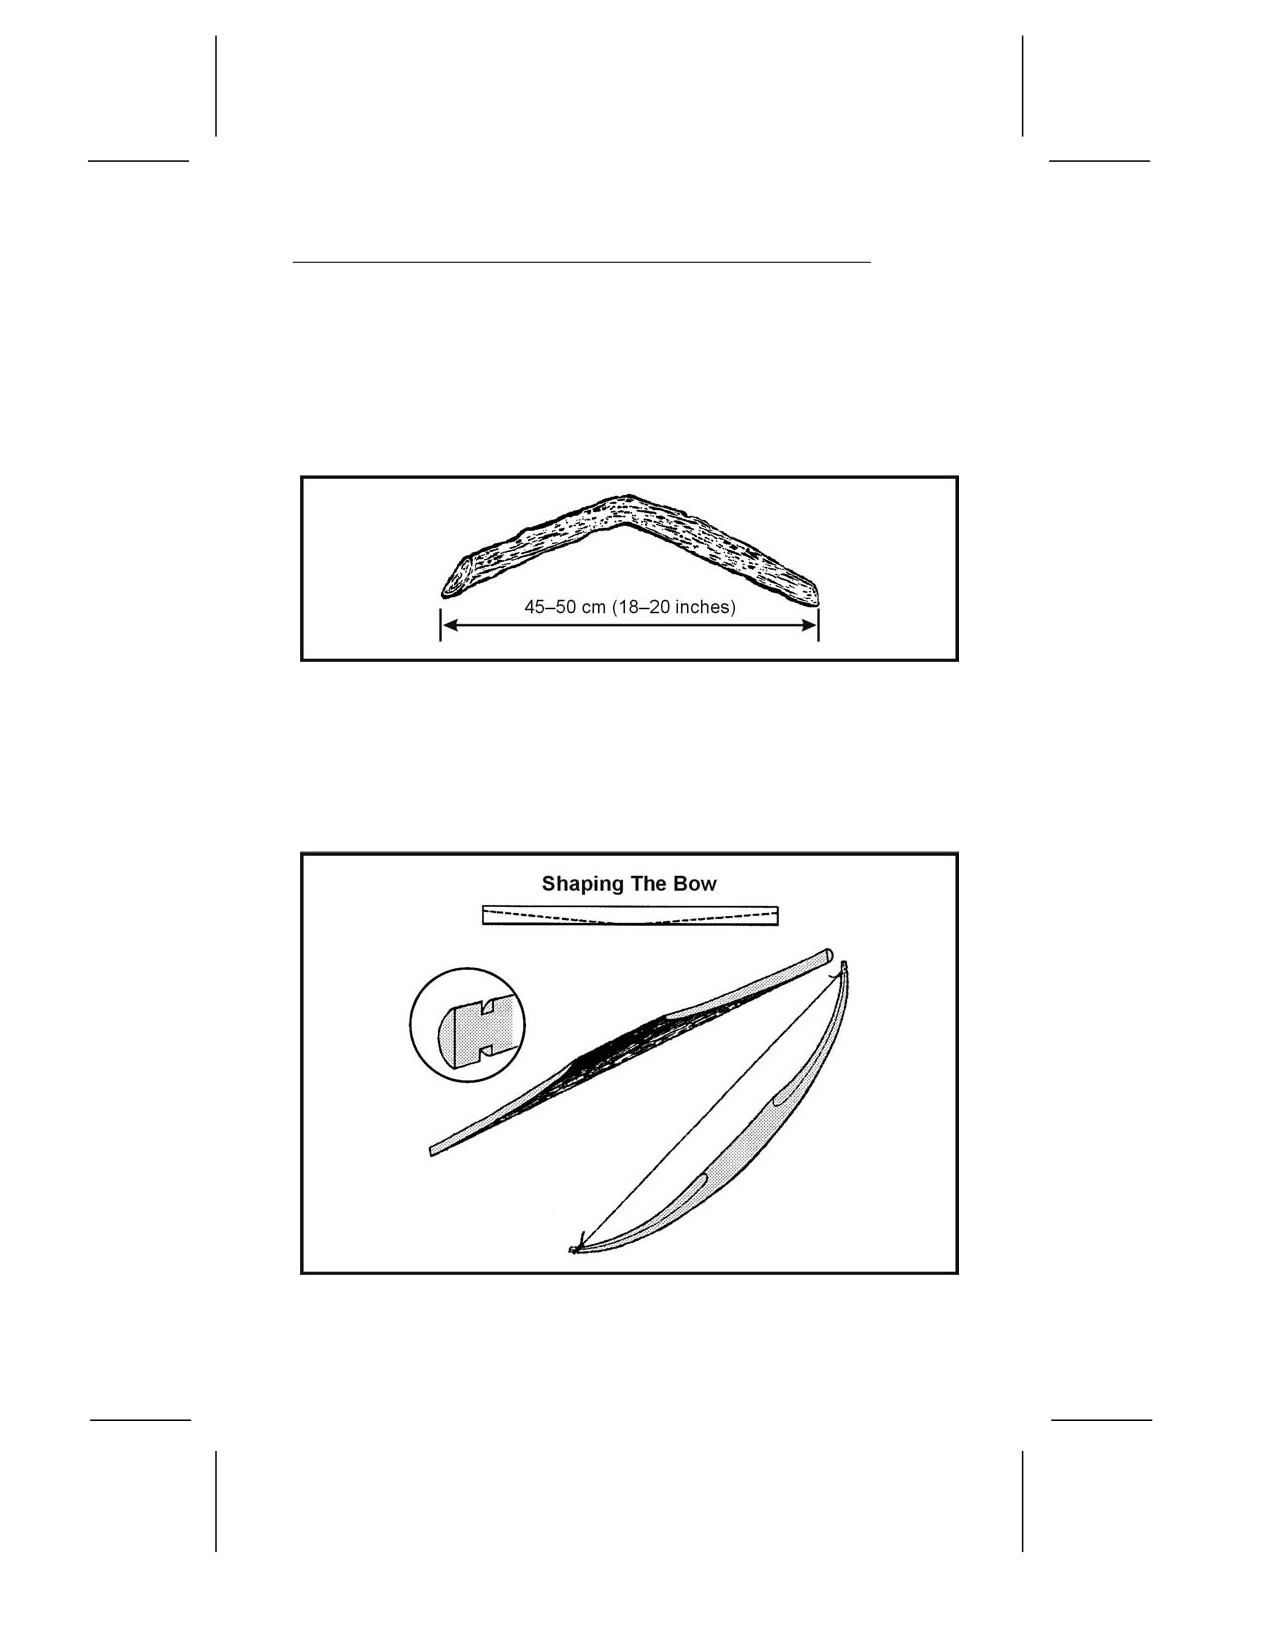
rabbits). The rabbit stick itself is a blunt stick, naturally curved
at about a 45-degree angle. Select a stick with the desired angle
from heavy hardwood such as oak. Shave off two opposite sides so
that the stick is flat like a boomerang (Figure 12-5, page 12-9).
You must practice the throwing technique for accuracy and speed.
First, align the target by extending the nonthrowing arm in line
with the mid- to lower-section of the target. Slowly and repeatedly
12-8
raise the throwing arm up and back until the throwing stick
crosses the back at about a 45-degree angle or is in line with the
nonthrowing hip. Bring the throwing arm forward until it is just
slightly above and parallel to the nonthrowing arm. This will be
the throwing stick’s release point. Practice slowly and repeatedly
to attain accuracy.
Figure 12-5. Rabbit Stick
ARCHERY EQUIPMENT
12-22. You can make a bow and arrow (Figure 12-6) from materials
available in your survival area. To make a bow, use the procedure
described in paragraphs 8-53 through 8-56 in Chapter 8.
Figure 12-6. Archery Equipment
12-9
12-23. While it may be relatively simple to make a bow and
arrow, it is not easy to use one. You must practice using it a long
time to be reasonably sure that you will hit your target. Also, a
field-expedient bow will not last very long before you have to
make a new one. For the time and effort involved, you may well
decide to use another type of field-expedient weapon.
BOLA
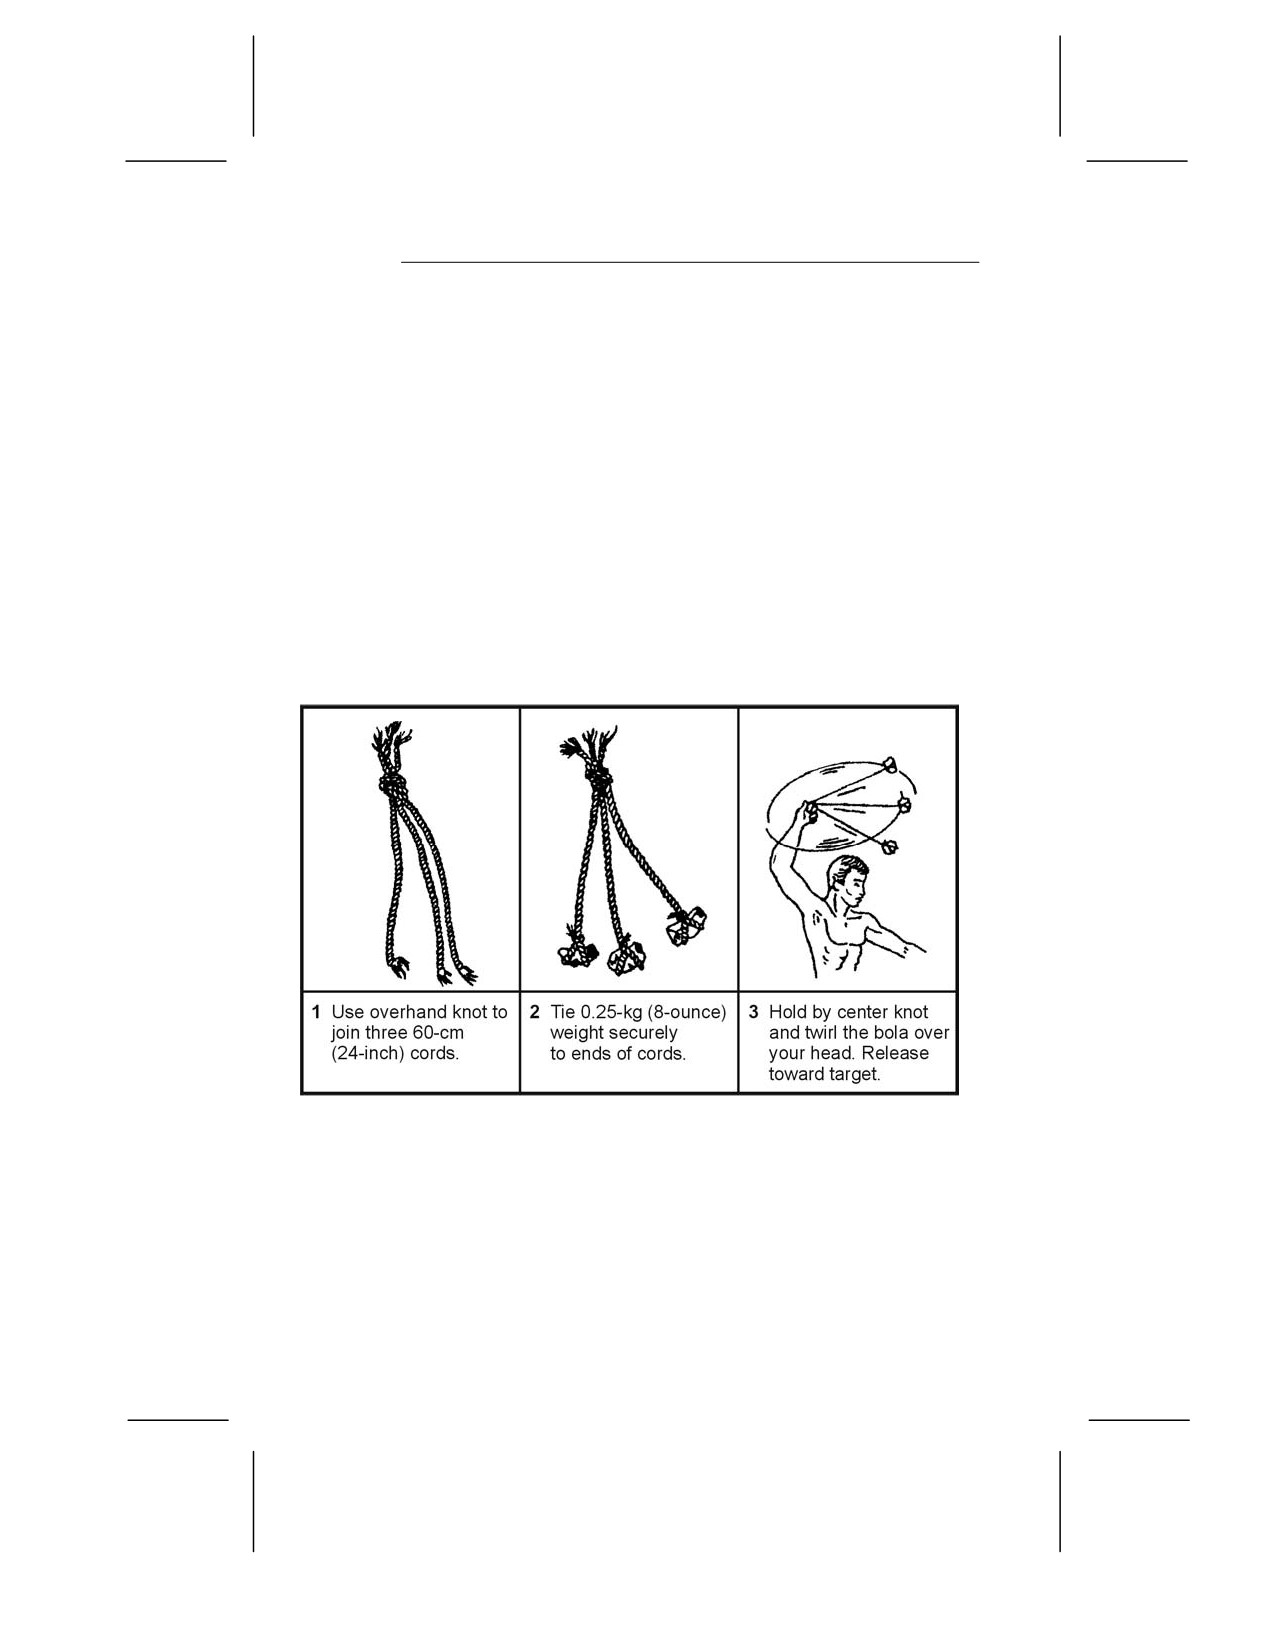
12-24. The bola is another field-expedient weapon that is easy to
make (Figure 12-7). It is especially effective for capturing running
game or low-flying fowl in a flock. To use the bola, hold it by the
center knot and twirl it above your head. Release the knot so that
the bola flies toward your target. When you release the bola, the
weighted cords will separate. These cords will wrap around and
immobilize the fowl or animal that you hit.
Figure 12-7. Bola
CORDAGE AND LASHING
12-25. Many materials are strong enough for use as cordage and
lashing. A number of natural and man-made materials are
available in a survival situation. For example, you can make a
cotton web belt much more useful by unraveling it. You can then
use the string for other purposes (fishing line, thread for sewing,
and lashing).
12-10
NATURAL CORDAGE SELECTION
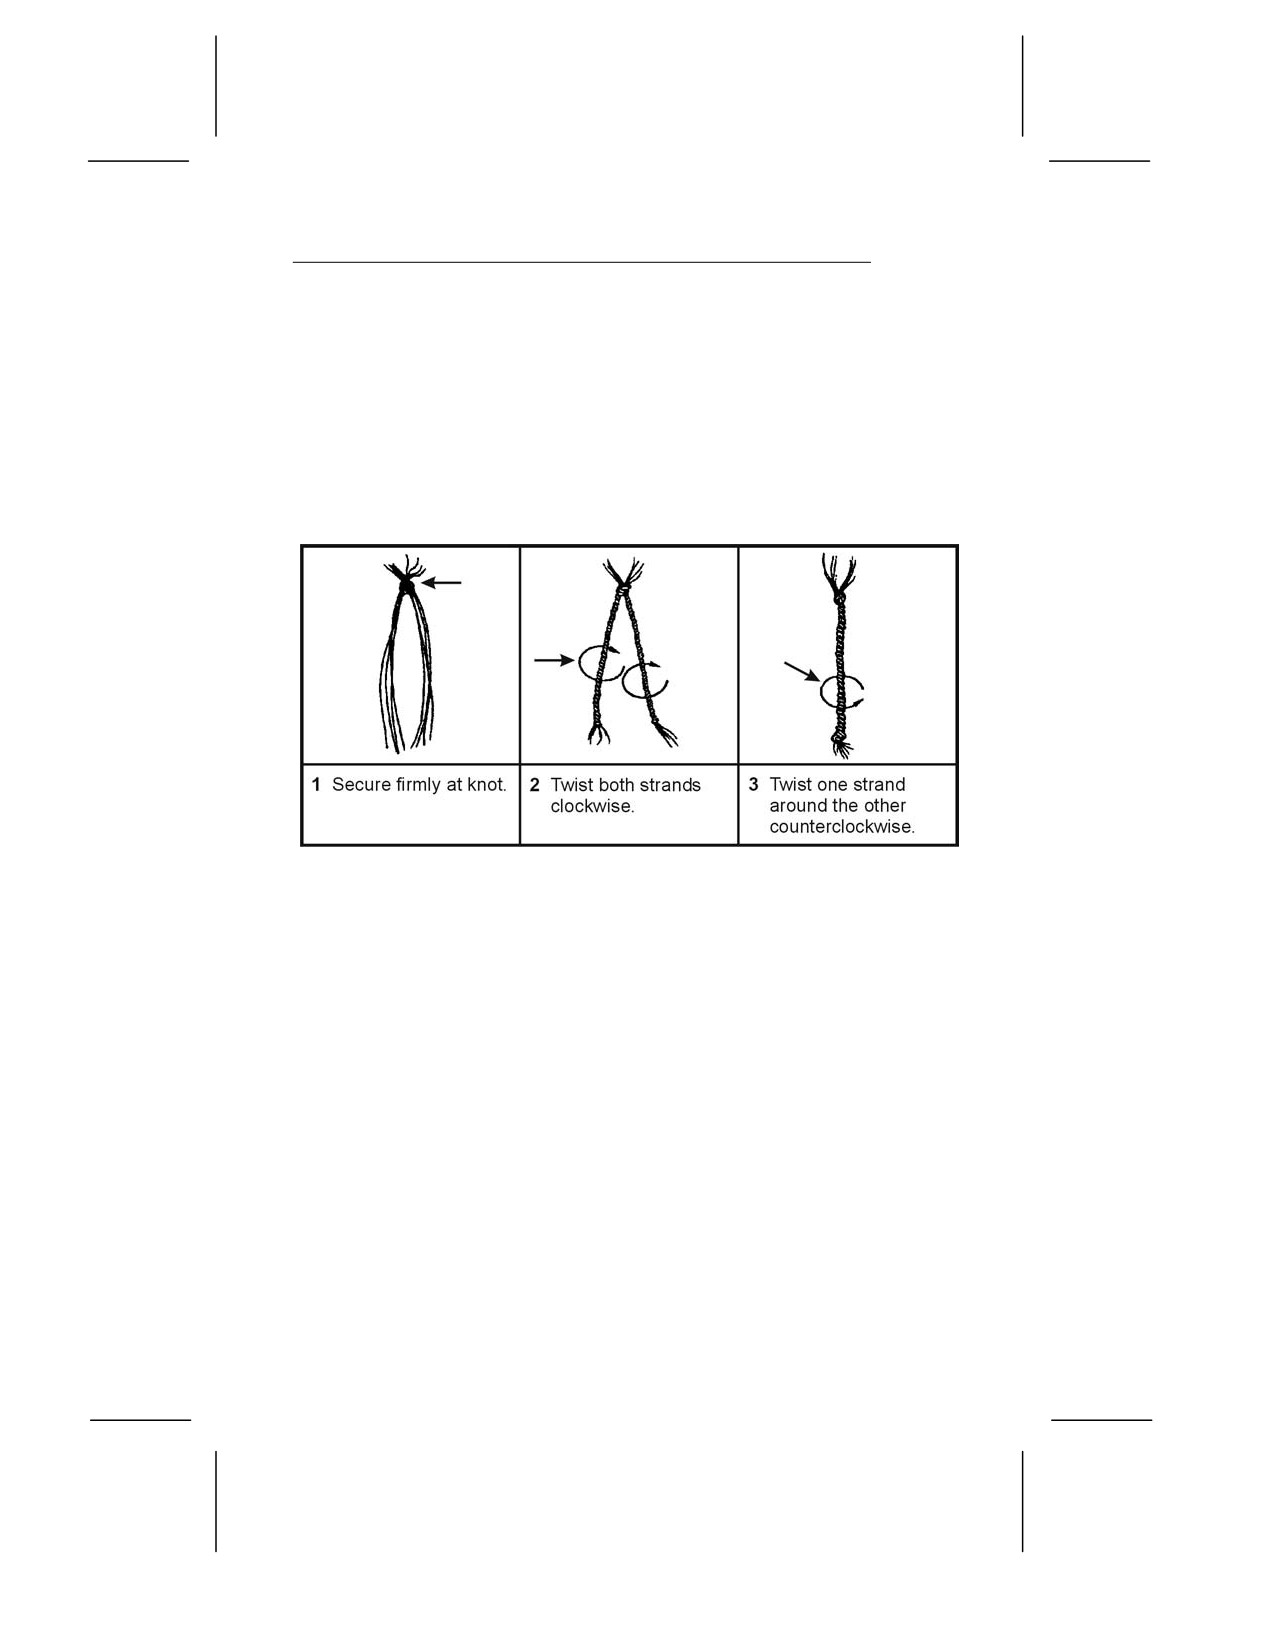
12-26. Before making cordage, there are a few simple tests you
can do to determine you material’s suitability. First, pull on a
length of the material to test for strength. Next, twist it between
your fingers and roll the fibers together. If it withstands this
handling and does not snap apart, tie an overhand knot with the
fibers and gently tighten. If the knot does not break, the material
is usable. Figure 12-8 shows various methods of making cordage.
Figure 12-8. Making Lines From Plant Fibers
LASHING MATERIAL
12-27. The best natural material for lashing small objects is
sinew. You can make sinew from the tendons of large game, such
as deer. Remove the tendons from the game and dry them
completely. Smash the dried tendons so that they separate into
fibers. Moisten the fibers and twist them into a continuous
strand. If you need stronger lashing material, you can braid the
strands. When you use sinew for small lashings, you do not need
knots as the moistened sinew is sticky and it hardens when dry.
12-28. You can shred and braid plant fibers from the inner bark of
some trees to make cord. You can use the linden, elm, hickory,
white oak, mulberry, chestnut, and red and white cedar trees.
After you make the cord, test it to be sure it is strong enough for
your purpose. You can make these materials stronger by braiding
several strands together.
12-11
12-29. You can use rawhide for larger lashing jobs. Make rawhide
from the skins of medium or large game. After skinning the
animal, remove any excess fat and any pieces of meat from the
skin. Dry the skin completely. You do not need to stretch it as
long as there are no folds to trap moisture. You do not have to
remove the hair from the skin. Cut the skin while it is dry. Make
cuts about 6 millimeters (1/4 inch) wide. Start from the center of
the hide and make one continuous circular cut, working clockwise
to the hide’s outer edge. Soak the rawhide for 2 to 4 hours or until
it is soft. Use it wet, stretching it as much as possible while
applying it. It will be strong and durable when it dries.
RUCKSACK CONSTRUCTION
12-30. The materials for constructing a rucksack or pack are almost
limitless. You can use wood, bamboo, rope, plant fiber, clothing,
animal skins, canvas, and many other materials to make a pack.
12-31. There are several construction techniques for rucksacks.
Many are very elaborate, but those that are simple and easy are
often the most readily made in a survival situation.
HORSESHOE PACK
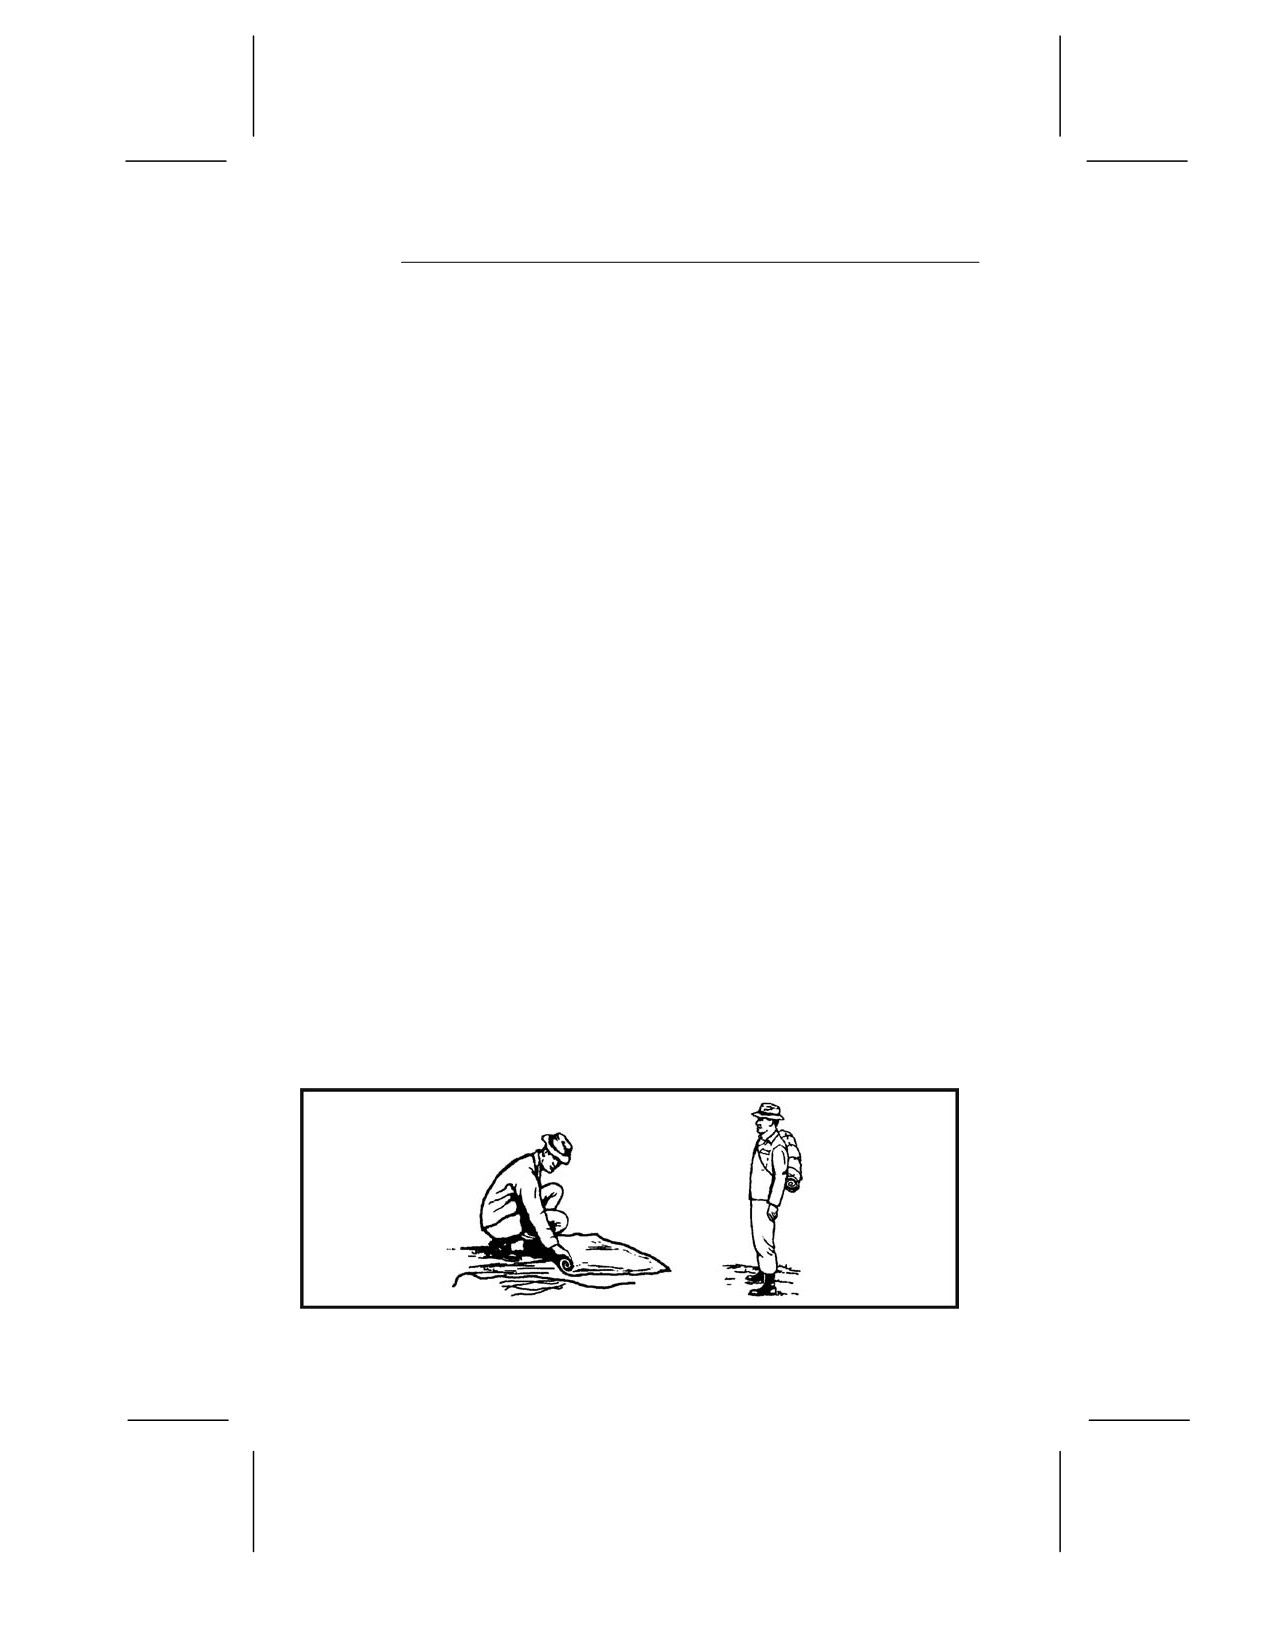
12-32. This pack is simple to make and use and relatively
comfortable to carry over one shoulder. Lay available square-
shaped material, such as poncho, blanket, or canvas, flat on the
ground. Lay items on one edge of the material. Pad the hard
items. Roll the material (with the items) toward the opposite edge
and tie both ends securely. Add extra ties along the length of the
bundle. You can drape the pack over one shoulder with a line
connecting the two ends (Figure 12-9).
Figure 12-9. Horseshoe Pack
12-12
SQUARE PACK
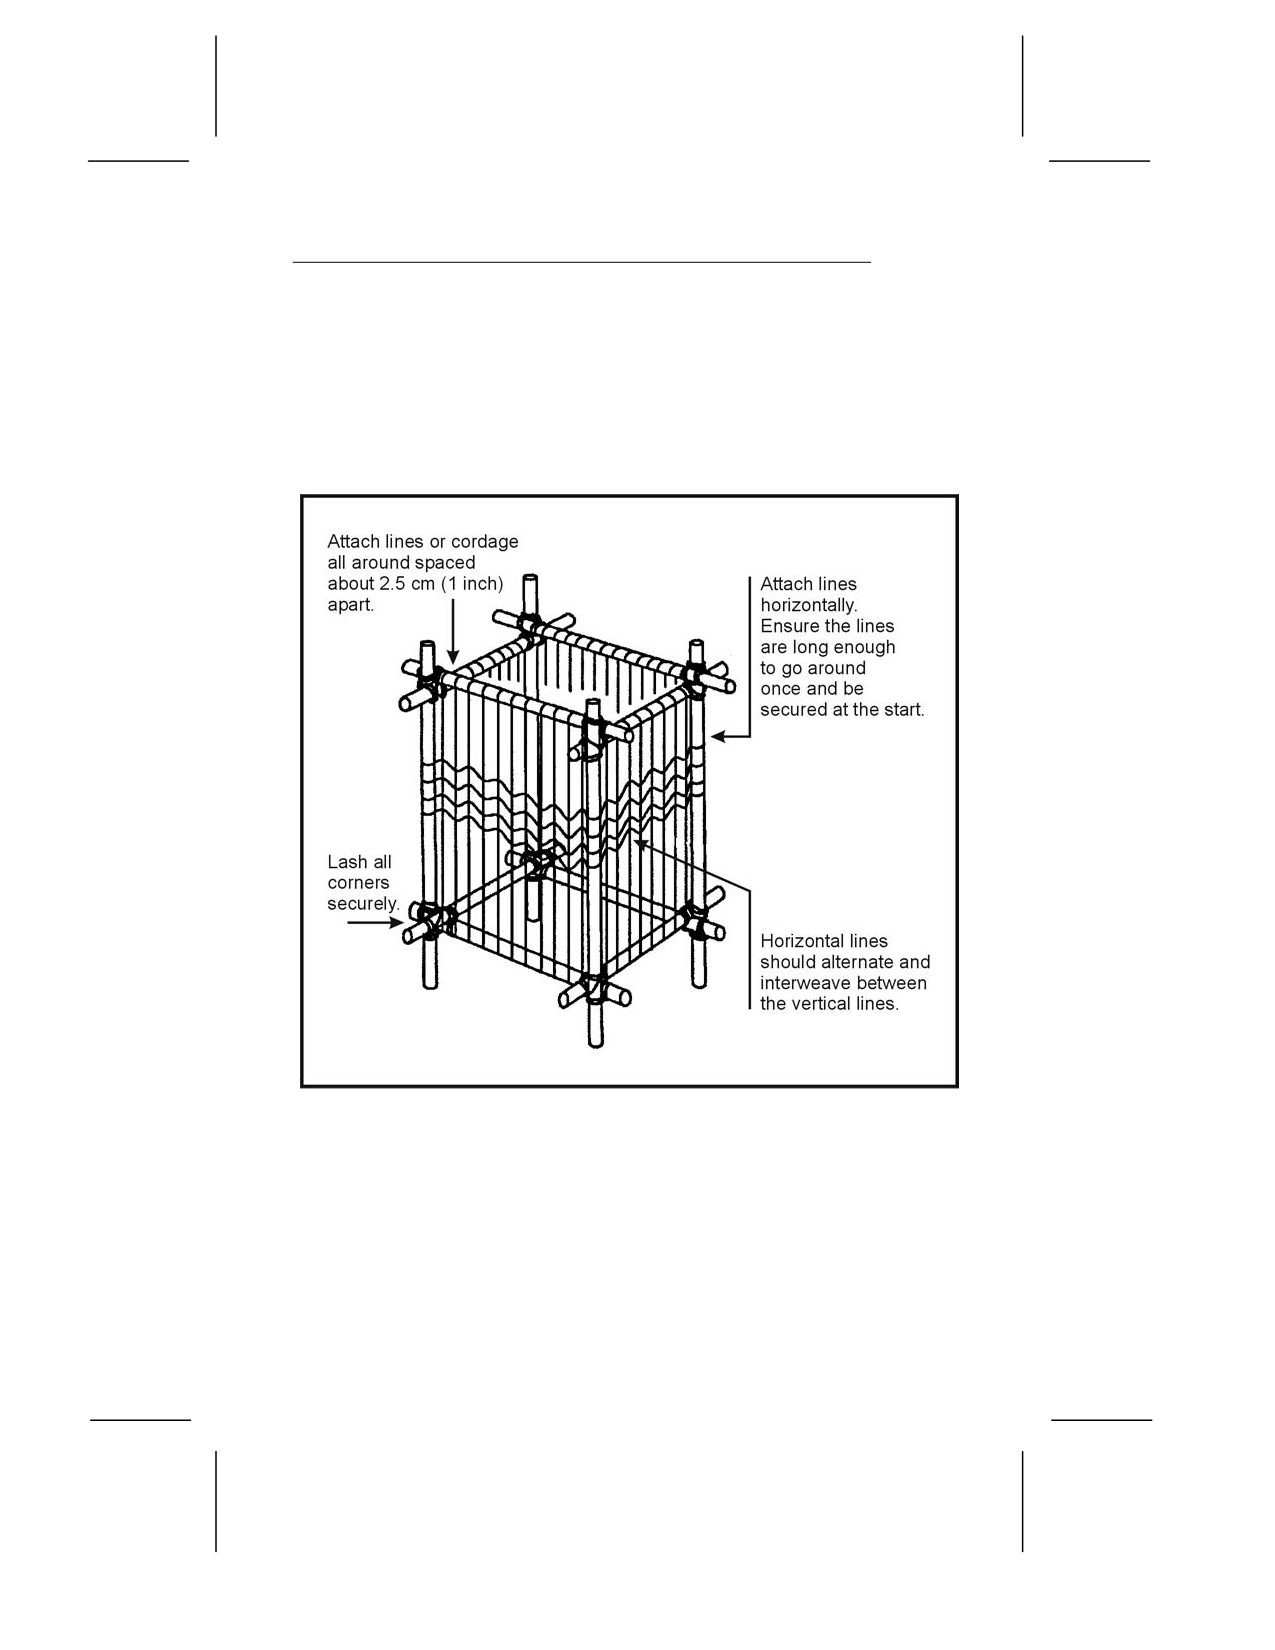
12-33. This pack is easy to construct if rope or cordage is
available. Otherwise, you must first make cordage. To make this
pack, construct a square frame from bamboo, limbs, or sticks. Size
will vary for each person and the amount of equipment carried
(Figure 12-10).
Figure 12-10. Square Pack
CLOTHING AND INSULATION
12-34. You can use many materials for clothing and insulation.
Both man-made materials, such as parachutes, and natural
materials, such as skins and plant materials, are available and
offer significant protection.
12-13
PARACHUTE ASSEMBLY
12-35. Consider the entire parachute assembly as a resource. Use
every piece of material and hardware, to include the canopy,
suspension lines, connector snaps, and parachute harness. Before
disassembling the parachute, consider all of your survival
requirements and plan to use different portions of the parachute
accordingly. For example, consider shelter requirements, need for
a rucksack, and any additional clothing or insulation needs.
ANIMAL SKINS
12-36. The selection of animal skins in a survival situation will
most often be limited to what you manage to trap or hunt.
However, if there is an abundance of wildlife, select the hides of
larger animals with heavier coats and large fat content. Do not
use the skins of infected or diseased animals if possible. Since
they live in the wild, animals are carriers of pests such as ticks,
lice, and fleas. Because of these pests, use water to thoroughly
clean any skin obtained from any animal. If water is not
available, at least shake out the skin thoroughly. As with
rawhide, lay out the skin and remove all fat and meat. Dry the
skin completely. Use the hindquarter joint areas to make shoes,
mittens, or socks. Wear the hide with the fur to the inside for its
insulating factor.
PLANT FIBERS
12-37. Several plants are sources of insulation from cold. Cattail
is a marshland plant found along lakes, ponds, and the
backwaters of rivers. The fuzz on the tops of the stalks forms dead
air spaces and makes a good down-like insulation when placed
between two pieces of material. Milkweed has pollenlike seeds
that act as good insulation. The husk fibers from coconuts are
very good for weaving ropes and, when dried, make excellent
tinder and insulation.
COOKING AND EATING UTENSILS
12-38. You can use many materials to make equipment for the
cooking, eating, and storing of food. Usually all materials can
serve some type of purpose when in a survival situation.
12-14
BOWLS
12-39. Use wood, bone, horn, bark, or other similar material to
make bowls. To make wooden bowls, use a hollowed out piece of
wood that will hold your food and enough water to cook it in.
Hang the wooden container over the fire and add hot rocks to the
water and food. Remove the rocks as they cool and add more hot
rocks until your food is cooked.
CAUTION
Do not use rocks with air pockets, such as limestone and
sandstone. They may explode while heating in the fire.
12-40. You can also use this method with containers made of bark
or leaves. However, these containers will burn above the
waterline unless you keep them moist or keep the fire low.
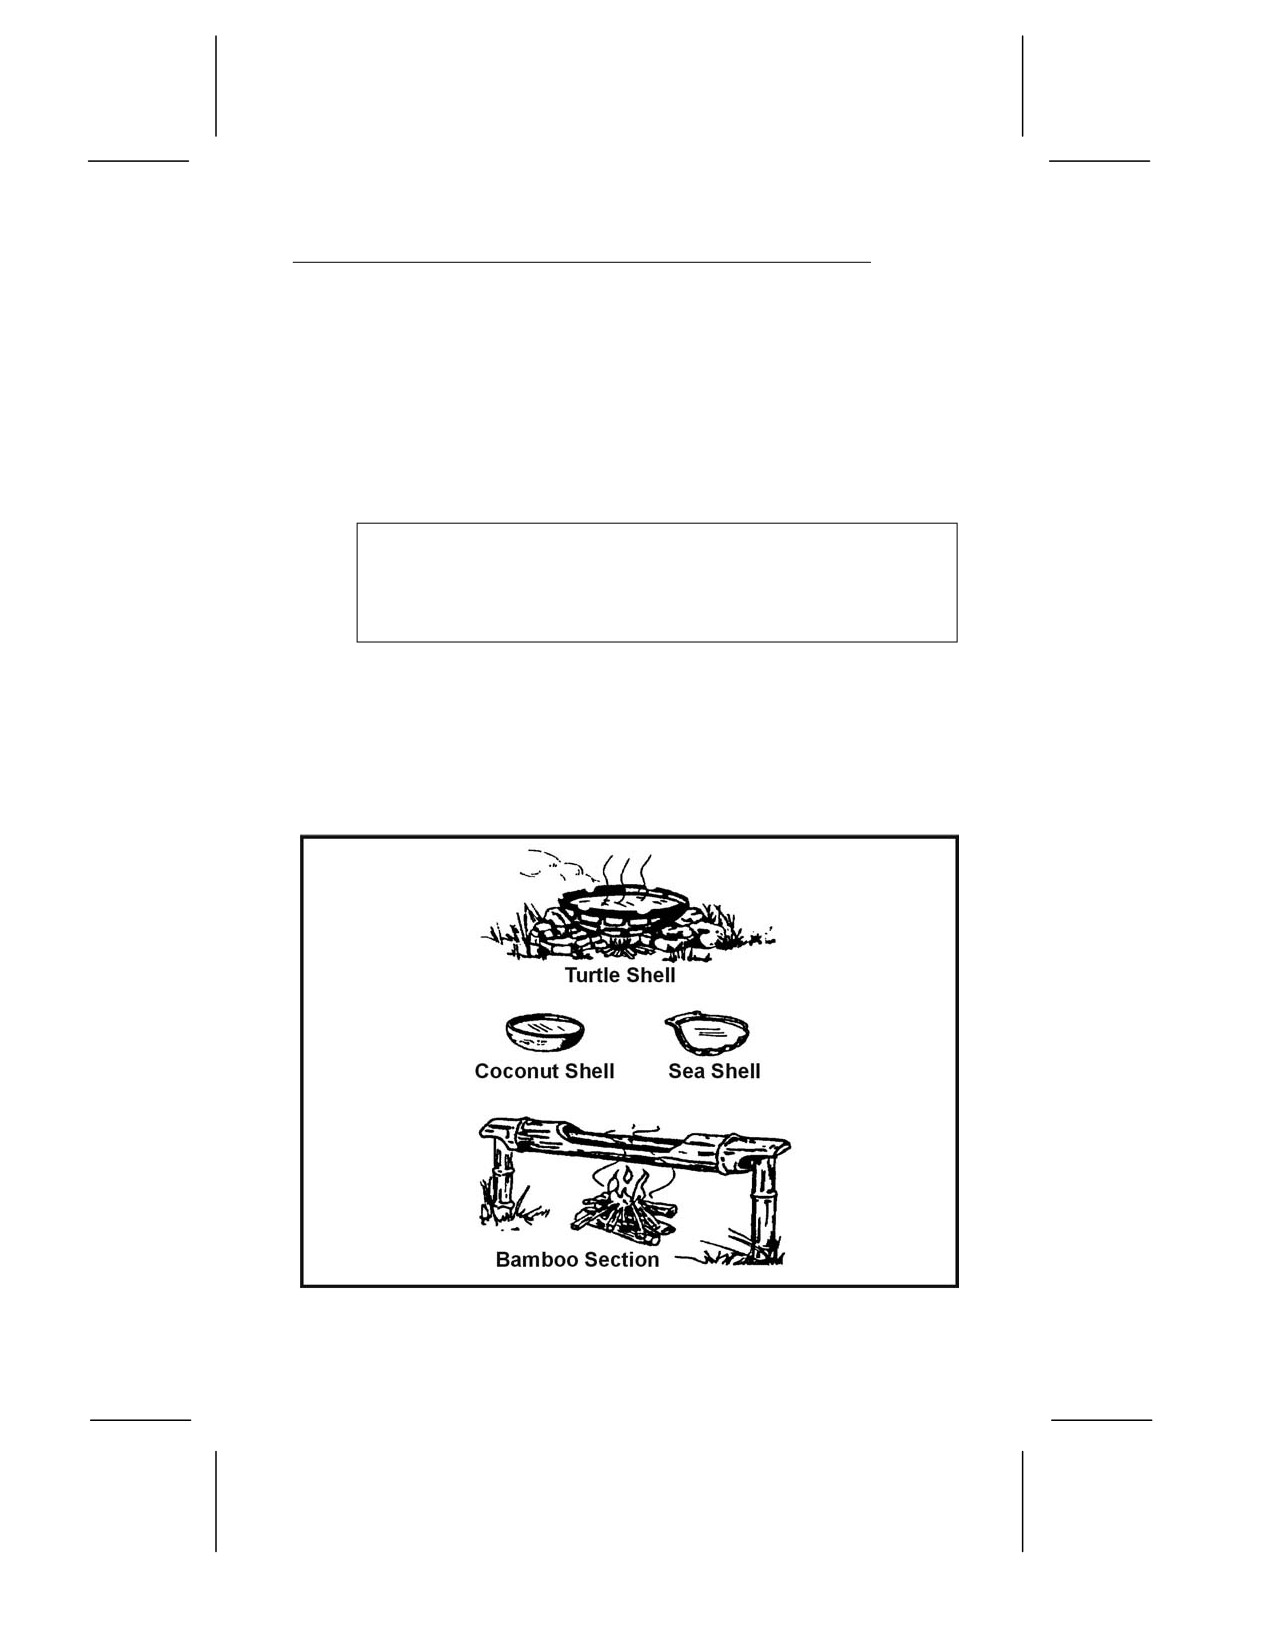
12-41. A section of bamboo also works very well for cooking. Be
sure you cut out a section between two sealed joints (Figure 12-11).
Figure 12-11. Containers for Boiling Food
12-15
CAUTION
A sealed section of bamboo will explode if heated
because of trapped air and water in the section.
FORKS, KNIVES, AND SPOONS
12-42. Carve forks, knives, and spoons from nonresinous woods so
that you do not get a wood resin aftertaste or do not taint the
food. Nonresinous woods include oak, birch, and other hardwood
trees.
NOTE: Do not use those trees that secrete a syrup or resinlike
liquid on the bark or when cut.
POTS
12-43. You can make pots from turtle shells or wood. As described
with bowls, using hot rocks in a hollowed out piece of wood is very
effective. Bamboo is the best wood for making cooking containers.
12-44. To use turtle shells, first thoroughly boil the upper portion
of the shell. Then use it to heat food and water over a flame
(Figure 12-11, page 12-15).
WATER BOTTLES
12-45. Make water bottles from the stomachs of larger animals.
Thoroughly flush the stomach out with water, then tie off the
bottom. Leave the top open, with some means of fastening
it closed.
12-16
Chapter 13
Desert Survival
To survive and evade in arid or desert areas, you
must understand and prepare for the
environment you will face. You must determine
your equipment needs, the tactics you will use,
and how the environment will affect you and your
tactics. Your survival will depend upon your
knowledge of the terrain, basic climatic elements,
your ability to cope with these elements, and your
will to survive.
TERRAIN
13-1. Most arid areas have several types of terrain. The five basic
desert terrain types are—
• Mountainous (high altitude).
• Rocky plateau.
• Sand dunes.
• Salt marshes.
• Broken, dissected terrain (“gebel” or “wadi”).
13-2. Desert terrain makes movement difficult and demanding.
Land navigation will be extremely difficult as there may be very
few landmarks. Cover and concealment may be very limited;
therefore, the threat of exposure to the enemy remains constant.
MOUNTAIN DESERTS
13-3. Scattered ranges or areas of barren hills or mountains
separated by dry, flat basins characterize mountain deserts. High
ground may rise gradually or abruptly from flat areas to several
thousand meters above sea level. Most of the infrequent rainfall
occurs on high ground and runs off rapidly in the form of flash
floods. These floodwaters erode deep gullies and ravines and
deposit sand and gravel around the edges of the basins. Water
rapidly evaporates, leaving the land as barren as before, although
13-1
there may be short-lived vegetation. If enough water enters the
basin to compensate for the rate of evaporation, shallow lakes
may develop, such as the Great Salt Lake in Utah or the Dead
Sea. Most of these lakes have a high salt content.
ROCKY PLATEAU DESERTS
13-4. Rocky plateau deserts have relatively slight relief
interspersed with extensive flat areas with quantities of solid or
broken rock at or near the surface. There may be steep-walled,
eroded valleys, known as wadis in the Middle East and arroyos or
canyons in the United States and Mexico. Although their flat
bottoms may be superficially attractive as assembly areas, the
narrower valleys can be extremely dangerous to men and
material due to flash flooding after rains. The Golan Heights is an
example of a rocky plateau desert.
SANDY OR DUNE DESERTS
13-5. Sandy or dune deserts are extensive flat areas covered with
sand or gravel. “Flat” is a relative term, as some areas may
contain sand dunes that are over 300 meters (1,000 feet) high and
16 to 24 kilometers (10 to 15 miles) long. Trafficability in such
terrain will depend on the windward or leeward slope of the
dunes and the texture of the sand. However, other areas may be
flat for 3,000 meters (10,000 feet) and more. Plant life may vary
from none to scrub over 2 meters (7 feet) high. Examples of this
type of desert include the edges of the Sahara, the empty quarter
of the Arabian Desert, areas of California and New Mexico, and
the Kalahari in South Africa.
SALT MARSHES
13-6. Salt marshes are flat, desolate areas, sometimes studded
with clumps of grass but devoid of other vegetation. They occur in
arid areas where rainwater has collected, evaporated, and left
large deposits of alkali salts and water with a high salt
concentration. The water is so salty it is undrinkable. A crust that
may be 2.5 to 30 centimeters (1 to 12 inches) thick forms over the
saltwater.
13-7. In arid areas, there are salt marshes hundreds of
kilometers square. These areas usually support many insects,
most of which bite. Avoid salt marshes. This type of terrain is
13-2
highly corrosive to boots, clothing, and skin. A good example is
the Shatt al Arab waterway along the Iran-Iraq border.
BROKEN TERRAIN
13-8. All arid areas contain broken or highly dissected terrain.
Rainstorms that erode soft sand and carve out canyons form this
terrain. A wadi may range from 3 meters (10 feet) wide and 2
meters (7 feet) deep to several hundred meters wide and deep.
The direction it takes varies as much as its width and depth. It
twists and turns and forms a mazelike pattern. A wadi will give
you good cover and concealment, but do not try to move through it
because it is very difficult terrain to negotiate.
ENVIRONMENTAL FACTORS
13-9. Surviving and evading the enemy in an arid area depends
on what you know and how prepared you are for the
environmental conditions you will face. Determine what
equipment you will need, the tactics you will use, and the
environment’s impact on them and you.
13-10. In a desert area there are seven environmental factors that
you must consider—
• Low rainfall.
• Intense sunlight and heat.
• Wide temperature range.
• Sparse vegetation.
• High mineral content near ground surface.
• Sandstorms.
• Mirages.
LOW RAINFALL
13-11. Low rainfall is the most obvious environmental factor in an
arid area. Some desert areas receive less than 10 centimeters (4
inches) of rain annually, and this rain comes in brief torrents that
quickly run off the ground surface. You cannot survive long
without water in high desert temperatures. In a desert survival
situation, you must first consider the amount of water you have
and other water sources.
13-3