FM 3-05.70 Field Manual Survival (17 May 2002) - page 5
8-11. In fresh water, look for mollusks in the shallows, especially
in water with a sandy or muddy bottom. Look for the narrow
trails they leave in the mud or for the dark elliptical slit of their
open valves.
8-12. Near the sea, look in the tidal pools and the wet sand. Rocks
along beaches or extending as reefs into deeper water often bear
clinging shellfish. Snails and limpets cling to rocks and seaweed
from the low water mark upward. Large snails, called chitons,
adhere tightly to rocks above the surf line.
8-13. Mussels usually form dense colonies in rock pools, on logs,
or at the base of boulders.
CAUTION
Mussels may be poisonous in tropical zones during the
summer! If a noticeable red tide has occurred within
72 hours, do not eat any fish or shellfish from that water
source.
8-14. Steam, boil, or bake mollusks in the shell. They make
excellent stews in combination with greens and tubers.
CAUTION
Do not eat shellfish that are not covered by water at
high tide!
FISH
8-15. Fish represent a good source of protein and fat. They offer
some distinct advantages to the survivor or evader. They are
usually more abundant than mammal wildlife, and the ways to
get them are silent. To be successful at catching fish, you must
know their habits. For instance, fish tend to feed heavily before a
storm. Fish are not likely to feed after a storm when the water is
muddy and swollen. Light often attracts fish at night. When there
is a heavy current, fish will rest in places where there is an eddy,
such as near rocks. Fish will also gather where there are deep
8-5
pools, under overhanging brush, and in and around submerged
foliage, logs, or other objects that offer them shelter.
8-16. There are no poisonous freshwater fish. However, the
catfish species has sharp, needlelike protrusions on its dorsal fins
and barbels. These can inflict painful puncture wounds that
quickly become infected.
8-17. Cook all freshwater fish to kill parasites. As a precaution,
also cook saltwater fish caught within a reef or within the
influence of a freshwater source. Any marine life obtained farther
out in the sea will not contain parasites because of the saltwater
environment. You can eat these raw.
8-18. Most fish encountered are edible. The organs of some species
are always poisonous to man; other fish can become toxic because
of elements in their diets. Ciguatera is a form of human poisoning
caused by the consumption of subtropical and tropical marine fish
which have accumulated naturally occurring toxins through their
diet. These toxins build up in the fish’s tissues. The toxins are
known to originate from several algae species that are common to
ciguatera endemic regions in the lower latitudes. Cooking does not
eliminate the toxins; neither does drying, smoking, or marinating.
Marine fish most commonly implicated in ciguatera poisoning
include the barracudas, jacks, mackerel, triggerfish, snappers, and
groupers. Many other species of warm water fishes harbor
ciguatera toxins. The occurrence of toxic fish is sporadic, and not
all fish of a given species or from a given locality will be toxic. This
explains why red snapper and grouper are a coveted fish off the
shores of Florida and the East Coast. While they are a restaurant
and fisherman’s favorite, and a common fish market choice, they
can also be associated with 100 cases of food poisonings in May
1988, Palm Beach County, Florida. The poisonings resulted in a
statewide warning against eating hogfish, grouper, red snapper,
amberjack, and barracuda caught at the Dry Tortuga Bank. A
major outbreak of ciguatera occurred in Puerto Rico between April
and June
1981 prompting a ban on the sale of barracuda,
amberjack, and blackjack. Other examples of poisonous saltwater
fish are the porcupine fish, cowfish, thorn fish, oilfish, and puffer
(Figure 8-2, page 8-7).
8-6
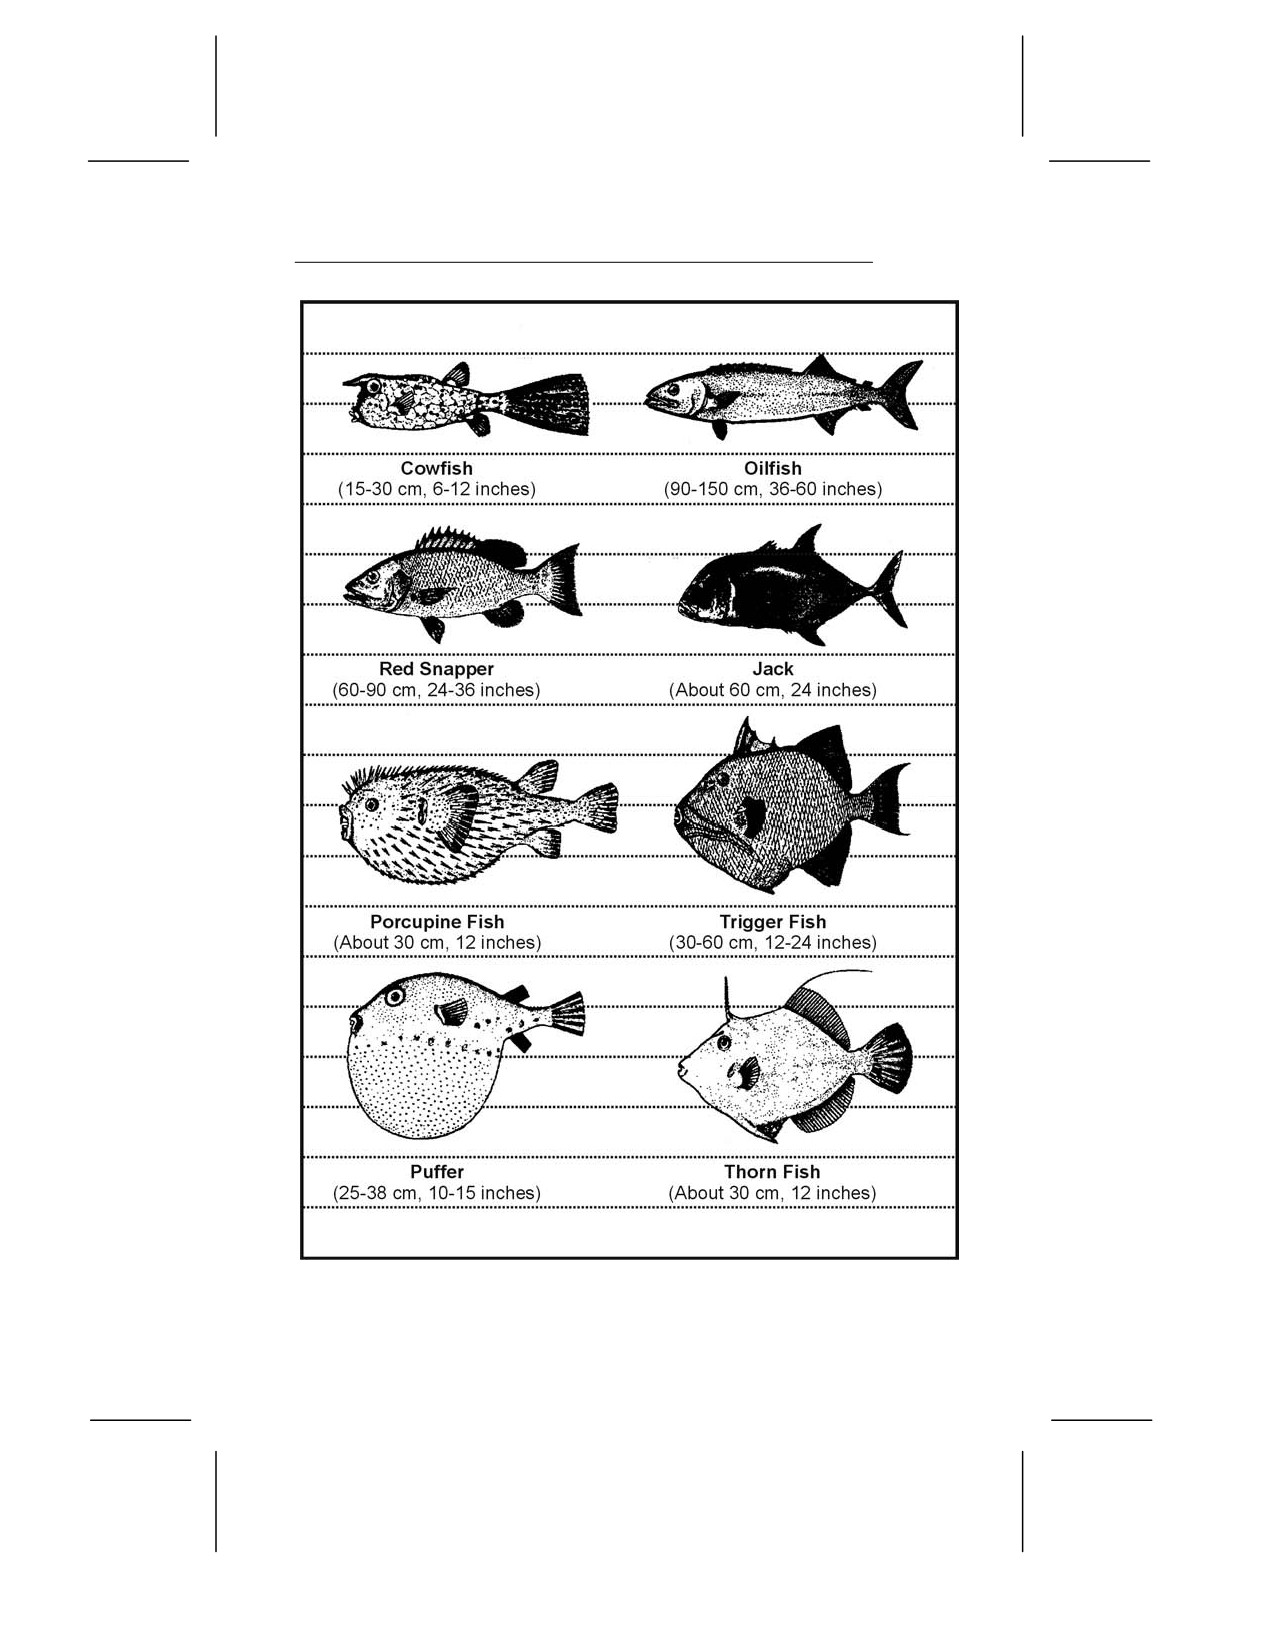
Figure 8-2. Fish With Poisonous Flesh
8-7
AMPHIBIANS
8-19. Frogs are easily found around bodies of fresh water.
Frogs seldom move from the safety of the water’s edge. At the
first sign of danger, they plunge into the water and bury
themselves in the mud and debris. Frogs are characterized by
smooth, moist skin. There are few poisonous species of frogs.
Avoid any brightly colored frog or one that has a distinct “X”
mark on its back as well as all tree frogs. Do not confuse toads
with frogs. Toads may be recognized by their dry, “warty” or
bumpy skin. They are usually found on land in drier
environments. Several species of toads secrete a poisonous
substance through their skin as a defense against attack.
Therefore, to avoid poisoning, do not handle or eat toads.
8-20. Do not eat salamanders; only about
25 percent of all
salamanders are edible, so it is not worth the risk of selecting a
poisonous variety. Salamanders are found around the water. They
are characterized by smooth, moist skin and have only four toes
on each foot.
REPTILES
8-21. Reptiles are a good protein source and relatively easy to
catch. Thorough cooking and hand washing is imperative with
reptiles. All reptiles are considered to be carriers of salmonella,
which exists naturally on their skin. Turtles and snakes are
especially known to infect man. If you are in an undernourished
state and your immune system is weak, salmonella can be deadly.
Cook food thoroughly and be especially fastidious washing your
hands after handling any reptile. Lizards are plentiful in most
parts of the world. They may be recognized by their dry, scaly
skin. They have five toes on each foot. The only poisonous ones
are the Gila monster and the Mexican beaded lizard. Care must
be taken when handling and preparing the iguana and the
monitor lizard, as they commonly harbor the salmonellal virus in
their mouth and teeth. The tail meat is the best tasting and
easiest to prepare.
8-22. Turtles are a very good source of meat. There are actually
seven different flavors of meat in each snapping turtle. Most of
the meat will come from the front and rear shoulder area,
although a large turtle may have some on its neck. The box turtle
(Figure 8-3, page 8-9) is a commonly encountered turtle that you
8-8
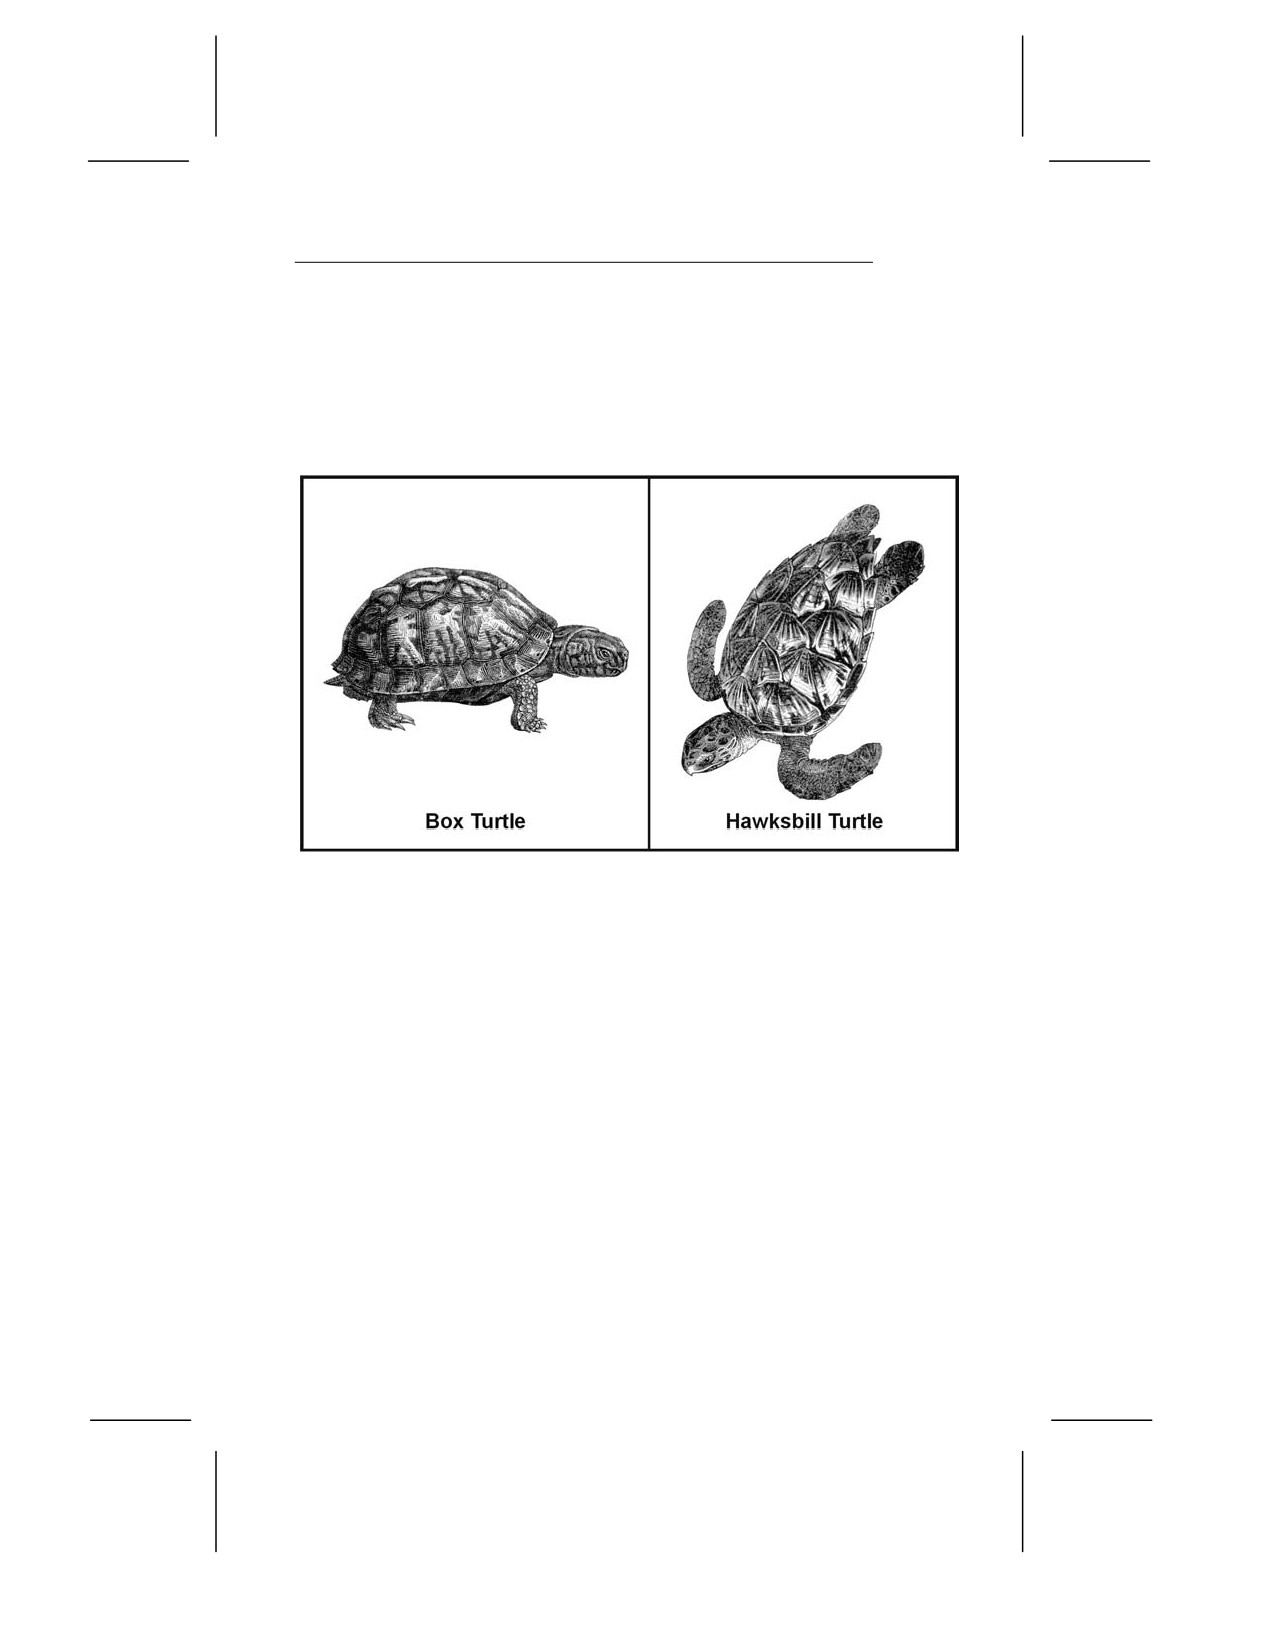
should not eat. It feeds on poisonous mushrooms and may build
up a highly toxic poison in its flesh. Cooking does not destroy this
toxin. Also avoid the hawksbill turtle (Figure 8-3), found in the
Atlantic Ocean, because of its poisonous thorax gland. Poisonous
snakes, alligators, crocodiles, and large sea turtles present
obvious hazards to the survivor.
Figure 8-3. Turtles With Poisonous Flesh
BIRDS
8-23. All species of birds are edible, although the flavor will vary
considerably. The only poisonous bird is the Pitohui, native only
to New Guinea. You may skin fish-eating birds to improve their
taste. As with any wild animal, you must understand birds’
common habits to have a realistic chance of capturing them. You
can take pigeons, as well as some other species, from their roost
at night by hand. During the nesting season, some species will
not leave the nest even when approached. Knowing where and
when the birds nest makes catching them easier (Figure 8-4, page
8-10). Birds tend to have regular flyways going from the roost to a
feeding area, to water, and so forth. Careful observation should
reveal where these flyways are and indicate good areas for
catching birds in nets stretched across the flyways (Figure 8-5,
page 8-11). Roosting sites and waterholes are some of the most
promising areas for trapping or snaring.
8-9
8-24. Nesting birds present another food source—eggs. Remove
all but two or three eggs from the clutch, marking the ones that
you leave. The bird will continue to lay more eggs to fill the
clutch. Continue removing the fresh eggs, leaving the ones you
marked.
Types of Birds
Frequent Nesting Places
Nesting Periods
Inland birds.
Tree, woods, or fields.
Spring and early summer
in temperate and arctic
regions; year-round in the
tropics.
Cranes and
Mangrove swamps or high Spring and early summer.
herons.
trees near water.
Some species of
High trees.
Late December through
owls.
March.
Ducks, geese, and Tundra areas near ponds,
Spring and early summer
swans.
rivers, or lakes.
in arctic regions.
Some sea birds.
Sandbars or low sand
Spring and early summer
islands.
in temperate and arctic
regions.
Gulls, auks,
Steep rocky coasts.
Spring and early summer
murres, and
in temperate and arctic
cormorants.
regions.
Figure 8-4. Birds’ Nesting Places
MAMMALS
8-25. Mammals are excellent protein sources and, for Americans,
the tastiest food source. There are some drawbacks to obtaining
mammals. In a hostile environment, the enemy may detect any
traps or snares placed on land. The amount of injury an animal
can inflict is in direct proportion to its size. All mammals have
teeth and nearly all will bite in self-defense. Even a squirrel can
inflict a serious wound and any bite presents a serious risk of
infection. Also, any mother can be extremely aggressive in
defense of her young. Any animal with no route of escape will
fight when cornered.
8-10
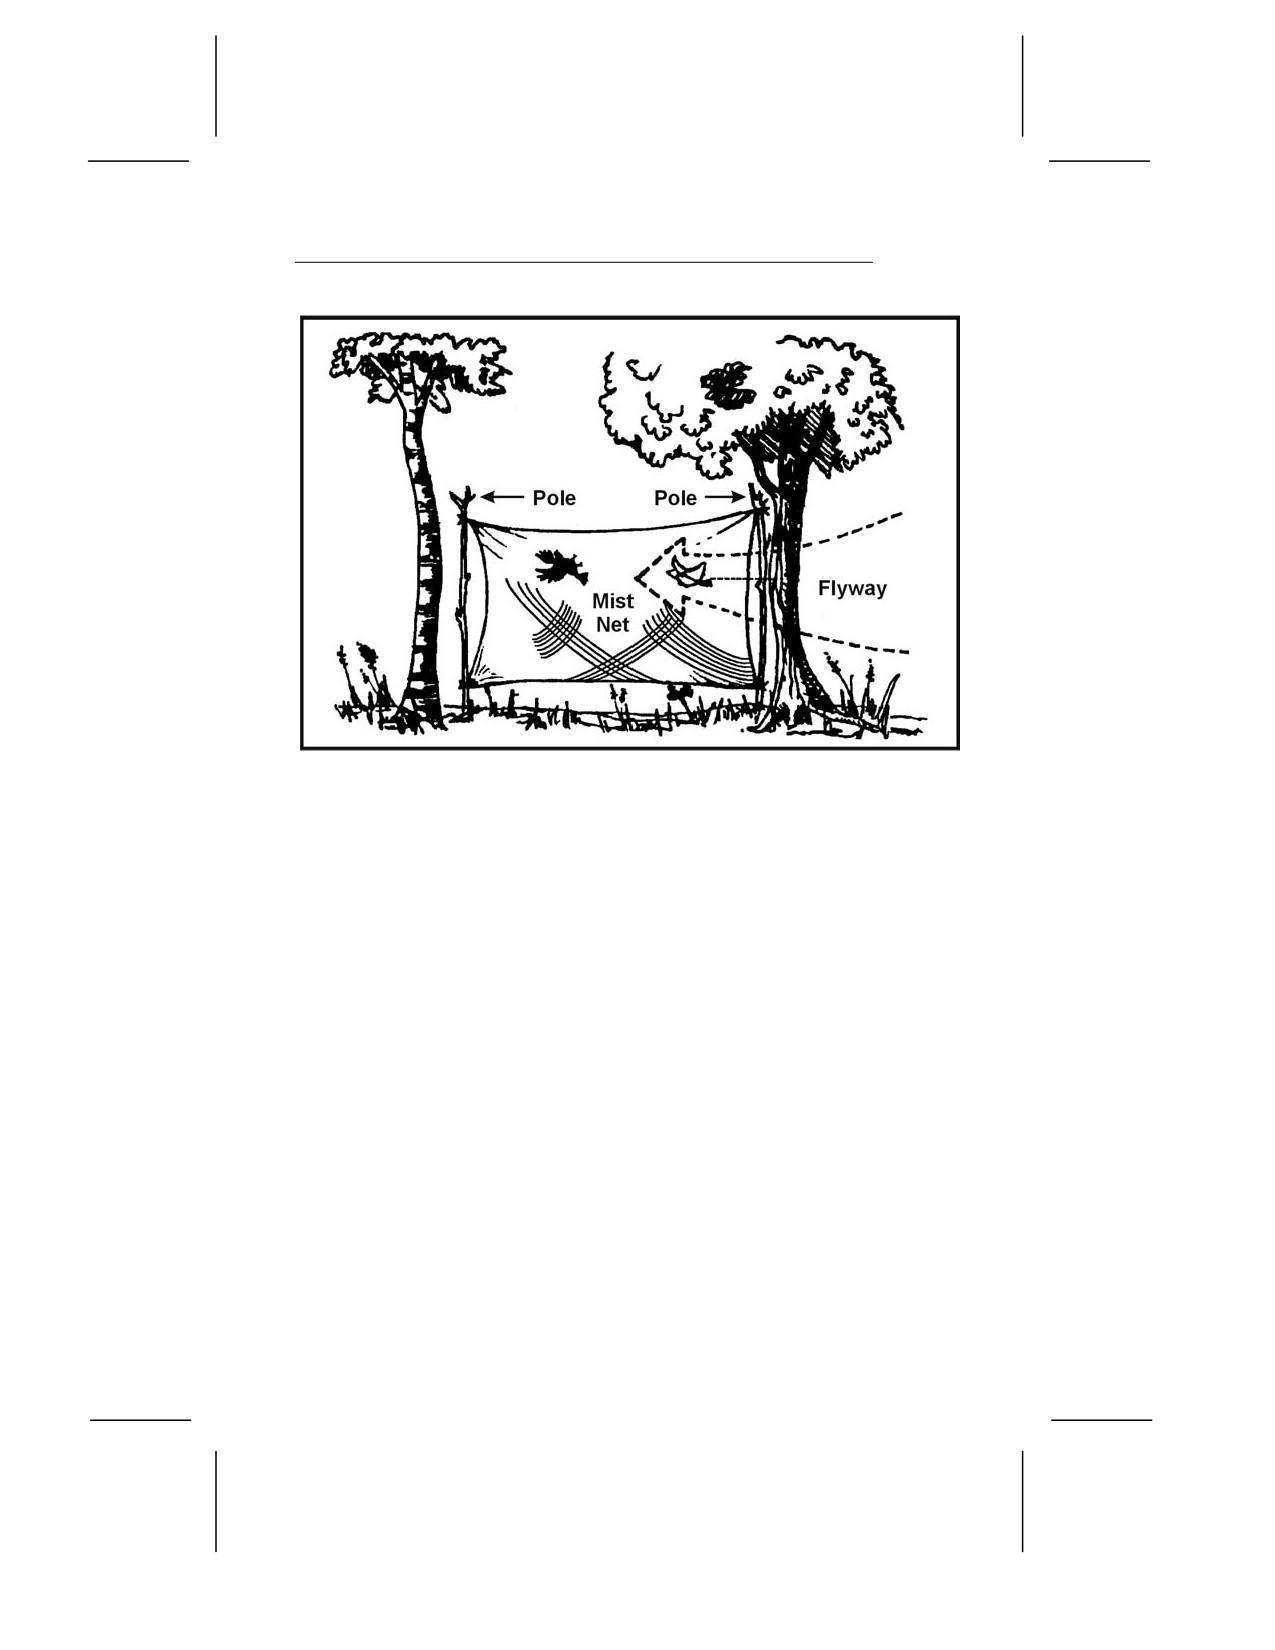
Figure 8-5. Catching Birds in a Net
8-26. All mammals are edible; however, the polar bear and
bearded seal have toxic levels of vitamin A in their livers. The
platypus, native to Australia and Tasmania, is an egg-laying,
semiaquatic mammal that has poisonous claws on its hind legs.
Scavenging mammals, such as the opossum, may carry diseases.
TRAPS AND SNARES
8-27. For an unarmed survivor or evader, or when the sound of a
rifle shot could be a problem, trapping or snaring wild game is a
good alternative. Several well-placed traps have the potential to
catch much more game than a man with a rifle is likely to shoot.
To be effective with any type of trap or snare, you must—
• Be familiar with the species of animal you intend to catch.
• Be capable of constructing a proper trap and properly
masking your scent.
• Not alarm the prey by leaving signs of your presence.
8-11
8-28. There are no catchall traps you can set for all animals. You
must determine what species are in the area and set your traps
specifically with those animals in mind. Look for the following:
• Runs and trails.
• Tracks.
• Droppings.
• Chewed or rubbed vegetation.
• Nesting or roosting sites.
• Feeding and watering areas.
8-29. Position your traps and snares where there is proof that
animals pass through. You must determine if it is a “run” or a
“trail.” A trail will show signs of use by several species and will be
rather distinct. A run is usually smaller and less distinct and will
only contain signs of one species. You may construct a perfect
snare, but it will not catch anything if haphazardly placed in the
woods. Animals have bedding areas, water holes, and feeding
areas with trails leading from one to another. You must place
snares and traps around these areas to be effective.
8-30. If you are in a hostile environment, trap and snare
concealment is important. However, it is equally important not to
create a disturbance that will alarm the animal and cause it to
avoid the trap. Therefore, if you must dig, remove all fresh dirt
from the area. Most animals will instinctively avoid a pitfall-type
trap. Prepare the various parts of a trap or snare away from the
site, carry them in, and set them up. Such actions make it easier
to avoid disturbing the local vegetation, thereby alerting the prey.
Do not use freshly cut, live vegetation to construct a trap or
snare. Freshly cut vegetation will “bleed” sap that has an odor the
prey will be able to smell. It is an alarm signal to the animal.
8-31. You must remove or mask the human scent on and around
the trap you set. Although birds do not have a developed sense of
smell, nearly all mammals depend on smell even more than on
sight. Even the slightest human scent on a trap will alarm the
prey and cause it to avoid the area. Actually removing the scent
from a trap is difficult but masking it is relatively easy. Use the
fluid from the gall and urine bladders of previous kills. Do not use
human urine. Mud, particularly from an area with plenty of
rotting vegetation, is also good. Use it to coat your hands when
8-12
handling the trap and to coat the trap when setting it. In nearly
all parts of the world, animals know the smell of burned
vegetation and smoke. It is only when a fire is actually burning
that they become alarmed. Therefore, smoking the trap parts is
an effective means to mask your scent. If one of the above
techniques is not practical, and if time permits, allow a trap to
weather for a few days and then set it. Do not handle a trap while
it is weathering. When you position the trap, camouflage it as
naturally as possible to prevent detection by the enemy and to
avoid alarming the prey.
8-32. Traps or snares placed on a trail or run should use
funneling or channelization. To build a channel, construct a
funnel-shaped barrier extending from the sides of the trail toward
the trap, with the narrowest part nearest the trap.
Channelization should be inconspicuous to avoid alerting the
prey. As the animal gets to the trap, it cannot turn left or right
and continues into the trap. Few wild animals will back up,
preferring to face the direction of travel. Channelization does not
have to be an impassable barrier. You only have to make it
inconvenient for the animal to go over or through the barrier. For
best effect, the channelization should reduce the trail’s width to
just slightly wider than the targeted animal’s body. Maintain this
constriction at least as far back from the trap as the animal’s
body length, then begin the widening toward the mouth of the
funnel.
USE OF BAIT
8-33. Baiting a trap or snare increases your chances of catching
an animal. When catching fish, you must bait nearly all the
devices. Success with an unbaited trap depends on its placement
in a good location. A baited trap can actually draw animals to it.
The bait should be something the animal knows. However, this
bait should not be so readily available in the immediate area that
the animal can get it close by. For example, baiting a trap with
corn in the middle of a cornfield would not be likely to work.
Likewise, if corn is not grown in the region, a corn-baited trap
may arouse an animal’s curiosity and keep it alerted while it
ponders the strange food. Under such circumstances it may not go
for the bait. One bait that works well on small mammals is the
8-13
peanut butter from a meal, ready-to-eat (MRE) ration. Salt is also
a good bait. When using such baits, scatter bits of it around the
trap to give the prey a chance to sample it and develop a craving
for it. The animal will then overcome some of its caution before it
gets to the trap.
8-34. If you set and bait a trap for one species but another species
takes the bait without being caught, try to determine what the
animal was. Then set a proper trap for that animal, using the
same bait.
NOTE: Once you have successfully trapped an animal, you will
not only gain confidence in your ability, you will also have
resupplied yourself with bait for several more traps.
CONSTRUCTION
8-35. Traps and snares crush, choke, hang, or entangle the prey.
A single trap or snare will commonly incorporate two or more of
these principles. The mechanisms that provide power to the trap
are usually very simple. The struggling victim, the force of
gravity, or a bent sapling’s tension provides the power.
8-36. The heart of any trap or snare is the trigger. When planning a
trap or snare, ask yourself how it should affect the prey, what is the
source of power, and what will be the most efficient trigger. Your
answers will help you devise a specific trap for a specific species.
Traps are designed to catch and hold or to catch and kill. Snares are
traps that incorporate a noose to accomplish either function.
Simple Snare
8-37. A simple snare (Figure 8-6, page 8-15) consists of a noose
placed over a trail or den hole and attached to a firmly planted
stake. If the noose is some type of cordage placed upright on a
game trail, use small twigs or blades of grass to hold it up.
Filaments from spider webs are excellent for holding nooses open.
Make sure the noose is large enough to pass freely over the
animal’s head. As the animal continues to move, the noose
tightens around its neck. The more the animal struggles, the
tighter the noose gets. This type of snare usually does not kill the
animal. If you use cordage, it may loosen enough to slip off the
animal’s neck. Wire is therefore the best choice for a simple snare.
8-14
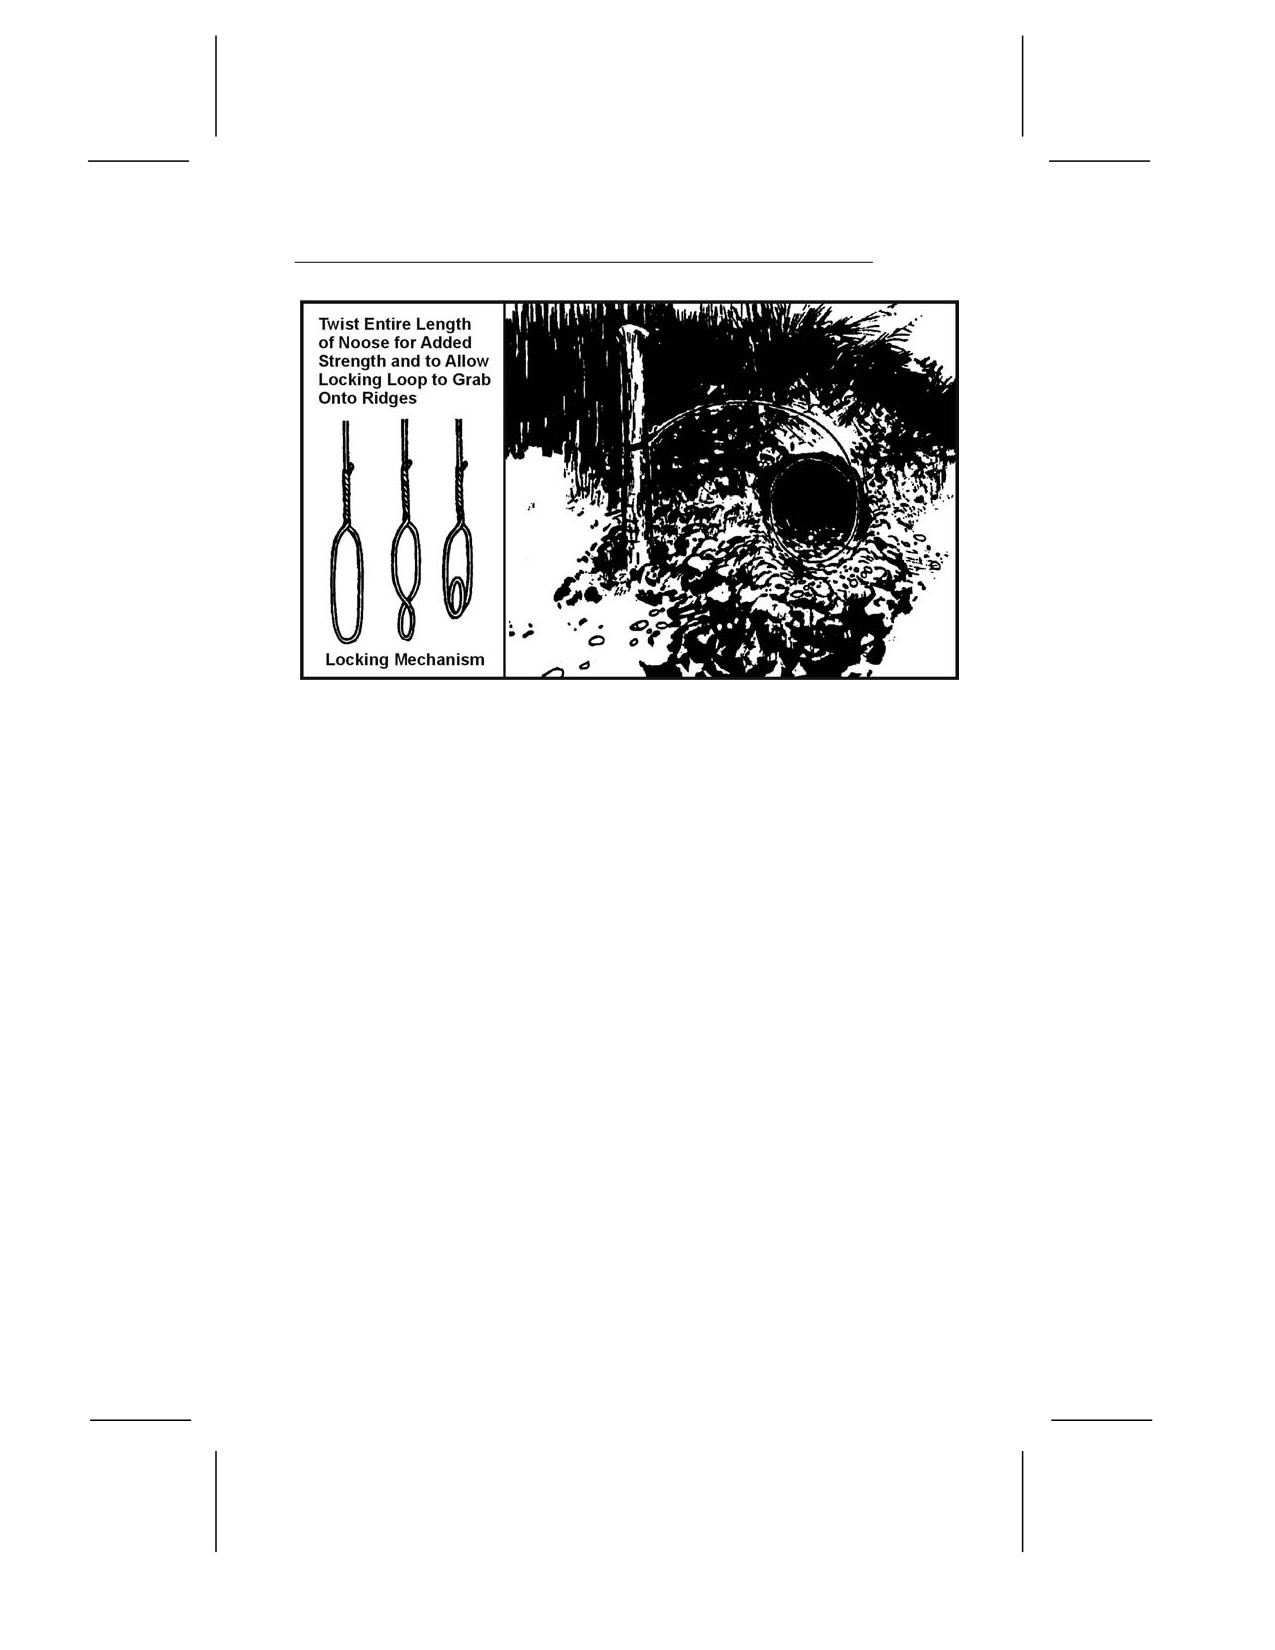
Figure 8-6. Simple Snare
Drag Noose
8-38. Use a drag noose on an animal run (Figure 8-7, page 8-16).
Place forked sticks on either side of the run and lay a sturdy
crossmember across them. Tie the noose to the crossmember and
hang it at a height above the animal’s head. (Nooses designed to
catch by the head should never be low enough for the prey to step
into with a foot.) As the noose tightens around the animal’s neck,
the animal pulls the crossmember from the forked sticks and
drags it along. The surrounding vegetation quickly catches the
crossmember and the animal becomes entangled.
Twitch-Up
8-39. A twitch-up is a supple sapling that, when bent over and
secured with a triggering device, will provide power to a variety of
snares. Select a hickory or other hardwood sapling along the trail.
A twitch-up will work much faster and with more force if you
remove all the branches and foliage.
8-15
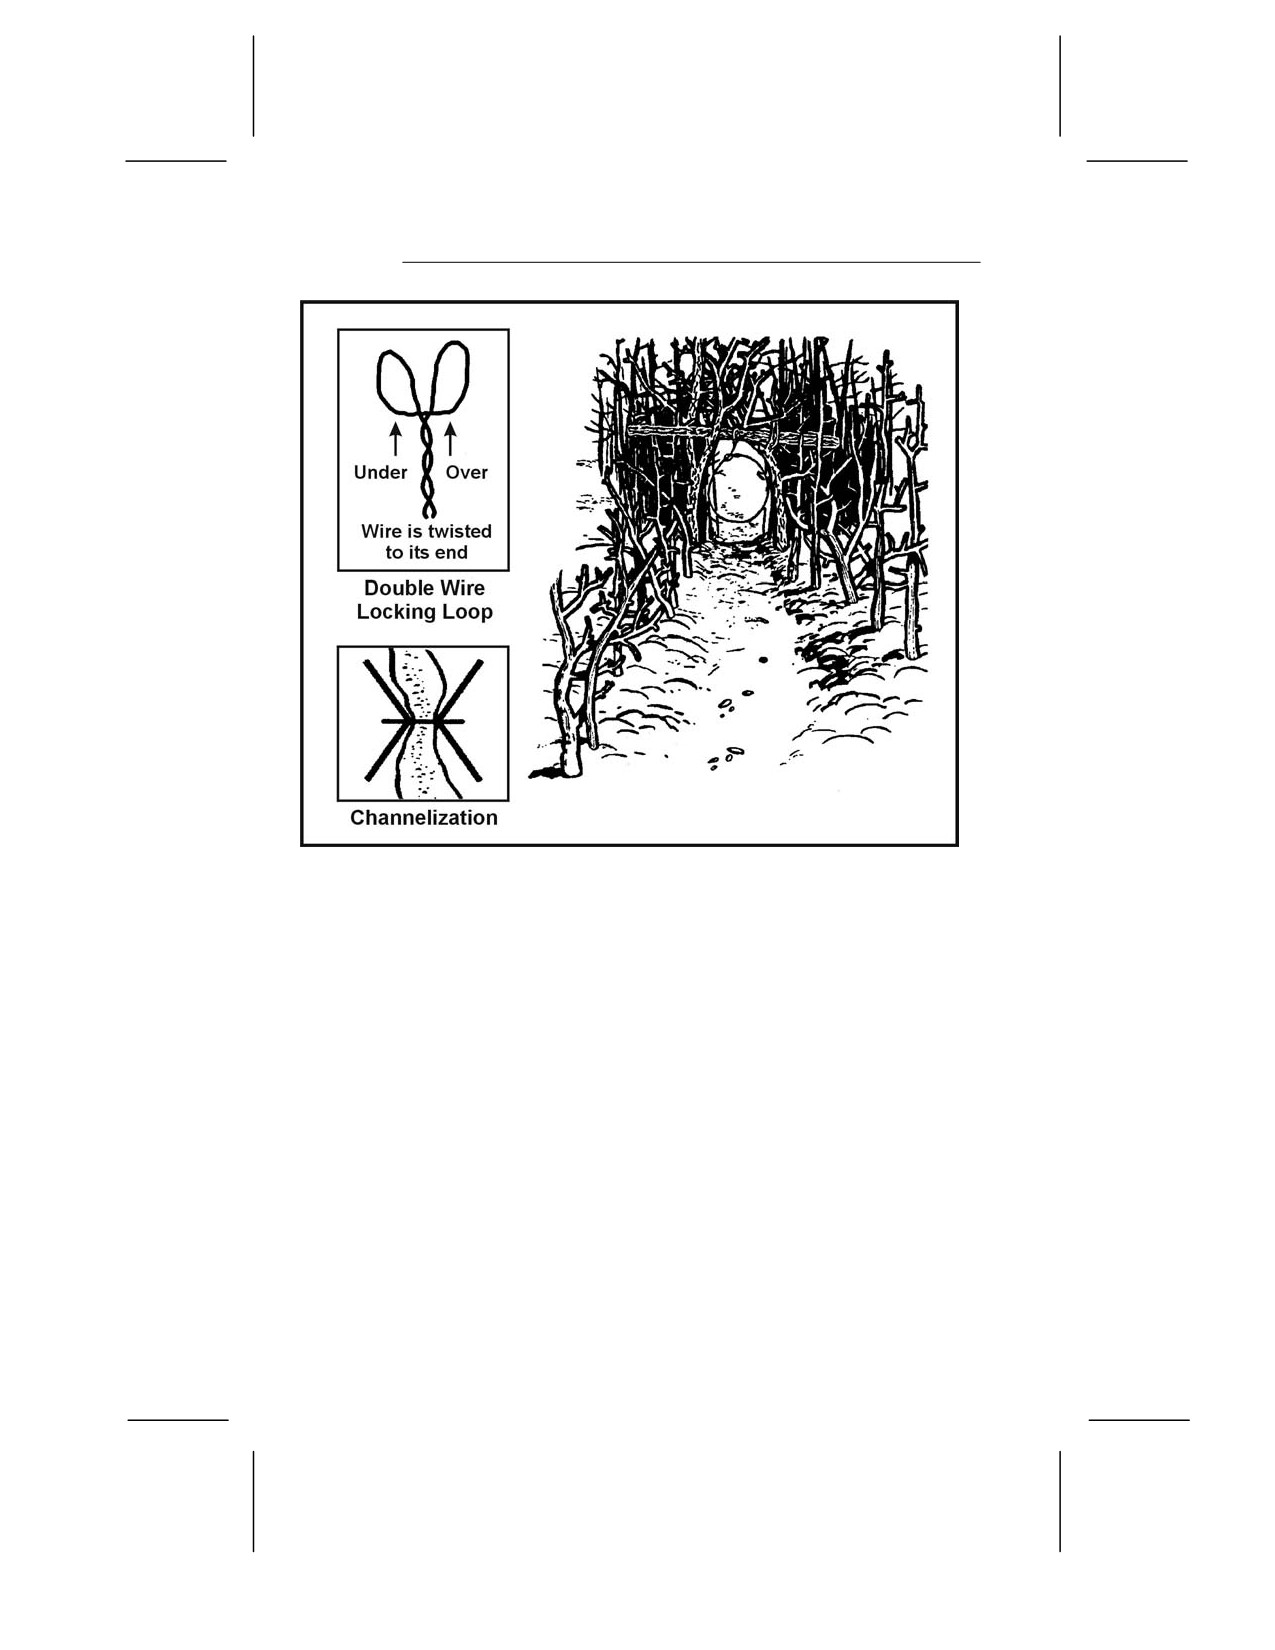
Figure 8-7. Drag Noose
Twitch-Up Snare
8-40. A simple twitch-up snare uses two forked sticks, each with
a long and short leg (Figure 8-8, page 8-17). Bend the twitch-up
and mark the trail below it. Drive the long leg of one forked stick
firmly into the ground at that point. Ensure the cut on the short
leg of this stick is parallel to the ground. Tie the long leg of the
remaining forked stick to a piece of cordage secured to the twitch-
up. Cut the short leg so that it catches on the short leg of the
other forked stick. Extend a noose over the trail. Set the trap by
bending the twitch-up and engaging the short legs of the forked
sticks. When an animal catches its head in the noose, it pulls the
forked sticks apart, allowing the twitch-up to spring up and hang
the prey.
NOTE: Do not use green sticks for the trigger. The sap that oozes
out could glue them together.
8-16
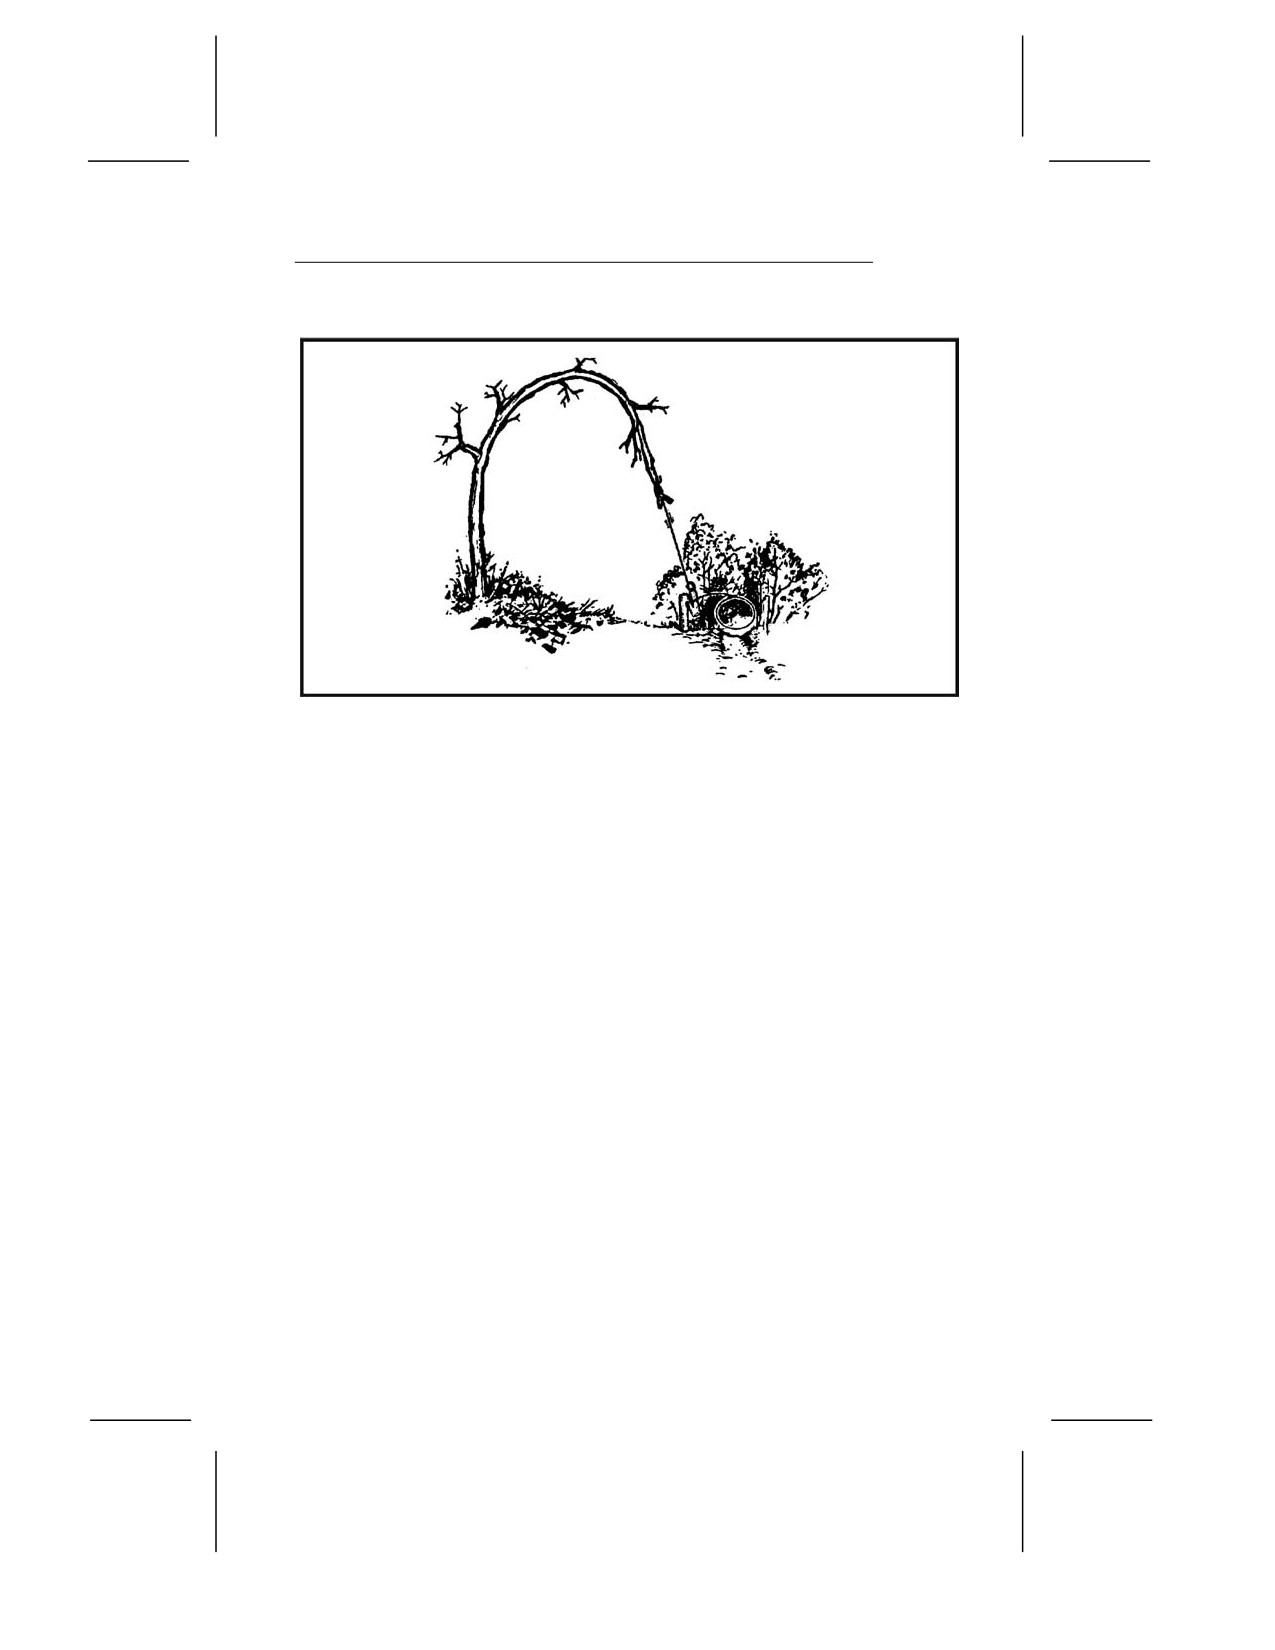
Figure 8-8. Twitch-Up Snare
Squirrel Pole
8-41. A squirrel pole is a long pole placed against a tree in an
area showing a lot of squirrel activity (Figure 8-9, page 8-18).
Place several wire nooses along the top and sides of the pole so
that a squirrel trying to go up or down the pole will have to pass
through one or more of them. Position the nooses
(5 to
6
centimeters [2 to 2 1/4-inches] in diameter) about 2.5 centimeters
(1 inch) off the pole. Place the top and bottom wire nooses 45
centimeters (18 inches) from the top and bottom of the pole to
prevent the squirrel from getting its feet on a solid surface. If this
happens, the squirrel will chew through the wire. Squirrels are
naturally curious. After an initial period of caution, they will try
to go up or down the pole and will be caught in the noose. The
struggling animal will soon fall from the pole and strangle. Other
squirrels will soon be drawn to the commotion. In this way, you
can catch several squirrels. You can emplace multiple poles to
increase the catch.
8-17
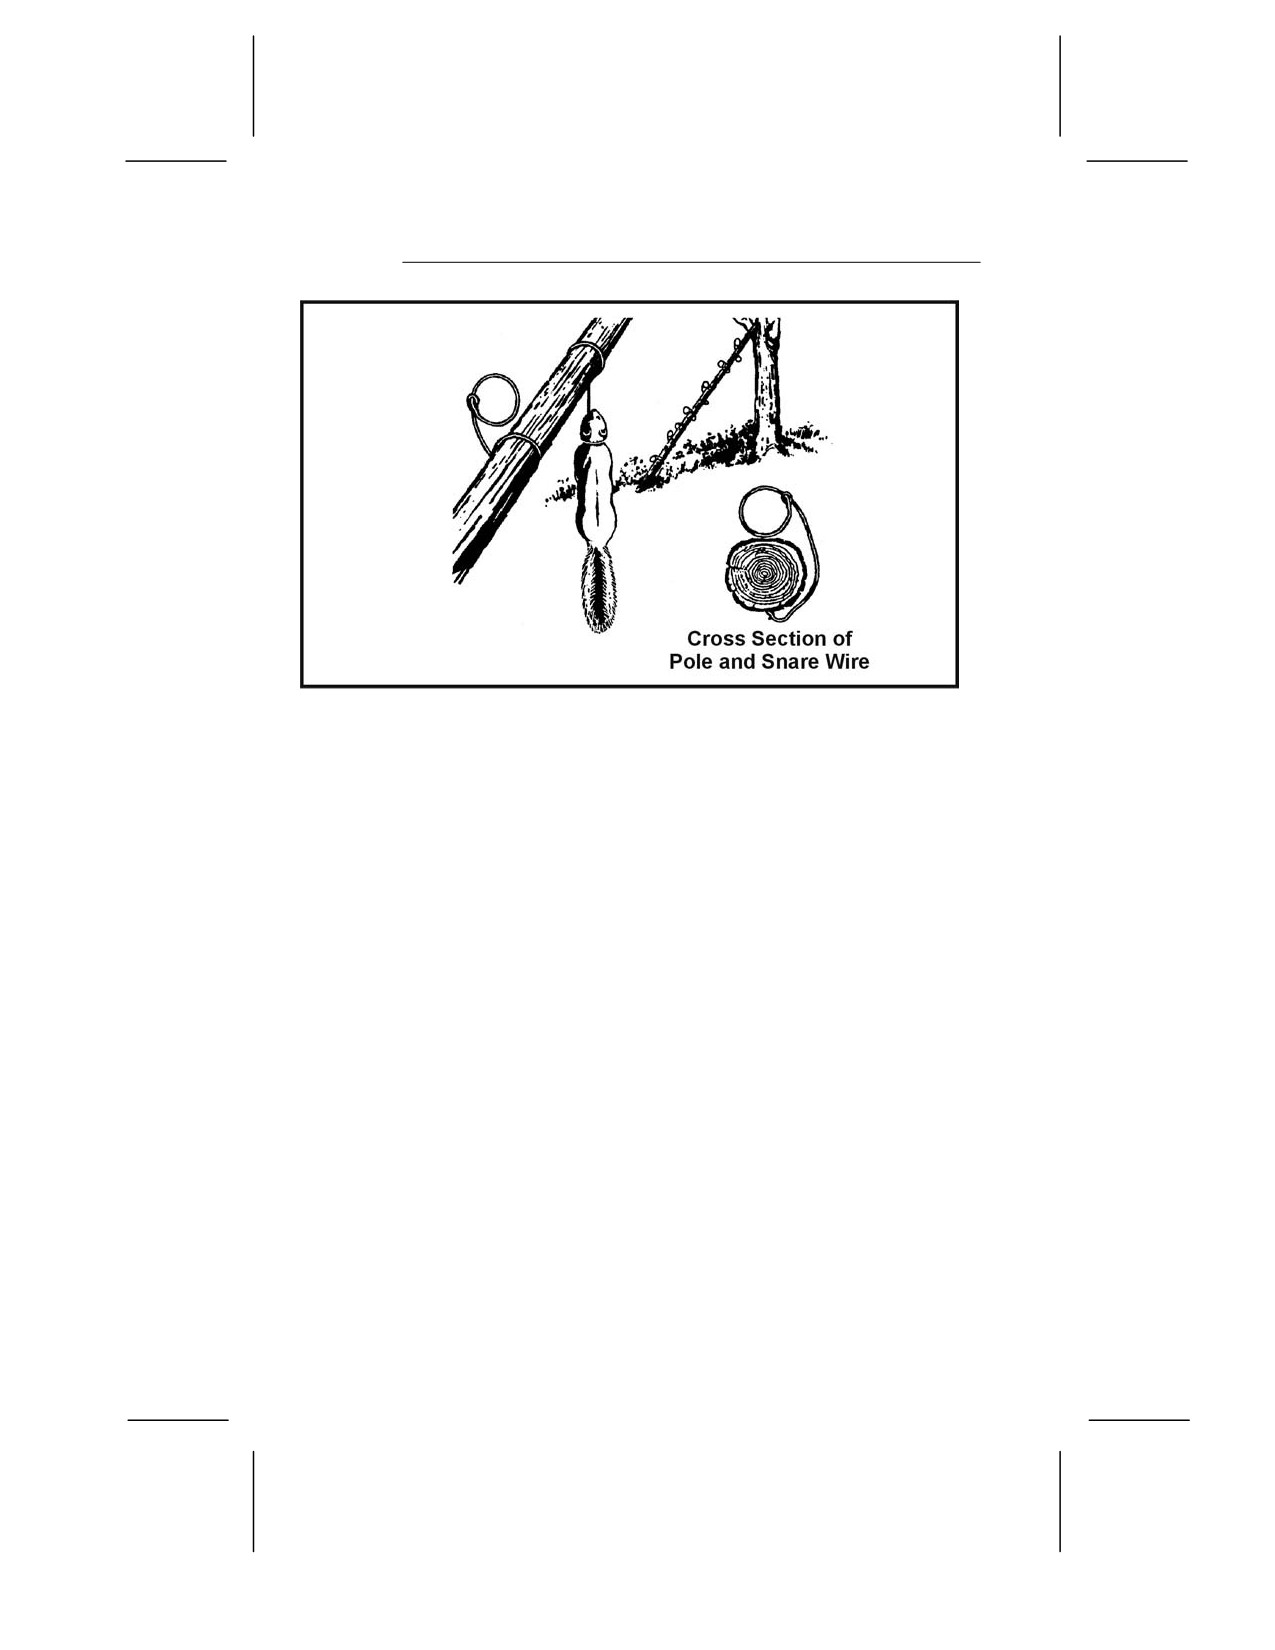
Figure. 8-9. Squirrel Pole
Ojibwa Bird Pole
8-42. An Ojibwa bird pole is a snare that has been used by Native
Americans for centuries (Figure 8-10, page 8-19). To be effective,
it should be placed in a relatively open area away from tall trees.
For best results, pick a spot near feeding areas, dusting areas, or
watering holes. Cut a pole 1.8 to 2.1 meters (6 to 7 feet) long and
trim away all limbs and foliage. Do not use resinous wood such as
pine. Sharpen the upper end to a point, then drill a small-
diameter hole 5 to 7.5 centimeters (2 to 3 inches) down from the
top. Cut a small stick 10 to 15 centimeters (4 to 6 inches) long and
shape one end so that it will almost fit into the hole. This is the
perch. Plant the long pole in the ground with the pointed end up.
Tie a small weight, about equal to the weight of the targeted
species, to a length of cordage. Pass the free end of the cordage
through the hole, and tie a slip noose that covers the perch. Tie a
single overhand knot in the cordage and place the perch against
the hole. Allow the cordage to slip through the hole until the
overhand knot rests against the pole and the top of the perch. The
tension of the overhand knot against the pole and perch will hold
the perch in position. Spread the noose over the perch, ensuring it
covers the perch and drapes over on both sides. Most birds prefer
to rest on something above ground and will land on the perch. As
soon as the bird lands, the perch will fall, releasing the overhand
8-18
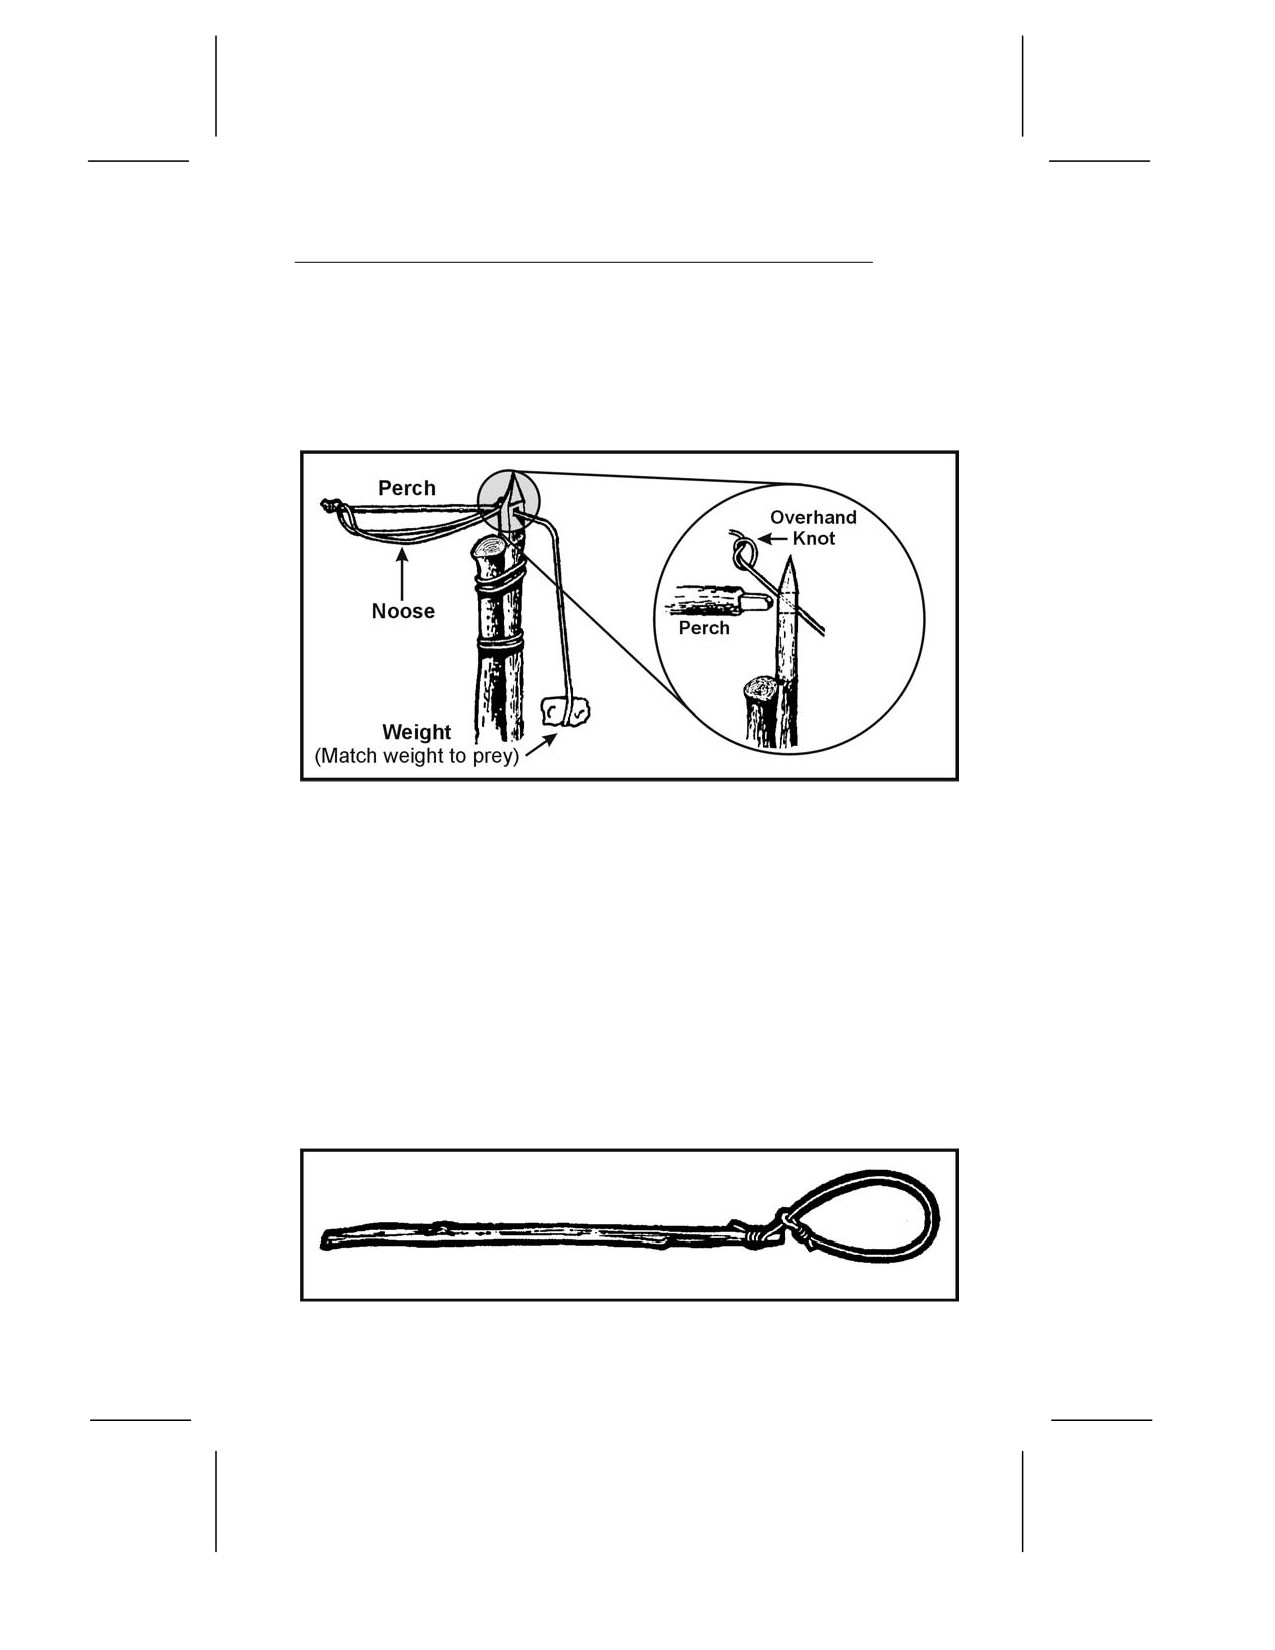
knot and allowing the weight to drop. The noose will tighten
around the bird’s feet, capturing it. If the weight is too heavy, it
will cut off the bird’s feet, allowing it to escape. Another variation
would be to use spring tension such as a tree branch in place of
the weight.
Figure 8-10. Ojibwa Bird Pole
Noosing Wand
8-43. A noose stick or “noosing wand” is useful for capturing
roosting birds or small mammals (Figure 8-11). It requires a
patient operator. This wand is more a weapon than a trap. It
consists of a pole (as long as you can effectively handle) with a
slip noose of wire or stiff cordage at the small end. To catch an
animal, you slip the noose over the neck of a roosting bird and
pull it tight. You can also place it over a den hole and hide in a
nearby blind. When the animal emerges from the den, you jerk
the pole to tighten the noose and thus capture the animal. Carry
a stout club to kill the prey.
Figure 8-11. Noosing Wand
8-19
Treadle Spring Snare
8-44. Use a treadle snare against small game on a trail (Figure
8-12, page 8-21). Dig a shallow hole in the trail. Then drive a
forked stick (fork down) into the ground on each side of the hole
on the same side of the trail. Select two fairly straight sticks that
span the two forks. Position these two sticks so that their ends
engage the forks. Place several sticks over the hole in the trail by
positioning one end over the lower horizontal stick and the other
on the ground on the other side of the hole. Cover the hole with
enough sticks so that the prey must step on at least one of them
to set off the snare. Tie one end of a piece of cordage to a twitch-
up or to a weight suspended over a tree limb. Bend the twitch-up
or raise the suspended weight to determine where you will tie the
trigger. The trigger should be about 5 centimeters (2 inches) long.
Form a noose with the other end of the cordage. Route and spread
the noose over the top of the sticks over the hole. Place the trigger
stick against the horizontal sticks and route the cordage behind
the sticks so that the tension of the power source will hold it in
place. Adjust the bottom horizontal stick so that it will barely
hold against the trigger. As the animal places its foot on a stick
across the hole, the bottom horizontal stick moves down, releasing
the trigger and allowing the noose to catch the animal by the foot.
Because of the disturbance on the trail, an animal will be wary.
You must therefore use channelization. To increase the
effectiveness of this trap, a small bait well may be dug into the
bottom of the hole. Place some bait in the bottom of the hole to
lure the animal to the snare.
Figure 4 Deadfall
8-45. The figure 4 deadfall is a trigger used to drop a weight onto
a prey and crush it (Figure 8-13, page 8-22). The type of weight
used may vary, but it should be heavy enough to kill or
incapacitate the prey immediately. Construct the figure 4 using
three notched sticks. These notches hold the sticks together in a
figure 4 pattern when under tension. Practice making this trigger
beforehand; it requires close tolerances and precise angles in its
construction.
8-20
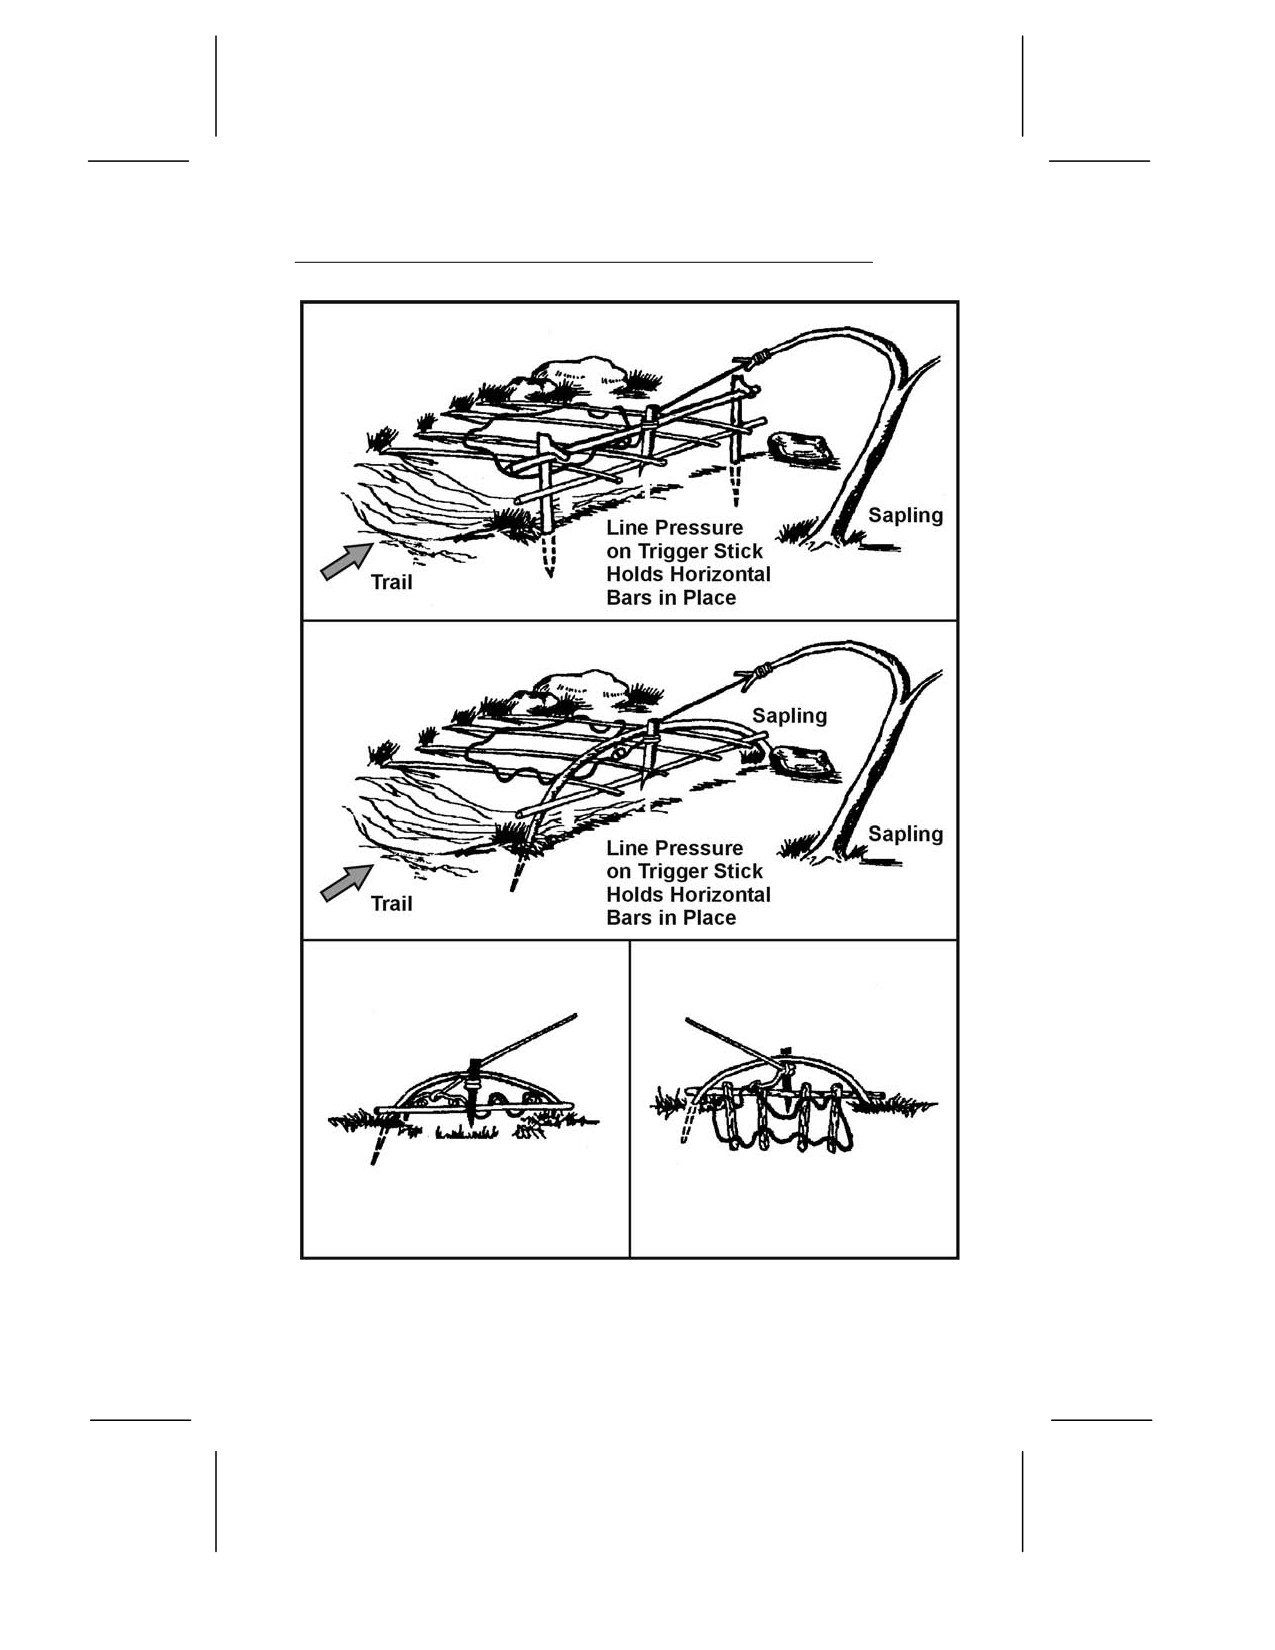
Figure 8-12. Treadle Spring Snare
8-21
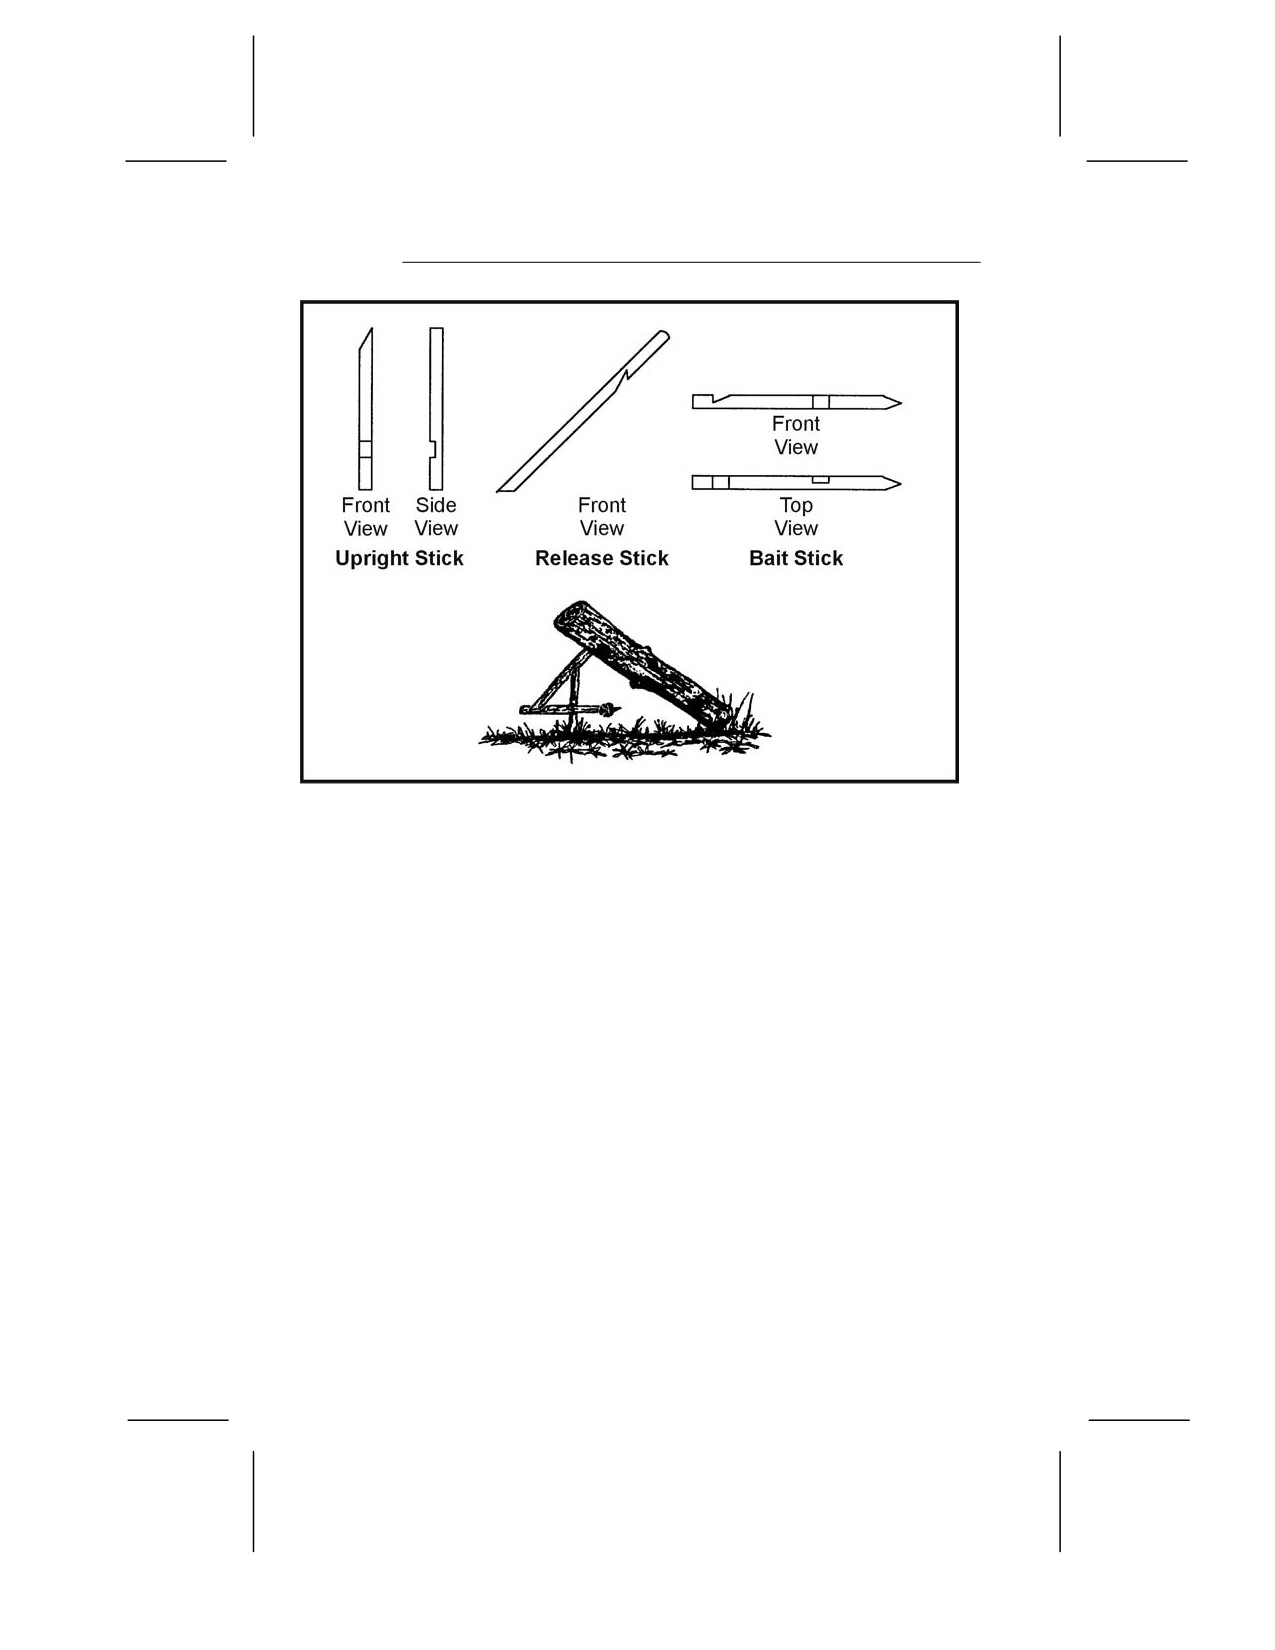
Figure 8-13. Figure 4 Deadfall
Paiute Deadfall
8-46. The Paiute deadfall is similar to the figure 4 but uses a
piece of cordage and a catch stick (Figure 8-14, page 8-23). It has
the advantage of being easier to set than the figure 4. Tie one end
of a piece of cordage to the lower end of the diagonal stick. Tie the
other end of the cordage to another stick about 5 centimeters
(2 inches) long. This stick is the catch stick. Bring the cord
halfway around the vertical stick with the catch stick at a 90-
degree angle. Place the bait stick with one end against the drop
weight, or a peg driven into the ground, and the other against the
catch stick. When a prey disturbs the bait stick, it falls free,
releasing the catch stick. As the diagonal stick flies up, the weight
falls, crushing the prey. To increase the effectiveness of this trap,
a small bait well may be dug into the bottom of the hole. Place
some bait in the bottom of the hole to lure the animals to the
snare.
8-22
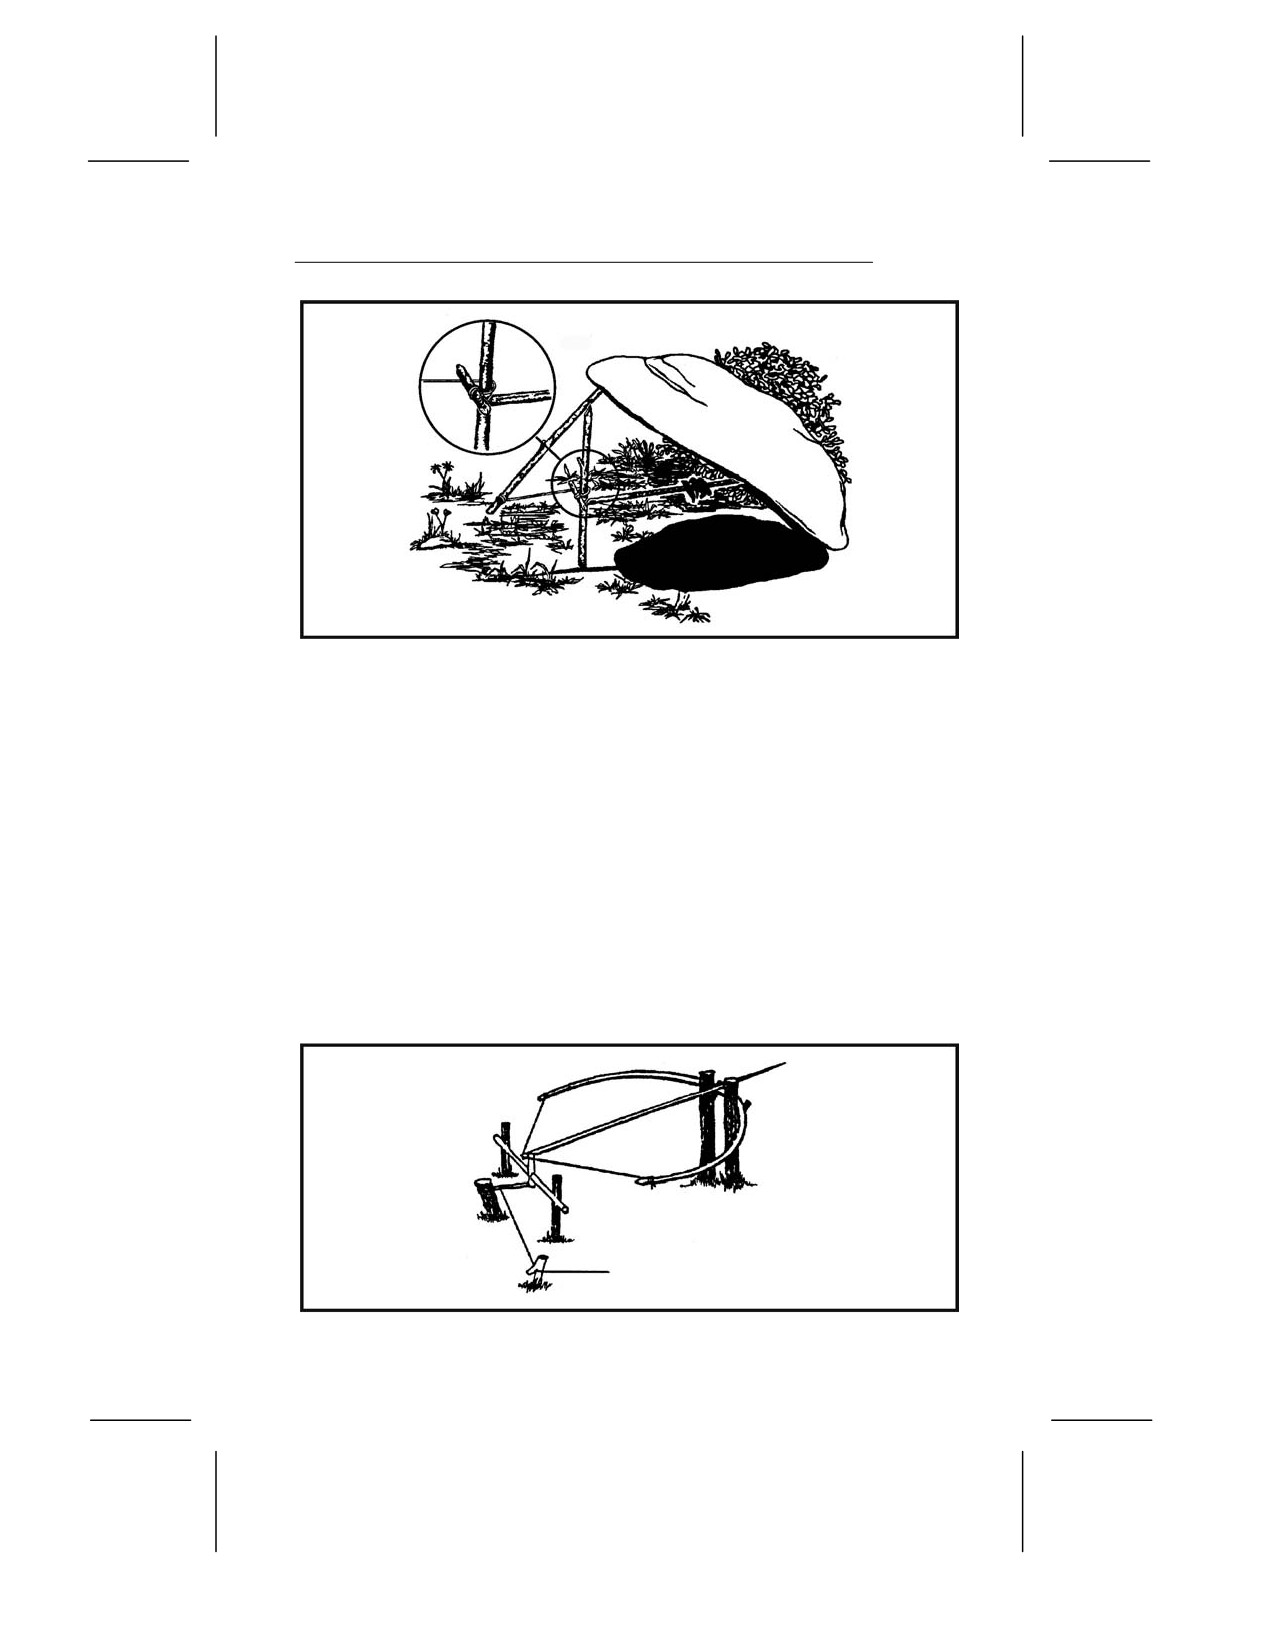
Figure 8-14. Paiute Deadfall
Bow Trap
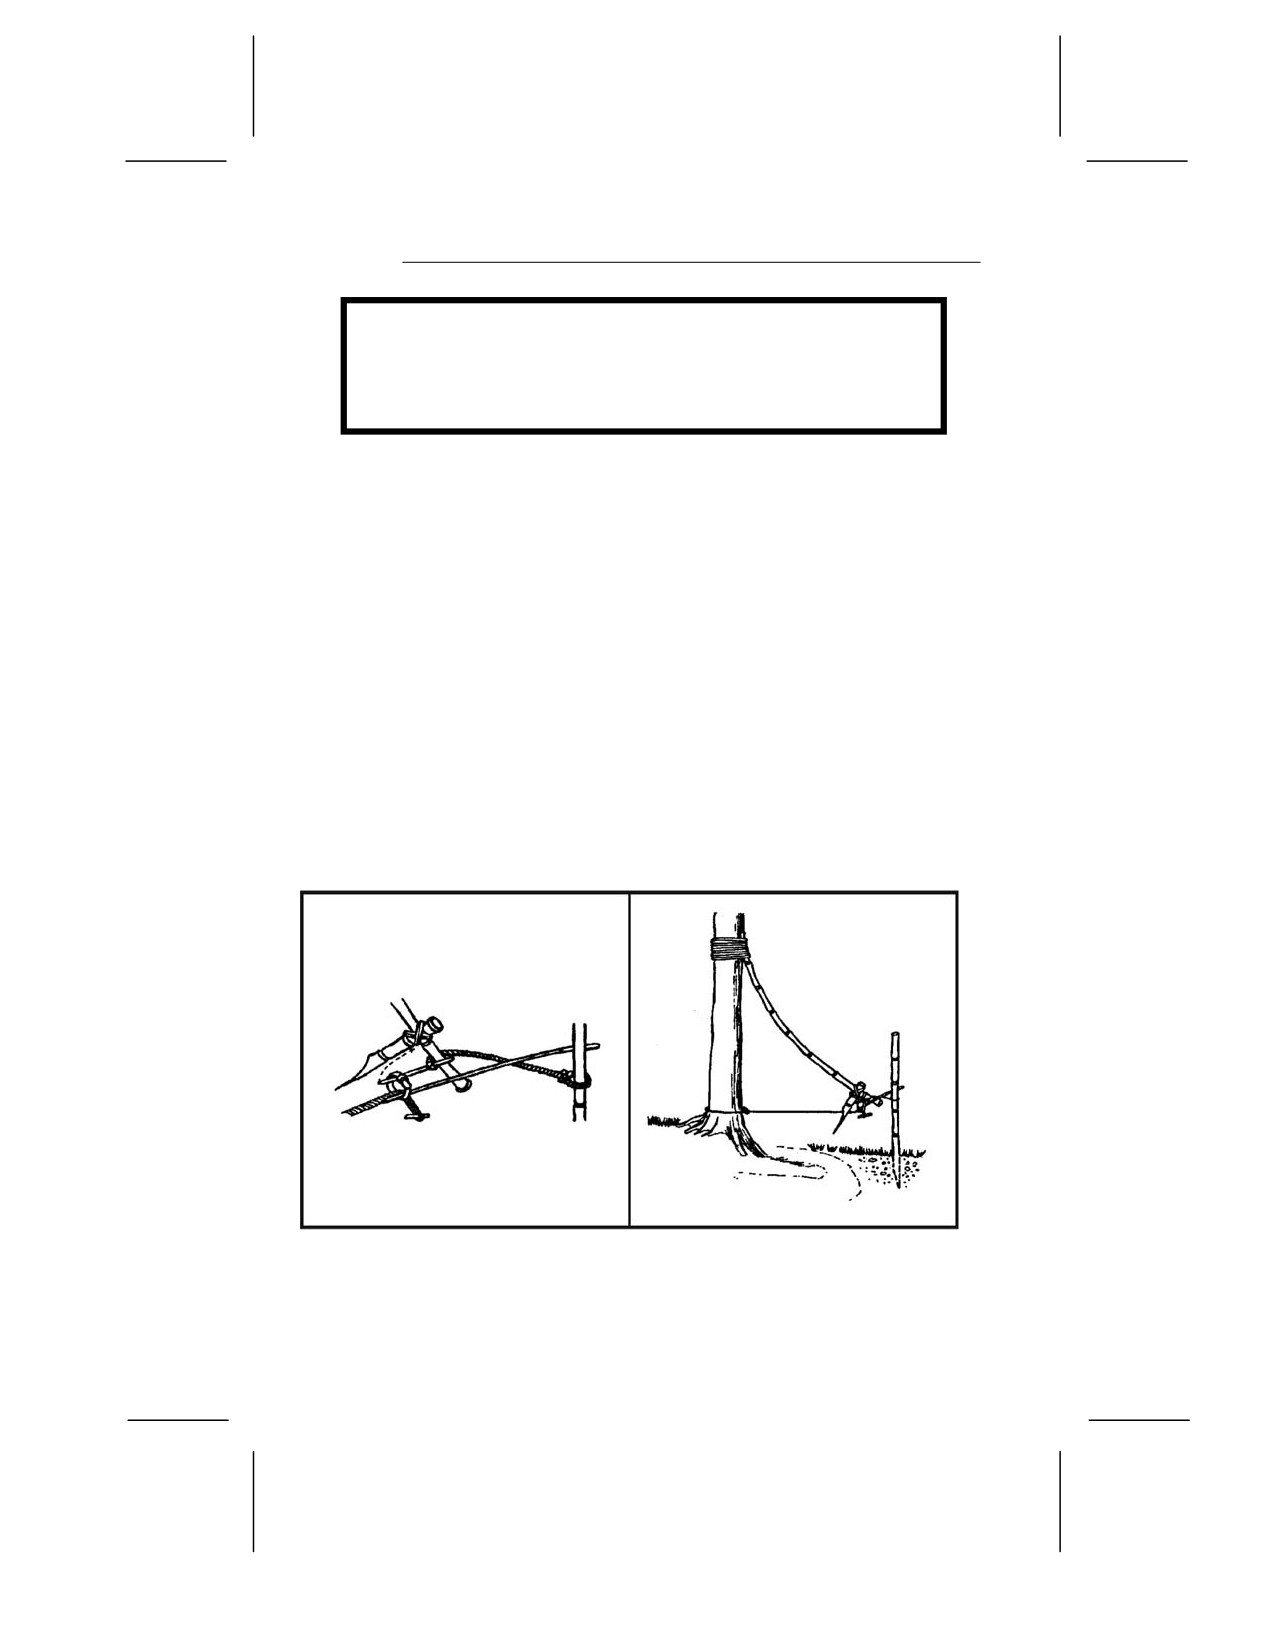
8-47. A bow trap is one of the deadliest traps (Figure 8-15). It is
dangerous to man as well as animals. To construct this trap, build
a bow and anchor it to the ground with pegs. Adjust the aiming
point as you anchor the bow. Lash a toggle stick to the trigger
stick. Two upright sticks driven into the ground hold the trigger
stick in place at a point where the toggle stick will engage the
pulled bowstring. Place a catch stick between the toggle stick and
a stake driven into the ground. Tie a trip wire or cordage to the
catch stick and route it around stakes and across the game trail
where you tie it off (as in Figure 8-15). When the prey trips the
trip wire, the bow looses an arrow into it. A notch in the bow
serves to help aim the arrow.
Figure 8-15. Bow Trap
8-23
WARNING
This is a lethal trap. Approach it with caution and
from the rear only!
Pig Spear Shaft
8-48. To construct the pig spear shaft, select a stout pole about 2.5
meters (8 feet) long (Figure 8-16). At the smaller end, firmly lash
several small stakes. Lash the large end tightly to a tree along the
game trail. Tie a length of cordage to another tree across the trail.
Tie a sturdy, smooth stick to the other end of the cord. From the
first tree, tie a trip wire or cord low to the ground, stretch it across
the trail, and tie it to a catch stick. Make a slip ring from vines or
other suitable material. Encircle the trip wire and the smooth stick
with the slip ring. Emplace one end of another smooth stick within
the slip ring and its other end against the second tree. Pull the
smaller end of the spear shaft across the trail and position it
between the short cord and the smooth stick. As the animal trips
the trip wire, the catch stick pulls the slip ring off the smooth
sticks, releasing the spear shaft that springs across the trail and
impales the prey against the tree.
Figure 8-16. Pig Spear Shaft
8-24
WARNING
This is a lethal trap. Approach it with caution and
from the rear only!
Bottle Trap
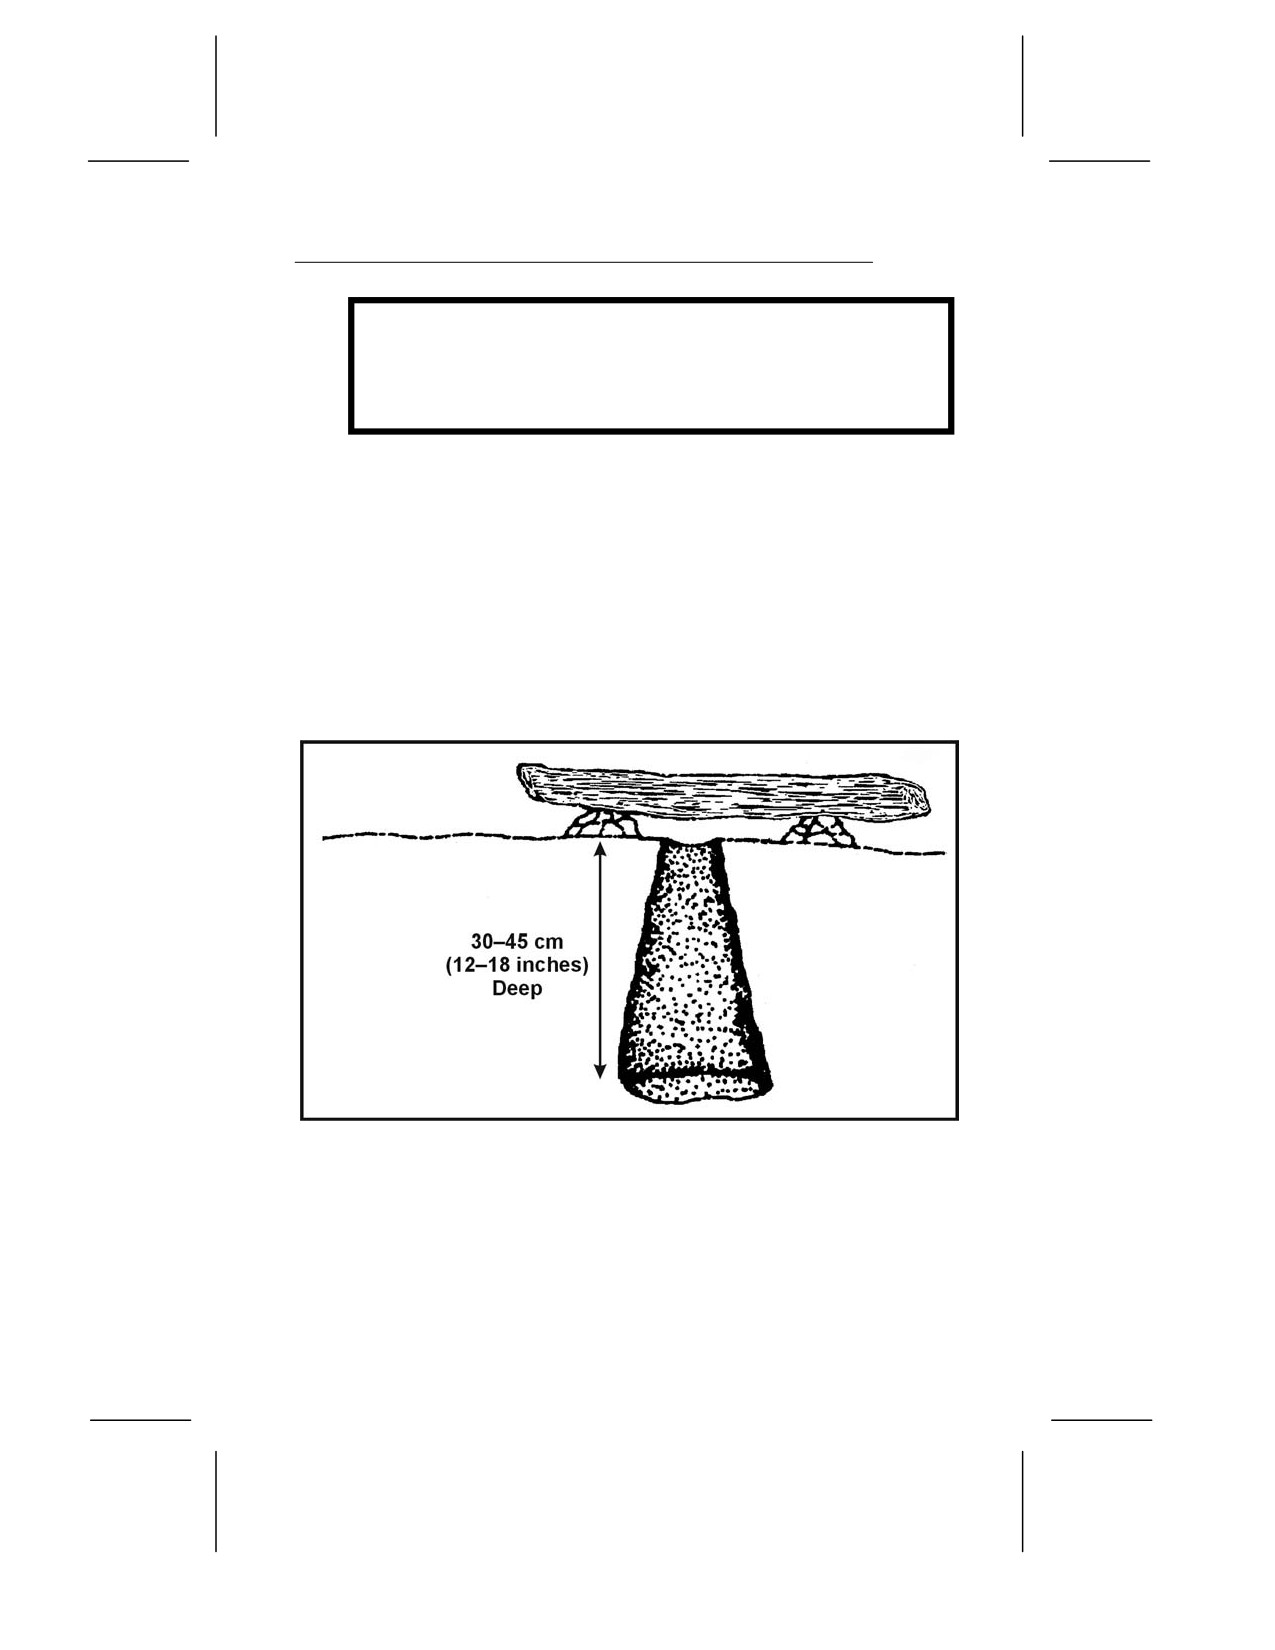
8-49. A bottle trap is a simple trap for mice and voles (Figure 8-17).
Dig a hole 30 to 45 centimeters (12 to 18 inches) deep that is wider
at the bottom than at the top. Make the top of the hole as small as
possible. Place a piece of bark or wood over the hole with small
stones under it to hold it up 2.5 to 5 centimeters (1 to 2 inches) off
the ground. Mice or voles will hide under the cover to escape
danger and fall into the hole. They cannot climb out because of the
wall’s backward slope. Use caution when checking this trap; it is an
excellent hiding place for snakes.
Figure 8-17. Bottle Trap
KILLING DEVICES
8-50. There are several killing devices that you can construct to
help you obtain small game to help you survive. The rabbit stick,
the spear, the bow and arrow, and the sling are such devices.
8-25
RABBIT STICK
8-51. One of the simplest and most effective killing devices is a
stout stick as long as your arm, from fingertip to shoulder, called
a “rabbit stick.” You can throw it either overhand or sidearm and
with considerable force. It is best thrown so that it flies sideways,
increasing the chance of hitting the target. It is very effective
against small game that stops and freezes as a defense.
SPEAR
8-52. You can make a spear to kill small game and to fish. Jab
with the spear—do not throw it. Paragraph 8-67, page 8-32,
explains spearfishing.
BOW AND ARROW
8-53. A good bow is the result of many hours of work. You can
construct a suitable short-term bow fairly easily. When it loses its
spring or breaks, you can replace it. Select a hardwood stick about
1 meter (3 feet) long that is free of knots or limbs. Carefully
scrape the large end down until it has the same pull as the small
end. Careful examination will show the natural curve of the stick.
Always scrape from the side that faces you, or the bow will break
the first time you pull it. Dead, dry wood is preferable to green
wood. To increase the pull, lash a second bow to the first, front to
front, forming an “X” when viewed from the side. Attach the tips
of the bows with cordage and only use a bowstring on one bow.
8-54. Select arrows from the straightest dry sticks available. The
arrows should be about half as long as the bow. Scrape each shaft
smooth all around. You will probably have to straighten the shaft.
You can bend an arrow straight by heating the shaft over hot
coals. Do not allow the shaft to scorch or burn. Hold the shaft
straight until it cools.
8-55. You can make arrowheads from bone, glass, metal, or pieces
of rock. You can also sharpen and fire-harden the end of the shaft.
Fire hardening is actually a misnomer. To fire-harden wood, hold
it over hot coals or plunge it deep under the coals in the ashes,
being careful not to burn or scorch the wood. The purpose of fire
hardening is to harden the wood by drying the moisture out of it.
8-56. You must notch the ends of the arrows for the bowstring.
Cut or file the notch; do not split it. Fletching (adding feathers to
8-26
the notched end of an arrow) improves the arrow’s flight
characteristics. Fletching is recommended but not necessary on a
field-expedient arrow.
SLING
8-57. You can make a sling by tying two pieces of cordage, each
about 60 centimeters (24 inches) long, at opposite ends of a palm-
sized piece of leather or cloth. Place a rock in the cloth and wrap
one cord around your middle finger and hold in your palm. Hold
the other cord between your forefinger and thumb. To throw the
rock, spin the sling several times in a circle and release the cord
between your thumb and forefinger. Practice to gain proficiency.
The sling is very effective against small game.
FISHING DEVICES
8-58. You can make your own fishhooks, nets, and traps. The
paragraphs below discuss several methods to obtain fish.
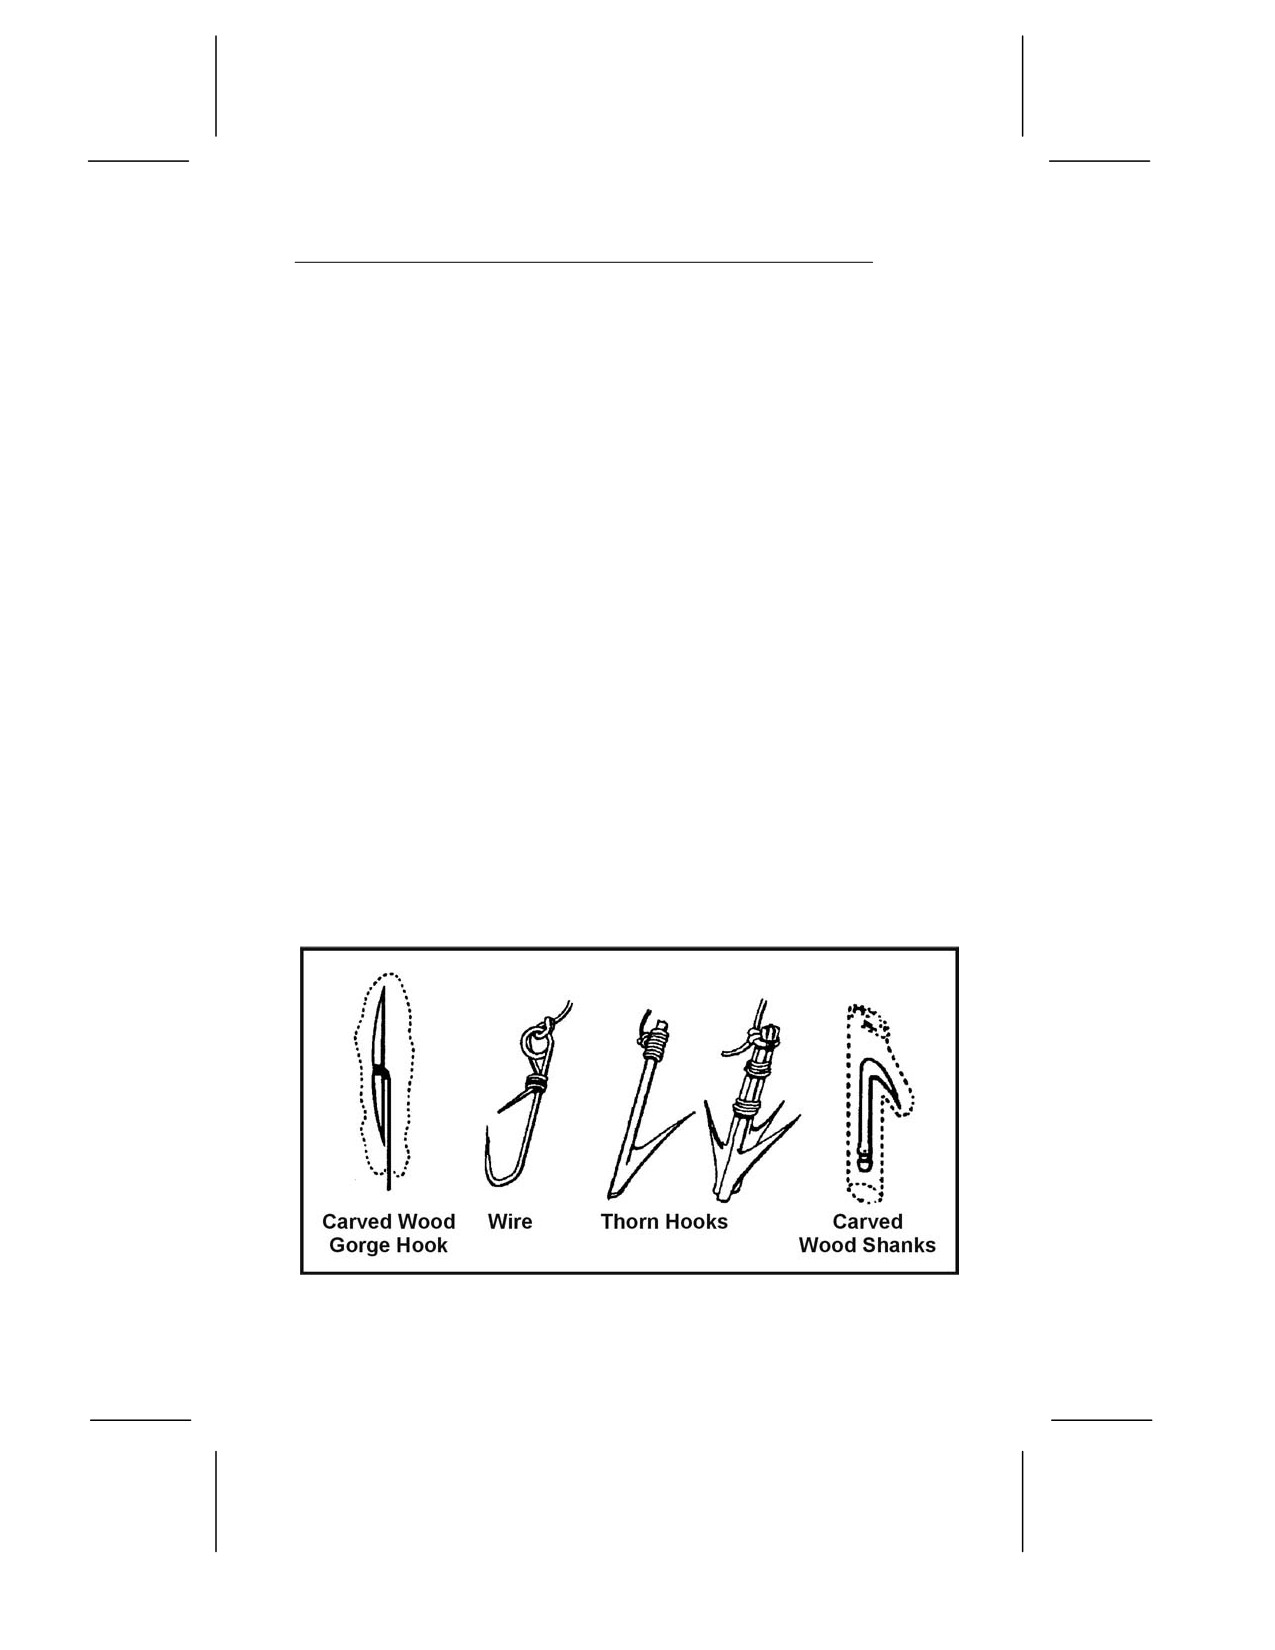
IMPROVISED FISHHOOKS
8-59. You can make field-expedient fishhooks from pins, needles,
wire, small nails, or any piece of metal. You can also use wood,
bone, coconut shell, thorns, flint, seashell, or tortoise shell. You
can also make fishhooks from any combination of these items
(Figure 8-18).
Figure 8-18. Improvised Fishhooks
8-27
8-60. To make a wooden hook, cut a piece of hardwood about 2.5
centimeters (1 inch) long and about 6 millimeters (1/4 inch) in
diameter to form the shank. Cut a notch in one end in which to place
the point. Place the point (piece of bone, wire, nail) in the notch. Hold
the point in the notch and tie securely so that it does not move out of
position. This is a fairly large hook. To make smaller hooks, use
smaller material.
8-61. A gorge or skewer is a small shaft of wood, bone, metal, or
other material. It is sharp on both ends and notched in the middle
where you tie cordage. Bait the gorge by placing a piece of bait on
it lengthwise. When the fish swallows the bait, it also swallows
the gorge. If you are tending the fishing line when the fish bites,
do not attempt to pull on the line to set the hook as you would
with a conventional hook. Allow the fish to swallow the bait to get
the gorge as far down its throat before the gorge sets itself.
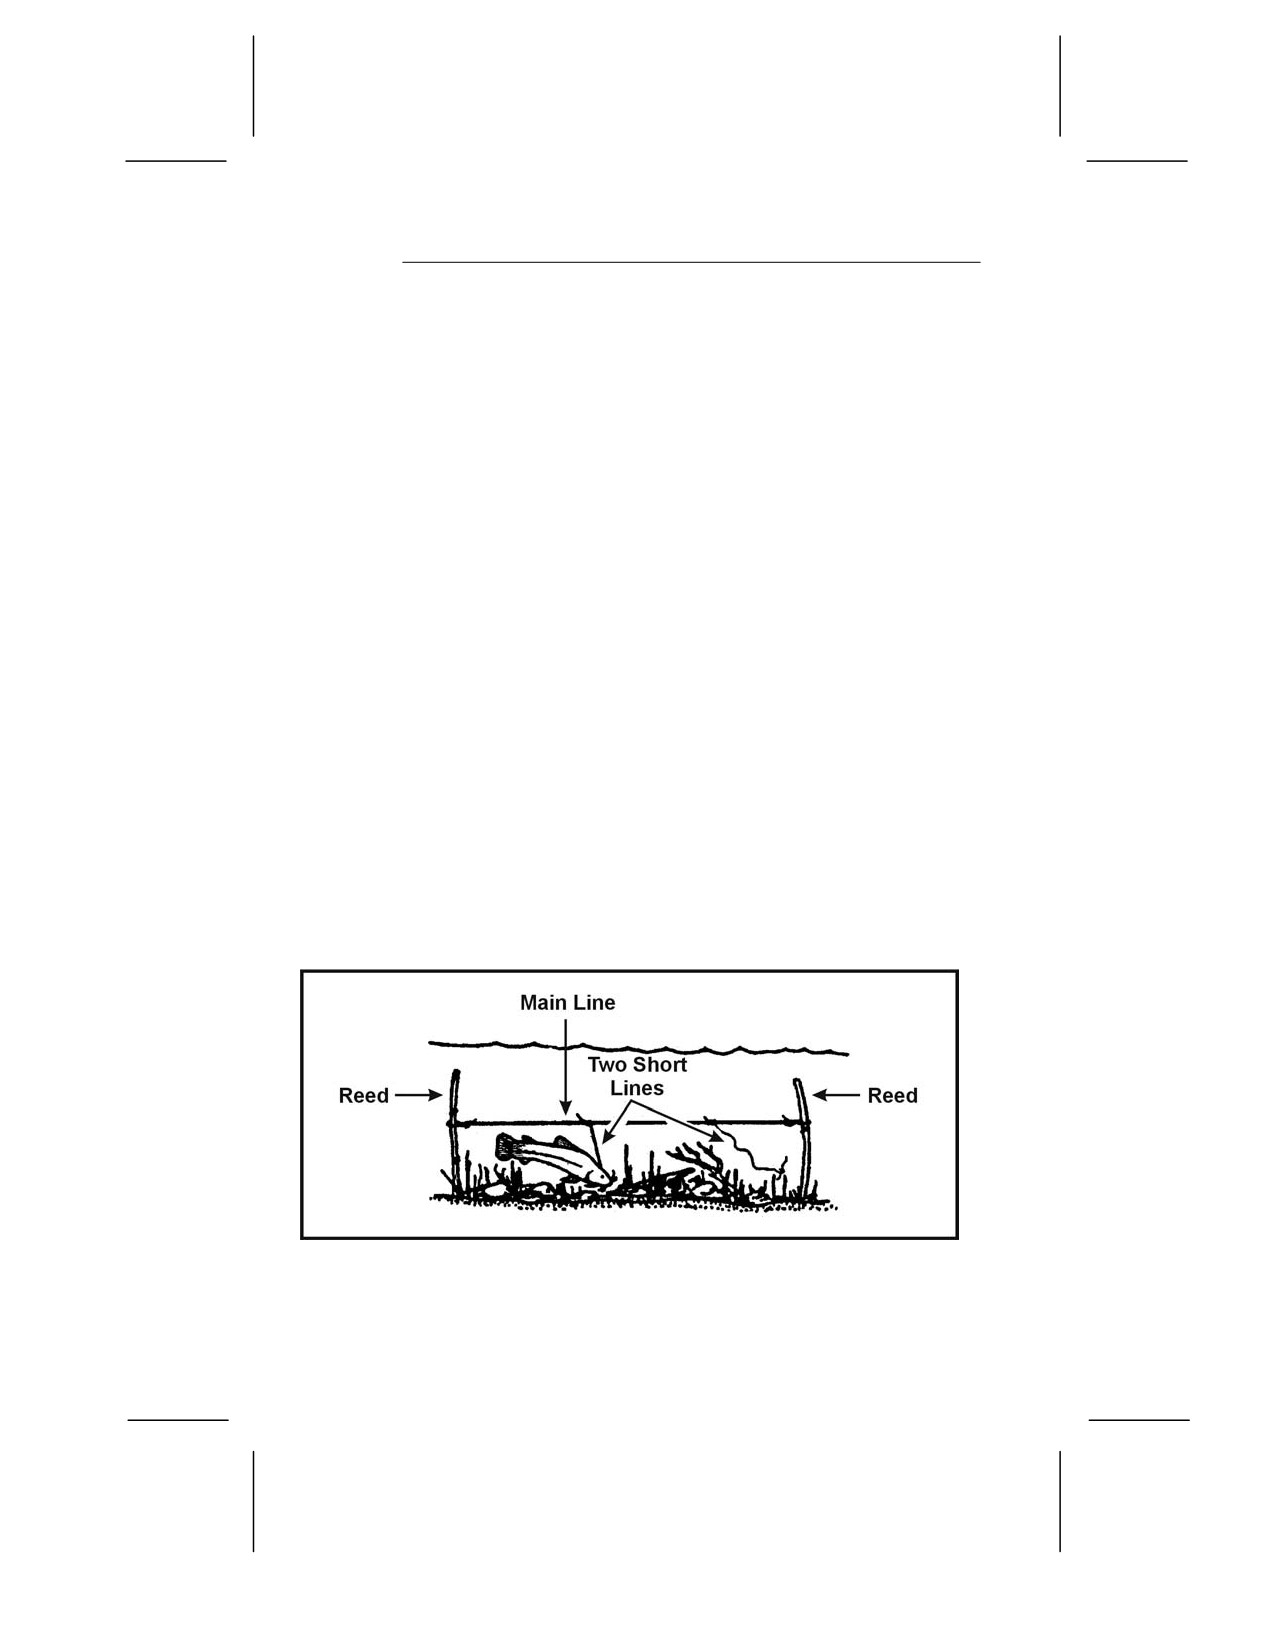
STAKEOUT
8-62. A stakeout is a fishing device you can use in a hostile
environment (Figure 8-19). To construct a stakeout, drive two
supple saplings into the bottom of the lake, pond, or stream with
their tops just below the water surface. Tie a cord between them
just slightly below the surface. Tie two short cords with hooks or
gorges to this cord, ensuring that they cannot wrap around the
poles or each other. They should also not slip along the long cord.
Bait the hooks or gorges.
Figure 8-19. Stakeout
8-28
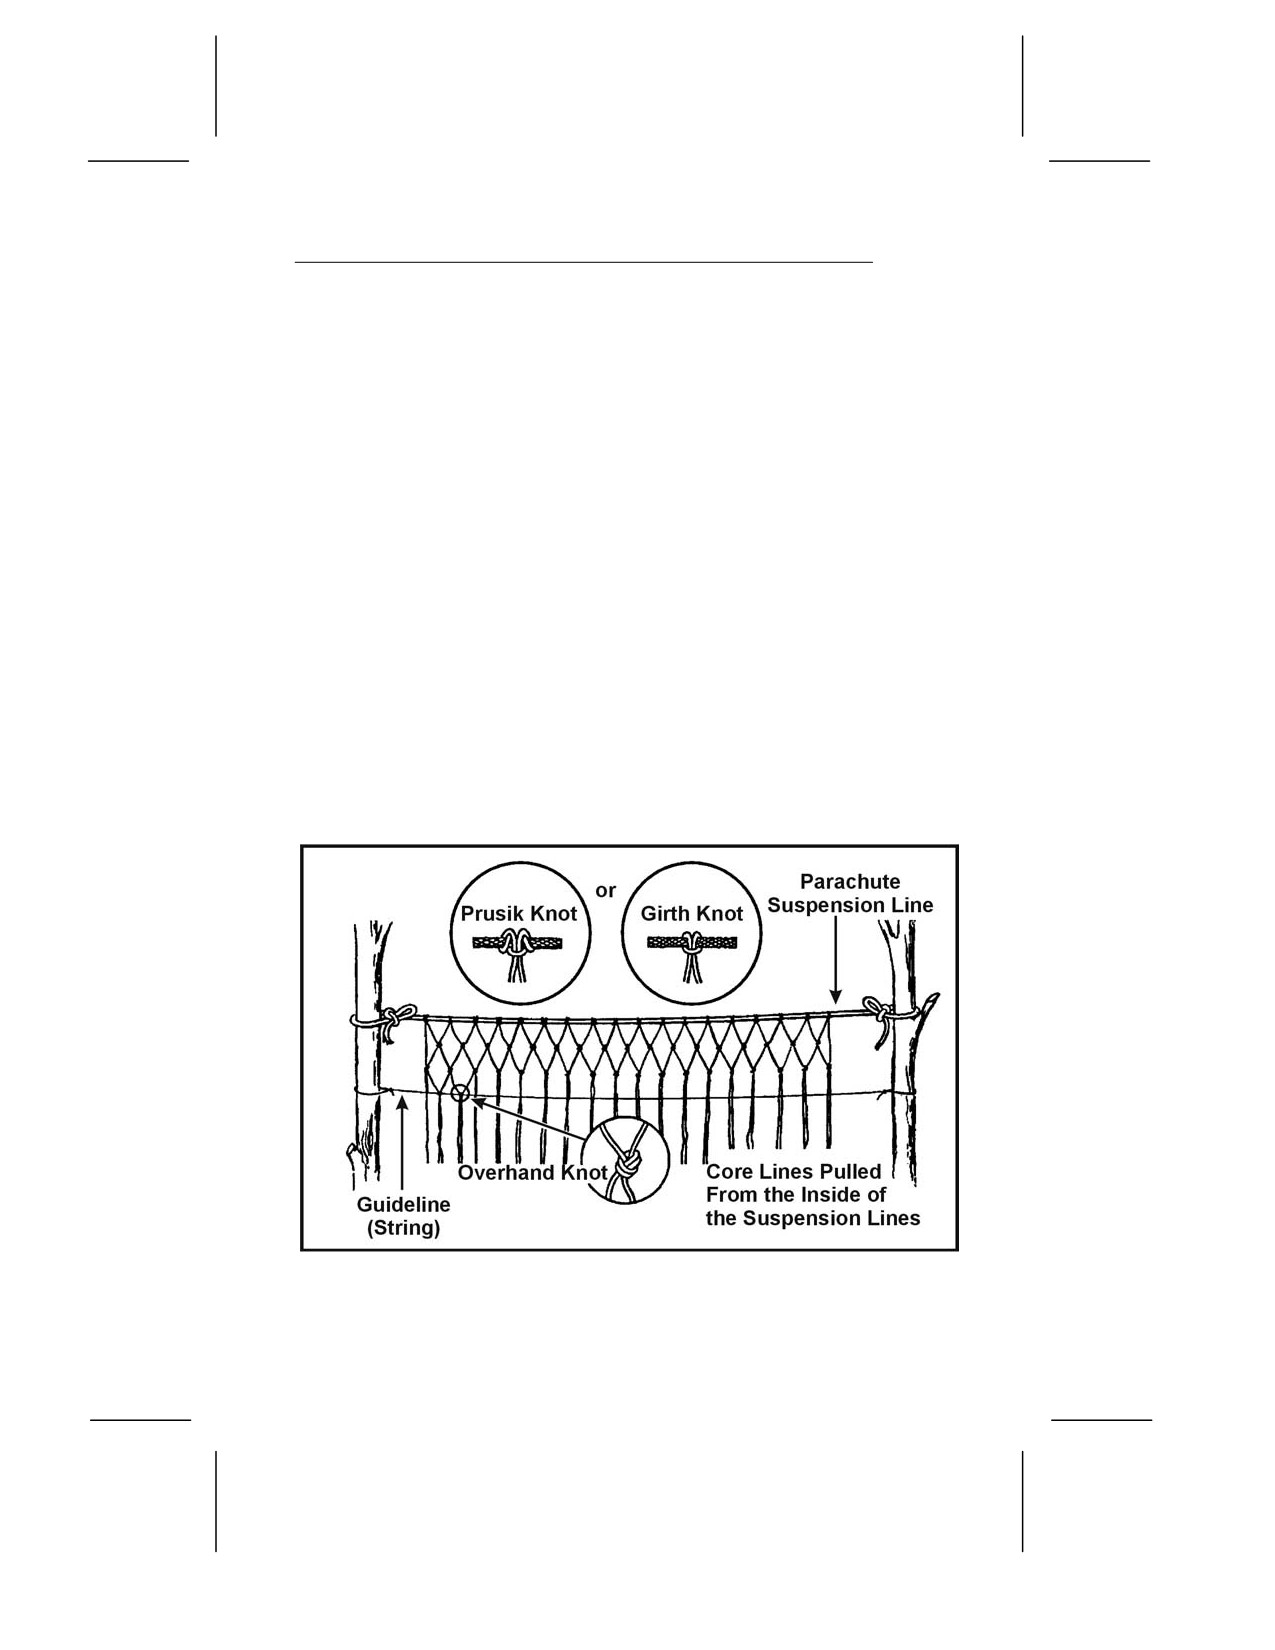
GILL NET
8-63. If a gill net is not available, you can make one using
parachute suspension line or similar material
(Figure
8-20).
Remove the core lines from the suspension line and tie the casing
between two trees. Attach several core lines to the casing by
doubling them over and tying them with prusik knots or girth
hitches. These lines should be six times the desired depth of the
net (for example, a 6-foot [180-centimeter] piece of string girth-
hitched over the casing will give you two 3-foot [90-centimeter]
pieces, which after completing the net, will provide a 1-foot [30-
centimeter] deep net). The length of the desired net and the size
of the mesh determine the number of core lines used and the
space between them. The recommended size of the spaces in the
net mesh is about 1 inch (2.5 centimeters) square. Starting at one
end of the casing, tie the second and the third core lines together
using an overhand knot. Then tie the fourth and fifth, sixth and
seventh, and so on, until you reach the last core line. You should
now have all core lines tied in pairs with a single core line
hanging at each end. Start the second row with the first core line,
tie it to the second, the third to the fourth, and so on.
Figure 8-20. Making a Gill Net
8-29
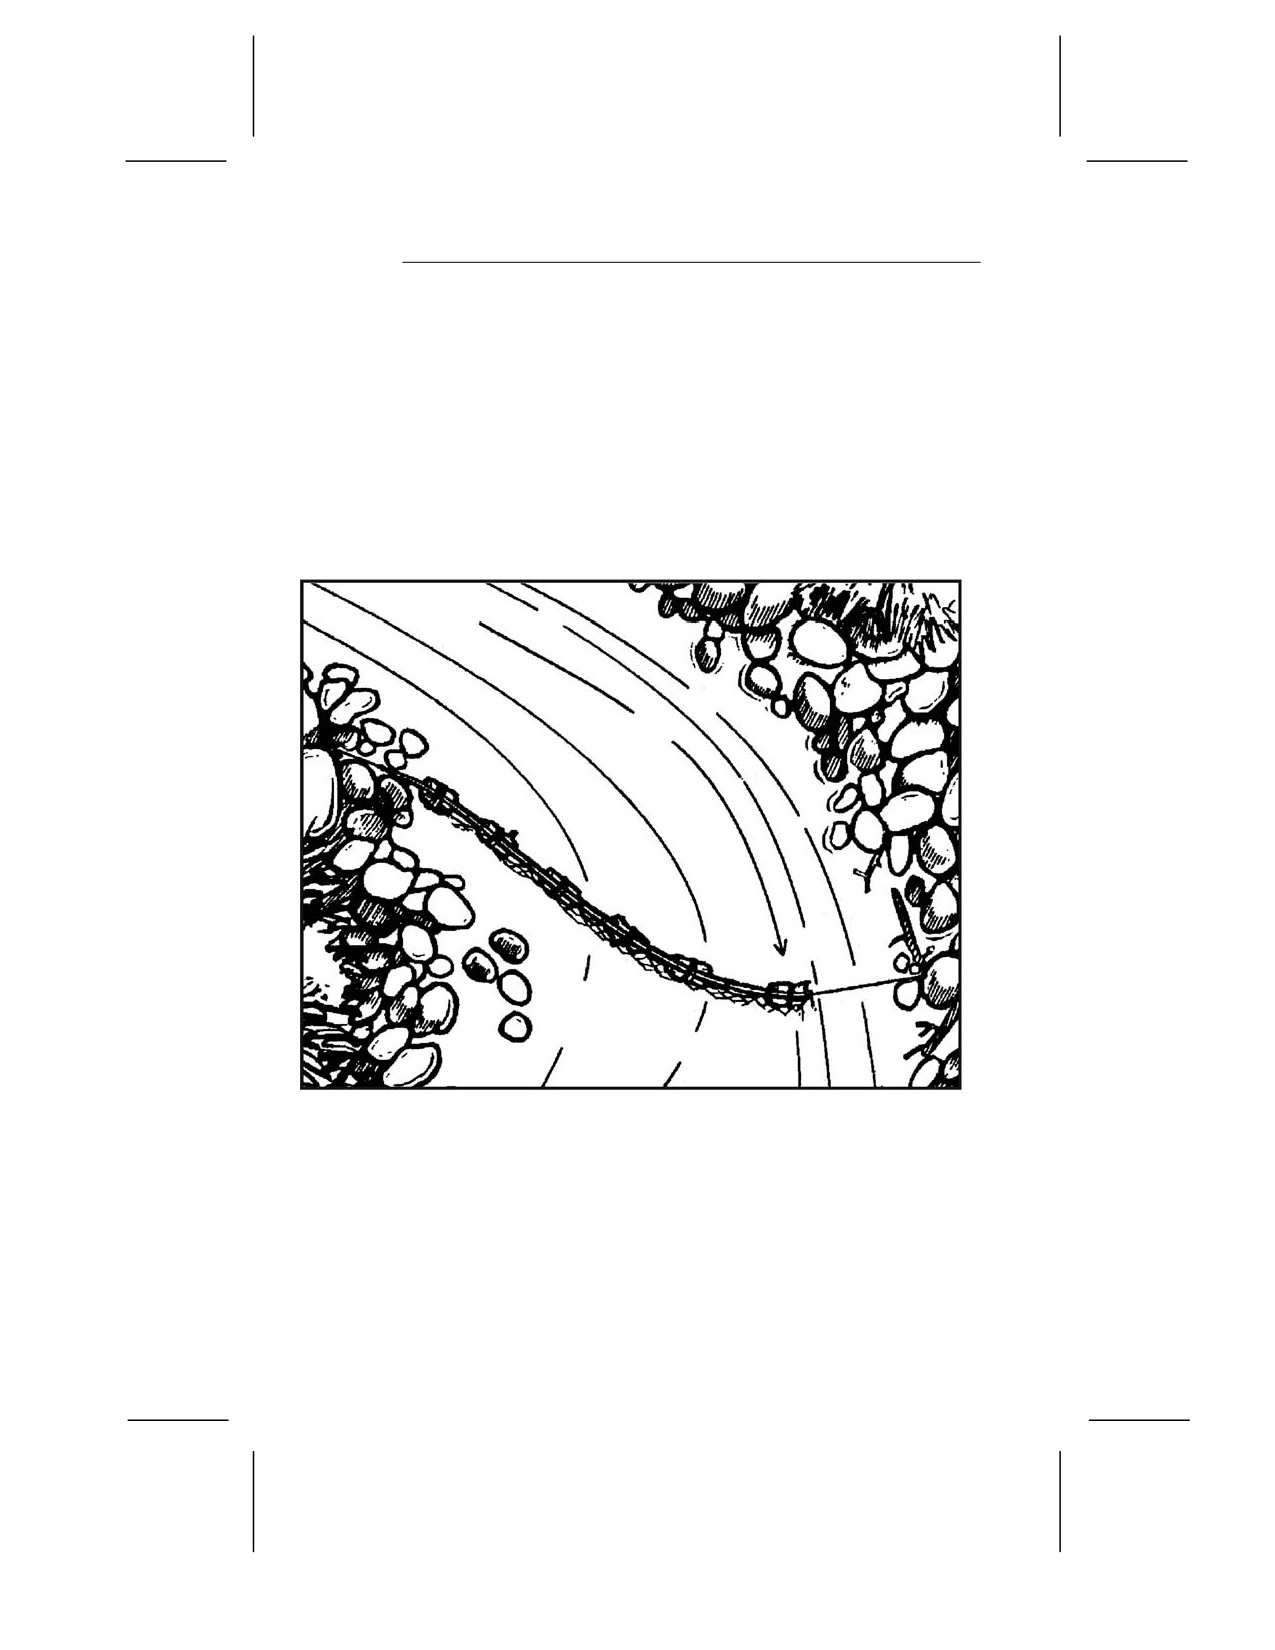
8-64. To keep the rows even and to regulate the size of the mesh,
tie a guideline to the trees. Position the guideline on the opposite
side of the net you are working on. Move the guideline down after
completing each row. The lines will always hang in pairs and you
always tie a cord from one pair to a cord from an adjoining pair.
Continue tying rows until the net is the desired width. Thread a
suspension line casing along the bottom of the net to strengthen
it. Use the gill net as shown in Figure 8-21. Angling the gill net
will help to reduce the amount of debris that may accumulate in
the net. Be sure to check it frequently.
Figure 8-21. Setting a Gill Net in the Stream
FISH TRAPS
8-65. You may trap fish using several methods (Figure 8-22, page
8-31). Fish baskets are one method. You construct them by lashing
several sticks together with vines into a funnel shape. You close
the top, leaving a hole large enough for the fish to swim through.
8-30
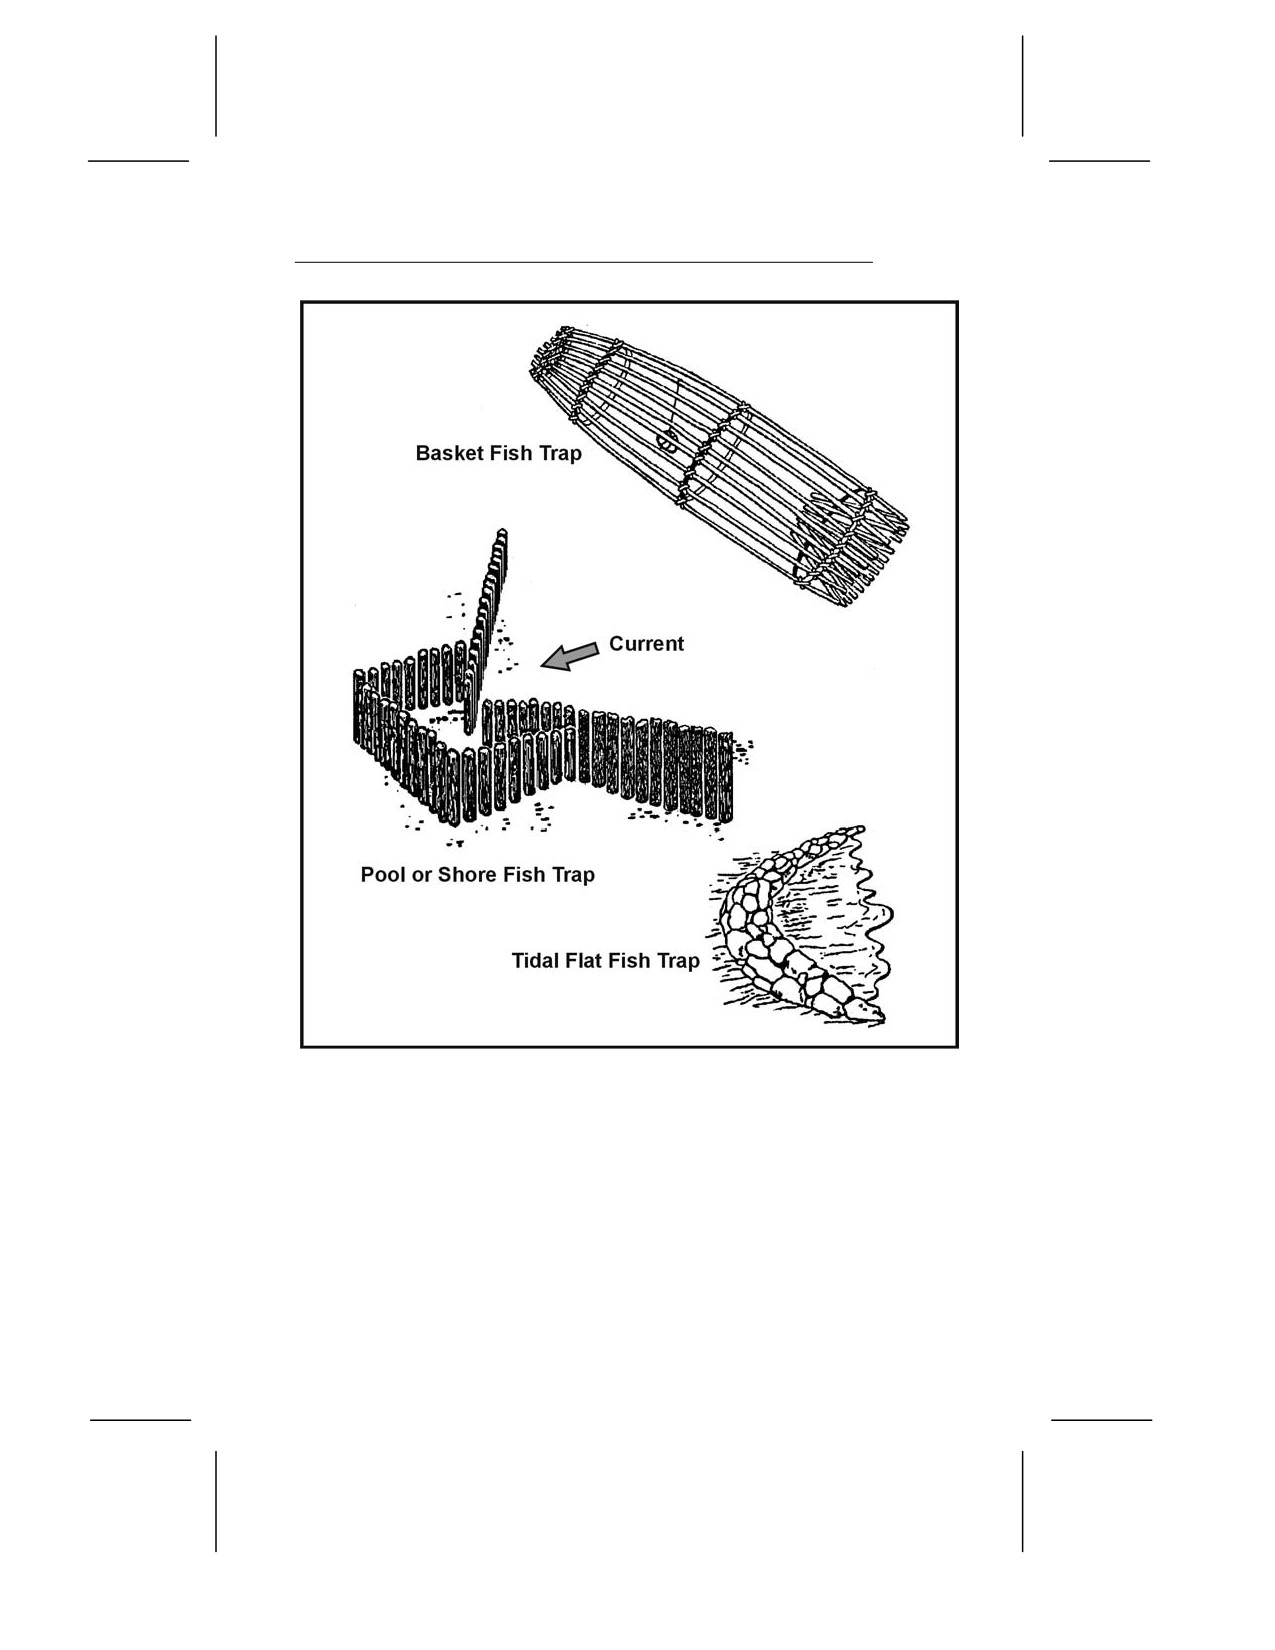
Figure 8-22. Various Types of Fish Traps
8-66. You can also use traps to catch saltwater fish, as schools
regularly approach the shore with the incoming tide and often
move parallel to the shore. Pick a location at high tide and build
the trap at low tide. On rocky shores, use natural rock pools.
On coral islands, use natural pools on the surface of reefs by
blocking the openings as the tide recedes. On sandy shores, use
sandbars and the ditches they enclose. Build the trap as a low
stone wall extending outward into the water and forming an angle
with the shore.
8-31
SPEARFISHING
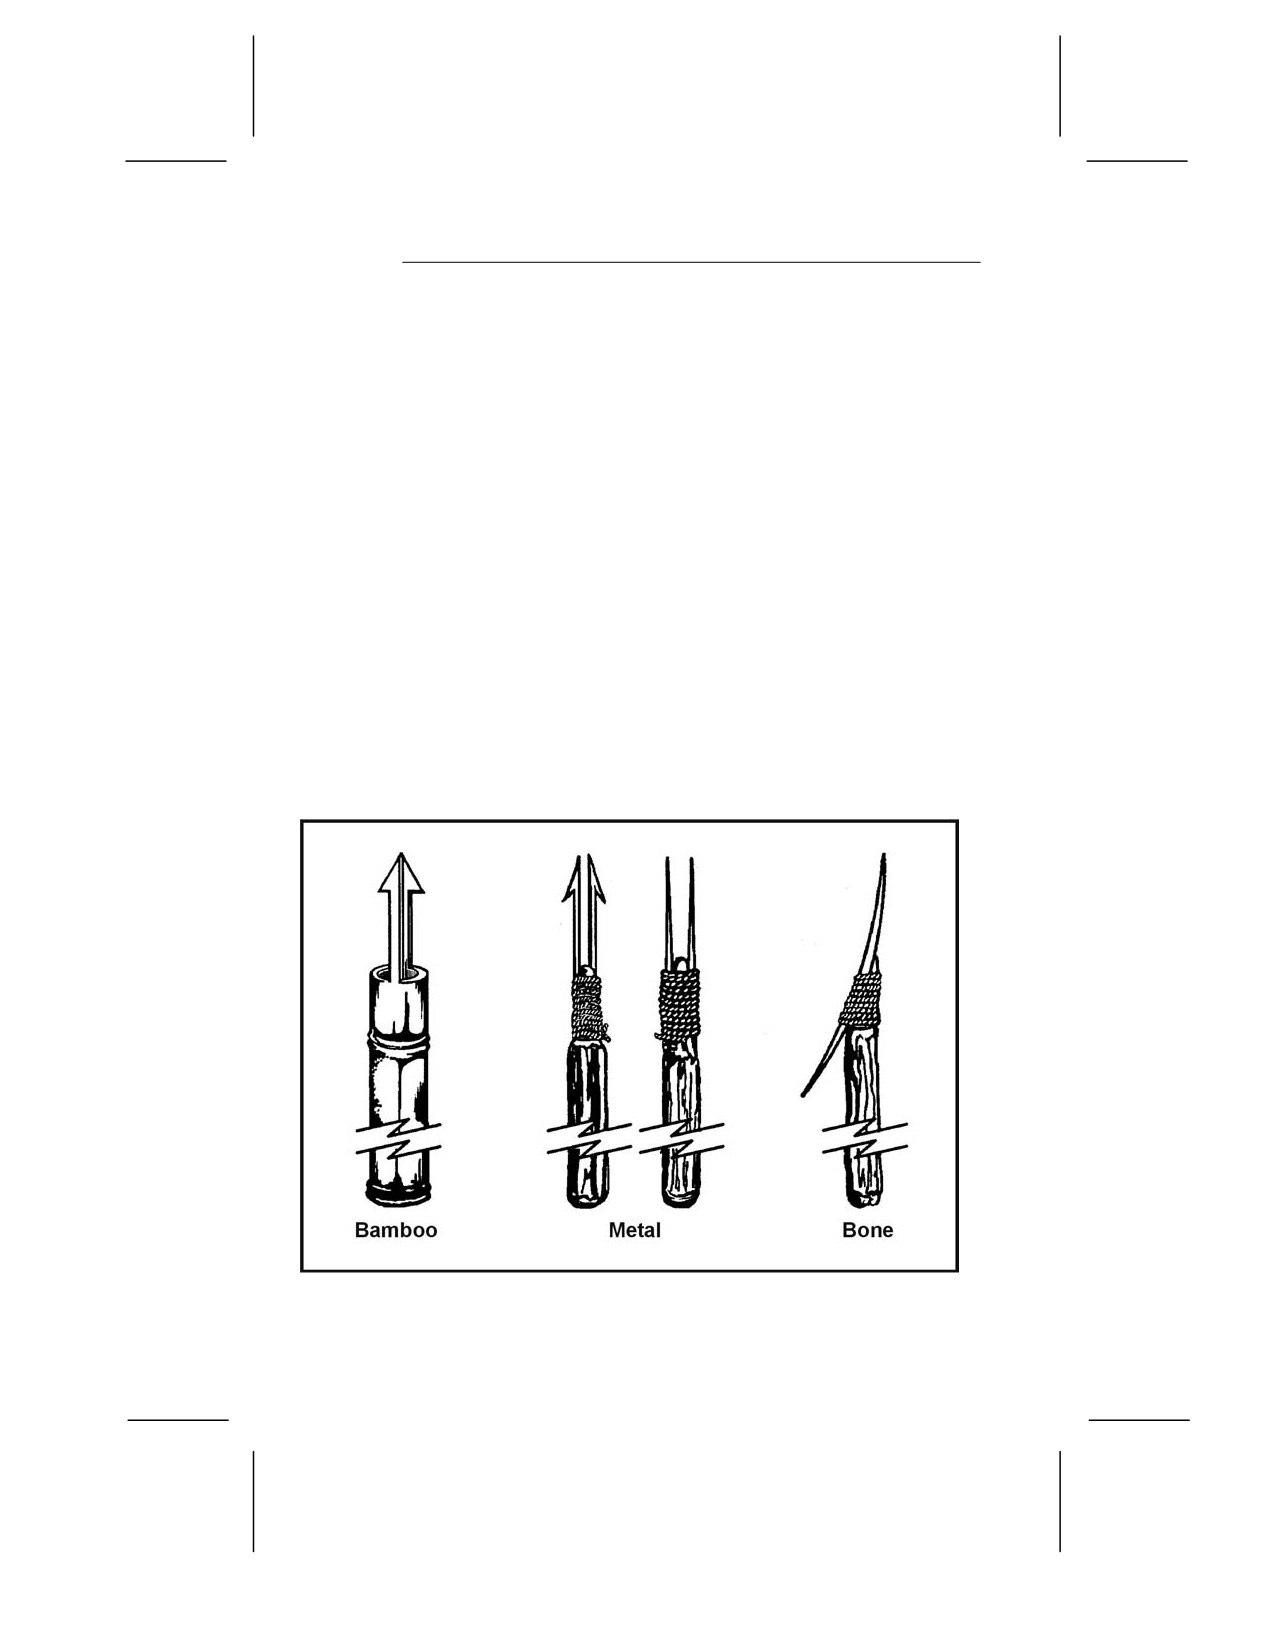
8-67. If you are near shallow water (about waist deep) where the
fish are large and plentiful, you can spear them. To make a spear,
cut a long, straight sapling (Figure 8-23). Sharpen the end to a
point or attach a knife, jagged piece of bone, or sharpened metal.
You can also make a spear by splitting the shaft a few inches
down from the end and inserting a piece of wood to act as a
spreader. You then sharpen the two separated halves to points.
To spear fish, find an area where fish either gather or where
there is a fish run. Place the spear point into the water and slowly
move it toward the fish. Then, with a sudden push, impale the
fish on the stream bottom. Do not try to lift the fish with the
spear, as it with probably slip off and you will lose it; hold the
spear with one hand and grab and hold the fish with the other. Do
not throw the spear, especially if the point is a knife. You cannot
afford to lose a knife in a survival situation. Be alert to the
problems caused by light refraction when looking at objects in the
water. You must aim lower than the object, usually at the bottom
of the fish, to hit your mark.
Figure 8-23. Types of Spear Points
8-32
CHOP FISHING
8-68. At night, in an area with high fish density, you can use a
light to attract fish. Then, armed with a machete or similar
weapon, you can gather fish using the back side of the blade to
strike them. Do not use the sharp side as you will cut them in two
pieces and end up losing some of the fish.
FISH POISON
8-69. Another way to catch fish is by using poison. Poison works
quickly. It allows you to remain concealed while it takes effect. It
also enables you to catch several fish at one time. When using fish
poison, be sure to gather all of the affected fish, because many
dead fish floating downstream could arouse suspicion. Some
plants that grow in warm regions of the world contain rotenone, a
substance that stuns or kills cold-blooded animals but does not
harm persons who eat the animals. The best place to use
rotenone, or rotenone-producing plants, is in ponds or the
headwaters of small streams containing fish. Rotenone works
quickly on fish in water 21 degrees C (70 degrees F) or above.
The fish rise helplessly to the surface. It works slowly in water 10
to 21 degrees C (50 to 70 degrees F) and is ineffective in water
below 10 degrees C (50 degrees F). The following plants, used as
indicated, will stun or kill fish:
• Anamirta cocculus (Figure 8-24, page 8-34). This woody
vine grows in southern Asia and on islands of the South
Pacific. Crush the bean-shaped seeds and throw them in
the water.
• Croton tiglium (Figure 8-24, page 8-34). This shrub or
small tree grows in waste areas on islands of the South
Pacific. It bears seeds in three angled capsules. Crush the
seeds and throw them into the water.
• Barringtonia (Figure 8-24, page 8-34). These large trees
grow near the sea in Malaya and parts of Polynesia. They
bear a fleshy one-seeded fruit. Crush the seeds and bark
and throw into the water.
• Derris eliptica (Figure 8-24, page 8-34). This large genus of
tropical shrubs and woody vines is the main source of
commercially produced rotenone. Grind the roots into a
powder and mix with water. Throw a large quantity of the
mixture into the water.
8-33
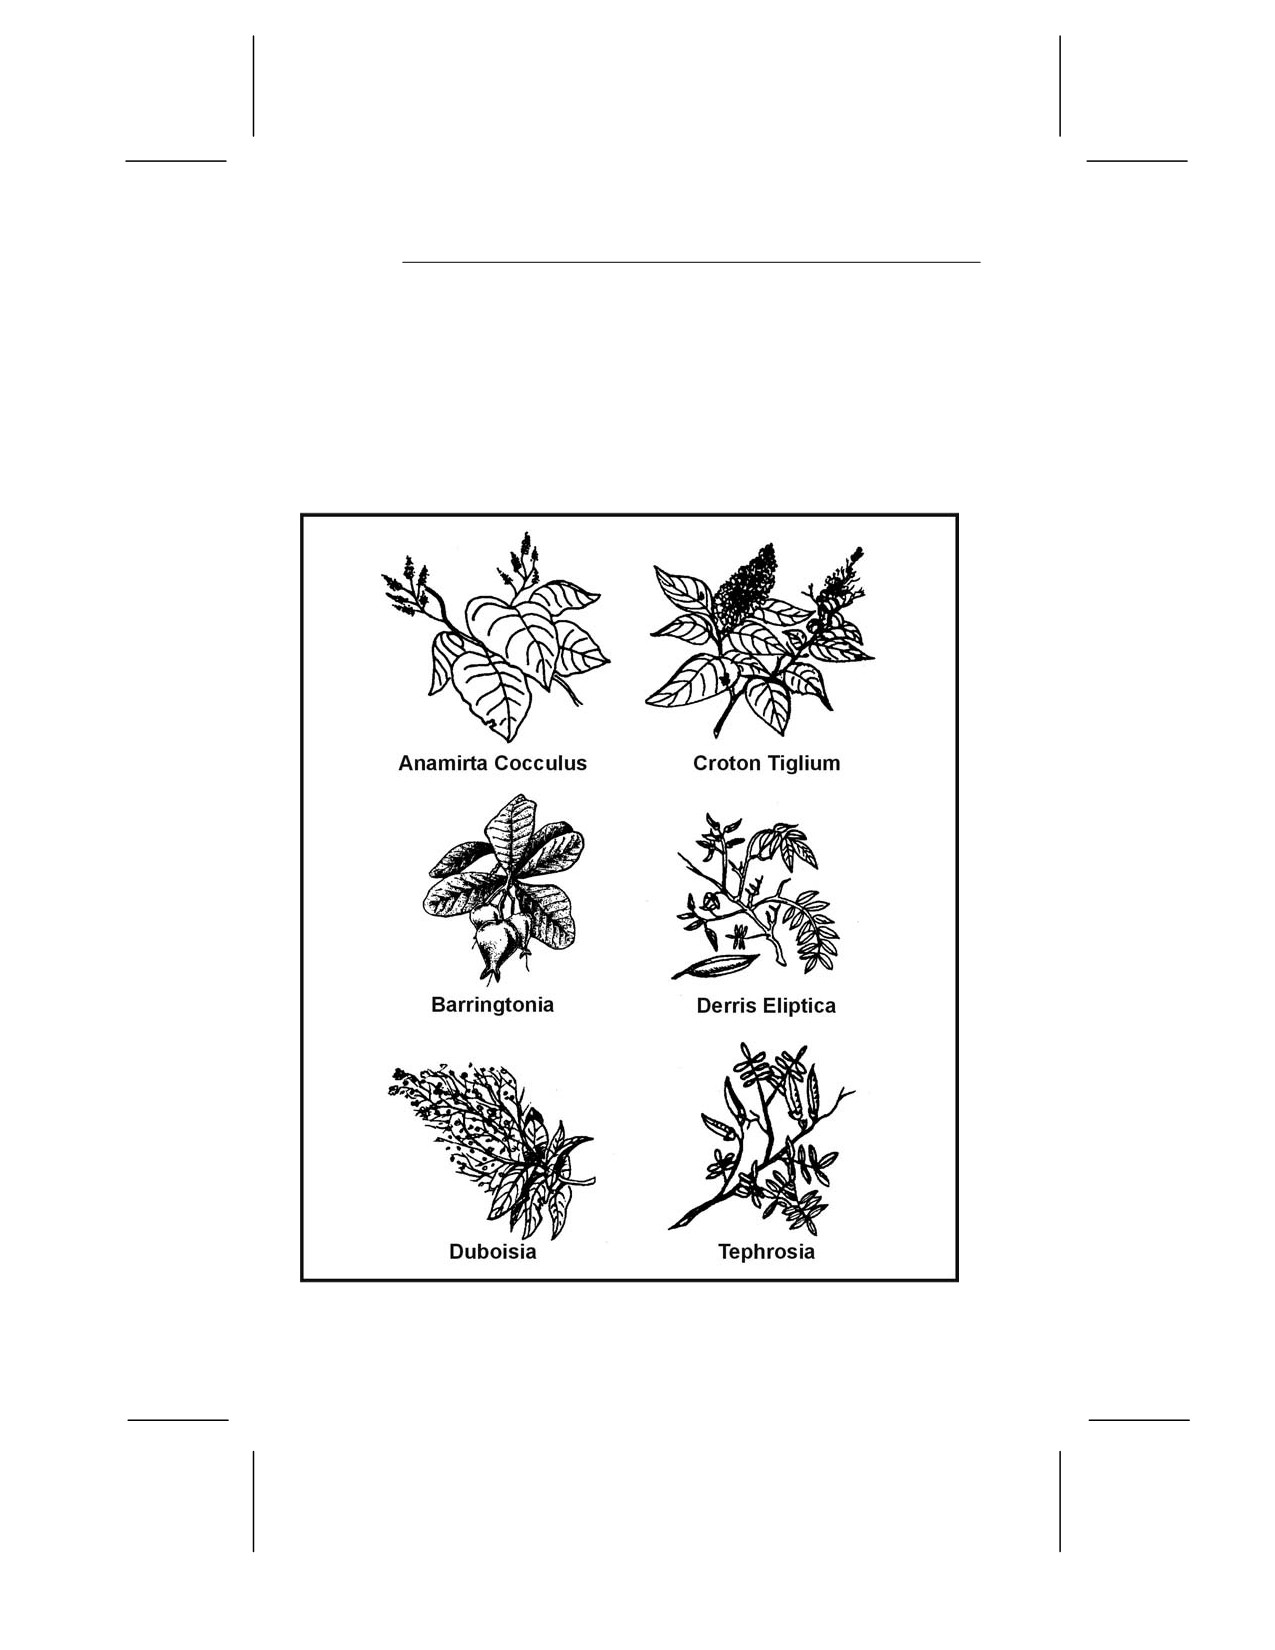
• Duboisia (Figure 8-24). This shrub grows in Australia and
bears white clusters of flowers and berrylike fruit. Crush
the plants and throw them into the water.
• Tephrosia
(Figure
8-24). This species of small shrubs,
which bears beanlike pods, grows throughout the tropics.
Crush or bruise bundles of leaves and stems and throw
them into the water.
Figure 8-24. Fish-Poisoning Plants
8-34