FM 3-05.70 Field Manual Survival (17 May 2002) - page 4
Means of
Sources of
Obtaining and/or
Environment
Water
Making Potable
Remarks
Desert (cont)
Cacti
Cut off the top of
Without a machete, cutting into a
a barrel cactus
cactus is difficult and takes time
and mash or
since you must get past the long,
squeeze the pulp.
strong spines and cut through the
tough rind.
CAUTION: Do
not eat pulp.
Place pulp in
mouth, suck out
juice, and
discard pulp.
Depressions or
Periodic rainfall may collect in pools,
holes in rocks
seep into fissures, or collect in holes
in rocks.
Fissures in rock
Insert flexible
tubing and siphon
water. If fissure is
large enough, you
can lower a
container into it.
Porous rock
Insert flexible
tubing and siphon
water.
Condensation on
Use cloth to
Extreme temperature variations
metal
absorb water,
between night and day may cause
then wring water
condensation on metal surfaces.
from cloth.
Following are signs to watch for in
the desert to help you find water:
• All trails lead to water. You
should follow in the direction in
which the trails converge. Signs of
camps, campfire ashes,
animal droppings, and trampled
terrain may mark trails.
• Flocks of birds will circle over
water holes. Some birds fly to
water holes at dawn and sunset.
Their flight at these times is
usually fast and close to the
ground. Bird tracks or chirping
sounds in the evening or early
morning sometimes indicate that
water is nearby.
Figure 6-1. Water Sources in Different Environments (Continued)
6-2. If you do not have a reliable source to replenish your water
supply, stay alert for ways in which your environment can help you.
6-3
NOTE: DO NOT substitute the fluids listed in Figure 6-2 for water.
Fluid
Remarks
Alcoholic beverages
Dehydrate the body and cloud judgment.
Contains harmful body wastes. Is about 2
Urine
percent salt.
Is salty and considered a food; therefore,
Blood
requires additional body fluids to digest.
May transmit disease.
Is about 4 percent salt. It takes about 2
liters of body fluids to rid the body of
Seawater
waste from 1 liter of seawater. Therefore,
by drinking seawater you deplete your
body’s water supply, which can cause
death.
Figure 6-2. The Effects of Substitute Fluids
6-3. Heavy dew can provide water. Tie rags or tufts of fine grass
around your ankles and walk through dew-covered grass before
sunrise. As the rags or grass tufts absorb the dew, wring the
water into a container. Repeat the process until you have a supply
of water or until the dew is gone. Australian natives sometimes
mop up as much as 1 liter an hour this way.
6-4. Bees or ants going into a hole in a tree may point to a
water-filled hole. Siphon the water with plastic tubing or scoop it
up with an improvised dipper. You can also stuff cloth in the hole
to absorb the water and then wring it from the cloth.
6-5. Water sometimes gathers in tree crotches or rock crevices.
Use the above procedures to get the water. In arid areas, bird
droppings around a crack in the rocks may indicate water in or
near the crack.
6-6. Green bamboo thickets are an excellent source of fresh
water. Water from green bamboo is clear and odorless. To get the
water, bend a green bamboo stalk, tie it down, and cut off the top
(Figure 6-3, page 6-5). The water will drip freely during the night.
Old, cracked bamboo may also contain water.
6-4
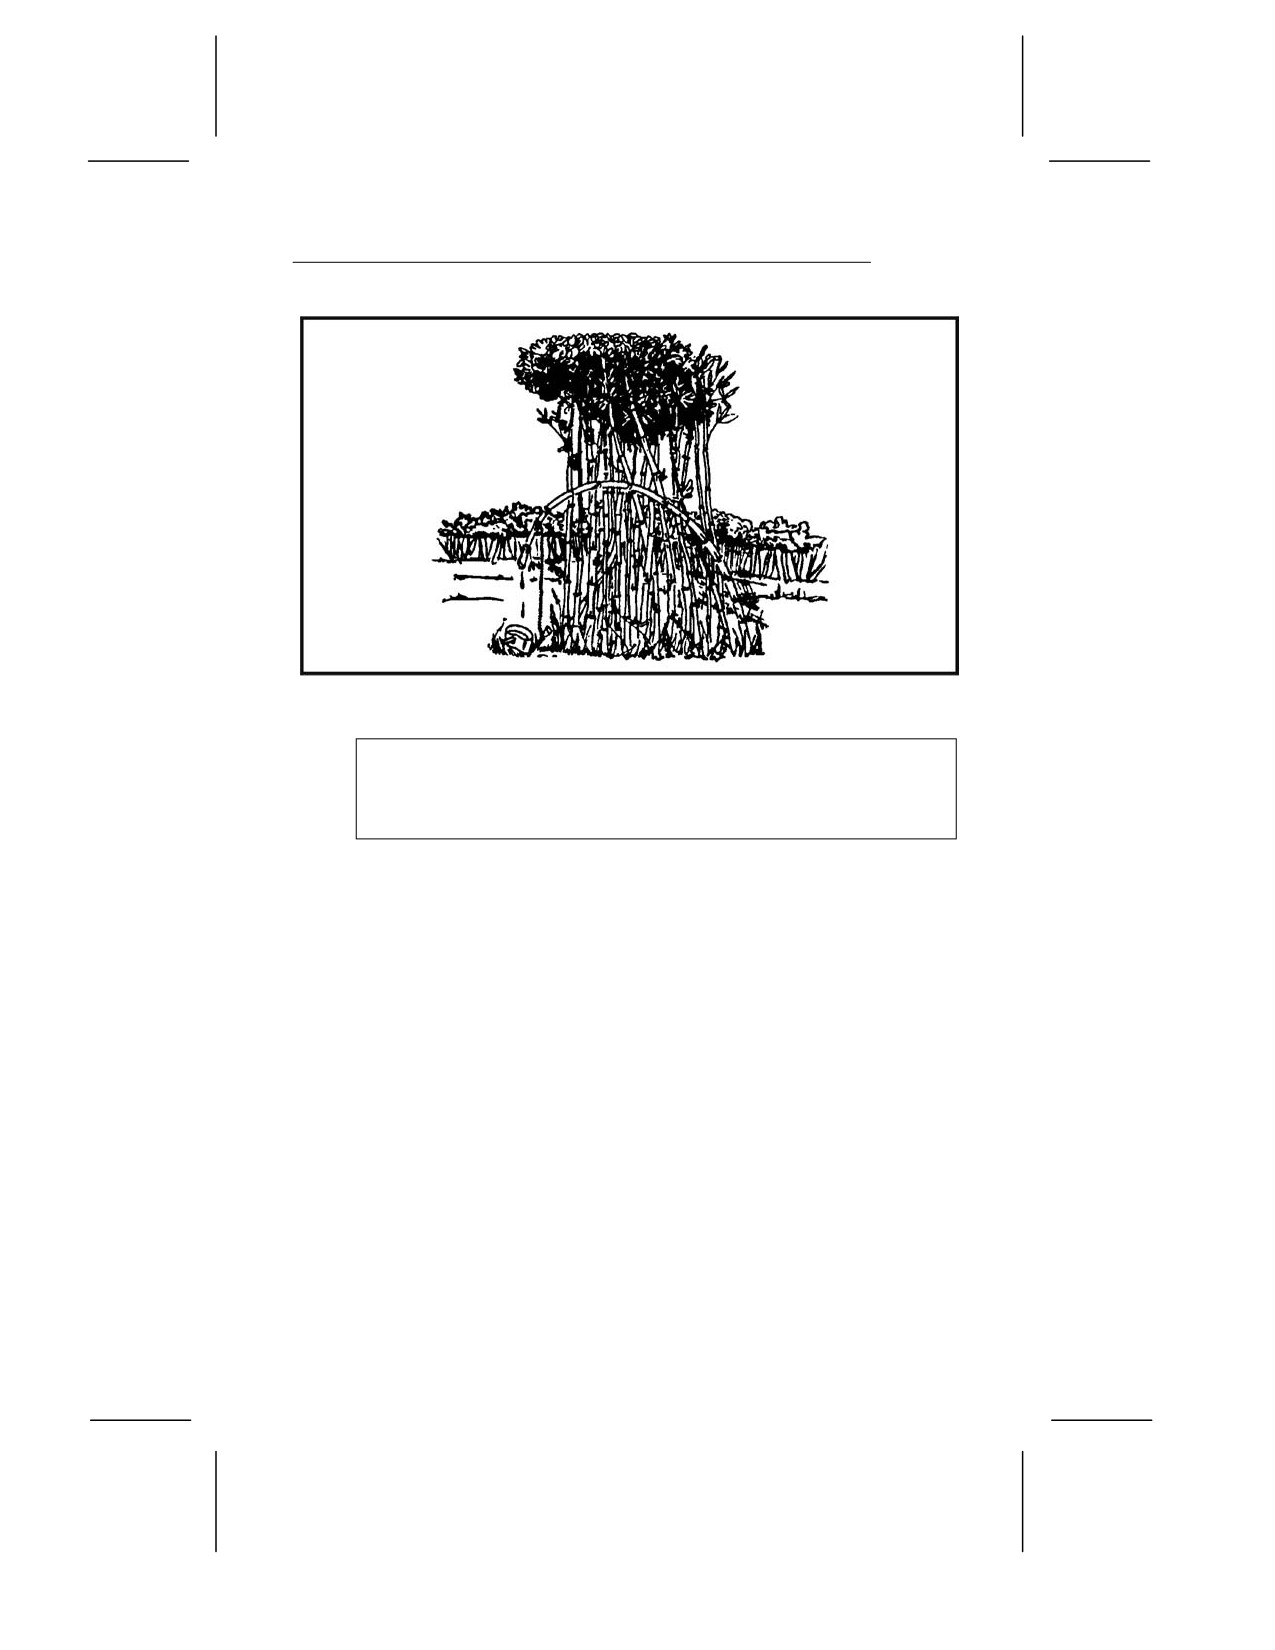
Figure 6-3. Water From Green Bamboo
CAUTION
Purify the water before drinking it.
6-7. Wherever you find banana trees, plantain trees, or
sugarcane, you can get water. Cut down the tree, leaving about a
30-centimeter (12-inch) stump, and scoop out the center of the
stump so that the hollow is bowl-shaped. Water from the roots
will immediately start to fill the hollow. The first three fillings of
water will be bitter, but succeeding fillings will be palatable. The
stump (Figure 6-4, page 6-6) will supply water for up to 4 days.
Be sure to cover it to keep out insects.
6-5
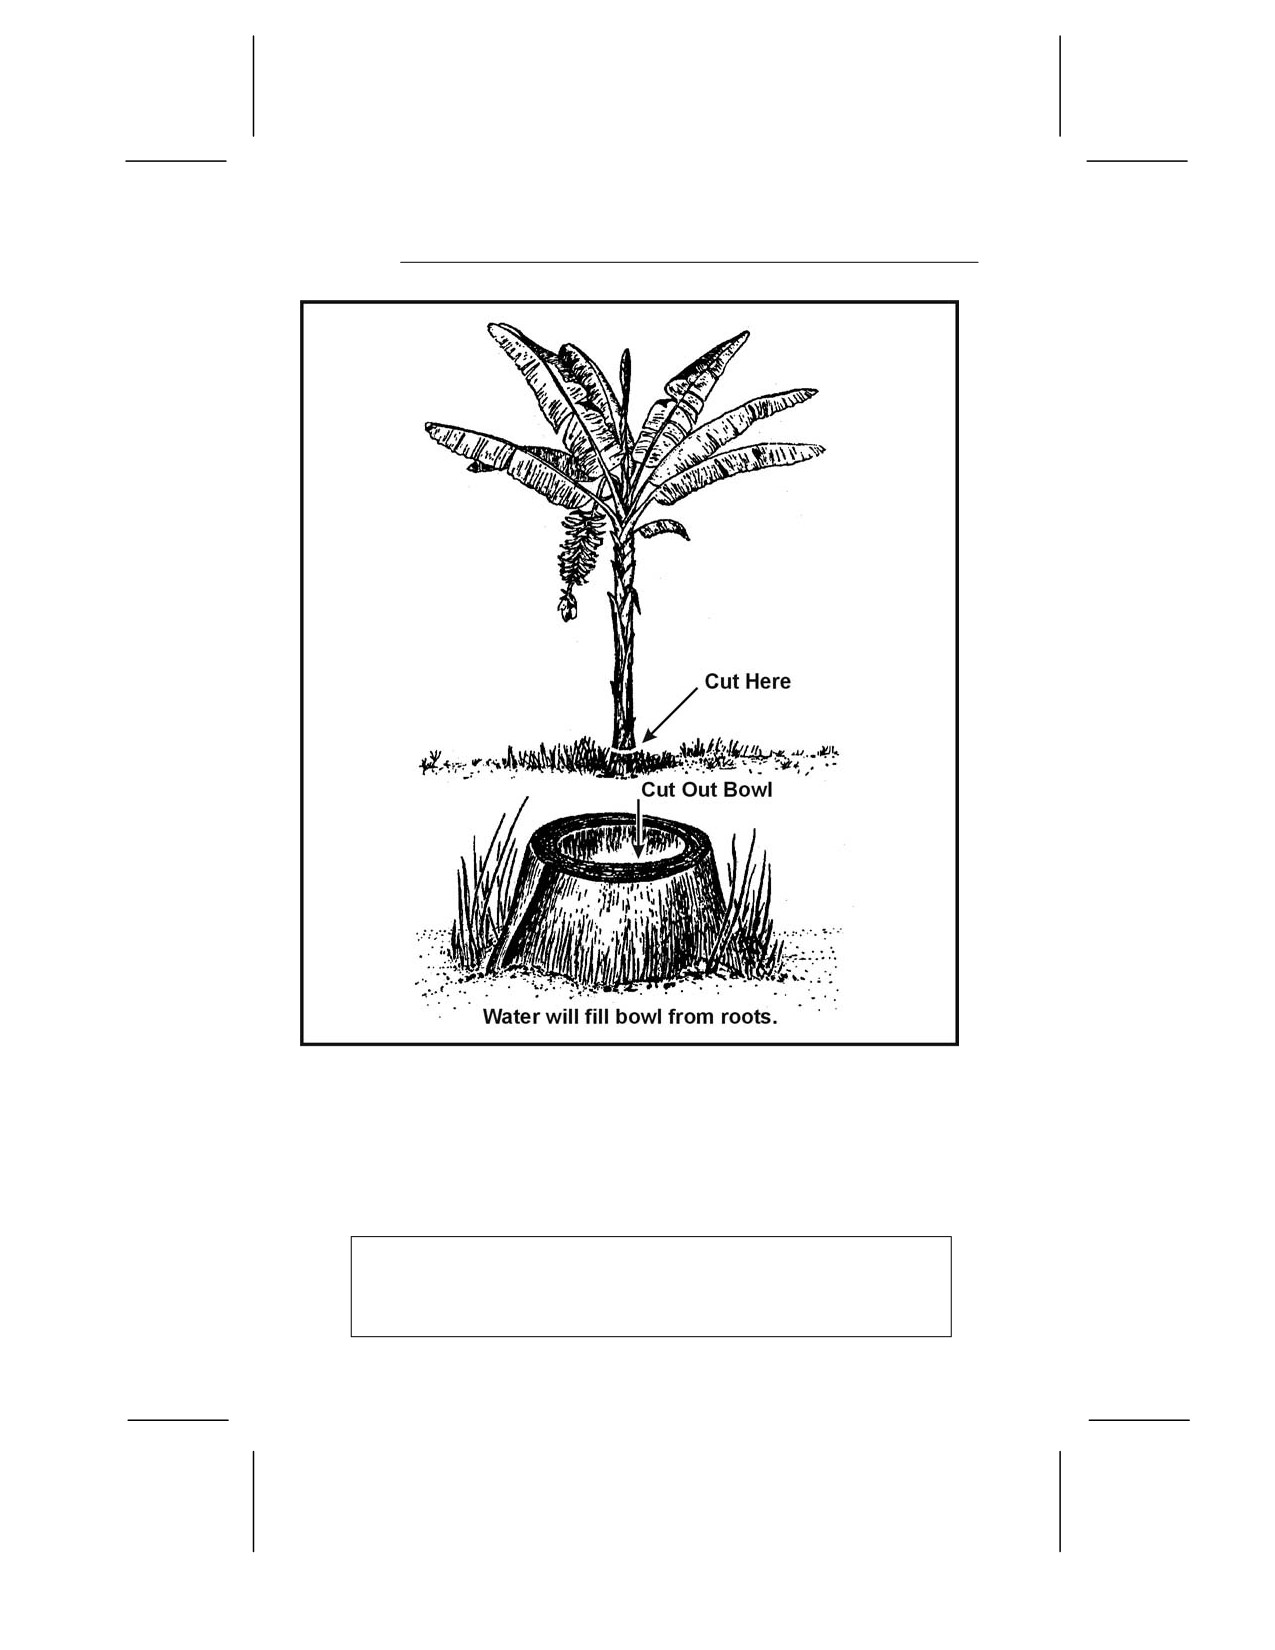
Figure 6-4. Water From Plantain or Banana Tree Stump
6-8. Some tropical vines can give you water. Cut a notch in the
vine as high as you can reach, then cut the vine off close to the
ground. Catch the dropping liquid in a container or in your mouth
(Figure 6-5, page 6-7).
CAUTION
Ensure that the vine is not poisonous.
6-6
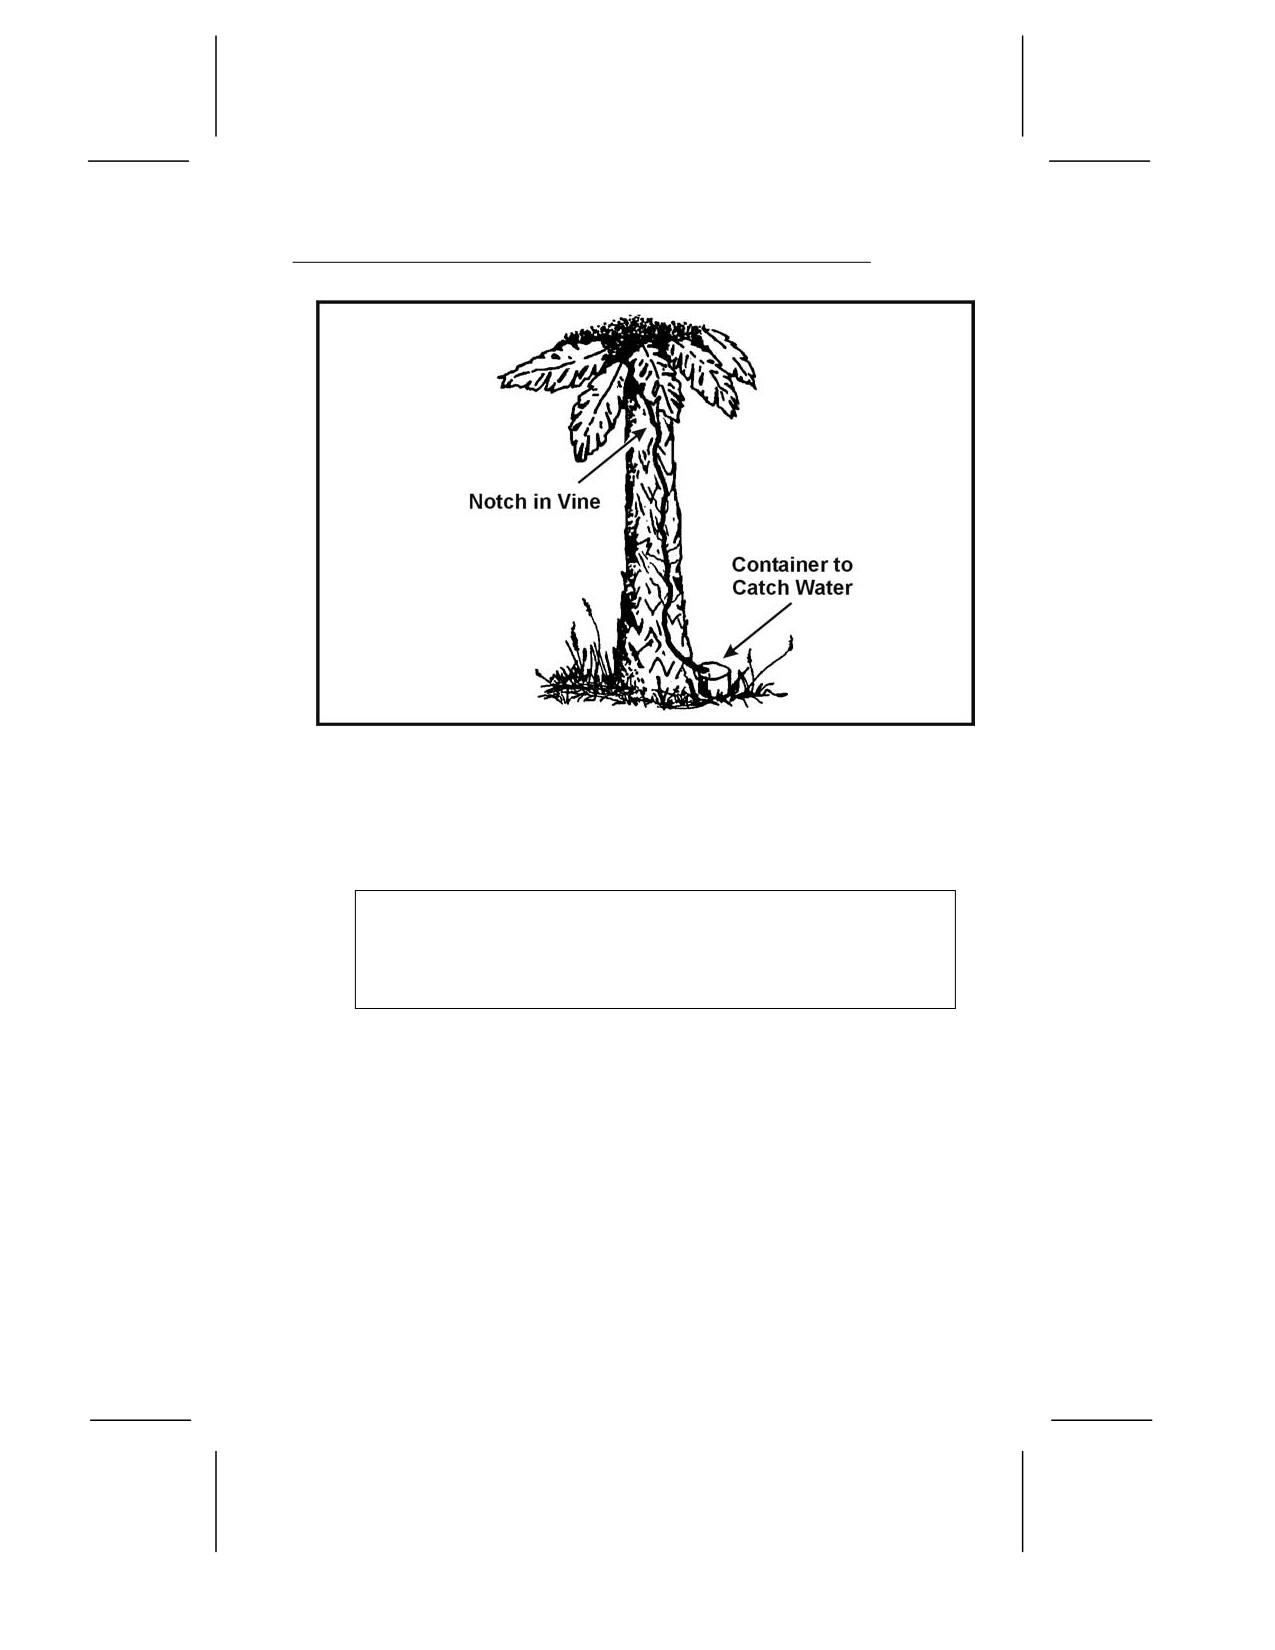
Figure 6-5. Water From a Vine
6-9. The milk from young, green (unripe) coconuts is a good
thirst quencher. However, the milk from mature, brown, coconuts
contains an oil that acts as a laxative. Drink in moderation only.
CAUTION
Do not drink the liquid if it is sticky, milky, or bitter
tasting.
6-10. In the American tropics you may find large trees whose
branches support air plants. These air plants may hold a
considerable amount of rainwater in their overlapping, thickly
growing leaves. Strain the water through a cloth to remove
insects and debris.
6-11. You can get water from plants with moist pulpy centers.
Cut off a section of the plant and squeeze or smash the pulp so
that the moisture runs out. Catch the liquid in a container.
6-12. Plant roots may provide water. Dig or pry the roots out of
the ground, cut them into short pieces, and smash the pulp so
that the moisture runs out. Catch the liquid in a container.
6-7
6-13. Fleshy leaves, stems, or stalks, such as bamboo, contain
water. Cut or notch the stalks at the base of a joint to drain out
the liquid.
6-14. The following trees can also provide water:
• Palms. The buri, coconut, sugar, rattan, and nips contain
liquid. Bruise a lower frond and pull it down so the tree
will “bleed” at the injury.
• Traveler’s tree. Found in Madagascar, this tree has a
cuplike sheath at the base of its leaves in which water
collects.
• Umbrella tree. The leaf bases and roots of this tree of
western tropical Africa can provide water.
• Baobab tree. This tree of the sandy plains of northern
Australia and Africa collects water in its bottlelike trunk
during the wet season. Frequently, you can find clear,
fresh water in these trees after weeks of dry weather.
CAUTION
Do not keep the sap from plants longer than 24 hours. It
begins fermenting, becoming dangerous as a water
source.
STILL CONSTRUCTION
6-15. You can use stills in various areas of the world. They draw
moisture from the ground and from plant material. You need
certain materials to build a still, and you need time to let it collect
the water. It takes about 24 hours to get 0.5 to 1 liter of water.
ABOVEGROUND STILLS
6-16. You can construct two types of aboveground stills. To make
the vegetation bag still, you need a sunny slope on which to
place the still, a clear plastic bag, green leafy vegetation, and a
small rock (Figure 6-6, page 6-9).
6-8
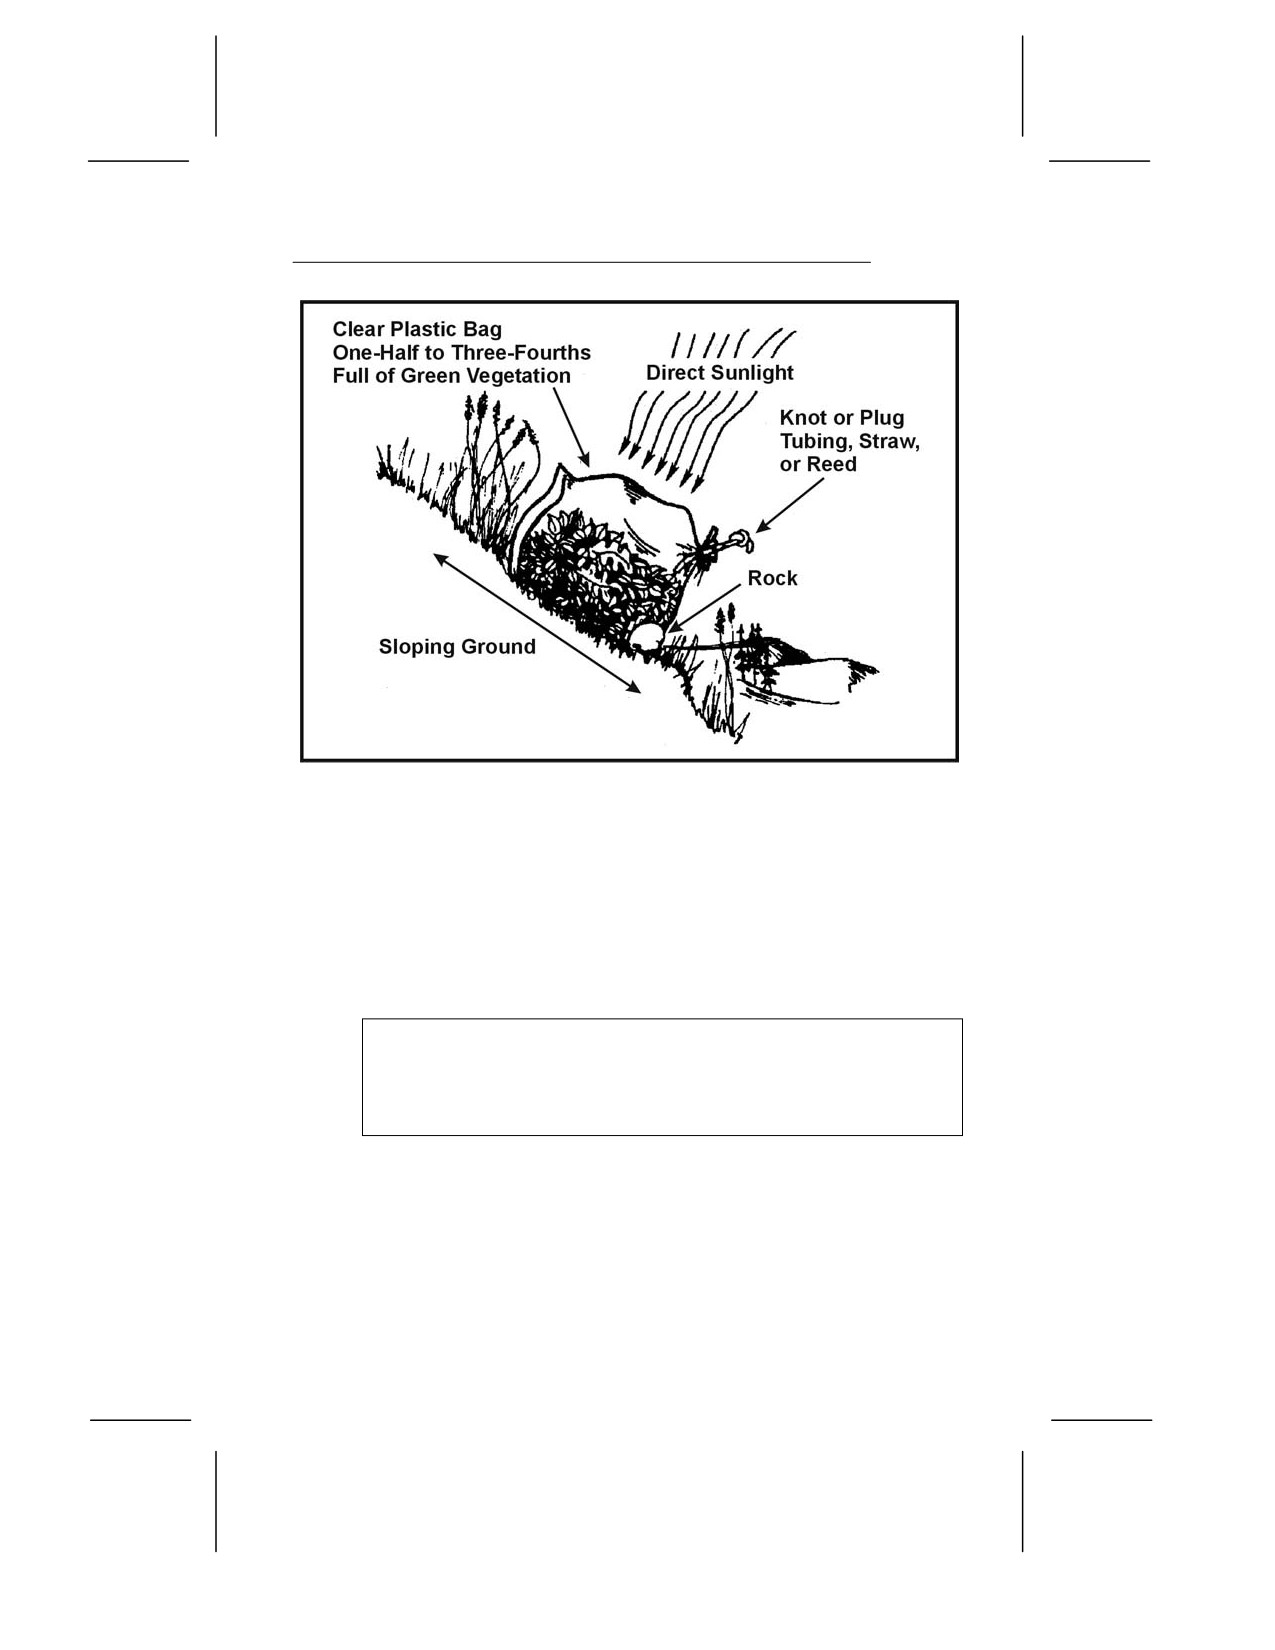
Figure 6-6. Vegetation Bag Still
6-17. To make the still, you should—
• Fill the bag with air by turning the opening into the breeze
or by “scooping” air into the bag.
• Fill the plastic bag one-half to three-fourths full of green
leafy vegetation. Be sure to remove all hard sticks or sharp
spines that might puncture the bag.
CAUTION
Do not use poisonous vegetation. It will provide
poisonous liquid.
• Place a small rock or similar item in the bag.
• Close the bag and tie the mouth securely as close to the
end of the bag as possible to keep the maximum amount of
air space. If you have a piece of tubing, a small straw, or a
hollow reed, insert one end in the mouth of the bag before
you tie it securely. Then tie off or plug the tubing so that
6-9

air will not escape. This tubing will allow you to drain out
condensed water without untying the bag.
• Place the bag, mouth downhill, on a slope in full sunlight.
Position the mouth of the bag slightly higher than the low
point in the bag.
• Settle the bag in place so that the rock works itself into the
low point in the bag.
6-18. To get the condensed water from the still, loosen the tie
around the bag’s mouth and tip the bag so that the water
collected around the rock will drain out. Then retie the mouth
securely and reposition the still to allow further condensation.
6-19. Change the vegetation in the bag after extracting most of
the water from it. This will ensure maximum output of water.
6-20. Making a transpiration bag still is similar to the
vegetation bag, only easier. Simply tie the plastic bag over a leafy
tree limb with a tube inserted, and tie the mouth of the bag off
tightly around the branch to form an airtight seal. Tie the end of
the limb so that it hangs below the level of the mouth of the bag.
The water will collect there (Figure 6-7).
6-21. The same limb may be used for 3 to 5 days without causing
long-term harm to the limb. It will heal itself within a few hours
of removing the bag.
Figure 6-7. Water Transpiration Bag
6-10
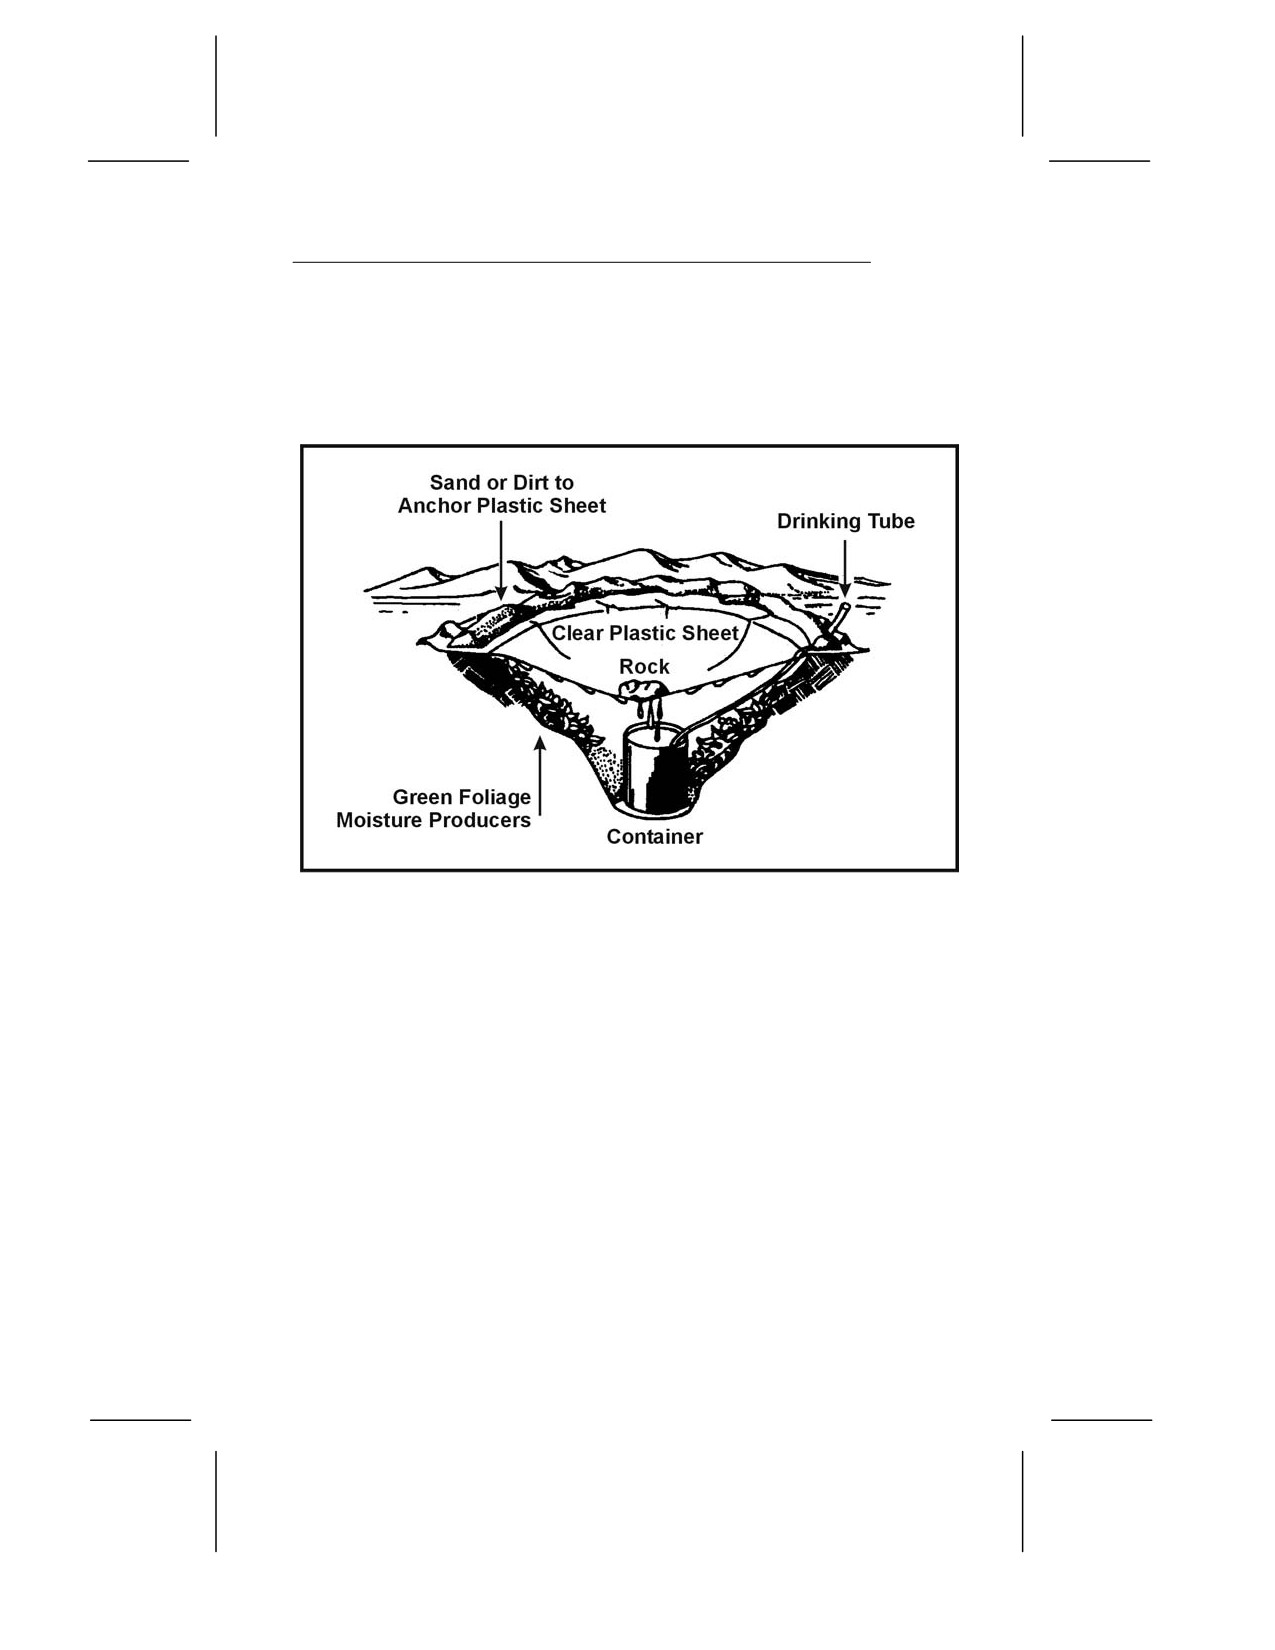
BELOWGROUND STILL
6-22. To make a belowground still, you need a digging tool, a
container, a clear plastic sheet, a drinking tube, and a rock
(Figure 6-8).
Figure 6-8. Belowground Still
6-23. Select a site where you believe the soil will contain moisture
(such as a dry streambed or a low spot where rainwater has
collected). The soil at this site should be easy to dig, and sunlight
must hit the site most of the day.
6-24. To construct the still, you should—
• Dig a bowl-shaped hole about 1 meter (3 feet) across and
60 centimeters (24 inches) deep.
• Dig a sump in the center of the hole. The sump’s depth and
perimeter will depend on the size of the container that you
have to place in it. The bottom of the sump should allow
the container to stand upright.
• Anchor the tubing to the container’s bottom by forming a
loose overhand knot in the tubing.
• Place the container upright in the sump.
6-11
• Extend the unanchored end of the tubing up, over, and
beyond the lip of the hole.
• Place the plastic sheet over the hole, covering its edges
with soil to hold it in place.
• Place a rock in the center of the plastic sheet.
• Lower the plastic sheet into the hole until it is about 40
centimeters (16 inches) below ground level. It now forms
an inverted cone with the rock at its apex. Make sure that
the cone’s apex is directly over your container. Also make
sure the plastic cone does not touch the sides of the hole
because the earth will absorb the condensed water.
• Put more soil on the edges of the plastic to hold it securely
in place and to prevent the loss of moisture.
• Plug the tube when not in use to keep the moisture from
evaporating and to keep insects out.
6-25. You can drink water without disturbing the still by using
the tube as a straw. By opening the still, you release the moist,
warm air that has accumulated.
6-26. You may want to use plants in the hole as a moisture
source. If so, dig out additional soil from the sides of the hole to
form a slope on which to place the plants. Then proceed as above.
6-27. If polluted water is your only moisture source, dig a small
trough outside the hole about 25 centimeters (10 inches) from the
still’s lip
(Figure
6-9, page
6-13). Dig the trough about
25
centimeters (10 inches) deep and 8 centimeters (3 inches) wide.
Pour the polluted water in the trough. Be sure you do not spill
any polluted water around the rim of the hole where the plastic
sheet touches the soil. The trough holds the polluted water and
the soil filters it as the still draws it. The water then condenses
on the plastic and drains into the container. This process works
extremely well when your only water source is salt water.
6-28. You will need at least three stills to meet your individual
daily water intake needs. In comparison to the belowground still
and the water transpiration bag still, the vegetation bag produces
the best yield of water.
6-12
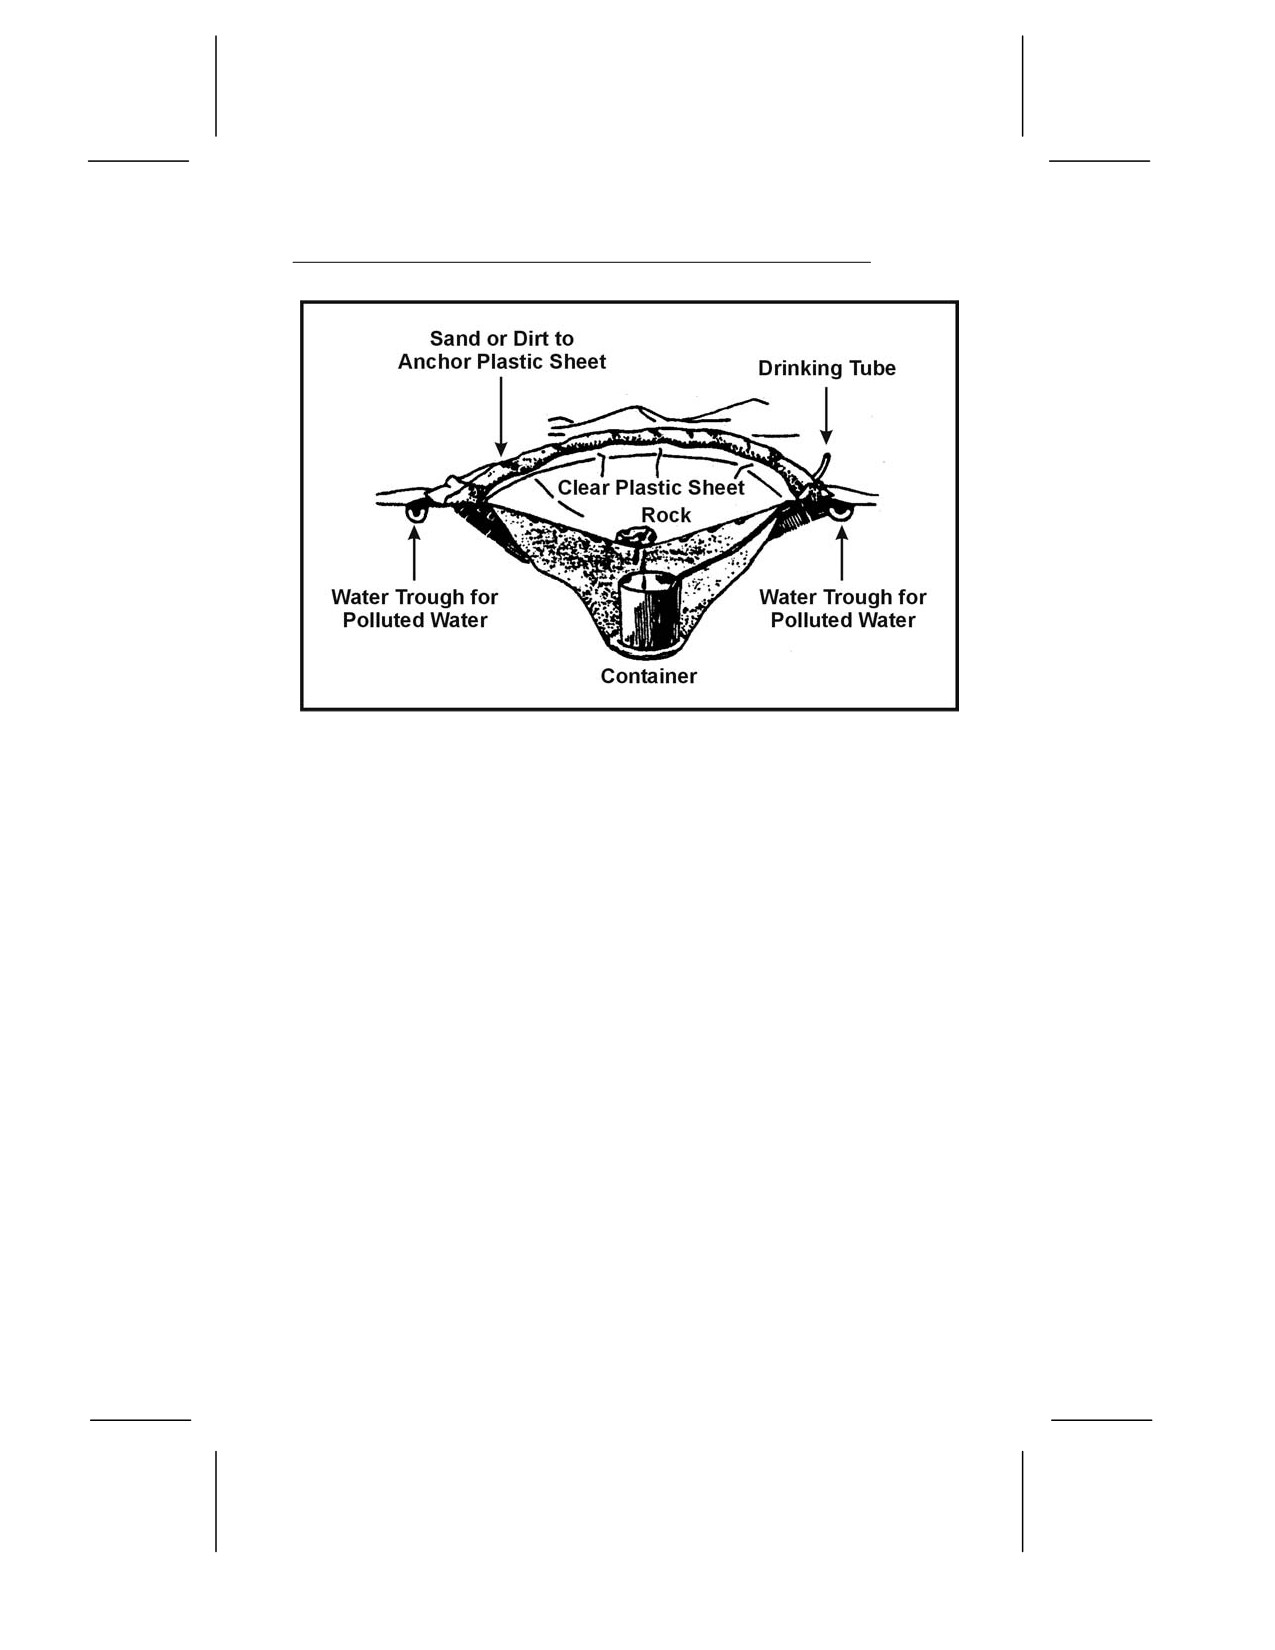
Figure 6-9. Belowground Still to Get Potable Water
From Polluted Water
WATER PURIFICATION
6-29. Rainwater collected in clean containers or in plants is
usually safe for drinking. However, purify water from lakes,
ponds, swamps, springs, or streams, especially the water near
human settlements or in the tropics.
6-30. When possible, purify all water you get from vegetation or
from the ground by boiling or using iodine or chlorine. After
purifying a canteen of water, you must partially unscrew the cap
and turn the canteen upside down to rinse unpurified water from
the threads of the canteen where your mouth touches.
6-31. Purify water by the following methods:
• Use water purification tablets.
(Follow the directions
provided.)
• Place 5 drops of 2 percent tincture of iodine in a canteen
full of clear water. If the canteen is full of cloudy or cold
water, use 10 drops. (Let the canteen of water stand for 30
minutes before drinking.)
• Use 2 drops of 10 percent (military strength) povidone-
iodine or 1 percent titrated povidone-iodine. The civilian
6-13
equivalent is usually 2 percent strength, so 10 drops will
be needed. Let stand for 30 minutes. If the water is cold
and clear, wait 60 minutes. If it’s very cold or cloudy, add 4
drops and wait 60 minutes.
•
Place
2 drops of chlorine bleach
(5.25 percent sodium
hypochlorite) in a canteen of water. Let stand 30 minutes.
If the water is cold or cloudy, wait 60 minutes. Remember
that not all bleach is the same around the world; check the
available level of sodium hypochlorite.
•
Use potassium permanganate, commonly marketed as
Condy’s Crystals, for a number of applications, including
emergency disinfection of water. The crystals are of a
nonuniform size, so you must judge the actual dosage by
the color of the water after adding the crystals. Add three
small crystals to 1 liter (1 quart) of water. If the water
turns a bright pink after waiting 30 minutes, the water is
considered purified. If the water turns a dark pink, there is
too much potassium permanganate to drink safely. Either
add more water to dilute the mixture or save it for use as
an antiseptic solution. If the water becomes a full red, like
the color of cranberry juice, the solution may be used as an
antifungal solution.
•
Boil your drinking water. This is the safest method of
purifying your drinking water. By achieving a rolling boil,
you can ensure that you are destroying all living
waterborne pathogens.
6-32. By drinking nonpotable water you may contract diseases or
swallow organisms that can harm you and may easily lead to
potentially fatal waterborne illnesses.
6-33. Two of the most prevalent pathogens found in most water
sources throughout the world are—
• Giardia, which causes Giardiasis
(beaver fever). It is
characterized by an explosive, watery diarrhea
accompanied by severe cramps lasting 7 to 14 days.
• Cryptosporidium, which causes Cryptosporidiosis. It is
much like Giardiasis, only more severe and prolonged, and
there is no known cure but time. Diarrhea may be mild
and can last from 3 days to 2 weeks.
6-14
NOTE: The only effective means of neutralizing Cryptosporidium
is by boiling or by using a commercial microfilter or reverse-
osmosis filtration system. Chemical disinfectants such as iodine
tablets or bleach have not shown to be 100 percent effective in
eliminating Cryptosporidium.
6-34. Examples of other diseases or organisms are—
• Dysentery. You may experience severe, prolonged diarrhea
with bloody stools, fever, and weakness.
• Cholera and typhoid. You may be susceptible to these
diseases regardless of inoculations. Cholera can cause
profuse, watery diarrhea, vomiting, and leg cramps.
Typhoid symptoms include fever, headache, loss of
appetite, constipation, and bleeding in the bowel.
• Hepatitis A. Symptoms include diarrhea, abdominal pain,
jaundice, and dark urine. This infection can spread
through close person-to-person contact or ingestion of
contaminated water or food.
• Flukes. Stagnant, polluted water—especially in tropical
areas—often contains blood flukes. If you swallow flukes,
they will bore into the bloodstream, live as parasites, and
cause disease.
• Leeches. If you swallow a leech, it can hook onto the throat
passage or inside the nose. It will suck blood, create a
wound, and move to another area. Each bleeding wound
may become infected.
WATER FILTRATION DEVICES
6-35. If the water you find is also muddy, stagnant, and foul-
smelling, you can clear the water—
• By placing it in a container and letting it stand for 12
hours.
• By pouring it through a filtering system.
NOTE: These procedures only clear the water and make it more
palatable. You will have to purify it.
6-36. To make a filtering system, place several centimeters or
layers of filtering material such as sand, crushed rock, charcoal,
6-15
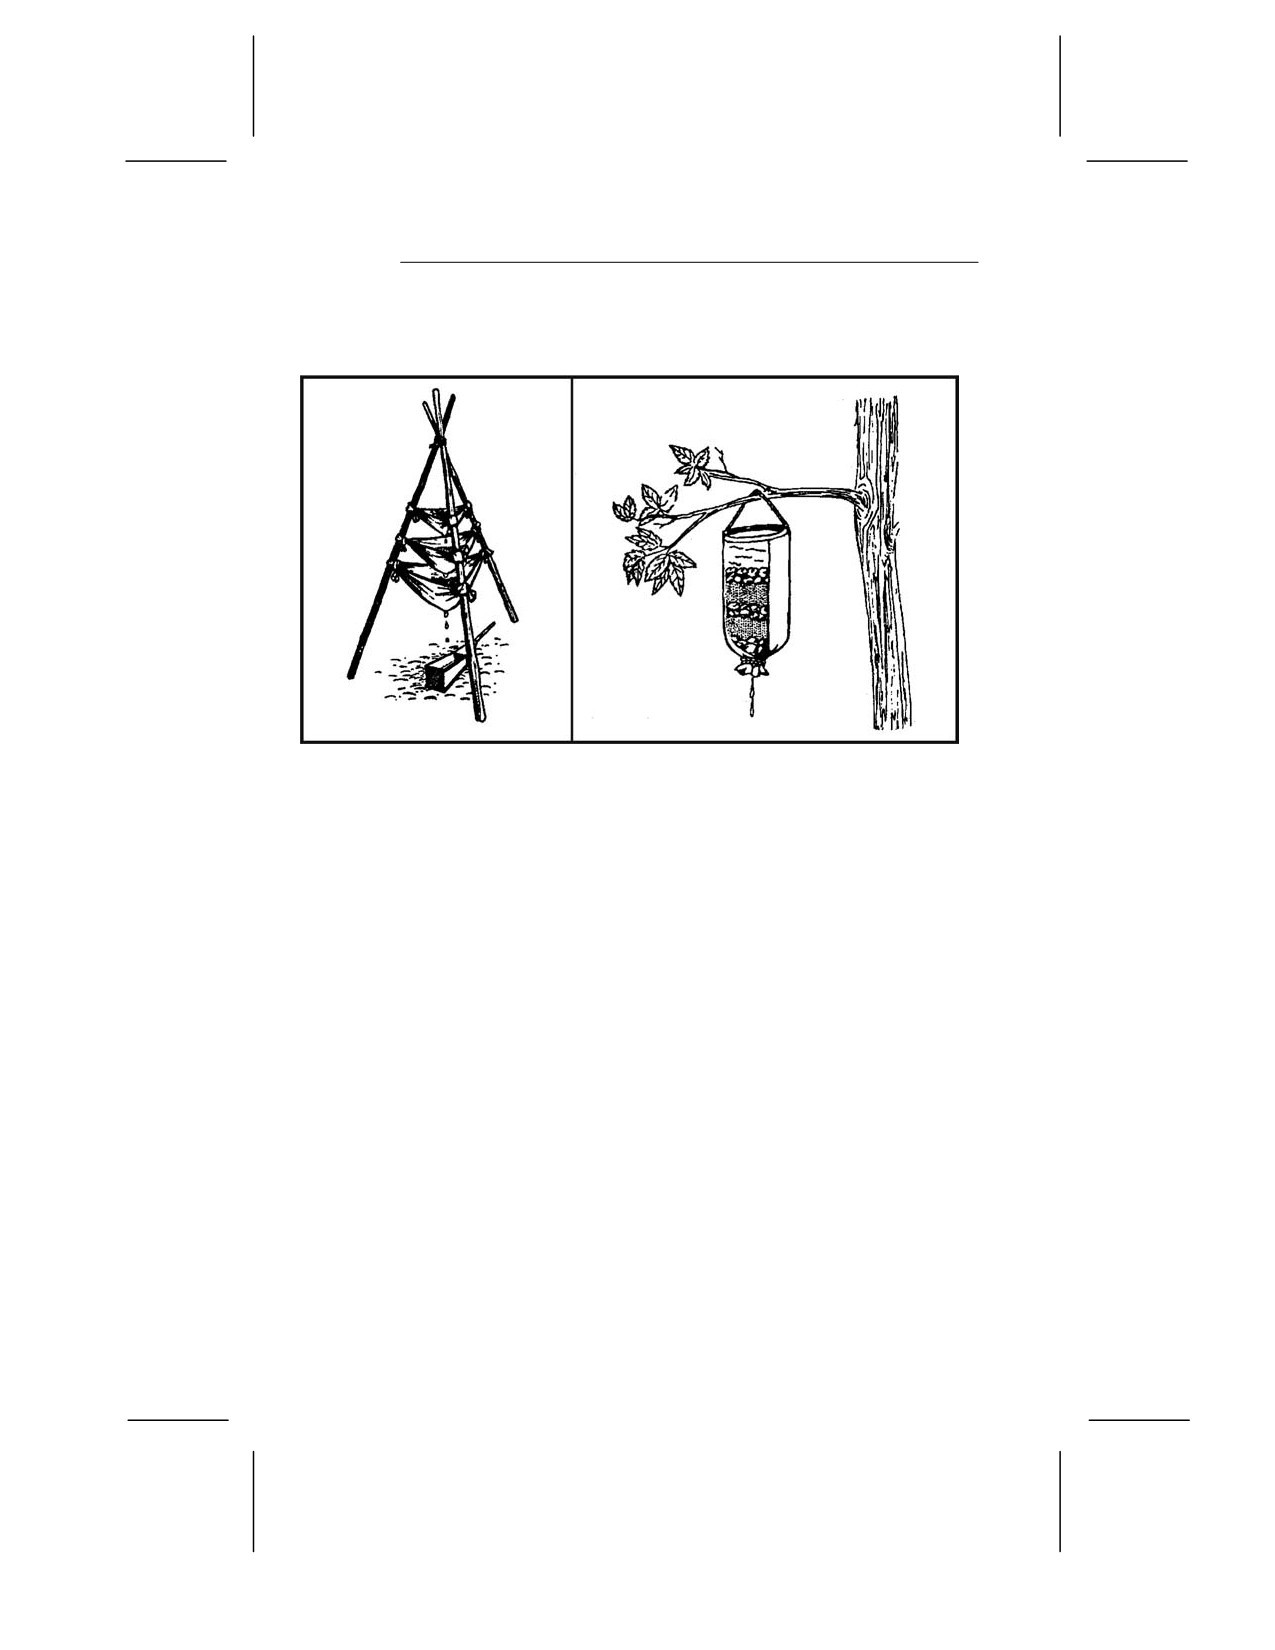
or cloth in bamboo, a hollow log, or an article of clothing
(Figure 6-10).
Figure 6-10. Water Filtering Systems
6-37. Remove the odor from water by adding charcoal from your
fire. Charcoal is also helpful in absorbing some agricultural and
industrial chemicals. Let the water stand for 45 minutes before
drinking it.
6-16
Chapter 7
Firecraft
In many survival situations, the ability to start a
fire can make the difference between living and
dying. Fire can fulfill many needs. It can provide
warmth and comfort. It not only cooks and
preserves food, it also provides warmth in the
form of heated food that saves calories our body
normally uses to produce body heat. You can use
fire to purify water, sterilize bandages, signal for
rescue, and provide protection from animals. It
can be a psychological boost by providing peace of
mind and companionship. You can also use fire to
produce tools and weapons.
Fire can cause problems, as well. The enemy can
detect the smoke and light it produces. It can
cause forest fires or destroy essential equipment.
Fire can also cause burns and carbon monoxide
poisoning when used in shelters.
Weigh your need for fire against your need to
avoid enemy detection.
BASIC FIRE PRINCIPLES
7-1. To build a fire, it helps to understand the basic principles of
a fire. Fuel (in a nongaseous state) does not burn directly. When
you apply heat to a fuel, it produces a gas. This gas, combined
with oxygen in the air, burns.
7-2. Understanding the concept of the fire triangle is very
important in correctly constructing and maintaining a fire. The
three sides of the triangle represent air, heat, and fuel. If you
remove any of these, the fire will go out. The correct ratio of these
components is very important for a fire to burn at its greatest
capability. The only way to learn this ratio is to practice.
7-1
SITE SELECTION AND PREPARATION
7-3. You will have to decide what site and arrangement to use.
Before building a fire consider—
• The area (terrain and climate) in which you are operating.
• The materials and tools available.
• Time; how much time do you have?
• Need; why do you need a fire?
• Security; how close is the enemy?
7-4. Look for a dry spot that—
• Is protected from the wind.
• Is suitably placed in relation to your shelter (if any).
• Will concentrate the heat in the direction you desire.
• Has a supply of wood or other fuel available. (Figure 7-4,
pages 7-5 and 7-6, lists types of material you can use.)
7-5. If you are in a wooded or brush-covered area, clear the
brush and scrape the surface soil from the spot you have selected.
Clear a circle at least 1 meter (3 feet) in diameter so there is little
chance of the fire spreading.
7-6. If time allows, construct a fire wall using logs or rocks. This
wall will help to reflect or direct the heat where you want it
(Figure 7-1, page 7-3). It will also reduce flying sparks and cut
down on the amount of wind blowing into the fire. However, you
will need enough wind to keep the fire burning.
CAUTION
Do not use wet or porous rocks as they may explode
when heated.
7-2
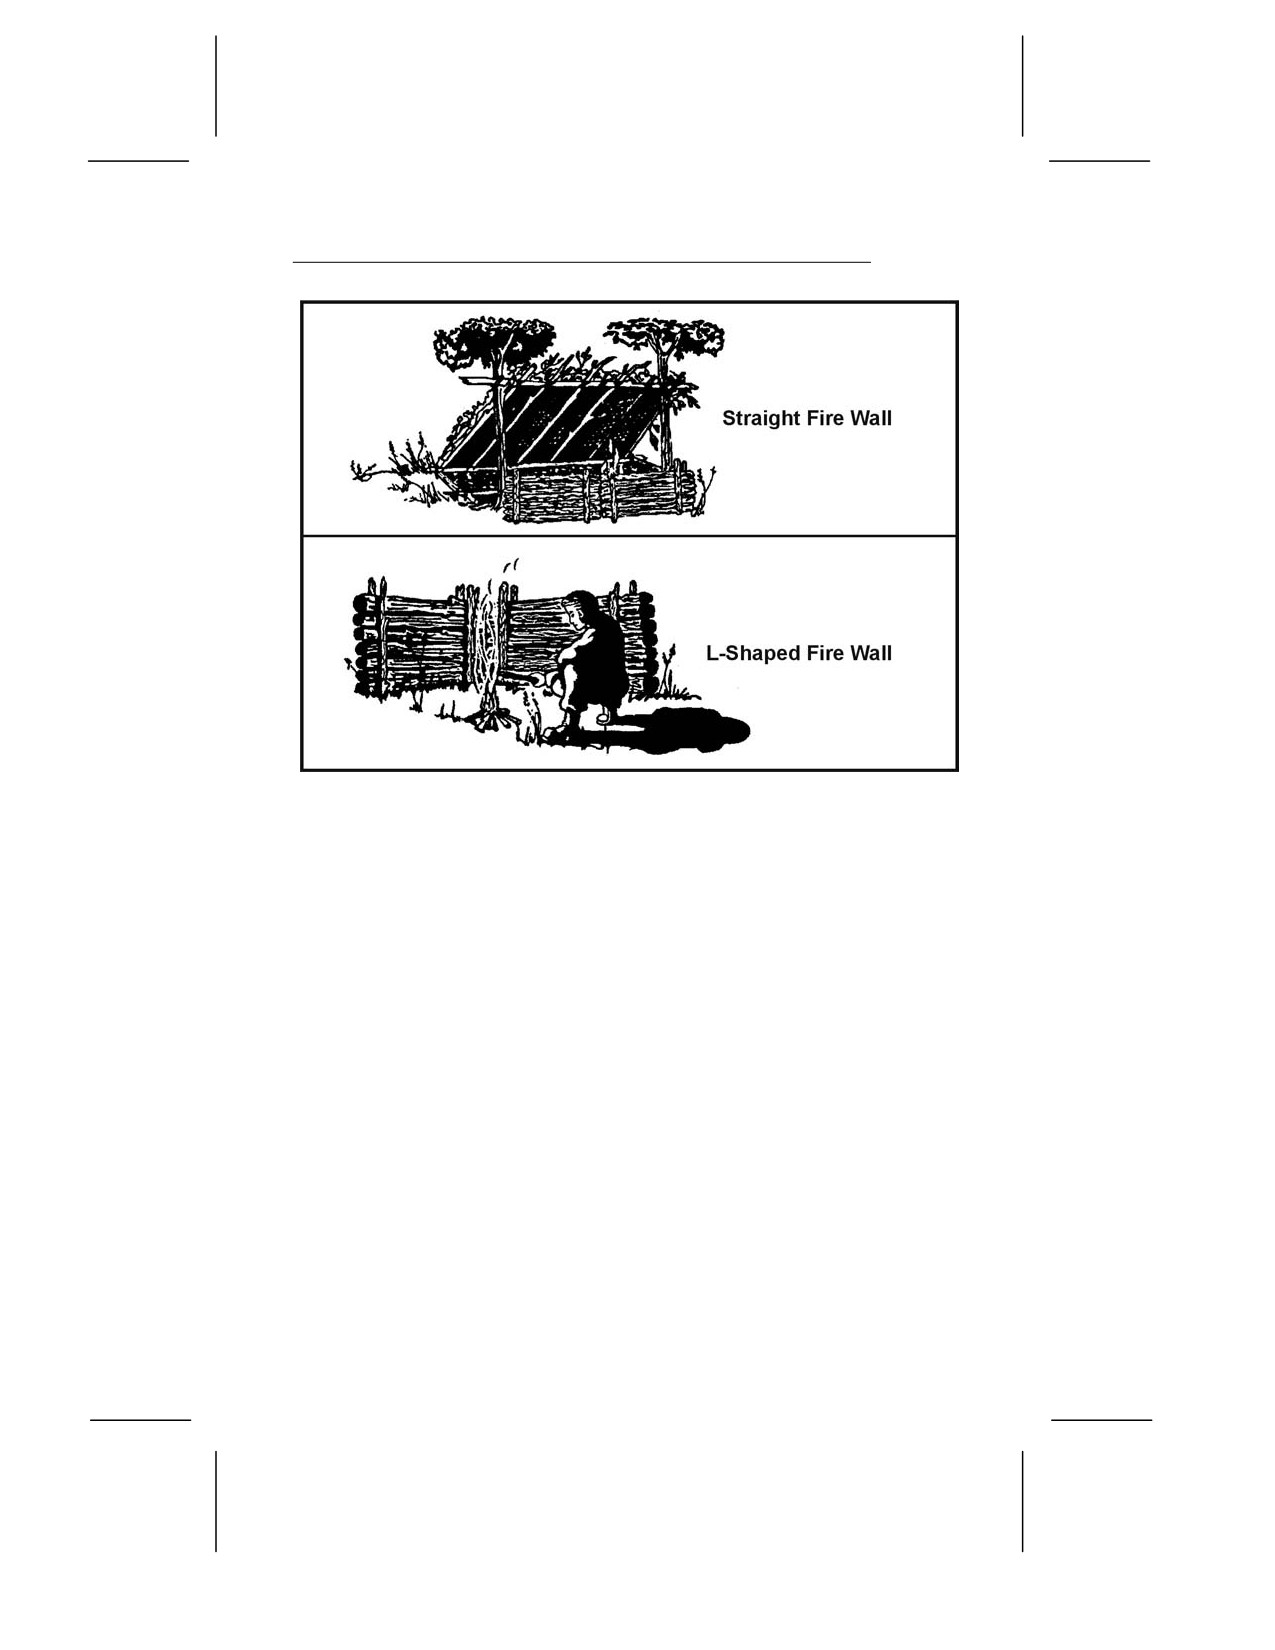
Figure 7-1. Types of Fire Walls
7-7. In some situations, you may find that an underground
fireplace will best meet your needs. It conceals the fire and serves
well for cooking food. To make an underground fireplace or
Dakota fire hole (Figure 7-2, page 7-4)—
• Dig a hole in the ground.
• On the upwind side of this hole, poke or dig a large
connecting hole for ventilation.
• Build your fire in the hole as illustrated.
7-3
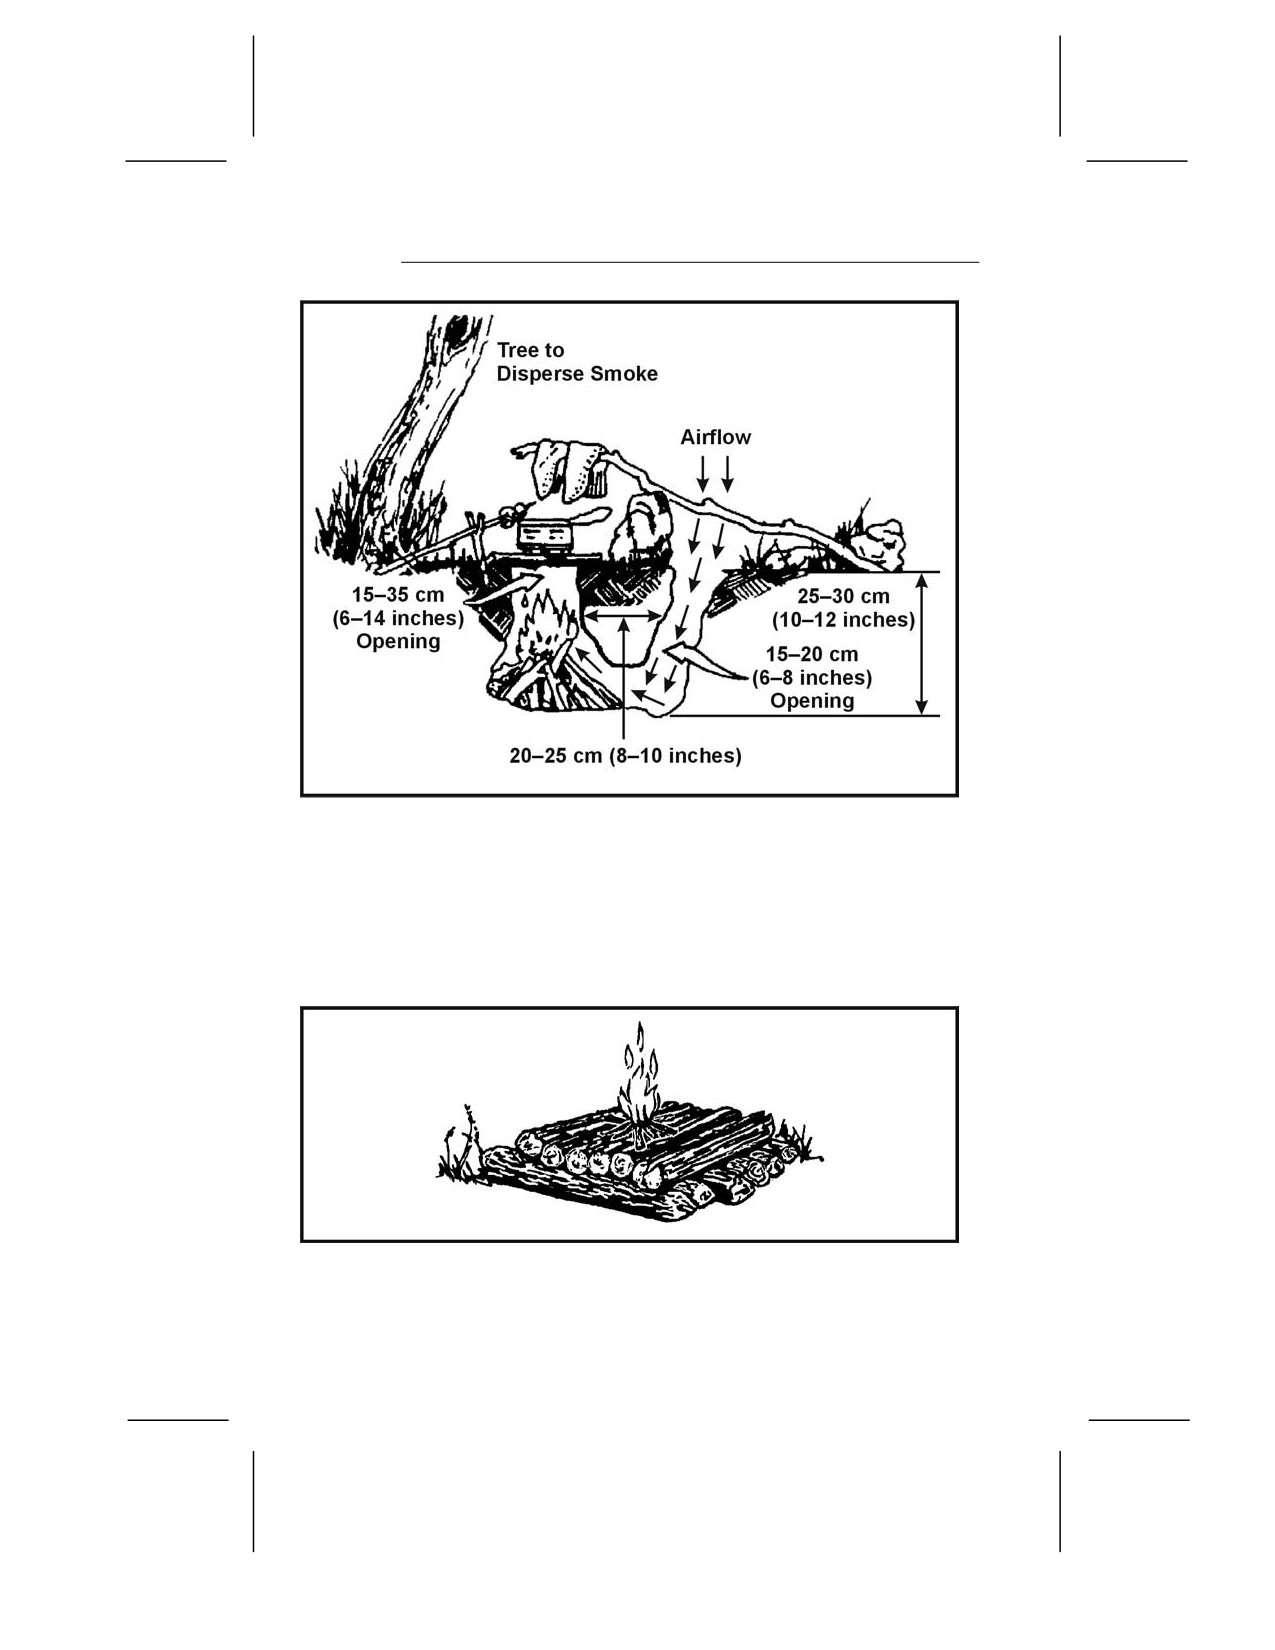
Figure 7-2. Dakota Fire Hole
7-8. If you are in a snow-covered area, use green logs to make a
dry base for your fire (Figure 7-3). Trees with wrist-sized trunks
are easily broken in extreme cold. Cut or break several green logs
and lay them side by side on top of the snow. Add one or two more
layers. Lay the top layer of logs opposite those below it.
Figure 7-3. Base for Fire in Snow-covered Area
7-4
FIRE MATERIAL SELECTION
7-9. You need three types of materials (Figure 7-4, pages 7-5 and
7-6) to build a fire.
7-10. Tinder is dry material that ignites with little heat—a spark
starts a fire. The tinder must be absolutely dry to be sure just a
spark will ignite it. If you have a device that generates only
sparks, charred cloth will be almost essential. It holds a spark for
long periods, allowing you to put tinder on the hot area to
generate a small flame. You can make charred cloth by heating
cotton cloth until it turns black, but does not burn. Once it is
black, you must keep it in an airtight container to keep it dry.
Prepare this cloth well in advance of any survival situation. Add
it to your individual survival kit. Other impromptu items could be
alcohol pads or petroleum jelly gauze.
7-11. Kindling is readily combustible material that you add to the
burning tinder. Again, this material should be absolutely dry to
ensure rapid burning. Kindling increases the fire’s temperature
so that it will ignite less combustible material.
7-12. Fuel is less combustible material that burns slowly and
steadily once ignited.
Tinder
Kindling
Fuel
• Birch bark.
• Small twigs.
• Dry, standing
• Shredded inner bark from
• Small strips of wood.
wood and dry,
cedar, chestnut, red elm
dead branches.
• Lighter knot from pine tree
trees.
stumps with a heavy
• Dry inside (heart)
• Fine wood shavings.
concentration of resin.
of fallen tree
• Dead grass, ferns, moss,
• Heavy cardboard.
trunks and large
fungi.
branches.
• Pieces of wood removed from
• Straw.
the inside of larger pieces.
• Green wood that
• Sawdust.
• Wood that has been doused
is finely split.
• Very fine pitchwood
with highly flammable
• Dry grasses
scrapings.
materials, such as gasoline,
twisted into
oil, or wax.
bunches.
• Dead evergreen needles.
Figure 7-4. Materials for Building Fires
7-5
Tinder
Kindling
Fuel
• Punk (the completely
• Peat dry enough
rotted portions of dead
to burn (this may
logs or trees).
be found at the
• Evergreen tree knots.
top of undercut
banks).
• Bird down (fine feathers).
• Down seed heads
• Dried animal
(milkweed, dry cattails,
dung.
bulrush, or thistle).
• Animal fats.
• Fine, dried vegetable
• Coal, oil shale, or
fibers.
oil lying on the
• Spongy threads of dead
surface.
puffball.
• Dead palm leaves.
• Skinlike membrane lining
bamboo.
• Lint from pockets and
seams.
• Charred cloth.
• Waxed paper.
• Other bamboo shavings.
• Gunpowder.
• Cotton.
Figure 7-4. Materials for Building Fires (Continued)
HOW TO BUILD A FIRE
7-13. There are several methods for laying a fire and each one
has advantages. The situation you are in will determine which of
the following fires to use.
TEPEE
7-14. To make a tepee fire (Figure 7-5, page 7-7), arrange the
tinder and a few sticks of kindling in the shape of a tepee or cone.
Light the center. As the tepee burns, the outside logs will fall
inward, feeding the fire. This type of fire burns well even with
wet wood.
7-6
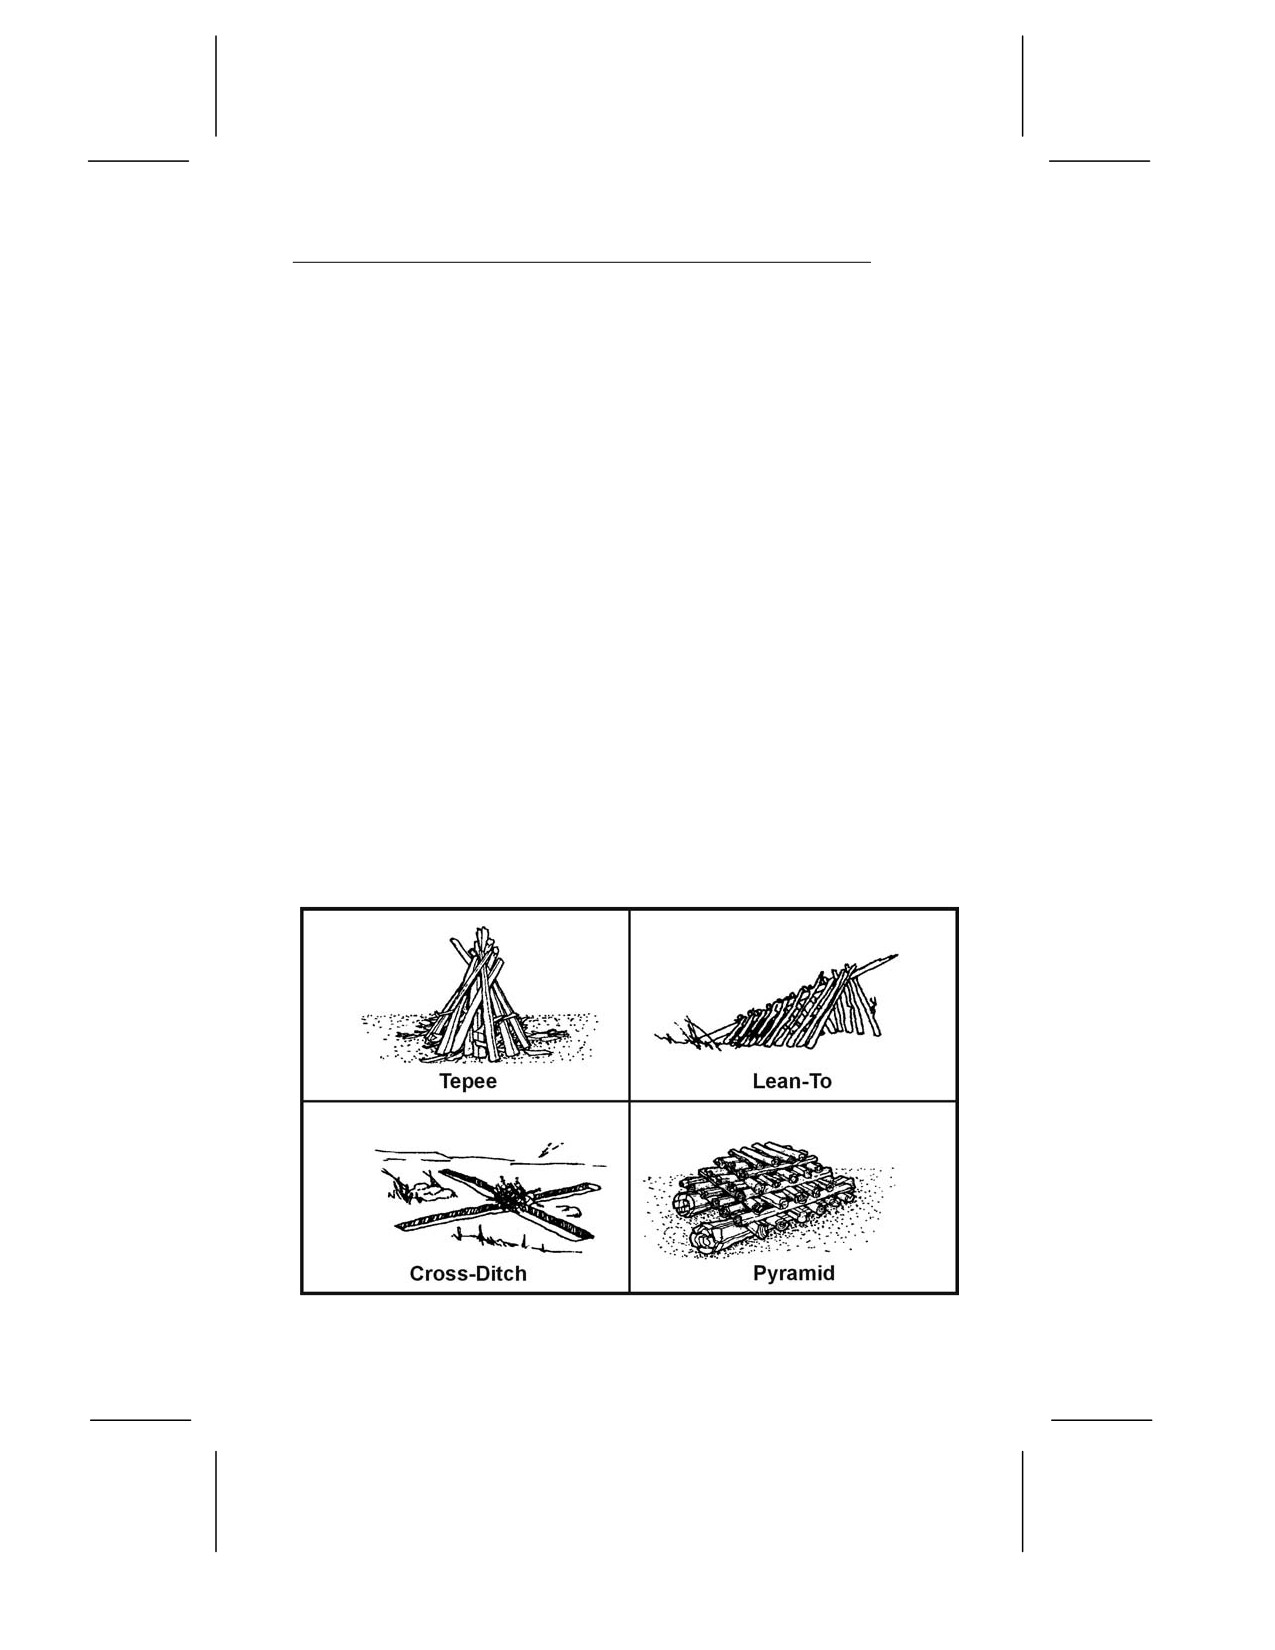
LEAN-TO
7-15. To lay a lean-to fire (Figure 7-5), push a green stick into the
ground at a 30-degree angle. Point the end of the stick in the direction
of the wind. Place some tinder deep under this lean-to stick. Lean
pieces of kindling against the lean-to stick. Light the tinder. As the
kindling catches fire from the tinder, add more kindling.
CROSS-DITCH
7-16. To use the cross-ditch method (Figure 7-5), scratch a cross
about 30 centimeters (12 inches) in size in the ground. Dig the
cross 7.5 centimeters (about 3 inches) deep. Put a large wad of
tinder in the middle of the cross. Build a kindling pyramid above
the tinder. The shallow ditch allows air to sweep under the tinder
to provide a draft.
PYRAMID
7-17. To lay the pyramid fire (Figure 7-5), place two small logs or
branches parallel on the ground. Place a solid layer of small logs
across the parallel logs. Add three or four more layers of logs,
each layer smaller than and at a right angle to the layer below it.
Make a starter fire on top of the pyramid. As the starter fire
burns, it will ignite the logs below it. This gives you a fire that
burns downward, requiring no attention during the night.
Figure 7-5. Methods for Laying Fires
7-7
7-18. There are several other ways to lay a fire that are quite
effective. Your situation and the material available in the area
may make another method more suitable.
HOW TO LIGHT A FIRE
7-19. Always light your fire from the upwind side. Make sure you
lay the tinder, kindling, and fuel so that your fire will burn as
long as you need it. Igniters provide the initial heat required to
start the tinder burning. They fall into two categories: modern
methods and primitive methods.
MODERN METHODS
7-20. Modern igniters use modern devices. These are items that
we normally think of to start a fire.
Matches
7-21. Make sure these matches are waterproof. Also, store them
in a waterproof container along with a dependable striker pad.
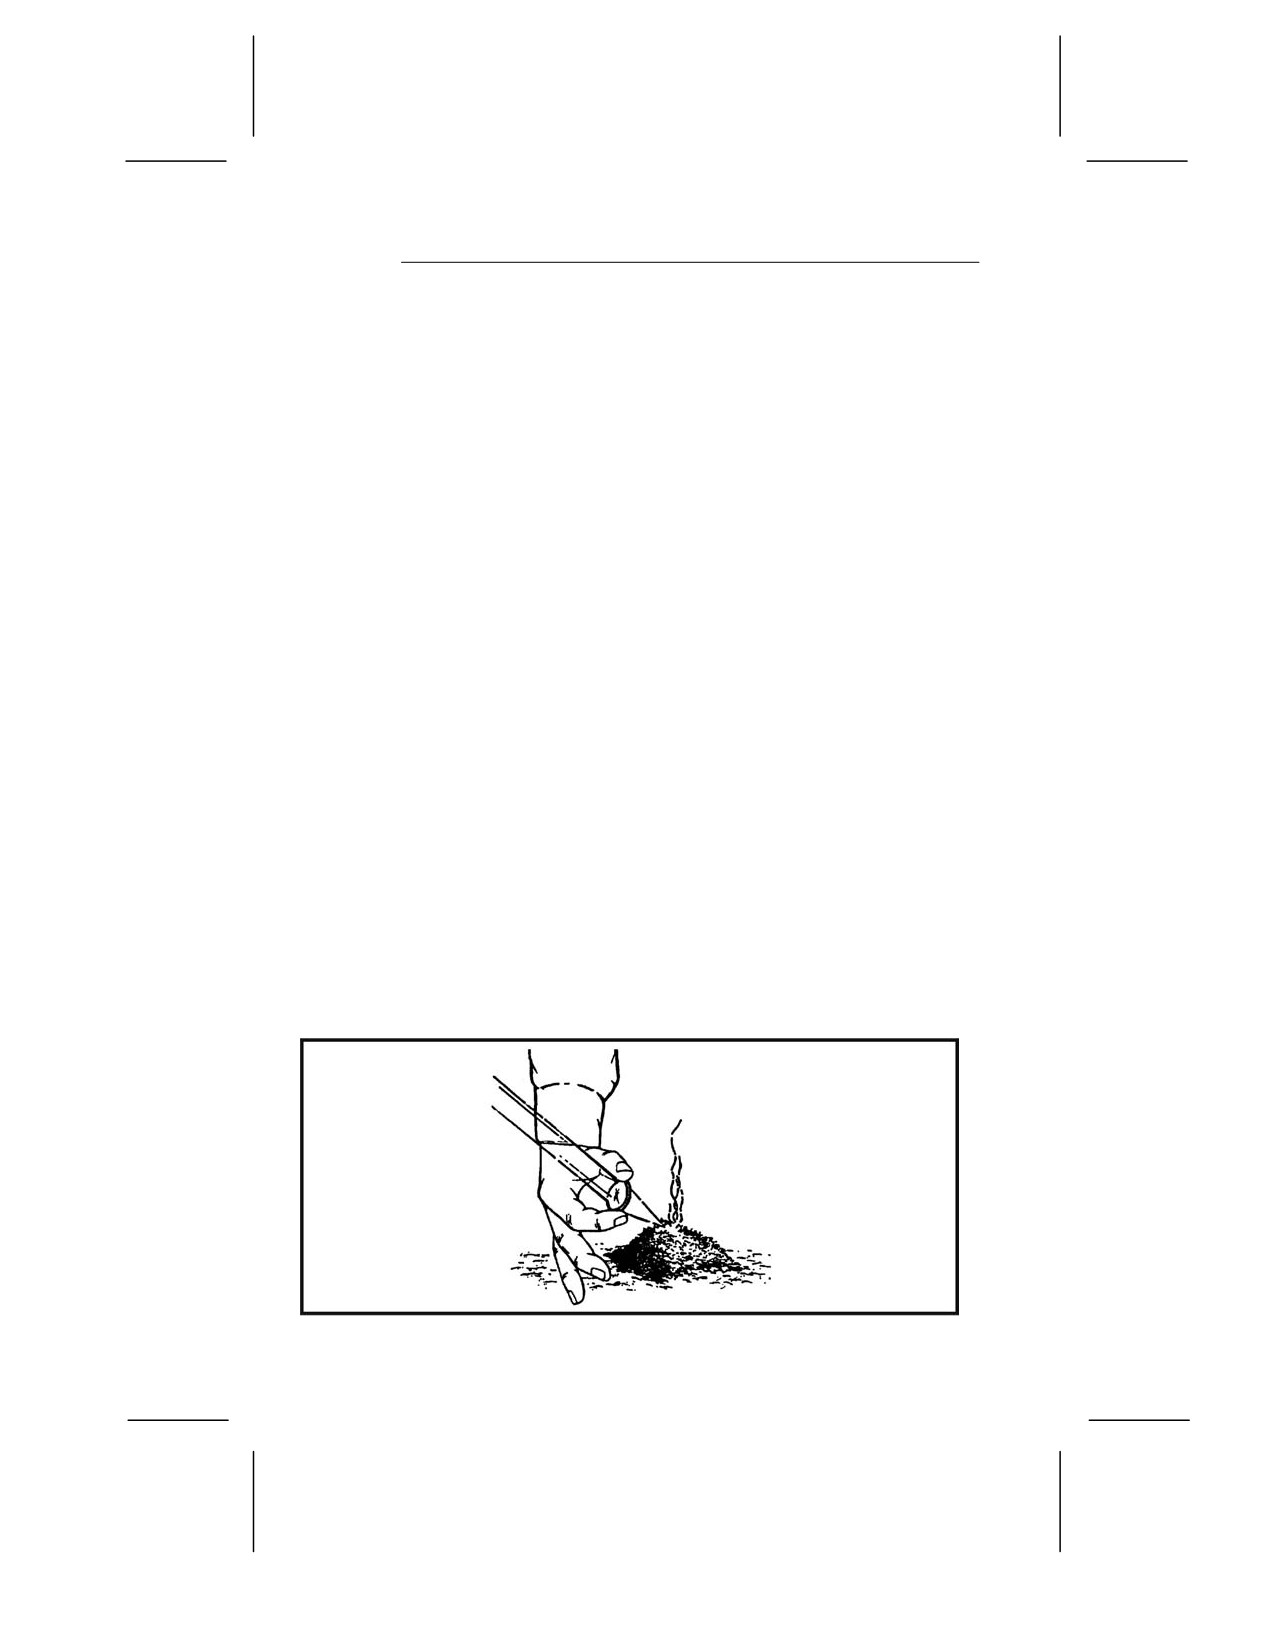
Convex Lens
7-22. Use this method (Figure 7-6) only on bright, sunny days.
The lens can come from binoculars, a camera, telescopic sights, or
magnifying glasses. Angle the lens to concentrate the sun’s rays
on the tinder. Hold the lens over the same spot until the tinder
begins to smolder. Gently blow or fan the tinder into a flame and
apply it to the fire lay.
Figure 7-6. Lens Method
7-8
Metal Match
7-23. Place a flat, dry leaf under your tinder with a portion
exposed. Place the tip of the metal match on the dry leaf, holding
the metal match in one hand and a knife in the other. Scrape your
knife against the metal match to produce sparks. The sparks will
hit the tinder. When the tinder starts to smolder, proceed as
above.
Battery
7-24. Use a battery to generate a spark. Use of this method
depends on the type of battery available. Attach a wire to each
terminal. Touch the ends of the bare wires together next to the
tinder so the sparks will ignite it.
Gunpowder
7-25. Often, you will have ammunition with your equipment. If
so, carefully extract the bullet from the shell casing by moving the
bullet back and forth. Use the gunpowder as tinder. Discard the
casing and primers. A spark will ignite the powder.
NOTE: Be extremely careful during this operation as the primers
are still sensitive and even a small pile of gunpowder can give
surprising results.
PRIMITIVE METHODS
7-26. Primitive igniters are those attributed to our early
ancestors. They can be time-consuming, which requires you to be
patient and persistent.
Flint and Steel
7-27. The direct spark method is the easiest of the primitive
methods to use. The flint and steel method is the most reliable of
the direct spark methods. Strike a flint or other hard, sharp-
edged rock with a piece of carbon steel (stainless steel will not
produce a good spark). This method requires a loose-jointed wrist
and practice. When the tinder catches a spark, blow on it. The
spark will spread and burst into flames.
7-9
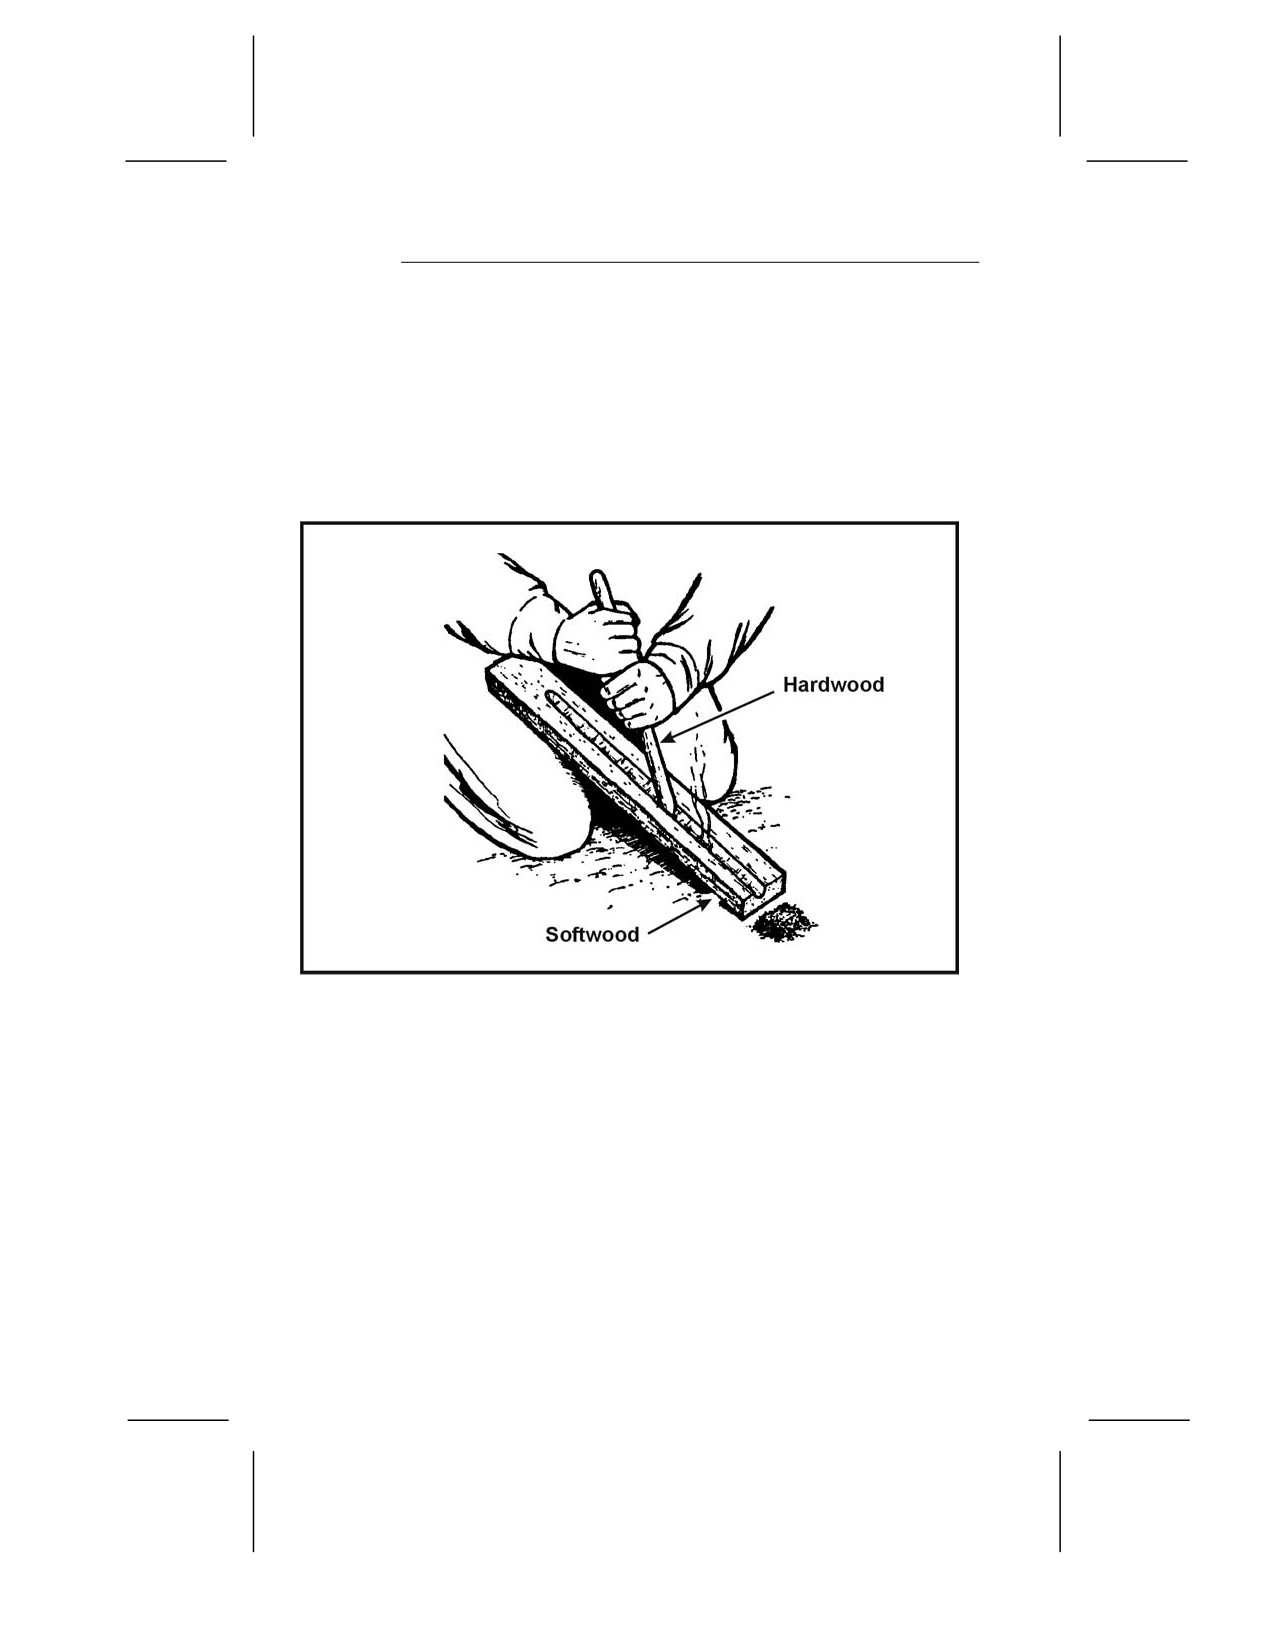
Fire-Plow
7-28. The fire-plow (Figure 7-7) is a friction method of ignition. To
use this method, cut a straight groove in a softwood base and
plow the blunt tip of a hardwood shaft up and down the groove.
The plowing action of the shaft pushes out small particles of wood
fibers. Then, as you apply more pressure on each stroke, the
friction ignites the wood particles.
Figure 7-7. Fire-Plow
Bow and Drill
7-29. The technique of starting a fire with a bow and drill (Figure
7-8, page 7-11) is simple, but you must exert much effort and be
persistent to produce a fire. You need the following items to use
this method:
• Socket. The socket is an easily grasped stone or piece of
hardwood with a slight depression in one side. Use it to
hold the drill in place and to apply downward pressure.
• Drill. The drill should be a straight, seasoned hardwood
stick about 2 centimeters (3/4 inch) in diameter and 25
centimeters (10 inches) long. The top end is round and the
low end blunt (to produce more friction).
7-10
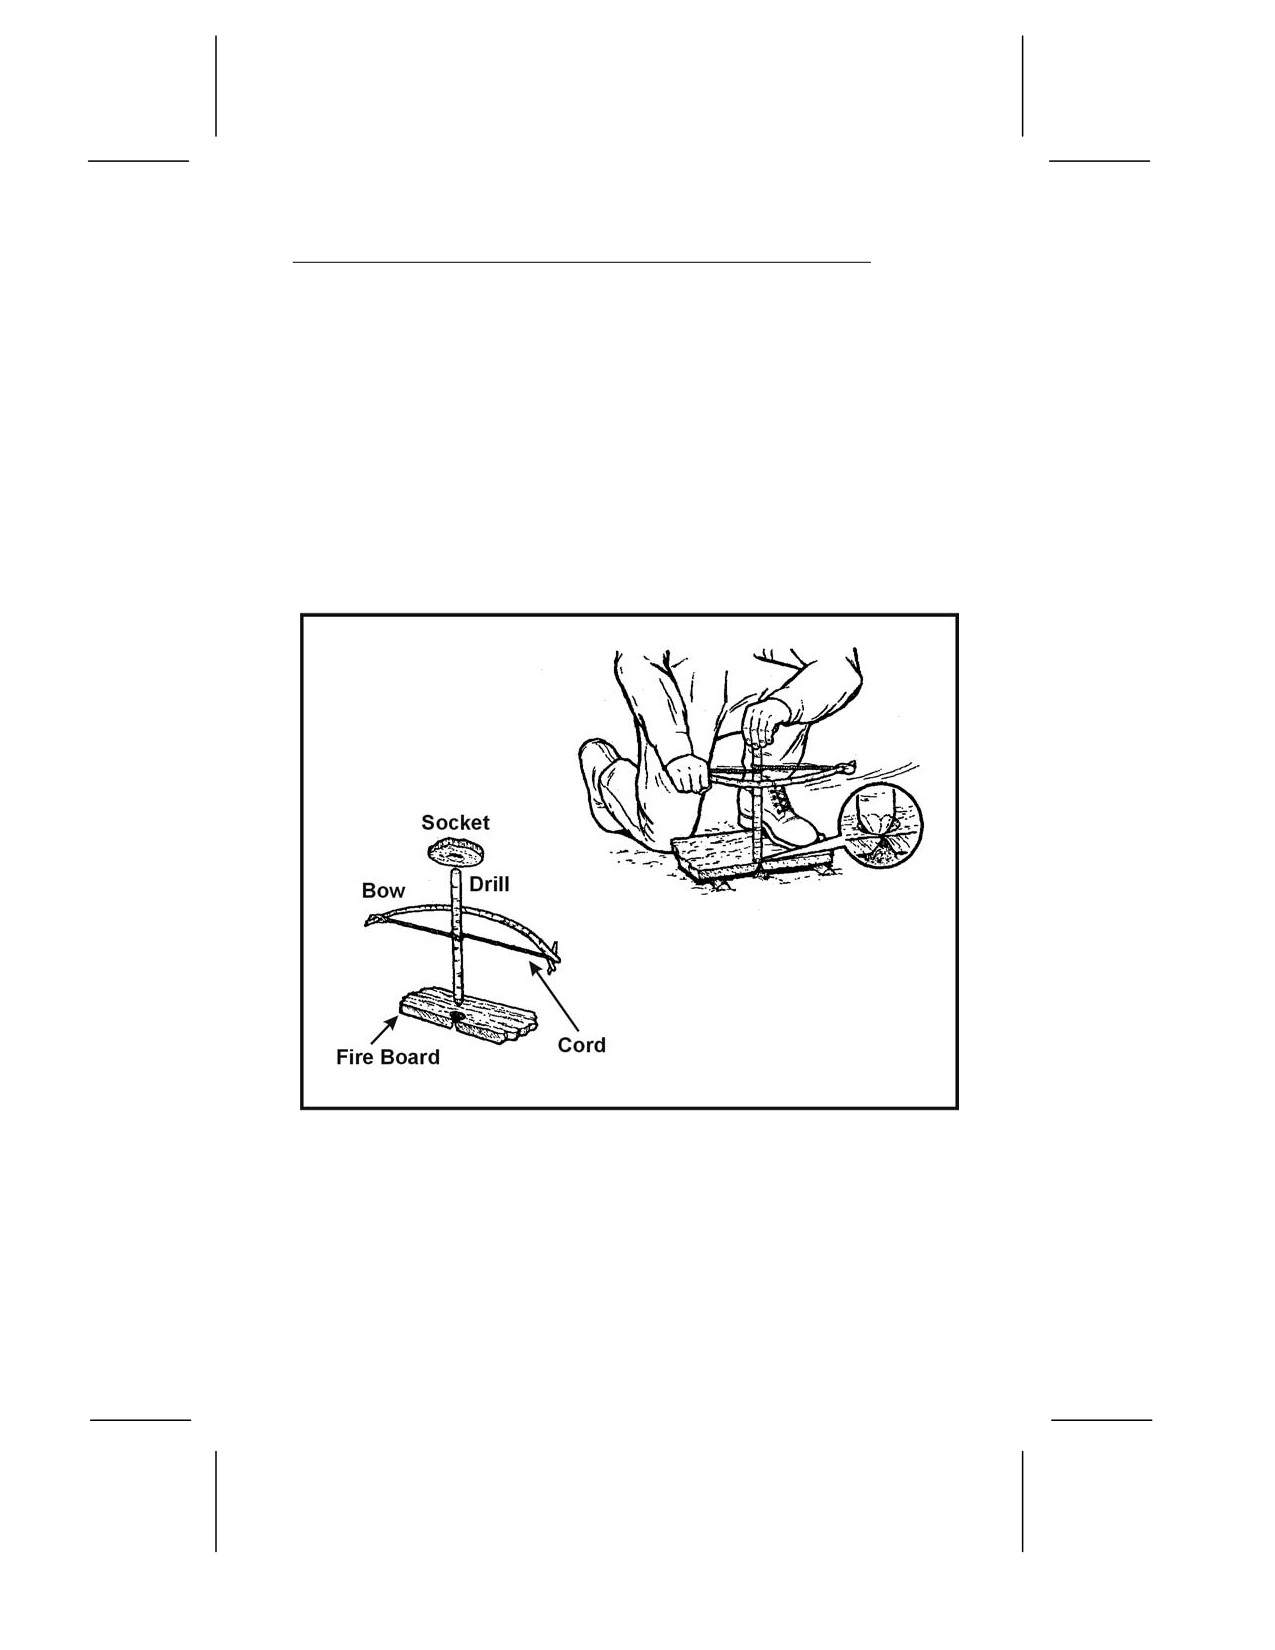
• Fire board. Although any board may be used, a seasoned
softwood board about 2.5 centimeters (1 inch) thick and 10
centimeters (4 inches) wide is preferable. Cut a depression
about 2 centimeters (3/4 inch) from the edge on one side of
the board. On the underside, make a V-shaped cut from
the edge of the board to the depression.
• Bow. The bow is a resilient, green stick about
2.5
centimeters (3/4 inch) in diameter with a bowstring. The
type of wood is not important. The bowstring can be any
type of cordage. Tie the bowstring from one end of the bow
to the other, without any slack.
Figure 7-8. Bow and Drill
7-30. To use the bow and drill, first prepare the fire lay. Then
place a bundle of tinder under the V-shaped cut in the fire board.
Place one foot on the fire board. Loop the bowstring over the drill
and place the drill in the precut depression on the fire board.
Place the socket, held in one hand, on the top of the drill to hold it
in position. Press down on the drill and saw the bow back and
forth to twirl the drill (Figure 7-8). Once you have established a
7-11
smooth motion, apply more downward pressure and work the bow
faster. This action will grind hot black powder into the tinder,
causing a spark to catch. Blow on the tinder until it ignites.
7-31. Primitive fire-building methods are exhausting and require
practice to ensure success. If your survival situation requires the
use of primitive methods, remember the following hints to help
you construct and maintain the fire:
• If possible, use nonaromatic seasoned hardwood for fuel.
• Collect kindling and tinder along the trail.
• Add insect repellent to the tinder.
• Keep the firewood dry.
• Dry damp firewood near the fire.
• Bank the fire to keep the coals alive overnight.
• Carry lighted punk, when possible.
• Be sure the fire is out before leaving camp.
• Do not select wood lying on the ground. It may appear to
be dry but generally doesn’t provide enough friction.
7-12
Chapter 8
Food Procurement
One of man’s most urgent requirements is food.
In contemplating virtually any hypothetical
survival situation, the mind immediately turns
to thoughts of food. Unless the situation occurs in
an arid environment, even water, which is more
important to maintaining body functions, will
usually follow food in our initial thoughts. The
survivor must remember that the three
essentials of survival—water, food, and shelter—
are prioritized according to the estimate of the
actual situation. This estimate must not only be
timely but accurate as well. We can live for
weeks without food but it may take days or
weeks to determine what is safe to eat and to
trap animals in the area. Therefore, you need to
begin food gathering in the earliest stages of
survival as your endurance will decrease daily.
Some situations may well dictate that shelter
precede both food and water.
ANIMALS FOR FOOD
8-1. Unless you have the chance to take large game, concentrate
your efforts on the smaller animals. They are more abundant and
easier to prepare. You need not know all the animal species that
are suitable as food; relatively few are poisonous, and they make
a smaller list to remember. However, it is important to learn the
habits and behavioral patterns of classes of animals. For example,
animals that are excellent choices for trapping, those that inhabit
a particular range and occupy a den or nest, those that have
somewhat fixed feeding areas, and those that have trails leading
from one area to another. Larger, herding animals, such as elk or
caribou, roam vast areas and are somewhat more difficult to trap.
Also, you must understand the food choices of a particular species
to select the proper bait.
8-1
8-2. You can, with relatively few exceptions, eat anything that
crawls, swims, walks, or flies. You must first overcome your
natural aversion to a particular food source. Historically, people
in starvation situations have resorted to eating everything
imaginable for nourishment. A person who ignores an otherwise
healthy food source due to a personal bias, or because he feels it is
unappetizing, is risking his own survival. Although it may prove
difficult at first, you must eat what is available to maintain your
health. Some classes of animals and insects may be eaten raw if
necessary, but you should, if possible, thoroughly cook all food
sources whenever possible to avoid illness.
INSECTS
8-3. The most abundant and easily caught life-form on earth are
insects. Many insects provide 65 to 80 percent protein compared
to 20 percent for beef. This fact makes insects an important, if not
overly appetizing, food source. Insects to avoid include all adults
that sting or bite, hairy or brightly colored insects, and
caterpillars and insects that have a pungent odor. Also avoid
spiders and common disease carriers such as ticks, flies, and
mosquitoes.
8-4. Rotting logs lying on the ground are excellent places to look
for a variety of insects including ants, termites, beetles, and
grubs, which are beetle larvae. Do not overlook insect nests on or
in the ground. Grassy areas, such as fields, are good areas to
search because the insects are easily seen. Stones, boards, or
other materials lying on the ground provide the insects with good
nesting sites. Check these sites. Insect larvae are also edible.
Insects that have a hard outer shell such as beetles and
grasshoppers will have parasites. Cook them before eating.
Remove any wings and barbed legs also. You can eat most soft-
shelled insects raw. The taste varies from one species to another.
Wood grubs are bland, but some species of ants store honey in
their bodies, giving them a sweet taste. You can grind a collection
of insects into a paste. You can mix them with edible vegetation.
You can cook them to improve their taste.
WORMS
8-5. Worms (Annelidea) are an excellent protein source. Dig for
them in damp humus soil and in the rootball of grass clumps, or
watch for them on the ground after a rain. After capturing them,
8-2
drop them into clean, potable water for about 15 minutes. The
worms will naturally purge or wash themselves out, after which
you can eat them raw.
CRUSTACEANS
8-6. Freshwater shrimp range in size from 0.25 centimeter (1/16
inch) up to 2.5 centimeters (1 inch). They can form rather large
colonies in mats of floating algae or in mud bottoms of ponds and
lakes.
8-7. Crayfish are akin to marine lobsters and crabs. You can
distinguish them by their hard exoskeleton and five pairs of legs,
the front pair having oversized pincers. Crayfish are active at
night, but you can locate them in the daytime by looking under
and around stones in streams. You can also find them by looking
in the soft mud near the chimney-like breathing holes of their
nests. You can catch crayfish by tying bits of offal or internal
organs to a string. When the crayfish grabs the bait, pull it to
shore before it has a chance to release the bait.
8-8. You can find saltwater lobsters, crabs, and shrimp from the
surf’s edge out to water 10 meters (33 feet) deep. Shrimp may
come to a light at night where you can scoop them up with a net.
You can catch lobsters and crabs with a baited trap or a baited
hook. Crabs will come to bait placed at the edge of the surf, where
you can trap or net them. Lobsters and crabs are nocturnal and
caught best at night.
NOTE: You must cook all freshwater crustaceans, mollusks, and
fish. Fresh water tends to harbor many dangerous organisms (see
Chapter
6), animal and human contaminants, and possibly
agricultural and industrial pollutants.
MOLLUSKS
8-9. This class includes octopuses and freshwater and saltwater
shellfish such as snails, clams, mussels, bivalves, barnacles,
periwinkles, chitons, and sea urchins (Figure 8-1, page 8-4). You
find bivalves similar to our freshwater mussel and terrestrial and
aquatic snails worldwide under all water conditions.
8-3
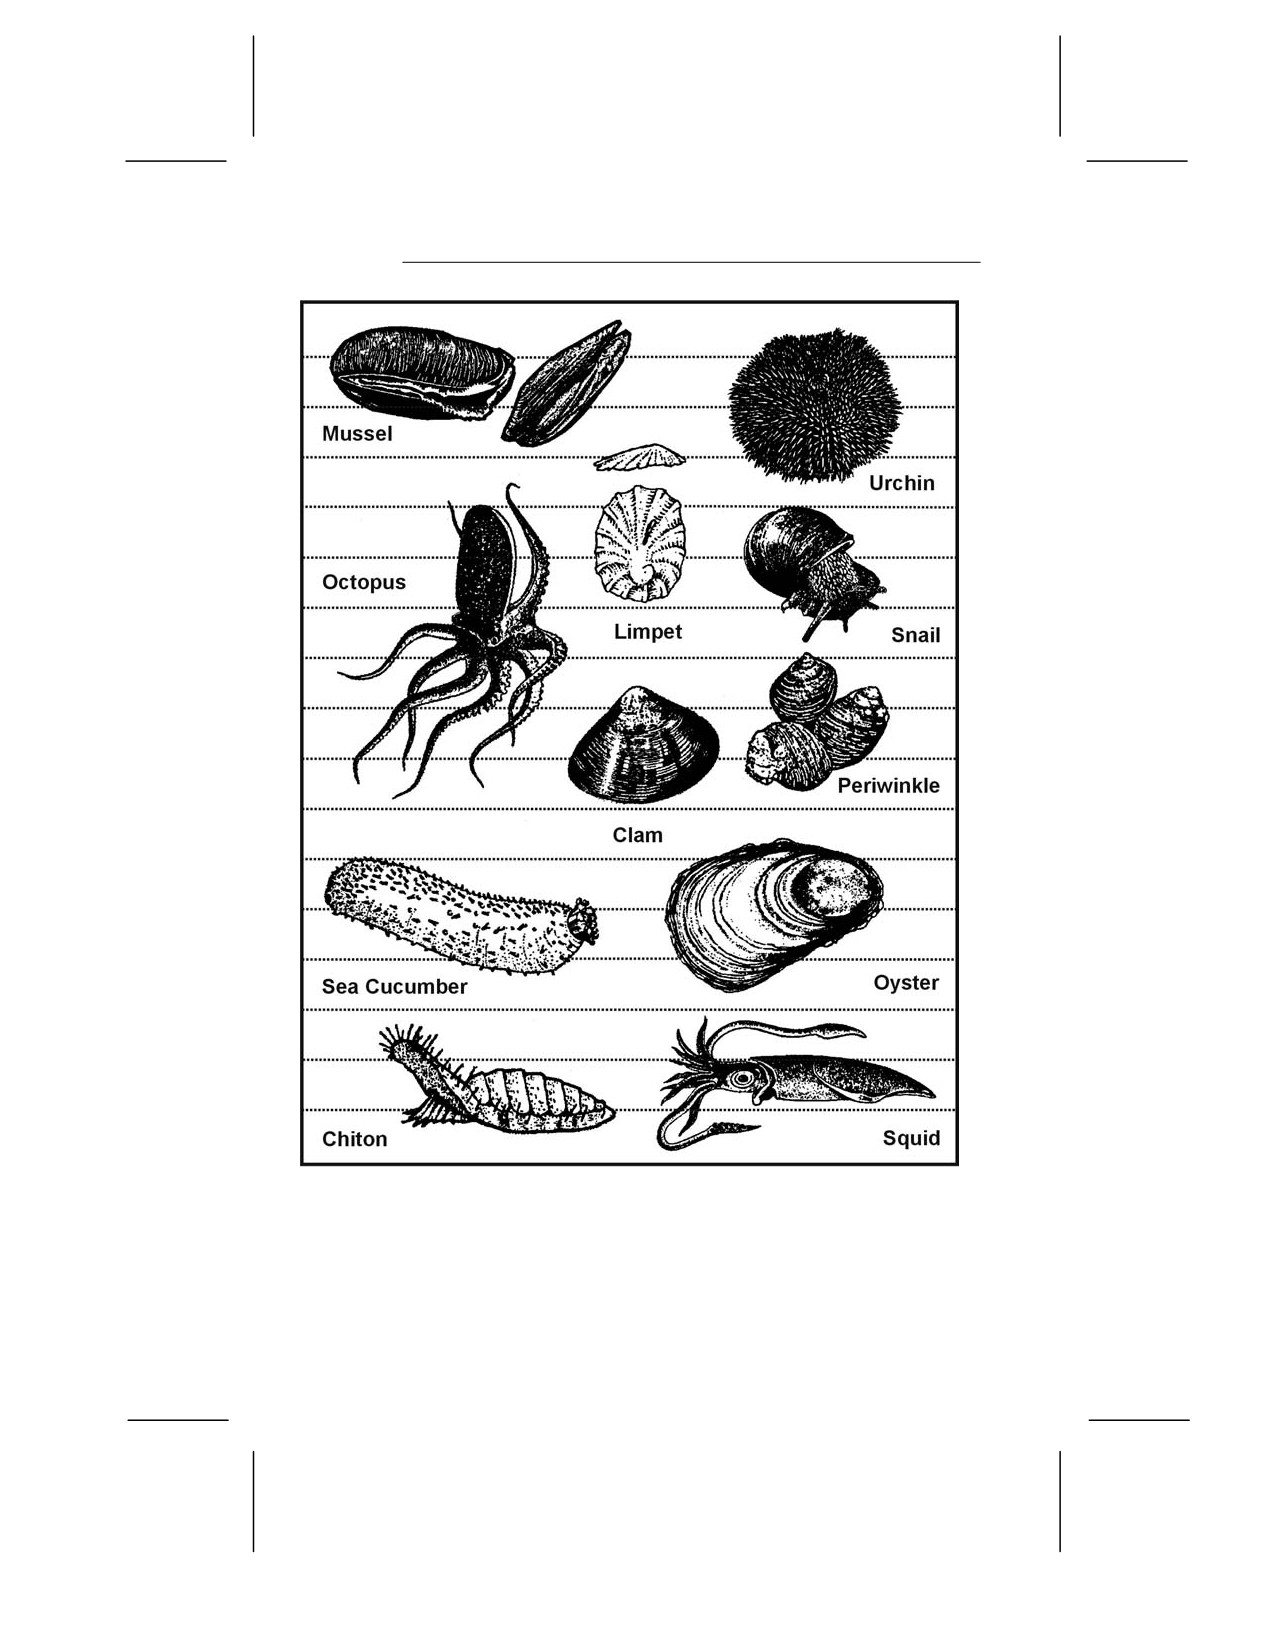
Figure 8-1. Edible Mollusks
8-10. River snails or freshwater periwinkles are plentiful in
rivers, streams, and lakes of northern coniferous forests. These
snails may be pencil point or globular in shape.
8-4