FM 3-05.70 Field Manual Survival (17 May 2002) - page 3
correctly. Then open the boil using a sterile knife, wire, needle, or
similar item. Thoroughly clean out the pus using soap and water.
Cover the boil site, checking it periodically to ensure no further
infection develops.
Fungal Infections
4-100. Keep the skin clean and dry, and expose the infected area
to as much sunlight as possible. Do not scratch the affected
area. During the Southeast Asian conflict, soldiers used
antifungal powders, lye soap, chlorine bleach, alcohol, vinegar,
concentrated salt water, and iodine to treat fungal infections with
varying degrees of success. As with any “unorthodox” method of
treatment, use these with caution.
Rashes
4-101. To treat a skin rash effectively, first determine what is
causing it. This determination may be difficult even in the best of
situations. Observe the following rules to treat rashes:
• If it is moist, keep it dry.
• If it is dry, keep it moist.
• Do not scratch it.
4-102. Use a compress of vinegar or tannic acid derived from tea
or from boiling acorns or the bark of a hardwood tree to dry
weeping rashes. Keep dry rashes moist by rubbing a small
amount of rendered animal fat or grease on the affected area.
4-103. Remember, treat rashes as open wounds; clean and dress
them daily. There are many substances available to survivors in
the wild or in captivity for use as antiseptics to treat wounds.
Follow the recommended guidance below:
• Iodine tablets. Use 5 to 15 tablets in a liter of water to
produce a good rinse for wounds during healing.
• Garlic. Rub it on a wound or boil it to extract the oils and
use the water to rinse the affected area.
• Salt water. Use 2 to 3 tablespoons per liter of water to kill
bacteria.
• Bee honey. Use it straight or dissolved in water.
4-30
CAUTION
Unpasteurized honey has been known to contain
botulinum, which affects young children mostly.
Discontinue treatment if vomiting, double vision, fever, or
muscular paralysis occur.
• Sphagnum moss. Found in boggy areas worldwide, it is a
natural source of iodine. Use as a dressing.
• Sugar. Place directly on wound and remove thoroughly
when it turns into a glazed and runny substance. Then
reapply.
• Syrup. In extreme circumstances, some of the same
benefits of honey and sugar can be realized with any high-
sugar-content item.
NOTE: Again, use noncommercially prepared materials with
caution.
BURNS
4-104. The following field treatment for burns relieves the pain
somewhat, seems to help speed healing, and offers some
protection against infection:
• First, stop the burning process. Put out the fire by removing
clothing, dousing with water or sand, or by rolling on the
ground. Cool the burning skin with ice or water. For burns
caused by white phosphorous, pick out the white
phosphorous with tweezers; do not douse with water.
• Soak dressings or clean rags for 10 minutes in a boiling
tannic acid solution
(obtained from tea, inner bark of
hardwood trees, or acorns boiled in water).
• Cool the dressings or clean rags and apply over burns.
Sugar and honey also work for burns with honey being
especially effective at promoting new skin growth and
stopping infections. Use both as you would in an open
wound above.
• Treat as an open wound.
• Replace fluid loss. Fluid replacement can be achieved through
oral (preferred) and intravenous routes (when resources are
4-31
available). One alternate method through which rehydration
can be achieved is through the rectal route. Fluids do not
need to be sterile, only purified. A person can effectively
absorb approximately 1 to 1.5 liters per hour by using a tube
to deliver fluids into the rectal vault.
• Maintain airway.
• Treat for shock.
• Consider using morphine, unless the burns are near the
face.
ENVIRONMENTAL INJURIES
4-105. Heatstroke, hypothermia, diarrhea, and intestinal parasites
are environmental injuries you could face in a survival situation.
Read and follow the guidance provided below.
HEATSTROKE
4-106. The breakdown of the body’s heat regulatory system (body
temperature more than 40.5 degrees C [105 degrees F]) causes a
heatstroke. Other heat injuries, such as cramps or dehydration,
do not always precede a heatstroke. Signs and symptoms of
heatstroke are—
• Swollen, beet-red face.
• Reddened whites of eyes.
• Victim not sweating.
• Unconsciousness or delirium, which can cause pallor, a
bluish color to lips and nail beds (cyanosis), and cool skin.
NOTE: By this time, the victim is in severe shock. Cool the victim
as rapidly as possible. Cool him by dipping him in a cool stream.
If one is not available, douse the victim with urine, water, or at
the very least, apply cool wet compresses to all the joints,
especially the neck, armpits, and crotch. Be sure to wet the
victim’s head. Heat loss through the scalp is great. Administer
IVs and provide drinking fluids. You may fan the individual.
4-107. You can expect the following symptoms during cooling:
• Vomiting.
• Diarrhea.
4-32
• Struggling.
• Shivering.
• Shouting.
• Prolonged unconsciousness.
• Rebound heatstroke within 48 hours.
• Cardiac arrest; be ready to perform CPR.
NOTE: Treat for dehydration with lightly salted water.
CHILBLAINS
4-108. Frostnip begins as firm, cold and white or gray areas on the
face, ears, and extremities that can blister or peel just like sunburn
as late as 2 to 3 days after the injury. Frostnip, or chilblains as it is
sometimes called, is the result of tissue exposure to freezing
temperatures and is the beginning of frostbite. The water in and
around the cells freezes, rupturing cell walls and thus damaging
the tissue. Warming the affected area with hands or a warm object
treats this injury. Wind chill plays a factor in this injury;
preventative measures include layers of dry clothing and protection
against wetness and wind.
TRENCH FOOT
4-109. Immersion or trench foot results from many hours or days
of exposure to wet or damp conditions at a temperature just above
freezing. The nerves and muscles sustain the main damage, but
gangrene can occur. In extreme cases the flesh dies and it may
become necessary to have the foot or leg amputated. The best
prevention is to keep your feet dry. Carry extra socks with you in
a waterproof packet. Dry wet socks against your body. Wash your
feet daily and put on dry socks.
FROSTBITE
4-110. This injury results from frozen tissues. Frostbite extends
to a depth below the skin. The tissues become solid and
immovable. Your feet, hands, and exposed facial areas are
particularly vulnerable to frostbite.
4-111. When with others, prevent frostbite by using the buddy
system. Check your buddy’s face often and make sure that he
4-33
checks yours. If you are alone, periodically cover your nose and
lower part of your face with your mittens.
4-112. Do not try to thaw the affected areas by placing them close
to an open flame. Frostbitten tissue may be immersed in 37 to 42
degrees C (99 to 109 degrees F) water until thawed. (Water
temperature can be determined with the inside wrist or baby
formula method.) Dry the part and place it next to your skin to
warm it at body temperature.
HYPOTHERMIA
4-113. It is defined as the body’s failure to maintain an inner core
temperature of 36 degrees C (97 degrees F). Exposure to cool or
cold temperature over a short or long time can cause
hypothermia. Dehydration and lack of food and rest predispose
the survivor to hypothermia.
4-114. Immediate treatment is the key. Move the victim to the best
shelter possible away from the wind, rain, and cold. Remove all wet
clothes and get the victim into dry clothing. Replace lost fluids with
warm fluids, and warm him in a sleeping bag using two people (if
possible) providing skin-to-skin contact. If the victim is unable to
drink warm fluids, rectal rehydration may be used.
DIARRHEA
4-115. A common, debilitating ailment caused by changing water
and food, drinking contaminated water, eating spoiled food,
becoming fatigued, and using dirty dishes. You can avoid most of
these causes by practicing preventive medicine. However, if you
get diarrhea and do not have antidiarrheal medicine, one of the
following treatments may be effective:
• Limit your intake of fluids for 24 hours.
• Drink one cup of a strong tea solution every 2 hours until
the diarrhea slows or stops. The tannic acid in the tea
helps to control the diarrhea. Boil the inner bark of a
hardwood tree for 2 hours or more to release the tannic
acid.
• Make a solution of one handful of ground chalk, charcoal,
or dried bones and treated water. If you have some apple
pomace or the rinds of citrus fruit, add an equal portion to
the mixture to make it more effective. Take 2 tablespoons
4-34
of the solution every 2 hours until the diarrhea slows or
stops.
INTESTINAL PARASITES
4-116. You can usually avoid worm infestations and other
intestinal parasites if you take preventive measures. For
example, never go barefoot. The most effective way to prevent
intestinal parasites is to avoid uncooked meat, never eat raw
vegetables contaminated by raw sewage, and try not to use
human waste as a fertilizer. However, should you become infested
and lack proper medicine, you can use home remedies. Keep in
mind that these home remedies work on the principle of changing
the environment of the gastrointestinal tract. The following are
home remedies you could use:
• Salt water. Dissolve 4 tablespoons of salt in 1 liter of water
and drink. Do not repeat this treatment.
• Tobacco. Eat
1 to
1 1/2 cigarettes or approximately
1
teaspoon (pinch) of smokeless tobacco. The nicotine in the
tobacco will kill or stun the worms long enough for your
system to pass them. If the infestation is severe, repeat the
treatment in 24 to 48 hours, but no sooner.
• Kerosene. Drink 2 tablespoons of kerosene, but no more.
If necessary, you can repeat this treatment in 24 to 48
hours. Be careful not to inhale the fumes. They may cause
lung irritation.
NOTE: Tobacco and kerosene treatment techniques are very
dangerous, be careful.
• Hot peppers. Peppers are effective only if they are a steady
part of your diet. You can eat them raw or put them in
soups or rice and meat dishes. They create an environment
that is prohibitive to parasitic attachment.
• Garlic. Chop or crush 4 cloves, mix with 1 glass of liquid,
and drink daily for 3 weeks.
HERBAL MEDICINES
4-117. Our modern wonder drugs, laboratories, and equipment
have obscured more primitive types of medicine involving
determination, common sense, and a few simple treatments.
However, in many areas of the world the people still depend on
4-35
local “witch doctors” or healers to cure their ailments. Many of the
herbs (plants) and treatments they use are as effective as the
most modern medications available. In fact, many modern
medications come from refined herbs.
WARNING
Use herbal medicines with extreme care, and only
when you lack or have limited medical supplies.
Some herbal medicines are dangerous and may
cause further damage or even death. Chapter 9
explains some basic herbal medicine treatments.
4-36
Chapter 5
Shelters
A shelter can protect you from the sun, insects,
wind, rain, snow, hot or cold temperatures, and
enemy observation. It can give you a feeling of well-
being and help you maintain your will to survive.
In some areas, your need for shelter may take
precedence over your need for food and possibly
even your need for water. For example, prolonged
exposure to cold can cause excessive fatigue and
weakness
(exhaustion). An exhausted person
may develop a “passive” outlook, thereby losing
the will to survive.
Seek natural shelters or alter them to meet your
needs, therefore, saving energy. A common error
in making a shelter is to make it too large. A
shelter must be large enough to protect you and
small enough to contain your body heat,
especially in cold climates.
PRIMARY SHELTER—UNIFORM
5-1. Your primary shelter in a survival situation will be your
uniform. This point is true regardless of whether you are in a hot,
cold, tropical, desert, or arctic situation. For your uniform to
protect you, it must be in as good of a condition as possible and be
worn properly. We use the term COLDER which is addressed in
Chapter 15 to remind us of what to do.
SHELTER SITE SELECTION
5-2. When you are in a survival situation and realize that
shelter is a high priority, start looking for shelter as soon as
possible. As you do so, remember what you will need at the site.
Two requisites for shelter are that it must—
• Contain material to make the type of shelter you need.
5-1
• Be large enough and level enough for you to lie down
comfortably.
5-3. You should focus on your tactical situation and your safety
when considering these requisites. You must also consider
whether the site—
• Provides concealment from enemy observation.
• Has camouflaged escape routes.
• Is suitable for signaling, if necessary.
• Provides protection against wild animals and rocks and
dead trees that might fall.
• Is free from insects, reptiles, and poisonous plants.
5-4. You must remember the problems that could arise in your
environment. For instance, avoid—
• Flash flood areas in foothills.
• Avalanche or rockslide areas in mountainous terrain.
• Sites near bodies of water that are below the high-water
mark.
5-5. In some areas, the season of the year has a strong bearing
on the site you select. Ideal sites for a shelter differ in winter and
summer. During cold winter months you will want a site that will
protect you from the cold and wind, but will have a source of fuel
and water. During summer months in the same area you will
want a source of water, but you will also want the site to be
almost insect free.
5-6. When you are considering shelter site selection, remember
the word BLISS and the following guidelines:
• B-Blend in with the surroundings.
• L-Low silhouette.
• I-Irregular shape.
• S-Small.
• S-Secluded location.
5-2
TYPES OF SHELTERS
5-7. When looking for a shelter site, keep in mind the type
of shelter you need. However, you must also consider the
questions below:
• How much time and effort will you need to build the
shelter?
• Will the shelter adequately protect you from the elements
(sun, wind, rain, snow)?
• Do you have the tools to build it? If not, can you make
improvised tools?
• Do you have the type and amount of materials needed to
build it?
5-8. To answer these questions, you need to know how to
make various types of shelters and what materials you need to
make them.
PONCHO LEAN-TO
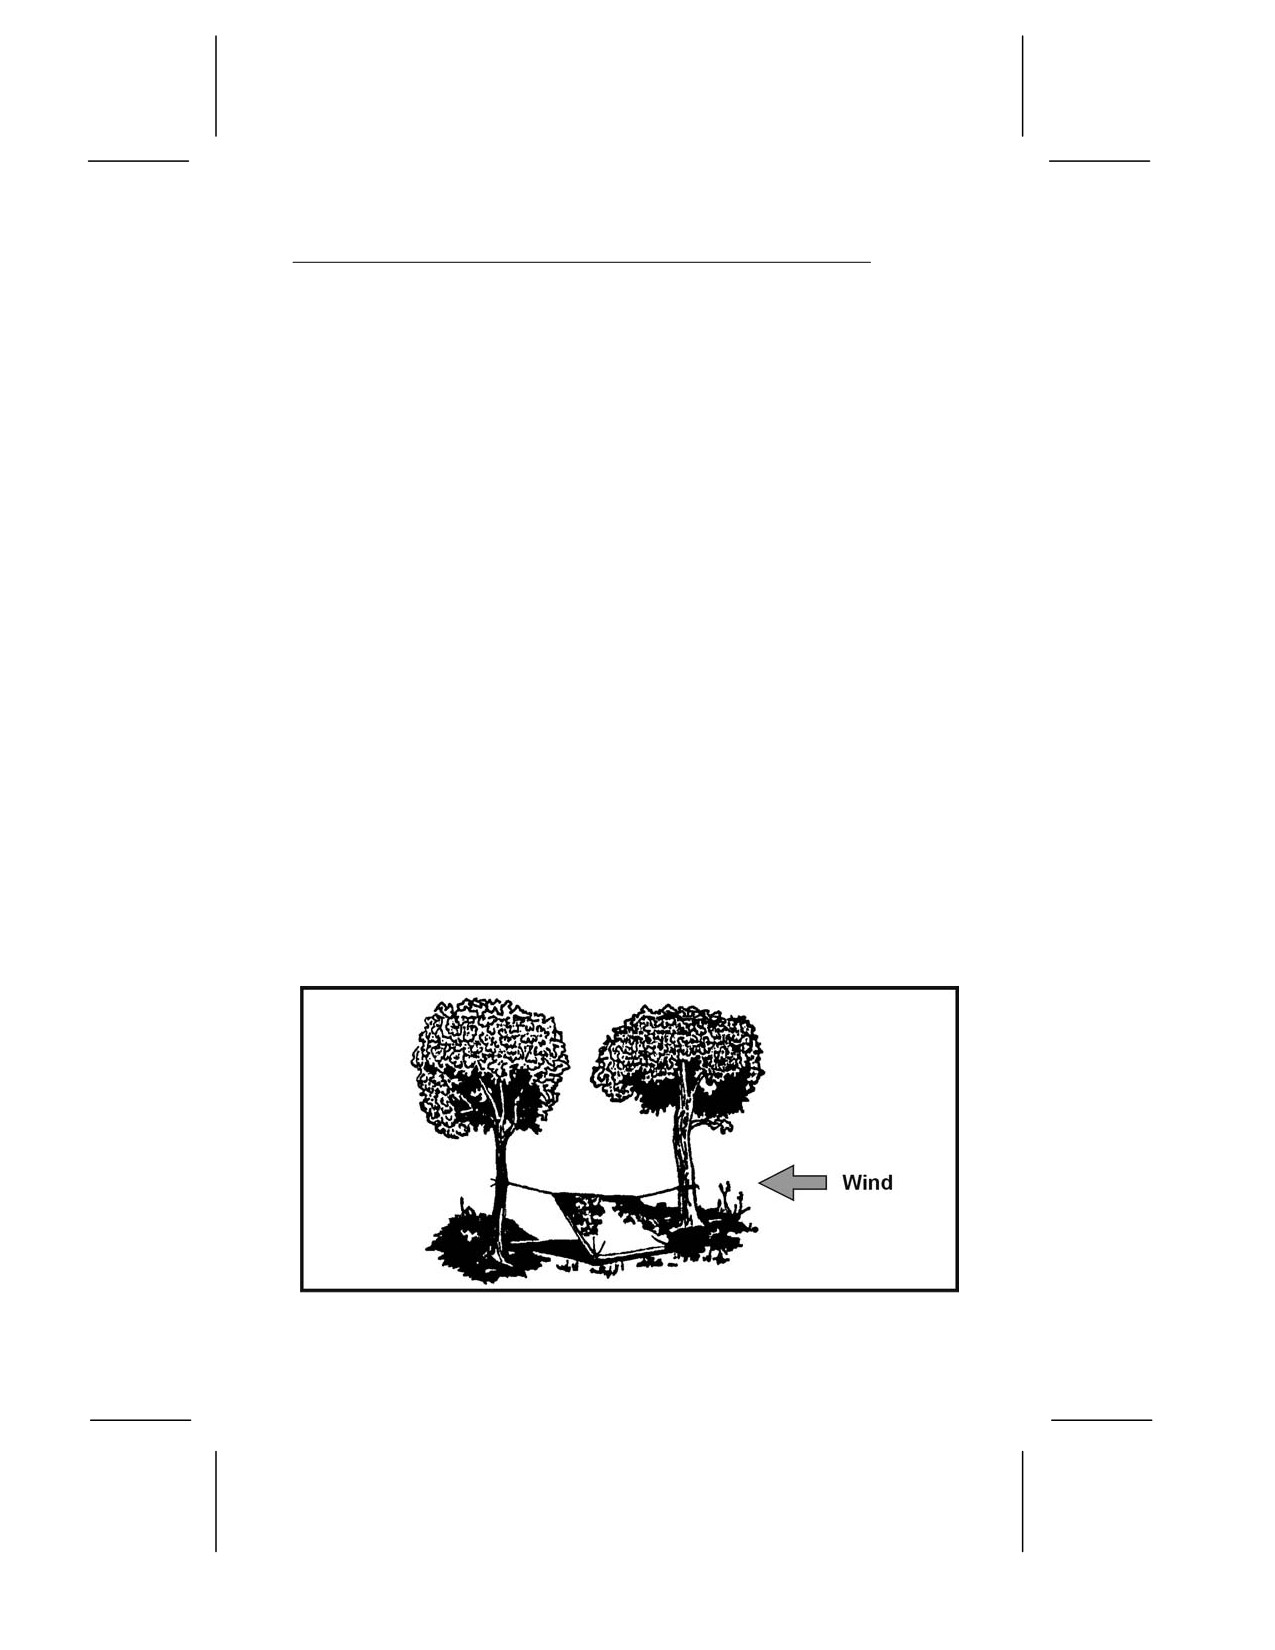
5-9. It takes only a short time and minimal equipment to build
this lean-to (Figure 5-1). You need a poncho, 2 to 3 meters (7 to 10
feet) of rope or parachute suspension line, three stakes about 30
centimeters (1 foot) long, and two trees or two poles 2 to 3 meters
(7 to 10 feet) apart. Before selecting the trees you will use or the
location of your poles, check the wind direction. Ensure that the
back of your lean-to will be into the wind.
Figure 5-1. Poncho Lean-to
5-3
5-10. To make the lean-to, you should—
• Tie off the hood of the poncho. Pull the drawstring tight,
roll the hood longways, fold it into thirds, and tie it off with
the drawstring.
• Cut the rope in half. On one long side of the poncho, tie
half of the rope to the corner grommet. Tie the other half to
the other corner grommet.
• Attach a drip stick (about a 10-centimeter [4-inch] stick) to
each rope about 2.5 centimeters (about 1 inch) from the
grommet. These drip sticks will keep rainwater from
running down the ropes into the lean-to. Tying strings
(about 10 centimeters [4 inches] long) to each grommet
along the poncho’s top edge will allow the water to run to
and down the line without dripping into the shelter.
• Tie the ropes about waist high on the trees. Use a round
turn and two half hitches with a quick-release knot.
• Spread the poncho and anchor it to the ground, putting
sharpened sticks through the grommets and into the
ground.
5-11. If you plan to use the lean-to for more than one night, or
you expect rain, make a center support for the lean-to. Make this
support with a line. Attach one end of the line to the poncho hood
and the other end to an overhanging branch. Make sure there is
no slack in the line.
5-12. Another method is to place a stick upright under the center
of the lean-to. However, this method will restrict your space and
movements in the shelter.
5-13. For additional protection from wind and rain, place some
brush, your rucksack, or other equipment at the sides of the lean-to.
5-14. To reduce heat loss to the ground, place some type of
insulating material, such as leaves or pine needles, inside your
lean-to.
NOTE: When at rest, you lose as much as 80 percent of your body
heat to the ground.
5-15. To increase your security from enemy observation, lower
the lean-to’s silhouette by making two changes. First, secure the
5-4

support lines to the trees at knee height (not at waist height)
using two knee-high sticks in the two center grommets (sides of
lean-to). Second, angle the poncho to the ground, securing it with
sharpened sticks, as above.
PONCHO TENT
5-16. This tent (Figure 5-2) provides a low silhouette. It also
protects you from the elements on two sides. It has, however, less
usable space and observation area than a lean-to, decreasing your
reaction time to enemy detection. To make this tent, you need a
poncho, two 1.5- to 2.5-meter (5- to 8-foot) ropes, six sharpened
sticks about 30 centimeters (1 foot) long, and two trees 2 to 3
meters (7 to 10 feet) apart.
Figure 5-2. Poncho Tent Using Overhanging Branch
5-17. To make the tent, you should—
• Tie off the poncho hood in the same way as the poncho
lean-to.
• Tie a 1.5- to 2.5-meter (5- to 8-foot) rope to the center
grommet on each side of the poncho.
• Tie the other ends of these ropes at about knee height to
two trees 2 to 3 meters (7 to 10 feet) apart and stretch the
poncho tight.
• Draw one side of the poncho tight and secure it to the
ground pushing sharpened sticks through the grommets.
• Follow the same procedure on the other side.
5-5
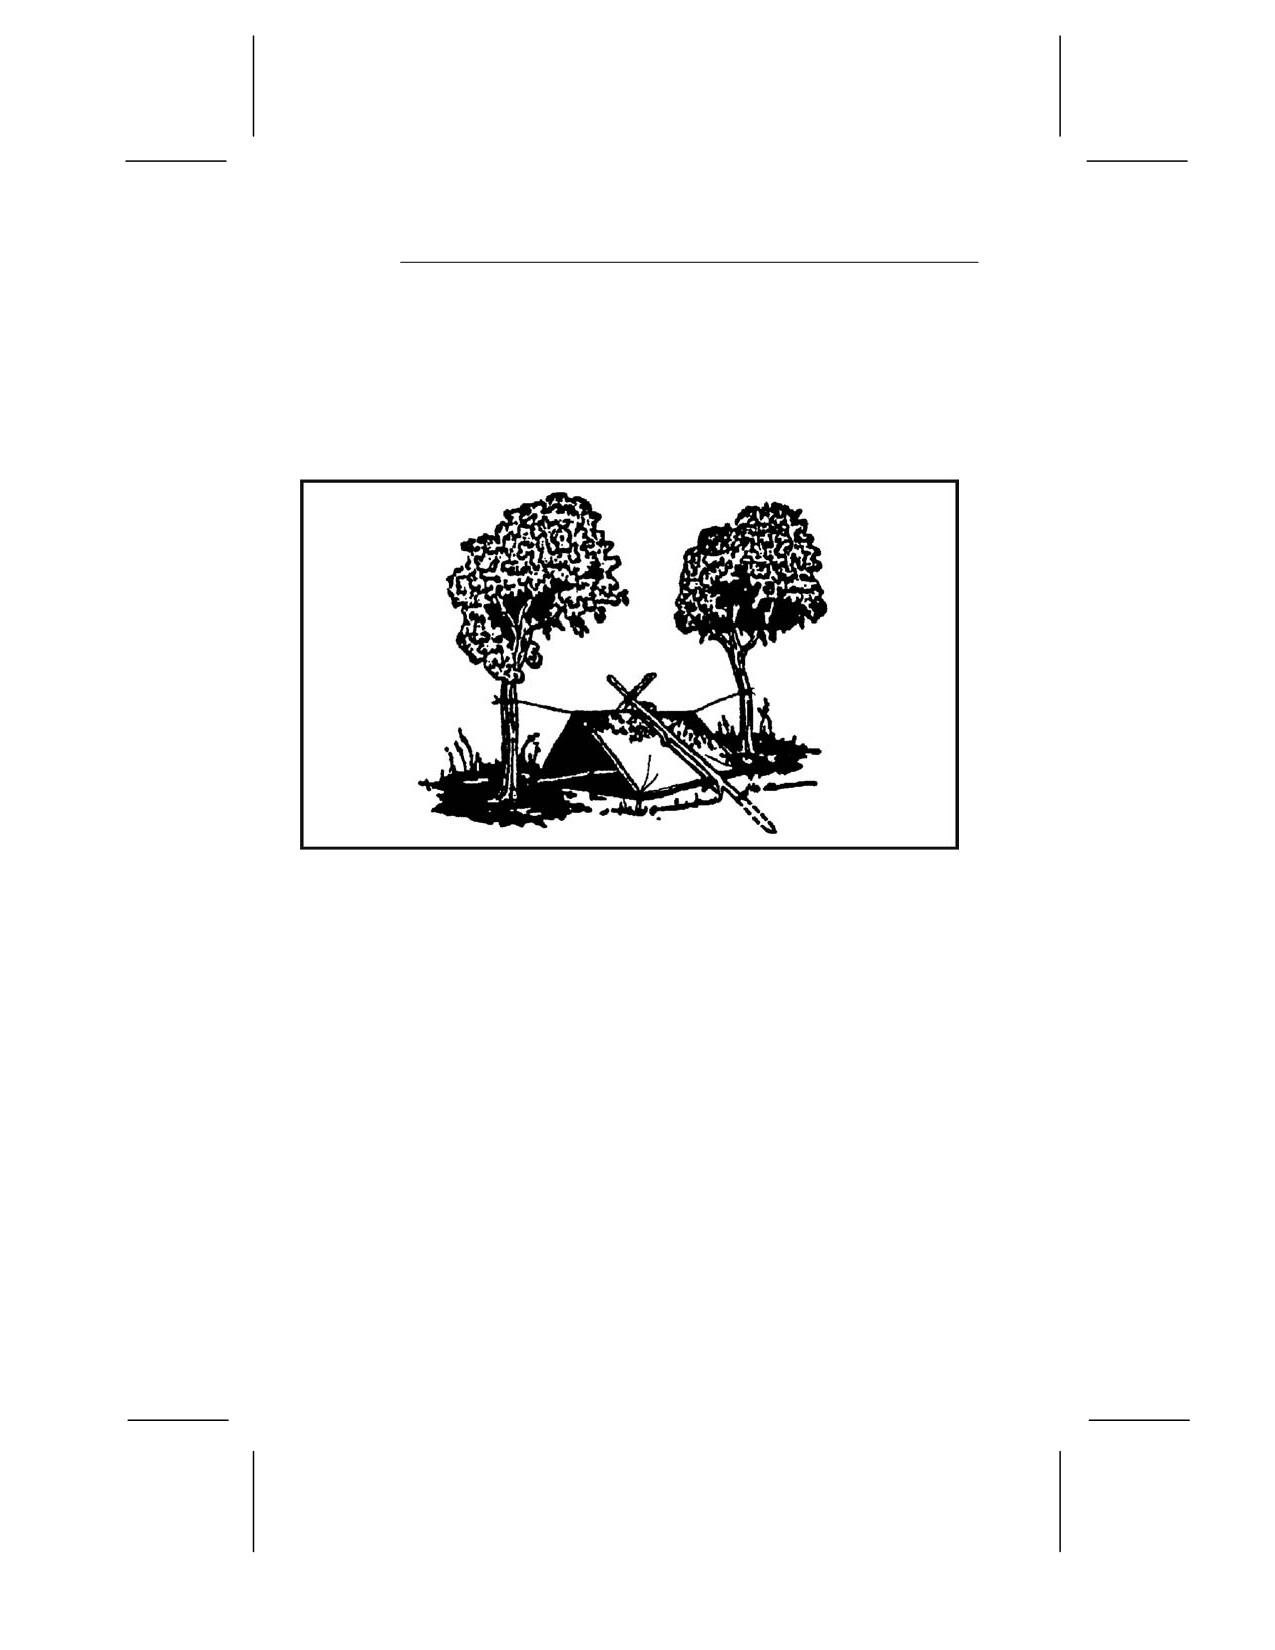
5-18. If you need a center support, use the same methods as for
the poncho lean-to. Another center support is an A-frame set
outside but over the center of the tent (Figure 5-3). Use two 90- to
120-centimeter-long (12- to 16-foot-long) sticks, one with a forked
end, to form the A-frame. Tie the hood’s drawstring to the A-
frame to support the center of the tent.
Figure 5-3. Poncho Tent With A-Frame
THREE-POLE PARACHUTE TEPEE
5-19. If you have a parachute and three poles and the tactical
situation allows, make a parachute tepee. It is easy and takes
very little time to make this tepee. It provides protection from the
elements and can act as a signaling device by enhancing a small
amount of light from a fire or candle. It is large enough to hold
several people and their equipment and to allow sleeping,
cooking, and storing firewood.
5-20. You can make this tepee (Figure 5-4, page 5-7) using parts
of or a whole personnel main or reserve parachute canopy. If
using a standard personnel parachute, you need three poles 3.5 to
4.5 meters (12 to 15 feet) long and about 5 centimeters (2 inches)
in diameter.
5-6
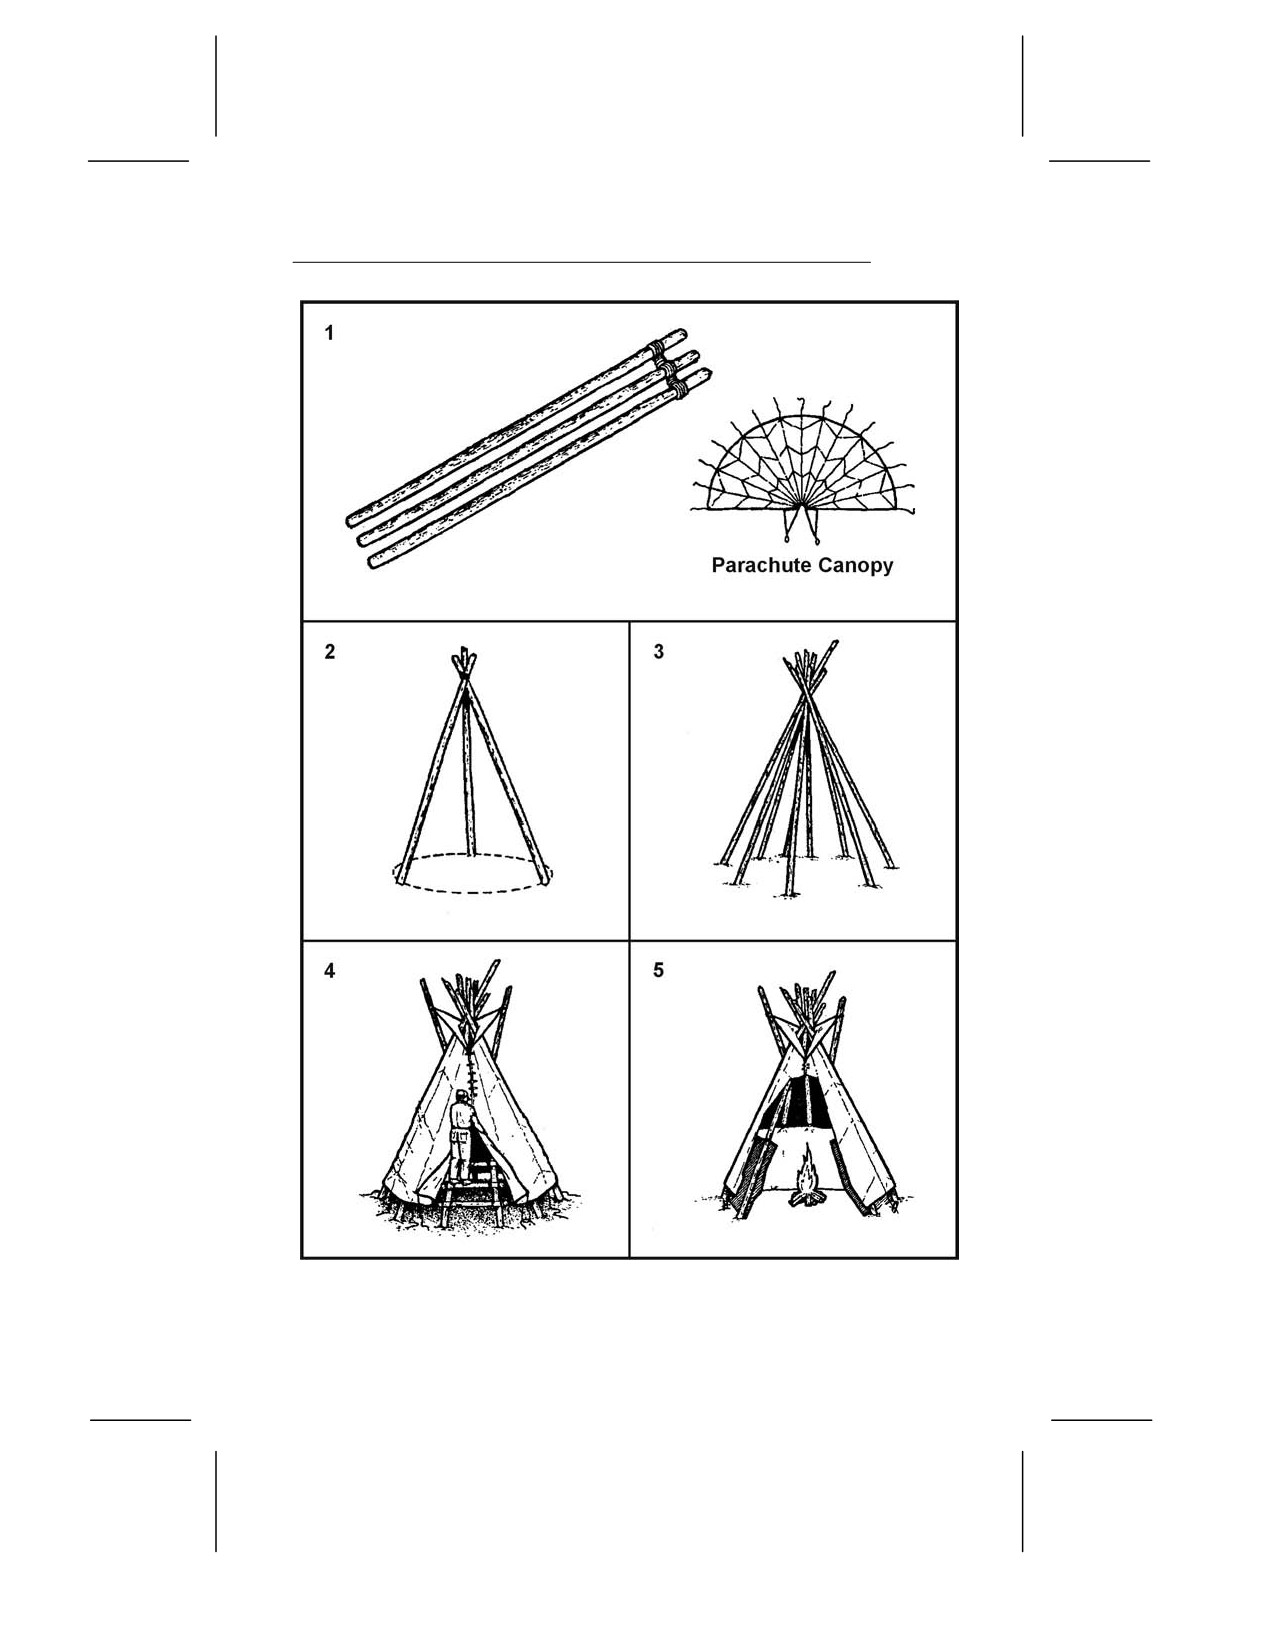
Figure 5-4. Three-Pole Parachute Tepee
5-7
5-21. To make this tepee, you should—
•
Lay the poles on the ground and lash them together at one
end.
•
Stand the framework up and spread the poles to form a
tripod.
•
For more support, place additional poles against the tripod.
Five or six additional poles work best, but do not lash them
to the tripod.
•
Determine the wind direction and locate the entrance 90
degrees or more from the mean wind direction.
•
Lay out the parachute on the “backside” of the tripod and
locate the bridle loop (nylon web loop) at the top (apex) of
the canopy.
•
Place the bridle loop over the top of a freestanding pole.
Then place the pole back up against the tripod so that the
canopy’s apex is at the same height as the lashing on the
three poles.
•
Wrap the canopy around one side of the tripod. The canopy
should be of double thickness, as you are wrapping an
entire parachute. You need only wrap half of the tripod, as
the remainder of the canopy will encircle the tripod in the
opposite direction.
•
Construct the entrance by wrapping the folded edges of the
canopy around two free-standing poles. You can then place
the poles side by side to close the tepee’s entrance.
•
Place all extra canopy underneath the tepee poles and
inside to create a floor for the shelter.
•
Leave a 30- to 50-centimeter (12- to 20-inch) opening at the
top for ventilation if you intend to have a fire inside the
tepee.
5-22. You need a 14-gore section (normally) of canopy, stakes, a
stout center pole, and an inner core and needle to construct this
tepee (Figure 5-5, page 5-9). You cut the suspension lines except
for 40- to 45-centimeter (16- to 18-inch) lengths at the canopy’s
lower lateral band.
5-8
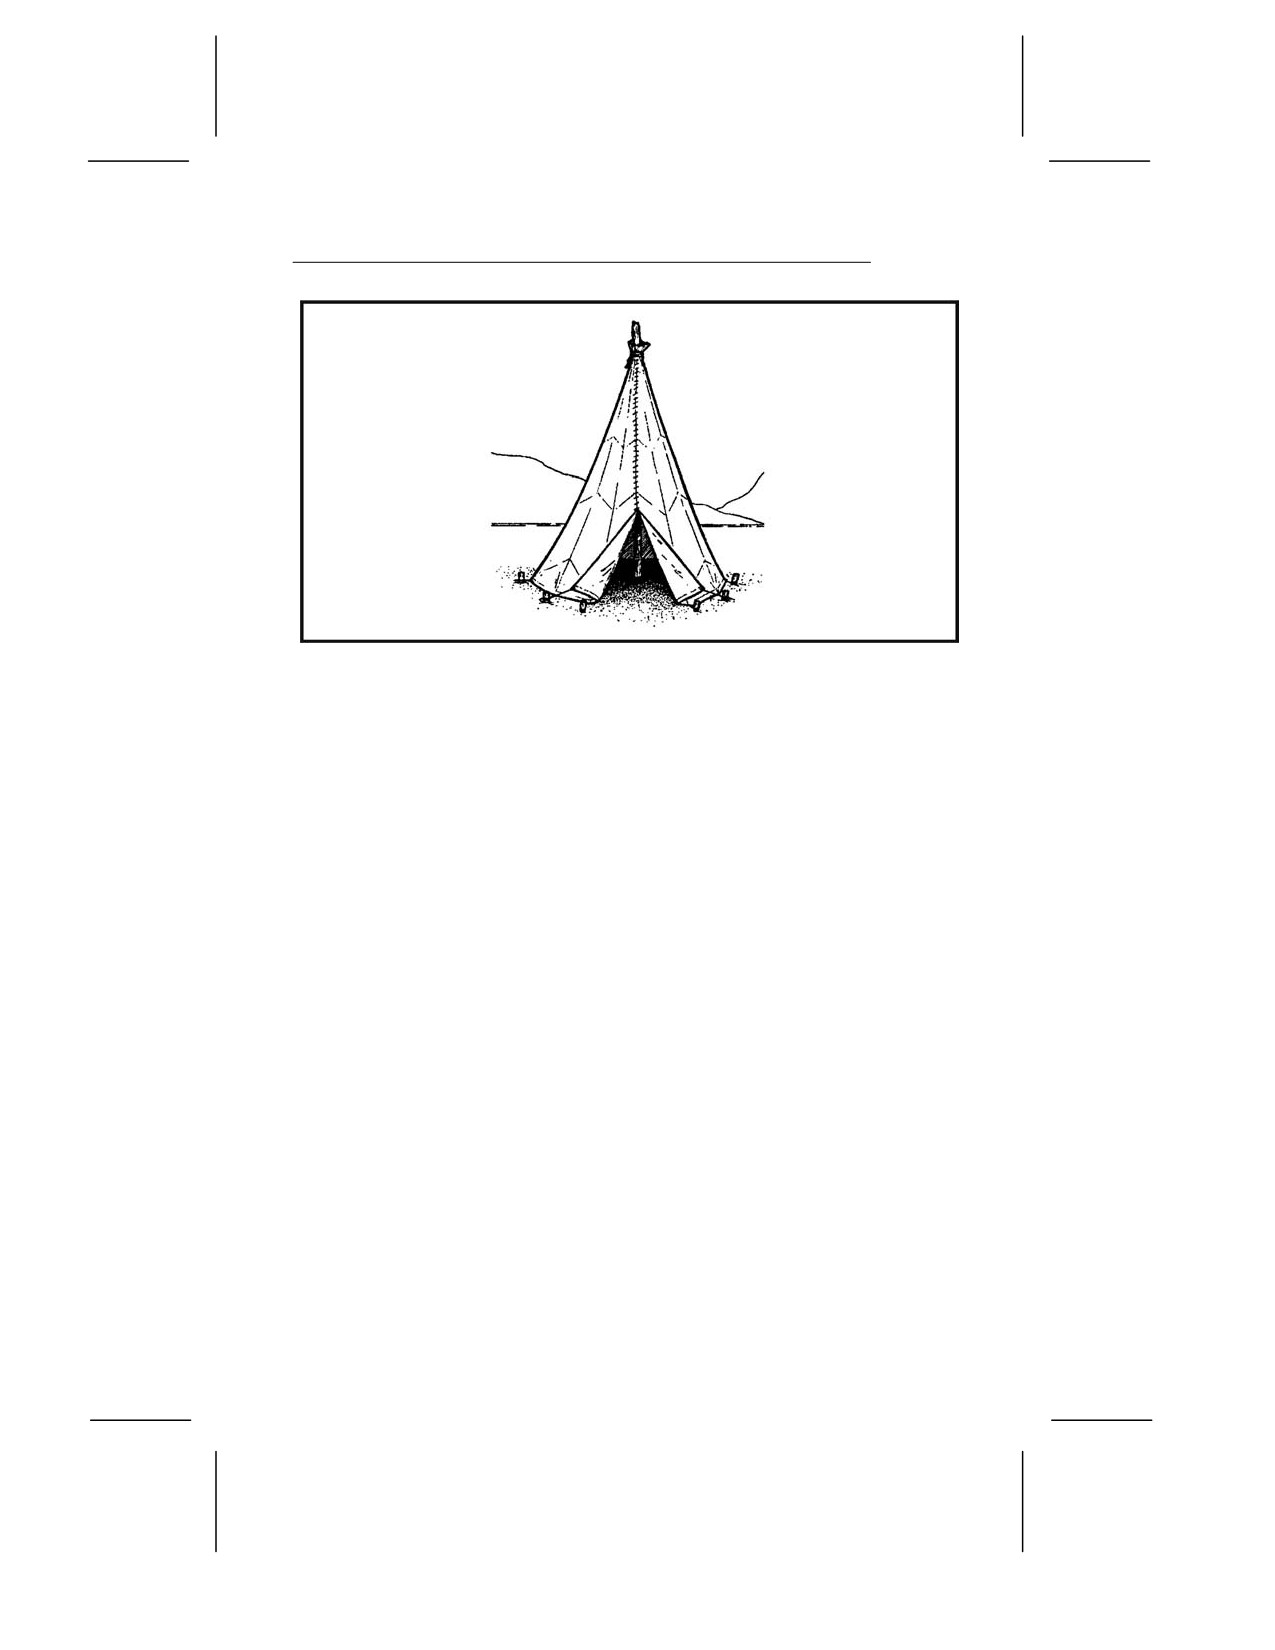
Figure 5-5. One-Pole Parachute Tepee
5-23. To make this tepee, you should—
• Select a shelter site and scribe a circle about 4 meters
(13 feet) in diameter on the ground.
• Stake the parachute material to the ground using the lines
remaining at the lower lateral band.
• After deciding where to place the shelter door, emplace a
stake and tie the first line (from the lower lateral band)
securely to it.
• Stretch the parachute material taut to the next line,
emplace a stake on the scribed line, and tie the line to it.
• Continue the staking process until you have tied all the
lines.
• Loosely attach the top of the parachute material to the
center pole with a suspension line you previously cut and,
through trial and error, determine the point at which the
parachute material will be pulled tight once the center pole
is upright.
• Securely attach the material to the pole.
• Using a suspension line (or inner core), sew the end gores
together leaving 1 to 1.2 meters (3 to 4 feet) for a door.
5-9
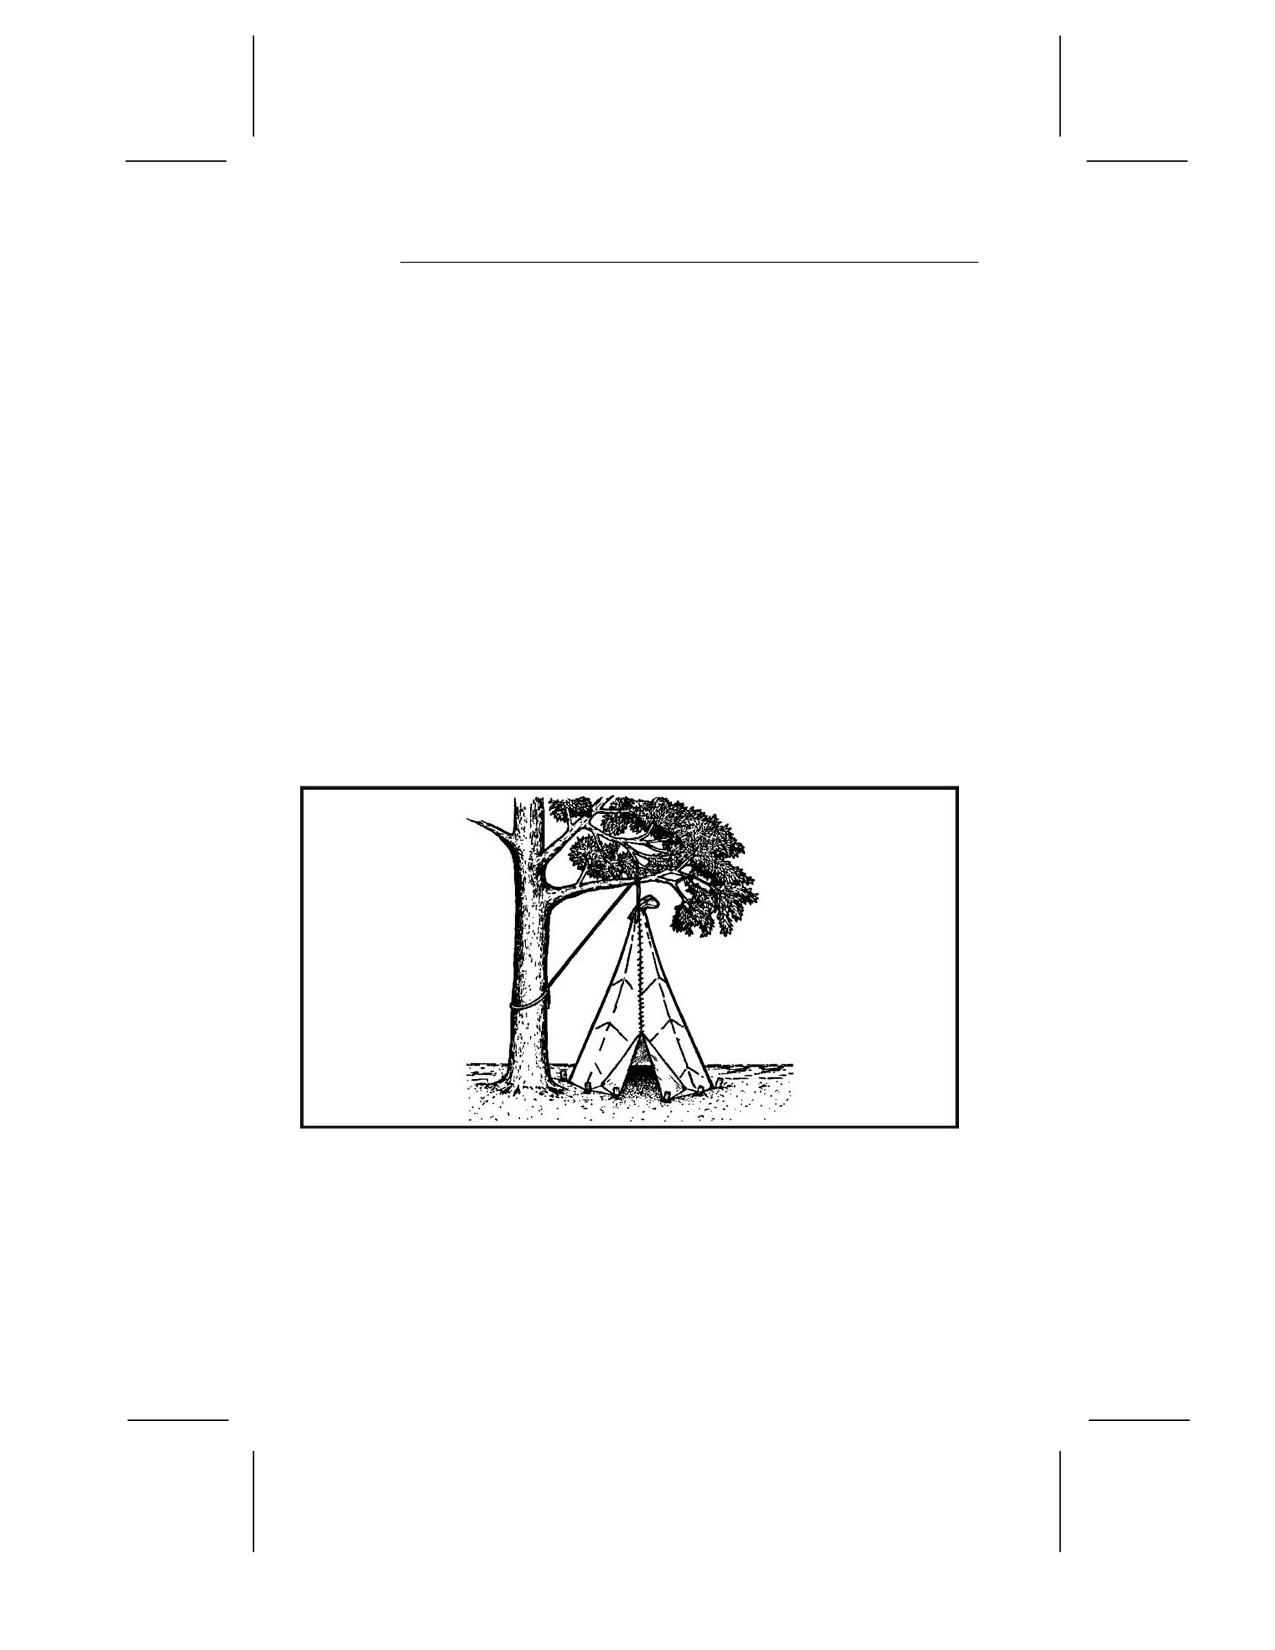
NO-POLE PARACHUTE TEPEE
5-24. Except for the center pole, you use the same materials for a
no-pole parachute tepee
(Figure
5-6), as for the one-pole
parachute tepee.
5-25. To make this tepee, you should—
• Tie a line to the top of parachute material with a
previously cut suspension line.
• Throw the line over a tree limb, and tie it to the tree trunk.
• Starting at the opposite side from the door, emplace a
stake on the scribed 3.5- to 4.3-meter (12- to 14-foot) circle.
• Tie the first line on the lower lateral band.
• Continue emplacing the stakes and tying the lines to them.
5-26. After staking down the material, unfasten the line tied to
the tree trunk, tighten the tepee material by pulling on this line,
and tie it securely to the tree trunk.
Figure 5-6. No-Pole Parachute Tepee
ONE-MAN SHELTER
5-27. A one-man shelter (Figure 5-7, page 5-11) you can easily
make using a parachute requires a tree and three poles. One pole
should be about 4.5 meters (15 feet) long and the other two about
3 meters (10 feet) long.
5-10

Figure 5-7. One-Man Shelter
5-28. To make this shelter, you should—
• Secure the 4.5-meter (15-foot) pole to the tree at about
waist height.
• Lay the two 3-meter (10-foot) poles on the ground on either
side of and in the same direction as the 4.5-meter (15-foot)
pole.
• Lay the folded canopy over the 4.5-meter (15-foot) pole so
that about the same amount of material hangs on both
sides.
• Tuck the excess material under the 3-meter (10-foot) poles
and spread it on the ground inside to serve as a floor.
• Stake down or put a spreader between the two 3-meter (10-
foot) poles at the shelter’s entrance so they will not slide
inward.
• Use any excess material to cover the entrance.
5-29. The parachute cloth makes this shelter wind-resistant, and
the shelter is small enough that it is easily warmed. A candle,
used carefully, can keep the inside temperature comfortable.
However, this shelter is unsatisfactory when snow is falling, as
even a light snowfall will cave it in.
5-11
PARACHUTE HAMMOCK
5-30. You can make a hammock using six to eight gores of
parachute canopy and two trees about 4.5 meters (15 feet) apart
(Figure 5-8, page 5-13).
FIELD-EXPEDIENT LEAN-TO
5-31. If you are in a wooded area and have enough natural
materials, you can make a field-expedient lean-to (Figure 5-9,
page 5-14) without the aid of tools or with only a knife. It takes
longer to make this type of shelter than it does to make other
types, but it will protect you from the elements.
5-32. You will need two trees (or upright poles) about 2 meters (7
feet) apart; one pole about
2 meters
(7 feet) long and
2.5
centimeters (1 inch) in diameter; five to eight poles about
3
meters (10 feet) long and 2.5 centimeters (1 inch) in diameter for
beams; cord or vines for securing the horizontal support to the
trees; and other poles, saplings, or vines to crisscross the beams.
5-33. To make this lean-to, you should—
• Tie the 2-meter (7-foot) pole to the two trees at waist to
chest height. This is the horizontal support. If a standing
tree is not available, construct a bipod using Y-shaped
sticks or two tripods.
• Place one end of the beams (3-meter [10-foot] poles) on one
side of the horizontal support. As with all lean-to type
shelters, be sure to place the lean-to’s backside into the
wind.
• Crisscross saplings or vines on the beams.
• Cover the framework with brush, leaves, pine needles, or
grass, starting at the bottom and working your way up like
shingling.
• Place straw, leaves, pine needles, or grass inside the
shelter for bedding.
5-12
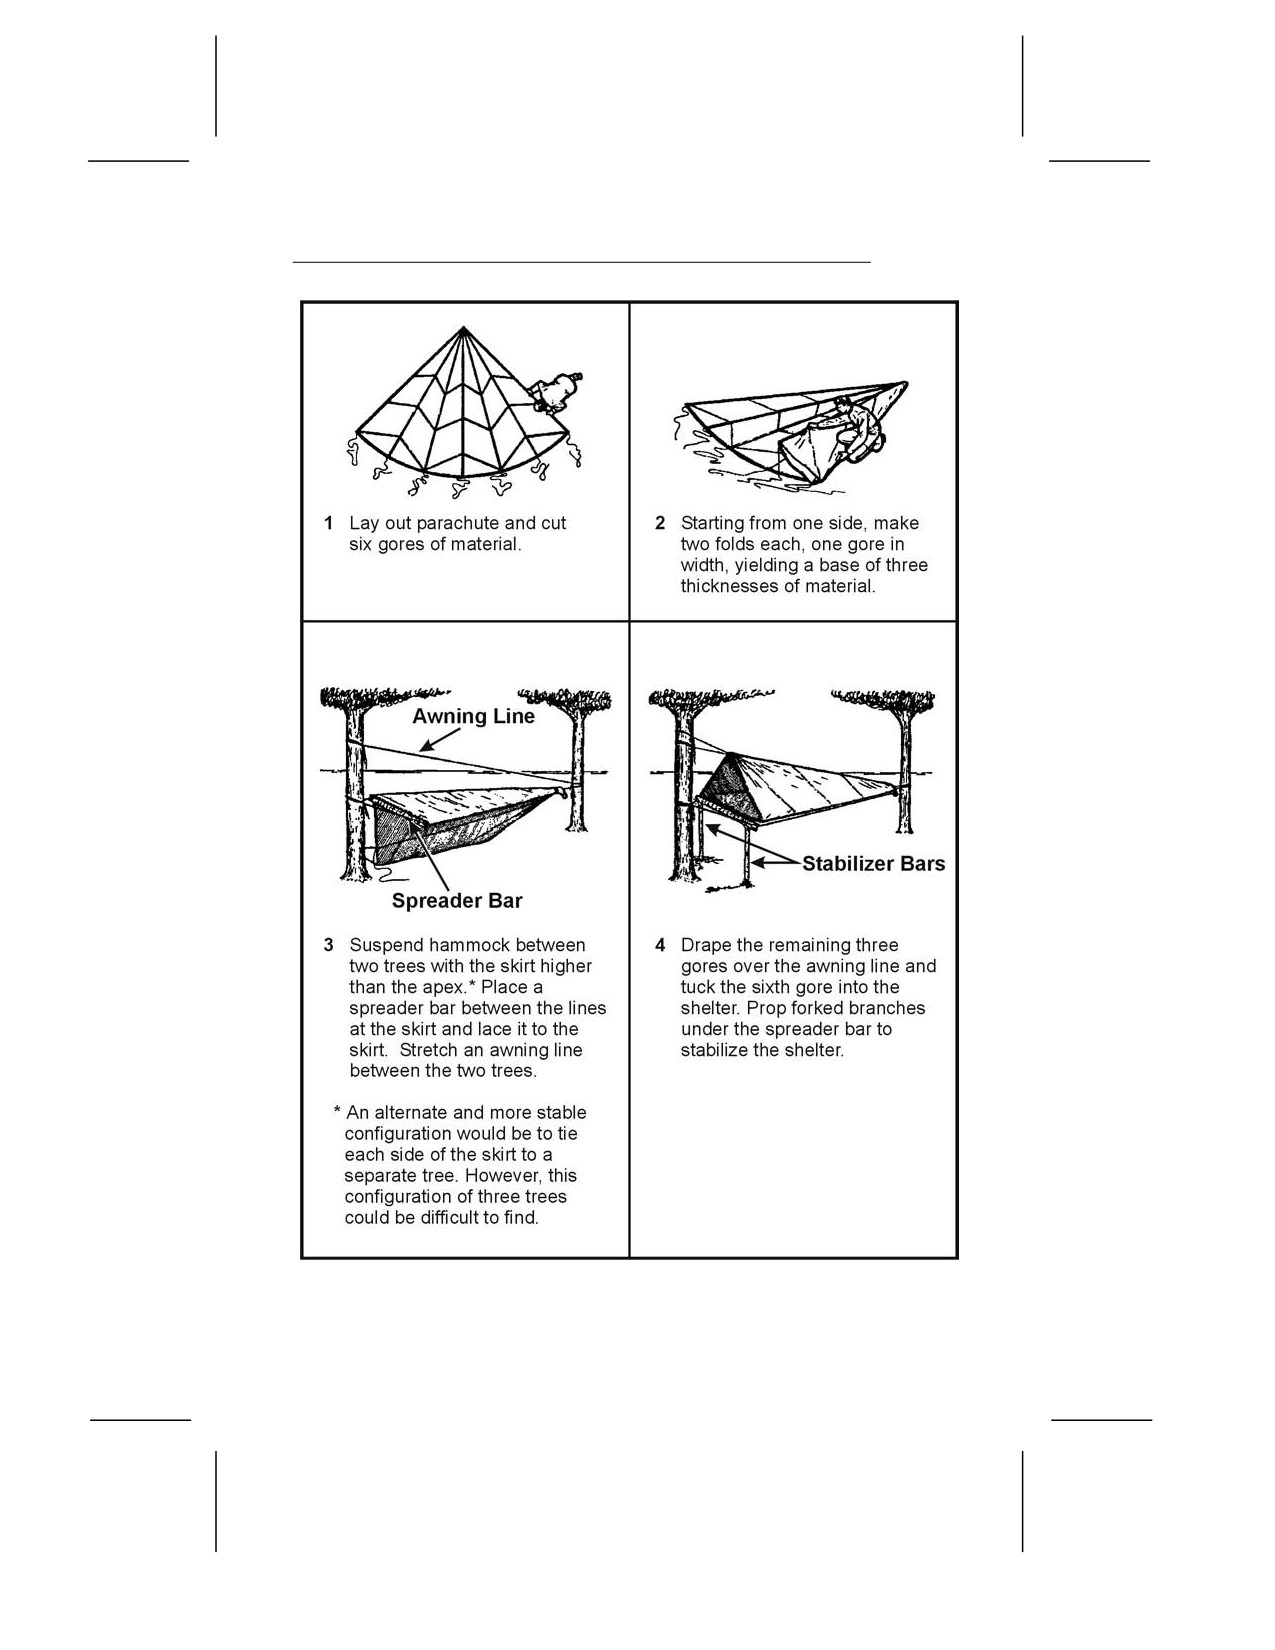
Figure 5-8. Parachute Hammock
5-13

Figure 5-9. Field-Expedient Lean-to and Fire Reflector
5-34. In cold weather, add to your lean-to’s comfort by building a
fire reflector wall (Figure 5-9). Drive four 1.5-meter-long (5-foot-
long) stakes into the ground to support the wall. Stack green logs
on top of one another between the support stakes. Form two rows
of stacked logs to create an inner space within the wall that you
can fill with dirt. This action not only strengthens the wall but
makes it more heat reflective. Bind the top of the support stakes
so that the green logs and dirt will stay in place.
5-35. With just a little more effort you can have a drying rack.
Cut a few 2-centimeter-diameter (3/4-inch-diameter) poles long
enough to span the distance between the lean-to’s horizontal
support and the top of the fire reflector wall. Lay one end of the
poles on the lean-to support and the other end on top of the
reflector wall. Place and tie smaller sticks across these poles. You
now have a place to dry clothes, meat, or fish.
SWAMP BED
5-36. In a marsh or swamp, or any area with standing water or
continually wet ground, the swamp bed (Figure 5-10, page 5-15)
keeps you out of the water. When selecting such a site, consider
the weather, wind, tides, and available materials.
5-14
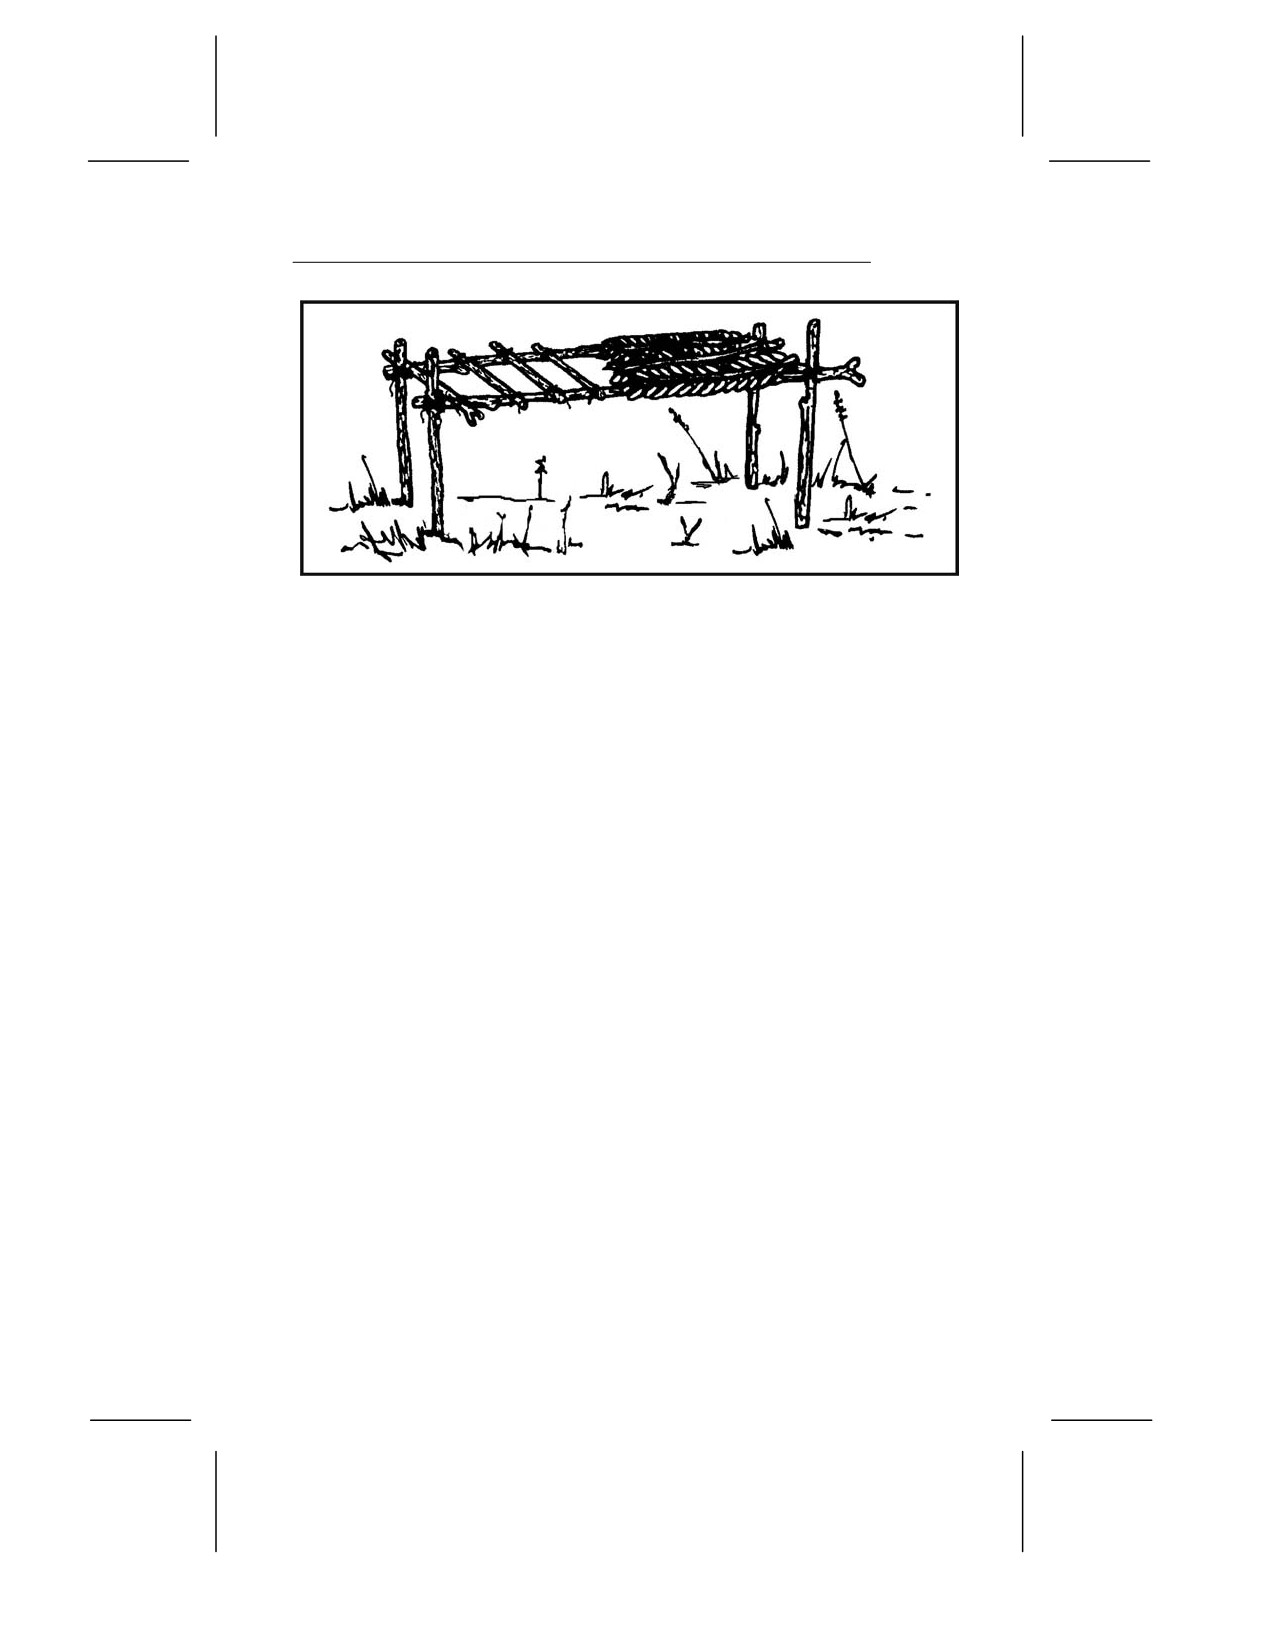
Figure 5-10. Swamp Bed
5-37. To make a swamp bed, you should—
• Look for four trees clustered in a rectangle, or cut four
poles (bamboo is ideal) and drive them firmly into the
ground so they form a rectangle. They should be far
enough apart and strong enough to support your height
and weight, to include equipment.
• Cut two poles that span the width of the rectangle. They,
too, must be strong enough to support your weight.
• Secure these two poles to the trees (or poles). Be sure they
are high enough above the ground or water to allow for
tides and high water.
• Cut additional poles that span the rectangle’s length. Lay
them across the two side poles and secure them.
• Cover the top of the bed frame with broad leaves or grass
to form a soft sleeping surface.
• Build a fire pad by laying clay, silt, or mud on one corner of
the swamp bed and allow it to dry.
5-38. Another shelter designed to get you above and out of the
water or wet ground uses the same rectangular configuration as
the swamp bed. You simply lay sticks and branches lengthwise on
the inside of the trees (or poles) until there is enough material to
raise the sleeping surface above the water level.
5-15
NATURAL SHELTERS
5-39. Do not overlook natural formations that provide shelter.
Examples are caves, rocky crevices, clumps of bushes, small
depressions, large rocks on leeward sides of hills, large trees with
low-hanging limbs, and fallen trees with thick branches.
However, when selecting a natural formation—
• Stay away from low ground such as ravines, narrow
valleys, or creek beds. Low areas collect the heavy cold air
at night and are therefore colder than the surrounding
high ground. Thick, brushy, low ground also harbors more
insects.
• Check for poisonous snakes, ticks, mites, scorpions, and
stinging ants.
• Look for loose rocks, dead limbs, coconuts, or other natural
growth than could fall on your shelter.
DEBRIS HUT
5-40. For warmth and ease of construction, the debris hut (Figure
5-11, page 5-17) is one of the best. When shelter is essential to
survival, build this shelter.
5-41. To make a debris hut, you should—
• Build it by making a tripod with two short stakes and a
long ridgepole or by placing one end of a long ridgepole on
top of a sturdy base.
• Secure the ridgepole
(pole running the length of the
shelter) using the tripod method or by anchoring it to a
tree at about waist height.
• Prop large sticks along both sides of the ridgepole to create
a wedge-shaped ribbing effect. Ensure the ribbing is wide
enough to accommodate your body and steep enough to
shed moisture.
• Place finer sticks and brush crosswise on the ribbing.
These form a latticework that will keep the insulating
material (grass, pine needles, leaves) from falling through
the ribbing into the sleeping area.
• Add light, dry, if possible, soft debris over the ribbing until
the insulating material is at least 1 meter (3 feet) thick—
the thicker the better.
5-16
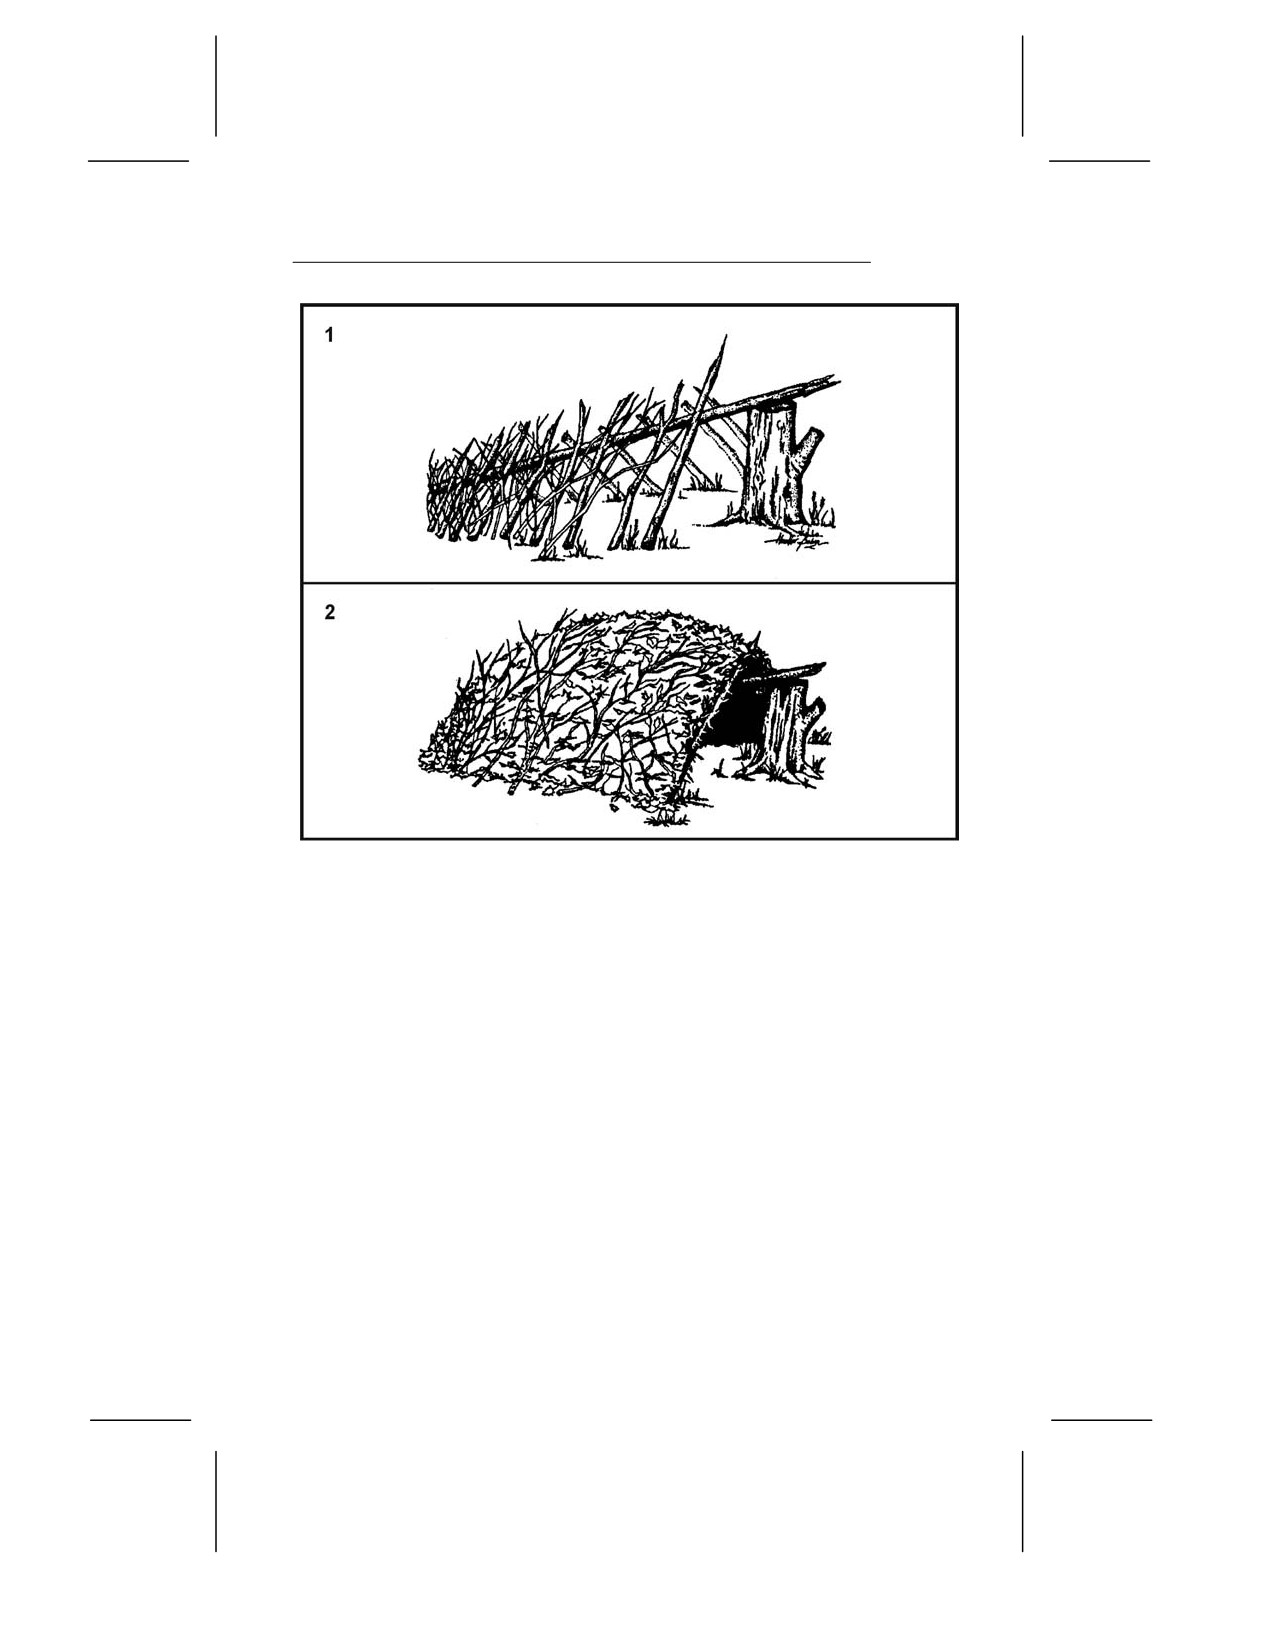
Figure 5-11. Debris Hut
• Place a 30-centimeter (1-foot) layer of insulating material
inside the shelter.
• At the entrance, pile insulating material that you can drag
to you once inside the shelter to close the entrance or build
a door.
• As a final step in constructing this shelter, add shingling
material or branches on top of the debris layer to prevent
the insulating material from blowing away in a storm.
TREE-PIT SNOW SHELTER
5-42. If you are in a cold, snow-covered area where evergreen
trees grow and you have a digging tool, you can make a tree-pit
shelter (Figure 5-12, page 5-18).
5-43. To make this shelter, you should—
• Find a tree with bushy branches that provides overhead
cover.
5-17
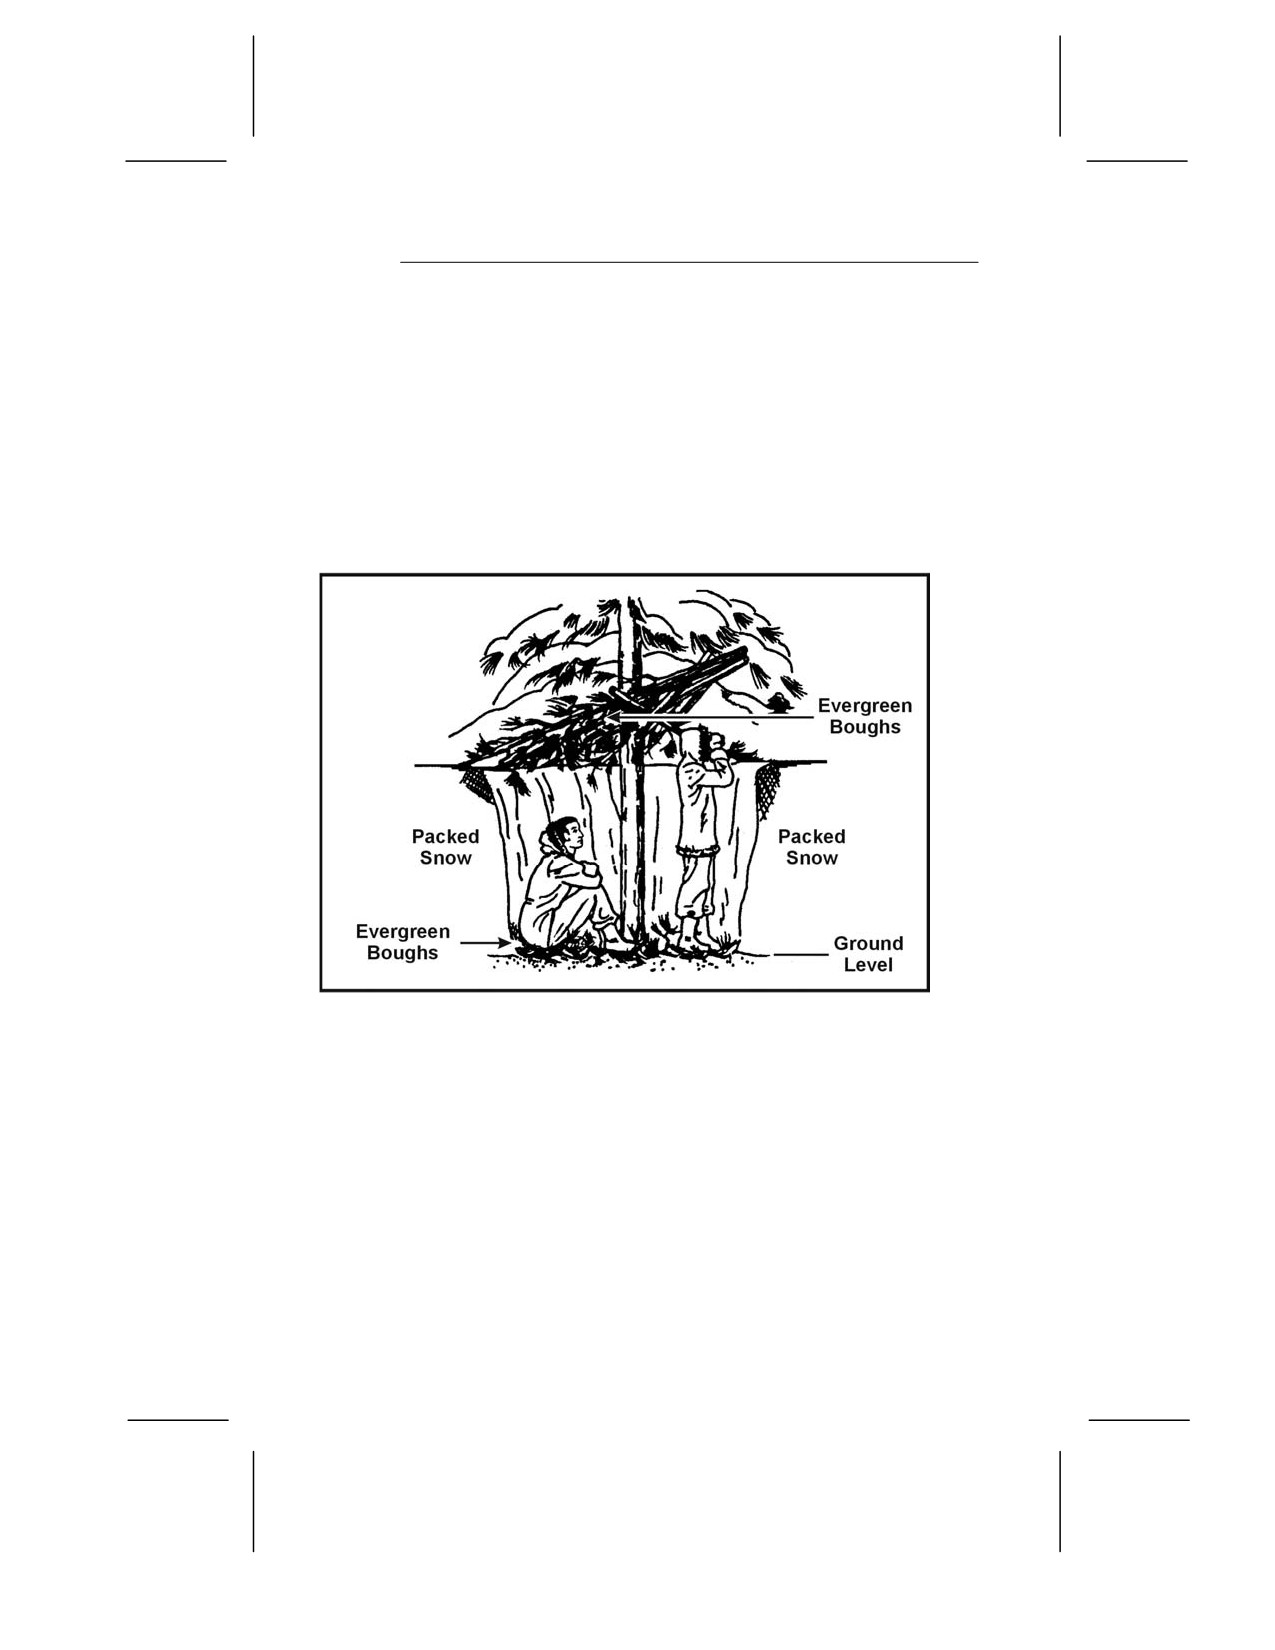
• Dig out the snow around the tree trunk until you reach the
depth and diameter you desire, or until you reach the
ground.
• Pack the snow around the top and the inside of the hole to
provide support.
• Find and cut other evergreen boughs. Place them over the
top of the pit to give you additional overhead cover. Place
evergreen boughs in the bottom of the pit for insulation.
5-44. See Chapter 15 for other arctic or cold weather shelters.
Figure 5-12. Tree-Pit Snow Shelter
BEACH SHADE SHELTER
5-45. The beach shade shelter (Figure 5-13, page 5-19) protects
you from the sun, wind, rain, and heat. It is easy to make using
natural materials.
5-46. To make this shelter, you should—
• Find and collect driftwood or other natural material to use
as support beams and as a digging tool.
• Select a site that is above the high water mark.
5-18

• Scrape or dig out a trench running north to south so that it
receives the least amount of sunlight. Make the trench
long and wide enough for you to lie down comfortably.
• Mound soil on three sides of the trench. The higher the
mound, the more space inside the shelter.
• Lay support beams (driftwood or other natural material)
that span the trench on top of the mound to form the
framework for a roof.
• Enlarge the shelter’s entrance by digging out more sand in
front of it.
• Use natural materials such as grass or leaves to form a bed
inside the shelter.
Figure 5-13. Beach Shade Shelter
DESERT SHELTERS
5-47. In an arid environment, consider the time, effort, and
material needed to make a shelter. If you have material such as a
poncho, canvas, or a parachute, use it along with such terrain
features as rock outcroppings, mounds of sand, or depressions
between dunes or rocks to make your shelter.
5-48. When using rock outcroppings, you should—
• Anchor one end of your poncho (canvas, parachute, or other
material) on the edge of the outcrop using rocks or other
weights.
5-19
• Extend and anchor the other end of the poncho so it
provides the best possible shade.
5-49. In a sandy area, you should—
• Build a mound of sand or use the side of a sand dune for
one side of the shelter.
• Anchor one end of the material on top of the mound using
sand or other weights.
• Extend and anchor the other end of the material so it
provides the best possible shade.
NOTE: If you have enough material, fold it in half and form a 30-
to 45-centimeter (12- to 18-inch) airspace between the two halves.
This airspace will reduce the temperature under the shelter.
5-50. A belowground shelter (Figure 5-14, page 5-21) can reduce
the midday heat as much as 16 to 22 degrees C (30 to 40 degrees
F). However, building it requires more time and effort than for
other shelters. Since your physical effort will make you sweat more
and increase dehydration, construct it before the heat of the day.
5-51. To make this shelter, you should—
• Find a low spot or depression between dunes or rocks. If
necessary, dig a trench 45 to 60 centimeters (18 to 24
inches) deep, and long and wide enough for you to lie in
comfortably.
• Pile the sand you take from the trench to form a mound
around three sides.
• On the open end of the trench, dig out more sand so you
can get in and out of your shelter easily.
• Cover the trench with your material.
• Secure the material in place using sand, rocks, or other
weights.
5-52. If you have extra material, you can further decrease the
midday temperature in the trench by securing the material 30 to
45 centimeters (12 to 18 inches) above the other cover. This
layering of the material will reduce the inside temperature 11 to
22 degrees C (20 to 40 degrees F).
5-20
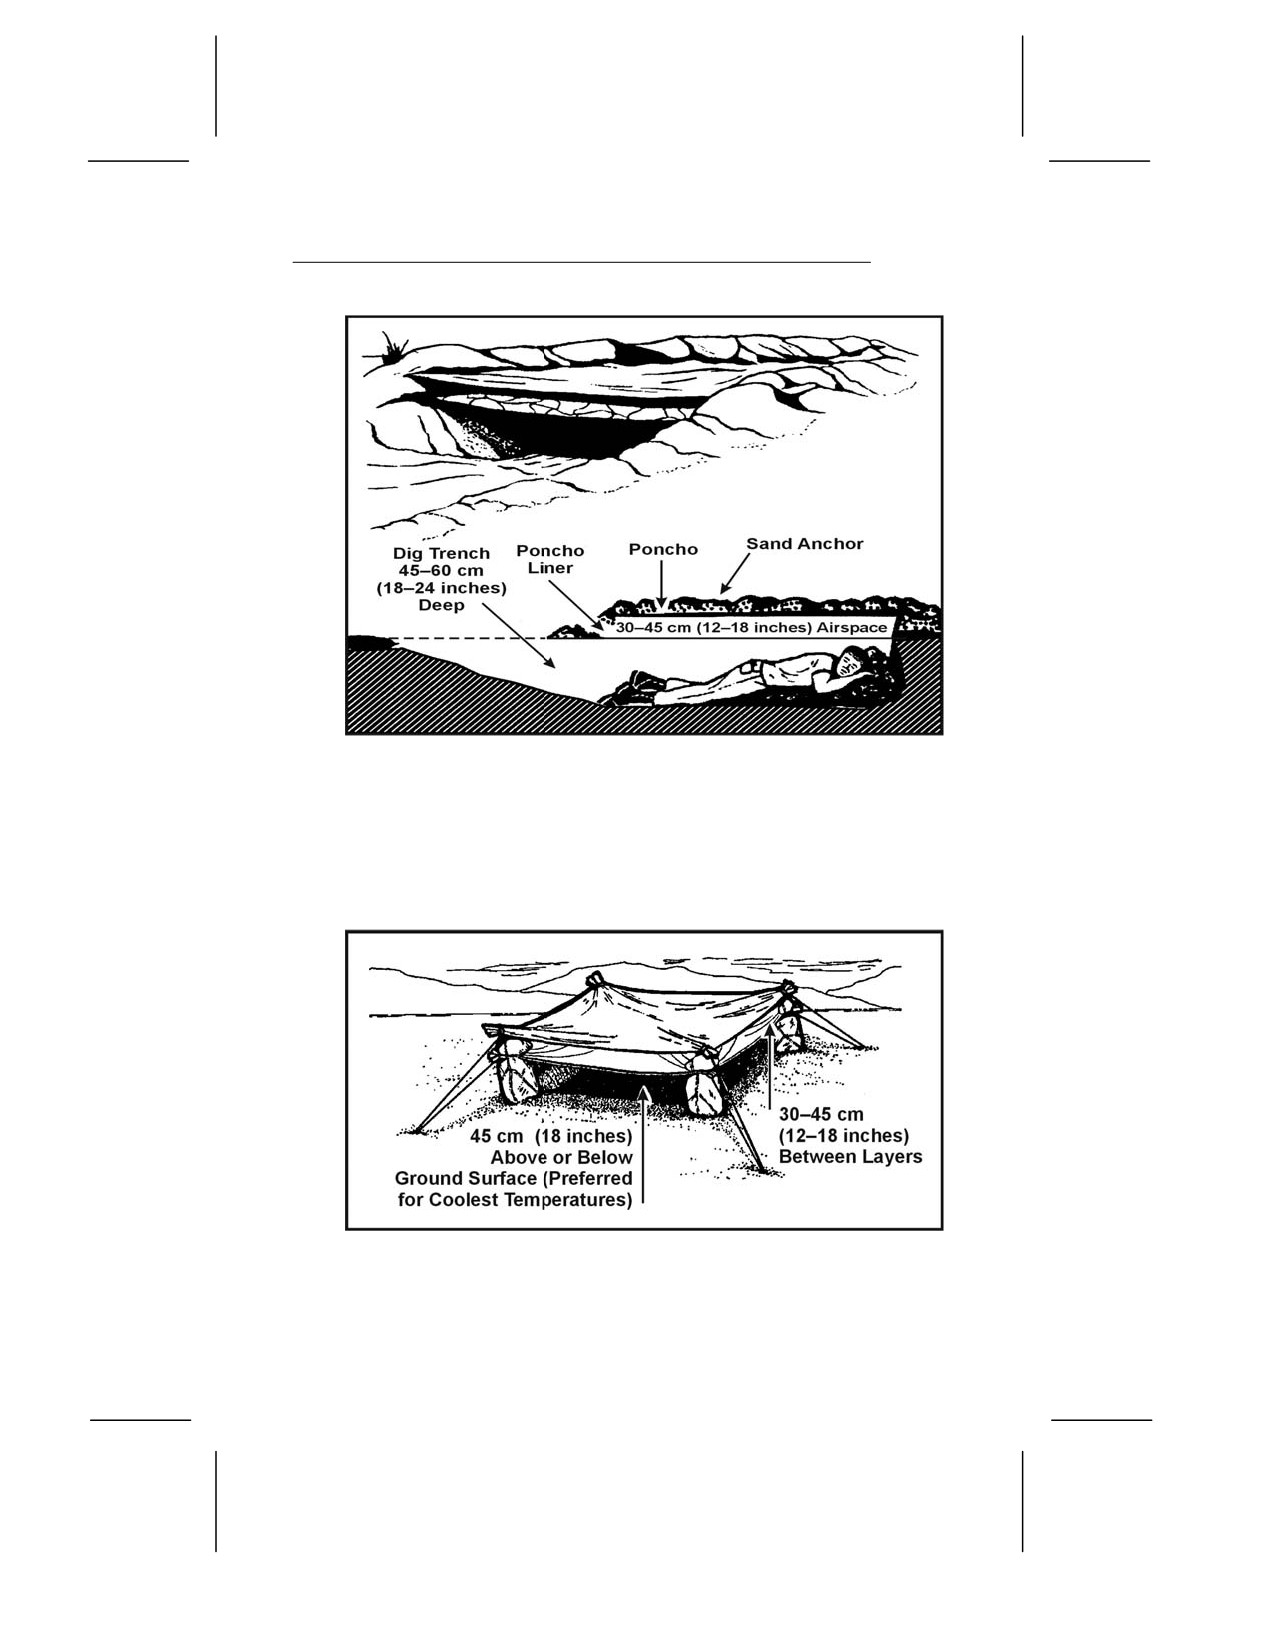
Figure 5-14. Belowground Desert Shelter
5-53. The open desert shelter is of similar construction, except all
sides are open to air currents and circulation. For maximum
protection, you need a minimum of two layers of parachute
material (Figure 5-15). White is the best color to reflect heat; the
innermost layer should be of darker material.
Figure 5-15. Open Desert Shelter
5-21
Chapter 6
Water Procurement
Water is one of your most urgent needs in a
survival situation. You can’t live long without it,
especially in hot areas where you lose water
rapidly through perspiration. Even in cold areas,
you need a minimum of 2 liters of water each day
to maintain efficiency.
More than three-fourths of your body is
composed of fluids. Your body loses fluid because
of heat, cold, stress, and exertion. To function
effectively, you must replace the fluid your body
loses. So, one of your first goals is to obtain an
adequate supply of water.
WATER SOURCES
6-1. Almost any environment has water present to some degree.
Figure 6-1, pages 6-2 and 6-3, lists possible sources of water in
various environments. It also provides information on how to
make the water potable.
NOTE: If you do not have a canteen, cup, can, or other type of
container, improvise one from plastic or water-resistant cloth.
Shape the plastic or cloth into a bowl by pleating it. Use pins or
other suitable items—even your hands—to hold the pleats.
6-1
Means of
Sources of
Obtaining and/or
Environment
Water
Making Potable
Remarks
Frigid areas
Snow and ice
Melt and purify.
Do not eat without melting! Eating
snow or ice can reduce body
temperature and lead to more
dehydration.
Snow or ice are no purer than the
water from which they come.
Sea ice that is gray in color or
opaque is salty. Do not use it without
desalting it. Sea ice that is crystalline
with a bluish cast has little salt in it.
At sea
Sea
Use desalinator.
Do not drink seawater without
desalting.
Rain
Catch rain in
If tarp or water-holding material is
tarps or in other
coated with salt, wash it in the sea
water-holding
before using (very little salt will
containers.
remain on it).
Sea ice
See previous remarks for frigid
areas.
Beach
Ground
Dig hole deep
Alternate method if a container or
enough to allow
bark pot is available: Fill container or
water to seep in;
pot with seawater; build fire and boil
obtain rocks, build
water to produce steam; hold cloth
fire, and heat
over container to absorb steam;
rocks; drop hot
wring water from cloth.
rocks in water;
hold cloth over
hole to absorb
steam; wring
water from cloth.
Fresh
Dig behind first
group of sand
dunes. This will
allow the
collection of fresh
water.
Desert
Ground
Dig holes deep
In a sand dune belt, any available
• In valleys and
enough to allow
water will be found beneath the
low areas
water to seep in.
original valley floor at the edge of
dunes.
• At foot of concave
banks of dry rivers
• At foot of cliffs
or rock outcrops
• At first depression
behind first sand
dune of dry lakes
• Wherever you find
damp surface
sand
• Wherever you find
green vegetation
Figure 6-1. Water Sources in Different Environments
6-2