HNC-8 System Operating. Manual (Milling Machine) V2.4 Series - page 5
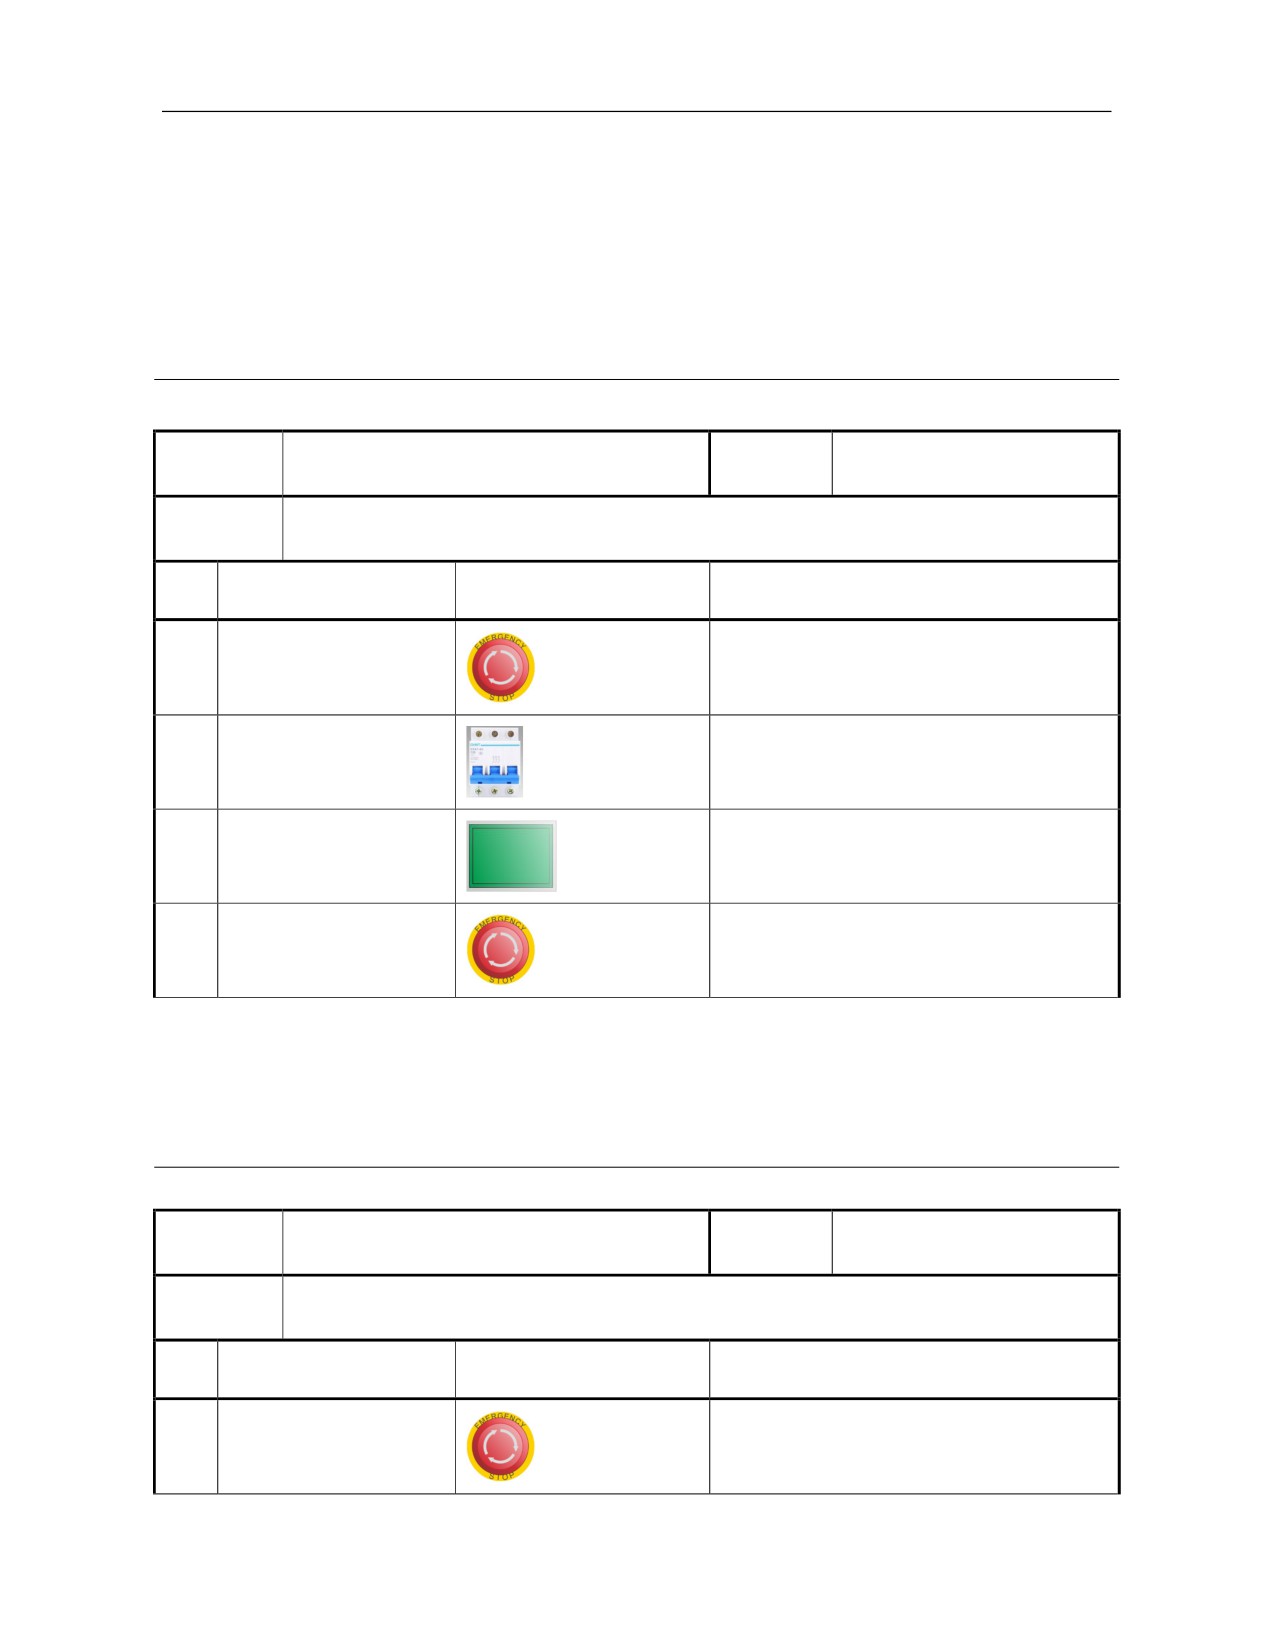
4 Power-on, Power-off, Safety Protection, Emergency Stop
This chapter mainly introduces power-on, power-off, emergency stop, reset and overtravel release of machine tool
and CNC device.
4.1 Power-on
Operation
Working
Power-on
Emergency stop
name
mode
Basic
(1) Check whether machine tool status is normal; (2) Check whether power supply voltage is
requirements
consistent with the requirements; (3) Check whether connection is correct and secure.
SN
Operation steps
Key
Description
1
Press [Emergency stop]
Safety protection
Turn on [Air switch of
2
Power on the machine tool
machine tool]
3
Press [System power-on]
Power on the system
Rotate right to release
[Emergency stop]
4
Release [Emergency stop]
button
System reset
Note: After power-on, inspect whether the indicator light on the panel is
normal, and release emergency stop button.
4.2 Power-off
Operation
Working
Power-off
Emergency stop
name
mode
Basic
(1) Stop operation of machine tool; (2) Disable auxiliary function.
requirements
SN
Operation steps
Key
Description
1
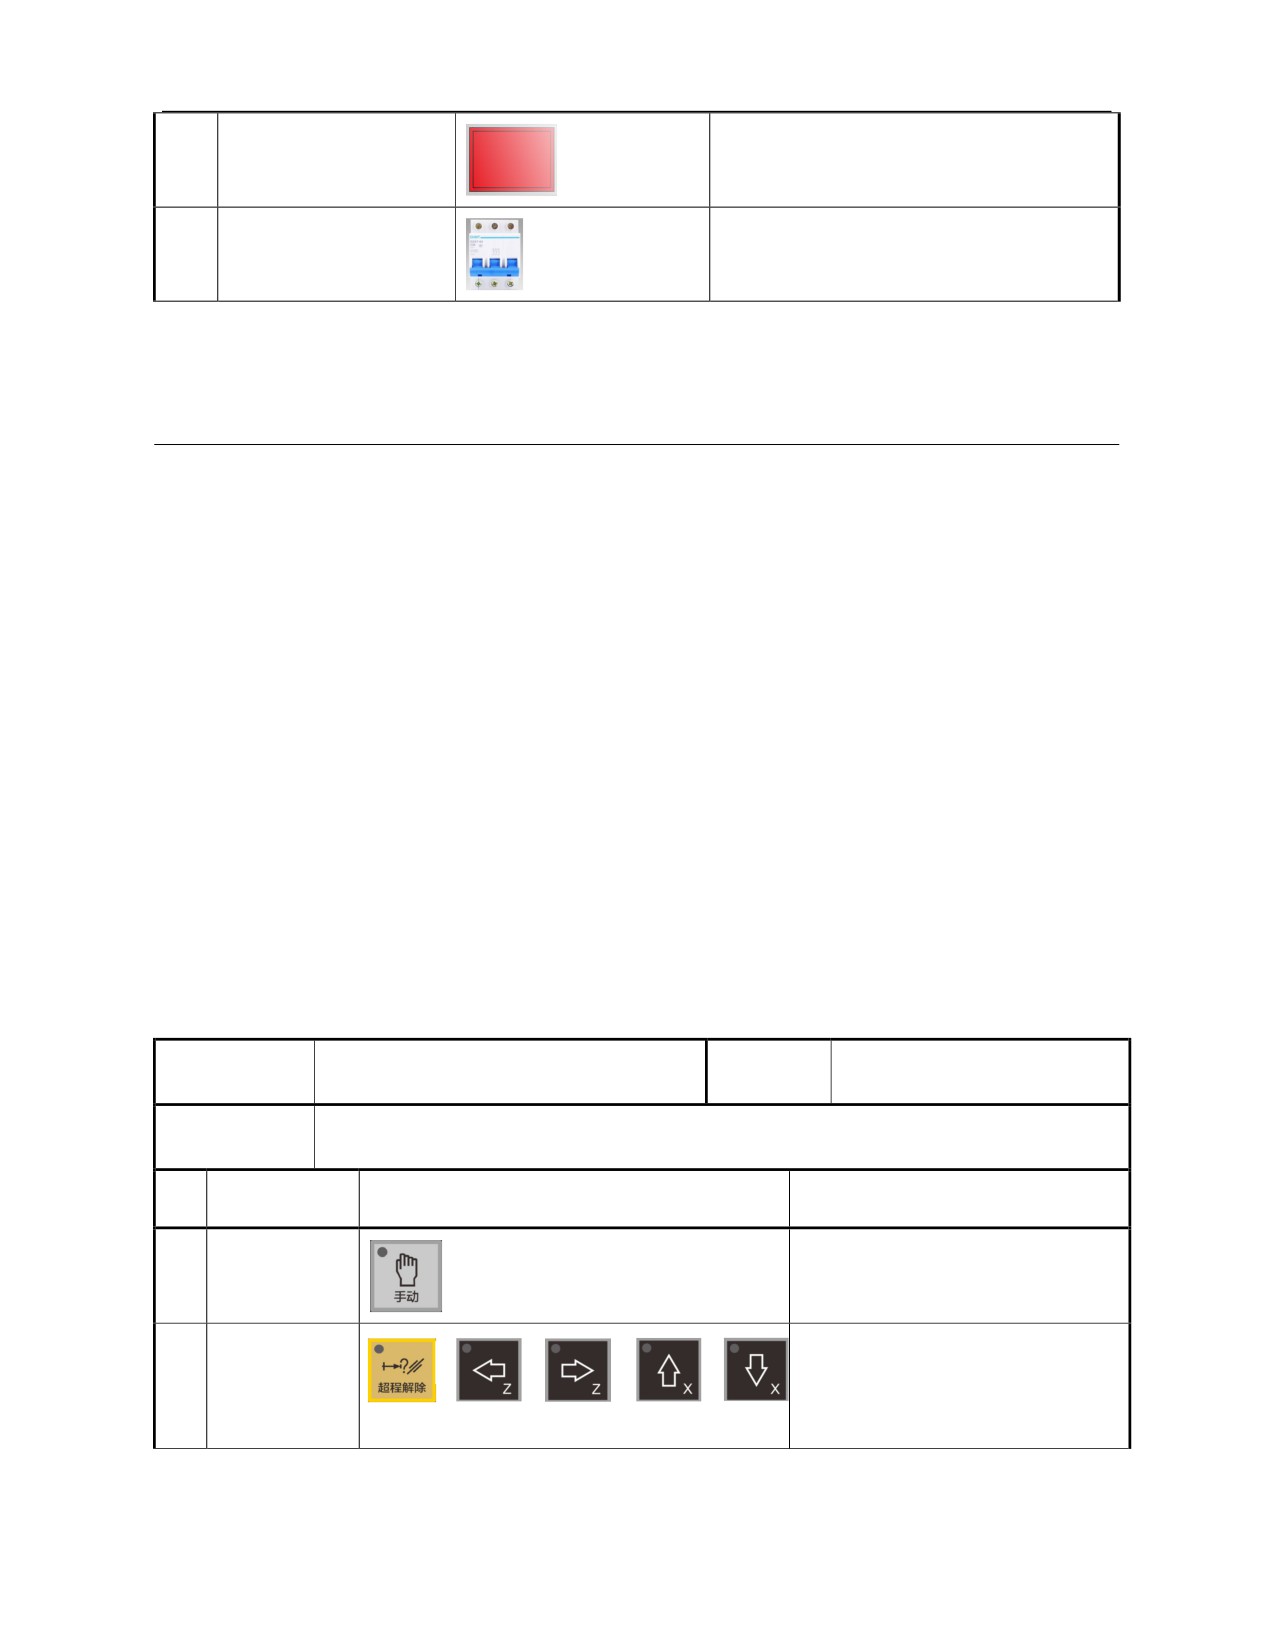
Press [Emergency stop]
Safety protection
101
2
Press [System power-off]
System power-off
Turn off [Air switch] of
3
Power off the machine tool
the machine tool
Note: If users power it off and then power it on again, users must keep it off for more than 20 seconds.
4.3 Overtravel Protectiona And Release
4.3.1 Overtravel Protection
There is a travel limit switch at each end of the travel of servo axis, which is
used to prevent from damaging the linear axis mechanism arising from
collision. When the mechanism touches the travel limit switch, the hard
overtravel protection will occur. When the hardware overtravel protection of
an axis occurs (the indicator light of "Overtravel release" lights up), the
system regards its status as the emergency stop and the machine tool stops
operation.
This system also can set software overtravel protection through parameters
100006, 100007, 101006, 101007, 102006 and 102007. That is, when the
machine tool runs beyond the parameter setup range, the machine tool gives an
alarm and stops operation.
4.3.2 Hardware Overtravel Release
Working
Operation name
Overtravel release
Jog, handwheel
mode
Basic
(1) If an axis of the machine tool exceeds the travel, all axes must not move and give an alarm.
requirements
SN
Operation steps
Key
Description
Press
【 Jog】
1
or
Set effective working mode
【Handwheel】
Press
Press
[Overtravel release] and
Or
Or
Or
[Overtravel
[Axis feed] simultaneously
+
2
release]
and
Select [Axis feed] in the reverse
[Axis feed]
direction of overtravel axis
Note:
102
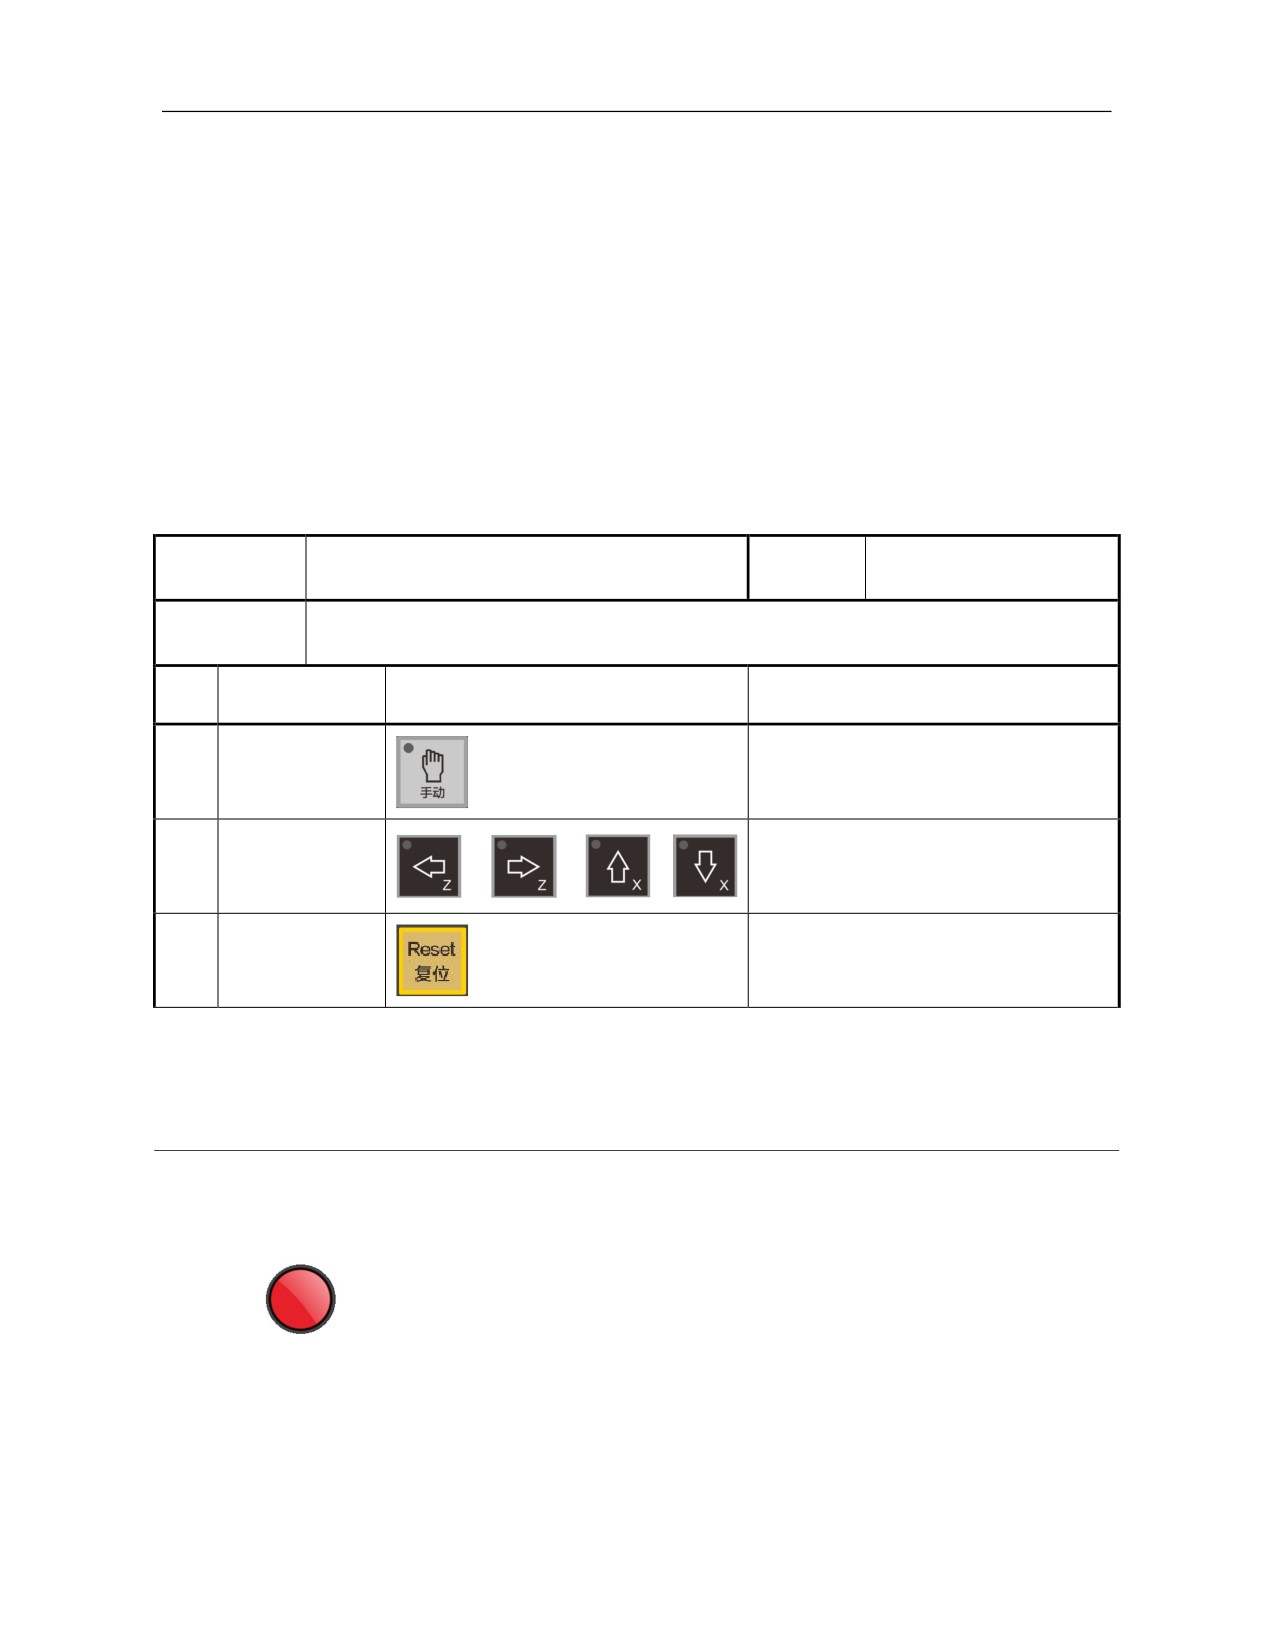
Under jog (handwheel) mode, enable the axis to exit the overtravel
status in the reverse direction;
While the machine tool is moving to exit the overtravel status, please be
sure to pay attention to movement direction and movement speed in
order to avoid collision;
If "Overtravel release" key is released, "Error" in the operating state bar
changes to "Normal", which means the normal work is restored and
operation can be resumed.
4.3.3 Over Travel Release
Operation
Working
Overtravel release
Jog, handwheel
name
mode
Basic
(1) In case of overtravel of an axis of the machine tool, all axes must not move and a prompt
requirements
message will be given.
SN
Operation steps
Key
Description
Press 【Jog】 or
1
Set the effective working mode
【Handwheel】
Press
[Axis feed] in the reverse
Or
Or
Or
2
Press [Axis feed]
direction of overtravel axis
3
Press 「Reset」
Clear alarm
4.4 Emergency Stop
4.4.1 Feed Hold
Press
[Feed hold] button when the machine tool runs the program
automatically to suspend the machining program. But it cannot be stopped
immediately while a threading program is being executed.
103

4.4.2 Reset
When the system is in the alarm state, the coordinate axis moves abnormally,
the output is abnormal or the input needs to exit, user can press the "reset"
button to make the system in the reset state. The system "reset" status is as
follows:
All axes stop running (except during threading);
M and S function output is invalid;
Stop automatic operation and hold modal function.
Besides, validation of some parameters is "Effective after reset". Press Reset to
validate these parameters after they are input and saved.
4.4.3 Emergency Stop
When the machine tool is running, in case of danger or an emergency, press
"Emergency stop" button, the CNC system enters emergency stop status, and
servo feed and spindle rotation stop immediately (the feed drive power supply
in the control cabinet is cut off); release "Emergency stop" (rotate right this
button), and the system enters reset status.
Before emergency stop is released, confirm whether fault cause has been
eliminated. After emergency stop is released, re-execute returning to the
reference point in order to ensure correctness of coordinate position.
Note:
Press "Emergency stop" to reduce electric shock of device before
power-on and power-off.
104
5 Manual Operation and Speed Override
5.1 Manual Reference Point Return
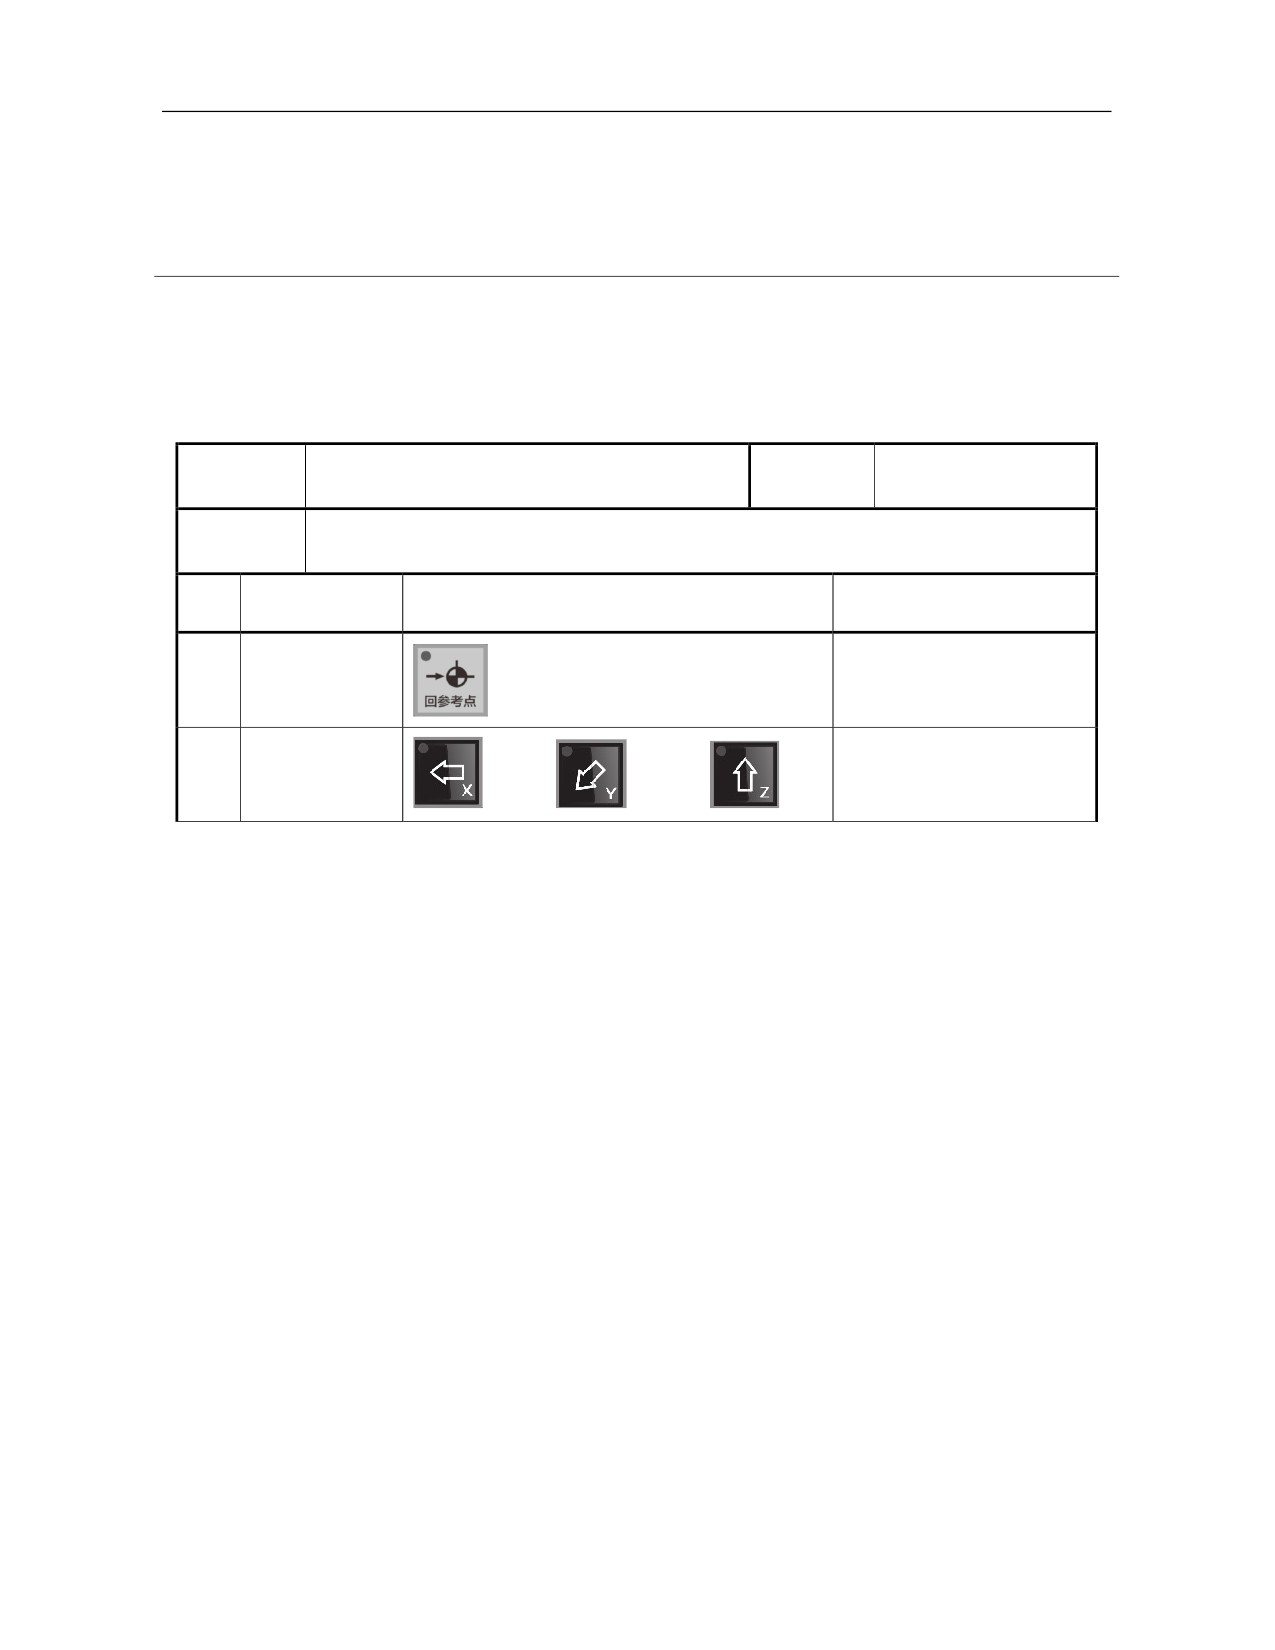
The precondition for controlling movement of the machine tool is to establish
the machine tool coordinate system. For this purpose, return all axes of the
machine tool to the reference point after the system is powered on and reset.
The methods are as follows:
Operation
Working
Manual reference point return
Reference point return
name
mode
Basic
With the reference point as the boundary, ensure the machine feed axis stops in the opposite
requirements
direction stipulated by parameter "Reference point return direction"
SN
Operation steps
Key
Description
Press
Set effective working
1
【 Reference
mode
point return】
[Axis feed] key* in the
Press
[Axis
2
specified
stipulated
feed]
Or
Or
direction
Note:
When the machine tool is configured with the absolute encoder motor,
the system needs not return to the reference point;
While returning to the reference point, [Axis feed] key is determined
according to “Reference point return direction” parameters (100011,
101011 and 102011).
Press axis direction selection keys (X, Y and Z) simultaneously to return
axes (X, Y and Z) to the reference point;
After all axes return to the reference point, as long as the servo drive
device does not give an alarm during operation, the reference point
return doesn’t need to perform when other alarms are issued (including
pressing emergency stop button);
When zero pulse of the motor and mounting position of the travel
switch are too small, reference point return may be inaccurate, and there
is often a distance roughly equal to 1 screw pitch. At this time, it is
necessary to move the travel switch for a certain distance.
105
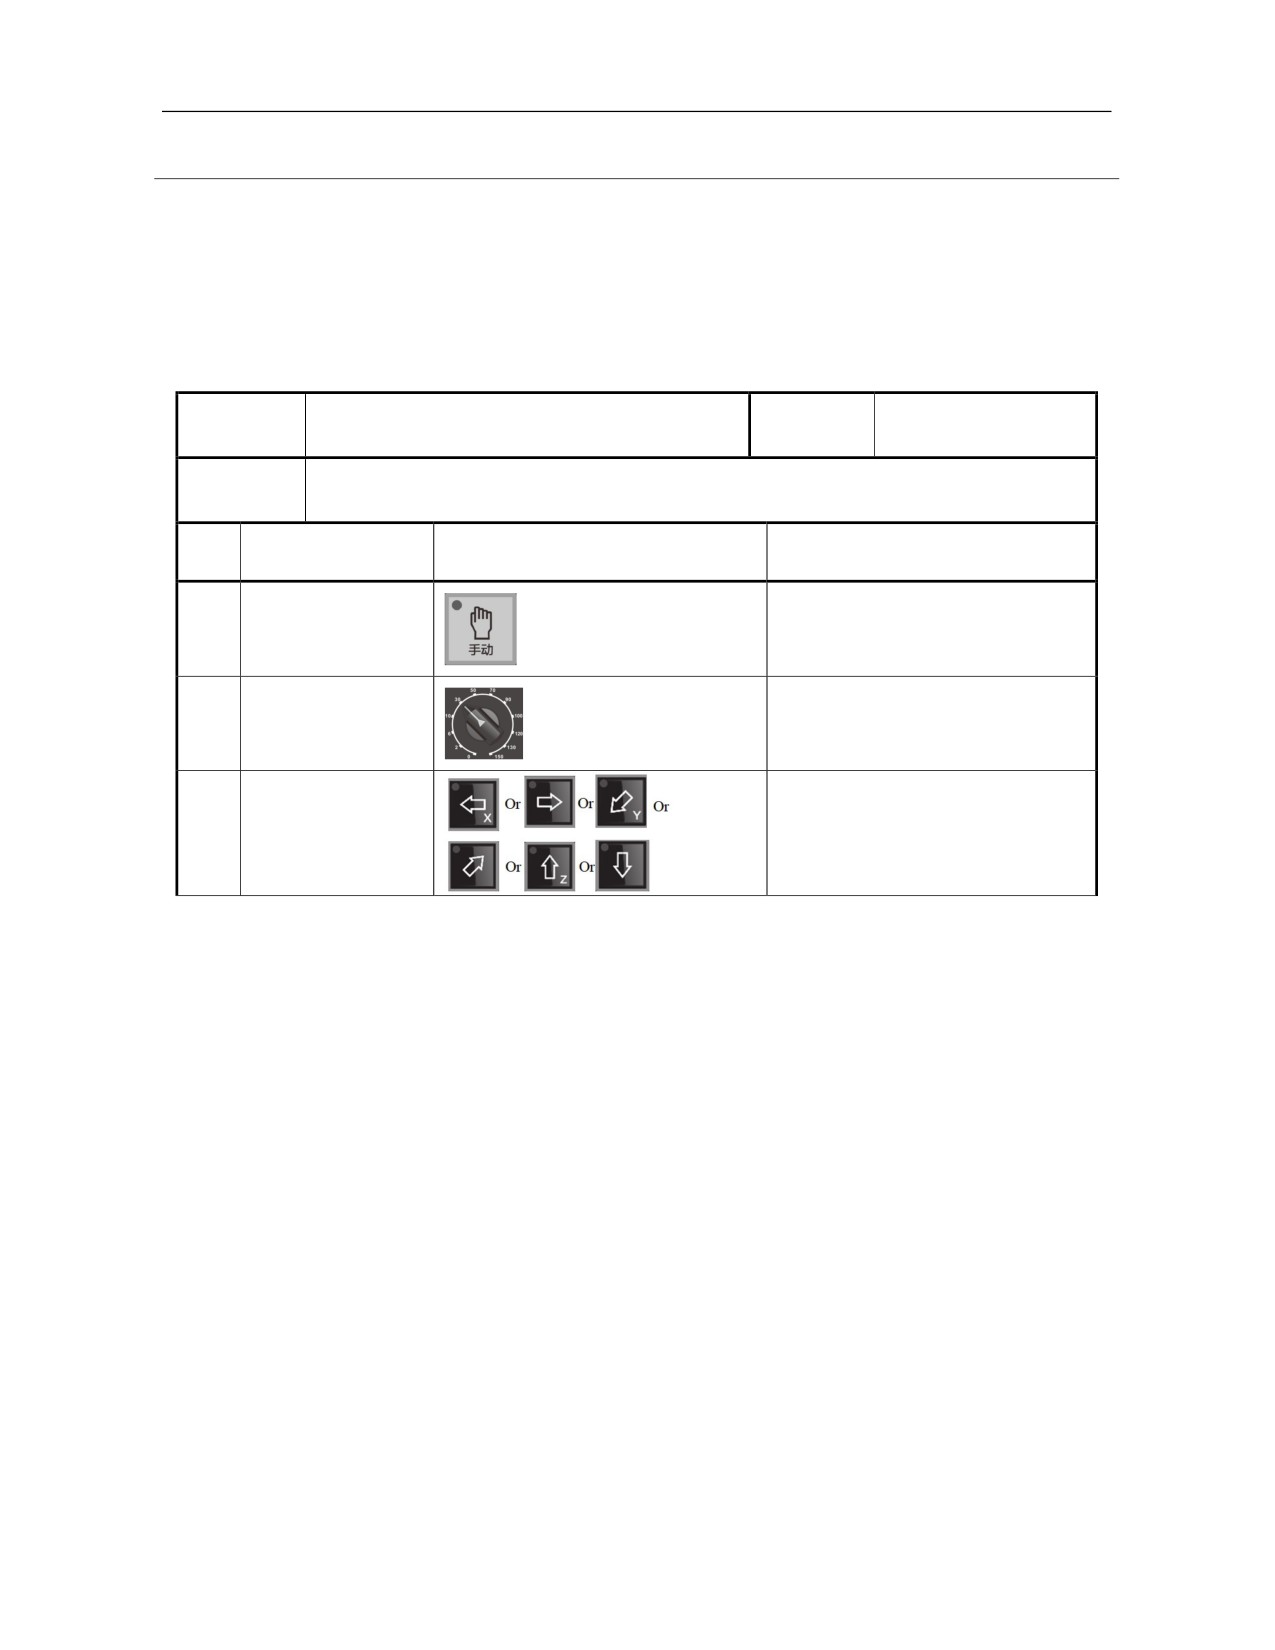
5.2 Move Coordinate Axis By Manual Feed
In this mode, movement of the coordinate axis can be controlled continuously.
Generally it is used for machining of simple parts. Press 【Jog】 working
mode key, [Axis feed] key and [Feedrate override] key on the control panel to
move coordinate axis of the machine tool manually.
Operation
Working
Move coordinate axis in jog mode
Joh
name
mode
Basic
(1) The need for continuous movement of machine tool
requirements
SN
Operation steps
Key
Description
1
Press 【Jog】
Set the effective working mode
Select
[Feedrate
The product of default speed and
2
override]
feedrate override
Press [Axis feed]
If the key is released, feed stops
Note:
Set the default speed by “Slow speed Jog speed” parameter (X: 100032,
Y: 101032, Z: 102032) in coordinate axis parameters;
Press all [Axis feed] keys, the indicator light lights up and the
corresponding machine tool axis moves continuously. Release it, the
indicator light lights off, and the machine tool stops moving;
Press multiple [Axis feed] keys simultaneously in Jog mode, the
corresponding axes move continuously.
106
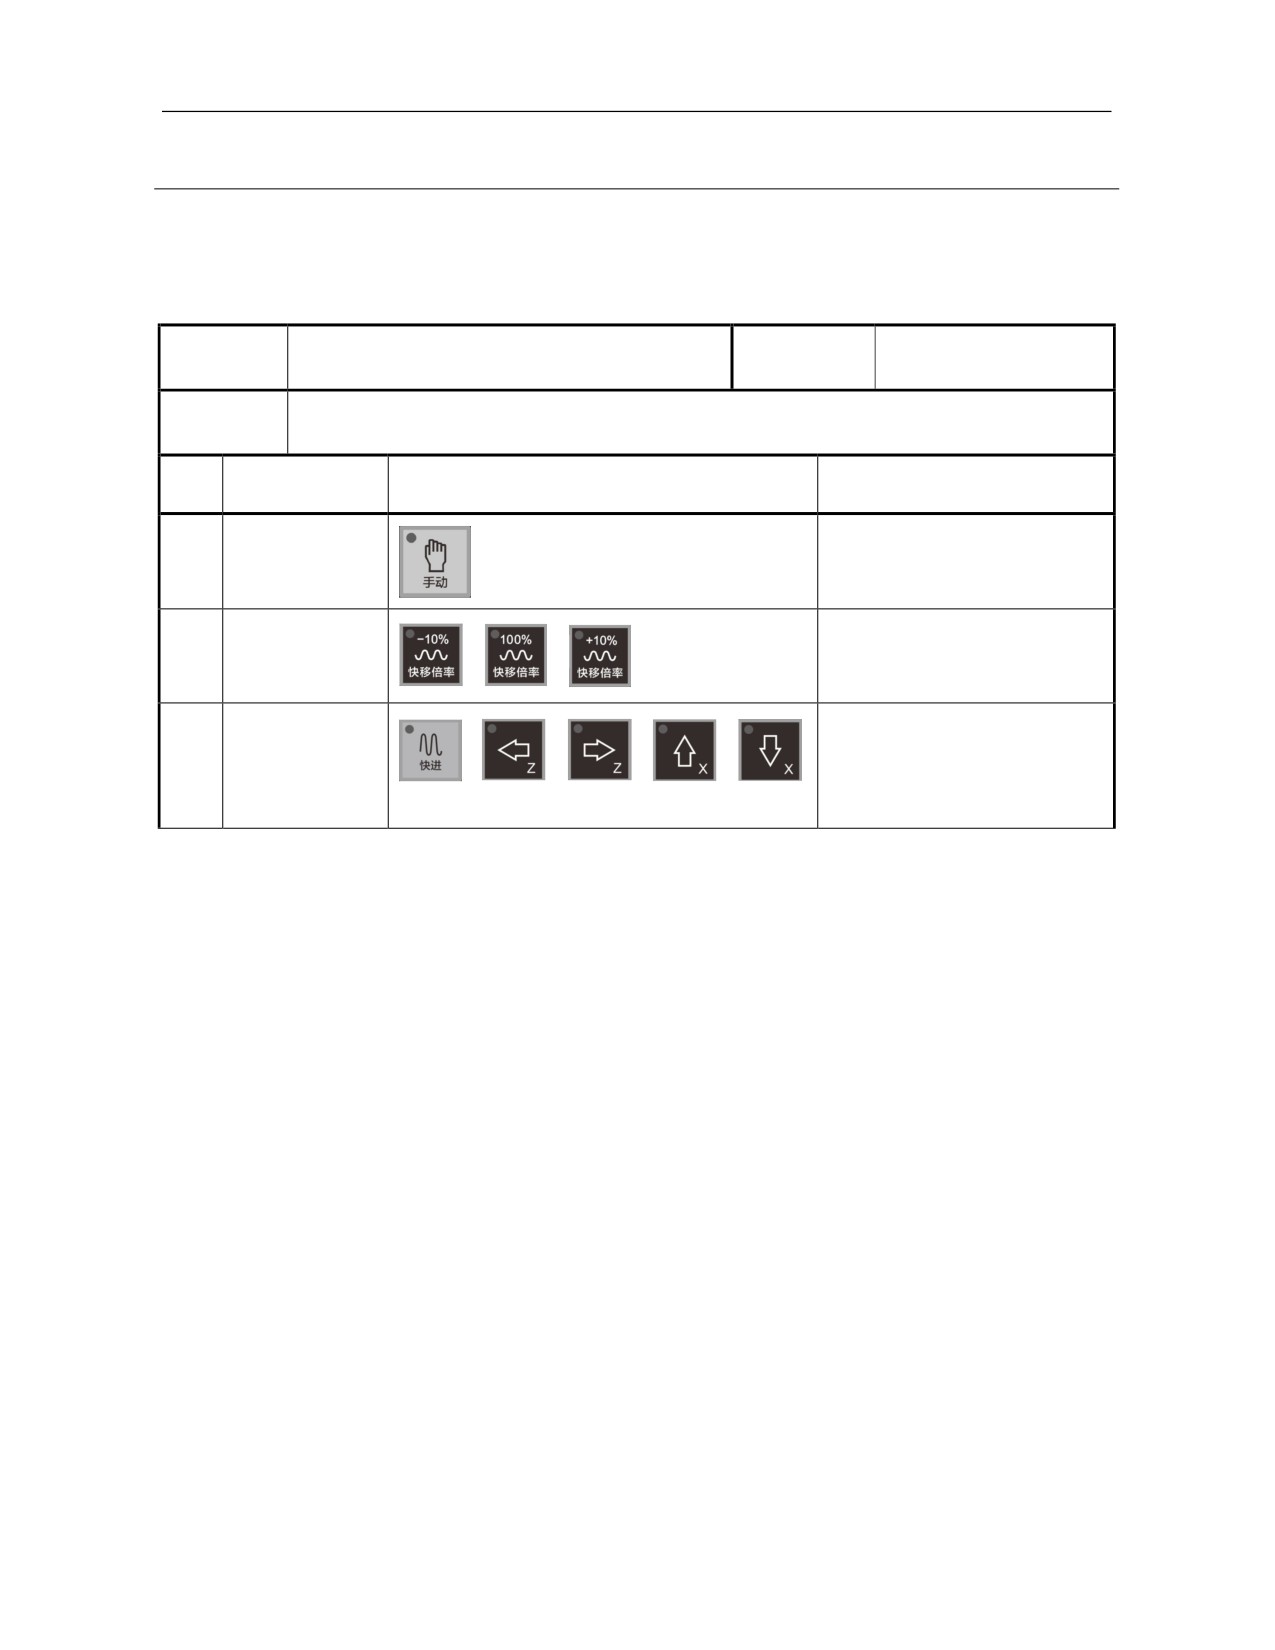
5.3 Rapidly Move Coordinate Axis Manually
This function can move the coordinate axis rapidly and continuously. Press
【Jog】 working mode, [Rapid traverse override] and [Rapid traverse]+[Axis
feed] on the control to complete this operation.
Operation
Working
Rapidly move coordinate axis in Jog mode
Jog
name
mode
Basic
(1) The need for rapid movement of machine tool
requirements
SN
Operation steps
Key
Description
1
Press 【Jog】
Set effective working mode
Select
[Rapid
The product of default speed
Or
Or
2
traverse
and
rapid
traverse
override]
magnification
Press
[Rapid traverse] and
Press
[Rapid
Or
Or
Or
[Axis feed] simultaneously
+
3
traverse]
and
If the key is released, feed
[Axis feed]
stops
Note:
Set the default speed by “High speed jog speed” parameter (X: 100033, Z:
102033) in coordinate axis parameter;
Based on 100% of default speed, increase and decrease rapid traverse
override rate as per 10%;
Under other modes than "Manual" mode, the [Rapid travers] key is
invalid.
107
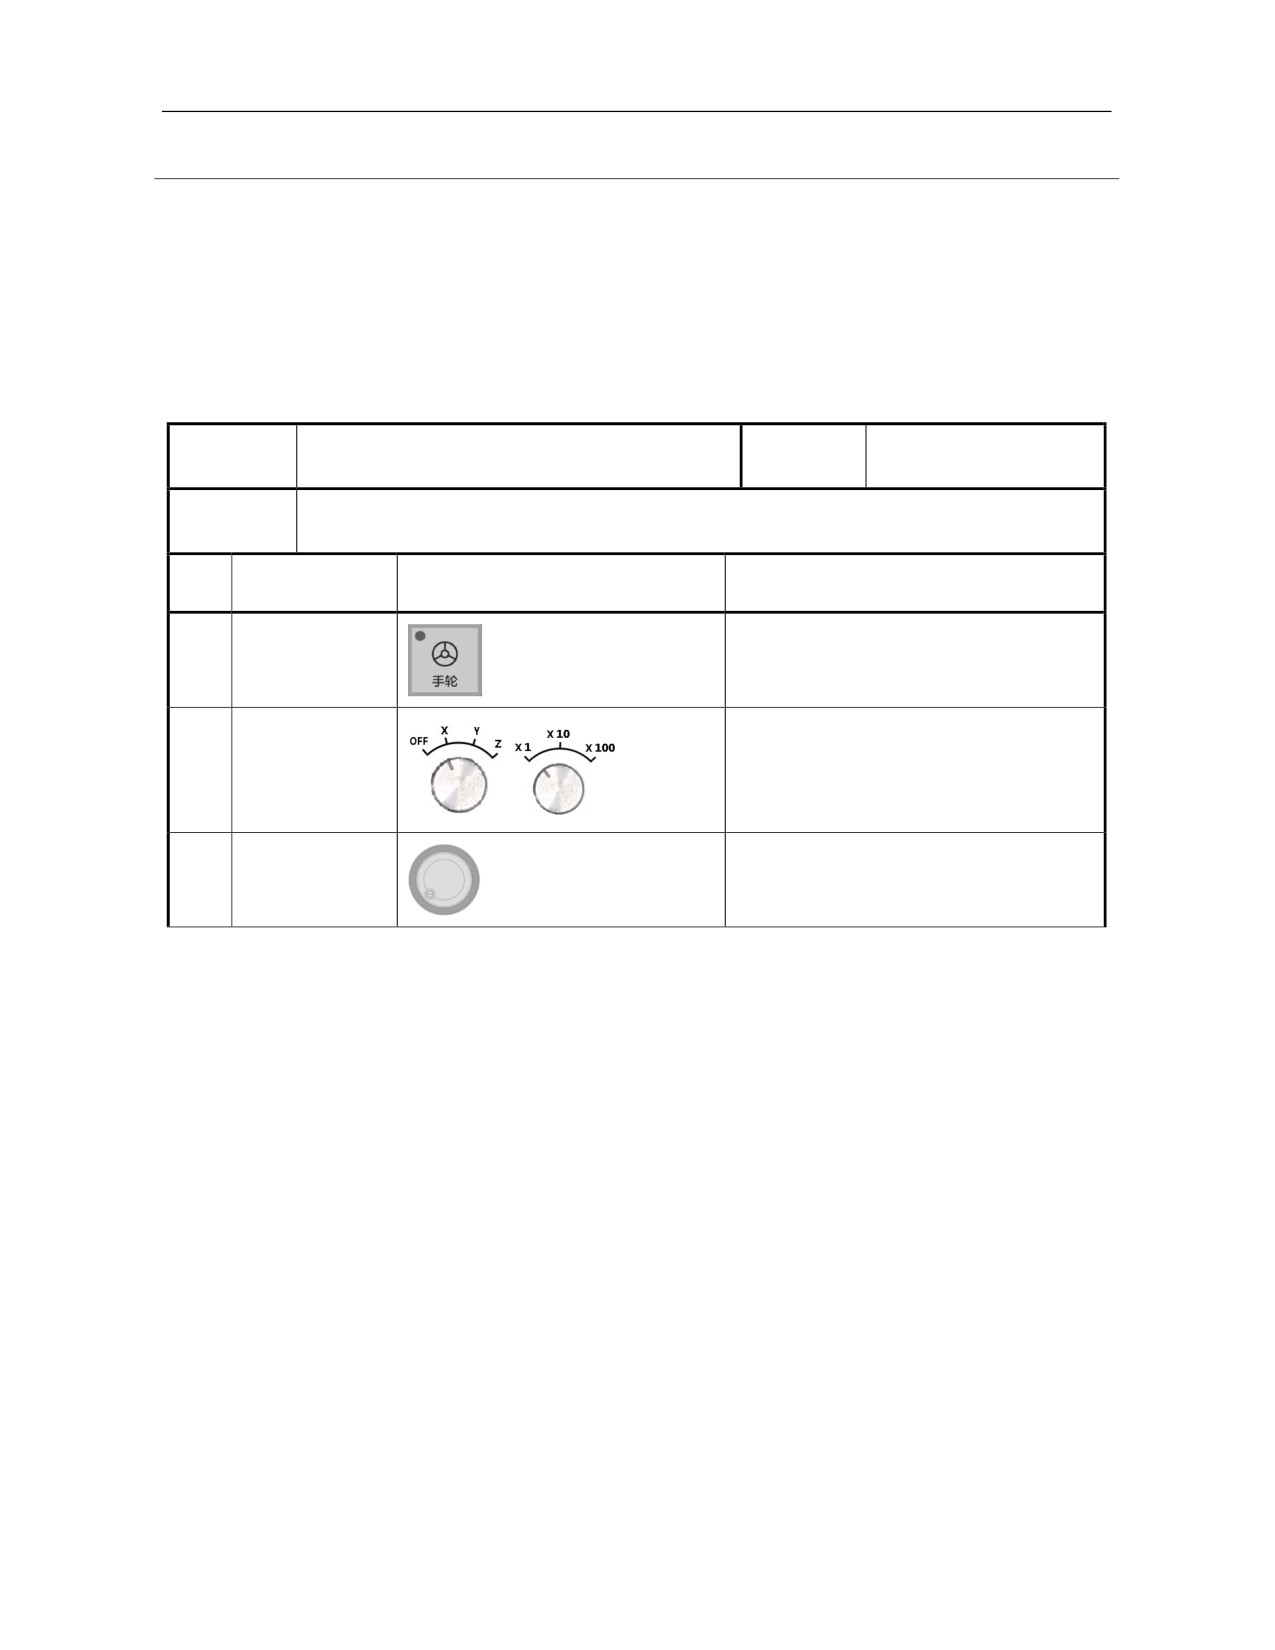
5.4 Move Coordinate Axis By Handwheel
In this mode, the axis can be moved continuously and quantitatively. It is
often used for tool setting or magazine commissioning and other operations
to control accurate positioning of machine tool.
Press 【Handwheel】 working mode, [Override] and [Axis feed] on the
control panel and MPG to move coordinate axis of the machine tool by
handwheel feed.
Operation
Working
Move the coordinate axis by handwheel
Handwheel
name
mode
Basic
(1) The need for continuous accurate movement of machine tool
requirements
SN
Operation steps
Key
Description
Press
1
Set effective working mode
【Handwheel】
Select
[Axis
For the axis selection,Select X, Y and Z
selection]
and
axis or OFF (no axis selection)
2
[Magnification]
The product of magnification and
of handheld unit
0.001mm
Swing
Continuously and accurately move the
[Handwheel]
machine tool
Note:
When the handwheel rotates, the movement distance per graduation is
the product of 0.001mm and magnification;
The handwheel should rotate at the speed of no greater than 5r/s. If the
handwheel rotates too fast, the movement distance is not equal to the
pulse count of handwheel, or the feed axis cannot stop immediately
when the handwheel stops rotating.
108
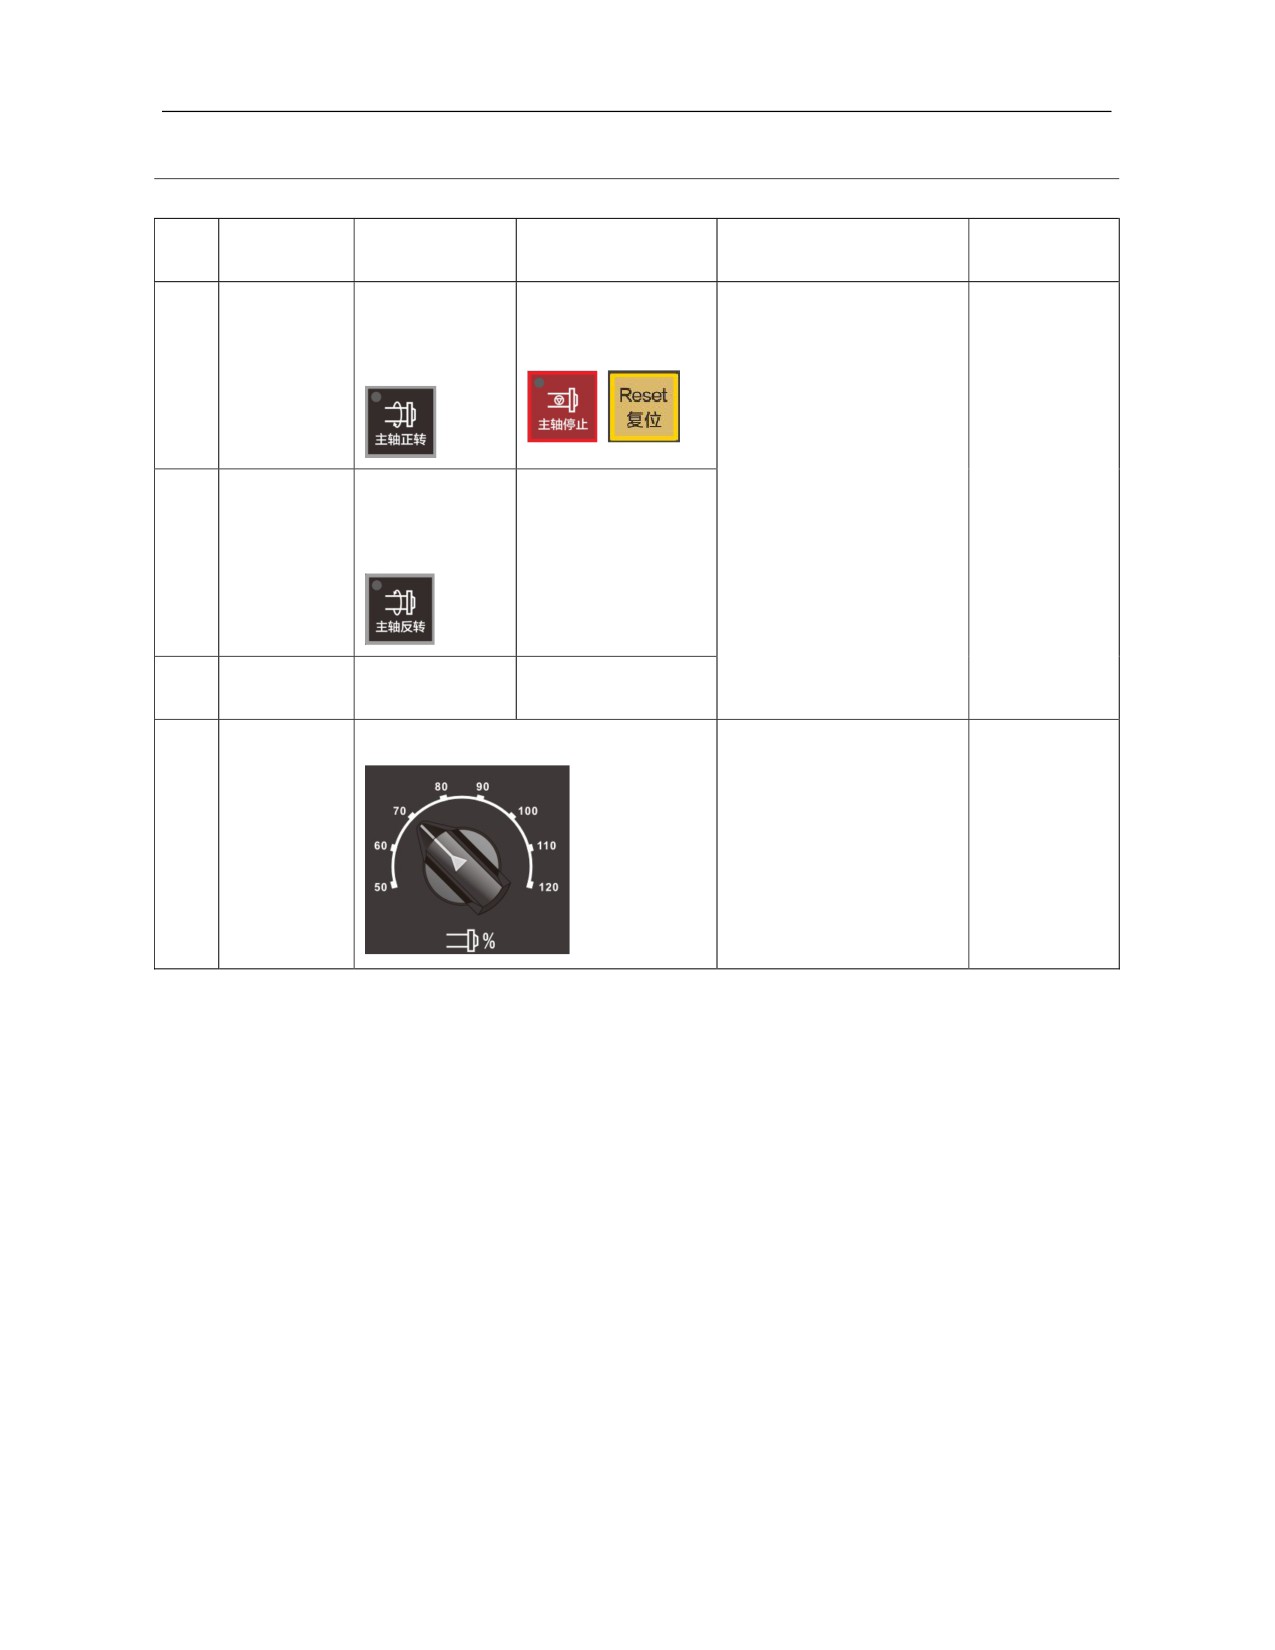
5.5 Manual Control Of Spindle
Operation
Effective
SN
Start operation
Stop operation
Description
name
working mode
Press [Spindle
1. [Spindle rotation CW],
Press
[Spindle stop]
rotation CW]
[Spindle rotation CCW]
or [Reset] key
Spindle
key
and [Spindle stop] are
1
rotation CW
interlocked;
2. While spindle control
needs to be changed for
Handwheel,
Press
[ Spindle
auto operation, switch to
incremental,
rotation CCW ]
jog mode and then switch
Spindle
jog
key
Press
[Spindle stop]
back to auto mode.
2
rotation
or [Reset]
CCW
Press
[Spindle
3
Spindle stop
Press [Reset]
stop]
Rotate [Spindle override] knob
Spindle
Handwheel,
1.
Override
range:
6
speed
incremental,
50%-120%.
magnification
jog, auto, MDI
109
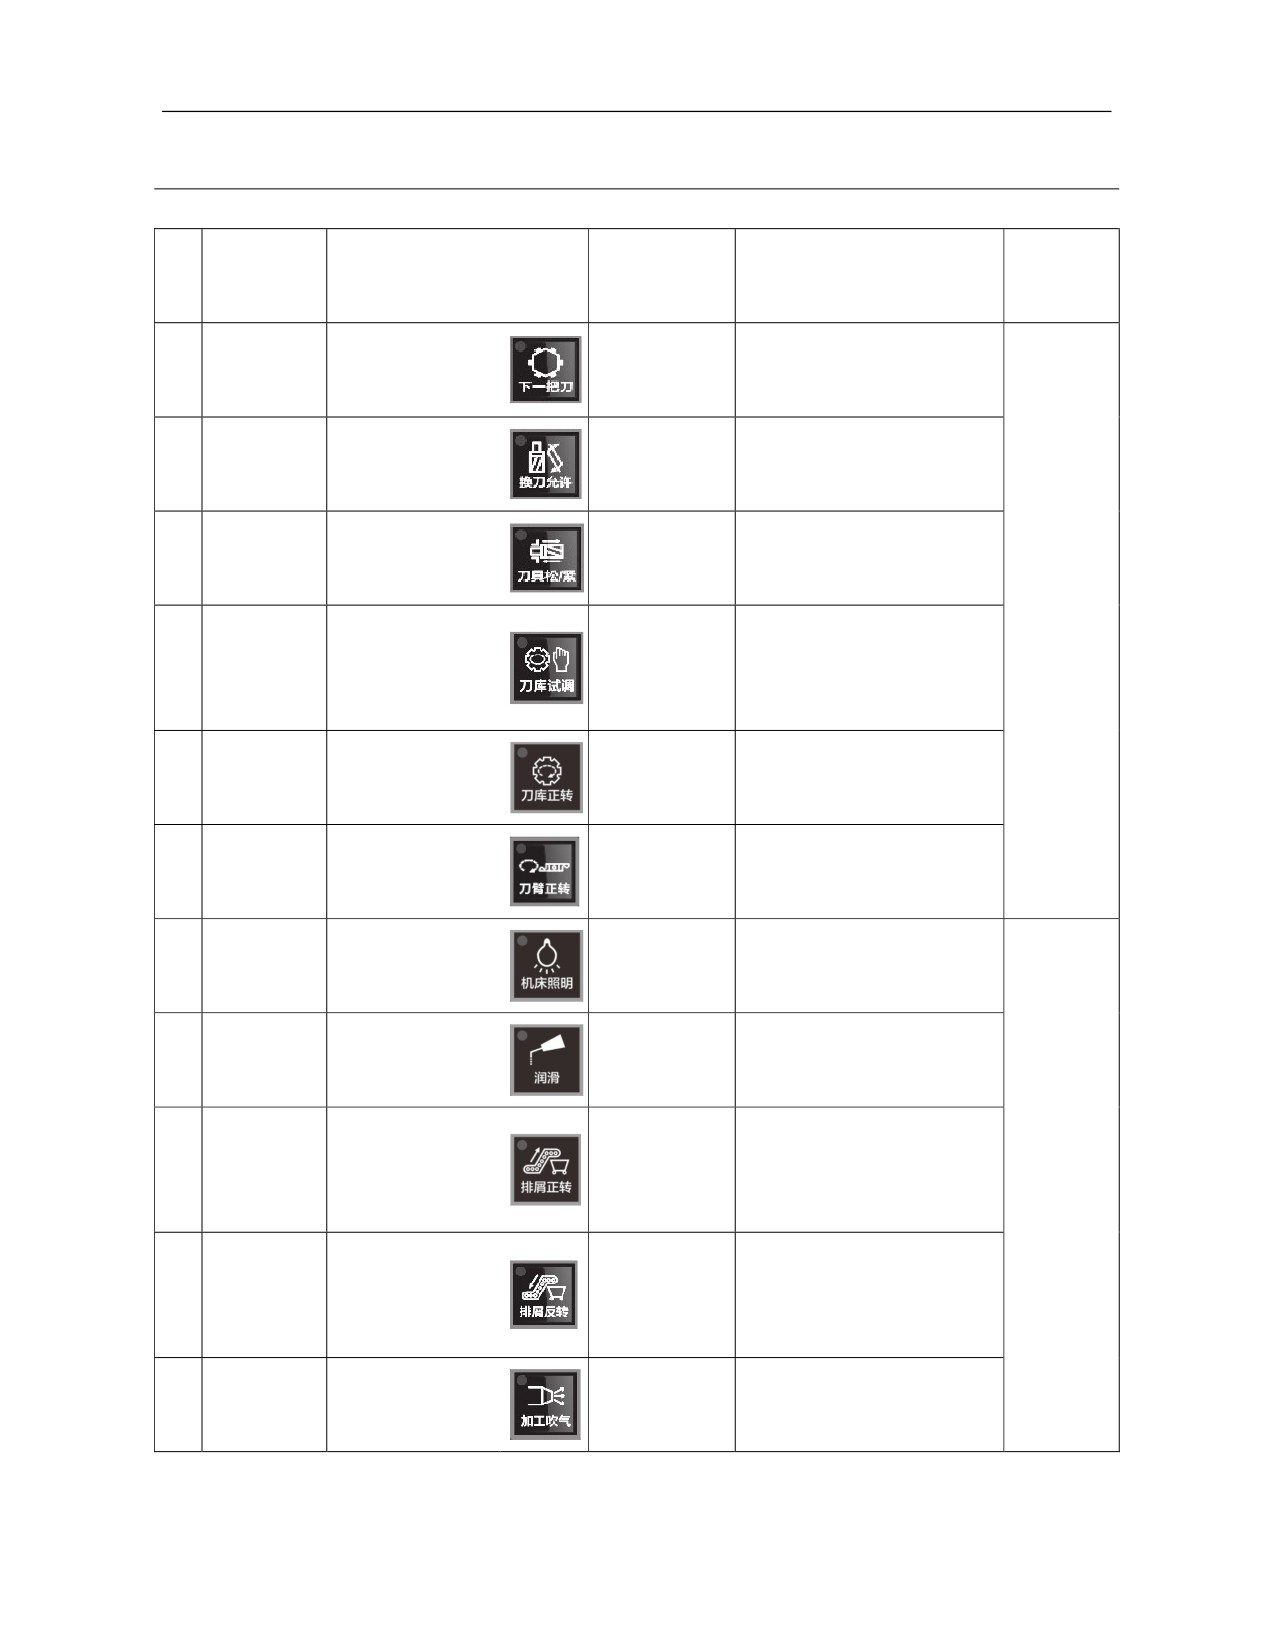
5.6 Other Manual Operations
Effective
Operation
SN
Start operation
Stop operation
Description
working
name
mode
Stop after the
Press this key to control the
1
Next tool
Press [Next tool]
next tool is
magazine tool to change the next
changed
tool.
Press [Tool change
Press this key
Press this key, and the system
2
Tool change
is]
again
allows tool changing.
Tool
When the tool change is allowed,
Press [Tool
Press this key
3
clamping/rele
press this key to control loosening
clamping/release]
again
ase
and tightening of spindle tool.
K2.0 is turned on for K parameter,
Jog
Magazine
Press this key
press this key, and the system
4
commissionin
Press [Magazine]
again
enters magazine commissioning
g
or reset key
state.
Stop after
The magazine rotates CW a tool
Magazine
Press [Magazine
5
rotating a tool
position as this key is pressed
rotation CW
CW]
position
once.
Stop after
Under magazine commissioning
Tool
arm
6
Press [Tool arm CW]
rotating CW an
state, the tool arm rotates CW an
rotation CW
action
action.
Machine
Press this key to cyclically control
Press this key
6
lighting
Press [Lighting]
ON or OFF of light. It is OFF by
again
ON/OFF
default.
Press this to cyclically control ON
Lubrication
Press this key
7
Press [Lubrication]
or OFF of lubricating pump. It is
ON/OFF
again
OFF by default.
Press this key to control the CW
Jog,
CW rotation
Press [Chip removal
Press this key
rotation or stop of chip removal
handwheel,
8
of
chip
CW]
again
motor cyclically. It is OFF by
incremental,
removal
default.
auto, MDI,
Press this key to control the CCW
single block
CCW removal
Press [Chip removal
Press this key
rotation or stop of chip removal
8
of
chip
CCW]
again
motor cyclically. It is OFF by
removal
default.
Press this key to control the start
Blowing
Press this key
9
Press [Blowing]
or stop of blowing cyclically. It is
ON/OFF
again
OFF by default.
110
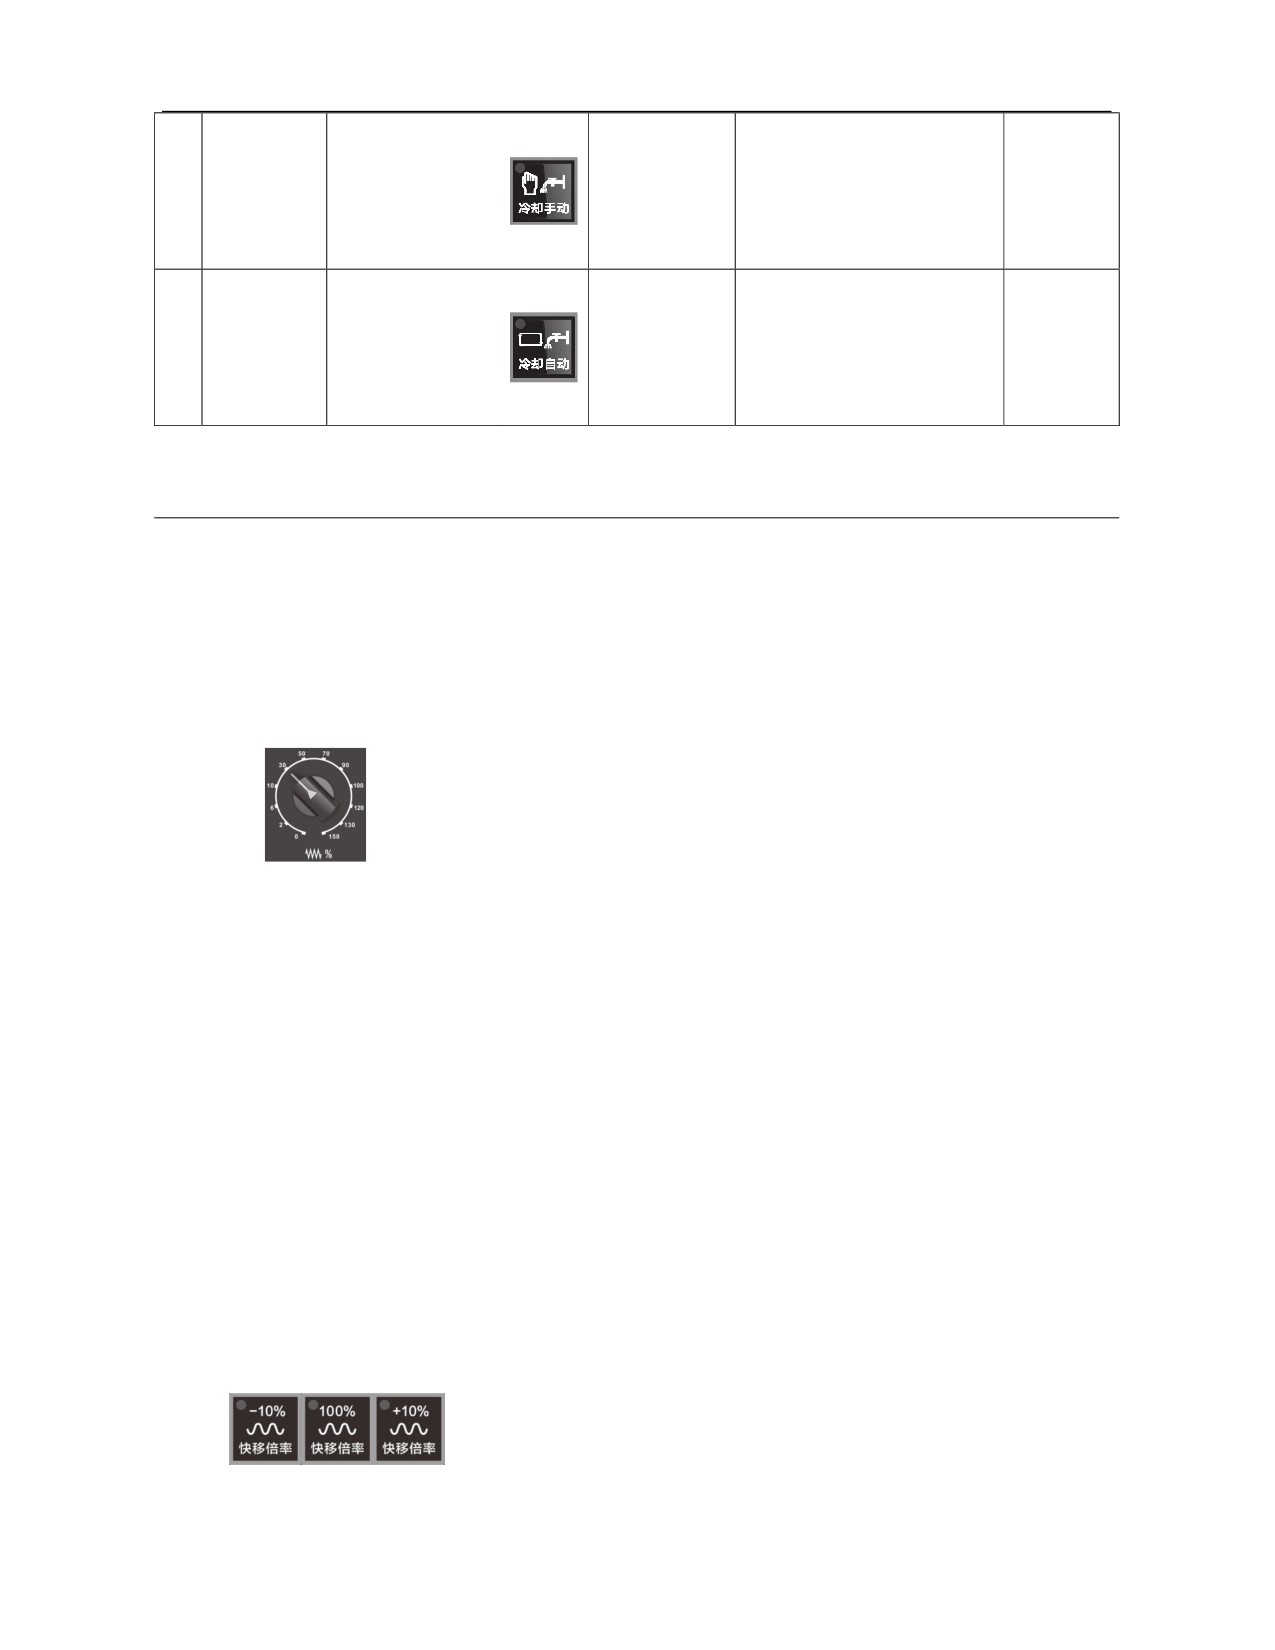
Press this key to control the start
Manual
or stop of cooling pump
Press
[Manual
Press this key
10
cooling
cyclically. It is OFF by default.
cooling]
again
ON/OFF
Start/stop cannot be controlled
through M8 and M9 codes.
Press this key to control the start
or stop of cooling pump
Auto cooling
Press this key
11
Press [Auto cooling]
cyclically. It is OFF by default.
Auto
Start/stop
again or M9 code
Start/stop cannot be controlled
through M8 and M9 codes.
5.7 Speed Override
5.7.1
Feedrate Override
Under auto mode or MDI operation mode, when the feedrate specified by F
command is too high or too low, rotate the feedrate override switch to adjust
the feedrate in the program. Override range: 0%-120%.
If the feedrate is not designated in the automatic operational program and
"Manual MS" function is not enabled, the system runs as per the set value of
channel parameter "Default feedrate" 040030. If "Manual MS" function is
enabled, the system runs as per the speed configured in "Manual MS" and the
feedrate override in the operational process is valid.
Under manual continuous feed mode, the manual feedrate can be adjusted by
this switch, and the system runs as per the set value of axis parameter
"Low-speed jog speed" 100032 (X axis), 101032 (Y axis) and 102032 (Z axis).
Note:
When this knob is turned to 0, the feedrate override is 0, and rapid
traverse override rate changes to 0 temporarily. If the feedrate override is
changed to a non-zero value, the rapid traverse override recovers to the
original value;
Feedrate override is invalid during rigid tapping machining, the program
runs with the original speed;
5.7.2 Rapid Traverse Speed Override
When a program runs under auto or MDI mode, G00 speed of X, Y and Z
axes is set by "Maximum rapid traverse speed" parameters 100034, 101034
and 102034;
Under jog rapid traverse mode, the jog rapid traverse speed can be
111
regulated by "Rapid traverse override". Manual rapid traverse speed of X,
Y and Z axes is set by "High speed jog speed" parameters 100033, 101033
and 102033;
The rapid traverse block in jog rapid traverse, G00 rapid traverse and
canned cycle, G28, and G29 can increase and decrease by 10% by "Rapid
traverse magnification", and the override range is 0%-100%.
Note:
As requested by some users, rapid traverse override of some systems is
set as follows: When rapid traverse override is set as 0%, the actual
rapid traverse is 2%. Actual rapid traverse override is 0% only when the
feedrate override is also 0.
112
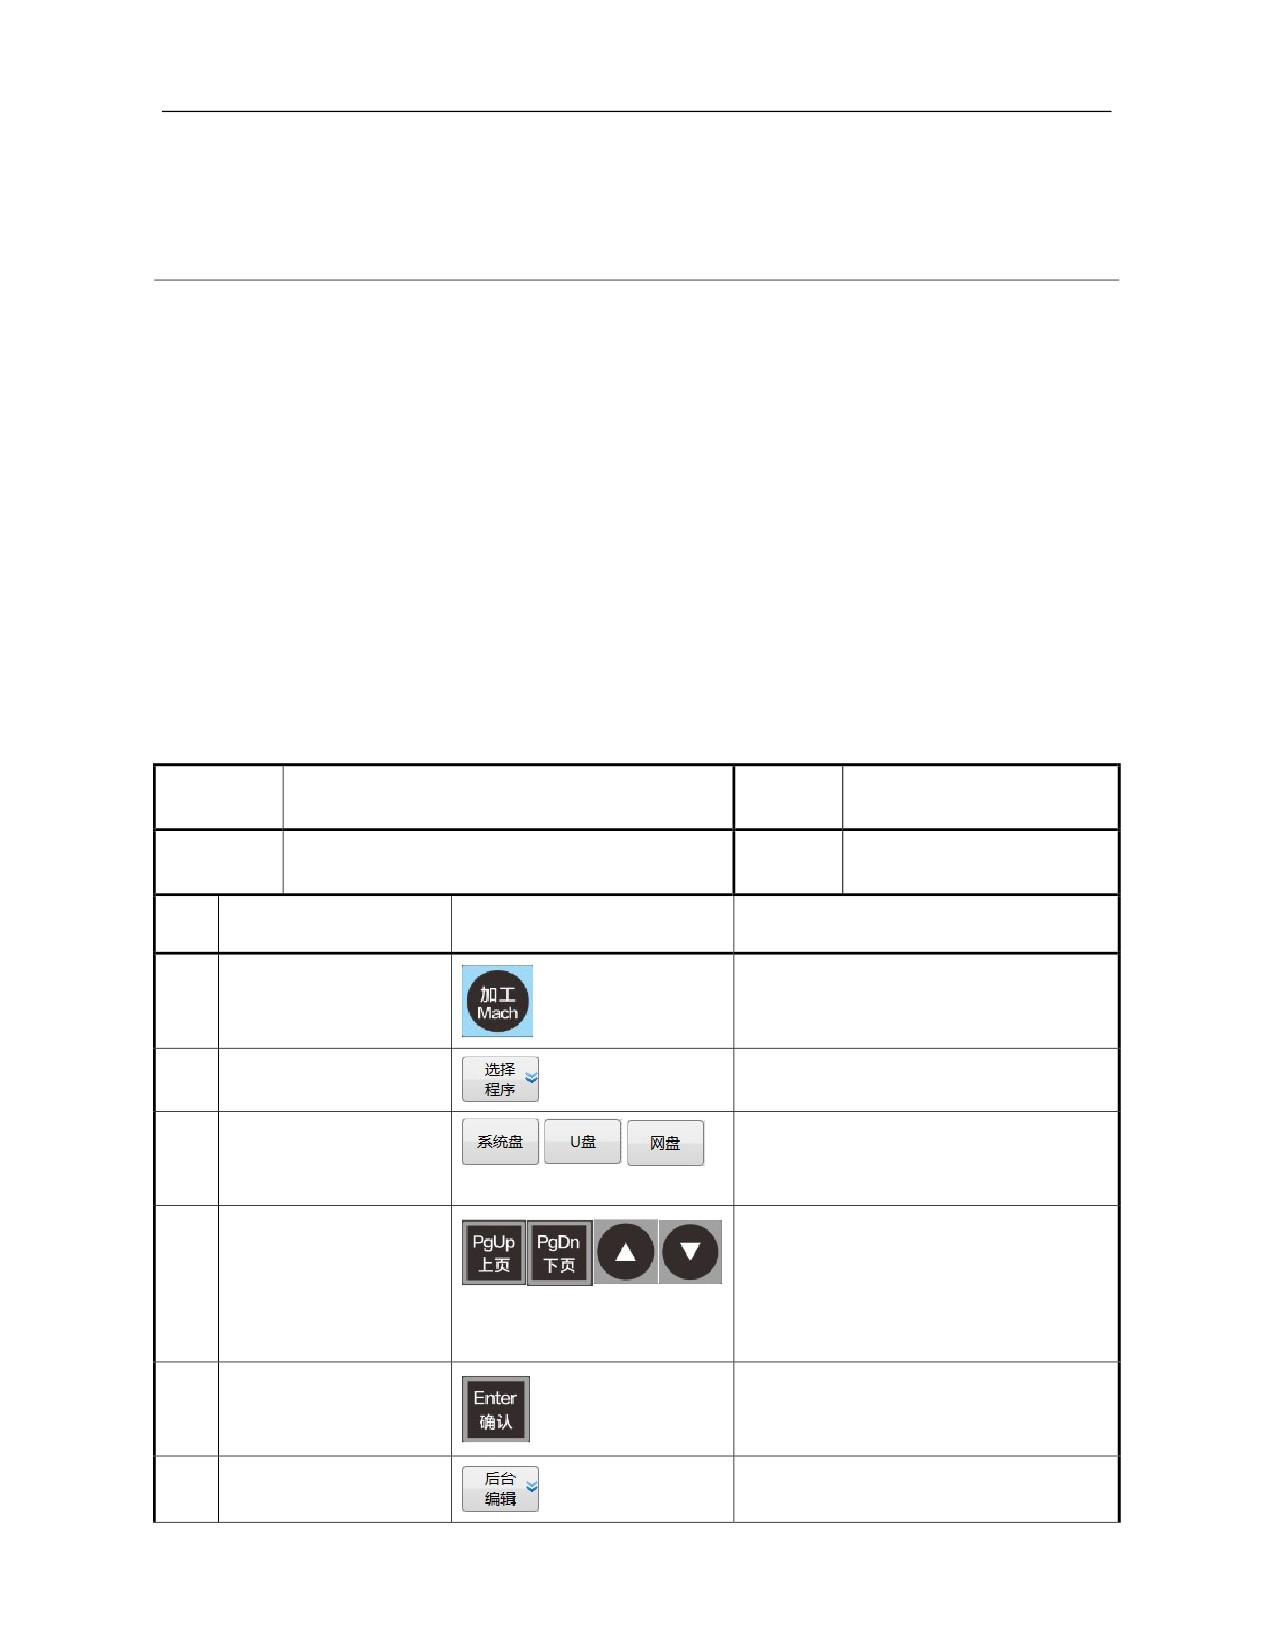
6 Program Edit and Management
6.1 Program Search
HNC-808DiM system has the program search function under
"Machining" function set and "Program" function set, but usage of
programs found under the two function sets is different. Programs found
under "Machining" function set are used for machining program loading,
program backstage editing and other operations; while programs searched
under "Program" function set are used for program management
including program copy, paste and delete and program transmission
among different disks,etc.
6.1.1 Machining Or Editing Program Search
6.1.1.1 Direct search
Operation
Working
Machining or editing program search
Auto, single block, jog
name
mode
Basic
Display
3.2.2
"Select
program"
Programs to be searched have already existed
requirements
interface
sub-interface
SN
Operation steps
Key
Description
1
Press 〖Machining〗
Default interface, main menu
"Select program" sub-interface and
2
Press 『Select program』
menu
Press
『 System disk 』
Select system disk, USB flash disk,
3
and 『USB flash disk』,
network disk and user disk
and so on
Complete the search and move the
cursor to the program name to be
Press
「 Cursor 」 or
4
searched
「PgUp/PgDn」
The found programs can be used for
two purposes
The found programs are used for
5.1
Press 「Enter」
loading machining program and running
The found programs are used for
5.2
Press 『Backstage edit』
entering program editing status
113
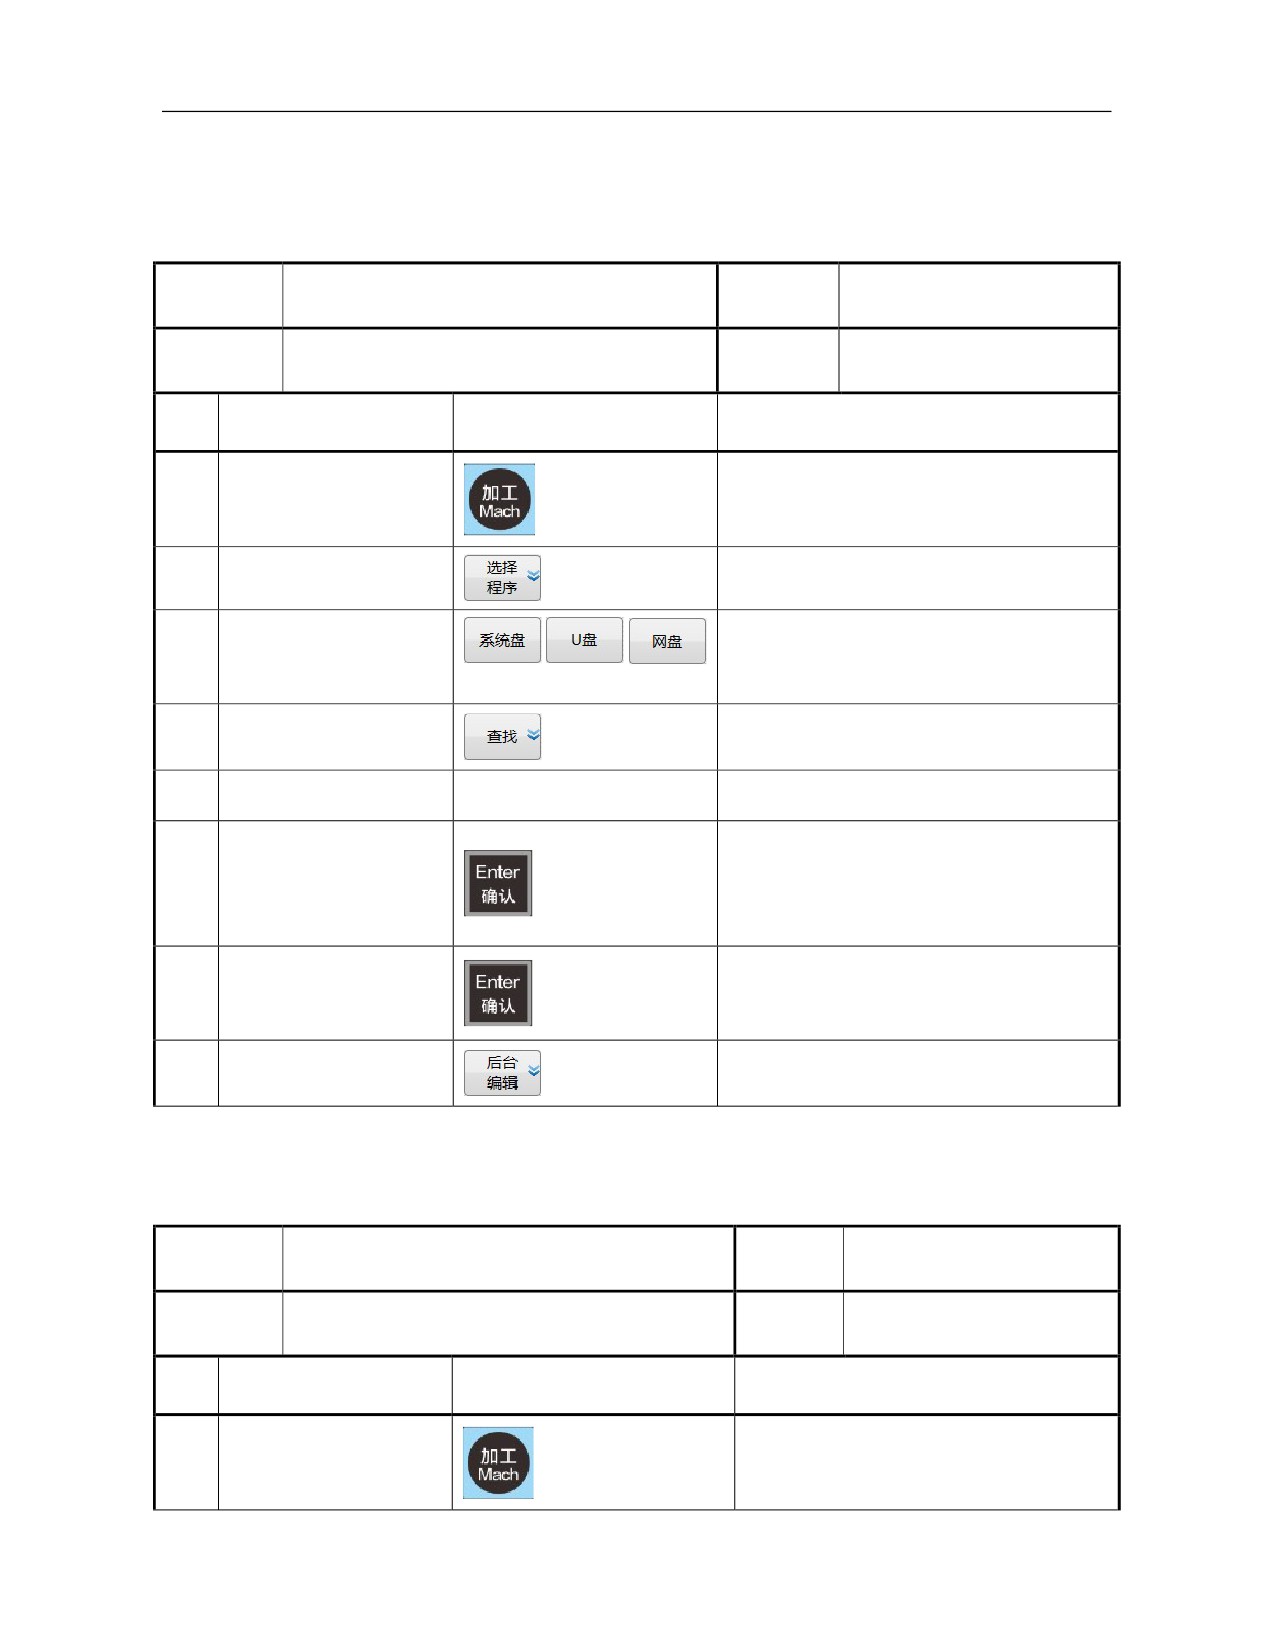
6.1.1.2 Search programs under different disks by "Find" function
Operation
Working
Search of machining or editing program
Auto, single block, jog
name
mode
Basic
Display
3.2.2
"Select
program"
Programs to be searched have already existed
requirements
interface
sub-interface
SN
Operation steps
Key
Description
1
Press 〖Machining〗
Default interface, main menu
"Select program" sub-interface, level 2
2
Press 『Select program』
menu
Press
『 System disk 』
Select system disk, USB flash disk,
3
and 『USB flash disk』,
network disk and user disk
etc.
4
Press 『Find』
Prompt: Enter a file name
5
(Enter a file name)
---
e.g.: Onc123
Complete searching programs, and move
the cursor to the program to be searched;
6
Press 「Enter」
Searched programs can be used for two
purposes
Searched programs are used for loading
7.1
Press 「Enter」
machining program and running
Searched programs are used for entering
7.2
Press 『Backstage edit』
program editing status
6.1.1.3 Search programs under the directory by "Search" function
Operation
Working
Search of machining or editing program
Auto, single block, jog
name
mode
Basic
Display
3.2.2
"Select
program"
Programs to be searched have already existed
requirements
interface
sub-interface
SN
Operation steps
Key
Description
1
Press 〖Machining〗
Default interface, main menu
114
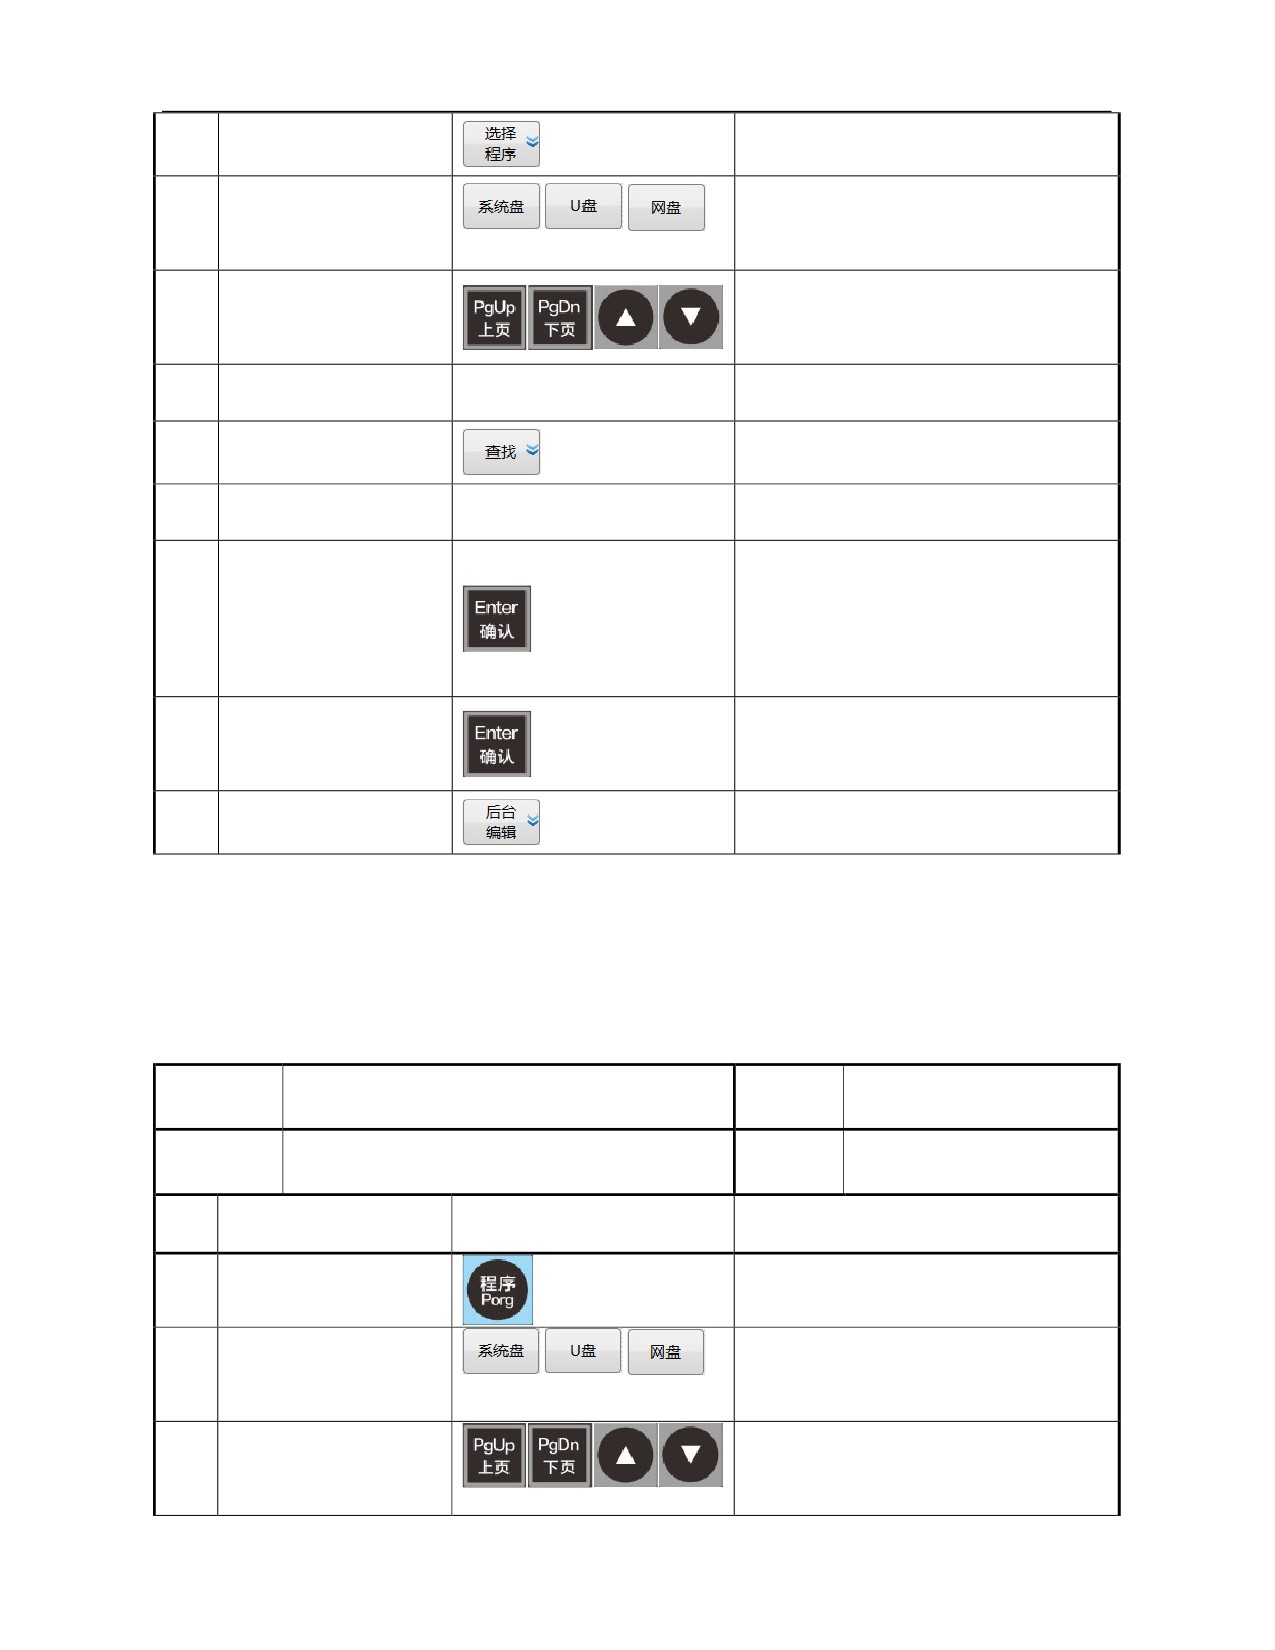
"Select program" sub-interface, level 2
2
Press 『Select program』
menu
Press 『System disk』
Select system disk, USB flash disk,
3
and 『USB flash disk』,
network disk and user disk
etc.
「Cursor」 or
Move the cursor to the selected file
4
「PgUp/PgDn」
directory name
5
Press 「Enter」
Confirm and open the directory
6
Press 『Find』
Prompt: Enter a file name
7
(Enter a file name)
---
e.g.: Onc123
Complete searching programs and
move the cursor to the program to be
8
Press 「Enter」
searched;
The found programs can be used for
two purposes
The found programs are used for
9.1
Press 「Enter」
loading machining program and
running.
The found programs are used for
9.2
Press 『Backstage edit』
entering program editing status
6.1.2 Search Of Management Program (to Be Transmitted and Deleted)
6.1.2.1 Direct search
Operation
Working
Search of management (copy, paste) program
Auto, single block, jog
name
mode
Basic
Display
3.4 "Program" function set
Programs to be searched have already existed
requirements
interface
interface
SN
Operation steps
Key
Description
1
Press 〖Program〗
Default interface, main menu
Press
『System disk』
Select system disk, USB flash disk,
2
and 『USB flash disk』,
network disk and user disk
etc.
Complete search
Press
「 Cursor 」 or
3
Move the cursor to the program name to
「PgUp/PgDn」
be searched
115
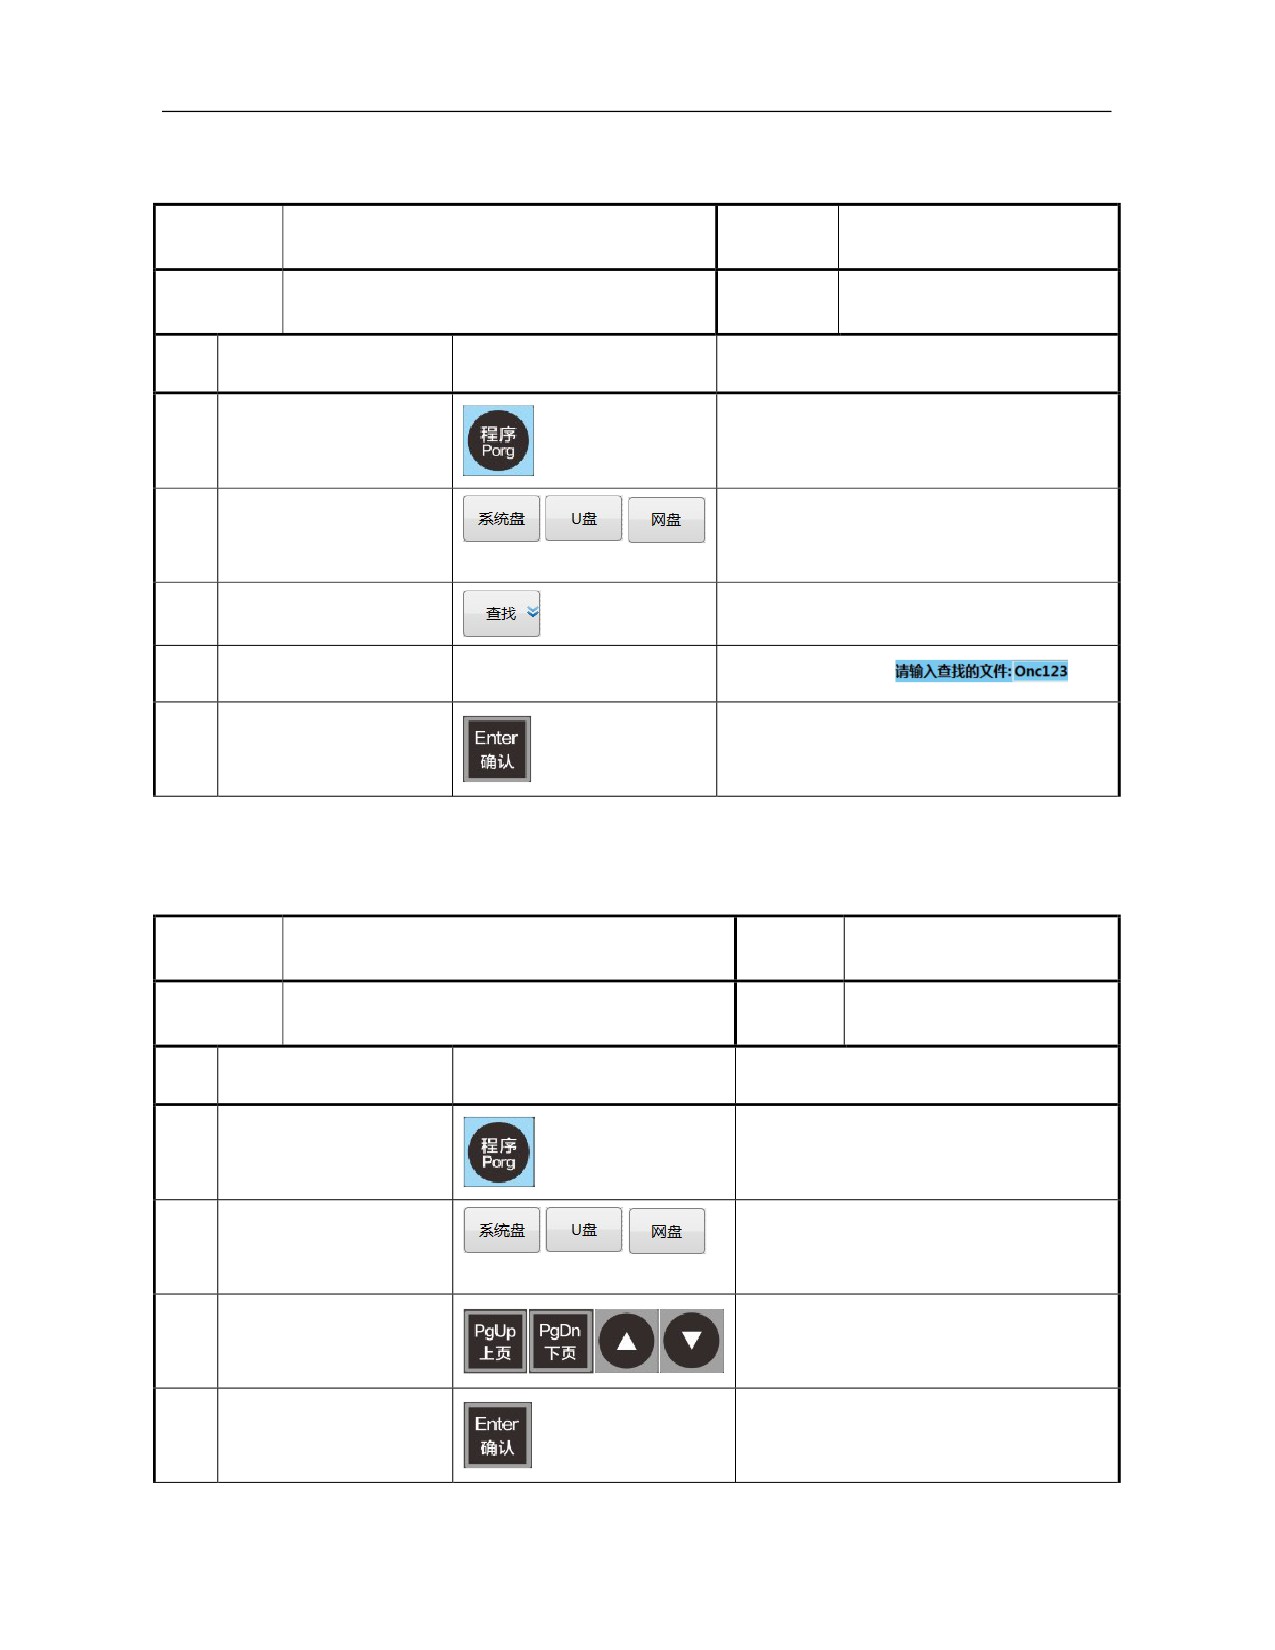
6.1.2.2 Search programs under different disks by "Search" function
Operation
Working
Search of management (copy, paste) program
Auto, single block, jog
name
mode
Basic
Display
3.4 "Program" function set
Programs to be searched have already existed
requirements
interface
interface
SN
Operation steps
Key
Description
1
Press 〖Program〗
Default interface, main menu
Press
『 System disk 』
Select system disk, USB flash disk,
2
and 『USB flash disk』,
network disk and user disk
etc.
3
Press 『Find』
Prompt: Enter a file name
e.g.: Onc123
4
(Enter a file name)
---
Complete search
5
Press 「Enter」
Move the cursor to the program name to
be searched
6.1.2.3 Search programs under the directory by "Search" function
Operation
Working
Search of management (copy, paste) program
Auto, single block, jog
name
mode
Basic
Display
3.4 "Program" function set
Programs to be searched have already existed
requirements
interface
interface
SN
Operation steps
Key
Description
1
Press 〖Program〗
Default interface, main menu
Press
『 System disk 』
Select system disk, USB flash disk,
2
and 『USB flash disk』,
network disk and user disk
etc.
「 Cursor
」 or
Move the cursor to the selected file
3
「PgUp/PgDn」
directory name
4
Press 「Enter」
Confirm and open the directory
116
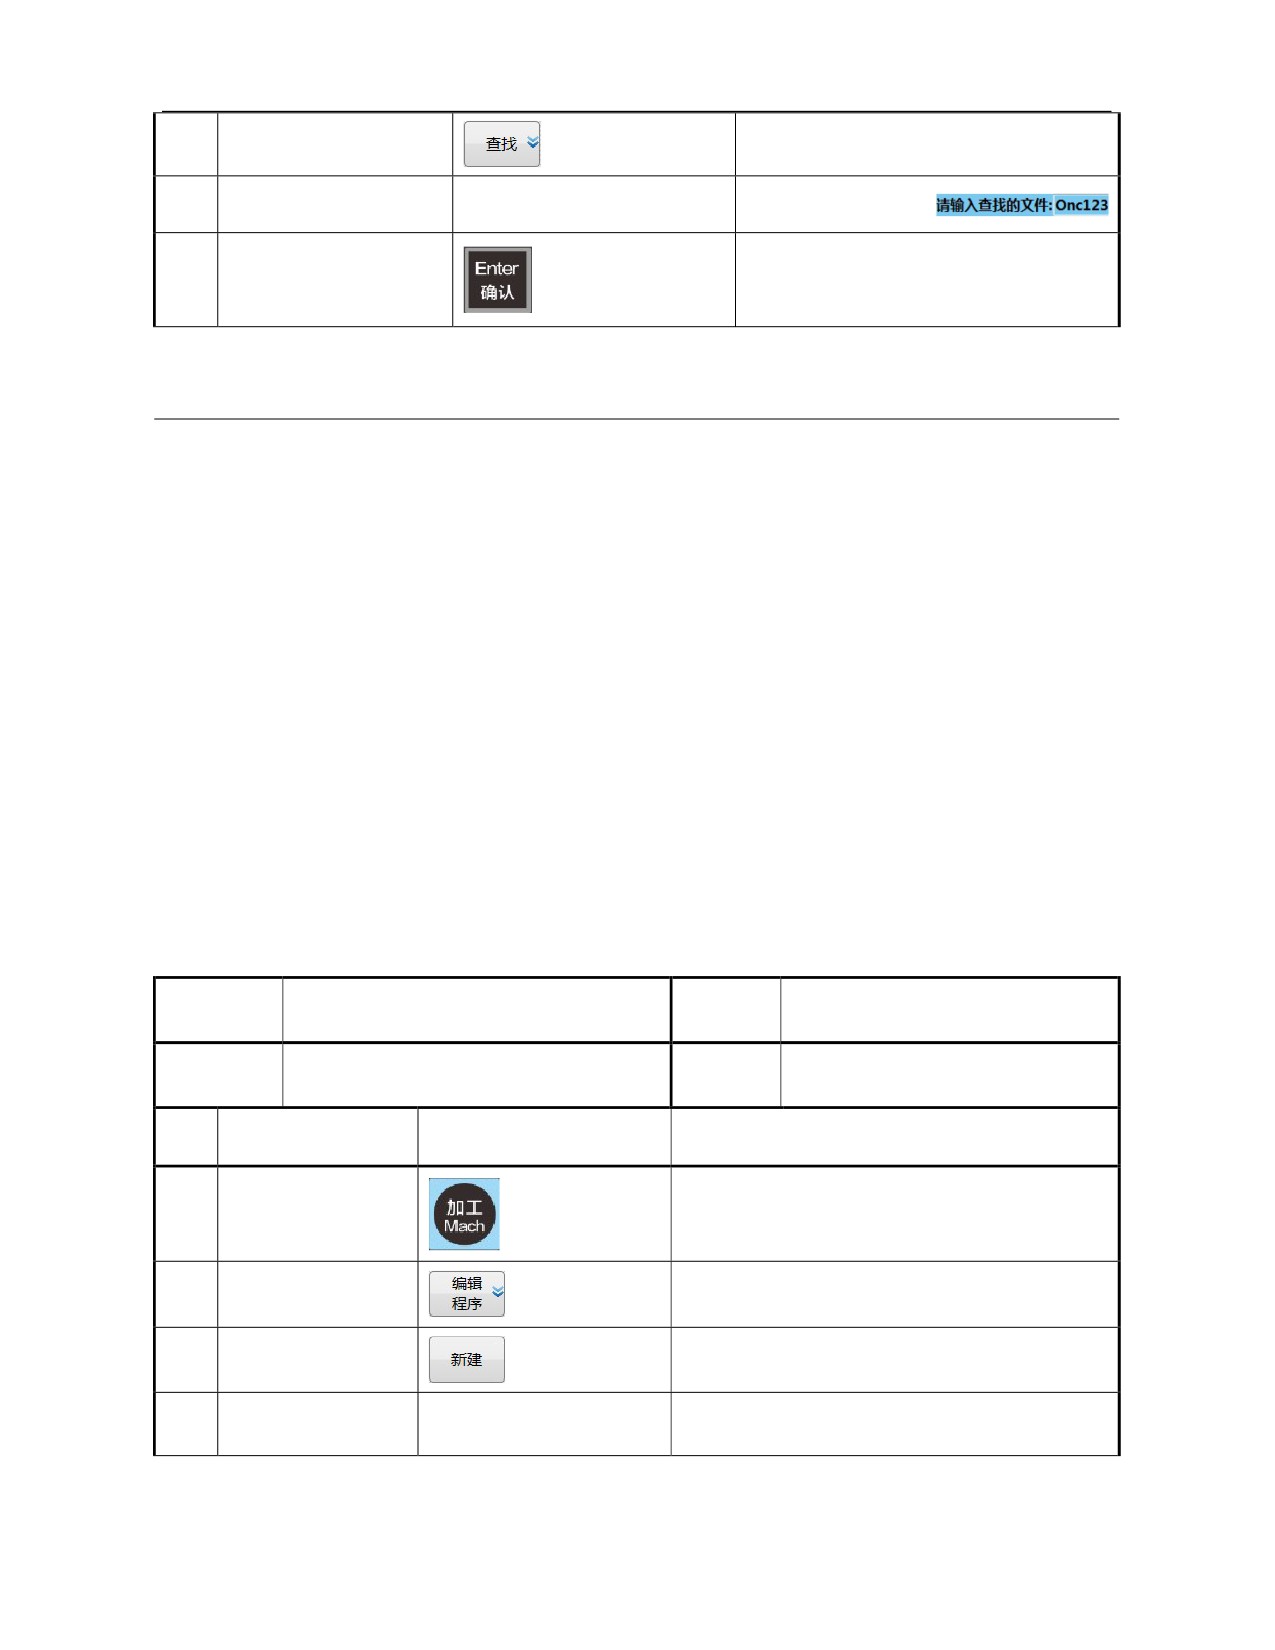
5
Press 『Find』
Prompt: Enter a file name
e.g.: Onc123
6
(Enter a file name)
---
Complete search
7
Press 「Enter」
Move the cursor to the program name
to be searched
6.2 Program Edit
This system enters program editing status in 4 ways. 1. " New program"
under "Machining" function set; 2. "Program edit" under "Machining"
function set; 3. "Backstage edit" under "Machining" function set; 4. "New
programs" under "Program" function set.
6.2.1 Create New Programs
The "New programs" function can be found both under "Machining"
function set and "Program" function set. Although the two " are operated
in different ways, their functions are basically identical. Configuration of
two "Create new programs" can simplify operator's use.
6.2.1.1 Create new programs under "Machining" function set
1) Create new programs under "Program edit" sub-interface
Operation
Create new programs under "Machining"
Working
Auto, single block, jog
name
function set
mode
Basic
The new program name cannot be the same
Display
3.2.3 "Edit program" sub-interface
requirements
as existing program names
interface
SN
Operation steps
Key
Description
1
Press 〖Machining〗
Default interface, main menu
Press
『 Edit
2
Enter current loading program editing status
program』
3
Press 『New』
Prompt: Please enter a file name
(Enter a program
4
---
Input program name such as O321
name)
117
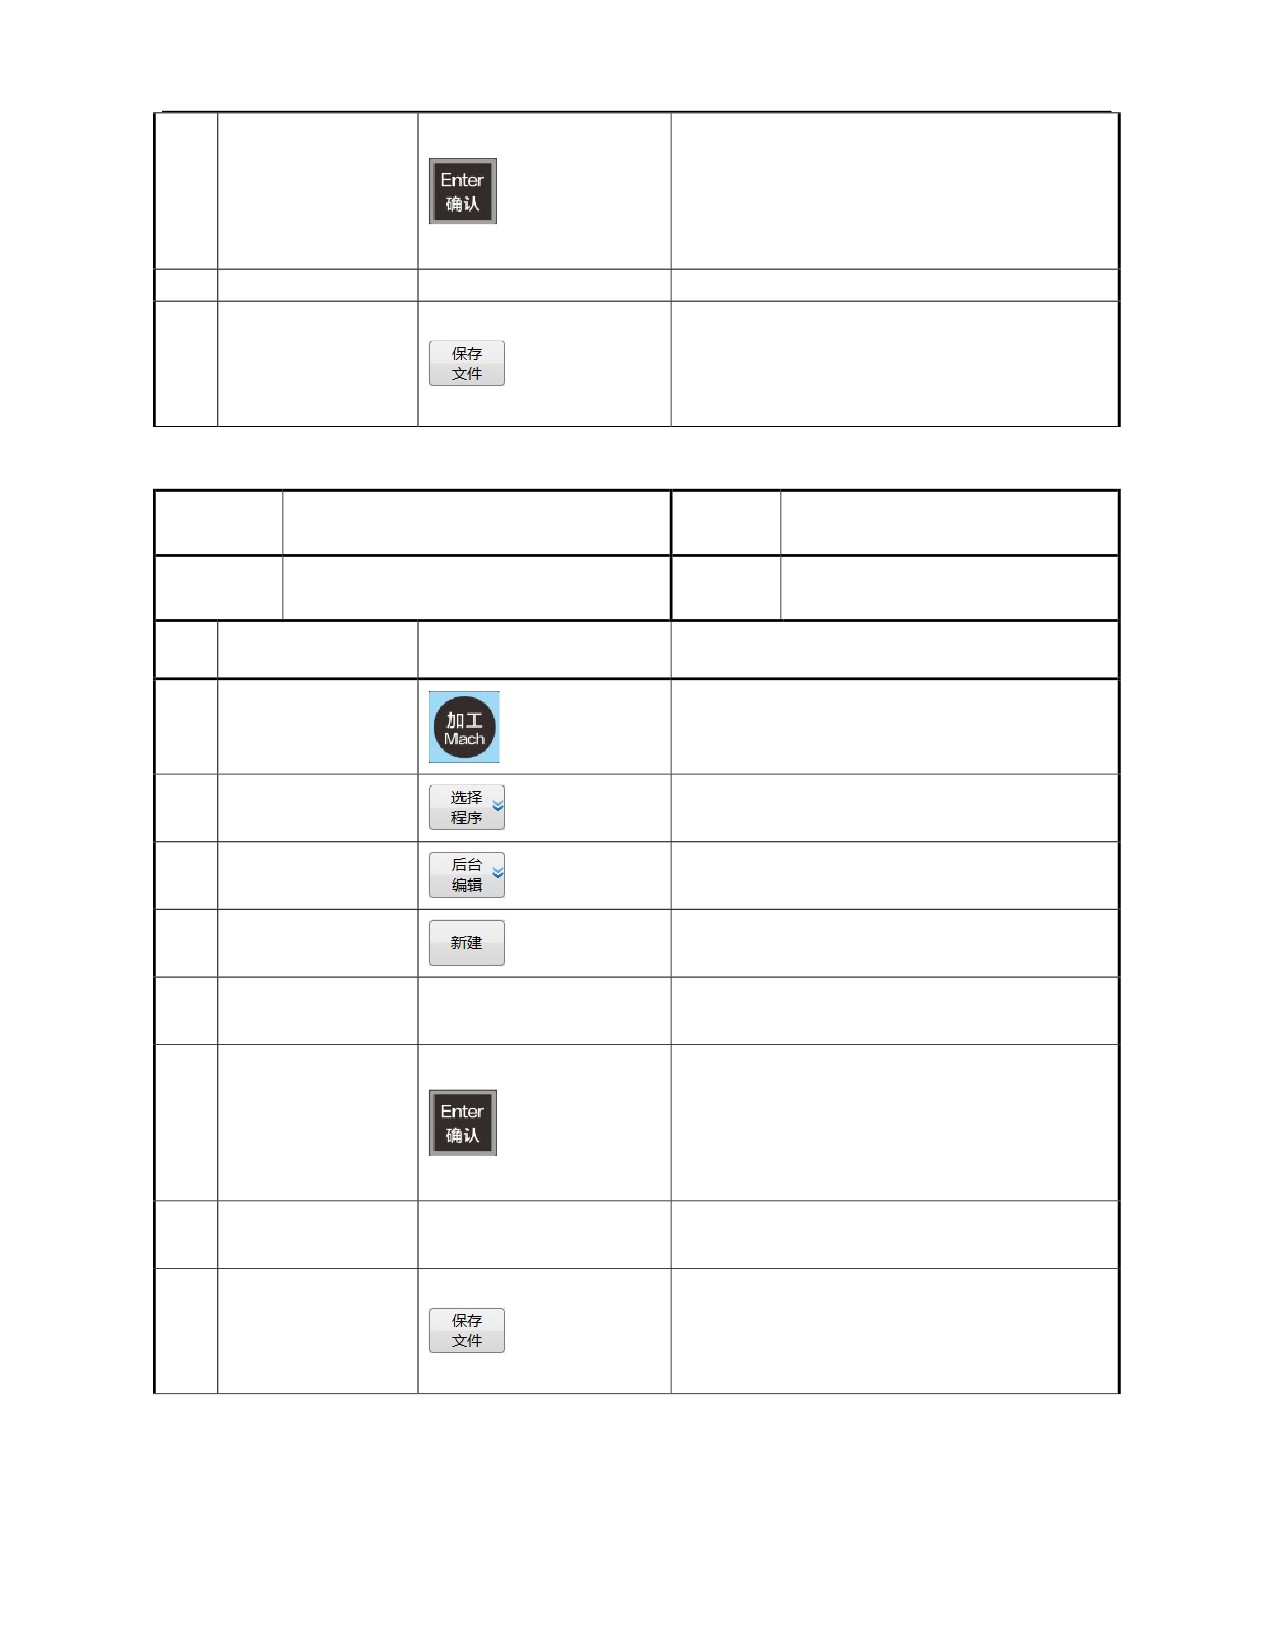
Confirm the new file name and enter the editing
area
5
Press 「Enter」
To rename, a prompt message will be given and
a request for reentering a program name will be
given
6
(Edit program)
---
Complete program editing
A prompt message Program has been saved will
be given
7
Press 『Save』
The new program is immediately loaded as
machining program
2) Create new programs under "Backstage edit" sub-interface
Operation
Create new programs under "Machining"
Working
Auto, single block, jog
name
function set
mode
Basic
The new program name cannot be the same
Display
3.2.2 "Select program" sub-interface
requirements
as existing program names
interface
SN
Operation steps
Key
Description
1
Press 〖Machining〗
Default interface, main menu
Select
『 Select
2
"Select program" sub-interface, level 2 menu
program』
Press
『 Backstage
Enter the "Backstage edit" sub-interface, level 3
edit』
interface
3
Press 『New』
Prompt: Please enter a file name
(Enter a program
4
---
Input program name such as O321
name)
Confirm the new file name and enter the editing
area
5
Press 「Enter」
To rename, a prompt message will be given and
a request for reentering a program name will be
given
6
(Edit program)
---
Complete program editing
A prompt message Program has been saved will
be given
7
Press 『Save file』
The new program is immediately loaded as
machining program
118
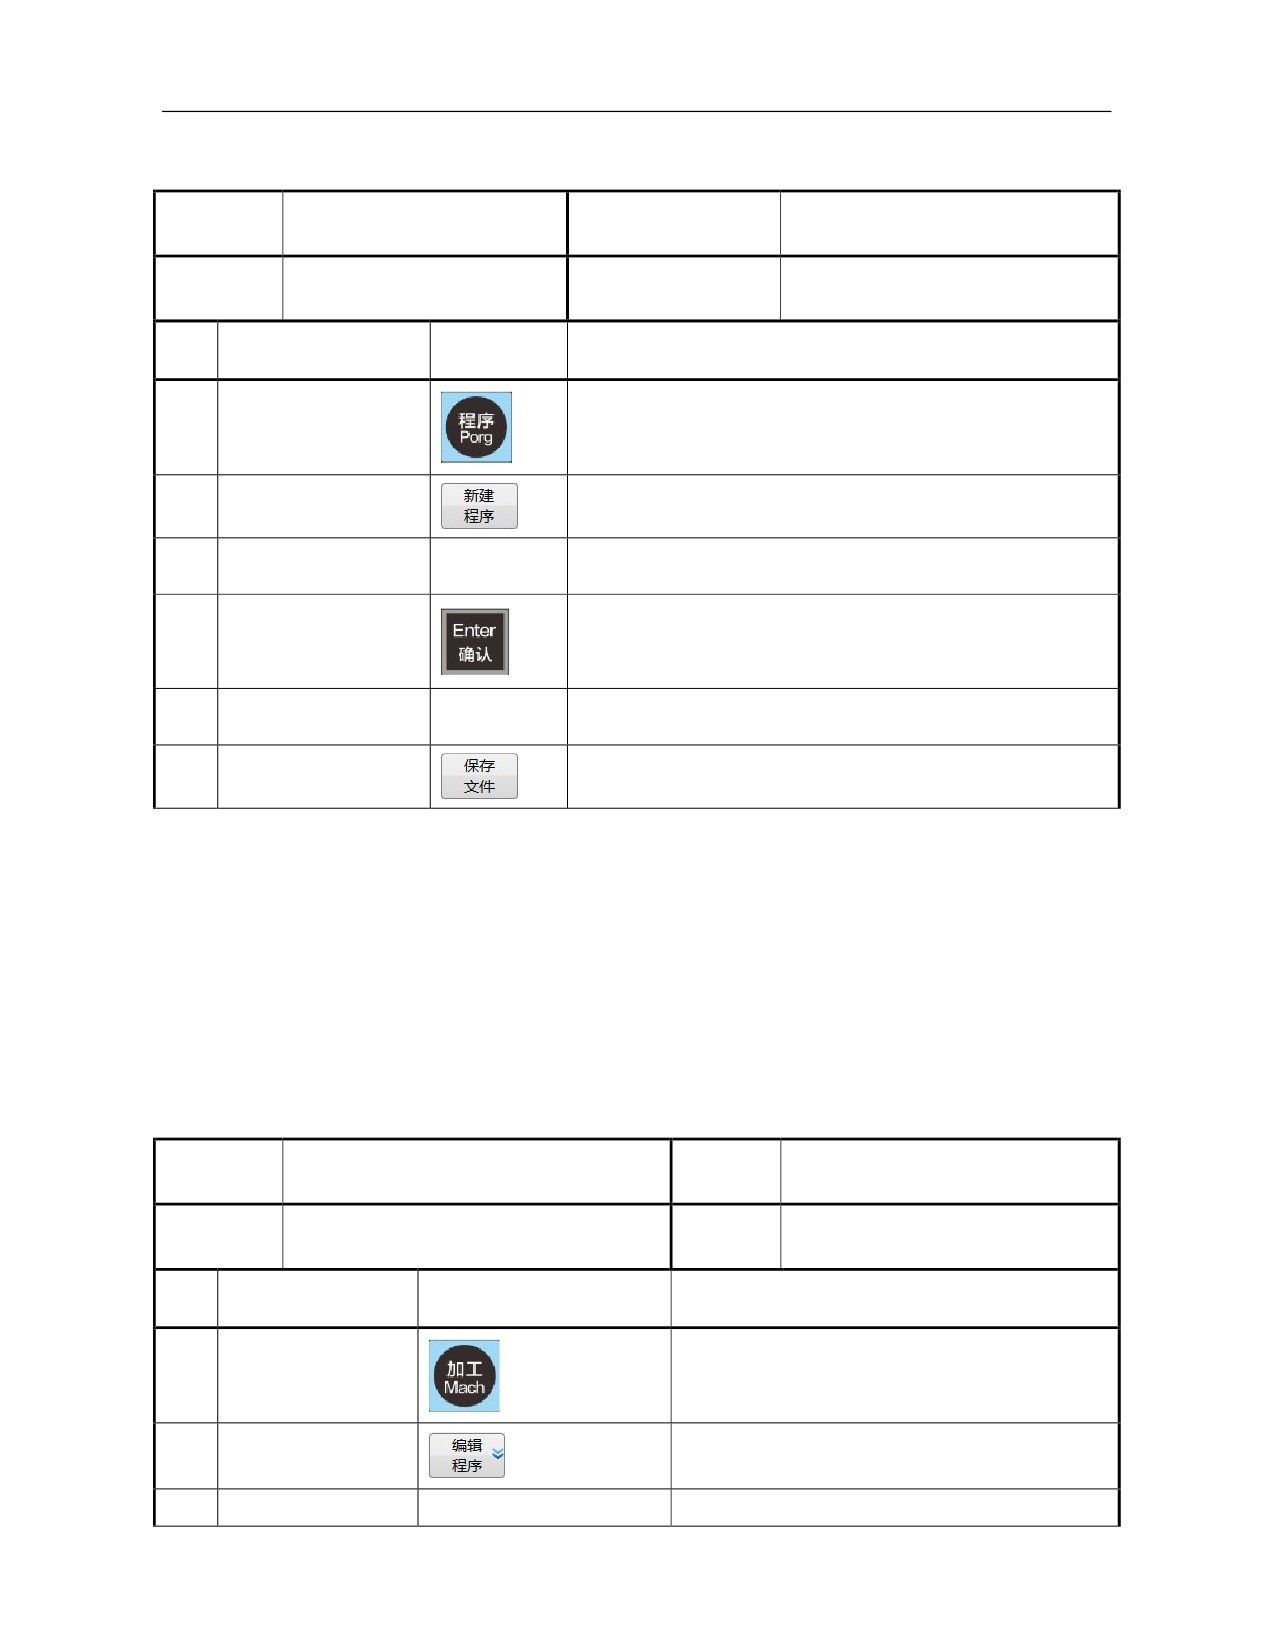
6.2.1.2 Create new programs under "Program" function set
Operation
New programs created under
Working mode
Auto, single block
name
"Program" function set
Basic
Display interface
3.4 "Program" function set interface
requirements
SN
Operation steps
Key
Description
1
Press 〖Program〗
Default interface, main menu
2
Press 『New』
A prompt message "Please enter a file name" will be given
3
(Enter a file name)
e.g.: Onc321
Confirm file name and switch to "Machining" function set
4
Press 「Enter」
Enter the editing area
5
(Edit program)
---
Complete program editing
A prompt message Program has been saved will be given
6
Press 『Save』
The new program is not loaded as machining program
6.2.2 Modification and Editing Of Program
Existing programs should be edited and modified in "Machining"
function set of this system. There are two types of edited and modified
programs: current loading program and non-loading program.
6.2.2.1 Editing and modification of current loading program
Operation
Editing and modification of current loading
Working
Auto, single block, jog
name
program
mode
Basic
Display
Existing loading programs
3.2.3 "Edit program" sub-interface
requirements
interface
SN
Operation steps
Key
Description
1
Press 〖Machining〗
Default interface, main menu
Press
『 Edit
2
Enter current loading program editing status
program』
3
(Edit program)
---
Edit and modify existing loading programs
119
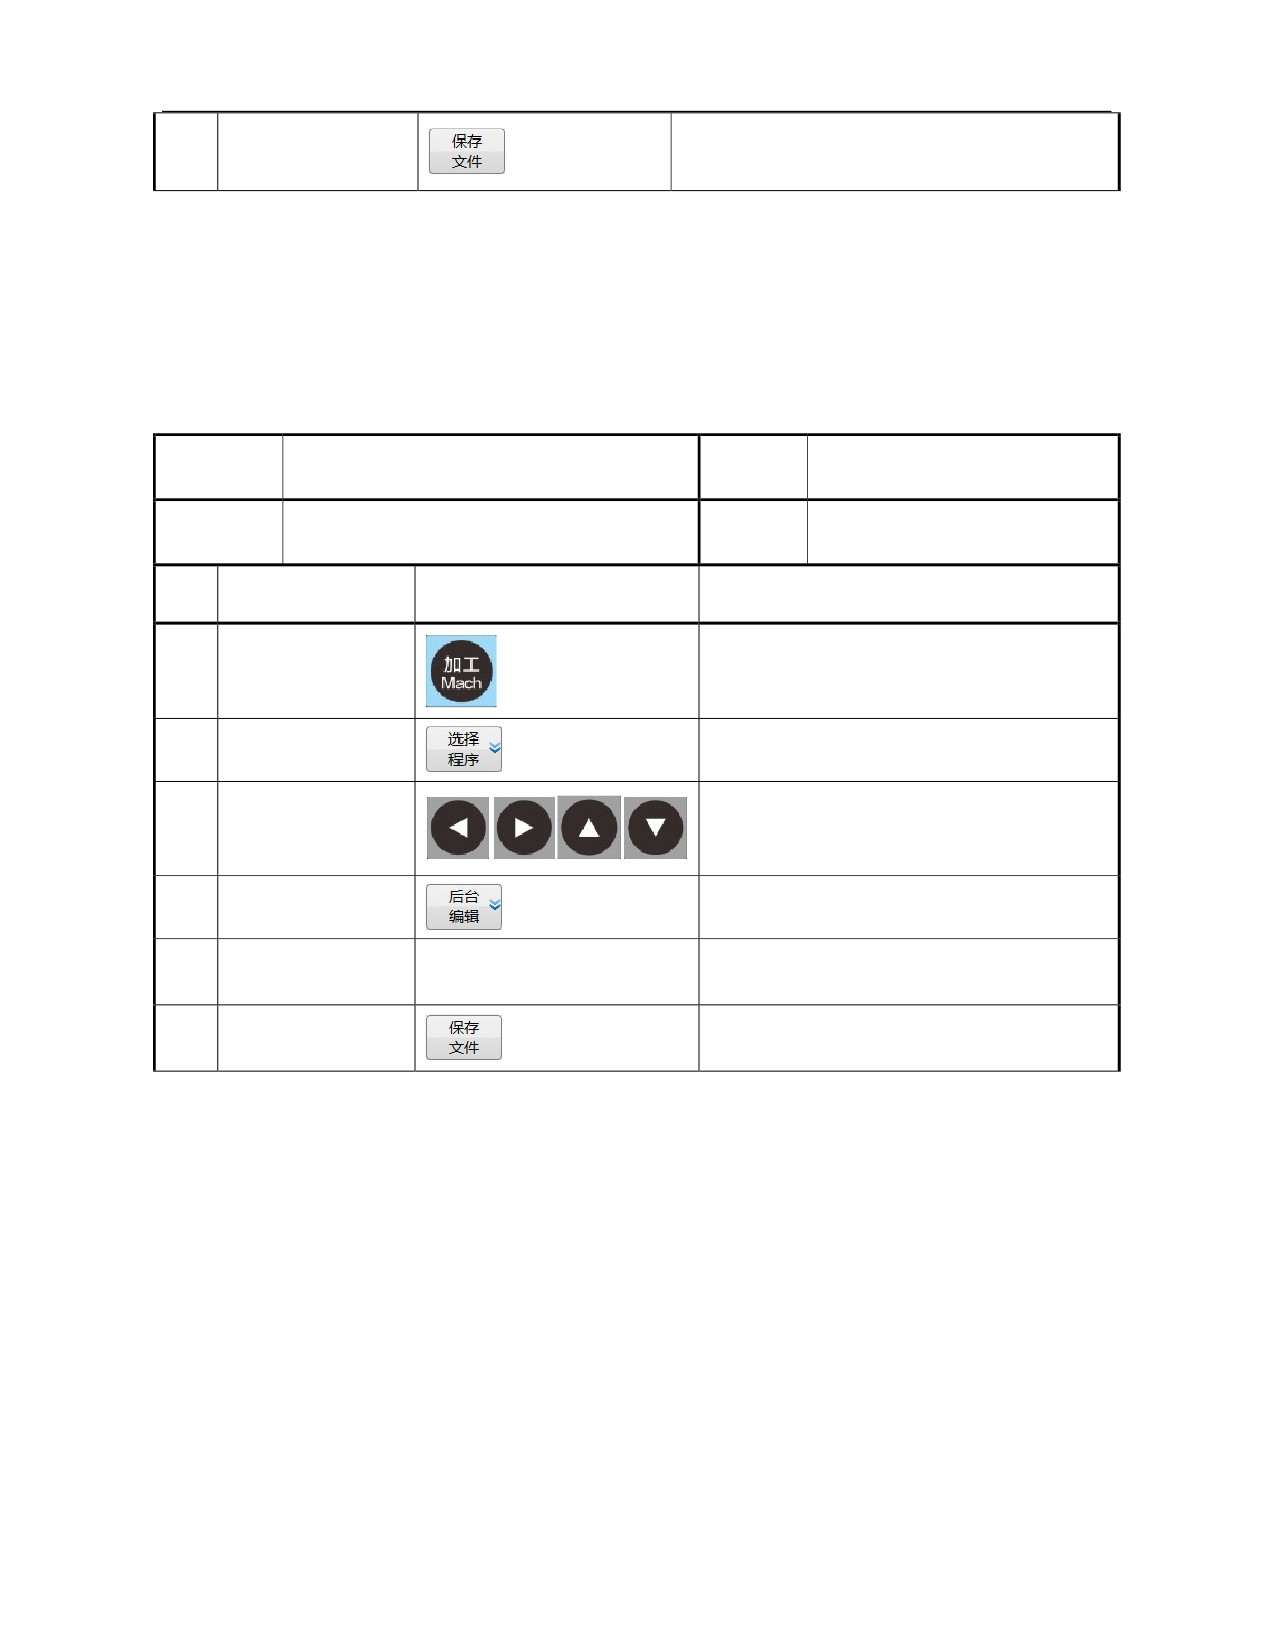
4
Press 『Save』
Program has been saved
Note:
The machine tool should not be at running status while editing
current machining program.
6.2.2.2 Editing and modification of non-loading program in the backstage
Operation
Editing and modification of non-loading
Working
Auto, single block, jog
name
program in the backstage
mode
Basic
Display
3.2.2
"Select
program"
Existing programs to be modified
requirements
interface
sub-interface
SN
Operation steps
Key
Description
1
Press 〖Machining〗
Default interface, main menu
Press
『 Select
2
"Select program" sub-interface
program』
Select current programs to be edited and
3
Press 「Cursor」
modified
Press
『 Backstage
4
Enter program editing status
edit』
5
(Edit program)
---
Edit and modify existing loading programs
6
Press 『Save』
Program has been saved
Note:
When current loading program is selected in the "Select
program" sub-interface, the current loading program also can be
edited through "Backstage edit" function.
6.2.3 Save as
"Save as" function of this system is to integrally and quickly copy the
program of current editing status. Thus, the current loading program can
enter program editing status in the "Edit program" sub-interface and
non-loading programs can enter program editing status in the "Backstage
edit" sub-interface in order to realize the saving.
120
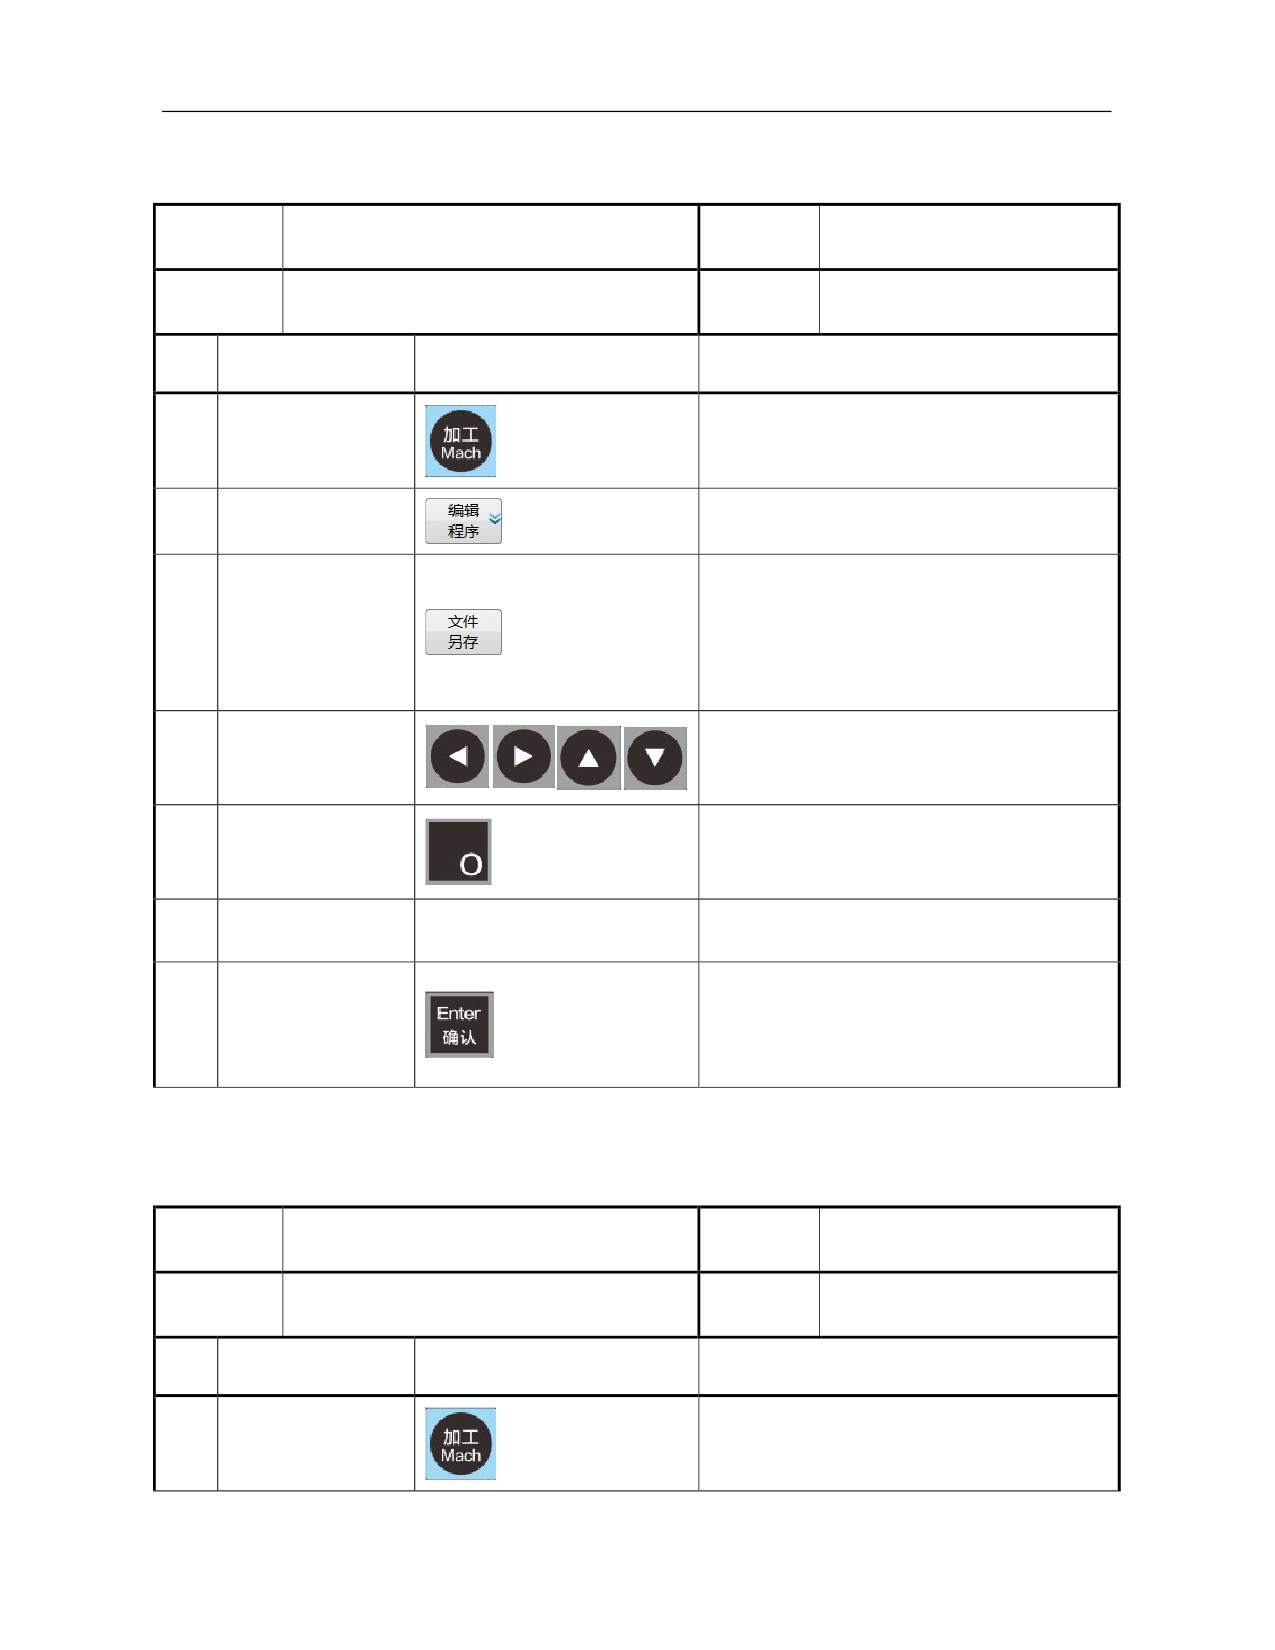
6.2.3.1 Save program as "Current loading program"
Operation
Working
Save program as "Current loading program"
Auto, single block, jog
name
mode
Basic
The saved file name cannot be the same as the
Display
3.2.3
"Edit
program"
requirements
existing program names
interface
sub-interface
SN
Operation steps
Key
Description
1
Press 〖Machining〗
Default interface, main menu
Press
『 Edit
2
Enter current loading program editing status
program』
Storage target selection dialog box
"System disk, USB flash disk or user disk"
3
Press 『Save as』
can be selected
The file directory of all disks can be
selected
Move the cursor to the selected target disk
4
Press 「Cursor」
or file directory name
5
Press 「O」
Activate the file name input box
(Input the saved file
If renamed, the original program will be
6
name)
covered
Current loading program is saved in the
target position
7
Press 「Enter」
Exit the storage target selection dialog box
The saved file is the current editing program
6.2.3.2 Save "Non-loading program" as
Operation
Working
Save "Non-loading program" as
Auto, single block, jog
name
mode
Basic
The saved file name cannot be the same as the
Display
3.2.2
"Select
program"
requirements
existing program names
interface
sub-interface
SN
Operation steps
Key
Description
1
Press 〖Machining〗
Default interface, main menu
121
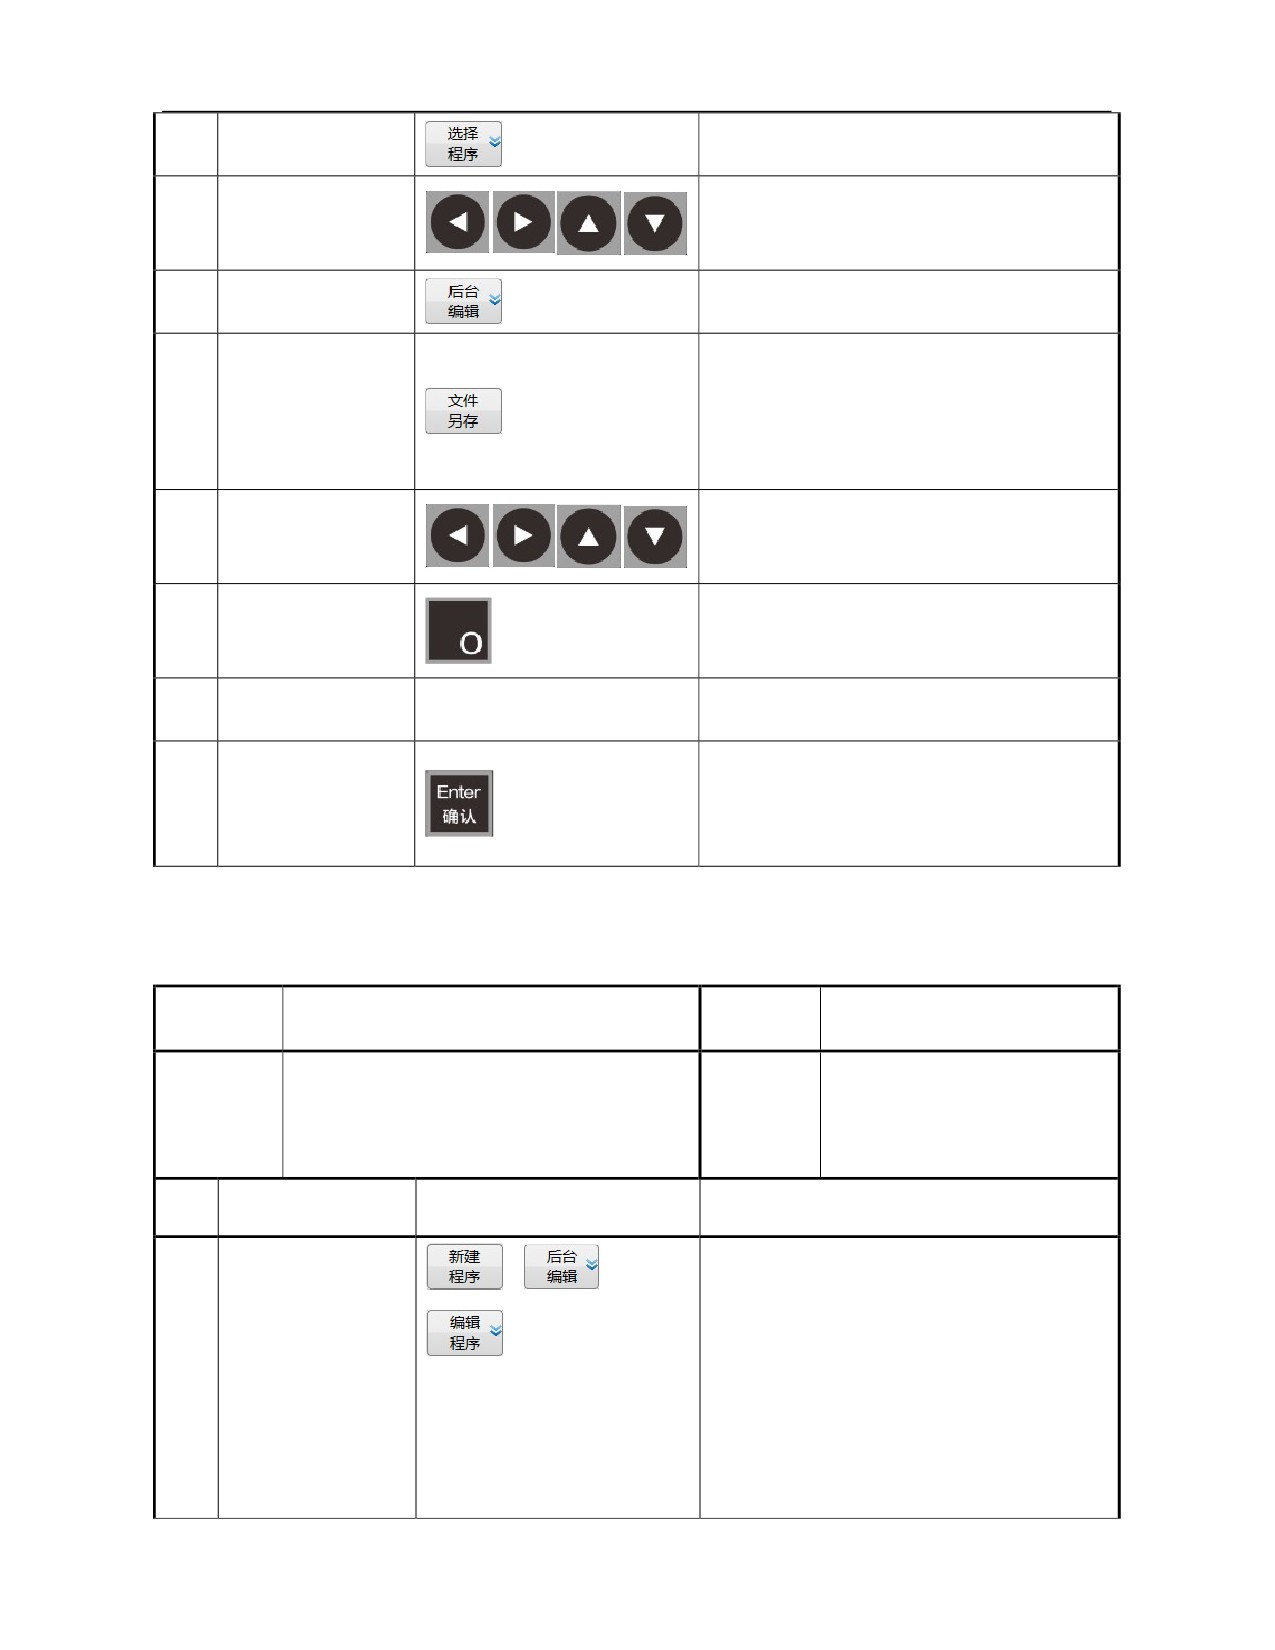
Press 『Select
2
"Select program" sub-interface
program』
3
Press 「Cursor」
Select the current program to be saved
Press 『Backstage
4
Enter program editing status
edit』
Storage target selection dialog box
"System disk, USB flash disk, or user disk"
5
Press 『Save as』
can be selected
The file directory of all disks can be
selected
Move the cursor to the selected target disk
6
Press 「Cursor」
or file directory name
7
Press 「O」
Activate the file name input box
(Input the saved file
If renamed, the original program will be
8
name)
covered
Current loading program is saved in the
target position
9
Press 「Enter」
Exit the storage target selection dialog box
The saved file is the current editing program
6.2.4 Copy and Paste of Program Block
Operation
Working
Copy and paste of program block
Auto, single block, jog
name
mode
3.2 "Machining" function set
Basic
Display
interface
Enter program editing status
requirements
interface
3.3
"Program" function set
interface
SN
Operation steps
Key
Description
This system enters program editing status in
4 ways:
Create "new program" function under
"Machining" function set
1
(Edit program)
"Edit program" function under
"Machining" function set
"Backstage edit" function under
"Machining" function set
Create "New program" function under
122
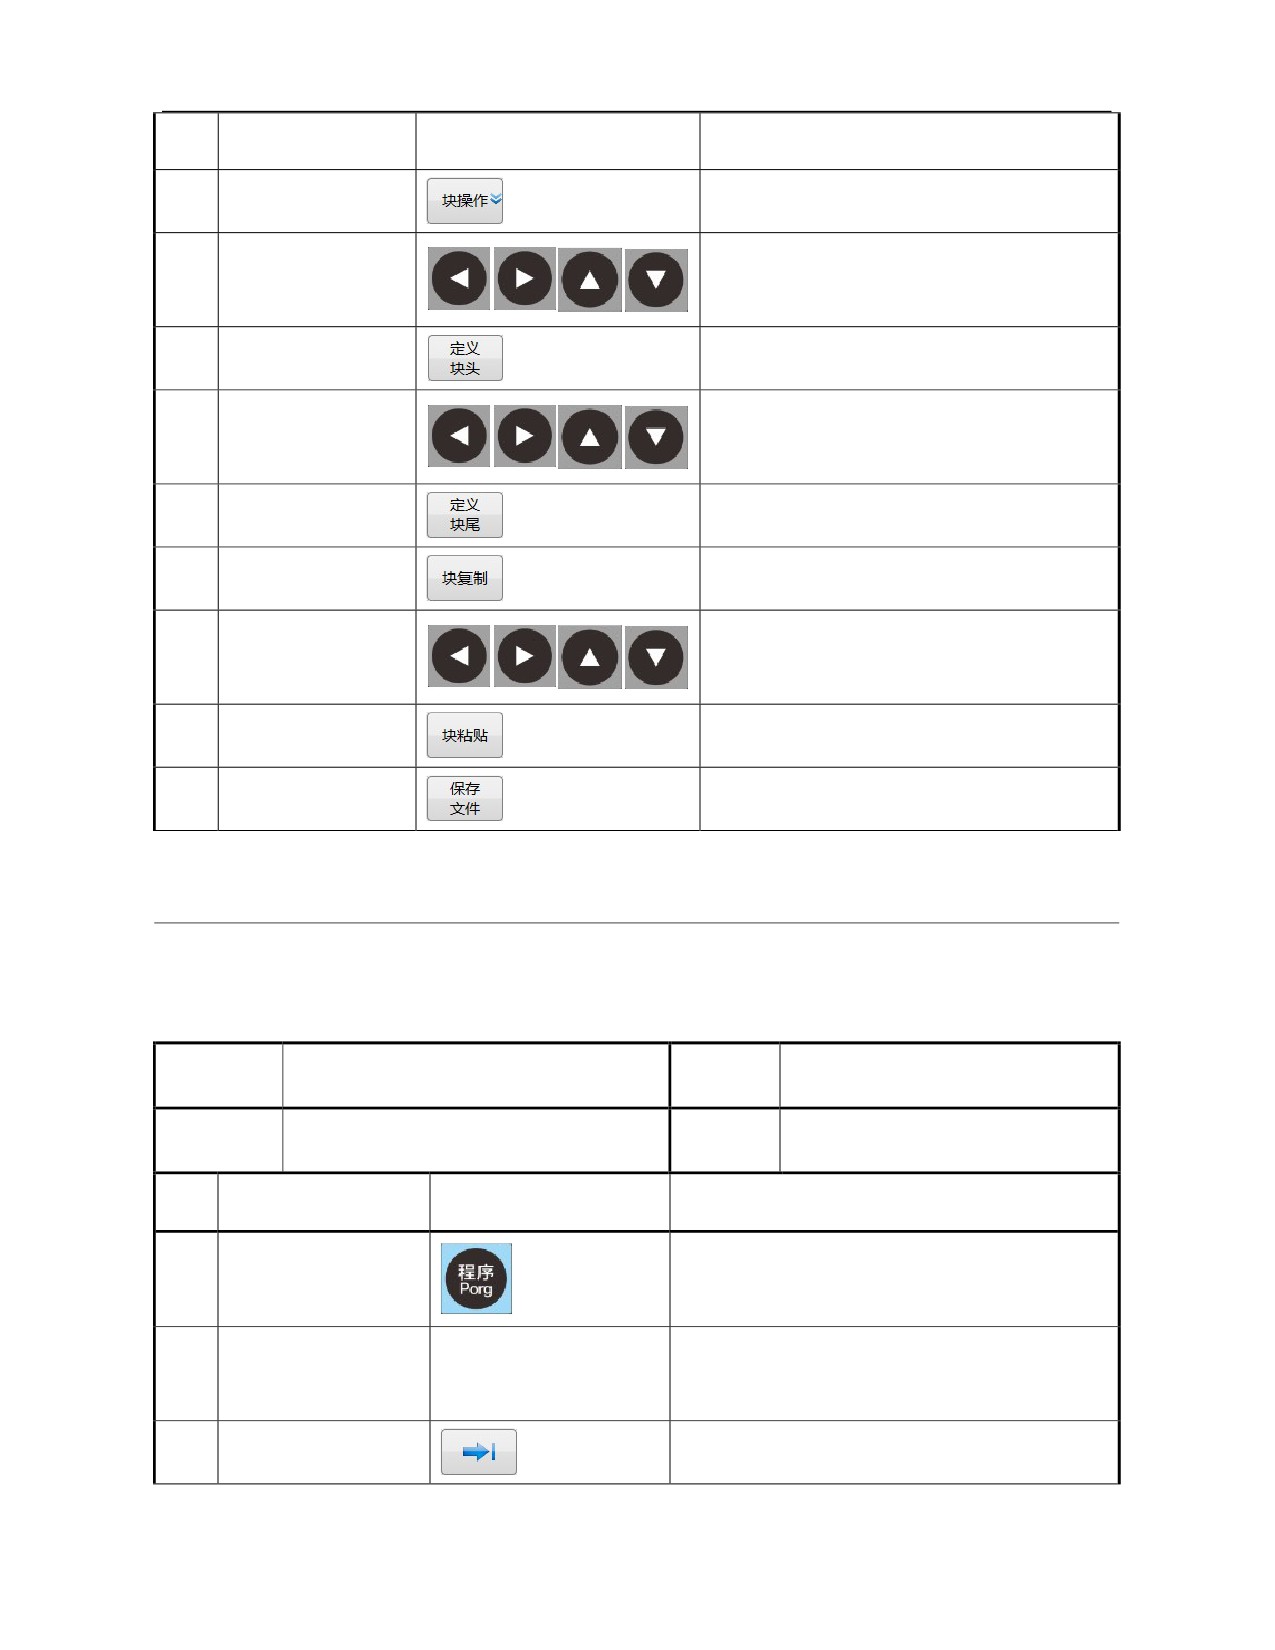
"Program" function set
2
『Block』
Enter "Block " sub-interface
「 Cursor
」
or
Move the cursor to the head of the copied
3
「PgUp/PgDn」
block
4
『Block head』
---
「 Cursor
」
or
Move the cursor to the end of the copied
5
「PgUp/PgDn」
block
6
『Block end』
---
7
『Block copy』
---
「 Cursor 」
or
Move the cursor to where the current
8
「PgUp/PgDn」
program or other programs are pasted
9
『Paste』
Paste succeeds
10
『Save』
Exit and save programs
6.3 Program Management
6.3.1 Rename of File Directory and Program
Operation
Working
Rename of file directory and program
Auto, single block, jog
name
mode
Basic
Display
Existing programs can be searched
3.4.4 "Rename" sub-interface
requirements
interface
SN
Operation steps
Key
Description
1
Press 〖Program〗
Default interface, main menu
Move the cursor to the directory and program to
(Search directory and
2
---
be renamed according to 6.1.2 search program
program)
of "Program" function set
3
Press 『→』
Enter "Program" set, level 1 extension menu
123
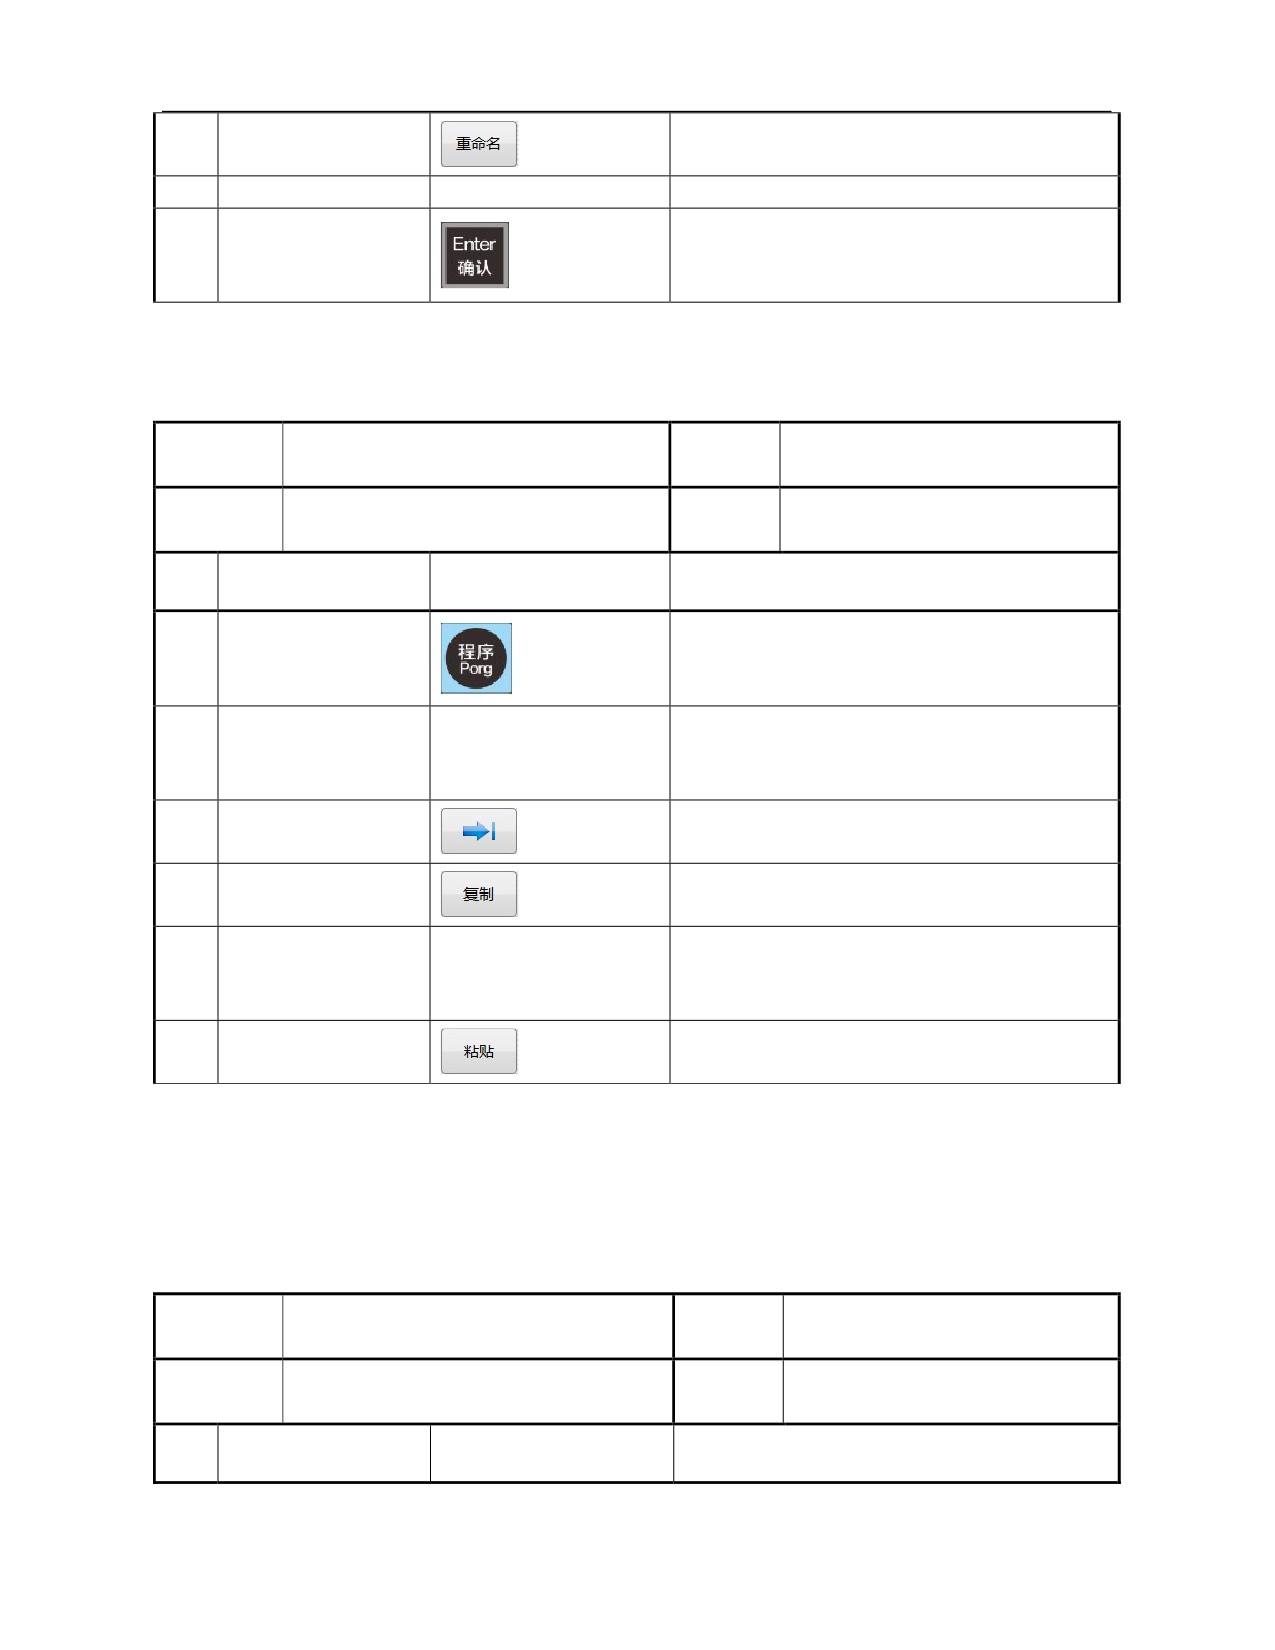
4
Press 『Rename』
Prompt: Enter a new file name
5
(Rename a file)
---
Enter a new file name
Confirm the new file name
6
Press 「Enter」
Prompt: Rename the old file as a new file
6.3.2 Copy and Paste File Directory and Program
Operation
Working
Copy and paste file directory and program
Auto, single block, jog
name
mode
Basic
Display
3.4.2.2 "Program copy and paste"
Existing programs can be searched
requirements
interface
sub-interface
SN
Operation steps
Key
Description
1
Press 〖Program〗
Default interface, main menu
Move the cursor to the program name to be
(Search the program to
2
---
copied according to 6.1.2 search program of
be copied)
"Program" function set
3
Press 『→』
Enter "Program" set, level 1 extension menu
4
Press 『Copy』
Prompt: Select target disk of paste
Move the cursor to the target disk or the file
(Select target disk or
5
---
directory according to 6.1.2 search program of
directory)
"Program" function set
6
Press 『Paste』
Prompt: Paste succeeds
6.3.3 Program Deletion
6.3.3.1 Program deletion under "Machining" function set
Operation
Deletion of program
(under "Machining"
Working
Auto, single block, jog
name
function set)
mode
Basic
Display
3.2.2
"Program
selection"
Programs to be deleted can be searched
requirements
interface
sub-interface
SN
Operation steps
Key
Description
124
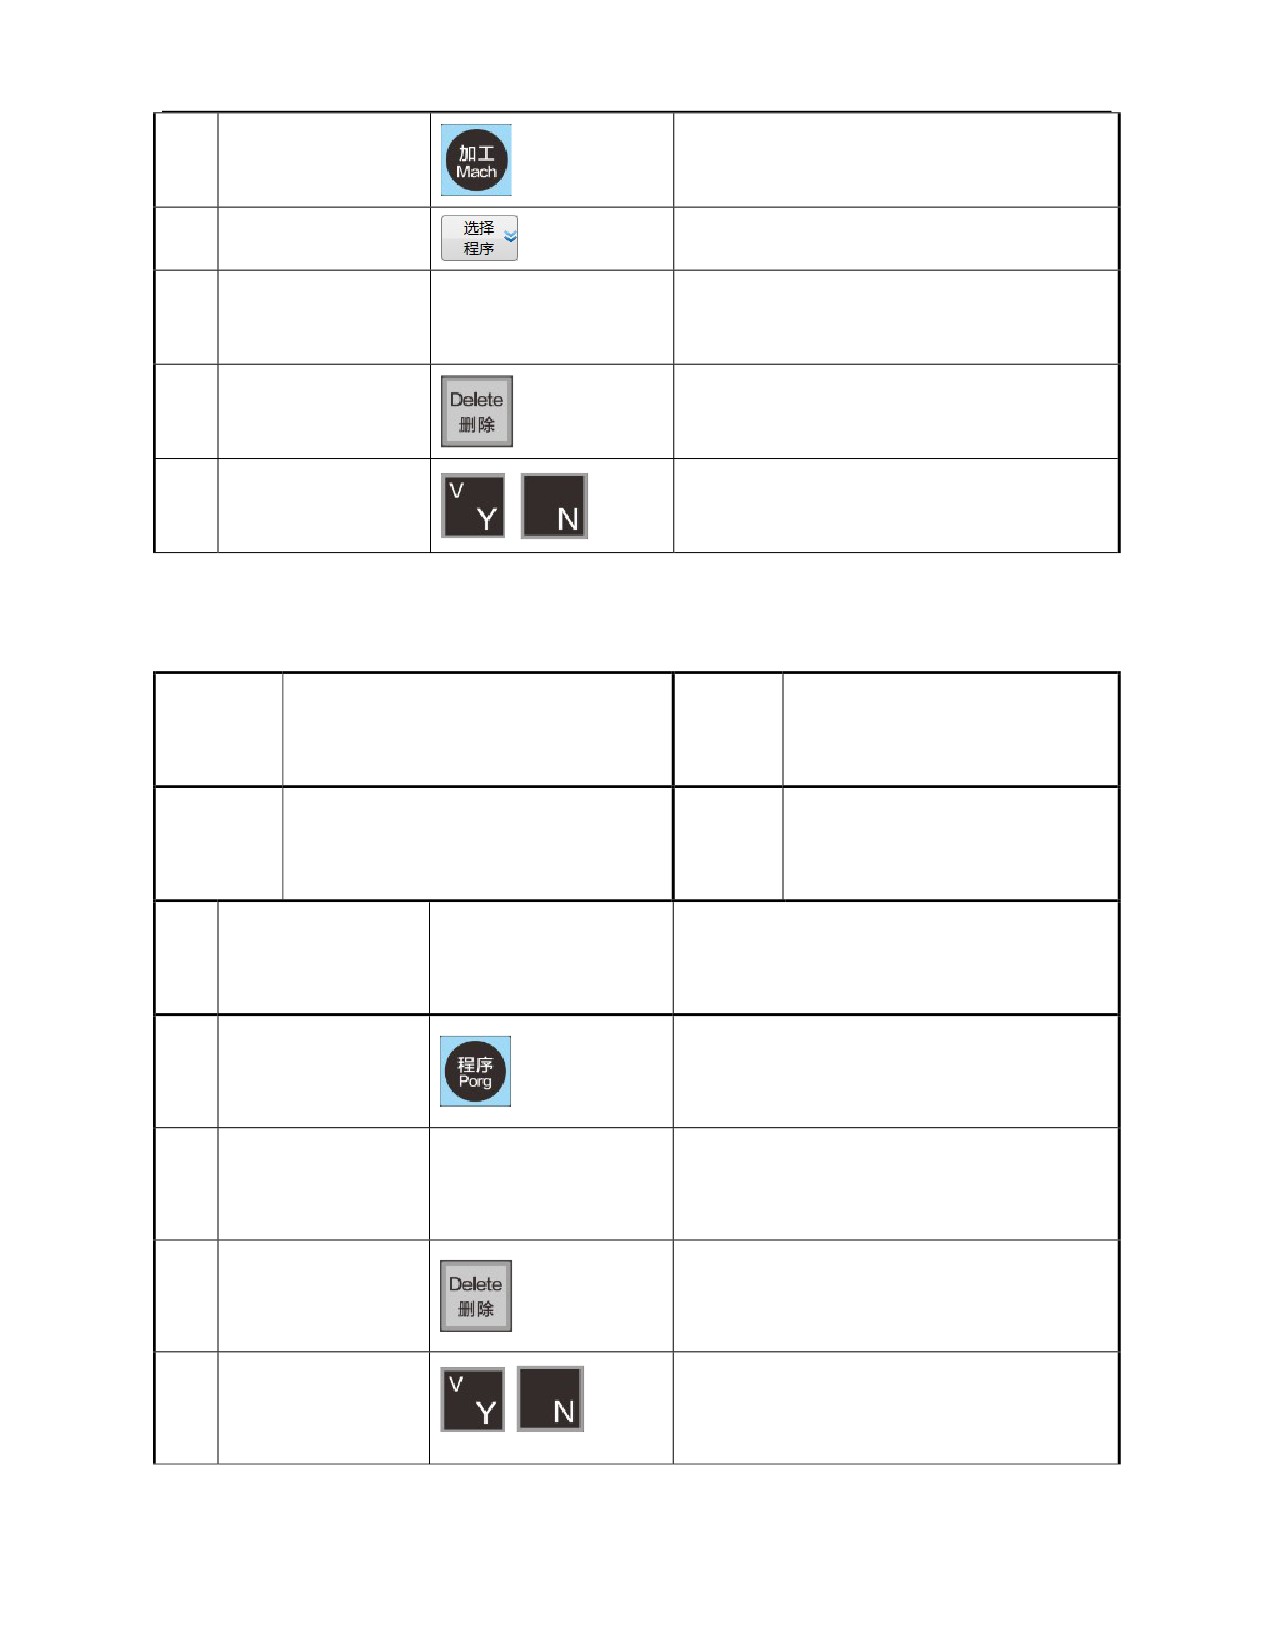
1
Press 〖Machining〗
Default interface, main menu
Press
『 Select
2
"Select program" sub-interface
program』
Move the cursor to the program name to be
(Search directory and
3
---
deleted according to 6.1.2 search program of
program)
"Program" function set
Prompt: "Conform to delete the selected file?
4
Press [Delete]
(Y/N)”
Press 「Y」 to complete deletion
5
Press 「Y」 or 「N」
Press 「N」 to abandon deletion
6.3.3.2 Program deletion under "Program" function set
Operation
Deletion of program
(under "Program"
Working
Auto, single block, jog
name
function set)
mode
Basic
Display
Programs to be deleted can be searched
3.4 "Program" function set interface
requirements
interface
SN
Operation steps
Key
Description
1
Press 〖Program〗
Default interface, main menu
Move the cursor to the program name to be
(Search the program
2
---
deleted according to 6.1.2 search program of
to be deleted)
"Program" function set
Prompt: "Confirm to delete the selected file?
3
Press [Delete]
(Y/N)”
Press 「Y」 to complete deletion
4
「Y」 or 「N」
Press 「N」 to abandon deletion
125