Iveco Stralis AT/AD. Manual - part 115
 

  Index      Iveco     Iveco Stralis AT/AD - service repair manual 2003 year


Search            


Content   ..  113  114  115  116   ..


Iveco Stralis AT/AD. Manual - part 115


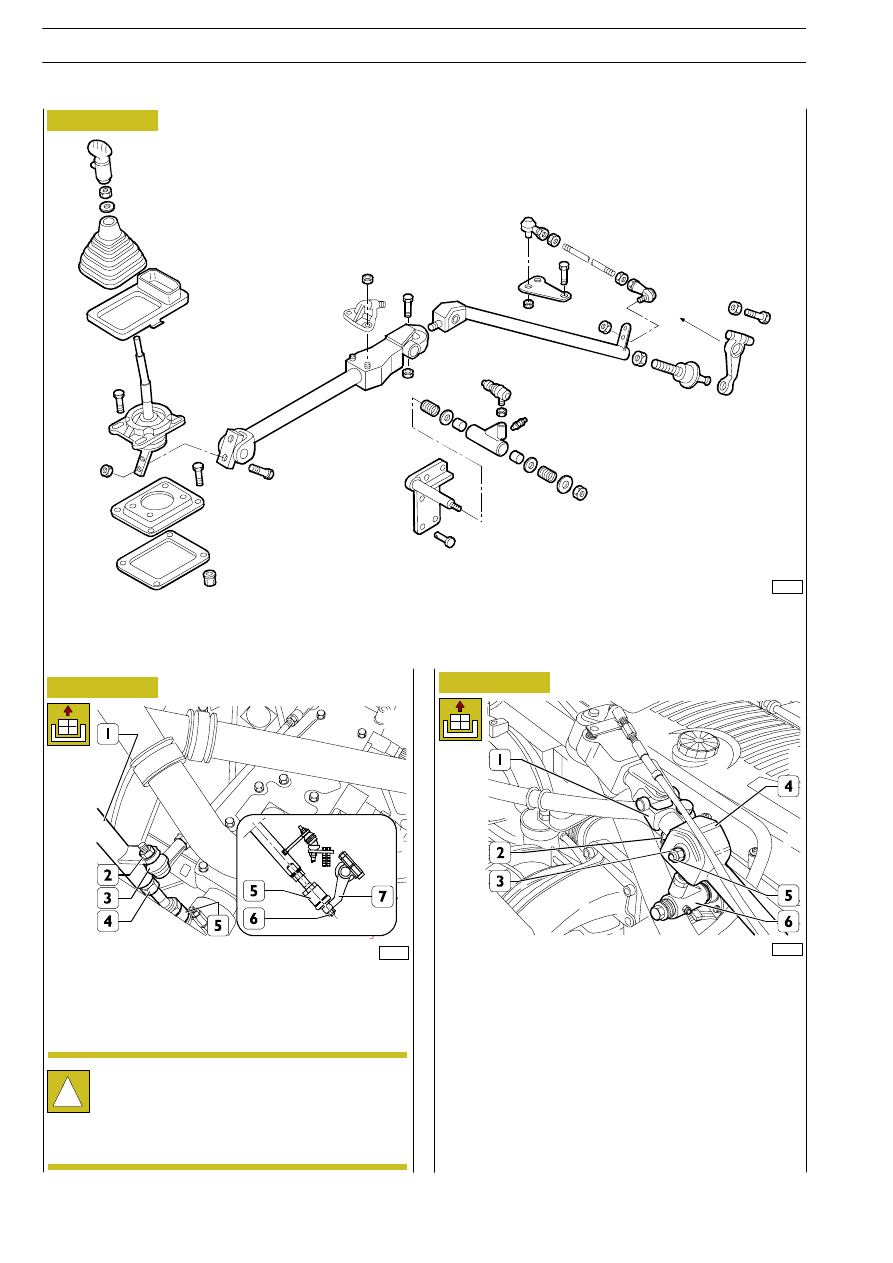
Figure 2

Remove the nut (2) and disconnect the articulated head (3)
from the side tie rod (1).
Disconnect the articulated head (3) from the lever (4).
Remove the nut (6) and disconnect the ball joint (5) from the
lever (7).

Mark the universal joint (1) assembly position on the tie rod
(4), release the nut (2) and remove the telescopic tie rod
universal joint (1) from the tie rod (4).
Remove the articulate head pin (5) fastening nut (3) of the
idler arm (6).

79133

Figure 3

Figure 4

79135

79134

!

If the ball joint (5) is to be replaced, first release the
retaining nut (4) and then write down the number
of turns needed to slacken it from the tie rod (1), so
that the new element will be driven in with the same
number of turns and the transmission adjustment
will be maintained.

505021

SIDE TIE ROD

Removal

TRANSMISSION COMPONENT DETAILS

200

TRANSMISSION EXTERNAL CONTROL

S

TRALIS

AT/AD

Base - January 2003

Refitting

Refit the telescopic tie rod by reversing the removal
procedure. Make sure the nuts or the screws are tightened
to the prescribed torque. At the end of refitting, restore the
oil level in the cabin titling cylinder.

79136

79137

79138

79139

Figure 5

Figure 6

Figure 7

Figure 8

Use press 99341015 (1) and a suitable plate (4) positioned
as shown in the figure to remove the articulated head (3)
from the tie rod (2) and the tie rod itself.

Refitting

Refit the side tie rod by reversing the removal procedure.
Make sure the nuts are tightened to the prescribed torque
and check that the tie rod adjustment corresponds to that
described in the Transmission tie rod adjustment section.

505023

TELESCOPIC TIE ROD

Removal

Remove the screws (2) and disconnect the telescopic tie rod
(3) from the gearshift lever (1).

Disconnect the hydraulic pipe (2) from the cylinder (1).

TRANSMISSION IDLER ARM

Removal

Remove the side tie rod from the idler arm as shown in
figures 3 and 4.
Remove the nut (1) and take off the washer (2), the spring
(3), the washer (4), the idler arm (5), the washer (6) and the
spring (7) from the support pin (8).
Should the support pin (8) be worn, change the support (8)
by removing the engine fastening screw (9).

!

Close the hydraulic pipe (2) to prevent oil from
coming out.

Mark the universal joint (3) assembly position on the tie rod
(5). Release the nut (4) and remove the telescopic tie rod by
taking off the universal joint (3) from the tie rod (4).

TRANSMISSION EXTERNAL CONTROL

201

S

TRALIS

AT/AD

79140

79141

Figure 9

Figure 10

Release the nut (2) and slacken the articulated head (1).
Write down the number of turns needed to remove it from
the idler arm (3).
Use the appropriate tool to take off the bushes (4) from the
idler arm (3).

Assembly

Use the appropriate beater to fit the bushes (4) into the idler
arm (3).
Drive in the articulated head (1) in the idler arm with the
same number of turns written down at disassembly and
tighten the nut (2) to the prescribed torque.

Refitting

Apply grease Tutela MRM2 inside the idler arm housing (3)
and refit it and its components on the support (4) by reversing
the removal procedure. Tighten the fastening nut (5)to
torque 118

÷ 144 Nm.

Make sure distance A or B between the articulated head pin
(1) centre and that of the support pin (4) has the following
value.

A

=

(CT vehicles excluded)

B

=

(only CT vehicles)

!

The nut is self-locking and shall be replaced with a
new one at every disassembly.

125

+1,5

-0

115

+1,5

-0

202

TRANSMISSION EXTERNAL CONTROL

S

TRALIS

AT/AD

Base - January 2003

79142

Figure 11

Remove the articulated head (1 and 3) fastening nuts from
their connecting points and take off the cross tie rod (2).
Release the nuts (4 and 5) and slacken the articulated heads
(1 and 3) for the number of turns required to remove them.
Refit the new articulated heads by driving them on the tie rod
with the same number of turns written down at disassembly
and tighten the nuts (4 and 5) to the prescribed torque.

Refitting

Refit the cross tie rod by reversing the removal procedure
and tighten the articulated head fastening nuts to the
prescribed torque.
After refitting, check the tie rod adjustment as described in
the related section.

TRANSMISSION EXTERNAL CONTROL

203

S

TRALIS

AT/AD

CROSS TIE ROD

Removal


Content   ..  113  114  115  116   ..