Freightliner Coronado 132 / 122SD. Manual - part 19


  Index      Freightliner     Freightliner Coronado 132, Freightliner 122SD - service repair manual


Search            


Content   ..  17  18  19  20   ..


Freightliner Coronado 132 / 122SD. Manual - part 19


2.

Remove the axle carrier fill plug. Then remove
the drain plug from the bottom of the housing.
Completely drain the lubricant while the unit is
warm, to allow the lubricant to drain faster.

On tandem-drive axles, it is also necessary to
remove the plug at the bottom of the interaxle
differential housing to drain that lubricant.
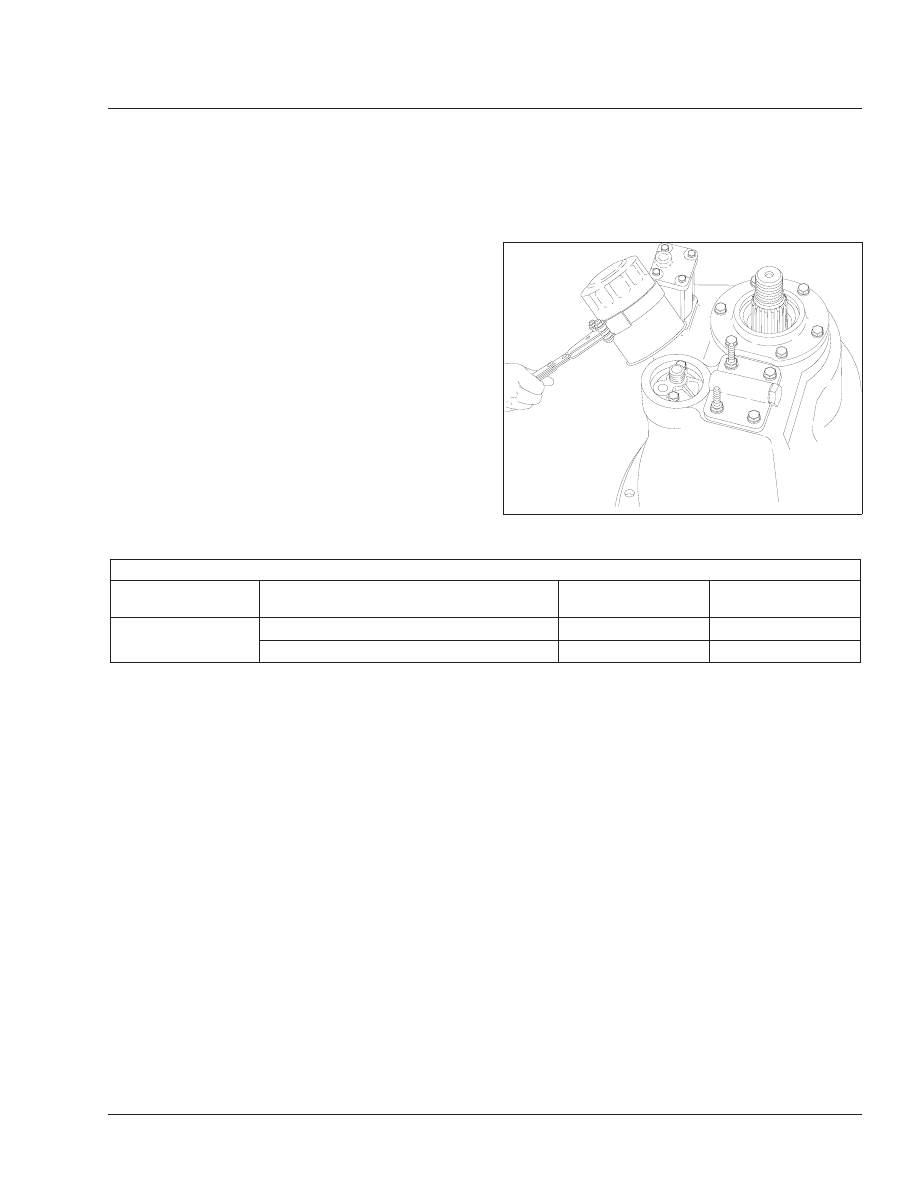
3.

If equipped with an oil pump, remove the axle oil
filter. Use a suitable filter strap wrench; see

Fig.

3

Discard the old filter.

NOTE: There may be about one pint (0.5 L) of
lubricant remaining in the filter. Be careful not to
spill it when removing the filter.

4.

Using the recommended drive axle lubricant,
coat the face of the gasket on the new oil filter, if
one was removed. Install the filter over the
adapter, and tighten the filter one full turn after
the gasket contacts the base; do not overtighten.
See

Table 3

for recommended lubricants.

5.

Clean the fill and drain plugs as follows. Change
them if necessary.

Meritor Drive Axle Recommended Lubricant

Recommended
Lubricant Type

Ambient Temperature

Lubricant SAE

Viscosity Grade

Meritor Specification

Synthetic Gear Oil

–40°F (–40°C) and Up

*

75W–90

0–76–N

–40°F (–40°C) and Up

*

75W–140

0–76–M

*

There is no upper limit on these outside temperatures, but axle sump temperature must never exceed 250°F (121°C).

Table 3, Meritor Drive Axle Recommended Lubricant

5.1

For magnetic plugs, use a piece of key
stock or any other convenient steel slug
to short the two magnetic poles and divert
the magnetic field.

5.2

Check the drain plug for metal particles
every 100,000 miles (160 000 km). Clean
away the collected material deposited on
each pole. Magnets will rapidly lose their
effectiveness as collected material
bridges the gap between the two poles.

5.3

Each time the oil is changed, replace any
magnetic drain plug that does not meet
the minimum pickup capacity.

NOTE: Meritor recommends plugs with ele-
ments having a minimum pickup capacity of
1.5 pounds (0.7 kg) of low-carbon steel.

5.4

After cleaning, install the drain plug(s)
and tighten to 35 lbf·ft (47 N·m).

6.

Fill the axle with recommended lubricant as fol-
lows. See

Table 4

for drive axle lubricant capaci-

ties.

NOTE: Some Meritor axles have a small
tapped and plugged hole near and below the
housing lubricant fill hole. This smaller hole
is for a lubricant temperature indicator only,
and should not be used as a fill or level
hole.

6.1

With the vehicle on a level surface, fill the
axle through the oil fill hole. Allow a few
minutes for the oil to flow into the axle.
Lubricant should be level with the bottom
of the oil fill hole. To check fluid level, see

Fig. 2

.

6.2

Install and tighten the fill plug 35 lbf·ft (47
N·m).

f350119a

05/27/93

Fig. 3, Meritor Axle Oil Filter Removal

Rear Axle

35

35/3

7.

Whenever the interaxle differential housing has
been drained, add an additional 2 pints (0.9 L) of
the recommended lubricant directly into the inter-
axle differential housing.

8.

Remove the chocks, then drive the vehicle, un-
loaded, for 1 or 2 miles (2 or 3 km) at speeds
not to exceed 25 mph (40 km/h), to thoroughly
circulate lubricant throughout the carrier and
housing assemblies.

Meritor Drive Axle Lubricant Capacities

Axle Model

Capacity

*

: pt (L)

Single-Drive, Single Reduction

RS–21–160

39.5 (18.7)

RS–23–160

39.5 (18.7)

RS–23–161

37.2 (17.6)

RS–23–185

47.3 (22.4)

RS–23-186

47.3 (22.4)

RS–26-185

46.0 (22.0)

Tandem-Drive, Single Reduction

MT–40–143MA–N

Forward

30.2 (14.3)

Rear

25.8 (12.2)

RT–40–145, RT–40–145A,

RT–40–145P

Forward

30.2 (14.3)

Rear

25.8 (12.2)

RT–40–160

Forward

39.1 (18.5)

Rear

39.4 (16.3)

RT–44–145, RT–44–145P

Forward

29.3 (13.9)

Rear

25.1 (11.9)

RT–46–160, RT–46–160P

Forward

39.1 (18.5)

Rear

34.4 (16.3)

RT–46–164EH/P

Forward

38.0 (18.0)

Rear

33.0 (15.0)

RT–50–160

Forward

38.0 (18.0)

Rear

33.0 (15.0)

RT–52–185

Forward

56.1 (26.5)

Rear

36.1 (17.1)

RT–58–185

Forward

56.1 (26.5)

Rear

36.1 (17.1)

Meritor Drive Axle Lubricant Capacities

Axle Model

Capacity

*

: pt (L)

RT–70–380

Forward

54.4 (25.7)

Rear

53.1 (25.1)

*

Quantities listed are approximate. Fill axle until lubricant is level with bot-

tom of fill hole with vehicle on level ground.

Table 4, Meritor Drive Axle Lubricant Capacities

Dana® Spicer®

IMPORTANT: The use of friction modifiers is not
approved in Dana drive axles.

1.

Park the vehicle on level ground, set the parking
brakes, and chock the tires.

2.

Clean the fill plug and the area around it. In the
axle housing rear cover, remove the plug from
the oil fill hole (or standpipe, if installed in the oil
fill hole); see

Fig. 4

.

3.

Place a drain pan under the rear axle drain plug;
see

Fig. 4

Drain the oil at normal operating tem-

perature, 150°F to 200°F (65°C to 93°C). At this
temperature, the oil will run more freely and en-
sure that the axle is flushed.

NOTE: Some tandem-drive axles are equipped
with a cylindrical magnetic strainer, located
below the lube pump on the front of the power

f350018a

05/27/93

1

2

1.

Oil Fill Plug

2.

Oil Drain Plug

Fig. 4, Dana Spicer Axle Housing Drain and Fill Plugs

Rear Axle

35

35/4

divider cover. All rear axles are fitted with mag-
netic drain and fill plugs.

4.

At each axle oil change, remove and clean the
magnetic strainer, if equipped, as follows; see

Fig. 5

.

4.1

Remove the magnetic strainer from the
power divider cover.

WARNING

Always wear eye protection when using com-
pressed air to clean parts, as flying debris could
cause permanent damage to unprotected eyes. Do
not point the air stream in the direction of other
persons.

4.2

Wash the strainer in solvent, and blow it
dry with compressed air to remove oil and
metal particles.

4.3

Install and tighten the magnetic strainer
40 to 60 lbf·ft (54 to 81 N·m).

5.

Clean the fill and drain plugs as follows. Change
them if necessary.

5.1

For magnetic plugs, use a piece of key
stock or any other convenient steel slug

to short the two magnetic poles and divert
the magnetic field.

5.2

Clean away the collected material depos-
ited on each pole. Magnets will rapidly
lose their effectiveness as collected mate-
rial bridges the gap between the two
poles.

5.3

After the first oil is changed, inspect the
drain plug each time for large quantities
of metal particles.

5.4

After cleaning, install the drain plug(s)
and tighten to 40 to 60 lbf·ft (54 to 81
N·m).

6.

Fill the axle with the recommended lubricant as
follows. See

Table 5

for recommended drive axle

lubricants, and

Table 6

for drive axle lubricant

capacities.

Dana Spicer Drive Axle Recommended Lubricant

Lubricant Type

Condition

Lubricant SAE

Viscosity

Grade

Dana Spicer
Roadranger®
Synthetic Drive Axle
Lubricants, or
Equivalent with
Military Specification
MIL–L–2105D

Over-the-Road
Service

75W–90

Off-Highway
Equipment, or
Under Extra
Heavy Loads

80W–140

Table 5, Dana Spicer Drive Axle Recommended

Lubricant

Dana Spicer Drive Axle Lubricant Capacities

Axle Type

Axle Model

Capacity

*

:

Pints (liters)

Tandem-Drive Axle Installation

Single
Reduction

DD404, DD404P

31 (14.7)

DD405

31 (14.7)

DS404, DS404P

31 (14.7)

DS405, DS405P

31 (14.7)

DDH40, DDH40P,

DSH40

31 (14.7)

D40-170P, D46-

170P

39 (18.5)

2-Speed (dual-
range)

DT463P

40 (18.9)

f350017a

1

2

05/27/93

1.

Magnetic Strainer

2.

Power Divider

Fig. 5, Dana Spicer Tandem-Drive Axle Magnetic

Strainer

Rear Axle

35

35/5

Dana Spicer Drive Axle Lubricant Capacities

Axle Type

Axle Model

Capacity

*

:

Pints (liters)

Double
Reduction

DP463P

40 (18.9)

*

Quantities listed are approximate. Fill axle until lubricant is level with bot-

tom of fill hole with vehicle on level ground.

Add 2 pints (1 L) of additional lubricant to the power divider.

Table 6, Dana Spicer Drive Axle Lubricant Capacities

NOTE: Some Dana Spicer axles have a
small tapped and plugged hole near and
below the housing oil fill hole. This smaller
hole is for a lubricant temperature indicator
only, and should not be used as a fill or level
hole.

6.1

With the vehicle on a level surface, fill the
axle through the oil fill hole or standpipe
opening. Lubricant should be level with
the bottom of the oil fill hole, or the top of
the standpipe opening. To check fluid
level, see

Fig. 2

.

6.2

Install and tighten the fill plug 40 to 60
lbf·ft (54 to 81 N·m).

Two-Speed Axles With Shift Unit

IMPORTANT: Also do the appropriate procedure
under the heading "All Axle Models."

Dana Spicer and Meritor

1.

Remove the shift unit housing cover; see

Fig. 6

.

Drain and discard the old lubricant. Discard the
housing cover gasket.

2.

Thoroughly wash the axle shift parts and housing
cover, and allow them to air dry.

3.

Install the housing cover and a new cover gas-
ket. Tighten the housing cover capscrews 90 to
110 lbf·in (1020 to 1240 N·cm), then remove the
oil fill plug from the cover.

IMPORTANT: When the ambient temperature is
above 0°F (–18°C), use SAE 10 heavy-duty en-
gine oil, API service classification SD (sulfated
ash content must not exceed 1.85%). When the
ambient temperature is below 0°F (–18°C), use
one part kerosene to three parts SAE 10 heavy-
duty engine oil, API service classification SD

(sulfated ash content must not exceed 1.85%).
This cold-weather mixture can be safely used
up to 32°F (0°C).

Commercially available automatic transmission
fluid may be used in place of SAE 10 engine oil.
Automatic transmission fluid can be used for all
temperatures; do not mix it with kerosene. To
prevent component damage, do not mix engine
oil and automatic transmission fluid.

4.

Using the recommended lubricant, fill the shift
unit housing through the oil fill hole until the lubri-
cant is level with the bottom of the opening.

5.

Coat the threads of the fill plug with a small
amount of Loctite® 242, or equivalent sealant.
Install the fill plug finger-tight in the rear axle shift
unit housing. Using a wrench, tighten it an addi-
tional 1-1/2 turns.

35–02 Axle Breather and Axle

Lubricant Level
Inspection

For all axles, including tandem drive axles and two-
speed axles, perform the applicable procedures
under the heading, "All Axle Models." For a two-
speed axle with a shift unit, also check the shift unit

f350021a  

08/06/93  

1  

2  

3  

1.

Housing Cover Gasket

2.

Oil Fill Plug

3.

Shift Unit Housing Cover

Fig. 6, Two-Speed-Axle Shift Unit

Rear Axle

35

35/6


Content   ..  17  18  19  20   ..