Freightliner Coronado 132 / 122SD. Manual - part 18


  Index      Freightliner     Freightliner Coronado 132, Freightliner 122SD - service repair manual


Search            


Content   ..  16  17  18  19   ..


Freightliner Coronado 132 / 122SD. Manual - part 18


5.

Place a turn-plate or turntable under both front
tires. Remove the safety stands and lower the
vehicle. Remove the lock-pins from the gauges;
make sure the tires are exactly straight ahead.

NOTE: If turn-plates or turntables are not avail-
able, lower the vehicle. Remove the chocks
from the rear tires and release the parking
brakes. Move the vehicle backward, then for-
ward about six feet (two meters).
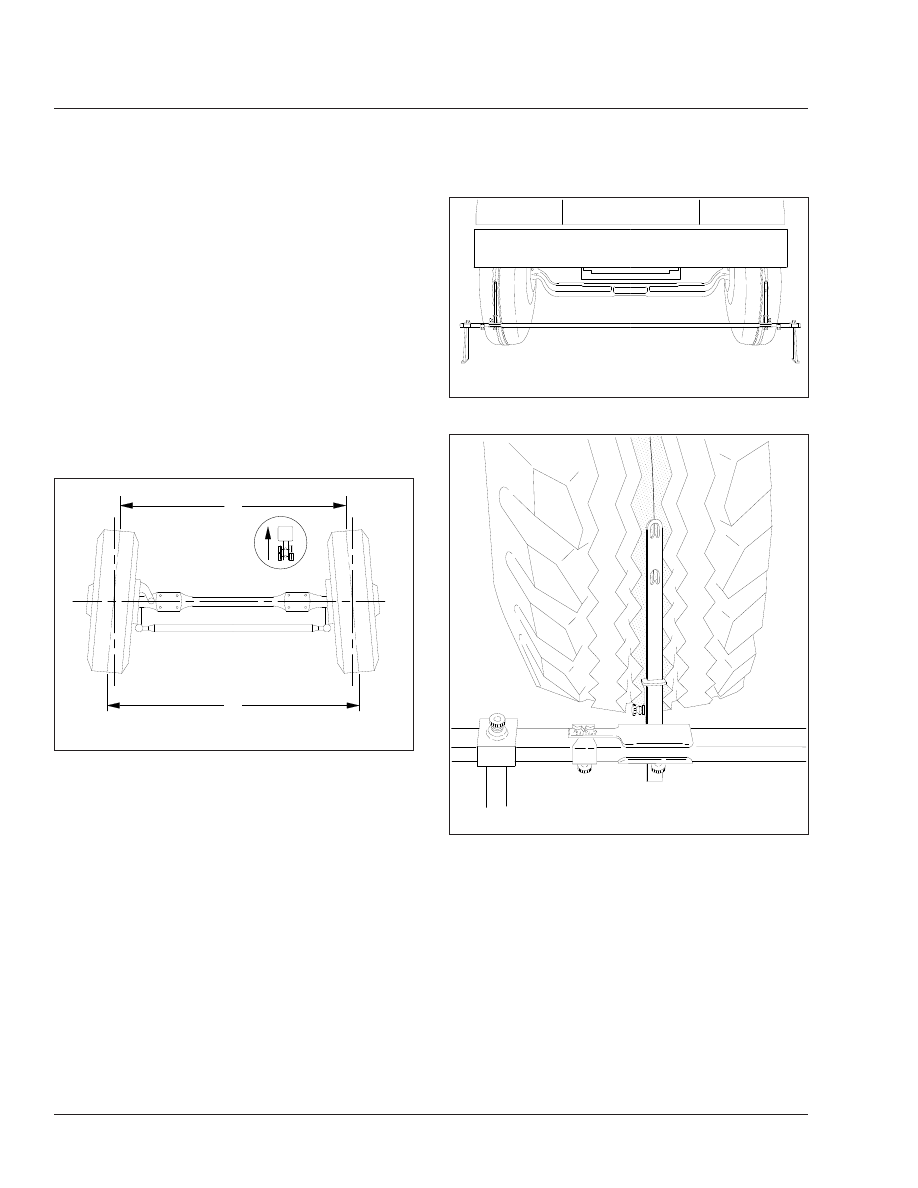
6.

Place a trammel bar at the rear of the front tires;
locate the trammel pointers at spindle height,
and adjust the pointers to line up with the scribe
lines on the center ribs of the front tires. See

Fig. 7

Lock in place. Check that the scale is set

on zero.

7.

Place the trammel bar at the front of the tires
(see

Fig. 8

and adjust the scale end so that the

pointers line up with the scribe lines. See

Fig. 9

.

8.

Read the toe-in from the scale, and compare it to
the toe-in specification in Group 33 of the ve-
hicle Workshop Manual. If corrections are
needed, refer to Group 33 of the vehicle Work-
shop Manual for instructions on adjusting the
toe-in.

A

B

f330082a

08/29/94

NOTE: B minus A equals toe-in.

Fig. 7, Wheel Toe-In (overhead view)

f330014a

08/30/94

Fig. 8, Trammel Bar Positioning

f400100a

08/30/94

Fig. 9, Setting Trammel Bar Pointers

Front Axle

33

33/4

Title of Maintenance Operation (MOP)

MOP Number

Axle Breather and Axle Lubricant Level Inspection. . . . . . . . . . . . . . . . . . . . . . . . . . . . . . . . . . . . . . . . . . 35–02

Axle Lubricant and Filter Change, and Magnetic Strainer Cleaning (Synthetic

Lubricant)

. . . . . . . . . . . . . . . . . . . . . . . . . . . . . . . . . . . . . . . . . . . . . . . . . . . . . . . . . . . . . . . . . . . . . . . . 35–01

Safety Precautions . . . . . . . . . . . . . . . . . . . . . . . . . . . . . . . . . . . . . . . . . . . . . . . . . . . . . . . . . . . . . . . . . 35–00

Rear Axle

35

Index, Alphabetical

35–00 Safety Precautions

Safety Precautions in this section apply to all
procedures within this group.

DANGER

When working on the vehicle, shut down the en-
gine, set the parking brake, and chock the tires.
Before working under the vehicle, always place
jack stands under the frame rails to ensure the
vehicle can not drop. Failure to follow these steps
could result in serious personal injury or death.

35–01 Axle Lubricant and Filter

Change, and Magnetic
Strainer Cleaning
(Synthetic Lubricant)

NOTICE

When operating under adverse conditions, it may
be necessary to change the axle lubricant at more
frequent intervals than listed in the scheduled
maintenance tables. Failure to do so could result
in axle damage.

IMPORTANT: For all axles, including tandem-
drive axles and two-speed axles, do the proce-
dures under the heading, "All Axle Models." For
a two-speed axle with a shift unit, also change
the shift unit lubricant. See under the heading,
"Two-Speed Axles With Shift Unit."

All Axle Models

Detroit

IMPORTANT: On Detroit axles, the oil change
interval for long haul vehicles can be extended
to 500,000 miles (800 000 km) for axles with
weight ratings of 34,000 to 40,000 lb (15 000 to
18 000 kg) using synthetic lubricant if a lubricant
analysis shows adequate quality. Oil must be
changed at least every four years, and more
often if the axle is exposed to high temperatures
and steep grades.

1.

Park the vehicle on a level surface, shut down
the engine, and set the parking brake. Chock the
tires.

2.

Clean the fill plug and the area around it. In the
axle housing rear cover, remove the plug from
the oil fill hole. See

Fig. 1

.

1

2

4

3

2

B

A

12/07/2010

f350509a

A. Front View

B. Rear View

1.

Axle Breather

2.

Breather Hose

3.

Temperature Sensor Port

4.

Oil Fill Plug

Fig. 1, Detroit Tandem Axle (forward axle shown)

Rear Axle

35

35/1

CAUTION

Be careful when draining the axle oil. It may be
very hot, and could cause personal injury if it con-
tacts the skin.

3.

Place a drain pan under the rear axle drain plug.
Drain the oil when it is warm. At this tempera-
ture, the oil will run more freely and ensure that
the axle is flushed.

4.

Clean the fill and drain plugs. Change them if
necessary.

4.1

For magnetic plugs, use a piece of key
stock or any other convenient steel slug
to short the two magnetic poles and divert
the magnetic field.

4.2

Clean away the collected material depos-
ited on each pole. Magnets will rapidly
lose their effectiveness as collected mate-
rial bridges the gap between the two
poles.

4.3

After the first oil is changed, inspect the
drain plug each time for large quantities
of metal particles.

4.4

After cleaning, install the drain plug(s)
and tighten to 30 lbf·ft (41 N·m).

5.

Fill the axle with the recommended lubricant.
See

Table 1

for recommended drive axle lubri-

cants and

Table 2

for lubricant capacities.

Detroit Drive Axle Lubricants

*

IMPORTANT: Lubricant used in Detroit rear axles must

meet Mercedes-Benz specification 235.20 (mineral) or

235.8 (synthetic). Mobil Delvac

Gear Oil A 80W-90 and

Mobilube

HD-A Plus 80W-90 meet specification 235.20.

Mobil Delvac 1 Gear Oil 75W-90 and Mobilube 1 SHC

75W-90 meet specification 235.8. For more product

information, see http://bevo.mercedes-benz.com.

Type

Ambient Temperature

SAE

Viscosity

Grade

Mineral Oil

–15°F (–26.1°C) and up

80W–90

Synthetic Oil

–40°F (–40°C) and up

75W–90

*

Detroit rear axles do not require the use of friction modifiers.

There is no upper limit on the ambient temperature, but axle sump tem-

perature must never exceed 250°F (121°C).

Table 1, Detroit Drive Axle Lubricants

NOTE: Some Detroit axles have a small
tapped and plugged hole near and below the
housing oil fill hole. This smaller hole is for a
lubricant temperature indicator only, and
should not be used as a fill or level hole.

5.1

Fill the axle through the oil fill hole. Lubri-
cant should be level with the bottom of
the oil fill hole. To check fluid level, see

Fig. 2

.

5.2

Install and tighten the fill plug 30 lbf·ft (41
N·m).

Detroit Rear Axle Lubricant Capacity

Axle

Oil Capacity:

Quarts (liters)

Forward-Rear

15.9 (15.0)

*

Single and Rearmost Tandem

10.6 (10.0)

*

*

Actual oil capacity might vary slightly depending on gear ratio.

Table 2, Detroit Rear Axle Lubricant Capacity

Meritor®

IMPORTANT: If using synthetic lubricant in an
axle equipped with a pump and filter system,
the lubricant change interval is extended to
500,000 miles (800 000 km).

IMPORTANT: Meritor rear axles do not require
the use of friction modifiers.

1.

Park the vehicle on level ground, apply the park-
ing brakes, and chock the front tires.

f350061a

A

B

08/17/2009

A. Correct (lube level at bottom of fill hole)
B. Incorrect (lube level below fill hole)

Fig. 2, Axle Lubricant Level Inspection

Rear Axle

35

35/2


Content   ..  16  17  18  19   ..