Chrysler Sebring, Stratus sedan, Sebring Convertible. Manual - part 685


  Index      Chrysler     Chrysler Sebring, Stratus sedan, Sebring Convertible - service repair manual 2001-2007 year


Search            


Content   ..  683  684  685  686   ..


Chrysler Sebring, Stratus sedan, Sebring Convertible. Manual - part 685


SUNSHADE

REMOVAL

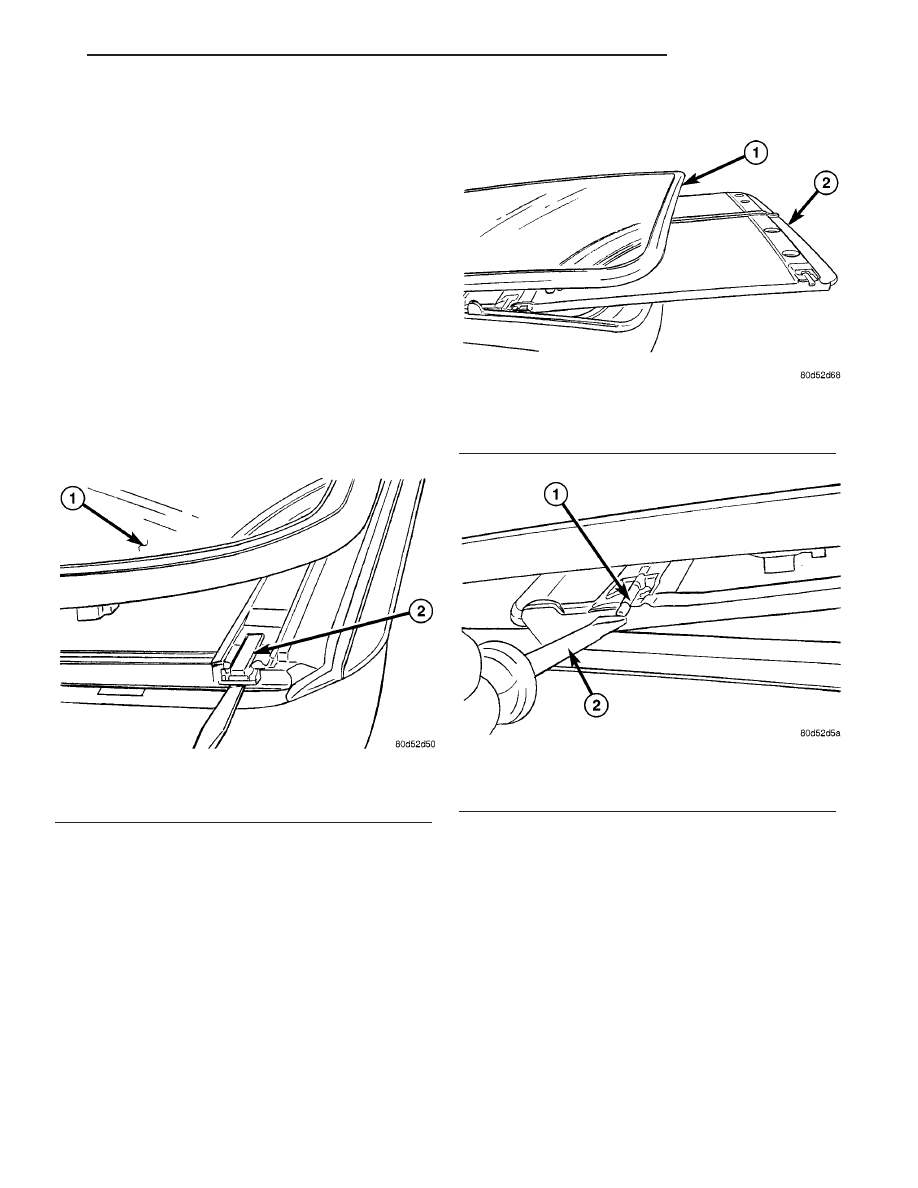
(1) Place the sunroof glass panel in the vent posi-

tion.

(2) Move the sunshade to the closed position
(3) From the outside of the vehicle, using a flat

blade tool, disengage the rear sunshade guides. Push-
ing the guide toward the center of the vehicle (Fig.
8). Raise up on sunshade and slide it rearward out
through the opening (Fig. 9). Release the front two
guides and remove sunshade from the vehicle (Fig.
10).

CAUTION: Use care not to crease the sunshade
when removing or installing.

(4) Remove the sunshade handle from sunshade by

compressing the back side of the handle together and
pull the handle out.

INSTALLATION

(1) Install sunshade handle into the sunshade, by

pressing the handle into place until the tabs lock
behind the sunshade.

(2) Install the sunshade into the vehicle between

the roof and the glass panel in the vent position (Fig.
9).

(3) Move the sunshade to the closed position.

Through the opening using a flat tool, engage the
rear guides into the guide rails (Fig. 8).

(4) Slide sunshade rearward to access the front

two guides. Engage the front guides into the guide
rails (Fig. 10).

(5) Ensure the sunshade operation and operate the

sunroof.

Fig. 8 SUNSHADE REAR GUIDE

1 - GLASS PANEL
2 - SUNSHADE REAR GUIDE

Fig. 9 SUNSHADE REMOVAL

1 - GLASS PANEL
2 - SUNSHADE REMOVAL

Fig. 10 SUNSHADE FRONT GUIDE

1 - SUNSHADE FRONT GUIDE
2 - SCREWDRIVER DEPRESSING FRONT GUIDE

JR

SUNROOF

23 - 137

WIND DEFLECTOR

REMOVAL

(1) Open sunroof glass panel.
(2) Remove hinge pins by pushing them outboard

to release the wind deflector from sunroof housing
(Fig. 11).

(3) Remove wind deflector (Fig. 12).

INSTALLATION

(1) Place wind deflector on wind deflector brackets.
(2) Install wind deflector hinge pins.
(3) Test sunroof operation.

Fig. 11 Wind Deflector Hinge Pin

1 - PUSH

Fig. 12 Wind Deflector

1 - WIND DEFLECTOR

23 - 138

SUNROOF

JR

WEATHERSTRIP/SEALS

TABLE OF CONTENTS

page

page

A-PILLAR SEAL

REMOVAL

. . . . . . . . . . . . . . . . . . . . . . . . . . . . 139

INSTALLATION

. . . . . . . . . . . . . . . . . . . . . . . . 139

A-PILLAR WEATHERSTRIP RETAINER AND

MOLDING
REMOVAL

. . . . . . . . . . . . . . . . . . . . . . . . . . . . 140

INSTALLATION

. . . . . . . . . . . . . . . . . . . . . . . . 140

DECKLID OPENING WEATHERSTRIP

REMOVAL

. . . . . . . . . . . . . . . . . . . . . . . . . . . . 140

INSTALLATION

. . . . . . . . . . . . . . . . . . . . . . . . 140

DOOR INNER BELT WEATHERSTRIP

REMOVAL

. . . . . . . . . . . . . . . . . . . . . . . . . . . . 141

INSTALLATION

. . . . . . . . . . . . . . . . . . . . . . . . 141

DOOR OPENING TRIM WELT

REMOVAL

. . . . . . . . . . . . . . . . . . . . . . . . . . . . 141

INSTALLATION

. . . . . . . . . . . . . . . . . . . . . . . . 141

DRIP RAIL WEATHERSTRIP

REMOVAL

. . . . . . . . . . . . . . . . . . . . . . . . . . . . 141

INSTALLATION

. . . . . . . . . . . . . . . . . . . . . . . . 142

FRONT & REAR DOOR OPENING

WEATHERSTRIP
REMOVAL

. . . . . . . . . . . . . . . . . . . . . . . . . . . . 142

INSTALLATION

. . . . . . . . . . . . . . . . . . . . . . . . 142

FRONT DOOR GLASS RUN WEATHERSTRIP

REMOVAL

. . . . . . . . . . . . . . . . . . . . . . . . . . . . 142

INSTALLATION

. . . . . . . . . . . . . . . . . . . . . . . . 142

FRONT DOOR INNER BELT WEATHERSTRIP

REMOVAL

. . . . . . . . . . . . . . . . . . . . . . . . . . . . 143

INSTALLATION

. . . . . . . . . . . . . . . . . . . . . . . . 143

FRONT DOOR OUTER BELT MOLDING

REMOVAL

. . . . . . . . . . . . . . . . . . . . . . . . . . . . 143

INSTALLATION

. . . . . . . . . . . . . . . . . . . . . . . . 143

HEADER / A-PILLAR WEATHERSTRIP

REMOVAL

. . . . . . . . . . . . . . . . . . . . . . . . . . . . 143

INSTALLATION

. . . . . . . . . . . . . . . . . . . . . . . . 144

HEADER WEATHERSTRIP RETAINER/

MOLDING
REMOVAL

. . . . . . . . . . . . . . . . . . . . . . . . . . . . 145

INSTALLATION

. . . . . . . . . . . . . . . . . . . . . . . . 145

OUTER DOOR BELT WEATHERSTRIP

REMOVAL

. . . . . . . . . . . . . . . . . . . . . . . . . . . . 145

INSTALLATION

. . . . . . . . . . . . . . . . . . . . . . . . 145

QUARTER PANEL WEATHERSTRIP

REMOVAL

. . . . . . . . . . . . . . . . . . . . . . . . . . . . 145

INSTALLATION

. . . . . . . . . . . . . . . . . . . . . . . . 146

QUARTER PANEL OUTER BELT

WEATHERSTRIP/MOLDING
REMOVAL

. . . . . . . . . . . . . . . . . . . . . . . . . . . . 146

INSTALLATION

. . . . . . . . . . . . . . . . . . . . . . . . 146

REAR DOOR B-PILLAR DOOR SEAL

REMOVAL

. . . . . . . . . . . . . . . . . . . . . . . . . . . . 146

INSTALLATION

. . . . . . . . . . . . . . . . . . . . . . . . 146

REAR DOOR GLASS RUN WEATHERSTRIP

REMOVAL

. . . . . . . . . . . . . . . . . . . . . . . . . . . . 146

INSTALLATION

. . . . . . . . . . . . . . . . . . . . . . . . 146

REAR DOOR INNER BELT WEATHERSTRIP

REMOVAL

. . . . . . . . . . . . . . . . . . . . . . . . . . . . 147

INSTALLATION

. . . . . . . . . . . . . . . . . . . . . . . . 147

REAR DOOR OUTER BELT MOLDING

REMOVAL

. . . . . . . . . . . . . . . . . . . . . . . . . . . . 147

INSTALLATION

. . . . . . . . . . . . . . . . . . . . . . . . 147

SECONDARY SILL WEATHERSTRIP

REMOVAL

. . . . . . . . . . . . . . . . . . . . . . . . . . . . 148

INSTALLATION

. . . . . . . . . . . . . . . . . . . . . . . . 148

SIDE RAIL WEATHERSTRIP

REMOVAL

. . . . . . . . . . . . . . . . . . . . . . . . . . . . 148

INSTALLATION

. . . . . . . . . . . . . . . . . . . . . . . . 149

A-PILLAR SEAL

REMOVAL

(1) Open front door.
(2) Using a fork-type tool (C-4829), disengage

push-in fasteners attaching A-pillar seal to A-pillar.

(3) Remove A-pillar seal from vehicle.

INSTALLATION

(1) Place A-pillar seal into position.
(2) Install push-in fasteners attaching A-pillar seal

to A-pillar.

(3) Close front door.

JR

WEATHERSTRIP/SEALS

23 - 139

A-PILLAR WEATHERSTRIP
RETAINER AND MOLDING

REMOVAL

(1) Partially raise convertible top.
(2) Remove header and A-pillar weatherstrip as

necessary to gain access.

(3) Remove screws holding A-pillar weatherstrip

retainer to A-pillar (Fig. 1).

(4) Remove retainer from vehicle.
(5) Remove screws attaching A-pillar molding to

A-pillar.

(6) Remove A-pillar molding from vehicle.

INSTALLATION

(1) Clean A-pillar of any seal material residue.
(2) Position A-pillar molding to vehicle.
(3) Install screws attaching A-pillar molding to

A-pillar.

(4) Position A-pillar weatherstrip retainer on A-pil-

lar.

(5) Install screws attaching retainer to A-pillar.

Install middle screw first and then work outward.

(6) Install header and A-pillar weatherstrip.
(7) Lower and secure convertible top.

DECKLID OPENING
WEATHERSTRIP

REMOVAL

(1) Release decklid latch and open decklid.
(2) Disconnect and isolate the battery negative

cable.

(3) Remove four push pins and remove the latch

cover.

(4) Disconnect the three harness electrical connec-

tors and remove the ground strap screw.

(5) Tape the wires together and tape in one chase

wire.

(6) Route the wires through the decklid.
(7) Pull decklid opening weatherstrip from decklid

opening flange (Fig. 2).

(8) Remove decklid opening weatherstrip from

vehicle.

INSTALLATION

(1) Position decklid opening weatherstrip on vehi-

cle (Fig. 2).

(2) Starting at center weatherstrip over decklid

latch striker and press weatherstrip firmly onto
decklid opening flange. Ensure that the weatherstrip
seats properly along the entire length.

(3) Route the wire harness through the decklid

and remove the tape and chase wire.

(4) Connect the three harness connectors and

install the ground strap screw.

(5) Install the latch cover and install the four push

pins.

(6) Connect the battery negative cable.
(7) Verify decklid operation and sealing.

Fig. 1 A-Pillar Weatherstrip Retainer

1 - A-PILLAR WEATHERSTRIP RETAINER
2 - HEADER
3 - A-PILLAR

Fig. 2 DECKLID OPENING WEATHERSTRIP

1 - TRUNK OPENING WEATHERSTRIP
2 - TRUNK OPENING FLANGE

23 - 140

WEATHERSTRIP/SEALS

JR


Content   ..  683  684  685  686   ..