Chrysler Sebring, Stratus sedan, Sebring Convertible. Manual - part 678
INSTALLATION
INSTALLATION
CAUTION: Do not handle by seat adjuster release bar.
NOTE: Ensure that the seat tracks are rearward.
Ensure the seat tracks on the right and left are in
equal latch positions.
(1) Place front seat in position in vehicle.
(2) Connect front seat wire harness connector to
body harness connector.
(3) Install bolts to attach front of seat track to the
floor kick up. Tighten bolts to 61 N·m (45 ft. lbs.) torque.
(4) Slide seat forward and install bolts attaching
rear of seat track to the floor. Tighten bolts to 61
N·m (45 ft. lbs.) torque.
(5) Verify front seat operation.
INSTALLATION - MANUAL - JR-27
CAUTION: It is important that the following steps be
done correctly to insure that the seat tracks are prop-
erly timed prior to securing the seats to the vehicle.
(1) Adjust seat back to vertical position using
either recliner handle.
WARNING: DO NOT GRAB EITHER RECLINER HANDLE
OR TOWEL BAR WHEN HANDLING SEAT. THE SEAT
TRACKS ARE SPRING LOADED AND WILL RELEASE.
(2) Turn seat upside down so that the seat tracks
can be seen.
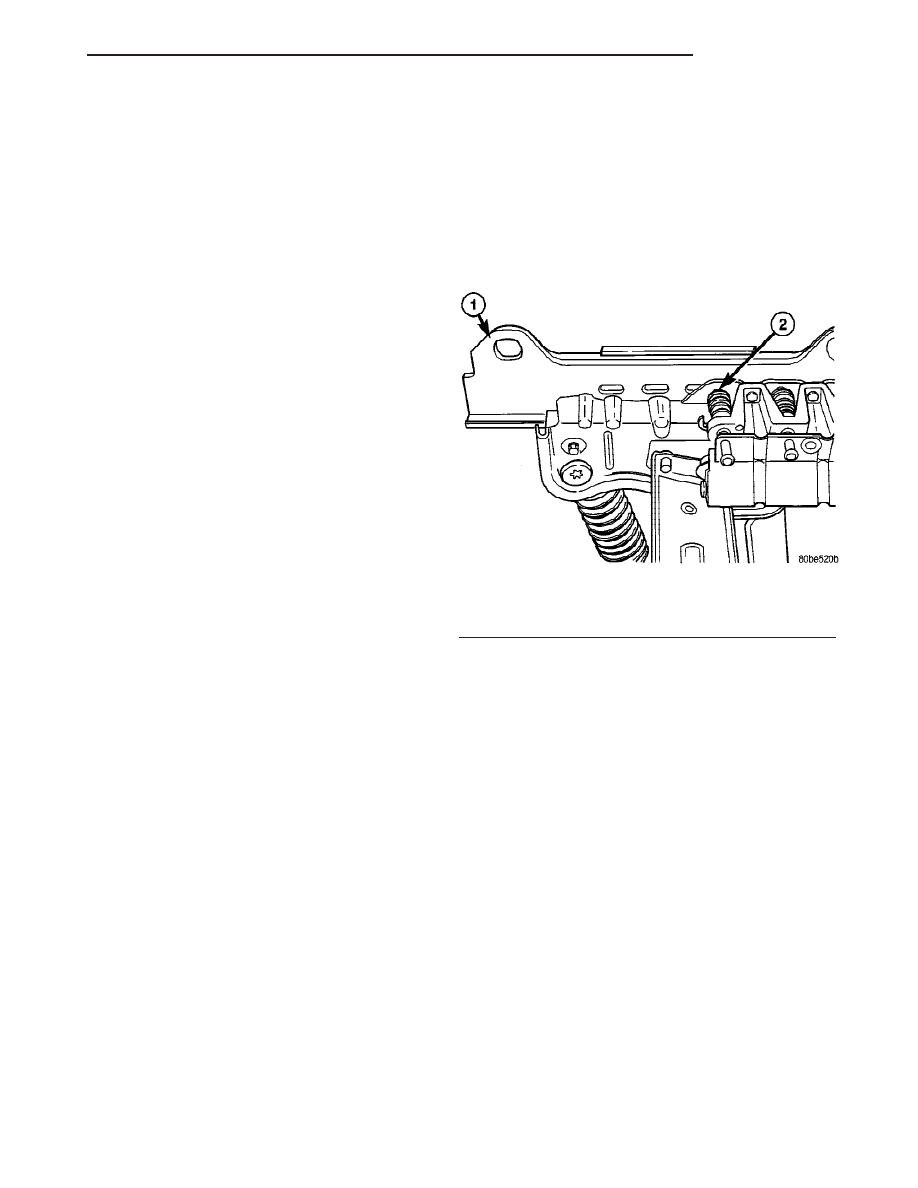
(3) Securely grasp the spring loaded outboard
track rail and while lifting the towel bar, position the
lower rail so that it is locked in the forth hole from
the end (Fig. 5).
(4) Position the inboard seat track rail so that it is
identical to the outboard track lower rail.
(5) Return seat to upright position.
(6) Position seat in vehicle.
(7) Tilt seat rearward and connect wire connector
to seat belt pretensioner.
(8) Push downward on seat cushion to ensure that
the front mounting brackets are fully seated to floor
pan crossmember.
(9) Install and tighten rear outboard bolt seat to
side sill pylon.
(10) Install and tighten forward outboard bolt
attaching seat to crossmember.
(11) Install
and
tighten
forward
inboard
bolt
attaching seat to crossmember.
(12) Move seat to full forward position. Push rear-
ward slightly on seat to ensure that the adjuster
latches are engaged on both seat tracks.
(13) Install and tighten rear inboard bolt attaching
seat to floor pan.
(14) Install and tighten middle outboard bolt
attaching seat to side sill pylon.
(15) Move seat forward and rearward and check
the efforts to move seat. If effort is to high loosen
seat track bolts and retighten to the proper torque.
NOTE: Tighten all seat track retaining bolts to 61
N·m (45 ft. lbs.) torque.
INSTALLATION - POWER - JR-27 ONLY
(1) Adjust seat back to vertical position using
either recliner handle.
(2) Position seat in vehicle.
(3) Tilt seat rearward and connect wire connector
to seat belt pretensioner and power seat mechanism.
(4) Push downward on seat cushion to ensure that
the front mounting brackets are fully seated to floor
pan crossmember.
(5) Use power seat switch to move seat to full rear-
ward position.
(6) Install and tighten rear outboard bolt attaching
seat to side sill pylon.
(7) Install
and
tighten
forward
outboard
bolt
attaching seat to crossmember.
(8) Install and tighten forward inboard bolt attach-
ing seat to crossmember.
(9) Use power seat switch to move seat to full for-
ward position.
(10) Install and tighten rear inboard bolt attaching
seat to floor pan.
(11) Install
and
tighten
middle
outboard
bolt
attaching seat to side sill pylon.
NOTE: Tighten all seat track retaining bolts to 61
N·m (45 ft. lbs.) torque.
Fig. 5 Seat Track Position
1 - REAR OF SEAT TRACK
2 - FORTH HOLE POSITION
JR
SEATS
23 - 109
FRONT SEAT (Continued)