Chrysler Sebring, Stratus sedan, Sebring Convertible. Manual - part 679
 

  Index      Chrysler     Chrysler Sebring, Stratus sedan, Sebring Convertible - service repair manual 2001-2007 year


Search            


Content   ..  677  678  679  680   ..


Chrysler Sebring, Stratus sedan, Sebring Convertible. Manual - part 679


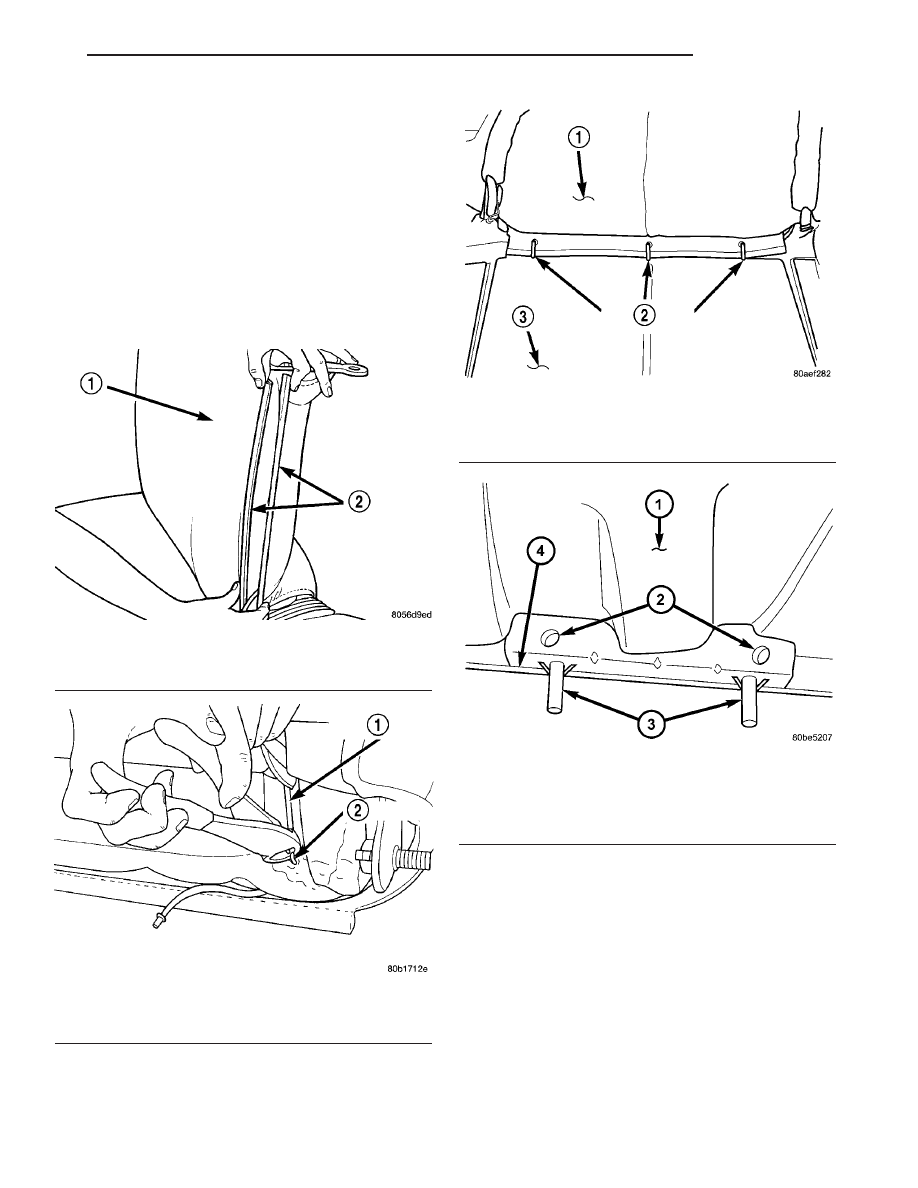
(8) Disengage plastic J-strap retainer at bottom of

seat back (Fig. 14).

(9) Remove hog rings holding seat cover seam

cords to wires in seat back foam (Fig. 15) and (Fig.
16).

(10) Feed seat belt bezel and seat belt through

seat cover while pulling cover from seat back foam.

(11) Remove hog rings attaching the seat cover

seam cords and wires to seat back foam.

(12) Poll seat cover upward to mid point position.
(13) Remove head restraint guides (Fig. 17).
(14) Remove seat back cover from seat back foam

and frame.

INSTALLATION

INSTALLATION

NOTE: Do not reuse the recliner assembly attaching
bolts.

(1) Position cover on the top of seat back.
(2) Install new head restraint sleeve guides.
(3) Carefully roll cover down to the area that hog

rings are to be installed.

(4) Install hog rings.
(5) Install hog rings attaching back frame to foam

pad.

(6) Roll cover downward.

Fig. 14 Seat Cover Retainer Strip

1 - SEAT BACK
2 - PLASTIC RETAINER STRIP

Fig. 15 Hog Rings

1 - SEAT COVER SEAM STRAP
2 - HOG RING

Fig. 16 Mid Seat Back Hog Rings

1 - CUSHION COVER
2 - HOG RINGS
3 - CUSHION

Fig. 17 2 Head Restraint Guides

1 - SEAT CUSHION
2 - HOG RINGS
3 - HEADREST GUIDES
4 - BOTTOM OF TOP SEAT FRAME RAIL

JR

SEATS

23 - 113

FRONT SEAT BACK COVER (Continued)

(7) Engage the J-strap retainer
(8) Install lumbar support handle, if equipped.
(9) Install new head restraint sleeve guides.
(10) Install seat back to seat cushion. Tighten

recliner bolts to 40 N·m (30 ft. lbs.) torque. Tighten
pivot bolts to 12 N·m (9 ft. lbs.) torque.

(11) Install seat in vehicle.
(12) Install head restraint.
(13) Check seat back and headrest operation.

INSTALLATION - JR-27 ONLY

(1) Position seat back cover on to seat back foam

and frame.

(2) Install hog rings attaching seat back foam to

seat back frame.

(3) Feed seat belt bezel and seat belt through hole

in seat cover.

(4) Route recliner cable in front of metal strap at

bottom of the seat back frame (Fig. 11).

(5) Pull seat cover downward to first horizontal

trench in seat back foam.

(6) Align seat cover upper horizontal seam center

notch to center hog ring location.

(7) Install hog rings, center first, to attach upper

insert cover seam wire to wire in seat back foam.

(8) Install hog rings to attach seat cover seam

cords to wires in seat back foam.

(9) Pull seat cover down fully over seat back foam.
(10) Connect seat cover J-straps at bottom of seat

back.

(11) Install head restraint guides
(12) Slide long snaps on outboard portion of seat

belt bezel inside seat back cover and seat belt retrac-
tor cover.

(13) Install upper recliner handle and lumbar

adjustment handle, if so equipped.

(14) Attach lower seat belt anchor to bolt on seat

adjuster.

(15) Verify that seat belt is routed such that it will

not be twisted when engaged to the seat belt buckle.

(16) Install new nut attaching lower seat belt

anchor to seat frame (Fig. 8).

NOTE: Tighten the lower seat belt anchor nut to 47
N·m (35 ft. lbs.) torque.

(17) Verify that a minimum of three threads

extend beyond the lower seat belt anchor nut and
that the lower seat belt anchor swivels freely. If both
conditions are not found, check that the bolt is fully
engaged to the seat adjuster.

(18) Install seat to vehicle (Refer to 23 - BODY/

SEATS/SEAT - INSTALLATION).

(19) Check seat belt operation.

FRONT SEAT CUSHION SIDE
SHIELDS

REMOVAL

REMOVAL

(1) Remove seat from vehicle.
(2) Remove screws attaching seat cushion side

shield to the bottom and side of seat cushion (Fig. 18)
and (Fig. 19).

(3) Remove shield from seat
(4) Disconnect switch wire connectors, if equipped.
(5) Remove seat switches, if equipped.

Fig. 18 Bottom View of Side Shield

1 - RECLINER HANDLE AND FASTENER
2 - SIDE SHIELD FASTENERS

Fig. 19 Side View of Side Shield

1 - SIDESHIELD FASTENERS

23 - 114

SEATS

JR

FRONT SEAT BACK COVER (Continued)

REMOVAL - JR-27 ONLY

(1) Remove lower recliner handle.
(2) Remove screws attaching seat side shield to

seat frame.

(3) Remove screws attaching power seat switch to

side shield, if so equipped.

(4) Remove side shield from vehicle (Fig. 20).

INSTALLATION

INSTALLATION

(1) Transfer seat switches, if equipped.
(2) Connect switch wire connectors to cushion side

shield, if equipped.

(3) Place shield in position on seat cushion.
(4) Install screws attaching seat cushion side

shield.

(5) Install seat. Tighten front screws to 61 N·m (45

ft. lbs.) and the rear screws to 61 N·m (45 ft. lbs.).

INSTALLATION - JR-27 ONLY

(1) Position side shield near seat.
(2) Install screws attaching power seat switch to

side shield, if so equipped.

(3) Install screws attaching side shield to seat

frame.

(4) Install lower recliner handle.

FRONT SEAT CUSHION

REMOVAL - FRONT

(1) Remove seat from vehicle.
(2) Remove front seat cushion side shields and dis-

connect wire connectors, if equipped.

(3) Remove seat back.

(4) Remove seat cushion bolts.
(5) Disconnect wire harness fasteners from cushion

frame (Fig. 21).

(6) Remove seat cushion (Fig. 22).

INSTALLATION - FRONT

(1) Install

wire

harness

fasteners

to

cushion

frame.

(2) Install seat cushion bolts.
(3) Install seat back. Tighten recliner bolts to 12

N·m (9 ft. lbs.) torque. Tighten pivot bolts to 40 N·m
(30 ft. lbs.) torque.

(4) Connect switch wire connectors to the cushion

side shield, if equipped.

(5) Install cushion side shields.
(6) Install seat in vehicle.

Fig. 20 Front Seat Side Shield

1 - SEAT FRAME
2 - SEAT SIDE SHIELD
3 - POWER SEAT SWITCH

Fig. 21 Front Seat Cushion Wire Harness

1 - WIRE HARNESS

Fig. 22 Front Seat Cushion

1 - FRONT SEAT CUSHION

JR

SEATS

23 - 115

FRONT SEAT CUSHION SIDE SHIELDS (Continued)

FRONT SEAT CUSHION COVER

REMOVAL - FRONT SEAT CUSHION COVER

NOTE: Fabric covered cushions are serviced as an
assembly.

(1) Remove seat from vehicle.
(2) Remove front seat cushion side shields and dis-

connect wire connectors, if equipped.

(3) Remove seat back.
(4) Remove seat cushion bolts.
(5) Disconnect wire harness fasteners from cushion

pan. (Fig. 21).

(6) Disengage J-strap attaching seat cover from

the seat cushion frame (Fig. 23).

(7) Pull cover off to the hog rings (Fig. 24).
(8) Cut hog rings attaching seat cover seat cush-

ion.

(9) Remove seat cushion cover from seat cushion.

INSTALLATION - FRONT SEAT CUSHION
COVER

NOTE: Fabric covered cushions are serviced as an
assembly.

(1) Position seat cover on cushion.
(2) Align seat cover with cushion alignment inden-

tations (Fig. 25).

(3) Install hog rings.
(4) Engage J-strap attaching seat cover to front of

seat cushion frame.

(5) Install wire harness fasteners to cushion pan.
(6) Install seat cushion bolts.
(7) Install seat back. Tighten recliner bolts to 12

N·m (9 ft. lbs.) torque. Tighten pivot bolts to 40 N·m
(30 ft. lbs.) torque.

(8) Connect switch wire connectors to the cushion

side shield, if equipped.

(9) Install cushion side shields.
(10) Install seat in vehicle.

Fig. 23 Front Seat Cushion J-Strap

1 - J-STRAP

Fig. 24 Seat Cushion Cover

1 - SEAT COVER
2 - HOG RINGS

Fig. 25 Seat Cushion

1 - SEAT CUSHION
2 - ALIGNMENT INDENTATIONS
3 - HOOK AND LOOP FASTENER

23 - 116

SEATS

JR


Content   ..  677  678  679  680   ..