Chrysler Sebring, Stratus sedan, Sebring Convertible. Manual - part 675


  Index      Chrysler     Chrysler Sebring, Stratus sedan, Sebring Convertible - service repair manual 2001-2007 year


Search            


Content   ..  673  674  675  676   ..


Chrysler Sebring, Stratus sedan, Sebring Convertible. Manual - part 675


UPPER B-PILLAR TRIM

REMOVAL

(1) Remove the door opening weatherstrips. (Refer

to

23

-

BODY/WEATHERSTRIP/SEALS/DOOR

OPENING WEATHERSTRIP - REMOVAL)

(2) Pry shoulder belt knob straight off height

adjuster using a trim stick (C-4755).

(3) Remove seat belt turning loop cover.
(4) Remove bolt attaching turning loop to height

adjuster.

(5) Remove bolt attaching seat belt lower anchor to

floor.

(6) Disengage clips attaching upper B-pillar trim

to B-pillar.

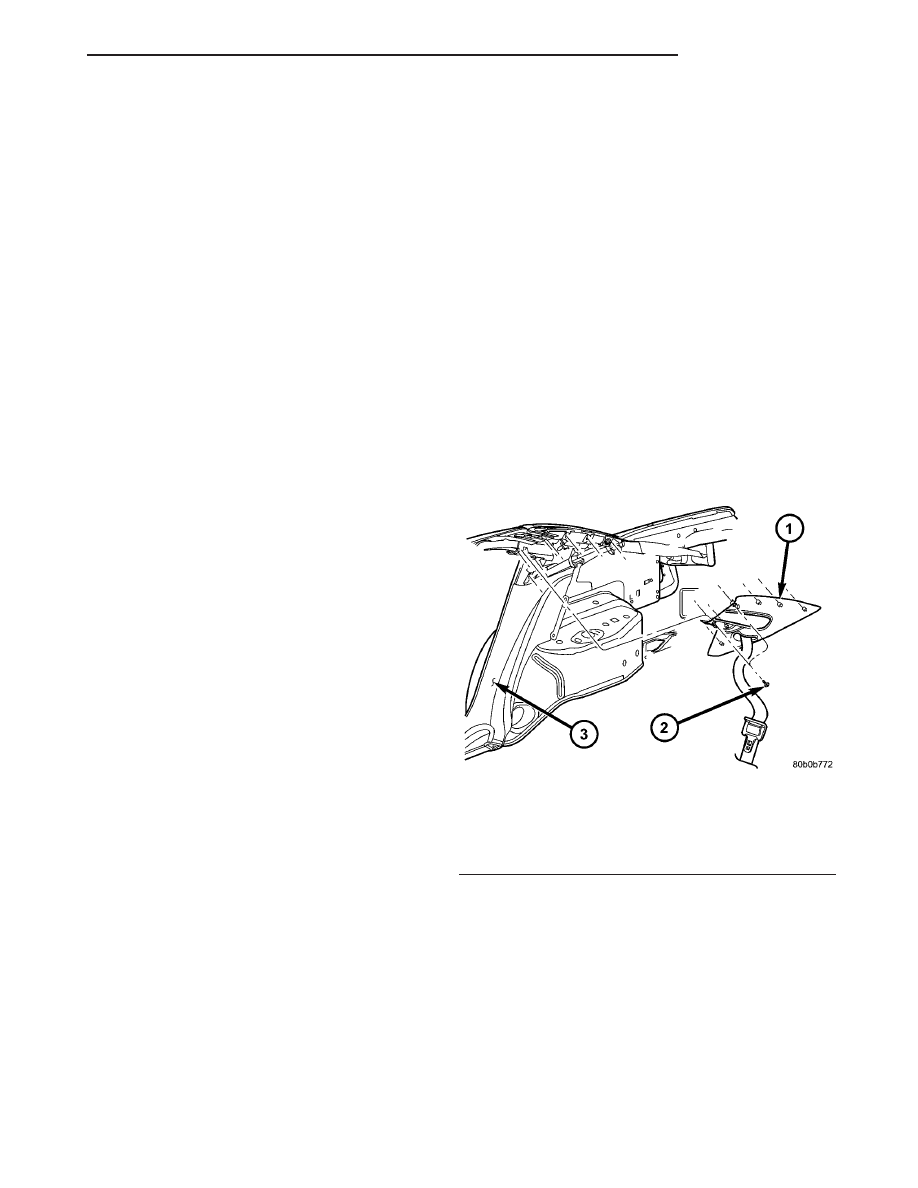
(7) Remove upper B-pillar trim from vehicle (Fig.

1).

INSTALLATION

(1) Place upper B-pillar trim into position.
(2) Engage clips attaching upper B-pillar trim to

B-pillar.

(3) Install bolt attaching seat belt lower anchor to

floor.

(4) Install bolt attaching turning loop to height

adjuster.

(5) Install seat belt turning loop cover.
(6) Push shoulder belt knob straight on height

adjuster.

(7) Install the door opening weatherstrips. (Refer

to

23

-

BODY/WEATHERSTRIP/SEALS/DOOR

OPENING WEATHERSTRIP - INSTALLATION)

UPPER DECK MOLDING

REMOVAL

(1) Lower convertible top to midway position.
(2) Remove screws attaching upper deck molding

to rear deck panel above convertible top rear attach-
ment.

(3) Open decklid.
(4) Remove screws attaching upper deck molding

to rear deck panel inside decklid water trough.

(5) Disconnect wire connector for CHMSL.
(6) Remove upper deck molding from vehicle.

INSTALLATION

(1) Position upper deck molding on vehicle.
(2) Connect wire connector for CHMSL.
(3) Install screws attaching upper deck molding to

rear deck panel inside decklid water trough.

(4) Install screws attaching upper deck molding to

rear deck panel above convertible top rear attach-
ment.

(5) Raise and secure convertible top.

UPPER QUARTER TRIM

REMOVAL

(1) Remove the door opening weatherstrips as nec-

essary.

(Refer

to

23

-

BODY/WEATHERSTRIP/

SEALS/DOOR

OPENING

WEATHERSTRIP

-

REMOVAL)

(2) Remove rear seat cushion. (Refer to 23 - BODY/

SEATS/REAR SEAT CUSHION - REMOVAL)

(3) Remove bolt attaching rear seat belt anchor to

floor. (Refer to 8 - ELECTRICAL/RESTRAINTS/
SEAT BELT - REMOVAL)

(4) On vehicles equipped with a side curtain air

bag, open the screw cap covers and remove the
screws (Fig. 27).

(5) Fold the seat back down.
(6) Disengage clips attaching upper quarter trim

to inner quarter panel (Fig. 27) and (Fig. 28).

(7) Route seat belt webbing through access hole in

upper quarter trim.

(8) Remove upper quarter trim panel from vehicle.

INSTALLATION

(1) Place upper quarter trim panel into position.
(2) Route seat belt webbing through access hole in

upper quarter trim.

(3) Engage clips attaching upper quarter trim to

inner quarter panel.

(4) On vehicles equipped with side curtain air bag,

install the screws and close the screw cap covers.

(5) Install bolt attaching rear seat belt anchor to

floor. (Refer to 8 - ELECTRICAL/RESTRAINTS/
SEAT BELT - INSTALLATION)

(6) Install rear seat cushion. (Refer to 23 - BODY/

SEATS/REAR SEAT CUSHION - INSTALLATION)

Fig. 27 UPPER QUARTER TRIM W/CURTAIN AIR

BAG

1 - UPPER QUARTER TRIM PANEL
2 - SCREWS
3 - C-PILLAR LOWER

JR

INTERIOR

23 - 97

(7) Install the door opening weatherstrips as nec-

essary.

(Refer

to

23

-

BODY/WEATHERSTRIP/

SEALS/DOOR

OPENING

WEATHERSTRIP

-

INSTALLATION)

WINDSHIELD HEADER
DAMPER

REMOVAL

(1) Remove center header trim panel (Refer to 23 -

BODY/INTERIOR/INTERIOR

TRIM

PANELS

-

REMOVAL).

(2) Remove nuts attaching damper (Fig. 29).
(3) Remove damper from vehicle.

INSTALLATION

(1) Place windshield header damper in position.
(2) Install nuts attaching damper.
(3) Install center header trim panel into position

(Refer to 23 - BODY/INTERIOR/INTERIOR TRIM
PANELS - INSTALLATION).

Fig. 28 UPPER QUARTER TRIM W/O CURTAIN AIR

BAG

1 - C-PILLAR LOWER
2 - UPPER QUARTER TRIM PANEL
3 - SHOLDER BELT

Fig. 29 Windshield Header Damper

1 - STUDS
2 - HEADER PANEL
3 - WINDSHIELD HEADER DAMPER
4 - NUT(S)

23 - 98

INTERIOR

JR

UPPER QUARTER TRIM (Continued)

PAINT

TABLE OF CONTENTS

page

page

PAINT

SPECIFICATIONS - COLOR CODE CHARTS

. . 99

BASECOAT/CLEARCOAT FINISH

DESCRIPTION

. . . . . . . . . . . . . . . . . . . . . . . . . 99

PAINT CODE

DESCRIPTION

. . . . . . . . . . . . . . . . . . . . . . . . 100

PAINTED SURFACE TOUCH-UP

DESCRIPTION

. . . . . . . . . . . . . . . . . . . . . . . . 100

FINESSE SANDING/BUFFING AND POLISHING

DESCRIPTION

. . . . . . . . . . . . . . . . . . . . . . . . 100

PAINT

SPECIFICATIONS - COLOR CODE CHARTS

EXTERIOR COLORS

EXTERIOR COLOR

DAIMLERCHRYSLER

CODE

EXTERIOR COLOR

DAIMLERCHRYSLER

CODE

BRIGHT SILVER METALLIC

CLEAR COAT

WS2

MAGNESIUM PEARL COAT

BPK

BRILLIANT BLACK PEARL

COAT

AXR

MIDNIGHT BLUE PEARL

COAT

BB8

GRAPHITE METALLIC

CLEAR COAT

ZDR

SATIN JADE PEARL COAT

AP4

INFERNO RED TINTED

PEARL COAT

WEL

STONE WHITE CLEAR

COAT

SW1

LINEN GOLD PEARL COAT

CYG

INTERIOR COLORS

INTERIOR COLOR

DAIMLERCHRYSLER

CODE

INTERIOR COLOR

DAIMLERCHRYSLER

CODE

G = DEEP JADE/LIGHT

TAUPE

P2

T = TAUPE

L5

L = LIGHT TAUPE

L2

S = DARK SLATE GRAY

DV

BASECOAT/CLEARCOAT
FINISH

DESCRIPTION

On most vehicles a two-part paint application

(basecoat/clearcoat) is used. Color paint that is
applied to primer is called basecoat. The clearcoat
protects the basecoat from ultraviolet light and pro-
vides a durable high-gloss finish.

CAUTION: Do not use abrasive chemicals or com-
pounds on painted surfaces. Damage to finish can
result.
Do not use harsh alkaline based cleaning solvents
on painted surfaces. Damage to finish or color can
result.

JR

PAINT

23 - 99

PAINT CODE

DESCRIPTION

Exterior vehicle body colors are identified on the

Body Code plate. (Refer to VEHICLE DATA/VEHI-
CLE

INFORMATION/BODY

CODE

PLATE

-

DESCRIPTION). The paint code is also identified on
the Vehicle Safety Certification Label which is
located on the drivers door shut face. The first digit
of the paint code listed on the vehicle indicates the
sequence of application, i.e.: P = primary coat, Q =
secondary coat. The codes listed in the Color Code
Chart are used for manufacturing purposes.

PAINTED SURFACE TOUCH-UP

DESCRIPTION

When a painted metal surface has been scratched

or chipped, it should be touched up as soon as possi-
ble to avoid corrosion. For best results, use Mopar

t

Scratch Filler/Primer, Touch Up Paints and Clear Top
Coat. (Refer to VEHICLE DATA/VEHICLE INFOR-
MATION/BODY CODE PLATE - DESCRIPTION).

WARNING: USE AN OSHA APPROVED RESPIRATOR
AND SAFETY GLASSES WHEN SPRAYING PAINT
OR SOLVENTS IN A CONFINED AREA. PERSONAL
INJURY CAN RESULT.

TOUCH UP PROCEDURE

(1) Scrape loose paint and corrosion from inside

scratch or chip.

(2) Clean affected area with Mopar

t Tar/Road Oil

Remover, and allow to dry.

(3) Fill the inside of the scratch or chip with a coat

of filler/primer. Do not overlap primer onto good sur-
face finish. The applicator brush should be wet

enough to puddle-fill the scratch or chip without run-
ning. Do not stroke brush applicator on body surface.
Allow the filler/primer to dry hard.

(4) Cover the filler/primer with color touch up

paint. Do not overlap touch up color onto the original
color coat around the scratch or chip. Butt the new
color to the original color, if possible. Do not stroke
applicator brush on body surface. Allow touch up
paint to dry hard.

(5) On vehicles without clearcoat, the touch up

color can be lightly finesse sanded (1500 grit) and
polished with rubbing compound.

(6) On vehicles with clearcoat, apply clear top coat

to touch up paint with the same technique as
described in Step 4. Allow clear top coat to dry hard.
If desired, Step 5 can be performed on clear top coat.

WARNING: AVOID PROLONGED SKIN CONTACT
WITH PETROLEUM OR ALCOHOL – BASED CLEAN-
ING SOLVENTS. PERSONAL INJURY CAN RESULT.

FINESSE SANDING/BUFFING
AND POLISHING

DESCRIPTION

Minor acid etching, orange peel, or smudging in

clearcoat or single-stage finishes can be reduced with
light finesse sanding, hand buffing, and polishing. If
the finish has been finesse sanded in the past,
it cannot be repeated. Finesse sanding opera-
tion should be performed by a trained automo-
tive paint technician.

CAUTION:

Do

not

remove

clearcoat

finish,

if

equipped. Basecoat paint must retain clearcoat for
durability.

23 - 100

PAINT

JR


Content   ..  673  674  675  676   ..