Volvo S90 Twin Engine (2019 year). Instruction - part 9


  Index      Volvo     Volvo S90 Twin Engine - instruction 2019 year in english


Search            


Content   ..  7  8  9  10   ..


Volvo S90 Twin Engine (2019 year). Instruction - part 9


WINDOWS, GLASS AND MIRRORS

}}

* Option/accessory.

169

Adjusting the door mirrors

To improve visibility to the rear, the door mirrors
need to be adjusted to the driver's height and
seating position. There are several automatic
settings that can also be connected to the mem-
ory function buttons for the power seat*.

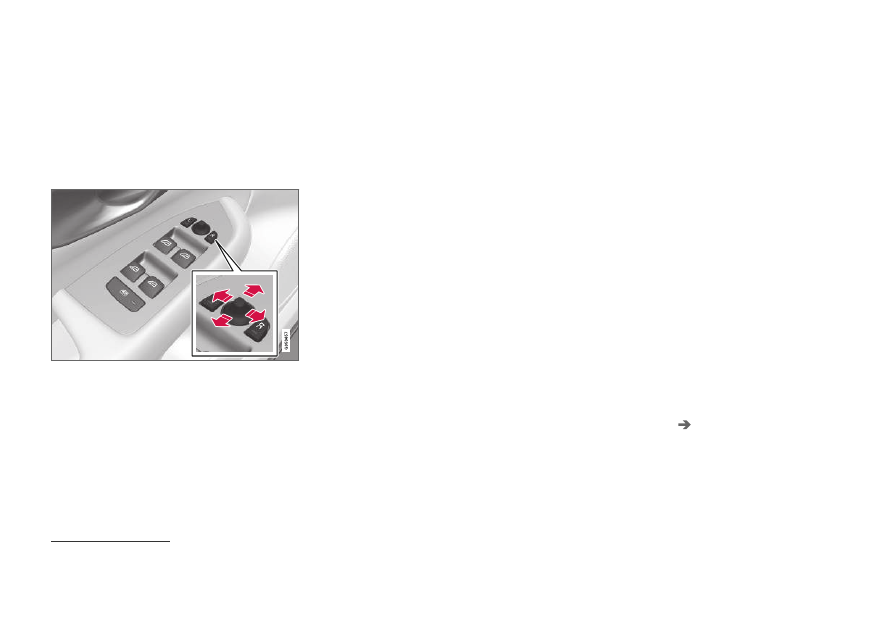
Controls used for door mirrors

Door mirror controls.

The joystick in the drivers' door control panel is
used to adjust the position of the door mirrors.
The ignition must be in at least mode I.

1. Press the L button for the left door mirror or

R for the right door mirror. The button will
light up.

2. Adjust the position using the joystick located

between the buttons.

3. Press the L or R button again. The light in

the button will go out.

Automatically folding door mirrors*

The door mirrors can be automatically folded
when driving or parking in tight spaces.

1. Press the L and R buttons at the same time.

2. Release the buttons after about 1 second.

The mirrors will automatically stop when they
are completely folded in.

Open the mirrors by pressing L and R at the
same time. The mirrors will automatically stop
when they are completely open.

Resetting the mirrors' position

A mirror that has been moved out of position
manually (e.g. hit or bumped into) must be electri-
cally returned to its normal position for automatic
folding* to function properly.

1. Fold in the mirrors by pressing the L and R

buttons at the same time.

2. Open them again by pressing the L and R

buttons at the same time.

3. Repeat the above procedure as needed.

The mirrors are now reset to their original posi-
tions.

Tilting when parking

3

The door mirrors can be tilted down to help give
the driver a better view along the sides of the
vehicle, e.g. of the curb when parking.

Select reverse gear and press the L or R mir-
ror button.

Please note that the button may need to be
pressed twice depending on settings. When the
door mirror is tilted down, the light in the button
will flash. When reverse gear is engaged, the
door mirrors will automatically start to move after
3 seconds and will reach their original position
after about 8 seconds.

Automatically tilting when parking

3

With this setting, the door mirrors will automati-
cally tilt down when reverse gear is engaged. The
folded position is preset and cannot be adjusted.
To immediately return the door mirrors to their
original position, press the L or R button twice.

1. Tap 

Settings

 in the center display's Top

view.

2. Tap 

My Car

Mirrors and Convenience

.

3. Under 

Exterior Mirror Tilt at Reverse

,

select 

Off

Driver

Passenger

 or 

Both

 to

activate/deactivate and to select which mir-
ror to tilt.

3

Only on models equipped with a power driver's seat with memory buttons*.

||

WINDOWS, GLASS AND MIRRORS

* Option/accessory.

170

Automatic folding when the vehicle is
locked*

The door mirrors can automatically fold in when
the vehicle is locked and open when the vehicle
is unlocked using the remote key.

1. Tap 

Settings

 in the center display's Top

view.

2. Tap 

My Car

Mirrors and Convenience

.

3. Select 

Fold Mirror When Locked

 to acti-

vate/deactivate.

Related information

Rearview/door mirrors (p. 167)

Adjusting the rearview mirror dimming func-
tion (p. 168)

Storing positions for seats, mirrors and head-
up display* (p. 182)

Activating and deactivating the heated rear
window and door mirrors (p. 218)

Panoramic roof

The panoramic roof is divided into two glass
sections. The front section can be opened verti-
cally at the rear edge (ventilation position) or hor-
izontally (open position). The rear section cannot
be moved.

The panoramic roof has a wind deflector and
sun curtain made of perforated fabric (located
beneath the glass sections) for extra protection
in e.g. bright sunlight.

The panoramic roof and sun curtain are operated
using the controls in the ceiling.

The panoramic roof and sun curtain can also be
operated with the controls in the right-side rear
door.

It can also be operated using keyless opening*
with the door handle.

To operate the panoramic roof and sun curtain,
the ignition must be in mode I or II.

WINDOWS, GLASS AND MIRRORS

}}

* Option/accessory.

171

WARNING

Children, other passengers or objects can be

trapped by the moving parts.

Always operate the windows with caution.

Do not allow children to play with the
operating controls.

Never leave a child alone in the vehicle.

Remember to always cut the current to
the power windows by setting the vehi-
cle's electrical system to ignition mode 0
and then taking the remote key with you
when leaving the vehicle.

Never stick objects or body parts out
through the windows, even if the vehicle
electrical system is completely turned off.

CAUTION

Do not open the panoramic roof when
load carriers are installed.

Never place heavy objects on the panor-
amic roof.

CAUTION

Remove ice and snow before opening the
panoramic roof. Be careful not to scratch
any surfaces or damage the trim.

Do not operate the panoramic roof if it is
frozen in place.

Wind blocker

The panoramic roof is equipped with a wind
blocker that folds up when the roof is open.

Related information

Operating the panoramic roof (p. 171)

Auto closing the panoramic roof sun curtain
(p. 175)

Pinch protection for windows and sun cur-
tains (p. 162)

Keyless locking and unlocking* (p. 253)

Locking and unlocking using the remote key
(p. 240)

Operating the panoramic roof

The panoramic roof and sun curtain are oper-
ated using a control in the ceiling panel, and
both are equipped with pinch protection.

The control in the right rear door can also be
used for operation.

WARNING

Children, other passengers or objects can be

trapped by the moving parts.

Always operate the windows with caution.

Do not allow children to play with the
operating controls.

Never leave a child alone in the vehicle.

Remember to always cut the current to
the power windows by setting the vehi-
cle's electrical system to ignition mode 0
and then taking the remote key with you
when leaving the vehicle.

Never stick objects or body parts out
through the windows, even if the vehicle
electrical system is completely turned off.

CAUTION

Do not open the panoramic roof when
load carriers are installed.

Never place heavy objects on the panor-
amic roof.

||

WINDOWS, GLASS AND MIRRORS

* Option/accessory.

172

CAUTION

Remove ice and snow before opening the
panoramic roof. Be careful not to scratch
any surfaces or damage the trim.

Do not operate the panoramic roof if it is
frozen in place.

To operate the panoramic roof and sun curtain,
the ignition must be in mode I or II.

It can also be operated using keyless opening*
with the door handle.

WARNING

Make sure that no child or other passenger

comes into contact with the windows as they

are closing with keyless closing*.

CAUTION

Check that the panoramic roof is properly
closed when closing.

The movement of the roof will stop if the control
is released during manual operation or when the
glass has reached the fully open/closed position.
The movement of both the panoramic roof and
the sun curtain is also stopped if the control in
the ceiling is operated again in the direction
opposite that of the current direction of move-

ment. Movement will also stop if the control in the
right rear door is moved again in any direction.

The panoramic roof and sun curtain are also
equipped with pinch protection. If there is any
problem with the pinch protection, a rest proce-
dure can be tested.

NOTE

For manual opening, the sun curtain must be
completely open before the panoramic roof
can be opened. For the reverse procedure,
the panoramic roof must be completely
closed before the sun curtain can be com-
pletely closed.

Opening and closing ventilation
position

Ventilation position, rear edge raised.

Open by pushing the control upward once.

Close by pushing the control downward
once.

When ventilation mode is selected, the rear edge
of the front section of the roof is raised. If the sun
curtain is fully closed when ventilation position is
selected, it will automatically open approx. 50 mm
(approx. 2 inches).

If the panoramic roof is closed from the ventila-
tion position, the sun curtain will also automati-
cally close.

WINDOWS, GLASS AND MIRRORS

}}

173

NOTE

If the roof is closed using the control in the
right rear door, the sun curtain must be
closed separately.

Fully opening and closing the
panoramic roof with the control in the
ceiling

Operation, manual mode

Operation, automatic mode

Manual operation

1. To open the sun curtain, pull the control

backward to the manual open mode.

2. To open the panoramic roof, pull the control

backward a second time to the manual open-
ing position.

Close by repeating the above procedure in
reverse - push the control forward/down to the
manual closing position.

Auto operation

1. To open the sun curtain to the fully open

position, pull the control backward to the
auto open mode and release.

2. To open the panoramic roof, pull the control

backward a second time to the automatic
opening position and release.

Close by repeating the above procedure in
reverse - push the control forward/down to the
auto close position.

Automatic operation - rapid opening or
closing

The panoramic roof and sun curtain can be
opened or closed simultaneously:

Open - press the control backward twice to
the automatic operation position and release.

Close - press the control forward/down twice
to the automatic operation position and
release.

Operating with right-side rear door
controls

Sun curtain control.

Operation, manual mode

Operation, automatic mode

||

WINDOWS, GLASS AND MIRRORS

* Option/accessory.

174

Panoramic roof control.

Operation, manual mode

Operation, automatic mode

Manual operation

1. To open the panoramic roof to the ventilation

position, move the panoramic roof control
downward to the manual opening position.

2. To open the sun curtain, move the sun cur-

tain control downward to the manual open
position.

3. To open the panoramic roof fully, move the

panoramic roof control downward a second
time to the manual operation position.

To close, pull up the respective control to the
manual closing position.

Auto operation

1. To open to the ventilation position, move the

panoramic roof control downward to the auto
open position and release.

2. To open to the sun curtain, move the sun

curtain control downward to the auto open
position and release.

3. To open the panoramic roof, move the panor-

amic roof control downward a second time to
the auto open position and release.

To close, pull up the respective control to the
automatic closing position.

Automatic operation - rapid opening and
closing

The panoramic roof and sun curtain can be
opened or closed simultaneously.

1. To open to the ventilation position, move the

panoramic roof control downward to the auto
position and release.

2. To open fully, move the sun curtain control

downward to the auto position and release.
Then immediately move the panoramic roof
control downward to the auto position and
release.

To close, pull up the panoramic roof control
to the auto position and release. Then imme-
diately move the sun curtain control up to the
auto position and release.

Related information

Panoramic roof (p. 170)

Auto closing the panoramic roof sun curtain
(p. 175)

Pinch protection for windows and sun cur-
tains (p. 162)

Keyless locking and unlocking* (p. 253)

Locking and unlocking using the remote key
(p. 240)

WINDOWS, GLASS AND MIRRORS

* Option/accessory.

175

Auto closing the panoramic roof

sun curtain

With this function, the sun curtain closes auto-
matically 15 minutes after the car has been
locked if it is parked in hot weather. This is done
to lower the passenger compartment tempera-
ture and protect the upholstery against being
bleached by the sun.

The function is deactivated as the default factory
setting and can be activated or deactivated using
the center display.

1. Tap 

Settings

 in the Top view in the center

display.

2. Tap 

My Car

Locking

.

Select 

Auto Close Sunroof Curtain

 to

activate/deactivate.

NOTE

The sun curtain also closes when all windows
are closed with keyless closing*.

Related information

Panoramic roof (p. 170)

Operating the panoramic roof (p. 171)

Pinch protection for windows and sun cur-
tains (p. 162)

Keyless locking and unlocking* (p. 253)

Locking and unlocking using the remote key
(p. 240)

Wiper blades and washer fluid

The wipers and the washer fluid are used to
improve visibility and the headlight pattern.

The washer nozzles are heated* automatically in
cold weather to prevent the washer fluid from
freezing.

When there is approximately 1 liter (1 qt) of
washer fluid remaining, a message to refill will
appear in the instrument panel.

Related information

Using the rain sensor (p. 176)

Using the windshield and headlight washers
(p. 178)

Using the rain sensor's memory function
(p. 177)

Filling washer fluid (p. 635)

Windshield wipers in the service position
(p. 634)

Replacing windshield wiper blades (p. 633)

Using the windshield wipers (p. 176)

WINDOWS, GLASS AND MIRRORS

176

Using the windshield wipers

The windshield wipers clean the windshield. The
right-side steering wheel lever is used to adjust
windshield wiper settings.

Right-hand steering wheel lever.

Thumb wheel, used to set rain sensor sensi-
tivity and interval wiper speed.

Single sweep

Move the lever down and release for a
single sweep.

Wipers off

Move the lever to position 0 to turn off
the windshield wipers.

Interval wipers

Set the number of sweeps per time unit
with the thumb wheel when interval wip-

ers are selected.

Continuous wipers

Move the lever upward for the wipers to
operate at normal speed.

Move the lever upward again for the wip-
ers to operate at high speed.

CAUTION

Before activating the wipers, make sure that
the wiper blades are not frozen in place and
that any snow or ice on the windshield has
been scraped away.

CAUTION

Use plenty of washer fluid when the wipers
clean the windshield. The windshield must be
wet when the windshield wipers are working.

Related information

Using the rain sensor (p. 176)

Using the windshield and headlight washers
(p. 178)

Wiper blades and washer fluid (p. 175)

Using the rain sensor's memory function
(p. 177)

Filling washer fluid (p. 635)

Windshield wipers in the service position
(p. 634)

Replacing windshield wiper blades (p. 633)

Using the rain sensor

The rain sensor monitors the amount of water on
the windshield and automatically starts the wind-
shield wipers. Rain sensor sensitivity can be
adjusted using the thumb wheel on the right-
hand steering wheel lever.

Right-hand steering wheel lever.

Rain sensor button

Thumb wheel, sensitivity/interval wiper speed

When the rain sensor is activated, the 

 rain

sensor symbol will be displayed in the instrument
panel.

Activating the rain sensor

When the rain sensor is activated, the engine
must be running or the ignition must be in mode I
or II. The windshield wiper lever must also be in
position 0 or in the single sweep position.

WINDOWS, GLASS AND MIRRORS

177

Activate the rain sensor by pressing the rain sen-
sor button 

.

If the lever is pressed down, the wipers will make
additional sweeps across the windshield.

Turn the thumb wheel upward for increased sen-
sitivity and downward for decreased sensitivity.
The wipers will make one extra sweep when the
thumb wheel is turned upward.

Deactivate the rain sensor

Deactivate the rain sensor by pressing the 
rain sensor button or moving the lever upward to
another wiper mode.

The rain sensor is automatically deactivated in
ignition mode 0 or when the engine is switched
off.

The rain sensor is also automatically deactivated
when the wiper blades are put in the service
position. The rain sensor will reactivate when
service mode is switched off.

CAUTION

The windshield wipers may start inadvertently
and be damaged in automatic car washes.
Deactivate the rain sensor when the engine is
running or when the ignition is in mode I or II.
The symbol in the instrument panel will go
out.

Related information

Using the windshield and headlight washers
(p. 178)

Wiper blades and washer fluid (p. 175)

Using the rain sensor's memory function
(p. 177)

Filling washer fluid (p. 635)

Windshield wipers in the service position
(p. 634)

Replacing windshield wiper blades (p. 633)

Using the windshield wipers (p. 176)

Using the rain sensor's memory

function

The rain sensor monitors the amount of water on
the windshield and automatically starts the wind-
shield wipers.

Activating/deactivating memory
function

The rain sensor's memory function can be set to
activate so that the rain sensor button does not
need to be pressed each time the engine is
started:

1. Tap 

Settings

 in the Top view in the center

display.

2. Tap 

My Car

Wipers

.

3. Select 

Rain Sensor Memory

 to activate/

deactivate the memory function.

Related information

Using the rain sensor (p. 176)

Using the windshield and headlight washers
(p. 178)

Wiper blades and washer fluid (p. 175)

Filling washer fluid (p. 635)

Windshield wipers in the service position
(p. 634)

Replacing windshield wiper blades (p. 633)

Using the windshield wipers (p. 176)

WINDOWS, GLASS AND MIRRORS

* Option/accessory.

178

Using the windshield and headlight

washers

The windshield and headlight washers clean the
windshield and headlights. Use the right-side
steering wheel lever to start the windshield and
headlight washers.

Starting the windshield and headlight
washers

Washing function, right-hand steering wheel lever.

Move the right-hand steering wheel lever
toward the steering wheel to start the wind-
shield and headlight washers.
> After the lever is released, the wipers

make several extra sweeps.

CAUTION

Avoid activating the washer system when it is
frozen or the fluid reservoir is empty. Other-
wise, there is a risk of damaging the pump.

Headlight washer*

To save washer fluid, the headlights are washed
automatically according to a defined interval
when the headlights are on.

Reduced washing

When there is about 1 liter (1 qt) of washer fluid
left in the reservoir and the 

Washer fluid


Level

low, refill

 message is displayed in the instrument

panel together with the 

 symbol, the washer

fluid supply to the headlights is cut off. This is to
prioritize windshield cleaning and visibility
through it. The headlights are only washed if high
or low beam is on.

Related information

Using the rain sensor (p. 176)

Wiper blades and washer fluid (p. 175)

Using the rain sensor's memory function
(p. 177)

Filling washer fluid (p. 635)

Windshield wipers in the service position
(p. 634)

Replacing windshield wiper blades (p. 633)

Using the windshield wipers (p. 176)

SEATS AND STEERING WHEEL

* Option/accessory.

180

Manual front seats

The power front seats can be adjusted in a num-
ber of different ways for optimal comfort and
ergonomics.

Raise/lower the front edge of the seat cush-
ion* by moving the control up/down.

1

Change the length of the seat cushion* by
pulling up the lever and moving the cushion
forward/backward.
Move the seat forward/backing by lifting the
handle and moving the seat to a suitable dis-
tance from the steering wheel and pedals.
Check to make sure the seat is securely
locked into place after its setting has been
changed.

Adjust lumbar support by pressing the button
up/down/forward/rearward

2

.

Raise/lower the seat by moving the control
up/down.
Change the backrest tilt by turning the knob
on the backrest.

WARNING

Do not adjust the seat while driving. The
seat should be adjusted so that the brake
pedal can be depressed fully. In addition,
position the seat as far rearward as com-
fort and control allow.

Check that the seat is securely locked
into position after adjusting.

Related information

Power* front seats (p. 181)

Adjusting the power* front seats (p. 181)

Storing positions for seats, mirrors and head-
up display* (p. 182)

Using stored positions for seats, mirrors and
head-up display* (p. 183)

Adjusting front seat massage settings*
(p. 185)

Adjusting* front seat cushion length (p. 185)

Front seat massage* settings (p. 184)

Adjusting front seat side bolster settings*
(p. 186)

Adjusting front seat lumbar support* (p. 187)

Adjusting the passenger seat from the driv-
er's seat* (p. 188)

1

Only applies to the driver's seat.

2

Applies for four-way lumbar support*. Two-way lumbar support* is adjusted forward/rearward.

SEATS AND STEERING WHEEL

}}

* Option/accessory.

181

Power* front seats

The power front seats can be adjusted in a num-
ber of different ways for optimal comfort and
ergonomics. The power seat can be moved for-
ward/backward and up/down. The height and
length* of the seat cushion and the tilt of the
backrest can be adjusted. Lumbar support* can
be adjusted up, down, forward and backward

3

.

The power seats can be adjusted for a certain
period of time after the door is unlocked without
the engine running. The seats can always be
adjusted while the engine is running. They can
also be adjusted for a short period after the
engine is turned off.

CAUTION

The power seats have an overload protector
that is triggered if a seat is blocked by any
object. If this occurs, remove the object and
attempt to adjust the seat again.

Related information

Manual front seats (p. 180)

Adjusting the power* front seats (p. 181)

Storing positions for seats, mirrors and head-
up display* (p. 182)

Using stored positions for seats, mirrors and
head-up display* (p. 183)

Adjusting front seat massage settings*
(p. 185)

Adjusting* front seat cushion length (p. 185)

Front seat massage* settings (p. 184)

Adjusting front seat side bolster settings*
(p. 186)

Adjusting front seat lumbar support* (p. 187)

Adjusting the passenger seat from the driv-
er's seat* (p. 188)

Adjusting the power* front seats

Set the desired seating position using the con-
trols on the front seat cushion. To set the con-
venience functions, turn the multifunction con-
trol

4

 upward/downward.

The illustration shows the controls in a vehicle with four-
way lumbar support*. Vehicles with two-way lumbar sup-
port* do not have the rotary multifunction control.

In vehicles with four-way lumbar support*,
turn the multifunction control

4

 up/down to

set the convenience functions. In vehicles
with two-way lumbar support*, use the round
button to adjust the lumbar support forward/
rearward.
Raise/lower the front edge of the seat cush-
ion by moving the control up/down.

3

Applies for four-way lumbar support*. Two-way lumbar support* is adjusted forward/rearward.

||

SEATS AND STEERING WHEEL

* Option/accessory.

182

Raise/lower the seat by moving the control
up/down.
Move the seat forward/rearward by moving
the control forward/rearward.
Change the backrest tilt by moving the con-
trol forward/backward.

Only one movement (forward/rearward/up/
down) can be performed at a time.

The front seat backrests cannot be folded down
completely.

Related information

Manual front seats (p. 180)

Power* front seats (p. 181)

Storing positions for seats, mirrors and head-
up display* (p. 182)

Using stored positions for seats, mirrors and
head-up display* (p. 183)

Adjusting front seat massage settings*
(p. 185)

Adjusting* front seat cushion length (p. 185)

Front seat massage* settings (p. 184)

Adjusting front seat side bolster settings*
(p. 186)

Adjusting front seat lumbar support* (p. 187)

Adjusting the passenger seat from the driv-
er's seat* (p. 188)

Storing positions for seats, mirrors

and head-up display*

Adjustment settings for the power* seat, door
mirrors and head-up display* can be stored in
the memory buttons.

Two different positions for the power* seat, door
mirrors and head-up display* can be stored using
the memory buttons. The buttons are located on
the inside of either one or both* front doors.

Button M for storing a setting

Memory button

Memory button

Storing positions

1. Adjust the seat, door mirrors and head-up

display to the desired position.

2. Press and hold the M button. The indicator

light in the button will illuminate.

3. Within three seconds, press and hold the 1

or 2 button.
> When the position has been stored in the

memory button, an audio signal will sound
and the indicator light in the M button will
go out.

If none of the memory buttons are pressed within
three seconds, the M button will go out and no
position will be stored.

The seats, door mirrors or head-up display must
be readjusted before a new memory position can
be set.

Related information

Manual front seats (p. 180)

Power* front seats (p. 181)

Adjusting the power* front seats (p. 181)

Using stored positions for seats, mirrors and
head-up display* (p. 183)

Adjusting front seat massage settings*
(p. 185)

Adjusting* front seat cushion length (p. 185)

4

Not available in vehicles with two-way lumbar support*.

SEATS AND STEERING WHEEL

}}

* Option/accessory.

183

Front seat massage* settings (p. 184)

Adjusting front seat side bolster settings*
(p. 186)

Adjusting front seat lumbar support* (p. 187)

Adjusting the passenger seat from the driv-
er's seat* (p. 188)

Adjusting the door mirrors (p. 169)

Head-up display settings* (p. 140)

Using stored positions for seats,

mirrors and head-up display*

If the positions for the power* seat, door mirrors
and head-up display* have been stored, they can
be easily activated using the memory buttons.

Using a stored position

A stored position can be used with the front door
open or closed:

Front door open

Briefly press one of the memory buttons 1
(

) or 2 (

). The power seats, door mirrors

and head-up display will move and stop at
the positions stored in that button.

Front door closed

Press and hold one of the memory buttons 1
(

) or 2 (

) until the seat, door mirrors

and head-up display stop in the positions
stored in that memory button.

If the memory button is released, the seat, door
mirrors and head-up display will stop moving.

WARNING

This list point needs to be translated
exactly to: "Because the driver's seat can
be adjusted with the ignition off, children
should never be left unattended in the
vehicle.

Movement of the seat can be STOPPED
at any time by pressing any button on the
power seat control panel.

Do not adjust the seat while driving.

The seat should be adjusted so that the
brake pedal can be depressed fully. In
addition, position the seat as far rearward
as comfort and control allow.

The seat rails on the floor must not be
obstructed in any way when the seat is in
motion.

Related information

Manual front seats (p. 180)

Power* front seats (p. 181)

SEATS AND STEERING WHEEL

* Option/accessory.

184

Adjusting the power* front seats (p. 181)

Storing positions for seats, mirrors and head-
up display* (p. 182)

Adjusting front seat massage settings*
(p. 185)

Adjusting* front seat cushion length (p. 185)

Front seat massage* settings (p. 184)

Adjusting front seat side bolster settings*
(p. 186)

Adjusting front seat lumbar support* (p. 187)

Adjusting the passenger seat from the driv-
er's seat* (p. 188)

Adjusting the door mirrors (p. 169)

Head-up display settings* (p. 140)

Front seat massage* settings

The settings for the multifunctional seats can be
adjusted using either the mutifunction control on
the seat or the center display. The adjustment
settings are shown in the center display.

Multifunction control, located on the side of the seat
cushion.

Massage settings

The following massage settings are available:

On

/

Off

: Select 

On

/

Off

 to turn on/off the

massage function.

Programs 1-5

: There are 5 preset massage

programs. Select 

Swell

Tread

Advanced

,

Lumbar

 or 

Shoulder

.

Intensity

: Select 

Low

Normal

 or 

High

.

Speed

: Select 

Slow

Normal

 or 

Fast

.

Restarting the massage function

The massage function turns off automatically
after 20 minutes. The function is reactivated
manually.

Tap 

Restart

, which is displayed in the center

display, to restart the selected massage pro-
gram.
> The massage program will restart. If no

selection is made, the message will be
stored in Top view.

Related information

Manual front seats (p. 180)

Power* front seats (p. 181)

Adjusting the power* front seats (p. 181)

Storing positions for seats, mirrors and head-
up display* (p. 182)

Using stored positions for seats, mirrors and
head-up display* (p. 183)

Adjusting front seat massage settings*
(p. 185)

Adjusting* front seat cushion length (p. 185)

Adjusting front seat side bolster settings*
(p. 186)

Adjusting front seat lumbar support* (p. 187)

Adjusting the passenger seat from the driv-
er's seat* (p. 188)

SEATS AND STEERING WHEEL

}}

* Option/accessory.

185

Adjusting front seat massage

settings*

The settings for the multifunctional seats can be
adjusted using either the mutifunction control on
the seat or the center display. The adjustment
settings are shown in the center display.

Adjusting front seat massage settings

The front seat backrests have a massage func-
tion. Air-filled cushions provide the massaging
action and a number of settings are available.

The massage function can only be activated
when the engine is running.

1. Activate the multifunction control by turning

the control 

 upward/downward. The seat

settings view will appear in the center dis-
play.

2. Select 

Massage

 in the seat settings view.

3. Select massage settings by tapping the cen-

ter display or by moving the cursor up/down
using the multifunction control's upper 

/

lower 

 buttons. Change a setting in the

selected function by tapping the arrows on
the center display or by using the multifunc-
tion control's front 

/rear 

 buttons.

Related information

Manual front seats (p. 180)

Power* front seats (p. 181)

Adjusting the power* front seats (p. 181)

Storing positions for seats, mirrors and head-
up display* (p. 182)

Using stored positions for seats, mirrors and
head-up display* (p. 183)

Adjusting* front seat cushion length (p. 185)

Front seat massage* settings (p. 184)

Adjusting front seat side bolster settings*
(p. 186)

Adjusting front seat lumbar support* (p. 187)

Adjusting the passenger seat from the driv-
er's seat* (p. 188)

Adjusting* front seat cushion length

Depending on the selected equipment level, the
length of the seat cushion can either be
adjusted using the multifunction control* on the
side of the seat cushion, or manually adjusted
using the control on the front of the seat cush-
ion.

Adjusting seat cushion length using the
multifunction control

The multifunction control, located on the side of the seat
cushion.

1. Activate the multifunction control by turning

the control 

 upward/downward. The seat

settings view will appear in the center dis-
play.


Content   ..  7  8  9  10   ..