Volkswagen 01M Transmission. Manual - part 64


  Index      Volkswagen     Volkswagen 01M Transmission - service manual 2001 year


Search            copyright infringement  


Content   ..  62  63  64  65   ..


Volkswagen 01M Transmission. Manual - part 64


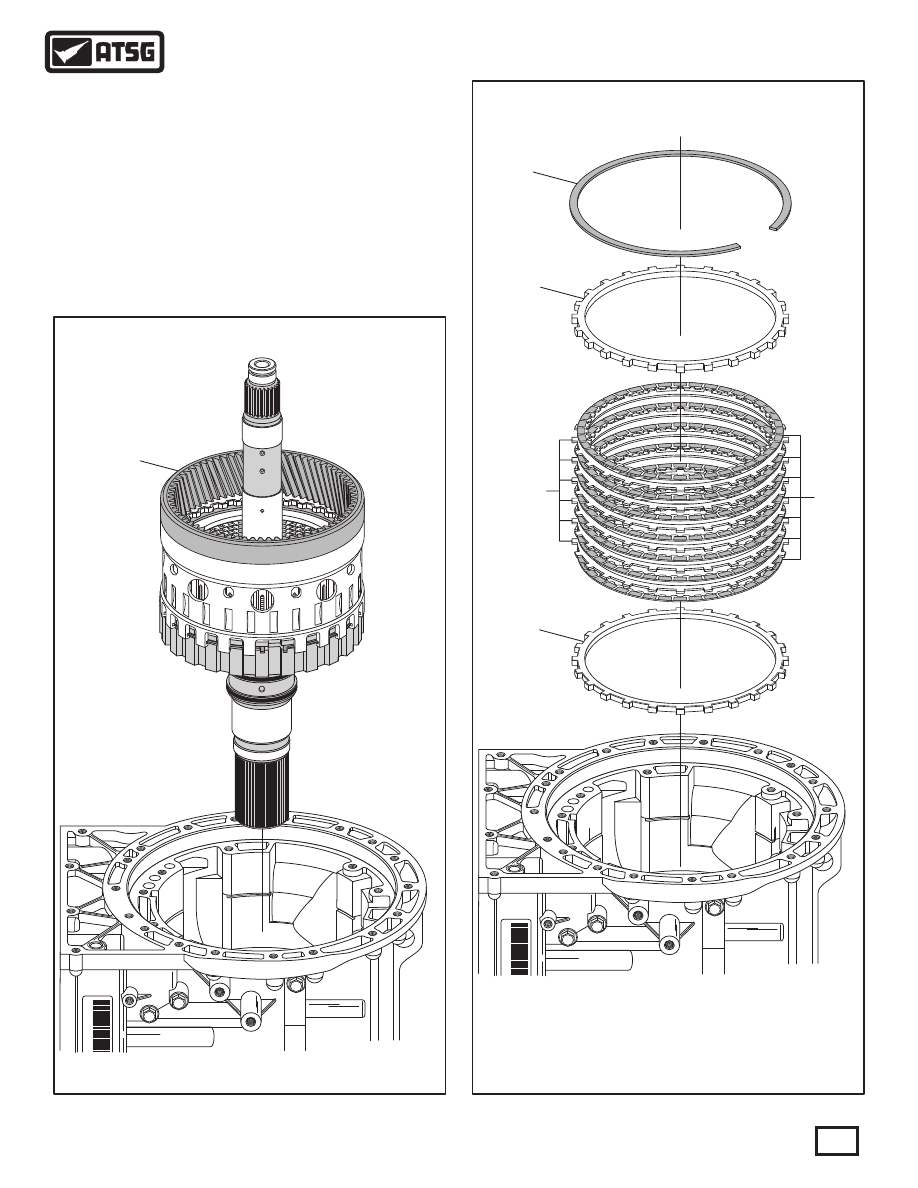
 417  B2 CLUTCH BACKING PLATE SNAP RING, 2.5 MM (.099") THK.
 418  B2 BACKING PLATE, STAMPED "63", 6.32 MM (.248") THICK.
 419  B2 CLUTCH FRICTION PLATE   (QUANITY VARIES).
 420  B2 CLUTCH STEEL PLATES, 1.82 MM (.072") THICK.
 421  B2 APPLY PLATE, STAMPED "50", 5.05 MM (.199") THICK.

* 20SGL

 J00037

63

50

417

418

419

420

421

Figure 204

Figure 203

* 20SGL

 J00037

COMPLETED

REAR RING GEAR,

OUTPUT SHAFT AND

K2 CLUTCH HOUSING

ASSEMBLY

COMPLETED

REAR RING GEAR,

OUTPUT SHAFT AND

K2 CLUTCH HOUSING

ASSEMBLY

TRANSMISSION ASSEMBLY (CONT'D)

   5. Lubricate the output shaft seals and seal surface 
           in case with small amount of Trans-Jel®, and
           install the completed rear ring gear, output shaft
           and K2 clutch housing, as shown in Figure 203.
   6. The entire B2 clutch pack must be temporarily
           installed, as shown in Figure 204, to verify the
      B2 clutch clearance. 

Continued on Page 116

115

Copyright © 2010 ATSG

Copyright © 2010 ATSG

AUTOMATIC TRANSMISSION SERVICE GROUP

Technical Service Information

WWW.ALL-TRANS.BY

Figure 205

Figure 206

TRANSMISSION ASSEMBLY (CONT'D)

Continued on Page 117

ROUNDED EDGE

TOWARDS FRICTION

ROUNDED EDGE

TOWARDS FRICTION

BACKING

PLATE

APPLY

PLATE

B2 CLUTCH STACK-UP

     7. Install the B2 clutch apply plate, as shown in
             Figure 204, with the "rounded" edge facing up
             towards the friction, as shown in Figure 205.
     8. Install B2 clutch plates beginning with a friction
             and alternating with the steel plates, as shown in
             Figure 204, until you have the proper amount
       installed as quantity may vary.
       Note: All friction plates should be soaked in
             proper fluid for 30 minutes before installing.
     9. Install the B2 clutch backing plate, as shown in
             Figure 204, with "rounded" edge facing down
             toward the last friction, as shown in Figure 205.
 10. Install the B2 clutch backing plate snap ring, as
             shown in Figure 204, and ensure fully seated.
 11. Measure the B2 clutch clearance using a feeler
             gauge between the backing plate and friction
       plate, as shown in Figure 206.
       Note: There are no factory clutch clearance
       specifications available, but the clearances
             were the "traditional" .010" per friction plate
       through-out this unit.
 12. B2 clutch clearance should be approximately             
           .010" per friction plate installed, as shown in
       Figure 206. 
 13. After verification of the B2 clutch clearance,
       remove the entire B2 clutch pack.

B2 Clutch Clearance Should Be

Approximately .010" Per Friction

Plate Installed

116

Copyright © 2010 ATSG

Copyright © 2010 ATSG

AUTOMATIC TRANSMISSION SERVICE GROUP

Technical Service Information

WWW.ALL-TRANS.BY

* 20SGL

 J00037

 408  F1 SPRAG OUTER RACE SNAP RING, 1.19 MM (.047") THICK.
 409  F1 SPRAG INNER RACE SNAP RING, 1.19 MM (.047") THICK.
 413  F1 SPRAG ASSEMBLY COMPLETE.

408

409

413

Figure 207

Figure 208

454

* 20SGL

 J00037

452

SPRAG RACE
SPACER AND

WAVE SPRING

SPRAG RACE
SPACER AND

WAVE SPRING

 452  NUMBER 10 THRUST BEARING   (INSIDE CARRIER).
 453  COMPLETED REAR PL ANETARY CARRIER ASSEMBLY.
 454  NUMBER 11 BEARING FRONT RACE   (BACK OF CARRIER).

453

Continued on Page 118

14. Ensure that number 11 thrust bearing front race
             is still stuck to the back side of planetary carrier,
       as shown in Figure 207.
15. Ensure that number 10 thrust bearing is installed
           inside of the rear planetary carrier, as shown in
      Figure 207.
16. Install completed rear planetary carrier into case,
           as shown in Figure 207, by rotating to engage the
           pinion gears into ring gear and rotate back and
           forth to engage each of the K2 friction plates on
           rear planetary carrier hub until fully seated.
17. Re-install the entire B2 clutch pack using steps
           7 thru 10 on Page 116.

TRANSMISSION ASSEMBLY (CONT'D)

 18. Install completed F1 sprag assembly, as shown
       in Figure 208.
       Note: Lugs on outer race must engage slots in
             case and splines on inner race must engage the
       splines on rear planetary carrier.
 19. Install outer race to case snap ring, as shown in
             Figure 208, and ensure it is fully seated in case.
 20. Install inner race to planetary carrier snap ring, 
             as shown in Figure 208, and ensure it is fully 
       seated in planetary carrier.

117

Copyright © 2010 ATSG

Copyright © 2010 ATSG

AUTOMATIC TRANSMISSION SERVICE GROUP

Technical Service Information

WWW.ALL-TRANS.BY

* 20SGL

 J00037

450

451

 450  SMALL REAR SUN GEAR.
 451  NUMBER 10 THRUST BEARING RACE.

Figure 211

Figure 210

TRANSMISSION ASSEMBLY (CONT'D)

 21. After installation and both snap rings are fully
             seated, planetary carrier and sprag inner race
             should freewheel in a clockwise direction, as
       shown in Figure 209.
 22. Ensure number 10 thrust bearing race is still
             stuck to bottom of small rear sun gear, as shown
             in Figure 210, and install sun gear into the rear
       planetary carrier.
 23. Install the number 9 thrust bearing race onto the
             rear planetary carrier, as shown in Figure 211.
 24. Ensure number 9 thrust bearing is still stuck to
             back of large sun gear and shell, as shown in
             Figure 211, and install the large sun gear into 
       planetary carrier by rotating into position.

Planetary Carrier And Sprag Inner

Race Should Freewheel Clock-Wise

Figure 209

FR

EL

E

E

EWH

* 20SGL

 J00037

405

406

407

 405  L ARGE REAR SUN GEAR AND SHELL ASSEMBLY.
 406  NUMBER 9 THRUST BEARING.
 407  NUMBER 9 THRUST BEARING RACE.

Continued on Page 119

118

Copyright © 2010 ATSG

Copyright © 2010 ATSG

Copyright © 2010 ATSG

AUTOMATIC TRANSMISSION SERVICE GROUP

Technical Service Information

Hold

WWW.ALL-TRANS.BY


Content   ..  62  63  64  65   ..