Toyota 4Runner (2024 year). Manual in english - page 16
 

  Index      Toyota     Toyota 4Runner (2024 year). Manual in english


Search            copyright infringement  


Content      ..     14      15      16      17     ..


Toyota 4Runner (2024 year). Manual in english - page 16


481

7-2. Steps to take in an emergency

7

Wh

en tro

uble

 a

ris

es

4RUNNER (U)

(Flashes or 
illuminates)

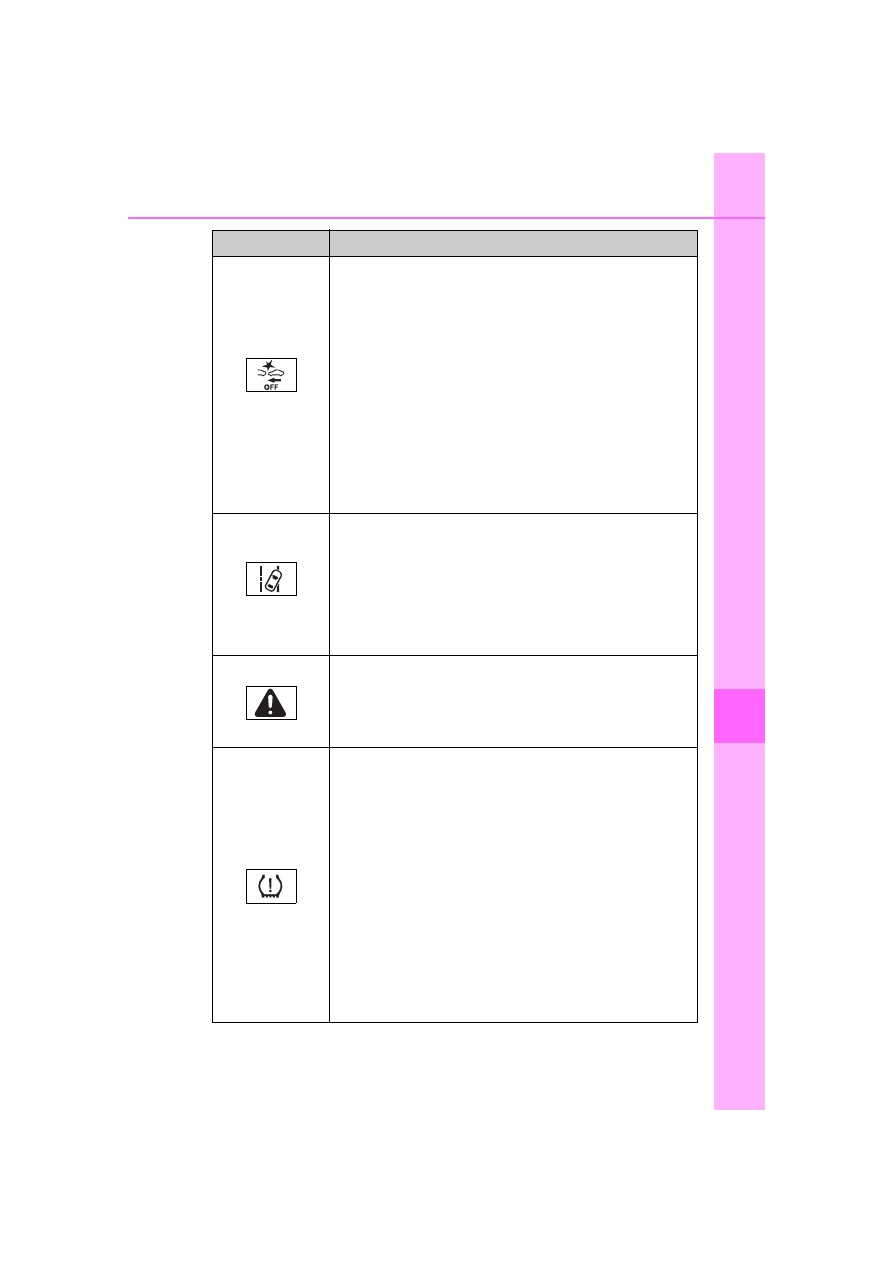
PCS warning light

When a buzzer sounds simultaneously:
Indicates a malfunction has occurred in the PCS (Pre-
Collision System).

Have the vehicle inspected by your Toyota dealer
immediately.

When a buzzer does not sound: 
The PCS (Pre-Collision System) has become tempo-
rarily unavailable, corrective action may be necessary.

Follow the instructions displayed on the multi-
information display. (

P. 237, 488)

If the PCS (Pre-Collision System) or VSC (Vehicle Sta-
bility Control) system is disabled, the PCS warning
light will illuminate.

P. 248

(Amber)

LDA indicator

*

4

Indicates a malfunction in the LDA

When “LDA Unavailable” is displayed on the
multi-information display, turn the LDA system
off, wait for a little while, and then turn the LDA
system back on. (

P. 252) 

When a message other than above is displayed,
follow the instructions displayed in the message.

Master warning light

A buzzer sounds and warning light comes on flashes
to indicate that the master warning system has
detected a malfunction.

P. 488

Tire pressure warning light

When the light comes on: 
Low tire inflation pressure such as
• Natural causes (

P. 484)

• Flat tire (

P. 493)

Adjust the tire inflation pressure (including the
spare tire) to the specified level. 
The light will turn off after a few minutes. In
case the light does not turn off even if the tire
inflation pressure is adjusted, have the system
checked by your Toyota dealer.

When the light comes on after blinking for 1 minute:
Malfunction in the tire pressure warning system 
(

P. 485)

Have the system checked by your Toyota
dealer.

Warning light

Warning light/Details/Actions

482

7-2. Steps to take in an emergency

4RUNNER (U)

*

1

: Parking brake engaged warning buzzer:

A buzzer will sound if the vehicle is driven at a speed of approximately 3
mph (5 km/h) or more.

*

2

: Open door warning buzzer:

The open door warning buzzer sounds to alert one or more of the doors is
not fully closed (with the vehicle having reached a speed of 3 mph [5 km/h]).

*

3

: Driver’s seat belt buzzer:

The driver's seat belt warning buzzer sounds to alert the driver that his or
her seat belt is not fastened. Once the engine switch is turned to ON, the
buzzer sounds. If the seat belt is still unfastened, the buzzer sounds inter-
mittently for a certain period of time after the vehicle reaches a certain
speed.
Front passenger’s seat belt warning buzzer:
The front passenger’s seat belt warning buzzer sounds to alert the front
passenger that his or her seat belt is not fastened. If the seat belt is unfas-
tened, the buzzer sounds intermittently for a certain period of time after the
vehicle reaches a certain speed.

*

4

: This light illuminates on the multi-information display.

(Flashes)

RCTA OFF indicator (warning buzzer)

Indicates a malfunction in the RCTA (Rear Cross Traf-
fic Alert) function

Have the vehicle inspected by your Toyota dealer
immediately.

Indicates that the rear bumper around the radar sen-
sor is covered with dirt, etc. (

P. 272)

Follow the instructions displayed on the multi-
information display. (

P. 287)

BSM OFF indicator (warning buzzer)

Indicates a malfunction in the BSM (Blind Spot Moni-
tor) function

Have the vehicle inspected by your Toyota dealer
immediately.

Indicates that the rear bumper around the radar sen-
sor is covered with dirt, etc. (

P. 272)

Follow the instructions displayed on the multi-
information display. (

P. 271)

Warning light

Warning light/Details/Actions

483

7-2. Steps to take in an emergency

7

Wh

en tro

uble

 a

ris

es

4RUNNER (U)

SRS warning light

This warning light system monitors the airbag sensor assembly, front impact
sensors, side impact sensors (front door), side impact sensors (rear), safing
sensor (rear), driver's seat belt buckle switch, front passenger occupant clas-
sification system (ECU and sensors), “AIR BAG ON” and “AIR BAG OFF”
indicator lights, front passenger's seat belt buckle switch, seat belt preten-
sioners, airbags, interconnecting wiring and power sources. (

P. 37)

Open moon roof reminder buzzer (if equipped)

The buzzer indicates that the moon roof is not fully closed with the engine off
and the driver’s door opened.

Front passenger detection sensor, passenger seat belt reminder and
warning buzzer

If luggage is placed on the front passenger seat, the front passenger detec-
tion sensor may cause the warning light to flash and the warning buzzer to
sound even if a passenger is not sitting in the seat.

If a cushion is placed on the seat, the sensor may not detect a passenger,
and the warning light may not operate properly.

If the malfunction indicator lamp comes on while driving

First check the following:

Is the fuel tank empty?
If it is, fill the fuel tank immediately.

Is the fuel tank cap loose?
If it is, tighten it securely.

The light will go off after several driving trips.
If the light does not go off even after several trips, contact your Toyota dealer
as soon as possible.

484

7-2. Steps to take in an emergency

4RUNNER (U)

When the tire pressure warning light comes on

Inspect the appearance of the tire to check that the tire is not punctured.

If the tire is punctured: 

P. 493

If the tire is not punctured:
Carry out the following procedure after the tire temperature has lowered
sufficiently.

Check the tire inflation pressure and adjust to the appropriate level.

If the warning light does not go out even after several minutes, check
that the tire inflation pressure is at the specified level and carry out ini-
tialization. (

P. 429)

The warning light may come on again if the above operations are con-
ducted without first allowing the tire temperature to lower sufficiently.

The tire pressure warning light may come on due to natural causes

The tire pressure warning light may come on due to natural causes such
as natural air leaks and tire inflation pressure changes caused by tem-
perature. In this case, adjusting the tire inflation pressure will turn off the
warning light (after a few minutes).

When a tire is replaced with a spare tire

Vehicles without P245/60R20 tires

The spare tire is not equipped with a tire pressure warning valve and
transmitter. If a tire goes flat, the tire pressure warning light will not turn off
even though the flat tire has been replaced with the spare tire. Replace
the spare tire with the repaired tire and adjust the tire inflation pressure.
The tire pressure warning light will go off after a few minutes.

Vehicles with P245/60R20 tires

The spare tire is also equipped with a tire pressure warning valve and
transmitter. The tire pressure warning light will turn on if the tire inflation
pressure of the spare tire is low. If a tire goes flat, the tire pressure warn-
ing light will not turn off even though the flat tire has been replaced with
the spare tire. Replace the spare tire with the repaired tire and adjust the
tire inflation pressure. The tire pressure warning light will go off after a few
minutes.

485

7-2. Steps to take in an emergency

7

Wh

en tro

uble

 a

ris

es

4RUNNER (U)

If the tire pressure warning system is not functioning

The tire pressure warning system will be disabled in the following condi-
tions:

(When the condition becomes normal, the system will work properly.)

If tires not equipped with tire pressure warning valves and transmitters
are used

If the ID code on the tire pressure warning valves and transmitters is not
registered in the tire pressure warning computer

If the tire inflation pressure is 73 psi (500 kPa, 5.1 kgf/cm

2

 or bar) or

higher

The tire pressure warning system may be disabled in the following condi-
tions:

(When the condition becomes normal, the system will work properly.)

If electronic devices or facilities using similar radio wave frequencies are
nearby

If a radio set at a similar frequency is in use in the vehicle

If a window tint that affects the radio wave signals is installed

If there is a lot of snow or ice on the vehicle, particularly around the
wheels or wheel housings

If non-genuine Toyota wheels are used (Even if you use Toyota wheels,
the tire pressure warning system may not work properly with some types
of tires.)

If tire chains are used

Vehicles with P245/60R20 tires: If the spare tire is in a location subject
to poor radio wave signal reception

Vehicles with P245/60R20 tires: If a large metallic object which can
interfere with signal reception is put in the luggage compartment

If the tire pressure warning light frequently comes on after blinking
for 1 minute

If the tire pressure warning light frequently comes on after blinking for 1
minute when the engine switch is turned on, have it checked by your
Toyota dealer.

Customization that can be configured at Toyota dealer

The vehicle speed linked seat belt reminder buzzer can be disabled. 
(Customizable features 

P. 549) However, Toyota recommends that the seat

belt reminder buzzer be operational to alert the driver and front passenger
when seat belts are not fastened.

486

7-2. Steps to take in an emergency

4RUNNER (U)

WARNING

If the tire pressure warning light comes on

Be sure to observe the following precautions. Failure to do so could

cause a loss of vehicle control and result in death or serious injury.

Stop your vehicle in a safe place as soon as possible. Adjust the tire

inflation pressure immediately. 

If the tire pressure warning light comes on even after tire inflation pres-

sure adjustment, it is probable that you have a flat tire. Check the tires.

If a tire is flat, change it with the spare tire and have the flat tire

repaired by the nearest Toyota dealer.

Avoid abrupt maneuvering and braking. If the vehicle tires deteriorate,

you could lose control of the steering wheel or the brakes.

If a blowout or sudden air leakage should occur

The tire pressure warning system may not activate immediately.

Maintenance of the tires

Each tire, including the spare (if provided), should be checked monthly

when cold and inflated to the inflation pressure recommended by the

vehicle manufacturer on the vehicle placard or tire inflation pressure

label (tire and load information label). (If your vehicle has tires of a dif-

ferent size than the size indicated on the vehicle placard or tire inflation

pressure label [tire and load information label], you should determine

the proper tire inflation pressure for those tires.)
As an added safety feature, your vehicle has been equipped with a tire

pressure monitoring system (TPMS-tire pressure warning system) that

illuminates a low tire pressure telltale (tire pressure warning light) when

one or more of your tires is significantly under-inflated. Accordingly,

when the low tire pressure telltale (tire pressure warning light) illumi-

nates, you should stop and check your tires as soon as possible, and

inflate them to the proper pressure. Driving on a significantly under-

inflated tire causes the tire to overheat and can lead to tire failure.

Under-inflation also reduces fuel efficiency and tire tread life, and may

affect the vehicle’s handling and stopping ability.
Please note that the TPMS (tire pressure warning system) is not a sub-

stitute for proper tire maintenance, and it is the driver’s responsibility to

maintain correct tire pressure, even if under-inflation has not reached

the level to trigger illumination of the TPMS low tire pressure telltale (tire

pressure warning light).

487

7-2. Steps to take in an emergency

7

Wh
en 
tro

uble
 a

ris

es

4RUNNER (U)

WARNING

Your vehicle has also been equipped with a TPMS (tire pressure warn-

ing system) malfunction indicator to indicate when the system is not

operating properly. The TPMS (tire pressure warning system) malfunc-

tion indicator is combined with the low tire pressure telltale (tire pressure

warning light). When the system detects a malfunction, the telltale will

flash for approximately one minute and then remain continuously illumi-

nated. This sequence will continue upon subsequent vehicle start-ups

as long as the malfunction exists. When the malfunction indicator is illu-

minated, the system may not be able to detect or signal low tire pres-

sure as intended.
TPMS (tire pressure warning system) malfunctions may occur for a vari-

ety of reasons, including the installation of replacement or alternate tires

or wheels on the vehicle that prevent the TPMS (tire pressure warning

system) from functioning properly. Always check the TPMS (tire pres-

sure warning system) malfunction telltale after replacing one or more

tires or wheels on your vehicle to ensure that the replacement or alter-

nate tires and wheels allow the TPMS (tire pressure warning system) to

continue to function properly.

NOTICE

To ensure the tire pressure warning system operates properly 

Do not install tires with different specifications or makers, as the tire

pressure warning system may not operate properly.

488

7-2. Steps to take in an emergency

4RUNNER (U)

Master warning light

The master warning light also
comes on or flashes in order to
indicate that a message is cur-
rently being displayed on the multi-
information display.

Multi-information display

Handling method

Follow the instructions of the mes-
sage on the multi-information dis-
play.

If any of the warning messages are shown again after the following
actions have been performed, contact your Toyota dealer.

If a warning message is displayed

The multi-information display shows warnings of system mal-
functions, incorrectly performed operations, and messages that
indicate a need for maintenance. When a message is shown,
perform the correction procedure appropriate to the message.

1

2

3

489

7-2. Steps to take in an emergency

7

Wh

en tro

uble

 a

ris

es

4RUNNER (U)

The warning lights and warning buzzers operate as follows depending
on the content of the message. If a message indicates the need for
inspection by a dealer, have the vehicle inspected by your Toyota
dealer immediately.

The operation of the warning lights and warning buzzers may differ
from those stated. in this case, perform the correction procedure
according to the displayed message.

*

: A buzzer sounds the first time a message is shown on the multi-informa-

tion display.

Messages and warnings

System 

warning 

light

Warning 

buzzer

*

Warning

Comes on Comes on

Sounds

Indicates an important situation, such
as when a system related to driving is
malfunctioning or that danger may
result if the correction procedure is not
performed

Comes on

Sounds

Comes on 

or flashes

Sounds

Indicates an important situation, such
as when the systems shown on the
multi-information display may be mal-
functioning

Flashes

Sounds

Indicates a situation, such as when
damage to the vehicle or danger may
result

Comes on

Does not 

sound

Indicates a condition, such as mal-
function of electrical components, their
condition, or indicates the need for
maintenance

Flashes

Does not 

sound

Indicates a situation, such as when an
operation has been performed incor-
rectly, or indicates how to perform an
operation correctly

490

7-2. Steps to take in an emergency

4RUNNER (U)

Warning messages

The warning messages explained below may differ from the actual messages
according to operation conditions and vehicle specifications.

System warning lights

The master warning light does not come on or flash in the following cases.
Instead, a separate system warning light will come on along with a message
or image shown on the multi-information display.

Malfunction in the ABS
The ABS warning light comes on. (

P. 478)

Indicates that the PCS (Pre-Collision System) is not currently functional
The PCS warning light comes on or flashes. (

P. 481)

Malfunction in the tire pressure warning system 
The tire pressure warning light comes on. (

P. 481)

If a message instructing to refer to the Owner’s Manual is displayed

If the following message is shown, there may be a malfunction.
Immediately stop the vehicle in a safe place and contact your Toyota dealer.
Continuing to drive the vehicle may be dangerous.

• “Braking Power Low Stop in a Safe Place See Owner’s Manual”
• “Oil Pressure Low Stop in a Safe Place See Owner’s Manual”

If “Engine Coolant Temp High Stop in a Safe Place See Owner’s Manual” is
displayed, follow the instructions accordingly. (

P. 519)

If “Front Camera Unavailable See Owner’s Manual” is displayed, follow the
instructions accordingly. (

P. 237, 488)

If the following message is shown, there may be a malfunction.
Immediately have the vehicle inspected by your Toyota dealer.

• “Smart Key System Malfunction See Owner’s Manual”

If “High transmission fluid temperature” is shown, it indicates that the
automatic transmission fluid temperature is too high.

Immediately stop the vehicle in a safe place, shift the shift lever to P and wait
until the warning message and light go off. If the warning message and light
go off, you may start the vehicle again. If the warning message and light do
not go off, contact your Toyota dealer.

491

7-2. Steps to take in an emergency

7

Wh

en tro

uble

 a

ris

es

4RUNNER (U)

If “Auto power off to conserve battery” is shown

Power was turned off due to the automatic power off function.
Next time when starting the engine, increase the engine speed slightly and
maintain that level for approximately 5 minutes to recharge the battery.

When a message that indicates the need for the shift lever operation is
shown

To prevent the shift lever from being operated incorrectly or the vehicle from
moving unexpectedly, a message that requires shifting the shift lever may be
shown on the multi-information display. In that case, follow the instruction of
the message and shift the shift lever.

When “Headlight System Malfunction Visit Your Dealer” is displayed on
the multi-information display

The following system may be malfunctioning. Have the vehicle inspected by
your Toyota dealer.

Automatic High Beam

If a message that indicates the malfunction of front camera is displayed

The following systems may be suspended until the problem shown in the
message is resolved. (

P. 237, 488)

PCS (Pre-Collision System)

LDA (Lane Departure Alert)

Dynamic radar cruise control

Automatic High Beam

If a message that indicates the malfunction of radar sensor is displayed

The following systems may be suspended until the problem shown in the
message is resolved. (

P. 237, 488)

PCS (Pre-Collision System)

LDA (Lane Departure Alert)

Dynamic radar cruise control

If a following message is shown, take appropriate action and confirm
that the message has disappeared.

*

“Crawl Not Available Select L4 and Shift to [D] or [R] Position”

“Crawl Not Available Check System Operation Conditions”

*

: Refer to the “Off-road Driving Owner’s Manual”.

If “Oil Maintenance Required Soon” is displayed (U.S.A. only)

Indicates that all maintenance according to the driven distance on the mainte-
nance schedule

*

 should be performed soon.

Comes on approximately 4500 miles (7200 km) after the message has been
reset.

If necessary, perform maintenance. Please reset the message after the main-
tenance is performed. (

P. 404)

*

: Refer to the separate “Scheduled Maintenance Guide” or “Owner’s Manual

Supplement” for the maintenance interval applicable to your vehicle.

492

7-2. Steps to take in an emergency

4RUNNER (U)

If “Oil Maintenance Required” is displayed (U.S.A. only)

Indicates that all maintenance is required to correspond to the driven distance

on the maintenance schedule

*

.

Comes on approximately 5000 miles (8000 km) after the message has been

reset.
(The indicator will not work properly unless the message has been reset.)
Perform the necessary maintenance. Please reset the message after the

maintenance is performed. (

P. 404)

*

: Refer to the separate “Scheduled Maintenance Guide” or “Owner’s Manual

Supplement” for the maintenance interval applicable to your vehicle.

If “Visit Your Dealer” is shown

The system or part shown on the multi-information display is malfunctioning.

Have the vehicle inspected by your Toyota dealer immediately. 

Warning buzzer

In some cases, the buzzer may not be heard due to being in a noisy location

or audio sound.

NOTICE

While the engine oil level warning is displayed

Continued engine operation with low engine oil will damage the engine.

493

7-2. Steps to take in an emergency

7

Wh
en 
tro

uble
 a

ris

es

4RUNNER (U)

Phillips screwdriver

Stop the vehicle in a safe place on a hard, flat surface.

Set the parking brake.

Shift the shift lever to P.

Stop the engine.

Turn on the emergency flashers. (

P. 466)

If you have a flat tire

Your vehicle is equipped with a spare tire. The flat tire can be

replaced with the spare tire.
For details about tires: 

P. 427

WARNING

If you have a flat tire

Do not continue driving with a flat tire.
Driving even a short distance with a flat tire can damage the tire and the

wheel beyond repair, which could result in an accident.

You will need the following item:

Before jacking up the vehicle

494

7-2. Steps to take in an emergency

4RUNNER (U)

Spare tire

Jack

Tool bag

Location of the spare tire, jack and tools

1

2

3

495

7-2. Steps to take in an emergency

7

Wh
en 
tro

uble
 a

ris

es

4RUNNER (U)

WARNING

Using the tire jack

Improper use of the tire jack may cause the vehicle to suddenly fall off

the jack, leading to death or serious injury.

Do not use the tire jack for any purpose other than replacing tires or

installing and removing tire chains.

Only use the tire jack that comes with this vehicle for replacing a flat

tire. 

Do not use it on other vehicles, and do not use other tire jacks for

replacing tires on this vehicle.

Always check that the tire jack is securely set to the jack point.

Do not put any part of your body under the vehicle while it is supported

by the jack.

Do not start or run the engine while your vehicle is supported by the

jack.

Do not raise the vehicle while someone is inside.

When raising the vehicle, do not put an object on or under the jack.

Do not raise the vehicle to a height greater than that required to

replace the tire.

Use a jack stand if it is necessary to get under the vehicle.

Vehicles with Automatic running boards

Observe the following precautions. Failure to do so may result in seri-

ous injury:
• When jacking up the vehicle, always turn the Automatic running

boards switch off.

• When jacking up the vehicle, do not use an Automatic running board

as a jack point. The Automatic running board may break, causing

injuries.

Take particular care when lowering the vehicle to ensure that no one

working on or near the vehicle may be injured.

Using the jack handle/wheel nut wrench (used with jack handle)

Tighten all the jack handle bolts securely to prevent the extension parts

from coming apart unexpectedly.

496

7-2. Steps to take in an emergency

4RUNNER (U)

Remove the cover.

Unhook and take out the tool
bag.

Take out the jack.

For loosening

For tightening

Taking out the jack and tool bag

1

2

3

1

2

497

7-2. Steps to take in an emergency

7

Wh

en tro

uble

 a

ris

es

4RUNNER (U)

Vehicles without Jack handle: Assembling the wheel nut wrench
(used with jack handle).

Remove the wheel nut wrench and the jack handle extension bar from
the tool bag and assemble by following these steps.

Loosen the bolt using a
wheel nut wrench.

Assemble the jack handle
extension bar and wheel nut
wrench and tighten the bolt.

Check that the bolts are firmly
tightened.

Taking out the spare tire

1

1

2

498

7-2. Steps to take in an emergency

4RUNNER (U)

Vehicles with Jack handle: Assembling the jack handle.

Remove the jack handle and the jack handle extension bar from the
tool bag and assembly by following these steps.

Loosen the bolt and the
screw using either the jack
handle or a screwdriver.

Assemble the jack handle
extension bars and tighten
the bolt.

Check that the bolt is firmly
tightened.

Assemble the jack handle
and the jack handle exten-
sion bar and tighten the
screw.

Check that the screw is firmly
tightened.

1

1

2

3

499

7-2. Steps to take in an emergency

7

Wh

en tro

uble

 a

ris

es

4RUNNER (U)

Insert the end of the jack han-
dle extension into the lowering
screw and turn it counterclock-
wise.

Lower the spare tire completely
to the ground.

Pull out the spare tire and
remove the holding bracket.

2

3

500

7-2. Steps to take in an emergency

4RUNNER (U)

Chock the tires.

Remove the wheel ornament
using the wheel ornament
remover.

To protect the wheel ornament,
place a rag between the wheel
ornament remover and the wheel
ornament, as shown in the illus-
tration.

Slightly loosen the wheel nuts
(one turn).

Replacing a flat tire

1

Flat tire

Wheel chock positions

Front

Left-hand side

Behind the rear right-hand side tire

Right-hand side

Behind the rear left-hand side tire

Rear

Left-hand side

In front of the front right-hand side tire

Right-hand side

In front of the front left-hand side tire

2

3

501

7-2. Steps to take in an emergency

7

Wh

en tro

uble

 a

ris

es

4RUNNER (U)

Vehicles without Jack handle: Assembling the wheel nut wrench
(used with jack handle).

Remove the wheel nut wrench, jack handle extension bar and jack
handle bar from the tool bag and assemble by following these steps.

Loosen the bolt using a
wheel nut wrench.

Assemble the jack handle
bar, jack handle extension
bar and wheel nut wrench
and tighten the bolts.

Check that the bolts are firmly
tightened.

4

1

2

502

7-2. Steps to take in an emergency

4RUNNER (U)

Vehicles with Jack handle: Assembling the jack handle.

Remove the jack handle, jack handle extension bar and jack handle
bar from the tool bag and assemble by following these steps.

Loosen the bolts and the
screw using either the jack
handle or a screwdriver.

Assemble the jack handle
extension bars and the jack
handle bar and tighten the
bolts.

Check that the bolts are firmly
tightened.

Assemble the jack handle
extension bar and the jack
handle and tighten the screw.

Check that the screw is firmly
tightened.

4

1

2

3

503

7-2. Steps to take in an emergency

7

Wh

en tro

uble

 a

ris

es

4RUNNER (U)

Position the jack at the jack
points as shown.

Front - Under the chassis frame
side rail

Rear - Under the rear axle
housing

Raise the vehicle until the tire is
slightly raised off the ground.

When positioning the jack under
the rear axle housing, make sure
the groove on the top of the jack
fits with the rear axle housing.

Remove all the wheel nuts and
the tire.

When resting the tire on the
ground, place the tire so that the
wheel design faces up to avoid
scratching the wheel surface.

5

6

7

504

7-2. Steps to take in an emergency

4RUNNER (U)

WARNING

Replacing a flat tire

Observe the following precautions. 

Failure to do so may result in serious injury:
• Lower the spare tire completely to the ground before removing it

from under the vehicle.

• Do not try to remove the wheel ornament by hand. Take due care in

handling the ornament to avoid unexpected personal injury.

• Do not attach a heavily damaged wheel ornament, as it may fly off

the wheel while the vehicle is moving.

• Do not touch the disc wheels or the area around the brakes immedi-

ately after the vehicle has been driven.

After the vehicle has been driven the disc wheels and the area

around the brakes will be extremely hot. Touching these areas with

hands, feet or other body parts while changing a tire, etc. may result

in burns.

Failure to follow these precautions could cause the wheel nuts to

loosen and the tire to fall off, resulting in death or serious injury.
• After replacing a tire, check the tightening torque as soon as possi-

ble.

Wheel nut torque:

Steel wheels: 83 ft•lbf (112 N•m, 11.4 kgf•m)

Aluminum wheels: 76 ft•lbf (103 N•m, 10.5 kgf•m)

• When installing a tire, only use wheel nuts that have been specifi-

cally designed for that wheel.

• If there are any cracks or deformations in the bolt screws, nut

threads or bolt holes of the wheel, have the vehicle inspected by

your Toyota dealer.

• When installing the wheel nuts, be sure to install them with the

tapered ends facing inward.

505

7-2. Steps to take in an emergency

7

Wh

en tro

uble

 a

ris

es

4RUNNER (U)

Remove any dirt or foreign mat-
ter from the wheel contact sur-
face.

If foreign matter is on the wheel
contact surface, the wheel nuts
may loosen while the vehicle is in
motion, causing the tire to come
off.

Install the spare tire and loosely tighten each wheel nut by hand by
approximately the same amount.

When replacing an aluminum
wheel with a steel wheel,
tighten the wheel nuts until the
tapered portion comes into
loose contact with the disc
wheel seat.

When replacing an aluminum
wheel with an aluminum wheel,
tighten the wheel nuts until the
washers comes into contact
with the disc wheel.

Installing the spare tire

1

2

Tapered 
portion

Disc wheel seat

Washer

Disc wheel

506

7-2. Steps to take in an emergency

4RUNNER (U)

Lower the vehicle.

Securely tighten the wheel nuts

two or three times in the order

shown in the illustration using a

wheel nut wrench.

Tightening torque

Steel wheels: 

83 ft•lbf (112 N•m, 11.4 kgf•m)

Aluminum wheels: 

76 ft•lbf (103 N•m, 10.5 kgf•m)

3

4

WARNING

Stowing the flat tire

Failure to follow steps listed under stowing the tire may result in damage

to the spare tire carrier and lose of the tire, which could result in death or

serious injury.

507

7-2. Steps to take in an emergency

7

Wh

en tro

uble

 a

ris

es

4RUNNER (U)

Lay down the tire with the outer
side facing up, and install the
holding bracket, inserting the
claw into the wheel lug nut hole.
Turn the jack handle extension
clockwise to take up slack in
the chain.

Then, check to ensure the claw
is in the wheel lug nut hole and
the holding bracket is centered
in the wheel hub.

Holding bracket

Claw

Vehicles without kinetic
dynamic suspension: While
raising, secure the tire, taking
care that the tire goes straight
up without catching on any sur-
rounding part to prevent it from
flying forward during a collision
or sudden braking.

Vehicles with kinetic dynamic suspension: While raising, pull the
tire towards the rear of the vehicle, taking care that the tire goes up
without catching on any surrounding part to prevent it from flying
forward during a collision or sudden braking.

Tightening torque:

34.4 ft

lbf (46.6 N

m, 4.8 kgf

m)

Confirm that the tire is not loose
after tightening:

Push and pull the tire

Try rotating

Vishually check to ensure the tire
is not hung on surrounding parts.
If looseness or misassembly
exists, repeat step 

 and step

.

Stowing the flat/spare tire, jack and tools

1

1

2

2

1

2

1

2

508

7-2. Steps to take in an emergency

4RUNNER (U)

Repeat step   any time the tire is lowered or disturbed.
Stow the tools and jack securely.

After completing the tire change

The tire pressure warning system must be reset. (

P. 430)

When using the spare tire (vehicles without P245/60R20 tires)

As the spare tire is not equipped with a tire pressure warning valve and

transmitter, low inflation pressure of the spare tire will not be indicated by

the tire pressure warning system. Also, if you replace the spare tire after

the tire pressure warning light comes on, the light remains on.

NOTICE

Do not drive the vehicle with a flat tire

Do not continue driving with a flat tire.

Driving even a short distance with a flat tire can damage the tire and the

wheel beyond repair.

When stowing the flat tire

Ensure that there is no object caught between the tire and the vehicle

underbody.

When replacing the tires

When removing or fitting the wheels, tires or the tire pressure warning

valve and transmitter, contact your Toyota dealer as the tire pressure

warning valve and transmitter may be damaged if not handled cor-

rectly.

Replace the grommets for the tire pressure warning valves and trans-

mitters as well.

To avoid damage to the tire pressure warning valves and transmit-

ters

When a tire is repaired with liquid sealants, the tire pressure warning

valve and transmitter may not operate properly. If a liquid sealant is

used, contact your Toyota dealer or other qualified service shop as soon

as possible. Make sure to replace the tire pressure warning valve and

transmitter when replacing the tire. (

P. 430)

3

2

4

509

7-2. Steps to take in an emergency

7

Wh

en tro

uble

 a

ris

es

4RUNNER (U)

One of the following may be the cause of the problem:

There may not be sufficient fuel in the vehicle’s tank. 
Refuel the vehicle.

The engine may be flooded. 
Try to restart the engine again following correct starting procedures.
(

P. 199)

There may be a malfunction in the engine immobilizer system. 
(

P. 78)

One of the following may be the cause of the problem:

The battery may be discharged. (

P. 515)

The battery terminal connections may be loose or corroded.

The engine starting system may be malfunctioning due to an electrical
problem such as an open circuit or a blown fuse. However, an interim
measure is available to start the engine. (

P. 510)

If the engine will not start

If the engine will not start even though correct starting proce-
dures are being followed (

P. 199), consider each of the follow-

ing points:

The engine will not start even though the starter motor operates
normally.

The starter motor turns over slowly, the interior lights and head-
lights are dim, or the horn does not sound or sounds at a low
volume.

The starter motor does not turn over

510

7-2. Steps to take in an emergency

4RUNNER (U)

One of the following may be the cause of the problem:

One or both of the battery terminals may be disconnected.

The battery may be discharged. (

P. 515)

Contact your Toyota dealer if the problem cannot be repaired, or if repair
procedures are unknown.

When the engine does not start, the following steps can be used as an
interim measure to start the engine if the engine switch is functioning
normally:

Set the parking brake.

Shift the shift lever to P.

Turn the engine switch to ACCESSORY mode.

Press and hold the engine switch for about 15 seconds while
depressing the brake pedal firmly.

Even if the engine can be started using the above steps, the system
may be malfunctioning. Have the vehicle inspected by your Toyota
dealer.

The starter motor does not turn over, the interior lights and head-
lights do not turn on, or the horn does not sound.

Emergency start function

1

2

3

4

511

7-2. Steps to take in an emergency

7

Wh

en tro

uble

 a

ris

es

4RUNNER (U)

Remove the cover on the back
door trim.

Tear the plastic film. Remove
the cover.

Pull the lever.

If you cannot operate back door opener

If the back door opener does not operate, there may be a prob-
lem with the back door opener system. Have the vehicle
inspected by your Toyota dealer immediately. 
The following steps may be used as an emergency measure to
ensure that the back door can be opened from the inside.

1

2

3

512

7-2. Steps to take in an emergency

4RUNNER (U)

Use the mechanical key 
(

P. 103) in order to perform the

following operations:

Locks all the doors

Closes the windows and moon
roof (turn and hold)

*


(

P. 156, 163)

Unlocks all the doors

Turning the key rearward unlocks the driver’s door. Turning the key once
again unlocks the other doors.

Opens the windows and moon roof (turn and hold)

*


(

P. 156, 163)

*

: This setting must be customized at your Toyota dealer.

If the electronic key does not operate 

properly

If communication between the electronic key and vehicle is
interrupted (

P. 117) or the electronic key cannot be used

because the battery is depleted, the smart key system and wire-
less remote control cannot be used. In such cases, the doors
can be opened and the engine can be started by following the
procedure below.

Locking and unlocking the doors

1

2

3

4


Content      ..     14      15      16      17     ..