Toyota Corolla (2024 year). Manual in english - page 9
 

  Index      Toyota     Toyota Corolla (2024 year). Manual in english


Search            copyright infringement  


Content      ..     7      8      9      10     ..


Toyota Corolla (2024 year). Manual in english - page 9


257

5-1. Using the air conditioning system and defogger

5

Interior

 featur

es

*

: If equipped

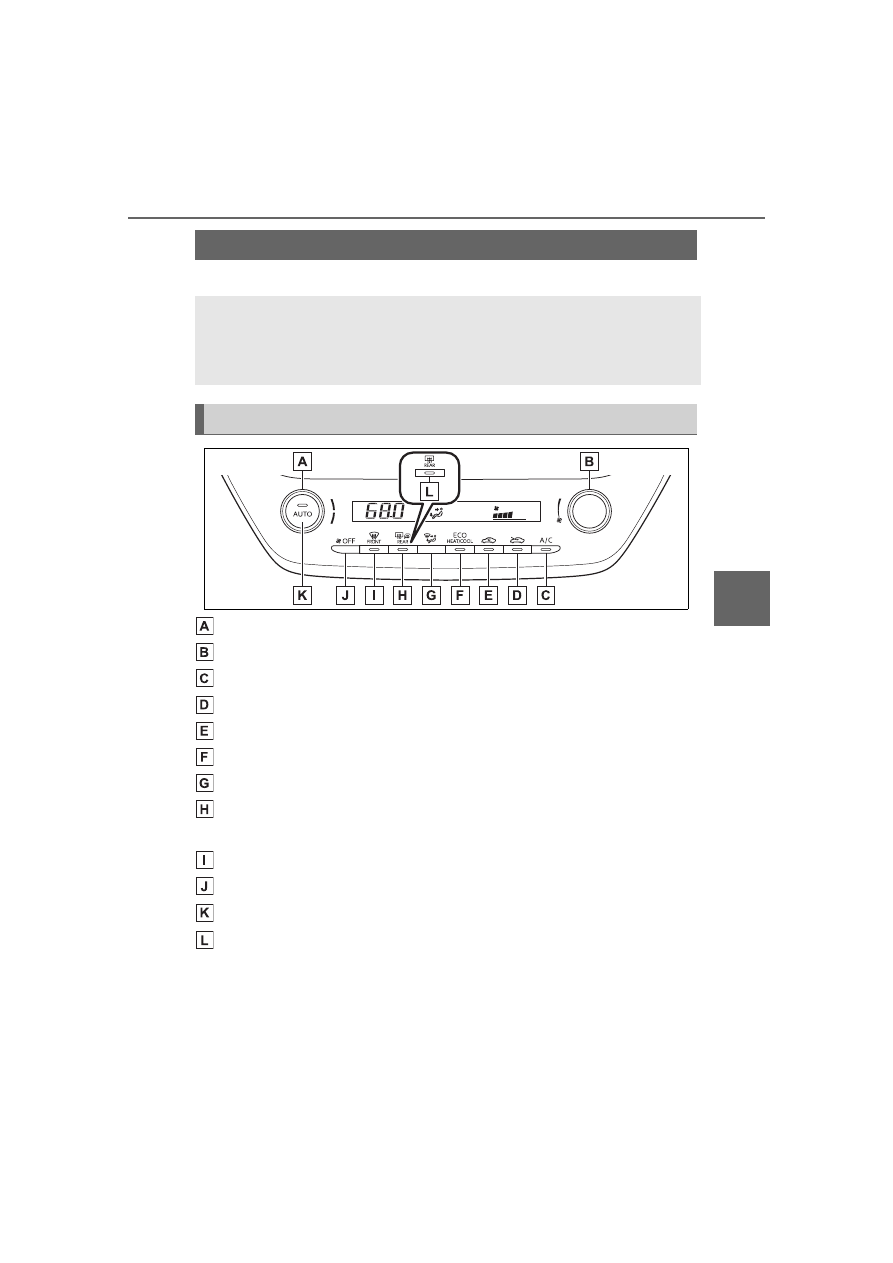
Temperature control switch

Fan speed control switch

“A/C” switch

Outside air mode switch

Recirculated air mode switch

Eco air conditioning mode switch

Airflow mode control switch

Rear window defogger and outside rear view mirror defoggers 

switch

*

Windshield defogger switch

Off switch

Automatic mode switch

Rear window defogger switch

*

*

: If equipped

Adjusting the temperature 
setting

To adjust the temperature set-
ting, turn the temperature con-
trol switch clockwise (warm) or 

Automatic air conditioning system

*

Air outlets are automatically selected and fan speed is auto-
matically adjusted according to the set temperature setting.
Also, the display and button positions will differ depending on 
the type of the system.

Air conditioning controls

258

5-1. Using the air conditioning system and defogger

counterclockwise (cool).

If “A/C” switch is not pressed, the 
system will blow ambient tempera-
ture air or heated air.

Setting the fan speed

To adjust the fan speed, turn the 
fan speed control switch clock-
wise (increase) or counterclock-
wise (decrease).

Pressing the off switch to turns off 
the fan.

Change the airflow mode

Press the airflow mode control 
switch.

The airflow mode changes as fol-
lows each time the switch is 
pressed.

1

Upper body

2

Upper body and feet

3

Feet

4

Feet and the windshield 
defogger operates

Switching between outside 
air and recirculated air 
modes

To change to recirculated air 
mode, press the recirculated 
air mode switch.

The indicator illuminates on the 
recirculated air mode switch.

To change to outside air 
mode, press the outside air 
mode switch.

The indicator illuminates on the out-
side air mode switch.

Set cooling and dehumidifi-
cation function

Press the “A/C” switch.

When the function is on, the indica-
tor illuminates on the “A/C” switch.

Defogging the windshield

Defoggers are used to defog the 
windshield and front side win-
dows.

Press the windshield defogger 
switch.

Set the outside/recirculated air 
mode switch to outside air mode if 
the recirculated air mode is used. (It 
may switch automatically.)

To defog the windshield and the 
side windows quickly, turn the air 
flow and temperature up.

To return to the previous mode, 
press the windshield defogger 
switch again when the windshield is 
defogged.

When the windshield defogger 
switch is on, the indicator illumi-
nates on the windshield defogger 

259

5-1. Using the air conditioning system and defogger

5

Interior

 featur

es

switch.

Defogging the rear window 
and outside rear view mir-
rors

Vehicles without outside rear 
view mirror defoggers

A defogger is used to defog the 
rear window.

Press the rear window defogger 
switch.

The defogger will automatically turn 
off after a while.

When the rear window defogger 
switch is on, the indicator illumi-
nates on the rear window defogger 
switch.

Vehicles with outside rear 
view mirror defoggers

Defoggers are used to defog the 
rear window, and to remove 
raindrops, dew and frost from 
the outside rear view mirrors.

Press the rear window and out-
side rear view mirror defoggers 
switch.

The defoggers will automatically 
turn off after a while.

When the rear window and outside 
rear view mirror defoggers switch is 
on, the indicator illuminates on the 
rear window and outside rear view 
mirror defoggers switch.

Eco air conditioning mode

The air conditioning is controlled 
with low fuel consumption priori-
tized such as reducing fan 
speed, etc.

Press the eco air conditioning 
mode switch.

When the eco air conditioning 
mode is on, the indicator illumi-
nates on the eco air conditioning 
mode switch.

When the outside temperature 
exceeds 75°F (24°C) and the air 
conditioning system is on

In order to reduce the air condi-
tioning power consumption, the air 
conditioning system may switch to 
recirculated air mode automati-
cally. This may also reduce fuel 
consumption.

Recirculated air mode is selected 
as a default mode when the 
engine switch is turned to ON.

It is possible to switch to outside 
air mode at any time by pressing 
the outside air mode switch.

Fogging up of the windows

The windows will easily fog up 
when the humidity in the vehicle is 
high. Turning “A/C” on will dehu-
midify the air from the outlets and 
defog the windshield effectively.

If you turn “A/C” off, the windows 
may fog up more easily.

The windows may fog up if the 
recirculated air mode is used.

When driving on dusty roads

Close all windows. If dust thrown up 
by the vehicle is still drawn into the 
vehicle after closing the windows, it 
is recommended that the air intake 
mode be set to outside air mode and 
the fan speed to any setting except 
off.

Outside/recirculated air mode

Setting to the recirculated air 
mode temporarily is recom-
mended in preventing dirty air 
from entering the vehicle interior 
and helping to cool the vehicle 
when the outside air temperature 

260

5-1. Using the air conditioning system and defogger

is high.

Outside/recirculated air mode may 

automatically switch depending on 

the temperature setting or the 

inside temperature.

When the outside temperature 

falls to nearly 32°F (0°C)

The dehumidification function may 

not operate even when “A/C” switch 

is pressed.

Ventilation and air conditioning 

odors

To let fresh air in, set the air condi-

tioning system to the outside air 

mode.

During use, various odors from 

inside and outside the vehicle may 

enter into and accumulate in the 

air conditioning system. This may 

then cause odor to be emitted 

from the vents.

To reduce potential odors from 

occurring:

• It is recommended that the air 

conditioning system be set to out-

side air mode prior to turning the 

vehicle off.

• The start timing of the blower may 

be delayed for a short period of 

time immediately after the air con-

ditioning system is started in auto-

matic mode.

When parking, the system auto-

matically switches to outside air 

mode to encourage better air cir-

culation throughout the vehicle, 

helping to reduce odors that occur 

when starting the vehicle.

Air conditioning filter

P.326

Air conditioning system refrig-

erant

A label regarding the refrigerant of 

the air conditioning system is 

attached to the engine compart-

ment at the location shown in the 

following illustration.

The meaning of each symbol on 

the label are as follows:

Customization

Some functions can be customized. 

(

P.406)

Caution

Air conditioning sys-

tem

Air conditioning sys-

tem lubricant type
Requires registered 

technician to service 

air conditioning sys-

tem

Flammable refrigerant

WARNING

To prevent the windshield 

from fogging up

Do not use the windshield defog-

ger switch during cool air opera-

tion in extremely humid weather. 

The difference between the tem-

perature of the outside air and 

that of the windshield can cause 

the outer surface of the wind-

shield to fog up, blocking your 

vision.

261

5-1. Using the air conditioning system and defogger

5

Interior

 featur

es

1

Press the automatic mode 

switch.

2

Adjust the temperature set-

ting.

3

To stop the operation, press 

the off switch.

If the fan speed setting or air 

flow modes are operated, the 

automatic mode indicator goes 

off. However, automatic mode 

for functions other than that 

operated is maintained.

Using automatic mode

Fan speed is adjusted automati-

cally according to the temperature 

setting and the ambient conditions.

Therefore, the fan may stop for a 

while until warm or cool air is ready 

to flow immediately after the auto-

matic mode switch pressed.

Prevent ice from building up on 

the windshield and wiper 

blades.

When the windshield wiper de-icer 

switch is on, the indicator illumi-

nates on the windshield wiper 

de-icer switch.
The windshield wiper de-icer will 

automatically turn off after a period 

of time.

Location of air outlets

The air outlets and air volume 

changes according to the 

selected air flow mode.

WARNING

When the outside rear view 

mirror defoggers are operat-

ing (if equipped)

Do not touch the outside rear view 

mirror surfaces, as they can 

become very hot and burn you.

NOTICE

To prevent battery discharge

Do not leave the air conditioning 

system on longer than necessary 

when the engine is off.

When repairing/replacing 

parts of the air conditioning 

system

Have repair/replacement per-

formed by your Toyota dealer.

When a part of the air conditioning 

system, such as the evaporator, is 

to be replaced, it must be 

replaced with a new one.

Using automatic mode

Windshield wiper de-icer 

(if equipped)

WARNING

To prevent burns

Do not touch the glass at lower 

part of the windshield or to the 

side of the front pillars when the 

windshield wiper de-icer is on.

Air outlet layout and oper-

ations

262

5-1. Using the air conditioning system and defogger

:If equipped

Adjusting the position of 

and opening and closing 

the air outlets

Front center

Direct air flow to the left or right, up 

or down

Front right-hand side

Direct air flow to the left or right, up 

or down

Front left-hand side

Direct air flow to the left or right, up 

or down

WARNING

To prevent the windshield 

defogger from operating 

improperly

Do not place anything on the 

instrument panel which may cover 

the air outlets. Otherwise, air flow 

may be obstructed, preventing the 

windshield defoggers from defog-

ging.

263

5-1. Using the air conditioning system and defogger

5

Interior

 featur

es

*

: If equipped

Heated steering wheel

Turns heated steering wheel 

on/off

When the heated steering wheel is 

on, the indicator illuminates on the 

heated steering wheel switch.

Seat heaters

Front

Turns seat heaters on/off

1

High temperature

2

Low temperature

When the seat heater is on, the 

indicator illuminates on the seat 

heater switch.
When not in use, put the switch in 

the neutral position. The indicator 

will turn off.

Rear

Turns seat heaters on/off

Heated steering 

wheel

*

/seat heaters

*

Heated steering wheel

Warms up the grip of the 

steering wheel

Seat heaters

Warm up the seat upholstery

WARNING

To prevent minor burn inju-

ries

Care should be taken if anyone in 

the following categories comes in 

contact with the steering wheel or 

seats when the heater is on:

Babies, small children, the 

elderly, the sick and the physi-

cally challenged

Persons with sensitive skin

Persons who are fatigued

Persons who have taken alco-

hol or drugs that induce sleep 

(sleeping drugs, cold remedies, 

etc.)

NOTICE

To prevent damage to the 

seat heaters

Do not put heavy objects that 

have an uneven surface on the 

seat and do not stick sharp 

objects (needles, nails, etc.) into 

the seat.

To prevent battery discharge

Do not use the functions when the 

engine is off.

Operation instructions

264

5-1. Using the air conditioning system and defogger

When the seat heater is on, the 

indicator illuminates on the seat 

heater switch.

The heated steering wheel and 

seat heaters can be used when

The engine switch is in ON.

WARNING

To prevent overheating and 

minor burn injuries

Observe the following precautions 

when using the seat heaters.

Do not cover the seat with a 

blanket or cushion when using 

the seat heater.

Do not use seat heater more 

than necessary.

265

5-2. Using the interior lights

5

Interior

 featur

es

5-2.Using the interior lights

Rear interior light (

P.265)

Front interior/personal lights (

P.265)

Front

1

Turns the door position on/off

When a door is opened while the 
door position is on, the lights turn 

on.

2

Turns the lights on/off

Rear

Turns the lights on/off

When the door position is on for 
the front interior lights, the rear 

Interior lights list

Location of the interior lights

Operating the interior 
lights

266

5-2. Using the interior lights

interior light will turn on when a 

door is open and turn off when 

all of them are closed.
When the rear interior light is on 

linked to the door position for 

the front interior lights, it will not 

turn off even though the switch 

is pressed.

Turns the lights on/off

Illuminated entry system

The lights automatically turn on/off 

according to the engine switch 

mode (position), the presence of the 

electronic key (vehicles with a smart 

key system), whether the doors are 

locked/unlocked, and whether the 

doors are opened/closed.

To prevent the battery from 

being discharged

If the interior lights remain on when 

the engine switch is turned off, the 

lights will go off automatically after 

20 minutes.

The interior lights may turn on 

automatically when

If any of the SRS airbags deploy 

(inflate) or in the event of a strong 

rear impact, the interior lights will 

turn on automatically.

The interior lights will turn off auto-

matically after approximately 20 

minutes.

The interior lights can be turned off 

manually. However, in order to help 

prevent further collisions, it is rec-

ommended that they be left on until 

safety can be ensured.

(The interior lights may not turn on 

automatically depending on the 

force of the impact and conditions of 

the collision.)

Customization

Some functions can be customized. 

(

P.406)

Operating the personal 

lights

NOTICE

To prevent battery discharge

Do not leave the lights on longer 

than necessary when the engine 

is not running.

267

5-3. Using the storage features

5

Interior

 featur

es

5-3.Using the storage features

Bottle holders/door pockets (

P.268)

Open trays (if equipped) (

P.269)

Glove box (

P.268)

Cup holders (if equipped) (

P.268)

Console box (

P.269)

List of storage features

Location of the storage features

WARNING

Items that should not be left 

in the storage spaces

Do not leave glasses, lighters or 

spray cans in the storage spaces, 

as this may cause the following 

when cabin temperature becomes 

high:

Glasses may be deformed by 

heat or cracked if they come 

into contact with other stored 

items.

Lighters or spray cans may 

explode. If they come into con-

tact with other stored items, the 

lighter may catch fire or the 

spray can may release gas, 

causing a fire hazard.

268

5-3. Using the storage features

Pull up the lever to open the 

glove box.

Glove box light (if equipped)

The glove box light turns on when 

the tail lights are on.

Front

Rear (if equipped)

Pull the armrest down.

Front

Rear

Glove box

WARNING

Caution while driving

Keep the glove box closed. In the 

event of sudden braking or sud-

den swerving, an accident may 

occur due to an occupant being 

struck by the open glove box or 

the items stored inside.

Cup holders

WARNING

Items unsuitable for the cup 

holder

Do not place anything other than 

cups or beverage cans in the cup 

holders.

Other items may be thrown out of 

the holders in the event of an 

accident or sudden braking and 

cause injury. If possible, cover hot 

drinks to prevent burns.

Bottle holders

269

5-3. Using the storage features

5

Interior

 featur

es

Bottle holders

When storing a bottle, close the 

cap.

The bottle may not be stored 

depending on its size or shape.

1

Slide the lid to the rear most 

position. (vehicles with a 

slide function)

2

Lift the lid while pulling up the 

knob.

Slide function (if equipped)

The console box lid can be slid for-

ward or backward.

Front

Rear

WARNING

Items unsuitable for the bottle 

holders

Do not place anything other than 

a bottle in the bottle holders.

Other items may be thrown out of 

the holders in the event of an 

accident or sudden braking and 

cause injury.

Console box

WARNING

Caution while driving

Keep the console box closed.

Injuries may result in the event of 

an accident or sudden braking.

Open trays (if equipped)

WARNING

Caution while driving

Observe the following precautions 

when putting items in the open 

tray. Failure to do so may cause 

items to be thrown out of the tray 

in the event of sudden braking or 

steering. In these cases, the items 

may interfere with pedal operation 

or cause driver distraction, result-

ing in an accident.

270

5-3. Using the storage features

WARNING

Do not store items in the tray 

that can easily shift or roll out.

Do not stack items in the tray 

higher than the tray’s edge.

Do not put items in the tray that 

may protrude over the tray’s 

edge.

271

5-4. Other interior features

5

Interior

 featur

es

5-4.Other interior features

The USB charging port are used 

to supply 3.0 A of electricity at 5 

V to external devices.

The USB charging port are for 

charging only. They are not 

designed for data transfer or 

other purposes.

Depending on the external 

device, it may not charge prop-

erly. Refer to the manual 

included with the device before 

using a USB charging port.

Using the USB charging 

port

Front

Lift the lid while pulling up the 

knob.

Rear (if equipped)

The USB charging port can be 

used when

The engine switch is in ACC or ON.

Situations in which the USB 

charging port may not operate 

correctly

If a device which consumes more 

than 3.0 A at 5 V is connected

If a device designed to communi-

cate with a personal computer, 

such as a USB memory device, is 

connected

If the connected external device is 

turned off (depending on device)

If the temperature inside the vehi-

cle is high, such as after the vehi-

cle has been parked in the sun

About connected external 

device

Depending on the connected exter-

nal device, charging may occasion-

ally be suspended and then start 

again. This is not a malfunction.

Other interior features

USB charging port (if 

equipped)

NOTICE

To prevent damage to the 

USB charging port

Do not insert foreign objects into 

the port.

Do not spill water or other liq-

uids into the port.

272

5-4. Other interior features

The power outlet can be used 

for 12 V accessories that run on 

less than 10 A.
Lift the lid while pulling up the 

knob and open the power outlet 

lid.

The power outlet can be used 

when

The engine switch is in ACC or ON.

When turning the engine switch 

off

Disconnect electrical devices with 

charging functions, such as mobile 

battery packs.

If such devices are left connected, 

the engine switch may not be turned 

off normally.

A portable device, such as a 

smartphone or mobile battery, 

can be charged by just placing it 

on the charging area, provided 

the device is compatible with the 

Qi wireless charging standard 

created by the Wireless Power 

Consortium.
The wireless charger cannot be 

used with a portable device that 

NOTICE

Do not apply excessive force to 

or impact the USB charging 

port.

Do not disassemble or modify 

the USB charging port.

To prevent damage to exter-

nal devices

Do not leave external devices in 

the vehicle. The temperature 

inside the vehicle may become 

high, resulting in damage to an 

external device.

Do not push down on or apply 

unnecessary force to an exter-

nal device or the cable of an 

external device while it is con-

nected.

To prevent battery discharge

Do not use the USB charging port 

for a long period of time with the 

engine stopped.

Power outlet

NOTICE

To prevent the fuse from 

being blown

Do not use an accessory that 

uses more than 12 V 10 A.

To avoid damaging the power 

outlet

Close the power outlet lid when 

the power outlet is not in use. 

Foreign objects or liquids that 

enter the power outlet may cause 

a short circuit.

To prevent the battery from 

being discharged

Do not use the power outlet lon-

ger than necessary when the 

engine is not running.

Wireless charger (if 

equipped)

273

5-4. Other interior features

5

Interior

 featur

es

is larger than the charging area. 
Additionally, depending on the 
portable device, the wireless 
charger may not operate prop-
erly. Refer to the operation man-
ual of the portable device.

The “Qi” symbol

The “Qi” symbol is a trademark 
of the Wireless Power Consor-
tium.

Name for all parts

Power supply switch

Operation indicator light

Charge area

*

Charging tray

*

: Portable devices and wireless 

chargers contain charging coils. 
The charging coil in the wireless 
charger can be moved within the 
charge area near the center of 
the charging tray. If the charging 
coil inside a portable device is 

detected in the charge area, the 
charging coil inside the wireless 
charger will move toward it and 
start charging. If the charging coil 
inside a portable device moves 
outside of the charge area, 
charging will automatically stop.
If 2 or more portable devices are 
placed on the charging tray, their 
charging coils may not be prop-
erly detected and they may not 
be charged.

Using the wireless charger

1

Press the power supply 
switch of the wireless char-
ger.

Pressing the switch again turns the 
wireless charger off.
When turned on, the operation indi-
cator light (green) comes on. 
When the engine switch is turned 
off, the on/off state of the wireless 
charger will be memorized.

2

Place a portable device on 
the charging area with its 
charging surface facing 
down.

While charging, the operation indi-
cator light (orange) will be illumi-
nated.
If charging does not begin, move 
the portable device as close to the 
center of the charging area as pos-
sible.
If charging is not performed, the 

274

5-4. Other interior features

operation indicator light will slowly 
illuminate in green and orange 
alternatively and a sound of 
charging coil operation may be 
heard repeatedly. Depending on 
the portable device, its charging coil 
may not be in the center of the 
device. In this case, place the por-
table device so that its charging coil 
is centered in the charging area.
When charging is complete, the 
operation indicator light (green) will 
illuminate.

Recharging function

If a certain amount of time has 
elapsed since charging com-
pleted and the portable device 
has not been moved, the 
wireless charger will restart 
charging.

If a portable device is moved 
significantly within the 
charging area, the charging 
coil may disconnect and 
charging may temporarily be 
stopped. However, if a 
charging coil is detected 
within the charging area, the 
charging coil inside the wire-
less charger will move near 
the other coil and charging 
will resume.

Operation indicator light status

*

: Depending on the portable device, the operation indicator light may stay 

illuminated (orange) after charging has completed.

If the operation indicator light blinks

If an error is detected, the operation indicator light will blink (orange). Take 
the appropriate measures according to the table below.

Operation indicator light

State

Off

The Wireless charger is off

Green (illuminated)

Standby (charging is possible)

Charging is complete

*

Orange (illuminated)

A portable device has been placed on the 
charging area (identifying the portable 
device)

Charging in progress

275

5-4. Other interior features

5

Interior

 featur

es

The wireless charger can be 
operated when

The engine switch is in ACC or ON.

Portable devices that can be 
charged

Portable devices compatible with 
the Qi wireless charging standard 
can be charged by the wireless 
charger. However, compatibility 
with all devices which meet the Qi 
wireless charging standard is not 
guaranteed.

The wireless charger is designed 
to supply low power electricity (5 
W or less) to a cellular phone, 
smartphone, or other portable 
device.

If a cover or accessory is 
attached to the portable device

Do not charge a portable device if a 
cover or accessory which is not Qi 
compatible is attached. Depending 
on the type of cover (including for 

certain genuine manufacture parts) 
and/or accessory attached, it may 
not be possible to charge the porta-
ble device. If the portable device is 
placed on the charging area and 
does not charge, remove the cover 
and/or accessories.

If interference is heard in AM 
radio broadcasts while 
charging

Turn off the wireless charger and 
check if the noise is reduced. If 
noise is reduced, press and hold the 
power supply switch of the wireless 
charger for 2 seconds. The fre-
quency of the wireless charger is 
changed and noise may be 
reduced. When the frequency is 
changed, the operation indicator 
light will blink (orange) 2 times.

Charging precautions

If the electronic key cannot be 
detected in the cabin, charging 
cannot be performed. When a 

Operation indicator light Suspected cause

Measure

Blinks (orange) at a one 
second interval continu-
ously

Vehicle to charger com-
munication failure.

If the engine is running, 
stop and then restart the 
engine.
If the engine switch is in 
ACC, start the engine.

Blinks (orange) 3 times 
repeatedly

A foreign object exists 
between the portable 
device and charging 
area.

Remove the foreign 
object.

Portable device is not 
positioned properly on 
the charging area.

If there is a case or 
cover attached to the 
portable device, remove 
it.

Blinks (orange) 4 times 
repeatedly

The temperature of the 
wireless charger is 
excessively high.

Stop charging, remove 
the portable device from 
the charging tray, wait 
for the temperature to 
drop, and then start 
charging again.

276

5-4. Other interior features

door is opened and closed, 

charging may be temporarily sus-

pended.

While charging, the wireless char-

ger and the portable device will 

become warm. 

This is not a malfunction.If a porta-

ble device becomes warm while 

charging and charging stops due 

to the protection function of the 

portable device, wait until the por-

table device cools down and 

charge it again.

Sound generated during opera-

tion

When the power supply switch is 

turned on or while a portable device 

is being identified, operation sounds 

may be heard. This is not a malfunc-

tion.

Cleaning the wireless charger

P.285

WARNING

Caution while driving

When charging a portable device, 

for safety reasons, the driver 

should not operate the main part 

of the portable device while driv-

ing.

Caution while in motion

Do not charge lightweight devices 

such as wireless headphones 

while in motion. These devices 

are very light and may be ejected 

from the charging tray, which may 

lead to unforeseen accidents.

Caution regarding interfer-

ence with electronic devices

People with implantable cardiac 

pacemakers, cardiac resynchroni-

zation therapy pacemakers or 

implantable cardioverter defibrilla-

tors, as well as any other electri-

cal medical device, should consult 

their physician about the usage of 

the wireless charger.

To prevent damage or burns

Observe the following precau-

tions. 

Failure to do so may result in a 

equipment failure and damage, 

catch fire, burns due to overheat 

or electric shock.

Do not insert any metallic 

objects between the charge 

area and the portable device 

while charging

Do not attach an aluminum 

sticker or other metallic object to 

the charge area.

Do not attach an aluminum 

sticker or other metallic object to 

the side of the portable device 

(or to its case or cover) that 

touches the charge area.

Do not use the charging tray as 

a small storage space.

Do not subject to a strong force 

or impact.

Do not disassemble, modify or 

remove.

Do not charge devices other 

than specified portable devices.

Keep away from magnetic 

items.

Do not charge devices if the 

charge area is covered in dust.

Do not cover with a cloth or sim-

ilar material.

NOTICE

Situations in which the func-

tion may not operate normally

Devices may not be charged nor-

mally in the following situations.

The portable device is fully 

charged

277

5-4. Other interior features

5

Interior

 featur

es

The portable device is being 

charged with a cable connected

There is foreign matter between 

the charge area and portable 

device

Charging has caused the porta-

ble device to heat up

The temperature around the 

charging tray is 95°F (35°C) or 

higher, such as in extreme heat

The portable device is placed 

with its charging side facing up

The portable device is placed in 

an area misaligned from the 

charge area

The portable device is larger 

than the charging tray

A foldable and portable device 

is placed outside the charge 

area

The camera lens protrudes 0.12 

in (3 mm) or more from the sur-

face of the portable device

The vehicle is in an area where 

strong electrical waves or noise 

are emitted, such as near a tele-

vision tower, power plant, gaso-

line station, broadcasting 

station, large display, airport, 

etc.

Any of the following objects that 

is 0.08 in (2 mm) or thicker is 

between the charging side of 

the portable device and the 

charge area

• Thick cases or covers
• A case or cover attached with 

an uneven or tilted surface, so 

that the charging side is not flat

• Thick decorations
• Accessories, such as finger 

rings, straps, etc.

When the portable device is in 

contact with, or is covered by 

any of the following metallic 

objects:

• A card that has metal on it, such 

as aluminum foil, etc.

• A pack of cigarettes that 

includes aluminum foil

• A wallet or bag that is made of 

metal

• Coins
• A heating pad
• CDs, DVDs or other media
• A metal accessory
• A case or cover made of metal
• A case which has magnet in it 

on the charging side of the por-

table device.

Electric wave type wireless 

remote controls are being used 

nearby

NOTICE

2 or more portable devices are 

placed on the charging tray at 

the same time

If charging is abnormal or the 

operation indicator light contin-

ues to flash for any other reason, 

the wireless charger may be mal-

functioning. Contact your Toyota 

dealer.

278

5-4. Other interior features

1

To set the visor in the forward 
position, flip it down.

2

To set the visor in the side 
position, flip down, unhook, 
and swing it to the side.

3

To use the side extender, 
place the visor in the side 
position, then slide it back-
ward. (if equipped)

Slide the cover to open.

The vanity light turns on. (if 
equipped)

To prevent battery discharge 
(vehicles with vanity lights)

If the vanity lights remain on when 
the engine switch is OFF, the lights 
will go off automatically after 20 min-
utes.

To prevent malfunctions and 
data corruptions

When charging, bringing a 
credit, or other magnetic card, 
or magnetic storage media 
close to the charge area may 
clear any stored data due to 
magnetic influence. Also, do not 
bring a wristwatch or other pre-
cision instrument close to the 
charge area since doing so may 
cause it to malfunction.

Do not charge with a non-con-
tact IC card such as a transpor-
tation system IC card inserted 
between the charging side of a 
portable device and the charge 
area. The IC chip may become 
extremely hot and damage the 
portable device or IC card. Be 
especially careful not to charge 
a portable device inside a case 
or cover with a non-contact IC 
card attached.

Do not leave portable devices 
inside the vehicle. The inside of 
the vehicle can become hot in 
extreme heat, which could 
cause a malfunction.

If the smartphone OS has 
been updated

If the smartphone OS has been 
updated to a newer version, its 
charging specifications may have 
changed significantly. For details, 
check the information on the man-
ufacturer’s website.

To prevent battery discharge

Do not use the wireless charger 
for a long period of time with the 
engine stopped.

Sun visors

Vanity mirrors

279

5-4. Other interior features

5

Interior

 featur

es

Fold down the armrest for use.

An assist grip installed on the 

ceiling can be used to support 

your body while sitting on the 

seat.

The coat hooks are provided 

with the rear assist grips.

NOTICE

To prevent the battery from 

being discharged (vehicles 

with vanity lights)

Do not leave the vanity lights on 

for extended periods while the 

engine is stopped.

Armrest (if equipped)

NOTICE

To prevent damage to the 

armrest

Do not apply too much load on the 

armrest.

Assist grips

WARNING

Assist grip

Do not use the assist grip when 

getting in or out of the vehicle or 

rising from your seat.

NOTICE

To prevent damage to the 

assist grip

Do not hang any heavy object or 

put a heavy load on the assist 

grip.

Coat hooks

WARNING

Items that cannot be hung on 

the coat hook

Do not hang coat hangers or 

other hard or sharp objects on the 

hook. If the SRS curtain shield air-

bags deploy, these items may 

become projectiles, causing death 

or serious injury.

280

5-4. Other interior features

281

6

6

Maintena

nce

 a

nd 

ca
re

Maintenance and care

.

6-1. Maintenance and care

Cleaning and protecting the 

vehicle exterior ..........

282

Cleaning and protecting the 

vehicle interior ...........

285

6-2. Maintenance

Maintenance requirements

..................................

288

General maintenance..

290

Emission inspection and 

maintenance (I/M) pro-
grams ........................

292

6-3. Do-it-yourself mainte-

nance

Do-it-yourself service pre-

cautions.....................

294

Hood ...........................

296

Positioning a floor jack

..................................

297

Engine compartment ...

298

Tires ............................

305

Tire inflation pressure..

322

Wheels ........................

324

Air conditioning filter....

326

Wireless remote con-

trol/electronic key battery

..................................

327

Checking and replacing 

fuses..........................

331

Headlight aim ..............

333

Light bulbs...................

334

282

6-1. Maintenance and care

6-1.Maintenance and care

Working from top to bottom, 
liberally apply water to the 
vehicle body, wheel wells and 
underside of the vehicle to 
remove any dirt and dust.

Wash the vehicle body using 
a sponge or soft cloth, such 
as a chamois.

For hard-to-remove marks, 
use car wash soap and rinse 
thoroughly with water.

Wipe away any water.

Wax the vehicle when the 
waterproof coating deterio-
rates.

If water does not bead on a clean 
surface, apply wax when the vehi-
cle body is cool.

Automatic car washes

Fold the mirrors before washing 
the vehicle. Start washing from the 
front of the vehicle. Make sure to 
extend the mirrors before driving.

Brushes used in automatic car 
washes may scratch the vehicle 
surface, parts (wheel, etc.) and 
harm your vehicle’s paint.

Vehicles with a rear spoiler: In cer-
tain automatic car washes, the 

rear spoiler may interfere with 
machine operation. This may pre-
vent the vehicle from being 
cleaned properly or result in dam-
age to the rear spoiler.

High pressure car washes

As water may enter the cabin, do 
not bring the nozzle tip near the 
gaps around the doors or perimeter 
of the windows, or spray these 
areas continuously.

When using a car wash (vehi-
cles with a smart key system)

If the door handle becomes wet 
while the electronic key is within the 
effective range, the door may lock 
and unlock repeatedly. In that case, 
follow the following correction pro-
cedures to wash the vehicle:

Place the key in a position 6 ft. (2 
m) or more separate from the 
vehicle while the vehicle is being 
washed. (Take care to ensure that 
the key is not stolen.)

Set the electronic key to bat-
tery-saving mode to disable the 
smart key system. (

P.115)

Wheels and wheel ornaments

Remove any dirt immediately by 
using a neutral detergent.

Wash detergent off with water 
immediately after use.

To protect the paint from damage, 
make sure to observe the follow-
ing precautions.

• Do not use acidic, alkaline or 

abrasive detergent

• Do not use hard brushes
• Do not use detergent on the 

wheels when they are hot, such 
as after driving or parking in hot 
weather

Brake pads and calipers

Rust may form if the vehicle is 
parked with wet brake pads or disc 
rotors, causing them to stick. Before 
parking the vehicle after it is 
washed, drive slowly and apply the 
brakes several times to dry the 

Cleaning and protect-

ing the vehicle exte-

rior

Perform cleaning in a man-
ner appropriate to each 
component and its material.

Cleaning instructions

283

6-1. Maintenance and care

6

Maintena

nce
 a

nd 
ca

re

parts.

Bumpers and side moldings

Do not scrub with abrasive cleaners.

Plated portions

If dirt cannot be removed, clean the 

parts as follows:

Use a soft cloth dampened with an 

approximately 5% solution of neu-

tral detergent and water to clean 

the dirt off.

Wipe the surface with a dry, soft 

cloth to remove any remaining 

moisture.

To remove oily deposits, use alco-

hol wet wipes or a similar product.

WARNING

When washing the vehicle

Do not apply water to the inside of 

the engine compartment. Doing 

so may cause the electrical com-

ponents, etc. to catch fire.

Precautions regarding the 

exhaust pipe

Exhaust gasses cause the 

exhaust pipe to become quite hot.

When washing the vehicle, be 

careful not to touch the pipe until it 

has cooled sufficiently, as touch-

ing a hot exhaust pipe can cause 

burns.

Precaution regarding the rear 

bumper

If the paint of the rear bumper is 

chipped or scratched, the follow-

ing systems may not function cor-

rectly. If this occurs, consult your 

Toyota dealer.

BSM (if equipped)

RCTA (if equipped)

SEA (if equipped)

NOTICE

To prevent paint deteriora-

tion and corrosion on the 

body and components (alumi-

num wheels, etc.)

Wash the vehicle immediately in 

the following cases:

• After driving near the sea coast
• After driving on salted roads
• If coal tar or tree sap is present 

on the paint surface

• If dead insects, insect droppings 

or bird droppings are present on 

the paint surface

• After driving in an area contami-

nated with soot, oily smoke, 

mine dust, iron powder or chem-

ical substances

• If the vehicle becomes heavily 

soiled with dust or mud

• If liquids such as benzene and 

gasoline are spilled on the paint 

surface

If the paint is chipped or 

scratched, have it repaired 

immediately.

To prevent the wheels from cor-

roding, remove any dirt and 

store in a place with low humid-

ity when storing the wheels.

Cleaning the exterior lights

Wash carefully. Do not use 

organic substances or scrub 

with a hard brush.

This may damage the surfaces 

of the lights.

Do not apply wax to the sur-

faces of the lights.

Wax may cause damage to the 

lenses.

284

6-1. Maintenance and care

NOTICE

To prevent damage to the 

windshield wiper arms

When lifting the wiper arms away 

from the windshield, pull the driver 

side wiper arm upward first, and 

repeat for the passenger side. 

When returning the wipers to their 

original position, do so from the 

passenger side first.

When using a high pressure 

car wash

When washing the vehicle, do 

not spray the camera or its sur-

rounding area directly with a 

high pressure washer. Shock 

applied from high pressure 

water may cause the device to 

not operate normally.

Do not spray water directly on 

the radar which is equipped 

behind the emblem. Otherwise 

it may cause the device to be 

damaged.

Do not bring the nozzle tip close 

to boots (rubber or resin manu-

factured cover), connectors or 

the following parts. The parts 

may be damaged if they come 

into contact with high-pressure 

water.

• Traction related parts
• Steering parts
• Suspension parts
• Brake parts

Keep the cleaning nozzle at 

least 11.9 in. (30 cm) away from 

the vehicle body. Otherwise 

resin section, such as moldings 

and bumpers, may be deformed 

and damaged. Also, do not con-

tinuously hold the nozzle in the 

same place.

Do not spray the lower part of 

the windshield continuously. If 

water enters the air conditioning 

system intake located near the 

lower part of the windshield, the 

air conditioning system may not 

operate correctly.

Do not wash the underside of 

the vehicle using a high pres-

sure car washer.

285

6-1. Maintenance and care

6

Maintena

nce
 a

nd 
ca

re

Remove dirt and dust using a 

vacuum cleaner. Wipe dirty 

surfaces with a cloth damp-

ened with lukewarm water.

If dirt cannot be removed, 

wipe it off with a soft cloth 

dampened with neutral deter-

gent diluted to approximately 

1%.

Wring out any excess water 

from the cloth and thoroughly 

wipe off remaining traces of 

detergent and water.

Shampooing the carpets

There are several commercial foam-

ing-type cleaners available. Use a 

sponge or brush to apply the foam. 

Rub in overlapping circles. Do not 

use water. Wipe dirty surfaces and 

let them dry. Excellent results are 

obtained by keeping the carpet as 

dry as possible.

Handling the seat belts

Clean with mild soap and lukewarm 

water using a cloth or sponge. Also 

check the belts periodically for 

excessive wear, fraying or cuts.

Cleaning and protect-

ing the vehicle interior

Perform cleaning in a man-

ner appropriate to each 

component and its material.

Protecting the vehicle 

interior

WARNING

Water in the vehicle

Do not splash or spill liquid in 

the vehicle.

Doing so may cause electrical 

components, etc. to malfunc-

tion or catch fire.

Do not get any of the SRS com-

ponents or wiring in the vehicle 

interior wet.

(

P.31)

An electrical malfunction may 

cause the airbags to deploy or 

not function properly, resulting 

in death or serious injury.

Vehicles with wireless charger:

Do not let the wireless charger 

(

P.272) get wet. Failure to do 

so may cause the charger to 

become hot and cause burns or 

could cause electric shock 

resulting in death or serious 

injury.

Cleaning the interior (espe-

cially instrument panel)

Do not use polish wax or polish 

cleaner. The instrument panel 

may reflect off the windshield, 

obstructing the driver’s view and 

leading to an accident, resulting in 

death or serious injury.

NOTICE

Cleaning detergents

Do not use the following types 

of detergent, as they may dis-

color the vehicle interior or 

cause streaks or damage to 

painted surfaces:

• Areas other than the seats and 

steering wheel: Organic sub-

stances such as benzene or 

gasoline, alkaline or acidic solu-

tions, dye, and bleach

286

6-1. Maintenance and care

Remove dirt using a 

water-dampened soft cloth or 

synthetic chamois.

Wipe the surface with a dry, 

soft cloth to remove any 

remaining moisture.

Cleaning the areas with 

satin-finish metal accents

The metal areas use a layer of real 

metal for the surface. It is necessary 

to clean them regularly. If dirty areas 

are left uncleaned for long periods 

of time, they may be difficult to 

clean.

Remove dirt and dust using a 

vacuum cleaner.

Wipe off any excess dirt and 

dust with a soft cloth damp-

ened with diluted detergent.

Use a diluted water solution of 

approximately 5% neutral wool 

NOTICE

• Seats: Alkaline or acidic solu-

tions, such as thinner, benzene, 

and alcohol

• Steering wheel: Organic sub-

stances, such as thinner, and 

cleaner that contains alcohol

Do not use polish wax or polish 

cleaner. The instrument panel’s 

or other interior part’s painted 

surface may be damaged.

Preventing damage to leather 

surfaces

Observe the following precautions 

to avoid damage to and deteriora-

tion of leather surfaces:

Remove any dust or dirt from 

leather surfaces immediately.

Do not expose the vehicle to 

direct sunlight for extended peri-

ods of time. Park the vehicle in 

the shade, especially during 

summer.

Do not place items made of 

vinyl, plastic, or containing wax 

on the upholstery, as they may 

stick to the leather surface if the 

vehicle interior heats up signifi-

cantly.

Water on the floor

Do not wash the vehicle floor with 

water.

Vehicle systems such as the 

audio system may be damaged if 

water comes into contact with 

electrical components such as the 

audio system above or under the 

floor of the vehicle. Water may 

also cause the body to rust.

When cleaning the inside of 

the windshield

Do not allow glass cleaner to con-

tact the lens. Also, do not touch 

the lens. (

P.179)

Cleaning the inside of the rear 

window

Do not use glass cleaner to 

clean the rear window, as this 

may cause damage to the rear 

window defogger heater wires 

or antenna. Use a cloth damp-

ened with lukewarm water to 

gently wipe the window clean. 

Wipe the window in strokes run-

ning parallel to the heater wires 

or antenna.

Be careful not to scratch or 

damage the heater wires or 

antenna.

Cleaning the areas with 

satin-finish metal accents

Cleaning the leather areas

287

6-1. Maintenance and care

6

Maintena

nce

 a

nd 

ca
re

detergent.

Wring out any excess water 
from the cloth and thoroughly 
wipe off all remaining traces 
of detergent.

Wipe the surface with a dry, 
soft cloth to remove any 
remaining moisture. Allow the 
leather to dry in a shaded and 
ventilated area.

Caring for leather areas

Toyota recommends cleaning the 
interior of the vehicle at least twice a 
year to maintain the quality of the 
vehicle’s interior.

Remove dirt and dust using a 
vacuum cleaner.

Wipe it off with a soft cloth 
dampened with neutral deter-
gent diluted to approximately 
1%.

Wring out any excess water 
from the cloth and thoroughly 
wipe off remaining traces of 
detergent and water.

Cleaning the synthetic 
leather areas

288

6-2. Maintenance

6-2.Maintenance

Repair and replacement

It is recommended that genuine 

Toyota parts be used for repairs to 

ensure performance of each sys-

tem. If non-Toyota parts are used in 

replacement or if a repair shop other 

than a Toyota dealer performs 

repairs, confirm the warranty cover-

age.

Allow inspection and repairs to 

be performed by a Toyota 

dealer

Toyota technicians are 

well-trained specialists and are 

kept up to date with the latest ser-

vice information. They are well 

informed about the operation of all 

systems on your vehicle.

Keep a copy of the repair order. It 

proves that the maintenance that 

has been performed is under war-

ranty coverage. If any problem 

should arise while your vehicle is 

under warranty, your Toyota 

dealer will promptly take care of it.

General maintenance should be 

performed on a daily basis. This 

can be done by yourself or by a 

Toyota dealer.

Scheduled maintenance should 

be performed at specified inter-

vals according to the mainte-

nance schedule.

For details about maintenance 

items and schedules, refer to the 

“Scheduled Maintenance Guide” or 

“Owner’s Manual Supplement”.

Maintenance require-

ments

To ensure safe and econom-

ical driving, day-to-day care 

and regular maintenance 

are essential. It is the 

owner’s responsibility to 

perform regular checks. 

Toyota recommends the 

maintenance below.

WARNING

If your vehicle is not properly 

maintained

Improper maintenance could 

result in serious damage to the 

vehicle and possible death or seri-

ous injury.

Handling of the battery

Engine exhaust, some of its 

constituents, and a wide variety 

of automobile components con-

tain or emit chemicals known to 

the State of California to cause 

cancer and birth defects and 

other reproductive harm. Work 

in a well ventilated area.

Oils, fuels and fluids contained 

in vehicles as well as waste pro-

duced by component wear con-

tain or emit chemicals known to 

the State of California to cause 

cancer and birth defects or 

other reproductive harm. Avoid 

exposure and wash any 

affected area immediately.

Battery posts, terminals and 

related accessories contain lead 

and lead compounds which are 

known to cause brain damage. 

Wash your hands after han-

dling. (

P.303)

General maintenance

Scheduled maintenance


Content      ..     7      8      9      10     ..