Toyota Corolla (2024 year). Manual in english - page 6
 

  Index      Toyota     Toyota Corolla (2024 year). Manual in english


Search            copyright infringement  


Content      ..     4      5      6      7     ..


Toyota Corolla (2024 year). Manual in english - page 6


161

4-2. Driving procedures

4

Dr
iv

ing

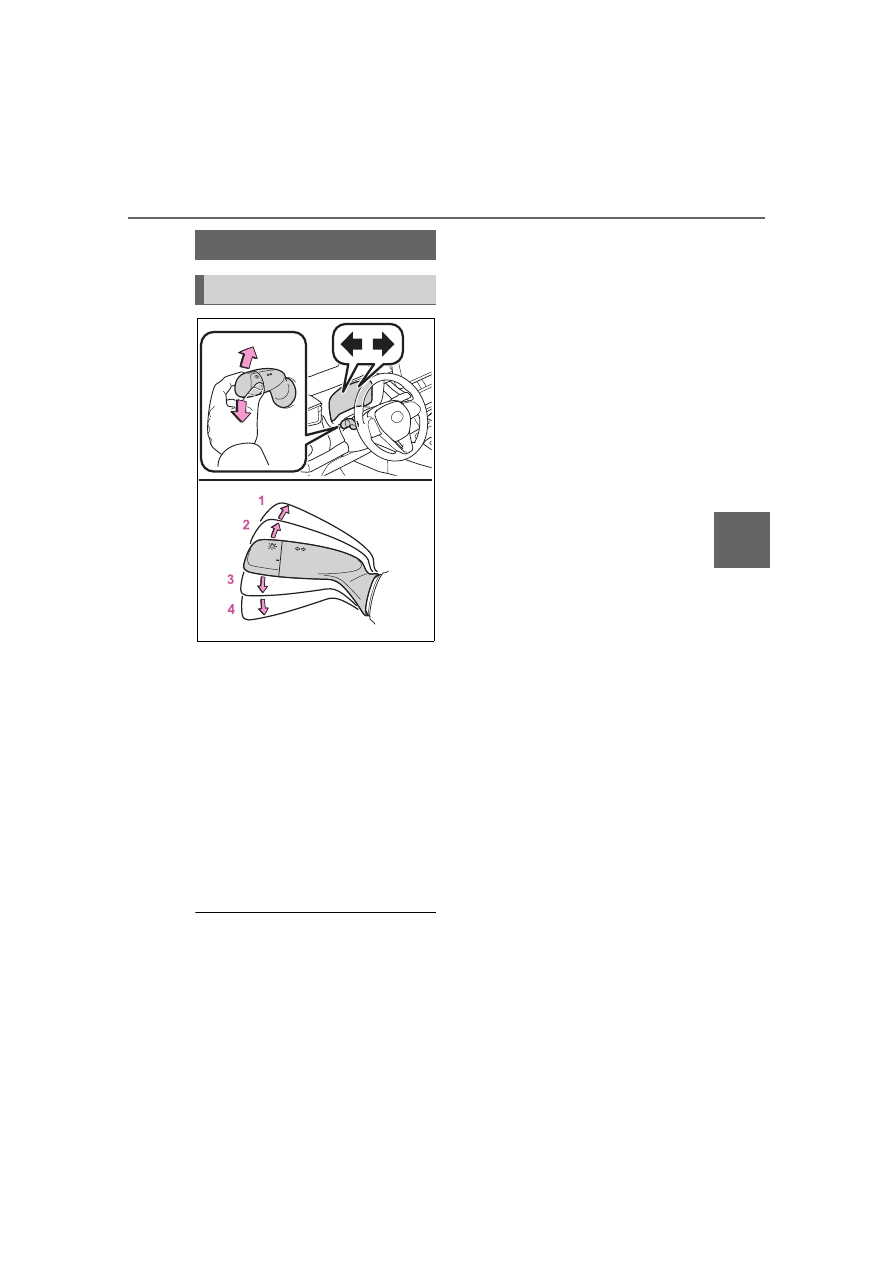
1

Right turn

2

Lane change to the right 
(move the lever partway and 
release it)

The right hand signals will flash 3 
times.

3

Lane change to the left 
(move the lever partway and 
release it)

The left hand signals will flash 3 
times.

4

Left turn

Turn signals can be operated 
when

The engine switch is in ON.

If the indicator flashes faster 
than usual

Check that a light bulb in the front or 
rear turn signal lights has not 

burned out.

Turn signal lever

Operating instructions

162

4-2. Driving procedures

Using the manual mode

The parking brake can be set 
and released manually.

Parking brake indicator light 
(for the U.S.A.)

Parking brake indicator light 
(for Canada)

1

Pull the switch to set the 
parking brake.

The parking brake indicator light 
will turn on.

Pull and hold the parking brake 
switch if an emergency occurs and 
it is necessary to operate the park-
ing brake while driving.

2

Press the switch to release 
the parking brake.

• Operate the parking brake switch 

while depressing the brake pedal.

• Using the parking brake auto-

matic release function, the park-
ing brake can be released by 
depressing the accelerator pedal. 
When using this function, slowly 
depress the accelerator pedal. 
(

P.163)

Make sure that the parking brake 
indicator light turn off.

If the parking brake indicator 
light flash, operate the switch 
again. (

P.357)

Turning the automatic 
mode on

While the vehicle is stopped, 
pull and hold the parking brake 
switch until a buzzer sounds and 
a message is shown on the 
multi-information display.

When the automatic mode is 
turned on, the parking brake 
operates as follows.

When the shift lever is shifted 
from P, the parking brake will 
be released, and the parking 
brake indicator light will turn 
off.

When the shift lever is shifted 
to P, the parking brake will be 
set, and the parking brake 

Parking brake

The parking brake can be 
set or released automati-
cally or manually.

In automatic mode, the 
parking brake can be set or 
released automatically 
according to shift lever 
operation.

Also, even in automatic 
mode, the parking brake can 
be set or released manually.

Operating instructions

163

4-2. Driving procedures

4

Dr
iv

ing

indicator light will turn on.

Operate the shift lever with the 
vehicle stopped and the brake 
pedal depressed.

The auto function may not operate 
if the shift lever is moved extremely 
quickly. In this situation, apply the 
parking brake manually. (

P.162)

Turning the automatic 
mode off

While the vehicle is stopped and 
depressing the brake pedal, 
press and hold the parking 
brake switch until a buzzer 
sounds and a message is 
shown on the multi-information 
display.

Parking brake operation

When the engine switch is not in 
ON, the parking brake cannot be 
released using the parking brake 
switch.

When the engine switch is not in 
ON, automatic mode (automatic 
brake setting and releasing) is not 
available.

Parking brake automatic 
release function

When all of the following conditions 
are met, the parking brake can be 
released by depressing the acceler-
ator pedal.

The driver’s door is closed

The driver is wearing the seat belt

The shift lever is in a forward driv-
ing position or reverse driving 
position

The malfunction indicator lamp or 
brake system warning light is not 
illuminated.

When depressing the accelerator 
pedal, depress it slowly.

If the parking brake is not released 
when the accelerator pedal is 
depressed, release the parking 
brake manually.

When the shift lever is shifted from 
P, the parking brake will be released 
automatically.

Parking brake automatic lock 
function

The parking brake will be set auto-
matically under the following condi-
tions:

The brake pedal is not depressed

The driver’s door is open

The driver’s seat belt is not fas-
tened

The shift lever is in a position 
other than P or N

The malfunction indicator lamp 
and brake system warning light 
are not illuminated

If “Parking Brake Temporarily 
Unavailable” is displayed on 
the multi-information display

If the parking brake is operated 
repeatedly over a short period of 
time, the system may restrict opera-
tion to prevent overheating. If this 
happens, refrain from operating the 
parking brake. Normal operation will 
return after about 1 minute.

If “Parking Brake Unavailable” 
is displayed on the multi-infor-
mation display

Operate the parking brake switch. If 
the message does not disappear 
after operating the switch several 
times, the system may be malfunc-
tioning. Have the vehicle inspected 
by your Toyota dealer.

Parking brake operation sound

When the parking brake operates, a 
motor sound (whirring sound) may 
be heard. This does not indicate a 
malfunction.

Parking brake indicator light

Depending on the engine switch 

164

4-2. Driving procedures

position/mode, the parking brake 

indicator light will turn on and stay 

on as described below:

ON: Comes on until the parking 

brake is released.

Not in ON: Stays on for approxi-

mately 15 seconds.

When the engine switch is turned 

off with the parking brake set, the 

parking brake indicator light will 

stay on for about 15 seconds. This 

does not indicate a malfunction.

When the parking brake switch 

malfunctions

Automatic mode (automatic brake 

setting and releasing) will be turned 

on automatically.

Parking the vehicle

P.137

Parking brake engaged warning 

buzzer

A buzzer will sound if the vehicle is 

driven with the parking brake 

engaged. “Parking Brake ON” is dis-

played on the multi-information dis-

play (with the vehicle reaching a 

speed of 3 mph [5 km/h]).

If the brake system warning 

light comes on

P.350

Usage in winter time

P.247

WARNING

When parking the vehicle

Do not leave a child in the vehicle 

alone. The parking brake may be 

released unintentionally by a child 

and there is the danger of the 

vehicle moving that may lead to 

an accident resulting in death or 

serious injury.

Parking brake switch

Do not set any objects near the 

parking brake switch.

Objects may interfere with the 

switch and may lead the parking 

brake to unexpectedly operate.

Parking brake automatic lock 

function

Never use the automatic parking 

brake engagement function in 

place of normal parking brake 

operation. This function is 

designed to reduce the risk of a 

collision due to the driver forget-

ting to engage the parking brake. 

Over-reliance on this function to 

park the vehicle safely may lead 

to an accident resulting in death 

or serious injury.

NOTICE

When parking the vehicle

Before you leave the vehicle, shift 

the shift lever to P, set the parking 

brake and make sure that the 

vehicle does not move.

When the system malfunc-

tions

Stop the vehicle in a safe place 

and check the warning messages.

When the vehicle battery is 

discharged

The parking brake system cannot 

be activated. (

P.377)

When the parking brake can-

not be released due to a mal-

function

Driving the vehicle with the park-

ing brake set will lead to brake 

components overheating, which 

may affect braking performance 

and increase brake wear.
Have the vehicle inspected by 

your Toyota dealer immediately if 

this occurs.

165

4-2. Driving procedures

4

Dr
iv

ing

Turn the brake hold system on

The brake hold standby indicator 

(green) 

 comes on. While the 

system is holding the brake, the 
brake hold operated indicator (yel-

low) 

 comes on.

Brake hold system operating 
conditions

The brake hold system cannot be 
turned on in the following condi-
tions:

The driver’s door is not closed.

The driver is not wearing the seat 
belt.

The parking brake is engaged.

If any of the conditions above are 
detected when the brake hold sys-
tem is enabled, the system will turn 
off and the brake hold standby indi-
cator light will go off. In addition, if 
any of the conditions are detected 
while the system is holding the 
brake, a warning buzzer will sound 
and a message will be shown on the 
multi-information display. The park-
ing brake will then be set automati-
cally.

Brake hold function

If the brake pedal is left released 
for a period of about 3 minutes 
after the system has started hold-
ing the brake, the parking brake 
will be set automatically. In this 
case, a warning buzzer sounds 
and a message is shown on the 
multi-information display.

To turn the system off while the 
system is holding the brake, firmly 
depress the brake pedal and 
press the button again.

The brake hold function may not 
hold the vehicle when the vehicle 
is on a steep incline. In this situa-
tion, it may be necessary for the 
driver to apply the brakes. A warn-
ing buzzer will sound and the 
multi-information display will 
inform the driver of this situation. If 
a warning message is shown on 
the multi-information display, read 
the message and follow the 
instructions.

When do not wish for the parking 
brake to operate automatically, 
press and hold the brake hold 

Brake Hold

The brake hold system 
keeps the brake applied 
when the shift lever is in D, 
B (vehicles without paddle 
shift switches), M (vehicles 
with paddle shift switches) 
or N with the system on and 
the brake pedal has been 
depressed to stop the vehi-
cle. The system releases the 
brake when the accelerator 
pedal is depressed with the 
shift lever in D, B (vehicles 
without paddle shift 
switches) or M (vehicles 
with paddle shift switches) 
to allow smooth start off.

Enabling the system

166

4-2. Driving procedures

switch until the standby indicator 

(green) turns off, and then turn the 

engine switch off.

When the parking brake is set 

automatically while the system 

is holding the brakes

Perform any of the following opera-

tions to release the parking brake:

Depress the accelerator pedal. 

(The parking brake will not be 

released automatically if the seat 

belt is not fastened.)

Operate the parking brake switch 

with the brake pedal depressed.

Make sure that the parking brake 

indicator light goes off. (

P.162)

When an inspection at your 

Toyota dealer is necessary

When the brake hold standby indi-

cator (green) does not illuminate 

even when the brake hold switch is 

pressed with the brake hold system 

operating conditions met, the sys-

tem may be malfunctioning. Have 

the vehicle inspected at your Toyota 

dealer.

If “Brake Hold Malfunction 

Press Brake to Deactivate Visit 

Your Dealer” or “Brake Hold 

Malfunction Visit Your Dealer” 

is displayed on the multi-infor-

mation display

The system may be malfunctioning. 

Have the vehicle inspected by your 

Toyota dealer.

Warning messages and buzzers

Warning messages and buzzers are 

used to indicate a system malfunc-

tion or to inform the driver of the 

need for caution. If a warning mes-

sage is shown on the multi-informa-

tion display, read the message and 

follow the instructions.

If the brake hold operated indi-

cator flashes

P.357

WARNING

When the vehicle is on a 

steep incline

Take care when using the brake 

hold system on a steep incline, 

exercise caution. The brake hold 

function may not hold brakes in 

such situations.
Also, the system may not activate 

depending on the angle of the 

slope.

When stopped on a slippery 

road

The system cannot stop the vehi-

cle when the gripping ability of the 

tires has been exceeded. Do not 

use the system when stopped on 

a slippery road.

NOTICE

When parking the vehicle

The brake hold system is not 

designed for use when parking 

the vehicle for a long period of 

time. Turning the engine switch off 

while the system is holding the 

brake may release the brake, 

which would cause the vehicle to 

move. When operating the engine 

switch, depress the brake pedal, 

shift the shift lever to P and set 

the parking brake.

167

4-3. Operating the lights and wipers

4

Dr
iv

ing

4-3.Operating the lights and wipers

Operating the 

 switch 

turns on the lights as follows:

For the U.S.A.

1

 The headlights, daytime 

running lights (

P.167) and 

all the lights listed below turn 
on and off automatically.

2

 The side marker, park-

ing, LED accent (if 
equipped), tail, license plate, 
instrument panel lights, and 
daytime running lights 
(

P.167) turn on.

3

 The headlights and all 

lights listed above (except 
daytime running lights) turn 

on.

4

 Off

For Canada

1

 The headlights, daytime 

running lights (

P.167) and 

all the lights listed below turn 
on and off automatically.

2

 The side marker, park-

ing, LED accent (if 
equipped), tail, license plate, 
instrument panel lights, and 
daytime running lights 
(

P.167) turn on.

3

 The headlights and all 

lights listed above (except 
daytime running lights) turn 
on.

AUTO mode can be used when

The engine switch is in ON.

Daytime running light system

The daytime running lights illumi-
nate using the same lights as the 
headlights and illuminate darker 
than the headlights.

Headlight switch

The headlights can be oper-
ated manually or automati-
cally.

Operating instructions

168

4-3. Operating the lights and wipers

To make your vehicle more visible 
to other drivers during daytime 
driving, the daytime running lights 
turn on automatically when all of 
the following conditions are met. 
(The daytime running lights are 
not designed for use at night.)

• The engine is running
• The parking brake is released

• The headlight switch is in the 


or 

*

 position

*

: When the surroundings are bright

The daytime running lights remain 
on after they illuminate, even if the 
parking brake is set again.

For the U.S.A.: Daytime running 
lights can be turned off by operat-
ing the switch.

Compared to turning on the head-
lights, the daytime running light 
system offers greater durability 
and consumes less electricity, so 
it can help improve fuel economy.

Headlight control sensor

The sensor may not function prop-
erly if an object is placed on the sen-
sor, or anything that blocks the 
sensor is affixed to the windshield.
Doing so interferes with the sensor 
detecting the level of ambient light 
and may cause the automatic head-
light system to malfunction.

Automatic light off system

When the headlights are on: The 
headlights and tail lights turn off 
30 seconds after the driver’s door 
is opened and closed if the engine 
switch is turned to ACC or OFF. 
(Vehicles with a wireless remote 
control: The lights turn off immedi-

ately if 

 on the key is pressed 

after all the doors are closed.)

When only the tail lights are on: 
The tail lights turn off automati-
cally if the engine switch is turned 
to ACC or OFF and the driver’s 
door is opened.

To turn the lights on again, turn the 
engine switch to ON, or turn the light 
switch off once and then back to 

 or 

 (except for the Canada).

Light reminder buzzer

A buzzer sounds when the engine 
switch is turned to OFF or ACC and 
the driver’s door is opened while the 
lights are turned on.

Windshield wiper linked head-
light illumination

When driving during daytime with 

the headlight switch turned to 

, if 

the windshield wipers are used, the 
headlights will turn on automatically 
after several seconds to help 
enhance the visibility of your vehi-
cle.

Battery-saving function

In order to prevent the battery of the 
vehicle from discharging, if the 
headlights and/or tail lights are on 
when the engine switch is turned off 
the battery saving function will oper-
ate and automatically turn off all the 
lights after approximately 20 min-
utes. When the engine switch is 
turned to ON, the battery-saving 
function will be disabled.
When any of the following are per-
formed, the battery-saving function 
is canceled once and then reacti-
vated. All the lights will turn off auto-
matically 20 minutes after the 
Battery- saving function has been 
reactivated:

When the headlight switch is oper-
ated

When a door is opened or closed

169

4-3. Operating the lights and wipers

4

Dr

iv

ing

Customization

Some functions can be customized. 

(

P.406)

1

With the headlights on, push 

the lever away from you to 

turn on the high beams.

Pull the lever toward you to the 

center position to turn the high 

beams off.

2

Pull the lever toward you and 

release it to flash the high 

beams once.

You can flash the high beams with 

the headlights on or off.

1

Press the Automatic High 

Beam switch.

NOTICE

To prevent battery discharge

Do not leave the lights on longer 

than necessary when the engine 

is not running.

Turning on the high beam 

headlights

AHB (Automatic High 

Beam)

The Automatic High Beam 

uses a front camera located 

on the upper portion of the 

windshield to detect the 

brightness of the lights of 

vehicles ahead, street-

lights, etc., and automati-

cally changes the head 

lights between the high 

beams and low beams.

WARNING

For safe use

Do not overly rely on the Auto-

matic High Beam. Always drive 

safely, taking care to observe your 

surroundings and turning the high 

beams on or off manually if nec-

essary.

To prevent unintentional 

operation of the Automatic 

High Beam System

When it is necessary to disable 

the system: 

P.178

Using the Automatic High 

Beam system

170

4-3. Operating the lights and wipers

2

Turn the headlight switch to 

the  

or  

position.

When the headlight switch lever is 
in the low beam position, the AHB 
system will be enabled and the 
AHB indicator will illuminate.

Automatic operating condi-
tions of the high beams

When all of the following condi-
tions are met, the high beams will 
illuminate automatically:

• The vehicle speed is approxi-

mately 21 mph (34 km/h) or more.

• The area ahead of the vehicle is 

dark.

• There are no vehicles ahead with 

lights on.

• There are few streetlights or other 

lights on the road ahead.

If any of the following conditions 
are met, the headlights will 
change to the low beams:

• Vehicle speed drops below 

approximately 17 mph (27 km/h).

• The area ahead of the vehicle is 

not dark.

• There is a vehicle ahead with 

lights on.

• There are many streetlights or 

other lights on the road ahead.

Front camera detection

In the following situations, the high 
beams may not be automatically 
changed to the low beams:

• When a vehicle cuts in front of 

your vehicle

• When another vehicle crosses in 

front of the vehicle

• When vehicles ahead are repeat-

edly detected and then hidden 
due to repeated curves, road 
dividers or roadside trees

• When a vehicle ahead 

approaches from a far lane

• When a vehicle ahead is far away
• When a vehicle ahead has no 

lights

• When the lights of a vehicle ahead 

are dim

• When a vehicle ahead is reflecting 

strong light, such as own head-
lights

• Situations in which the sensors 

may not operate properly: 

P.182

The headlights may change to the 
low beams if a vehicle ahead that 
is using fog lights without its head-
lights turned on is detected.

House lights, street lights, traffic 
signals, and illuminated billboards 
or signs may cause the high 
beams to change to the low 
beams, or the low beams to 
remain on.

The following may change the tim-
ing at which the headlights 
change to the low beams:

• The brightness of lights of vehi-

cles ahead

• The movement and direction of 

vehicles ahead

• The distance between the vehicle 

and a vehicle ahead

• When a vehicle ahead only has 

lights illuminated on one side

• When a vehicle ahead is a 

two-wheeled vehicle

• The condition of the road (gradi-

ent, curve, condition of the road 
surface, etc.)

• The number of passengers and 

amount of luggage

The headlights may change 
between the high beams and low 
beams unexpectedly.

Bicycles and other small vehicles 
may not be detected.

In the following situations, the sys-
tem may not be able to correctly 
detect the brightness of the sur-

171

4-3. Operating the lights and wipers

4

Dr
iv

ing

roundings. This may cause the 
low beams to remain on or the 
high beams to flash or dazzle 
pedestrians or vehicles ahead. In 
such a case, it is necessary to 
manually change between the 
high beams and low beams.

• When there are lights similar to 

headlights or tail lights in the sur-
rounding area

• When headlights or tail lights of 

vehicles ahead are turned off, 
dirty, changing color, or not aimed 
properly

• When the headlights are repeat-

edly changing between the high 
beams and low beams.

• When use of the high beams is 

inappropriate or when the high 
beams may be flashing or daz-
zling pedestrians or other drivers.

• When the vehicle is used in an 

area in which vehicles travel on 
the opposite side of the road of 
the country for which the vehicle 
was designed, for example using 
a vehicle designed for right-hand 
traffic in a left-hand traffic area, or 
vice versa

• When it is necessary to disable 

the system: 

P.178

• Situations in which the sensors 

may not operate properly: 

P.182

Temporarily reducing front 
camera sensitivity (for the 
U.S.A.)

The sensitivity of the front camera 
can be temporarily reduced.

1

Turn the engine switch off with 
the following conditions met.

• The headlight switch is in the 


or  

position.

• The headlight switch lever is in the 

low beam position.

• The automatic High Beam switch 

is on.

2

Press the engine switch to ON.

3

Within 60 seconds after perform-
ing step 2, push the headlight 
switch lever to the high beam 
position then pull it to the original 

position quickly 10 times, then 
leave the lever in its original posi-
tion.

Changing to the high 
beams

Push the lever forward.

The Automatic High Beam indicator 
will turn off and the high beam indi-
cator will turn on.

Pull the lever to its original position 
to enable the Automatic High Beam 
system again.

Changing to the low beams

Press the Automatic High Beam 
switch.

The Automatic High Beam indicator 
will turn off.

Press the switch to enable the 
Automatic High Beam system 
again.

Turning the high beams 
on/off manually

172

4-3. Operating the lights and wipers

Temporarily changing to 

the low beams

It is recommended to switch to 

the low beams when use of the 

high beams is inappropriate or 

when the high beams may 

cause problems or distress to 

other drivers or pedestrians 

nearby.
Pull the lever rearward and then 

return it to its original position.

The high beams will illuminate 

while the lever is pulled, however, 

after the lever is returned to its orig-

inal position, the low beams will 

remain on for a certain amount of 

time. After this, the Automatic High 

Beam system will operate.

Operating the 

 lever oper-

ates the wipers or washer as fol-

lows.

1

 (U.S.A.) or 

 (Canada)

Intermittent windshield wiper 

operation

2

 (U.S.A.) or 

 (Canada)

Low speed windshield wiper 

Windshield wipers and 

washer

Operating the lever can use 

the windshield wipers or the 

washer.

NOTICE

When the windshield is dry

Do not use the wipers, as they 

may damage the windshield.

Operating the wiper lever

173

4-3. Operating the lights and wipers

4

Dr

iv

ing

operation

3

 (U.S.A.) or 

 (Canada)

High speed windshield wiper 

operation

4

 (U.S.A.) or 

 (Canada)

Temporary operation

5

 Washer/wiper dual 

operation

Pulling the lever operates the wip-

ers and washer.
Wipers will automatically operate a 

couple of times after the washer 

squirts.

Interval adjustment type only:

Wiper intervals can be adjusted 

when intermittent operation is 

selected.

6

Increases the intermittent 

windshield wiper frequency

7

Decreases the intermittent 

windshield wiper frequency

The windshield wiper and 

washer can be operated when

The engine switch is in ON.

If no windshield washer fluid 

sprays

Check that the washer nozzles are 

not blocked if there is washer fluid in 

the windshield washer fluid reser-

voir.

When stopping the engine in an 

emergency while driving

If the windshield wipers are operat-

ing when the engine is stopped, the 

windshield wipers will operate in 

high speed operation. After the vehi-

cle is stopped, operation will return 

to normal when the engine switch is 

turned to ON.

WARNING

Caution regarding the use of 

washer fluid

When it is cold, do not use the 

washer fluid until the windshield 

becomes warm. The fluid may 

freeze on the windshield and 

cause low visibility. This may lead 

to an accident, resulting in death 

or serious injury.

NOTICE

When the washer fluid tank is 

empty

Do not operate the switch continu-

ally as the washer fluid pump may 

overheat.

When a nozzle becomes 

blocked

In this case, contact your Toyota 

dealer.Do not try to clear it with a 

pin or other object. The nozzle will 

be damaged.

174

4-4. Refueling

4-4.Refueling

Turn the engine switch off and 

ensure that all the doors and 

windows are closed.

Confirm the type of fuel.

Fuel types

P.393

Fuel tank opening for unleaded 

gasoline

To help prevent incorrect fueling, 

your vehicle has a fuel tank opening 

that only accommodates the spe-

cial nozzle on unleaded fuel pumps.

If the malfunction indicator 

lamp illuminates

The malfunction indicator lamp may 

illuminate erroneously if refueling is 

performed repeatedly when the fuel 

tank is nearly full.

Opening the fuel tank 

cap

Perform the following steps 

to open the fuel tank cap:

Before refueling the vehi-

cle

WARNING

When refueling the vehicle

Observe the following precautions 

while refueling the vehicle. Failure 

to do so may result in death or 

serious injury.

After exiting the vehicle and 

before opening the fuel door, 

touch an unpainted metal sur-

face to discharge any static 

electricity. It is important to dis-

charge static electricity before 

refueling because sparks result-

ing from static electricity can 

cause fuel vapors to ignite while 

refueling.

Always hold the grips on the 

fuel tank cap and turn it slowly 

to remove it.

A whooshing sound may be 

heard when the fuel tank cap is 

loosened. Wait until the sound 

cannot be heard before fully 

removing the cap. In hot 

weather, pressurized fuel may 

spray out the filler neck and 

cause injury.

Do not allow anyone that has 

not discharged static electricity 

from their body to come close to 

an open fuel tank.

Do not inhale vaporized fuel.

Fuel contains substances that 

are harmful if inhaled.

Do not smoke while refueling 

the vehicle.

Doing so may cause the fuel to 

ignite and cause a fire.

Do not return to the vehicle or 

touch any person or object that 

is statically charged.

This may cause static electricity 

to build up, resulting in a possi-

ble ignition hazard.

When refueling

Observe the following precautions 

to prevent fuel overflowing from 

the fuel tank:

Securely insert the fuel nozzle 

into the fuel filler neck.

Stop filling the tank after the fuel 

nozzle automatically clicks off.

175

4-4. Refueling

4

Dr

iv

ing

1

Pull up the opener to open 

the fuel filler door.

2

Turn the fuel tank cap slowly 

and remove it, then hang it 

on the back of the fuel filler 

door.

After refueling, turn the fuel tank 

cap until you hear a click. Once 

the cap is released, it will turn 

slightly in the opposite direction.

WARNING

Do not top off the fuel tank.

NOTICE

Refueling

Do not spill fuel during refueling.

Doing so may damage the vehi-

cle, such as causing the emission 

control system to operate abnor-

mally or damaging fuel system 

components or the vehicle’s 

painted surface.

Opening the fuel tank cap

Closing the fuel tank cap

WARNING

When replacing the fuel tank 

cap

Do not use anything but a genu-

ine Toyota fuel tank cap designed 

for your vehicle. Doing so may 

cause a fire or other incident 

which may result in death or seri-

ous injury.

176

4-5. Using the driving support systems

4-5.Using the driving support systems

*

: If equipped

This Owner's Manual contains 

information for Ver. 1 For the lat-

est information about the con-

trols, use, warnings/precautions, 

etc. of each function of Toyota 

Safety Sense, refer to the Digital 

Owner's Manual at the Owner's 

Manual website.
If the software of this system 

has been updated after initial 

purchase of the vehicle, before 

using this system, be sure to 

read the Owner's Manual which 

corresponds to the software ver-

sion of the system.

Precautions for use

Be aware that some functions 

may temporarily be disabled if a 

legal or safety related issue 

occurs.

If a connected services contract 

has not been entered or has 

expired, software updates will not 

be able to be performed wire-

lessly.

If the software of this system 

has been updated after initial 

purchase of the vehicle, to 

access the appropriate Owner’s 

Manual, it is necessary to check 

the software version of the sys-

tem and then visit the Owner's 

Manual website.

The software version of the sys-

tem can be checked using Toy-

ota app.

Toyota Safety Sense 
3.0 software update

*

It is necessary to enter a 

connected services con-

tract, provided by Toyota, to 

use these functions. For 

details, contact your Toyota 

dealer.

WARNING

For safe use

When the Toyota Safety Sense 

3.0 software is updated, the oper-

ating methods of functions may 

change. Using this system without 

knowing the correct operating 

methods may lead to an accident 

resulting in death or serious injury.

Make sure to read the Digital 

Owner's Manual which corre-

sponds to the software version 

of the system, available at the 

Owner's Manual website, before 

using this system.

Content of the Toyota 

Safety Sense Owner's 

Manual

Checking your vehicle’s 

Toyota Safety Sense ver-

sion

Checking the version 

using Toyota app

177

4-5. Using the driving support systems

4

Dr
iv

ing

1

Access the following URL 
using a computer or smart-
phone:

For the U.S.A. owners

https://www.toyota.com/owners/
resources/
warranty-owners-manuals/
manual?om=
om02684u.corolla.2024.2309.cv.vh

For Canadian owners

https://www.toyota.ca/toyota/
owners/manual?om=
om02684u.corolla.2024.2309.cv.vh

2

Select the file which includes 
the previously checked sys-
tem version.

If a software update is available, 
a notification will be displayed 
by Toyota app. Follow the 
instructions displayed on the 
screen.

Software update precautions

After a software update has been 
performed, it will not be possible 
to revert to a previous version.

Depending on the communication 
environment and the content of an 
update, a software update may 
take several hours. Although an 
update will be suspended when 
the engine switch is turned off, it 
will resume when the engine 
switch is changed back to ON 
mode.

Toyota Safety Sense can still be 
used while a software update is 
being performed.

What can be checked using the 
Toyota app

The following items can be checked 
or performed.

Software version, update details, 
precautions, use methods, etc.

Software update

Selecting your vehicle’s 
Toyota Safety Sense ver-
sion

Updating the software

178

4-5. Using the driving support systems

Toyota Safety Sense 

3.0

The Toyota Safety Sense 3.0 

consists of the driving 

assist systems and contrib-

utes to a safe and comfort-

able driving experience:

WARNING

Toyota Safety Sense 3.0

The Toyota Safety Sense 3.0 

operates under the assumption 

that the driver will drive safely, 

and is designed to help reduce 

the impact to the occupants in a 

collision and assist the driver 

under normal driving conditions.

As there is a limit to the degree of 

recognition accuracy and control 

performance that this system can 

provide, do not overly rely on this 

system. The driver is solely 

responsible for paying attention to 

the vehicle’s surroundings and 

driving safely.

For safe use

Do not overly rely on this sys-

tem. The driver is solely respon-

sible for paying attention to the 

vehicle’s surroundings and driv-

ing safely. This system may not 

operate in all situations and pro-

vided assistance is limited. 

Over-reliance on this system to 

drive the vehicle safely may 

lead to an accident resulting in 

death or serious injury.

Do not attempt to test the oper-

ation of the system, as it may 

not operate properly, possibly 

leading to an accident.

If attention is necessary while 

performing driving operations or 

a system malfunction occurs, a 

warning message or warning 

buzzer will be operated. If a 

warning message is displayed 

on the display, follow the 

instructions displayed.

Depending on external noise, 

the volume of the audio system, 

etc. it may be difficult to hear the 

warning buzzer. Also, depend-

ing on the road conditions, it 

may be difficult to recognize the 

operation of the system.

When it is necessary to dis-

able the system

In the following situations, make 

sure to disable the system.
Failure to do so may lead to the 

system not operating properly, 

possibly leading to an accident 

resulting in death or serious injury.

When the vehicle is tilted due to 

being overloaded or having a 

flat tire

When driving at extremely high 

speeds

When towing another vehicle

When the vehicle is being trans-

ported by a truck, ship, train, 

etc.

When the vehicle is raised on a 

lift and the tires are allowed to 

rotate freely

When inspecting the vehicle 

using a drum tester such as a 

chassis dynamometer or speed-

ometer tester, or when using an 

on vehicle wheel balancer

When the vehicle is driven in a 

sporty manner or off-road

When using an automatic car 

wash

179

4-5. Using the driving support systems

4

Dr

iv

ing

PCS (Pre-Collision System)

P.184

LTA (Lane Tracing Assist)

P.195

LDA (Lane Departure Alert)

P.200

AHB (Automatic High 

Beam)

P.169

PDA (Proactive driving 

assist)

P.205

RSA (Road Sign Assist)

*

P.211

*

: If equipped

Dynamic radar cruise con-

trol

P.213

Cruise control

P.221

Emergency Driving Stop 

System

P.224

Various sensors are used to 

obtain the necessary informa-

tion for system operation.

Sensors which detect the 

surrounding conditions

Front radar sensor
Front camera

WARNING

When a sensor is misaligned or 

deformed due to a strong 

impact being applied to the sen-

sor or the area around the sen-

sor

When accessories which 

obstruct a sensor or light are 

temporarily installed to the vehi-

cle

When a compact spare tire or 

tire chains are installed to the 

vehicle or an emergency tire 

puncture repair kit has been 

used

When the tires are excessively 

worn or the inflation pressure of 

the tires is low

When tires other than the manu-

facturer specified size are 

installed

When the vehicle cannot be 

driven stably, due to a collision, 

malfunction, etc.

Driving assist system

Sensors used by Toyota 

Safety Sense 3.0

180

4-5. Using the driving support systems

WARNING

To prevent malfunction of the 

radar sensors

Observe the following precau-

tions. Failure to do so may lead to 

a radar sensor not operating prop-

erly, possibly leading to an acci-

dent resulting in death or serious 

injury.

Keep the radar sensors and 

radar sensor covers clean at all 

times.

Clean the front of a radar sensor 

or the front or back of a radar sen-

sor cover if it is dirty or covered 

with water droplets, snow, etc.
When cleaning the radar sensor 

and radar sensor cover, use a soft 

cloth to remove dirt so as to not 

damage them.

Type A

Type B

Radar sensor
Radar sensor cover

Do not attach accessories, 

stickers (including transparent 

stickers), aluminum tape, etc. to 

a radar sensor or radar sensor 

cover and their surrounding 

area.

Do not subject a radar sensor or 

its surrounding area to impact.

If a radar sensor, the front grille, 

or front bumper has been sub-

jected to a impact, have the 

vehicle inspected by your Toy-

ota dealer.

Do not disassemble the radar 

sensors.

Do not modify or paint the radar 

sensors or radar sensor cover, 

or replace them with anything 

other than Toyota genuine parts.

In the following situations, recal-

ibration of the radar sensors will 

be necessary. For details, con-

tact your Toyota dealer.

• When a radar sensor is 

removed and installed, or 

replaced

• When the front bumper or the 

front grille has been replaced

To prevent malfunction of the 

front camera

Observe the following precau-

tions.

Failure to do so may lead to the 

front camera not operating prop-

erly, possibly leading to an acci-

dent resulting in death or serious 

injury.

Always keep the windshield 

clean.

• If the windshield is dirty or cov-

ered with an oily film, water 

droplets, snow, etc., clean the 

windshield.

181

4-5. Using the driving support systems

4

Dr

iv

ing

WARNING

• Even if a glass coating agent is 

applied to the windshield, it will 

still be necessary to use the 

windshield wipers to remove 

water droplets, etc. from the 

area of the windshield in front of 

the front camera.

• If the inner side of the wind-

shield where the front camera is 

installed is dirty, contact your 

Toyota dealer.

Do not attach stickers (including 

transparent stickers) or other 

items to the area of the wind-

shield in front of the front cam-

era (shaded area in the 

illustration).

Approximately 1.6 in. (4 cm)

If the part of the windshield in 

front of the front camera is 

fogged up or covered with con-

densation or ice, use the wind-

shield defogger to remove the 

fog, condensation, or ice.

If water droplets cannot be 

properly removed from the area 

of the windshield in front of the 

front camera by the windshield 

wipers, replace the wiper insert 

or wiper blade.

Do not attach window tint to the 

windshield.

Replace the windshield if it is 

damaged or cracked.

If the windshield has been 

replaced, recalibration of the 

front camera will be necessary. 

For details, contact your Toyota 

dealer.

Do not allow liquids to contact 

the front camera.

Do not allow bright lights to 

shine into the front camera.

Do not damage the lens of the 

front camera or allow it to 

become dirty.

When cleaning the inside of the 

windshield, do not allow glass 

cleaner to contact the lens of 

the front camera. Do not touch 

the lens of the front camera.

If the lens of the front camera is 

dirty or damaged, contact your 

Toyota dealer.

Do not subject the front camera 

to a strong impact.

Do not change the position or 

orientation of the front camera 

or remove it.

Do not disassemble the front 

camera.

Do not modify any parts around 

the front camera, such as the 

inside rear view mirror or ceil-

ing.

Do not attach accessories 

which may obstruct the front 

camera to the hood, front grille, 

or front bumper. For details, 

contact your Toyota dealer.

If a surfboard or other long 

object is to be mounted on the 

roof, make sure that it will not 

obstruct the front camera.

Do not modify or change the 

headlights and other lights.

182

4-5. Using the driving support systems

Situations in which the sensors 

may not operate properly

When the height or inclination of 

the vehicle has been changed due 

to modifications

When the windshield is dirty, 

fogged up, cracked or damaged

When the ambient temperature is 

high or low

When mud, water, snow, dead 

insects, foreign matter, etc., is 

attached to the front of the sensor

When in inclement weather such 

as heavy rain, fog, snow, or a 

sandstorm

When water, snow, dust, etc. is 

thrown up in front of the vehicle, or 

when driving through mist or 

smoke

When the headlights are not illu-

minated while driving in the dark, 

such as at night or when in a tun-

nel

When the lens of a headlight is 

dirty and illumination is weak

When the headlights are mis-

aligned

When a headlight is malfunction-

ing

When the headlights of another 

vehicle, sunlight, or reflected light 

shines directly into the front cam-

era

When the brightness of the sur-

rounding area changes suddenly

When driving near a TV tower, 

broadcasting station, electric 

power plant, radar equipped vehi-

cles, etc., or other location where 

strong radio waves or electrical 

noise may be present

When a wiper blade is blocking 

the front camera

When in a location or near objects 

which strongly reflect radio waves, 

such as the following:

• Tunnels

• Truss bridges

• Gravel roads

• Rutted, snow-covered roads

• Walls

• Large trucks

• Manhole covers

• Guardrail

• Metal plates

When near a step or protrusion

When a detectable vehicle is nar-

row, such as a small mobility vehi-

cle

When a detectable vehicle has a 

small front or rear end, such as an 

unloaded truck

When a detectable vehicle has a 

low front or rear end, such as a 

low bed trailer

When a detectable vehicle has 

extremely high ground clearance

WARNING

Front camera installation area 

on the windshield

If the system determines that the 

windshield may be fogged up, it 

will automatically operate the 

heater to defog the part of the 

windshield around the front cam-

era. When cleaning, etc., be care-

ful not to touch the area around 

the front camera until the wind-

shield has cooled sufficiently, as 

touching it may cause burns.

183

4-5. Using the driving support systems

4

Dr
iv

ing

When a detectable vehicle is car-
rying a load which protrudes from 
its cargo area

When a detectable vehicle has lit-
tle exposed metal, such as a vehi-
cle which is partially covered with 
cloth, etc.

When a detectable vehicle is 
irregularly shaped, such as a trac-
tor, sidecar, etc.

When the distance between the 
vehicle and a detectable vehicle 
has become extremely short

When a detectable vehicle is at an 
angle

When snow, mud, etc. is attached 
to a detectable vehicle

When driving on the following 
kinds of roads:

• Roads with sharp curves or wind-

ing roads

• Roads with changes in grade, 

such as sudden inclines or 
declines

• Roads which is sloped to the left 

or right

• Roads with deep ruts
• Roads which are rough and 

unmaintained

• Roads which frequently undulate 

or are bumpy

When the steering wheel is being 
operated frequently or suddenly

When the vehicle is not in a con-
stant position within a lane

When parts related to this system, 
the brakes, etc. are cold or 
extremely hot, wet, etc.

When the wheels are misaligned

When driving on slick road sur-

faces, such as when it is covered 
with ice, snow, gravel, etc.

When the course of the vehicle 
differs from the shape of a curve

When the vehicle speed is exces-
sively high when entering a curve

When entering/exiting a parking 
lot, garage, car elevator, etc.

When driving in a parking lot

When driving through an area 
where there are obstructions 
which may contact your vehicle, 
such as tall grass, tree branches, 
a curtain, etc.

When driving in strong wind

Situations in which the lane 
may not be detected

When the lane is extremely wide 
or narrow

Immediately after changing lanes 
or passing through an intersection

When driving in a temporary lane 
or lane regulated by construction

When there are structures, pat-
terns, shadows which are similar 
to lane lines in the surrounding

When the lane lines are not clear 
or driving on a wet road surface

When a lane line is on a curb

When driving on a bright, reflec-
tive road surface, such as con-
crete

Situations in which some or all 
of the functions of the system 
cannot operate

When a malfunction is detected in 
this system or a related system, 
such as the brakes, steering, etc.

When the VSC, TRAC, or other 
safety related system is operating

When the VSC, TRAC, or other 
safety related system is off

Changes in brake operation 
sound and pedal response

When the brakes have been oper-
ated, brake operation sounds may 

184

4-5. Using the driving support systems

be heard and the brake pedal 
response may change, but this 
does not indicate a malfunction.

When the system is operating, the 
brake pedal may feel stiffer than 
expected or sink. In either situa-
tion the brake pedal can be 
depressed further. Further 
depress the brake pedal as nec-
essary.

PCS (Pre-Collision Sys-

tem)

The pre-collision system 
uses sensors to detect 
objects (

P.185) in the path 

of the vehicle. When the 
system determines that the 
possibility of a frontal colli-
sion with a detectable 
object is high, a warning 
operates to urge the driver 
to take evasive action and 
the potential brake pressure 
is increased to help the 
driver avoid the collision. If 
the system determines that 
the possibility of a collision 
is extremely high, the 
brakes are automatically 
applied to help avoid the 
collision or help reduce the 
impact of the collision.

The pre-collision system 
can be disabled/enabled 
and the warning timing can 
be changed. (

P.194)

185

4-5. Using the driving support systems

4

Dr

iv

ing

The system can detect the fol-

lowing as detectable objects. 

(Detectable objects differ 

depending on the function.)

Vehicles

Bicycles

*

Pedestrians

Motorcycles

*

*

: Detected as a detectable object 

only when being ridden.

Pre-collision warning

When the system determines 

that the possibility of a collision 

is high, a buzzer will sound and 

an icon and warning message 

will be displayed on the 

multi-information display to urge 

the driver to take evasive action.
If the detectable object is a vehi-

cle, moderate braking will be 

performed with the warning.

If the system determines that 

the accelerator pedal is strongly 

depressed, the following icon 

and message will be displayed 

on the multi-information display.

WARNING

For safe use

Driving safely is solely the 

responsibility of the driver. Pay 

careful attention to the sur-

rounding conditions in order to 

ensure safe driving.

Never use the pre-collision sys-

tem in place of normal braking 

operations. This system cannot 

help avoid or reduce the impact 

of a collision in every situation. 

Over-reliance on this system to 

drive the vehicle safely may 

lead to an accident resulting in 

death or serious injury.

Although the pre-collision sys-

tem is designed to help avoid or 

help reduce the impact of a col-

lision, its effectiveness may 

change according to various 

conditions. Therefore, it may not 

always be able to achieve the 

same level of performance.

Read the following items care-

fully. Do not overly rely on this 

system and always drive care-

fully.

For safe use: 

P.178

When to disable the pre-colli-

sion system

When it is necessary to disable 

the system: 

P.178

Detectable objects

System functions

186

4-5. Using the driving support systems

Pre-collision brake assist

If the system determines that 
the possibility of a collision is 
high and the brake operation by 
the driver is insufficient, the 
braking power will be increased.

Pre-collision brake control

If the system determines that 
the possibility of a collision is 
extremely high, the brakes are 
automatically applied to help 
avoid the collision or reduce the 
impact of the collision.

Emergency steering assist

If the system determines that 
the following conditions are met, 
assistance will be provided to 
help enhance vehicle stability 
and prevent lane departure. 
During assistance, in addition to 
the pre-collision warning, the fol-
lowing icon will be displayed on 
the multi-information display.

The possibility of a collision is 
high

There is sufficient space 
within the lane to perform 
evasive steering maneuvers

The driver is operating the 
steering wheel

During assistance, the pre-colli-
sion warning will operate and a 
message will be displayed to 
warn the driver.

Intersection collision avoid-
ance support (left/right 
turn)

In situations such as the follow-
ing, if the system determines 
that the possibility of a collision 
is high, the pre-collision warning 
and pre-collision braking will 
operate.

Depending on the intersection, 
assistance may not operate cor-
rectly.

When turning left/right at an 
intersection and crossing the 
path of an oncoming vehicle

When turning left/right and an 
oncoming pedestrian or bicy-
cle is detected

187

4-5. Using the driving support systems

4

Dr

iv

ing

Intersection collision avoid-

ance support (crossing 

vehicles)

At an intersection, etc., if the 

system determines that the pos-

sibility of a collision with an 

approaching vehicle or motorcy-

cle is high, the pre-collision 

warning and pre-collision brak-

ing will operate.

Depending on the intersection, 

assistance may not operate cor-

rectly.

Acceleration Suppression 

at Low Speed

When driving at a low speed, if 

the accelerator pedal is strongly 

depressed and the system 

determines that there is a possi-

bility of a collision, engine output 

will be restrained or the brakes 

will be applied weakly to restrict 

acceleration. During operation, 

a buzzer will sound and a warn-

ing indicator and message will 

be displayed on the multi-infor-

mation display.

WARNING

Pre-collision braking

When the pre-collision braking 

function is operating, a large 

amount of braking force will be 

applied.

The pre-collision braking func-

tion is not designed to hold the 

vehicle stopped. If the vehicle is 

stopped by pre-collision brake 

control, the driver should oper-

ate the brakes immediately as 

necessary.

The pre-collision braking func-

tion may not operate if certain 

operations are performed by the 

driver. If the accelerator pedal is 

being depressed strongly or the 

steering wheel is being turned, 

the system may determine that 

the driver is taking evasive 

action and possibly prevent the 

pre-collision braking function 

from operating.

If the brake pedal is being 

depressed, the system may 

determine that the driver is tak-

ing evasive action and possibly 

delay the operation timing of the 

pre-collision brake control.

188

4-5. Using the driving support systems

WARNING

Acceleration Suppression at 

Low Speed

If the steering wheel is being 

turned, the system may determine 

that the driver is taking evasive 

action and possibly prevent the 

Acceleration Suppression at Low 

Speed function from operating.

Emergency steering assist

The emergency steering assist 

will be canceled when the sys-

tem determines that lane depar-

ture prevention control has 

completed.

Depending on operations per-

formed by the driver, emer-

gency steering assist may not 

operate or operation may be 

canceled.

• If the accelerator pedal is 

depressed strongly, the steering 

wheel is turned heavily, the 

brake pedal is depressed, or the 

turn signal lever is operated, the 

system may determine that the 

driver is taking evasive action 

and the emergency steering 

assist may not operate.

• While the emergency steering 

assist is operating, if the accel-

erator pedal is depressed 

strongly, the steering wheel is 

turned heavily, or the brake 

pedal is depressed, the system 

may determine that the driver is 

taking evasive action and emer-

gency steering assist operation 

may be canceled.

• While the emergency steering 

assist is operating, if the steer-

ing wheel is held or turned in the 

opposite direction of system 

operation, emergency steering 

assist operation will be can-

celed.

189

4-5. Using the driving support systems

4

Dr
iv

ing

Operating conditions of each function of the pre-collision system

The pre-collision system is enabled and the system determines that the pos-
sibility of a frontal collision with a detected object is high.

However, the system will not operate in the following situations:

When the vehicle has not been driven a certain amount after a terminal of 
the battery has been disconnected and reconnected

When the shift lever is in R

When the VSC OFF indicator is illuminated (only the pre-collision warning 
function will be operational)

The following are the operational speeds and cancelation conditions of each 
function:

Pre-collision warning

While the pre-collision warning is operating, if the steering wheel is operated 
heavily or suddenly, the pre-collision warning may be cancelled.

Pre-collision brake assist

Detectable objects

Vehicle speed

Relative speed between 

your vehicle and object

Preceding vehicles, 
stopped vehicles

Approximately 3 to 110 
mph (5 to 180 km/h)

Approximately 3 to 110 
mph (5 to 180 km/h)

Oncoming vehicles

Approximately 20 to 110 
mph (30 to 180 km/h)

Approximately 50 to 130 
mph (80 to 220 km/h)

Bicycles

Approximately 3 to 50 
mph (5 to 80 km/h)

Approximately 3 to 50 
mph (5 to 80 km/h)

Pedestrians

Approximately 3 to 50 
mph (5 to 80 km/h)

Approximately 3 to 50 
mph (5 to 80 km/h)

Preceding motorcycles, 
stopped motorcycles

Approximately 3 to 110 
mph (5 to 180 km/h)

Approximately 3 to 50 
mph (5 to 80 km/h)

Oncoming motorcycles

Approximately 20 to 110 
mph (30 to 180 km/h)

Approximately 20 to 110 
mph (30 to 180 km/h)

Detectable objects

Vehicle speed

Relative speed between 

your vehicle and object

Preceding vehicles, 
stopped vehicles

Approximately 20 to 110 
mph (30 to 180 km/h)

Approximately 7 to 110 
mph (10 to 180 km/h)

Bicycles

Approximately 20 to 50 
mph (30 to 80 km/h)

Approximately 20 to 50 
mph (30 to 80 km/h)

190

4-5. Using the driving support systems

Pre-collision braking

If either of the following occur while the pre-collision braking function is oper-
ating, it will be canceled:

• The accelerator pedal is strongly depressed

• The steering wheel is operated heavily or suddenly

Emergency steering assist

The emergency steering assist will not operate when the turn signal lights 
are flashing.

The emergency steering assist will not operate when the VSC OFF indicator 
is illuminated.

Pedestrians

Approximately 20 to 50 
mph (30 to 80 km/h)

Approximately 20 to 50 
mph (30 to 80 km/h)

Preceding motorcycles, 
stopped motorcycles

Approximately 20 to 110 
mph (30 to 180 km/h)

Approximately 7 to 50 
mph (10 to 80 km/h)

Detectable objects

Vehicle speed

Relative speed between 

your vehicle and object

Preceding vehicles, 
stopped vehicles

Approximately 3 to 110 
mph (5 to 180 km/h)

Approximately 3 to 110 
mph (5 to 180 km/h)

Oncoming vehicles

Approximately 20 to 110 
mph (30 to 180 km/h)

Approximately 50 to 130 
mph (80 to 220 km/h)

Bicycles

Approximately 3 to 50 
mph (5 to 80 km/h)

Approximately 3 to 50 
mph (5 to 80 km/h)

Pedestrians

Approximately 3 to 50 
mph (5 to 80 km/h)

Approximately 3 to 50 
mph (5 to 80 km/h)

Preceding motorcycles, 
stopped motorcycles

Approximately 3 to 110 
mph (5 to 180 km/h)

Approximately 3 to 50 
mph (5 to 80 km/h)

Oncoming motorcycles

Approximately 20 to 110 
mph (30 to 180 km/h)

Approximately 20 to 110 
mph (30 to 180 km/h)

Detectable objects

Vehicle speed

Relative speed between 

your vehicle and object

Preceding vehicles, 
stopped vehicles, bicy-
cles, pedestrians, 
motorcycles

Approximately 25 to 50 
mph (40 to 80 km/h)
Active steering func-

tion: 

*

 to 50 mph (

*

 to 80 

km/h)

Approximately 25 to 50 
mph (40 to 80 km/h)
Active steering func-

tion: 

*

 to 50 mph (

*

 to 80 

km/h)

Detectable objects

Vehicle speed

Relative speed between 

your vehicle and object

191

4-5. Using the driving support systems

4

Dr
iv

ing

*

: Minimum vehicle speed: Vehicle speed at which evasion using pre-colli-

sion brake control is difficult

While the emergency steering assist is operating, if any of the following are 
performed, emergency steering assist operation may be cancelled:

• The accelerator pedal is strongly depressed

• The steering wheel is operated heavily or suddenly

• The brake pedal is depressed

Intersection collision avoidance support (left/right turn)

The intersection collision avoidance support (for left/right turning vehicles) 
will not operate when the turn signal lights are not flashing.

Intersection collision avoidance support (crossing vehicles)

Detectable 
objects

Vehicle speed

Oncoming vehicle 
speed

Relative speed 
between your 
vehicle and object

Oncoming vehi-
cles

Approximately 3 
to 25 mph (5 to 
40 km/h)

Approximately 3 
to 45 mph (5 to 
75 km/h)

Approximately 7 
to 70 mph (10 to 
115 km/h)

Pedestrians

Approximately 3 
to 20 mph (5 to 
30 km/h)

Approximately 3 
to 25 mph (5 to 
40 km/h)

Bicycles

Approximately 3 
to 20 mph (5 to 
30 km/h)

Approximately 3 
to 30 mph (5 to 
50 km/h)

Oncoming motor-
cycles

Approximately 3 
to 25 mph (5 to 
40 km/h)

Approximately 3 
to 45 mph (5 to 
75 km/h)

Approximately 7 
to 70 mph (10 to 
115 km/h)

Detectable 
objects

Vehicle speed

Crossing vehicle 
speed

Relative speed 
between your 
vehicle and object

Vehicles (side)

Approximately 3 
to 38 mph (5 to 
60 km/h)

• Your vehicle 

speed or less

• Approximately 

25 mph (40 
km/h) or less

Approximately 3 
to 38 mph (5 to 
60 km/h)

Motorcycles 
(side)

Approximately 3 
to 38 mph (5 to 
60 km/h)

• Your vehicle 

speed or less

• Approximately 

25 mph (40 
km/h) or less

Approximately 3 
to 38 mph (5 to 
60 km/h)

192

4-5. Using the driving support systems

Acceleration Suppression at Low Speed

The Acceleration Suppression at Low Speed function will not operate when 
the turn signal lights are flashing.

While the Acceleration Suppression at Low Speed function is operating, if 
any of the following are performed, the low speed sudden acceleration sup-
pression function operation will be cancelled:

• The accelerator pedal is released.

• The steering wheel is operated heavily or suddenly

Detection of detectable objects

Objects are detected based on their 
size, shape, and movement.
Depending on the ambient bright-
ness, movement, posture and direc-
tion of a detectable object, it may 
not be detected and the system may 
not operate properly.
The system detects shapes, such as 
the following, as detectable objects.

Situations in which the system 
may operate even though the 
possibility of a collision is not 
high

In certain situations, such as the 
following, the system may deter-
mine that the possibility of a colli-
sion is high and operate:

• When passing a detectable object
• When changing lanes while over-

taking a detectable object

• When suddenly approaching a 

detectable object

• When approaching a detectable 

object or other object on the road-
side, such as guardrails, utility 
poles, trees, walls, etc.

• When there is a detectable object 

or other object by the roadside at 
the entrance of a curve

• When there are patterns or a 

painting ahead of the vehicle that 
may be mistaken for a detectable 
object

• When passing a detectable object 

that is changing lanes or turning 
left/right

Detectable objects

Vehicle speed

Relative speed between 
your vehicle and object

Preceding vehicles, 
stopped vehicles

Approximately 0 to 9 
mph (0 to 15 km/h)

Approximately 0 to 9 
mph (0 to 15 km/h)

Pedestrians

Approximately 0 to 9 
mph (0 to 15 km/h)

Approximately 0 to 9 
mph (0 to 15 km/h)

Bicycles

Approximately 0 to 9 
mph (0 to 15 km/h)

Approximately 0 to 9 
mph (0 to 15 km/h)


Content      ..     4      5      6      7     ..