Toyota Corolla (2024 year). Manual in english - page 3
 

  Index      Toyota     Toyota Corolla (2024 year). Manual in english


Search            copyright infringement  


Content      ..     1      2      3      4      ..


Toyota Corolla (2024 year). Manual in english - page 3


65

1-2. Child safety

1

For safety and secu

rity

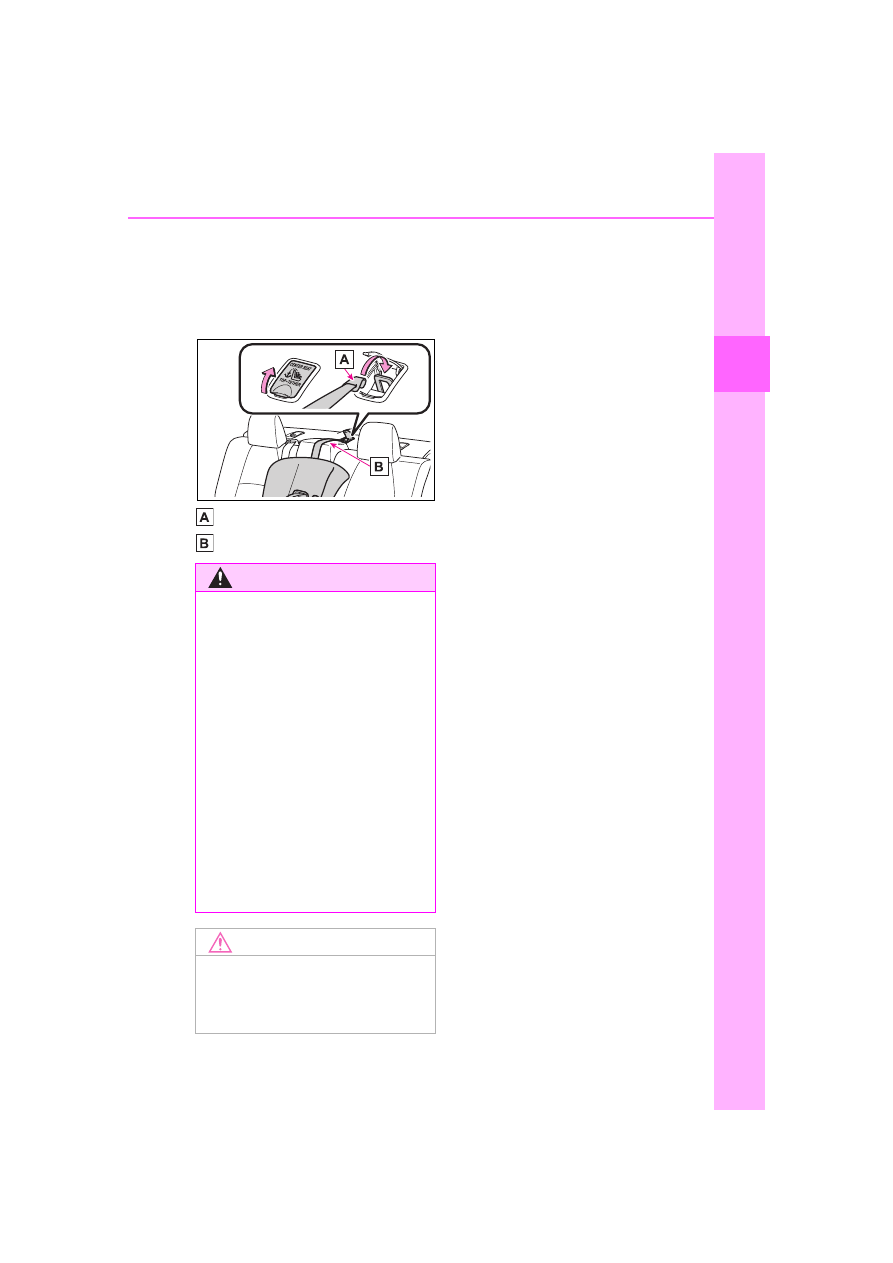
tether anchorage and tighten 

the top strap.

Make sure the top strap is securely 

latched.  (

P.58)

Hook
Top strap

WARNING

When installing a child 

restraint system

Observe the following precau-

tions. 

Failure to do so may result in 

death or serious injury.

Firmly attach the top strap and 

make sure that the belt is not 

twisted.

Do not attach the top strap to 

anything other than the top 

tether anchorages.

After securing a child restraint 

system, never adjust the seat.

Follow all installation instruc-

tions provided by the child 

restraint system manufacturer.

NOTICE

Top tether anchorages

When not in use, make certain to 

close the lid. If it remains open, 

the lid may be damaged.
66

1-3. Emergency assistance

1-3.Emergency assistance

*

: If equipped

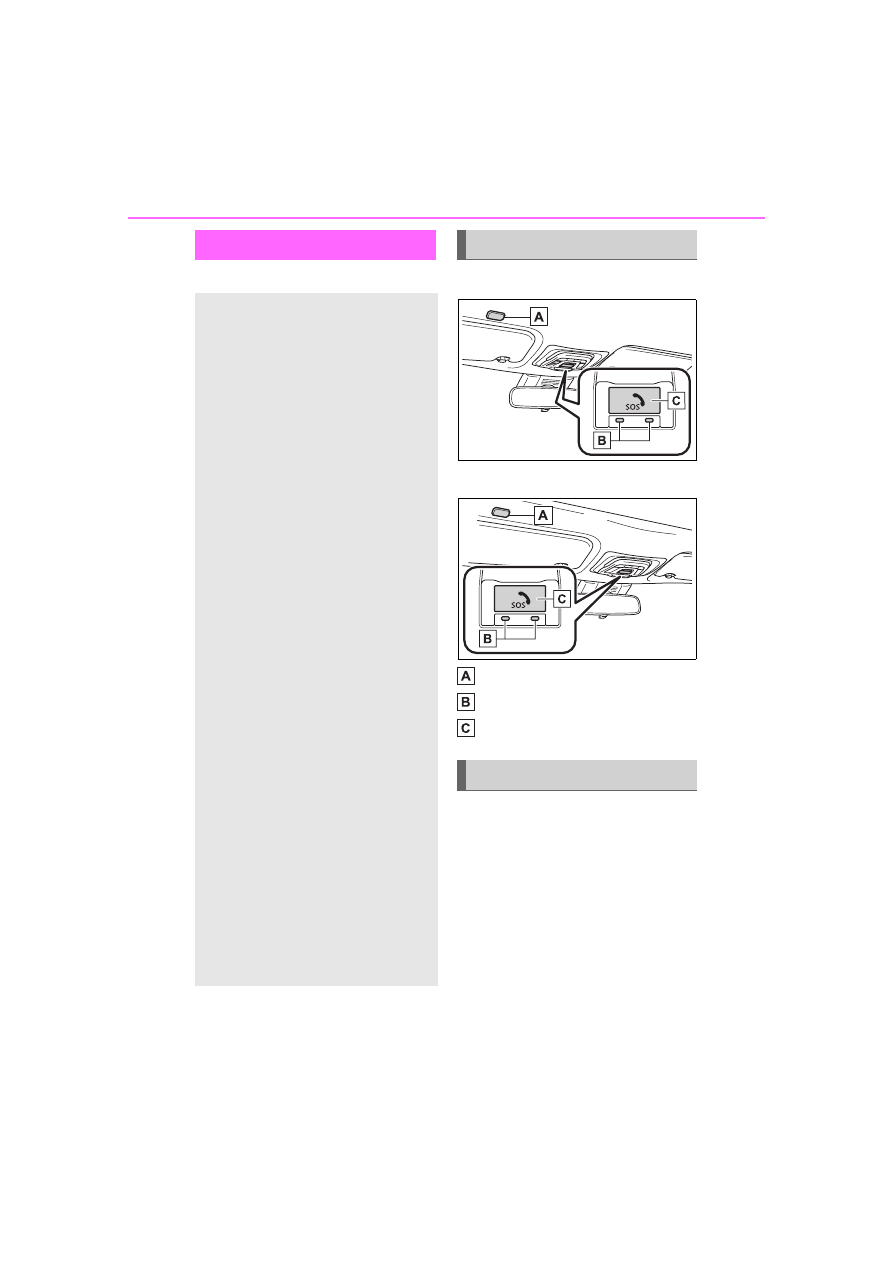
Type A

Type B

Microphone (driver’s side)

LED light indicators

“SOS” button

Subscribers have the following 
Safety Connect services avail-
able:

Automatic Collision Notifica-

tion

*

Helps drivers receive necessary 
response from emergency service 
providers. (

P.68)

*

: U.S. Patent No. 7,508,298 B2

Stolen Vehicle Location

Safety Connect

*

Safety Connect is a sub-
scription-based telematics 
service that uses Global 
Positioning System (GPS) 
data and embedded cellular 
technology to provide 
safety and security features 
to subscribers. Safety Con-
nect is supported by Toy-
ota’s designated response 
center, which operates 24 
hours per day, 7 days per 
week.

Safety Connect service is 
available by subscription on 
select, telematics hard-
ware-equipped vehicles.

By using the Safety Connect 
service, you are agreeing to 
be bound by the Telematics 
Subscription Service Agree-
ment and its Terms and 
Conditions, as in effect and 
amended from time to time, 
a current copy of which is 
available at Toyota.com in 
the United States, Toy-
otapr.com in Puerto Rico 
and Toyota.ca in Canada. All 
use of the Safety Connect 
service is subject to such 
then-applicable Terms and 
Conditions.

System components

Services

67

1-3. Emergency assistance

1

For safety and secu

rity

Helps drivers in the event of vehicle 
theft. (

P.68)

Emergency Assistance Button 
(“SOS”)

Connects drivers to response-cen-
ter support. (

P.68)

Enhanced Roadside Assis-
tance

Provides drivers various on-road 
assistance. (

P.69)

After you have signed the 
Telematics Subscription Service 
Agreement and are enrolled, 
you can begin receiving ser-
vices. 
A variety of subscription terms 
are available for purchase. Con-
tact your Toyota dealer, call the 
following appropriate Customer 
Experience Center or push the 
“SOS” button in your vehicle for 
further subscription details.
• The United States

1-800-331-4331

• Canada

1-888-869-6828

• Puerto  Rico

1-877-855-8377

Safety Connect Services Infor-
mation

Phone calls using the vehicle’s 
Bluetooth

®

 technology will not be 

possible when Safety Connect is 
active and in use.

Safety Connect is available begin-
ning Fall 2009 on select Toyota 

models (in the contiguous United 
States only). Contact with the 
Safety Connect response center 
is dependent upon the telematics 
device being in operative condi-
tion, cellular connection availabil-
ity, and GPS satellite signal 
reception, which can limit the abil-
ity to reach the response center or 
receive emergency service sup-
port. Enrollment and Telematics 
Subscription Service Agreement 
are required. A variety of subscrip-
tion terms are available; charges 
vary by subscription term selected 
and location.

Automatic Collision Notification, 
Emergency Assistance and Stolen 
Vehicle Location are available in 
the United States, including 
Hawaii and Alaska, Puerto Rico 
and Canada, and Enhanced 
Roadside Assistance are avail-
able in the United States, Puerto 
Rico and Canada.

Automatic Collision Notification, 
Emergency Assistance, Stolen 
Vehicle and Enhanced Road 
Assistance are not available in the 
U.S. Virgin Islands.
For vehicles first sold in the U.S. 
Virgin Islands, no Safety Connect 
services will function in or outside 
the U.S. Virgin Islands.

Safety Connect services are not 
subject to section 255 of the Tele-
communications Act and the 
device is not TTY compatible.

Languages

The Safety Connect response cen-
ter will offer support in multiple lan-
guages.
The Safety Connect system will 
offer voice prompts in English, 
Spanish, and French. Please indi-
cate your language of choice when 
enrolling.

When contacting the response 
center

You may be unable to contact the 
response center if the network is 

Subscription

68

1-3. Emergency assistance

busy.

When the engine switch is 
turned to ON, the red indicator 
light comes on for 2 seconds 
then turns off. Afterward, the 
green indicator light comes on, 
indicating that the service is 
active.
The following indicator light pat-
terns indicate specific system 
usage conditions:

Green indicator light on = 
Active service

Green indicator light flashing 
= Safety Connect call in pro-
cess

Red indicator light (except at 
vehicle start-up) = System 
malfunction (contact your Toy-
ota dealer)

No indicator light (off) = 
Safety Connect service not 
active

Automatic Collision Notifi-
cation

In case of either airbag deploy-
ment or severe rear-end colli-
sion, the system is designed to 
automatically call the response 
center. The responding agent 
receives the vehicle’s location 
and attempts to speak with the 

vehicle occupants to assess the 
level of emergency. If the occu-
pants are unable to communi-
cate, the agent automatically 
treats the call as an emergency, 
contacts the nearest emer-
gency services provider to 
describe the situation, and 
requests that assistance be sent 
to the location.

Stolen Vehicle Location

If your vehicle is stolen, Safety 
Connect can work with local 
authorities to assist them in 
locating and recovering the 
vehicle. After filing a police 
report, call the Customer Experi-
ence Center at 1-800-331-4331 
in the United States, 
1-877-855-8377 in Puerto Rico 
or 1- 888-869-6828 in Canada, 
and follow the prompts for 
Safety Connect to initiate this 
service. 
In addition to assisting law 
enforcement with recovery of a 
stolen vehicle, Safety-Con-
nect-equipped vehicle location 
data may, under certain circum-
stances, be shared with third 
parties to locate your vehicle. 
Further information is available 
at Toyota.com in the United 
States, Toyotapr.com in Puerto 
Rico and Toyota.ca in Canada.

Emergency Assistance But-
ton (“SOS”)

In the event of an emergency on 
the road, push the “SOS” button 

Safety Connect LED light 
Indicators

Safety Connect services

69

1-3. Emergency assistance

1

For safety and secu

rity

to reach the Safety Connect 
response center. The answer-
ing agent will determine your 
vehicle’s location, assess the 
emergency, and dispatch the 
necessary assistance required.

If you accidentally press the “SOS” 
button, tell the response-center 
agent that you are not experiencing 
an emergency.

Enhanced Roadside Assis-
tance

Enhanced Roadside Assistance 
adds GPS data to the already 
included warranty-based Toyota 
roadside service.

Subscribers can press the 
“SOS” button to reach a Safety 
Connect response-center agent, 
who can help with a wide range 
of needs, such as: towing, flat 
tire, fuel delivery, etc. For a 
description of the Enhanced 
Roadside Assistance services 
and their limitations, please see 
the Safety Connect Terms and 
Conditions, which are available 
at Toyota.com in the United 
States, Toyotapr.com in Puerto 
Rico and Toyota.ca in Canada.

Important! Read this informa-
tion before using Safety Con-
nect.

Exposure to radio fre-
quency signals

The Safety Connect system 
installed in your vehicle is a 
low-power radio transmitter and 
receiver. It receives and also 
sends out radio frequency (RF) 
signals.

In August 1996, the Federal 
Communications Commission 
(FCC) adopted RF exposure 
guidelines with safety levels for 
mobile wireless phones. Those 
guidelines are consistent with 
the safety standards previously 
set by the following U.S. and 
international standards bodies.

ANSI (American National 
Standards Institute) C95.1 
[1992]

NCRP (National Council on 
Radiation Protection and 
Measurement) Report 86 
[1986]

ICNIRP (International Com-
mission on Non-Ionizing Radi-
ation Protection) [1996]

Those standards were based on 
comprehensive and periodic 
evaluations of the relevant sci-
entific literature. Over 120 scien-
tists, engineers, and physicians 
from universities, and govern-
ment health agencies and 
industries reviewed the avail-
able body of research to 
develop the ANSI Standard 
(C95.1).

Safety information for 
Safety Connect

70

1-3. Emergency assistance

The design of Safety Connect 
complies with the FCC guide-
lines in addition to those stan-
dards.

Free/Open Source Software 
Information

This product contains Free/Open 
Source Software (FOSS).

The license information and/or the 
source code of such FOSS can be 
found at the following URL.

https://opensource.lge.com/osSch/
list?types=ALL&search=TL21BNU

71

1-4. Theft deterrent system

1

For safety and secu

rity

1-4.Theft deterrent system

Vehicles without a smart key 

system

The indicator light flashes after 

the key has been removed from 

the engine switch to indicate 

that the system is operating.
The indicator light stops flashing 

after the registered key has 

been inserted into the engine 

switch to indicate that the sys-

tem has been canceled.

Vehicles with a smart key sys-

tem

The indicator light flashes after 

the engine switch has been 

turned off to indicate that the 

system is operating.
The indicator light stops flashing 

after the engine switch has been 

turned to ACC or ON to indicate 

that the system has been can-

celed.

System maintenance

The vehicle has a mainte-

nance-free type engine immobilizer 

system.

Conditions that may cause the 

system to malfunction

If the grip portion of the key is in 

contact with a metallic object

If the key is in close proximity to or 

touching a key to the security sys-

tem (key with a built-in transpon-

der chip) of another vehicle

Engine immobilizer 

system

The vehicle’s keys have 

built-in transponder chips 

that prevent the engine from 

starting if a key has not 

been previously registered 

in the vehicle’s on-board 

computer.
Never leave the keys inside 

the vehicle when you leave 

the vehicle.
This system is designed to 

help prevent vehicle theft 

but does not guarantee 

absolute security against all 

vehicle thefts.

Operating the system

NOTICE

To ensure the system oper-

ates correctly

Do not modify or remove the sys-

tem. If modified or removed, the 

proper operation of the system 

cannot be guaranteed.

72

1-4. Theft deterrent system

*

: If equipped

Items to check before lock-
ing the vehicle

To prevent unexpected trigger-
ing of the alarm and vehicle 
theft, make sure of the following:

Nobody is in the vehicle.

The windows and moon roof 
(if equipped) are closed 
before the alarm is set.

No valuables or other per-
sonal items are left in the 
vehicle.

Setting

Close the doors, trunk and 

hood, and lock all the doors. 
The system will set automati-
cally after 30 seconds.

The indicator light changes from 
being on to flashing when the sys-
tem is set.

Deactivating or stopping

Do one of the following to deac-
tivate or stop the alarms:

Unlock the doors.

Turn the engine switch to 
ACC or ON, or start the 
engine. (The alarm will be 
deactivated or stopped after a 
few seconds.)

System maintenance

The vehicle has a mainte-
nance-free type alarm system.

Triggering of the alarm

The alarm may be triggered in the 
following situations: 
(Stopping the alarm deactivates the 
alarm system.)

A person inside the vehicle opens 
a door, the trunk or hood, or 
unlocks the vehicle using a door 
lock switch or inside lock button.

Alarm

*

The alarm uses light and 
sound to give an alert when 
an intrusion is detected. 
The alarm is triggered in the 
following situations when 
the alarm is set:

A locked door or trunk is 
unlocked or opened in any 
way other than using the 
entry function (if equipped), 
wireless remote control, 
mechanical key (if 
equipped) or key (if 
equipped). (The doors will 
lock again automatically.)

The hood is opened.

Setting/deactivating/stop-
ping the alarm system

73

1-4. Theft deterrent system

1

For safety and secu

rity

The battery is recharged or 

replaced when the vehicle is 

locked. (

P.379)

Alarm-operated door lock

In the following cases, depending 

on the situation, the door may auto-

matically lock to prevent improper 

entry into the vehicle:

When a person remaining in the 

vehicle unlocks the door and the 

alarm is activated.

While the alarm is activated, a 

person remaining in the vehicle 

unlocks the door.

When recharging or replacing the 

battery

NOTICE

To ensure the system oper-

ates correctly

Do not modify or remove the sys-

tem. If modified or removed, the 

proper operation of the system 

cannot be guaranteed.

74

1-4. Theft deterrent system

75

2

2

Vehicle

 statu

s

 information an

in

dicator

s

Vehicle status information

and indicators

.

2-1. Instrument cluster

Warning lights and indica-

tors ...............................

76

Gauges and meters 

(4.2-inch display)..........

80

Gauges and meters (7-inch 

display).........................

83

Multi-information display 

(4.2-inch display)..........

85

Multi-information display 

(7-inch display).............

91

Fuel consumption informa-

tion ...............................

96

76

2-1. Instrument cluster

2-1.Instrument cluster

For the purpose of explanation, the following illustrations display all 
warning lights and indicators illuminated.

4.2-inch display

7-inch display

Warning lights and indicators

The warning lights and indicators on the instrument cluster, 
center panel, overhead console and outside rear view mirrors 
inform the driver of the status of the vehicle’s various sys-
tems.

Warning lights and indicators displayed on the instru-
ment cluster

77

2-1. Instrument cluster

2

Vehicle

 statu

s

 information an

in

dicator

s

Warning lights inform the driver 
of malfunctions in the indicated 
vehicle’s systems.

Warning lights

(U.S.A.)

Brake system warning 

light

*1

 (

P.350)

(Red)

(Canada)

Brake system warning 

light

*1

 (

P.350)

(Yellow)

Brake system warning 

light

*1

 (

P.350)

High coolant temperature 

warning light

*2

 (

P.350)

Charging system warning 

light

*1

 (

P.351)

Low engine oil pressure 

warning light

*2

 (

P.351)

(U.S.A.)

Malfunction indicator 

lamp

*1

 (

P.351)

(Canada)

Malfunction indicator 

lamp

*1

 (

P.351)

SRS warning light

*1


(

P.351)

(U.S.A.)

ABS warning light

*1


(

P.352)

(Canada)

ABS warning light

*1


(

P.352)

Inappropriate pedal opera-

tion warning light

*2


(

P.352)

(Red/yel-

low)

Electric power steering 

system warning light

*1


(

P.352)

Low fuel level warning 
light (

P.353)

Driver’s and front passen-
ger’s seat belt reminder 
light (

P.353)

*3

Rear passengers’ 
seat belt reminder 
lights (

P.354)

*4

Tire pressure warning 

light

*1

 (if equipped) 

(

P.354)

PCS warning light

*1


(

P.355)

(Orange)

LTA indicator (

P.355)

(Orange)

LDA indicator (

P.355)

(Orange)

PDA indicator (

P.355)

(Orange)

Dynamic radar cruise con-
trol indicator (

P.355)

(Orange)

Cruise control indicator 
(

P.356)

Driving assist information 

indicator

*1

 (

P.356)

Slip indicator

*1

 (

P.356)

(Flashes)

(U.S.A.)

Parking brake indicator 
(

P.357)

78

2-1. Instrument cluster

*1

:These lights come on when the 

engine switch is turned to ON to 

indicate that a system check is 

being performed. They will turn 

off after the engine is started, or 

after a few seconds. There may 

be a malfunction in a system if 

the lights do not come on, or turn 

off. Have the vehicle inspected 

by your Toyota dealer.

*2

:This light illuminates on the 

multi-information display.

*3

:4.2-inch display

*4

:7-inch display

The indicators inform the driver 

of the operating state of the 

vehicle’s various systems.

(Flashes)

(Canada)

Parking brake indicator 

(

P.357)

(Flashes)

Brake hold operated indi-
cator

*1

(

P.357)

WARNING

If a safety system warning 

light does not come on

Should a safety system light such 

as the ABS and SRS warning light 

not come on when you start the 

engine, this could mean that 

these systems are not available to 

help protect you in an accident, 

which could result in death or seri-

ous injury. Have the vehicle 

inspected by your Toyota dealer 

immediately if this occurs.

Indicators

Turn signal indicator 

(

P.161)

(U.S.A.)

Headlight indicator 

(

P.167)

(Canada)

Tail light indicator 

(

P.167)

Headlight high beam indi-

cator (

P.169)

Automatic High Beam 

indicator (

P.169)

PCS warning light

*1, 2


(

P.185)

Dynamic radar cruise con-

trol indicator (

P.216)

Cruise control indicator 

(

P.222)

(Green/W

hite/Orang

[Flashes])

LDA indicator (

P.203)

(Green/W

hite/Orang

[Flashes])

LTA indicator (

P.199)

(Green/W

hite)

PDA indicator (

P.205)

BSM outside rear view 
mirror indicators

*1,3

 (if 

equipped) (

P.227)

Driving assist information 
indicator

*1,2

 (

P.227, 

231)

(Flashes)

Slip indicator

*1

 (

P.243)

79

2-1. Instrument cluster

2

Vehicle

 statu

s

 information an

in

dicator

s

*1

: These lights come on when the 

engine switch is turned to ON to 
indicate that a system check is 
being performed. They will turn 
off after the engine is started, or 
after a few seconds. There may 
be a malfunction in a system if 
the lights do not come on, or turn 
off. Have the vehicle inspected 
by your Toyota dealer.

*2

: This light comes on when the 

system is turned off.

*3

: This light illuminates on the out-

side rear view mirrors.

*4

: This light illuminates on the 

multi-information display.

*5

: When the outside temperature is 

approximately 37°F (3°C) or 
lower, this indicator will flash for 
approximately 10 seconds, then 
stay on.

*6

: This light illuminates on the cen-

ter panel.

*7

: This light illuminates on the over-

head console.

VSC OFF indicator

*1, 2


(

P.244)

Smart key system indica-

tor

*4

 (if equipped) 

(

P.149)

(U.S.A.)

Parking brake indicator 
(

P.162)

(Canada)

Parking brake indicator 
(

P.162)

Brake hold standby indi-

cator

*1

 (

P.165)

Brake hold operated indi-

cator

*1

 (

P.165)

Eco Driving Indicator 

Light

*1

 (

P.87)

Low outside temperature 

indicator

*5

 (

P.80, 83)

Security indicator

*6


(

P.71, 72)

“AIR BAG ON/OFF” 

indicator

*1, 7

 (

P.41)

Sport mode indicator (if 
equipped) (

P.241)

80

2-1. Instrument cluster

Locations of gauges and meters

The units of measure may differ depending on the intended destination of 
the vehicle.

Tachometer

Displays the engine speed in revolutions per minute

Outside temperature

Displays the outside temperature within the range of -40°F (-40°C) to 140°F 
(60°C)

Clock (

P.82)

Multi-information display

Presents the driver with a variety of vehicle data (

P.85)

Displays warning messages if a malfunction occurs (

P.360)

Speedometer

Fuel gauge

Displays the quantity of fuel remaining in the tank

Odometer and trip meter display (

P.81)

Shift position indicator (

P.154)

Engine coolant temperature gauge

Displays the engine coolant temperature

Display change button (

P.81)

Gauges and meters (4.2-inch display)

Meter display

81

2-1. Instrument cluster

2

Vehicle

 statu
s information 

an

in

dicator

s

Outside temperature display

In the following situations, the cor-

rect outside temperature may not 

be displayed, or the display may 

take longer than normal to 

change:

• When stopped, or driving at low 

speeds (less than 12 mph [20 

km/h])

• When the outside temperature 

has changed suddenly (at the 

entrance/exit of a garage, tunnel, 

etc.)

When “--” or “E” is displayed, the 

system may be malfunctioning. 

Take your vehicle to your Toyota 

dealer.

Liquid crystal display

P.86

Customization

The gauges and meters can be cus-
tomized in 

 of the multi-informa-

tion display. (

P.406)

Changing the display

Press the display change button 

until the desired item is dis-

played.

Display items

Odometer

Displays the total distance the vehi-

cle has been driven.

Trip meter A/Trip meter B

Displays the distance the vehicle 

has been driven since the meter 

was last reset. Trip meters A and B 

can be used to record and display 

WARNING

The information display at 

low temperatures

Allow the interior of the vehicle to 

warm up before using the liquid 

crystal information display. At 

extremely low temperatures, the 

information display monitor may 

respond slowly, and display 

changes may be delayed.
For example, there is a lag 

between the driver’s shifting and 

the new gear number appearing 

on the display. This lag could 

cause the driver to downshift 

again, causing rapid and exces-

sive engine braking and possibly 

an accident resulting in death or 

injury.

NOTICE

To prevent damage to the 

engine and its components

Do not let the indicator needle 

of the tachometer enter the red 

zone, which indicates the maxi-

mum engine speed.

The engine may be overheating 

if the engine coolant tempera-

ture gauge is in the red zone 

(H). In this case, immediately 

stop the vehicle in a safe place, 

and check the engine after it 

has cooled completely. 

(

P.381)

Odometer and trip meter 

display

82

2-1. Instrument cluster

different distances independently.

To reset, display the desired trip 
meter and press and hold the dis-
play change button.

The brightness of the instrument 
panel lights can be adjusted.

1

Brighter

2

Darker

Instrument panel light bright-
ness adjustment

The brightness of the instrument 
panel lights can be adjusted sepa-
rately for when the tail lights are on 
and off.

The clocks can be adjusted 
on the audio system 
screen.

Refer to “MULTIMEDIA 
OWNER’S MANUAL”.

Changing the instrument 
panel light brightness

Adjusting the clock

83

2-1. Instrument cluster

2

Vehicle

 statu

s

 information an

in

dicator

s

Locations of gauges and meters

Engine coolant temperature gauge

Displays the engine coolant temperature

Outside temperature

Displays the outside temperature within the range of -40°F (-40°C) to 140°F 
(60°C)

Analog speedometer/Tachometer

This setting can be changed on the setting screen. (

P.406)

Clock (

P.85)

Fuel gauge

Displays the quantity of fuel remaining in the tank

Odometer and trip meter display (

P.84)

Shift position indicator (

P.154, 156)

Multi-information display

Presents the driver with a variety of vehicle data (

P.91)

Displays warning messages if a malfunction occurs (

P.360)

Digital speedometer

Gauges and meters (7-inch display)

Meter display

84

2-1. Instrument cluster

Display change button (

P.84)

Outside temperature display

In the following situations, the cor-

rect outside temperature may not 

be displayed, or the display may 

take longer than normal to 

change:

• When stopped, or driving at low 

speeds (less than 12 mph [20 

km/h])

• When the outside temperature 

has changed suddenly (at the 

entrance/exit of a garage, tunnel, 

etc.)

When “--” or “E” is displayed, the 

system may be malfunctioning. 

Take your vehicle to your Toyota 

dealer.

Liquid crystal display

P.91

Customization

The gauges and meters can be cus-
tomized in 

 of the multi-informa-

tion display. (

P.406)

Changing the display

Press the display change button 

until the desired item is dis-

played.

Display items

Odometer

Displays the total distance the vehi-

cle has been driven.

Trip meter A/Trip meter B

Displays the distance the vehicle 

has been driven since the meter 

was last reset. Trip meters A and B 

WARNING

The information display at 

low temperatures

Allow the interior of the vehicle to 

warm up before using the liquid 

crystal information display. At 

extremely low temperatures, the 

information display monitor may 

respond slowly, and display 

changes may be delayed.
For example, there is a lag 

between the driver’s shifting and 

the new gear number appearing 

on the display. This lag could 

cause the driver to downshift 

again, causing rapid and exces-

sive engine braking and possibly 

an accident resulting in death or 

injury.

NOTICE

To prevent damage to the 

engine and its components

Do not let the indicator needle 

of the tachometer enter the red 

zone, which indicates the maxi-

mum engine speed.

The engine may be overheating 

if the engine coolant tempera-

ture gauge is in the red zone 

(H). In this case, immediately 

stop the vehicle in a safe place, 

and check the engine after it 

has cooled completely. 

(

P.381)

Odometer and trip meter 

display

85

2-1. Instrument cluster

2

Vehicle

 statu

s

 information an

in

dicator

s

can be used to record and display 
different distances independently.

To reset, display the desired trip 
meter and press and hold the dis-
play change button.

The brightness of the instrument 
panel lights can be adjusted.

1

Brighter

2

Darker

Instrument panel light bright-
ness adjustment

The brightness of the instrument 
panel lights can be adjusted sepa-
rately for when the tail lights are on 
and off.

The clocks can be adjusted 
on the audio system 
screen.

Refer to “MULTIMEDIA 
OWNER’S MANUAL”.

Display

Driving support system status 
display area

Displays an image when the follow-
ing systems are operating and a 

menu icon other than 

 is 

selected:
• LTA (Lane Tracing Assist)
• LDA (Lane Departure Alert)
• Dynamic radar cruise control
• RSA (Road Sign Assist) (if 

equipped) (

P.211)

Content display area

By selecting menu icons on the 
multi-information display, a variety 
of driving-related information can 
be displayed. The multi-information 
display can also be used to change 
display settings and other vehicle 
settings.

Warning or advice pop-up displays 
are also displayed in certain situa-
tions.

Menu icons

The menu icons will be dis-

played by pressing the 

 or 


Changing the instrument 
panel light brightness

Adjusting the clock

Multi-information dis-

play (4.2-inch display)

Display and menu icons

86

2-1. Instrument cluster

meter control switch.

Liquid crystal display

Small spots or light spots may 

appear on the display. This phenom-

enon is characteristic of liquid crys-

tal displays, and there is no problem 

continuing to use the display.

The multi-information display is 

operated using the meter control 

switches.

/

: Select menu icons

/

: Change displayed 

content, scroll up/down the 

screen and move the cursor 

up/down
Press: Enter/Set

Press and hold: Reset/Dis-

play customizable items
Return to the previous screen
Call sending/receiving and 

history display

Linked with the hands-free system, 

sending or receiving call is dis-

played. For details regarding the 

hands-free system, refer to the 

“MULTIMEDIA OWNER’S MAN-

UAL”.

Display items

Speedometer display/Driving 

range

Fuel economy

Eco Driving Indicator/Driving 

range

Driving information display 

(

P.86)

Driving support system 

information display 

(

P.88)

Audio system-linked dis-

play (

P.89)

Vehicle information dis-

play (

P.89)

Settings display (

P.89)

Warning message display 

(

P.360)

WARNING

Caution for use while driving

When operating the multi-infor-

mation display while driving, 

pay extra attention to the safety 

of the area around the vehicle.

Do not look continuously at the 

multi-information display while 

driving as you may fail to see 

pedestrians, objects on the 

road, etc. ahead of the vehicle.

The information display at 

low temperatures

P.81

Changing the meter dis-

play

Content of driving infor-

mation

87

2-1. Instrument cluster

2

Vehicle

 statu

s

 information an

in

dicator

s

Speedometer display/Driv-
ing range

Speedometer display

Driving range

Displays driving range with remain-
ing fuel. Use the displayed values 
as a reference only.

This distance is computed based 
on your average fuel consumption. 
As a result, the actual distance that 
can be driven may differ from that 
displayed.

When only a small amount of fuel is 
added to the tank, the display may 
not be updated.
When refueling, turn the engine 
switch off. If the vehicle is refueled 
without turning the engine switch 
off, the display may not be updated.

Fuel economy

Use the displayed values as a ref-
erence only.

Average fuel economy (after 
reset)

To reset the average fuel economy 

display, press and hold the 


meter control switch.

Current fuel consumption

Displays instantaneous current fuel 
consumption.

Driving range

Displays driving range with remain-
ing fuel.

This distance is computed based 
on your average fuel consumption. 
As a result, the actual distance that 
can be driven may differ from that 
displayed.

When only a small amount of fuel is 
added to the tank, the display may 
not be updated.
When refueling, turn the engine 
switch off. If the vehicle is refueled 
without turning the engine switch 
off, the display may not be updated.

The average fuel economy dis-

play can be changed in 

(

P.89)

Average fuel economy (after 
start)

Displays the average fuel con-
sumption since engine start.

Average fuel economy (after 
refuel)

Displays the average fuel con-
sumption since the vehicle was 
refueled.

Eco Driving Indicator/Driv-
ing range

Eco Driving Indicator

88

2-1. Instrument cluster

Eco Driving Indicator Light

During Eco-friendly acceleration 
(Eco driving), the Eco Driving Indi-
cator Light will turn on. When the 
acceleration exceeds the Zone of 
Eco driving, or when the vehicle is 
stopped, the light turns off.

Eco Driving Indicator Zone 
Display

Suggests the Zone of Eco driving 
with current Eco driving ratio based 
on acceleration.

Eco driving ratio based on 
acceleration

If the acceleration exceeds the 
Zone of Eco driving, the right side 
of the Eco Driving Indicator Zone 
Display will illuminate.

At this time, the Eco Driving Indica-
tor Light will turn off.

Zone of Eco driving

Driving range

Displays driving range with remain-
ing fuel. Use the displayed values 
as a reference only.

This distance is computed based 
on your average fuel consumption. 
As a result, the actual distance that 
can be driven may differ from that 
displayed.

When only a small amount of fuel is 
added to the tank, the display may 
not be updated.
When refueling, turn the engine 
switch off. If the vehicle is refueled 
without turning the engine switch 
off, the display may not be updated.

Eco Driving Indicator

Eco Driving Indicator will not oper-
ate under the following conditions:

The shift lever is in any position 
other than D.

A paddle shift switch is operated. 
(If equipped)

The driving mode is set to sport 
mode. (If equipped)

The vehicle speed is approxi-
mately 80 mph (130 km/h) or 
higher.

Driving support system 
information

Select to display the operational 
status of the following systems:

LTA (Lane Tracing Assist) 
(

P.195)

LDA (Lane Departure Alertl) 
(

P.200)

Dynamic radar cruise control 
(

P.213)

Driving support system 
information display

89

2-1. Instrument cluster

2

Vehicle

 statu

s

 information an

in

dicator

s

Navigation system-linked 
display (if equipped)

Select to display the following 
navigation system-linked infor-
mation:

Route guidance to destination

Compass display (head-
ing-up display)

Select to enable selection of an 
audio source or track on the 
meter using the meter control 
switches.

This menu icon can be set to be 

displayed/not displayed in 

.

Drive information

Displays drive information such as 
the following:

Drive information type

Drive information items

Displays the following depend-
ing on which drive information 

type and drive information items 

were selected in 

. (

P.89)

After start

• Distance: Displays the distance 

driven since engine start

• Elapsed time: Displays the 

elapsed time since engine start

• Average vehicle speed: Displays 

the average vehicle speed since 
engine start

After reset

• Distance: Displays the distance 

driven since the display was 

reset

*

• Elapsed time: Displays the 

elapsed time since the display 

was reset

*

• Average vehicle speed: Displays 

the average vehicle speed since 

the display was reset

*

*

: To reset, display the desired item 

and press and hold the 


meter control switch.

Meter display settings that 
can be changed

Language

Select to change the language dis-
played.

Units

Select to change the units of mea-
sure displayed.

Eco Driving Indicator Light

Select to enable/disable the Eco 
Driving Indicator Light.

Audio system-linked dis-
play

Vehicle information dis-
play

Settings display

90

2-1. Instrument cluster

• Fuel economy display
Select to change the average fuel 

consumption display between after 

start/after reset. (

P.87)

Select to display/not display the 

audio system linked display.

Select to change the displayed con-

tent of the following:
• Drive information type
Select to change the drive informa-

tion type display between after 

start/after reset.
• Drive information items
Select to set the first and second 

items of the drive information dis-

play to any of the following: aver-

age vehicle 

speed/distance/elapsed time.

Pop-up display

Select to enable/disable pop-up 

displays for each relevant system.

Multi-information display off

Select to turn the multi-information 

display off.
To turn the multi-information display 

on again, press any of the following 

meter control switches 

/

/

/

/

/

.

Default setting

Select to reset the meter display 

settings to the default setting.

Vehicle functions and set-

tings that can be changed

P.406

Suspension of the settings dis-

play

Some settings cannot be changed 

while driving. When changing set-

tings, park the vehicle in a safe 

place.

If a warning message is displayed, 

operation of the settings display 

will be suspended.

WARNING

Cautions during setting up 

the display

If the engine is running when 

changing the display settings, 

ensure that the vehicle is parked 

in a place with adequate ventila-

tion. In a closed area such as a 

garage, exhaust gases including 

harmful carbon monoxide (CO) 

may collect and enter the vehicle. 

This may lead to death or a seri-

ous health hazard.

NOTICE

During setting up the display

To prevent battery discharge, 

ensure that the engine is running 

while setting up the display fea-

tures.

91

2-1. Instrument cluster

2

Vehicle

 statu
s information 

an

in

dicator

s

Display

Content display area

By selecting menu icons on the 

multi-information display, a variety 

of driving-related information can 

be displayed. The multi-information 

display can also be used to change 

display settings and other vehicle 

settings.
Warning or advice pop-up displays 

are also displayed in certain situa-

tions.

Driving support system status 

display area

Displays an image when the follow-

ing systems are operating and a 
menu icon other than 

 is 

selected:

• LTA (Lane Tracing Assist)

• LDA (Lane Departure Alert)

• Dynamic radar cruise control

Menu icons

The menu icons will be dis-
played by pressing the 

 or 


meter control switch.

Liquid crystal display

Small spots or light spots may 

appear on the display. This phenom-

enon is characteristic of liquid crys-

tal displays, and there is no problem 

continuing to use the display.

The multi-information display is 

operated using the meter control 

switches.

Multi-information dis-

play (7-inch display)

Display and menu icons

Driving information display 

(

P.92)

Driving support system 

information display 

(

P.93)

Audio system-linked dis-

play (

P.94)

Vehicle information dis-

play (

P.94)

Settings display (

P.94)

Warning message display 

(

P.360)

WARNING

Caution for use while driving

When operating the multi-infor-

mation display while driving, 

pay extra attention to the safety 

of the area around the vehicle.

Do not look continuously at the 

multi-information display while 

driving as you may fail to see 

pedestrians, objects on the 

road, etc. ahead of the vehicle.

The information display at 

low temperatures

P.84

Changing the meter dis-

play

92

2-1. Instrument cluster

/

: Select menu icons, 

scroll the screen and move 
the cursor

/

: Change displayed 

content, scroll the screen and 
move the cursor

Press: Enter/Set
Press and hold: Reset/Dis-
play customizable items

Return to the previous screen

Call sending/receiving and 
history display

Linked with the hands-free system, 
sending or receiving call is dis-
played. For details regarding the 
hands-free system, refer to the 
“MULTIMEDIA OWNER’S MAN-
UAL”.

Display items

Fuel economy

Eco Driving Indicator/Driving 
range

Fuel economy

Use the displayed values as a ref-
erence only.

Current fuel consumption

Displays instantaneous current fuel 
consumption.

Average fuel economy (after 
reset)

To reset the average fuel economy 

display, press and hold the 


meter control switch.

The average fuel economy dis-

play can be changed in 

(

P.94)

Average fuel economy (after 
start)

Displays the average fuel con-
sumption since engine start.

Average fuel economy (after 
refuel)

Displays the average fuel con-
sumption since the vehicle was 
refueled.

Eco Driving Indicator/Driv-
ing range

Eco Driving Indicator

Content of driving infor-
mation

93

2-1. Instrument cluster

2

Vehicle

 statu

s

 information an

in

dicator

s

Eco Driving Indicator Light

During Eco-friendly acceleration 
(Eco driving), the Eco Driving Indi-
cator Light will turn on. When the 
acceleration exceeds the Zone of 
Eco driving, or when the vehicle is 
stopped, the light turns off.

Eco Driving Indicator Zone 
Display

Suggests the Zone of Eco driving 
with current Eco driving ratio based 
on acceleration.

Eco driving ratio based on 
acceleration

If the acceleration exceeds the 
Zone of Eco driving, the right side 
of the Eco Driving Indicator Zone 
Display will illuminate.

At this time, the Eco Driving Indica-
tor Light will turn off.

Zone of Eco driving

Driving range

Displays driving range with remain-
ing fuel. Use the displayed values 
as a reference only.

This distance is computed based 
on your average fuel consumption. 
As a result, the actual distance that 
can be driven may differ from that 
displayed.

When only a small amount of fuel is 
added to the tank, the display may 
not be updated.
When refueling, turn the engine 
switch off. If the vehicle is refueled 
without turning the engine switch 
off, the display may not be updated.

Eco Driving Indicator

Eco Driving Indicator will not oper-
ate under the following conditions:

The shift lever is in any position 
other than D.

The driving mode is set to Sport 
mode.

The vehicle speed is approxi-
mately 80 mph (130 km/h) or 
higher.

Driving support system 
information

Select to display the operational 
status of the following systems:

Dynamic radar cruise control 
(

P.213)

LTA (Lane Tracing Assist) 
(

P.195)

LDA (Lane Departure Alert) 
(

P.200)

Navigation system-linked 
display (if equipped)

Select to display the following 
navigation system-linked infor-

Driving support system 
information display

94

2-1. Instrument cluster

mation:

Route guidance to destination

Compass display (head-
ing-up display)

Select to enable selection of an 
audio source or track on the 
meter using the meter control 
switches.

This menu icon can be set to be 

displayed/not displayed in 

.

Drive information

Displays drive information such as 
the following:

Drive information 1

Drive information 2

Displays the following depend-
ing on which drive information 
type and drive information items 

were selected in 

. (

P.94)

After start

• Distance: Displays the distance 

driven since engine start

• Elapsed time: Displays the 

elapsed time since engine start

• Average vehicle speed: Displays 

the average vehicle speed since 
engine start

After reset

• Distance: Displays the distance 

driven since the display was 

reset

*

• Elapsed time: Displays the 

elapsed time since the display 

was reset

*

• Average vehicle speed: Displays 

the average vehicle speed since 

the display was reset

*

*

: To reset, display the desired item 

and press and hold the 


meter control switch.

Meter display settings that 
can be changed

Language

Select to change the language dis-
played.

Units

Select to change the units of mea-
sure displayed.

Meter Type

Select to change the meter type.

Dial Type

Select to change the display of the 
speedometer or tachometer.

Eco Driving Indicator Light

Select to enable/disable the Eco 

Audio system-linked dis-
play

Vehicle information dis-
play

Settings display

95

2-1. Instrument cluster

2

Vehicle

 statu
s information 

an

in

dicator

s

Driving Indicator Light.

Fuel economy display
Select to change the average fuel 

consumption display to any of the 

following: trip average/total aver-

age/tank average. (

P.92)

Select to display/not display the 

audio system linked display.

Select to change the displayed con-

tent of the following:
• Drive information type
Select to change the drive informa-

tion type display between trip infor-

mation/total information.
• Drive information items
Select to set the first and second 

items of the drive information dis-

play to any of the following: aver-

age vehicle 

speed/distance/elapsed time.

Pop-up display

Select to enable/disable pop-up 

displays for each relevant system.

Multi-information display off

Select to turn the multi-information 

display off.
To turn the multi-information display 

on again, press any of the following 

meter control switches 

/

/

/

/

/

.

Default setting

Select to reset the meter display 

settings to the default setting.

Vehicle functions and set-

tings that can be changed

P.406

Suspension of the settings dis-

play

Some settings cannot be changed 

while driving. When changing set-

tings, park the vehicle in a safe 

place.

If a warning message is displayed, 

operation of the settings display 

will be suspended.

WARNING

Cautions during setting up 

the display

If the engine is running when 

changing the display settings, 

ensure that the vehicle is parked 

in a place with adequate ventila-

tion. In a closed area such as a 

garage, exhaust gases including 

harmful carbon monoxide (CO) 

may collect and enter the vehicle. 

This may lead to death or a seri-

ous health hazard.

NOTICE

During setting up the display

To prevent battery discharge, 

ensure that the engine is running 

while setting up the display fea-

tures.

96

2-1. Instrument cluster

Audio system screen

Trip information

1

Select 

 on the main menu.

2

Select “Trip information”.

If a screen other than “Current” is 
displayed, select “Current”.

The image is an example only, and 
may vary slightly from actual condi-
tions.

Resetting the consumption 

data

Fuel consumption in the past 
15 minutes

Current fuel consumption

Average vehicle speed since 
the engine was started.

Elapsed time since the 
engine was started.

Cruising range

Average fuel consumption for 
the past 15 minutes is divided 
by color into past averages and 
averages attained since the 
engine switch was last turned to 
ON. Use the displayed average 
fuel consumption as a refer-
ence.

History

1

Select 

 on the main menu.

2

Select “Trip information”.

If a screen other than “History” is 
displayed, select “History”.

The image is an example only, and 
may vary slightly from actual condi-
tions.

Best recorded fuel consump-
tion

Latest fuel consumption

Fuel consumption 

information

Fuel consumption informa-
tion can be displayed on the 
audio system screen.

System components

Consumption


Content      ..     1      2      3      4      ..