Toyota Corolla (2024 year). Manual in english - page 2


  Index      Toyota     Toyota Corolla (2024 year). Manual in english


Search            copyright infringement  


Content      ..      1      2      3      ..


Toyota Corolla (2024 year). Manual in english - page 2


33

1-1. For safe use

1

For safety and secu

rity

Front impact sensors

Airbag sensor assembly

Your vehicle is equipped with ADVANCED AIRBAGS designed 
based on the US motor vehicle safety standards (FMVSS208). The 
airbag sensor assembly (ECU) controls airbag deployment based on 
information obtained from the sensors etc. shown in the system 
components diagram above. This information includes crash sever-
ity and occupant information. As the airbags deploy, a chemical 
reaction in the inflators quickly fills the airbags with non-toxic gas to 
help restrain the motion of the occupants.

If the SRS airbags deploy 
(inflate)

Slight abrasions, burns, bruising 
etc., may be sustained from SRS 
airbags, due to the extremely high 
speed deployment (inflation) by 
hot gases.

A loud noise and white powder will 
be emitted.

Parts of the airbag module (steer-
ing wheel hub, airbag cover and 
inflator) as well as the front seats, 
parts of the front and rear pillars, 
and roof side rails, may be hot for 
several minutes. The airbag itself 
may also be hot.

The windshield may crack.

The brakes and stop lights will be 
controlled automatically. (

P.243)

The interior lights will turn on auto-
matically. (

P.266)

The emergency flashers will turn 
on automatically. (

P.342)

Fuel supply to the engine will be 
stopped. (

P.349)

For Safety Connect subscribers, if 
any of the following situations 
occur, the system is designed to 
send an emergency call to the 
response center, notifying them of 
the vehicle’s location (without 
needing to push the “SOS” button) 
and an agent will attempt to speak 
with the occupants to ascertain 

the level of emergency and assis-
tance required. If the occupants 
are unable to communicate, the 
agent automatically treats the call 
as an emergency and helps to dis-
patch the necessary emergency 
services. (

P.66)

• An SRS airbag is deployed.
• A seat belt pretensioner is acti-

vated.

• The vehicle is involved in a severe 

rear-end collision.

SRS airbag deployment condi-
tions (SRS front airbags)

The SRS front airbags will deploy 
in the event of an impact that 
exceeds the set threshold level 
(the level of force corresponding 
to an approximately 12 - 18 mph 
[20 - 30 km/h] frontal collision with 
a fixed wall that does not move or 
deform).

However, this threshold velocity will 
be considerably higher in the follow-
ing situations:
• If the vehicle strikes an object, 

such as a parked vehicle or sign 
pole, which can move or deform 
on impact

• If the vehicle is involved in an 

underride collision, such as a colli-
sion in which the front of the vehi-
cle “underrides”, or goes under, 
the bed of a truck

Depending on the type of collision, 
it is possible that only the seat belt 
pretensioners will activate.
34

1-1. For safe use

The SRS front airbags for the front 
passenger will not activate if there 
is no passenger sitting in the front 
passenger seat. However, the 
SRS front airbags for the front 
passenger may deploy if luggage 
is put in the seat, even if the seat 
is unoccupied.

The SRS seat cushion airbag on 
the front passenger seat will not 
operate if the occupant is not 
wearing a seat belt.

SRS airbag deployment condi-
tions (SRS side and curtain 
shield airbags)

The SRS side and curtain shield 
airbags will deploy in the event of 
an impact that exceeds the set 
threshold level (the level of force 
corresponding to the impact force 
produced by an approximately 
3300 lb. [1500 kg] vehicle colliding 
with the vehicle cabin from a 
direction perpendicular to the 
vehicle orientation at an approxi-
mate speed of 12 - 18 mph [20 - 
30 km/h]).

Both SRS curtain shield airbags 
will deploy in the event of a side 
collision on either side.

Both SRS curtain shield airbags 
will deploy in the event of vehicle 
rollover.

Both SRS curtain shield airbags 
may also deploy in the event of a 
severe frontal collision.

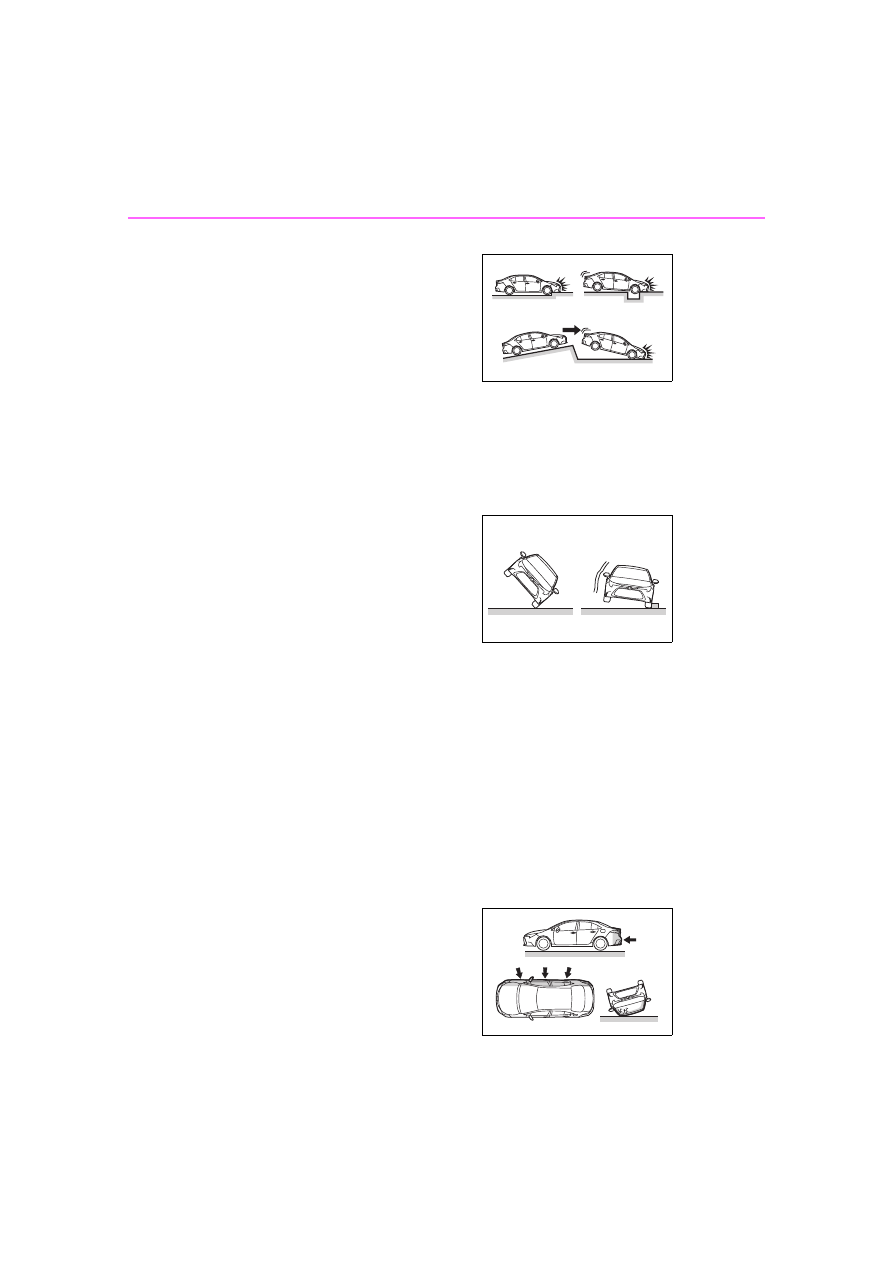
Conditions under which the 
SRS airbags may deploy 
(inflate), other than a collision

The SRS front airbags and SRS 
side and curtain shield airbags may 
also deploy if a serious impact 
occurs to the underside of your vehi-
cle. Some examples are shown in 
the illustration.

Hitting a curb, edge of pavement 
or hard surface

Falling into or jumping over a deep 
hole

Landing hard or falling

The SRS curtain shield airbags may 
also deploy under the situations 
shown in the illustration.

The angle of vehicle tip-up is mar-
ginal.

The vehicle skids and hits a curb 
stone.

Types of collisions that may not 
deploy the SRS airbags (SRS 
front airbags)

The SRS front airbags do not gener-
ally inflate if the vehicle is involved 
in a side or rear collision, if it rolls 
over, or if it is involved in a 
low-speed frontal collision. But, 
whenever a collision of any type 
causes sufficient forward decelera-
tion of the vehicle, deployment of 
the SRS front airbags may occur.

Collision from the side

Collision from the rear

Vehicle rollover

35

1-1. For safe use

1

For safety and secu

rity

Types of collisions that may not 
deploy the SRS airbags (SRS 
side and curtain shield airbags)

The SRS side and curtain shield air-
bags may not activate if the vehicle 
is subjected to a collision from the 
side at certain angles, or a collision 
to the side of the vehicle body other 
than the passenger compartment.

Collision from the side to the vehi-
cle body other than the passenger 
compartment

Collision from the side at an angle

The SRS side airbags do not gener-
ally inflate if the vehicle is involved 
in a frontal or rear collision, if it rolls 
over, or if it is involved in a 
low-speed side collision.

Collision from the front

Collision from the rear

Vehicle rollover

The SRS curtain shield airbags do 
not generally inflate if the vehicle is 
involved in a rear collision, if it 
pitches end over end, or if it is 
involved in a low-speed side or 
low-speed frontal collision.

Collision from the rear

Pitching end over end

When to contact your Toyota 
dealer

In the following cases, the vehicle 
will require inspection and/or repair. 
Contact your Toyota dealer as soon 
as possible.

Any of the SRS airbags have 
been inflated.

The front of the vehicle is dam-
aged or deformed, or was 
involved in an accident that was 
not severe enough to cause the 
SRS front airbags to inflate.

A portion of a door or its surround-
ing area is damaged, deformed or 
has had a hole made in it, or the 
vehicle was involved in an acci-
dent that was not severe enough 
to cause the SRS side and curtain 
shield airbags to inflate.

The pad section of the steering 
wheel, dashboard near the front 
passenger airbag or lower portion 
of the instrument panel is 

36

1-1. For safe use

scratched, cracked, or otherwise 

damaged.

The seat cushion surface is 

scratched, cracked, or otherwise 

damaged.

The surface of the seats with the 

SRS side airbag is scratched, 

cracked, or otherwise damaged.

The portion of the front pillars, rear 

pillars or roof side rail garnishes 

(padding) containing the SRS cur-

tain shield airbags inside is 

scratched, cracked, or otherwise 

damaged.

WARNING

SRS airbag precautions

Observe the following precautions 

regarding the SRS airbags.

Failure to do so may cause death 

or serious injury.

The driver and all passengers in 

the vehicle must wear their seat 

belts properly.

The SRS airbags are supple-

mental devices to be used with 

the seat belts.

The SRS driver airbag deploys 

with considerable force, and 

can cause death or serious 

injury especially if the driver is 

very close to the airbag. The 

National Highway Traffic Safety 

Administration (NHTSA) 

advises:

Since the risk zone for the driver’s 

airbag is the first 2 - 3 in. (50 - 75 

mm) of inflation, placing yourself 

10 in. (250 mm) from your driver 

airbag provides you with a margin 

of safety. This distance is mea-

sured from the center of the steer-

ing wheel to your breastbone. If 

you sit less than 10 in. (250 mm) 

away now, you can change your 

driving position in several ways:
• Move your seat to the rear as 

far as you can while still reach-

ing the pedals comfortably.

• Slightly recline the back of the 

seat.

Although vehicle designs vary, 

many drivers can achieve the 

10 in. (250 mm) distance, even 

with the driver seat all the way 

forward, simply by reclining the 

back of the seat somewhat. If 

reclining the back of your seat 

makes it hard to see the road, 

raise yourself by using a firm, 

non-slippery cushion, or raise 

the seat if your vehicle has that 

feature.

37

1-1. For safe use

1

For safety and secu

rity

WARNING

• If your steering wheel is adjust-

able, tilt it downward. This 

points the airbag toward your 

chest instead of your head and 

neck.

The seat should be adjusted as 

recommended by NHTSA above, 

while still maintaining control of 

the foot pedals, steering wheel, 

and your view of the instrument 

panel controls.

If the seat belt extender has 

been connected to the front 

seat belt buckles but the seat 

belt extender has not also been 

fastened to the latch plate of the 

seat belt, the SRS front airbags 

will judge that the driver and 

front passenger are wearing the 

seat belt even though the seat 

belt has not been connected. In 

this case, the SRS front airbags 

may not activate correctly in a 

collision, resulting in death or 

serious injury in the event of a 

collision. Be sure to wear the 

seat belt with the seat belt 

extender.

The SRS front passenger air-

bag also deploys with consider-

able force, and can cause death 

or serious injury especially if the 

front passenger is very close to 

the airbag. The front passenger 

seat should be as far from the 

airbag as possible with the seat-

back adjusted, so the front pas-

senger sits upright.

Improperly seated and/or 

restrained infants and children 

can be killed or seriously injured 

by a deploying airbag. An infant 

or child who is too small to use 

a seat belt should be properly 

secured using a child restraint 

system. Toyota strongly recom-

mends that all infants and chil-

dren be placed in the rear seats 

of the vehicle and properly 

restrained. The rear seats are 

safer for infants and children 

than the front passenger seat. 

(

P.48)

Do not sit on the edge of the 

seat or lean against the dash-

board.

Do not allow a child to stand in 

front of the SRS front passenger 

airbag unit or sit on the knees of 

a front passenger.

Do not allow the front seat occu-

pants to hold items on their 

knees.

38

1-1. For safe use

WARNING

Do not lean against the door, 

the roof side rail or the front, 

side and rear pillars.

Do not allow anyone to kneel on 

the passenger seats toward the 

door or put their head or hands 

outside the vehicle.

Do not attach anything to or 

lean anything against areas 

such as the dashboard, steering 

wheel pad and lower portion of 

the instrument panel.

These items can become pro-

jectiles when the SRS driver, 

front passenger and knee air-

bags deploy.

Do not attach anything to areas 

such as a door, windshield, side 

windows, front or rear pillar, roof 

side rail and assist grip.

Vehicles without a smart key 

system: Do not attach any 

heavy, sharp or hard objects 

such as keys and accessories 

to the key. The objects may 

restrict the SRS knee airbag 

inflation or be thrust into the 

driver’s seat area by the force of 

the deploying airbag, thus caus-

ing a danger.

Do not hang hangers or other 

hard objects on the coat hooks. 

All of these items could become 

projectiles and may cause 

death or serious injury, should 

the SRS curtain shield airbags 

deploy.

If a vinyl cover is put on the area 

where the SRS driver’s knee 

airbag will deploy, be sure to 

remove it.

39

1-1. For safe use

1

For safety and secu

rity

WARNING

Do not use seat accessories 

which cover the parts where the 

SRS side airbags and SRS seat 

cushion airbag inflate as they 

may interfere with inflation of 

the SRS airbags. Such acces-

sories may prevent the side air-

bags and seat cushion airbag 

from activating correctly, disable 

the system or cause the side 

airbags and seat cushion airbag 

to inflate accidentally, resulting 

in death or serious injury.

Do not strike or apply significant 

levels of force to the area of the 

SRS airbag components or the 

front doors.

Doing so can cause the SRS 

airbags to malfunction.

Do not touch any of the compo-

nent parts immediately after the 

SRS airbags have deployed 

(inflated) as they may be hot.

If breathing becomes difficult 

after the SRS airbags have 

deployed, open a door or win-

dow to allow fresh air in, or 

leave the vehicle if it is safe to 

do so. Wash off any residue as 

soon as possible to prevent skin 

irritation.

If the areas where the SRS air-

bags are stored, such as the 

steering wheel pad and front 

and rear pillar garnishes, are 

damaged or cracked, have 

them replaced by your Toyota 

dealer.

Do not place anything, such as 

a cushion, on the front passen-

ger’s seat. Doing so will 

disperse the passenger’s 

weight, which prevents the sen-

sor from detecting the passen-

ger’s weight properly. As a 

result, the SRS front airbags for 

the front passenger may not 

deploy in the event of a colli-

sion.

Modification and disposal of 

SRS airbag system compo-

nents

Do not dispose of your vehicle or 

perform any of the following modi-

fications without consulting your 

Toyota dealer. The SRS airbags 

may malfunction or deploy 

(inflate) accidentally, causing 

death or serious injury.

Installation, removal, disassem-

bly and repair of the SRS air-

bags

Repairs, modifications, removal 

or replacement of the steering 

wheel, instrument panel, dash-

board, seats or seat upholstery, 

front, side and rear pillars, roof 

side rails, front door panels, 

front door trims or front door 

speakers

Modifications to the front door 

panel (such as making a hole in 

it)

Repairs or modifications of the 

front fender, front bumper, or 

side of the occupant compart-

ment

Installation of a grille guard (bull 

bars, kangaroo bar, etc.), snow 

plows, winches or roof luggage 

carrier

Modifications to the vehicle’s 

suspension system

40

1-1. For safe use

WARNING

Installation of electronic devices 

such as mobile two-way radios 

and CD players

Modifications to your vehicle for 

a person with a physical disabil-

ity

41

1-1. For safe use

1

For safety and secu

rity

SRS warning light
Front passenger’s seat belt reminder light
“AIR BAG OFF” indicator light
“AIR BAG ON” indicator light

Front passenger occupant classification system

Your vehicle is equipped with a front passenger occupant 

classification system. This system detects the conditions of 

the front passenger seat and activates or deactivates the front 

passenger airbag and seat cushion airbag in the front passen-

ger side.

System components

WARNING

Front passenger occupant 

classification system precau-

tions

Observe the following precautions 

regarding the front passenger 

occupant classification system.

Failure to do so may cause death 

or serious injury.

Wear the seat belt properly.

Make sure the front passenger’s 

seat belt latch plate has not 

been left inserted into the 

buckle before someone sits in 

the front passenger seat.

42

1-1. For safe use

WARNING

Make sure the “AIR BAG OFF” 

indicator light is not illuminated 

when using the seat belt 

extender for the front passenger 

seat. If the “AIR BAG OFF” indi-

cator light is illuminated, discon-

nect the extender tongue from 

the seat belt buckle, and recon-

nect the seat belt. Reconnect 

the seat belt extender after 

making sure the “AIR BAG ON” 

indicator light is illuminated. If 

you use the seat belt extender 

while the “AIR BAG OFF” indi-

cator light is illuminated, the 

SRS airbags for the front pas-

senger may not activate, which 

could cause death or serious 

injury in the event of a collision.

Do not apply a heavy load to the 

front passenger seat or equip-

ment.

Do not put weight on the front 

passenger seat by putting your 

hands or feet on the front pas-

senger seat seatback from the 

rear passenger seat.

Do not let a rear passenger lift 

the front passenger seat with 

their feet or press on the seat-

back with their legs.

Do not put objects under the 

front passenger seat.

Do not recline the front passen-

ger seatback so far that it 

touches a rear seat. This may 

cause the “AIR BAG OFF” indi-

cator light to be illuminated, 

which indicates that the SRS 

airbags for the front passenger 

will not activate in the event of a 

severe accident. If the seatback 

touches the rear seat, return the 

seatback to a position where it 

does not touch the rear seat. 

Keep the front passenger seat-

back as upright as possible 

when the vehicle is moving. 

Reclining the seatback exces-

sively may lessen the effective-

ness of the seat belt system.

If an adult sits in the front pas-

senger seat, the “AIR BAG ON” 

indicator light is illuminated. If 

the “AIR BAG OFF” indicator is 

illuminated, ask the passenger 

to sit up straight, well back in 

the seat, feet on the floor, and 

with the seat belt worn correctly. 

If the “AIR BAG OFF” indicator 

still remains illuminated, either 

ask the passenger to move to 

the rear seat, or if that is not 

possible, move the front pas-

senger seat fully rearward.

When it is unavoidable to install 

a forward-facing child restraint 

system on the front passenger 

seat, install the child restraint 

system on the front passenger 

seat in the proper order. 

(

P.50)

Do not modify or remove the 

front seats.

Do not kick the front passenger 

seat or subject it to severe 

impact. Otherwise, the SRS 

warning light may come on to 

indicate a malfunction of the 

front passenger occupant clas-

sification system. In this case, 

contact your Toyota dealer 

immediately.

43

1-1. For safe use

1

For safety and secu

rity

Adult

*1

Child

*4

WARNING

Child restraint systems installed 

on the rear seat should not con-

tact the front seatbacks.

Do not use a seat accessory, 

such as a cushion and seat 

cover, that covers the seat 

cushion surface.

Do not modify or replace the 

upholstery of the front seat.

Front passenger occupant classification system condi-

tions and operation

Indicator/warning 

light

“AIR BAG ON” and “AIR BAG 

OFF” indicator lights

“AIR BAG ON”

SRS warning light

Off

Front passenger’s seat belt 

reminder light

Off

*2

 or flashing

*3

Devices

Front passenger airbag

Activated

Seat cushion airbag in the front 

passenger side

Activated

*2

 or 

deactivated

*3

Indicator/warning 

light

“AIR BAG ON” and “AIR BAG 

OFF” indicator lights

“AIR BAG OFF” or 

“AIR BAG ON”

*4

SRS warning light

Off

Front passenger’s seat belt 

reminder light

Off

*2

 or flashing

*3

Devices

Front passenger airbag

Deactivated or 

activated

*4

Seat cushion airbag in the front 

passenger side

Deactivated or 

activated

*4, 2

44

1-1. For safe use

Child restraint system with infant

*5

Unoccupied

There is a malfunction in the system

*1

: The system judges a person of adult size as an adult. When a smaller 

adult sits in the front passenger seat, the system may not recognize 
him/her as an adult depending on his/her physique and posture.

*2

: In the event the front passenger is wearing a seat belt.

*3

: In the event the front passenger does not wear a seat belt.

*4

: For some children, child in seat, child in booster seat or child in convert-

Indicator/warning 

light

“AIR BAG ON” and “AIR BAG 

OFF” indicator lights

“AIR BAG OFF”

*6

SRS warning light

Off

Front passenger’s seat belt 

reminder light

Off

*2

 or flashing

*3

Devices

Front passenger airbag

Deactivated

Seat cushion airbag in the front 

passenger side

Indicator/warning 

light

“AIR BAG ON” and “AIR BAG 

OFF” indicator lights

“AIR BAG OFF”

SRS warning light

Off

Front passenger’s seat belt 

reminder light

Devices

Front passenger airbag

Deactivated

Seat cushion airbag in the front 

passenger side

Indicator/warning 

light

“AIR BAG ON” and “AIR BAG 

OFF” indicator lights

“AIR BAG OFF”

SRS warning light

On

Front passenger’s seat belt 

reminder light

Devices

Front passenger airbag

Deactivated

Seat cushion airbag in the front 

passenger side

45

1-1. For safe use

1

For safety and secu

rity

ible seat, the system may not recognize him/her as a child. Factors 
which may affect this can be the physique or posture.

*5

: Never install a rear-facing child restraint system on the front passenger 

seat. A forward-facing child restraint system should only be installed on 
the front passenger seat when it is unavoidable. (

P.48)

*6

: In case the indicator light is not illuminated, consult this manual on how 

to install the child restraint system properly. (

P.48)

46

1-1. For safe use

Exhaust gas precau-

tions

Harmful substance to the 

human body is included in 

exhaust gases if inhaled.

WARNING

Exhaust gases include harmful 

carbon monoxide (CO), which is 

colorless and odorless. Observe 

the following precautions.

Failure to do so may cause 

exhaust gases enter the vehicle 

and may lead to an accident 

caused by light-headedness, or 

may lead to death or a serious 

health hazard.

Important points while driving

Keep the trunk lid closed.

If you smell exhaust gases in 

the vehicle even when the trunk 

lid is closed, open the windows 

and have the vehicle inspected 

at your Toyota dealer as soon 

as possible.

When parking

If the vehicle is in a poorly venti-

lated area or a closed area, 

such as a garage, stop the 

engine.

Do not leave the vehicle with 

the engine on for a long time.

If such a situation cannot be 

avoided, park the vehicle in an 

open space and ensure that 

exhaust fumes do not enter the 

vehicle interior.

Do not leave the engine running 

in an area with snow build-up, 

or where it is snowing. If snow-

banks build up around the vehi-

cle while the engine is running, 

exhaust gases may collect and 

enter the vehicle.

Exhaust pipe

The exhaust system needs to be 

checked periodically. If there is a 

hole or crack caused by corro-

sion, damage to a joint or abnor-

mal exhaust noise, be sure to 

have the vehicle inspected and 

repaired by your Toyota dealer.

47

1-2. Child safety

1

For safety and secu

rity

1-2.Child safety

Riding with children

Observe the following pre-

cautions when children are 

in the vehicle.

Use a child restraint system 

appropriate for the child, 

until the child becomes 

large enough to properly 

wear the vehicle’s seat belt.

It is recommended that chil-

dren sit in the rear seats to 

avoid accidental contact 

with the shift lever, wiper 

switch, etc.

Use the rear door child-pro-

tector lock or the window 

lock switch to avoid children 

opening the door while driv-

ing or operating the power 

window accidentally. 

(

P.110, 130)

Do not let small children 

operate equipment which 

may catch or pinch body 

parts, such as the power 

window, hood, trunk, seats, 

etc.

WARNING

When children are in the vehi-

cle

Never leave children unattended 

in the vehicle, and never allow 

children to have or use the key.
Children may be able to start the 

vehicle or shift the vehicle into 

neutral. There is also a danger 

that children may injure them-

selves by playing with the win-

dows, the moon roof (if equipped) 

or other features of the vehicle. In 

addition, heat build-up or 

extremely cold temperatures 

inside the vehicle can be fatal to 

children.

48

1-2. Child safety

Points to remember: P.48
Child restraint system: P.50
When using a child restraint sys-

tem: P.53
Child restraint system installa-

tion method

• Fixed with a seat belt: P.55

• Fixed with a child restraint 

LATCH anchor (except for 

Puerto Rico): P.59

• Fixed with an ISOFIX lower 

anchorage (for Puerto Rico): 

P.61

• Using an anchor bracket (for 

top tether strap) (except for 

Puerto Rico): P.63

• Using a top tether anchorage 

(for Puerto Rico): P.64

The laws of all 50 states of the 

U.S.A. as well as Canada now 

require the use of child restraint 

systems.

Prioritize and observe the 

warnings, as well as the laws 

and regulations for child 

restraint systems.

Use a child restraint system 

until the child becomes large 

enough to properly wear the 

vehicle’s seat belt.

Choose a child restraint sys-

tem that suits your vehicle 

and is appropriate to the age 

and size of the child.

Child restraint sys-

tems

Before installing a child 

restraint system in the vehi-

cle, there are precautions 

that need to be observed, 

different types of child 

restraint systems, as well as 

installation methods, etc., 

written in this manual.

Use a child restraint system 

when riding with a small child 

that cannot properly use a 

seat belt. For the child’s 

safety, install the child 

restraint system to a rear seat. 

Be sure to follow the installa-

tion method that is in the oper-

ation manual enclosed with 

the restraint system.

Table of contents

Points to remember

WARNING

When a child is riding

Observe the following precau-

tions. 

Failure to do so may result in 

death or serious injury.

For effective protection in auto-

mobile accidents and sudden 

stops, a child must be properly 

restrained, using a seat belt or 

child restraint system which is 

correctly installed. For installa-

tion details, refer to the opera-

tion manual enclosed with the 

child restraint system. General 

installation instruction is pro-

vided in this manual.

49

1-2. Child safety

1

For safety and secu

rity

WARNING

Toyota strongly urges the use of 

a proper child restraint system 

that conforms to the weight and 

size of the child, installed on the 

rear seat. According to accident 

statistics, the child is safer when 

properly restrained in the rear 

seat than in the front seat.

Holding a child in your or some-

one else’s arms is not a substi-

tute for a child restraint system. 

In an accident, the child can be 

crushed against the windshield 

or between the holder and the 

interior of the vehicle.

Handling the child restraint 

system

If the child restraint system is not 

properly fixed in place, the child or 

other passengers may be seri-

ously injured or even killed in the 

event of sudden braking, sudden 

swerving, or an accident.

If the vehicle were to receive a 

strong impact from an accident, 

etc., it is possible that the child 

restraint system has damage 

that is not readily visible. In 

such cases, do not reuse the 

restraint system.

Make sure you have complied 

with all installation instructions 

provided with the child restraint 

system manufacturer and that 

the system is properly secured.

Keep the child restraint system 

properly secured on the seat 

even if it is not in use. Do not 

store the child restraint system 

unsecured in the passenger 

compartment.

If it is necessary to detach the 

child restraint system, remove it 

from the vehicle or store it 

securely in the trunk.

50

1-2. Child safety

Types of child restraint system installation methods

Confirm with the operation manual enclosed with the child restraint 
system about the installation of the child restraint system.

Child restraint system

51

1-2. Child safety

1

For safety and secu

rity

Installation method

Page

Seat belt attachment

P.55

52

1-2. Child safety

Except for Puerto Rico: 

Child restraint LATCH 

anchors attachment

For Puerto Rico: 

ISOFIX lower anchor-

age attachment

Except for Puerto Rico: 

For Puerto Rico: 

P.59, 61

Installation method

Page

53

1-2. Child safety

1

For safety and secu

rity

When installing a child 
restraint system to a front 
passenger seat

For the safety of a child, install a 
child restraint system to a rear 
seat. When installing a child 
restraint system to a front pas-
senger seat is unavoidable, 
adjust the seat as follows and 
install the child restraint system:

Move the front seat fully rear-
ward.

If the passenger seat height 

can be adjusted, Adjust the 
seat height to the upper most 
position.

Adjust the seatback angle to 
the most upright position.

If there is a gap between the child 
seat and the seatback, adjust the 
seatback angle until good contact is 
achieved.

If the head restraint interferes 
with the child restraint system 
installation and the head 
restraint can be removed, 
remove the head restraint.

Otherwise, put the head restraint in 
the upper most position.

Except for Puerto Rico: 

Anchor brackets (for 

top tether strap) attach-

ment

For Puerto Rico: 

Top tether anchorage 

attachment

Except for Puerto Rico:

For Puerto Rico: 

P.63, 64

Installation method

Page

When using a child 
restraint system

54

1-2. Child safety

WARNING

When using a child restraint 

system

Observe the following precau-

tions.

Failure to do so may result in 

death or serious injury.

Never install a rear-facing child 

restraint system on the front 

passenger seat even if the “AIR 

BAG OFF” indicator light is illu-

minated. In the event of an acci-

dent, the force of the rapid 

inflation of the front passenger 

airbag can cause death or seri-

ous injury to the child if the 

rear-facing child restraint sys-

tem is installed on the front pas-

senger seat.

A forward-facing child restraint 

system may be installed on the 

front passenger seat only when 

it is unavoidable. A child 

restraint system that requires a 

top tether strap should not be 

used in the front passenger seat 

since there is no top tether strap 

anchor for the front passenger 

seat.

A forward-facing child restraint 

system may be installed on the 

front passenger seat only when 

it is unavoidable. When install-

ing a forward-facing child 

restraint system on the front 

passenger seat, adjust the seat-

back angle to the most upright 

position, move the seat to the 

rearmost position, and raise the 

seat to the upper most position, 

even if the “AIR BAG OFF” indi-

cator light is illuminated. If the 

head restraint interferes with the 

child restraint system installa-

tion and the head restraint can 

be removed, remove the head 

restraint.

Do not allow the child to lean 

his/her head or any part of 

his/her body against the door or 

the area of the seat, front or rear 

pillars, or roof side rails from 

which the SRS side airbags or 

SRS curtain shield airbags 

deploy even if the child is 

seated in the child restraint sys-

tem. It is dangerous if the SRS 

side and curtain shield airbags 

inflate, and the impact could 

cause death or serious injury to 

the child.

55

1-2. Child safety

1

For safety and secu

rity

A child restraint system for a 

small child or baby must itself be 

properly restrained on the seat 

with the lap portion of the 

lap/shoulder belt.

Installing child restraint 

system using a seat belt 

(child restraint lock func-

tion belt)

Install the child restraint system 

in accordance to the operation 

manual enclosed with the child 

restraint system.

Rear-facing 

 Infant 

seat/convertible seat

1

Place the child restraint sys-

tem on the rear seat facing 

the rear of the vehicle.

2

Run the seat belt through the 

child restraint system and 

insert the plate into the 

buckle. Make sure that the 

belt is not twisted.

3

Fully extend the shoulder belt 

and allow it to retract to put it 

WARNING

When a booster seat is 

installed, always ensure that the 

shoulder belt is positioned 

across the center of the child’s 

shoulder. The belt should be 

kept away from the child’s neck, 

but not so that it could fall off the 

child’s shoulder.

Use child restraint system suit-

able to the age and size of the 

child and install it to the rear 

seat.

If the driver’s seat interferes 

with the child restraint system 

and prevents it from being 

attached correctly, attach the 

child restraint system to the 

right-hand rear seat.

Adjust the front passenger seat 

so that it does not interfere with 

the child restraint system.

Child restraint system 

fixed with a seat belt

56

1-2. Child safety

in lock mode. In lock mode, 
the belt cannot be extended.

4

While pushing the child 
restraint system down into 
the rear seat, allow the shoul-
der belt to retract until the 
child restraint system is 
securely in place.

After the shoulder belt has 
retracted to a point where there is 
no slack in the belt, pull the belt to 
check that it cannot be extended.

5

After installing the child 
restraint system, rock it back 
and forth to ensure that it is 
installed securely. (

P.58)

Forward-facing 

 Convert-

ible seat

1

If installing the child restraint 
system to the front passen-
ger seat is unavoidable, refer 
to P.53for the front passenger 
seat adjustment.

2

Place the child restraint sys-
tem on the seat facing the 
front of the vehicle.

3

Run the seat belt through the 
child restraint system and 
insert the plate into the 
buckle. Make sure that the 
belt is not twisted.

4

Fully extend the shoulder belt 
and allow it to retract to put it 
in lock mode. In lock mode, 
the belt cannot be extended.

5

While pushing the child 
restraint system into the rear 

57

1-2. Child safety

1

For safety and secu

rity

seat, allow the shoulder belt 
to retract until the child 
restraint system is securely in 
place.

After the shoulder belt has 
retracted to a point where there is 
no slack in the belt, pull the belt to 
check that it cannot be extended.

6

If the child restraint has a top 
tether strap, follow the child 
restraint manufacturer’s 
operation manual regarding 
the installation, using the top 
tether strap to latch onto the 
top tether strap anchor. 
(

P.63)

7

After installing the child 
restraint system, rock it back 
and forth to ensure that it is 
installed securely. (

P.58)

Booster seat

1

If installing the child restraint 
system to the front passen-
ger seat is unavoidable, refer 
to P.53for the front passenger 
seat adjustment.

2

High back type: If the head 
restraint interferes with your 
child restraint system, and 
the head restraint can be 
removed, remove the head 

restraint.
Otherwise, put the head 
restraint in the upper most 
position. (

P.122)

3

Place the child restraint sys-
tem on the seat facing the 
front of the vehicle.

Booster type

High back type

4

Sit the child in the child 
restraint system. Fit the seat 
belt to the child restraint sys-
tem according to the manu-
facturer’s instructions and 
insert the plate into the 
buckle. Make sure that the 
belt is not twisted.

Check that the shoulder belt is cor-
rectly positioned over the child’s 
shoulder and that the lap belt is as 

58

1-2. Child safety

low as possible. (

P.27)

Removing a child restraint 

system installed with a seat 

belt

Press the buckle release button 

and fully retract the seat belt.

When releasing the buckle, the 

child restraint system may spring 

up due to the rebound of the seat 

cushion. Release the buckle while 

holding down the child restraint 

system.
Since the seat belt automatically 

reels itself, slowly return it to the 

stowing position.

WARNING

When installing a child 

restraint system

Observe the following precau-

tions. 

Failure to do so may result in 

death or serious injury.

Do not allow children to play 

with the seat belt. If the seat belt 

becomes twisted around a 

child’s neck, it may lead to 

choking or other serious injuries 

that could result in death.

If this occurs and the buckle 

cannot be unfastened, scissors 

should be used to cut the belt.

Ensure that the belt and plate 

are securely locked and the 

seat belt is not twisted.

Shake the child restraint system 

left and right, and forward and 

backward to ensure that it has 

been securely installed.

After securing a child restraint 

system, never adjust the seat.

When a booster seat is 

installed, always ensure that the 

shoulder belt is positioned 

across the center of the child’s 

shoulder. The belt should be 

kept away from the child’s neck, 

but not so that it could fall off the 

child’s shoulder.

Follow all installation instruc-

tions provided by the child 

restraint system manufacturer.

When securing some types of 

child restraint systems in rear 

seats, it may not be possible to 

properly use the seat belts in 

positions next to the child 

restraint without interfering with 

it or affecting seat belt effective-

ness. Be sure your seat belt fits 

snugly across your shoulder 

and low on your hips. If it does 

not, or if it interferes with the 

child restraint, move to a differ-

ent position. Failure to do so 

may result in death or serious 

injury.

59

1-2. Child safety

1

For safety and secu

rity

Child restraint LATCH 

anchors

LATCH anchors are provided for 

the outboard rear seat. (Marks 

displaying the location of the 

anchors are attached to the 

seats.)

When installing in the rear 

outboard seats

Install the child restraint system 

in accordance to the operation 

manual enclosed with the child 

restraint system.

With flexible lower attach-

ments

1

Remove the anchor covers, 

and install the child restraint 

system to the seat.

The bars are installed behind the 

anchor covers.
For owners in Canada:

The symbol on a child restraint sys-

tem indicates   the presence of a 

lower connector system.

Canada only

With rigid lower attachments

1

Remove the anchor covers, 

and install the child restraint 

system to the seat.

The bars are installed behind the 

anchor covers.
For owners in Canada:

The symbol on a child restraint sys-

tem indicates   the presence of a 

WARNING

When installing a booster 

seat

To prevent the belt from going into 

ALR lock mode, do not fully 

extend the shoulder belt. ALR 

mode causes the belt to tighten 

only. This could cause injury or 

discomfort to the child. (

P.29)

Do not use a seat belt 

extender

If a seat belt extender is used 

when installing a child restraint 

system, the seat belt will not 

securely hold the child restraint 

system, which could cause death 

or serious injury to the child or 

other passengers in the event of 

sudden braking, sudden swerv-

ing or an accident.

Child restraint system 

fixed with a child restraint 

LATCH anchor (except for 

Puerto Rico)

60

1-2. Child safety

lower connector system.

Canada only

2

If the child restraint has a top 

tether strap, follow the child 

restraint manufacturer’s 

operation manual regarding 

the installation, using the top 

tether strap to latch onto the 

top tether strap anchor. 

(

P.63)

3

After installing the child 

restraint system, rock it back 

and forth to ensure that it is 

installed securely. (

P.58)

When installing in the rear 

center seat

There are no LATCH anchors 

behind the rear center seat. 

However, the inboard LATCH 

anchors of the outboard seats, 

which are 15.6 in. (396 mm) 

apart, can be used if the child 

restraint system manufacturer’s 

instructions permit use of those 

anchors with the anchor spacing 

stated.

Child restraint systems with rigid 

lower attachments cannot be 

installed in the center seat. This 

type of child restraint system 

can only be installed in the out-

board seat.

Laws and regulations pertain-

ing to anchors

The LATCH system conforms to 

FMVSS225 or CMVSS210.2. 

Child restraint systems conforming 

to FMVSS213 or CMVSS213 speci-

fications can be used. 

This vehicle is designed to conform 

to SAE J1819.

WARNING

When installing a child 

restraint system

Observe the following precau-

tions. 

Failure to do so may result in 

death or serious injury.

When using the LATCH 

anchors, be sure that there are 

no foreign objects around the 

anchors and that the seat belt is 

not caught behind the child 

restraint system.

Follow all installation instruc-

tions provided by the child 

restraint system manufacturer.

Never attach two child restraint 

system attachments to the 

same anchor. In a collision, one 

anchor may not be strong 

enough to hold two child 

restraint system attachments 

and may break. If the LATCH 

anchors are already in use, use 

the seat belt to install a child 

restraint system in the center 

seat.

61

1-2. Child safety

1

For safety and secu

rity

ISOFIX lower anchorages 

(ISOFIX child restraint sys-

tem)

Lower anchorages are provided 

for the outboard rear seats. 

(Marks displaying the location of 

the anchorages are attached to 

the seats.)

When installing in the rear 

outboard seats

Install the child restraint system 

in accordance to the operation 

manual enclosed with the child 

restraint system.

With flexible lower attach-

ments

1

Remove the anchorage cov-

ers, and install the child 

restraint system to the seat.

The bars are installed behind the 

anchorage covers.

With rigid lower attachments

1

Remove the anchorage cov-

ers, and install the child 

restraint system to the seat.

The bars are installed behind the 

WARNING

When securing some types of 

child restraint systems in rear 

seats, it may not be possible to 

properly use the seat belts in 

positions next to the child 

restraint without interfering with 

it or affecting seat belt effective-

ness. Be sure your seat belt fits 

snugly across your shoulder 

and low on your hips. If it does 

not, or if it interferes with the 

child restraint, move to a differ-

ent position. Failure to do so 

may result in death or serious 

injury.

If the seat is adjusted, reconfirm 

the security of the child restraint 

system.

Child restraint system 

fixed with an ISOFIX lower 

anchorage (for Puerto 

Rico)

62

1-2. Child safety

anchorage covers.

2

If the child restraint has a top 

strap, follow the child 

restraint manufacturer’s 

operation manual regarding 

the installation, using the top 

strap to latch onto the top 

strap anchorage. (

P.63)

3

After installing the child 

restraint system, rock it back 

and forth to ensure that it is 

installed securely. (

P.58)

When installing in the rear 

center seat

There are no lower anchorages 

behind the rear center seat. 

However, the inboard lower 

anchorages of the outboard 

seats, which are 15.6 in. (396 

mm) apart, can be used if the 

child restraint system manufac-

turer’s instructions permit use of 

those anchorages with the 

anchorage spacing stated.
Child restraint systems with rigid 

lower attachments cannot be 

installed in the center seat. This 

type of child restraint system 

can only be installed in the out-

board seat.

WARNING

When installing a child 

restraint system

Observe the following precau-

tions. 

Failure to do so may result in 

death or serious injury.

When using the lower anchor-

ages, be sure that there are no 

foreign objects around the 

anchorages and that the seat 

belt is not caught behind the 

child restraint system.

Follow all installation instruc-

tions provided by the child 

restraint system manufacturer.

Never attach two child restraint 

system attachments to the 

same anchorage. In a collision, 

one anchorage may not be 

strong enough to hold two child 

restraint system attachments 

and may break. If the lower 

anchorages are already in use, 

use the seat belt to install a 

child restraint system in the cen-

ter seat.

When securing some types of 

child restraint systems in rear 

seats, it may not be possible to 

properly use the seat belts in 

positions next to the child 

restraint without interfering with 

it or affecting seat belt effective-

ness. Be sure your seat belt fits 

snugly across your shoulder 

and low on your hips. If it does 

not, or if it interferes with the 

child restraint, move to a differ-

ent position. Failure to do so 

may result in death or serious 

injury.

63

1-2. Child safety

1

For safety and secu

rity

Anchor brackets (for top 

tether strap)

Anchor brackets are provided 

for each rear seat.
Use anchor brackets when fix-

ing the top tether strap.

Anchor brackets
Top tether strap

Fixing the top tether strap 

to the anchor bracket

Install the child restraint system 

in accordance to the operation 

manual enclosed with the child 

restraint system.

Rear outboard seats

Open the anchor bracket cover, 

latch the hook onto the anchor 

bracket and tighten the top 

tether strap.

Make sure the top tether strap is 

securely latched.  (

P.58)

Hook
Top tether strap

Rear center seat

Latch the hook onto the anchor 

bracket and tighten the top 

tether strap.

Make sure the top tether strap is 

securely latched.  (

P.58)

Hook
Top tether strap

Laws and regulations pertain-

ing to anchors

The LATCH system conforms to 

FMVSS225 or CMVSS210.2. 

Child restraint systems conforming 

to FMVSS213 or CMVSS213 speci-

fications can be used. 

This vehicle is designed to conform 

to SAE J1819.

WARNING

If the seat is adjusted, reconfirm 

the security of the child restraint 

system.

Using an anchor bracket 

(for top tether strap) 

(except for Puerto Rico)

64

1-2. Child safety

Top tether anchorages

Top tether anchorages are pro-

vided for each rear seat.
Use top tether anchorages 

when fixing the top strap.

Top tether anchorages
Top strap

Fixing the top strap to the 

top tether anchorages

Install the child restraint system 

in accordance to the operation 

manual enclosed with the child 

restraint system.

Rear outboard seats

Open the top tether anchorage 

cover, latch the hook onto the 

top tether anchorage and 

tighten the top strap.

Make sure the top strap is securely 

latched.  (

P.58)

Hook
Top strap

Rear center seat

Latch the hook onto the top 

WARNING

When installing a child 

restraint system

Observe the following precau-

tions. 

Failure to do so may result in 

death or serious injury.

Firmly attach the top tether 

strap and make sure that the 

belt is not twisted.

Do not attach the top tether 

strap to anything other than the 

anchor bracket.

After securing a child restraint 

system, never adjust the seat.

Follow all installation instruc-

tions provided by the child 

restraint system manufacturer.

NOTICE

Anchor brackets (for top 

tether strap)

When not in use, make certain to 

close the lid. If it remains open, 

the lid may be damaged.

Using a top tether anchor-

age (for Puerto Rico)


Content      ..      1      2      3      ..