Toyota Prius (2023 year). Manual in english - page 38
 

  Index      Toyota     Toyota Prius (2023 year). Manual in english


Search            copyright infringement  


Content      ..     36      37      38      39     ..


Toyota Prius (2023 year). Manual in english - page 38


627

7-2. Steps to take in an emergency

7

W

hen
 trou

bl

e ari

se

s

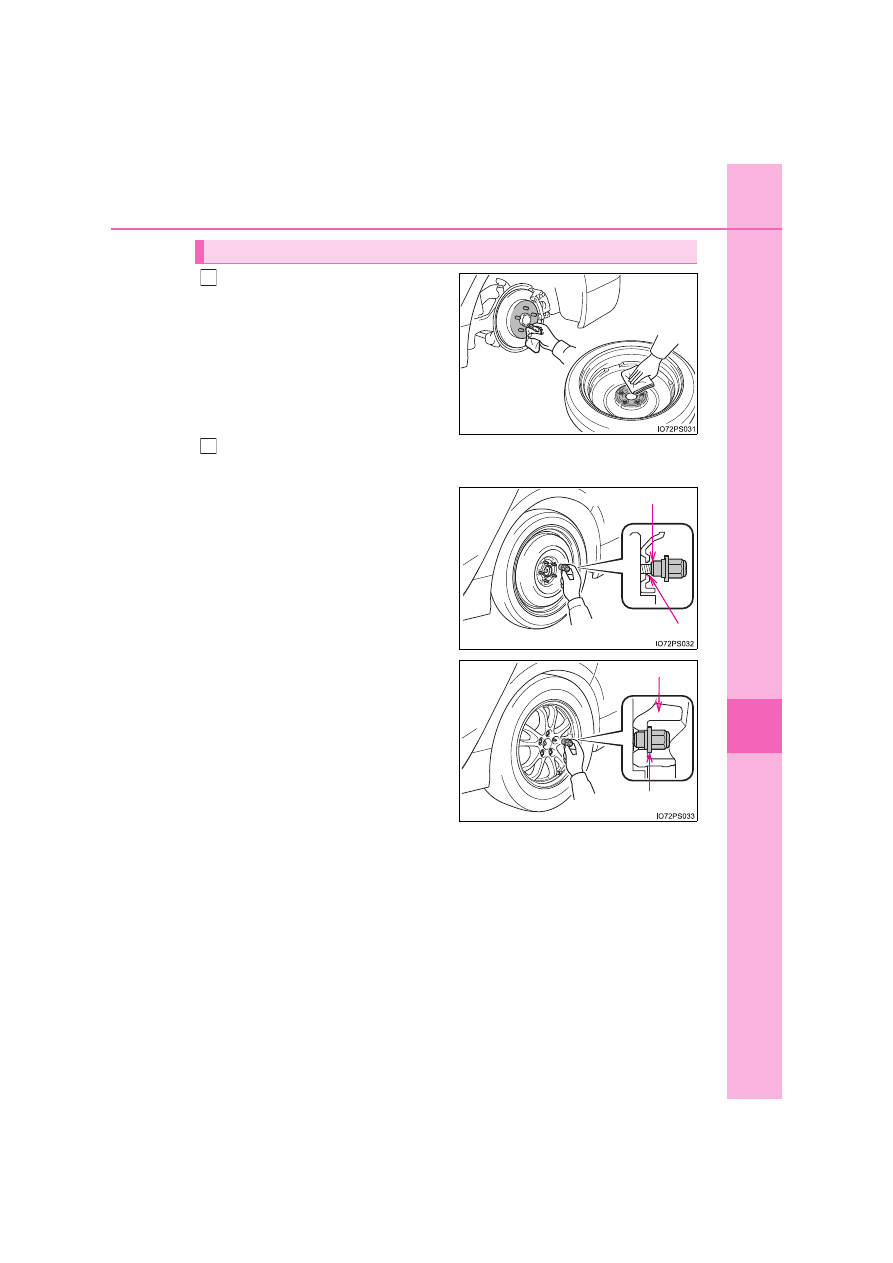
Remove any dirt or foreign mat-
ter from the wheel contact sur-
face.

If foreign matter is on the wheel
contact surface, the wheel nuts
may loosen while the vehicle is in
motion, causing the tire to come
off.

Install the spare tire and loosely tighten each wheel nut by hand by
approximately the same amount.

When replacing an aluminum
wheel with a steel wheel
(including a compact spare
tire), tighten the wheel nuts until
the tapered portion comes into
loose contact with the disc
wheel seat.

When replacing an aluminum
wheel with an aluminum wheel,
turn the wheel nuts until the
washers come into contact with
the disc wheel.

Installing the spare tire

1

2

Tapered portion

Disc wheel seat

Washer

Disc wheel

628

7-2. Steps to take in an emergency

Lower the vehicle.

Firmly tighten each wheel nut
two or three times in the order
shown in the illustration.

Tightening torque:

103 N•m (10.5 kgf•m, 76 ft•lbf)

For vehicles with 195/65R15
tires: When reinstalling an origi-
nal wheel or installing a full-size
spare tire, reinstall the wheel
ornament.

*

Align the cutout of the wheel orna-
ment with the valve stem as
shown.

*

: The wheel ornament cannot be

installed on the compact spare tire.

Stow the flat tire, tire jack and all tools.

3

4

5

6

629

7-2. Steps to take in an emergency

7

W

hen
 trou

bl

e ari

se

s

The compact spare tire (if equipped)

The compact spare tire is identified by the label “TEMPORARY USE ONLY”
on the tire sidewall.
Use the compact spare tire temporarily, and only in an emergency.

Make sure to check the tire inflation pressure of the compact spare tire.
(

P. 665)

When using the compact spare tire (vehicles with the tire pressure warn-
ing system)

As the compact spare tire is not equipped with a tire pressure warning valve
and transmitter, low inflation pressure of the spare tire will not be indicated by
the tire pressure warning system. Also, if you replace the compact spare tire
after the tire pressure warning light comes on, the light remains on.

When the compact spare tire is equipped (if equipped)

The vehicle height may become lower when driving with the compact spare
tire compared to when driving with standard tires.

If you have a flat front tire on a road covered with snow or ice (vehicles
with compact spare tire)

Install the compact spare tire on one of the rear wheels of the vehicle. Per-
form the following steps and fit tire chains to the front tires:

Replace a rear tire with the compact spare tire.
Replace the flat front tire with the tire removed from the rear of the vehicle.
Fit tire chains to the front tires.

Jack point

Storing the jack

The mark indicating the jack point is
stamped on the underside of the vehicle.

Place the jack in the same direction as the
mark next to the storage space.

1

2

3

632

7-2. Steps to take in an emergency

WARNING

When using the compact spare tire (if equipped)

Remember that the spare tire provided is specifically designed for use with
your vehicle. Do not use your spare tire on another vehicle.

Do not use more than one compact spare tire simultaneously.

Replace the spare tire with a standard tire as soon as possible.

Avoid sudden acceleration, abrupt steering, sudden braking and shifting
operations that cause sudden engine braking.

When the compact spare tire is attached (if equipped)

The vehicle speed may not be correctly detected, and the following systems
may not operate correctly:

Also, not only can the following system not be utilized fully, but it may even
negatively affect the drive-train components:
• E-Four (Electric Four wheel drive system)

*

*

: If equipped

Speed limit when using the compact spare tire (if equipped)

Do not drive at speeds in excess of 80 km/h (50 mph) when a compact
spare tire is installed on the vehicle.
The compact spare tire is not designed for driving at high speeds. Failure to
observe this precaution may lead to an accident causing death or serious
injury.

After using the tools and jack

Before driving, make sure all the tools and jack are securely in place in their
storage location to reduce the possibility of personal injury during a collision
or sudden braking.

• ABS & Brake assist
• VSC
• TRC
• EPS
• AHB (Automatic High Beam)

*

• PCS (Pre-Collision System)

*

• LTA (Lane Tracing Assist)

*

• Dynamic radar cruise control with

full-speed range

*

• Cruise control

*

• BSM (Blind Spot Monitor)

*

• Toyota parking assist-sensor

*

• Parking Support Brake function

*

• Simple Intelligent Parking Assist

System

*

• Toyota parking assist monitor

*

• Navigation system

*

• Panoramic view monitor

*

633

7-2. Steps to take in an emergency

7

W

hen
 trou

bl

e ari

se

s

NOTICE

Be careful when driving over bumps with the compact spare tire
installed on the vehicle. (if equipped)

The vehicle height may become lower when driving with the compact spare
tire, compared to when driving with standard tires. Be careful when driving
over uneven road surfaces.

Driving with tire chains and the compact spare tire (if equipped)

Do not fit tire chains to the compact spare tire.
Tire chains may damage the vehicle body and adversely affect driving per-
formance.

When replacing the tires (vehicles with the tire pressure warning sys-
tem)

When removing or fitting the wheels, tires or the tire pressure warning valve
and transmitter, contact any authorized Toyota retailer or Toyota authorized
repairer, or any reliable repairer as the tire pressure warning valve and
transmitter may be damaged if not handled correctly.

Handling the decorative resin parts (for vehicles equipped with 17-inch
wheels)

P. 500

634

7-2. Steps to take in an emergency

If the hybrid system will not start

One of the following may be the cause of the problem:

The electronic key may not be functioning properly.

*

 (

P. 636)

There may not be sufficient fuel in the vehicle’s tank.
Refuel the vehicle. (

P. 86)

There may be a malfunction in the immobilizer system.

*

 (

P. 91)

There may be a malfunction in the shift control system.

*


(

P. 247, 597)

The hybrid system may be malfunctioning due to an electrical prob-
lem such as electronic key battery depletion or a blown fuse. How-
ever, depending on the type of malfunction, an interim measure is
available to start the hybrid system. (

P. 635)

*

: It may not be possible to shift the shift position other than P.

One of the following may be the cause of the problem:

The 12-volt battery may be discharged. (

P. 639)

The 12-volt battery terminal connections may be loose or corroded. 
(

P. 521)

Reasons for the hybrid system not starting vary depending on
the situation. Check the following and perform the appropriate
procedure: 

The hybrid system will not start even though the correct starting
procedure is being followed. (

P. 244)

The interior lights and headlights are dim, or the horn does not
sound or sounds at a low volume.

635

7-2. Steps to take in an emergency

7

W

hen
 trou

bl

e ari

se

s

One of the following may be the cause of the problem:

The 12-volt battery may be discharged. (

P. 639)

One or both of the 12-volt battery terminals may be disconnected. 
(

P. 521)

Contact any authorized Toyota retailer or Toyota authorized repairer, or any
reliable repairer if the problem cannot be repaired, or if repair procedures
are unknown.

When the hybrid system does not start, the following steps can be
used as an interim measure to start the hybrid system if the power
switch is functioning normally. 
Do not use this starting procedure except in cases of emergency.

Set the parking brake.
Turn the power switch to ACCESSORY mode.
Press and hold the power switch for about 15 seconds while
depressing the brake pedal firmly.

Even if the hybrid system can be started using the above steps, the
system may be malfunctioning. Have the vehicle inspected by any
authorized Toyota retailer or Toyota authorized repairer, or any reliable
repairer.

The interior lights and headlights do not turn on, or the horn
does not sound.

Emergency start function 

1

2

3

636

7-2. Steps to take in an emergency

If the electronic key does not operate 

properly

Use the mechanical key (

P. 173) in order to perform the following

operations:

Locks all the doors
Closes the windows and moon
roof 

*

1

 (turn and hold)

*

2

Unlocks all the doors
Opens the windows and moon
roof 

*

1

 (turn and hold)

*

2

*

1

: If equipped

*

2

: This setting must be customized at

any authorized Toyota retailer or
Toyota authorized repairer, or any
reliable repairer. (

P. 670)

If communication between the electronic key and vehicle is inter-
rupted (

P. 190) or the electronic key cannot be used because the

battery is depleted, the smart entry & start system and wireless
remote control cannot be used. In such cases, the doors can be
opened and the hybrid system can be started by following the pro-
cedure below.

Locking and unlocking the doors

1
2

3
4

637

7-2. Steps to take in an emergency

7

W

hen
 trou

bl

e ari

se

s

Depress the brake pedal.

Touch the Toyota emblem side
of the electronic key to the
power switch.

When the electronic key is
detected, a buzzer sounds and the
power switch will turn to ON mode.
When the smart entry & start sys-
tem is deactivated in customization
setting, the power switch will turn
to ACCESSORY mode.

Firmly depress the brake pedal

and check that 

 is shown

on the multi-information display.

Press the power switch.

In the event that the hybrid system still cannot be operated, contact
any authorized Toyota retailer or Toyota authorized repairer, or any
reliable repairer.

Starting the hybrid system

1

2

3

4

638

7-2. Steps to take in an emergency

Stopping the hybrid system

Set the parking brake, shift the shift position to P and press the power switch
as you normally do when stopping the hybrid system.

Replacing the key battery

As the above procedure is a temporary measure, it is recommended that the
electronic key battery be replaced immediately when the battery is depleted. 
(

P. 554)

Alarm (if equipped)

Using the mechanical key to lock the doors will not set the alarm system.
If a door is unlocked using the mechanical key when the alarm system is set,
the alarm may be triggered. (

P. 93)

Changing power switch modes

Release the brake pedal and press the power switch in step   above. The
hybrid system does not start and modes will be changed each time the switch
is pressed. (

P. 246)

When the electronic key does not work properly

Make sure that the smart entry & start system has not been deactivated in
the customization setting. If it is off, turn the function on. 
(Customizable features: 

P. 670)

Check if battery-saving mode is set. If it is set, cancel the function. 
(

P. 189)

WARNING

When using the mechanical key and operating the power windows or
moon roof (if equipped)

Operate the power window or moon roof after checking to make sure that
there is no possibility of any passenger having any of their body parts
caught in the window or moon roof. 
Also, do not allow children to operate the mechanical key. It is possible for
children and other passengers to get caught in the power window or moon
roof.

3

639

7-2. Steps to take in an emergency

7

W

hen
 trou

bl

e ari

se

s

If the 12-volt battery is discharged

If you have a set of jumper (or booster) cables and a second vehicle
with a 12-volt battery, you can jump start your vehicle by following the
steps below.

Vehicles with alarm (

P. 93): 

Confirm that the electronic key
is being carried.

When connecting the jumper (or
booster) cables, depending on the
situation, the alarm may activate
and doors locked. (

P. 95)

Open the hood. (

P. 511)

Remove the engine cover.

Pull up the both ends of the cover
vertically.

The following procedures may be used to start the hybrid sys-
tem if the vehicle’s 12-volt battery is discharged.
You can also call any authorized Toyota retailer or Toyota autho-
rized repairer, or any reliable repairer.

1

2

3

640

7-2. Steps to take in an emergency

Connect the jumper cables according to the following procedure:

Connect a positive jumper cable clamp to the positive (+) battery
terminal on your vehicle.
Connect the clamp on the other end of the positive cable to the
positive (+) battery terminal on the second vehicle.
Connect a negative cable clamp to the negative (-) battery termi-
nal on the second vehicle.
Connect the clamp at the other end of the negative cable to a
solid, stationary, unpainted metallic point away from the 12-volt
battery and any moving parts, as shown in the illustration.

Start the engine of the second vehicle. Increase the engine speed
slightly and maintain at that level for approximately 5 minutes to
recharge the 12-volt battery of your vehicle.
Maintain the engine speed of the second vehicle and start the
hybrid system of your vehicle by turning the power switch to ON
mode.
Make sure the “READY” indicator comes on. If the indicator light
does not come on, contact any authorized Toyota retailer or Toyota
authorized repairer, or any reliable repairer.

4

1

2

3

4

3

2

4

1

5

6

7

641

7-2. Steps to take in an emergency

7

W

hen
 trou

bl

e ari

se

s

Once the hybrid system has started, remove the jumper cables in
the exact reverse order from which they were connected.
To install the engine cover, conduct the removal procedure in
reverse. After installing, check that the fixed pins are inserted
securely.

Once the hybrid system starts, have the vehicle inspected at any
authorized Toyota retailer or Toyota authorized repairer, or any reliable
repairer as soon as possible.

When opening the cover of the positive (+) battery terminal

P. 523

Starting the hybrid system when the 12-volt battery is discharged

The hybrid system cannot be started by push-starting.

To prevent 12-volt battery discharge

Turn off the headlights and the audio system while the hybrid system is off.

Turn off any unnecessary electrical components when the vehicle is running
at a low speed for an extended period, such as in heavy traffic.

When the 12-volt battery is removed or discharged

Information stored in the ECU is cleared. When the 12-volt battery is
depleted, have the vehicle inspected at any authorized Toyota retailer or
Toyota authorized repairer, or any reliable repairer.

Some systems may require initialization. (

P. 679)

When removing the 12-volt battery terminals

When the 12-volt battery terminals are removed, the information stored in the
ECU is cleared. Before removing the 12-volt battery terminals, contact any
authorized Toyota retailer or Toyota authorized repairer, or any reliable
repairer.

Charging the 12-volt battery

The electricity stored in the 12-volt battery will discharge gradually even when
the vehicle is not in use, due to natural discharge and the draining effects of
certain electrical appliances. If the vehicle is left for a long time, the 12-volt
battery may discharge, and the hybrid system may be unable to start. (The
12-volt battery recharges automatically while the hybrid system is operating.)

8

9

642

7-2. Steps to take in an emergency

When recharging or replacing the 12-volt battery

In some cases, it may not be possible to unlock the doors using the smart
entry & start system when the 12-volt battery is discharged. Use the wire-
less remote control or the mechanical key to lock or unlock the doors.

The hybrid system may not start on the first attempt after the 12-volt battery
has recharged but will start normally after the second attempt. This is not a
malfunction.

The power switch mode is memorized by the vehicle. When the 12-volt bat-
tery is reconnected, the system will return to the mode it was in before the
12-volt battery was discharged. Before disconnecting the 12-volt battery,
turn the power switch off. 
If you are unsure what mode the power switch was in before the 12-volt bat-
tery discharged, be especially careful when reconnecting the 12-volt battery.

If the 12-volt battery discharges while the shift position is in P, it may not be
possible to shift the shift position to other positions. In this case, the vehicle
cannot be towed without lifting both front wheels because the front wheels
will be locked. (

P. 572)

When replacing the 12-volt battery

Use a 12-volt battery that conforms to European regulations.

Use a 12-volt battery that the case size is same as the previous one (LN1),
20 hour rate capacity (20HR) is equivalent (45Ah) or greater, and perfor-
mance rating (CCA) is equivalent (295A) or greater.
• If the sizes differ, the 12-volt battery cannot be properly secured.
• If the 20 hour rate capacity is low, even if the time period where the vehi-

cle is not used is a short time, the 12-volt battery may discharge and the
hybrid system may not be able to start.

For details, consult any authorized Toyota retailer or Toyota authorized
repairer, or any reliable repairer.

643

7-2. Steps to take in an emergency

7

W

hen
 trou

bl

e ari

se

s

WARNING

When removing the 12-volt battery terminals

Always remove the negative (-) terminal first. If the positive (+) terminal con-
tacts any metal in the surrounding area when the positive (+) terminal is
removed, a spark may occur, leading to a fire in addition to electrical shocks
and death or serious injury.

Avoiding 12-volt battery fires or explosions

Observe the following precautions to prevent accidentally igniting the flam-
mable gas that may be emitted from the 12-volt battery:

Make sure each jumper cable is connected to the correct terminal and that
it is not unintentionally in contact with any other than the intended terminal.

Do not allow the other end of the jumper cable connected to the “+” termi-
nal to come into contact with any other parts or metal surfaces in the area,
such as brackets or unpainted metal.

Do not allow the + and - clamps of the jumper cables to come into contact
with each other.

Do not smoke, use matches, cigarette lighters or allow open flame near
the 12-volt battery.

12-volt battery precautions

The 12-volt battery contains poisonous and corrosive acidic electrolyte,
while related parts contain lead and lead compounds. Observe the following
precautions when handling the 12-volt battery:

When working with the 12-volt battery, always wear safety glasses and
take care not to allow any battery fluids (acid) to come into contact with
skin, clothing or the vehicle body.

Do not lean over the 12-volt battery.

In the event that battery fluid comes into contact with the skin or eyes,
immediately wash the affected area with water and seek medical attention.
Place a wet sponge or cloth over the affected area until medical attention
can be received.

Always wash your hands after handling the 12-volt battery support, termi-
nals, and other battery-related parts.

Do not allow children near the 12-volt battery.

644

7-2. Steps to take in an emergency

NOTICE

When handling jumper cables

When connecting the jumper cables, ensure that they do not become entan-
gled in the cooling fans, etc.


Content      ..     36      37      38      39     ..