Toyota Land Cruiser Prado (2023 year). Manual in english - page 33
 

  Index      Manuals     Toyota Land Cruiser Prado (2023 year). Manual in english


Search            copyright infringement  


Content      ..     31      32      33      34     ..


Toyota Land Cruiser Prado (2023 year). Manual in english - page 33


530

6-2. Using the interior lights

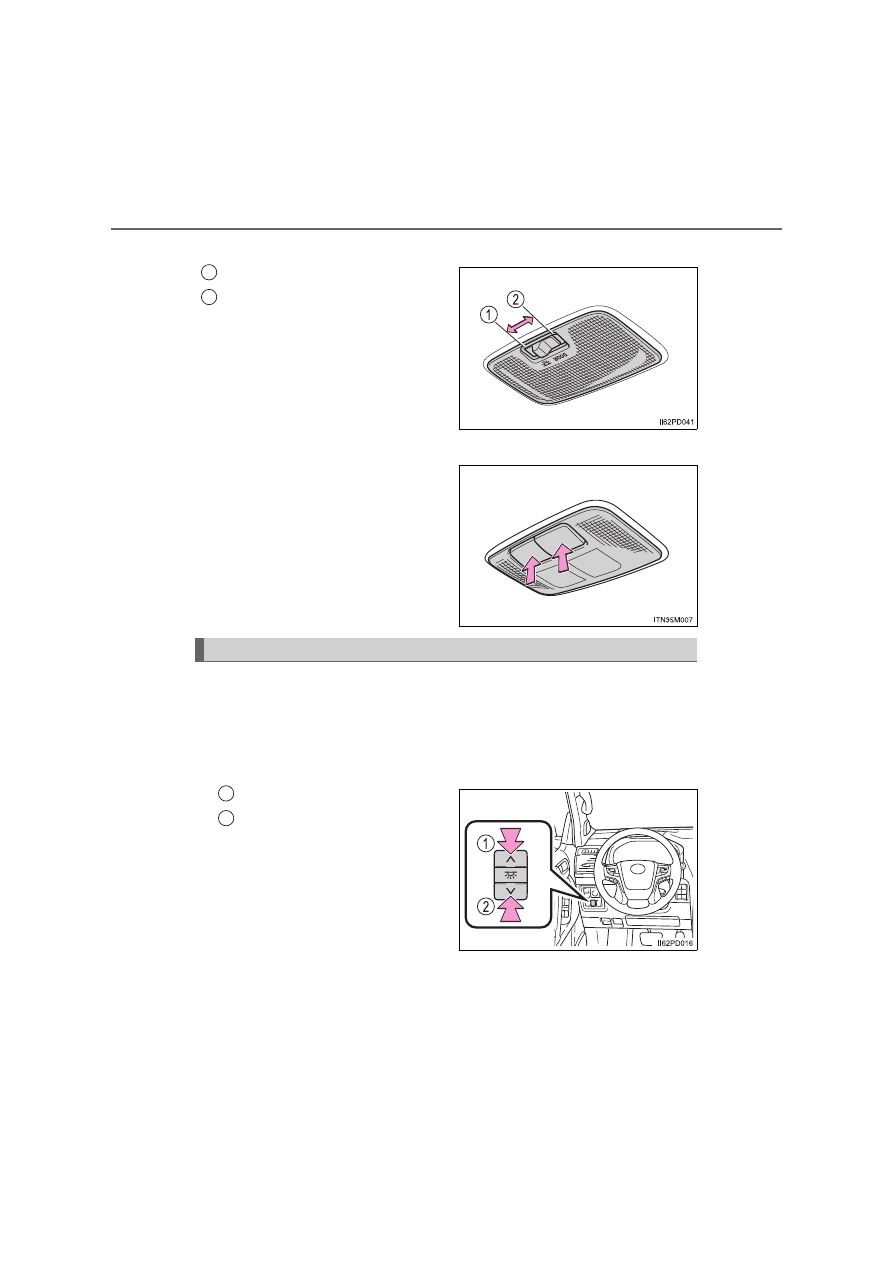
Rear (without personal lights)

Turns the lights on
Turns the door position on

Door position: When the personal/
interior light main switch is in the
“OFF” position, the lights will not
turn on.

Rear (with personal lights)

Turns the lights on/off

The brightness of the following lights can be adjusted:

Inside door handle lights

Ornament illumination

Door pocket lights

Footwell lights

Brighter
Darker

1
2

Lounge illumination control switches (if equipped)

1
2

531

6-2. Using the interior lights

6

In

teri
or f
eatu

res

Illuminated entry system

Vehicles without a smart entry & start system

The lights automatically turn on/off according to the engine switch position,
whether the doors are locked/unlocked, and whether the doors are open/
closed.

Vehicles with a smart entry & start system

The lights automatically turn on/off according to the engine switch mode, the
presence of the electronic key, whether the doors are locked/unlocked, and
whether the doors are open/closed.

To prevent battery discharge

If the following lights remain on when the engine switch is turned off the lights
will go off automatically after 20 minutes:

Personal/interior light

Inside door handle lights (if equipped)

Ornament illumination (if equipped)

Door pocket lights (if equipped)

Footwell lights (if equipped)

Customization

Settings (e.g. time elapsed before the interior lights turn off) can be changed.
(Customizable features: 

P. 774)

NOTICE

To prevent battery discharge, do not leave the lights on longer than neces-
sary when the engine is not running.

532

6-3. Using the storage features

List of storage features

Cup holders (

P. 536)

Bottle holders/door pockets (

P. 537)

Auxiliary boxes (if equipped) (

P. 540)

Glove box (

P. 533)

Card holder (right-hand drive vehicles) (

P. 534)

Console box (if equipped) (

P. 534)

Cool box (if equipped) (

P. 548)

1
2
3
4

5

533

6-3. Using the storage features

6

In

teri
or f
eatu

res

Unlock with the master key or
the mechanical key
Lock with the master key or the
mechanical key
Open (pull the lever)

The glove box light turns on when the tail lights are on.

WARNING

Do not leave glasses, lighters or spray cans in the storage spaces, as this
may cause the following when cabin temperature becomes high:
• Glasses may be deformed by heat or cracked if they come into contact

with other stored items.

• Lighters or spray cans may explode. If they come into contact with other

stored items, the lighter may catch fire or the spray can may release
gas, causing a fire hazard.

Keep the storage compartments lids closed when driving or not in use.
In the event of sudden braking or sudden swerving, an accident may occur
due to an occupant being struck by an open lid or the items stored inside.

Glove box

1

2

3

534

6-3. Using the storage features

The card holder is located in the glove box.

Your vehicle is equipped with either a console box or cool box.
For vehicles with the cool box, refer to P. 548.

Lift the lid while pulling up the knob to release the lock.

Lifts the lid and tray
Lifts the lid
Pull the tray up to open the console box.

Card holder (right-hand drive vehicles)

Console box (if equipped)

1
2

535

6-3. Using the storage features

6

In

teri
or f
eatu

res

Using the console box vent (if equipped)

Items unsuitable for the console box

Drinks in unsealed containers

Fragile items, perishables or anything with strong odor

Owner’s manual, electronic devices, CDs, etc. (when using the console box
vent)

When using the console box lid as an armrest

Air from the air conditioner can be distrib-
uted into the console box by opening and
closing the vent.

Open
Close

Slide the console box lid forward or back-
ward as needed. Slide the lid while pulling
up the lever to release the lock.

NOTICE

Make sure of the following when the lid or tray of the console box does not
close, or when the tray sticks while opening the lid. 
Operating them forcibly may cause damage to the console box or the stored
items.

The stored items in the console box do not interfere with the tray.

The stored items in the tray do not interfere with the lid of the console box.

1

2

536

6-3. Using the storage features

Cup holders

Cup holders/bottle holders/door pockets

Front (vehicles with an auto-
matic transmission)

Front (vehicles with a manual
transmission)

Press down and release the
cup holder lid.

Press down and release the cup
holder lid.

Rear (type A) (if equipped)

Rear (type B) (if equipped)

Pull the armrest down.

Pull the armrest down and press
in and release the button.

537

6-3. Using the storage features

6

In

teri
or f
eatu

res

Bottle holders/door pockets

Removing the holder, separate tray and adapter of the cup holder

Front (vehicles with an automatic transmission)

Rear (type C) (if equipped)

Rear (type D) (if equipped)

Push the lid.

Front

Rear (if equipped)

Pull up the holder.

538

6-3. Using the storage features

Front (vehicles with a manual transmission)

Rear (type A)

When storing a bottle in the bottle holder

Close the cap.

The bottle may not be stored depending on its size or shape.

Pull up the separate tray.

Pull up the adapter.

WARNING

Items unsuitable for the cup holder

Do not place anything other than cups, mugs or beverage cans in the cup
holders. Even when the lid is closed, items must not be stored in the cup
holders.
Other items may be thrown out of the holders in the event of sudden brak-
ing, sudden swerving or an accident, cause injury. If possible, cover hot
drinks to prevent burns.

Items unsuitable for the bottle holder

Do not place anything other than a bottle in the bottle holders.
Other items may be thrown out of the holders in the event of an accident or
sudden braking and cause injury.

539

6-3. Using the storage features

6

In

teri
or f
eatu

res

NOTICE

To prevent damage to the rear cup holders (rear [type B])

Stow the cup holders before stowing the armrest.

Items that should not be stowed in the bottle holders

Do not place open bottles in the bottle holders, or glasses and paper cups
containing liquid. The contents may spill and glasses may break.

540

6-3. Using the storage features

Auxiliary boxes

Type A (if equipped)

Type B (if equipped)

Press in the lid.

The auxiliary box is useful for tem-
porarily storing sunglasses and
similar small items.

Push the lid.

Type C (if equipped)

Type D (vehicles with an auto-
matic transmission)

Push the lid.

541

6-3. Using the storage features

6

In

teri
or f
eatu

res

Type E (vehicles with a manual
transmission)

WARNING

Do not place cups, beverage cans or bottles in the box. They may be
thrown out of the box in the event of sudden braking, sudden swerving or
an accident, resulting in injury. (type D and E)

Do not store items heavier than 0.2 kg (0.4 lb.).
Doing so may cause the auxiliary box to open and the items inside may fall
out, resulting in an accident. (type A)

Do not put large items in the overhead console.
The overhead console may not be able to be shut from the conversation
mirror state. (type A)

542

6-3. Using the storage features

Luggage compartment features

To attach the deck hooks, use the
deck rails.

The deck hook itself is not included
as an original equipment.
Vehicles with the third seats (power
seat): When using the deck rail, the
third seat must be fold down. (

P.

207)

Raise the hook to use.

The cargo hooks are provided for
securing loose items.
Vehicles with the third seats (man-
ual seat): When using the deck
hooks, the third seat must be fold
down. (

P. 205)

Deck rail (if equipped)

Cargo hooks (if equipped)

Type A

Type B

543

6-3. Using the storage features

6

In

teri
or f
eatu

res

Open the cover.

Turn the knob clockwise.
Open the cover.

Secure the warning reflector.

The warning reflector itself is not
included as an original equipment.

To hang the cargo net, use the cargo net hooks.

The cargo net itself is not included as an original equipment.

Warning reflector holder

1

1
2

2

Cargo net hooks

Type A

Type B

544

6-3. Using the storage features

Auxiliary box (if equipped)

Type A

Type B

Remove the cover.

Auxiliary tray (if equipped)

545

6-3. Using the storage features

6

In

teri
or f
eatu

res

Installing the luggage cover

Install the side of the luggage
cover with the cutout to the
holder on the left side of the
vehicle. While pushing the
opposite end of the cover in,
install it to the holder on the
right side.

Attach the hooks to the head restraints.

Vehicles with the third seats: When using the luggage cover, the third
seat must be fold down. (

P. 205, 207)

Luggage cover (if equipped)

1

2

3-doors models

5-doors models


Content      ..     31      32      33      34     ..