Toyota Land Cruiser Prado (2023 year). Manual in english - page 13
 

  Index      Manuals     Toyota Land Cruiser Prado (2023 year). Manual in english


Search            copyright infringement  


Content      ..     11      12      13      14     ..


Toyota Land Cruiser Prado (2023 year). Manual in english - page 13


208

3-3. Adjusting the seats

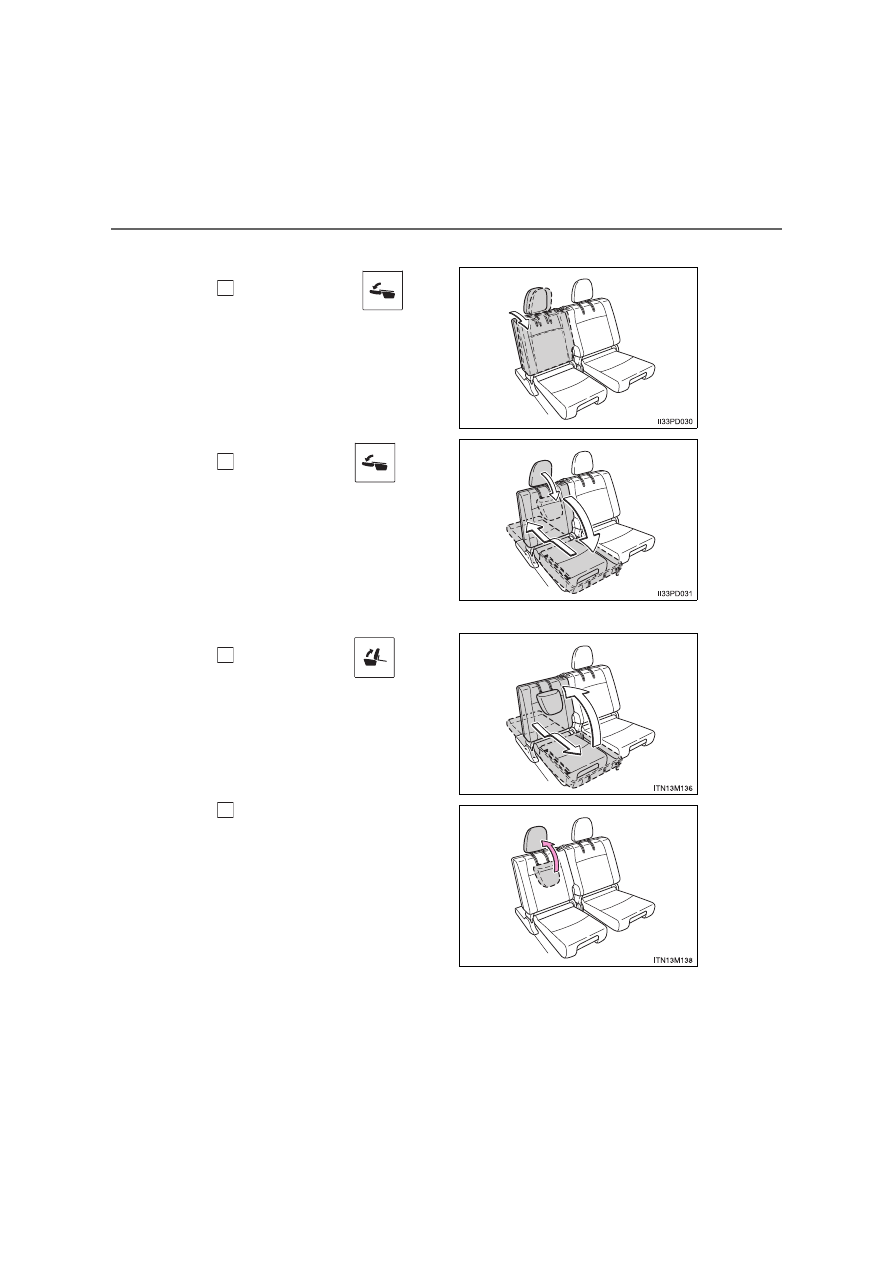
Folding down the third seats

Press and hold 

. Two

beeps sound and the seat-
back will rise.

When operating is completed,
two beeps sound again.

Press and hold 

 again.

Two beeps sound, the head
restraints will fold forward,
and the seat will be stowed.

When operating is completed,
two beeps sound again.

Returning the third seats

Press and hold 

.

Two beeps sound and seat-
back and seat cushion begin
to move. When operating is
completed, two beeps sound
again.

Lift the head restraints up
until they lock.

1

2

1

2

209

3-3. Adjusting the seats

3

O

p

er

ati

on 
of e
a

ch

 c

o

m

pon
ent

The third power seats can be operated when

The engine switch is off.

The shift lever is in P position (vehicles with an automatic transmission) or
the parking brake is applied (vehicles with a manual transmission) with the
engine switch in IGNITION ON mode.

During third power seat stowing operation

Do not remove your hand from the switch until the operation stops automati-
cally. If you remove your hand from the switch, the operation will stop and the
buzzer will sound continuously. The buzzer will stop when the switch is
pressed again.

Enlarging the luggage compartment (vehicles with third power seats)

The third seat can be used for sitting when it is in the position shown in step

 of the folding down the third seats. (

P. 207)

This can be convenient for enlarging the luggage compartment, for instance
when the luggage is against the back of the seatback.

If the warning buzzer sounds continuously (vehicles with third power
seats)

If there is an abnormality in the system, the warning buzzer will sound contin-
uously while the engine switch is in IGNITION ON mode. In this case, perform
the following operations:

Press and hold 

 to return the seat.

Press and hold 

 to stow the seat.

For each step, wait until the seat movement stops automatically and the two
beeps sound twice before removing your hand from the switch.
If the warning buzzer does not stop even after performing the above proce-
dure correctly, perform the following operations:

Press and hold 

 on the rear door side. (The switches on the back

door side are not be used.)

While holding 

, press forward on 

 5 times within 10 seconds.

After the buzzer beeps three times, the beep will then sound continuously
again.

Repeat step   and step  .

2

1

2

3

4

5

1

2

210

3-3. Adjusting the seats

WARNING

When folding the seatbacks down

Observe the following precautions. Failure to do so may result in death or
serious injury.

Do not fold the seatbacks down while driving.

Stop the vehicle on level ground, set the parking brake and shift the shift
lever to P (automatic transmission) or N (manual transmission).

Do not allow anyone to sit on a folded seatback or in the luggage compart-
ment while driving.

Do not allow children to enter the luggage compartment.

Seat adjustment

Observe the following precautions. Failure to do so may result in death or
serious injury.

To reduce the risk of sliding under the lap belt during a collision, do not
recline the seat more than necessary.
If the seat is too reclined, the lap belt may slide past the hips and apply
restraint forces directly to the abdomen, or your neck may contact the
shoulder belt, increasing the risk of death or serious injury in the event of
an accident.
Adjustments should not be made while driving as the seat may unexpect-
edly move and cause the driver to lose control of the vehicle.

Be careful not to get hands or feet pinched between the rear console box
and the second seat when folding down the seatback.

211

3-3. Adjusting the seats

3

O

p

er

ati

on 
of e
a

ch

 c

o

m

pon
ent

WARNING

When stowing the third seats

Observe the following precautions. Failure to do so may result in death or
serious injury.

Check that there is no luggage and that there are no other people around
the seat before stowing operation.

Conduct the procedure slowly and carefully (vehicles with manual third
seats).

Do not insert hands or feet into the moving parts of the seat.

Do not allow children to operate the seat.

Do not use the seat if only the seat cushion has been stowed (vehicles
with manual third seats).

After returning the seatbacks to the upright position

Observe the following precautions. Failure to do so may result in death or
serious injury.

Make sure the seatback is securely locked by pushing it forward and rear-
ward on the top. (except for third power seats)

Check that the seat belts are not twisted or caught in the seatback.

NOTICE

When returning the third seat (vehicles with luggage cover)

If the luggage cover is installed in the luggage compartment, make sure you
remove it before returning the third seat (

P. 546). The luggage cover may

be damaged by the seat.

212

3-3. Adjusting the seats

Driving position memory

Your preferred driving position (the position of the driver’s seat, steer-
ing wheel and outside rear view mirrors) can be memorized and
recalled with the touch of a button.
Two different driving positions can be entered into memory.

Recording procedure

Vehicles with an automatic transmission:
Check that the shift lever is in P.
Vehicles with a manual transmission:
Check that the parking brake is set.
Vehicles without a smart entry & start system:
Turn the engine switch to the “ON” position.
Vehicles with a smart entry & start system:
Turn the engine switch to IGNITION ON mode.
Adjust the driver’s seat, steering wheel and outside rear view
mirrors to the desired positions.

While pressing the “SET”
button, or within 3 seconds
after the “SET” button is
pressed, press button “1” or
“2” until the buzzer sounds.

If the selected button has
already been preset, the previ-
ously recorded position will be
overwritten.

: If equipped

This feature automatically adjusts the driver’s seat, steering
wheel and outside rear view mirrors to suit your preferences.

Driving position memory

1

2

3

4

213

3-3. Adjusting the seats

3

O

p

er

ati

on 
of e
a

ch

 c

o

m

pon
ent

Recall procedure

Vehicles with an automatic transmission:
Check that the shift lever is in P.
Vehicles with a manual transmission:
Check that the parking brake is set.
Vehicles without a smart entry & start system:
Turn the engine switch to the “ON” position.
Vehicles with a smart entry & start system:
Turn the engine switch to IGNITION ON mode.
Press button “1” or “2” for the
driving position you want to
recall until the buzzer
sounds.

To stop the position recall operation part-way through

Perform any of the following:

Press the “SET” button.

Press button “1” or “2”.

Operate any of the seat adjustment switches (only cancels seat position
recall).

Operate the tilt and telescopic steering control switch (only cancels steering
wheel position recall).

Seat positions that can be memorized (

P. 195)

The adjusted positions other than the position adjusted by lumbar support
switch can be recorded.

Operating the driving position memory after turning the engine switch
off

Recorded seat positions can be activated up to 180 seconds after the driver’s
door is opened and another 60 seconds after it is closed again.

In order to correctly use the driving position memory function

If a seat position is already in the furthest possible position and the seat is
operated in the same direction, the recorded position may be slightly different
when it is recalled.

1

2

3

214

3-3. Adjusting the seats

Each electronic key can be registered to recall your preferred driving
position.

Registering procedure

Record your driving position to button “1” or “2” before performing
the following:
Carry only the key to which you want to register, and then close the
driver’s door. If 2 or more keys are in the vehicle, the driving posi-
tion cannot be recorded properly.

Vehicles with an automatic transmission:
Check that the shift lever is in P.
Vehicles with a manual transmission:
Check that the parking brake is set.
Turn the engine switch to IGNITION ON mode.
Recall the driving position that you want to record.

While pressing the recalled
button, press and hold the
driver’s door lock switch
(either lock or unlock) until
the signal beeps.

If the button could not be regis-
tered, the buzzer sounds contin-
uously for approximately 3
seconds.

Recall procedure

Make sure that the doors are locked before recalling the driving
position. Carry the electronic key that has been registered to the
driving position, and then unlock and open the driver’s door using
the smart entry & start system or wireless remote control.

The driving position will move to the recorded position. 
If the driving position is in a position that has already been recorded, the
seat and outside rear view mirrors will not move.

Memory recall function (vehicles with a smart entry & start sys-
tem)

1

2

3

4

215

3-3. Adjusting the seats

3

O

p

er

ati

on 
of e
a

ch

 c

o

m

pon
ent

Cancelation procedure

Carry only the key you want to cancel and then close the driver’s
door.
If 2 or more keys are in the vehicle, the driving position cannot be
canceled properly.

Turn the engine switch to IGNITION ON mode.
While pressing “SET” button, press and hold the driver’s door
lock switch (either lock or unlock) until the buzzer sounds twice.

Recalling the driving position using the memory recall function

Different driving positions can be registered for each electronic key. There-
fore, the driving position that is recalled may be different depending on the
key being carried.

If a door other than the driver’s door is unlocked with the smart entry & start
system, the driving position cannot be recalled. In this case, press the driv-
ing position button which has been set.

Customization

The unlock door settings of the memory recall function can be customized.
(Customizable features: 

P. 772)

WARNING

Seat adjustment caution

Take care during seat adjustment so that the seat does not strike the rear
passenger or squeeze your body against the steering wheel.

1

2

216

3-3. Adjusting the seats

Head restraints

Up

Pull the head restraints up.

Down

Push the head restraint down while
pushing the lock release button.

To fold the head restraints, pull the
lock release strap.

To return the head restraints, lift
them up until they lock.

Removing the head restraints

Front, second and third manual seats

Third power seats

The head restraint cannot be removed.

Head restraints are provided for all seats.

Front, second and third manual seats (if equipped)

Lock release button

1

2

Third power seats (if equipped)

Pull the head restraint up while pressing
the lock release button.

Lock release

button

217

3-3. Adjusting the seats

3

O

p

er

ati

on 
of e
a

ch

 c

o

m

pon
ent

Installing the head restraints (front, second and third manual seats)

Adjusting the height of the head restraints

Using the second center, second outer (5-door models without third
seats) and third manual seat head restraints

Using the third power seats head restraints (if equipped)

Always lift the head restraints up until they lock when using.

Align the head restraint with the installa-
tion holes and push it down to the lock
position.
Press and hold the lock release button
when lowering the head restraint.

*

*

: If equipped

Make sure that the head restraints are
adjusted so that the center of the head
restraint is closest to the top of your ears.

Always raise the head restraint one level
from the stowed position when using.

218

3-3. Adjusting the seats

WARNING

Head restraint precautions

Observe the following precautions regarding the head restraints. Failure to
do so may result in death or serious injury.

Use the head restraints designed for each respective seat.

Adjust the head restraints to the correct position at all times.

After adjusting the head restraints, push down on them and make sure
they are locked in position.

Do not drive with the head restraints removed.

219

3

3-4. Adjusting the steering wheel and mirrors

O

p

er

ati

on 
of e
a

ch

 c

o

m

pon
ent

Steering wheel

Manual adjustment type

Hold the steering wheel and
pull the lever down.

Adjust to the ideal position by
moving the steering wheel hori-
zontally and vertically.

After adjustment, pull the lever up
to secure the steering wheel.

Power adjustment type

Up
Down
Away from the driver
Toward the driver

Adjustment procedure

1

2

1
2
3
4

220

3-4. Adjusting the steering wheel and mirrors

When the engine switch is turned
off, the steering wheel returns to
its stowed position by moving up
and away to enable easier driver
entry and exit.

Turning the engine switch to
ACCESSORY or IGNITION ON
mode will return the steering wheel
to the original position.

To sound the horn, press on or
close to the 

 mark.

The power adjustment type steering wheel can be adjusted when

The engine switch is in ACCESSORY or IGNITION ON mode.

Automatic adjustment of the steering position

A desired steering position can be entered to memory and recalled automati-
cally by the driving position memory system. (

P. 212)

After adjusting the steering wheel (manual adjustment type)

Make sure that the steering wheel is securely locked.
The horn may not sound if the steering wheel is not securely locked. 

Auto tilt away (power adjustment type)

Horn

221

3-4. Adjusting the steering wheel and mirrors

3

O

p

er

ati

on 
of e
a

ch

 c

o

m

pon
ent

WARNING

Caution while driving

Do not adjust the steering wheel while driving.
Doing so may cause the driver to mishandle the vehicle and cause an acci-
dent, resulting in death or serious injury.

After adjusting the steering wheel (manual adjustment type)

Make sure that the steering wheel is securely locked. 
Otherwise, the steering wheel may move suddenly, possibly causing an
accident, and resulting in death or serious injury.

222

3-4. Adjusting the steering wheel and mirrors

Inside rear view mirror

The height of the rear view mirror can be adjusted to suit your driving
posture.

Adjust the height of the rear view
mirror by moving it up and down.

Manual anti-glare inside rear view mirror

Reflected light from the headlights of vehicles behind can be reduced
by operating the lever.

Normal position
Anti-glare position

The rear view mirror’s position can be adjusted to enable suffi-
cient confirmation of the rear view.

Adjusting the height of rear view mirror

Anti-glare function

1
2

223

3-4. Adjusting the steering wheel and mirrors

3

O

p

er

ati

on 
of e
a

ch

 c

o

m

pon
ent

Auto anti-glare inside rear view mirror

Responding to the level of brightness of the headlights of vehicles
behind, the reflected light is automatically reduced.

Changing automatic anti-glare
function mode
On/off

When the automatic anti-glare
function is in ON mode, the indica-
tor illuminates. 
The function will set to ON mode
each time the engine switch is
turned to IGNITION ON mode.
Pressing the button turns the func-
tion to OFF mode. (The indicator
also turns off.)

To prevent sensor error (vehicles with auto anti-glare inside rear view
mirror)

Indicator

To ensure that the sensors operate prop-
erly, do not touch or cover them.

WARNING

Do not adjust the position of the mirror while driving.
Doing so may lead to mishandling of the vehicle and an accident, resulting
in death or serious injury.


Content      ..     11      12      13      14     ..