Toyota Tundra Hybrid (2023 year). Manual in english - page 7
 

  Index      Toyota     Toyota Tundra Hybrid (2023 year). Manual in english


Search            copyright infringement  


Content      ..     5      6      7      8     ..


Toyota Tundra Hybrid (2023 year). Manual in english - page 7


112

3-1. Key information

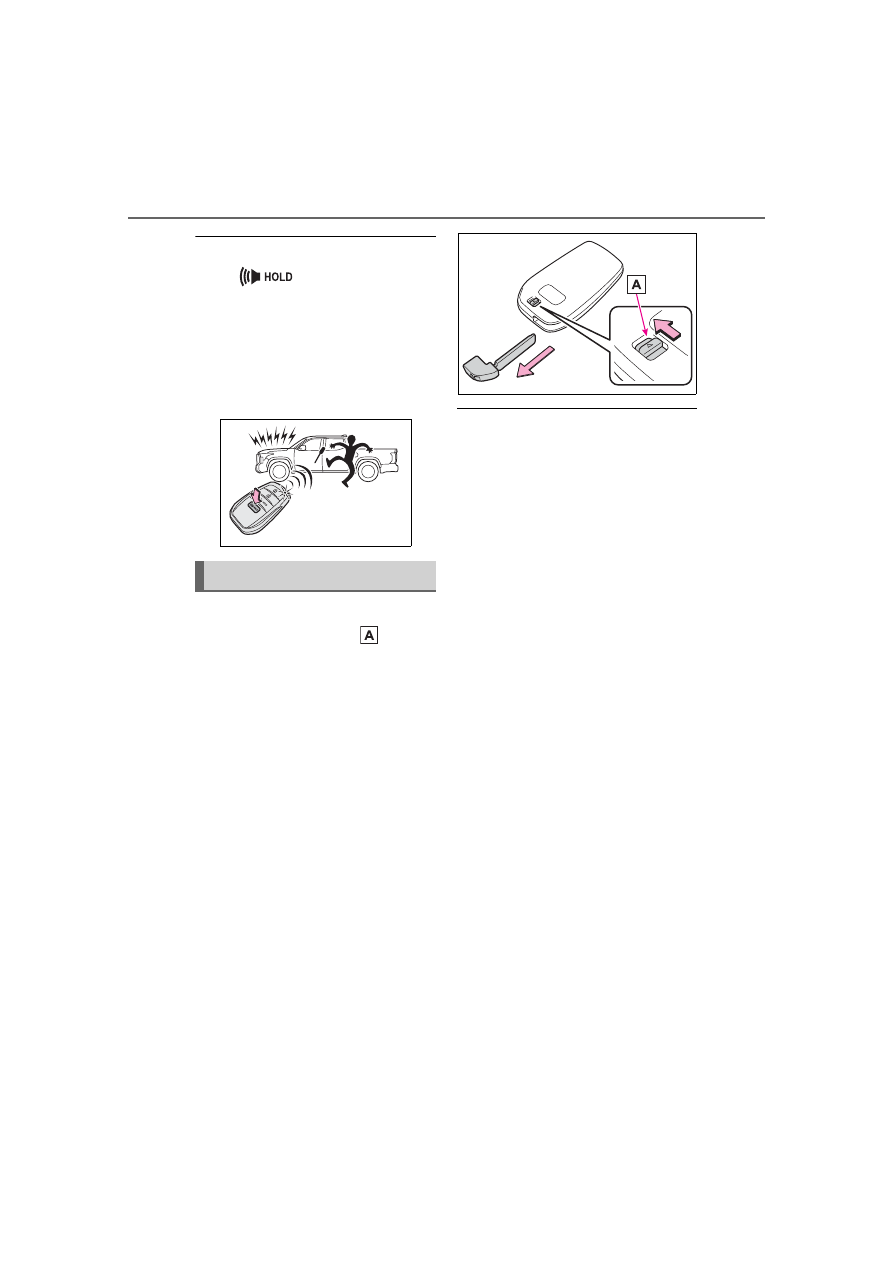
Theft deterrent panic mode

When 

 is pressed for longer 

than about one second, an alarm 
will sound intermittently and the 
vehicle lights will flash to deter any 
person from trying to break into or 
damage your vehicle.
To stop the alarm, press any button 

on the electronic key.

To take out the mechanical key, 
slide the release lever   and 
take the key out.

The mechanical key can only be 
inserted in one direction, as the key 
only has grooves on one side. If the 
key cannot be inserted in a lock cyl-
inder, turn it over and re-attempt to 
insert it.
After using the mechanical key, 
store it in the electronic key. Carry 
the mechanical key together with 
the electronic key. If the electronic 
key battery is depleted or the entry 
function does not operate properly, 
you will need the mechanical key. 
(

P.527)

When required to leave the 

vehicle’s key with a parking 

attendant

Remove the mechanical key for 

your own use and provide the atten-

dant with the electronic key only.

If you lose your mechanical 

keys

P.526

If a wrong key is used

The key cylinder rotates freely, iso-

lated from the internal mechanism.

Using the mechanical key

113

3-2. Opening, closing and locking the doors and tailgate

3

Before 

driving

3-2.Opening, closing and locking the doors and tailgate

Smart key system (entry 
function)

Carry the electronic key to 
enable this function.

1

Grip the driver’s door handle 
to unlock the door. Holding 
the driver’s door handle for 
approximately 2 seconds 
unlocks all the doors. Grip 
front passenger door handle 
to unlock all the doors.

*

Make sure to touch the sensor on 
the back of the handle.
The doors cannot be unlocked for 3 
seconds after the doors are locked.

2

Touch the lock sensor (inden-
tation on the upper part or 
lower part of the handle) to 
lock all the doors.

Check that the door is securely 
locked.

*

: The door unlock settings can be 

changed.

Wireless remote control

1

Locks all the doors and the 
tailgate

Check that the doors and the tail-
gate are securely locked.

2

Unlocks all the doors and the 
tailgate

Pressing the button unlocks the 
driver’s door. Pressing the button 
again within 5 seconds unlocks the 
other door.
Press and hold to open the win-
dows

*1

 and the panoramic moon 

roof

*1, 2

*1

:This setting must be customized 

at your Toyota dealer.

*2

:If equipped

Switching the door unlock func-

tion

It is possible to set which doors the 

entry function unlocks using the 

wireless remote control.

1

Turn the power switch off.

2

When the indicator light on the 
key surface is not on, press and 
hold 

 or 

 for 

approximately 5 seconds while 
pressing and holding 

.

The setting changes each time an 

operation is performed, as shown 

below. (When changing the setting 

Side doors

Unlocking and locking the 
doors from the outside

114

3-2. Opening, closing and locking the doors and tailgate

continuously, release the buttons, 

wait for at least 5 seconds, and 

repeat step 

2

.)

To prevent unintended triggering of 
the alarm, unlock the doors using 
the wireless remote control and 
open and close a door once after 
the settings have been changed. (If 
a door is not opened within 60 sec-
onds after 

 is pressed, the doors 

will be locked again and the alarm 
will automatically be set.)
In a case that the alarm is triggered, 
immediately stop the alarm. (

P.82)

Impact detection door lock 

release system

In the event that the vehicle is sub-

ject to a strong impact, all the doors 

are unlocked. Depending on the 

force of the impact or the type of 

accident, however, the system may 

not operate.

Operation signals

A buzzer sounds and the emer-

gency flashers flash to indicate that 

the doors have been 

locked/unlocked. (Locked: once; 

Unlocked: twice)
A buzzer sounds to indicate that the 

windows are operating.

Security feature

If a door is not opened within 

approximately 60 seconds after the 

vehicle is unlocked, the security fea-

ture automatically locks the vehicle 

again.

When the doors cannot be 

locked by the lock sensor on 

the upper part of the door han-

dle

If the door will not lock even when 

the topside sensor area is touched, 

try touching both the topside and 

underside sensor areas at the same 

time.

Open door warning buzzer

If an attempt to lock the doors is 

made when a door is not fully 

closed, a buzzer sounds continu-

ously for 5 seconds. Fully close the 

door to stop the buzzer, and lock the 

vehicle once more.

Setting the alarm

Locking the doors will set the alarm 

system. (

P.82)

Conditions affecting the opera-

tion of the smart key system or 

wireless remote control

P.130

Multi-informa-

tion display/Beep

Unlocking func-

tion

Exterior: Beeps 3 

times

Interior: Pings 

once

Holding the 
driver’s door 
handle unlocks 
only the driver’s 
door.

Holding the front 
passenger door 
handles unlocks 
all the doors and 
tailgate.

Exterior: Beeps 

twice

Interior: Pings 

once

Holding either 
front door handle 
unlocks all the 
doors and tail-
gate.

115

3-2. Opening, closing and locking the doors and tailgate

3

Before 

driving

If the smart key system or the 

wireless remote control does 

not operate properly

Use the mechanical key to lock and 

unlock the doors. (

P.527)

Replace the key battery with a new 

one if it is depleted. (

P.484)

If the 12-volt battery is dis-

charged

The doors cannot be locked and 

unlocked using the smart key sys-

tem or wireless remote control. Lock 

or unlock the doors using the 

mechanical key. (

P.527)

Rear seat reminder function

In order to remind you not to for-

get luggage, etc., in the rear seat, 

when the power switch is turned to 

OFF after any of the following con-

ditions are met, a buzzer will 

sound and a message will be dis-

played on the multi-information 

display for approximately 6 sec-

onds.

• The hybrid system is started 

within 10 minutes after opening 

and closing a rear door.

• A rear door has been opened and 

closed after the hybrid system 

was started.

However, if a rear door is opened 
and then closed within approxi-
mately 2 seconds, the rear seat 
reminder function may not operate.

The rear seat reminder function 

determines that luggage, etc., has 

been placed in a rear seat based 

on opening and closing of a rear 

door. Therefore, depending on the 

situation, the rear seat reminder 

function may not operate and you 

may still forget luggage, etc., in 

the rear seat, or it may operate 

unnecessarily.

The rear seat reminder function 

can be enabled/disabled. 

(

P.561)

Customization

Some functions can be customized. 

(

P.561)

WARNING

To prevent an accident

Observe the following precautions 

while driving the vehicle.

Failure to do so may result in a 

door opening and an occupant 

falling out of the vehicle, resulting 

in death or serious injury.

Ensure that all doors are prop-

erly closed and locked.

Do not pull the inside handle of 

the doors while driving.

Be especially careful for the front 
doors, as the doors may be 
opened even if the inside lock but-
tons are in locked position.

Set the rear door child-protector 

locks when children are seated 

in the rear seats.

When opening or closing a 

door

Check the surroundings of the 

vehicle such as whether the vehi-

cle is on an incline, whether there 

is enough space for a door to 

open and whether a strong wind 

is blowing. When opening or clos-

ing the door, hold the door handle 

tightly to prepare for any unpre-

dictable movement.

116

3-2. Opening, closing and locking the doors and tailgate

Door lock switches (to 
lock/unlock)

1

Locks all the doors

2

Unlocks all the doors

Inside lock buttons

1

Locks the door

2

Unlocks the door

The front doors can be opened by 
pulling the inside handle even if the 
lock buttons are in the lock position.

Locking the front doors from 

the outside without a key

1

Move the inside lock button to 

the lock position.

2

Close the door.

The door cannot be locked if the 

power switch is in ACC or ON, or 

the electronic key is left inside the 

vehicle. However, the key may not 

be detected correctly and the door 

may be locked.

Open door warning buzzer

If a door is not fully closed, a buzzer 

will sound when the vehicle speed 

reaches 3 mph (5 km/h).

The open door(s) is indicated on the 

multi-information display.

The door cannot be opened 
from inside the vehicle when the 
lock is set.

1

Unlock

2

Lock

These locks can be set to prevent 
children from opening the rear 
doors. Push down on each rear 
door switch to lock both rear doors.

The following functions can be 
set or canceled:

For instructions on customizing, 
refer to P.561.

Unlocking and locking the 
doors from the inside

Rear door child-protector 
lock

Automatic door locking 
and unlocking systems

117

3-2. Opening, closing and locking the doors and tailgate

3

Before 

driving

*

: If equipped

Function

Operation

Speed linked 
door locking 
function

All doors are auto-
matically locked 
when vehicle 
speed is approxi-
mately 12 mph (20 
km/h) or higher.

Shift position 
linked door 
locking func-
tion

All doors are auto-
matically locked 
when the shift posi-
tion is shifted to a 
position other than 
P.

Shift position 
linked door 
unlocking 
function

All doors are auto-
matically unlocked 
when the shift posi-
tion is shifted to P.

Driver’s door 
linked door 
unlocking 
function

All doors are auto-
matically unlocked 
when driver’s door 
is opened within 
approximately 45 
seconds after turn-
ing the power 
switch off.

Power running boards

*

The power running boards 
deploy when opening a door 
or by using the switch 
inside the vehicle.

The power running boards 
stow by closing a door, 
operating the switch inside 
the vehicle, or by driving 3 
mph (5 km/h) or higher.

WARNING

Cautions regarding the power 

running boards

Observe the following precau-

tions.

Failure to do so may cause seri-

ous injury.

Check to make sure that all pas-

sengers and people in the vehi-

cle’s surrounding area do not 

have a hand on the boards or 

any part of their body in a posi-

tion where it could be caught 

between the boards and the 

vehicle when the power running 

boards is being operated.

Confirm that the boards have 

completely deployed or stowed 

before getting in or out of the 

vehicle. If someone gets in or 

out of the vehicle during the 

power running boards opera-

tion, the boards may stop 

deploying or stowing.

Take care when pressing the 

power steps switch. The boards 

will deploy or stow and may hit 

other people or objects.

118

3-2. Opening, closing and locking the doors and tailgate

1

Opening a door: The appro-
priate board deploys.

2

Closing a door: The appropri-
ate board stows.

Jam protection function

If a board contacts an obstacle 

when deploying, it will stow. If an 

obstacle gets caught between a 

board and the vehicle when stow-

ing, the board will deploy.
If an obstacle is detected 3 times in 

a row during power running board 

operation, the board will stop at the 

position it contacts the obstacle. 

When the side door on the same 

side as the board is opened and 

closed, or switch is operated once 

the obstacle is cleared, the board 

will attempt to stow or deploy again.

Automatic stowing function

The boards will be automatically 

stowed, for safety, under the follow-

ing conditions:

WARNING

Always check that the power 

steps switch is turned off when 

cleaning the boards, before 

jacking up or placing any object 

under the vehicle, or if boards 

are not operating correctly.

Do not allow children to operate 

the power running boards. 

Operating the power running 

boards so that the boards con-

tacts someone can cause seri-

ous injury, and in some 

instances, even death.

Jam protection function

Observe the following precau-

tions.

Failure to do so may cause seri-

ous injury.
Do not place any body part 

between the boards and vehicle.
The jam protection function may 

not work depending on the shape 

of the object that is caught.

Side door linked opera-
tion

119

3-2. Opening, closing and locking the doors and tailgate

3

Before 

driving

A board is not completely stowed

Vehicle speed is approximately 3 

mph (5 km/h) or higher

The boards will not automatically 

deploy again when vehicle speed 

returns to less than 3 mph (5 km/h).

If “Running Board Unable to 

Deploy” is displayed on the 

multi-Information display

The board may not be completely 

deployed.
Close and open the door once more 

or use the switch inside the vehicle 

(

P.119) and completely deploy the 

board.

If “Power Steps Unable to 

Retract” is displayed on the 

multi-Information display

The boards may not be completely 

stowed.
Check that nothing is caught 

between the boards and the vehicle.

If “Power Steps System Mal-

function See Owner’s Manual” 

is displayed on the multi-infor-

mation display

The system may be malfunctioning. 

Have the vehicle inspected by Toy-

ota dealer.

When snow or mud is attached 

to the boards or the boards are 

frozen

The power running boards may not 

operate correctly. Before stepping 

on a board, check that it is com-

pletely deployed. If the power run-

ning boards are not operating 

correctly, turn the power steps 

switch off and refrain from use.

After recharging/reconnecting 

the 12-volt battery

If the power running boards have 

not completely deployed or stowed, 

the boards may not move in the 

intended direction the first time they 

are operated. However, from the 

second time onwards, the boards 

will resume normal operation.

When getting in and out of the 

vehicle

Take care because clothes and 

shoes may become dirty due to con-

tact with the lower part of the vehicle 

body.

1

Deploys the running boards 
on both sides.

2

Stows the running boards on 
both sides.

The power bed step is also linked 
with switch operations. (

P.126)

Putting the switch in the neutral 
position sets the power running 
boards to AUTO mode. AUTO 
mode allows the deploying/stowing 
of the boards to be linked to open-
ing/closing of the side doors.
Both power running boards and 
power bed step are deployed when 
“OUT” position is selected. Opera-
tion only if steps are not already 
deployed.
Both power running boards and 
power bed step are stowed when 
“OFF” position is selected. Opera-
tion only if steps are not already 
stowed.

Deploying and stowing 
the power running boards 
from inside

120

3-2. Opening, closing and locking the doors and tailgate

Automatic stowing function

The boards will be automatically 

stowed, for safety, under the follow-

ing condition:

Vehicle speed is approximately 3 

mph (5 km/h) or higher

Smart key system (entry 
function)

Carry the electronic key to 
enable this function.

1

Unlock the tailgate

The tailgate cannot be unlocked for 
3 seconds after the tailgate is 
locked.

2

Locks all the doors and the 
tailgate

Tailgate

The tailgate can be 
locked/unlocked and 
opened/closed by the fol-
lowing procedures.

WARNING

Caution while driving

Observe the following precau-

tions.

Failure to do so may result in 

death or serious personal injury.

Do not drive with the tailgate 

open.

Do not allow anyone to get on 

the rear step bumper.

Locking/unlocking the 
tailgate

121

3-2. Opening, closing and locking the doors and tailgate

3

Before 

driving

Check that the tailgate is securely 
locked.

Using the wireless remote 
control

P.111

Opening the tailgate

Using the handle switch

Unlock the tailgate before oper-
ating.
Open the tailgate slowly while 
pushing the tailgate opener 
switch.

The support cables will hold the tail-
gate horizontal.

Using the tailgate release 
switch

While carrying an electronic key, 
press the tailgate opener switch 
on the left side tail lamp.

Tailgate opens by gravity.
The support cables will hold the tail-
gate horizontal.

Using the wireless remote 
control (if equipped)

Press and hold the switch.

*

Tailgate opens by gravity.
The support cables will hold the tail-
gate horizontal.

*

: This setting can be customized at 

your Toyota dealer.

Closing the tailgate

Lift and close the tailgate

After closing the tailgate, try pulling 
it toward you to make sure it is 
securely locked.

Opening/closing the tail-
gate

122

3-2. Opening, closing and locking the doors and tailgate

Changing the setting of tailgate 

opening alert

When the tailgate is left open, a 

buzzer sounds and a warning mes-

sage is displayed on the multi-infor-

mation display.

Settings can be changed on 


screen of the multi-information dis-
play. Select the “

 Alert” and 

change the settings. (

P.565)

Customization

Some functions can be customized. 

(

P.561)

Before removing the tail-
gate

Turn the tailgate opening alert 
off before removing the tailgate. 
(

P.122)

These connector covers are 
used when removing the tail-

WARNING

Opening the tailgate (tailgate 

release switch and wireless 

remote control)

Observe the following precautions 

when operating the tailgate 

release switch. Failure to do so 

may cause death or serious injury.

If there are people in the vicinity, 

make sure they are safe and let 

them know that the tailgate is 

about to open or close.

On upward inclines, the tailgate 

may suddenly open after press-

ing the tailgate release switch or 

electronic key switch. Make 

sure the tailgate is fully open 

and secure.

On downward inclines, the tail-

gate may be difficult to open 

after pressing the tailgate 

release switch or electronic key 

switch. Make sure the tailgate is 

fully open and secure.

NOTICE

Opening the tailgate (tailgate 

release switch and wireless 

remote control)

Check the safety of the sur-

rounding area to make sure 

there are no obstacles or any-

thing that could cause any of 

your belongings to get hit.

Check that the tailgate is not 

frozen and its opening and clos-

ing is not obstructed.

If there is any type of strong 

impact in area of the tailgate 

release switch, have the vehicle 

inspected at your Toyota dealer.

Do not place stickers, etc., or 

paint anything on the tailgate 

release switch.

Do not use if a carrier or acces-

sory other than a genuine Toy-

ota part is installed to the 

tailgate.

After closing the tailgate

Try pulling it toward you to make 

sure it is securely locked.

Removing the tailgate

123

3-2. Opening, closing and locking the doors and tailgate

3

Before 

driving

gate, to prevent the wire har-
ness connectors from being 
contaminated.

Connector cover (Type A)

Connector cover (Type B)

Connector cover (Type C)

Connector cover (Type D)

Connector cover (Type E)

Connector cover (Type F)

Store the connector covers in 
the glove box in a plastic bag 
when not using.

1

Open the tailgate.

2

To disconnect the wire har-
ness connectors.

3

Install the connector cover 
(Type A, B, and C) to the wire 
harness connector of the 
vehicle body frame.

The shape of each connector dif-

fers. Install connector cover to the 

corresponding connector.

Connector cover (Type A)

Connector cover (Type B)

Connector cover (Type C)

4

Pull out the plastic wire pro-
tector located in the vehicle 

124

3-2. Opening, closing and locking the doors and tailgate

bed by pressing the tabs and 
pulling the protector.

5

Pull out the wire harness 
from the vehicle bed.

6

Install the connector cover 
(Type D, E, and F) to the wire 
harness connector of the tail-
gate.

The shape of each connector dif-

fers. Install connector cover to the 

corresponding connector.

Connector cover (Type D)

Connector cover (Type E)

Connector cover (Type F)

Removing the tailgate

1

Open the tailgate to the angle 
where you can release the 
brackets on the support 
cables from the lugs on both 
sides.
Lift the support cable bracket 
up and slide it off.

To unhook the support cable 

bracket, keep pulling up the clip on 

the bracket and unhook the 

bracket.

Support cable bracket

Clip

2

Tilt the tailgate to about 45° 
from vertical and pull up the 
right side of the tailgate to 
unhook the right side.

125

3-2. Opening, closing and locking the doors and tailgate

3

Before 

driving

3

Tilt the tailgate up to 15°.

4

Slide the tailgate a little to the 
right to unhook the left side.

To attach the tailgate, follow the 

removal procedure in reverse order.

For rear end protection and eas-
ier step-up loading.

To get on the rear step bumper, use 
the shaded area in the illustration.

WARNING

Before removing the tailgate

Disconnect the wire harness 

between the back-up camera and 

the vehicle.
Failure to do so may result in seri-

ous personal injury or damage to 

the vehicle components.

NOTICE

To prevent damage to the tail-

gate wire harness

Do not pull out all of the tailgate 

wire harness before opening the 

tailgate.

To prevent damage to the 

camera lens

Store the removed tailgate with 

the back-up camera lens facing 

upward.

Rear step bumper

NOTICE

To prevent damage to the rear 

step bumper

Do not allow more than one per-

son to get on the rear step 

bumper at a time.

126

3-2. Opening, closing and locking the doors and tailgate

*

: If equipped

Automatic stowing function

The step will be automatically 

retracted, for safety, under the fol-

lowing condition:

Vehicle speed is approximately 3 

mph (5 km/h) or higher

If “Power Steps Unable to 

Retract” is displayed on the 

multi-Information display

The step may not be completely 

stowed.
Check that nothing is caught 

between the step and the vehicle.

If “Power Steps System Mal-

function See Owner’s Manual” 

is displayed on the multi-infor-

mation display

The system may be malfunctioning. 

Have the vehicle inspected by Toy-

ota dealer.

Power bed step

*

The power bed step deploys 
when opening the tailgate, 
operating the wireless 
remote control, or by using 
the switch inside the vehi-
cle.

The power bed step stows 
by closing the tailgate, oper-
ating the switch inside the 
vehicle, or by driving above 
3 mph (5 km/h).

WARNING

Cautions regarding the power 

bed step

Observe the following precau-

tions. Failure to do so may cause 

serious injury.

Check to make sure that all pas-

sengers and people in the vehi-

cle’s surrounding area do not 

have a hand on the step or any 

part of their body in a position 

where it could be caught 

between the step and the vehi-

cle when the power bed step is 

being operated.

Confirm that the step has com-

pletely deployed or stowed 

before getting in or out of the 

vehicle. If someone gets in or 

out of the vehicle during power 

bed step operation, the step 

may stop deploying or stowing.

Take care when pressing the 

power steps switch. The step 

will deploy or stow and may hit 

other people or objects.

Always check that the power 

steps switch is turned off when 

cleaning the step, before jack-

ing up or placing any object 

under the vehicle, or if the step 

is not operating correctly.

Do not allow children to operate 

the power bed step. Operating 

power bed step so that a step 

contacts someone can cause 

serious injury, and in some 

instances, even death.

Jam protection function

Observe the following precau-

tions. Failure to do so may cause 

serious injury.
Do not place any body part 

between the power bed step and 

vehicle. The jam protection func-

tion may not work depending on 

the shape of the object that is 

caught.

127

3-2. Opening, closing and locking the doors and tailgate

3

Before 

driving

Press the switch.
The power bed step automati-
cally deploys with the tailgate or 
stows.
Before pressing the button, 
make sure the power steps 
switch is in “AUTO” position.

1

Deploys the bed step.

2

Stows the bed step.

Putting the switch in the neutral 
position sets the power bed step 
to AUTO mode. AUTO mode 
allows the deploying and stow-

ing of the step to be linked to 
opening/closing the tailgate.
Both power running boards and 
power bed step are deployed 
when “OUT” position is 
selected. Operate only if the 
steps are not already deployed 
and if the vehicle speed is 3 
mph (5 km/h) or less.
Both power running boards and 
power bed step are stowed 
when “OFF” position is selected. 
Operate only if the step is not 
already stowed.

1

Opening the tailgate: The 
step deploys.

2

Closing the tailgate: The step 
stows.

Deploying and stowing 
the power bed step with 
wireless remote control

Deploying and stowing 
the power bed step from 
inside

Tailgate linked operation


Content      ..     5      6      7      8     ..