Toyota Supra (2023 year). Manual in english - page 18
 

  Index      Toyota     Toyota Supra (2023 year). Manual in english


Search            copyright infringement  


Content      ..     16      17      18      19     ..


Toyota Supra (2023 year). Manual in english - page 18


284

5-1. MOBILITY

• The filled in tire sealant closes 

the damage from the inside 
when it hardens.

• Follow the instructions on 

using the tire repair set found 
on the compress or and seal-
ant bottle.

• The use of a tire repair set 

can be ineffective if the tire 
puncture measures above 
approx. 0.16 in/4 mm.

• Do not remove foreign objects 

that have penetrated the tire. 
Remove foreign objects only 
when they are visibly protrud-
ing from the tire.

• The compressor can be used 

to check the tire inflation pres-
sure.

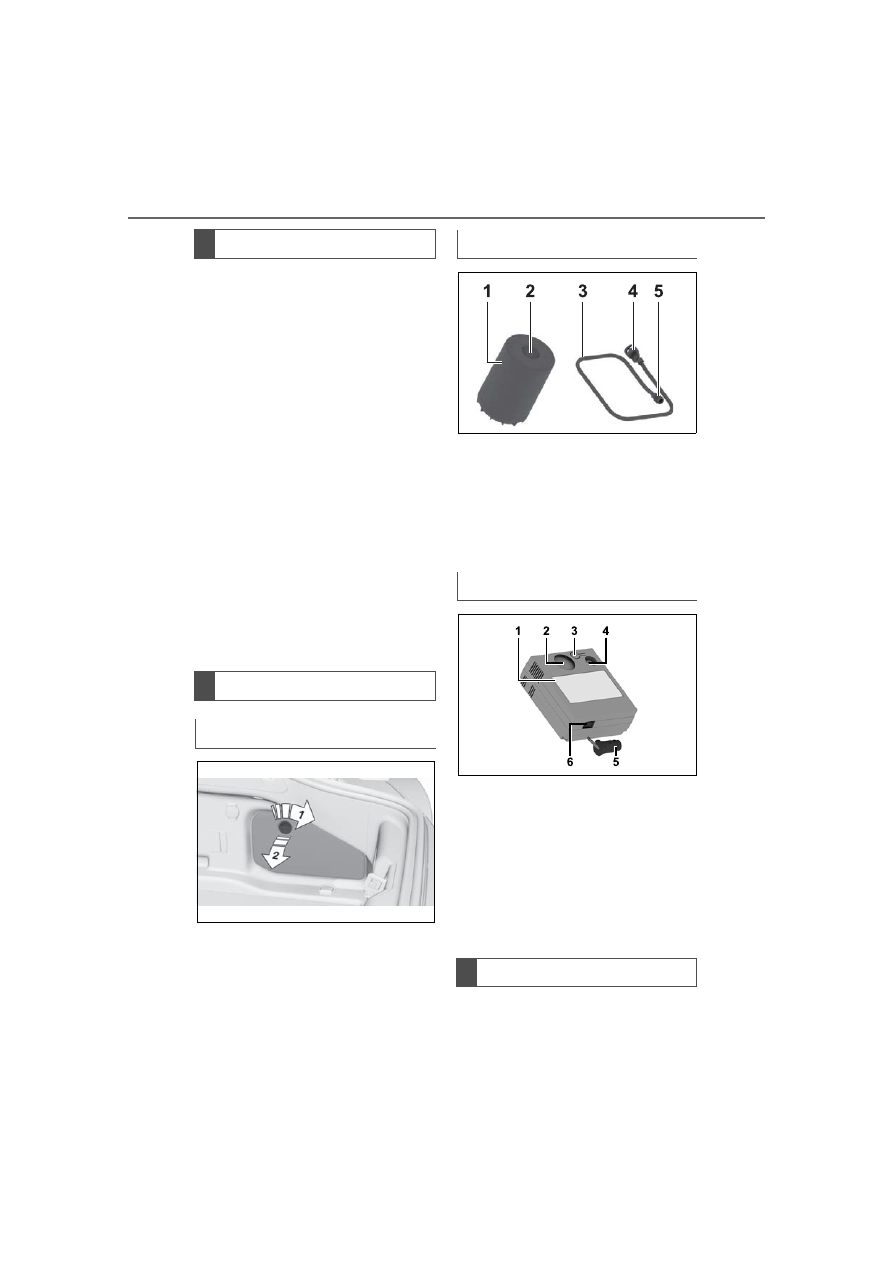
Storage for the tire repair set is pro-
vided in the cargo area behind the 
right side trim panel.

1

Sealant bottle

2

Sealant bottle outlet

3

Filler hose

4

Sealant bottle connection

5

Wheel valve connection

1

Compressor

2

Tire pressure display

3

Pressure reducing valve but-
ton

4

Sealant bottle mount

5

Connector for socket

6

On/off switch

• Park the vehicle as far away 

as possible from passing traf-

General information

Overview

Storage

Sealant bottle and filler hose

Compressor

Safety precautions

285

5-1. MOBILITY

5

MOBILITY

fic and on solid ground.

• Turn on the hazard warning 

system.

• Set the parking brake.
• Turn the steering wheel until 

the front wheels are in the 
straight-ahead position and 
engage the steering wheel 
lock.

• As soon as permitted by the 

traffic flow, have all vehicle 
occupants get out and make 
sure that they remain outside 
the hazardous area such as 
behind a guardrail.

• If necessary, set up the haz-

ard triangle or hazard warning 
lights at an appropriate dis-
tance.

• Remove the warning label for 

the maximum permissible 
speed from the compressor 
and attach it in the visible 
area in the vehicle interior.

• Remove the warning label 

from the tire sealant bottle 
and attach it to the rim.

1

Insert the sealant bottle into 
the mount on the housing of 
the compressor.

2

Turn the sealant bottle clock-
wise by 90° to the stop.

3

Connect the filler hose to the 
outlet of the sealant bottle 
and turn clockwise by 90° to 
the stop.

4

Unscrew the valve cap from 
the wheel and screw the con-

Preparing the tire repair kit

286

5-1. MOBILITY

necting piece of the filler 
hose onto the valve.

5

With the compressor 
switched off, insert the con-
nector into the power socket 
in the vehicle interior.

1

With standby state or 
drive-ready state switched 
on, switch on the compres-
sor.
Let the compressor run for 
max. 10 minutes to fill in the 
tire sealant and reach a tire 
pressure of 2.5 bar/36 psi.
While the tire is being filled 
with tire sealant, the tire pres-
sure can briefly reach 
approx. 6 bar/87 psi. Do not 
turn off the compressor in this 
phase.

2

Switch off the compressor.

Read the tire pressure on the 
tire pressure display of the com-
pressor. The tire pressure must 
be at least 2.5 bar/36 psi.

If the tire pressure is too high, 
reduce the tire pressure with the 
pressure reducing valve on the 
compressor.

Filling the tire with sealant

Safety information

WARNING

If the exhaust pipe is blocked or 

ventilation is insufficient, harmful 

exhaust gases can penetratethe 

vehicle. The exhaust gases con-

tain pollutants which are colorless 

and odorless. In enclosed areas, 

exhaust gases can also accumu-

late outside of the vehicle. There 

is adanger to life. Keep the 

exhaust pipe free and ensure suf-

ficient ventilation.

NOTICE

The compressor can overheat 

during extended operation. There 

is a risk of damageto property. Do 

not run the compressor for more 

than 10 minutes.

Filling the tire with sealing 
compound

Checking the tire pressure

Tire pressure too high

287

5-1. MOBILITY

5

MOBILITY

Do not continue driving unless a 
minimum tire pressure of 2.5 
bar/36 psi is reached. Contact 
your Toyota dealer.

1

Pull the connector out of the 
socket in the vehicle interior.

2

Disconnect the hose from the 
sealant bottle and the valve 
on the wheel.

3

Unscrew the valve cap.

4

Stow the tire repair set in the 
cargo area.

5

Immediately drive 5 miles/10 
km to ensure that the tire 
sealant is evenly distributed 
in the tire.

Do not exceed the permissible 

maximum speed of 50 mph/80 

km/h.
If possible, do not drive at speeds 

less than 12 mph/20 km/h.
Tire sealant may spray from the 

damaged area during the initial 

wheel rotations.

1

Stop at a suitable location.

2

Connect the hose directly to 
the compressor and turn 

clockwise by 90° until it audi-
bly engages.

3

Unscrew the valve cap from 
the wheel and screw the con-
necting piece of the hose 
onto the valve.

4

Insert the connector into the 
socket in the vehicle interior.

5

Read the tire pressure on the 
tire pressure display of the 
compressor.
Do not continue driving 
unless a minimum tire pres-
sure of 1.3 bar/19 psi is dis-
played. Contact your Toyota 
dealer.

6

Correct the tire pressure to 
2.5 bar/36 psi.

• Increase tire pressure: with 

standby or driving readiness 
turned on, turn on the com-
pressor and let it run for a 

Minimum tire inflation pres-
sure is not reached

Minimum tire inflation pres-
sure is reached

Adjusting the tire pressure

288

5-1. MOBILITY

maximumof 10 minutes.

• Reduce tire pressure: press 

the pressure reducing valve 
button on the compressor.

1

Switch off the compressor.

2

Pull the connector out of the 
socket in the vehicle interior.

3

Disconnect the hose from the 
compressor and the valve on 
the wheel.

4

Unscrew the valve cap.

5

Stow the tire repair set in the 
cargo area.

Do not exceed the permissible 
maximum speed of 50 mph/80 
km/h.
Do not exceed a maximum dis-
tance travelled of 125 miles/200 
km.
Reset the Tire Pressure Monitor 
TPM, refer to page P.288
Replace the faulty tire and the 
sealant bottle of the tire repair 
set promptly.

Contact your Toyota dealer.
When checking the tire pres-
sure: using sealant can damage 
the wheel electronics. In this 

case, have the electronics 
replaced at the next opportunity.

Tire chains cannot be mounted. 
Snow tires should be used 
instead.

The system monitors tire infla-
tion pressure in the four 
mounted tires. The system 
warns you if there is a loss of 
pressure in one or more tires.

Sensors in the tire valves mea-
sure the tire inflation pressure 
and tire temperature.
The system detects the 
mounted tires automatically. The 
system displays the specified 
nominal pressure values on the 
Control Display and compares 
these values to the actual tire 

Remove and stow the tire 
repair set

Continuing the trip

System limits

Snow chains

NOTICE

Driving with tire chains

Do not fit tire chains. Tire chains 

may damage the vehicle body 

and suspension, and adversely 

affect driving performance.

Selecting tire chains

Tire Pressure Monitor 
TPM

Concept

General information

289

5-1. MOBILITY

5

MOBILITY

pressure values.
If tires are being used that are 
not specified on the tire inflation 
pressure details on the vehicle, 
refer to page 272, such as tires 
with special approval, the sys-
tem needs to be actively reset. 
The system will then take over 
the actual tire inflation pressures 
as the target pressures.
When operating the system, 
also note the additional informa-
tion found in the Tire inflation 
pressure, refer to page 272.

The following conditions must 
be met for the system; other-
wise, reliable flagging of a loss 
of tire inflation pressure is not 
assured:
• After each tire or wheel 

change, the system detects 

and updates the mounted 
tires and displays them after a 
short trip on the Control Dis-
play.

Enter the information about the 
mounted tires in the tire settings 
when the system does not automat-
ically detect the tires.

• TPM does not activate until 

after driving for a few minutes:

• After a tire or wheel replacement.
• Reset, for tires without special 

approval.

• After changing the tire setting.

• For tires with special 

approval:

• After a tire or wheel replacement, 

a reset was performed with the 
correct tire inflation pressure.

• After the tire inflation pressure 

was adjusted to a new value, a 
reset was performed.

• Wheels with TPM wheel elec-

tronics.

The information about the 
mounted tires can be entered in 
the tire settings if the system 
does not automatically detect 
the tires.
The tire sizes of the mounted 
tires can be gathered from the 
tire inflation pressure details on 
the vehicle, refer to page 272, or 
directly on the tires.

Safety information

WARNING

The display of the target pres-

sures is not a substitute for the 

tire inflation pressure details on 

the vehicle. Incorrect entries in 

the tire settings can lead to incor-

rect target tire inflation pressure 

values. In this case, it cannot be 

guaranteed that the notification of 

a loss of tire inflation pressure will 

be reliable. There is a risk of injury 

and risk of damage to property. 

Ensure that the tire sizes of the 

mounted tires are displayed cor-

rectly and match the details on the 

tires and on the vehicle.

Functional requirements

Tire settings

General information

290

5-1. MOBILITY

The tire details do not need to 
be re-entered when the tire infla-
tion pressure is corrected.
For summer and winter tires, the 
tire details entered last are 
stored. After a tire or wheel 
replacement, the settings of the 
tire sets used last can be 
selected.

Via Toyota Supra Command:

1

"My vehicle"

2

"Vehicle status"

3

 "Tire Pressure Monitor"

Via Toyota Supra Command:

1

"Tire settings"

2

Selecting tires:

• "Summer tires"
• "Winter tires/all-season tires"

3

"Current:"

4

Select the tire type that is 
mounted on the rear axle:

• Tire size, e.g., 245/45 R18 96 

Y.

• For tires with special 

approval: "Other tire"

5

Select the maximum road 
speed that will be used with 
the tires.

6

"Confirm settings"

The measurement of the current 
tire inflation pressure is started. 

The measurement progress is 
displayed.

The system status can be dis-
played on the Control Display, 
e.g., whether or not the system 
is active.
Via Toyota Supra Command:

1

"My vehicle"

2

"Vehicle status"

3

 "Tire Pressure Monitor"

The current status is displayed.

The current tire inflation pres-
sure is displayed for each tire.
The current tire inflation pres-
sures may change during driv-
ing operation or depending on 
the external temperature.

Depending on the model, the 
current tire temperatures are 
displayed.
The current tire temperatures 
may change while driving or due 
to the external temperature.

Opening the menu

Changing settings

Status display

Current status

Current tire inflation pres-
sure

Current tire temperature

291

5-1. MOBILITY

5

MOBILITY

Tire and system status are indi-
cated by the color of the wheels 
and a SMS text message on the 
Control Display.
Any existing messages are not 
deleted if the displayed target 
pressure is not reached after the 
tire inflation pressure is cor-
rected.

• The system is active and 

bases warnings on the dis-
played target pressures.

• For tires with special 

approval: the system is active 
and bases warnings on the 
tire inflation pressures stored 
during the last reset.

A flat tire or major drop in the 
tire inflation pressure has 
occurred in the indicated tires.

It may not be possible to identify 
tire inflation pressure losses.
Possible causes:
• Malfunction.
• During tire inflation pressure 

measurement, after confirma-
tion of the tire settings.

• For tires with special 

approval: the system is being 
reset.

Via Toyota Supra Command:

1

"My vehicle"

2

"Vehicle status"

3

"Tire Pressure Monitor"

4

"Tire settings"

5

Selecting tires:

• "Summer tires"
• "Winter tires/all-season tires"

6

"Current:"

When not selecting "Other 
tire":

7

"Load state"

8

"Confirm settings"

9

Drive the vehicle.

When selecting "Other tire":

7

"Tire settings"

8

Switch on drive-ready state 
and do not drive off.

9

Reset tire inflation pressure: 
"Perform reset".

10

Drive away.

After driving faster than 19 
mph/30 km/h for a short period, 
the set tire inflation pressures 
are accepted as the target tire 
inflation pressures. The reset is 
completed automatically while 
driving.
After a successfully completed 

Tire conditions

General information

All wheels green

One to four yellow wheels

Gray wheels

Reset the tire inflation 
pressure

292

5-1. MOBILITY

reset, the wheels on the Control 
Display are shown in green.
You may interrupt this trip at any 
time. When you continue the 
reset resumes automatically.

A low tire inflation pressure may 
cause the VSC Vehicle Stability 
Control System to be switched 
on.

Message

A symbol with a vehicle mes-
sage appears on the Control 
Display.

Measure

Check the tire pressure and cor-
rect as needed.

Message

In addition, a symbol with a 
vehicle message appears on the 
Control Display.

Measure

1

Reduce the vehicle speed. 
Do not exceed a speed of 80 
mph/130 km/h.

2

Stop at a filling station, etc. 
and check the tire inflation 
pressure of all 4 tires as soon 
as possible. Adjust the tire 
inflation pressure or have 
repairs performed as neces-
sary.

Messages: for tires with-
out special approval

General information

Safety information

WARNING

A damaged regular tire with low or 

missing tire inflation pressure 

impacts handling, such as steer-

ing and braking response. Do not 

continue driving if the vehicle is 

equipped with normal tires.

If a tire inflation pressure 
check is required

Symbol

Possible cause

Inflation was not carried 
out according to specifi-
cations, e.g., when the 
tire has not been suffi-
ciently inflated or in the 
case of a natural steady 
tire pressure loss.

If the tire inflation pressure 
is too low

A yellow warning light is 
illuminated in the instru-
ment cluster.

Symbol

Possible cause

There is a tire inflation 
pressure loss.

293

5-1. MOBILITY

5

MOBILITY

Message

In addition, a symbol with the 
affected tire appears in a vehicle 
message on the Control Display.

Measure

Reduce your speed and stop 
cautiously. Avoid sudden brak-
ing and steering maneuvers.

A low tire inflation pressure may 
cause the VSC Vehicle Stability 
Control System to be switched 
on.

Message

A symbol with a vehicle mes-
sage appears on the Control 
Display.

Measure

1

Check the tire pressure and 
correct as needed.

2

Perform a system reset.

If there is a significant loss 
of tire inflation pressure

A yellow warning light is 
illuminated in the instru-
ment cluster.

Symbol

Possible cause

There is a flat tire or a 
major loss in tire infla-
tion pressure.

Messages: for tires with 
special approval

General information

Safety information

WARNING

A damaged regular tire with low or 

missing tire inflation pressure 

impacts handling, such as steer-

ing and braking response. Do not 

continue driving if the vehicle is 

equipped with normal tires.

If a tire inflation pressure 
check is required

Symbol

Possible cause

Inflation was not carried 
out according to specifi-
cations, e.g., the tire 
has not been suffi-
ciently inflated.
The system has 
detected a wheel 
change, but no reset 
was done.
The tire inflation pres-
sure has fallen below 
the level of the last 
reset.
No reset was per-
formed for the system. 
The system issues a 
warning based on the 
tire inflation pressures 
stored during the last 
reset.

294

5-1. MOBILITY

Message

In addition, a symbol with a 
vehicle message appears on the 
Control Display.

Measure

1

Reduce the vehicle speed. 
Do not exceed a speed of 80 
mph/130 km/h.

2

At the next opportunity, for 
instance at a gas station, 
check the tire inflation pres-
sure in all four tires and cor-
rect if necessary.

3

Reset the system.

Message

In addition, a symbol with the 
affected tire appears in a vehicle 
message on the Control Display.

Measure

Reduce your speed and stop 
cautiously. Avoid sudden brak-
ing and steering maneuvers.

1

Identify the damaged tire.

Check the tire inflation pressure in 

all four tires, for instance using the 

tire pressure gauge of a flat tire kit.
For tires with special approval: if 

the tire inflation pressure in all four 

tires is correct, the TPM may not 

have been reset. In this case, per-

form the reset.
If tire damage cannot be found, 

contact your Toyota dealer.

If the tire inflation pressure 
is too low

A yellow warning light is 
illuminated in the instru-
ment cluster.

Symbol

Possible cause

There is a tire inflation 
pressure loss.
No reset was per-
formed for the system. 
The system issues a 
warning based on the 
tire inflation pressures 
stored during the last 
reset.

If there is a significant loss 
of tire inflation pressure

A yellow warning light is 
illuminated in the instru-
ment cluster.

Symbol

Possible cause

There is a flat tire or a 
major loss in tire infla-
tion pressure.
No reset was per-
formed for the system. 
The system issues a 
warning based on the 
tire inflation pressures 
stored during the last 
reset.

Actions in the event of a 
flat tire

295

5-1. MOBILITY

5

MOBILITY

2

Repair the flat tire, e.g., with 
a flat tire kit or by changing 
the wheel.

Use of sealant, for instance from 
the flat tire kit, may damage the 
TPM wheel electronics. Have 
the electronics replaced at the 
next opportunity.

The tire inflation pressure 
depends on the tire's tempera-
ture.
Driving or exposure to the sun 
will increase the tire's tempera-
ture, thus increasing the tire 
inflation pressure.
The tire inflation pressure is 
reduced when the tire tempera-
ture falls again.
These circumstances may 
cause a warning when tempera-
tures fall very sharply.
Following a temperature-related 
warning, the target pressures 
are displayed on the Control 
Display again after a short dis-
tance.

The system cannot indicate sud-
den serious tire damage caused 
by external circumstances.

Tires with special approval: the 
system will not function correctly 
if a reset was not performed, for 
example a flat tire may be indi-
cated although the tire inflation 
pressures are correct.

• A wheel without TPM wheel 

electronics, such as an emer-
gency wheel, is mounted: 
have the wheels checked, if 
needed.

• Malfunction: have the system 

checked.

• Interference caused by sys-

tems or devices with the 
same radio frequency: after 
leaving the area of the inter-
ference, the system automati-
cally becomes active again.

• For tires with special 

approval: the system was 
unable to complete the reset. 

System limits

Temperature

Sudden tire pressure loss

Failure to perform a reset

Malfunction

Message

The yellow warning 
light flashes and is then 
illuminated continu-
ously. A vehicle mes-
sage is displayed. It 
may not be possible to 
identify tire pressure 
losses.

Measure

296

5-1. MOBILITY

Perform a system reset again.

• Tire Pressure Monitor mal-

function: have the system 
checked by your Toyota 
dealer.

• Each tire, including the spare 

(if provided) should be 
checked monthly when cold 
and inflated to the inflation 
pressure recommended by 
the vehicle manufacturer on 
the vehicle placard or tire 
inflation pressure label. (If 
your vehicle has tires of a dif-
ferent size than the size indi-
cated on the vehicle placard 
or tire inflation pressure label, 
you should determine the 
proper tire inflation pressure 
for those tires.) As an added 
safety feature, your vehicle 
has been equipped with a tire 
pressure monitoring system 
(TPMS) that illuminates a low 
tire pressure telltale when one 
or more of your tires is signifi-
cantly under-inflated. Accord-
ingly, when the low tire 
pressure telltale illuminates, 
you should stop and check 
your tires as soon as possi-
ble, and inflate them to the 
proper pressure. Driving on a 
significantly under-inflated tire 
causes the tire to overheat 

and can lead to tire failure. 
Under-inflation also reduces 
fuel efficiency and tire tread 
life, and may affect the vehi-
cle's handling and stopping 
ability. Please note that the 
TPMS is not a substitute for 
proper tire maintenance, and 
it is the driver's responsibility 
to maintain correct tire pres-
sure, even if under-inflation 
has not reached the level to 
trigger illumination of the 
TPMS low tire pressure tell-
tale. Your vehicle has also 
been equipped with a TPMS 
malfunction indicator to indi-
cate when the system is not 
operating properly. The TPMS 
malfunction indicator is com-
bined with the low tire pres-
sure telltale. When the system 
detects a malfunction, the tell-
tale will flash for approxi-
mately one minute and then 
remain continuously illumi-
nated. This sequence will 
continue upon subsequent 
vehicle start-ups as long as 
the malfunction exists. When 
the malfunction indicator is 
illuminated, the system may 
not be able to detect or signal 
low tire pressure as intended. 
TPMS malfunctions may 
occur for a variety of reasons, 
including the installation of 
replacement or alternate tires 
or wheels on the vehicle that 
prevent the TPMS from func-

Declaration according to 
NHTSA/FMVSS 138 Tire 
Pressure Monitoring System

297

5-1. MOBILITY

5

MOBILITY

tioning properly. Always 
check the TPMS malfunction 
telltale after replacing one or 
more tires or wheels on your 
vehicle to ensure that the 
replacement or alternate tires 
and wheels allow the TPMS 
to continue to function prop-
erly.

If a tire is punctured and loses 
pressure, it is not necessary to 
replace the tire immediately if a 
tire repair kit (Mobility System) is 
used.
If needed, the tools for changing 
wheels are available as acces-
sories from your Toyota dealer.

*

: if equipped

The wheel lug bolts have a spe-
cial coding. The lug bolts can 
only be released with the 
adapter which matches the cod-

ing.

The adapter of the lug bolt lock 
is in the onboard vehicle tool kit 
or in a storage compartment 
close to the onboard vehicle tool 
kit.

• Lug bolt, arrow 

1

.

• Adapter, arrow 

2

.

1

Attach the adapter to the lug 
bolt.

2

Unscrew the lug bolt.

3

Remove the adapter after 
unscrewing the lug bolt.

1

Attach the adapter to the lug 
bolt. If necessary, turn the 
adapter until it fits on the lug 
bolt.

2

Screw on the lug lock bolt. 
The tightening torque is 101 
lbs ft/140 Nm.

Changing wheels/tires

General information

NOTICE

Using an impact wrench to loosen 

or tighten the wheel lock bolt can 

damage it. There is a risk of dam-

age to property, among other 

potential damage. Only use a lug 

wrench to loosen and tighten the 

wheel lock bolt.

Lug bolt lock*

Concept

Overview

Unscrewing

Screwing on

298

5-1. MOBILITY

3

Remove the adapter and 
stow it after screwing on the 
lug bolt.

This chapter describes all stan-
dard, country-specific and 
optional features offered with 
the series. It also describes fea-
tures and functions that are not 
necessarily available in your 
vehicle, e.g., due to the selected 
options or country versions. This 
also applies to safety-related 
functions and systems. When 
using these functions and sys-
tems, the applicable laws and 
regulations must be observed.

Engine compartment

Vehicle features and 
options

299

5-1. MOBILITY

5

MOBILITY

1

Filler neck for washer fluid

2

Jump-starting, negative battery terminal

3

Jump-starting, positive battery terminal

4

Oil filler neck

5

Coolant reservoir, auxiliary cooling

6

Coolant reservoir, engine

7

Vehicle identification number

Overview

Hood

Safety information

WARNING

Improperly executed work in the 

engine compartment can damage 

vehicle components and impair 

vehicle functions. There is a risk 

of an accident and damage to 

property. Have work in the engine 

compartment performed by your 

Toyota dealer.

WARNING

The engine compartment accom-

modates moving components. 

Certain components in the engine 

compartment can also move with 

the vehicle switched off, for 

instance the radiator fan. There is 

a risk of injury. Do not reach into 

the area of moving parts. Keep 

articles of clothing and hair away 

from moving parts.


Content      ..     16      17      18      19     ..