Toyota RAV4 Prime (2023 year). Manual in english - page 9
 

  Index      Toyota     Toyota RAV4 Prime (2023 year). Manual in english


Search            copyright infringement  


Content      ..     7      8      9      10     ..


Toyota RAV4 Prime (2023 year). Manual in english - page 9


144

2-2. Charging

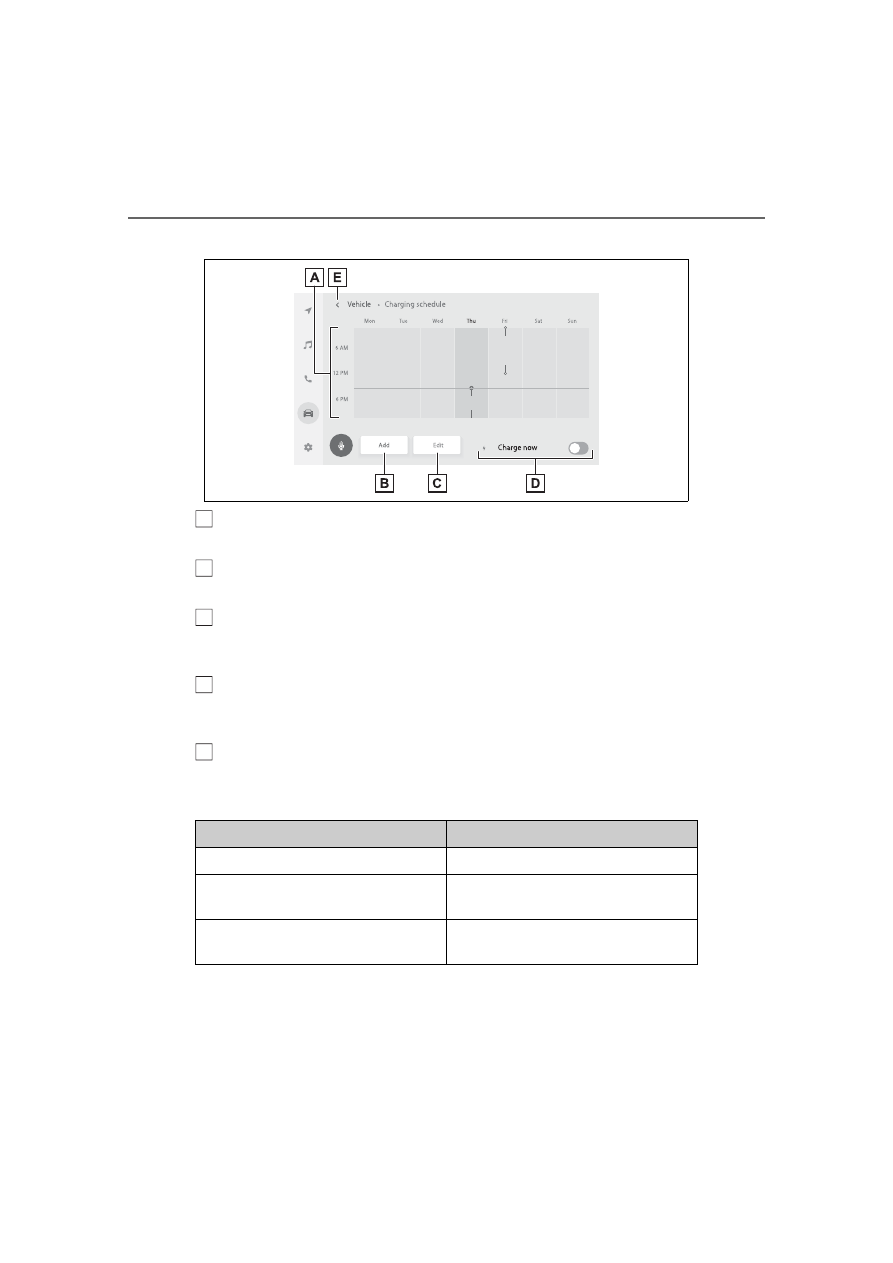
How to read the “Charging schedule” screen

Charging schedules (calendar display)

Displays the week-long registered charging schedule in a list using icons.

“Add” button

Press to add a new item to the charging schedule. (

P.145)

“Edit” button

Press to change or delete registered items on the charging schedule. 
(

P.146)

“Charge Now” button

Each time the button is pressed, “Charge Now” switches between on and 
off. (

P.147)

Return button

Press to close the “Charging schedule” screen.

Main content displayed on the calendar:

When “Charge Now” is set to on, the blue icon will be displayed on 
the gray line.

Display

Content

Gray line

Current time

Green icon

The charging mode is set to “Depar-
ture time”

Blue icon

The charging mode is set to “Start at 
set time”

A

B

C

D

E

145

2-2. Charging

2

Plug-in 

hybri

sy

st

em

Registering the charging 
schedule

1

Display the “Charging sched-
ule” screen. (

P.143)

2

Press “Add”.

The “Add event” screen will be dis-

played on the screen.

3

Select charging mode.

Press “Start at set time” or “Depar-

ture time” to set the desired 

charging mode, and set the time by 

pressing buttons on the screen.
When “Start at set time” is selected:
Set the charging start time (start 

time), then press “OK”.

When “Departure time” is selected:
Set the charging end time (depar-

ture time), then press “OK”.

4

When the charging mode is 
set to “Departure time”, set 
the air conditioning-linked 
function to on or off.

To operate the air conditioning sys-

tem according to the departure 

time, press the “Climate prepara-

tion” to set the function to on.
Each time the button is pressed, 

the function switches between on 

and off.

5

Select the desired day of the 
week to activate for the 
repeated setting, and then 
press “OK”.

The charging schedule will be 

repeated on the selected day. It is 

possible to select more than one 

day.
If no days are selected, charging is 

only carried out once according to 

the charging schedule for the next 

146

2-2. Charging

24 hours.

6

After setting operations are 
complete, press “Save”.

The charging schedule is registered 

and an icon is added to the calen-

dar.
To cancel registration of the 

charging schedule, press “X”.
After setting operations are com-

plete, when the power switch is 

turned off and the AC charging 

cable is connected to the vehicle, 

charging is carried out according to 

the charging schedule settings.

Switching charging sched-
ules between on and off

1

Display the “Charging sched-
ule” screen. (

P.143)

2

Press “Edit”.

The “Events” screen will be dis-

played on the screen.

3

From the items displayed on 
the screen, press 

 or 


in the row of the charging 
schedule you wish to change.

If the charging schedule you wish to 

change is not displayed on the 

screen, scroll the list up and down 

to display it.
Each time the button is pressed, 

the charging schedule switches 

between on and off.

Changing the registered 
charging schedules

1

Display the “Charging sched-
ule” screen. (

P.143)

2

Press “Edit”.

The “Events” screen will be dis-

played on the screen.

3

Press “Edit” on the “Events” 
screen.

4

From the items displayed on 
the screen, press the 
charging schedule you want 
to change.

The “Edit events” screen will be dis-

147

2-2. Charging

2

Plug-in 

hybri

sy

st

em

played on the screen.
It is also possible to display the 

“Edit events” screen by pressing 

the icon of the charging schedule 

you want to change from those dis-

played on the calendar.

Changing registered items:

Change the desired settings as 
described in step 

3

 to step 

5

 of the 

“Registering the charging schedule” 
procedure. (

P.145)

When a setting is changed, its icon 
on the calendar also changes.

Deleting registered items:

Press “Delete”.
A deletion confirmation message 
will be displayed.
Press “Delete” to delete the 
selected charging schedule.
To cancel deletion, press “Cancel” 
or the return button.
When a charging schedule is 
deleted, its icon is also deleted from 
the calendar.

Turning “Charge Now” on

1

Display the “Charging sched-
ule” screen. (

P.143)

2

Press 

 of “Charge Now”.

Each time the button is pressed, 

“Charge Now” switches between on 

and off.

After setting operations are 
complete, charging starts when 
the AC charging cable is con-
nected. (

P.121)

When a charging schedule has 

been registered

When all the items in the charging 

schedule are turned off, icons are 

not displayed on the “Charging 

schedule” screen (calendar display).
The icons will be displayed when 

they are set to on using the “Events” 

screen.

When charging schedule set-

ting operations are canceled

When the vehicle is in the following 

148

2-2. Charging

conditions, charging schedule set-

ting operations are canceled.

The power switch is turned off 

before the settings are confirmed

The vehicle starts off

A display with a higher priority 

than that of the charging schedule 

setting is shown

1

Connect the AC charging 
cable to the vehicle and start 
charging

2

Turn the power switch on 
during charging

The setting screen of “My Room 

Mode” is displayed automatically on 

the multi-information display.

3

Press 

 or 

 of the meter 

control switches, select 
“Yes”, and then press 

.

“My Room Mode” starts and sys-

tems such as the air conditioning 

system and audio system can be 

used inside the vehicle.
When not using “My Room Mode”, 

WARNING

Cautions while performing 

the setting operation

As the hybrid system needs to be 

operating during setting up the 

display, ensure that the vehicle is 

parked in a place with adequate 

ventilation. In a closed area such 

as a garage, exhaust gases 

including harmful carbon monox-

ide (CO) may collect and enter 

the vehicle. This may lead to 

death or a serious health hazard.

NOTICE

While performing the setting 

operation

When performing the setting 

operation while the hybrid system 

is stopped, be careful that the 12-

volt battery will not be discharged.

Using the “My Room 

Mode”

When the AC charging cable 
is connected to the vehicle, 
electrical components such 
as the air conditioning sys-
tem or audio system can be 
used using the external 
power source.

Starting “My Room Mode”

149

2-2. Charging

2

Plug-in 

hybri

sy

st

em

select “No”, and then press 

.

Vehicles with 7-inch multi-
information display

Vehicles with 12.3-inch multi-
information display

To stop “My Room Mode”, turn 
the power switch off.

When “My Room Mode” starts, 
the remaining charge display 
screen for the hybrid battery 
(traction battery) is displayed 
automatically on the multi-infor-
mation display. The approxi-
mate power balance (balance 
between electricity supply and 
consumption) while using “My 
Room Mode” can be checked 
from the color and size of the 
arrows.

Vehicles with 7-inch multi-
information display

Vehicles with 12.3-inch multi-
information display

Discharging status

Charging status

When the electricity supply from the 
AC charging cable is larger than the 
power consumption inside the vehi-
cle, 

 becomes larger. When the 

power consumption is larger than 
the electricity supply, 

 becomes 

larger.
When the electricity supply and 
consumption are balanced (when 
the power balance is judged to be 
zero), 

 and 

 are displayed as 

the same size.

Meter display during charging

If “My Room Mode” is not turned on 

for approximately 100 seconds after 

the power switch is turned on during 

charging, the power switch will auto-

matically turn off.

While using “My Room Mode”

Any of the following may occur.

Display of power balance 
information while using 
“My Room Mode”

A

B

A

B

C

D

D

C

C

D

150

2-2. Charging

When the remaining charge of the 

hybrid battery (traction battery) 

reaches the lower limit, the air 

conditioning system automatically 

turns off. 

In this situation, the air condition-

ing system cannot be used until 

the remaining charge of the hybrid 

battery (traction battery) 

increases. Turn the power switch 

off and use “My Room Mode” after 

the remaining charge of the hybrid 

battery (traction battery) is 

restored.

When the outside temperature is 

low, the heater output may be lim-

ited due to the air conditioning 

system operation being restricted.

Warning lights and indicators such 

as electric power steering system 

warning light (yellow) and mal-

function indicator lamp may turn 

on, but this is not a malfunction.

Also, when the headlight switch is 

in the AUTO position and the sur-

rounding area is dark, the head-

lights are turned on. (

P.321)

When a charging schedule is 

registered

When “My Room Mode” starts while 

the charging schedule is on 

standby, charging schedules are 

ignored and charging starts.

When “My Room Mode” is used 

while the hybrid battery (trac-

tion battery) is fully charged

When the power switch is turned on 
while the hybrid battery (traction 
battery) is fully charged and the 
charging connector that supplies 
power is connected, “Charging Port 
Lid is Open” is displayed on the 
multi-information display. In this 
case, press 

 on the meter control 

switches to display the setting 
screen of “My Room Mode”, and 
then select “My Room Mode”.
When “My Room Mode” is used 

while the hybrid battery (traction 

battery) is fully charged, the electric 

power of the hybrid battery (traction 

battery) may be consumed. In this 

case, charging may be performed 

again.

When a message related to “My 

Room Mode” is displayed

When a message is displayed on 

the multi-information display while 

using or attempting to start “My 

Room Mode”, take the following cor-

rection procedures.

“Traction battery is too low for “My 

Room Mode””

There is insufficient remaining 
charge in the hybrid battery (traction 
battery) for starting “My Room 
Mode”.
Wait until the charge of the hybrid 
battery (traction battery) increases, 
then start “My Room Mode”.

““My Room Mode” has stopped 

due to low traction battery”

The remaining charge in the hybrid 
battery (traction battery) is insuffi-
cient.
Stop using “My Room Mode” and 
charge the hybrid battery (traction 
battery).

““My Room Mode” will stop when 

traction battery is too low Reduce 

power usage to continue using 

“My Room Mode””

The power consumption inside the 
vehicle is greater than the power 
being charged to the hybrid battery 
(traction battery), and the remaining 
charge of the hybrid battery (traction 
battery) is low.

*

• “My Room Mode” will end unless 

the power consumption inside the 

vehicle is improved.

• To continue using “My Room 

Mode”, turn off the power of sys-

tems such as the air conditioning 

151

2-2. Charging

2

Plug-in 

hybri

sy

st

em

system and audio system to 

increase the remaining charge of 

the hybrid battery (traction bat-

tery).

*

: The power balance status during 

“My Room Mode” can be checked 
from the remaining charge dis-
play screen for the hybrid battery 
(traction battery) displayed on the 
multi-information display. 
(

P.149)

WARNING

Cautions for using “My Room 

Mode”

Make sure to observe the follow-

ing precautions.
Failure to do so may result in seri-

ous health problems or even 

death.

Do not leave children, people 

who need assistance, or pets 

inside the vehicle. The system 

may turn off automatically and 

the interior temperature may 

become high or low, resulting in 

heat stroke, dehydration or 

hypothermia. Devices such as 

the wipers can also be used, 

which may lead to mistaken 

operation and an accident.

Check the safety around the 

vehicle carefully before use.

152

2-2. Charging

Refer to the following table and carry out the appropriate correction 
procedure.

The power source indicator on the CCID (Charging Circuit 
Interrupting Device) does not illuminate, even though the 
plug is connected to an external power source.

When charging cannot be carried out

When charging does not start, even though the normal proce-
dure is followed, check each of the following items.

If a message is shown on the multi-information display, also refer 
to P.158.

When charging cannot be carried out

Likely cause

Correction procedure

Plug is not properly connected to 
outlet

Check that the plug is properly con-
nected to the outlet.

Power is out

After power is restored, carry out the 
charging procedure again.

Building breaker is tripped and 
power is cut off

Check that the breaker is connected 
and if there is no malfunction, check 
if the vehicle can be charged through 
another outlet.
If charging is possible, the first outlet 
may have a malfunction. Contact the 
building or facility manager, or an 
electrician.

Short circuit between CCID 
(Charging Circuit Interrupting 
Device) and plug

Immediately stop charging and con-
tact your Toyota dealer.

153

2-2. Charging

2

Plug-in 

hybri

sy

st

em

The error warning indicator on the CCID (Charging Circuit 
Interrupting Device) flashes.

Charging indicator of the charging port does not illuminate, 
even though charging connector is connected.

Likely cause

Correction procedure

Electrical leakage detection function 
or self-diagnostic function operates 
and power is cut off

When the voltage is insufficient, the 
error warning indicator may flash 
when there is noise interference. 
Perform a reset and connect to a 
proper power source. (

P.103)

If charging does not start, immedi-
ately stop charging and contact your 
Toyota dealer.

Likely cause

Correction procedure

The plug is not properly connected to 
the outlet

Check whether the plug is properly 
connected to the outlet.

Charging connector is not securely 
connected to AC charging inlet

Check the connection status of the 
charging connector.

When connecting the charging 
connector, make sure not to touch 
the latch release button. Insert the 
charging connector securely until 
you hear a click. The charging con-
nector may not be connected cor-
rectly if the latch release button is 
pressed while inserting.

After connecting the charging con-
nector, check that the latch release 
button is not pressed and the 
charging indicator of the charging 
port is turned on.

If the charging indicator of the 
charging port does not illuminate, 
even though the charging connector 
is securely connected, there may be 
a malfunction in the system. Immedi-
ately stop charging and contact your 
Toyota dealer.

154

2-2. Charging

Charging indicator of the charging port flashes and charging 
cannot be carried out.

*

: Refer to P.98 for details regarding charging indicator of the charging port 

illumination and flashing.

Refer to the following table and carry out the appropriate correction 
procedure.

Cannot charge at desired time

Hybrid battery (traction battery) is 
already fully charged

When the hybrid battery (traction 
battery) is fully charged, charging is 
not performed.

The charger does not operate

Please contact the facility manager 
when there is a problem with char-
ger.

Likely cause

Correction procedure

When charging indicator of the 
charging port flashes

*

: Charging 

schedule is registered

When you wish to charge according 
to the charging schedule, wait until 
the set time.
To start charging, set “Charge Now” 
to on. (

P.135, 141, 147)

When charging indicator of the 
charging port rapidly flashes

*

: Mal-

function occurred in an external 
power source or the vehicle

Start the hybrid system and follow 
the instructions displayed by the 
message on the multi-information 
display. (

P.158)

When charging schedule function does not operate nor-
mally

Likely cause

Correction procedure

Vehicle clock is not properly adjusted 
or the calendar is not set correctly

Check the clock settings and adjust it 
to the proper time.

*1

Check the calendar settings and 
adjust it to the correct date.

*2


(

P.191, 203)

Likely cause

Correction procedure

155

2-2. Charging

2

Plug-in 

hybri

sy

st

em

*1

:The automatic adjustment of the clock by GPS is set to on. For details 

regarding setting clock, refer to “MULTIMEDIA OWNER’S MANUAL”.

*2

:This can only be set if GPS calibration of clock is turned off in the Multi-

media Display settings.

Cannot change charging schedule from smartphone applica-
tion (if equipped)

*

*

: In order to use the smartphone application, it is necessary to apply to 

Toyota Apps. For details about Toyota Apps, refer to 
http://www.toyota.com/connectedservices in the United States and 
http://www.toyota.ca/connected in Canada.

Charging starts, even though charging schedule is registered

AC charging cable is not connected 
to vehicle

Before using the charging schedule, 
connect the AC charging cable.

Incorrect charging mode selected

Check the charging mode setting. 
(

P.128)

When the charging mode is “Start” or 
“Start at set time”, charging starts at 
the set time, but when it is “Depar-
ture” or “Departure time”, charging is 
completed by the set time. (The 
charging start time is automatically 
controlled by the system.)

Likely cause

Correction procedure

Smartphone is outside its coverage 
area

Check the signal strength. If the 
smartphone is outside its coverage 
area, move to a place with a better 
signal.

Likely cause

Correction procedure

“Charge Now” is set to on

When charging according to the 
charging schedule, set “Charge 
Now” to off. (

P.135, 141, 147)

Charging schedule is set to off

Check that charging schedule is not 
set to off. (

P.133, 139, 146)

Likely cause

Correction procedure

156

2-2. Charging

Charging mode is set to “Departure” 
or “Departure time” and schedule 
departure time is close to current 
time

When the system determines that 
there is no time to finish charging by 
the set scheduled departure time, it 
starts charging. Check the charging 
schedules.

AC charging cable was removed and 
reinserted while charging indicator of 
the charging port was flashing

If the AC charging cable is removed 
and reinserted while the charging 
indicator is flashing, the charging 
schedule is canceled (

P.123).

Temporarily remove the AC charging 
cable, and then reconnect it.

The “My Room Mode” or the Remote 
Air Conditioning System was oper-
ated

When the “My Room Mode” or the 
Remote Air Conditioning System is 
operated, the system will start 
charging, even if the charging sched-
ule is registered. To carry out 
charging using the charging sched-
ule, stop the “My Room Mode” or the 
Remote Air Conditioning System, 
and then reconnect the AC charging 
cable.

“Battery Heater” (

P.113) operated

When the charging mode is set to 
“Departure” or “Departure time”, 
“Battery Heater” may operate before 
charging starts. Check the status of 
the charging indicator of the charging 
port. (

P.98)

Outside temperature is low and 
hybrid battery (traction battery) 
warming control (

P.113) operated 

(Alaska and Canada only)

When hybrid battery (traction bat-
tery) warming control operates, the 
charging schedules are ignored and 
charging starts. In order to protect 
the hybrid battery (traction battery), 
allow charging to continue.

Likely cause

Correction procedure

157

2-2. Charging

2

Plug-in 

hybri

sy

st

em

Charging ends earlier than time set in “Departure” or “Depar-
ture time”

Charging is not complete, even though it is time set in 
“Departure” or “Departure time”

Charging does not start, even though it is time set in “Start” 
or “Start at set time”

Likely cause

Correction procedure

Charging end time does not match 
estimated end time due to condition 
of power source or outside tempera-
ture

If sudden changes in temperature or 
changes in the condition of the 
power source occur while charging, 
charging may end earlier than the 
time estimated by the system.

Likely cause

Correction procedure

“Climate Prep” or “Climate prepara-
tion” is set to on

When “Climate Prep” or “Climate 
preparation” is set to on, the air con-
ditioning operates until the set depar-
ture time.
Therefore, charging may not com-
plete by the set time due to charging 
conditions.
To have the hybrid battery (traction 
battery) fully charged, allow charging 
to continue.

Charging end time does not match 
estimated end time due to condition 
of power source or outside tempera-
ture

If sudden changes in temperature or 
changes in the condition of the 
power source occur while charging, 
charging may not end exactly at the 
time estimated by the system.

Likely cause

Correction procedure

AC charging cable was connected 
after set time

Connect the AC charging cable 
before the time set in “Start” or “Start 
at set time”.

158

2-2. Charging

When a door is opened with the 
power switch off, after charging, 
a message is displayed in the 
multi-information display.

When this occurs, follow the 
instructions displayed on the 
screen.

If “Charging Stopped Due to Pulled Charging Connector” is 
shown

When charging-related message is displayed

Likely cause

Correction procedure

Charging connector is removed 
while charging

When the charging connector is 
removed while charging, charging 
stops. If you want to fully charge the 
hybrid battery (traction battery), 
reconnect the charging connector.

After the hybrid battery (traction bat-
tery) is fully charged, the charging 
connector is removed while the 
hybrid battery (traction battery) is 
being recharged again because 
electricity-consuming functions

*

 have 

been used and the remaining charge 
is now reduced.

159

2-2. Charging

2

Plug-in 

hybri

sy

st

em

*

: Electricity is consumed when operating “Battery Heater” (

P.113), the air 

conditioning-linked function (

P.129) or Remote Air Conditioning System 

(

P.431).

If “Charging Complete Limited Due to Battery Temp” is 
shown

Charging connector is not securely 
connected

Check the connection status of the 
charging connector.

When connecting the charging 
connector, make sure not to touch 
the latch release button. Insert the 
charging connector securely until 
you hear a click. The charging con-
nector may not be connected cor-
rectly if the latch release button is 
pressed while inserting.

After connecting the charging con-
nector, check that the latch release 
button is not pressed and the 
charging indicator of the charging 
port is turned on.

If charging cannot be carried out, 
even though the proper procedures 
were followed, have the vehicle 
inspected by your Toyota dealer.

Latch release button of charging 
connector was pressed while 
charging

When the latch release button is 
pressed while charging, charging 
stops. To continue charging, recon-
nect the charging connector.

Likely cause

Correction procedure

Charging was stopped to protect the 
hybrid battery (traction battery) as it 
continued to remain hot for a certain 
period of time.

Allow the hybrid battery (traction bat-
tery) to cool down and perform 
charging again if the charging 
amount has not reached the desired 
amount.

Likely cause

Correction procedure


Content      ..     7      8      9      10     ..