Toyota Raize (2023 year). Manual in english - page 9
 

  Index      Toyota     Toyota Raize (2023 year). Manual in english


Search            copyright infringement  


Content      ..     7      8      9      10     ..


Toyota Raize (2023 year). Manual in english - page 9


144

3-2. Opening, closing and locking the doors

: If equipped

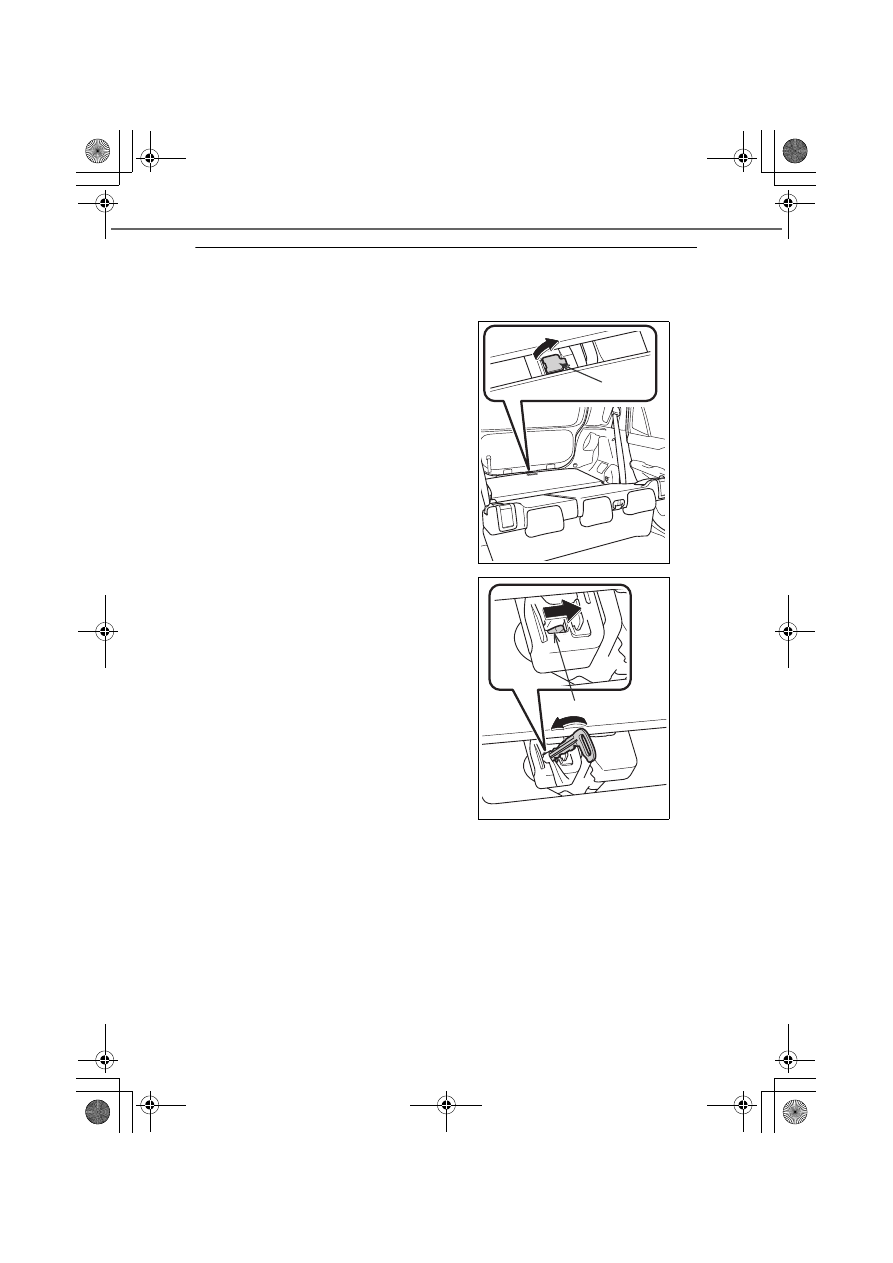
If the back door will not open

You can open the back door from the inside.

a

Fold down the rear seatback forward (

P. 149)

b

Open the cover

c

Move the lever in the direction of

the arrow using the key or emer-

gency key

 (

P. 118)

To prevent damage, wrap a cloth

etc. around the tip of the key or the

like to protect it.

KBRO320208

Cover

KBRO320209

Lever

145

3-2. Opening, closing and locking the doors

Oper

ati

on of each com

ponent

3

WARNING

Caution while driving

Keep the back door closed while driving.
If the back door is left open, it may hit near-by objects while driving or lug-

gage may be unexpectedly thrown out, causing an accident.
In addition, exhaust gases may enter the vehicle, causing death or a serious

health hazard. Make sure to close the back door before driving.

Before driving the vehicle, make sure that the back door is fully closed. If the
back door is not fully closed, it may open unexpectedly while driving, causing

an accident.

Never let anyone sit in the luggage compartment. In the event of sudden
braking or a collision, they are susceptible to death or serious injury.

When children are in the vehicle

Observe the following precautions.
Failure to do so may result in death or serious injury.

Do not allow children to play in the luggage compartment.
If a child is accidentally locked in the luggage compartment, they could have

heat exhaustion or other injuries.

Do not allow a child to open or close the back door.
Doing so may cause the back door to move unexpectedly, or cause the

child’s hands, head, or neck to be caught by the closing back door.

Operating the back door

Observe the following precautions.
Failure to do so may cause parts of the body to be caught, resulting in death or

serious injury.

Remove any heavy loads, such as snow and ice, from the back door before
opening it. Failure to do so may cause the back door to suddenly shut again

after it is opened.

When opening or closing the back door, thoroughly check to make sure the
surrounding area is safe.

If anyone is in the vicinity, make sure they are safe and let them know that
the back door is about to open or close.

Use caution when opening or closing the back door in windy weather as i t
may move abruptly in strong wind.

146

3-2. Opening, closing and locking the doors

WARNING

The back door may suddenly shut if
it is not opened fully. It is more diffi-

cult to open or close the back door

on an incline than on a level sur-

face, so beware of the back door

unexpectedly opening or closing by

itself. Make sure that the back door

is fully open and secure before

using the luggage compartment.

When closing the back door, take
extra care to prevent your fingers,

etc., from being caught.

When closing the back door, make
sure to press it lightly on its outer

surface. If the edge of the door is

held when fully closing the back

door, it may result in hands or arms

being caught.

Do not pull on the back door damper stay to close the back door, and do not
hang on the back door damper stay.
Doing so may cause hands to be caught or the back door damper stay to

break, causing an accident.

If a bicycle carrier or similar heavy object is attached to the back door, it may
suddenly shut again after being opened, causing someone’s hands, head or

neck to be caught and injured. When installing an accessory part to the back

door, using a genuine Toyota part is recommended.

KBRO320204

KBRO320205

147

3-2. Opening, closing and locking the doors

Oper

ati

on of each com

ponent

3

NOTICE

Back door handle switch

Never apply excessive force or use a sharp object to press the back door han-

dle switch. Doing so could cause the switch to break.

Damper stays

The back door is equipped with damper stays that hold the back door in place.

Observe the following precautions to prevent damage or malfunction to the

back door damper stay rod.

Do not attach any foreign matter,
such as stickers, plastic sheets, or

adhesives to the damper stay rod

Do not touch the damper stay rod
with gloves or other fabric items

Do not install non-genuine Toyota
accessories to the back door

Do not place your hand on the
damper stay or apply lateral forces

to it

Striker bar

When closing the back door, make

sure that no foreign matter gets into

the striker bar. The bar may be dam-

aged and the back door may not

close.

KBRO320206N

KBRO320207

148

: If equipped

3-3. Adjusting the seats

Front seats

Adjustment procedure

a

Front/rear position adjustment

b

Reclining adjustment

c

Overall seat height adjustment

(driver’s seat only)

WARNING

When adjusting the seat

Take care when adjusting the seat position to ensure that other passengers
are not injured by the moving seat.

Do not put your hands under the seat or near the moving parts to avoid serious injury.
Fingers or hands may become jammed in the seat mechanism.

Provide sufficient legroom and be careful not to get your feet caught.

Reclining adjustment

Be sure support the seatback with your hands when operating the seatback.
The seatback may fall back suddenly.

Do not apply excessive force to the seatback. If a strong force is applied to
the seatback, it may suddenly fall back and cause injury.

Do not recline the seatback more than necessary.
If the seat is too reclined, the seat belt may slide past the hips and apply

restraint forces directly to the abdomen, or your neck may contact the shoulder

belt, increasing the risk of death or serious injury in the event of an accident.

After adjusting the seat, make sure that the seat is locked in position.

1

2

3

KBRO330101E

149

3-3. Adjusting the seats

Oper

ati

on of each com

ponent

3

Rear seats

Adjustment procedure

a

Reclining adjustment

Pull the reclining lever and adjust the seatback in 2 stages.

Folding the seat forward

a

Store the seat belt buckle of the

rear middle seat

b

Lower the head restraint all the way to be bottom (

P. 152)

1

KBRO330201

KBRO330202

150

3-3. Adjusting the seats

c

While pulling the reclining lever,

bend the seatback forward

Pull the lever until the lock is fully

released.

d

To return the seatback to its original position, perform the steps in the

reverse order

WARNING

Observe the following precautions.
Failure to do so may cause death or serious injury.

Seat adjustments

Be careful not to hit the passengers or luggage with the seat.

Be sure support the seatback with your hands when operating the seatback.
The seatback may fall back suddenly.

Do not apply excessive force to the seatback. If a strong force is applied to
the seatback, it may suddenly fall back and cause injury.

When someone sits in the rear middle seat, make sure to adjust the seatback
angle of the rear seats on both sides.
Failure to maintain the correct posture could result in serious injury or death

in the event of an accident.

After adjusting the seat, make sure that the seat is secured in place.

When folding the seatback forward

Do not operate the rear seats while driving

Make sure that the parking brake is applied on a flat area and set the shift
lever to P (for continuously variable transmission vehicles) or N (manual

transmission vehicles)

When adjusting the seat, be careful not to get your hands or feet caught in
the movable parts or coupling parts

Do not allow anyone sit on a folded seatback or ride in the luggage compart-
ment while driving

Be careful not to let a child enter the luggage compartment

KBRO330203

151

3-3. Adjusting the seats

WARNING

Oper

ati

on of each com

ponent

3

After returning the seatback to the upright position

Make sure the seatback is securely locked by pushing it forward and rear-
ward

Check that the seat belt is not caught in the seat

NOTICE

When folding the seatback forward

Before you fold the seatback down, make sure to retract the seat belt and the

buckle of the rear middle seat.
Failure to do so may damage the seat or buckle.

152

3-3. Adjusting the seats

Head restraints

Front seats

a

Raise

b

Lower

Push the head restraint down while

pressing the lock release button.

Rear seats

a

Raise

b

Lower

Push the head restraint down while

pressing the lock release button.

Removing the head restraints

Pull the head restraint up while press-

ing the lock release button.

If the ceiling is preventing you from

removing the front seat’s head

restraints, fold down the seatback.

(

P. 148)

1

2

KBRO330301

Release

button

1

2

KBRO330302

Release

button

KBRO330303

Release 

button

153

3-3. Adjusting the seats

Oper

ati

on of each com

ponent

3

Installing the head restraints

Align the head restraint with the

installation holes and push it down to

the lock position.*

Press and hold the lock release but-

ton when lowering the head restraint

further.

*

If it is difficult to push the head restraint
down, press the lock release button
while pushing down.

Height of the front seat head restraint

Make sure that the head restraints

are adjusted so that the center of the

head restraint is closest to the top of

your ears.

Using head restraints on the rear seats

When using, make sure that it is one stage above the stored position.

WARNING

Head restraints

Observe the following precautions.
Failure to do so may cause death or serious injury.

Use the head restraints designed for each respective seat.

Adjust the head restraints to the correct position at all times

Do not attach the head restraints backwards

After adjusting the head restraints, push down on them and make sure they
are locked in position.

Do not drive with the head restraints removed

KBRO330304

Release 

button

KBRO330305

154

3-4. Steering wheel position and mirrors

Steering wheel

Adjustment procedure

a

Grip the steering wheel and raise

the lever

b

Move the steering wheel up and

down to adjust it to the right

position

Once you decided on the position,

lower the lever and secure the steering

wheel in place.

Horn

If you press the periphery of 
on the steering wheel, the horn will

sound.

After adjusting the steering wheel position

Make sure that the steering wheel is secured in place.
If it is not secured in place, the horn may not sound. (

P. 154)

KBRO340101E

KBRO340102E

KBRO340103E

155

3-4. Steering wheel position and mirrors

Oper

ati

on of each com

ponent

3

WARNING

Important points while driving

Do not adjust the steering wheel position while driving.
Doing so may lead to mishandling of the vehicle that could result in serious

injury or death.

After adjusting the steering wheel position

Make sure that the steering wheel is secured in place.
If the steering wheel is not secured in place, its position changes all of a sud-

den, which could lead to an unforeseen accident and result in serious injury or

death.

156

3-4. Steering wheel position and mirrors

Inside rear view mirror

The inside rear view mirror’s position can be adjusted to enable suffi-

cient confirmation of the rear view.

Adjustment procedure

The inside rear view mirror’s position can be adjusted according to the

driver’s position.
Adjust  it  by  holding  the  inside  rear

view mirror body

Anti-glare function

Operate the lever to reduce the reflected light by the headlights of the

vehicle behind you.

a

Normal use

b

Anti-glare ON

WARNING

Caution while driving

Do not adjust the mirror while driving.
Doing so may lead to mishandling of the vehicle and cause an accident, result-

ing in death or serious injury.

KBRO340201E

1

2

KBRO340202E

157

3-4. Steering wheel position and mirrors

Oper

ati

on of each com

ponent

3

Outside rear view mirrors

Adjustment procedure (manual type)

Adjusting the mirrors by moving the

entire mirror unit with hand

After the adjustment, sit on the driver’s

seat and make sure that the rear view is

visible.

Adjustment procedure (electric type)

Use the switch to adjust the mirror angle.

a

Select a mirror to adjust

a

Left

b

Right

b

Operate the switch to adjust the

mirror surface

a

Top

b

Right

c

Bottom

d

Left

KBRO340305E

1

2

KBRO340301E

3

2

4

1

KBRO340302E

158

3-4. Steering wheel position and mirrors

Folding the outside rear view mirrors (manual type)

Fold the outside rear view mirrors by

pushing them backward with hand

Use your hand to push them forward

and restore them to the original posi-

tion.

Folding the outside rear view mirrors (electric type)

How to fold and extend the mirrors manually

Press the switch

a

Fold

b

Extend

Automatic mode (vehicles with key-free system)

When the switch is set to the neutral

(AUTO) position, the outside rear

view mirrors are automatically

folded and extended according to

the door locking and unlocking

operation by the lock/unlock switch

or key-free system.

KBRO340306E

1

2

KBRO340303E

KBRO340304E

159

3-4. Steering wheel position and mirrors

Oper

ati

on of each com

ponent

3

Operating conditions (electric type)

When the engine switch is “ACC” or “ON”

Using “Automatic mode” in cold weather (vehicles with key-free system)

When using “Automatic mode” in cold weather, the mirrors may not be folded

or extended automatically if the outside rear view mirrors get frozen. If this

happens, remove ice or snow covering the outside rear view mirrors, and acti-

vate them by using “Manual mode” or move the mirrors with your hands.

Disabling folding (or extension) in the automatic mode (vehicles with key-
free system)

Set the switch to the extend (or fold) position.

Customization (vehicles with key-free system)

You can customize the operation contents of the automatic mode. (List of cus-

tomizable features: 

P. 430)

WARNING

Important points while driving

Be sure to observe the following precautions while driving the vehicle.
Failure to do so may result in mishandling of the vehicle and cause an accident,

resulting in death or serious injury.

Do not adjust the mirrors while driving

Do not drive with the outside rear view mirrors folded

Both the driver and passenger side mirrors must be extended and properly
adjusted before driving

When the mirror is moving (electric type)

Do not touch it with your hands.
Doing so could get your hands caught and cause injury or the mirror to mal-

function.

Adjusting the mirrors (manual type)

Do not adjust them with dirty hands. If the mirror surface gets dirty, it will

cause diffused reflection of the lights from behind during nighttime etc., which

is extremely dangerous as it could compromise the visibility.


Content      ..     7      8      9      10     ..