Toyota GR Corolla (2023 year). Manual in english - page 21
 

  Index      Toyota     Toyota GR Corolla (2023 year). Manual in english


Search            copyright infringement  


Content      ..     19      20      21      22     ..


Toyota GR Corolla (2023 year). Manual in english - page 21


337

7-2. Steps to take in an emergency

7

W

he

tro

ub

le

 ar

is

es

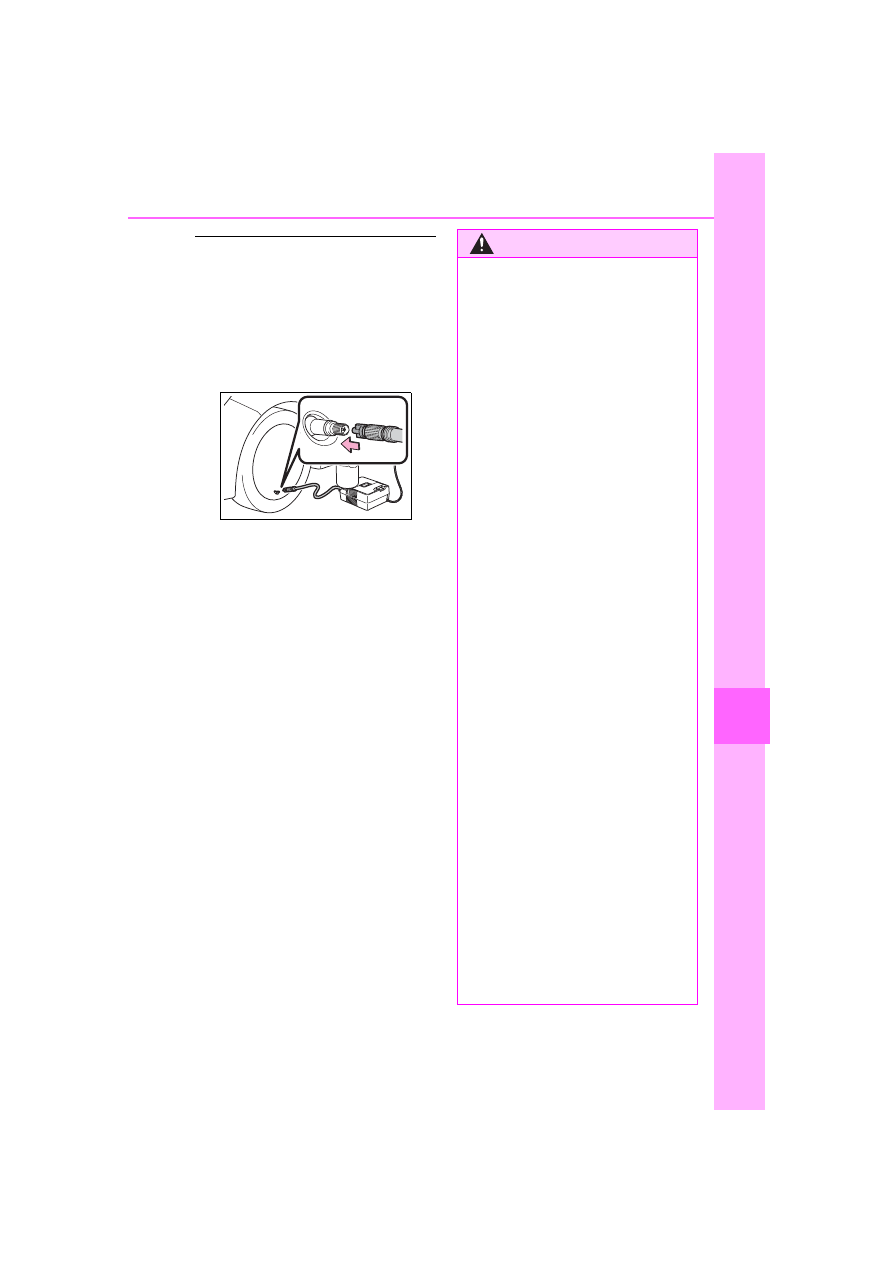
If the tire is inflated to more 

than the specified air pressure

1

Disconnect the hose from the 

valve.

2

Install the air release cap to the 

end of the hose and push the 

protrusion on the air release cap 

into the tire valve to let some air 

out.

3

Disconnect the hose from the 

valve, remove the air release cap 

from the hose and then recon-

nect the hose.

4

Turn the compressor switch on 

and wait for several seconds, 

and then turn it off. Check that 

the air pressure indicator shows 

the specified air pressure. 

(

P.358)

If the air pressure is under the des-

ignated pressure, turn the compres-

sor switch on again and repeat the 

inflation procedure until the speci-

fied air pressure is reached.

The valve of a tire that has been 

repaired

After a tire is repaired with the emer-

gency tire puncture repair kit, the 

valve should be replaced.

WARNING

Do not drive the vehicle with 

a flat tire

Do not continue driving with a flat 

tire.

Driving even a short distance with 

a flat tire can damage the tire and 

the wheel beyond repair.
Driving with a flat tire may cause a 

circumferential groove on the side 

wall. In such a case, the tire may 

explode when using a repair kit.

When fixing the flat tire

Stop your vehicle in a safe and 

flat area.

Do not touch the wheels or the 

area around the brakes immedi-

ately after the vehicle has been 

driven. 

After the vehicle has been 

driven, the wheels and the area 

around the brakes may be 

extremely hot. Touching these 

areas with hands, feet or other 

body parts may result in burns.

Connect the valve and hose 

securely with the tire installed 

on the vehicle. If the hose is not 

properly connected to the valve, 

air leakage may occur as seal-

ant may be sprayed out.

If the hose comes off the valve 

while inflating the tire, there is a 

risk that the hose will move 

abruptly due to air pressure.

After inflation of the tire has 

completed, the sealant may 

splatter when the hose is dis-

connected or some air is let out 

of the tire.

Follow the operation procedure 

to repair the tire. If the proce-

dures not followed, the sealant 

may spray out.

338

7-2. Steps to take in an emergency

WARNING

Keep back from the tire while it 

is being repaired, as there is a 

chance of it bursting while the 

repair operation is being per-

formed. If you notice any cracks 

or deformation of the tire, turn 

off the compressor switch and 

stop the repair operation imme-

diately.

The repair kit may overheat if 

operated for a long period of 

time. Do not operate the repair 

kit continuously for more than 

40 minutes.

Parts of the repair kit become 

hot during operation. Be careful 

handling the repair kit during 

and after operation. Do not 

touch the metal part connecting 

the bottle and the compressor. It 

will be extremely hot.

Do not attach the vehicle speed 

warning sticker to an area other 

than the one indicated. If the 

sticker is attached to an area 

where an SRS airbag is located, 

such as the pad of the steering 

wheel, it may prevent the SRS 

airbag from operating properly.

Driving to spread the liquid 

sealant evenly

Observe the following precautions 

to reduce the risk of accidents.

Failing to do so may result in a 

loss of vehicle control and cause 

death or serious injury.

Drive the vehicle carefully at a 

low speed. Be especially careful 

when turning and cornering.

If the vehicle does not drive 

straight or you feel a pull 

through the steering wheel, stop 

the vehicle and check the fol-

lowing.

• Tire condition. The tire may 

have separated from the wheel.

• Tire inflation pressure. If tire 

inflation pressure is 19 psi (130 
kPa, 1.3 kgf/cm

2

 or bar) or 

below, this may indicate severe 

tire damage.

NOTICE

When performing an emer-

gency repair

A tire should only be repaired 

with the emergency tire punc-

ture repair kit if the damage is 

caused by a sharp object such 

as nail or screw passing through 

the tire tread.

Do not remove the sharp object 

from the tire. Removing the 

object may widen the opening 

and disenable emergency repair 

with the repair kit.

The repair kit is not waterproof. 

Make sure that the repair kit is 

not exposed to water, such as 

when it is being used in the rain.

Do not put the repair kit directly 

onto dusty ground such as sand 

at the side of the road. If the 

repair kit vacuums up dust etc., 

a malfunction may occur.

Make sure to stand the kit with 

the bottle vertical. The kit can-

not work properly if it is laid on 

its side.

Precautions for the emer-

gency tire puncture repair kit

The repair kit power source 

should be 12 V DC suitable for 

vehicle use. Do not connect the 

repair kit to any other source.

If fuel splatters on the repair kit, 

the repair kit may deteriorate. 

Take care not to allow fuel to 

contact it.

339

7-2. Steps to take in an emergency

7

W

he

tro

ub

le

 ar

is

es

One of the following may be the 
cause of the problem:

There may not be sufficient 
fuel in the vehicle’s tank. 
Refuel the vehicle.

The engine may be flooded. 
Try to restart the engine again 
following correct starting pro-
cedures. (

P.127)

There may be a malfunction 
in the engine immobilizer sys-
tem. (

P.64)

One of the following may be the 
cause of the problem:

The battery may be dis-
charged. (

P.343)

NOTICE

Place the repair kit in a storage 

to prevent it from being exposed 

to dirt or water.

Store the repair kit in the lug-

gage compartment out of reach 

of children.

Do not disassemble or modify 

the repair kit. Do not subject 

parts such as the air pressure 

indicator to impacts. This may 

cause a malfunction.

To avoid damage to the tire 

pressure warning valves and 

transmitters

When a tire is repaired with liquid 

sealants, the tire pressure warn-

ing valve and transmitter may not 

operate properly. If a liquid seal-

ant is used, contact your Toyota 

dealer or other qualified service 

shop as soon as possible. After 

use of liquid sealant, make sure to 

replace the tire pressure warning 

valve and transmitter when repair-

ing or replacing the tire. (

P.281)

If the engine will not 

start

If the engine will not start 
even though correct starting 
procedures are being fol-
lowed (

P.127), consider 

each of the following points:

The engine will not start 
even though the starter 
motor operates normally.

The starter motor turns 
over slowly, the interior 
lights and headlights are 
dim, or the horn does not 
sound or sounds at a low 
volume.

340

7-2. Steps to take in an emergency

The battery terminal connec-
tions may be loose or cor-
roded. (

P.274)

The engine starting system may 
be malfunctioning due to an 
electrical problem such as elec-
tronic key battery depletion or a 
blown fuse. However, an interim 
measure is available to start the 
engine. (

P.340)

One of the following may be the 
cause of the problem:

The battery may be dis-
charged. (

P.343)

One or both of the battery ter-
minals may be disconnected. 
(

P.274)

There may be a malfunction 
in the steering lock system.

Contact your Toyota dealer if the 
problem cannot be repaired, or if 
repair procedures are unknown.

When the engine does not start, 
the following steps can be used 
as an interim measure to start 

the engine if the engine switch is 
functioning normally.
Do not use this starting proce-
dure except in case of emer-
gency.

1

Set the parking brake. 
(

P.134)

2

Check that the shift lever is 
set in N.

3

Turn the engine switch to 
ACC

*

.

4

Press and hold the engine 
switch for about 15 seconds 
while depressing the clutch 
pedal and brake pedal firmly.

Even if the engine can be started 
using the above steps, the system 
may be malfunctioning. Have the 
vehicle inspected by your Toyota 
dealer.

*

: ACC mode can be enabled/dis-

abled on the customize menu. 
(

P.371)

The starter motor does 
not turn over

The starter motor does 
not turn over, the interior 
lights and headlights do 
not turn on, or the horn 
does not sound.

Emergency start function

341

7-2. Steps to take in an emergency

7

W

he

tro

ub

le

 ar

is

es

When the electronic key does 

not work properly

Make sure that the smart key sys-

tem has not been deactivated in 

the customization setting. If it is 

off, turn the function on. (Custom-

izable features 

P.371)

Check if battery-saving mode is 

set. If it is set, cancel the function. 

(

P.97)

The electronic key function may 

be suspended. (

P.86)

Use the mechanical key 

If you lose your keys

New genuine mechanical 
keys can be made by your 
Toyota dealer using another 
mechanical key and the key 
number stamped on your 
key number plate.

Keep the plate in a safe 
place such as your wallet, 
not in the vehicle.

NOTICE

When an electronic key is lost

If the electronic key remains lost, 

the risk of vehicle theft increases 

significantly. Visit your Toyota 

dealer immediately with all 

remaining electronic keys that 

were provided with your vehicle.

If the electronic key 

does not operate prop-

erly

If communication between 
the electronic key and vehi-
cle is interrupted (

P.97) or 

the electronic key cannot be 
used because the battery is 
depleted, the smart key sys-
tem and wireless remote 
control cannot be used. In 
such cases, the doors can 
be opened and the engine 
can be started by following 
the procedure below.

NOTICE

In case of a smart key system 

malfunction or other 

key-related problems

Take your vehicle with all the elec-

tronic keys provided with your 

vehicle to your Toyota dealer.

Locking and unlocking 
the doors

342

7-2. Steps to take in an emergency

(

P.88) in order to perform the 

following operations:

1

Locks all the doors

2

Unlocks all the doors

Turning the key unlocks the driver’s 
door. Turning the key again unlocks 
the other doors.

Key linked functions

1

Closes the windows (turn and 
hold)

*

2

Opens the windows (turn and 
hold)

*

*

: This setting must be customized 

at your Toyota dealer.

1

Shift the shift lever to N and 
depress the clutch pedal.

2

Touch the Toyota emblem 
side of the electronic key to 
the engine switch.

When the electronic key is 

detected, a buzzer sounds and the 

engine switch will turn to ON.
When the smart key system is 

deactivated in customization set-

ting, the engine switch will turn to 

ACC.

3

Firmly depress the clutch 
pedal and check that 

 is 

shown on the multi-informa-
tion display.

WARNING

When using the mechanical 

key and operating the power 

windows

Operate the power window after 

checking to make sure that there 

is no possibility of any passenger 

having any of their body parts 

caught in the window.

Also, do not allow children to 

operate the mechanical key. It is 

possible for children and other 

passengers to get caught in the 

power window.

Starting the engine

343

7-2. Steps to take in an emergency

7

Whe

n tr

ouble

 ar

ises

4

Press the engine switch 
shortly and firmly.

In the event that the engine still 
cannot be started, contact your 
Toyota dealer.

Stopping the engine

Shift the shift lever to N and press 

the engine switch as you normally 

do when stopping the engine.

Electronic key battery

As the above procedure is a tempo-

rary measure, it is recommended 

that the electronic key battery be 

replaced immediately when the bat-

tery is depleted. (

P.299)

Changing engine switch modes

Release the clutch pedal and press 

the engine switch in step 

3

 above.

The engine does not start and 

modes will be changed each time 

the switch is pressed. (

P.130)

If you have a set of jumper (or 
booster) cables and a second 
vehicle with a 12-volt battery, 
you can jump start your vehicle 
by following the steps below.

1

Vehicles with an alarm 
(

P.65): Confirm that the 

electronic key is being car-
ried.

When connecting the jumper (or 

booster) cables, depending on the 

situation, the alarm may activate 

and doors locked. (

P.66)

2

Open the hood. (

P.265)

If the vehicle battery 

is discharged

The following procedures 
may be used to start the 
engine if the vehicle’s bat-
tery is discharged.
You can also call your Toy-
ota dealer or a qualified 
repair shop.

Restarting the engine

344

7-2. Steps to take in an emergency

3

Remove the engine cover.

4

Connect a positive jumper cable clamp to   on your vehicle and 
connect the clamp on the other end of the positive cable to   on 
the second vehicle. Then, connect a negative cable clamp to   
on the second vehicle and connect the clamp at the other end of 
the negative cable to  .

Positive (+) battery terminal (your vehicle)
Positive (+) battery terminal (second vehicle)
Negative (-) battery terminal (second vehicle)
Solid, stationary, unpainted metallic point away from the battery 
and any moving parts as shown in the illustration

5

Start the engine of the sec-
ond vehicle. Increase the 
engine speed slightly and 
maintain at that level for 
approximately 5 minutes to 

recharge the battery of your 
vehicle.

6

Open and close any of the 
doors of your vehicle with the 
engine switch OFF.

345

7-2. Steps to take in an emergency

7

Whe

n tr

ouble

 ar

ises

7

Maintain the engine speed of 
the second vehicle and start 
the engine of your vehicle by 
turning the engine switch to 
ON.

8

Once the vehicle’s engine 
has started, remove the 
jumper cables in the exact 
reverse order from which 
they were connected.

Once the engine starts, have the 
vehicle inspected at your Toyota 
dealer as soon as possible.

Starting the engine when the 

battery is discharged

The engine cannot be started by 

push-starting.

To prevent battery discharge

Turn off the headlights and the 

audio system while the engine is 

off.

Turn off any unnecessary electri-

cal components when the vehicle 

is running at a low speed for an 

extended period, such as in heavy 

traffic.

When the battery is removed or 

discharged

Information stored in the ECU is 

cleared. When the battery is 

depleted, have the vehicle 

inspected at your Toyota dealer.

Some systems may require initial-

ization. (

P.380)

When removing the battery ter-

minals

When the battery terminals are 

removed, the information stored in 

the ECU is cleared. Before remov-

ing the battery terminals, contact 

your Toyota dealer.

Charging the battery

The electricity stored in the battery 

will discharge gradually even when 

the vehicle is not in use, due to nat-

ural discharge and the draining 

effects of certain electrical appli-

ances. If the vehicle is left for a long 

time, the battery may discharge, 

and the engine may be unable to 

start. (The battery recharges auto-

matically during driving.)

When recharging or replacing 

the battery

In some cases, it may not be pos-

sible to unlock the doors using the 

smart key system when the bat-

tery is discharged. Use the wire-

less remote control or the 

mechanical key to lock or unlock 

the doors.

The engine may not start on the 

first attempt after the battery has 

recharged but will start normally 

after the second attempt. This is 

not a malfunction.

The engine switch mode is memo-

rized by the vehicle. When the 

battery is reconnected, the system 

will return to the mode it was in 

before the battery was dis-

charged. Before disconnecting the 

battery, turn the engine switch off.

If you are unsure what mode the 

engine switch was in before the 

battery discharged, be especially 

careful when reconnecting the 

battery.

When replacing the battery

Use a battery that conforms to 

European regulations.

Type A: Use a battery that the 

case size is same as the previous 

one (LN2), 20 hour rate capacity 

(20HR) is equivalent (60Ah) or 

greater, and performance rating 

(CCA) is equivalent (345A) or 

greater.

Type B: Use a battery that the 

case size is same as the previous 

one (LN3), 20 hour rate capacity 

346

7-2. Steps to take in an emergency

(20HR) is equivalent (70Ah) or 

greater, and performance rating 

(CCA) is equivalent (600A) or 

greater.

• If the sizes differ, the battery can-

not be properly secured.

• If the 20 hour rate capacity is low, 

even if the time period where the 

vehicle is not used is a short time, 

the battery may discharge and the 

engine may not be able to start.

After replacing, firmly attach the 

following items to the exhaust hole 

of the battery.

• Use the exhaust hose that was 

attached to the battery before 

replacing and confirm that it is 

firmly connected to the hole sec-

tion of the vehicle.

• Use the exhaust hole plug 

included with the battery replaced 

or the one installed on the battery 

prior to the replacement. (Depend-

ing on the battery to be replaced, 

the exhaust hole may be 

plugged.)

Exhaust hole plug
Exhaust hole
Exhaust hose

For details, consult your Toyota 

dealer.

WARNING

When removing the battery 

terminals

Always remove the negative (-) 

terminal first. If the positive (+) ter-

minal contacts any metal in the 

surrounding area when the posi-

tive (+) terminal is removed, a 

spark may occur, leading to a fire 

in addition to electrical shocks 

and death or serious injury.

Avoiding battery fires or 

explosions

Observe the following precautions 

to prevent accidentally igniting the 

flammable gas that may be emit-

ted from the battery:

Make sure each jumper cable is 

connected to the correct termi-

nal and that it is not unintention-

ally in contact with any other 

than the intended terminal.

Do not allow the other end of 

the jumper cable connected to 

the “+” terminal to come into 

contact with any other parts or 

metal surfaces in the area, such 

as brackets or unpainted metal.

Do not allow the + and - clamps 

of the jumper cables to come 

into contact with each other.

Do not smoke, use matches, 

cigarette lighters or allow open 

flame near the battery.

Battery precautions

The battery contains poisonous 

and corrosive acidic electrolyte, 

while related parts contain lead 

and lead compounds. Observe 

the following precautions when 

handling the battery:

347

7-2. Steps to take in an emergency

7

W

he

tro

ub

le

 ar

is

es

WARNING

When working with the battery, 

always wear safety glasses and 

take care not to allow any bat-

tery fluids (acid) to come into 

contact with skin, clothing or the 

vehicle body.

Do not lean over the battery.

In the event that battery fluid 

comes into contact with the skin 

or eyes, immediately wash the 

affected area with water and 

seek medical attention. Place a 

wet sponge or cloth over the 

affected area until medical 

attention can be received.

Always wash your hands after 

handling the battery support, 

terminals, and other bat-

tery-related parts.

Do not allow children near the 

battery.

After recharging the battery

Have the battery inspected at 

your Toyota dealer as soon as 

possible.

If the battery is deteriorating, con-

tinued use may cause the battery 

to emit a malodorous gas, which 

may be detrimental to the health 

of passengers.

When replacing the battery

For information regarding bat-

tery replacement, contact your 

Toyota dealer.

After replacing, securely attach 

the exhaust hose and exhaust 

hole plug to the exhaust hole of 

the replaced battery. If not prop-

erly installed, gases (hydrogen) 

may leak into the vehicle inte-

rior, and there is the possible 

danger of the gas igniting and 

exploding.

NOTICE

When handling jumper cables

When connecting the jumper 

cables, ensure that they do not 

become entangled in the cooling 

fan or engine drive belt.

To prevent damaging the 

vehicle

The exclusive jump starting termi-

nal is to be used when charging 

the battery from another vehicle in 

an emergency. It cannot be used 

to jump start another vehicle.

348

7-2. Steps to take in an emergency

1

Stop the vehicle in a safe 
place and turn off the air con-
ditioning system, and then 
stop the engine.

2

If you see steam:
Carefully lift the hood after 
the steam subsides.
If you do not see steam:
Carefully lift the hood.

3

After the engine has cooled 
down sufficiently, inspect the 

hoses and radiator core (radi-
ator) for any leaks.

Radiator
Cooling fan

If a large amount of coolant leaks, 
immediately contact your Toyota 
dealer.

4

The coolant level is satisfac-
tory if it is between the 
“FULL” and “LOW” lines on 
the reservoir.

Reservoir
“FULL” line
“LOW” line

5

Add engine coolant if neces-
sary.

Water can be used in an emer-

gency if engine coolant is unavail-

If your vehicle over-

heats

The following may indicate 
that your vehicle is over-
heating.

The engine coolant tem-
perature gauge (

P.72) is 

in the red zone or a loss of 
engine power is experi-
enced. (For example, the 
vehicle speed does not 
increase.)

“Engine Coolant Temp High 
Stop in a Safe Place See 
Owner’s Manual” is shown 
on the multi-information dis-
play.

Steam comes out from 
under the hood.

Correction procedures

349

7-2. Steps to take in an emergency

7

W

he

tro

ub

le

 ar

is

es

able.

6

Start the engine and turn the 
air conditioning system on to 
check that the radiator cool-
ing fan operates and to check 
for coolant leaks from the 
radiator or hoses.

The fan operates when the air con-

ditioning system is turned on imme-

diately after a cold start. Confirm 

that the fan is operating by check-

ing the fan sound and air flow. If it is 

difficult to check these, turn the air 

conditioning system on and off 

repeatedly. (The fan may not oper-

ate in freezing temperatures.)

7

If the fan is not operating:
Stop the engine immediately 
and contact your Toyota 
dealer.
If the fan is operating:
Have the vehicle inspected at 
the nearest Toyota dealer.

WARNING

When inspecting under the 

hood of your vehicle

Observe the following precau-

tions. Failure to do so may result 

in serious injury such as burns.

If steam is seen coming from 

under the hood, do not open the 

hood until the steam has sub-

sided. The engine compart-

ment may be very hot.

Keep hands and clothing (espe-

cially a tie, a scarf or a muffler) 

away from the fan and belts. 

Failure to do so may cause the 

hands or clothing to be caught, 

resulting in serious injury.

Do not loosen the coolant reser-

voir caps while the engine and 

radiator are hot.

High temperature steam or 

coolant could spray out.

NOTICE

When adding engine coolant

Add coolant slowly after the 

engine has cooled down suffi-

ciently. Adding cool coolant to a 

hot engine too quickly can cause 

damage to the engine.

To prevent damage to the 

cooling system

Observe the following precau-

tions:

Avoid contaminating the coolant 

with foreign matter (such as 

sand or dust etc.).

Do not use any coolant additive.

350

7-2. Steps to take in an emergency

1

Stop the engine. Set the 
parking brake and shift the 
shift lever to N.

2

Remove the mud, snow or 
sand from around the front 
wheels.

3

Place wood, stones or some 
other material under the front 
wheels to help provide trac-
tion.

4

Restart the engine.

5

Shift the shift lever to 1 or R 
and release the parking 
brake. Then, while exercising 
caution, depress the acceler-
ator pedal.

When it is difficult to free the 

vehicle

Press the 

 switch to turn off 

TRAC.

If the vehicle becomes 

stuck

Carry out the following pro-
cedures if the tires spin or 
the vehicle becomes stuck 
in mud, dirt or snow:

Recovering procedure

WARNING

When attempting to free a 

stuck vehicle

If you choose to push the vehicle 

back and forth to free it, make 

sure the surrounding area is clear 

to avoid striking other vehicles, 

objects or people. The vehicle 

may also lunge forward or lunge 

back suddenly as it becomes free. 

Use extreme caution.

NOTICE

To avoid damaging the trans-

mission and other compo-

nents

Avoid spinning the front wheels 

and depressing the accelerator 

pedal more than necessary.

If the vehicle remains stuck 

even after these procedures are 

performed, the vehicle may 

require towing to be freed.

351

8

8

Vehicle

 specificatio

ns

Vehicle specifications

.

8-1. Specifications

Maintenance data (fuel, oil 

level, etc.)..................

352

Fuel information ..........

359

Tire information ...........

361

8-2. Customization

Customizable features

..................................

371

8-3. Initialization

Items to initialize .........

380

352

8-1. Specifications

8-1.Specifications

*

: Unladen vehicles

Vehicle identification num-
ber

The vehicle identification num-
ber (VIN) is the legal identifier 
for your vehicle. This is the pri-
mary identification number for 
your Toyota. It is used in regis-
tering the ownership of your 
vehicle.
This number is stamped under 
the right-hand front seat.

This number is also stamped on 
the top left of the instrument 
panel.

Maintenance data (fuel, oil level, etc.)

Dimensions and weight

Overall length

173.6 in. (4410 mm)

Overall width

72.8 in. (1850 mm)

Overall height

*

58.3 in. (1480 mm)

Wheelbase

103.9 in. (2640 mm)

Tread

Front

62.6 in. (1590 mm)

Rear

63.8 in. (1620 mm)

Vehicle capacity weight
(Occupants + luggage)

880 lb. (400 kg)

Seating capacity

Seating capacity

5 (Front 2, Rear 3)

Vehicle identification


Content      ..     19      20      21      22     ..