Toyota C-HR (2023 year). Manual in english - page 39
 

  Index      Toyota     Toyota C-HR (2023 year). Manual in english


Search            copyright infringement  


Content      ..     37      38      39      40     ..


Toyota C-HR (2023 year). Manual in english - page 39


718

7-2. Steps to take in an emergency

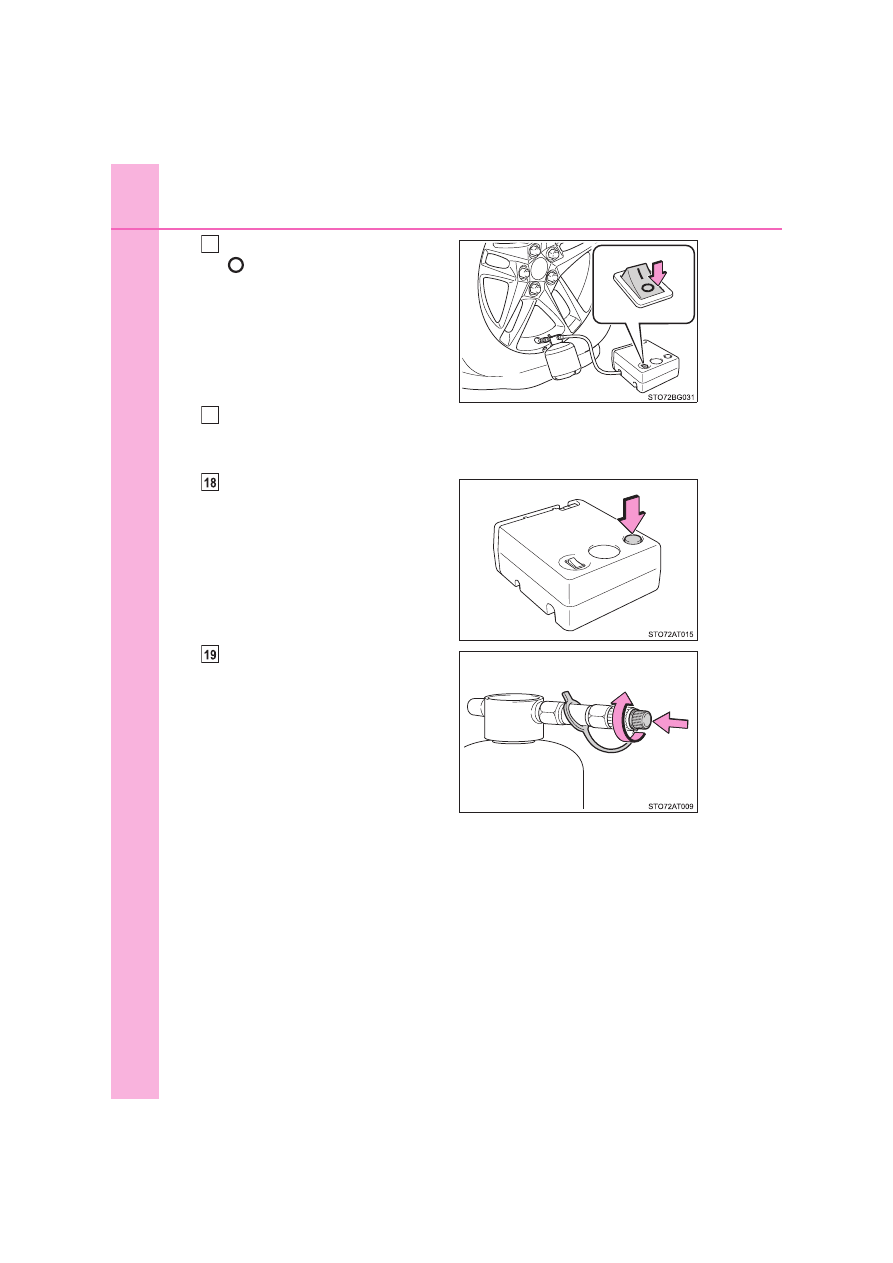
Turn  the  compressor  switch  is

 (off).

Pull out the power plug from the power outlet socket and then dis-
connect the nozzle from the valve on the tire.

Some sealant may leak when the hose is removed.

Press  the  button  to  release
pressure from the bottle.

Attach the cap to the nozzle.

16

17

719

7-2. Steps to take in an emergency

7

W

hen
 trou

bl

e ari

se

s

Install the valve cap onto the valve of the repaired tire.
Disconnect  the  hose  from  the
bottle and attach the cap to the
bottle.

Place the bottle in the original bag
and zip it.

Temporarily  store  the  bottle  and  compressor  in  the  luggage  com-
partment.
To spread the liquid sealant evenly within the tire, immediately drive
safely for about 5 km (3 miles) below 80 km/h (50 mph).

After  driving  for  about  5  km  (3
miles),  stop  your  vehicle  in  a
safe  place  on  a  hard,  flat  sur-
face and connect the compres-
sor.

720

7-2. Steps to take in an emergency

Check  the  tire  inflation  pres-
sure.

If the tire inflation pressure is
under  130  kPa  (1.3  kgf/cm

2

or bar, 19 psi): The puncture
cannot  be  repaired.  Contact
any 

authorized 

Toyota

retailer  or  Toyota  authorized
repairer,  or  any  reliable
repairer.
If the tire inflation pressure is 130 kPa (1.3 kgf/cm

2

 or bar, 19 psi)

or higher, but less than the specified air pressure: Proceed to 

.

If the tire inflation pressure is the specified air pressure (

P. 774):

Proceed to 

.

Turn  the  compressor  switch  is 

  (on)  to  inflate  the  tire  until  the

specified air pressure is reached. Drive for about 5 km (3 miles) and
then perform 

.

Store the compressor in the luggage compartment.
Taking  precautions  to  avoid  sudden  braking,  sudden  acceleration
and sharp turns, drive carefully at under 80 km/h (50 mph) to the
nearest authorized Toyota retailer or Toyota authorized repairer, or
any reliable repairer for tire repair or replacement.

26

27

26

27
28

721

7-2. Steps to take in an emergency

7

W

hen
 trou

bl

e ari

se

s

If the tire is inflated to more than the specified air pressure

Press the button to let some air out.

Check that the air pressure indicator shows the specified air pressure.
If the air pressure is under the designated pressure, turn the compressor
switch on (type A) or 

 (

on) (type B) again and repeat the inflation proce-

dure until the specified air pressure is reached.

The valve of a tire that has been repaired

After a tire is repaired with the emergency tire puncture repair kit, the valve
should be replaced.

After a tire is repaired with the emergency tire puncture repair kit

The tire pressure warning valve and transmitter should be replaced.

Even if the tire inflation pressure is at the recommended level, the tire pres-
sure warning light may come on/flash.

Note for checking the emergency tire puncture repair kit

Check the sealant expiry date occasionally.
The expiry date is shown on the bottle. Do not use sealant whose expiry date
has already passed. Otherwise, repairs conducted using the emergency tire
puncture repair kit may not be performed properly.

1

Type A

Type B

2

722

7-2. Steps to take in an emergency

Emergency tire puncture repair kit

The sealant has a limited lifespan. The expiry date is marked on the bottle.
The bottle of sealant should be replaced with a new bottle before the expiry
date. Contact any authorized Toyota retailer or Toyota authorized repairer, or
any reliable repairer for replacement.

The  sealant  stored  in  the  emergency  tire  puncture  repair  kit  can  be  used
only  once  to  temporarily  repair  a  single  tire.  If  the  sealant  has  been  used
and needs to be replaced, purchase a new bottle at any authorized Toyota
retailer or Toyota authorized repairer, or any reliable repairer. The compres-
sor is reusable.

The sealant can be used when the outside temperature is from -30°C (-22°F)
to 60°C (140°F).

The  repair  kit  is  exclusively  designed  for  size  and  type  of  tires  originally
installed on your vehicle. Do not use it for tires that a different size than the
original ones, or for any other purposes.

If the sealant gets on your clothes, it may stain.

If the sealant adheres to a wheel or the surface of the vehicle body, the stain
may not be removable if it is not cleaned at once. Immediately wipe away
the sealant with a wet cloth.

During operation of the repair kit, a loud operation noise is produced. This
does not indicate a malfunction.

Do not use to check or to adjust the tire pressure.

723

7-2. Steps to take in an emergency

7

W

hen
 trou

bl

e ari

se

s

WARNING

Do not drive the vehicle with a flat tire

Do not continue driving with a flat tire.
Driving even a  short  distance  with  a  flat  tire can  damage  the  tire  and  the
wheel beyond repair.
Driving with a flat tire may cause a circumferential groove on the side wall.
In such a case, the tire may explode when using a repair kit.

Caution while driving

Store the repair kit in the luggage compartment. 
Injuries may result in the event of an accident or sudden braking.

The repair kit is exclusively only for your vehicle.
Do  not  use  repair  kit  on  other  vehicles,  which  could  lead  to  an  accident
causing death or serious injury.

Do not use repair kit for tires that are different size than the original ones,
or for any other purpose. If the tires have not been completely repaired, it
could lead to an accident causing death or serious injury.

Precautions for use of the sealant

Ingesting  the  sealant  is  hazardous  to  your  health.  If  you  ingest  sealant,
consume as much water as possible, and then immediately consult a doc-
tor.

If  sealant  gets  in  eyes  or  adheres  to  skin,  immediately  wash  it  off  with
water. If discomfort persists, consult a doctor.

724

7-2. Steps to take in an emergency

WARNING

When fixing the flat tire

Stop your vehicle in a safe and flat area.

Do not touch the wheels or the area around the brakes immediately after
the vehicle has been driven. 
After  the  vehicle  has  been  driven,  the  wheels  and  the  area  around  the
brakes  may  be  extremely  hot. Touching  these  areas  with  hands,  feet  or
other body parts may result in burns.

To avoid risk of burst or severe leakage, do not drop or damage the bottle.
Visually  inspect  the  bottle  before  use.  Do  not  use  a  bottle  with  shock,
crack, scratch, leakage or any other damage. In such case, immediately
replace.

Connect the valve and hose securely with the wheel installed to the vehi-
cle.  If  the  hose  is  not  properly  connected  to  the  valve,  air  leakage  may
occur and sealant may be sprayed out.

If the hose comes off the valve while inflating the tire, there is a risk that
the hose will move abruptly due to air pressure.

After inflation of the tire has completed, the sealant may splatter when the
hose is disconnected or some air is let out of the tire.

Follow the operation procedure to repair the tire. If the procedures not fol-
lowed, the sealant may spray out.

Keep back from the tire while it is being repaired, as there is a chance of it
bursting  while  the  repair  operation  is  being  performed.  If  you  notice  any
cracks or deformation of the tire, turn off (type A) or 


(off) (type B) the

compressor switch and stop the repair operation immediately.

The repair kit may overheat if operated for a long period of time. Do not
operate the repair kit continuously for more than 40 minutes.

Parts of the repair kit become hot during operation. Be careful when han-
dling the repair kit during and after operation. Do not touch the metal part
around the connecting area between the bottle and the compressor. It will
be extremely hot.

Do not attach the vehicle speed warning sticker to an area other than the
one indicated. If the sticker is attached to an area where an SRS airbag is
located,  such  as  the  pad  of  the  steering  wheel,  it  may  prevent  the  SRS
airbag from operating properly.

725

7-2. Steps to take in an emergency

7

W

hen
 trou

bl

e ari

se

s

WARNING

Driving to spread the liquid sealant evenly

Observe the following precautions to reduce the risk of accidents. 
Failing to do so may result in a loss of vehicle control and cause death or
serious injury.

Drive the vehicle carefully at a low speed. Be especially careful when turn-
ing and cornering.

If the vehicle does not drive straight or you feel a pull through the steering
wheel, stop the vehicle and check the following.
• Tire condition. The tire may have separated from the wheel.
• Tire inflation pressure. If the tire inflation pressure is 130 kPa (1.3 kgf/cm

2

or bar, 19 psi) or less, the tire may be severely damaged.

726

7-2. Steps to take in an emergency

NOTICE

When performing an emergency repair

A tire should only be repaired with the emergency tire puncture repair kit if
the  damage  is  caused  by  a  sharp  object  such  as  nail  or  screw  passing
through the tire tread.
Do not  remove the  sharp  object from the  tire.  Removing the  object  may
widen the opening and disenable emergency repair with the repair kit.

The  repair  kit  is  not  waterproof.  Make  sure  that  the  repair  kit  is  not
exposed to water, such as when it is being used in the rain.

Do  not  put  the  repair  kit  directly  onto  dusty  ground  such  as  sand  at  the
side of the road. If the repair kit vacuums up dust, etc., a malfunction may
occur.

Do not turn the bottle upside down when using it, as doing so may cause
damage to the compressor.

Precautions for the emergency tire puncture repair kit

The repair kit power source should be 12 V DC suitable for vehicle use. Do
not connect the repair kit to any other source.

If gasoline splatters on the repair kit, the repair kit may deteriorate. Take
care not to allow gasoline to contact it.

Place the repair kit in a storage to prevent it from being exposed to dirt or
water.

Store the repair kit in the tool tray under the deck mat out of reach of chil-
dren.

Do not disassemble or modify the repair kit. Do not subject parts such as
the air pressure indicator to impacts. This may cause a malfunction.

To avoid damage to the tire pressure warning valves and transmitters

When a tire is repaired with liquid sealants, the tire pressure warning valve
and transmitter may not operate properly. If a liquid sealant is used, contact
any authorized Toyota retailer or Toyota authorized repairer, or any reliable
repairer or other qualified service shop as soon as possible. After use of liq-
uid sealant, make sure to replace the tire pressure warning valve and trans-
mitter when repairing or replacing the tire. (

P. 616)

727

7-2. Steps to take in an emergency

7

W

hen
 trou

bl

e ari

se

s

If you have a flat tire (vehicles with a spare tire)

Stop the vehicle in a safe place on a hard, flat surface.

Set the parking brake.

Shift the shift lever to P.

Stop the hybrid system.

Turn on the emergency flashers. (

P. 668)

Your  vehicle  is  equipped  with  a  spare  tire.  The  flat  tire  can  be
replaced with the spare tire.
For details about tires: 

P. 614

WARNING

If you have a flat tire

Do not continue driving with a flat tire.
Driving even a  short  distance  with  a  flat  tire can  damage  the  tire  and  the
wheel beyond repair, which could result in an accident.

Before jacking up the vehicle

728

7-2. Steps to take in an emergency

Vehicles with compact spare tire (type A)

Location of the spare tire, jack and tools

Towing eyelet
Wheel nut wrench
Jack

Jack handle
Spare tire

729

7-2. Steps to take in an emergency

7

W

hen
 trou

bl

e ari

se

s

Vehicles with compact spare tire (type B)

Spare tire
Jack
Wheel nut wrench

Jack handle
Towing eyelet

730

7-2. Steps to take in an emergency

Vehicles with full-size spare tire

Wheel nut wrench
Towing eyelet
Jack

Spare tire
Jack handle

731

7-2. Steps to take in an emergency

7

W

hen
 trou

bl

e ari

se

s

WARNING

Using the tire jack

Observe the following precautions. 
Improper use of the tire jack may cause the vehicle to suddenly fall off the
jack, leading to death or serious injury.

Do not use the tire jack for any purpose other than replacing tires or install-
ing and removing tire chains.

Only use the tire jack that comes with this vehicle for replacing a flat tire. 
Do not use it on other vehicles, and do not use other tire jacks for replac-
ing tires on this vehicle.

Do not put any part of your body under the vehicle while it is supported by
the jack.

Do not start the hybrid system or drive the vehicle while the vehicle is sup-
ported by the jack.

Do not raise the vehicle while someone is inside.

When raising the vehicle, do not put an object on or under the jack.

Do not raise the vehicle to a height greater than that required to replace
the tire.

Use a jack stand if it is necessary to get under the vehicle.

When lowering the vehicle, make sure that there is no-one near the vehi-
cle. If there are people nearby, warn them vocally before lowering.

Put  the  jack  properly  in  its  jack  point.
(

P. 733)

732

7-2. Steps to take in an emergency

Remove the deck board. (

P. 565)

Take out the jack.

Remove the deck board. (

P. 565)

Remove the cushion.

Loosen the center fastener that
secures the spare tire.

Taking out the jack

1
2

Taking out the spare tire

1
2

3

WARNING

When storing the spare tire

Be careful not to get fingers or other body parts caught between the spare
tire and the body of the vehicle.

733

7-2. Steps to take in an emergency

7

W

hen
 trou

bl

e ari

se

s

Chock the tires.

Slightly  loosen  the  wheel  nuts
(one turn).

Turn the tire jack portion 

 by

hand  until  the  center  of  the
recessed  portion  of  the  jack  is
in contact with the center of the
jack point.

Replacing a flat tire

1

Flat tire

Wheel chock positions

Front

Left-hand side

Behind the rear right-hand side tire

Right-hand side

Behind the rear left-hand side tire

Rear

Left-hand side

In front of the front right-hand side tire

Right-hand side

In front of the front left-hand side tire

2

3


Content      ..     37      38      39      40     ..