Toyota C-HR (2023 year). Manual in english - page 38


  Index      Toyota     Toyota C-HR (2023 year). Manual in english


Search            copyright infringement  


Content      ..     36      37      38      39     ..


Toyota C-HR (2023 year). Manual in english - page 38


702

7-2. Steps to take in an emergency

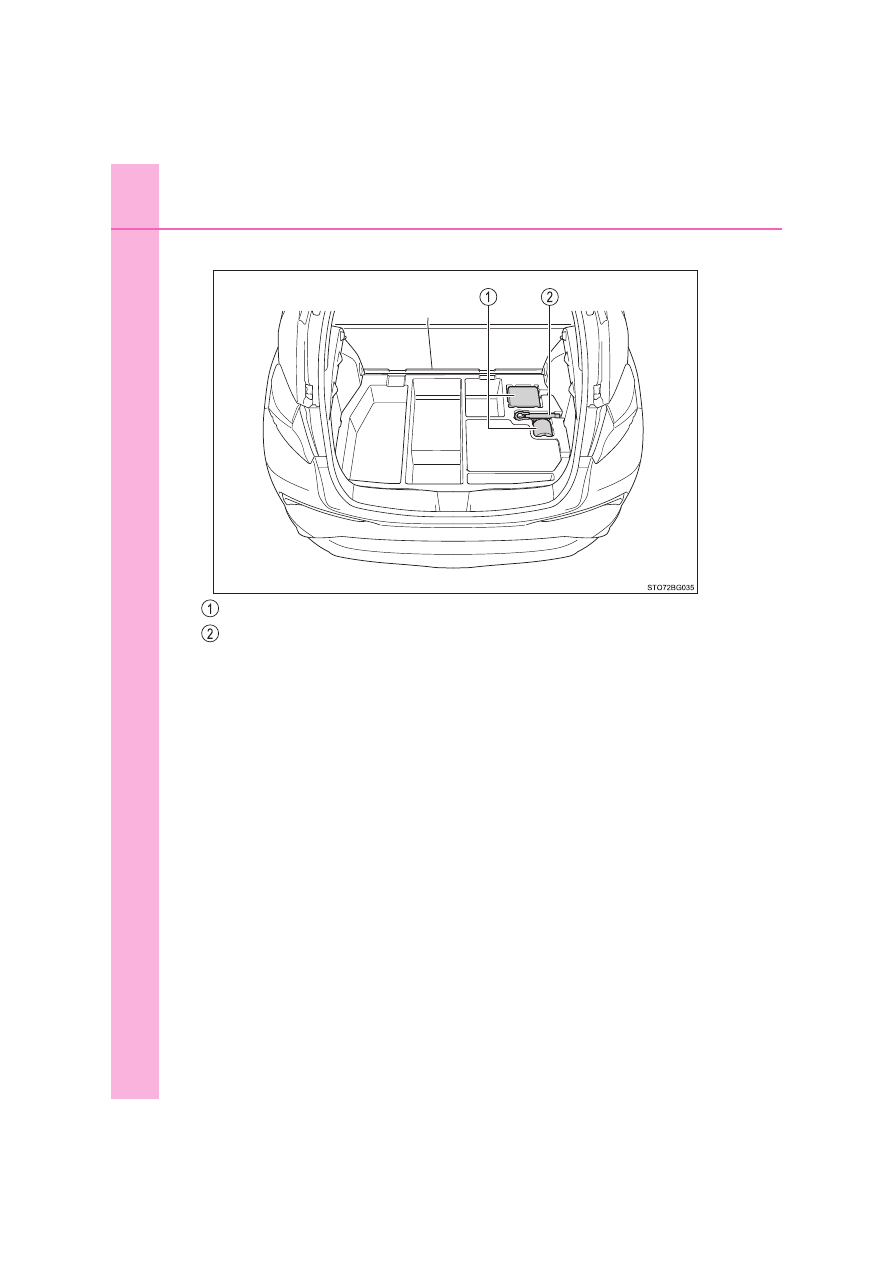
Type C

Emergency tire puncture repair kit
Towing eyelet

703

7-2. Steps to take in an emergency

7

W

hen
 trou

bl

e ari

se

s

Type A

Emergency tire puncture repair kit components

Nozzle
Hose
Compressor switch
Air pressure gauge

Pressure release button
Power plug
Sticker

704

7-2. Steps to take in an emergency

Type B

Nozzle
Hose
Power plug
Air pressure gauge

Pressure release button
Compressor switch
Sticker

705

7-2. Steps to take in an emergency

7

W

hen
 trou

bl

e ari

se

s

Remove the deck board. (

P. 565)

Take out the emergency tire puncture repair kit. (

P. 700)

Type A

Take out the repair kit.

When taking out the bottle from the original bag, do not tear or discard the
bag.

Attach the sticker provided with
the  tire  puncture  repair  kit  to  a
position  easily  seen  from  the
driver’s seat.

Remove the valve cap from the
valve of the punctured tire.

Remove  the  cap  from  the  noz-
zle.

Taking out the emergency tire puncture repair kit

Emergency repair method

1
2

1

2

3

4

706

7-2. Steps to take in an emergency

Connect  the  nozzle  to  the
valve.

Screw the end of the nozzle clock-
wise as far as possible.
The  bottle  should  hang  vertically
without  contacting  the  ground.  If
the bottle does not hang vertically,
move  the  vehicle  so  that  the  tire
valve is located properly.

Remove  the  cap  from  the  bot-
tle.

Pull the hose out from the com-
pressor.

Connect  the  bottle  to  the  com-
pressor.

Screw the end of the nozzle clock-
wise as far as possible.

5

6

7

8

707

7-2. Steps to take in an emergency

7

W

hen
 trou

bl

e ari

se

s

Make sure that the compressor
switch is off.

Remove  the  power  plug  from
the compressor.

Connect  the  power  plug  to  the
power outlet socket. (

P. 574)

9

10

11

708

7-2. Steps to take in an emergency

Check the specified tire inflation pressure.

Tire inflation pressure is specified on the label as shown. (

P. 774)

Start the hybrid system. (

P. 303)

To inject the sealant and inflate
the  tire,  turn  the  compressor
switch on.

12

Left-hand drive vehicles

Right-hand drive vehicles

13
14

709

7-2. Steps to take in an emergency

7

W

hen
 trou

bl

e ari

se

s

Inflate the tire until the specified
air pressure is reached.

The  sealant  will  be  injected
and  the  pressure  will  surge
and then gradually decrease.
The  air  pressure  gauge  will
display  the  actual  tire  infla-
tion pressure about 1 minute
(5  minutes  at  low  tempera-
ture)  after  the  switch  is
turned on.
Inflate the tire until the speci-
fied air pressure.

• If the tire inflation pressure is

still  lower  than  the  specified
point after inflation for 35 min-
utes  with  the  switch  on,  the
tire  is  too  damaged  to  be
repaired.  Turn  the  compres-
sor switch off and contact any
authorized  Toyota  retailer  or
Toyota authorized repairer, or
any reliable repairer.

• If the tire inflation pressure exceeds the specified air pressure, let out

some air to adjust the tire inflation pressure. (

P. 721, 774)

15

710

7-2. Steps to take in an emergency

Turn the compressor off.

Pull out the power plug from the power outlet socket and then dis-
connect the nozzle from the valve on the tire.

Some sealant may leak when the hose is removed.

Press  the  button  to  release
pressure from the bottle.

Attach the cap to the nozzle.

16

17

711

7-2. Steps to take in an emergency

7

W

hen
 trou

bl

e ari

se

s

Install the valve cap onto the valve of the repaired tire.
Disconnect  the  hose  from  the
bottle and attach the cap to the
bottle.

Place the bottle in the original bag
and zip it.

Temporarily  store  the  bottle  and  compressor  in  the  luggage  com-
partment.
To spread the liquid sealant evenly within the tire, immediately drive
safely for about 5 km (3 miles) below 80 km/h (50 mph).

After  driving  for  about  5  km  (3
miles),  stop  your  vehicle  in  a
safe  place  on  a  hard,  flat  sur-
face and connect the compres-
sor.

712

7-2. Steps to take in an emergency

Check  the  tire  inflation  pres-
sure.

If the tire inflation pressure is
under  130  kPa  (1.3  kgf/cm

2

or bar, 19 psi): The puncture
cannot  be  repaired.  Contact
any 

authorized 

Toyota

retailer  or  Toyota  authorized
repairer,  or  any  reliable
repairer.
If the tire inflation pressure is 130 kPa (1.3 kgf/cm

2

 or bar, 19 psi)

or higher, but less than the specified air pressure: Proceed to 

.

If the tire inflation pressure is the specified air pressure (

P. 774):

Proceed to 

.

Turn the compressor switch 

 (on) to inflate the tire until the spec-

ified  air  pressure  is  reached.  Drive  for  about  5  km  (3  miles)  and
then perform 

.

Store the compressor in the luggage compartment.
Taking  precautions  to  avoid  sudden  braking,  sudden  acceleration
and sharp turns, drive carefully at under 80 km/h (50 mph) to the
nearest authorized Toyota retailer or Toyota authorized repairer, or
any reliable repairer for tire repair or replacement.

26

27

26

27
28

713

7-2. Steps to take in an emergency

7

W

hen
 trou

bl

e ari

se

s

Type B

Take out the repair kit.

When taking out the bottle from the original bag, do not tear or discard the
bag.

Attach the sticker provided with
the  tire  puncture  repair  kit  to  a
position  easily  seen  from  the
driver’s seat.

Remove the valve cap from the
valve of the punctured tire.

Remove  the  cap  from  the  noz-
zle.

1

2

3

4

714

7-2. Steps to take in an emergency

Connect  the  nozzle  to  the
valve.

Screw the end of the nozzle clock-
wise as far as possible.
The  bottle  should  hang  vertically
without  contacting  the  ground.  If
the bottle does not hang vertically,
move  the  vehicle  so  that  the  tire
valve is located properly.

Remove  the  cap  from  the  bot-
tle.

Pull the hose out from the com-
pressor.

Connect  the  bottle  to  the  com-
pressor.

Screw the end of the nozzle clock-
wise as far as possible.

5

6

7

8

715

7-2. Steps to take in an emergency

7

W

hen
 trou

bl

e ari

se

s

Make sure that the compressor
switch is 

 (off).

Remove  the  power  plug  from
the compressor.

Connect  the  power  plug  to  the
power outlet socket. (

P. 574)

9

10

11

716

7-2. Steps to take in an emergency

Check the specified tire inflation pressure.

Tire inflation pressure is specified on the label as shown. (

P. 774)

Start the hybrid system. (

P. 303)

To inject the sealant and inflate
the  tire,  turn  the  compressor
switch is 

 (on).

12

Left-hand drive vehicles

Right-hand drive vehicles

13
14

717

7-2. Steps to take in an emergency

7

W

hen
 trou

bl

e ari

se

s

Inflate the tire until the specified
air pressure is reached.

The  sealant  will  be  injected
and  the  pressure  will  surge
and then gradually decrease.
The  air  pressure  gauge  will
display  the  actual  tire  infla-
tion pressure about 1 minute
(5  minutes  at  low  tempera-
ture)  after  the  switch  is
turned 

 (on).

Inflate the tire until the speci-
fied air pressure.

• If the tire inflation pressure is

still  lower  than  the  specified
point after inflation for 35 min-
utes  with  the  switch  is 

(on)

, the tire is too damaged

to be repaired. Turn the com-
pressor switch is 

 (off)

 and

contact 

any 

authorized

Toyota  retailer  or  Toyota
authorized  repairer,  or  any
reliable repairer.

• If the tire inflation pressure exceeds the specified air pressure, let out

some air to adjust the tire inflation pressure. (

P. 721, 774)

15


Content      ..     36      37      38      39     ..