Toyota Corolla Hatchback (2023 year). Manual in english - page 15
 

  Index      Toyota     Toyota Corolla Hatchback (2023 year). Manual in english


Search            copyright infringement  


Content      ..     13      14      15      16     ..


Toyota Corolla Hatchback (2023 year). Manual in english - page 15


240

5-1. Using the air conditioning system and defogger

nates on the windshield wiper 
de-icer switch.
The windshield wiper de-icer will 
automatically turn off after a period 
of time.

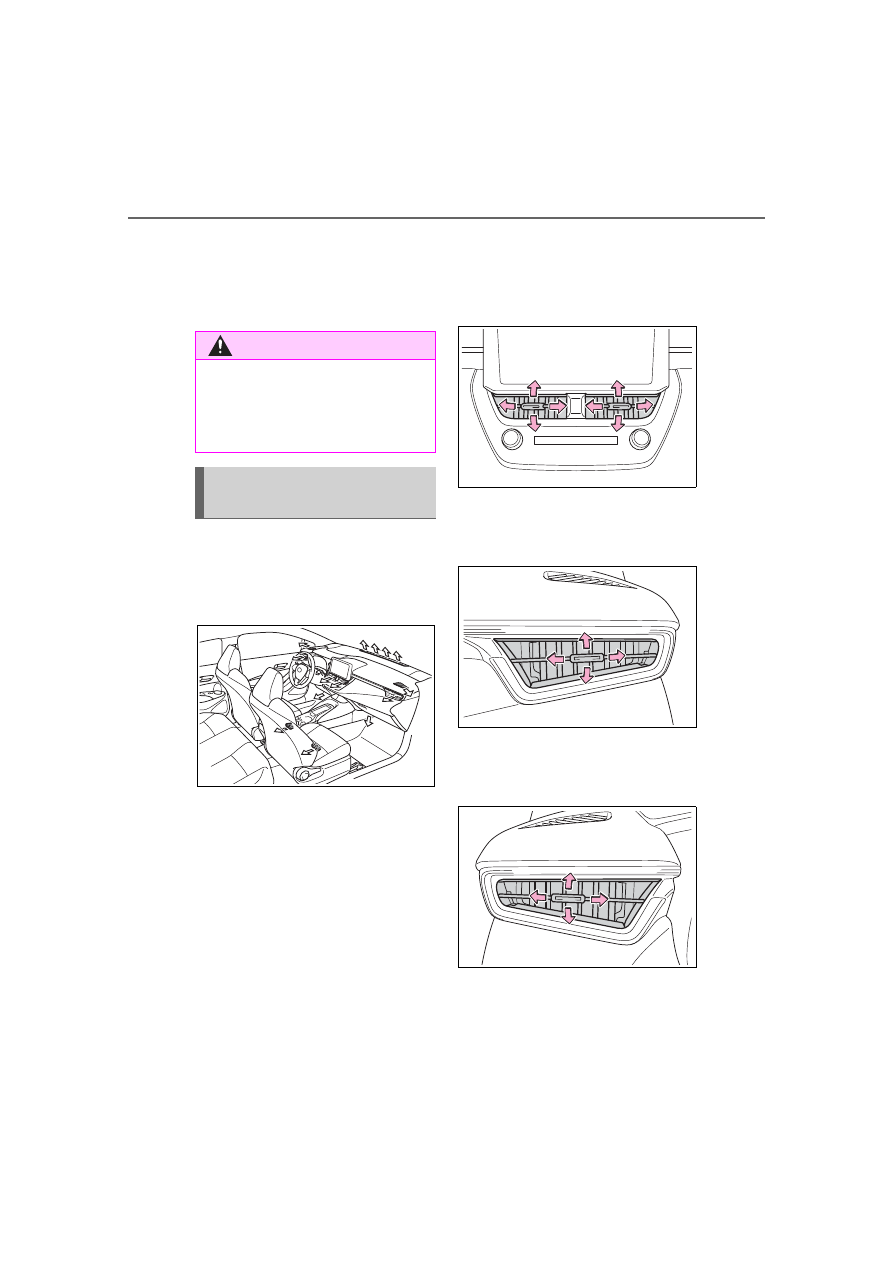
Location of air outlets

The air outlets and air volume 
changes according to the 
selected air flow mode.

Adjusting the position of 
and opening and closing 
the air outlets

Front center

Direct air flow to the left or right, up 
or down

Front right-hand side

Direct air flow to the left or right, up 
or down

Front left-hand side

Direct air flow to the left or right, up 
or down

WARNING

To prevent burns

Do not touch the glass at lower 

part of the windshield or to the 

side of the front pillars when the 

windshield wiper de-icer is on.

Air outlet layout and oper-
ations

241

5-1. Using the air conditioning system and defogger

5

Interior

 featur

es

*

: If equipped

WARNING

To prevent the windshield 

defogger from operating 

improperly

Do not place anything on the 

instrument panel which may cover 

the air outlets. Otherwise, air flow 

may be obstructed, preventing the 

windshield defoggers from defog-

ging.

Heated steering 

wheel

*

/seat heaters

*

Heated steering wheel

Warms up the grip of the 
steering wheel

Seat heaters

Warm up the seat upholstery

WARNING

To prevent minor burn inju-

ries

Care should be taken if anyone in 

the following categories comes in 

contact with the steering wheel or 

seats when the heater is on:

Babies, small children, the 

elderly, the sick and the physi-

cally challenged

Persons with sensitive skin

Persons who are fatigued

Persons who have taken alco-

hol or drugs that induce sleep 

(sleeping drugs, cold remedies, 

etc.)

NOTICE

To prevent damage to the 

seat heaters

Do not put heavy objects that 

have an uneven surface on the 

seat and do not stick sharp 

objects (needles, nails, etc.) into 

the seat.

To prevent battery discharge

Do not use the functions when the 

engine is off.

242

5-1. Using the air conditioning system and defogger

Heated steering wheel

Turns heated steering wheel 
on/off

When the heated steering wheel is 
on, the indicator illuminates on the 
heated steering wheel switch.

Seat heaters

Turns seat heaters on/off

1

High temperature

2

Low temperature

When the seat heater is on, the 
indicator illuminates on the seat 
heater switch.
When not in use, put the switch in 
the neutral position. The indicator 
will turn off.

The heated steering wheel and 

seat heaters can be used when

The engine switch is in ON.

Operation instructions

WARNING

To prevent overheating and 

minor burn injuries

Observe the following precautions 

when using the seat heaters.

Do not cover the seat with a 

blanket or cushion when using 

the seat heater.

Do not use seat heater more 

than necessary.

243

5-2. Using the interior lights

5

Interior

 featur

es

5-2.Using the interior lights

Rear interior light (

P.243)

Front interior/personal lights (

P.243)

Front

1

Turns the door position on/off

When a door is opened while the 
door position is on, the lights turn 

on.

2

Turns the lights on/off

Rear

Turns the lights on/off
When the door position is on for 
the front interior lights, the rear 

Interior lights list

Location of the interior lights

Operating the interior 
lights

244

5-2. Using the interior lights

interior light will turn on when a 
door is open and turn off when 
all of them are closed.
When the rear interior light is on 
linked to the door position for 
the front interior lights, it will not 
turn off even though the switch 
is pressed.

Turns the lights on/off

Illuminated entry system

The lights automatically turn on/off 

according to the engine switch 

mode, the presence of the elec-

tronic key, whether the doors are 

locked/unlocked, and whether the 

doors are opened/closed.

To prevent the battery from 

being discharged

If the interior lights remain on when 

the engine switch is turned off, the 

lights will go off automatically after 

20 minutes.

The interior lights may turn on 

automatically when

If any of the SRS airbags deploy 

(inflate) or in the event of a strong 

rear impact, the interior lights will 

turn on automatically.

The interior lights will turn off auto-

matically after approximately 20 

minutes.

The interior lights can be turned off 

manually. However, in order to help 

prevent further collisions, it is rec-

ommended that they be left on until 

safety can be ensured.

(The interior lights may not turn on 

automatically depending on the 

force of the impact and conditions of 

the collision.)

Customization

Some functions can be customized. 

(

P.386)

Operating the personal 
lights

NOTICE

To prevent battery discharge

Do not leave the lights on longer 

than necessary when the engine 

is not running.

245

5-3. Using the storage features

5

Interior

 featur

es

5-3.Using the storage features

Bottle holders (

P.246)

Open trays (if equipped) (

P.247)

Glove box (

P.246)

Cup holders (

P.246)

Console box (

P.247)

List of storage features

Location of the storage features

WARNING

Items that should not be left 

in the storage spaces

Do not leave glasses, lighters or 

spray cans in the storage spaces, 

as this may cause the following 

when cabin temperature becomes 

high:

Glasses may be deformed by 

heat or cracked if they come 

into contact with other stored 

items.

Lighters or spray cans may 

explode. If they come into con-

tact with other stored items, the 

lighter may catch fire or the 

spray can may release gas, 

causing a fire hazard.

246

5-3. Using the storage features

Pull up the lever to open the 
glove box.

Glove box light

The glove box light turns on when 

the tail lights are on.

Front

Rear

Pull the armrest down.

Front

Glove box

WARNING

Caution while driving

Keep the glove box closed. In the 

event of sudden braking or sud-

den swerving, an accident may 

occur due to an occupant being 

struck by the open glove box or 

the items stored inside.

Cup holders

WARNING

Items unsuitable for the cup 

holder

Do not place anything other than 

cups or beverage cans in the cup 

holders.

Inappropriate items must not be 

stored in the cup holders even if 

the lid is closed.

Other items may be thrown out of 

the holders in the event of an 

accident or sudden braking and 

cause injury. If possible, cover hot 

drinks to prevent burns.

Bottle holders

247

5-3. Using the storage features

5

Interior

 featur

es

Rear

Bottle holders

When storing a bottle, close the 

cap.

The bottle may not be stored 

depending on its size or shape.

1

Slide the lid to the rear most 
position. (vehicles with a 
slide function)

2

Lift the lid while pulling up the 
knob.

Slide function (if equipped)

The console box lid can be slid for-

ward or backward.

Front

Rear

WARNING

Items unsuitable for the bottle 

holders

Do not place anything other than 

a bottle in the bottle holders.

Other items may be thrown out of 

the holders in the event of an 

accident or sudden braking and 

cause injury.

Console box

WARNING

Caution while driving

Keep the console box closed.

Injuries may result in the event of 

an accident or sudden braking.

Open trays (if equipped)

248

5-3. Using the storage features

The cargo hooks are provided 
for securing loose items.

WARNING

Caution while driving

Observe the following precautions 

when putting items in the open 

tray. Failure to do so may cause 

items to be thrown out of the tray 

in the event of sudden braking or 

steering. In these cases, the items 

may interfere with pedal operation 

or cause driver distraction, result-

ing in an accident.

Do not store items in the tray 

that can easily shift or roll out.

Do not stack items in the tray 

higher than the tray’s edge.

Do not put items in the tray that 

may protrude over the tray’s 

edge.

Luggage compart-

ment features

Cargo hooks

WARNING

When cargo hooks are not in 

use

To avoid injury, always return the 

hooks to their stowed positions 

when not in use.

Grocery bag hooks

WARNING

To prevent damage to the gro-

cery bag hooks

Do not hang any object heavier 

than 4.4 lb. (2 kg) on the grocery 

bag hooks.

249

5-3. Using the storage features

5

Interior

 featur

es

1

Unhook the cords.

2

Remove the cover from the anchors.

Side tray (if equipped)

Removing the luggage cover

250

5-4. Other interior features

5-4.Other interior features

The USB charging port are used 
to supply 3.0 A of electricity at 5 
V to external devices.
The USB charging port are for 
charging only. They are not 
designed for data transfer or 
other purposes.
Depending on the external 
device, it may not charge prop-
erly. Refer to the manual 
included with the device before 
using a USB charging port.

Using the USB charging 
port

Front

Open the console box lid.

Rear (if equipped)

The USB charging port can be 

used when

The engine switch is in ACC or ON.

Situations in which the USB 

charging port may not operate 

correctly

If a device which consumes more 

than 3.0 A at 5 V is connected

If a device designed to communi-

cate with a personal computer, 

such as a USB memory device, is 

connected

If the connected external device is 

turned off (depending on device)

If the temperature inside the vehi-

cle is high, such as after the vehi-

cle has been parked in the sun

About connected external 

device

Depending on the connected exter-

nal device, charging may occasion-

ally be suspended and then start 

again. This is not a malfunction.

Other interior features

USB charging port

NOTICE

To prevent damage to the 

USB charging port

Do not insert foreign objects into 

the port.

Do not spill water or other liq-

uids into the port.

Do not apply excessive force to 

or impact the USB charging 

port.

Do not disassemble or modify 

the USB charging port.

To prevent damage to exter-

nal devices

Do not leave external devices in 

the vehicle. The temperature 

inside the vehicle may become 

high, resulting in damage to an 

external device.

251

5-4. Other interior features

5

Interior

 featur

es

The power outlet can be used 
for 12 V accessories that run on 
less than 10 A.
Open the console box lid and 
open the lid.

The power outlet can be used 

when

The engine switch is in ACC or ON.

When turning the engine switch 

off

Disconnect electrical devices with 

charging functions, such as mobile 

battery packs.

If such devices are left connected, 

the engine switch may not be turned 

off normally.

A portable device, such as a 
smartphone or mobile battery, 
can be charged by just placing it 
on the charging area, provided 
the device is compatible with the 
Qi wireless charging standard 
created by the Wireless Power 
Consortium.
The wireless charger cannot be 
used with a portable device that 
is larger than the charging area. 
Additionally, depending on the 
portable device, the wireless 
charger may not operate prop-
erly. Refer to the operation man-
ual of the portable device.

The “Qi” symbol

The “Qi” symbol is a trademark 
of the Wireless Power Consor-

NOTICE

Do not push down on or apply 

unnecessary force to an exter-

nal device or the cable of an 

external device while it is con-

nected.

To prevent battery discharge

Do not use the USB charging port 

for a long period of time with the 

engine stopped.

Power outlets

NOTICE

To prevent the fuse from 

being blown

Do not use an accessory that 

uses more than 12 V 10 A.

To avoid damaging the power 

outlet

Close the power outlet lid when 

the power outlet is not in use. 

Foreign objects or liquids that 

enter the power outlet may cause 

a short circuit.

To prevent the battery from 

being discharged

Do not use the power outlet lon-

ger than necessary when the 

engine is not running.

Wireless charger (if 
equipped)

252

5-4. Other interior features

tium.

Name for all parts

Power supply switch
Operation indicator light
Charge area
Charging tray

Using the wireless charger

1

Press the power supply 
switch of the wireless char-
ger.

Pressing the switch again turns the 

wireless charger off.

When turned on, the operation indi-

cator light (green) comes on. 

When the engine switch is turned 

off, the on/off state of the wireless 

charger will be memorized.

2

Place a portable device on 
the charging area with its 
charging surface facing 
down.

Depending on the portable device, 

its charging coil may not be in the 

center of the device. In this case, 

place the portable device so that its 

charging coil is centered in the 

charging area.

While charging, the operation indi-

cator light (orange) will be illumi-

nated.

If charging is not occurring, the 

operation indicator light slowly blink 

in green and orange alternately, 

and coil operating sound may be 

heard. Try placing the portable 

device as close to the center of the 

charging area as possible.

When charging is complete, the 

operation indicator light (green) will 

illuminate.

Recharging function

If a certain amount of time has 
elapsed since charging com-

253

5-4. Other interior features

5

Interior

 featur

es

pleted and the portable device 
has not been moved, the 
wireless charger will restart 
charging.

If a portable device is moved 
significantly within the 
charging area, the charging 
coil may disconnect and 

charging may temporarily be 
stopped. However, if a 
charging coil is detected 
within the charging area, the 
charging coil inside the wire-
less charger will move near 
the other coil and charging 
will resume.

Operation indicator light status

*

: Depending on the portable device, the operation indicator light may stay 

illuminated (orange) after charging has completed.

If the operation indicator light blinks

If an error is detected, the operation indicator light will blink (orange). Take 
the appropriate measures according to the table below.

Operation indicator light

State

Off

The Wireless charger is off

Green (illuminated)

Standby (charging is possible)

Charging is complete

*

Orange (illuminated)

A portable device has been placed on the 
charging area (identifying the portable 
device)

Charging in progress

Operation indicator light Suspected cause

Measure

Blinks (orange) at a one 
second interval continu-
ously

Vehicle to charger com-
munication failure.

If the engine is running, 
stop and then restart the 
engine.
If the engine switch is in 
ACC, start the engine.

254

5-4. Other interior features

The wireless charger can be 

operated when

The engine switch is in ACC or ON.

Portable devices that can be 

charged

Portable devices compatible with 

the Qi wireless charging standard 

can be charged by the wireless 

charger. However, compatibility 

with all devices which meet the Qi 

wireless charging standard is not 

guaranteed.

The wireless charger is designed 

to supply low power electricity (5 

W or less) to a cellular phone, 

smartphone, or other portable 

device.

If a cover or accessory is 

attached to the portable device

Do not charge a portable device if a 

cover or accessory which is not Qi 

compatible is attached. Depending 

on the type of cover (including for 

certain genuine manufacture parts) 

and/or accessory attached, it may 

not be possible to charge the porta-

ble device. If the portable device is 

placed on the charging area and 

does not charge, remove the cover 

and/or accessories.

If interference is heard in AM 

radio broadcasts while 

charging

Turn off the wireless charger and 

check if the noise is reduced. If 

noise is reduced, press and hold the 

power supply switch of the wireless 

charger for 2 seconds. The fre-

quency of the wireless charger is 

changed and noise may be 

reduced. When the frequency is 

changed, the operation indicator 

light will blink (orange) 2 times.

Charging precautions

If the electronic key cannot be 

detected in the cabin, charging 

cannot be performed. When a 

door is opened and closed, 

charging may be temporarily sus-

pended.

While charging, the wireless char-

ger and the portable device will 

become warm. 

This is not a malfunction.If a porta-

ble device becomes warm while 

charging and charging stops due 

to the protection function of the 

portable device, wait until the por-

table device cools down and 

charge it again.

Blinks (orange) 3 times 
repeatedly

A foreign object exists 
between the portable 
device and charging 
area.

Remove the foreign 
object.

Portable device is not 
positioned properly on 
the charging area.

If there is a case or 
cover attached to the 
portable device, remove 
it.

Blinks (orange) 4 times 
repeatedly

The temperature of the 
wireless charger is 
excessively high.

Stop charging, remove 
the portable device from 
the charging tray, wait 
for the temperature to 
drop, and then start 
charging again.

Operation indicator light Suspected cause

Measure

255

5-4. Other interior features

5

Interior

 featur

es

Sound generated during opera-

tion

When the power supply switch is 

turned on or while a portable device 

is being identified, operation sounds 

may be heard. This is not a malfunc-

tion.

Cleaning the wireless charger

P.263

WARNING

Caution while driving

When charging a portable device, 

for safety reasons, the driver 

should not operate the main part 

of the portable device while driv-

ing.

Caution while in motion

Do not charge lightweight devices 

such as wireless headphones 

while in motion. These devices 

are very light and may be ejected 

from the charging tray, which may 

lead to unforeseen accidents.

Caution regarding interfer-

ence with electronic devices

People with implantable cardiac 

pacemakers, cardiac resynchroni-

zation therapy-pacemakers or 

implantable cardioverters, as well 

as any other electrical medical 

device, should consult their physi-

cian about the usage of the wire-

less charger.

To prevent malfunctions or 

burns

Observe the following precau-

tions.

Failure to do so may result in a 

equipment failure and damage, 

catch fire, burns due to overheat 

or electric shock.

Do not insert any metallic 

objects between the charge 

area and the portable device 

while charging

Do not attach an aluminum 

sticker or other metallic object to 

the charge area

Do not attach an aluminum 

sticker or other metallic object to 

the side of the portable device 

(or to its case or cover) that 

touches the charge area

Do not use the charging tray as 

a small storage space

Do not subject to a strong force 

or impact

Do not disassemble, modify or 

remove

Do not charge devices other 

than specified portable devices

Keep away from magnetic items

Do not charge devices if the 

charge area is covered in dust

Do not cover with a cloth or sim-

ilar material

NOTICE

Situations in which the func-

tion may not operate normally

Devices may not be charged nor-

mally in the following situations.

The camera lens protrudes 0.12 

in (3 mm) or more from the sur-

face of the portable device

The electronic key is not inside 

the vehicle

The portable device is fully 

charged

The portable device is being 

charged with a cable connected

There is foreign matter between 

the charge area and portable 

device


Content      ..     13      14      15      16     ..